Transcripts
1. Introduction: Hi everyone, my name is Irina Trzaskos, I'm an artist and illustrator. I invite you to my studio to explore the magic of watercolor. In today's class, I will show you few different ways of painting whimsical birds in watercolor. Birds that are always on-demand on various design markets, and they'll make a great addition to your art collection. I hope my classes will help you build a beautiful and successful portfolio. In next video, I will show the supply we'll be using in this class. Let's get started.
2. Supplies: In this class we'll be using following supplies: Watercolor paint, watercolor paper; I'll be using Canson Cold Press, but you can use any watercolor paper brand you like. Also need a simple office paper for our sketches, water of course, a pallet for paint, a paper towel. Also need a pencil for drawing, an eraser and a pencil for sketching; this is a soft 2B pencil. Or for sketching, you can use any sketching tool you like, it could be fine liner or a pen or any medium watercolor brush. This is [inaudible] number four. This small watercolor brush for details. This is [inaudible] number two. Also be using a white gel pen or you can use a whitewash if you like it better. In the Project Section of the class you can find the list of all the supplies. In next detail, we'll be mixing colors for our birds.
3. Color Palette: Now, I will show you the color palette I'll be working with today. To make a color palette work, so to unify any colors we want in the color palette, there is a tip. We can add a drop of one color in every color of our color palette and I will be adding purple. So just one drop of purple I'll be adding in every single color I'll be using today. So purple is my unifying color. So today I'll be using, of course, one of my favorites, ultramarine blue. Just as I said, I'll add a drop of purple in it. It makes it deeper and richer. Another color I'll be using today is magenta. Again, we'll be adding a drop, only one drop of purple to it. If you follow my work you know how much I like colorful illustrations. You of course know how to use my color palette. You can use any colors you like. Another color I'll be using is yellow. Just be very careful when you add your purple in yellow because purple sometimes is so overwhelming. So if you feel you added too much purple, just add a little more yellow. Also, I would like my yellow to be a little warmer, so I'll add a little bit of orange to it too. So I'm mixing yellow with orange and a drop of purple again. Another color I'll be using, is another of my favorites, is turquoise. Again, we're adding a drop of purple to it. Now, I have this beautiful teal color. For details we'll be using sepia, not a lot, just a little bit and again we'll add some purple to it. This is a light version of sepia, gives it more color, more pigments, so it will look darker because that's what we'll be using. So again, sepia with some purple. Let's say we'll be using the value of the color, so to have that. For the dark part of the color, we'll use more pigment. When we want to make it lighter, we'll just be adding more water to it. Lighter, some more water until it gets as light as we need. Also to make it even darker than this, we will need to add a complimentary color to it. So as we see, the complimentary of magenta would be green but because it's cold color of red, we'll be adding emerald green to it, so it won't look muddy. So we're adding a drop of emerald green to our magenta to get even a darker shade. So as you see, we have different values of the color, so where it's the lightest. This is my sun. Where it's the lightest it will have more water and less color and the, where it's the darkest it'll have more pigment, and if we want it darker, we'll add a complimentary color to it. So this is our moon. So these are the colors I'll be using today, ultramarine blue, magenta, yellow, turquoise, sepia, all of that with a drop of purple, and also we'll be using different values of this colors.
4. Quick Study in Bird Drawing: Birds often appear in my artwork and mostly their imaginary boards but I always look for inspiration in the realistic birds. So now I'm going to show you how to draw a basic realistic birds. So you can get as far as from nature and draw your whimsical birds. In the project section of the class, I provided a link to Pinterest board with realistic birds where you can look and get inspired and draw your own birds. So to draw a basic bird, we would start with an egg shape. The white part of the egg will be the shoulders, even birds do have shoulders. Let's imagine this are shoulders of the bird. Then we will draw a circle or an oval and abandon the bird for a head. At this point we have to decide in which direction our bird will be looking. I'd like her to look at that direction, and I will draw a bill. Now we have to unify all the body we've had. Proportions are always different for different birds, and here we'll have the tail. A tail is really simple to draw it's like a this shape mostly. Sometimes it's more interesting like what feathers we will experiment a bit later. Here, we have an eye. So this is a basic shape and variation of it could be, or you can draw our egg like this and let's head is here. It will be looking straight and the tail will go up. Now you can unify everything with one line. So here is our basic bird shape. The tail can be more interesting, it can grow more. So what do we do if the neck of our bird is longer than this, or the head not that close to the body? We would start again with the body. Then looking at the reference pictures to whichever bird you refer to, let's say we have this here. Then we can draw neck and the tail or of if I have such a bird with a really long neck like flamingo. We will start again with an egg. Let's say, the head is here. Draw this long, beautiful neck and a bill. In the same way we would do a swan. So let's start with an egg. Swan has a neck coming all the way out. So this is basic bird shape. Also, we can have a different variations for our head, it always starts with a circle or an oval. But then we can have a long bill. Also the eye can be just a dot or it can be surrounded by a circle. Also it can have a crown. So whatever you think like, something like a cardinal. If we have a bird which is flying, we would draw again an egg from a body. It will be slimmer than the usual and then the head. Then we would have an open wing which will have two parts like this. Here, we would have smaller feathers and here, they'd be longer but closer to each other, till here. This part they would start coming apart beautifully, and again on the tail. What about the wings on these birds? It would be just like a small drop. Sometimes it will just come out. Again, I have smaller feathers here, and bigger here. The longest on this part. They're overlapping. Smaller feathers, medium ones, and then the longest are just like lines. So this is our quick study of bird drawing. Next we can start painting.
5. Painting a Monochrome Whimsical Bird: First, the whimsical bird we'll be painting is a monochrome textured bird. I will start with the drawing. Just like during the study, we'll draw a body as an egg, and circle for the head, and then the beak, and then we'll unify everything with lines. I think my body is too big so I'll cut it here a little bit and the tail will go there. Now we have to erase all extra lines. Refine our drawing. If you feel like this has to be more round just undo it, and maybe here. Then we'll have the wing coming down here. We'll see a little bit of it back here. I did a really simple drawing. Here the feathers will come a little bit like this and then we'll have smaller feathers, medium feathers, and these are the longest ones. The eye will be somewhere here. That's all the drawing we need for this style. What I'm doing next, is I'll just mix some turquoise with a drop of purple. It's too much purple. I delete it with a lot of water and after, I will just paint the branch where our bird will be sitting. Just very simple, like this. Now we finally can start painting our bird. The color I chose for this type of a bird, I decided it will be magenta and different values. Somewhere lighter, somewhere darker. As we decided, it will be with a little bit of purple. This is way too much. When I want it lighter, I'll just dilute it with water. I'm starting with the beak and I want it to be a bit really dark, so am adding a little bit of emerald green to my magenta too. Next I will paint the eye with the the same dark color and we can leave a white dot in it. Then I like to put a little dot next to the eye, like this. Then we'll start just filling our bird with different textures depending if it's a head or a wing and I'll show you how. For head we'll start with little strokes. I'd our bird to have a crown too. A red crown. So my stokes would come up like this, and then we would go up from the beak, and we will go with these little loops all the way to the eye. I'll make a few more dots here. A few more feathers. Then, I will make some strokes here, and some texture right here, and again little lines. One at all, aligns right here. So this is our hand for now. Now let us start working on the wing. Jinn small favors, so they'll be like almost like scales that are made on occasion have. Since the [inaudible] 100 like same technique. We're having our basic sketch or drawing and I'm going to let just feel different parts of different textures and those same color. Scientists are ordinate though favors, and next we have, I'll meet him for hours. Will be like this. We'II have euros on them. In the meantime, feathers, I would like to put a line in the middle of each other to bring more value, add depth to our illustration. As you see, my line is not reaching that ends just like on the top. You can embed other texture if you like. Then we have other long feathers, so many. Add some texture to them and a little later. Next I'd like to add some dots on the back of them guard. You can go with any pattern you like, and little lines to show where the back-ends. For now the tail will be also like three inverse. So the bird has a short-term tail first, color red too. It's like when you refer here. Just like there. But at least parts of a bird, I am deleting gently with more water and I'll be making literally the lines, but not all the way to the end of the row, just here and there. In this part I'm changing it to, like little V's. Again, I'll move some lines along and tell me. Okay. Now can I add some texture to these feathers? It's bleeding but it is beautiful. It's the same color sorts of missing and of course a tail. I'm making different textures on different colors. So we can see there is different colors, also what I would like to do is to get creative and make some, let our imagination free, and can be some branches coming out, leaves, different shapes of feathers coming out of the tail. If you feel that it's too dark somewhere, you can always use by Japan and a goulash and lighten it up. This is our monochrome bird with textures. Next I'll be painting a colorful bird.
6. Painting a Colorful Bird: Next whimsical bird we'll be painting is a colorful bird, and it'll be a bird in flight. We'll start drawing again with an egg for the body. When bird is flying it's always slimmer than if a bird is sitting. It'll be looking up. Here's the head, and here we have a wing going forward, and another wing behind. After we do the quick sketch, we have to decide on different areas of a bird, so we can color them in different colors. Here's the beak, and we'll have an eye. I like different color to be around the eye, here. Then we'll have a different color for the head, the back. That part of the wing will be one color, and this part. Then we'll have other feathers, and another layer probably a different color, and the long feathers. This wing we're going to see only one. Maybe two feathers. Little legs, and we'll have fewer feathers for the tail. Let's say three, and some more in between. This is all the drawing we need. You can erase it a little bit to make it lighter. I'll leave it like this so it will be more visible. Now I can start coloring. We'll be using a lot of colors, and as you remember, as we talked, we'll use a drop of purple in every color to make them look like a unified color palette. So first I'll mix yellow with some purple, and a drop of orange, and I'll color the head of the bird. I'm avoiding this head side which I would like to be a different color. I'd say I like this part of the bird to be yellow too. So I'm coloring it right away, and maybe these feathers, which are in between the main feathers. Next I'll take some sepia with a little bit of purple right here. Just one drop, and I'll color the beak with a small brush. Then let's make sure that the area around the eye is totally dry, and we can color the eye too. This part of the bird I'd like to be the teal color when I mix some turquoise with little bit of purple again. Purple is very overwhelming so make sure it's not so much. Just one drop, and everything turns in purple. I'd like this part of the bird to be teal. I'll say in my illustrations that sometimes I like to leave between the area of this little white lines just half of millimeter between every color there, but it's up to you. I would like this part to be teal too. I need to use a smaller brush. Also these feathers. On this illustration, I decided in advance where which colors I would like. So it's faster when I show it to you, but in your sketch book, you can make few different color waves before you start painting, and decide which one you like better. Next I'll mix some ultramarine blue with a drop of purple, and I'll color the last feathers on the wings. Once you're decided with colors it's really relaxing to work on some birds. I think I like to paint this feathers too in blue. The last color we have left is magenta. I'm mixing magenta with a drop of purple again. Now the painting, this feathers. It is a very colorful bird. Now we have to add some texture to the back of our bird. I'm taking this ultramarine blue I have already on my pallet and I'll make some neck scales like texture. As much as you want. You don't have to know it all over the bird. An eagle-eyed lottery [inaudible] protocol we have, I'll add some texture to the head. With turquoise, I'll add some dots on the belly and under these feathers. Also I would like to add a little bit magenta right here just a few lines. You have dots here and some here. Again I have ultramarine blue and some lines on magenta feathers. For us to test, I'll use sapium. If you feel you need it a little bit darker in there, just use sapium. I want to show the feathers better. Darker in the beak a little bit. Maybe a few more details here. Of course the very last detail we add with some dots on the wings and on this part. On the tail. Whatever you feel like. This is our colorful whimsical bird.
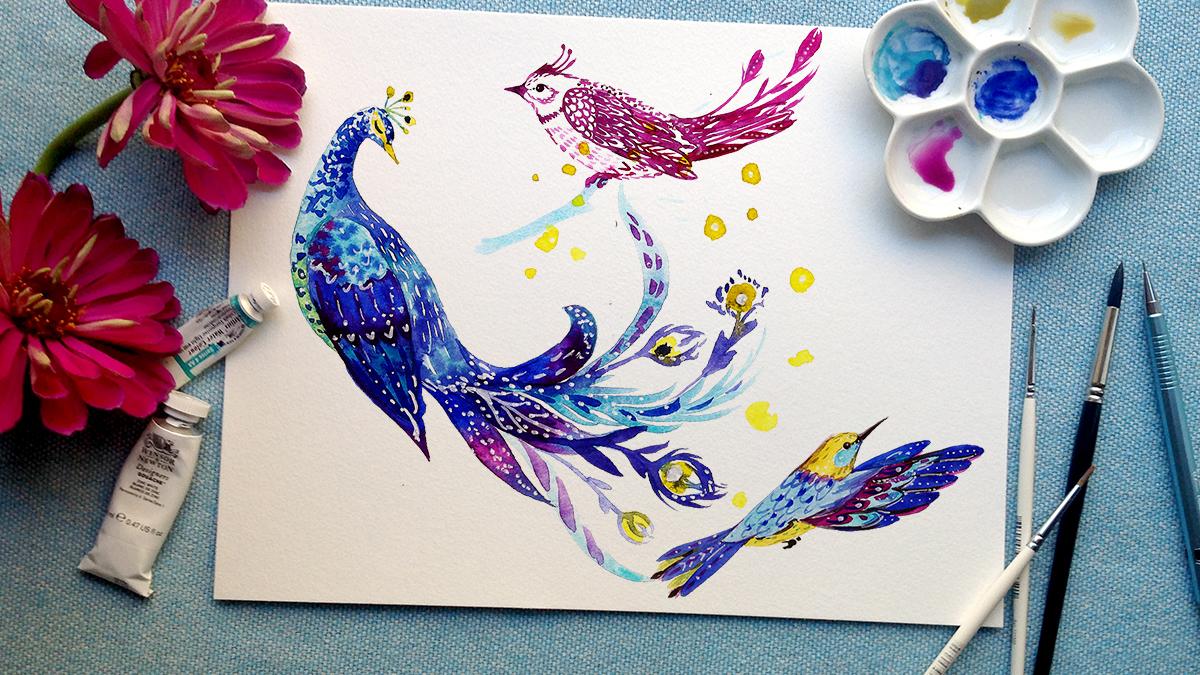
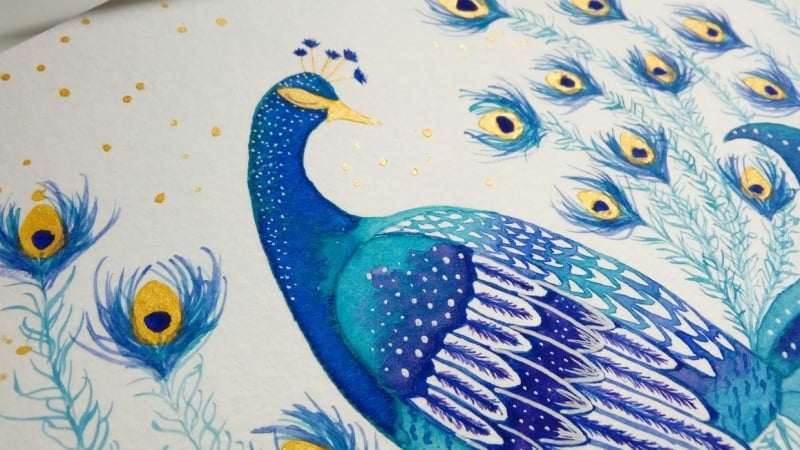
7. Painting a Complex Whimsical Bird: Now let's draw and paint a more complex whimsical bird where I will combine all the techniques we learned so far. Again, we'll start with the body of the shape of an egg. The head, and the bird will be looking in this direction, and beak. Here we'll have a wing, a short tail and for the main tail, we'll just draw a few feathers for now and for the rest it'll be just painting freehand with watercolor. On the wing let's decide where the short feathers will go, and the medium ones, and the rest is for the longer ones. We're close done. Now when I erased all extra lines, I can start painting. We'll start with yellow, and again we'll mix it with a drop of purple. I won't be adding any orange to it for this painting. We've yellow, I'm coloring end of the bill, and the area around the eye. Next I'll mix some turquoise with a little bit of purple again. Make sure your yellow is dry and then we can paint the head of the bird, and all this part of the neck. While our tail is still wet, we'll add some ultramarine blue mixed with a tiny bit of purple to this side, and to this part of the head. Make sure you have your paper towel next to you to dry your brush when you need it. Next we'll take more ultramarine blue and we'll start making this texture we did and monochrome bird like scales or feathers on the back of the bird. We're mixing some ultramarine blue with purple. After we did some of the scales, we'll switch back to tail color. While our ultramarine blue is still wet, we'll start adding some teal feathers in here, and you see how the colors are mixing. It's just really beautiful. Now we'll be switching again back to ultramarine blue, and again to teal. Tail-end we'll just color it like this, and will add to it some ultramarine blue. Next to the teal, we'll color this part, we need a little bit more purple on my teal. This part of the bird. While it's still wet, we'll add a little bit, just fewer dots of yellow in it. Beautiful. Now let's start painting the wing. Start with the teal again on the top, and you do watery, and the edge will be a little bit of this scarred. While it's still wet, not too wet, not dull but shiny, we'll add some dots of ultramarine blue and purple in it. On this side we'll add some dots of magenta with purple. Next I'll take some ultramarine blue and I'll start a painting of the medium feathers on our wing. If some of the colors will bleed in this part, it's okay, so I'm leaving this white space here and then I'll fill it with another color. Probably a magenta, so while it's still wet, we'll take a magenta with purple, and we'll make a few more feathers. See how I have a lot of purple in magenta at the moment. We'll add magenta here in the white spaces too. You can see how beautiful the paint is mixing right on paper. Next part of the wing will be tail again with some Ultramarine blue. That makes [inaudible] it buckling in, it's a little darker, and we'll start making these long feathers. Again, I can't drag some curves from the top, it's totally fine, it's splitting, and it's beautiful, add some Ultramarine blue. We'll still come back to add more details or textures later, if we won't like it. Think of too much of blue, so I'd like to add few dots of [inaudible] so as to brighten on top of it a little bit. At tail, feathers we'll start with Ultramarine blue at this end. We need to add purple and Ultramarine blue, so it will look more unified with other colors, and the rest we'll start painting with magenta. Again we give them water so they'll mix beautifully, and at the end we'll add some tail, and the same way, all three feathers. I'll take a bigger brush for this, so we start with blue and then magenta, and tail at the end, and this see they mix pretty well together. We need more water here. All this gradients give the bird some glowing effect, it's just really beautiful. Now after we've painted all the main parts of the bird, we can start on details. Just make sure when you're painting the details, the bird has to be totally dry. Let's start from the head, I'm taking Ultramarine blue with quite a lot of pigment, and I'll let some texture on the feathers. On the head, just some dots, and on the neck build up like scales. If you love your gradients on the neck, you don't have to add this textures, you can leave it as it is. I think this is enough. Next, I will add some dots on this part of the body. Also, I like my bird to have a crown, so I will paint some yellow dots. This whimsical bird is inspired from a peacock, but we'll let our imagination free, and we can add details which doesn't exist in a peacock if we want to. Then, with detail, I will connect it to the head. The ink is still pretty wet so we'll wait on that, and meanwhile, we can start adding more details to the tail of the bird. It could be more feathers, just like we did during our monochrome bird. We can add all kinds of details. Here too, feathers, here and one here. Next, to a bigger brush, I will take some yellow with purple, and I'll add some dots of color. You can add some splashes, too, if you feel like it. Also, you can paint some flowers, branches, berries, whichever if you like. Some of these yellow dots I'll connect to a tail, not all of them, and I'll make them look more like peacock feathers. It needs to dry a little more. At this part, you can get as creative as you want, adding as many elements if you like. I don't want to overwhelm it too much, so I won't be adding too many elements, but feel free to add some texture to these feathers. It could be lines, dots, diagonal lines, something like this. Finally, our wing is dry so I can add some more details here with ultramarine blue. I feel like I want to fix this shape a little bit, add some scalps here, and a little bit of magenta at the end, just to make it more interesting. A few more details with darker colors, just to bring more depth to the painting. The very last details we'll be adding with a white gel pen, or you can use white gouache if you like. Just be careful where the paint is still wet. White is always bringing some magic to the painting. This is our final complex whimsical bird. I hope you liked this class. The project of the class, paint a bird in a style which you like the most or in all free styles.
8. Last Thoughts: Thank you for watching my classes. I hope you had a chance to paint with me. If you liked this class, please leave a review and upload the project to our project section of the class. I can't wait to see your beautiful birds. See you in my next class.
 Irina Trzaskos, Watercolor Artist & Illustrator