Transcripts
1. Hey there!: Hey, guys, it's me, Nikki Joe P, also known as Nichola. And I'm back with something really fun for you today. If you're taking my previous skill shirt classes, you know that I'm big into our journaling and I try to really encourage and inspire my students to start their own practice of marginally. This class is called out of your AR journal and into the world, and I hope to really inspire you with a bunch of fun things that you can do. And now that you've made some art, this class is for anyone that hasn't are journal started or really any creative person that has made bits and pieces of artwork. And right now they're just hiding. I've always loved how I end up with these loose and casual pictures hiding on these pages where obviously anything goes. If you told me to sit down and paint a coffee cup, well, I'm I just kind of freeze, and it might not have the same like soul and personality as when I am just creating it just for me. So I started noticing that I would find these cute little moments in our journals, and I started thinking What could I do with Holly's? In the first lesson, we'll talk about the supplies to get you started. Super basic. Then we'll move right into taking pictures of your artwork, and then we're going to do three fun projects together. First, we're gonna make a digital e card, which is basically just a fun little greeting you can send with text or email to your family and friends. Next, we'll order up some customized cute vinyl stickers, and lastly will experiment with putting some of our artwork on some household objects with print on demand services. Don't be intimidated for this class. We're not even using a scanner. Photoshopped, I hope in the end of this class you'll see how fun and easy it is to take cute little things out of your AR journals and turn them into awesome things that your friends and family will love. The class project will be to post a picture of something that you make when you take something out of your AR journal and into the world. Let's get started with the simple supplies
2. Supplies: Okay, let's begin by showing you what you'll need for this little class. I'm gonna be finding sketches and doodles from my own art journals and things laying around my studio only to find some of your own artwork to get started. It doesn't matter what medium you like to use. Drawings, paintings, sketches, anything goes. You could even use scribbles from your kids. You also need a phone. I'm assuming most of us have one of those handy. You can use your phone's editing options, but for really impressive results, I recommend downloading a pixel mater app. This app is free and has so many neat features. I'll be walking through editing with pixel mater in an upcoming video. If you're curious about my favorite supplies for our journaling, be sure to check out my intro to art journaling class also on skill share, and I'll give you all the details. Once you have your art in your phone, you're ready to get started. Next up, we'll talk about taking photos of your art
3. Taking Pics of Your Art: This is a quick little last cinema taking the best photos of your artwork. First off, I want to remind you that even the weird little mistakes and experiments can be used for this class. You want to look for things where the color is interesting or there is something unique that catches your eye. Another thing to keep in mind as you are making the art in the first place is to take a photo of your page before you fill it in with journaling and other stuff. This way you have a snapshot of something que without having to do a lot of cleaning up afterwards. Since we are not using a scanner, you want to make sure you are taking photos. Kind of the way of scanner would up close and personal and with bright light. I typically don't use a flash, but I make sure my art journal is in good natural lighting. And then I position my phone just over the image I like and get really close. Try to keep your phone as level as possible so that it doesn't look worked. Then I touch on the screen to focus and snap a picture that really has the art right in the center of image. The more you can crop things out of the photo, the less you have to clean up later. But I will be showing you all sorts of tricks to get things looking really awesome. In the next video, I'm showing you here how I'm doing all my photography in one big batch when the lighting is good so that I have all sorts of art to work with. On my phone, I find it really relaxing to do the editing and tweaking when I'm riding in the car or waiting for an appointment. What do you have? A few good shots? You're ready to take them all into pixel mater.
4. Ecard: one of fastest, coolest ways To take things out of your art journal and into the world is to use a doodle to make what I'm calling an e card. What I mean by an e card is basically a cute little image that you consent to your family or friends when you haven't quite gotten your act together to send a real card. Birthdays. Holidays Thinking of you I'm a big card person, but it doesn't always work to get something to the post office. And yet it's fun to send something more personal than a gift for a sticker from your phone . You can even make them from chaotic pages with lots going on like this page here, where it took just the chair and turned it into a cute little Take her easy note. Once you say these cute little greetings in a folder on your phone, you have them ready to go the next time you realize it's a friend's birthday and you want to send them something in seconds. People love getting these little snippets of your artwork. Here's an example of how I took a simple little lakeshore painting in one case turned it into an e card that says Just breathe. And then, by flipping it and adding red lettering, it suddenly looks Christmassy. So now I'll be walking through a tutorial of making some of these cuties on the pixel mater app. I'm gonna be using my iPad because the screen is just so much bigger. But all the same features are available on your phone. I'll be starting off with an easy one. I'll open up a file that has a close up picture of some watercolor stripes. Once I'm in this document, I am just gonna do the plus button and then add T for text, double tap on the word text and then just type something out. You could experiment with color and position, but I'm just going to highlight it and just make it a little bit bigger here. Under the paint brush, you can tap up in size, tap and hold, and it will just slide quite a bit bigger. And then, once you're satisfied with the size, you can tap anywhere on your screen, and then it will be right there, ready to be moved where you like, and I like it on this later section here at the bottom. So when you're done, you want to go up here to this little arrow in the box and you can copy to photos, and then you'll have it right there in your camera roll. So in this one, I'm gonna show you this process with two different spots of this art journal spread where I drew a continuous line drawing on a trip to Sweden. And later I looked back and, like the simple nous and thought, they may make you a little e Kurds. So once I'm in the pixel mater app, I'll tap on the left corner here to do plus and then open my photos and pick the close up picture of the area that I want to make into a card. And as you can see, there's quite a bit of extra stuff in there. So then you're going to go down to the paintbrush and crop and first crop off as much as I can without cutting into the illustration itself. And I just want this little hanging light here, so I'm getting pretty close. But as you can see, I can't quite get everything. And then the next step is to tap the paint brush again. And now we're going to drag it out, um, at a square ratio or they're tapped aspect and chose square. And then I'm gonna drag it to be a bigger square so that there's more white space around this design, and I'm gonna kind of put that artwork right in the middle. Next time I want to tap the paintbrush again to adjust the colors. And that's one of the options here. And there's all these different little filters at the top. I usually like vivid or bright, and that looks good so that I may have to pay brush and do paint and use the color picker tool to slide right over to the edge here and choose this off way color right at the edge and then with my paintbrush, I'm just gonna come in here and scrub the edge to have a lot more white on it, and you can make the brush bigger and you just kind of go around the edge. You can re pick that color as it changes. If you want. I'll show you how we fix those little scenes later, but I'm just gonna go around the edge, picking the color and just kind of using my finger to fill in the edges there. So what already looks quite a bit better. And then I tap done. So now, under the paintbrush, I want to choose a tool called retouch and then under retouch. There's a bandit here for repair, and with this tool you drag your finger over anywhere where there's a little seem and it just scrambles it up there so it looks way better and seamless. So over here there's another spot that needs that done. And then along the bottom there of that light and then a little bit more up here at the top . And I just really I'm impressed by how well it takes out any changing color, and I'm gonna add some text under the plus button here, chews through a bond I usually like. They're really simple ones, so any of them will work. But I'm just kind of considering the new double tap on the word text and then type out whatever you want it to say. I usually go for, like, punny things. This is going to say you light up my life and then tap anywhere on the screen to get rid of that keyboard and then tap on the text and the Texas like on its own layers. Then you drag it down to the bottom wherever you want it just centered or whatever. And when you're happy with the placement, then you can press the paint brush to move the size up again like we did in the 1st 1 And I usually like to make sure it's nice and legible. You can tap anywhere on your screen to x out of that menu. And then again, when you're satisfied with everything the way it is, then he'll go to this little box with an arrow out of it. Oh, I'm gonna reposition that a little bit, actually. And then that makes for a little more room at the bottom that I need to paint. So go right back to the paint tool again. This is not, um, super serious repair here, but I'm in a color pick the edge right there, and then I'm just gonna paint that little edge one more time. I like the positioning of the candle right there. Better right smack dab in the middle so you can paint that back later without touching your text. I really like that. And then I'm done. And now I'm totally satisfied with all my edits. I am going to export it to your photos, and there it is, waiting for you on your camera roll. Now I'm gonna show you next how I do the same thing on a image that's quite a bit more complicated. So again, in pixel mater pushed plus pick the photo and I zoomed in here on this chandelier that I drew very quickly in my art journal. And this page has a lot more going on. So I'm gonna go up to the paint brush tool once it's highlighted. And here, under a range, you can, you know, rotate left, rotate, right. And I want to get it positioned properly. And then I'm going to what we did in the 1st 1 We're going to do crop and you drag the corners in and try to get as much of the extra stuff out of the picture. So I'm drinking it in like that on all sides and just get us close as you can. But I drew the door very close here to the chandelier and that's okay. So then you to apply, and then we're gonna go back, toe the crop tool, and again tap the bottom for Aspect square, and then you can drag. This is Bigas you want, and then move your artwork wherever you want it on the page. And I want it kind of in the middle, even though that lamp cord doesn't reach all the way to the top will fix that later. So now I'm gonna just the colors for the first time just to get things looking a little brighter like that Quite a bit. And just to give me the first taste of what it could look like then we're gonna go to paint again and we're gonna choose the color for right right by the lamp here. And this one's quite a bit tighter, so I need to make sure my brush is quite a bit smaller and you can always undo things up in the left corner here. But I want to make this brush smaller, and that's those numbers right there. And I'm gonna It keeps kind of wiggling away from me, but I'm going to use my finger really close in here, and I'm gonna just first with a little brush just to get the details. And then I will go in there and make my brush a little bit bigger. Ah, and just get these bigger swaths around the edge on this is just the off white of the paper color and again color sample over on the edge here and just get all that filled in so that there is a lot more white space around this image and just squeeze as close as I can to that little cord there. And I'm going to remove that Washington that I even used in my in my art journal. So on this iPad screen, I get very, very close and really precise and get every last bit of that out of there. And I really like how that looks. So then you quick done. But now this still needs a little bit of work. So the next thing I'm gonna dio is go in here too, paint. And I'm going to choose the color of this little chord here. So just a nice off black and make sure my brush Israel small and I'm just going to scratch in a little, you know, in a very sketchy way. Same as my originals sketch. But I'm just gonna make the court a little longer, and then I need to go in here with retouch and repair the band aid again. And I'm gonna blur these spots where the background looks a little bit patchy and just completely camouflages them out of there. I really like how that just blends it all together, and then you do done. And then I'm wondering if maybe I want to adjust the colors a little more or no, I'm an ad text. So just this simple one again. Double tap on the word text. And then now we can write something here. I'm going to do it in all caps shine on and we're gonna tap on the text to drag it around and double tap to change the size under the paintbrush. If you press and hold, it will just slide right up to be the size you want. And I just wanted to be real simple on the bottom, but I'm kind of feeling like this page needs maybe a little something more and I'm going to add here. There's some shapes so I'm gonna add a square, and you can drag this square out to the corners where you want it. This just feels like it just kind of outlines the e card. This really makes it pop. So I'm a drug. It kind of equal distant from the edges. And then that square itself is highlighted. It's kind of on its own layer, and I'll do use the paint brush tool. And here I can move it up a few points so that it's a thicker line, and I really like how that looks. So then you export it to your photos and you have it right there in your camera roll to send to someone that needs a little pick me up. Next up, we're going to do stickers.
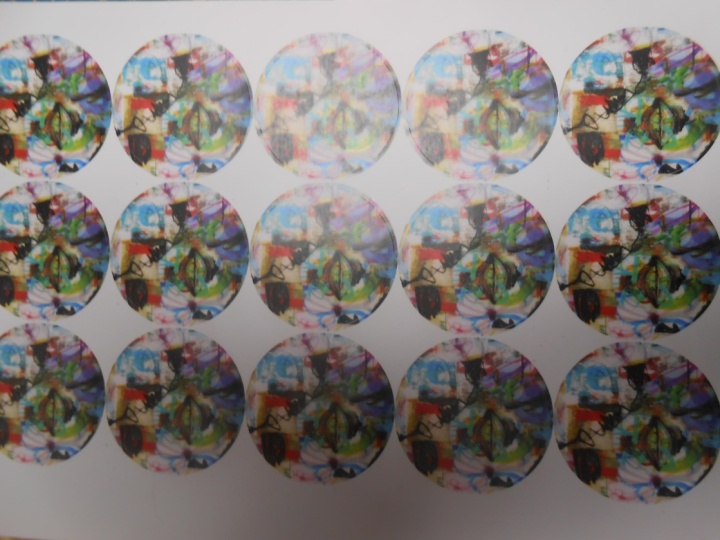
5. Vinyl Sticker: Now you may have noticed that stickers air having a bit of a moment. Right now, we're all having so much fun covering our laptops, water bottles and cars with these phone pops of personality. I discovered a company called Sticker Mule about a year ago, and I am such a fan of their durable vinyl stickers that are waterproof UV proof and dishwasher proof. And I have loved the process of seeing my simple little designs printed and delivered within the week. These are some of the stickers that I have in my Etsy shop that I have made from just a quick our general page I teach about adding mantra is to your art journal in my last class are journaling for your mental health. I'm gonna show you now just how easy it is to navigate their site and get some cool stickers headed your way. But first we're gonna open the pixel meter app again and up in the corner where there's a plus sign, you choose a photo, I'm gonna show you a sticker here with a patron, my art journal that I did after a recent bike trip of my family. So when I opened this quick little doodle of bike. Then I need to go into the paint brush like we did before, dragging the corners to kind of crop out all the extra white space and get it down as close as we can. But I'm still gonna leave some of that coil in there. Next up, I'm going to tap the paintbrush and do the color picker here, too. Pick that, wait up at the top, and then I'm going to kind of paint over these holes on the top of my our journal so that I have a little bit more white space around it. And if you pick that color right on the edge, you can just make them disappear. I kind of have a circle design in mind and picturing a circle sticker as a souvenir for my family that came along on the bike ride. And I'm just going in here and scrubbing off with a very small brush first. And then I can make my brush a little bit bigger up here under the numbers I'm using kind of a rough brush, but then I can go all the way to the edge with this one once I've gotten the little details . All right, then I'm gonna tap down, and now I'm gonna look at those colors a little bit. I like it a little more vivid, a little more saturated, So I'm going to try one of those filters. And now I'm realizing I might need a little more room at the bottom. So I'm gonna pull that down a little more also under the paintbrush, also under crop. And then I'm going to also paint at the bottom edge of that page, pick the color, and then brush in some more white there at the bottom just to give me a little more room to work with with my circle. So then I can tap Don, and I'll do my circle under the plus under shapes. There's a circle, and I'll drag that out to the right shape, and then I actually want to modify that. Make it a little thicker of a line. So once you get the position right, you go back under the paintbrush and under stroke, you can slide that bar over and you can make it a stick of a line as you want. And now you'll be able to send this artwork to sticker meal once you export it to your photos and then they can caught writer on that edge. It's really cool. So next up, I'm going to do copy to photos, and it will be waiting for me in my camera Roll. Next, we'll show you what to do on the website. So once we get on their website here, you want to look for this button in the middle that says get samples and then custom sticker samples so you can order tens tickers for $9. And if you don't already have artwork loaded than you do, she was up artwork. And I'm going to choose this bike artwork that I just did. And then in special instructions, I'm gonna say please caught around the circle line and continue, and it uploads. And there you ready to add it to your cart and I'm gonna show you another sticker design that we can order at the same time. So continue shopping now, here in pixel mater, I'm opening up a page of my our journal where I did Ah, simple drawing of my shoe. So again, this was pretty easy. I'm just going to crop down, pull all that extra background. No, and tap apply. And then I'm satisfied with that. So I exported it to my pictures. And now back again and sticker meal. You may have to go back to the home page and kind of go through that process again. Get samples custom, sicker samples. Order 10 stickers for $9. You're going to see a pattern here, then upload some artwork. I'm gonna choose it for my camera roll. That same picture of the shoe. I don't really have any instructions, so I'm just gonna continue on to put it in my cart. Just takes a couple seconds to load. And just for good measure, I'm gonna show you one more sticker that I actually first made into Ah, e card. Like I showed you in the first last night and I thought it might make a cute sticker for my shop. So again, home screen get samples. I'm not the sample pack, but custom sticker samples and then get 10 stickers for $9. And then when I choose the file, I'm just going right into my favorites where I keep my e cards and I'm gonna choose this one that says take care of yourself. And when it loads, I'm gonna put that in the car, too. I'm actually going to de select the one of the bike ride because I actually already ordered those stickers, um, and place your order. It's all very self explanatory. Anything like shopping online is the same. Enter your address. What? Not? And now I'm gonna show you what happens when you get an email within an hour that you have a proof ready. So here on the main screen, it says my proof is ready. So I get to look at this screen here and see how it looks. This is how my sandals sticker is gonna look three inches by one point for something. I really like that white border. I don't really have any edits to make. So when you click approve, they can start production of your sticker so I don't have any changes to make. So I always a little bit hesitate on this step, like, you know, this is the last last chance. But really it's a pretty low price $0.9 to get 10 really cool stickers and the other one's ready to So I'm gonna tap on that and I'll show you again what it looks like here. They shows that little design you can zoom right in and see kind of how it will actually look as a sticker. And I really like that. So again, if you're satisfied, tap on, approve and get those stickers headed your way. Right there is the orange button for start production and check the address one more time and everything like that, and you're good to go. Next up. We are going to talk about print on demand services.
6. Print on Demand: in this last lesson, I want to show you how exciting it is to see your little designs on actual products. I have had so much fun ordering personalized gifts from a company called Zazzle. You may have seen it, but usually they show it with, like, family pictures on mugs and stuff. But I really felt like it was fun to experiment with putting little snippets of my artwork on some of those same products. I myself have ordered mugs and key chains, but there are endless options on these websites for you to put your artwork on. There are a lot of other teachers on skill share that have really in depth classes about scanning your artwork at high resolution and editing them on Photoshopped. And I really recommend that you try them out if you are really getting serious about putting your designs on products, especially if you want to sell them. But for this class is just gonna be a quick tutorial, showing you how you can take your artwork, get it on these products really fast and easy without those more complicated steps for this lesson, it would be great if you had a piece of artwork that, like, filled the whole page rather than some of the previous lessons where we took designs that were actually pretty small. I've taught this class to middle schoolers, and even at that age, they just loved painting of funky little pattern, taking a photo of it and then taking it into Zazzle to experiment with it on all different products and then get him ordered up like phone cases and laptop decals and all that kind of stuff. So let's jump right onto their home page and show you a couple of fun projects. So here we are, on the home screen of Zazzle and on the bar on the side. You can do create your own, and I'm in a tap on mug just to show you some of the fun things you could put on a mug. So don't Here there's like a travel tumbler thermal tumbler. And right here you could do add image. And rather than take when I've already used before, I'm gonna upload an image from my camera roll. So right there, photo library. I am going to choose a photo I took of just some water color polka dots that are kind of bleeding together, and I just think it would be really fun print. So once it comes onto the screen, you can drag the corners how you can position in different ways you can go bigger, a smaller. It will generally give you an alert if it's too big, and then it just shows you a little preview down in the corner. So I want to have as much pink as possible. So I'm pulling it here and there to make sure that the pink spots show up. But you can also use this rotate feature and you can tweak it, move it. It's just kind of fun to experiment with. And like I mentioned right there, you can see right away what it will kind of look like. And you have to keep it going a little over the edge and then once you're looking at that preview, can see all the different sides of it. So on the back side, there will be a little seem right there. That doesn't bother me. Tons. You could actually choose an image that wouldn't go off the edge like that. But then, once you're done, you're just gonna wanna choose the quantity and make any last little changes. And then you It shows the price of 29. 95 right now, But they'll have a lot of good sales. You can wait till it's a sale. I'm gonna put it my car and then it immediately pops up. You can see how it look on a candle on a little flask mug, and all of a sudden your mind explodes with all the possibilities that you could put the same design on so many different products. I just think that's really a fun features. You could even make products that match. But I'm gonna show you something else you can do. Once you have that artwork in there, you can even go down here on the side on filters. And there's some really interesting effects. Black and white, whatever I really like. This one is just kind of a Grady int, and it totally changed was the look of your artwork, even though it's the same piece of art. If you wanted to look a little more feminine or whatever, and then again, it shows all the different things you can put it on. I really just feel like it's so fun to experiment. And next I'm gonna show you a notebook design where you I selected a notebook and then I'm just dragging appease artwork on and it just bam. It's on the cover of a notebook, and I wasn't initially planning on making too many changes, but then I saw right here that you can you can add it to. You can add like words on the cover. I wanted to make sure it was on the front and the back cover so you can tap that and add it to the front and the back. I really like how that looks. And then it looks a little bit a little bit blah. But hey, moved down here. You can see you can choose for it. Toe have lined paper grid paper. My husband's a big fan of graph papers so I can change the color of the spiral. I'm gonna choose an orange colored spiral that's really fun to kind of try some of those other colors and then I mean it will give you details of how many pages air in the book. You can customize so many different things. You can change the size, you confuse the shape all under notebook. You just really the options are endless. But like I said, I wanted to pick the graph paper, and the price is listed right there with each of your little add ons. You can change it, But this print, this black and white print, is looking a little bit, um, muddy. And so I'm going to go to a black and white filter so that it's really crisp, white and really crisp black. I just think that looks even more polished. So this is all without doing very many tweaks outside of Zazzle at all. You can really just have fun with those filters. That same filter I tried earlier. I think I like that black and white best just the crisp black and the crisp white. And we're going to get that ordered up. Yeah, I like it from all angles. Cool. So there we go at it to the cart. And then as soon as you add to the Kurt you can see like I mentioned before, all these other home products you could add it to you could make it coasters. You could make other office supplies that match all from one simple page oven are journal. I really just love all the possibilities. So there you have it. I hope you're inspired and charged up and ready to do it yourself.
7. Thx and Good Luck!: Well, guys, that's it for today. I hope you're fired up and inspired with everything I've thrown at you with all the ways to get your art out of your AR journal and into the world. I hope you're already thinking about all the ways you can take art that you've already made and turn it into something really cool and usable. I found this process to be a little bit addictive. Suddenly, everything would be cooler if it had something really personal on it. I can't wait to see all your projects in the gallery. You should post before and after pictures, so we can all just marvel at your editing skills. This is such a supportive community on here. Be sure to follow me on skill share. So you are notified about all my new classes coming out. I have so many ideas and you can also follow me on Instagram and Pinterest, where I post on my daily artwork and new things that I'm adding to my at sea shop. I'm Nikola on all the platforms. I'd love it if you left me a rating and review. So other students confined it Or tell a friend who you think would enjoy it, too. Feel free to leave any questions or comments in the discussions tab for this class. I love interacting with all of you. And if you're having trouble uploading your project to the gallery, be sure you're on a laptop or a desktop computer. You can't load a project to the gallery from your phone. Thanks so much. You guys keep creating art and I'll see you next time.
 Nikki Jouppe, artist