Transcripts
1. Introduction: A soft and guy
cinnamon roll with a decadent cream cheese glaze brings back amazing
childhood memories. In this class, we will
learn how to transform a rich and buttery brioche dough into three incredible
baked goods. Welcome to this class. My name is S Branhu I'm a professionally trained baker and chef from our core Deple. I had the amazing opportunity to open my bakery two years ago, and in this class, I share the recipes I make in
my bakery every day. We start this lesson by learning how to make a
brioche dough from scratch, understanding ingredients,
and how to make up poolish and learning how to
knead and develop the dough. We also understand
different aspects of fermentation of the dough. Next, we learn how to make soft and fluffy cinnamon rolls with a gooey cinnamon
sugar filling, learning how to shape, proof, and bake the rolls. We also learn how to make a cream cheese glaze and how
to glaze the cinnamon rolls. Then we move on to making a stunning brioche breaded loaf, learning the technique of
shaping the bread with a signature halal bread style with a soft and
slightly sweet crumb. Finally, we transform
the dough into delicious swedish custard buns, filled with silky pastry cream
and covered with coconut. This class also comes with
detailed recipe notes, so you can master the
recipes easily at home.
2. Class Project and Materials: Thank you for enrolling
in this class. So in this lesson,
we're going to go over the class project, as well as how you can
download the class materials. The project for this
class is to share a picture of any one
recipe from the class. So please click on the
Projects and Resources tab and click on the
Summit Project tab to upload your class project. To download the recipe notes, click on the PRF file just above the Class Project Sab
and open the PDF file. All the recipes and
directions are available in this PDF file so you can use
it while making the recipes.
3. Brioche Dough: Quick Poolish (Preferment): The first step in making
dough is to make a polish. Now polish is a pre format, which we will add to the dough. So what this does is it gives
amazing flavor to the dough and also gives a
light texture to it. So it's really simple. I just have some
bread flour here with yeast and some room
temperature milk. So I'm just going to mix this together and leave it aside for about 45 minutes to an hour
until it doubles in size. So just mix the yeast
together with the flour. So I'm using instant yeast here, so you can add it
directly to the flour. Then go in with your milk. And just mix it together
until it's combined. We're not kneading
the dough here. We just want to
hydrate all the flour. You just have to
mix this well so there are no flour
beds remaining. And after this is mixed,
we're going to cover it. This should take
anywhere between 45 minutes to an
hour to ferment. So what we are going to look for is for it to double in size. It's been 1 hour, and I want
to show you the poolish now. So you see it's doubled in size. You can see these
small air bubbles on the top. That looks perfect. Let's move on to understanding the other ingredients which go in the dough and let's start
making the dough as well.
4. Brioche Dough: Understanding Ingredients and Making the Dough: In this lesson, we're
going to understand the ingredients which go
into making the dough. The first ingredient
is bread flour. Now, bread flour is
really important to use in this recipe
because it has a higher protein
content and since we're going to add a lot of eggs
and butter in the dough, the dough tends to
develop better. Now, if you cannot
access bread flour, you can also use
all purpose flour, but I wouldn't recommend
using cake flour because the protein content is really less than cake flour. I've also added this sugar
here with the flour. I'm using caster sugar. Now, what sugar does is it
gives sweetness to the dough. It helps to balance
out the dough and also it acts as
food for the yeast. It helps in the fermentation
of the dough as well. I've also put some
salt here on the side. Now you can use kosher
salt or sea salt. Any salt is fine. What salt does is
basically it controls the fermentation so that the yeast doesn't
ferment too fast, and it also helps in the
gluten formation in the dough. In case you don't add
salt in the dough, what will happen is the
bread will rise during the proofing stage and when you bake it,
it will collapse. It helps to strengthen the
gluten structure in the dough. So I'm using eggs here. Eggs and butter is
for richness and fat, and this is also to provide
hydration to the dough. French brioche, eggs and butter is the most important ingredient when you make French brioche. That gives the
richness to the dough and also makes it
really flavorful. Let's begin making the dough. The first step while
I'm kneading the dough is I add the eggs to the polish. Let's add the eggs
to the polish. Now the reason I do this is because when
you mix the dough, it's much easier for the polish
to combine in the flour. Next, what I'm going
to do is I'm going to just mix all the ingredients
in the flour mix, which is sugar and salt. Mix it together with a spoon, so that it's nicely
combined in the flour. Perfect. Add this straight
in inside the bowl. Now we're going to
start kneading this. Also, the burrow, we
add the burrow later. Now the reason to
do this is because if we add it straight
away in the dough, it might split from the dough and also the structure
of the dough won't be strong because fat actually
prevents gluten formation. So once we knead
the dough slightly, we will add the butter
and that too in two parts because if we add
all the butter in one go, it will be really hard
for the dough to develop. We're going to add
half the butter, and then we're going
to add half more. Let's knead the
dough first at speed four for roughly about
eight to 10 minutes. Then I will keep showing you as I keep kneading the
dough and it progresses. When you make this at home, it's also easy for
you to follow along. So our dough has been kneading
for about 8 minutes now, and I wanted to show you
the texture of the dough. So if you see still
really sticky and it's not ready to
add the butter yet because the butter won't
be absorbed completely. So we want to develop a little bit more gluten in the dough. Now, your kitchen eid
might be stronger, it might develop faster, but my kitchen ed is
a little bit weaker, so it takes a little bit
more time to develop. So I'm just going to scrape
down all the dough from the mixer so it can
combine nicely. I'm going to knead this
for another 5 minutes, and then I will start adding
the butter in the dough. So it's been a total of
13 minutes of kneading. And I gave it 8 minutes first, then I gave it
another 5 minutes. So I wanted to show
you the dough aha. So if you see, it's got a
little bit more structure, you can see it's a
little bit more firm. So what I'm going to
do is I'm going to add half of the butter
now and then keep kneading it for another
seven to 8 minutes and then add the other
half of the butter. Just add it in the bowl. After 8 minutes of
kneading the dough, we're going to add the
rest of the butter to this dough and knead
for another 8 minutes. I wanted to show you the
consistency of the dough. You can see all the butter is absorbed and the dough is getting a little
bit more strength. You can see it's getting
closer to a window pane. It's still not
developed as much, but it's still getting better. So it has more structure now, add the rest of the butter and knead for another 8 minutes. So it's been 8 minutes
of kneading the dough, and you can see that
the dough feels more smoother and you can see more structure as
well on the dough. So we need to
develop a little bit more to develop a little
bit more strength in it. So now for the last
part of kneading, I want you to put your sand
mixer at the speed seven. It's really high speed
for about 3 minutes. So what that will
do is that we'll develop some more
strength in the dough. Then we'll take the dough out
of the sand mixer and then sort of give her
some stretch and folds to give more
strength to it. Our dough is finally ready. Let's have a look. You can
see it's extremely stretchy, that's the texture we want. I'm going to take it
off the sand mixer and then I will show you how to
give the stretch in folds. Make sure to use a bend
scraper that'll make it easy to scrape all the
dough from the pole. Perfect. To give the stretch and
fold, it's quite easy. What you do is you
tuck your fingers in, slap it and fold it like that. Slapping the dog on the
surface will give it more strength and also make the dog a
little bit smoother. I'm going to do this
about 20 times. Perfect. A dough is finally ready. You can see it's got quite a smooth surface and it's really soft because we incorporated so much butter and
eggs in the dough. You should get this shiny
dough ball. That looks nice. Let's put this in a bowl and our first fermentation will be around 45 minutes to an hour, then we'll degas the dough and
then put it in the fridge. After fermenting the dough
for about 45 minutes, you can see that
it's increased by about 60 to 70% in size. It's not completely double and we don't want it to double. Actually, we want it to
increase about 60 70%. Let's take it out of the bowl. You can see it's really light
and really airy as well. What you want to do now is
basically fold the dough, one, two, then turn it. Rectls. What this
does is it develops strength as well as
slightly degas the dough. Make it into a round bowl. That looks really nice. It's really smooth,
really airy as well. This goes straight
in the fridge for overnight fermentation
anywhere 12-24 hours. Let's put this in our bowl. Make sure to cover it with a plastic wrap so that
it doesn't get dry. Let's have a look at
this though tomorrow. This is our dough from yesterday and
it's nicely risen. Let's have a look. If
I open the dough up, you can see f really nice
fermentation strands here. That means fermentation was good and we developed the
dough really nicely. Now what we will do is we will divide this dough
into two parts. With one, I'm going to
make cinnamon rolls and the other we're going to be making our brioche bread
and brioche loaf as well.
5. Cinnamon Rolls: Rolling and Shaping: This is our dough
from yesterday. I just took it out of the fridge and I wanted to show it to you. You can see that it's
risen slightly in the fridge and it's also developed a lot of
flavor and texture. What I'm going to do
now is I'm going to take it out of the bowl and
divide the dough into half. With half of it,
we're going to make cinnamon rolls and
the other half, we're going to
make abraded loaf. Just take the plastic wrap off. Now we're going to
use a dough scraper because if you use your hand, it's going to be really hard
to take it out of the bowl. Scrape it from the side here and rotate the bowl again and just scrape it
again from the side, it should come off
really easily. That looks good. Now I'm going
to divide this into half. If you want, you can
measure the dough, how much it is to
do it precisely. Use a scale and just put
the dough on the scale. This is roughly
around 1,600 grams. I'm going to divide this
into seven 90 grams. Perfect. So you've got
two parts of dough, and now one of them I'm going to use to
make cinnamon roll, and the other one is
for the breaded loaf. So before we start rolling
the dough for cinnamon rolls, you want to make sure that
you have all the mison plus, so all the ingredients which
will go inside the dough. So we have some softened butter
here and cinnamon sugar. And I also have a palette
knife and a rolling pin. So make sure you have all
of this and make sure that the butter is softened because it's more easier to
spread in the dough. So now I'm going
to set this aside, and I'm going to start
rolling the dough. To roll the dough, just put a
little bit of flour on top, not too much, and a little bit of flour
at the bottom as well. So you want to start
off with the center and then move it ahead and then
center and move it backwards. Press it just push all the dough from the
center to the sides. Now we move the dough like this and make sure
that it's a square. So when the dough is still cold, it's more easier to spread it because we have a lot
of butter in the dough. So now I flip the dough, dust off all the flour. So this is the rough
side of the dough. So this is where the butter
and the sugar will go, and this is the smooth side of the dough that you
want that on the top. So you want to roll the dough to around 30 centimeters into
30 centimeters square. So flip the dough again. So we want to get it as evenly thick as possible
across the dough. So make sure you level it off, so it's even. That looks good. So take your palette knife and make sure your
butter is really soft, like spreadable consistency, and just spread a thin layer of
butter on top of the dough. So what this does is that it keeps the moisture
inside the dough, gives it flavor, as well as makes the cinnamon sugar
thick on the dough. So some people when
they make this, they actually add the sugar to the butter itself
and then spread that, but I prefer doing it this way. But you can do that, as well. Make sure you get to all
the corners. Perfect. That looks good. Now, I'm going to add all the
cinnamon sugar on top. So I'm going to start off with a little and just spread it around so that it's even. So you want to get a thin
layer of the cinnamon sugar. Now, you can increase
this or decrease this. It's totally up to you how sweet you like the
cinnamon roll. So once you spread it, I'm going to add a
little bit more. Perfect. Now, you're going
to start rolling it. So basically curve
your fingers like this and you want to just get a very thin layer and press it down a little
bit, so it seals it. And now we're just
going to drag it like this and seal it as we drag it. You see how I'm doing it?
I'm sort of tucking it in a little bit and trying
to evenly seal it. And then we'll get like this
log, something like this. So you just press it little
bit to make sure that it's even of even thickness across. So now you have two options. You can cut six out of
this or you can cut four. Some people even cut eight. It's totally up to
you what thickness of the cinnamon roll you like. So today, I'm going to cut
four because I actually really like big cinnamon
rolls it looks really nice. But it's totally up to you how big you want to cut
the cinnamon rolls. When you make at home to
cut the cinnamon rolls, I like to use a bread knife. Now, I've seen some
people they use, like, a butcher's
twine, as well. They do it like that.
But I found this is the most sort of
accessible way of doing it. So what you want to do
is you want to find the center. And cut it through. Then you want to
find the center here again and cut it through. Perfect. So we've got four
cinnamon rolls like this. So now, either, if you want, you can put it like
this on the pan. But what I prefer doing is I like sealing
it a little bit, so it tends to rise better. So what I do is I
open it a little bit. I add the remaining sugar, where I find there are spots
which doesn't have it. Spread it across and then
just roll it like this. And then right at the end, I want to just tuck
it inside like this. So what this does is it prevents
it from opening weirdly. It opens really uniformly. It also proves really
uniformly as well. And then you can just sort of do it like this to make it even. This is how it should look like. You see how evenly the sugar is speracross and all the layers are quite even in
thickness as well. And this one goes
right at the end. Let's do this for
the rest of it as well. It's the same thing. I opened it again. But a
little bit of the sugar. Roll it like that. Just
stretch the end a little bit, and this goes right at
the bottom here. Perfect. So once we finish shaping
all the cinnamon rolls, let's have a look how to
prepare the baking tin. And then I will
explain a little bit about the proofing
process as well. The baking tin we're going
to be using today is roughly around 26 centimeters
into 26 centimeters. So you can use a wider
baking dish as well. You can use a cake tin as
well, totally up to you. So I'm just going to put some softened butter at the bottom. This will basically keep the moisture inside
the cinnamon rolls, also give a lot of flavor
and a little bit of sugar. So this will caramelize and give a really nice
crust on the bottom. Just make sure to
coat it nicely. You can add a little bit more. Just move it around. So you
see it's very evenly coated. Now you're going to add
the cinnamon rolls in it. I like to press it
down a little bit. So it expands evenly. Perfect. So that's ready. I'm just going to start
proving them now. So when you prove
them, make sure that the temperature is not
too high when you prove it. Around 27 or 28
degrees is perfect. So what I like doing is
I just put a bowl of hot water in the oven
with the oven turned off, and I will have a look
at this after 1 hour. I reckon this will
take around 1.5 hours, the 2 hours to proof. After 1 hour and 45 minutes, our cinnamon rolls are
finally ready to bake. So you can see that they've
expanded really well. So before baking it,
what I'm going to do is put a little bit of whipping
cream on top of it, or you can use heavy cream
or fresh cream, as well. So any cream will
be fine to use. So what that does is basically the sugar we put at
the bottom of the tin, it will basically emulsify with it and make like
a caramel sauce, as well as it will keep
the cinnamon rolls really moist when baking
so they don't dry out. So I would recommend anywhere 50-60 L of cream or
until you cover the top, as well as a little
bit off the bottom. Pour a little bit
on the top here. And a little bit at
the bottom, as well. So this will really help
it get really nice flavor, as well as give it really
soft texture as well. So I'm going to bake this
for about 18 to 20 minutes or until you can see it, get a really nice
color on the top, and the cinnamon
rolls are nicely set.
6. Cinnamon Rolls: Baking and Glazing : Let's learn how
to make our cream cheese glaze for
our cinnamon rolls. So the ingredients
are as follows. We have some softened
cream cheese. Make sure this is at
room temperature, icing sugar, and some
room temperature milk. Now, it's really important that the ingredients are
not cold, otherwise, they won't emulsify, and the cream cheese
won't emulsify as well. So you'll get, like, a lot of
lumps on the cream cheese. So to make it really easy, all you need to do is sieve some icing sugar in
the cream cheese, whisk it, and then
add milk really slowly until you get the
desired consistency you need. So take the icing sugar. And the reason we see
it is because you can see it has a lot of lumps
on the icing sugar, so we want to avoid
that. Perfect. So now I'm going to start
whisking the cream cheese. Now, you can use a kitchen
aid mixer as well to do this. So you see, when it's
getting nice and smooth, all the icing sugar is nicely emulsified with
the cream cheese. I'm going to add the
milk really slowly. So just add maybe one
fourth of the milk. We can adjust this
as we whisk it. So I'm going to add some more. Okay, so we're almost there. Just add a little
bit more. Perfect. That should be enough. So you want the consistency to
be slightly liquidy, because as it cools down, it will spread, and you don't want it to
be too heavy as far. Perfect. So when you
get this consistency, that is really nice. Perfect. So after you make this, you can cover it and set it aside and bake our
cinnamon rolls. And when they come
out of the oven, it will be nice to
put them on top so that it sets nicely on top
of the cinnamon rolls. After 20 minutes of baking, this is how our cinnamon
roll looks like. It's got a really nice
color on the top, and I can see when I touch it, it's really nice and moist
so it's not dried out. So now you have two options. Either you can sort
of flip them out, put them on a cooling rack, or you can let them cool
in the baking dish itself. So totally up to you
which one you prefer. I personally find it's easier to take it out of
the pan when it's still slightly warm because
otherwise the caramel sets. So in case the caramel sets, just put the tray in hot water or put it in the oven
for like 30 seconds, and it will come
out really easily. To take the cinnamon
rolls out of the tin when it's
still slightly warm, I would recommend to
wear some gloves, some latex gloves
so it doesn't burn your hand and just flip
them over like that. So give it a nudge. It will come out really nicely. And you can see that it's caramelized nicely
on the bottom. So now what you can
do is with your hand, just take it off like
that and flip them over. Now, make sure to do this when they are slightly
cool down and not immediately when it comes out of the oven because the
caramel is really warm. Okay. Perfect. So now we're ready to put our
cream cheese glaze on top. When the cinnamon rolls are
still warm out of the oven, let's glaze them with
our cream cheese glaze, which we made earlier. So you want to get a spatula and just spread it on
the top like that. So since it's still warm, it will melt slightly upon touching the glaze and it
will absorb it really nicely. So it's totally up to you
how much you like pudding. Personally, I don't
like pudding too much because it makes the
cinnamon roll too heavy. For me, this much
is completely fine. But if you like putting more,
you can add more as well. We finally finished glazing the cinnamon rolls.
It looks really nice. I'm super happy with
how it turned out. The glaze also set
really nicely. So if you've made
your glaze well, what it does is it
actually absorbs in the cinnamon roll and doesn't
leak out of the bread. So this looks really nice. So what I'm going to do
now is tear into one of the cinnamon rolls and show you the crumb structure
inside the bread. If you see the bottom of
the cinnamon roll as well, you can see this caramel
layer on the bottom, which was formed because
of the cream and the sugar which we put
in the baking tin. This gives an
additional layer of flavor and texture to
the cinnamon roll. Let's finally tear into our cinnamon roll and see
the crumb structure inside. Super light and airy. Super gooey as well. Amazing. You see
how soft that is? You can see all the
gluten strands, and it's really nice. Really stretchy though. It Stasts so good. Amazing.
7. Brioche Braided Loaf: Shaping and Proofing : Ting ting in this lesson, we're going to be
learning how to make a brioche braided loaf. I've got half of the dough here. Now, with half of the dough, we're going to make
a braided loaf, which is going to be similar
to a halal bread loaf, which is a free form
loaf, and the other one, we're going to put
it in our bread baking tin, like a bread mold. I just wanted to show you
both the ways of doing it, whichever you like
you can make at home. For the first loaf,
you're going to divide the dough into 110 grams each. So three dogs of 110
grams, and the other one, we're going to
divide three dogs of one 50 grams. Let's
divide the dough. So you see, since
the dough is cold, it's really easy to handle. After dividing 110 grams, let's do one 50 grams. So just use your dough scraper. That's great. So I'm going to
show you the method of how to pre shape this dough. Since we're going to
braid it, I want to make it into a slightly long slender. So when I want to braid
it, it's easier for me. So you want to slightly
press it down, then take it in the center
at once. Then again. So if you see it becomes
a slight slender shape, then what you want
to do is you want to go from the center outwards. So take it like this. So you will get a rough
cylinder like this. So now we're going
to rest the dough for about 20 minutes after we shape it like this because if I try to final shape it now, the dog will tear and we
won't get a neat bread. So let's do this
same for the rest of the dough as well.
So press it down. Press it like this,
and then once more, press it down like
this, to seal it, go from the center and push it outwards. Like that. After pre shaping
the dough like this, I'm going to put it on a tray, cover with the plastic wrap, and let it rest for
about 20 minutes, and then I'll show you how
to do the final shaping. We spend 20 minutes and our
dough is nicely rested now. So we're going to move on to the final shaping step
for our braided brioche.
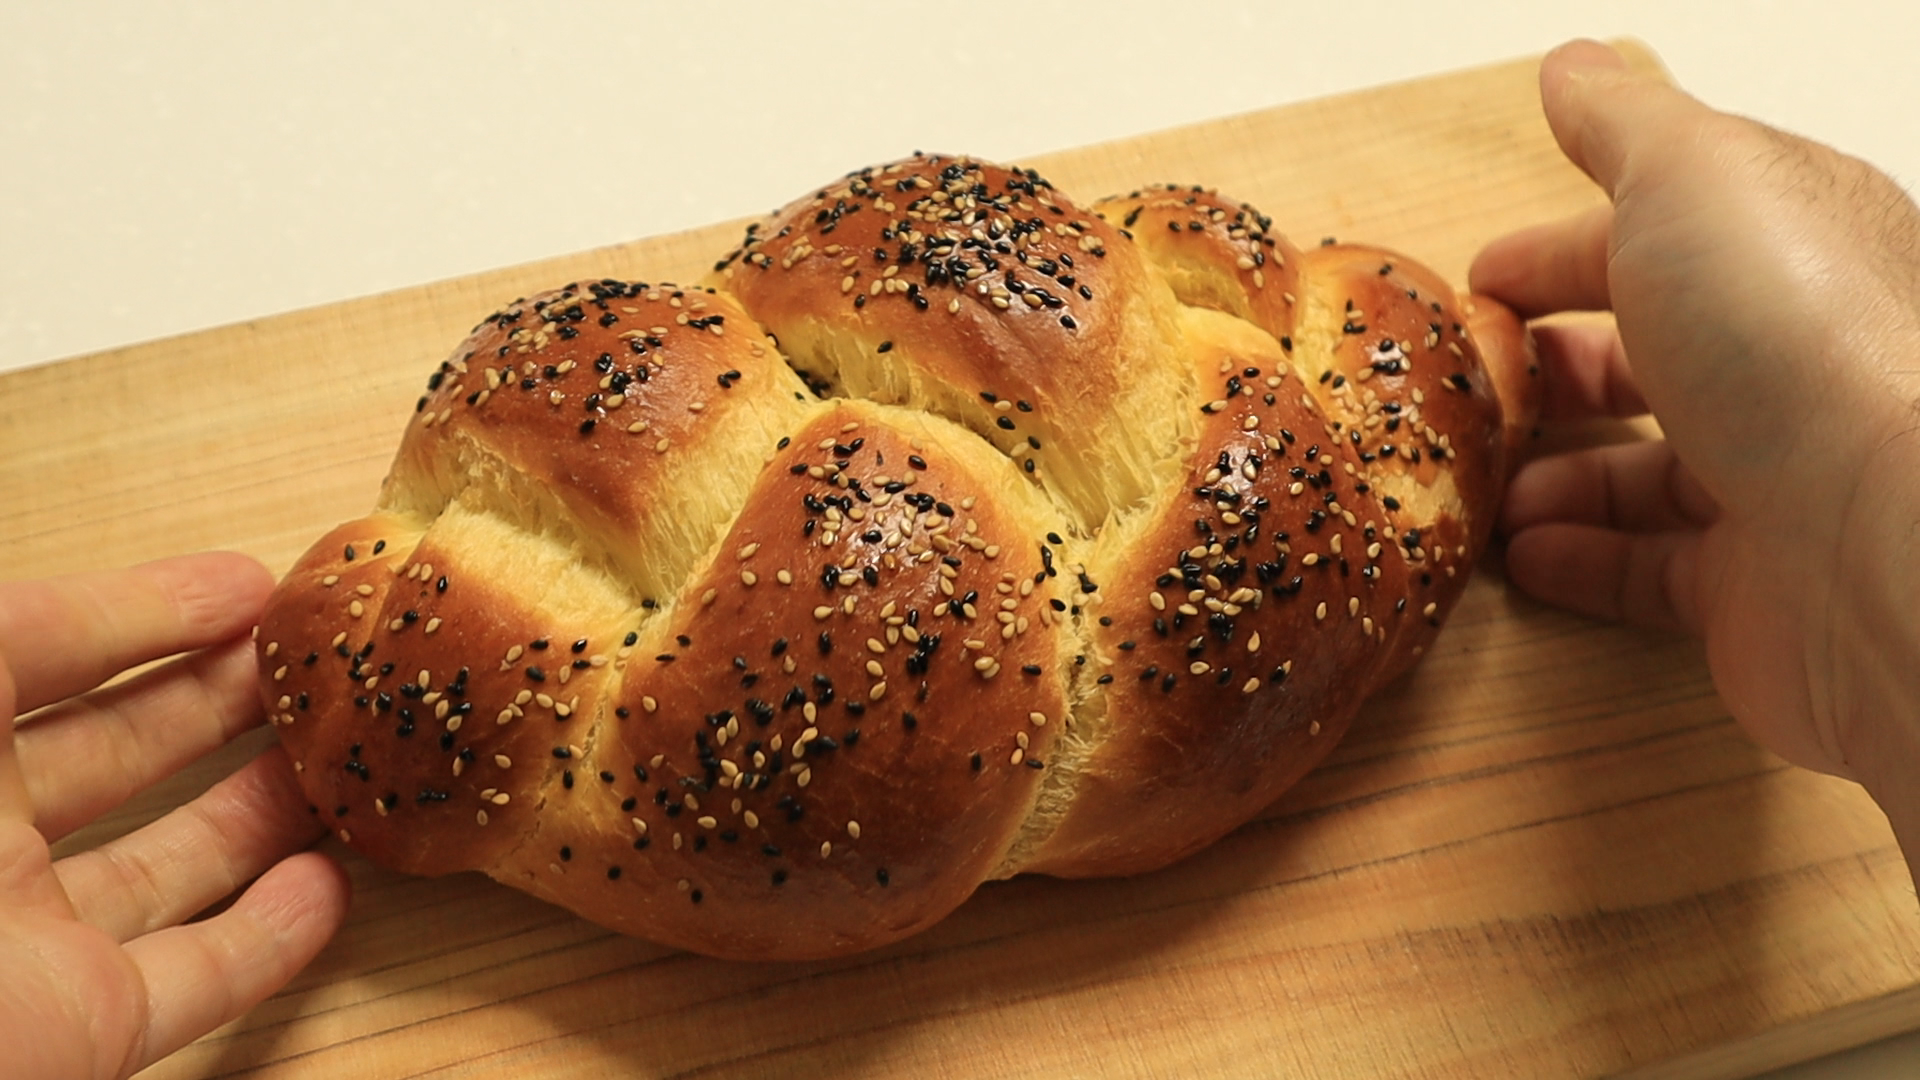
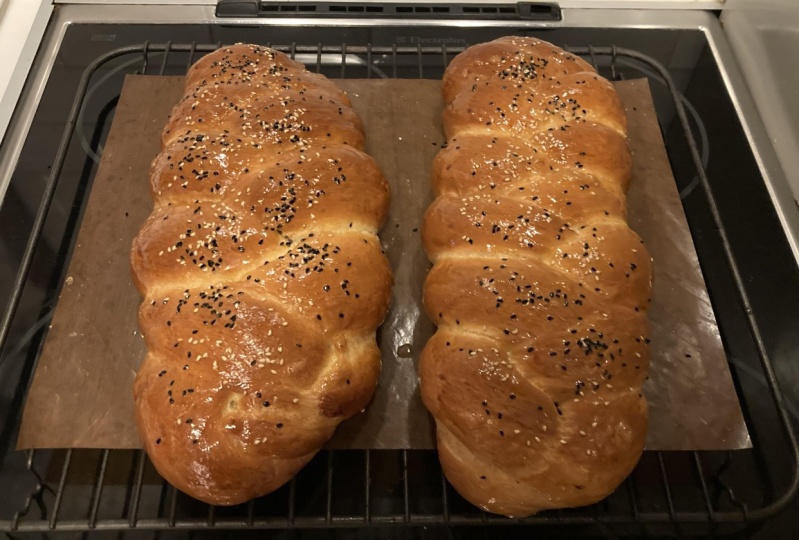
8. Brioche Braided Loaf: Baking the Loaf : Let's learn how to shape
the braided brioche loaf. So what you need to do
is basically start from the center and move outwards and make it
into a long slender. So now the dough is well rested, so it'll be more
easier to do this. Senter and outwards. So you get something like this. So try to make it as
even as possible. But usually the center might
be a little bit thicker, and that's completely fine. Now to shape the bread, we have the three clanders here. So what we're going
to do is take the top and just sort of stick it together and press it down
like this. So it seals it. Now, this one will go inside. This one goes in the center. This one goes in the center, and we keep following
it like that. So it makes into a nice braid. And then the end, we
just seal it again, press it down to seal it. Tuck it inside. The end here, tuck it inside as well. And then that's how
you get a nice braid. After you've brided the dough, we're going to put
this on a baking sheet and put it in the oven
with the oven turned off and a bowl of hot water
so that it recreates a dough prover so the
dough can ferment nicely. So this is our braided loaf. It's been about 1.5 hours, and you can see that it's
expanded really well. So this is ready for baking. Now, how do I test that? I I press it, you can see that
it shouldn't spring back. I should stay like
that a little bit. And if I move the tray, it should wobble slightly. So see if it's wobbling a little bit, that
means it's ready. So I'm going to
egg wash this and put a little bit of
sesame seeds on top. So what I'm going to do is
take a sheet of baking paper, just a tiny sheet like this, and dip it in the egg wash
and then glaze the bread. Now, you can use a brush
as well if you like, but I find this method is
more gentle on the dough, and it doesn't leave
any scars on the bread. So to make the egg
wash, I took one egg, and I added about one
teaspoon of milk in it, and I just whisk it together. So after glazing the
bread with egg wash, I just made a mixture of
black and white sesame seeds. So I'm just going to
sprinkle that on top. Now, this step is optional, but I found that it gives a really nice presentation
to the bread. That looks good, and our bread is finally
ready for baking. So I'm going to bake
this for about 20, 25 minutes at 180 degrees Celsius, 350 degrees Fahrenheit. So this is how our
final loaf looks like, and you can see it's
really beautiful. It opened really nicely as well. So what I'm going
to do now is brush a little bit of
butter on top so that it gets a nice shine and also it prevents it
from drying as well. Once it's cooled down for
about two or 3 minutes, what do you want to do is
just lift it up and put it on a cooling rack so that
it can dry out really well. Because if you leave it
on the tray like this, the bottom will get really soggy and it won't taste that good. So I'm going to put this
on the cooling rack. Set the bread aside for about one to 2 hours before
you start eating it, because the moisture
still needs to evaporate, and the bread will
be more lighter and tastier if you cool
it down properly. So our bread is
finally cool down, and I wanted to show you how it looks like from the inside. So let's cut through it and
see the texture inside. So I will cut
through the center. So I can already feel
it's really soft, and you can see the
butter and the eggs. That's why the color
is slightly yellowish. So let's cut a slice. Okay. And if I tear this apart, you can see the crumb is so soft and it's slightly
stringy in texture. That's the texture
you should get when you make a French pioche. It should be a
little bit stringy, because we need it so long, it gets this kind of texture. It smells so nice, so buttery. So I really enjoyed
making this recipe, and I hope you try making
this at home as well.
9. Swedish Custard Buns: Shaping and Baking the Custard Buns: In this lesson,
we're going to be learning how to make
our custard advance. So I've got half of the
brioche dough here. Now, what I'm going to do
is further divide this into half because today I only want
to make about six of them. But if you want to
make a bigger batch, you can use the whole
portion of the toe. So we want to make
it around 400 grams. Perfect. It's around
395. That's good. So now we're going
to divide this dough into 65 grams each. After dividing six equal
pieces of 65 grams each, we're going to make
them into a round ball. So when you do this,
you want to make sure that it's got a nice
seam on the bottom, and the dough is quite smooth. So what you do is you flip
the dough, you press it, slightly degas it, and then you just take
it inside like that. And then you just
make it a round ball. And then just with the
tension on the surface, just gonna put your
fingers underneath the dough and just
make it a little bit tighter so you get this
smooth round ball like this. So let's have a
look at this again. You press it down, take it towards the center
three to four times, you flip it over, then you put your fingers
underneath the dough. They're slightly touching
the surface like this. And then you just
with the tension, make it tighter like that. So you get a ball like this. After we finish
shaping the dough, what I'm going to do is
put it on a tray with a baking sheet or a silicon mat so we can start
proving the dough. To proof the dough,
I would recommend to use your home oven
with the oven turned off and a bowl of hot water so that it can create a good environment for
the dough to rise. I reckon this will take around
one to 1.5 hours to rise. I'm going to show it to you
after 1 hour of proving, and then I will show
you when it's at the right stage to basically press it down
and put the custard on it. Let's have a look at
this after 1 hour. S. After 1 hour of proving
the custard buns, I just wanted to show
you the texture. So if you see they've risen
by about 60 to 70% in volume, and if I touch it, I can see there's quite a
lot of air inside it. So at this step,
we're going to start making the indent here
to put the custard. So there are a couple of
ways you can do this. One way is to slightly
press with your fingers like this and just
create a corner. And then you just press
it down like that. So you get like a
slight indent here. So with your fingers, you just want to basically
push the air to the corner, like how you would when you make a pizza, something similar. But you want to be gentle with it so that you don't
deflator it too much. And then once you've
created the corner, you want to just press
it down slightly more. And create a sort of a cup here that can hold the
custard when we pipe it here. Let's have a look at the
second way to do it. So just take a
tablespoon like this, dip it into some
flour like that. Just brush off the flour, and then press the spoon
in the center like this and just press
it down a little bit, and then just lift it off. So you get something like this, and then you can just
basically press it down and make a little bit of a bigger hole in the center. So let's have a
look at that again. Put a little bit of
flour on the spoon. Put the spoon in the center
like this and just press it. Like that. So if
the dough sticks, you can just remove it with
your finger like that. And then just press it
down with your finger. Something like
that. So you can do it either way,
whichever you like. So this is how our
custard buns look like after we have
created indent on them. Now, what I would
like you to do is basically cover this
with a wet cloth or a plastic wrap and
set it aside for 20 minutes just so that
the dough can relax. Meanwhile, I want
you to set the oven at 180 degrees Celsius
so that it can preheat. After 20 minutes, our custard
buns are nicely relaxed. You can see that they've risen slightly, but not too much. Okay. And then I'm going
to egg wash the side. So I made egg wash with one
egg and a tablespoon of milk. So just take a sheet of baking paper and dip it
in the egg wash. So you want to make
sure to egg wash just the side and not the
center because the center, we're going to put the custard. So this will give nice
color to the bread. After you've egg
washed all the buns, we're going to put
the pastry cream which we prepared earlier. So you want to put roughly
about 20 to 30 crams in each and just in the center. So just go like that. A bit more. Just start from
the side, go in the center. Our custard buns are
finally ready to bake. I'm going to bake this for
about 12 to 15 minutes at 180 degrees Celsius. Let's have a look after 12 minutes just to
check the color. Then if you think
it needs longer, just give it another
two to 3 minutes. This is how our
custard buns look like after 15 minutes of baking. So you can see it's
got really nice and golden color on the side. So make sure to cool
the custard buns for about 30 minutes so that when we put the
glaze on the sides, it doesn't melt away, and it
actually sticks to the bun. So let's set this aside. And then once it's cooled down, we'll ice the sides of it and put coconut as
well on the side.
10. Swedish Custard Buns: Making the Vanilla Custard: In this lesson, we're going
to be learning how to make custard for
the custard buns. So this is a really
simple French custard. We've got two egg yolks, sugar, flour butter,
vanilla bean, and milk. So let's have a look how to
actually make this custard. The first step in making the custard is to basically
take the vanilla bean. Now, just split this in
half from the center. And scrape off all the
beautiful seeds inside. This will give really nice
flavor to our custard. Just scrape it like this,
take it in one corner, and just gently push it down so you get all
the vanilla beans. Now, that goes in
the pod along with the rest of the
vanilla bean as well. And then we're going to put
half of the sugar in Perfect. So let's get this up to a
simmer just before a boil. So put your stove on medium gas and just stir everything together so
the sugar dissolves nicely. And let's wait for it to
get to a rolling simo. So you'll start seeing
bubbles on the side. That's when you want to stop. So when you start seeing these
small bubbles on the side, you're going to
take the milk off the stove and you're going
to start whisking the eggs. Just take your egg yolks and
add the rest of the sugar. You want the egg yolks to be nicely emulsified
with the sugar. So I whisk it for
about 30 seconds. Now I'm going to go
in with the flour as well and whisk this as well
for around 30 seconds. You'll see a nice
smooth emulsion. Now, we add the sugar and the flour to the
egg yolks just to protect it so that it doesn't curdle or burn when we
put the milk inside it. So when you get, like, a
smooth emulsion like this, that's when we're going to add our warm milk into
the egg yolks. So just add a little
bit in the beginning to temper the eggs, whisk
everything through. And now we're going to add
the rest of it as fat. Perfect. Now this is
ready to start cooking. So you want to make sure to put this back in our cooking pot, along with the vanilla bean or vanilla bean paste,
whichever you're using. Just scrape everything
down nicely. Perfect. So now I'm going to put this on
load medium flame, not too high because
you don't want the custard to burn or
the milk to burn as well. And we're gonna keep
whisking and stirring it. So you want to make sure
that you keep using your spatula and that it doesn't
stick on the sides here. And once it gets slightly warm, I'm going to switch onto a whisk so that it doesn't curdle and we get a smooth
pastry cream. Nice, now let's move on to a
whisk and keep whisking it. So now I'm going
to lower the heat slightly because I can see
the custard is setting, so it's a little bit lower. I'm going to move
back to my spatula, and you can see it's
come up to a boil now, that means our custard is ready. So take it off the gas. So I'm going to put
this in a bowl, and then we're going to
add cold butter in it and emulsify it and
make it really smooth. And then add the butter and make sure the butter is cold so it can
emulsify really well. Then the butter will melt
slightly with the heat of the pastry cream and
just keep whisking it. And you will see as
the butter melts, it will make the pastry cream really silky and
really smooth as well. So as you can see, the butter is completely emulsified
in the pastry cream, and it's super thick and
really shiny and soft. So this is exactly
what you want. Now, you can take the
vanilla bean out from this. I'm going to cover
this with a plastic wrap so it can cool down. So when our custard
buns are ready, we can start piping this
on the custard buns. And then take a plastic
sheet, cling wrap, and you want to
make sure to put it down right at the surface of the pastry cream so that it
doesn't form a skin on top. Now you can easily double
this recipe, even triple it. It completely depends how many custard buns
you want to make. So today, we are making six, so I made this patch. But if you're making 12 or 20, just make sure to double
or triple it in volume. So I'm going to keep this aside, and you can store this in the fridge for up to
two to three days. It stasts completely fine. So once the pastry cream cools
down in about 30 minutes, I'm going to whisk it nicely
so it becomes smooth. And then I will put
it in a piping bag. So then once we start
making our custard buns, it's really easy
to pipe onto them.
11. Swedish Custard Buns: Glazing and Coating the Buns : Learn how to make the
icing sugar glaze for our custard buns. So I've got some 50
grams of sugar here. This is icing sugar and
around 15 grams of milk. So we're going to add
the milk really slowly. We're going to add half first, whisk it together, and then
add a little by little. So we want a consistency, which is a little bit thicker. And just in case if
it gets really thin, you can add more icing sugar
to it. So let's begin. It's quite simple. Just hydrate
the icing sugar nicely, and then whisk it together. And you will see it
will form a paste. And let's add a
little bit more here. So this consistency
looks good to me. You see, it's quite thick. And at the same time, it has, like, a runny texture.
So that's good. So our buns have been cooling
down for 30 minutes now, so we're finally ready to finish and put the
glaze on the buns. So I have my icing sugar glaze here and desiccated coconut. Now, you can use any size
of coconut you want. You can use bigger
pieces as well. This is quite a fine
powder I'm using today. So totally up to you
what texture you like. So there are two
ways you can do it. Either you can actually dip this in the icing sugar glaze, or the method I prefer
to do is to take a pastry brush and
basically glaze the bread. I find this is more easier. So you want to make sure that
when you glaze the bread, you only glaze the side and also to dip it
immediately in the coconut. Otherwise, the glaze will set and the coconut won't
stick to the glaze. Okay. That looks good. We've got all the
glaze really evenly. So now, we take the bowl
with the coconut in it and just roll it like that. Just like that. So you can see, it's really nice and evenly coated and it looks really
nice and beautiful. It looks really appetizing. So after you coat it, you want to make sure
that you set it aside for at least ten to 15 minutes so the glaze can set as
well as the coconut, because the coconut isn't
completely set right now. So unless you're eating it
immediately, that's right. But I would recommend to just set it aside and finish
the rest of them. So let's do the
same thing again. You want to take your coconut
and just dip it like that. If you roll it, it will stick
really nicely and evenly. That looks really beautiful. So let's cut through the pn. You can see the really
nice custard filling. Really soft dough as well. The custard and the coconut
go so well together and you can see the
custard is still so soft, even though we baked it. I really like this consistency and this ratio of the
custard to the bread. But you can definitely increase it if you like more
custard in your bread. I really enjoyed making this recipe and I hope you
try this at home as well.
 Shubranshu Bhandoh, Baker/Pastry Chef - Le Cordon Bleu