Transcripts
1. Hello and Welcome!: Managing an art business
involves a whirlwind of tasks. From pitching to clients, handling licenses and royalties, to promoting your work, Not to mention the
actual creative process of creating art. Imagine having a seamless system that organizes all
these aspects, ensuring that each time you embark on a new
artistic endeavor, the workflow is
effortlessly managed. This way you can invest more
time in what truly matters. The joy of creating art, Bulcome to notion for artists, where we'll explore how to make your art journey not
just creative but also incredibly efficient by using the productivity a notion. Hey, there I'm Mel, an illustrator and surface pattern designer
from Wellington, New Zealand with a
decade of experience in this creative industry and a background in
software engineering, I found my sweet spot by crafting my own
system in notion, it's not just about
managing my art business. It seamlessly blends
with my personal life, creating a harmonious balance. Now I'm excited to
share my insights with you in our notion for
artists class notion is your all in one
customizable workspace app designed to revolutionize how
you organize information, plan pro and navigate life. In this class, I'm
thrilled to guide you through harnessing
the power of notion to streamline your
art business a walkie through my specially
crafted template tailored for artists like you, From wrangling art files to maintaining client list and handling licenses and royalties. We'll cover it all. Plus I'll show you how to
personalize the template to seamlessly fit the unique rhythm of your own artistic venture. Now before we dive into the nitty gritty of
notion for artists, it's helpful to have a basic understanding
of the platform. Now if you're completely
new to notion, no worries. I recommend checking
out my notion for patent class where I walk you through some
fundamental concepts. Alternatively, you can explore beginner friendly classes
by Ashanke or Ali, both offering fantastic insights into the basics of notion. Then once you've got to the
hang of the essentials, you'll be all set to make the most of our notion for
artists adventure. If you're ready to take your productivity
to the next level, then let's start building
your own art hub in notion.
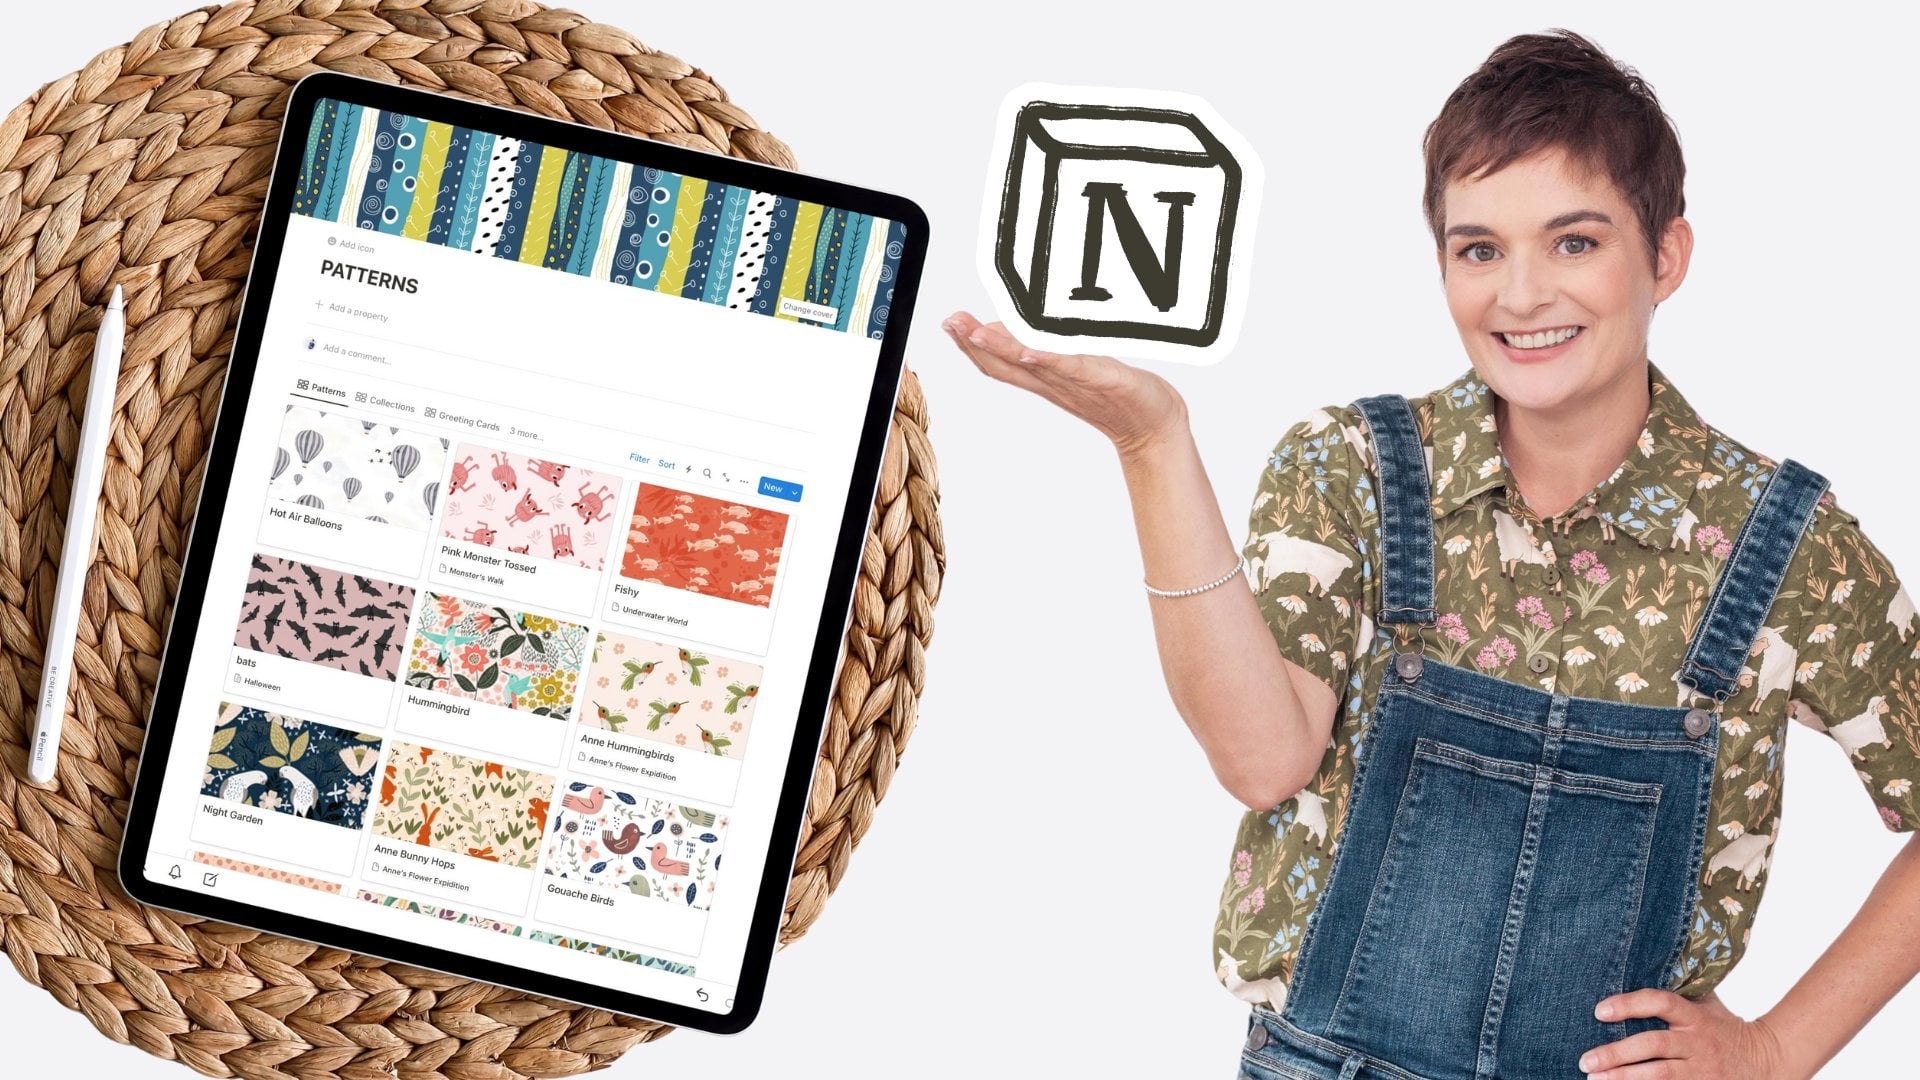
2. Art Hub Overview: So my art hub is made
up of a number of databases that help me manage my art and my pattern files, as well as my clients, my licenses and my royalties. As you grow as a business
in this creative industry, it's really important to stay
on top of all this admin, the management of all your
artwork and your licenses, just to stay ahead
of it and to free up your time for creating art. In this video, I'm going
to take you through my system that I use to manage
my art and my licenses, my royalties, all of that stuff. I'm going to show you
exactly how I use it. And then you have the
template as well. Now, I'm lucky that I have a background in
software engineering. I love setting up
these sorts of things. I'm a bit of a nerd, it's
not overly complicated, and I made it as simple as possible so that
anyone can use it. But you have the template
to download and then you can set it up to suit
your own business. Basically, I'm going to
show you how I use it. This is the full system, a little bit of insight into what I'm doing with
my work, I guess. And then we'll talk about how to set up the template
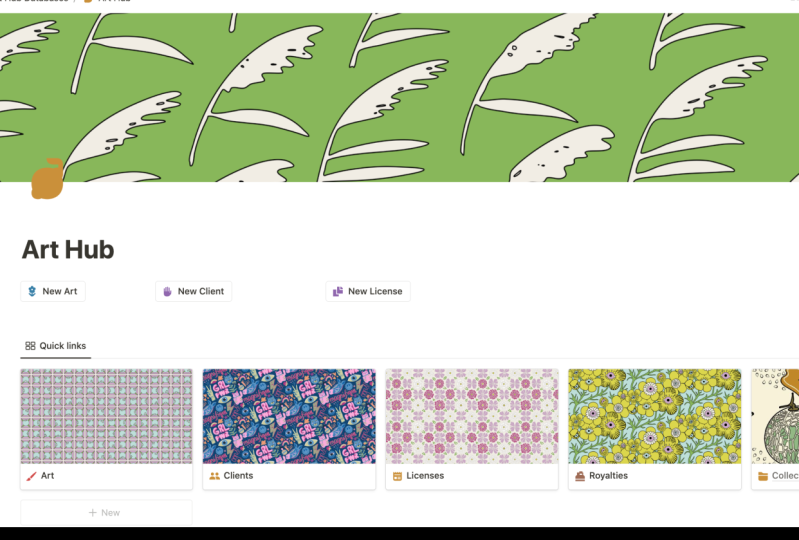
so that it suits you. This is the Hub page. This is basically just a hub to all the different areas
of my art business. We have the art database
where if I go in here, you'll see all my art, go to the gallery view. You can see all my patterns, my collections, my
greeting cards and so on. And if we go back to my art hub, then we've got the
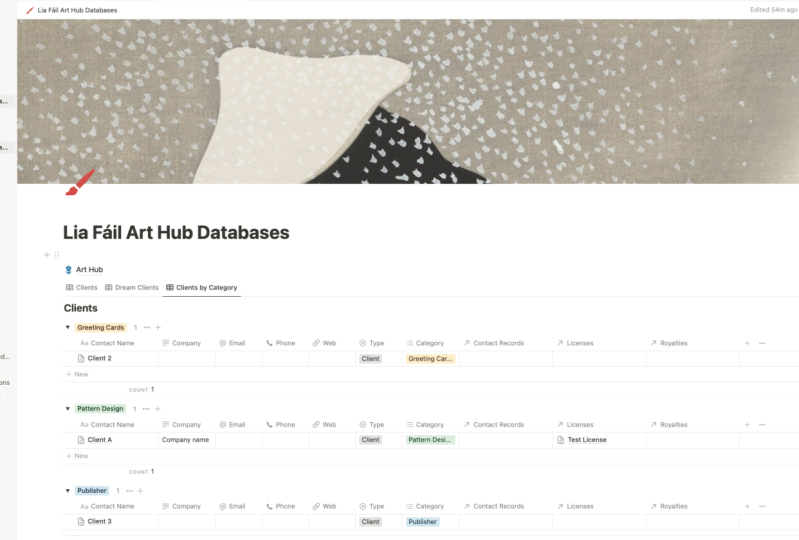
clients as well. This is the core
of the business, I guess, or the
core of the system. Let's go in here
and have a look. I have it set up so I
have two views here. I have a list of all
my clients that I currently work with or have
worked with in the past. And then I also have one
here called Dream Clients. So these are all the clients
that I want to reach out to and pitch to and hopefully
license my work too. When you're researching clients. This is where I will put
them in and I'll put all their details such as
their submission guidelines, or if I found a contact name. All of that kind of
stuff goes in here. And then let's create a
new dream client here. I'm going to say it's a
greeting card publisher. I would put in their
e mail address if I had their phone number, maybe their web address. Then down below, I have links or databases that are linked
to contact records. This is every time
I contact them. If I create one of these, I can say I sent them an e mail and it populates
the date automatically. Then you can see that now it's put that in the template
so I have a record of it. I can also add notes
down the bottom. Basically, anything I want, I could put in some
submission details that I need to stick to. If I'm e mailing
them that stuff, I actually categorize them by the sort of client they are, if they're greeting cards
or textiles or puzzles. That kind of thing is
very useful to have. Then we go over to our clients. Here, let me pick one for you. If I open up this
one with spotlight, it has a links to all of the licenses I currently
have with them. You can actually see them all
down here in the gallery. So this is all the designs
that I had licensed with them. And then down the
bottom is basically my royalties schedule when
I should be getting paid. Also put in there
how much I get paid. That's all in there as well. To keep track of, it's
really important to keep track of royalties because companies don't often pay
when they're meant to. That should be part
of the contract. If let's get out of there
and go back to the hub, the next one, the wish
list here is just basically a quick link to my dream clients,
which you already saw. The licenses, all the licenses that I've ever had all current. I've got ones that
are up for renewal. I've got a calendar to show any that are coming up
in the next month that are due for renewal. And then I've got a view here
that just shows every since I've ever done it has the
category and the location, and the timelines at the start and end
date of the license. Which is important
to know so that you don't double up on licensing
with another client. And you can keep
track of any renewals coming up so that you could e
mail them and say, oh look, your license is coming
up for renewal, Would you like to renew it for another two
years or whatever? We go back to the art hub. I also keep track
of my royalties. I do that by company name, and then obviously I just keep populating them as I
know that they are due. Then I set a reminder
to tell me when it is due so that I can chase them
up if it becomes overdue. I find that really handy. When I first started out, I didn't have any system in place for keeping
track of royalties. And of course, companies
didn't pay me, so I would have to chase them. Now I'm on top of it. I can have a good idea
of when I'm meant to be getting paid and
when they're meant to be sending reports to me. If it does become overdue, I can quickly chase them
up for those royalties. If we go back to my art hub, I have also got
these sections here. I've got any work that I'm
working on at the moment, I've got some collections
here in progress. I've also got my licenses that are expiring and my
royalties that are due. So these are all the things
that I need to be aware of at this point in time. And so I find them useful
to have on that Hub page. So when I come in
here in the morning, I can see exactly
what I need to be working on and doing
or chasing up. So in the next lesson, I'm going to show you how
to install the template. And then we are going to
talk about how you can set it up to meet your
business needs. See the.
3. Installing the Notion Template: Okay to duplicate the template and copy it over to
your own workspace, all you need to do is click on the link in the description, and that will open up the art hub databases
in your browser. You need to then click on the
duplicate link over here, which will copy it over
to your own workspace. If you've got
multiple workspaces, you will have this
option here to select the one that you
want to put it into. If you already did my pattern
notion database class. Then make sure you select the workspace that has
that database in it. And then I want to set the art hub as a favorite
to put it up the top there. And in the next
lesson, we're going to link up the pattern database
if you already have one. So if you don't have that, you can skip the next lesson
and go on to lesson five, where I will give
you an overview of how the client's
database works. See.
4. Integrating your Pattern Database: This lesson is for
those who have taken my previous Notion class on how to manage a pattern
collection and patterns. What we're going to do is
make your pattern database, the art database in the art hub. There's a few things
we need to do to get that set up correctly. Now if you didn't do
my previous notion, don't worry, you can just skip this lesson altogether and
just go on to the next one. The first thing we
need to do is locate the art database in
the art hub over here. Go to Art Hub
databases and expand that where it says Art here. We can expand that as well. I want you to click on the three dots here and
then select Delete. And then you can say
delete permanently. And you may need to go back
to your content like that. And then go to your
Patterns database and click on those three dots. And then rename it to Art. Now we need to update
some of the links. Click on the Art Hub databases, and then let's scroll down to the directory and you will
see this art database here. Just open that up at the moment, it's pointing to a database
that we just deleted. So we just want to re, link this to your pattern, which is now your art database. To do that, what
we need to do is click on these three
dots over here. Go to Source, then locate
your new art database. And then you need to do
that for each of these. The next thing we
need to do is update the buttons on the page. Click on the art hub page here, We just need to update
this new art button. Click on the little
spanner here, and then in here where
it says Add page to Art, select that and then select
your new Art database, And then click Done. Then let's click on
that Art button. And we are going to add a couple more properties
to this page. The first one is click on the Ad Property and we look
for a Select property. This is going to be called Category and we want
some options here. One is just art patterns and maybe greeting
greeting card. This is basically
the three areas that I create, art and license. I also do children's
book illustration, but I don't manage that in here. This is purely for
my licensing art. Those are the three that I do. You might have some
others that you might want to add that's in there now. Then another property we want to add is a relation property. To link it to our
licenses database, let's click on a
property and then type in and then locate licenses. We want to leave the
limit as no limit, and then we want to change
the show on licenses to On. And then just click a relation. Then we're going to do the same for the royalties database. Let's create another
relation property. This time, click on royalties, change the show on
royalties to On, and then add relation. Let's just type in test here, and this is just going
to be our test record. Another thing we need
to do is actually update the filters
on these views. When you reconnect it to
a different database, loses all the filters, we need to put them back in. This is quite easy to do, just over here on this first
view, click on filter. This is filtered by category and we want to say
these are art. Let's go to the patterns. Let's type in filter
category and then pattern. Then greeting cards go
to filter category. And greeting cards then
for the license run, go to filter licenses. In here we're just going
to say is empty basically. It's just going to show any
that don't have a license. Then the last one, now the spoon flower
one is only if you have the spoonflower property
on your art record. If I go into this test one here, I don't have a property here. This was from my original
pattern database. Just add a property here. This is only if
you want to track what designs you
have on spoonflour, which can be quite
handy for a lot of you. I just add a checkbox, let's call it spoonflower, then go out and then
let's put the filter on. All we need to do is add filter spoon flour and then checked, then
let's hide that. In that way you can see what designs are on spoonflower
and easily track them. There's one more thing we
need to do that is link up our new art database to
our licenses database. Just click on
licenses over here. Let's go into the
license template. Let's just this template and then then in here at the moment, it's pointing to what it's related to the old art database. To fix that, click
on Edit Property, click on Relation, and
then type in Relation. Again, this just gives
you the option to re, link it to a database. And then you can
click on the Art. Then you can click
on a Relation, and that will update it. We also have to do the same
for the Royal Sheet database. I'm just going to go
back to the Art hub. Click on Royalties, then click on the upside
down triangle. Then click on it. This template. Then in here, click on the six
dots, Edit property. Go in here and type in relation, then click on Art,
then add relation. All right, so that's it
for linking up your, your pattern now art
database with the art hub. In the next lesson I'm going
to show you how to add your own personal touch to your database
to make it yours. So that you can then add views that are specific
to your business. You can add covers and
icons and different ways to display things on the Hub page just to make it something that's
going to work for you. What I have might
not work for you, you might want to
adjust things around. I'm just going to give
you a few tips on how to do that. See you there.
5. Making it your Own: Okay, in this lesson,
I'm going to show you a few things you can do to make the template
more suited to you. So basically, you can add
views that suit your business. You can change the
look and feel of it, You can add buttons, you can move things around, you could add new titles
and all sorts of things. But basically, I'm
going to show you a few little things
that you can do and then you can do what you like with it to make it
meet your needs. I'm just on my hard
page in the template. One thing that you
might want to do first is change the covers
on these quick links. Let's go into the art One, all you need to do is hover
mouse over that cover. You can click on Change cover. You have the choice of picking just from the default gallery. You can upload a file. You can link to, say, a file on a website
or on your Dropbox, maybe, I'm not sure
if that will work. And then you can also
select one from Unsplash, which is a royalty free stock
image library on the web. Typically, I have customized mine and it has my
own artwork on there. I recommend doing that. Pick thing that represents
the category for art. Say I'm just going to
pick this design here. And then when I go back to my hub and it pops it in there, I would recommend
customizing each of these. You could also change the, the hub cover as well. You can also remove that if
you don't want that on there. I personally like it. You can create your own one, you can go to town with it. Basically, another thing you might want to do is add
another quick link to, say, another database that
you might already have. For those who did my collection
notion database class, you might want to
add your collection quick link here.
Let's do that now. All I need to do is
click on New here, then let's call
this Collections. And then we want to add a cover. I'm just going to
upload another pattern. Then go to your pattern
collection database. Click on the three dots
you want to copy the link. Then just select that
and then paste it. And you can see it's pasted
the link on the title there. Then go back to your
art hub and let's test that out there. It has opened up into
a collections page. The link is working,
then all you need to do, I would probably turn on
Full Width and then click underneath Forward and then type in link view of database, and then select your
collections in collections. Then obviously you can change this to suit yourself
however you want. You can remove the
title, hide the title. You can even put notes
and text on here as well. You might want to
put some information about stuff I don't know. You do whatever you
like, basically. You can also change the
properties that you see. You might want to hide
some to hide one, you can just click on it
and then hide it in view. Basically, you can set
that up however you like. If we go back to the hub, we've got that
there and we've got the link to go straight through. Another thing that you could
do is to add another button. To add a button, we
could just click this plus sign here, type in button. Then we want to click
on at page two. Then select Licenses. And then select
license template. Basically that is saying
create a new record or page in the licenses database and use the license template. Then we need one more step. Open page and then select Page, and then click on
New Page Added. So that basically says you've
created the page or record. And then where you want
to open it up so that you can enter in the
rest of the information. Click Done. We haven't
put a label on this. Let's go back in by
clicking on the Spanner, the Cog or whatever it is, and then type in new license. Then we could also add an icon. Click on the smiley face. I'm just going to pick a random. Icon. Let's pick an
apple. And then click. Done then to move this, because I want to put it
beside this one here. If you hover your mouse over the icon there that has
the six dots on it, you get the little hand just click on there and then drag. And then if I go all
the way to the side, you can see it gets
the line there to say it's going to
snap into the side bit. Then this is the difficult part. It can be a bit tricky. You can actually
grab these and move them around and then
smooth this one out. This is going to be
tricky one, there we go. Just to space them out. Space them out nicely. Let's just bring this
one in a little bit. Okay, let's just test this out. So click on New license, I'm just going to say license. And the category can be fabric, say client is client B, the currency is US dollar. I am getting $1,000 for it. The location is United
States as well. Then let's put in
the timeline of 1 November, first of November. And then we want to
click on End Date. And in here I'm going to go
to the end of November 2025. It's two years long. And let's do a reminder, the two weeks before as well. I'm going to leave that as is. Then if we go into our
licenses database, you should see that there. Another thing you might
want to do is add reference numbers
in my database. I have a reference number
that is actually the number that agency has so that I can quickly search for it in the database and see
if it's licensed already. But if you wanted to add
your own unique one, there's a couple of
ways you can do this. I'm just going into
the art database. And then let's open
up this test one here and then add property. You could simply just add a text box or a number box if you just
want a peer number, let's go text, just type an ID. That way you can then
type in the ID that's say your agent had and maybe it
was 123 or maybe it was. This is the format
my agent uses. You could have a
field like that. I'm not going to use that,
I'm going to delete that. If I click on the side here
and select Delete Property, that will go another way is
to automatically generate one notion has an
inbuilt ID number with each record
you can add that. Which is cool. If you
hit at a property, then ID, this one here, then you can actually
have a prefix. Maybe you want to
have art the number. It will just accumulate every time you
create a new record. Let's add that. You can see it's added
a unique ID there. You can't change it,
it's set in stone. But then if I created a, another one, it will
generate the next number. Let's just delete that. That's a really
nice way of keeping track of things as well. You could use that number to add to your file name
in your filing system. Wherever you keep your files, say in Dropbox or
on your computer. That just makes it
easier to find. You can just search
for that ID number. I find that quite handy to have. I'm just going to delete that. Another thing you could
do is grouping views or grouping the records in views so that you
can see them better. You can also add calculations
like say you wanted to know how many clients
you had that were fabric clients or maybe
stationary clients, whatever categories you have. So let's go into the
client's database. Let me just create a
couple of records here. Names one client 12, and let's give them three
different categories. Just so you can see, what you could do is go into, let's create another view. Actually click on the title here and then click Duplicate. Let's say by category. And then go down here to Group. And then click on Category. Then I also like to
hide empty groups. It'll just hide any that don't
have a category assigned. Then you've got each
in the category, and obviously you'd have
more clients in here. But say if I created
another one in here. The nice thing about this is it automates the category as well. So if I was to create
another one in here, automatically know that it's
going to be a pattern one, let's say this one's five. You can also then have
these calculations. You could just say count all basically it's
just going to tell you how many clients you have in that category notion goes
way, way further than this. If you want to do some
complex calculations, say if you're using it for
finance and stuff like that, it can do some
really cool things. But this, let's just
keep it really simple. Another thing you can do, say let's go into our, You wanted to create a template that every time
you create a new record, say you have
different processes. May start with a moodboard and then you do some sketching, or you want to collect
some resources you could create down
the bottom here, a few sections that you might want to populate
with information. If I go forward,
let's say heading to, let's say resources, then
let's do another one, heading to the Moodboard. Then what you could
do is every time you create a new art record in here, you could have each of these populate and then
they like little prompts to go and help you with the process of
creating that artwork. Everyone works differently. My pattern database, I have a heap of prompts
and different areas. Let's go into my pattern
one pattern collections. If I create a new pattern
collection, you can see here, it gives me all these
different areas of research that I do before I even start creating my
padding collection. To set that up, you would go, let's go back to that one over here on the
right where it says, at the moment there's
no templates. If I just create new template. Then down here,
say put a heading, say resources, then he moodboard and then
put whatever you like. Then when you go back
out back in here, and we didn't give that a
name, let's go back in. Let's give this a name called art template and
then go back out. Now if I click in here and
then set that as the default, we can do it for all views in the art database or just
on the illustrations view. I'm just going to
select all for this. Now when I create it, it will use that template
and populate those titles. I can now start my process of researching for
that art piece. I find that very useful, especially with my
pattern collections. I use it all the time to
create the story behind it, the colors, the movie board, all that kind of stuff. I highly recommend setting
that up to suit your business. Another thing you might want
to do on the Hub page is to add some other views that you want here for information
that you want to see. At a quick glance, when
you open up your Hub, if you've got your padding
collection database attached, you might want to
add another view of collections in progress. What I might do is
duplicate this title, Click on the six dots
and then duplicate, and let's say
Collins in progress. And then I'm just going
to click and drag it to the side of that one. It's going to
create two columns. And then we want to
move this art one up underneath the
Art in Progress, and that will snap
it into that column. Then over here in this column, if I do forward
and we want to do a linked view of a
database, basically, it's just going to
create another view, but it's going to
have all that data in there of your pattern
collection database. If I click on linked view
of database and then go to padding collections and
it's put the view in there. I can actually then filter
it. Click on Filter. I can click on the
Status and say, let's show me ones that I am planning and that
are in progress. Then we can also remove some of these columns that
we probably don't need, just click on the title
and then hide in View. Then I'm going to get rid of
some of these other ones. I really just want the title. Then I can click on
that filter just to hide those filters. And we can also remove this title by clicking on the three dots and
then hiding the title. Now I can see what I'm
doing at the moment. Collect, she put an S in
there for collections. My license is in my royalties. That's another way you can add a linked view to your page. I just like things on this
page that I need when I open it up in the morning
just to remind me what I am doing and
what I need to work on. That is pretty much, If
you do have any questions, do pop them in the discussions
area or do flick me an e mail because I do
not get the notifications when you put them in
the discussions area. At the moment for some reason they have a glitch
in the system, I would probably
e mail me if you can go to town with
it. Make it your own. Make it pretty, Yeah, enjoy.
6. Walkthrough: Okay, in this lesson,
I'm just going to walk you through quickly how you can create each of the elements in your art hub and have them
all linked up together. This is just a quick walk through to help you
get started with it. The first thing I want to do is maybe create a piece of art. I'm working on something. I'm just going to click
on New Art and I'm going to call this Lion greeting Card. I'm going to assign the
greeting card category. That's all I need to do for now. If I was doing a pattern, I might also add down here that it's a
hero or coordinate, or link it to a
pattern collection. But for this one, it's just
going to be a greeting card. If I click out of
there and say I've now finished my greeting card and someone wants to license it. First off, let's just go
back in here and click on the greeting card and
change the status to done. And then upload the image of
the greeting card in here. Okay, so that one is now, say I now have gotten a license, I'm going to go back
over to my art hub. Firstly, I need to make sure
I have the client in here. So I'm going to
click on to Client. Let's say, let's just call
this guy Greeting Card Client. This is the name
of the category. We could put some e mail and other type of
information in here, but we can leave
that for the moment. Then if I go back to my art tab, I'm going to create a license
for this greeting card. Then I'm going to click
on a new license. Let's just call this
greeting category is greeting the
piece of artwork. You can put artwork
in here if you've got pieces getting licensed
on the same contract. You can also put your actual
design here if you want. You don't have to because
you've already got it linked. But we'll put that one there. I'm going to put a
currency of US dollar. I'm going to say I'm getting 500 and it's going to be
a worldwide license. Let's say the timeline
starts today and runs four. We need an end date, two years. Let's add on two years. I'll leave that as is. And I'm going to put a red
date of scope to 2025, maybe a month before,
say around there. This one also gives
me royalties. I'm going to put 5% actually, I'm going to go back to
this remind and turn on the remind on that day. You can also put the
remind on the time line, but I actually prefer to have a set date
that I set myself, which is why I've got this.
But you don't need to. You could use just
the timeline date and then maybe set a reminder
for a week before. That's pretty much all I
need there for my license. I'm just going to
jump out of there because I am getting
royalties for it. I'm going to jump into the
royalties database and create new royalty record. Let's say line greeting card. Link it to the,
again, the client. Let's say it's due six
months from today, 123456. I'm going to say I
get it six monthly. We want to put six in the recur unit and months
in the recur unit, and then it automatically populates the date
there for you. That is all we need to do there. Now we have the piece of artwork that is in my
greeting cards folio here. It is linked to a license here, and it's also linked
to the royalties here. So I can be reminded
of when it's due. Basically, that's how it all
works and hangs together. I hope that helps. And have fun creating
your art hub.
7. Conclusion: Congratulations, you have
successfully crafted your personalized art
management system in Notion and
completed this class. Kudos to you. Throughout
our time together, you have gained the skills to import and set up
a notion template, tailor it to suit your
artistic journey, And create a dynamic
workspace to efficiently handle
your art licenses, royalties, and
client interactions. Now with a streamlined
system in place, you can invest more
of your time in the pure joy of creating art. I'm eagerly anticipating seeing how you've uniquely
shaped your art. So be sure to share
your project in the project section
here on skill share. For more insightful tutorials, check out my Youtube
channel at Mel Armstrong. And if you want to
stay in the loop with my artistic endeavors, follow me on Instagram
at Mel Armstrong Design. Stay inspired, stay creative, and until our creative
pass. Cross again. See you later.
 Mel Armstrong, Illustrator, Pattern Addict & Teacher