Transcripts
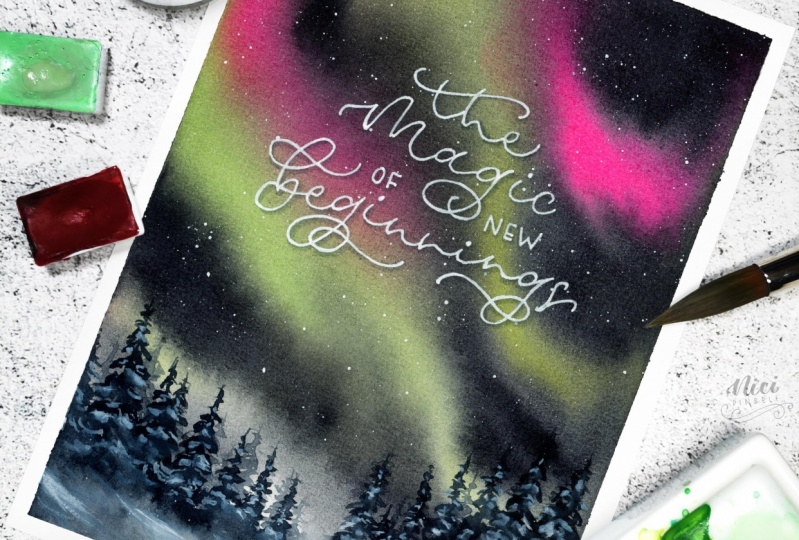
1. What is this class about?: [MUSIC] Hi, everyone. I'm [inaudible] a watercolor
artist and tutor. In my personal creations, I prefer to control watercolors
as much as possible. In my other videos
on this platform, I show different
techniques for that. Although I also think that for better understanding
of the medium, we sometimes need to let it flow and create pictures
almost on its own. In this class, is about it. In this video tutorial, I propose you and trust the most complicated parts
to watercolors streams. We will let it run,
spread and drip. Making this way the softest color transitions
of northern lights. I'll show you how to prepare
the palettes for this scene. Will explain how
paint capacity can help to create different
lights effects. I would recommend
the composition to choose for your first tries, and also we'll give several simple schemes
for painting for trees. Of course, you will discover a step-by-step demonstration of the picture creation process. This time, I will paint with
your three different plots. We will create winter
nozzle landscapes from simple to complex, from A_1 colors easy
to decomposition to two colors auroras and
mix media, winter forest. In the end, you will be able to combine abstract backgrounds with precise landscapes in your own northern
lights paintings. Let's have some fun. Join the class and
enjoy watercolors.
2. Supplies: All right, let's see what materials we
need for this class. First of all, of
course we need paper. I recommend you to
take several piece of paper to different tries, but I at the moment have only
one for the demonstration. It's arches a 300 grams
per square meter density. It's cold pressed and I taped it to my board with masking tape. Here I have my plastic
board, and in fact, you don't really need to
have exactly the same. It can be wooden board
or carton board as well. I also prepared some craft
paper for my desk protection. Of course, you can take
something else, instead of it, you can take plastic film or a newspaper or any other
paper that you have. Also, we will need some
draft paper for color tests, paper towel or a
piece of tissue. As for brush, we will need
one for moistening the paper. I also have one for
painting itself, it's round squirrel mixed brush, so it's squirrel
and synthetic hair, and small synthetic round
brush for painting details. You can add other
brush if you want, but for me, I guess this
set will be enough. These are colors that
I'm going to use here. Next, we will need a white
gouache or it also can be acrylics or even watercolor
white in the tube. You may take other
vibrant colors that you prefer for
painting lights. Of course, we also will need
plastic or ceramic palette. I'm going to use this very
simple one this time, and of course, water that
always stays behind the scene. This is our set of materials.
3. Color choice: Before we get started, let's see what colors might work for us with the
Northern lights. I plan to use May green. I'll show you that color. It's very bright, very intense. It's really good for bright subjects like
the Northern lights. When it's thick,
it's very green. When we blur it out, it looks like this
yellowish hue, but it's very specific
and not everyone has it. Now, I will tell you how you can get the same color but
using other paints. For that, what can I do? I can look at the tubes. Here, I always can
find information about the pigments that's paints
are made from right here. In this case, it's PY3 and PG36, which means yellow and green. I can assume that if I take two such colors or similar
colors and mix them together, I can get a similar shade. I have the PY3 yellow
shade that I want. It's a lemon yellow, and in this case, I have by White Nights, but I didn't have any green, which will have the
same pigment 36. I don't have much greens in general but I have this
phthalo green, which is PG7. Now I'm going to try to mix
it up and see what happens. I take lemon yellow and
emerald green, PG7. Now I'm going to mix them. Always, when you mix
something with yellow, take yellow as a base and add
the shade you want into it. Let's take more pigment, see what color we get. Almost similar. You can change the
color from more yellow to more emerald. With two colors, you can even derive the spectrum
of Northern lights. Let's also see what other colors can be used for the
Northern lights. I think this emerald green and even the lemon
yellow itself might, well, try to be Northern lights. But I prefer colder colors. I also want to show you
one of the colors that I'm going to use in our third work, It's neon pink by White Nights. The only thing to
keep in mind is that such paints
fade quickly so you have to scan your works or not to hang them in
direct sun afterwards. A stunning pink color that will look great
in Northern lights. In addition, it mixes
well with green and does not give
any ugly shades. But if you don't have neon pink, you can get my favorite pink. For example, this one
with PV19 pigment inside, a single pigment paint. This color is also quite bright and a little warmer,
and of course, not as neon pink, but more light fast. You can also use some turquoise, for example, and this one
is turquoise by Sennelier. It's very brighter on its own, but also this color
is very opaque. On our tubes, we normally have
these icons that indicate the opacity
of the paint, and if this pink
paint is transparent, but this one is opaque. All the colors that I normally use for Northern
lights, they are transparent. Like that they allow us to paint the light much brighter and, well, more transparent. Now, let's take a look at
the difference between transparent paints
and opaque paints and how we will use
it in our work.
4. Opaque colors: In order to demonstrate the covering properties
of the paints, I've prepared paper
for a mixed media. I'll take lemon
yellow, Naples yellow, which is initially opaque, and I'll take white gouache. Gouache itself is
very opaque paint. It's not watercolor, It's not
designed to be transparent. Let's paint first
with lemon yellow and I will even take
it very thickly. While it's wet, it
looks so bright yellow, but let it dry for a while. Next, I take Naples yellow. It contains three pigments, one yellow and two whites. I take a little water
and a lot of pigment. This paint looks even more intense compared
to the drying yellow. Now I take the gouache, squeeze it out of the tube, and wash it with a little water to about
the same creamy states. It looks bright and I'm going to dry it
off with a hairdryer. This is what it looks like. Let's take a closer look from different angles,
so you can see. Overall, the gouache
layer looks more evenly white compared to
our watercolor paints, even though this one also
contains white pigments. What are we going
to do with gouache? We're going to paint trees and snow on them and also stars. But it's important to understand
that the amount of water in the glass determines
what it can be. It may seem very light to
ask, for example here, but if we let it dry out, this is what we will have. Eventually, it will
become very transparent. We will use gouache for
different purposes. First, when it's liquid and
a little bit more opaque, we will use it to paint
trees and snow on them. Here is this fixed
state from the tube, which gives us the most white, the most opaque color. We will use it to paint stars. You see, where the paint
was as dance as possible, it's as white as possible. Hopefully, you can see the difference
between what we have here and when we
took more water. In such night landscapes, I always draw stars. They should be as wide
as possible, of course, and that snow on the trees, it will be almost transparent. With this state of paint,
with a lot of water. Let's take a closer
look at the stars now. I'll like to do them
with a small brush. We need to get the paint
on so that it's platters. Now I'll get a thicker paint. The main thing is to have paint here at the base of the
brush and not water. You will get smaller stars
if you take thicker paint. If needed, you can just
draw them by hand. Next, let's try it all out. We can get larger stars and smaller stars. If you notice that you get this transparency effect
instead of stars, it means that you
took too much water. Practice it on a
separate sheet of paper. Practice, sprinkle,
and decide what the gouache should look like for painting beautiful stars. If you can't do it at all, well, you can actually manually put all those stars
with the brush.
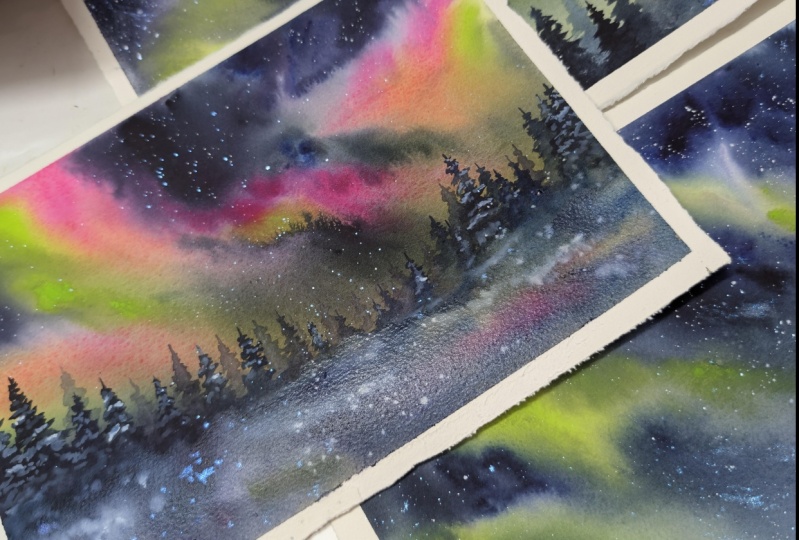
5. Picture 1: Background: I covered the table with protective paper and I
hope you did the same. I begin my work by
moistening the paper because all the transitions
we have are smooth. So we will definitely
need to wet the paper with water very well. That is, it must be really wet. Now using a brush
to put clean water, you can see how wet it is. But I try not to make
big puddles never the less I put enough water
and let it soak for awhile. In the meantime, I'll prepare the paint for both
parts at once. I'm going to take some green. This will be my green for
the glow part and I'll take gray with the same brush
I'm going to paint with. Take a drop of purple and more gray and really
a lot of pigment. See how thick the paint is, very slow flowing and you need
it to be even more thick. The purple I have is
a very good pigment. It's very dark times
gray and industry blue, I remind you, these are colors that I will
use for my dark part. You see what here they give. It's not straight black, but it has some purple
blue undertone, which is exactly what
I was looking for. I'm going to move the
palette a little bit because I need to have
more space here now. I'll take a little
more water here. I'll probably take a
diagonal direction of my Northern lights like this, which would be the easiest thing so that you can do for
the most basic level. Just lots and lots of
water is needed here, and I immediately begin
to put on the color. But if you added directly
from the tuber pan, don't forget to spread to
make your color well shaded. What do I do next? I take my dark color
and put the paint on. It should be enough
of a color here so that it can all spread out. You'll soon see how it goes. Overall, it really looks good, but it's like there's
somethings missing. There's obviously not
enough movement here. So I take a clipboard
now and start letting the paint flow properly
in different directions. You see the paint starts
to drip that's normal and that's why we just
protected our desktop from. Now, I can refine some
of the dark places a little bit more to make
them a little darker. Then let them flow again. About the color light, you probably wondering if we can add a little green
again, for example. Well, try it see what
you get, how it flows. The most important thing is that you have enough of liquids, enough water in the paint. Don't hesitate to
play with colors. You see even add a
little bit of light, almost white also possible. I let the paint flow. A lot of fluid is
dripping, it's okay. At some point, you'll
realize the work is done. Look at the effects, it's good. Then you just can
collect the excess, so water from the paper. Here, watch what I do. I end up with this extra
drop of paint in one place, so I carefully pick
it up with a napkin. What I still want to do at
this point is to darken the sky a little bit
more here and there. I mean, I've added
even darker paint. Why I'm doing it, because
I know for a fact that this one will fade as
soon as we dry it. So now I'm still collecting excess water around
the edge so it doesn't flow back
into the paper. I'll leave it to dry or of course I can dry
it with a hairdryer. You see the work itself
happens very quickly. So we have such an
abstract piece in the end. Now I'm going to take my hairdryer and
finally dry my work. You see how pale the work
already turns out in the end. I intentionally left some
of this space free and semitransparent in order to draw some landscape
in this place.
6. Picture 2: Landscape: [MUSIC] Here I already have some almost horizontal
direction of these lights. I propose you to make
some landscape here, maybe with the house
and a small field. [MUSIC] Let's begin. This time, I'll probably take
a big brush at once and let's figure out something interesting now as a background, as a landscape. I'll take a little bit of green, which I used for the sky, which actually makes
sense because it's the light that illuminates
everything that we see here. [MUSIC] Now, I take a little blue, draw some backgrounds in
the distance as if it were some mountains or something like a northern
landscape like that, and why not, you can even
try a little darker here. [MUSIC] I will always imagine it as if it were some northern scenery and maybe even snow-covered. Why not? Here in the foreground you can
make it a little darker. [MUSIC] I have to
decide what to do here, I suggest making a little
house like this one. I'll take a Payne's
gray for that. [MUSIC] Here will be the
luminous windows, I left them unpainted to make it easier to add lights
there if necessary. [MUSIC] I'll probably do
some more tree here, I'll take some very
thick paint, very dry. [MUSIC] Now we can take a
drop of Naples yellow and I take it very
thick yellow paint. But in fact, you can mix it a little bit with
white if you want, but I'll take pure
yellow for now. Now we make this
light and once again. You see, I put the paint very thickly with almost dry brush. I'm washing the brush for sure. Now I'll add another
gram of white here, just like a lamp,
like a highlight. You could try
giving a little bit of green here, for example, like we have a little bit of our northern lights give off. [MUSIC] It looks like a Halloween
theme that we have here. Don't you think so? [MUSIC] Now, all we have to do is the stars, but before I do that, maybe I'll make it darker here to balance it
out a little bit. [MUSIC] We return to the stars. Now I take the white and cover the space I don't want to be affected
and I spray on it. [MUSIC] Why I'm covering? Because if I spray
everywhere now like this, even on the ground, there will be a snow effect. But the thing is,
you can hardly see the northern lights anywhere in a snowfall because the
sky should be clear. I try not to do the
snow effect because that's a different story. I make some bigger
stars to go with it. [MUSIC] I think it looks not bad, maybe just a couple
of more lights or something like this on the background. [MUSIC] Well, that's it. Dry and remove the tape. [MUSIC] Here what we have for this try. Let's go to the next one.
7. Fir trees. Exercises: [MUSIC] Before we start drawing
the plot with the trees, I want to show you how
I usually draw them. I'm going to take
a piece of paper, the same kind I
usually paint on, and now I'm going to show you some principles about
how this can be done. We only need the tops
of the fir trees here, but nevertheless, I will show you all the schemes
as I usually do. The simplest thing
we can have is when we see trees very far away, we can just touch the
paper with our brush and it will give us a
sense of the forest. I think you'll
agree with me that when we paint some
heels in the distance, this may be enough to give
an impression of a forest. Naturally, it may vary a
little in color, in tone, but the fact is that it may
look like a forest like that. Further on, if we get closer, we get this zoom and then we can see the top of
the trees more clearly. For me to draw a fir tree is to draw a stick
and cross it out. Of course, you will
tell me what kind of pictures is this. Actually, it's just a scheme
and from this scheme, we go to painting. But in fact, the
secret is that I will cross without taking the
brush of the paper next. You can see that I
already have a tree. Next, we can move on to a group of fir
trees, for example, there may be more than one, but each time it's
important that the brush is fairly well loaded with water. You see, I have quite a lot
of liquids on the palettes. I try to do this so that all my little trees are united into common picture
of the forest. Next, I draw another
neighboring tree at different length,
for example, and because I have
everything wet here, they are all merged into
one common fir tree mass. But the principle
stays the same. I still draw a stick
and I cross it out. Note of course, that it's as if you're
forming a triangle, and it's very important to pay attention to how thin it is. If it's like this, then you will have a tall tree, or it can be wider, then you're likely to have a small tree or not
a very pretty tree. Here actually we can just
paint over the rest of it, blur it into our landscape. Of course, while it's
getting wet here, we can add some extra
shadows and so on. Just a stick crossed out gives us an impression
of the forest. That was our number 1. This is our number 2. Now, you and I are going to see what number 3 is.
Let's take a look. Now, we're going to have
a different kind of tree. Let me show you
again the scheme. We will also have a stick and its upper branch
will stick up at first, and then it will get
flatter and flatter. The lower we go, the heavier the
branches will become, and the more they will be
pressed by their weights, and they will become tilted. You see the inclination
is changing. If here they were
facing upwards, here they were facing sideways, and here they're already
sloping downwards. It's also important to note that if we look
at the fir tree from above, what we see. We will not see
situation like this, but we will see a
situation like that. It's important to understand
that this is what makes the difference between a fir tree and a palm branch. It will be palm tree
if we add this option, we'll have it like this. Finally, let's move on
to drawing the tree. As a result, we have
this kind of a level up. We're mostly like the going
to paint this second part. But if you want to
paint larger trees, then this option might come
in very handy for you. I draw a stick and start
drawing my branches. First, they look up, and then they start
looking down. You see the middle is full
and there's no empty space. You can add some shadows or
something else for example. We need to understand that
we have this part filled in so it doesn't feel like we're drawing a fish skeleton
or a palm branch. We will draw our big tree. It can be more fluffy, it can be less fluffy, then you can, for example, somewhere takeoff
extra tone and make it more 3D or draw the snow. It's only for your experiments. But you and I will probably
be working in this part here. I think that all three of
these schemes may come in handy in the future in
one way or another. So let's get to work.
8. Picture 2: Background: [MUSIC] I highly recommend
giving in the few tries, and I will do the same. Now I'm wetting the
paper and trying again. If you think that I always get it right from the first try, that's absolutely not the case. It's possible you will get some three or four not
very successful attempts, and then the fifth one
will come out fine. Either way, make a few of these attempts and
that's for sure, you will have one of
them turn out well. We can think of some more complicated
form to try this time. You can do it all
with a bigger brush, but I use this one. Make sure you have enough water in this green space right here. Sometimes, if you add
too much pigment, the paint would break
up the water in that area and leave you
very dry in that spot. Next, I'll take our
favorite dark colors and do something interesting. I'll
take more blue. I remind you that this dark, one must also be quite liquid, otherwise we won't get
what we have in mind. We take a lot of pigment
and accordingly, a lot of water too. Now, what I did, I drew on the bottom
edge of our lights, and let it all
drain out properly. This is my favorite
part, so playful. There is a little too much
green here for my taste, so let's break it up a little
with the darker color. We can clean up a bit here too. I'll add some greens and
let it run off, of course. I'll pick up extra
drops with a napkin. Try not to interfere
too much with the brush because traces of the brush
will be visible and here, we need exactly soft
and natural shapes. What I'm going to do is, I'll add a little bit of the
bottom edge to my lights. Now I have the top soft and I'll add some shape
to the bottom. There are times when they are a little bit more like
shaped from below. A little bit of that dark corner here so I
definitely have a contrast. Don't forget to always clean up any excess drops with a napkin. That's the kind of very
abstract thing we have. A very good exercise in letting the watercolor flow in
its own guided float. That's it. Now I can see that
it's starting to dry out. I'm removing the extra
drips from the edge, getting a hairdryer, and going to dry it off. [MUSIC] That's the background we got.
9. Picture 2: Foreground: [BACKGROUND] [MUSIC] Now you and I will finally
make this picture. I want to make a row
of trees like this, semi-transparent and
darker in the foreground, it's a simple version of that. I remember about
the pattern I had, and now I'm going to try to put all these
things together, so here we go. I'll probably try a small
brush to start with. If it's not enough, then I'll switch
to a larger brush. [MUSIC] It's always a good idea to have a piece of paper you
can use to test the color. [MUSIC] Shall we go? I started from the
middle for some reason, I don't even know why, you can start at the edge
and work your way up. Now, I took a lot of
water on the brush. Eventually, when this dries, it will be translucent and it
will give a nice 3D effect. [MUSIC] Now I'm doing what
will be in the background. [MUSIC] Here you see that it
got very transparent, which is exactly what I wanted, although it seems
very dark at first, in the end look. [MUSIC] I drew a line and crossed it out. [MUSIC] Continuing on, now maybe I'll start to add in a little bit more
darkness somewhere. [MUSIC] I took thicker paint, and now I'm adding darker trees. [MUSIC] Here's important that the top's don't overlap. Here they do a little bit, if it runs inside and
it's not a big deal. But if you want the tops
to be still more drawn, make sure that you
don't have it too wet. If you want to paint over, for example, a
smaller tree in size, then you need to
wait until you have a background to dry or dry it
with a hairdryer of course. [MUSIC] You can move right here from
left to right if you like. It's up to you to decide
how you like it better. I have some trees
that are so much more gloomy looking down. [MUSIC] I didn't draw anything in advance for myself, I just decide as I go along where and what I'm
going to paint. [MUSIC] Somewhere you can make
it a little longer, not so much the same. [MUSIC] I draw here and there, so that some places
have time to dry. Well, I think it's
coming out pretty good. [BACKGROUND] Overall, I like it already. Now I'm going to dry
this whole thing out. I'm going to get a
hairdryer and dry it. When everything is dry here, all we have to do
is add the stars. For that, I already
told you that I'm going to use white guash. I'm going to squeeze a
little bit right here separately I never
squeeze it out too much. I always like it to be
solved from the tube. Then I take a brush, it shouldn't be too wet, but it should have
some water in it. Because if you have
too much watery guash, then it will be too translucent. If it's too thick, then you can sprinkle with it, which I like to do of course, so it's quite thick.
Take a look at it. [MUSIC] Now I'm going to cover the places that I don't
want to get affected, and I start with
the dark places. [MUSIC] If you can't do it that way, you can tap on your finger or another brush or with
another brush on your brush. After all, it takes
a splatter too, I usually don't splatter on
the places that are light, and you can put some stars in by hand to make them
a little bit bigger. [MUSIC] Let's see what we got. We don't need too much, but we don't need less either. I think it came out well, so now we can
basically wait until we have everything dry
and remove the tape. [MUSIC] The paper is dry, be sure to warm the tape with a hair dryer
if you're worried that you might have tape sticking to the
paper too strongly, and we have this ready. You see, even though
the picture of this [inaudible] itself is
a little bit strange, a little bit hazy. In the end, when we
added the background, added the landscape
and added the stars, we got picture that makes it generally clear what's going on, and I think it came
out quite naturally. Let's get to the next one. [MUSIC]
10. Picture 3: Background : Now that we've tried a few different options
with just green, let's make it a little
bit more difficult for ourselves and make
it a level up again. I took a slightly different
format in the first place. Everything will be the same. I first wet the
paper good enough. I leave it to soak up for a
little while and now I'm going to use not just one
color, but two. I took a neon pink and I will use it to add two colors
to our northern lights. I make a dark mix at once
just like we did before. The paint on the palette
is a little dry so I use the spray like
this to wet it up. I remind you that the paint
must be very dark and thick. For these, I mix three colors, blue, purple, and Payne's gray. I like the color
and I will keep it. Again, a little wetting of
the paper before I start. Let's get started. I begin the same way as
before with the green. Let's think about how we're
going to make a direction maybe make greens and
have pink next to it, let's have something like this. Eventually, the green should be wet enough when we
put it in here. Really a lot of water. Somewhere more transparent,
somewhere darker. There really is water here. Now I'll take the pink in there. It's really such a neon,
very bright color. I think it should work well
for the northern lights. You can replace it with
some pink quinacridone, for example, quite well. Now we'll see how it goes, and now let's put our blue in. Shall we try to let them flow? There's a lot of
water in some places, so I don't know
what to expect yet. How's the effect coming out? In my opinion, pretty good right now. I want to keep almost
everything as it is just add a little bit of
darkness here and there. I really like the way
this top part turns out. Trying not to lose it, I'll just add a little
more darkness in places. What I'm doing this for is to have a contrast to my light. You remember that
everything will dry out and be very pale. Where I can to add
contrast, to add shadows. This I will leave so light. Here then we will have
a landscape to paint. I think it turned
out really great. Now I'm going to
leave it like this. As usual, I'll dry the work. You can also try a few times adding different
colors like this, but I don't think
there's any point in adding more than two because
it gets too complicated. There's a hair from the brush, I want to remove it right away. It might be good idea to
add a little green here. It's like I'm washing
away a little of the dark pigments and
adding green in its place. I might do the same here, not spraying paint,
no spraying water. Really, we have to make
everything flow here. Then it will look good. Of course, we gather
the excess here around the edges so that there
is no dark stripe left, and we carefully place a
napkin to the very edge. Now look, the dark stuff is corrected and I'm picking it up from here. Well, it's always a big risk try to add something
at the very end, but I took a risk and
I didn't regret it. I will leave it like this. This work, I think it
will be very good. Here next, we'll add a
beautiful winter forest. Well, I've dried the work and now let's go to the foreground.
11. Picture 3: Forest. Part 1: For this last piece, I want to do something complex. It reminded me of this
work I did a while back. I want to do the same kind of forest with a little
snow in the same part. I think it's just
perfect for our season. I'm going to procrastinate
and start drawing the trees that I have in
the background right away. I mix Payne's gray, blue, and purple to get some quite transparent
colors like this. Slowly I will begin as we
did in our previous work. Here I will have snow. I'm not sure how
light it will be yet, maybe a little green, maybe even a drop of pink. I will add clear water between the snow
and the trees so that it kind of go into
each other smoothly. Wash it out here so that
I have a smooth border. I leave a little
transparency here for now. I like the way the
light comes in here and the fact that you can see
in between the trees. And now here, in winter the branch
are all under the snow and they are
looking down now. The shape of my trees
changes a little, they are all become more round. Now I'm also crossing
out for trees, except I'm doing it in
a more circular motion. We get such a
semi-transparent forest. I let a little more water and you can darken
the foreground the bit to make it feel like there's snow and there
is a foreground. We'll adjust it later. Now, I'm going to let it dry for a while and do the next layer.
12. Picture 3: Forest. Part 2: Well, now I'll continue here. I'll take more thick paints, this time darker and continue
doing what I've been doing. This time I'm trying
a little harder to make the trees different
from each other. I'm still blind the
edge a little bit. Notice that I'm not taking it
and brushing it like that, but I'm just using the
edge of the brush. Notice that these trees
that are closer to me, they are taller and bigger. Accordingly, I have taller trees in
the foreground here too. Why am I doing this? So that I can have the
effect of perspective. There are heavy big
branches on the trees and still blurring
because I still want it to be all in the snow. Here I do the same thing as I have done in previous works. From time to time I get up and look at it from a distance, how it all looks.
13. Picture 3: Snow and Stars: I think you realize
that's not all. What I'm going to do
now is to add snow. I'll take a little
gouache, translucent, and I mix it with gray and
maybe even a drop of green. I'm going to start
painting snow somewhere. That is, I will have a
color like this which then will naturally
become more transparent. It seems wide and clear now, but then of course, drawing it will darken, and I'll add more
white on top of it. We can wait until our
little trees have dried up. Be sure to leave
a little shadow, that is I draw on
top of the branch. It all seems light now, but it will darken later, so I'm still going to reinforce that effect later by
adding some more white.
14. Picture 3: Details : We got it all dried
up a little bit, and now we can add
more white just in some places where we
have it highlighted. [MUSIC] You can add it a
little greenish. [MUSIC] Don't repeat it, don't stroke what was there, but I just add a little
more light on top. I'll try to lighten
these things up, the beads maybe here. [MUSIC] It all seems bright now but it won't end up being
so bright, so white. [MUSIC] I wash it out a bit. [MUSIC] Here we have snow, it's a little bit shiny. While it's drying here I'll
do the highlights at the top. [MUSIC] Well, I have white dried up, so I add a fresh
one from the tube. I'll cover what I don't
want to be damaged. [MUSIC] It's very beautiful,
in my opinion. [MUSIC] I'll make
some nice stars. [MUSIC] In a couple of places where
it was already light, you can make it as light as
possible and just pure white. [MUSIC] I'll help a little and
pick some up with a napkin so it's not so white
on the back parts. [MUSIC] Well, I think it turned
out pretty good. [MUSIC] That's how we got
this third plot. It came out really nice. Now I'll dry it out and then I can peel off the masking tape. [MUSIC]
15. Conclusion: [MUSIC] That's it, I hope you liked
the class and it was informative and
useful for you. I hope you learned some new
things about watercolors and the ways you can paint
northern lights as well. What I could recommend you
for your personal practice is to try painting this
background several times. Like this, you will have a pool of different
backgrounds to choose. You can pick up one and paint your favorite landscape
over it or of course, you can use your fails to practice fortress or
landscapes on them. It's always better than just
to try it on scrap paper. Of course, like this you
will be more confident in your new next tries. I wish you a very good luck
in your personal practice. Don't hesitate to share
your paintings with me. I'd be happy to
see your results. Have a great time
enjoying watercolor. I wish you very good luck. See you next time. Bye-bye.
 Maria Smirnova, Watercolor artist and author