Transcripts
1. Introduction: [MUSIC] Using natural dyes is such a beautiful and sustainable way to add vibrant color to fabric. It's also a rewarding way to interact with nature no matter what the season. Flowers and leaves, roots, bark, and even an insect create colors that are just as vivid and lasting as many commercial dyes. They foster a connection to nature that I know I'm craving these days more than ever. Hi there, I'm Casey. I am a textile artist and I exclusively use natural dyes
in the work that I do. My studio is on our farm in the forest just outside of Portland, Oregon. I specialize in botanical printing
using a lot of the leaves that are right outside my door here in the forest. With these botanical printings and other naturally dyed fibers, I create beautiful wearables, home goods, and also accessories. Living in the forest
is the perfect place for me because I can gather
many natural items to use for dye. I also have the space
to grow some of my own dye plans. I love cultivating beautiful flowers
that create color on fabric and I also grow
a large amount of Japanese indigo. I am lucky to live in the forest with a lot of things
that are accessible to me but no matter where you're watching this from
or whatever season it happens to be, I will share numerous natural dyes sources from things you probably have in your kitchen
to plants that are common in backyards and neighborhood walks, as well as some for purchasing online. I will teach you to prepare your fabric so that the colors
will last through wearing and washing and I'll walk you through several simple but effective ways to create complex color and pattern
on your fabric. If you are new to natural dyes, this is a great place to start
and you are practically guaranteed to come out with a beautiful scarf. If you have some natural dye experience, I think you also will benefit from this class
by maybe learning a new technique
or a new dye plant or a different way of using something than you are familiar with. I look forward to creating beautiful color with you and I can't wait to see you in class.
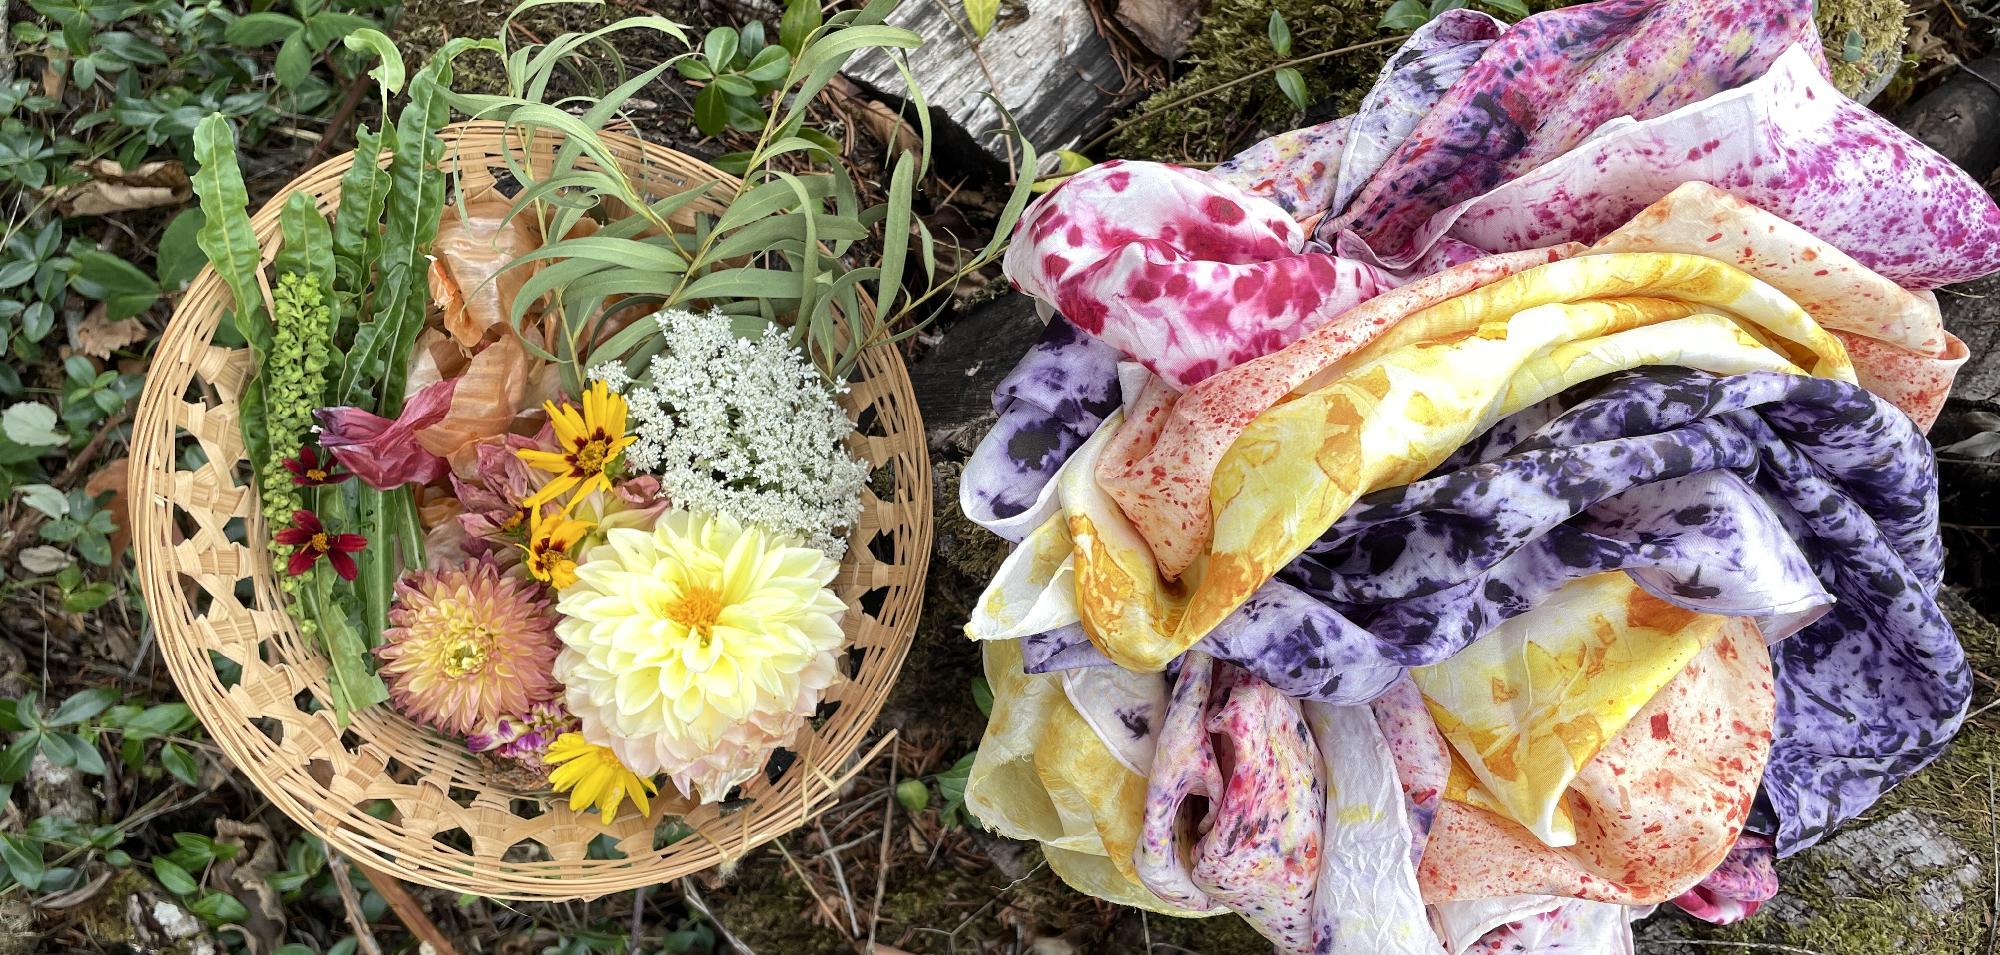
2. Class Project: [MUSIC] The project for this course is to dye a silk scarf
using a variety of natural dyes. This is a great project, especially if you're new to natural dyes. Because the pigments
from flowers and leaves and other natural items
bind beautifully with silk fabric. The method of creating this project, bundling dye matter and fabric together, leads to gorgeous results every time. If you're a beginner, this is a great way to get started and to learn about a variety of natural dyes
and the colors that they make. If you have some experience using natural materials as dye, then you will learn a new technique or a new dye material way of using it. This dye project uses simple tools and equipment
and you can make this on your dining room table
in the afternoon and easily have everything finished up and put away in time for dinner. The colors you use in your scarf
will vary according to which dye plants you have available to you
or choose to purchase. But I've intentionally included
some that you may already have in your home or can easily find in any season. This variability in dye sources
according to season or location is part of what makes using natural dyes so special. You can choose among a few ways to manipulate the pattern the dyes create, so that your scarf
will be uniquely yours. Finally, I'll give you tips
to care for your naturally dyed silk so that your scarf will be beautiful
for years to come. You can, of course, wear your naturally dyed fabric
as a scarf. But if that's not your style, there are many things you can do with the beautiful fabric that you make. You could display it in your home, use it as gorgeous fabric gift wrap, or even as children's play silks, which are a wonderfully creative,
open-ended toy. I can't wait to see what colors you create right from nature. Join me in the next class
where I will share what fabrics work best for this project
so that you can get started.
3. Selecting Fabric: In this lesson, I'll be sharing the types of fabric that work well for this natural dye project. I'm going to be using silk
and making a beautiful scarf. But all of the techniques that I describe work equally well with wool. So if you happen to have
a piece of light-weight wool, feel free to substitute that. Both silk and wool are protein fibers, which means that they come from an animal, and natural dyes
attach very easily to protein fibers, so I recommend using that for this project. Cotton requires
a slightly more complicated preparation for the natural dyes
to be vibrant and permanent, and I do not cover that in this class. But if you're interested
in learning about how to prepare cotton to use these techniques, I have included some information
in the resources tab. For this project, you will need a piece of silk or light-weight wool fabric. Here, I have silk scarves. They come in a variety of sizes. I like these 30 or 35 inch
square scarves to wear. This one is about 20 inches, and I'll be using this size
in my demonstrations today. They can be purchased online. Silk is really not as expensive
as you might think; each of these can easily be found for under $10, making it a really nice first project. You can also use
these same techniques on silk clothing. You might be able to find some at secondhand stores
or upcycle something you already have. The irregular shape of a garment might make it a little trickier
as a first project, but it's definitely doable. Now that you hopefully have some fabric in mind
to use for this project, let's head to the next lesson where I will share the tools
and equipment that you will need.
4. Choosing Dye Plants: [MUSIC] In this lesson, I will be sharing with you my favorite part of this process which is selecting natural materials that will make beautiful, lasting color on your fabric. No matter what season you're watching this course. If it's summer and there's an abundance of flowers and leaves on the trees, you will have probably an easy time finding some of these supplies. If it's winter and you don't see much when you look out the window, don't worry because I will also be sharing with you
some common household items, things that you might have in your refrigerator
or that you can find in the grocery store, as well as some unspecialized natural dyes that you can purchase online. Whenever you're watching this, you will be sure to find something that will make
some beautiful color. When you think about flowers, I'm sure a whole rainbow of colors comes to mind
but the interesting thing about natural dyes is that yellow pigments
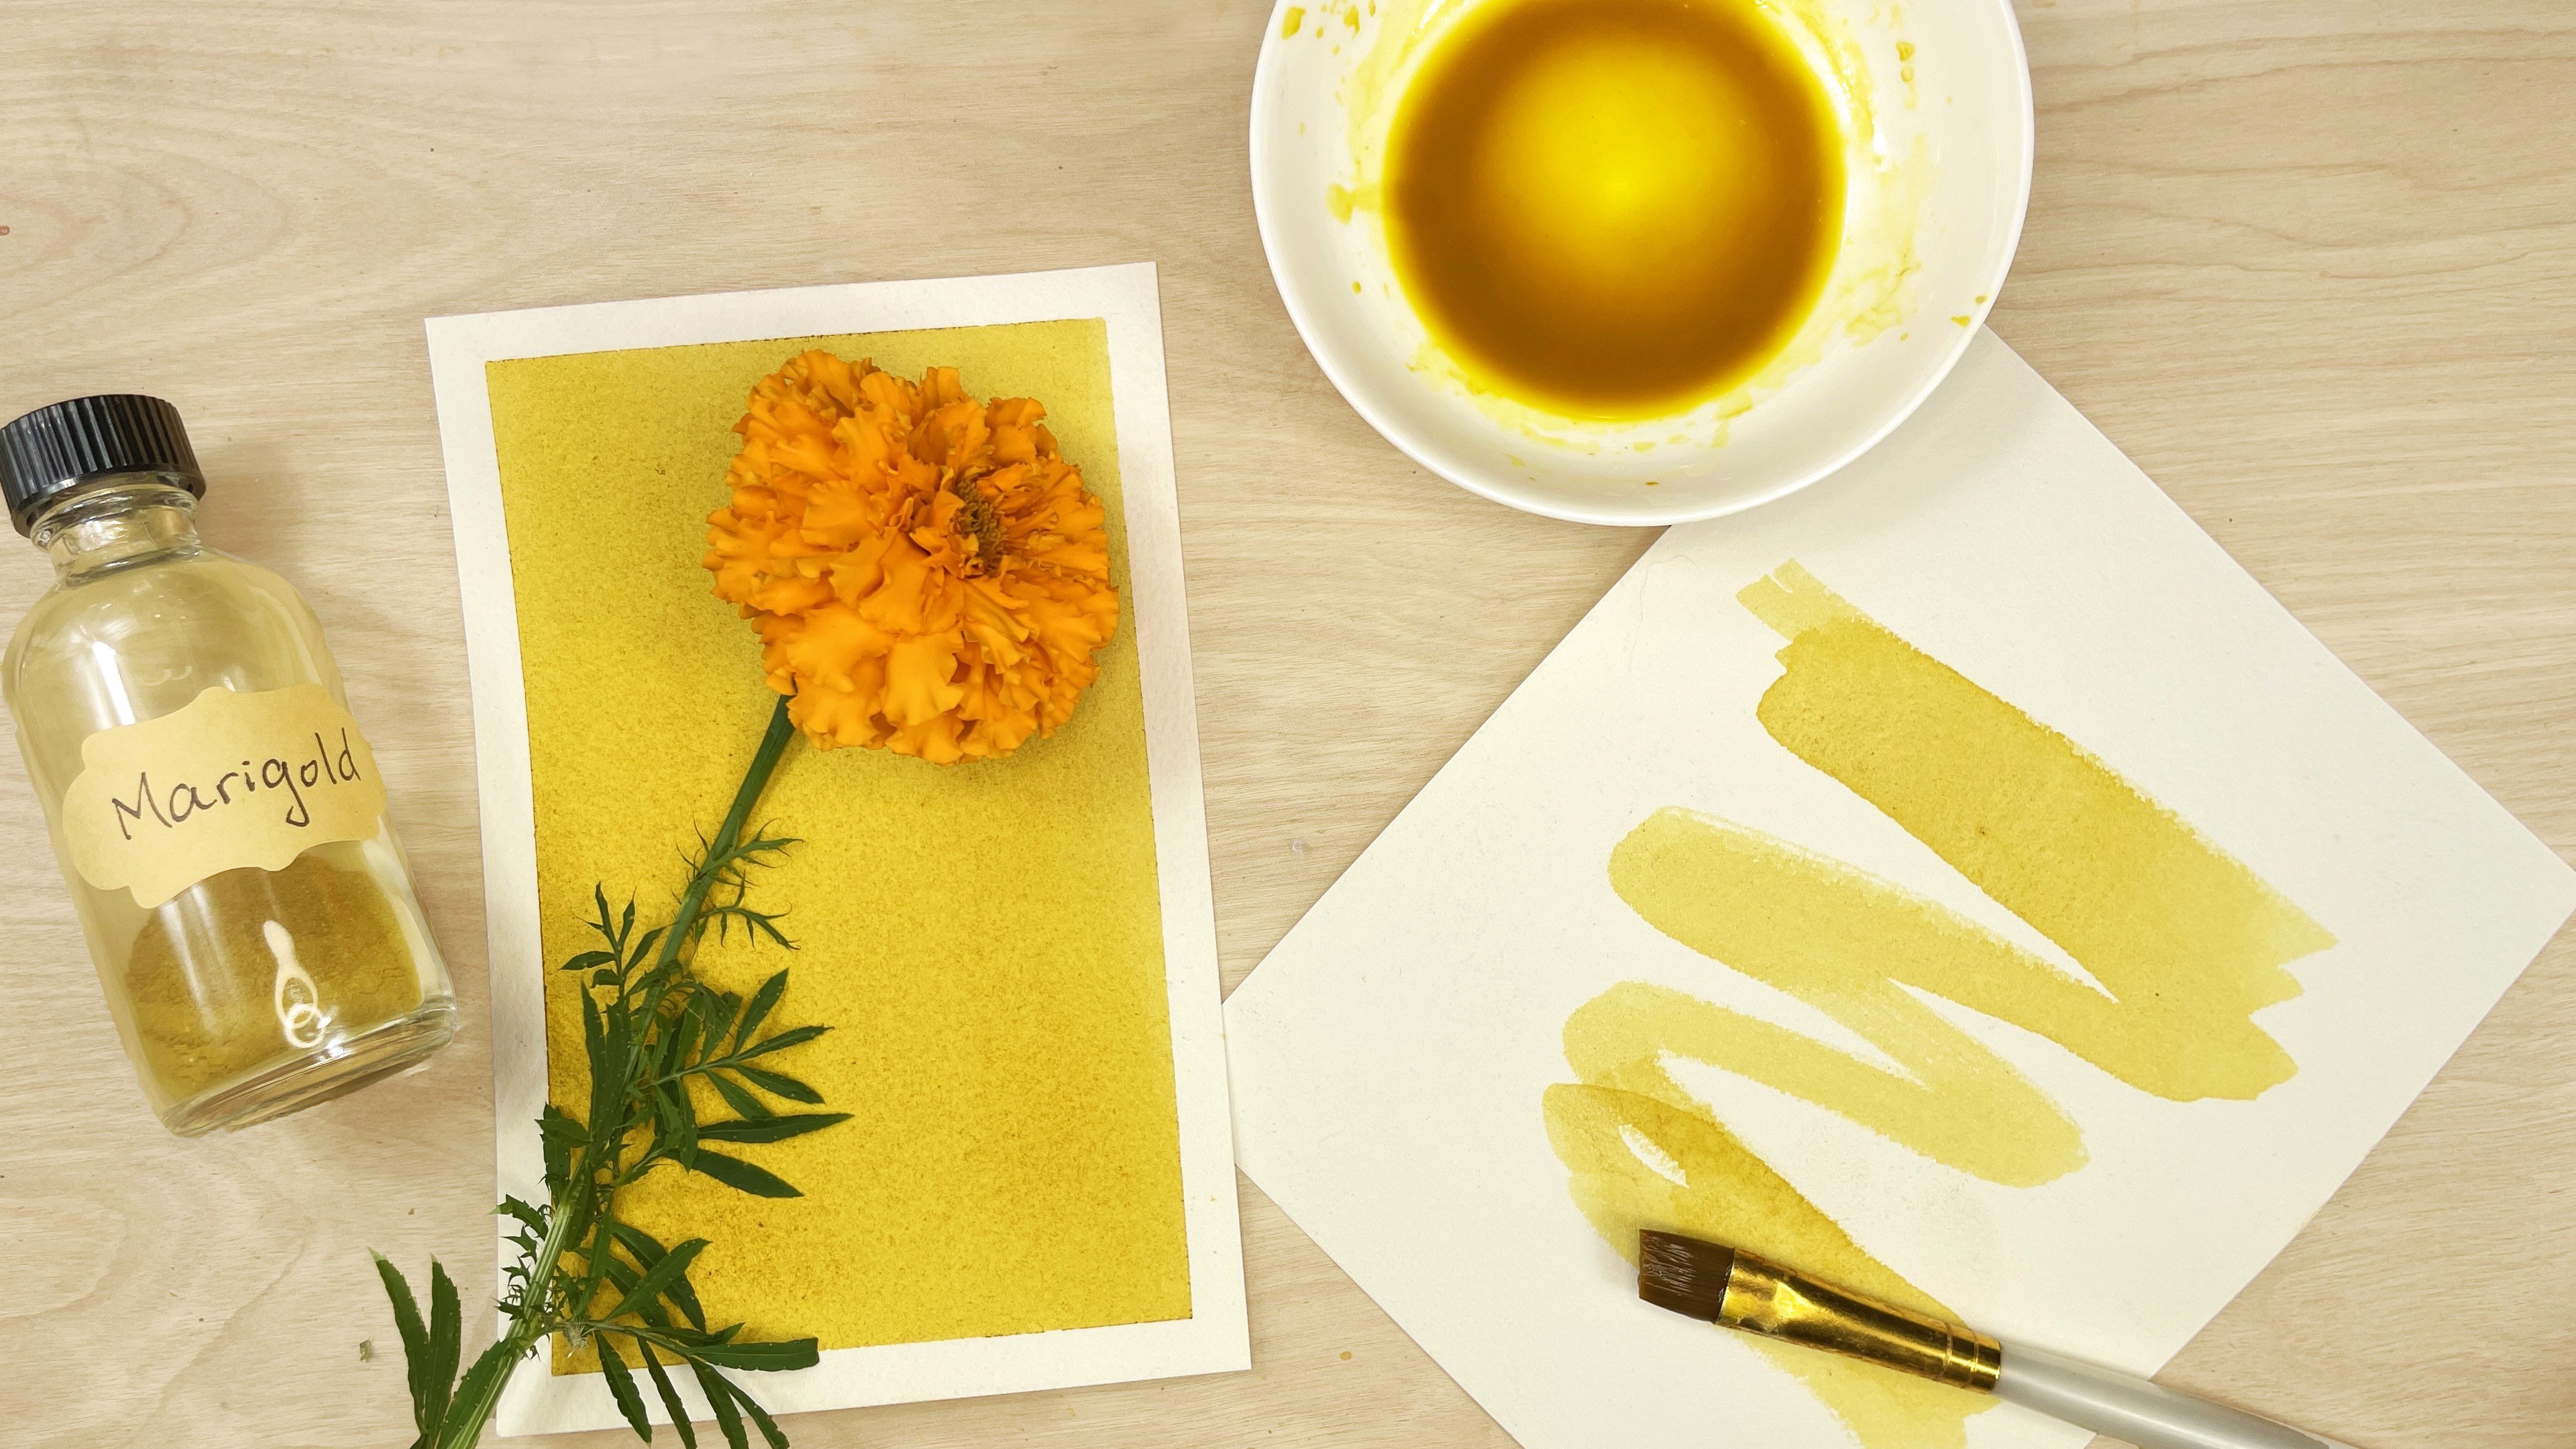
are the most common pigments found, especially in flowers,
no matter what the color. This sample here was dyed using Coreopsis flowers. There are several different varieties and they make this beautiful golden yellow color. Coreopsis can be used either fresh or you can dry the flowers
and then use them even in the winter. Queen Anne's lace is another wildflower that I love to use. They make these little sprays of white flowers and it dyes a yellow color sometimes with the hint of tan to it
like you see here. A fun fact about Queen Anne's lace is that it's in the same family as carrots. Carrot tops, these leafy greens that you cut off from your carrots, will dye a really similar color
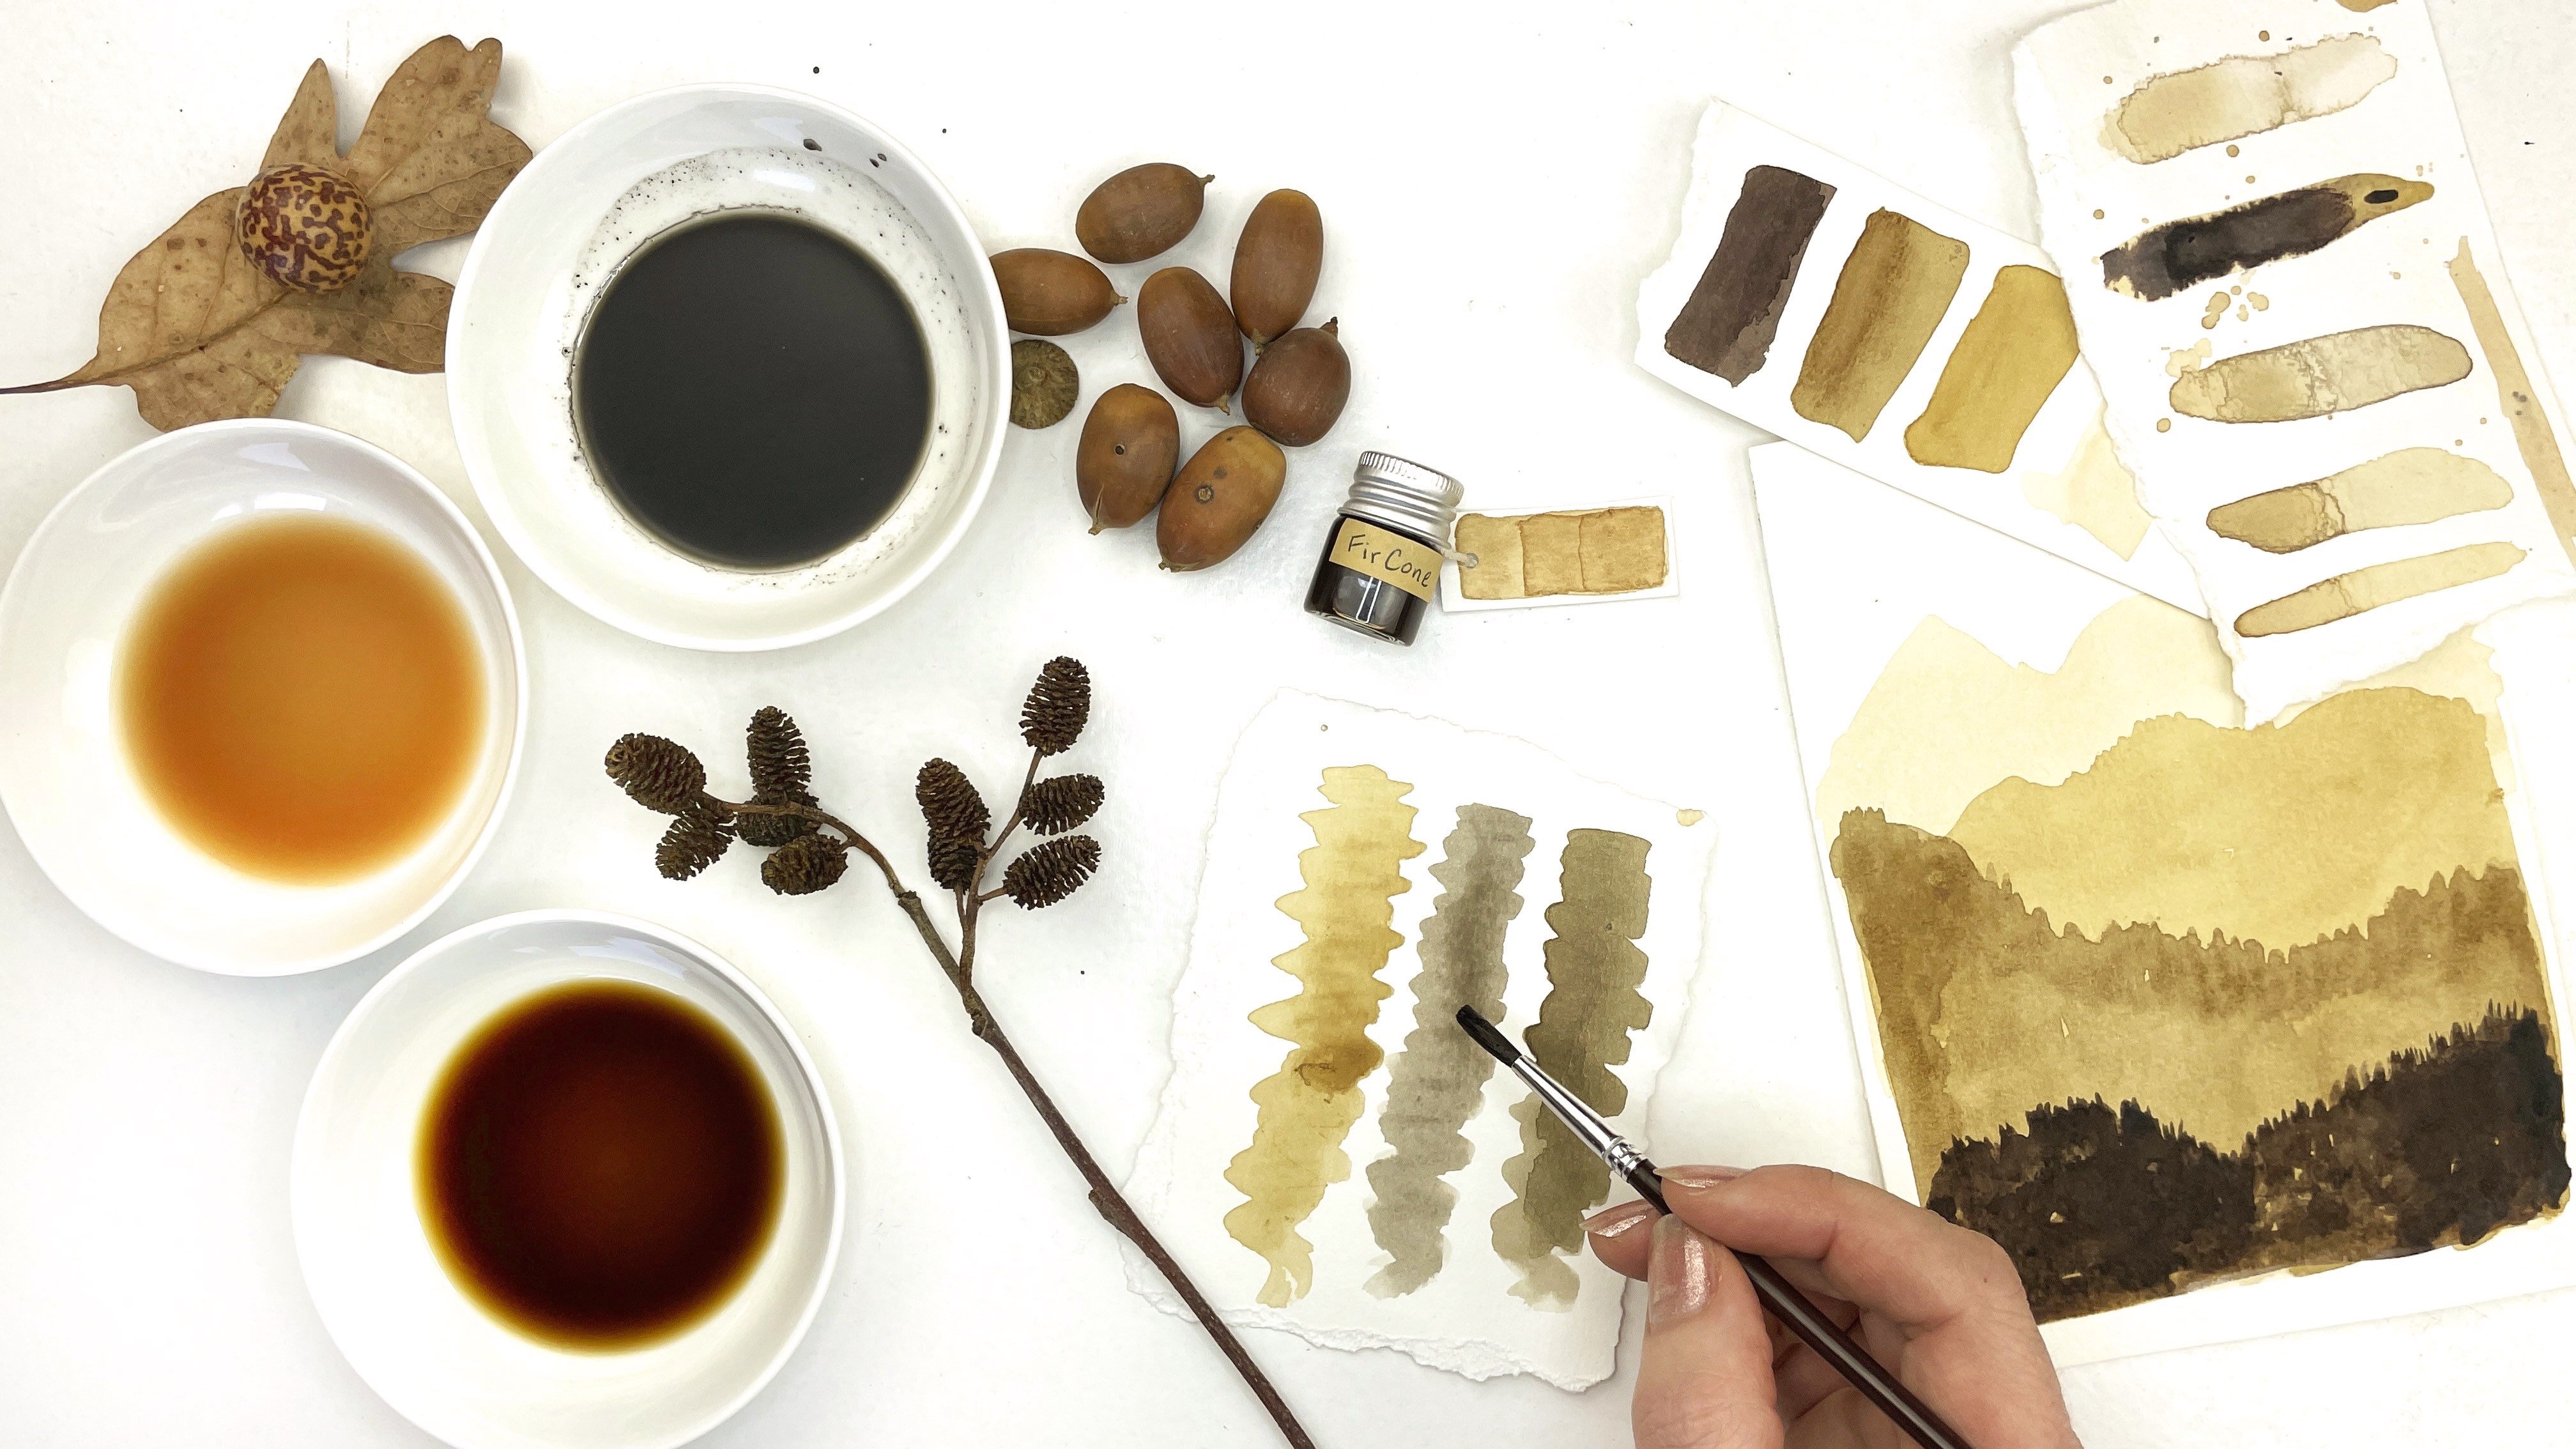
as the Queen Anne's lace. Dahlia flowers are some of my favorite flowers, and they come in a wide variety of colors but no matter what color you see with your eyes, they give a beautiful yellow on fabric. Just like the Coreopsis, you do not have to use them fresh. I often display my Dahlias and enjoy them while they look beautiful. Then when they start to get wilty then I will dry them and use them later or put the wilted petals on the fabric and make this beautiful yellow. Here are a couple more plants that create colors in the yellow and gold range. The first is the humble onion skin. These are so easy to come by, especially if you enjoy cooking. I keep a jar on my kitchen counter and every time I cook onions, I just put the skins in the jar, and then I have a whole bundle
when I'm ready to dye. They make a bright orange and gold color and the pieces of onion skin can make interesting shapes on your fabric. This next dye is called Weld, and it's a pretty nondescript plant. It has these long green leaves and more spikes of little flowers. The whole plant creates this yellow color, the little flowers, and the leaves. This is a dye that has been used for all of time really, along with indigo and madder, it created the three primary colors that are used in a lot of historical dyeing. It's a very colorfast
and for this reason you can also easily find it from sources that sell natural dye supplies. It comes dry and you can see that it's a mix of stem and leaf and little flower pieces. I don't have a sample to show you, but I do want to mention Goldenrod. This is a plant
that has several different varieties and it grows natively in most places in the United States. You probably have some growing near you. I grow some here on our farm and also see it when I'm out hiking
or even along roadsides. It has some of the same dye compounds in it as well. It's also very colorfast
and makes a similar color. This beautiful purple up here at the top of your screen is created with logwood dye. These are wood shavings that create a beautiful deep purple color. Some folks say that logwood dye
is not very colorfast, that it fades
to a more gray color after time. That can happen but I have found this deep dark purple color
to be pretty lasting, especially when the dye is applied directly to the fabric, like in this method
that I'm showing you in this course. This reddish-orange color comes from the Madder plant
and the dye here comes from the roots. This plant is not very difficult to grow
if you would like to try it yourself but it does require a commitment because it takes about three years
for the plant to accumulate enough of the dye compound in its roots
to be able to use. You can purchase this dye either as pieces of the root or ground into a finer powder. You can see on this side of the scarf, applying the pieces of root make these irregular shapes of color. Whereas on this side, I use the powder and it has a more fine, even coverage of color. This next dye is the only one that I'm showing you today
that does not come from a plant. This cochineal, which comes from an insect. These little granules are the exoskeletons from the insect. They make this beautiful,
vibrant fuchsia color. Just like the Madder, you can use it in these whole pieces and you can see it makes these large dots of color. I often grind it into a powder, either with a mortar and pestle, or you can put it in a Ziploc bag and roll it with a rolling pin. Here you see
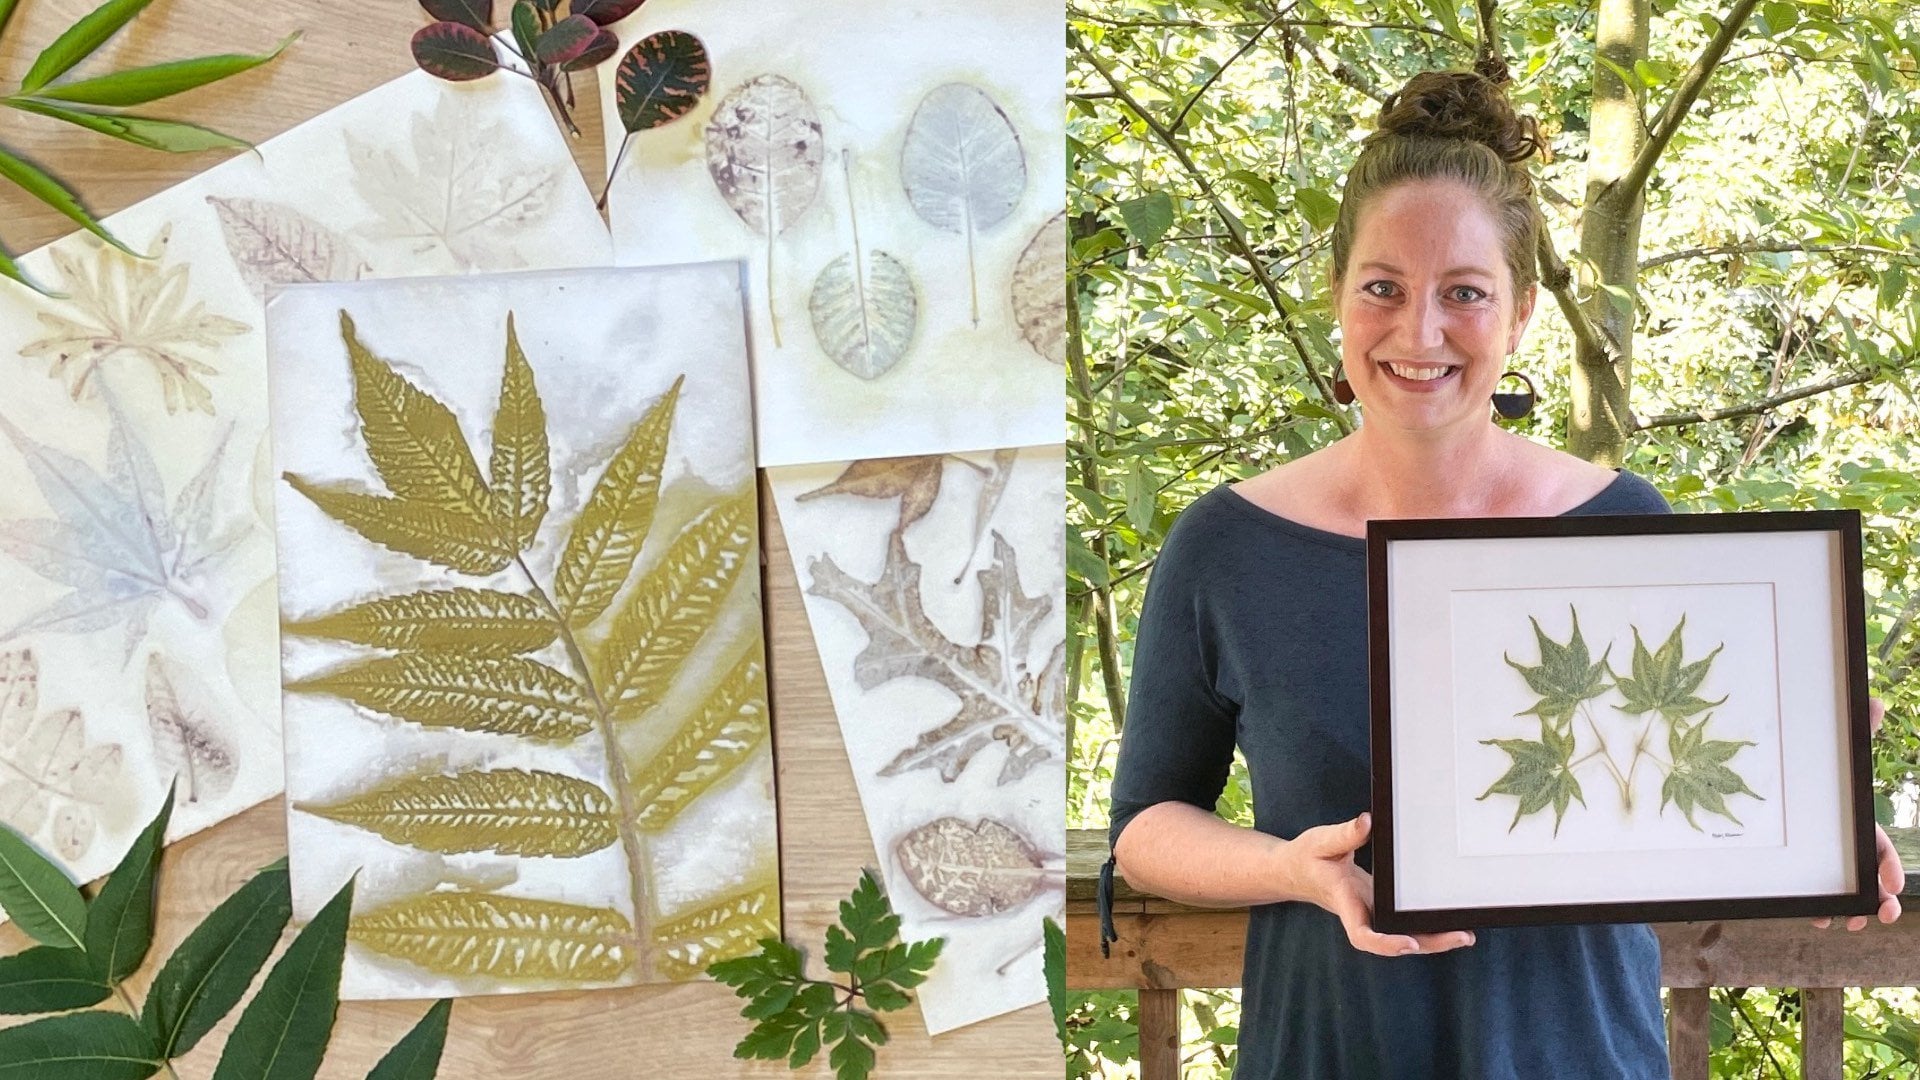
what it looks like using the powder. The last type of dye plants I want to mention, are leaves. This beautiful sample up here was dyed using these skinny eucalyptus leaves, which created
this beautiful reddish-orange color. Not all eucalyptus leaves
create an orange color, but they do all give some color. You can even use these little seed pods
and other parts of the plant that make little interesting marks on your fabric. This down here, I placed leaves on it. I use walnut and oak leaves here. This time you can see I ripped the leaves into little pieces
and it created this random effect. Whereas over here
I placed the actual whole leaves, which did blur together, but it creates larger areas of color. Experiment with tree leaves that you have, I find leaves that are high in tannins work pretty well for this project. These dyes that I've shown you are not an exhaustive list of what is available out in nature to make beautiful color on fabric. You might be thinking, but Casey, I've heard about people using turmeric or beets or even avocado or black beans to make color. It's true there are a lot of things that will make color on fabric. Most of my work, I make for items to sell and so I really care a lot about my colors being washable and colorfast and lasting for years to come. Some of those kitchen items like turmeric or beets or avocado, easily fade after being washed
or may shift in color and so I personally don't use those
in my work. But if you are making things just for yourself and want to experiment with other things that you have at home and don't mind colors that may fade or not last quite as long
as some of these that I've shown you, then feel free to experiment with what you have
and how fun with it. Now that you have a bounty of natural materials to choose from
to create beautiful color on your fabric, let's head to the next lesson where I will share with you
the easy way of preparing your plain silk fabric to be able to accept these natural dyes and turn them into these colorful beauties.
5. Equipment: [MUSIC] In this lesson, I'll be showing you the tools and equipment that you need
to complete this project. There aren't many things and most of you probably already have at your house. One that you may need to go out
and purchase is Alum. This can be found in most grocery stores in the spice aisle, or you can buy it in larger quantities from sources that cell natural dyeing supplies. This is a really important ingredient in our process
because this is what it's going to help the natural dyes
bind permanently to your fabric and be washable and beautiful and vibrant for years to come. The amount of Alum that you'll be using to complete this project depends on how much your fabric weighs. You'll need a kitchen scale
to weigh your fabric. Then we're going to be bundling it up with the dye materials into this little fabric and dye package. You will need some rubber bands
or string to secure it. The fabric and the dye will need to be steamed. This heating is what extracts the colors from the natural dyes
and sets it into the fabric. It's always safest to use pots and tongs that are dedicated to natural dye projects. You can find pots pretty inexpensively at second hand stores. You'll just need a pot with a lid on it since we're going to be steaming it and we want the lid to trap that heat and steam inside the pot. You'll also need something to raise your fabric up above the water line, so a steamer basket. If you don't have a steamer basket, you can be creative. There are lots of other ways to keep your fabric up above the water. Sometimes I use this metal colander turned upside down and place my fabric on top
and put that in the pot. You can also use cheese cloth to create the hammock on top of the pot, or even just put a small rack on top of a brick or other heat safe object. Removing it from the pot, it will be hot,
so you will want a pair of tongs. These are all of the tools that you'll need for this project. Let's go to the next lesson where I will show you the most fun part
of this preparation, which is selecting items to use
to create natural color.
6. Mordanting Your Fabric: In this lesson,
I will teach you what it means to mordant your fabric and how to complete
this important first step. Mordant comes from a French word
meaning to bite, and you can think of it as something that bites onto both for your fabric and also the pigments and the natural dyes and it permanently binds them together. This is an important step
because without it, many natural dyes will easily wash off your fabric
or quickly fade in color. To mordant your fabric,
you will, of course, need the silk wool that you will be dyeing, alum, a kitchen scale to weigh both your fabric and the alum, and a pot to put them in together. This will need to be heated on the stove or left to sit overnight. A utensil for stirring is also helpful. To determine how much alum you need to mordant your silk fabric, first it needs to be weighed. I have folded up my scarf so that it fits nicely on my kitchen scale here, and I have selected it
to measure the weight in grams. I find the whole numbers of grams easier to work with than fractions of ounces. My scarf here weighs 27 grams, and we need 8 percent that amount of the alum. Which means that we just have to do a simple math equation. We'll take 27 and multiply it by 0.08 and that gives us the grams of alum that I need for this scarf. In this case, that comes out to 2.16. My scale doesn't measure 0.16 grams, so it's fine to round. I will measure out two grams. To measure the Alum, I'll place this bowl on my scale and then press "Zero"
because I don't want to weigh the bowl, I just want to know how much the alum is. I put some in this measuring cup because I find it easier to pour from there. I'm looking for two grams, and there we have it. That's perfect. Once you have your alum weighed out, the rest of the mordanting process
is very simple. You just want to put the alum into a pot with some warm water, and stir it to dissolve as best you can. You want your pot to be big enough to hold your fabric and have room for it to move around so that the alum and the water can touch all the parts of your fabric. I'm going to unfold this silk scarf, and then gently place it in the water. There's room for it to move around in here. If it'll be dyeing multiple things, you can mordant them all at the same time. Just weigh out enough alum
for all of the items, and then make sure that your pot is big enough for all of your fabric to be in here
without being scrunched up too much. Heat will make the alum bind with the fabric a little quicker
than just leaving it cold. If you don't want to use any heat, you can let this sit overnight
and enough alum will be attached to your fabric the next day that it will be ready to dye. Or you can heat it on the stove to a gentle simmer and let it stay at that hot temperature for about 60 minutes and then let it cool. Once your silk in the alum water has cooled or has soaked for long enough that you are finished mordanting it, give it quick rinse
under some running water, that will rinse off any excess alum from your fabric, and then you can either
dye with it right away or I let it dry and store it for later. If you choose to store it and dye later, be sure that you label it so that you remember that it's already been mordanted. Now that your fabric is mordanted
and ready to dye, let's go to the next lesson
where I will show you how to layout your fabric and dye materials to make beautiful designs and color.
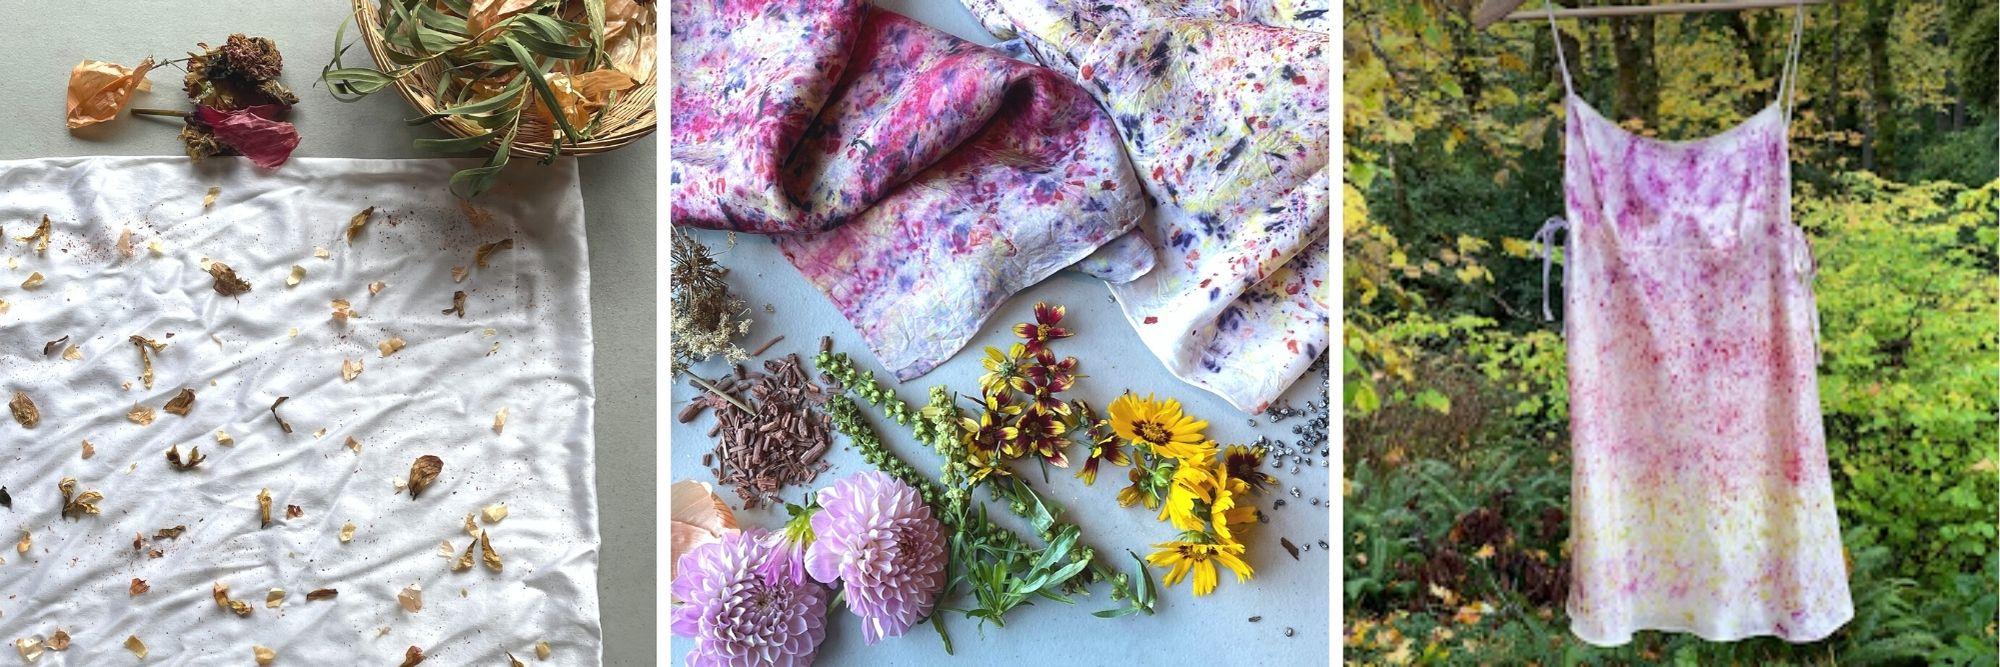
7. Creating a Dye Bundle: [MUSIC] In this lesson, I will show you
how to add the natural dyes to your fabric and then how to create this neat little package or a bundle. This is where the term
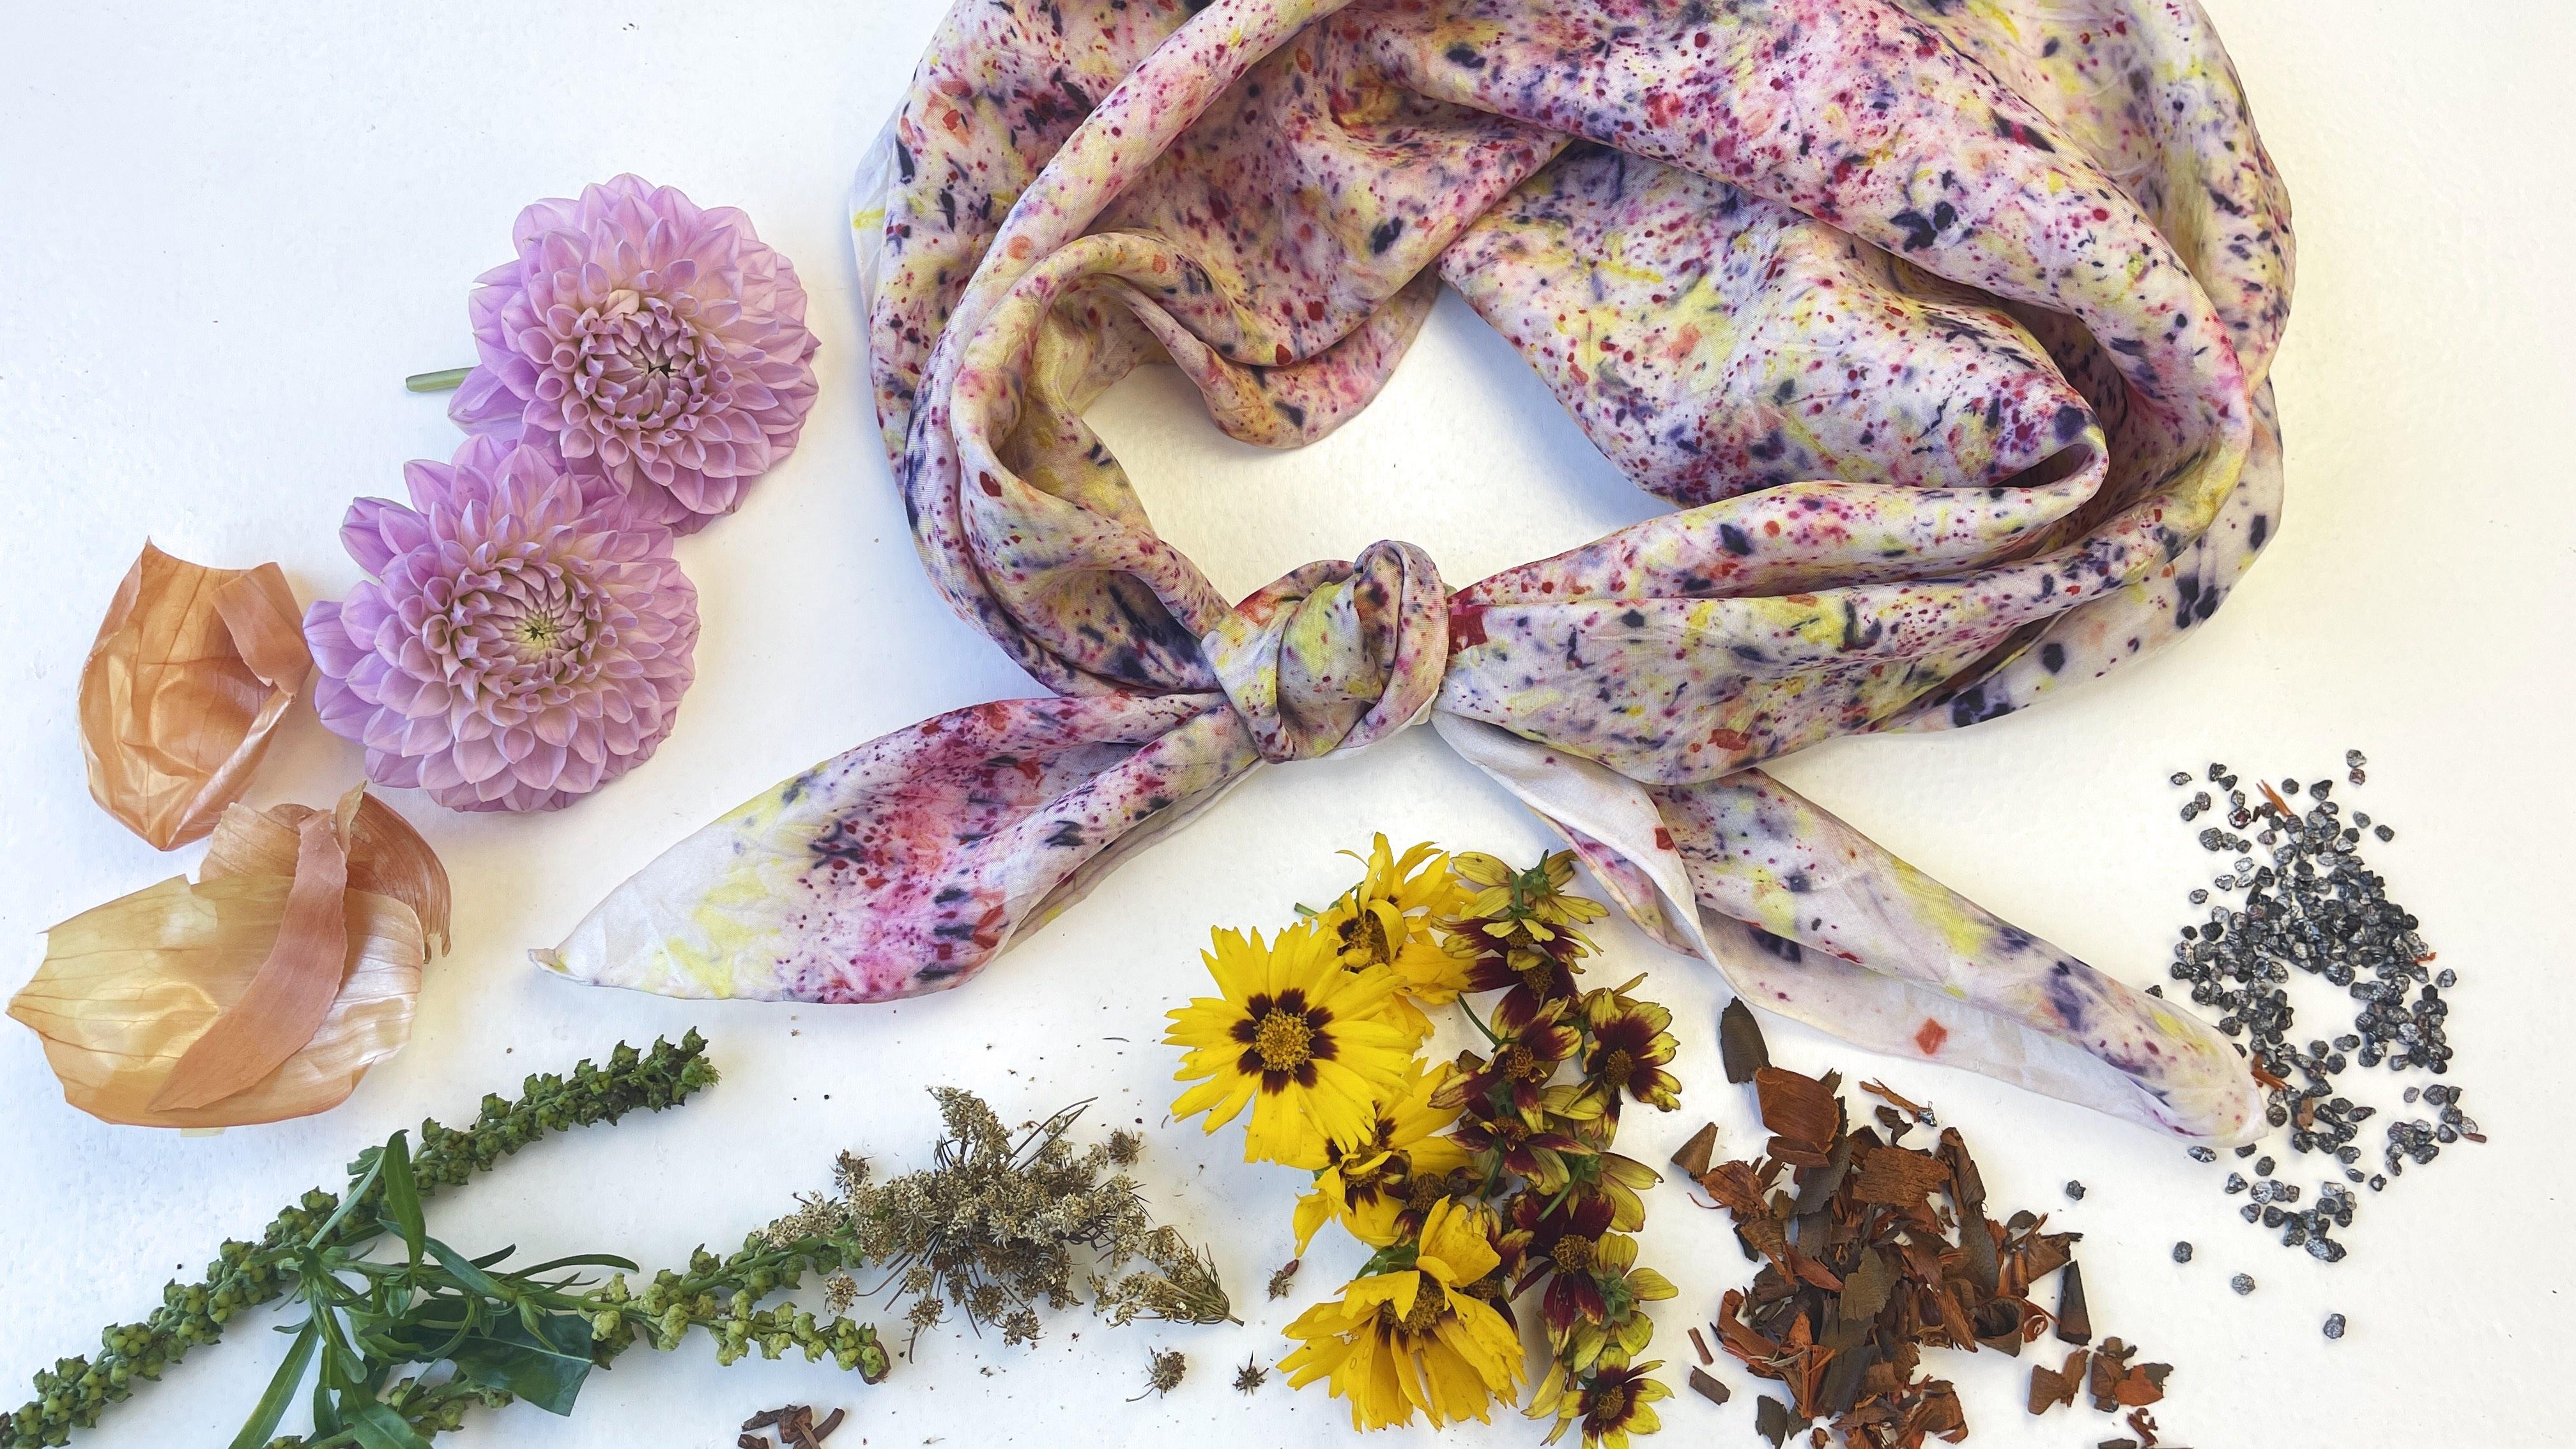
bundle dyeing comes from. For this demonstration scarf
that I'll be making, I've chosen to use dahlia flowers, a little onion skin, some logwood, powdered cochineal,
and some madder root. You don't have to use
as many things as I have here. You can use just one
or two sources of dye, like I showed in the samples
in a previous lesson. Even just one color creates a beautiful scarf with lots of interest, so use what you have. I look forward to seeing what your scarf looks like.
Let's get started. To begin laying out your dye materials, you will want to lay your scarf out
flat on the table. If you are doing this outside where it might be a little breezy or find that your scarf moves around easily on the tabletop, then this is where the spray bottle with water will come in handy. If you give it a little mist with water, it just helps weigh it down a little bit
and cling to the table, It might make it easier to do this process. You will be adding water
to the whole thing later, so getting it a little wet now
does not hurt at all. There is no right or wrong way to lay your dye materials out on your fabric. My recommendation is to sprinkle your selected items in a random arrangement on your fabric. Part of this process involves rolling up the fabric and dye material together. That's going to create
a repeating pattern of color. I will show you what I mean
with this onion skin scarf. You can see here in the middle, this interesting curved shape of onion skin shows up here. Then again here and here and here it gets lighter and again this way. That's because the coloring in most of these natural materials is strong enough to go through several layers of fabric. If I place
this piece of onion skin down right here near the edge
and I roll up my fabric, it's, of course, going to make color right here where I've placed it. But when I roll this up, now it's also going to make some color
on this part of the fabric. It can go through here and touch again right here
on the fabric. So it will make color
not just where you've placed it, but all along this rolled up fabric. For that reason making really detailed scenes or letters or complicated designs might not show up very distinctly in your finished scarf. Just sprinkle some things along. This is the madder root. It's really hard and not easy to break these bigger pieces, so it's fine to use them as is. The logwood shavings are sometimes fairly large
and three-dimensional, which might be difficult to roll them up. With those big pieces, I just break them between my fingers a little bit into some smaller bits. You can see I'm not covering the entire fabric. Because of that repeating pattern, these dye plants will fill in some of these white spaces
as I roll it. I'm going to add
some of these wilty dahlia flowers. Again, I'm not thinking too hard about where I'm putting them, just making sure that I put some dye plants even along the edges
and corners of the fabric. I'll add some of these purple ones
just so we can see in the finished scarf that they do dye pretty much the same color, even though the petals have different colorings that we see. Natural sources for dyes have different amounts of pigment
in them that come out. The logwood is really deep and vibrant even with just a few pieces, while the coloring from the dahlia petals is a little paler. I find that I need
more dahlia petals to create the same amount of color as just a few shavings of logwood or a few pieces of the madder. One dye that really only needs a very light application is cochineal. It is very potent and has so much of that pigment that makes this beautiful fuchsia color that it really just needs a little sprinkling of it. It's easy to overwhelm a whole scarf with this fuchsia color if too much is added. That can be a really beautiful effect
if you love pink. Again, with the onion skin, if I leave it in these big pieces, it will make really large areas of color which is completely fine to do. I prefer to have smaller pieces. They're still papery and thin and easy to reap them to little pieces. But again,
there's no wrong way to do it and if you want to try putting large pieces and having big areas of color, then go for it. There is my finished scarf. The next step is to roll it. I'll start at one straight edge and just fold it over and keep folding. It's okay if some of your dye plant shift or move around a little bit
as you're folding. This takes a little bit of practice. If you have someone else at home with you, you might want to call them over
for their assistance. Once you have this long tube of fabric, start at one end and roll it up like you're coiling up a snail shell. When your fabric is all coiled up,
nice and snug, take those rubber bands or string
and secure your fabric. This keeps
all of those dye plants safely inside. There you have it. In this lesson
I have shown you the basic method of applying dye matter to your scarf
and creating a bundle. Even though you can't create complex designs
with this method of dyeing, there are a few ways that you can manipulate the way you roll it and the way you apply the dye material to create a few different results. I will show you those options in the next lesson, so join me there.
8. Other Bundle Techniques: [MUSIC] In this lesson, I will be showing you
some alternate ways to lay out your dye plants and roll the scarf to create some different results
such as these big wide stripes. One way to affect the outcome of your finished scarf is to vary how much dye matter
you put onto your fabric. This scarf here you can see there's a fair amount of white space left. This had a pretty light application
of these dye sources. This scarf was dyed with the exact same materials
as this one here but you can see the color is covering pretty much the entire fabric
and it has a really saturated look. I can't tell you exactly how much dye plants to add to your fabric to get each of these two effects
because some of it depends on what materials
you're actually using, how potent your dye sources are. This is something that comes with some practice and experimentation. If your scarf turns out like this or even lighter in color
and you want to add more, you can always lay it out, sprinkle on more dye plants, and just roll it up and steam it again. You can always add to your finished work. Here's an example of the saddle striping effect that can come with this method of bundle dyeing. This is from rolling it up
edge to edge like I showed in the last lesson and you get these repeating areas of color. You can manipulate
the way the striping shows up by changing how you roll up your scarf. If you start to roll your scarf from one corner instead of a straight edge, this will change the striping pattern and create a diagonal orientation. The rolled fabric gets very long
as you get to the side to side corners that continue along, and then roll it up into a snail shell just as I demonstrated in the previous lesson. The last technique I have to show you
is how to create wide stripes of mostly single colors. This can be done
this orientation or diagonally by rolling it from the corner like I just showed you with that last design. To create these wide stripes of color, you will want to lay out single dye materials in straight lines along your fabric. Here I have some cochineal, a line of logwood, and I will sprinkle some coreopsis flowers, some of these are dried, along the fabric here and I can make a reddish-orange stripe by sprinkling some dried madder. Some of your dye materials might spread, not stay exactly where you put them. That gives a little bit of interest
and beauty, I think to the finished product. It's hard to get them to stay exactly where you have them. Make another line of cochineal along this edge
and then the important part of the step of making wide stripes
is to roll your fabric in the same direction
that your lines of dye plants go. I will start here at this edge and roll it up just like this. Then everything else is the same as with the other methods. After this,
roll it up like a snail shell, secure it, and then steam it. Now that you know
a few different ways to create a dye and fabric bundle to get a few different results
with your finished product, let's go to the next lesson
where I will show you how to steam it and extract these beautiful colors.
9. Steaming Your Fabric: Now that you have your fabric and dye plants bundled together, I will show you how to steam it. You will need your bundled fabric, the pot with the lid, and a steamer basket, and this does need to be heated on a stovetop or other heating element for at least 60 minutes. I usually do this outside
on a propane burner, but if you only are able to do this in your kitchen,
that's okay too. Just be sure to turn on
the exhaust fan if you have one or open some windows
for ventilation. This does create a lot of steam and sometimes the odors from the plants steaming
can be bothersome. Before steaming, it's very important that the fabric is fully wet. It may be a little dump
from spritzing it with water before you laid out the dye plants, but it does need to be saturated all the way into the center. Hold it under some running water
and gently squeeze it a little to be sure that the water gets all the way to the center of this bundle. You might see some color coming out of it depending on what dye materials
you used on the inside, and that's totally normal. Give it just a little squeeze, and then it's ready to put in the steamer. To steam the scarf, you will need several cups of water in your pot. The exact amount will depend
on how large your pot is and what you're using
as a steamer basket. This steamer I use
has these short little legs on it, so I place this upside-down metal colander in my pot so that my steamer basket
will be raised up above the water, and then place your bundles into the pot. If you have just one, you can put it in the center. You can put multiple things in the pot. If they're touching, then the colors from one can bleed onto the other. If you want the colors of each
to stay separate, make sure they have a little room in there. Then I'll place the lid on
and put it on the stove. I usually turn it on to high
until it gets good and hot enough
that a lot of steam is being created, and then I can turn it down
for the rest of the hour. It does not need to be at a full rolling boil the whole time. It just needs to be hot enough that steam is continuously being created in your pot. Be sure that your fabric stays wet during this entire process. Add more water if it seems like the level is getting a little low in your pot. If the silk bundles themselves look like they're drying out, pour a little water on top of them. If the silk is dry, it can actually burn in the pot, so the water is very important. Halfway through the steaming time, so at about 30 minutes, use your tongs and carefully turn the fabric bundles over. Gravity will pull the dyes towards the bottom of the bundle, so flipping them over
helps them be more evenly colored. After you flip them, put the lid back on and let them keep steaming for another 30 minutes. After one hour of steaming, take your fabric bundle out of the pot and set it somewhere to cool. Meet me in the next lesson and I will give you my tips for unbundling it, washing, and caring for your fabric.
10. Finishing & Fabric Care: [MUSIC] In this lesson, I will show you how to unbundle your fabric
as well as how to wash and care for it. I usually do this unbundling process outside because all those little bits of leaves and flower petals and other materials you have inside are going to fall out of it as soon as you unroll it, but it's a rainy day here in Oregon, go figure. My studio floor here is used to me dropping all kinds of things on it. I am just going to take the rubber bands off and undo this one right here. Look at these beautiful colors in here. As I unroll I start to see petals and onion skin
coming out of here. I'm just going to hold this over the floor here and continue. [NOISE] Do you hear that? It's all those little pieces
of madder root falling down. There are still bits of dye plants on here
and there is some excess color
that isn't bound to the fabric. Let me show you
how I wash it to get that off. Even after brushing off the large pieces, there will still be some small bits of dye material on here, especially if you use the powdered dye. There is some extra color
that hasn't completely attached itself to the fabric and we'll rinse off and that's a normal part of this process. Fill up a sink
or other basin with water and just rinse off the rest of those loose particles and color. You can see some big dahlia petals and little bits of things. If you don't want these items
to end up down your drain, then you can do this outside, just hold it under an outdoor spigot or swish it around in a bucket of water. You can let this soak for a few minutes to let this extra dye continue to come off of your fabric and I will come back in just a minute
and drain it. I drained the sink water
and filled it up a second time, and this time I added a little castile soap. You don't really need any special soap
but I've put some brand recommendations in the supply list in the resources tab. You can see the water is very pale now, once I drain this and rinse one more time to get the soap off, it will be time to hang this scarf up to dry. Iron can affect the colors of natural dyes so avoid hanging your scarf
on metal clothes hangers or shower curtain rods that could possibly have a bit of rust or iron on it as that could make unwanted marks on your beautiful fabric. Hanging it to dry on a clothesline or a plastic clothes hanger
would be great choices. The final step in finishing your silk scarf is to iron it. You might be thinking that you don't like ironing and I never did either until I started dyeing my own fabric and found that ironing it
really makes the colors and patterns shine. Silk can be ironed on a high heat and having the steam setting turned on is helpful. If you've never ironed silk before, I recommend placing a thin cloth
like a dish towel or a pillowcase over the top of your silk to protect it from the heat of the iron. I have ironed a lot of silk
with my iron here and so I am confident that it won't burn the fabric or get too hot. Let's look at all these beautiful colors our dye plants made. This golden orange along the edge is from the onion skin and there's a lot of yellow from the dahlia flower petals. This dark purple is from logwood chips and the reddish orange color are from those pieces of madder root. You can see there's a sprinkling
of pink throughout and that's from that little bit of cochineal powder that I put on there. It really doesn't take a lot of cochineal to make pink coloring. Even after ironing some small creases or crinkles will remain in your fabric, that's just part of the charm
of dyeing it in this style. They might lessen a little over time but I consider them a semi-permanent part of the design process. But when all these colors blend together and the way silk just shines, it's such a beautiful result
no matter what happens. If your scarf needs washing at anytime during its lifetime, you can spot clean it
with a little soap and water or wash the whole thing just as we did after dyeing it by hand washing in a basin of water
with some gentle detergent. These colors should last for years to come and be a beautiful snapshot of nature. I hope you enjoy your beautiful naturally dyed scarf
and that you are inspired to incorporate natural dyes into your future textile projects. In the next lesson, I will share
some more natural dye inspiration, as well as some ideas on what else you can make using this bundle dye method.
11. Final Thoughts: Congratulations on making a beautiful, naturally dyed work of art. I'm so glad you joined me today on this journey to discover nature's colors. You have learned how to modern silk fabric, how to identify plants
and other materials to use as dye. You've learned what colors each creates. Now you know several ways of bundling plants and fabric to create different effects and how to set the dye and care for your fabric. I hope that you have learned
something new about plants and that you look at nature
with a new appreciation. There are so many things
that you can make with fabric now that you know
how to dye it in this method. You can use dyed silk scarves
for many purposes, but you can also dye other silk or wool items
with the same methods. Silk pillowcases, either for your bed or throw pillows are so soft and nice to use. You can upcycle silk clothing and give old items new color. You can also dye silk or wool fabric
and sew it into new items like these luxurious I pillows that I sew and fill with organic materials. I hope that I have inspired you
to look at leaves, flowers, plants,
even kitchen items in a new way. I would love to see
your naturally dyed fabric. Please share a photo of your work here in the projects tab
for this class on Skillshare. You can also tag me in a post on Instagram. My account there is cedardellforestfarm. If you enjoyed this course, please leave me a review, and before you go
follow me here on Skillshare so that you will be notified when I have a new class available. Thank you so much for joining me in creating beautiful color.
 Casey Gallagher Newman, Natural Dye and Textile Artist