Transcripts
1. Introduction: Hi, everyone. My name is Marko Bukowski, and I want to thank you for
choosing this training. If you are curious about
AI workflow automations, if you wonder how
can they save you time by reducing
some repetitive work you might have there, or even how can you build and sell AI solutions to
other businesses, then you are in the right place. Don't worry. Theres no
previous experience required. We will learn everything
step by step here. You don't need any software development background
or, in fact, any IT related experience to start learning ATN and
automations today. Believe me, you are
in the perfect place. The only thing you need
really is a laptop, or PC, and some spare time. This training, you
will learn how to run N ATM as a native Cloud solution or locally on your laptop, how to build automations, how to build AI agents all
step by step, as I said, how can you connect
your favorite apps and services together that can save you hours and
hours of time? You will also see how to build AI solutions that you can even
sell to other businesses. And you might be
thinking now, Mark, how can I sell anything to other businesses if I don't even know what workflow automation is or how to build an AI agent? But believe me, you can. I'm really glad that you
made that decision to start educating yourself
in that direction by choosing this course. You have to just give
yourself a chance. That's what it is.
All you need to do really is start
today and remember, the sooner you
begin, the better. You'll already be
ahead of 99.9% of people who have never even heard of NATM or workflow automation. Might have heard
Nvidia CEO say that AI will create more millionaires
in the next five years than the entire Internet did in over 20 years and there are many reasons to
believe that is true. This training will give
you all the skills that you need to
understand how to build and run advanced AI
solutions in NA ten and also how to start selling your work and your solutions
to other businesses. But always remember, you don't have to take
it too seriously. Treat this as an
after hours fun. Maybe just start it as a little side hustle creating
some automations for yourself and then maybe selling some of those solutions
to your local businesses, just to see if this could be a career you'd like to pursue. You can't go wrong really.
At the very least, you'll stay up to date with the most recent
technology. But who knows? If you start making 1,000 or $2,000 a month as a side hustle, something you do after
work, maybe at that point, you'll decide to make it your main source of income
and do it full time. Who knows? That, of
course, it's your choice. With NA ten support
for AI agents, this really is the
platform to go. It's no surprise its popularity
has exploded recently, and I'm not surprised at all that you want to
learn more about it. By the way, if you
want to learn more about some related
topics like AWS, Linux, and Docker,
computer networking, and many moe, then check out our Automation Avenue
platform where you will find hours and hours of very useful IT
related materials. But going back to this training, we will have a
project to complete and as your product work, you will build your own AI agent with its own large
language model, its own memory,
and instructions. You will see that completing
this project is actually much easier than you might
imagine.'s waste no time then. I will see you in the
next episode where we'll prepare and run ITN
software together.
2. 3 ways to self-host n8n AI Automation software: Before we dive in, please remember to hit
the follow button. This is the best way
to ensure you never miss new classes or
important updates. Since the technology
constantly evolves, I frequently add new material to keep you completely
up to date. Don, are you sure? Okay, great. Let's start the training. In this video, we will just focus on the
installation part. NA ten can be run either free of charge or as a paid service. In this video, you will learn
three different ways to run NA ten on your local machine so you can use it
free of charge. But first, I want to just make you aware of
that paid option. If you go to that pricing tab, those paid options
are shown here, and those are the prices of
using NA ten in their cloud. With the Cloud version,
you don't have to worry about installation,
servers or configuration. Everything is there
ready for you to use. The downside is that it
costs money each month, you want to use this platform. But the great thing about NA ten is that it's
open source product, which means you can
pull entire code and install it on your machine instead of using their
paid Cloud solution. You can see that Github icon
in the top right corner. If you click on it,
you can basically see entire code that is used
to run NAM software. And because it's an open source, there are many ways you
can install it yourself. Running it on your server
is called self hosting, and that means you can use NA ten free of charge.
So let's do that. Let's get started.
We will go through three different methods
to get it installed, and you only need to
pick one of them. First two methods are
Docker container based, and they are very similar
to first method is where we run a simple Docker Run command and the second way, we will build a Docker
Compose Yamofle and we will run it using
Docker Compose app command. And the third method, we will install it on
Proxmox server with just one command using so called community script or helperscript,
it's also called. You can use official
documentation from NAten. You can find a lot of information
about installation and configuration here on
the docenten dot IO. Here is the Docker, for example, and we will use some
of the commands from here to have
it up and running. All right, so first method
using Locker Run, this one. This is my Ubuntu system, so it's a Linux based.
Let me make it bigger. And you can run
Docker containers on any operating system really. Here on Linux, you only need to install
Docker, for example. But if you want to run
them on Windows or Mac, they also let you run
Docker containers, but you need to install additional software
like Docker Desktop. So you can simply Google how
to install Docker Desktop or MAC or how to install
desktop on Windows, because it's not covered here, but just wanted to let
you know that you can run Docker containers on
Windows Or MAC as well. Here on my Ubuntu, I don't
need Docker Desktop. Linux can run Docker
containers natively. I just need to install Docker. But before I do, I
run that command. It's a Sudo UG update
and pudo UGT upgrade. And then I add Y. It's to simply answer
yes to any questions that might come up
during this process. So I press Enter, I
need Sudo password. And that command is
not Docker related, but you should always
run it to have your system up to date
before you do anything. But if I want to run
Docker, I say Docker. You can see Command
Docker is not found, but it can be installed
with any of those, and I'm not really
a fan of Snap, so I will just use this command. So do up to install
docker dot IO. Just copy paste. And that's it. Well, I didn't put Y, so I have to answer yes. I might take a while depends
on your Internet speed. But now we should have
Docker up and running. So if I run system
CTL status Docker, I can see that it's indeed up
and running for 12 seconds. Now, next command is optional, but if I don't run it, I would have to run
Docker with Sudo, always, like sudo Docker,
blah, blah, blah. I don't want to do that, so I can run this command instead. I run sudo user mode, AG it's lowercase A
and G then Docker. And dollar sign user. That means current user, whoever I am will be
added to Docker group. I press Enter, and
then to make it live, I run a new GRP Docker. It refreshes this group like you can also
log off and log on, but this is easier option. Just run that new GRP Docker. Now if I run Docker command, you can see it gives
me all options. I can run Docker Tag, Docker Stop, docker
RM, et cetera. Maybe let me clear
that to test Docker, there is a really nice command. It's Docker run Hello World. If I run that command
and I get the output, that means everything
works correctly. Docker can pull the images and all process
works as expected. So let's press Enter. It says unable to find image locally. That's true because I never
run this command before, but it was able to
pull this image. We can see it here,
pull complete, and it says, Hello from Docker. That means I can be sure that
Docker works as expected. This is a really good
test. That's basically it. We can now go to NAN and follow There's actually just
two commands we have to run. They say, we have to
create a volume first, that Nate N data because we will use that Docker
managed volume. So that's fine. I
will copy that. Maybe let me clear
first. I will paste it. And the volume
should be created. I can confirm running
Docker volume LS command. And indeed, I can see that local volume called NAN
data has been created. Next, we just run
this long command, Docker run ITRM name. Basically what it is. You
run it interactively. This is about how
to stop the Docker. This is the name of the
container port it's running on, and the volume we're using is that NTN data volume that
we have just created. And if we go further, this
is the image it will pull from doer dotn dot website. All right. So let's just copy. Copy, Paste. Again, unable to find locally, of course, because I've
never run this command. This is fresh operating system. Nothing is installed here, and again, it might
take a while. The process is now completed. You can see you can
press O to open in browser or you can
simply copy this link, local host on port 5678. So I just copy it. I will
paste it in my browser and go. And that's it. That's my NA ten. That's the process
Well nearly completed. We just have to set
up the account. I mean, that's not the
part of the installation, but maybe let's
do that because I created like a test email. You can see NA ten test email at protonmil.com, basically
just for that. So we can use it here. Merck
put your name or whatever. You create password, and
you just click Next. I will say it what
describes my company, a business owner or myself. Doesn't really
matter, get started. And now you have
that little button. Send me a free license key. I mean, you can skip
that, but you will have some extra options added if
you put that license key. So let's do that.
I will click that. Your license key is on the way. So I go back to my inbox and it should be sharply
hopefully here. All right, that my
free NATM license key. So I can activate it.
You can do it like that, or you can simply copy this key. Go to your NATM, go to that usage and plan, and you can paste it here,
Enter activation key. Activate license activated. You registered
community addition has been successfully activated. And you can see it
here. You are on community addition and
you are registered. Well, that was like
extra information, not part of the
installation, yes. If we go back to terminal, you can see a new message, license successfully activated. And if I control C here, it's a stopping NA ten, and now my website basically doesn't work anymore because
I stopped the service. Running it like that, I don't really like it the
Docker Run command. This is not doesn't
feel right for me. I like to run Docker images at least in Docker Compose file. Let's create it will
be the second version, second way of running NA ten. We will create a
Docker compose file. I'm currently in
my home directory, home I can use any
text editor I want. You can use even Notepad on
Windows or text edit on Mac. Here on Linux, I've
got, for example, Nano and I create file called Docker Compose dot
yaml. 1 second. Let me just clear that.
Nano Docker Compose Yamal. I can use that information from their website. I can
use basically it. I can use this command
and convert it to Yamel. We have some ports,
we've got the volume, we've got the Docker image. But to save some time, let me just show you something, I will remove it.
And this is it. This is what it looks like
the Docker Compose yam. I don't want to both with
the details how to translate that Docker Run to compose.
But basically, that's it. That's my Docker compose file. I press Control O,
enter Control X, at least on the MC
to save this file. If I run cat Docker Compose, you can see that's
what it looks like. Now, the only important thing, I have to be in the
same folder where this Docker compose
file is located. So if I run LSL, I can see I am here
in my home directory. This is my home directory, and this is where I have
my Docker compose file. There is one more thing. If I
run that cut command again, the volume, I wanted to match it to what we already
had previously. We run that Docker
Run command, yes? And we created
already this volume. It's called NA ten data. I mean, I can run this command
again, it doesn't help. So basically, I can run it now, you should run it before
you run Docker Compose really because these
volumes NA ten data, this external kind of expects this volume to
be already created. So you need to run
this command if you haven't already and
make sure running Docker volume S that indeed this volume is already
here. And that's cool. However, if I run
Docker Compose, it says it's not found
because Docker compose, it's a separate component. It's not part of Docker. It's like separate component, but we know it can be installed with psudoU to install
Docker Compose. Let's copy that.
I will paste it. Again, psudoPassor. Yes. And now Docker Compose has
been installed, which means now, let me
maybe clear that again. I can simply run Docker Compose up the IpressEner and it
created some network. It created the NA ten container. And if I run Docker PS, I can see that it indeed
has been created. It's running for
12 seconds again, and I can connect to it on this first port, which is 5678. I mean, let me
just cut it first. Basically, whatever
you have here, I mean, you can't
change this port. This is simply what
application runs on. But if you want, you can change this port on the left side. So whatever I have here, I simply connect to it
on the local host. So I go back again, HTTP, Local host 5678 and
defect decanter. You can see that it takes me straight to
this landing page. It doesn't take me to
this account creation. Why does it do that? Because I matched this volume. This volume was already created. That means it doesn't
matter if I run Docker Run or if I
run Docker Compose D, we write simply to the same
volume to the same storage. Whatever I saved when
I run Docker Run, I can also read from
that location when I run Docker Compose a D because
I use the same volume. I hope that makes sense.
And if I want to stop it, I can say, Docker compose. Stop. If you run Docker PSA, it will show us this container, but its status is exited, and then I can also
remove it by running. Let me clear Docker
compose down. The good thing, though, is it will not
remove this volume. As you can see, this
storage is still there, and all my configuration,
if I refresh here, well, we stopped the process, yes, but I can simply run, again, that Docker
compose up DRD, And if I go again
to the local host, it will get me straight
back to where I was before. That's why I like it. All right, but let's just stop it. Docker Compose down. Whoops. Down. It's now stopped. And let's go to
the third option, how to install it
the NA ten platform as an LAX container on Proxmox. This is my Proxmox
and the fact is that the Ubuntu we worked on is
also running on that Proxmox. It was this Ubuntu server
with idea of two oh six, where we were running
that Docker commands. But now I want to run it as standalone instance here
on the Proxmox server. So what I can do, I can simply Google Proxmox helper scripts, and just click on
the very top link, and we can see that
view script button. And here, I can just search for Naten you can see it in Internet of Things
and Smart Home section. So let's click on
that. That's the NATN and all you have to do
is to copy this link. You get this little
message. Be careful when copying scripts
from the Internet. Always remember to
check the source. That's a good advice, and
you can check the source by clicking this
button, star on Github. It will open new
tab and you will actually see what is the
code and what it does. But I have already checked that, so I can just copy this, and then I go to my Px Mx, to PVE or whatever
your node is called, to the shell, and I simply
paste this command here. And when you presenter, it will take you through
that interactive process. The simplest possible way is to just use that
default settings. It's really nothing
to show here. If I press Enter, it will
just go through this process. But we will go through it again. I don't like some of the
options that are chosen here, so I will show you how
it's fully automated. I mean, it's running right now, but then I will show
you how to change some of the options during
the installation if you want. Like, for example,
here, disk size 6 gigabytes or RM
size 2,048 megabytes. It's maybe okay if you
just start with NA ten. But if you want to store some additional files or
maybe, let's say, run some additional databases
that you want to connect to this NA ten service
and you want to run it on the same
Alexi container, then maybe you want to
change those values, and I will do it later on. Right now, I will just wait
until this setup finishes, and I will show
you how to change those values if that's
what you want to do. And if you wonder what are
those little dots here, they are so called tags, and that's also not
what I want to have. For example, this
yellow is this sort of blue is automation, this green is
community script tag. This is not important. It's just if you're curious. Let's wait for this
process to complete. And now this fully automated
process is completed. We can see the URL, it's different IP address
it doesn't show us local host because it's a
standalone Linux container, like C container.
We can copy that. We paste it in our browser, and we should still be
able to access NA ten. But as you can see, now, it takes you to that account
creation page because simply that LCC has
its own storage. It's a different storage
than we used before. That's why you would
have to go through the process from the beginning. You can see the
resources here, memory, swap, course, and root
disc is different. But I want to show,
let me just remove it. Let's just shut down this container first
and here in more, drop down when you remove because I don't need
this container. I will remove everything. And let's go back to that shell. Do I have it still
in the clipboard? That's past? No, no. Is the IP address. So let's copy this long comment again from the helper scripts. Go back. I will paste
it again, run it. But this time, I will
choose advanced settings. Number three, option number
three, I press Enter, and now it tells me that to make a selection, Spacebar, okay? That's fine. Press Enter. Unprivileged container. That's what I want.
Yes. Root password. Yes, I need that to be able to access this container, verify. Basically type it
again. Container ID. I want maybe 215, let's say, cost name
NA ten, that's fine. Disk size, not six, but maybe 100 might be overkill, but yeah, that's okay. CPU course, two courses is
enough, yes, I would say. Ram, little bit more, 4,096. Okay, network bridge default, VMBR zero. That's fine. And the static IP, I want to use my
own 192.168.1.215. Let's enter. Sorry. You
have to type 192 dot one, 68 dot one, 215,
forward slash 24. You have to provide subdt
mask as well. It's fine. Gateway IP is the IP address
of my router 192.168.1.1. I mean, these are my changes. You could leave it as DHTP
and it will work fine. It will generate
DIP for you like router will assign IP
to this container, but I want to have
it manually created. That's why I typed IP address and then default
gateway as well. App casher leave blank,
disable IPV six. Yes, MTU default 1,500 is fine. Search domain blank
and DNS server IP, I will use 1111 because I
use manual configuration, I don't rely on the DHCP, so that's why I typed this. Macaddress leave
blank, V and blank, custom tags, these
are these tags. Remember those two dots that
were here, blue and green. I don't need those tags. I will remove them. You can use tab to move
between those fields, okay? Now press Enter. SSH key for root, I could paste it here, but I already have password. It's good enough. Enable
root SSH access? Yes. Enable fuse support? Yes, because I might
want to use Arklon for that as well to synchronize
some data. So I say yes. And enable verbose mode, I say, yes, this is for
the installation process. It will show me
more information. What is going on
in the background. I press, ready to create? Yes. And the conflict file,
no, I'm not interested. And now, the installation
process starts again, but you can see those options
here are now different. The container ID is 215, my IP address,
these last digits, they match the container
ID because that's what I actually not
for containers only, but for all of those virtual
machines and containers, if I see this virtual machine has container ID of two oh six, I know the IP address for
that is 192.168.1.206. This is my way of doing things. I don't say it's
better or worse. It's whatever you choose. But now I have disk size of 100 gig and I have
four gig of Ram. And this is that verbos
information I was talking about. So you get more info
what is currently being pulled during this
installation process. But we just have to
wait again anyways, so maybe simply maybe it
makes it less boring. And it's now also completed, but we can see the
IP is the one that I specified and if
I just copy that, if I go to the URL, we are indeed again on the
account creation website. But if I go to the specs of
this NATNGaxy container, we can see I have now
four gig of memory, I've got 100 gigs of
storage, et cetera, which means if I want to manually overwrite
some settings, I can simply run
that option number three at the very beginning.
3. AI Agents and Workflow Automations explained: What does the term
workflow mean exactly? Or what is automation
or an AI agent? These recently
became very popular, but they are also
very confusing terms. You might even hear
something called AI workflow automation that combines all three
of those concepts. The good thing is that they are actually very easy to explain and you will understand all of that in the next few minutes. We will talk about each of them, and then we'll see how the
automation platforms like make Zapier or very popular
recently ATM platform can help us build those
AI workflow automations. Let's start with the term
workflow and automation. Fact is that workflows and automations are not even
the IT specific things. They've been with
us for ages and workflow workflow is
simply a sequence of steps that you
have to follow one after another to get a
particular task done. It might be surprising,
but you already use some workflows
in your daily life. Think about your
morning routine, I don't know,
brushing your teeth. Yes? What is the
workflow for that task? What is the list
of steps that you have to follow to have
your teeth clean? Well, you need to first
grab a toothbrush. You need to squeeze
some toothpaste on it. Then you brush the teeth, spit, rinse, and then you put
the toothbrush back. That's the workflow for
this particular task. These are the steps that
you have to follow in the exact order to
have your teeth clean. Let's say maybe you
drive to workers, what's the workflow for
that task to get done? First, you need to
grab the car keys, then you have to go
and get into your car. Then you drive to work and
you get out of the car. That's the workflow for
drive to work task. With just another list
of steps that you have to follow to get
this task completed. A workflow is simply a
list or a sequence of steps that have to be followed to complete
a specific task. That's it. What about
automation then? If you think about it, there are many workflows that are
very easy to automate. Again, it does not need
to be about IT industry. Think about all
those manufacturing and automotive workflows that have been automated over time just because they
were so repetitive. For example, if a
CNC machine needs to produce 10,000 identical
parts, let's say, it is worth to spend some time maybe at
the very beginning and create a program that
will follow automatically, it will follow these
steps required to make that one part and that
CNC machine then can be pre loaded with the
tools and we keep repeating that sequence 10,000 times until the entire job until this entire batch of 10,000
elements is completed. Basically that machine
will go on and on and on without or with very little supervision and intervention needed
from a human being. So again, what is
that automation then? The automation is
that single workflow, that's a single task that
is done automatic way, the way that needs none or
very little human supervision. Again, as you can see,
automation is nothing new. Automation has been
with us for ages. But to automate any task, you first need to
understand what the workflow looks like
for this particular task. What is the sequence of steps you have to follow
to get it completed? That's why you often
hear that phrase workflow automation because
that's exactly what it is. A workflow automation
is that workflow, that sequence of steps that is executed in an automated way. Now let's maybe talk
about IT industry because there are many workflows that are very easy to automate. What can be automated
Loads of things, you might run some
automated backup scripts every day or there are some scripts running
every day on the servers. Even at home, you might
have some automated way of backing up your
photo library, let's say, if you work in IT, you might actually get paid
to build some automation. Say, I don't know,
your boss says that every time they get email, when the email arrives, they want to get some
kind of notification on their Whatsapp application that they have installed on
their mobile phone. As always, to get
this job completed, you first need to understand
and define what the workflow for that would look
like because only then you can start
automating it. What that workflow
would look like, those steps that
you have to follow. First, you have to
know if there is a new email in the inbox or not. The first step is some kind
of check that is able to connect to the
boss's email inbox and check if there
is an email or no. If there is no email, then
there is nothing to do. But if there is an email, maybe you want to
grab the subject of that email and that
subject of the email will be then forwarded to Whatsapp application
on their mobile phone. To make that simple automation, you have some platforms
like NA ten or M or Zapier, and in fact, in previous video, we saw how we can install NA ten platform so we can self host it and use
it free of charge. There you can choose a trigger because we always need some kind of trigger and this trigger will do some checks
every minute. Let's say every minute,
this automation will check given inbox to see if there
is a new email or no, this step would do nothing
if there is no new email, but if there is a new email, we would need to extract the subject line of that
email and extracting that email subject
field would be our second step of our workflow. Then once we have
that email subject, we would need another third
step to send this subject. This kind of processed
information already and that processed
information has to be sent to Was application. We can use so called
web hooks, for example, or other whatsapp integrations to be able to send that message. And if you can run that
workflow in automated way, you have workflow automation. By now, I hope
it's clear what is a workflow and what
is the automation. But what about AI agents? What is the AI agent
and what exactly is that AI workflow automation? The AI workflow automation
is a type of automation that includes a human like reasoning
step in the workflow, and this step is very often handled by so called AI agent. But before we talk
about those AI agents, let me give you an example, simple example where we would
need that AI agent to be used as part of our workflow
automation process. Let's say we still work on that same request from our boss regarding the email forwarding to their WhatsAp application. But this time, instead of just forwarding
the subject line, bos asked us to send the summary of that email
to WhatsAp application. Now the workflow will
look slightly different. Well, the first step can
be left the same because we still need to check if
there is a new email or no. That trigger that checks email inbox every minute
can be left as it was. But then once we have new email, we need to read that
email and create a summary of what
this email is about. With standard automation,
we can maybe only pull that subject line of the email or we could
forward entire email, but our workflow currently can't understand and summarize
what that email says. Because to do that, we a
human like reasoning element. We need that AI agent backed up by some LLM, large
language model, I mean, that is able to read that email and generate
a summary of it. That is where that human like reasoning comes
into the workflow and that's what it turns it into that AI powered
workflow automation. Basically, AI agent
is that component in our workflow that can handle
some more complex tasks. When I say more complex, I mean where human
reasoning is required. Those AI agents effectively replace that human
part of the process. If we create our
workflow that way, we are also able to
keep that workflow automated because it does not
require human intervention. It still can be
done automated way. That platform like NA ten, we can connect that AI agent there to any large language
model that we want, GPT, cloud, deep Sk, blah, blah, whatever you can then also
give them some memory so this AI agent can remember
past steps or past tasks, and you can equip them also with some tools like
calculators like APIs, and many other tools. These AI agents can be extremely versatile
and they can be used for many tasks that are way beyond our current
very simple example. Even in this example, I mean, it wouldn't make much sense
to employ a human being to just read the email
when it arrives and then forward the
summary to our boss. Our boss might not even
be happy with that, that somebody reads
their emails. But it makes much
more sense to employ that programmatic AI agent
inside of our workflow. It becomes one step
in our workflow, and that AI agent can
be then used to create that summary every time
a new email arrives. And those AI agents are becoming extremely
popular, really. They're already being used
in some stock trading. They are already making
business decisions or they read CT scans or X ray
they can do, much more. That's why I think
it's super useful to know how you can employ
those AI agents to help you with any
workflows or maybe build workflows for companies
to automate their tasks.
4. Your first AI Agent in 20 minutes in n8n!: If you have no idea what an AI agent is or
how to build one, then you are in the right place. We are going to build our
first AI agent from scratch, and you will see that
it's very easy actually. You don't need any previous
experience to start building and playing
with that technology. You might be
wondering first what an AI agent actually is, and I will explain
that shortly as well. But to show you what it
is and what it does, you have to first
understand that an AI agent is a system
that has to run somewhere. Need some kind of
automation platform where you can host and run
those AI agents. For our first AI agent, we are going to use NATN
automation platform. But please note that
NATN platform has both free and paid
options for paid option, you simply need to sign on to the NATN platform and you can run your AI agents just there. Well, it will cost you
money each month that you want to play with that NA
ten platform in the Cloud. The great thing about
NAT N platform though, is that you can just
download it and you can run it locally
on your laptop, PC, mini PC, if you do it this way, then NATen is completely
free for you to use. NAN is a very powerful tool that lets you build all types of automations and AI
agents and what NA ten is exactly and how to
run it free of charge. We already covered that
in the previous video. You might want to
watch that one to get your platform first set up
because in this material, we will focus only on that AI agent component
available in NA ten. I mean, it's not NA
ten specific thing. There are other
platforms that will let you create AI agents, but we will concentrate
today how to build AI agents in NA ten. This is my NA ten platform. It's running on my
mini PC at home, and here you can see what the main page of that NA
ten software looks like. Even before we start building
anything here, if you, for example, went
for paid option, hosted by NATen in the Cloud, you will go to NA ten is
and you can actually here, see what this AI
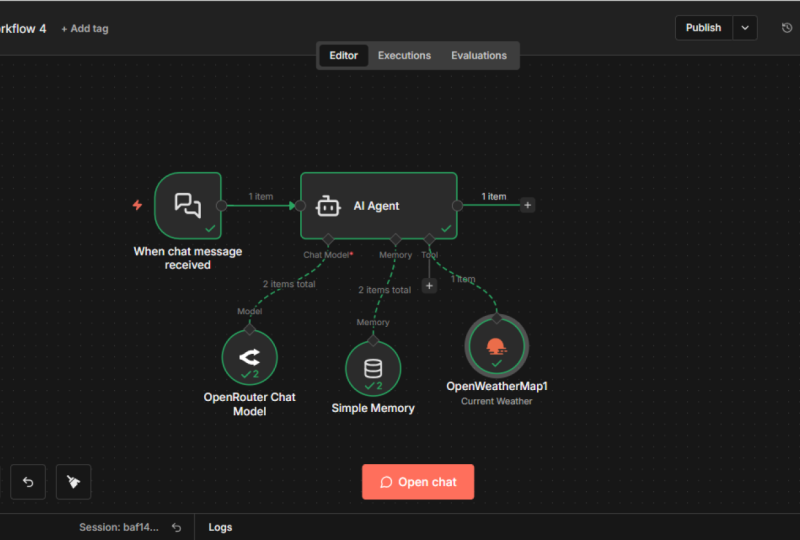
agent looks like. And each AI agent consists
of four main components. You can see that
chat model here, and that chat model can be a large language
model like chat GPT, Cloud, Gemini, et cetera. This is simply the model
that you can attach to your AI agent that
will act as its brain. Then you can attach memory, and there are multiple
types of memories, and then you can
see those tools. But there is also one
hidden component, it's the system prop. Which provides instructions
to the AI agent. But let's go back. What
is that AI agent then? This AI agent is a human
like reasoning system that uses large language model like that HGPT I
mentioned or Claude, and that model will power the AI agent so it can
make, for example, some decisions or it can
understand some stuff, and it can also remember
because it has that memory, and then it can
take some actions based on all that
information it. This memory for our agent, it can remember previous
conversations or tasks, so the AI agent can
take the decision based on that history that is
kept in this memory. When we talk about tools, these tools expand
the agent's abilities even further because tools let the agent interact with external services
and you connect to those services using
so called APIs, and we will also talk about
it, so don't worry about it. At this stage, you don't have
to worry about any of that. In fact, we will configure
such API access to a service called
Open weather Map and to connect to that service, you need something
called API key. I will also show you
how to get that API. Want to know what an API key is, it's like a very long password. It's simply a long string of characters like
letters and numbers, et cetera, and this string can be used by the application. This AI agent then can access other services or other
external applications. Bear in mind that
for some services, you might have to pay
to get that API key. But there are other
services that can give you that API key free of charge. We will get the free one
actually because openweather will provide API key free of charge, don't
worry about it. Simply think of an API key as a user and password combined. It's one long string of
numbers and letters, and that string is used to securely access
other applications. But that's enough
about API keys. Let's talk about that fourth component, the system prompt. System prompt is a set of clear instructions
for our AI agent, and it can tell our agent, for example, what
is its role here, what kind of output we expect, what it should and what
it should not do for us. And sometimes you can add
even more information like some default values or some limitations or some
further instructions. You will see it shortly, but I think it will be
easier to explain all of that during the
agent build process than just talking about it. So let's build that
AI agent, yes. First thing, I will go
back, I can close this. I can go back to
my NA ten platform and I just create workflow. Each workflow workflow means some steps that
you have to follow to get the task
completed simply. Each workflow has to start
with so called trigger. I mean, if you click that plus, you'll have some
triggers to choose from. The trigger I'm going to use
now is the chat message. It's really nice trigger
because you will get input and output
directly here in NA ten. You will see what I mean. If
we go back to Canvas here, we can see that trigger now. Let's move it may be there, and then the next
component can be already our AI agent.
I click that plus. I say AI and I will choose
that generic AI agent service. You can see it says
connected chat trigger node. The left side is that trigger, and it can already recognize that it's connected
to chat trigger node, and the prompt is user message. This is a JSON code. You will see what
it is for later on. If I expand it,
you can see right now it's just JSON chat input, but you will see what
it is for when we run. I will close it. I will go back to Canvas. That's basically it. This is our AI agent. But we can also see
it's not happy, it's red because it doesn't
have any chat model attached. It doesn't have memory
attached or tools attached. Memory and tools are actually
optional, but chat model, you need to have something attached because currently
it doesn't have a brain, the most important component. That chat model, that large language model I
was talking about, that's the first
external service that we are going to connect to. If I click that plus,
it will give me, there are many preconfigured
models I can choose from, you might recognize
some of them like grog, Deepsk, Google Gemini. But if you just start your
journey with A ten platform, I would suggest you go for
that open Router chat model. If you configure
that open outer, you will basically
have access to all other models.
Let me show you. Let's click that Open Router
and then you have to do, you have to click
that dropdown menu, or you will already see
that create new credential. That credential is that API
key I was talking about. But how to get the API key? You have to go to
Openouter website. It's hdpsopouter.ai. And once you configure
your account, you would have to go to credit Although I believe there are
some free options as well, but to be able to access
all available tools, you have to add some credit. As you can see, I added
$8 here five days ago, and they still have
$6.93 available. Will charge you per
1 million tokens. It's not like it doesn't
cost much really. I used it quite a lot and
in five days, I used $1. Once you've got that credit, I think $5 is the
lowest you can go. I'm not sure. But you
can basically then go to API keys and you
just create API key. I will call mine NATN and you can also
configure credit limit, but I will just leave blank. I will create new key,
and that's my key. I'll just copy it, go back here, and I
will paste it there. And this key is for open
Router account, so I save it. You should get that
green response, connection tested successfully. That means the API key
works as expected. I can now close it,
and from now on, I can access all available
LLMs in that open router, which is a lot of them. You have open AI like DPT. We've got perplexity. We've got some Q or Rakai
I've never even heard of. But you can see it's loads
and loads of them, yes. By default, it's GPT for
1 minute, which is fine. We can leave it as
it is. And this is the brain of your AI agent. So you can go back to Canvas. We can move things around here. You can just have a better view, but we already have
something like a chat bot. Because this when chat
message received, this is nice trigger
because here below, that's where you can
type your prompt. I will say just Hi, how are you? You can see agent works connected to open
Router chat model, you can see the input input
was from this trigger, and in the trigger, you
can see that chat input. Hi, how are you? That
was my question. And the output is
the AI agent saying, Hello, I'm doing great. Thanks for asking. How
can I assist you today? That's how you can
use any LLM model you want because you can change
it here. Sorry, not here. You have to go to open Router
yes and you can change LLM and test other responses
from other models. But I want to show
you something else. Right now, if I tell
it, hi, I'm Mark. You can see the
input, higher Mark, and the output. Hello Mark. How can I assist you today? If I ask it, what is my name? I'm not sure what your
name is. Why does it say? It doesn't remember anything.
Why doesn't it remember? Because we have to add some memory so it can remember
the previous conversation. By the way, you can see
here the tokens used. You can see the response
time, which is 1.9 second and you can see how many tokens
were used for this query. As I said, they usually charge
you per 1 million tokens, let's say $5 per million tokens. The longer the queries, the more tokens
you will be using. Yes. This is pretty
important field if you want to use it a lot. That's it. But I was
talking about memory. Let's click that
little plus then. I will add maybe that
simple memory is the simplest as it can
be because it's stored directly here
on an 810 platform, and it asks you for
content window length, which means how many past iterations the model
receives as context. Or in other words, how many
questions it will remember. Yes, five is more than enough
for now, I can go back now. Now I say hi, I am Mark. Response is the same. Hi,
Mark. How can I assist you? Now when I ask, what is my name, The output is now
your name is Mark. How can I help you further? You can also see that it stores two iterations already
in that simple memory. And it referred to that
previous conversation. I had to look up that
history and it found it, and it knows now that
my name is Mark. Simple memory is just this. It is very simple to configure, and it remember numbers
of previous interactions. If for some reason,
it doesn't work, it doesn't refer to the memory, you might want to
hover over this node. They are called nodes. Yes,
all of them are called nodes. But you can hover
over. You've got three little dots here. You just click on them. You
might have yours deactivated. So if I had it deactivated, it won't be able to access it. So I would have
to activate, yes. But that's just in case it
doesn't work as expected. You might want to check
this. And the AI agent became yellow because
we changed something, so we would have to it
doesn't really matter. You know, Yellow means there
were some outside changes. So we've got now large
language model as a brain. We've got some memory.
Now, add a tool. I thought about the
tool to use here. I was thinking, if I want to have a conversation
with this agent, maybe I want to find out what's the current
weather somewhere. I can use that external tool, which gives me the
accurate weather forecast. If we search for weather, we can see that open
weather map tool. Let's choose it and here you will also have to
create new credential. Ignore this. This is my previous
account. It's shown here. For you, it will probably show that create new credential. You would click on you also have to paste
your access token. How do you get access token? You go to openweathermap.org. You create your account here, and I believe the first API key is already included
in the welcome email. But even if you didn't get one, you can simply generate
another one here. I will call it NATM, generate and maybe's
remove that one. This is my API key. I will just copy it, go back to my Natan, and
I paste it here. My account is called Open
weather map account. I will add access
token, I will save it. Now tool description,
we can live as it is. Operation current
weather, that's fine. Format, you can change if
you use different format like Imperial or scientific
for me, metric is fine. Location selection, I don't
change anything here, but in the city, you've
got that little icon here. If you hover over, it says let the model define this parameter. That's what I need.
When I click on that, you can see change to defined
automatically by the model. And the model, it means that LLM model, large language model. What that basically means, if I ask my AI agent, what's the weather
like in London, the AI agent will
pass the city name, which is London, will
pass it to this tool, and weather specifically
for London will be retrieved from here and
returned back to my AI agent. So now I can go back to Canvas. And now we've got
this tool configured. But there is one more
thing I mentioned, and it's that
system instruction, that prompt for AI agent
because it doesn't really understand well what
it's supposed to do here. I mean, if I ask a
basic question, yes, it will respond, let's say, what is the capital of Portugal? As you can see, it's
connected to LAM. I checked the memory, but it probably didn't use it
because it didn't need to. I didn't see why it
would connect to open weathermp because
there was no question about weather yes, it just
answers the question. The capital of
Portugal is Lisbon. But I want to tell my agent that if it's a generic
question, this is fine. But if it's a question
about the weather, I wanted to contact this
tool, open weather map. I want to pull the most
recent information about the weather for
particular location, and I just simply want
to see the output here. How do I do that? I will just
double click on that agent. Now we will change the
source for prompt. If you click that dropdown menu, we will change it from
here to define below. But even before we do that, just make note of
what it takes as an input now is the
JSON chat input. So let me change it
to the define below. Then let me make it bigger.
I already have something. Let me just copy paste. Copy past it, and then
this little icon, I will make it full screen. And this is what I pasted. The instruction for AI agent is, you are a helpful assistant
that can chat with users and also check the
weather when needed. If the user asks
something casual, like, Hi, how are you?
Respond naturally. But if the user asks about the weather in a
particular location, then call the Open weather
map tool with that city name and only call that tool if the weather information
is clearly requested. Yes. We don't want to call
it if it's not needed. But what it's missing
here is another line. I have to instruct it to take whatever is also in
that chat message. Whatever the user input because currently
it will not know what comes in from the previous
step from that trigger. So I will have to instruct it, take the input from user, and now I will use
that curly bracket. It says Anything inside those curly brackets
is JavaScript. That's called JSON
JavaScript Object notation. If I do that, I can now
take that chat input. Previously, it was what is
the capital of Portugal is. Whatever I type in is in this
object here, chat input. I drag it here so basically what I'm saying is
take the input from user, whatever was typed in
in the chat message, take that in and then my AI agent will
evaluate that input, and it will take a
decision based on that. And if I ask for
something casual, it will just respond to me. But if in that input, I asked about weather, it will use, hopefully, open Weathermp. Let's
see if it works. I can close it now.
I can see it here. And if I go back to
Canvas, let's see. What's the weather like
in London? Presenter. You can see it contacts Salam, check the memory, but there was nothing to find,
and it responds. The weather in
London is currently mild with scattered clouds, which means it
understands the prompt. If I ask it basic question, it will not use this open
weather map tool because, you know, there is
no need for that. But if I ask about weather, that's when it finds
this tool handy and it will use it
as per instruction. Just wanted to add if
for some reason that open weather map
doesn't work for you, it not necessarily means that
you did something wrong. Because when you create
new API or new account, it can take up to 2 hours before your API key
is ready to use. If you have some
authorization problems or response like server
is not available, then you might
simply want to wait until your API key is active. It's not only for
open weather maap, it's for other services as well. Bear it in mind. This is one of the simplest AI agents
that you can build, but think what you can do next. Maybe you don't need
weather information. Maybe you want an AI agent that keeps checking a
stock market for you. Maybe you could change this message trigger
to something else. For example, we can use schedule trigger instead
of data message chat. It can run every
minute, let's say, and then you can connect
your AI agent using API key to a service that provides current stock
exchange information. You can then add another tool or even continue working
with your workflow. Maybe you want to send a
WhatsApp message or an email to yours when a given share price drops below a certain level. Or maybe you want an NI agent that summarizes emails for you. You can set a trigger for
every email that you get, and then you tell
AI agent to send the summary of that
email to your Whatsapp, so you only open the mailbox when you receive
something important. What I mean is that the
possibilities are endless here. You can start building more advanced
automation even today. And as you can see, there are no particular skills needed. You just need to set
up the platform and you can start building
your AI solution.
5. Please follow me :): One last quick reminder. If you found this
training helpful, please click that follow
button right now. This is the only way to
ensure that you never miss future classes or important
updates I add to this course. Plus, it lets you easily track your questions
and discussions. Thank you and I hope to
see you in the next class.
6. Build n8n Telegram bot to access all LLM's (step-by-step): This is a telegram bot that
is running on my phone that can access any large
language model I want. It connects to my
NA ten platform, and let me show
you how it works. If I type, for example, use Deepsk, I will get
an answer from Deepsk. If I say Use Groc, I will get answer from Grock and I can get answer
from GPD five, Gemini, whatever I want. This bot has basically access to any available language model
that you could think of, I will show you how to build
that all and don't worry. You don't need any
previous experience. With NA ten, it's easier than you think.
Let's get started then. But first, we need
that telegram app install this Telegram
is a chat program, something like a Whatsapp or messenger that you can
install on your phone, and it is bound to
your telephone number. You just go to Google Play or Appstore and you install
telegram on your phone, just like any other app. And once you have it
installed on your phone, you can also
authenticate this app on other devices like
your laptop or PC, which means that you can run it on any device that you want. Once we have that
telegram up and running, we need to create a chat bot in that telegram application
so we can use it to connect to our AI agents. You have to go to boot father. It's at Bt father,
you have to type, and when this window opens, you have several options here
and you need that new boat. You can see, create a new boat. That's exactly what
we need. I click on that and it says, New boat. How do you want to call it? You can call it
anything you want. I will call it
Automation Avenue boat. That's it. Now,
you have to choose the username for your boat
and it must end with both. It's either bot or underscore
both as per the examples. I will try to copy paste it, but note that it has to be not in use currently
by anybody else. Let's check if that
one is available. Oh, yes, it is. That's it. That's my bot created already. What's the most important
here is your API token. You've got here the API token
that we will be able to use in NA ten to bind NA ten with this
telegram application. Note that this API key
is very important. You don't want to
share it with anybody. I mean, I am showing this
to you, but in fact, I will remove this bot as soon
as I complete this video. But remember, this
is something like a password for you and
you need to keep it safe. But honestly, that's
all we need here. We're already done
with telegram. Next step is to run our NA ten automation
platform somewhere. And one of the options
to run NATen is to use their own NA
ten Cloud solution, but that cost quite a lot
of money every month, and to be honest, it has
quite a few limitations. That's why you might consider
using Hostinger instead. Hostinger has recently become a very popular option for self hosting NATen because they offer a VPs that comes preconfigured with everything you need to start creating your automations. Just go to hostinger.com
slash Automation Avenue. And it will take you directly
to the landing page for that self hosted NA ten
virtual private server. You simply scroll
down a little bit, and you will see all
available VPS plans. This is where you choose
the size of your server. And again, the KVM two is one of the most popular
ones because this is really more than enough
for NA ten to run, but it also has a very good
price. It has two CPUs. It has eight gigram
hundred gig SSD drive. That's really plenty to
just host NA ten platform. Choose how long you will
need this server for, you can pick one,
12 or 24 months. The longer the period,
the lower the price. For two years, it's
a 699 a month. And they gave me a
code that you can use, and the code is
automation Avenue. Once you apply that code, you will get 10%
extra off that price. Whatever the price is,
you will get 10% extra. You just continue and
you have to register. If you don't have an
account already, I mean, I will create a new account
and then it will get you to this page where you choose
a location for your server. By default, the closest
location will be chosen. But if you want to
build a server on the other side of the
world, that's up to you. You can change it here. But I will stick to United Kingdom. It's fine. So I click next. Here, you can choose
either plain OS. You can choose Santos,
Debian, et cetera. But what we are interested
in is the application. You can choose here, for
example, vanila NA ten. That's actually what
I'm interested in. But you can maybe want to go for the one that
has already applied 100 workflows or maybe so
called NA ten in Q mode. But as I said, I'm fine with just NA ten. That's what I need. I select it. I
create a password, so I can log on to
my server if I want. It's for SSH connection, and then you can
choose if you want to have Malwascammer included. I will leave it as
it is, which means I can click Finish setup now. And it says it will
take about 5 minutes, but to be honest, it didn't
take even 5 minutes. It took much less than that. But you just wait for
that process to complete, or you can read
the documentation. Bottom in the
meantime if you want. But that's basically it. Now
you can click that manage VPS which is Virtual Private
server, and this is it. This is your server
up and running. And if you click that
manage Up button, it will take you straight
to your NA ten application. It couldn't get any easier. But what I wanted to show you is a very important thing because what Hostinger
gives you as well, is so called fully
qualified domain name. And that's very important.
Especially when you want to connect
external resources like Telegram or Google or any other resource that want
to contact your instance, your Natan instance
from outside. That is usually
problematic if you host it locally on
your laptop or PC. You'd have to use CloudFlare
tunnel or Aroc tunnel, but here you don't have
to do that because Hostinger not only gave
you public IP address, but they also gave you that
fully qualified domain name, which can be used to interact
with other services. And in fact, you can use that domain to connect
to your service. Let's say you don't want
to click that Manage. Maybe you are on another PC and you still want to connect
to your NA ten application. So you just copy that address. You open a browser and you type HDDPs forwards forwards ten dot, and you past that address,
you just copy it. Presenter, and that also takes you to your
NA ten application. Because it's hosted in the
Cloud in Hostinger Cloud, you can access it from
anywhere you want. Because I open it
for the first time, it will ask me to set
up owner account. So you type email address, your name, last name, and
you create a password. Just click Next, fill in a form, whatever, that takes you
straight to your application. This is your NA ten
platform up and running. Here you can create workflows. That's basically
it. Personally, I don't like that light theme, so you can go to
settings to personal and you can change that
theme to dark theme. I mean, that is at
least my preference. And we are ready to
build our solution now. These are all three tabs
opened in another browser. This is Opera browser, but we are at the same stage. That's my telegram,
that's my hostinger, that's my NA ten, and let's connect the telegram
to my NA ten. I need to click that plus. The first step is always
so called trigger, and I need that telegram
to be my trigger. I click the telegram
and I say on message. If you check that web hook URL, you can see that subdomain
is used for this connection. That's what I meant.
HTTPS, N Aten, SRV. I mean, you don't
have to do anything here, it's just to point out. This is very useful feature that you get with
Hostinger server. And the credentials
to connect with, we don't have any yet. I need to create new credential to connect Aten to my telegram, but the botfaer already created
that HDDP API I can use. I just copy that, I copy selected text and paste
this access token here. And I save it, and it should give me or
that's what we need. Credential successfully created and connection
tested successfully. And it's optional, but let
me change this credential. I will call it I don't know
telegram NA ten, maybe. I know that's the
API that connects telegram to NA ten,
and I save it. That's all I need here.
I can close it now. And if I want to test this step, I can run that execute step. I can see the telegram is listening for test
event telegram trigger, I mean, which means I can
go back to my telegram. I can now use my bot. It says you will find
it at blah, blah, blah. You can click that little link. No messages here yet, of course, because
it's a new bot, I can start it and now even I don't have
to type anything yet, this already should
trigger something that forward slash
start, starting the bot. If I go back, that's what it is. I can see it's a bot
command and the text inserted was forward
slash start. But I can test it further. I will click that
execute step again. The telegram trigger
within ANA ten now listens to any messages coming
to the telegram itself, which means if I go to
that telegram and say, I don't know, hi, how are you? And if we go back,
now we can see the text here changed
to hi how are you? The other important
thing is that chat ID. We will use it later on.
And if you're curious, what the heck mark is that date? This is something
called epoch time. If you copy that, you can run something like epoch
time translation. I don't know. EPO converter O. Placed it here timestamp
to human date. It is indeed today's date and
the hour up to the second. But it's called epoch time. Doesn't really matter because
we will not use this one. It's just if you're curious why it's in that weird format. But that means our telegram
trigger works as expected, which means also
we can go back to Canvas and we can
continue our build. Let me maybe move
it to the left. And now let's configure
the first AI agent. I click on that plus and I
say AI agent and see it here. We will first build
a simple solution with just one large
language model, and once we've got
that up and running, we will add more and more
large language models. We have to simply understand what is going on under the hood. And the source for prompt, that's the first thing we
want to change it here because it's not connected
chat trigger node. It's chosen by default. We want define below. We want to define it ourselves. It's simply the
information for a agent, what it is supposed to do
here in this workflow. I will write a simple prompt, maybe something like take the
output from and from where? Well, on the left side, we
have the previous node. It's a telegram trigger, and we can see its output. And honestly, the
only output I'm interested in is that
text. Hi, how are you? Because we are going to send some text in our
telegram message, and I'm not interested
in anything else. I just want to pass that
message to my AI agent. Whatever is on the
left is the previous. Here is the current node, the AI agent, and on the right, you've got output, which
is the processed data, nothing here because there
is nothing processed. But once AI agent
processes the data, it will go here on the
right as an output. I want to grab that
text from the telegram. I will just grab it here. Take the output from this field. Whatever is in this field, if we switch to JSOM, it's JSOM under
message, under text. Whatever is here, let's
go back to Schema, maybe. Whatever is in that box, in that field, and respond back. Couldn't get any simpler really. The full instruction
is to just grab this text and respond
back to that text. That's all we need to set here. I will now go back to Canvas, but we can see the
AA agent is not happy because it doesn't have
any chat model attached. Let's attach the
chat model then. I click on that plus, and here you can use different anthropic, Azure, deep Sik,
many LLM models, but the easiest way
to access all models, not specific ones
like Grock or Gemini, you can go to open
Router hat Model, and open Router
provides you API access to nearly every single LLM model that is available in
the world, really. But that means you need an
account with open Router. You just have to go to
openouter.ai, create your account, and you immediately
have access to some freely accessible
LLM models, but not all models are
available for free, of course. If you want to use the
paid ones as well, then you have to go to
your account to credit, and you have to add some
money to your account. As you can see, I've got $6.50, and in two months, I used only $1.50. It's really a great
way to access many, many LLM models from
one single source. But what I need to do here,
I have to go to API key. And they have to
create new API key. I just call it let's say
telegram to NA ten, maybe. You can set the limit
for that API key. Let's say if you reach $2, that API key will stop working, but I will not do that, but it's up to you. I
will just create it. And once you've got
that API created, you have to copy it immediately because it will
not show up again. You would have to create
yet another API key. But now I've got that API
key, so I can go back. And in this open
outer chat model, I click that credential
to connect with, I create new credential, and I can paste my API key. I will change the name again, maybe telegram also to NA ten, so I know what it is
about, and I save it. I can see connection
tested successfully, that's all we need.
I can close it now. Now you can choose
any model you want. If you have some credits,
if you don't have credits, you can still choose Olama or there are models
available free of charge, but with some credits available, you can access all of them. And have a look
at that. The list is a nerve ending really, Deeps Google Gemini, infirmatic. You've got meta, ma, Microsoft, Mistral AI, Mistral
is really good by the way. Got morph nur Open
AI, GPT models. You've got multiple models. By default, 4.1 mini is
chosen, but if you want, you can also use GPT five or GPT five chat or maybe GPTive Mini. Let's have a look further. Q and blah, blah, hundreds. I don't know how many
of them are here. It's loads and loads of them. I will use GPT five Mini,
but that's basically it. That's all we need here. I
can go back now to Canvas. Now the agent is happy because it has now open
router chat model. Well, one more thing,
I will double click. Maybe I will change the
name to GPT five maybe, so I know what I chose. Now we go back. I know
it's open router, but we chose GPT five. One more thing we can
add here is a memory. If I click on that little
plus here next to memory, I can choose a simple memory. This is simply for my AI agent to remember
the previous conversation. Maybe I want to refer to the previous conversation and
ask some further questions. This way, using simple memory,
I will be able to do so. Default is five
previous conversations, but this JSON session ID,
it doesn't exist here. I want to change it
to define below. Basically, that's all
I need to remember, you know, just the text window. You will simply
remember those fields, what I was talking
about previously, or what questions I
asked previously. That's all it needs,
and it's green now, which means it's valid. We can go back now.
That's basically it. That's all we need for
our agent to work with a single large language model.
Let's test it again then. I say execute workflow. My telegram trigger now
listens to new messages. I will go back to the telegram then and I will ask
maybe this time, Hi who are you? A presenter. I'll go back quickly here
and you can already see AA agent works with GPT five and they are
working on the response. They used simple memory, which means any
previous conversation was already looked up, and now I can open this log. At the bottom, you've
got those logs, yes. I can use that up arrow, and this is the output. PD five asks, do you mean the assistant
previously reply to, who are you or do you
have some specific test? I mean, it works and doesn't work because
we've got output, but we've got this output
only here in this field. If I go back to my telegram, I can't see this
output here yes. That's because we have one very important
component missing. This AI agent now has to send this output back
to our telegram. Currently, I can
only see it here locally within the
AI agent node. Let's add that
telegram output then. I click on that
little plus here, and I search for telegram again. But now because I want to create that return
path, let's say, I will search for send a
text message. Here it is. And here, credentials can stay the same.
That's a good thing. It might take a little bit
longer to configure it first, but then you don't have to configure the credentials again. You can reuse
previous credentials. You can create new
one if you want, but you can simply reuse
the previous ones. Preserve message is correct. Operation is send message,
which is correct. But in fact, maybe
you want to change it to send photo or maybe
you want to send video, maybe you want to work with different AI models that can generate some photos
or videos, et cetera. That's where you would
personalize here, the response. But for me, it's a
simple send message. But what I need here is chat ID. That's what I mentioned. Well we can see the output is from the previous node and previous
node was AI agent itself, we still can see the
telegram trigger as well. We can see the information
from the first node. The telegram trigger tells us what the chat ID was actually used and chat ID is here and we can respond to the same chat ID, and I can simply grab
and put it here. Whatever chat ID is, I will use it here
in this field. The text note that I'm no longer interested
in this original text. I am interested now in the
output from my AI agent, so I drag this instead. This is the response of my AA agent to my
original question, and that's what I need to put back to the telegram channel. And I can simply
execute step here. I will reuse those details. If I execute the step, bam, node execute
it successfully. If I go back to my
bot, have a look. Now I can see the response here in my telegram
application as well. The one thing that I don't
like is that this bottom line, this message was sent
automatically with an item. This is not what I want to see. I can change it easily. I
can go back to the workflow. And here there is this
little button add field, and the very first choice, append NA ten attribution. You click on that,
you disable it, and now if I execute this step, it says execute it successfully. If I go back, I indeed have
the same information again, but with no, this
message was sent automatically now just the
message I want to see. Let's test it one
more time maybe, but let's test full workflow. We'll go back. I say
execute workflow. My telegram is listening for new messages,
telegram trigger. So I go to telegram
application and I say, maybe, Hi, what
ALA model are you? Enter. Go back here. It works with GPT five. It used the simple memory. It was very quick. I didn't
even see when it happened, and it sent the message
back to the telegram. If I go back to my
telegram application, Hi, I'm hat GPT. Allowed language model,
blah, blah, blah. So it doesn't say
ready, it's a GPT five. It just says it's chat
GPT, but never mind. You can see that
works as expected. How do I add more
LLM models then? Currently, I only have GPT five. How can I add more models? Maybe I want to have Deep Sk, maybe I want to have
grog, et cetera. It's actually very easy. Let's rearrange it a little bit. Let me move it up. Or you
can use this rectangle. No, I don't like it. I want
to move it somewhere here. To add other LLM models, it's actually very, very easy. You've got those tools here. You click that little plus, and now you search for AI, I will show you AI agent tool. That's exactly what
we want to use. I click on that, and
now my main AI agent, which operates with GPT five, will now be able to
access other AI agents, and I can use different
large language models for those other AI agents. Let's say this one
I will want to use as a rock. That will be my grog. Change the name and now
here in the prompt, I don't want to type anything. I will just use this
star like thing icon. Let the model define
this parameter. That's perfectly fine. I just click on that
because that parent node is AI agent and this like a
child node is also AI agent, they will be able to
communicate fine. I don't need to tell
them what to do. I just change the name to Grock. Prompt will be
defined by the model, I can go back to Canvas now. The only thing I have to
do here is to connect the Grock chat model for
this tool. With here. I will click on chat Model, and you might be tempted
to use that Grochat model. But remember, we can use
open Router and open Router. We already have credentials with open Router and
within this solution, I can search for Grock. Maybe I want to use
Grog three Mini. I changed the name to
grog here as well. And that's as easy as it is. I already have credentials. I just choose different model. I go back to Canvas,
and that's it. This tool is called Grock. Let's add another tool. Again, I use AI agent tool. I just click that stars, so the AI agents will
talk to each other. I change this name to I don't
know what should we choose. Maybe Deep Sk. That's
all I need here. I go back. Okay, I
messed up the name. Deepss not that important, but, you know, here, the
important bit is chat Model. Again, don't search for Deepsk. It's already here, but
we need open Router. That's the old beauty, you know. You just need one account
with open Router, and that gives you access to every other large
language model. And here with an open router, I search for Dipsk. Which one shall you choose? Maybe one, the original one. I will change it
to Deepsk as well, the name of the model. Let's go back. That's cool. But how our main AA agent
knows when to use them? When to use Grock or
when to use Dipsik? Well, it doesn't, in fact. We have to give it instruction
when to use this model, when to use that model, or maybe when to use
just the default one and do not refer to any other tools because they
are tools, yes. We can do that by double
clicking on our main AI agent, and we just change the prompt. I can click this little icon
here to make it bigger, and now I want to change
my so called prompt, which is instruction
for AI agent. I will just maybe copy paste. I say, take the output
from Jason message text, which is still here
because I still want to take the same
message from telegram. If it includes something
like use grog or Grock at the beginning of the
message, maybe, I will add. Then use Grock tool
to generate response. If it includes
something like use Deep seek or Deep seek at the
beginning of the message, then use Deep Sik tool
to generate response. Once you have that
response back, forward it back to telegram. If there is no specific
instruction which tool to use, then just use default chat model and answer straight
back to telegram. Pretty straightforward,
isn't it? That should work in theory. Let's see. Let's go
back to Canvas and now I will execute the
entire workflow again. I go back to my telegram
and I say, use Grock. Who are you? Let's enter,
let's go back quickly. A agent still will
use first GPT, and now we can already
see it uses grog. It understands this instruction. It knows it expects
response from the grog. Then it will prepare
the message and send it back to telegram, hopefully. And bom, this is it. Workflow executed successfully. Let's see what it
responded with. I'm grog, A assistant,
blah, blah, blah, from X. A assistant built by X. That's enough to prove
that Grock was used. We actually saw it running
in the background. What about the Deep
sk? Let's try that. Use Deep Sk. I will just ask the
same, who are you? Let's enter. Let's
go back quickly. Oh, I can execute work flow
quickly, it should work. Yeah. If you do it
pretty quickly, it will still work.
But look at this now. It uses Deep Sik goes back, and it should send the
message to the telegram. Bam. Workflow executed
successfully. Greetings. I'm Deep seek R one,
artificial intelligence. All right. But what if I don't say anything?
At the beginning? I mean, I don't want to
use Grock or Deepsk. I just say or ask, who are you? Let's enter. Let's go back. Again, execute workflow. Forgot to click first,
but never mind. Let's see what happens.
As you can see, it didn't go to Grock. It didn't go to Deepsk. I responded straight to a telegram without using
any of those tools. Let's see what it
responded with. Might not be super clear, but we can see it is
response from GPT five, but it says, I
don't have the who are you output.
Please paste it here. It simply tells us what
it expects as an input. Let's just delete the chart
and start again, maybe. If I just start but
see what happens. It refers to the instructions,
maybe I will ask. Explain very shortly
what is an A ten for. Enter execute workflow. We can see it doesn't
refer to Grock or Dipsk. Let's see what's
there as a response. All right, NA ten
is an open source, note based workflow automation. That works. Let's compare
it to response from Dipsk. I say use Deep Seek, explain very shortly
what is an A ten for. Enter, go here,
execute workflow. It hopefully now use Deep
Seek as a tool and it does. Now it will generate
the response. And let's have a look what
Deep Sik version looks like. It's pretty similar. It's even shorter than coming from GPT, and let's compare the Grock. Explain very sharply
what is an ADN for. Let's enter, go here, execute work flow quickly, and now it should go
to Grock it does. Let's see. All three are very similar but
different at the same time. But basically, once you have it configured and everything
works as expected, now you can make this
workflow active. You can just click active
here in the top right corner. You say, got it and now you don't have to keep clicking
that execute workflow. Every time you paste
something in your telegram, this workflow will work
automatically and we'll keep responding to all the messages that you post in that channel. That's all I wanted
to show you today, thank you for watching, Mark.
7. Build Mistral OCR & AI Agent that reads documents: In this video, we will build a fully working
NATN AI automation from scratch that can
read PDF documents. I mean, even ones of very poor quality or with
barely visible text. We will use a tool
called Mistral OCR, and then we will pass
that document to an AI agent and that AI agent can do anything we
want with that document. For example, it can
summarize it for us, I can translate it
to another language, or it can answer questions
about its content. As I said, we will go through the entire process step
by step and by the end, you'll have fully functional
solution that you can use at home or at
work, or who knows? Maybe even customize it
a little bit further and sell as a service
to other companies. It's my personal automation and I've been using it
quite a lot recently, as I had to review
some legal documents after purchasing a property. These documents usually
look like that and they are written in some legal language that I don't really understand. Instead of trying to
read them as they are, I just use my AI automation instead and upload
the document to Mr. OCR and then AI agent
will process that data for. Maybe I will simply show
how it works, okay? This is a PDF document that
we are going to work with, and you can see it's very
poor quality scan of my lease document
from 1980s or 1990s, and it's not fun to read at all. Plus, you can see some letters
are barely visible here, and also the text takes just
a quarter of every page. But then most of the PDFs
look like that, to be honest. And I think this will
be a good example. And we can see it's
44 pages document, extremely boring,
which means instead of reading all,
what I usually do. You probably know by
now that I'm lazy, I use my automation instead. I just do execute workflow. I browse for that document. This is this list document. I select it and submit. Now we can see the
workflow is running. The document is
being uploaded to Mistral we then get signed URL. Now the OCR happens, optical
character recognition. This is another AI from Mistral that deals
with this document. It tries to read what
is in that document. Then we've got a markdown node, and now AI agent creates a summary for me
of that document. I use Open AI, I think GPD for dot one, if
I remember right. But we are going to build that from scratch again anyways. If we check the output,
if I click the agent. All right, something I didn't think of actually
at the beginning, there are some personal details, but you can see, certainly, here is a little summary of
the document you provided, which is a lease
agreement and associated deeds related to the
property I mentioned. Let me scroll down maybe. It tells me that this document
includes images such as architectural role plans and company seals, blah, blah, blah. But now I've got one page and my instruction
is very basic. If we check my instructions only take all information
from this side. And create summary of that document, and
this is the output. This is summary
of this document. That's all the AI does
and how to set it up, how to customize the
instructions for the AI agent and
everything else, you will see during
the build process. So maybe let's get started. Let me close this one. I didn't really mean to change anything, so I can live without saving. But to get you started, you need one big prerequisite, though, and this is
the NA ten platform. And NA ten is a free to
use automation platform, but it's free to use
if you self host it, which means you
run it locally on your PC laptop or maybe mini PC, like I do, or maybe some
server in the Cloud. And what NATen is and
how to run it locally, we had a dedicated
video about it. So if you do that first, if you want to follow each step, you have to watch that
previous video which includes step by step guide on how
to run this NA ten locally, which means you can
run it free of charge. There was also another video where we built our
first AI agent, and that one is not
really a prerequisite, but it might make a lot of
sense to watch that one too. But as I said, it's optional, so it's your choice if you
want to watch that one or not. Once you have NA
ten up and running, we can start creating
our workflow. By default, you will
see nothing here, no projects, but you will have that create
workflow button. That's what you want to
click. And that's where you start building your
workflows in ANATN. The first step we want, first step is always
so called trigger. Something has to trigger
that entire workflow. Let me click that plus then, and I will search I think
it's a form something. Yes, NATNFm. And I need that trigger on
a new NA ten form event. We are building
that first bottom where I could upload my file, my last document, in that case. We will then be able to send that document up to Mistral OCR. And there is not much
here for us to do. Form title, maybe I
will call it document. You can add description,
but it's optional, but what we want to do
here is add form element. And field name, you
will see what it is. Don't worry about
it. Form element, we will call it document again. But the element type, we want to choose file
because there are many elements that you can
submit using this node, but we want to submit file. And we want to
submit single file. So let me disable
that multiple files. We are interested
in single file, and now you can also limit it
further to maybe just PDFs. But the fact is mistrl OCR
can read more than PDF. It can read word documents, power point presentations, so I will just
leave it as it is. I will switch that to a required field because we
have to attach a document. We have to work with something. That's it. That's
all for this node. If we now go back to Canvas, you can see we've got our first node because they
are all called nodes here. It's also a trigger,
so called trigger. Let me maybe rearrange that
and I can already test it. If I say execute workflow, now you can see those fields. First field we call document. Second field, we also
called document. Sorry. This is that second field, and this is this
window which let us select the file
and submit it. If I browse for my file, that's the least document, I can now select it and
I can also submit. And we've got workflow
executed successfully. That's what we want to
see. That's basically it. Our first node is
up and running, which means now we can
create a second node, which will upload our
document up to Mistral AI. But before we do
that, we have to have an account on Mistral
OCR or Mistral AI. Because if you go
there, the website is mistral.ai. That's what we need. Mistral OCR is currently the best software available on the market to read
information from PDFs, images, and other documents. The coolest thing
about Mistral OCR is that it's currently free
of charge for you to use. Have to open so called
experiment plan or experimental plan, something like that,
and it will not require any card details or any
other payment methods. Simply when you sign up, it will ask you what type
of account it is. You just say experiment,
and that's it. And what it means, you will be able to click that try the API. And this is where you
will get free API keys. You will be able to
create API keys. Like here, I can create new key. I already have some, I mean, but I can create another one. And if you go to that doc
in the top right corner, and then on the left, we choose document AI, I think. Yes, that's it. And we
choose that basic OCR. It's not really basic.
It's very sophisticated. But you can see the
options OCR with PDF, OCR with uploaded PDF, and OCR with image. OCR stands for optical
character recognition. What we need from this website, we have to scroll down and
these are our options. I'm already on curl, but I believe by
default there on Python, you will see
something like that. If you have your solution
written in Python, this is the code you can use. But for us, we will
need that curl. You will see shortly why. Simply click that curl option, and all other options we should switch to
that curl as well, and you might guess it, we will need that upload a file and we need
that curl code. Why do we need it? You will see. There is this gray little icon that will let you
copy everything. Let's use it. I
will just click on that to copy everything. I go back to my workflow now, and now I will click on this little plus to add another node, and I will search for HTTP. And this is exactly what I need. We will need actually three of them, and this
is the first one. These requests can simply communicate between our
PC or Mini PC or server, whatever you run your NATanm and it's the way of
communication with Mistral AI remote site. I clicked on that, and now I
can click that Import curl. And now we simply
paste this code here. I will paste it, click Import, and what it does, it simply populates all those
fields for me. And this is all cool. But the first thing
I need here is the API key and how
to get the API key. Once you have your account, you have to go to that mistrl either here API or maybe
from the main side, you click that try the API, you will basically land on this page and you
click that API keys. And you click Create New key. You give it a name, Mark
Mark key. That's fine. I can set expiration date. That's really good choice here. For this video, I will
choose tomorrow's date, which means tomorrow this
key will already be expired. That way, I don't have
to blur it or something because API key is
basically your password, so how to keep it safe. But because mine will
expire tomorrow, I will not create this
video till tomorrow. It will be already expired
when you watch the video. I click Create New key. And this API key is
only shown once, so you copy the key and either save it
immediately somewhere, or I will simply go back to our workflow and I
will paste it here, and I want to paste it exactly here after that
barrier information. Which means this is a header. This is a HTTP header
that will go to Mistral and it will show
Mistral that it's you. You can think of that as your user name and password
for that Mistral service. This is what API
key basically is. Maybe I will change
one more thing because we need three
of those nodes, and they will all be
called HTTP request. Let me change that name to maybe upload to
Mistral. That's cool. And we've got the authorization, and below also was
automatically populated. The purpose is OCR, but there is one
more thing because here you've got parameter type, and the type is NA
ten binary file. That's correct. The name
can be left as file. It doesn't really matter,
but what matters here is that input data field name. And what it is, the binary file, if you switch because you've got different views here, here, we've got Schema,
we've got table, JSON, and the binary. So make sure you are
here on the binary, and we need the
name of our file, which is here called a document. Simply whatever here
is on the top in red, you want to copy paste
it here in that field. And once we have it, I
believe that's all we need. If I execute the step, okay, I asked me to run
the whole workflow. That's fine. I will go back. Let's run this workflow,
I will browse, I will choose my document, select, submit, and
let's see what happens. Two things can actually happen. I can work or cannot
because I will tell you, all right, workflow
executed successfully. That's success,
but you might get an error at this stage
because these API keys, when you just create them, sometimes they don't
work immediately. Actually, it can
take up to 2 hours before an API key
works correctly. Was lucky one because mine
worked within 1 minute, but it might not be
the case for you. If it doesn't work, don't panic, don't worry, and don't
try to change anything. Simply leave it as it is
and try again in a while. Maybe your API key is
simply not ready yet, but for us, it works already as expected, so we
can go further. What I can also do,
I can double click on that and I can pin
that information. What that pin does, it
says exactly node will always output current data
instead of executing. I will click that,
I will go back, and now it's like
this purple color. That means it's pinned. And for testing purposes, it's a good option because it means when you
execute the workflow, this data is not constantly sent to mistrl back and forth. It will simply remember the current data and
we'll just use this. It's especially useful
if you have API that is limited to maybe ten requests a
minute, let's say. You don't want to push the
same data over and over again, it's better to pin it and it's stored here locally for now. All right, but let's
build another node, and another node will get us signed URL. Let me
click that plus. It will be again HTTP
request. That's fine. And we want to also import
it as curl command. So I will go back
here to this page with our curl commands, and
this is the one I need. Get signed URL. But what even it is about? I will maybe first copy it and then I will
explain it, right. So I copied this,
get signed URL. I go back to my node, Import curl. It's not the one. I have a new one,
it's this command, and I say Import, and I change
the node name to get URL. And now let me explain
what it is at all. You can see here on the left, it's input from the
previous node from that node that uploaded
the file to Mistral. It uploaded it to Mistral
and Mistral gave us that ID. This is the identifier
for our file, but already there in that
remote location in their cloud. And what we can do now, we can create a
signed URL signed URL is a secure temporary
link that can access your file in that mistral
cloud because our file is there in Mistral and it now just waits
to be processed, but it's not processed yet. This signed URL is a
secure link that we can use to locate our file
in that mistral cloud. I need this ID. I
want to move it here. In this URL, I want to replace. You can see dollar sign ID. I want to remove that
and what I really need, I want to move this container. I want to move this JSON object. You can even swap to JSON. You can see ID, yes. Is the JSON view. If I switch to schema,
that's the schema view. I can now hover
over that and drag this ID here, to that URL. Make sure this filled up
changed to expression. You can click first
expression and only then drag this container. This is JSON object, and whatever is in that object, we are not interested
about this value right now because this is static value
for this particular file. We are interested in this
container, in this object. It doesn't matter what
current value is. We want to have anything that is currently in this object,
in this JSON object. That's why I drag
this portion here, and I say, whatever is in that JSON ID,
currently it's this. It's whatever is in that object. I want to have it in this URL. If I click here, result, the result shows this actual value that
is currently there, this is simply taken out
from this container. Okay, I hope that makes sense. Below, you can also
change the expiry. By default, it's 24 hours, but honestly, we will need just maybe 1 hour or even note. But on the other hand,
it's safe to leave 24 hours because they
are pretty safe. The signed URL is
really secure link. It can be valid for 24 hours. That's not a problem. And
now let's scroll further. I entirely sure if
I need this header, let's just remove it. But we need the API key again. Maybe let me remove this value. For now, I will go
back and copy it from the previous node because I already don't have it in case. I copied something
else in the meantime. So I'll go back now
to get URL, again, authorization, and
this is better, and this is my API key
because it stays the same. And that I believe is
everything we need here. Let's go back and we need
one more HTDPRquest node. So search again, HTDP. That's the one we
need. And now we need a node that will actually
process the data. Go back to basic OCR to
this website I mean. And we search for it's at
the top, OCR with PDF. So basically the very first one here on this website right now. That's the curl command we need. I copy this one, I go
back to my workflow, and again, import curl. I remove that and
I paste this one. I say Import, all
fields are populated, and I will need APIKey again. So maybe I will first
change the name again to let's say OCR results. I will go back again and copy my API key again
from this node this time. That's the API key. I go back to my OCR results
node, and I paste it there. But if we scroll further, we will also change. We will also have to
change this document URL. For the time being,
it's like some random, I don't know what it is, even, but that's not
really what we need. What we need is actually
our document URL, and our document URL is that signed URL that we
created in previous node. And unfortunately, I can't
see it here because I forgot to run it
and pin the data. What we have to do I have
to go back to Canvas and maybe let's run entire
workflow, right? So I will browse for my
lease document again. I will select it,
I will submit it. This node will just go through. Get URL seems to be working fine because it's also green. I
will double click on that. I will pin this data as well because I know
everything seems to be fine and I can even see
problem in node OCR results. Well, I know about it. That's
because we need that URL. Nod OCR results is
the next node this. Here, I want to
only pin the data. I go back and we
go to OCR results. We just double click on
that, we scroll down, and now we have that URL. This is this long
URL, it's signed URL, which allows us to
pull the file back to our PC or wherever this NATA is running.
I just drag this. It's again, JSON
object that says URL, and I drag it there and paste it between those double quotes. And now we've got JSON URL. That's exactly what we
need. That's basically it. And the last thing here, this node will try to output
everything as a binary file. You can see file here,
response format. So you can either change it to JSOMO what you can also do. You can simply remove that
entire response field. And maybe I will
use this option. I will simply remove. You only have this send body,
and there is nothing else. Let's now go back to
Canvas and let's try to execute that workflow again.
Let's see what happens. Select, submit. It will go through these
because they are pinned, only this will be processed. Will it works as
expected this time? Yes, we can see workflow
executed successfully. Let me pin this data before I forget by clicking
this pin data icon. We can actually see
already what was previously barely visible
text we had in that PDF. We now have it in clear format, maybe let's move a few pages, no personal information is
further down this document. You can see now, it
clearly says what it is, demised premises,
the lesson making good damage the fire blah, blah. Whatever was in that poorly
scanned PDF document, now I have it here and
it's formatted properly. Every single page
of that document is shown here as a single
markdown field. If I scroll further, there is another markdown.
It's another index. Index means index
seven means page eight really because computer
starts counting from zero. I can scroll further and
further each page was translated by mistrl
OCR and it's here. It doesn't change the
fact that it's still the same boring document
I don't want to read. Maybe, first of all, I want to get rid of all that
redundant data. I don't need that height
weight dimensions, blah, blah. I want to have it formatted properly and maybe not markdown, but maybe as a text document
or word document or maybe let's say HTML document that I can simply open
in this browser. If you want to switch
that view to HTML, it's actually very simple
because you go back and you add another node which is called
markdown. That's the one. We want to switch
markdown to HTML code. There is one little
issue, though, because if all your
documents had only one page, then you would have to go here. Page zero is
basically first page. You would want to drag this markdown simply first
change to expression, yes. And now I can drag
this field here. But the problem
with that is this is only working for page zero, which is this first page. Or if I want maybe to
translate just page one, I would remove this and
I would drag that, yes. This will work only for page one, but that's
not what I need. My document has multiple pages, and I need all of them to
be translated to HTML, and maybe I want to also
preserve the page numbers. So my query here has to be a little bit
more sophisticated. We can simply ask hat GPT. We can copy this output here, maybe JSON, maybe
in JSON format. I will just copy
portion of that and I can ask hat GPT what
JSON query I should use to preserve all
the pages and to combine information only
from Markdown field. I basically need each of them
to be on a separate page. That will be again
separate page, and that again. And that's
exactly what I did. I asked hatDPT and hatDPT came up with several solutions because there is not
one solution that work, but it told me to use,
for example, that, and this indeed
works as expected, because I already tested it. And the destination key, we also want to
change it as HTML. So if I now go back to Canvas, let's run this workflow again. It's a workflow executed successfully. So
let's have a look. Let me pin that data
before I forget. The input is that
from OCR results. It's processed here in the middle and the
output is on my right. If I slide this view
here to the right, this is HTML code that can
be displayed by my browser. Again, let me scroll down so
there is no personal data. But you can see it's
split into pages and each markdown is
now on separate page. You could simply save it, and
maybe that's what you need. Maybe you want to display
it in your browser. But that's not
what I want to do. I don't want to read
this document at all. I want an AI agent to have
a look on that and either give me a summary of that or maybe translate it
to other language, or maybe I only need information
about some fixtures, like here or external walls. Maybe I want to ask AI a
very specific question. It will go through this document and will simply
answer instead of me going through 44 pages trying to find this information. The good thing is the HTML
code is perfectly fine for AI. It doesn't need
specific format as long as it's formatted
properly here, it's one big blob
it can work with. For AI, it doesn't really
matter if it's HTML, if it's text document,
if it's Word document. This is basically
something we can pass further to AI if
that's what we need. I'll go back to Canvas
and maybe let's rearrange that a bit because we need
a space for our AI agent. I just tick that plus. I say AI, AI agent. Let's switch the view to table. Now on the right, I mean, on the left side on the input, but if we slide to the right, we've got this HTML code, and maybe let's scroll
it down a little bit, so there is no
personal information, only some generic one. And all I have to do here is to create a prompt for my AA agent. What should be the
source of the prompt? I say, I will define it below. I click that and
I simply tell it, take all the information
from this HTML. Which is another JSON object that stores all these data, yes. So again, change this
to expression here now and move this
HTML field there. So take all the information
from this field, basically everything that is there and create a
summary of that document. That's very basic prompt. You can get more sophisticated one or maybe you want to ask specific question or
maybe you want to translate it to other language. That's where you can specify the instruction for AI
agent, what to do with it. I will just tell it
to create a summary, but maybe that's
not what you want. Maybe you want to
do something else. That's where you specify
that information. So I will go back to Canvas because that's all we need here. And our agent is red
right now because it doesn't have any
LLM model attached. And to attach LLM model,
you need one more thing. You have to sign up
to one of the LLMs, which means you can
click that plus, but you also will need an account on one
of those providers. I have, for example, OpenAI, which has Chat GPT and GPT
3.5 or GPD for one models. You can use Olama
which I think has some free of charge
models for you to use. But what I would
really recommend is to get an account on
that open Router. Why? Let me show you. I
click that open router. And what open outer
allows me to do, I can choose any
LLM model I want. Look, I've got Open
AI here included. Let me scroll down maybe. We've got Grock from X, yes. We've got some Tod DM, I
don't know what it is. The drummer, no idea as well. Soso, blah, blah, blah, QN. And we also have perplexity. You know, you have one tool that has access to most of the LLMs, or maybe all of the LLMs, because most of them I've
never even heard of. And we've got also
Open AI included here. Like Open AI GPT 41 Mini
is selected by default. But the thing is,
if you want to use Open Router and Open AI model, then you have to first create
an account open router, and then you have to add some
credits to your account. You have to top up,
for example, $5, and then you can
use those credits when you use the API keys. You would go then to API keys. You would create your API key, and once you have that
API key, you go back. Let me maybe duplicate this tab. Basically, go back
to the main page, you create credential and you create credential
for open Router. And you paste your API key here, but I already have one,
so I don't have to do it. But if you think it's worth it, and I really recommend
it because then you have access to all LLMs. You can switch between various different
large language models. I chose for one mini
or maybe for one. Let's change it to for
one, not for one mini. That's basically all I need. I can go back to Canvas. Now the agent is happy, it's not read anymore, at least. So now, maybe let's
save get of work. It's worth to save
every now and then. And let's execute
that workflow again. Let's see what happens.
My least document, select, submit. Went through because all
the information is pinned, but AI agent now works on a summary of that
document for us. It took a while, but it says workflow executed
successfully. Available click on that,
that's what I have currently. Here is a summary of
the key information in the document provided. It's much shorter version,
for example, alterations, no structural alterations or exterior changes without
written consent. Now I have one page to go
through rather than 44. Or if I have specific
question about this document, I can simply change it here. And that's where we are now. But you can develop
it even further. What you want to do
with this document? Maybe you want to
send it to Whatsapp, maybe to telegram, maybe you
want to email it somewhere. Or maybe this is just first part of your longer automation. Maybe you want to
add even more nodes, maybe you want to process it
even further. I don't know. You can add memory,
you can add tools. You can continue that workflow, develop it even further. You can do anything
you want with it, and probably every
person will have different needs and will want to do different maybe send
it somewhere else. But for me, this state
is completed because our document is processed
and it's been summarized. And that was my goal here today. The video was helpful and clear enough for you to build
this solution yourself. Thank you for watching
and see you later.
8. Access n8n workflows from the Internet: In this video, I want to share with you a tool I built for myself in NA ten that I use
basically every single day. It's just a bunch of AI agents, but each AI agent has
different LLM model attached, and I can access those AI agents or automations from
anywhere in the world. So this is what it looks
like in my browser, and I have that drop down
menu that I can use, and I can choose here any
model I want to currently use. For example, GPT, Cloud, Gemini, deepsk QN perplexity, you can configure as
many as you want. We will use OpenRouter for that, which has access
to loads and loads of different LLMs.
You will see shortly. If I choose Gemini
flash, let's say, I can ask a question here and if I want to attach
a file, for example, a screenshot I took or
the photo or text file, whatever I want, I
can attach here as well using that
choose files bottom. But let's maybe run it as it is. And we can see we get
the answer in no time. I can access that web
page from any PC, laptop, phone, or
even from my TV. No, I'm not joking. Here it is. It's me accessing my
AI agents from my TV. But that means I always have access to that automation
from any device I want. We will build all of
that today from scratch. If you look at the actual automation
running in the background, it might look a little
bit complicated, but what it really is is
just a single AI agent that I copied eight times and I just change the LLM model. You will see shortly
what I mean. It's very basic
automation, believe me, and you don't need any previous experience to follow this video. You can start building
it right now with me. But anyways, first, we
need that NA ten platform. And if you don't have
your own NA ten yet, then there are multiple
options you can choose from. You can even self host
your NA ten platform on your laptop or PC and we
had a video about it, but then attaching a domain might be a little bit
challenging because you need something called Angroc or Cloud fer tunnel
to make it working. What you can use instead,
you can use, for example, AWS platform where you can run a server for free
for six months, or even longer if
you include credit. Or you can use other
Cloud providers like Hostinger which
I'm using right now. I think it's the easiest
option which also automatically
provides you a domain so you don't have
to worry about it. Hostinger has recently
become a very popular option for self hosting NATen
because they offer a VPs that comes preconfigured with everything you need to start creating your automations. Just go to hostinger.com
slash automation Avenue, and it will take you directly
to the landing page for that self hosted NA ten
virtual private server. You simply scroll
down a little bit. And you will see all
available VPS plans. This is where you choose
the size of your server. Then you choose how long you
will need this server for. Hostinger gave me a
code that you can use, and the code is
automation Avenue. Once you apply that code, you will get 10%
extra off that price. Then you just continue
and you have to register. If you don't have
an account already, will create a new account
and then it will get you to this page where you choose
a location for your server. I will stick to United Kingdom. It's fine. So I click next. And here, you can
choose either plain OS. You can choos Santos,
Debian, et cetera. But what we are interested
in is the application. And you can choose here, for
example, vanilla NA ten. That's actually what
I'm interested in. But you can maybe want to go for the one that
has already applied 100 workflows or maybe so
called NA ten in Q mode. But as I said, I'm
fine with just NA ten. That's what I need. Then you can choose if you want to have
Malware scammer included. I will leave it as
it is, which means I can click Finish setup now. Now you can click
that Manage VPS which is Virtual Private
server, and this is it. This is your server
up and running. And if you click that
Manage Up button, it will take you straight
to your NA ten application. It couldn't get any easier. Because I open it
for the first time, it will ask me to set
up owner account. So we type like email address, your name, the last name,
and you create a password. Then you just click
next, fill in a form, whatever, that takes you
straight to your application. This is your NA ten
platform up and running. That's what it looks
like right now, and you can create
your NA ten AI agents and workflow automations. Let's create another one then. I say create Workflow here
in the top right corner. And we always have to
start with the trigger. Let's create that
so called trigger. I click that plus, and I'm
looking for NA ten form. That's the one, and
this is OnwFmevent. And at the very top, you've
got very interesting thing. You've got that test
URL and production URL. These are the locations, I mean, URLs that
you can simply copy, and they will work over
the Internet because this is fully qualified domain name. That's what I was talking about. If you are self hosting
on laptop or PC, this part is a little
bit challenging. But here with Hostinger, you don't even have
to think about it. They will provide you with
those URLs, which is great. For the time being,
let's leave it. Next field this authentication. And yes, we will use
the authentication. But for the time being,
let's leave it as known. The form title, let's
call it just chat. Form description, let's say multiple LLMs and form elements. Let's add some elements. Don't worry if you don't
know what it is about. You will see shortly
what we are doing here. Let's just add
that form element, and I will say LLM to use. Element type, I won't drop down. And for the time being, let's
call it just GPT, maybe. GPT 4.1, I think I
had in original form. And I will make it required field. We have to choose this. What we can do now,
we can test that URL. Let's check that test URL maybe. I can click here. It
will copy that long URL, says form URL copy it. I will open new tab and
I will just paste it. It will now not work because it says form triggering
isn't listening yet. But if we go back and if we say execute you can now
see it listening, and in fact, you don't even
have to open a new tab. It's basically just displayed
here in a new window. If it's not displayed, you have to search
for a little warning that pop up window was blocked
or something like that. You have to allow N ATN to display those pop
up windows, right? This is basically this
form we are working on. Form title is chat. The form description
is multiple LLMs. The form element,
first form element, we only have one so far
is called LLM to use, and in the dropdown menu, we've got this GPT for one. Now I can submit
that form and look at that node executed
successfully. We can close it now.
And yes, let's pin it. It says, You can pin this output instead of waiting
for a test event. Let's pin it. This output simply will be saved
temporarily here. You know what? Maybe not yet because we want to add
some more elements. We've got that form
element LLM to use. That will let us choose
GPT for one, for example, but we also need a field for our instruction
for the GPT four. I will add another
form element here. I will call it instruction
for LLM element type. This time, it can be
text where I can ask my LLM some questions or
provide some instructions. Yes. And in the place hurler, I will just say type here, and I will also make
it required field. So now if I go, I will copy that test URL, I will execute this step
now. It's listening again. If I open it in a new window, place it and go, we can see
now we have a new option. First one is that LLM to use where I can
choose my GPT for one, and we've got that new
field where I can type my instruction like
what is an A 104. I don't know. If
I submit it now, it says form submitted, and if we go back
to our automation, it's already
disappeared, but it was saying it was submitted
successfully. But in our form, we also had the field where we
could attach file, yes. So I will add yet
another form element, and I will say attach file. Element type, I
will choose file. Let multiple files to be
attached. That's not a problem. Maybe sometimes I want to ask AI question about multiple
files, not about single file. Here you can filter what type of files
you want to accept. Only JPx, only PNG, maybe only TXT, let's say. But if you leave
it clear, it will simply accept all file types. But I will not make
this field required. Not always, my question
to my LLM model is about a picture or snapshot or something
that I attach. Maybe I have a simple question
like what is two plus two. Then I will send it with no
picture or file attached. So we leave it not required
we also can change here, respond when the
workflow finishes, because we don't want to have it as soon as format is suben it. When we work on our workflow, we want to have a response
when workflow is finished, complete workflow
including AI agents. If I execute it now, again, past and go, now we have dropdown money with a single option,
but we have it there. Instruction we can
provide and we can also now attach a file. If I click this button, you can see I can browse
for any files I might have and I can attach
them if I want. What is two plus? Let's say, I will not
attach the file at this time at this stage,
and I will submit it. If I go back, it says node
executed successfully. And now we can pin it. I will pin it, so it will be saved because that's
all we need, really. There is one more
thing we can change. In this chart, you can see
form automated with NA ten. If you want to get rid of this, let's go back here
and in options, you can add that append
NA ten automation, attribution you can see
it's enabled by default. If I disable it, it will display this form
with no attribution, which is this form
automated with Natan. But, you know, it's
not really important. Anyways, we can now
go back to Canvas. This form element is now completed, at least
for the time being. Now we can add our AI agent. I click that little plus, I say AI, and I say AI agent. And on the left, you
can see what comes to the AI agent from the previous node from
this NA ten form. You can see all of our fields, LLM to use PT for one, instruction for
LLM, attach file. Currently, there is
no file attached, but they are basically
all the elements that we had in our form. The middle section
is for our AI agent, what it has to do with
that stuff on the left. So I say source for prompt. I use that dropdown menu and
I change it to define below. And here in this window, I
just say, it's very basic. It will be user message. I will just drag this field. Instruction for Alam.
This is what I said. What is to plastos? This is my question to my AAA LLM to my AI agent
that will use AAA LLM model. I simply drag this field here. Ser message is whatever
is in this field, instruction for LLM,
and then user file. And maybe let's add optional because you will not
always have user file, and user file will be here
in this attached file field. Currently, there is no file,
but it doesn't matter. I simply drag this field. Whenever there is a file, AI agent will know about it
and will be able to read it. And that's it. It can
be as simple as it is, these two fields. User message, user
file optional. Now we click that add option and we choose
system message. System message tells
our agent what is its role and what
is it supposed to do with all that stuff
that comes from the user? It starts with your
helpful assistant, but maybe let me
clear that and I will copy paste my message because it's pretty long, I
will paste it here. And it says, You are a
helpful assistant that analyses documents and
answers questions about them. No, that's not correct. Sorry. That responds to user
messages, maybe. You can fiddle with
that system message, whatever suits you best. Maybe you have specific
instructions for the AI, so you can change it
to whatever you want. So we're a helpful assistant that responds to user messages. When a user submits a file, carefully review its content and provides summary, direct
answers, relevance. I will add also, please
note the file is optional. So if there is no file, then just respond to
what is in user message. Field. That's it. This is it, but now we have to
attach hat model. This is the most important bit. Yes. Our AI agent is dumb if it doesn't have
any chat model attached, like large language model. Yes. We click this little plus, or you can choose it here. But if you are
here on this page, you can also click here this little plus next to chat Model. Next you do the same
choice of models. Can choose anthropic
specific ones. Google Gemini, Deep seek. But I would highly
recommend to go to that OpenRouter chat model instead because this OpenRouter will give you
access to all LLMs, even to the ones that you've
never heard of like Kimi, pH, Mistral really good one. Minimax, Loads Lama from meta. You got loads and loads
Google Gemini, look at that. How many of them
just from Google. But to have access
to OpenRouter API, you first need to create an
account with OpenRouter. I already have account
with OpenRouter. So if you don't have one yet, you simply sign up
to openrouter.ai. And then once you
are on that website, you can see all the
models available, and there are some models
that are free of charge, and you can use it straightaway. But if you want to
access all models, then you have to add some
credits to your account. As you can see, I still have $14 and I can add more
credits if I want. And once you add some credits, even $5 or whatever, then you will get access
to all LLM models. And this is real
beauty because you can access them all
from one single place. And then you can go to API keys, and I've got a key, but I can create also new key. By default, you will
have no key, yes. Then you create new key. You call it like NI ten. New key, maybe you can set
credit limit, maybe $3. And once this limit is reached, this key stops working,
and you just create it. And this is my API key that
I can now copy it's copied, I go back to my NA ten and what I can do now in
these credentials, I can create a new credential. You can ignore this one.
This is my current API key, but you will have
no keys at all. You have to click that
Create New credential. Now I just call it
NA ten new key, maybe underscores and I will paste my key. And they save it. Connection tested
successfully, which means my API key
works as expected. That's what it is. Credential
to connect with my API key. I connects me to
OpenRouter and the model. Yes, let's leave it as it is. GPT 4.1. It's chosen by default, and that's what we also chose
in our drop down my knee. That's basically it. We
can go back to Canvas and our AI agent should
be completed now. I go back to my form then, I copy my test URL. Let's execute the step. Oh, yes, I can now
unpin the data. Listening for form submission. Let me close the old ones. I will create new one, New Tab, paste and go, LLM, which was GPT 4.1. I ask some silly like what we
already asked, what is 2.2. I submit it, but
now this will go. If we go to agent, I can say execute step. Now it's executing the
step and the answer is 2.2 equals four,
which is great. We've got the answer, but we've
got the answer only here. We want the answer
back on our website. I want this answer
here in my form. I don't want it
locally here only. I want this answer to
be fed back to my form. So what I do now,
I'll go back to Canvas and we need another node. I click that little plus, and I say NA ten. Again, it's NA ten form, but now I say form ending. And the page type and
NA ten form submission, they can be both
left as they are. Completion title, I say maybe response from let's see what
we have available here. These are all the fields
I have available, and I want to say
that it's response from my LLM that I chose. So I drag this field again. Response from whatever
LLM was used. Completion message is the
answer from my AI agent. I actually only have one
field from AI agent, and it is output, but
that's exactly what I need. I need the output to be here
in my completion message, and that's basically it. If we execute step
now, look at that. Another pop up window, it shows us what the
response looks like, and I think it looks okay. It tells me what
model was in use, and it gives me the response
from my chat model. But what you will see, what you will notice, if we go back, if we save it, I keep forgetting to save sometimes and I
lose part of the work. You have to save as
often as possible. Basically, if we go back, if I copy the test URL, if I execute the
step Paste and go, GPT, what is three plus three? Maybe submit. If you
run it like that, it will show what you
might be tempted to do. It will not show you
the answer, yes. I mean, there are many
things you can do, but you can actually
make it production now. You say active. You can
activate that workflow, and you can use your
production, URL. You switch to production,
you copy this. And now, if you paste it, let's check What is
three plus three? Now you get this response, yes. So there is a little difference, I mean, between test
and production links. You have to bear that in mind. But what I also
wanted to show you is this field here
is very narrow. If you have long output, because this is basic
question three plus three. But what if you asking about the meaning of
life or whatever? The answer might be very long, but this field will
be very narrow, so the answer will be like
in million different lines. We can make this answer wider, this entire window wider. Okay? Let me show you how
to do that. Let's go back. In the last form, if you
choose that options, you can see that
custom form styling. And if we make it bigger maybe, you can see all
the form styling. And what you need to find is dimensions. You
can see them here. They are the dimensions
of this little window, and we want to make it wider. What I tend to do is I tend to change from pixels
like 448 pixels. You can change to either 90, let's say, FW W, its so called view port, or you can simply use percent percent of
the width available, or maybe not even 90 but 98%. Let's use that 98%
and if I close it, now if we run it again, save, remember to save it. Once it's saved, you
can just open again, past and go, GPT, what maybe what is NA ten
for. Let's choose this one. It will generate longer output. We submit it now. And now you can see this
window is much wider. You can play with
those settings. This is just one setting. You can change the spacing, you can change the
fonts, et cetera. You can customize it
any way you wish. I'm not that picky, so I left
everything else as it was, but you can play with
that if you want. There are many other
settings you can change. And believe me or not,
but we are nearly there. You will say a mark, but we only have one large
language model, yes. Well, yes, that's
true, but it's very easy now to add many more. We simply let's remove
this link here, so we detach that
form submission. I can simply now
highlight everything. And I say, duplicate
three nodes. This is it. Let's
rearrange a bit. And here in the middle, we add another node called switch that will switch between
different LLM models, and we create rules. First rule, I will
drag LLM to use. That's the only
difference between them. And I say when that LLM to
use equals GPT for one, which is this value
that's it for now. Let's go back to Canvas. You
can see a new connection was created and when
I choose the GPT 4.1, I want this switch to
connect to this AI agent because it uses GPT
41 as my LLM model. Now let's go back to this agent, and in OpenRouter, I will
change it to whatever. Maybe anthropic
Cloud Sonnet 4.5. What I have to do now, I have
to go to form submission. I have to add that option. I will call it just
Cloud, maybe. That's it. Just remember, whatever you
put here, you have to copy, it has to be exactly the
same in the following nodes, like in the switch, I
double click on switch. I add another routing rule. If this field LLM to
use will equal two. I will paste my Cloud. We go back to Canvas. We can see another
connection was created, and that is for Cloud. That simply will be
attached to this AI agent, which uses Cloud as
OpenRouter chat model. Maybe let's save it now
and see if it works. I say, Execute workflow, we can test it here and we
can see now two options. I will choose Cloud
and I will ask it, what is an A ten for? Maybe let's move it a bit so we can see which AI
agent it goes to. I submit it, and as you can see, it goes to clod. For a while. And we've got the response from Cloud A ten workload,
Mon, blah, blah, blah. This is basically
what you have to do. You have to do it for
every single agent. If you want more of
them, it's super easy. You copy everything again, you duplicate them,
and you just one sec. For this one, let's say,
I will use Deep seek, so I go back, starting
from the form submission, I need to add another
field option. I will call it Deep sik. Let's copy it. And
on the switch, it has to be under
the same name. I just add another
routing rule when LLM to use will equal to Deep Sk, then I will attach
it to this AI agent. Save. Don't forget to save because it won't work
if you don't save. And now let's execute
the workflow. We've got now Deep Sik. What is an ATN for
submit you can see. Yeah, it uses Deep Sik now. Let's wait for the answer. And that's response from Lipsik. So it's a great tool to test
many different LLM models. You can attach as many LLMs
as you want to this switch. Just remember that
on form submission, and on the switch, they have
to be under the same name. So that switch understands
what is coming, yes. The last thing you should think of is to add authentication
because this URL, for example, you
can see it here. I will remove the
entire automation. This is just for testing. But if you overlooked
somebody else's URL, you could simply start using DTS because there is no
authentication at all. Let's start using
authentication. I already have basic
auth I created, but in your case, you will have no
authentication method. You have to go back
all the way to all the projects and
you don't create workflow, you create credential. And you create basic Of. Say, continue, you can call it whatever my of my
authentication. And let's say my user will
be Marek and my password, whatever you want
your password to be. I save this my of. Now I can go back to the
workflows to my new workflow, to the form and for basic Of, I choose that credential
that I have just created. I called it my Of. It only supports basic
authentication for now. Maybe it will change
in the future. But if you create complicated
user name and password, I think it's good
enough, you know? Yeah. So now, if we go
back to production, if we save it first, yes. I mean, let me copy
the production URL. So if I open it, now it will ask me
for my credentials. It was Marek, and the password was whatever you
configured it to. It's a simple authentication to get to your webpage.
Hope that makes sense. I hope that video was helpful
and thank you for watching.
9. Get 2000+ FREE n8n templates (DON'T buy 'premium' workflows!): Going to be a very short video. I simply want to show you how to obtain thousands
and thousands of NA ten workflows
completely free of charge. It's simply another day where I see people complaining
that they were scammed because they
were trying to buy premium NA ten templates
or so called premium, workflows for like 20 or $30, and these templates
either never arrived or maybe they even
received some files, but they have no idea what
to do with those files. And the fact is, if
somebody is trying to sell 1,000 or 2000 workflows, then it means that
these workflows were never theirs anyways. They simply try to resell some stuff that they
found online themselves. I still don't really
even understand why people would fall
for that because I think it only really makes
sense if you want to buy one very specific
crafted for you, workflow that is designed to solve your
particular problem. But if you are looking for thousands and thousands
of templates, then they are
already available in multiple places and they
are completely free Well, the funny thing is that even
on the NNA ten website, there's already over 4,500
workflows available. You just go to NATNFward
Workflows, something like that, and you can simply copy paste all those workflows
straight to your NATen. But honestly, these cameras
didn't even bother to copy paste thousands of
templates from ANA ten website. What they do, they are selling the workflows that are
already available on Github, Gitlab, Bitbucket, or
other remote repositories. So how to find ones on the NA
ten website is very simple. But let me show you how you can easily find those other
ones in remote repository. Just Google something
like I don't know, Github and Aten workflows. I will just press
Enter and I will pick I don't know,
very first link. It already says, this
one is 1,000 workflows. Here, I first link, we've got 2053 workflows.
Okay, that's fine. And the workflows are
here in this folder. But let's see what
to do exactly. We can see read me file,
we'll tell you, Okay, it's 2053 workflows, and there is even some
documentation system. Looks like it's
something that you can open in the browser. So
let's have a look further. What does it say? You've got
some categories, et cetera. All right, usage instruction, modern fast system recommended. Okay, let's follow
these steps then. First, it says Git
clone and repo URL. What I will do then, I
will open my terminal, and they say, Git Clone. And the repo URL, we
have to scroll up, and this is the Repo URL. You have to click that code, and this HDDPS GitHub,
blah, blah, blah. That's what we have to
copy. I will go back, paste it, and I will present. Those files are now being downloaded from Gitlab
from Github, sorry. This is actually Ubunto server. So if you on LS Li,
I don't need A, but I can see the folder
NA ten workflows. It's just been created. That means I have those files now locally here on my Ubunto. Let's have a look then
what we should do next. Git clone that's done CD
into that folder. Okay? I see the NATen workflows, which means I change directory. I'm now in my home directory in NA ten workflows.
What do we do next? It says to run PIP
install requirements. Oh, I don't even have
PIP installed here. Let me just copy this.
Ubuntu tells me what to do. I paste the command.
And now it says, start the documentation server. It's really interesting. Let's see what it is. I
have no idea, to be honest. But this is my test server. Anyways, I can't break. I mean, even if I break anything here, it doesn't really matter. The good thing about
Github or Gitlab or other remote
repositories is that you can see exactly what is in those files before
you download them. But here, this is
my test server, so I will run this command. Python Run Pi. Oh, for me, it's actually Python
three. Run Pi. It doesn't have
missing dependencies. UCornFast IPI. Should be picked up previously, but let's run that manual. Probably something with the
requirements that takes TFL. But let's run again that
Python three Run Pi command. Python three, sorry. We can see this server is now running. I can
simply copy this. I will paste it into my browser
and let's see what it is. Seems like these are the
templates available and we even have a search
filled, let's say YouTube. What have we got for YouTube? Oh, there are multiple workflows specifically for YouTube. That looks good, and it says, if you want to stop this server running within on your server, you can simply press Control C, which means if I press Control
C, this is now stopped. If I refresh, you can
see unable to connect. If I go back to my terminal, so if I run it
again, it should be now available again and it is. It even seems to have a dark
mode. Oh, yeah, it has. Here you search and
let's pick any of those, maybe post new
youth videos to X. Let's click on that gives
you some description. It says download JSON, view, and, there is
a diagram as well. We can view the JSON
code. That's cool. That means we can copy it
here or we can download, but I just copy
that, they should be able to paste it on
my Anita platform. As I create workflow, there is Control V. That's it. Let's double click
to have a look. Let's Zoom to fit. Looks like extremely basic one, but honestly, that's
what you would get paying $20 anyways. But it looks like we indeed have loads and loads of
templates here available, and that's how easy
it is to get them. Just Google and download already available
ones rather than paying money to some
scammers online. That's all I wanted to
show today already. So hope that helps.
Thank you, Mark.
10. Bonus - Access ALL AI models free of charge! (ChatGPT Pro and Claude Pro for FREE!): What if I told you that there is a tool that lets you access loads and loads of AI models
available today like GPT, grog, Cloud, Deep
Seek, and many more, even some that you might
have never heard of, and they're all in one place. But most importantly, you can access them all completely
free of charge. This tool will also show you which AA models
are currently the best and you will also be
able to test them yourself. Regarding testing, there is
one very interesting way to test A models within
that tool where you, for example, ask one question, then you get multiple answers
from various AA models, but you don't know which one you simply pick the answer,
in your opinion, that you like the best simply, and you will find out
only what AI model wrote that answer after you pick
that favorite answer. In this video, you
will see how to use that tool and why it
is available for free. I think after my
last few sentences, you might start
getting the idea why you can access these AI
models free of charge. But let's start
from the beginning. The tool I'm talking about
is called L M Arena, and you can just Google LM
Arena and pick the top link. As you can imagine,
the fact that you ask questions
and pick what you think is the best
answer makes you kind of AI tester
for that website. I mean, you can click
that what is it? Trophy like World Cup
leaderboard icon, okay, in the top left corner,
and you will see the score for each AI model
displayed in real time. And there are different
sections like which one is best for text,
for web development. You can also click
that top sections like it will show you
only for text, yes. And we can see that Gemini
2.5 P is current leader in this section and text to image GPT Image one currently. And when you use this website, you simply participate
in that ranking. You have a say
which AI model is, in your opinion,
better than the other. So basically, you
could say that you are an AI tester
for that LM arena. Before we enter anything here, before we start typing anything, there is one important thing to understand because it
has some implications. You have to be aware that
whatever you type here, it will be sent to multiple AI models or multiple organizations
like Open AI, anthropic, Google X, et cetera. So you have to be careful
what you type in and not to type some sensitive data or some company
internal documents. I mean, it should be
true even if you use a single AA model like
let's say hatGPT. But here on this website, you have to be extra
careful to not just send some important data
because this data might land in multiple
destinations at the same time. All right, but let's talk
about this tool then. By the way, Lamarna
is not a new tool. It's been there for a while, but it was previously
meant to be configured and accessed via developers
or software engineers. But now they have that
new user interface that is much more user friendly. Everybody can access it and understand what
is going on here. We already know that first
icon, that leaderboard icon. We know that it will
show us the results, which AI model is current
leader for given section, but the next one is open New
chart. Let's click on that. Now at the top, you have a dropdown menu
and you can choose between battle side by side
and direct chat. Battle is the one that
I already mentioned. It's a battle between
two anonymous models. You don't know which
models participate, you simply pick the
best answer you think or let's say the
answer that you like most. So if I click on that,
it's chosen by default. Anyways. Let's
say, I don't know. Tell me a funny joke. And I think all those
AA models do not seem to understand the
term funny. So let's see. Why don't Skatonsever
go on dates? Because they have no
body to offer, right? I mean, you simply have
some examples, yes. Let's say I like this joke more or maybe not
the joke itself, but also how it's said, yes. So let's say I pick this one. I mean, that's not
the only choice here. You can see left is better. It's a tie. Both are bad, or right is better. Maybe I would say
left is better. Now, it will well, it prompts like, you know, I have to verify I am human. We can see the last
one was coming from Jemma tree model and right one from Gemini 2.5
flash. That's the battle. But now if we choose, for example, the side by side, they are not anonymous
anymore because I can simply choose a specific AI model
and you can see minstrel, small, Q W Q, command A. There are many different
models like Amazon Nova. Let's say cloud 37 Sonnet, right one maybe grog
three. I will repeat that. Tell me a funny joke. Let's see what they
will come up with. So it's kind of similar, but we know from the beginning which models
participate in that, yes, and now we can
make the same choice. Right is better, left
is better or, you know. But what I want to
mention as well, look at this drop down menu. You don't have to just
type text here, yes. I mean, you can choose
image creation, yes, create a new chat window. And now, well, it basically it's changed the models
because for image creation, we have different models, yes. So if I choose side by side, we can see it's GPT image one. We've got flux context
Max, flux Context Pro. And some other models like photon that are able
to create images, and then you can describe the
image you want to create. But basically, the
idea is the same. So if I say, create a photo realistic image of
an elephant riding a bike. You can see the time
the timer starts, how long it will take them
to generate that image. And let's see I have no
idea what that bugle is, to be honest, but never mind. So photon was first. It took around 30 seconds for
photon to create Well, it looks pretty good. I mean, I can't see the puddles, but it is an elephant
on the bike. Let's see. Let's wait for that bugle
to complete this task. So it took much longer, and I don't really like it because it doesn't make
much sense, does it? The front legs are
on the pedals. This one, at least the photon
tried to hide this fact that it's very difficult to
put an elephant on a bike. Never mind, you get the idea. Let's change it back
to text to chat. Sorry. Yes, start new session because the models
will change again. And now I just wanted to
show you the third option, which is not side by
side, but direct chat. But this is kind of self explanatory because
you simply choose one and you just
wear Hunan turbos. Okay, what tell me funny joke. What HunianTurbos will
come up with. Let's see. All right, came up
with something, but we can see we can't compare it to anything, but
we can still use it. So maybe let's see how
useful they really are. Be telling jokes is
just not a proper task? Let's say, maybe, but
maybe side by side, side by side, chat, and let's choose
something more popular. Cloud, it's fine. Chat DPT. I want to create
maybe HTML website, so maybe Grock doesn't
really matter. Let's say, can you create
a code for my website? And I mean code can include only HTML, CSS, and JavaScript. Basically, what
I'm trying to do. I'm on Ubuntu server, so let's maybe install nginx quickly, and we will just change
the index HDML file. That's my idea. But nginx can natively only work with
HTML, CSS, and JavaScript. So let's stick to
that and I will say I will I will say that I can
keep as a single index HTML. And can be served by nginx
alone with no back end. It can be any website. No, maybe the one that includes some funny jokes. All right. Presenter, let's have a go and let's see what
they come up with. They start Sonnet seems
to be a bit quicker. Gro is a bit slower here. Definitely, looked, how much code Cloud
already generated. Sorry. Oh, it's completed. Nice. So let's wait
for Grock to complete. The fact that Clote we finished first doesn't mean anything yet. Let's see what Grock
comes up with. If it's good, maybe it's
much better than Cloude. So yeah. In the meantime okay. We will leave it
running. It doesn't really matter how long
it generates this code. If it's good, I'm more
than happy with that. So let's just open the terminal. Let's install because I
don't have engine H I? No, I don't think. No,
I don't have enginX. I say, sudo up to install nginx, maybe I will dash Y, I will that sudo password. S. That's cool. Let me clear that. My engine
should be up and running. I can check with System
CTL status nginx. And it is up and
running for 13 seconds. Okay, that's cool.
So if it's running, it already serves a website. If I go here, oh, look at that. Greg still creating that. No, it's created, but it creates
really good instruction, it looks like. All right. So let's open another window. If I run HTDP local host, I should have, yes, that's the response from EnginX. If I go here, if I may be clear again, clear, Cd var HTML, LSL. So this is basically
this text index I mean, what we can see here,
welcome to Engine X. If you see full
page, blah, blah, it's this Engine X,
if you see this page. It's basically this single file, index dot nginx dot wb. It HDML. Now we can just copy. Alright, let's copy
Clouds code first. Generated it much quicker. So copy the code, and let's VIM. We will change sorry, pseudo. We will change that file
now. I don't have VM. I mean, I could
use nano as well, but well, I'm already
installing VIM, so never mind. Because I thought VIM
is there by default, but it looks like it's
not. It's a fresh server. There is nothing running
on it. So again, so do VIM, D 99 d, it
will remove everything. 99 lines it will remove. We will paste the code
we got from what? From Cloud Sonnet. I press call on WQ
to save this file. And now, if I go to
HTTP Local host, oh, that's the website. Random joke generator.
Tell me a joke. What do you call a fish
wearing a bow tie? So fish decayed. All right. Tell me another joke. Well, never mind. You know, this is
what it looks like. That's what this
website looks like. It's not bad, is it? Because it took it like 10
seconds to generate it. Okay, I thought maybe it would be worse,
but it's not bad. Let's see what Grock
created for us. Whoa, it's a long code. Okay, let's see, copy, and we will now paste this code. I will say psudo again, the 9990 because there were many lines, so I
will remove them all. I will paste this
one. Call on WQ. And now let's refresh and
see Whoa. Looks better. Okay, so that's what
I was talking about. Oh, I took longer,
but look at that. It looks much better. Oh, they're going up and down, those faces, those little faces. Let's see if the jokes are actually funny. Get a new joke. Why did the banana
go to the doctor? It wasn't appearing
well. All right. I've heard words. But generally, this website isn't bad, is it? It's very simple. Has two colors, blending in
the middle, not bad at all. Okay. That's basically it. This website isn't
very sophisticated, but you can see you
can achieve a lot in very quick time and
you can do it for free.
11. Hosting n8n in AWS intro: The next three videos
are optional to watch. We will go through the
process of running NA ten software in AWS Cloud, and I will show you how to run that NA ten server in AWS Cloud free of
charge for a year. If you wonder why would you want to run your server in AWS? Well, this is simply more professional production
ready, let's say, approach, where you run NATen services in public Cloud rather than
on your local machine. It might be useful
for you to know how to configure it
all from scratch, if you or one of your customers need that more
professional setup. You simply know how to
configure and host that server for yourself or
for other organizations. There is also additional
benefit because running it this way makes all external
connections to your NATN server possible because we are going
to buy a domain and we will use that so called fully qualified domain
name to run our service. I know that it might sound
confusing at the moment, but don't worry about it. This is again, step
by step tutorial, so we will learn all of
that from scratch again. In the first video, we will
create our own AWS account. We will also talk about
something called a free tier, the thing that lets us run that server for a year
that I mentioned for free. Then we will talk about
multifactor authentication then in the next video in the
second video regarding AWS, we will talk about
so called AWS budget and that budget is
used to monitor our expenses if we have any because hopefully we'll
run everything for free, but maybe you want to
run some paid services, and that's where AWS
budget comes in handy. Then in third video, we will install and configure our NA ten server in AWS
Cloud. Let's get started.
12. Create AWS Account (1st pre-requisite for n8n in AWS video): Today, I will show
you entire step by step process of how to
create new AWS account. This is new fresh
operating system with absolutely
nothing configured, and we'll be creating
here new AWS account. Let me open the browser
and we'll navigate to something like
AWS three tier. And what free tier is,
we'll talk about it later. But now, let me just
explain shortly. It's simply AWS
offering that lets you using loads and loads of
resources for a year for free. When you create new account, you can use those services
for free for one year. But we'll talk about it later when we actually
create resources. Now we're creating
the account itself. So as you can see here, I have create an AWS account. Let's click that because that's
what we're interested in. It takes me to
that web page with the create free account
button. Let's click on that. And maybe let's
accept those cookies. Now what I need is some
kind of email address. It can be any email
address use or you own, you just have to be sure you can access that email during
the signup process. I will just use gmail.com.
This is important bit. The one below, it's just
an alias for your account, so it can be anything
you want it to be called automation Avenue, but it's not that
important really. The email is important here. I click Verify email address, and now I will have to just
wait for the email to arrive. As you could probably hear,
the email has just arrived, and I've received a
verification code. You have to type it
here and click Verify. Okay, now we have to create
the password for root user. We'll talk about it a little bit later who is actually root user, but now let's just
create a password. And as you can see, it
has to include uppercase, lowercase, number, and non
alpha numer character. Just make sure
you've got that all. Even when I just start typing, let's say, capital letter, as you can see first box is
ticked the lower letter, now digit, and now
non alphanumeric. As you can see, all
those boxes are ticked, so my password is good enough for them. Now
I have to repeat. And that's it. We can continue. Just wanted to note
here on the left, you have a link if you want to explore those three
tier products. This is the link you can
use. But never mind. At this stage, we'll just concentrate on the
sign up process. I'll just click Continue. I will save the password. And now it asks me for
contact information. It asks me if it's business
account or personal account. I will treat it as
personal account. Anyway, if it's business, it will ask you for
organization name as well. Let's click personal
and my name is. You have to give them name and address, and the phone number. And you agree that you've
read the customer agreement. We can go further to step two. Now it asks you for
billing information. That's why you have to
provide your credit or debit card number
because as I said, there are some free
services you can use, but by signing up, you can use all services, the ones that are free, and the ones that you
have to pay for. That's why you have to put
the credit card details. But in later videos, I will show you how to create budget. This budget will
inform you if you started using some services
that you have to pay for. For the time being,
we have to put that information in to
be able to progress. So that's the credit card,
and we can go further. As I used my vote card, I have to confirm that in
the banking application, I click Confirm and that
authorizes this step. Now it asks me for
a telephone number to use to confirm the identity. I will use the same that they used previously
on previous page. Now, the capture, cop I have it. If it's completely messy, you
can also always refresh it. It will generate new one because some of
them are generated in such a weird way that you
can barely see what's there. Okay, now let's wait for the verification code
sent to my phone number. And as you could hear,
it's just arrived. And we can continue
to step number four. Here it asks me again what
type of account I really need. So we'll go, obviously
with the free one and want to pay $29
a month or 100. The free one is more than we
need really, and that's it. We click Complete, sign up. As you can see, it was
quick and easy process, and it says, Oh. Okay, as you get here, AWS says, we're activating your account, but I believe it's
just been activated. So yes, received the email, it said that I can
start using my account. Well, I can click
either this button or that button doesn't
really matter. Let's maybe click this one. Go to AWS Management Console. And now it asks me
if I want to sign in as a root user or the IAM user. We really only have
root at this stage. So for the time being,
as there is no choice. We only have root
user. We'll put the email address we used
for the signup process. So for me, it was gmail.com. We'll click next
and the password, the one that you just
created as well for this user. And sign in. Not bad. We are already
in our AWS console. That's what it's
called AWS Console, where we can do everything regarding this account
or our resources. Thing I want to show you it's here that says
automation Avenue. Remember, that's the alias we actually pasted during
the signup process. So instead of some
long weird digits, automation avenue
will be used here. For you, it can be anything you want to name this account, us. The next thing is
we can see stockhm. Well, you chosen,
I don't know why, but that's what we
call AWS region. This is where you want to
create your resources. You can see you can create
it all over the world. Let me just change it to London because that's
the closest for me. What I want you to
do is to activate multifactor authentication
for the root user. That's very important. This account has
to be very secure. What you can do here
in this search field, you can put IM IAM. We'll click that and you can see you can see that
even the Amazon itself, there is a security
recommendation one, add MFA for root user. To be almost every
single user you create should have MFA enabled, in my opinion, but
root one is definitely one you need to create
MFA authentication for. We can add MFA here,
clicking this button. And now we have a
choice what we want to use as a second separate
authentication method. The easiest way, I think,
is authenticator app, which is chosen by
default anyways. You can call, for example, for me, it will be
my Samsung phone. I can use that as an
doesn't really matter. It's just for you,
information for you. We can choose authentication
app. Click Next. And now you can see, you'll have to install one of the applications
on your foam, either Google authenticator,
do a mobile or some other apps that the list of all applications,
you can see here. But basically, you
need just one of them. Google is really good one.
I can recommend that one. And then once you've
installed that application, you have to click that Show QR code and just scan
it with your foam. Once you scan it, you
will receive MFA code, which you will have
to paste here twice. I mean, first code
and second code. This way, you will add that device as authorized one
to receive the MFA codes. Will not do that because this
is just temporary account. I will remove it later on, but you definitely
should do that. Okay, so I think at this stage, I don't want this
video to be too long. So I think that's it for today. In next video, I will show you how to create
that budget before you start actually creating
any resources in AWS Cloud. But you've got your own AWS account now, so congratulations. See you next time.
13. AWS Budget (2nd pre-requisite for n8n in AWS video): In previous video, we
created our new AWS account. We created and logo
as a root user, and we added MFA authentication
for that root user. What is next most important
thing is that we should know how much money AWS
services will cost us, if any, we can either try to
not spend any money there just using free
tier eligible services, but maybe we are okay
to spend some money, but we don't want to exceed certain threshold like maybe
$10 a month, let's say. But one way or
another, we definitely want to be in control
of our budget. And that's what AW budget
service exactly is for. Being logged on to our console, still as a road user, we can type here
in the services, we can search for budget. And we can see here budgets as of bidding and
cost management feature, or we can simply click that bidding and cost
management service, which budget is part of. Maybe let's click the top
one. Doesn't really matter. Here, you usually
see some summary how much last month it cost you, what's prediction
for this month. But because this is new account, there is no data available yet. But it doesn't really matter
because what we need is budgets here in the
left down corner. So let's click that
budget as you can see, we can create a new budget
here by clicking this button. Now we have a choice of
using a template or we can customize using
advanced settings. Let's stick to just
simplified version. Now, what type of template
do you want to use? By default, you can
see zero spent budget. Create a budget that
notifies you once your spending exceeds $0.01, which is above the
AWS free tier limit. That sounds good, doesn't it? Because that means if I
spend any money on anything, I will get a notification. Also, that's important
to remember, the AWS budget will not disable any resources for
us. It's not meant to be. It will only notify us every time we exceed
certain threshold. We can figure here. So the first threshold
will be that $0.01. If we use any service
that we have to pay for, it will send an email to the email address we
specify here below. Maybe before we go there, there
is a budget name as well. It's called My
Zero spend Budget, which is okay, but let
me just personalize it. Maybe Mark. Zero spend budget. Doesn't really matter.
It's just a name. And here is where we
enter the email address. And as you can see, it
doesn't have to be one. You can put multiple
email addresses here. You just have to separate
them using commas. I will just use one, let's
say, Mark at Avenue. That's it. If I want
to another one, just use coma and blah, blah, blah. But we'll
just use this one. That's really, I
believe, because yes, we can leave everything
else as it is, and you can see a confirmation. You will be notified
via email when any spend above
$0.01 is incurred. That's fine. That's
what I want. We create budget. And that's it. We've got our budget,
and don't ask me why it always shows $1
rather than $0.01. I don't know why
it is like that, but it should be for $0.01. But that's not a big deal.
It works as expected, actually, but maybe we want
to create another budget. What if we want to sometimes
use some services, but we don't want to
exceed $10 a month. So we can create
just another budget and set threshold to that. So let's click Create budget. We'll leave it as a template simplified, which
is much easier. And now we will change
from zero spend budget to maybe this one,
monthly cost budget. What's interesting about
it, as you can see, it notifies you if you exceed or are forecasted to
exceed the budget amount. If you start a new month and on the first day you exceeded $1, this AWS budget can see you will actually exceed $10 by
the end of the month. It will send you notification
before you actually reach that $10 threshold because it's forecasted for you to exceed that by the
end of the month. I hope that makes sense,
because our ultimate goal is not to exceed $10 a month. That's
exactly what we need. So now we can scroll down. Let's call it $10 budget, yeah. It's clear for us
what it is about. Now, we just adjust
this value to $10. Again, just list of emails. We want that notification
to be sent too. And that's it. And here below, you've got a summary
of how it works. You will be notified when.
Your spend reaches 85%. So if you are at
8:50, let's say, you will get email, then
it will be at 100% at $10. But the third option, if you're forecasted spent
is expected to reach 100%. But that's very handy
and useful for us. That's exactly what I need.
Just create a budget. This way, you can create as
many budgets as you want and get notified every time you reach any of
those thresholds.
14. Run n8n in AWS Cloud! (FREE for a year!): If you want to run NA
ten automation software 247 in your own AWS Cloud, then you are in the right place. I will show you
step by step how to build and configure
a virtual server in AWS and then how to set it up to run that NA
ten software for us. What's the best part, I
can run continuously for entire year within that AWS
completely free of charge. And that's why I chose
AWS as the provider for today's AWS is very reliable and it offers
so called free tier. For the first tier and for
the newly created accounts, you can run stuff
free of charge. Even if you want to
keep that server running beyond that first free, it only then cost four
or $5 a month anyways, after that free, I mean, it's not the end of
the world either. Note that we already had a video showing how to run NATN locally, but that was a very basic setup where you had to be
on the same network as your NATN server to be able to run and
create new workflow. That was very quick
and easy to build setup that you could run
on your laptop or PC, but you will have
a problem using external web hooks or
triggers or to be honest, any traffic that needs to be initiated from outside
of your network. You'd have to configure some additional third party
tools to make it happen. What we are building today
is something different. It's a solution where the NAN instance is
available over the Internet, so you can access this server
from anywhere in the world, which means you don't
have to be at home or on the same local network to be
able to access your NATN. Also show you how
to buy and set up a domain for our NATN service, so you can access it using
something like hdpsnten dot automation avenue.com instead of typing the IP address
and the port number. By the end of this video,
you will have NATN platform up and running in AWS. So let's get started. The first thing you need is
obviously an AWS account. It's very easy to create. I have a dedicated video
just for that process. If you want to follow
this video step by step from now on, maybe watch that
previous video first, get your AWS account ready, and only then go
back to this video. I would also say that there
is another prerequisite. Although it's optional,
I would suggest to set up so called budget in AWS. Because even though
our virtual server will be running free of charge, you might be tempted
or you might want to use some other paid
features within AWS, and that AWS budget service
is there just to make sure that you are notified of any charges detected
by AWS account. It's very quick and
easy process to get that AWS budget configured, so I would highly
recommend that. The fact is, I will use one of those paid services today
because I want to buy a domain for our NA ten platform because even though it's
possible to get a free domain, free of charge, I
prefer to get one directly from AWS
for two or $3 a year and have a proper
root domain rather than some free sub domain
from some third parties. As you can see, I already
have an AWS account. I already have budgets
configured, even more than one, so we can now start building our server for the NA
ten automation software. First thing I need to do is
to go to that EC two service. It's Elastic Compute
Cloud within AWS. That's where you create
your virtual servers, and then you choose the region where you want your
server to be built, it's your choice, but I will choose a region that
is close to me, which is London, EU West region. AWS will switch me
to that region, and now I can build
my virtual server. I say Launch instance,
this orange field. And now we are presented
with that web page. We can choose a name
for our server. I will just call it Aton. It doesn't really matter
what you call it. It's just so you can
recognize what it is. Then we scroll down
and we can choose our operating system and they want to run it on Ubuntu
operating system. And our method
today will work for any Ubuntu and Debian
operating systems, and with a little adjustments, it can work for any
other systems, really. But you will see
later on what I mean. I choose Ubuntu, and I will choose Ubuntu
version 22 oh four. Even though 24 oh four is newer, I think 22 oh four
is more stable. It says that some of the changes
will be removed or blah, blah, but it doesn't
really matter. You just confirm the changes, and this is our operating system now chosen for our server. So I scroll down. Here
is the instance type, which is the size of my server. But now let me go back
to that free tier. You can see here
that the free tier in your first year of
opening AWS account, you have 750 hours
every single month of T two micro instance or T three Micro where T
two isn't available, and have a look here. It says free tier eligible and that's what
you want to choose. The one that you can run
free of charge for a year. For me, it's T three Micro, but you have to make sure that your operating system is also free tier eligible and Ubuntu indeed is
free tier eligible. I've got operating system, I've got server type and
you can even see here. Even after that year, it costs just $0.01 per hour to run it. Not bad, isn't it? But
let's scroll down keeper. Keeper is so called
SSH key that you need to be able to log on
to your server remotely. I don't have a keeper. I've got some, but it
doesn't really matter. You will not have any keepers. What we need to click is
that create New keeper. I'll click on that. We
can choose a name for it. I will call mine NADM
keeper. Something like that. Again, doesn't
really matter what you call it. It's just a name. So I say, create a
keeper. And look at that. I will download so called private key to
your local server. So you will find it
in downloads ana ten keeper dot p. We
will work with it later, but just remember that
this has been downloaded from AWS automatically
to your local server. Whatever device you're
using right now, I mean. That's the keeper,
keeper sorted. We scroll down, and now
we have network settings. And in network settings, we want to make sure the
public IP address is enabled. We will need a public IP, and there are ways to run this
server without public IP. You can, for example, configure Cloudflare tunnels
or you can use AWS Cloud front service and keep this server
behind those services, and it is considered safer, but the way we will
set up our server today can also be
considered safe solution. Why? Because allow SSH traffic, I will lock it down
from anywhere, not that anybody can
just log onto my server. I will change it to my IP. I will be only able
to log onto my server and manage my server only
from my current IP address, which is my home location. So I say, Allow SSH
traffic from this IP. What's this IP address? If I go to the
Internet and I ask, what is my IP? That's basically it.
This is my IP address. We can see it finishes with 78. And indeed, it's here 1778. That's my IP, and only I
can access this server. That makes it pretty safe. We will want to add another option though
for our security group. We want to allow HTTPS traffic from the Internet to
our server because that's how we are
going to access our NA ten service
over HTTPS protocol. So with those two
settings, we are now fine. We also have public IP.
We can scroll down. By the way, that public
IPV four address that we configured
that we left enabled, that's also free of
charge, or I mean, 750 hours per month
are free of charge. Here for storage,
we can see that 30 gigabytes of IBS storage
is also free of charge. By default, we have
it here set to eight, so I will change it to 30 because that's
still free of charge. I will change the type to GP three GP means general purpose, and you can see even here, free tier eligible customers can get up to 30 gig of IBS
general purpose, SSD. P three is a newer
version, so I chose GPT, and we have to click
one more thing is this advanced tab and
here that little arrow, and I want to have it encrypted, and it's not optional. You have to have this
so called root volume. You have to have it encrypted. Otherwise, you will get error when creating a virtual server. It simply needs to be encrypted, and now that's all
we really need. I can now click Launch Instance. I just do that and my
instance is being created. It will only take few seconds. And already done. It's a successfully initiated
launch of the instance, and this is my instance ID. If I click on that, it will take me straight
to this instance, which means instance is a virtual server in the
cloud, and that's it. I have all the details
about my virtual server. I have two IP
addresses allocated. This is so called
private IP address, but I'm more interested
about my public IP address. And my public IP address
is 134020 eight.247. If I click on those instances
here in top left corner, I can indeed see my virtual
server. The state is running. However, the status check
is still initializing. It might take a minute or two before it's fully
up and running. But we don't have to
wait for anything. Once it's ticked here, I can choose this connect, but I can click on that, go to that SSH client, and here we have a
little instruction. It's instruction on how
to connect to our server. It says open an SSH client, and for me because
I'm also Ubunto, this is my laptop, local laptop. It's also running. It's MgBok but it's running
Ubunto in parallels. Bit complicated, but never mind. Basically, if I
go, first of all, if I run command PWD, that shows me my
current location. My location, my folder I'm currently in is home parallels, so I can see the to downloads. And here I can run command LS L, and I can see that
private key that was created during the process
in my Downloads folder. I can also, I mean, you know, you can also click these files. And if I go to downloads, that's basically the
same location, right? It's atenkeeper dot pm. Not sure what this file is, but we are concentrating
on that one. And that NA ten keeper is a private SSH key I want to
use to connect to my server. And it says that to run that if I want to
connect to my server, I actually have to run
this command first, change mode for 100
and then this file. I will copy this and being in the same folder
where my file is, I will just paste this command. What it does, if I run LSL, it changes the permission. It now only I mean, this means that only the
owner can read this file. Previously, it was
read write permission. So it changes the
permission for this file. And it says that now I
can connect to my server, and it gives me
this example, SSH. That's why I can copy
it and paste it. But the fact is I
will shorten it a bit here because I
don't have to use DNS, I can use public IP
address as well. So I can do this use
just the public IP, and here is the
location for this file. And full location is home
parallels and this file. I know it's a bit confusing, but I can simply write
something like Home parallels. This command, this full command, I can run it from anywhere. I don't even have to be
in the same folder where this file is now because
I specified full path. And if I run this command now, it should take me to my server. I should log on to my server using this
command. That's presenter. I say yes, you have to say yes. It asks you if you are sure
what you are connecting to. Yes, I know what
I'm connecting to. Oh, it says permission denied. Oh, you know what? I'm stupid. And you are probably watching that. Mark, what are you doing? It's not this location, home parallels, but then
our key is in downloads. Yes. Of course. Little mistake. Let's add that Downloads. Basically, if I go
here, sorry about that. This is where my key is. And the full path,
if I click here, is home parallels, downloads, and then this file. And now you can see a
little log here as well. That means it's locked only. It can only be read by current
owner, and that's good. That was added when we changed when we run that change mode. Command. All right,
let me try it again. Anyways, press Enter. We are going straight
to our server. This is our server. This
is private IP address, 18 151. I can double check. Let's click on that instance. Private IP is 18 151. Correct. If I run DF H, I can see indeed it's 30 gig. It's shown as 29 gigabytes, but it's basically
30 gig disc that we configured during the
configuration process, which means, yes, it's indeed
my server in the cloud. And I can log onto it remotely from my home because I'm
logged on from my laptop, from my MacBook, and my
server is in AWS Cloud. Maybe I will show
you one more thing. Let me exit that. The
command is just exit. I'm back on my laptop. I will use up arrow. This was the long command I had to use to log
onto my server. Yes. But what I can do, I can run command called alias. And then I let me make it bigger wider and I can call that
alias something, maybe NA ten. Then I say equals and
then a single quote. Then I have to go to the end
and also add a single quote, which we will make all of
that one long command. Now I press Enter and if I run now alias, that's basically it. That's my alias. What
this alias does, I can now simply type NA ten. Instead of running SS one,
two, blah, blah, blah, I can now simply say NA ten, and that NA ten will run
this long command for me. Let me show you I press Enter. And bam, I'm straight
back on my Cloud server. Let me clear that maybe, and now it's always considered
a best practice if you run sudo UtgUdate and
Sudo upto get upgrade. And then I add Y, which will answer yes to
any possible questions. And what it does, it
will simply update all packages and all software that this current
server is running on. I just press Enter
and I just wait. That upgrade is
optional, I would say, but up to get update
that first command is definitely
something you want to run every time you
build a new server. Now it asks me to restart
some services, which is fine. I just use tab buttom to switch to that o,
and now press Enter. And that process is completed. But which is another
good practice, you want to reboot
the server right now. I say, pudo reboot. Press Enter, you will be obviously disconnected
from the server now, but you only have to wait 20, 30 seconds maybe, and then we can log on back to our server. And remember, now, I only
have to run command eight N, which is our alias for
that long command. Maybe 15 seconds past. Let me try again already. Press Enter. Oh, we're
already back in. If I say uptime, our server is up 0 minutes because
it was just rebooted. That's all for our server build. Now, we start configuring the NA ten service
on this server. What I will do then,
I will go to Google. We are done with AWS for now, but we will get back
to this service. For now, I say NATen AWS,
something like that. I just simply need official
documentation from NATen. If I click on that first link, it will take me to server
setups for Amazon web services, and you might think that
this is what we need, but this is to run NA ten on another AWS service called
Elastic Kubernatis service. Kuberntis is like a cluster
that can autoscale. That's not what we
need. What we will use today is a Docker
Compose option. I will click on that Docker
Compose, and basically, this is the option that you can use for any other
provider as well. I configured the server in AWS, but you can use Docker
Compose approach for any other Cloud solution. Like if you have your server in digital ocean or
Hetsner or Azure, you can follow exactly
the same steps like we are doing here. Let's have a look what
they say here then, and they say, here, install
Docker and Docker Compose. There are many commands,
but what you can do, you can simply click on that square icon that
says Copy to Clipboard. We will copy all those
commands, and in fact, first command is also
UgtUdateeven twice, you can see, what it will do, it will install everything
we need on our server. I mean, Docker and Docker
compose, at least. I go back to the terminal
and I simply paste it. All comments are here, I
just press Enter and white. Looks like they
didn't add that Y. That's why you have to
manually type, yes. Yes, I want to continue. Press Enter again.
And that's job done. We go back to that website. We have installed Docker and Docker Compose. So
scroll further. It asks to verify
if the Docker and Docker Compose were
installed properly. We can run Docker version. We can basically
click that copy to clipboard again go
back to my server, maybe clear first
and paste it there. And we can see we have
Docker Version 2833 and Docker Compose version 2391, which means they are both installed and ready
for us to use. Now we can scroll further. It's optional non
root user access. You know what? It's
a good option. You will not have to use that studio every time when
you run Docker commands. It's not a big deal,
it's optional, but I will just
copy to Clipboard. Go back again, paste, enter, and that's job done. We can go further and
here we have DNS setup. It says to host NA ten
online or on a network, create a dedicated subdomain
pointed at your server, and I know it might sound scary, but it's actually
pretty simple process. But what we need is a subdomain, and to get subdomain, we need to first buy a domain. As I said, there are ways to
get a domain free of charge, but I'm not really
fan of that approach. I'd rather pay two or $3 and have a proper
domain from AWS. I will do then, I
will go back to AWS. I will need different
service now. The service is called Route 53. You can search here
for the Route 53. You click on that, and you are presented
with that web page. Let's click on that Get Started. And it says register a domain. You have other
options, but now we exactly need this option,
register a domain. So I again say get started. And domain is like
google.com or youtube.com. I will search for NA ten. Let's see what's
available because it says check availability
for a domain. I will search, and I can see
a ten.com is not available. Somebody already purchased that. But here below, we
have some options, but I already can see
they're all expensive. I'm not going to pay
$15 for a domain. I could have it
asnaten dot red for 23 but I'm not happy
with these prices. I can take here those
standard pricing, and here I can sort them
according to price. And now you can see that domain that finishes with dot
click is the cheapest. It costs only $3 a year. It's a price per year, so it makes it $0.25 per month, yes. Let's see if ten dot
clique is available then. I will search for
ten dot clique, and unfortunately it is not. Enten dot clue is not available. But n9n click is available
and it costs $3. I know it might not be
perfect pronunciation nninndt click. But I don't care. You can search
further and further, personalize it more, but I
will just pick this one. $3, I'm happy with that. I say select. It says the
domain registration fee is $3, and I'm happy with that.
I proceed to check out. And here you can
choose if you want this domain to be automatically
renewed every year. No, I'm not happy with that. This is basically just my test, so I will just run it for year. It will cost me $3, and close
to the end of that year, I will get a notification
that this domain will expire if I want
to renew it or not, but I will not renew it, so
I'm okay with this setting, and it can simply
expire in one year. I just say next.
And contact type, I say person and I put my
personal details here. Fill that in. I say next. Now just a confirmation. I say I have read agreed to domain registration
agreement and I submit. It says the request
is in progress, and it might take
several minutes, but usually it's pretty quick. I can refresh it here. I clicked Hosted Zones and it's already shown
in Hosted zone. Because when you
register domain, you will also have Hosted zone created and it looks
like it's already here, if I click on my domain, this first part is already done. It might take few more minutes to be shown up in
registered domains as well, but really hosted zone is
something even more interested. You will see shortly
why because if we go back to that website and follow
the instructions further, what we now have to do is
to create a subdomain and point it to server IP
address as A type record. That's what they say, and all that means is that I
have to go back to my Route 53 to hosted zones
to my domain n9n click, and I create a record. And they said it needs
to be A type record, which is chosen by
default anyways. The value is the public
IP address of our server. So if I go back to my server, this is my public IP address. And by the way, if you
go to the server itself, if you run curl I configure M, that's basically the
same information. That's your public IP address. I will copy it from
here's dot 20 eight.247. If I go here, 20 eight.247. It's alternative way of getting
your public IP address. And now I go to that Route 53 and they
want to paste it here. And now this is my domain. It's called ninndt click. And whatever I put here
is so called subdomain. You can add multiple records by adding something in
front of your domain. I will call it maybe server one. So basically what I create
now is server onennt click. And that record will
point to this IP address. That's what they want.
I create records, and this record has
been created for me. We can see it here, which
means now I can go back, do compose, configuration setup, and we can follow further steps. It says, create dot ENV file. It says, create a directory, make directory, and then CD into that
directory. All right. I'll go back to my server, but I'm currently in home
directory on the remote server, which is home Ubuntu. And it's up to you
where you want to create that folder
they are talking about, but it should be somewhere within that home
directory, I would say. So I'll go back and I will copy both those commands.
Place them here. This one created the folder and this one took me
into that folder. If I run PWD now, I'm in home Ubuntu and I
ten compose folder now. Let's go back and they say, inside the NATen
compose directory, create dot NV file to customize your NATN
instance details. What I want to do is
copy this all of that. Again, I go back to my Cloud server and
I say nano dot ENV. Nano is a text editor. It will create dot
NV file for me. Enter, it will be empty though. So I can write click and paste what they
asked us to paste. But what I have to change
now my domain name. I bought a domain, yes, but the domain name was
called nnn dot click. This was a domain, and
server one was a subdomain. I have to go back and they say, subdomain is server one. And now the time zone, this is not correct for me, I am in Europe but in London, and that's where my server
is created anyways. And as I sell email, I also want to change to the actual email I
want to use for that. That's some testing email. I created for that purpose, and I say now Control
O to write it out, now Enter and Control X to exit. This file is now created, and I can run Catt ENV just to check if
everything is correct, but it looks like it's correct. Nninendt clqu is my domain. Server one was my subdomain. Time zone, you can look up. You can Google simply what
are available time zones. I remember that mine
is Europe, London, and email whatever email
you want to use. That's it. So we go back. This is done now. Next step, they say, create
local files directory. Inside your project directory, and we are still in
that project directory. This is what they
mean NATen compose. We created in previous step. We're still there,
so I just copy that command, I paste it. If I run LSL now, we have created another folder inside NA ten Compose folder. Let's go back and
let's go further. It asks us to create compose dot YamlFlePast
the following in the file. I copy everything again. I go back here, I say
nano compose dot Yamal. This will create
file compose Yamal, and I will be able to edit it. I press Enter and I paste
all the output again. It's pretty long output,
and what it does really, it installs and runs
two Docker containers, traffic and NA ten, and it uses the so
called variables that we configured in
previous file dot ENV. For example, this SSL email, this value will be read
from the previous file. That's why it's so important that we have it
configured correctly. And if we scroll down, you can see subdomain,
domain name. This is also information. And here again, domain name, this is information that we also included in that
previous dot ENV file. And what it also does, even though the NA ten
itself runs on port 5678, this Docker compose we
secure our traffic, and we can connect to our
server via traffic on port 443, which is HTTPS, and
it's considered secure. But this is all the
extra information. You don't have to
worry about it. You simply can run again, Control O, enter Control X. And if you had everything configured correctly in the
previous file in this one, you don't have to study really
what that composamel does. Your convenience, I also created a PDF document that you can download free of
charge, of course, that document will include all steps and all
commands that I run here today because I know it's quite a lot of information
involved here in the process, but you can just grab that
document using the link below, and I hope that might help you to follow all of
these steps involved. We go back to these
instructions, scroll further, and this is just little instruction,
what it will do. But if we scroll even further, we can start Docker Compose now. It's a pseudo Docker Compose
a D. I will copy it again. Let's go here, paste, press Enter, and
everything should work. Honestly, we didn't
even have to run that sudo because we run
that previous command, which should run Docker compose with no
sudo, but I'm lazy. I just pasted it, so it
doesn't really matter. The images are being
downloaded for traffic and for NATM and once we
have them locally, the service should start. It might take several minutes
even let's just wait. It took less than a
minute actually for me, and it says, we have
two containers running. We have two volumes created, and one network was created. And we can confirm it. We can say Docker ps. That shows us that we have two Docker containers
running, indeed. One is NA ten and
one is traffic. They're up for 41 seconds, and we can also run
Docker volume. LS. And indeed, we can see that two Docker
volumes were created. That makes this service
up and running. And remember, we're still
on this Cloud server, but now I should be able to access my service from
anywhere in the world, not only from this laptop, but from any other
laptop as well. And to access my NITM, I should simply go
to this website. Let me copy it.
Let's have a look. HDDPS Column forward
slash forward slash, and I paste my server
one dot ten dot click. Press Enter. Some browser will show you this
information, some will not. You have to go to Advanced, accept Risk and continue, but it's really not risk. I will show you what it is.
But you can see it works. This is my NA ten platform, and I can use it from anywhere
just by going to this URL. And what that error was
about, have that little log. Says connection not
secure. It is secure. But if you click that
more information, it says this website does not supply ownership
information, and my domain has
ownership information. It's simply how it's resolved here in that docker in
that traffic and how let's encrypt gives us the
SSL sert for this service. It's a bit complicated.
But what I mean, some browsers will
display that error, but some browsers will simply ignore that and you will
not even notice anything. Believe me, this connection is secure because it says HTTPS. You have SSL ALS encryption for that traffic between you and
your server in the Cloud. And that is our setup
completed up and running. So I hope that's helpful.
Thank you for watching.
15. What next ?: Might be wondering,
what other videos or courses I should watch
to progress further? The answer is you don't need
to watch anything else. From now on, you should
focus on running your own NATN software and
building your own solutions. This is a very common mistake. People, sometimes including me, still, I have to admit, often spend too much time
watching tutorials instead of taking their current
knowledge and start practicing with
real life solutions. The fact is you already know how to host your
own NATN software. You know what nodes
and workflows are, how to build an AI agent, and how to work with APIs or
connect to other services. You are now ready to work
on your own solutions. If you don't know what
you should build, then head to NA ten website and search for
workflow templates. You will see thousands
and thousands of examples and ready to
use templates there. You can sort them by popularity or customer
reviews to get an idea what other people are building and what the
current hot topics are. Of course, you will stumble
upon some problems, but that is the
most efficient way to learn and to
become professional. You have to know how to resolve
issues because there will always be challenges when creating more and more
complex workflow. Remember to use official
documentation from NITM or look up solutions to specific problems
you might encounter. But from now on, the best way forward is to create
your own workflows. Start by building something
simple and then expand on it. You might also think about what automation other
businesses might need. Maybe you even go and ask some people running
local businesses what they need or what tools would help them to
save some time. So yeah, that's all I wanted
to pass in this training, and I'm really happy that
you have completed it, and I hope you found it useful. Thank you for
watching then, and I hope to see you next time, Mark.
 Marek Obuchowski, AI, n8n, Cloud and DevOps Engineer