Transcripts
1. Introduction: Hi, my name is macro-level. I'm a professional
DJ, a music producer. And this is my class where
I'm going to show you how exactly I made number one
selling record of mine. I'm going to share many of my secrets and
production techniques. So you can learn from them and implement them in
your own production. If you know your digital audio
workstation pretty well, but always struggled
to finish tracks. And this class is for you. If you follow along the steps
outlined in this class, I guarantee you'll
finish more music. You will learn some cool new
techniques along the way. I'm excited to share my start to finish process of music
creation with you. You will learn how to build a unique kick drum from scratch, how to construct
your own original Trump's without
using a single loop, we will create a
groovy bouncy baseline from scratch IN operator layer, a massive hook synth line using multiple soft
synth instruments. And I'm going to show you a really cool resampling
technique that I've been using for years and all of my tracks to make them
sound more original. Of course, we will drop a
vocal sample and process it. Once we have all
elements in a song, I will show you the
easiest way to arrange it. I will teach you how
to effectively use grouping and mixed groups
of similar frequencies. And at the end, I will
show you how I mastered the track to get it ready
to be played in a club. I'm going to let you in my brain so I know what goes
through my head. When I make certain
production decision. One thing I want to
advise before we begin the class is to not copy
my project like for like, make your own one,
make your own music. I guarantee you will learn a lot quicker and a lot more if you
would make your own tune. Used techniques and steps
outlined in this class, but use them in your own way. So if you're ready to take
your music production to the next level and press
play on that next video. And let's get started.
2. Kick: Hello, welcome to the class. And without further
ado, let's start. We're going to set
the temple to 126. As you can see, I've got
one midi track here, and there's absolutely nothing
on the master channel. So we're going to start with selecting an
instance of Serum. Going to set a loop to 4 bar. Make a midi clip. Go to G is zero. And just add a note, make that clip one beat. Extend that to four. And also extend the node. We can adjust that later. Basically, that is controlling
the length of your cake. That's the sound we
haven't at the moment. So let's go back to theorem. Going to have to select the
analog DB sign straight away, go into global and turn on the quality times four if
your computer allows that. But that's basically the best
sound quality of theorem. Now let's check how it sounds. Oh wait, that's for some
reason it went back to 1 bar. So let's change that
back to one beat. Let's just do it manually. We can to decrease that to
one beat, as you can see, 01. So then move this
to one-sixteenth. Here we go. That's
the kick pattern. Can type kick in here. I prefer caps just to be
able to see a bit better. Kick. Copy that to
this media pattern, make it so it loops. And now let's go
back again to serum. I also like to put a spectrum analyzer just to be able to see the
spectrum of the sound. Let's go and turn
this into a kick. So straight away, we're going to decreased sustained
tour in there. And then also decay to
around 300 something. And definitely increased
release to around there. To make it sound
like it's a kick, we need to modulate the pitch. So that's going to be our
amplitude envelope and we're going to use LFO
to modulate the pitch. So I'm going to turn
it into an envelope and do BPM, an anchor. So we can really control
the speed of the envelope, put it to 1.3 hz, add a dot here and
bring it to run here. Now, go into metrics and on the destination select
global master tuning, and on the source select LFO one and put it to around 29, 30. Now you can basically play with this to find perfect
tone for your cake. Oh yeah, make sure it's
turned on to one way. Can increase some volume. As you can see by
moving this envelope. You can create a whole spectrum of different sounding kicks. Nice and easy. Obviously, you can go into a Effects section
and spice it up with like saturation
and all sorts of that. But I'm not gonna do that. I'm going to be done with
this low end of the cake. I'm going to do next is
create another midi track, color it the same
way, and name it. Top and actually
rename this to bottom. So there are no That them
to channels are my kick. I'm also going to group
it and name it kick. All that is just
purely to be able to stay more organized and
find your elements easily, especially when you're opening old projects that you've
worked on years ago. So we're just going to copy this pattern into a
top, so rename it. So we know that's the
topless, the bottom. And there's a whole group. Alright, so I've got
this drum rack that I've prepared and I'm just going to go and drag it into the project. So this is basically a, an instance of a
sampler and it's got all these essential parameters
mapped into macro knobs. So I'm just copied the drum rack from here onto this top layer. And I'm going to go back
to my current project. I've got a whole bunch of
samples that I'm going to be using throughout this class
to create various elements. So for this top
layer of the cake, only use this sound here. And as you can see, now I've got a full control over
attack, sustained release, or really easily
accessible to while also like to do is
straightaway drop in a utility at the end of
the drum rack and select one of the channels to make
sure that the kick is mono. And there's no, any
weird phasing going on. I'm just going to
select left channel. We also need to go into the midi and change it onto a
kick to get the sound. So the moment is way too long. All I want is this initial transient
high-frequency information. I don't want any of that
low frequency information. So I'm just going to decrease
the sustain completely, decrease the release to
about 60 and decay to taste. So I'm going to play
and just decrease it. See what sounds best. That's way too much. Maybe, maybe like that. Let's hear it in a context with the low-end. Okay, that's good. Let's see if we can
mix it a little bit better of a EQ here. Like I said, I don't want any low frequency
information here, so I'm just going to locate
everything that I don't need. So I'm just cutting
the low-end rumble. And it's a bit too, too bright at the end here. So I'm going to show you
a little bit as well. Like so. Yeah, that sounds nice. So we can a bit. Yeah. Much better. I'm going to put a little widening on top of that. It may not make any
sense to you to make the kick mono first
and then to widen it. But this is just how I do it. The top player should be
wider than the bottom layer, just to make kick, stand out a little bit more. But you definitely should make the bottom layer mono 100%, because everything on
the sublevel should be mono to translate really
well in the clubs systems. Just going to increase the
white and see how it sounds. If you go too much, it doesn't sound good. Around there is fine. And if we take this of that off, you can hear a difference. Like it's definitely
wide sounding kick before you apply utility. And then up to utility, it's just left channel, which means it's mono. And then when you widen
just one channel, rather than wiring
both of the channels, you essentially make it
less likely to face. With that said, let
me move this away. And let's, let's
hear the difference with them to on and off. So that's width. That way. It's more controlled
and like I said, less likely to face. So let's clean up that
bottom end as well. Dropping an EQ, going
to have a 30 hz cut. And I just don't want
any high information from the low-end of the cake
crossing to the high-end. So they kinda like stay
away from each other. Let me show you, which just make the
dequeue less harsh, less abrupt, more pleasant
sounding if you will. So all I'm doing is basically removing all that very high-end, just keeping it nice and low. Also this is a bit
jumping out to me. So I'm going to do is
just drop a little dog here and just move it down a bit toward
it sounds nice. Even by using the queue, you can shape your kick
quite significantly. So we can add more low end if
you boost around this area. She can sound like. But I
think we're gonna do that by applying some by
applying some distortion. Change the Q. Oh yeah, that sounds cool. So just before and after
sounds much more smoother. Now, I don't really need this drum rack to be honest,
delete that channel. And whenever I need
the new drum rack, I'm just going to copy
this drum rack from the top layer and just swap
the sample that's right here. Now that we grouped
our kick here, we can apply some processing into both of the layers
to glue them together. First thing I want to
put in is a saturation. Let's put SAT and onto it, keep it warm tape
like this algorithm, start increasing the drive. It's quite harsh. Or
we can do is just add a bit of EQ
before the Saturn. Like I did before. I said I'm not going to do it, but I'm actually gonna do, I'm gonna bring out
bit of that low-end, cheap, very helpful thing. You can turn this on and off. Here in Q3 is this
keyboard button, which gives you this piano
roll from where you can select precisely which
note you boosting, and that node corresponds to the precise frequency
of that note. It's really good if
you're trying to boost specific note
rather than frequency. So I'm trying to boost around G, some reason this says G1, but since piano row says G zero, no idea why it's doing that, but this one is actually GZ
in Ableton has quite a nice, Let's turn this harsh
area down a bit. It's probably way too loud. Let me see. Let's have the bottom
kick play around -12 to control volumes
at the source. So I'm going to decrease the master volume on
the serum for the kick. Okay. That's good. See what we can do with the top layer. That's cool. Let's put the spectrum analyzer
at the end of the kick. See how it looks like. Quite like the way it sounds. Let's see where else we can do. Maybe we can put something like kick tweak at
the end of this. That's like a compressor slash. Saturate for cakes is quite cool for like other
elements of the track, even though it says
kick in its name, but feel free to use
it on other elements, like the drums are vocal, maybe to add some
character to the sound. Tone it down a bit. They all sound
slightly different. I mean, it's easier to hear the effect when it's
turned on like that. This is quite serious. One is his work or for maybe shave off a little more on high-end. Let's see what saturation does. Yeah, maybe that was a
little bit too much. You know what, We
can turn it back to where it was around 79. And instead, just blend it in, leave that like that
but use mixed nope. To mix it like
half and half e.g. Oh, yeah. Way better. Without saturation. And that's when saturation. So when it was all the way up to much yeah. Like that. That's obviously you can play as much as
you want with it, but I'm pretty happy with
the way that sounds. So I'm gonna see you
in the next lesson where we're going to
add some more drums.
3. Drums And Percussions (Part 1): Welcome back to lesson two, where we're going
to add some drums. Like I said, I'm going to
be using this drum rack. So I'm just going to copy it, going to insert new midi track. I'm going to color
it to the color I like my drums to be in. So I'm going to
rename this as well, clap and then paste
my drum rack in here. I'm gonna go back to
the sample folder and I'm going to
select Serum clap, which I made earlier. Next step, I'm going
to place this marker. This is the start of
the sample marker, right at the beginning
of the samples. Sometimes when the sample is
recorded in a lower volumes, it's quite handy
to increase this. This isn't the volume, this is just the
visual Zoom features so you can zoom in so you can
see it a little bit easier. The ideal place to place this marker is at
zero-point crossing, where the waveform
crosses zero line. So around there should be fine, can zoom back the way it was. And now I want this sample
to start right away. So I'm going to
decrease the attack, increase the cake
because I want it to sound for most
of the duration. I'm going to increase to
around there, like so. And then, you know what, I actually want it to sound completely all
the way through. So I'm going to
increase the sustained. So the entire sample
will play whenever the midi information
will pass through this drum rack also can increase
a little bit of release, create new media clip, and insert a clap
in here, like so. Make it so loops
and increase it. So it hits every second beat. Just like that. We don't need
this view at the moment, so we can just turn it off, make it a little bit cleaner. Obviously, doesn't
sound like a clap at the moment because
basically what this is is just a bunch of noise. It was a noise generator that
I've sampled from serum. And to make it sound like clap, you need to apply some effects. So the first thing I'm gonna
do is apply this saturation. We can increase it
and start listening. Also good idea to decrease the
volume straight away here, just in case it's way too loud. Which saturates is normally
do make things louder. Quite good idea to soft clip. It. Just doesn't clip. I
don't like this color. And to compensate for
the volume increase, which is going to
reduce the output. Let's change the
curve to medium. Shift makes things punchier, just trying to match
this really as good. Another thing that
can make your drums bunch here is this
thrombus got new stuff, new plugin from Ableton. I'm normally decreasing
this saturation down, but increasing the
transients quite a lot. If I need some
punch to my drums, instantly sounds much better. What it does is just adds
the trends into your sound. This dump is quite cool
as well. Check it out. If you increase, it, sounds like it's almost controls the character
of the sound. Almost like a filter. See if we can maybe spot
it in the spectrum. Yeah. Yeah, it's like a
filter but very kinda like gentle filter
and check this out by just adding those
two plugins onto a noise will make
it sound like that. Next thing we're gonna do is
remove unnecessary low-end. And please wherever you do, always compare it
before and after. Gain staging is a real thing. Maybe we can decrease that
by about one. This will. I don't like the way
it's clipping here, so I'm going to reduce
this to about four dB. So now that we don't clip here, we're ready to move on. Quiet. Don't like
this peak here. Yeah, that's much better. Alright, next step. Another midi channel. You know what we can maybe
even just duplicate that clap. Make sure this clip is also
named appropriately, like so. Now this next sound I'm going
to add is this vinyl snare. And I think I want it to
sound once every 4 bar. So I'm just going to
consolidate this clip. So it's a two bar loop. Yeah, this is a
four-bar loop here. So what we're gonna do is
just increase this to 8 bar, start with bar nine. In terms of arrangement, we're going to move
in aid bar sections. So 8 bar a boss. We're going to play some markers and make our
structure like this. So I'm going to just move everything cross to
start from bar nine. You don't have to
do this is just me. I like to work that way. And I'm going to, whoops, what happened
with six clap? Let's name this clap command, copy command. We clap. And then amend a little bit, consolidate the delete all this information
here. Start fresh. So that's our vinyl
snare channel. Remove all those
effects and all EQ, go back into a sample
selection of God, this quiet cool sample. I'm going to use
again attack at zero. I want it quiet punches so
sustained to zero as well. And then decay is, we're going to have maybe
like 400 milliseconds. Let's find out, let's put
some media information in and find out how it sounds. Set the grading
to one-sixteenth. And like I said,
I wanted to have this pattern once
every four bar. So I'm going to place the midi
notes like so and loop it. So it's like once every
4 bar with the decay, you basically control how long
did the sample place for. But only if the
sustain is decreased. If sustain is all the way, it will play for the
duration of the midi note. So I quite like the
way the sounds. Again, I want to make it mono. Let's see which channel sounds, but I'm really liking
the right channel. Even from looking
at this waveform, you can already tell that the left channel and right channel, they sound different,
they look different. So next thing we're going to add some compression because for one more beef out of
it, increased ratio. So it's like it's almost
like limiter, knee to zero. Maybe increase it and
then start from the top. Decrease the release, releases. How long it takes for
compressor to go back to zero. And then out again. I'm just going to compensate
manually as per usual, which is going to see
how we can clean this up nice and quickly without affecting its sound. Let's move on. At this stage, we can probably go
and group tracks like that Command G and
then rename it. Hi, my idea with this
is I'm going to have three different groups for
high and low frequencies, which I'm going to be mixing separately to achieve
the clean and mixdown. I'm briefly touching
on this just so you know why I'm naming
this group high. So let's continue
adding more elements. Another midi track, and it makes our life easier because
when you create another midi track
in a group gets assigned to the same
color, which is handy. So you can just go back and copy the drum rack paste
in the new channel. And we've got clean channel with an EQ at the end and spectrum. So next thing I want
to add is more snares. So this one, I want
to be the same every BAR command Shift
M to create a midi clip. I'm going to place
media nodes like so. Increase it and go
back to sample folder, select a different sample. This one is really cool. Going to increase attack
on this one because it's a bit too
punchy to my taste. Let's decrease the
volume straight away. Yeah, like that. And then
increase the TK a little bit. So they're almost
like a call and response question and an answer, although it doesn't happen here, but it's on purpose because
we're going to have some other sounds
occupying this area. So it's gonna be kinda like
dancing around each other. One cool trick I
like to do to make my sounds less robotic sounding is to add this random effect. It's a media effect
that basically randomizes velocity of
each individual midi note. So let's check this out. If you increase this random. As you can hear, each sound is either quieter or
allow the previous one, and it's always random. The more you increase
this random, the more you widen difference between the loudest
hit and the quietest. So in terms of processing, Let's just slam
decapitate on that. Let's hear how this sounds. I quite like that little bit
distorted sounding thing. Rename this snare, copy
that to the midi clip. So now we've got this little
pattern that's going on. Also, let's clean this up a bit. Nice. Let's just adjust volume. Yeah, That sounds
good. I'm gonna be doing a bit of
mixing as I'm going. And then we'll be
doing proper look at all the elements
in a mixing session. Alright, I think it's about
time to add our hi-hat. So I'm going to add
new midi track. As per usual, copy the
drum rack onto new track, rename it open hi-hat, add a media clip, decrease
the length of it. So we can add a
high hat on upbeat, go back into the sample
library and select the sound. We're starting to
shape our beat into something at this stage
That's decrease attack. Alright, let's start processing. Like I said, quite cool
trick is to use logins are not meant to be used
in certain situations, which is this kick tweak. Let's use it on this high hat. Slap it on and find the decent setting for yeah, nice, uncompressed bit too loud. You remember, we're going
to be adding more layers. It's good habit to
turn things down just to be able to
stock more or less. One other trick I
want to show you is widening technique by
utilizing ozone imager. So why normally do here is I hit steroids and set it to
around 7.5 milliseconds, then select the band, crank up the width of
this band to quite high, and then mode select first. And then to find
the frequency range that I want to widen. So it doesn't create
any phase issues. There's a quick
before and after foo. So it's clipping
here at the end. Here. So we can just turn it down like so and then turn up. All right, That sounds good. In terms of processing, that's really all we can do now is pull little
bit of EQ at the end, change the the cube. So it's like less
deep of a curve. I find 12.24 the most
pleasant values. This super high peak
one a team down. Yeah, like so. This
checkout before and after. Yes, much better to
double this layer up, create another midi channel. But let's get
creative this time. Instead of using sample, we're going to use silent, initialize the patch and
you use noise oscillator. Used to noise oscillator, keep re-trigger on pan, one left, one right. Make sure one is
on the one side of the stereo spectrum
and one is on the other side that
stereo spectrum copied the pattern denotes rename this silent hi-hat copy that
renamed the middle clip. Let's turn this down just
to protect our ears. Also, don't forget to crank
up the voicing to one. So we want this to have
at least one voice. Let's solo this. Let's
bring this down. So if you don't do the painting, it's right in the middle pan. It creates this
super wide high hat. Let's shape the
envelope for this. Crank up the decay. We don't want any sustained
and then we want some relief. Basically replicating
the same envelope as we've got here on the hi-hat. As you can hear, it's
exactly the same, but obviously it doesn't
sound any good at the moment, but it's really easy to fix. The only thing you
have to do is really select the right frequencies. So the moment it's playing
throughout the whole spectrum, just remove everything
that we don't want. Maybe turn it down
so it doesn't clip. Gain staging again. Very, very, very good practice. So you don't clip
at any point of your signal chain
starting from the source. Make sure you don't clip on
the output of the source. Make sure you don't click
on the output of the EQ. Make sure you don't clip
on the channel level. And as a rule of thumb
to equality mix really. From there you can go and tweak. Let's hear without it. It's just adds that extra
width, extra high intensity, high-frequency sound to fill in our main hi-hat and add a
bit of character to that. Let's continue adding more
layers onto our drums croup, going to take the
drum rack as before, copy and paste it, create a midi clip, make sure it's 1 bar, extended all the way to 8 bar. Add some nodes like
so copy this random, I want a bit of movement on
this rim I'm going to create, let's rename it rim
copy, paste here, and then go back to our projects samples and
use a room sound like so. Let's turn it down. Let's
make some adjustments, sustain all the way up. At this point really we can add some groove to our, our drums. So go into the midi
clip and in grooves, click that little
circular arrow button and find the groove you like, I like swing 16, 64. This is how it sounds and
we're just adding that into the groove pool
then in the middle clip, which is selecting that groove that we added to
this group pool. We can close that. We don't need that anymore. Let's hear. Width. That's without. And we
can apply that groove to whichever midi clips we want. I normally apply that to every single one
that's got 16th. Everything does go like 16th pattern will be
affected by the group. Let's hear how this sounds now. That's without. And that's where maybe
64 is a bit too much. Check this one out. Yeah, it's a little
bit less swing. Let's add some
processing to our rim. So first things first, I'm going to use utility to select the channel
because it's quite stereo. I wanted to translate and
every system really well. So if I'm going to make a mono, yeah, I quite like
direct channel. Let's get rid of the
low frequencies. Like that, quite like that. Now, I want to add extra
movement to this sound. I'm gonna do by using LFO Tool. Select the shape sign. I'm going to use pan. I'm going to set it to 1 bar. The moment It's also applying
a volume modulation. So let's undo that
and only use panning. It's just shifting
phase of this curve, basically another way of just moving curve along the axis. Yeah, just like that. Let's continue
adding more layers. Add another midi channel. I'm big fan of using rems
and snares in my tracks. So I'm going to add
another room sound. If you notice every channel and every sound is occupying
the empty spaces, sometimes they overlap,
but they rarely overlap with the sounds of the same spectrum is a
little bit like painting. So consider every single layer of your track is a
different color. And by applying that color into empty spaces on the canvas, you kinda painting the
picture, the whole image. So that's how I like to
think about the process. Making music. Or next rim shot, I'm going to use this one here. That one, make a midi
clip that's 2 bar long, turned a gradation to one-sixteenth and
add a midi note right at the end
of that midi clip. Stretch it out and make sure it's looping.
Here it sounds. Let's turn it down as that quite cool field
to our drum loop. Let's rename this room shot, copy, paste or something. Notice this hasn't been
titled yet. Let's do it. Okay, That's much better. Keep you organized. Again, use utility to control
the sterile field. Left channel is stronger, I think it mono anyway, but just to be safe, Just roughly mixing as I'm
going solo high frequencies. I just want to solo that and work directly on that top loop.
4. Drums And Percussions (Part 2): Let's continue adding layers. We've got a few
layers more to add. So let's not waste any
time and keep moving. I'm going to add another
drum channel from there, select a different sample. This is the one I want to use
to create even more groove. Make a one-bar loop. Once again, I'll make
sure it's looping, make sure it's in 16th. Drop a pattern like this. During this down. Here, we need to
shape the sound. So I wanted just to take a little bit rather
than play whole thing. Yeah, it looks so. Let's
copy this here as well. Quite like left channel. Let's add some
widening. Same again. But just make the
whole thing wide. This sample has got lots
of low frequencies, so we're going to cut them off. Maybe I've cut a bit too much like that. Let's rename this 16th
closed copy paste. Let's move on and other media
channel, another drum rack adjusted some levels
to make it more cohesive is add a shaker. This one, sustain
all the way up. And let's create a midi clip. We can just drop couple here. Like so, rename this
shaker attack to zero, released to where it
was, make it mono. Mean it sounds quite
nice there as well. But I like to be in control of everything
that my layer is doing. I'm going to get rid of the low frequencies also to
the last couple of layers, we've added what I'm gonna do, I'm gonna select the
More than Shift Tab and apply swing to
all midi clips. So now they've got
groove applied to them. Yes, much better, shaker, quite intense at the moment, I want to add
side-chain preset here. I'm going to tweak it a bit, take the volume
all the way down, and then control it
with this volume knob. That's ducking. Every
time the kick plays. If you start decreasing that
to let some of that sound through that on and off
that that's consistent. So if you turn it on, it kind of bounces back
and up and down. Just to create that
extra movement. I hope you can pick
it up on an off. I'm also going to just take
this widening copy here. That's without. And that's nice and wide, we want all the super
high frequencies and y to occupy our stereo field. Also going to go and
add some random, just copy that random onto
other channels. Like, so. Like that, this pattern
is super repetitive. You can see repeats every beat, but by adding little bits like
this throughout the chain, this random media effect
plus LFO as a side chain, this creates some
consistent movement throughout the sound, and it makes it less static. Let's continue filling
in our drumbeat, going to copy both
straight away like that. And then this channel, I'm going to create a
two-bar media loop, make it one eighth, and add a midi note in here. Go back to our sample library, and I want to select
this open hi-hat. This one here. I believe
that's a real symbol. So this will add character, a bit of realism to our track. So sustain all the way up, which is good on
the sound to play throughout its hear how it
sounds. Let's turn it down. I like the way this
beat is shaping up. So I'm going to select
one or the other channel. As per usual. I quite liked the left channel. Let's rename this open. Let's get rid of
some low frequencies like that and add some
movement at that as well. Select the sine wave, removed the volume modulation, and add some padding around
60% certain to one-fourth. So what this does, it just goes from the
left ear to right here. Every time we place,
Let's hear without it. It's just dead in the middle. With it. It's got
some movement That's slides from right
to left the air. Let's keep adding layers. I'm keen to add another rim. Let's just copy this and add
it onto our new channel. Go back to sound library. Of course, this
electric rim shot, the sample starts quite late. So we're going to have
to bring this star of a sample marker wrote at the
beginning of the sample. Let's create 1 bar midi clip. Extend it like that and
put some notes like so. Listen. Let's solo the drums again. The moment is quite loud. Let's bring it down a bit. Also. It doesn't
sound quite nice, but the reason is it doesn't have any swing applied to it. Once you apply the swing, it will almost like blend in
with the rest of the beat. Checks out. How good is that? Rename this electronic Rim.
Yeah, I like that. Nice. I love the look
the way it sounds. I don t feel it needs any
processing apart from just cleaning up nice and quick. Let's move on. Create another
media channel as before, copy, nice and quick. Select a different sample. Add 1 bar loop, put some notes in just so we
can hear what's going on. Listen. Just as extra groove, extra complexity to our drumbeat sounds like a pipe to me, it's called this pipe is go back to the device and shape it. Yeah, nice input
cost of going to EQ. It sounds like this. It helps to tune them. So this is playing G-sharp. That's where I've got
these tuning, these tunes, incense and these
tunes in semitones. So I just adjusted so
it's dead on G-sharp and I'm just going to go
minus one semitone. And now this is plain
same key as our kick. The trumps that have
some tonality to them sometimes helps to
tune them. Not always. I wouldn't suggest tune in every single drum here
because if it sounds good, it sounds good, even
if it's out of tune. You know what I mean?
Let's keep moving. Let's add another layer. I want to add a ride. Let's not forget to
add swing to a pipe. So with this one, I
want to add, right, so let's go back to
our sample library. It's a good old,
nine or nine, right? So for this one it's just
going to copy hi-hat pattern. I want it long, so I'm going to
increase the release, increase the k. The main thing to
shape it would be EQ because there's a
lot of low frequencies. Let's hear how it
sounds in a context. There's a whole bunch of resonant frequencies
and this sounds, so this is quite cool to use the special EQ,
it's called two. So I'm going to do is flat
start this completely flat, going too low cut, similar to what we've
done here in Pro Q. So it doesn't affect
any low frequencies. And then the rest of
it going to increase the depth until it sounds nice. With the sharpness you control the sharpness
of the peaks. We've got a lot of
really sharp peaks here. So increasing of
sharpness is only benefiting those on an author. Obviously it's reduced volume, so I'm going to increase it back and it's a way more pleasant
sounding ride cymbal. Before. And after. Much better. I want to add some
reverb just to blur it a little bit about how a room works really
well for this, I'm going to mix 5050. By clicking this,
you can lock the dry wet and even if you
select different preset, who will maintain that ratio. So I'm going to select
small ambience. This is quite dry, doesn't have any character, but once you apply
a small amount of reverb, check this out. It widens. At the same time. It adds some character in depth. Let's rename this Ride or Sit for the processing
of that one. Let's move on a couple
more layers in drums, and then we move on
to the processing, the group as a whole. So this one is going
to be a club row. I want this to be
the entire aid bars. And this will be the first midi clip
that I'm going to have. And once we move onto
the arrangement, we're going to go into each individual clip and
change the midi pattern. So every 8 bar of clubs will be different
to the previous 8 bar. So for this one we
draw a pretty simple. Drum pattern like that. And let's go and
select the sample. This one, decrease
the attack on it. Nice and punchy. Yeah,
that's quite cool. A little bit of cleaning up. Also we can add swing to this. One other thing we can is
obviously this random. We're going to just duplicate this club parole and
use a different sound. We're going to use
nine or nine snare. And we delete that.
Delete all this. Make a simple pattern like that. Just make sure it's
named correctly. Go back to the
sample library and select this. Nine are nice. They're obviously
it's way too high. We can it doesn't
sound right to me. Try and tune this. Oh yeah. Clap role is changed
as well because we copied the same drum rack. So we're going to undo
all these tuning. Much bare. Same here. Let's start from scratch. Let's see which node
That should be. Okay. Yeah, don't really need any processing on this sound because it's
quite intense as well. And we're going to process
the whole group together. Literally couple
more sounds to add, which is crash, rename crash. So what we're doing is
building our palette of sounds that we can then
arrange into a whole song, copy that as well. So eight bar loop, eight byte chunk rather, and then make a huge
long note of 4 bar, rename this brush, go
into our sample lab row. Let's copy the drum rack. Also can copy this random. Yeah, that's just going
to add a variety. This is very static, right? And if you add that, especially, especially
if you increase, it looks quite like that. Let's increase on
that clap as well. It's definitely
adding some dynamic to things like snare
Roles, click Browse. Quite a good technique
to do with crash. It's that one I want to choose. Let's increase the Decay. Let's turn this down. First of all. Really, I want it to sound all the way. Yep. So let's just remove
unnecessary frequencies. Okay, 12. Yeah, it looks like that. So what I'm going to use
is this delay echo plugin, select one-fourth,
bring that back down. Use ping pong and
feedback quite high. Change these two nodes. Yeah, just so it bounces
left and right like that. Cocoa. And let's put
some reverb as well. Low cut around there. Pretty late to zero
or as low as it goes. Decay time 15 s, quality on high removes spin. Around 50 per cent is
hear how it sounds. Yeah, just adds extra depth
and blurs, everything. Blows. The decay law is the echo blurs the actual crushed sounds. So kinda like blends
everything together. And that's it for that one
extra layer I want to add. And I'm going to explain how, how I made it when we move
on to the sense lesson, where I'm going
to show you how I use resampling to sample already existing sound to
create new and exciting sound. So I'm going to use
one or the sounds over sampled earlier just to
add the extra groove, go back to sample library. So this is the sound
I want to use, going to place it in, going to decrease the volume. Let's just hear how it
sounds at the moment. Little bit extended leg. So make sure it's
the same color. So this one, to make it
more like percussive sound, I'm going to use
this Beats algorithm selected to forwards only
and decrease this amount to where it sounds decent. Also select this 16th. Maybe. Trends in
sounded a bit better. Let's hear it in the context. Shape it, shave off some
of the low frequencies. Like that. I want to add
some movement to the sound. So I'm going to use
three different LFOs. One, I'm going to add side-chain as before,
but not all the way. Like so. Then I'm going to
use different LFO to remove the last
part of the sound. So I'm going to
select flood 100. So we'll play all the way until I remove that
last part shoots up. So this one is just
removes that last note. I could have done it on the
sample level like that, but you would require me to
do it every half a beat. I don't wanna do that.
This is much quicker way. So another one of LFOs, I want to add some
extra movement with a sine wave and
select it to 1 s, like half a bar, and some volume
automation modulation. So like if you remove all these and then
bring them back in, adds an extra groove. And let's bring this
back into the mix. Let's remove it. Feels empty. Maybe the crash could
be a bit louder. Now I've got all my drum
elements in a group. I can process them
simultaneously. Let's use thrombus, one of my
favorite things in Ableton, don't share this with anyone. Just dropping this
thrombus and doing absolutely nothing increases
the excitement of the sound. Quite cool. So I'm going
to use compressor. I'm going to trim ten dB or so. Let's just blend it in. Not use like 100% dry wet. Increase transient, tiny bit, like literally tiny bit. And let's not damp anything we want high frequencies
to still come through. It increases the
loudness quite a lot. So we're going to have
to compensate for that gain staging once again. And now, well enough
with the correct gain. Let's add some crunch.
See how this sounds. So much character with this one. I love the way this sounds. Let's add more
character saturation. Pretty cool plugin.
So this one is, we're going to use
rotten drum machine and use it really,
really suddenly. This is quite a lot. Just use a tiny
little bit to add even more character to the
sound, more compression. So I'm going to use
Google compressor, set it to auto release, quick attack, soft clip, and start decreasing
the threshold until it starts to bite. Then to utilize the clip, you have to crank
up this makeup, but then it increases in volume. So what you're going to
have to do is group these into a audio rack and add a utility of two that
because it's going to increase the volume because
you use a makeup gain. So to compensate for that, you just decrease the volume
here and just make sure that the input level is the
same as the output level. And the compressor is
ticking around clip areas. So it's shaving peaks off? Yeah. Like solely on and off. Yeah. We just compressing it, making sure that there's no
sudden peaks coming through. There's just add one final EQ to make sure no low
frequencies coming through. I like to do that on
the group level as the last plugin to make sure that the output of the
group is a clean signal. Make sure you don't overdo
it and play it altogether. Because if you overdo it, you end up ruining
the whole sound. Let me demonstrate that to
you. That's way too much. Let's put it together with
the kick here, how it sounds. Yeah. I'm happy with that. In the next lesson, we're going to move on
to creating a base, which is my favorite
thing to make. And I'm excited for this. So thank you and see
you in the next lesson.
5. Bass: Hello, Welcome back. In this lesson, we're going to be
creating a baseline. This is definitely one of my favorite things to create
when I'm making music. And I think whenever
I get cake and base, right, then the rest just
falls in quite easily. So we've got our beat going on. It's a pretty good foundation for our baseline to go around. So what I'm going to do
is create a midi channel, place it outside the
Kick group like that, color it differently
and rename it. So now it's base, group this straight away. Rename this low. So you're probably
starting to get an idea. So I'm going to have a couple of major groups which has low, high and made vocal, which is going to be
separate in this bass track, I'm going to be
using a operator, one of my favorite sense of all time for making baselines. There's many ways you
can create baselines. I'm going to show you
the one I like lot. So let's just click on the 16th. That's just a little
bit easier to draw. What we're doing is we're just drawing in harmonics like this. And by doing so, you can already see how
the waveform shapes from the sine wave to
whatever you prefer. So if you've got one harmonic like this is going
to be just pure sine wave. Once you add another one, it creates different wave form. And the more you add, the more different
the sound becomes. Let me show you. So let's
create a one-bar loop. Let's go down to
a base register. I think we're going
to just solo the low. So it got kicked
and bass playing and we start drawing in notes. Lower it down. Make
sure it's looping. Don't follow this. We can select the scale. So, oh yeah, the groove is also a good idea to just
grew straight in. And let's, let's make
this June in a minor. Once you've got a
baseline going on, which can go back into
operator and shape the sound. Let's hear how adding more harmonics or removing harmonics will change the sound. Just have fun for
house with this. What I am going to
do is I'm going to have, have it like this. So I'm going to remove
the filter altogether. Basically, our sound going to increase released
to like 120. And straight away. I want to shape this with AQ. Like so. Let's increase
the tone and volume. Let's hear how it
sounds on its own. I prefer creating baselines
with one layer if I can. Sometimes you just need to
add extra high frequencies, so make it out of
couple of layers. But if I can get away with
just using one synth, one layer, it makes
my life easier. I don't need to
make sure there's no issues when you blend
two layers together. So one layer is always
a winner for me, maybe a little controversial, but I'm using a thrombus, a baseline damp all the way up. Here it sounds. Obviously there's a significant
increase in volume. Remove like four dB. I love to sound on this. Definitely compressors
at some drive. Yeah, brilliant plug-in. Let's stuck some saturation
plug-ins on top. Let's stick the Sutton
on top of the thrombus, which is going to decrease the drive and put
up again to zero. And also use warm tube. So by adding extra layers of character and
color to the sound. At the moment, obviously
they clashing. So we're going to use LFO Tool to side chain
the base to the kick. And that's going to be our last our last plugin in the chain because
we don't want anything after the LFO Tool. And to make this
base a bit wider, I'm going to use imager
just before the side-chain, create a band around
hundred stereos, 7.5 milliseconds and increase the width of this
band to about there. You can definitely hear
it that became wider. But also you can see on this vector scope that
it's not mono anymore. So if I go back
stele in the middle, what this does is it splits
the signal into two bands and it widens only the
top band above 100 hz. That's all you need really. I mean, you can add
more saturation, maybe a decapitated
on top of the satin. So it's gonna be like three
levels of saturation. Just mixing it in like so. And it's that simple. It's only one layer. Let's name this base and
that's all you need really. It's all about making it
simple and effective, which in this case it is. Now from there, I want to
add some extra ear candy, if you will, like some
accent layers that are going to support our
baseline every now and then. Let me show you, I'm going to create another media channel, going to color them. I am going to name it Tom. I'm going to create
a four-bar loop, going to use a drum
rack from a clap. Just place it here. Go
back to my sound library. Going to select this. Thompson plays the start marker at the beginning of the sample, going to midi clip and punch
in some notes like that. Let's hear how it sounds. Let's put it down. Just going to solo. That's the way it sounds at the moment. We are
going to shape it. So maybe increase attack a bit like that. We don't want it to
clash with our baseline. So I'm going to filter
the low frequencies, going to bring the
volume down a bit. So what it does is it's just accents that last
node of the baseline. So if you noticed, I made a baseline so it doesn't
conflict with the cake. So see where the
kick is playing. There's no baseline, although
we use in side chain. It helps even if you try
and stay away from Keck. So that Tumblr, I think
we've done with that. Let me add another
supporting layer. This time I'm going
to use serum. I'm just going to copy the
baseline notes and go into my instruments and
select serum in here. I'm just going to
go into the presets and select Instant idea preset. Like I said, I don't want the entire baseline
to be layered. Only. Some couple of notes. I'm going to solo
the theorem layer, and I want to accent only
the first three nodes. Let's hear how this sounds. Let's turn it down. It's
very low at the moment. Let's put it up. Yeah. It needs shaping. So first stop, go
into an envelope one and decrease the sustained
decay to about 300. I want it quiet, punchy,
almost creating transient. Yeah, something like that. Let's see if switching off sub help blending
the extra layer. Yeah, we don't want
that sub in there. Let's hear how it
sounds with a kick. Shape the sound a bit further. We obviously don't want it to clash with our main baseline. So we're going to filter
all the low frequencies. And at the moment is a bit overwhelming in high
frequencies as well. As I removed a lot
of high frequencies, I decrease the volume naturally, so I'm going to increase the
gain of the channel level. Yeah, this sounds
pretty good to me. I'm going to rename this
the name of the preset. Also renamed the
tongue midi clip. And let's hear it
together with a beat. Yeah, I'm pretty happy
with the way this sounds. Let's remove these and see how this sounds without
those supporting layers. And now we've done this adds a bit of dynamic
to the baseline, is less static, is bouncy. It's more interesting.
My favorite thrombus, I think I'm going to copy
it from the baseline, which is to add some compression and color to the
instant idea layer. Down to drive dry wit to 50. Maybe we can
increase transients. Let's hear how that sounds. That sounds good. Pretty happy with
that. One extra thing I'm going to copy is LFO, which is R side chain,
if you remember. Just to make sure nothing is clashing with the,
with the kick. Here, even though
this note is in plane directly on
top of the cake, it still gets ducked
down like that. Because the curve
of the side chain and that creates extra groove. That's it for the base.
I'm pretty happy to wait. It sounds like I said, and now we can process it on the group level
together with the kick. And I'm going to start
with compression, going to go into UID and select 11 76 compressor here where I love to do to
add some grit to it, hitting the shift on my keyboard and engaging
all the buttons. I believe that's like an
infinity ratio on a compressor. So it's acting like a
clipper or limiter. Not sure about the
technical aspect of this, but I just love
the sound of that. Let me solo the low group. Can you hear that sound? That it adds
pleasant distortion? Let's adjust it. That's obviously way too much. So let's play with the
release. An attack. Releases to quit,
thins out the sound. Super slow attack, slow-release, because that's where
it's less invasive. Let's hear before
and after, before. As the extra layer of texture, we're going to need a filter. I'm going to use
volcano three for that. So this is just going to
be a high-pass filter, decrease the peak slightly, and then make sure it's clean. Frequency to about 200 hz, like so, and the slope to 24. And we need to write
some automation. Just need to show automation
and clicking couple of dots. So only switched on in
certain areas of the track. Let's hear it sounds. Yeah. So let's hear in
a context with a beat. Maybe that's a bit too much. Let's leave it
like this for now. We can always come back and
tweak it. And that's it. That's the low group
done, high group done. In the next lesson, we're going to move on into adding more melodic
elements to our track, going to add some sense. I'm also excited for this. We've got our tune
shaping nicely. Hope, enjoying the class so far. Stay tuned. I see you
in the next lesson.
7. Vocal: Hey, welcome back.
In this lesson, we're going to just
quickly slap in the vocals and move on
to the arrangement. Alright, let's
move things around a bit to make more sense. So low, mid, high. And then between mid and high, going to insert an
audio track, color it, rename it works, and then
go back to sound library, select a vocal sample. Fear that It's pretty good as it is. Fear that it's in the
same key of our track, which is E minor, has a couple
of things that we can add. One of them being a
little altar boy, who each we're going to
use as a doubling effect. I'm going to pitch
to -5.412 minus two. And then I'm going to increase
the dry wet feel that. I feel about that it's good. If it's too much fear
that sounds unnatural. This is pretty good. Some clean up, some
cleanup as per usual, bit of a low cut. Feel that let's slap in a,
well hello, supermassive. I believe that's a free
plugin from a holler. Use default preset. Just turn down the mix to
about 21% delay on there. And let's hear the sounds. I feel that I feel that here in the context. Without it. It's just makes it fuller and occupies the gaps between where the
bulk isn't doing anything. It sounds nice, but we can
make it sound even nicer. So I'm going to do is dropping this dry wet rag
that I've created. So it's got two channels. One is dry, one is wet. So when this knob is all the way to the left is
only dry signal, no effects being applied. If you drop some effects
on this wet channel, which is here, which we're going to drop supermassive onto. And we have to make sure it's
on 100%. So it's fully wet. This is the same way as
if you would have used return channel like this. And if you would have dropped the effect onto return channel, but sometimes I prefer to do this directly on the channel. I'm applying the effects
on purely because just ease for
organization purposes. Alright, so we're
going to set this to roughly where this was
like 20 per cent something. Remember this was like 20%. We can hide that.
We don't need this. So it's a parallel processing, this dry signal that's
not being processed. And there's wet signal that's been processed
with supermassive. And then I'm selecting how much of a dry versus how
much of a wet signal I'm getting at the end
of this chain to make this delay slash reverb
plugin sound cleaner. Or we're gonna do is a side chain compressor
at the end and select a vocal as a
trigger, knee to zero. And now every time
the vocal plays, reverb signal gets stuck
down. Let's check this out. I'll solo that so
we can hear it. See how delay doesn't
play when debacle place. I fear that if you
remove the compressor, I feel that that delay
is on top of the vocal. And that's it. A
much cleaner version of doing things like this. And let's hear the
whole thing altogether. I just backed the side chain
a little bit and that's it. This bokeh has been processed
is from a sample pack. And you don't really
need that much of a processing on
samples like this. So now our idea is done. We've got our vocal, we've got kickin base, we've got hook, we've got drums. We've got a decent
strong loop going on. And now we are ready
to arrange our track, which is what we're gonna
do in the next lesson. So I'll see you there.
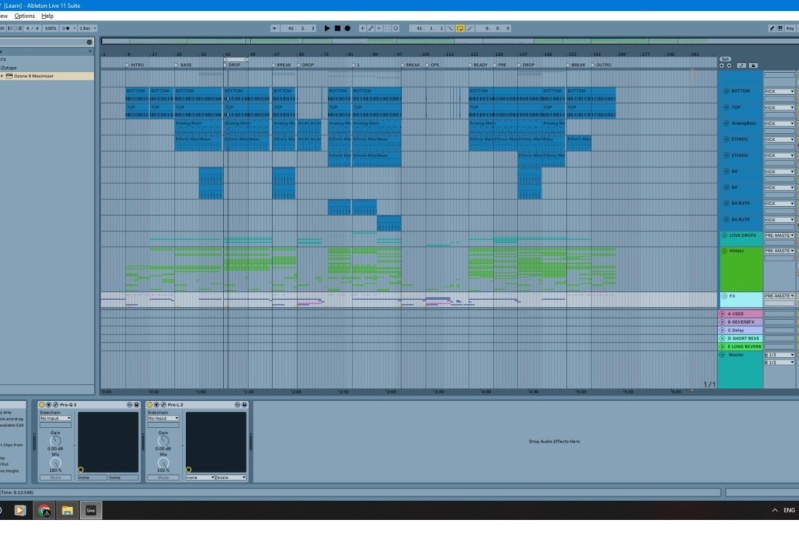
8. Arrangement: Alright, welcome back. It's time to turn our
loop into a full track. Let's remove this. We
don't need to expand this. What always helps
me to determine the structure of the track
is setting the markets. I'm going to start here
and name it intro. And then I want my intro
to last for 16 bar. From there, I want
to introduce base. I'm going to have my base
carry on for 16 bar. And then there's gonna be
a thirst drop from there. Another 16 bar break is
going to be a small break That's going to be 8 bar
long, only from there. It's going to be a
second drop shadow. I'm going to have
24 bar from there. It's going to be
a massive break, which is going to be quite long. I want it to last 40 bar. And then it's going
to be a drop. Again, the main drop where all
the elements will come in, in the 16 bar drop with
a small break fade bars, and then the outro, the outro
will happen for 32 bar, and that's gonna be
the end of the track. And that whole thing puts us in about 5 min and 30
s. So from here, now I've determined the
length of the track, just going to stretch out
all the main elements. Like I said, I want to
kick in around this mark. I definitely don't want any
base last 16 bar either. Just before the drop. I don't want any base. So that's that. Let's
stretch out most of those elements for the
whole arrangement. And now let's have a listen. Okay? All this is definitely
going to go into the drop. Same as the vocal around break. Obviously, this is way
intense for the intro. So what I'm gonna do is
remove some of the elements. Vinyl snare. I'm going to drop it somewhere in various
areas, maybe like that. So it's only going to be
present in a drop sections, maybe like so in my head, this will be the
cool trick effect, which I don't want
any instruments really playing in this area. I can even market like predrawn. So I know that this is gonna be the clean area for this special effect I'm
going to be creating. I don't want to
start with a crash. Crash will come in on a first drop or maybe
when the base comes in, this little thing, I want it
throughout the entire track, but not here, right? Probably not in the
beginning of the track. Let's take them to the drops. Maybe like so fills and roles. Let's put them away for now. Listen. That sounds cool.
We can move on. Long 16 bar loop,
DJ friendly intro. Let's turn off the loop. To make things interesting. As we go, we can start
paying club roles. Maybe we copy here
and there's go in. Like I said before, there's change the patterns
of each of those clips. So for this one, Let's delete
this and keep it like that. So that's already different
from this original one. For that one, Let's
go in here and delete this and move that here. So let's have a
listen how it sounds. Nice. We can move this here. So over here, I don't want to start with the base
straight away. So what I'm gonna do, I'm just going to copy
this filter envelope, going to bring it. So let's have a listen. Now, before the drop, the filter will drop to zero and the base will
be in full action. You need to move these away, maybe start them
on a second drop. Basically gradually
building towards the drop. That drop is not really a drop. Suddenly. It's only going to introduce the full base two. And then before the drop, we can introduce
the vocal as well. Grab this section here. Yeah, like so. Just before
the drop we introduce vocal and then it goes into the
drop for base, right? Maybe, let's, let's
put it like this. So the base starts on its own. Then after 8 bar, the term comes in, and then after another 8 bar, the drop kicks in. And this instant idea
comes along as well. I don't know if I prefer it. An octave higher or
lower. Maybe lower. Sounds, cool. Let's put those cool sounds. And like that. Stretch them out all the way because they
like kinda complement. And then maybe remove
them in break sections. That this is a bit too loud. Maybe that one as well. Without them kinda empty, you know, what's
coming with them. It's completely unique,
original kind of beat. Even though it's the
beginning of the track is already something
interesting going on. There is some movement
left to right, some sounds on the background, but you can clearly
hear that there. And then I kinda want
to briefly introduce the hook during second
section of the drop. Maybe like that.
And then copy this. Like so. And then
maybe we can take one. Copy here and on this
break is removed. Couple of nodes, maybe like so. Let's do that. This filter in here in place. Because it's a break. We can probably get rid
of some elements, maybe remove the
shaker, long open. Then we can just copy the
crash over a bunch of times. So I'm just copying this filter. So it's not as abrupt. Feel like we need some
kind of fill in here. So it's moves the transition
out between these sections. So let's just duplicate this. I think we can just
reuse this right here. Do something like this. That's going to be different. For me. It helps to break the track into
eight byte chunks. So what I'm going to do is just insert markers quickly
into those chunks, takeoff the numbers from them
so they don't distract me. That just helps me visually see where track is broken
into eight bar segments. So now I know e.g. how will my shaker not be
heard in the intersection? Only going to come
in next 8 bar. In the next slide bars. The base comes in
and filter kicks in. And then here we'll probably
need some effects like a rise or something
that's going to last for 8 bar just before the drop. And then maybe a
reverb and then bring everything together on a drop. So the idea with
the arrangement is basically every 8 bar,
there's a change. There's either something gets removed or something gets added. So let's continue. I don't want any shaker during the break and during
that break as well. So it only comes
in every now and then open hi-hat, same pipe. Really want it to be like an extra element just to make it different from the
rest of the truck. I think I'm going to
leave it throughout the entire second drop. Lung open. Don't need
that in the break. Copy. This here, and let's
hear how it sounds. So here we just removed
couple of nodes, start to introduce
the main melody. Instead playing fully
only plays first half. I kinda plays around
the vocal as well. So it's melody, vocal, melody, vocal with which
works really well. So you want to avoid crushing elements into
each other if you can help it saying we did
with the kick and base. So the kick is in plane
with the bass is playing, the mixes will sound
cleaner generally, if elements have their own
space in time as well as in spectrum and also
in stereo field. Continue adding variety to our track at a couple
of different scenarios. Maybe add one here, maybe here, and move
this away here, because it kinda plays
nicely between amino. Again. They have their own space. This is running for this long, then there's a little gap, and then there's this. So for this one, we have slightly
different pattern. Let's hear how it
sounds. Add couple of hits here. Boom, boom. Yeah, just to add interest, there's always
something going on. Maybe you don't expect it, it's there and it's going
to make you feel nice. Maybe do something like this. Move this across those. Let's hear this sense. Let's move this away
because they now clashing. And then let's copy this
here and remove that, go into here and then move
this couple of hits there. Again. That's completely
different pattern from this one or this
one or that one. Couple more variants to
snare roles and clap roles. Maybe a good old crash
and remove one from here. And this is a break. So we do want here is copy this filter and then we move it all the way
just before the drop. Also, we can copy these
in-between every 8 bar. So it sounds like this one here just before the
second 8 bar would drop. Definitely going to need
one in the break here. Copy them here. Yeah, that should be. So now when it
approaches the break, it would filter out
throughout this section. Maybe we don't need any of
this here because we're losing keychain base and
everything are here anyway. So it's just going
to cut this off. Yeah. Silence. That's why I need I'm going to make special
something in this area. Definitely need a crash in here. All right, let's continue adding some extra patterns
of our roles. Duplicate this, delete. Everything, is good
to have contrast. So it's good to have long
stretches of the drum roll. And then next day boss is
only a couple of hits e.g. see what works? Take
these three e.g. I'm literally just
go in and randomly selecting whatever
and then go in, change couple of things like so, and create different patterns. I mean, we've created
enough so I guess we can just go in and copy, whichever. Maybe like that. Right till the end. So this one will
be like this one. This one will make it different. That one literally
make it one hit. Boom. This one
probably copy that. And then this last one, like so. Let's move on to the snare here. Right before that silence. One, it's super long. I wanted to start here and I want it to
stretch for this long. Actually, no, I'm
want to die here. Stretch it like that. Maybe this is too much random. We can have some vocal in
their copy, this one here. Just before the drop. A couple of hits like that. Scope. Just adding variety
and the more hits. As you can see, if
there is no Club role, There's this narrow, if there's no snare roll, there
is a club pro. If there's a club pro and snare row and make sure that separate. Maybe remove first four here. Then remove. Like that in here. So different, like that. Nice about adding variety. This is quite cool
pattern and I'm reusing it quite a few
times for other track, maybe I'll put it here because
there's nothing there. And copy that there and then
have it run all the way. Okay, that's that maybe add
couple of crushes here as well for the break and then
for the drop for the outro. I mean it is kinda drop. Here track we'll get stripped
down in terms of elements. Definitely want a one crash right at the end of the track. So that's drums. Let's not forget about
vocal and melody. So I want this to
play for the drop. Then we're going back to the stripped-down version
just before the break, and we're going to have
it playing up until that silence moment
and then copy this to the next break, like so. Here. Here I want this hasn't come in
just before the drop. Yeah, that sounds good. And then we copy
the same thing into the break as well.
So we'll listen. I think it's good idea to get rid of base. Also, I think one of the
cakes can go drums as well. So listen, Let's see if we can get rid of this. We strike that. If we do that. Wait a second. Let's move it here. Okay. Yeah. Nice little silent moment just to make the impact of the drop
most significant. Yeah. See Wyoming. Copy the vocal here and then we
can take this vocal. The other section. I want it, the other section, sig figs. Like the very first section, would take another section here. And then we'll take the
third section. Hoops. It's always playing different
section for variety, use different parts of the
vocal in different areas. Now here, I want this to repeat a bunch of times because
it's a main break. We want to build tension in this area as much as possible. And then there's something called that's going
to happen here. And then boom, release
of the tension drop. And I also have this
really cool vocal. Let's go back to
the sample library and select this piece of vocal. Tone it down a bit. We're going to lose
everything here just to give that vocal space. Literally everything. That's why I made this snare. So it stops right here. You're
going to get rid of it. That's gonna be kinda
like main transition. And then we can copy this here. There won't be any
vocals in this area. Then this break will
be same as this break. And then copy that. Again, just trying to, whoops, just trying to use different parts of the
vocal in different areas. And then for the very last one, we're going to copy this. This is in the wrong place. Again here we can go in, get rid of the unnecessary
drums just to create more impact. So
we'll listen now. Maybe we can do that or like that. Here in the brakes section. I don't want any of that extra trying to break things
down to bare minimum. And then maybe like so we go in down in
terms of elements. I want to introduce
extra tension buildup, going to insert midi clip. Ableton automatically sets it to E minor to match the
rest of the track. So I'm going to go in
instruments and find zebra. Was there, bro. Most
the correct way? I have no idea. But I know that I
really like this. Preset. Select this, and we're going to go
in and add some notes. Let's put this up. Right
where the vocal stars. We're going to add some chords. This sounds really nice. Okay, that sounds good. So far. Let's copy
that over again. That sounds really nice. Desk just going to
add extra attention to our break main Greg. We need to shape it up so it doesn't clash
with our vocal cutting around the area where
vocal is more prominent, Let's hear before and after. Sounds much cleaner. I also want to
automate the level. So I'm going to drop a utility and dropping couple
of dots around there. Give a slight curve. Make it rise throughout
the duration of the break. Good idea to go into the base
and copy the helpful tool, which is our side chain. Maybe not as intense. It's just pumps up and down
subtly given that movement. Also, filter is a very
good idea for here. So I'm going to drop
in a filter a preset, clean, low-pass peak
down a bit, and then it's completely open like so. And it's thoughts, maybe
halfway, Let's have a listen. So we've got this one, and I think we're ready to add these little
interesting bit right here. So I'm going to create a
midi channel on this track. I want to drop in simpler. That's the simplest
way you can create this effect in Ableton. I've already sampled
this melody, so I'm not going to
waste time on that. I'm going to go into
a sample library. And this is the sample, I'm going to drop it in. I'm going to create a midi clip, the length of the 8 bar, I'm going to drop in
a c3 note because that's where a place
at the original pitch. Maybe turn down
the volume a bit. So one, instead of playing
throughout the sample once, I want only looping
this first note. So I'm going to select loop. And now if you automate
this marker here, it will shrink the loop. Let's check out what we're gonna do. I'm gonna automate the length. I'm going to go
from top, zoom in. So we can easily see this. I think let's insert another audio track
because I want this to play like
right at the end. Like so. We'll go back here
and draw the automation, insert another breakpoint there
and do a curve like this. That some point,
it gets so short that it's in front of the sample so it
doesn't play anything. So what we also have to
do is automate the star. So bring that to the ln. Put a dot here to here, and then back to zero. Let's hear how they sound. The moment it's kinda broken. So we're going to have
to increase the fade. So it kind of fades
in between sections. Also voices to one, this snap is activated,
so let's deactivate. That should make it smoother. Yeah, that sounds nice. Yes. This Let's have
a listen again. That's not too bad.
Obviously, we can go back and tweak it later on. But yeah, that's the basic idea. You just re-sample the
hook and you just loop it, decreased the loop length, automate it for the time, and then bring it back to
normal just before the drop. And then the drop,
quite a cool trick. And let's spice it up with
a reverb little plate. That's why when you
use for this and we automate the mix knob. So we go right from
zero all the way here and then back to zero.
So let's have a listen. You kinda one is tail to
overlap a little bit with this to bring it back to normal. So yeah, I think that's it. In terms of arrangement, we can start adding effects and little sounds in the
effects section, which we're gonna do
in the next lesson.
9. Fx: Hello, Welcome back.
In this lesson, we're going to
make some effects. So let's start with creating an audio track and then
color it in like so, group it and aim
to group effects, renamed the Track vinyl. And for me, nothing beats the GoodNotes of
the vinyl record. So for this, I'm
going to use our C20, go in and use vinyl
one preset for this. This is how it sounds. And to make it blend in
with the track a bit more, I'm going to EQ it like that. And let's play the track
back and turn it up so we can barely hear it. Take you off here,
and add it back in. She just feels nice and subtle. Background pad also widens
the track quite a lot. Next week we're
going to create is a snare roll right here
in the breakdown section. So we're going to copy
the drum rack again, paste it here, going
to the sound library. Select the snare that would
like nameless, narrow, create a midi clip and
plays 16th note pattern. Like so. Then let's move it across
because we don't want it over this section here. Maybe cut that end as well. Because remember, there's
this vocal snare roll copy, paste it here just so
we know what this is. Let's have a listen. Obviously we need to
do some work on this. First of all, I want to saturate it and going
to use overdrive. Increase this old way,
decrease the drive. Dynamic to zero, tone to zero. Then blender. That's just adds a bit of
body through our sorrow. I want to squeeze
the **** out of it. So I'm going to use
compressor to do that. Knee to zero. Threshold down ratio
is quite high. That sack and release to zero. Again. So it's like instead of hearing
each individual sound, so almost like a wall of sound has the effect I'm
trying to achieve with this next little plugin
I want to put in is hyper effects of
created this one here. This one is an effect chain
with a vocoder set to noise. And what I'm doing
with this is just automating of created
this a while ago. What this does is basically runs the snare roll through vocoder
for a noise generator. And then on the output of that, There's a bit of side chain
and that's all it does. It basically washes out. You can achieve similar
effect with the reverb. Prefer it to be in parallel. So there's dry signal
coming through unaffected and there's
wet signal initially, it's a dry snare than
a vocoder comes in. A vocoder itself has dry wet, but then if you do it that way, you won't be able to add
side-chain onto a vocoder directly because
that way it will affect the actual snare as
well, not just Vocoder. And I don't normally
have it all the way up. I have 60 something. So it's like noise mixed
in with a snare roll. So that's that I want to insert a utility just to control
the volume of this as well. I'm going to set
it to around -12. The n value is zero. So it's adding noise in parallel to this narrow rising in volume. And also we're going
to add a filter. Select tube filter
this time can add some color to about 4,000 hz. We don't want any peak
pretty much on this map, it automation curve like that. So there's three
different things going on simultaneously. There's a snare sample which
has been duplicated by the noise which rising in volume and filter
is opening up. So yeah, a lot going on, but that's how you make your
snare roles less boring. One other thing you can
do is to grab one of those random devices and randomize the midi,
see how it sounds. Maybe reduce random
a little bit. And also one extra
thing you can add is swing. Ever listened in cortex? This nine or nine snare duplicates it nicely right
before the end of it, just to add some more intensity. So that works really well. We can copy that and
do the padlock here. So we can have the automations
run with it. Like so. We can copy this here as well. We have to, we're
going to have to adjust the points like that. The easiest way now is to copy this and paste it here. So we've got similar things
going on both of our breaks. Let's have one just
before the drop as well. Let's make something
interesting here, has decrease the loop
length to 1 bar, crop it, and then remove gloves, couple of nodes, and
let's hear the sounds. So by doing this, which is giving some space, and also this sounds different
to the rest of them. One, return this back in.
Let's hear how this sounds. Kind of gives that
extra tail at the end. So let's put a padlock on that. Padlock is by the way,
locks in automation. So when you move stuff,
the automation stays. So I'm going to copy this
here and make sure that this drops down like that. And we can copy
that here as well. Actually. So all three small builds
different from this main one. So another bit of
facts I want to insert is this swash down
kind of sound, which I want to use
here to smooth out the transition between
the drop and break. I'm going to insert a midi note. It's going to last
for 8 bar in here. I'm going to go into
instruments in silent one. So I'm going to select this
preset called swoosh down. Let's hear how it sounds. Just a noise generator been filtered with the
modulation envelope. So let's hear in
a context that's gonna help us to smooth
out that transition. So to help this out, I like to use utility and automate the gain so it
doesn't stop there abruptly. So listen now, in nicely decays over time. That's ever listened
in a context. Another thing I want to
add is reversed crash. It's the same crash
that we used here. All I did is routed
it through reverb, re-sampled and reversed it. And this is the sound. I want it to happen just
before that Bohr called bit. So let's have a listen. Just as that extra
intensities before the vocal bit kicks in. So we did snare roll, swoosh down to help transition between the
drop in the break. Also, we need to create a buildup to create a
riser effects sound, I'm going to use silence again, going to select preset. It's called swash. Basically going to copy this, rename this square
riser, go in, edit, denote certainly
happens together with the reversed crash. Mike. So let's have a listen. It's quite cool. So I'm
going to duplicate that in-between each break and I'm
going to extend the note, or do we actually have it
start halfway through 8 bar? That just helps smooth out the transition
between the sections. I think I should add this
for each break helix. So couple of short sounds I've
created earlier, which I'm going to insert. So two audio tracks right here. I'm going to go back to the symbol library and
use this sound here. All these sounds basically
layers of one intense sound. So if you solo this effects, they create one complex
evolving riser. This one. If you copy it, and then reverse
it. It's a clap. Put through reverb and being
re-sampled and reversed. So it's very easy
to do if you have questions on how to do that, you can always hit me up. I'm happy to help. I'm here. If you need any help and if
you struggle with any sounds, just drop me a message. I will be happy to help. Another sample I'm
going to use is this. This is a bunch of hi-hat stuck together through
reverb and resample. I've done those as
you can see, 2020. So I use them on
many other projects. I always try and use my original sounds rather
than using sample packs. But you can consider this
as me going into splice and picking the risers and
impacts from splice. So would this sample
that is just releases that tension that
buildup has created. Let me solo the effects. There you go. Let's have
a listen in a context. And I put it here, it's going to drop
just to duplicate that crash together
this sound like that. Then we can just go in and reuse these samples
whenever we need them. So you can just copy it. So I'm gonna go here. Base section. Just
before bakes cakes in, I'm going to transition
to that section. Like so. Then I can copy it and use
it here before the drop. And also copied that. Let's hear how this sounds. Yeah, just go in for the track and copy it and
every now and then, like so I'm placing
them strategically. I can see my outro markers here, so I won't Section transition
to the outro section. So I'm placing right here. And that's one of the reasons
I put all these markets so I can clearly see which
section this is a worst. The start of this section
on what's this section? I can clearly see
by the titles on these markets So I can place
my sounds accordingly. So let's just copy this
over into some places. Maybe here and here and
here, something like this. And that's our effects group. We can throw in EQ on there just to make sure
it doesn't clash with any of the base,
roughly like this. Now that we've finished with adding effects in
the effects group, I want to go back
to the mid group, and I want to add those resampled sounds
that are recorded earlier, Ron, and I think now's
the time to add them in. So go back to a sample library. So let's create a
new audio track. And on the first draw on a drop in this sample color it is, turn it down straight away. So this is a re-sampled
version of the vocal. And to make it last longer, I'm going to drop
in a supermassive, select this billions
and billions preset. And literally that's it. Just drop it before the
EQ. So we'll listen. So the idea is that this
vocal sample is playing. And then this is
long reverb tail, right? It's like extra little
details that play on the background kind of thing
to fill in the blanks in. Good idea to make it
bounce to the beat. So just dropping a side chain. Yeah, I love the way it sounds. I'm going to copy it, have it throughout the track
a bunch of times. Every time after this
small vocal section, Let's move on
another audio track back to our sample library. Only use this sample. Going to place it
here. Shorten it. Only this section. Listen. Yeah, that's quite cool. So it's just small
little details like this to make a track
more interesting, duplicate that onto next 8 bar. And then here, we'll just make it interesting. Drop it in various places where it fits and
you're good to go. Let's move on another track. Again, this is a vocal. Lower the volume and duplicate that to next 8 bar, copy 16 bar, and duplicate
that on the next drop. And then here, and
then on the outro. Move on another track. This sound here. So let's move it here. So from hold 1 bar loop, I only want this sound. But it's a cool sound. So maybe, let's see if
we can extend this. Like so. Another fill in sound. And after that, we can insert another audio track
and add another sound. Let's lower the volume as
well. This is quite cool. Yeah, Again, this has been
sampled from the vocal. I think I want to move this here and move all this in here. This one here. Listen.
Shorten that up. Yeah, Let's have a listen. So that's the drop. So every beat, this something
interesting happening. Let's insert another track
and insert this sample. This is definitely
sampled from sense. Let's insert another track and this sound right at
the end, low the volume. So I'm going to copy this over. Actually here it kind of
clashes with the actual vocal. So I'm going to cut this out and I'm going
to paste this in. So first 8 bar is
going like this. Maybe a bit louder. And then next 8 bar is going like different sound is another colon
response kind of thing. Yeah, I'm not going
to do all of them. There's a lot, but you get
an idea if you just go in and drop those samples
the way they fit. And let's have a listen. So you get an idea. There's always
something happening. Instead of having boring, continuously repetitive 8 bar, we've now inserted a
bunch of weird effects sounds that we resampled using technique I
showed you earlier, found interesting bits and place them in various
places in the track. That's the idea behind it. So now we've placed a whole
bunch of effects sounds. Next, we're going to move
on into a mixing stage. So I will see you
in the next lesson.
10. Mixing: Hey, welcome back. In
this lesson we're going to look at how
we're going to take this track to a next level
by utilizing mixing. So I went in and added a whole bunch of other
resampled sounds. Let's have a listen
what we ended up with. Let's move on. So
first things first I want to look at is
panning some drums. Let's band is vinyl snare. So it goes to the right. And let's pan is other snare opposite. You can hear. They kinda bounced
left and right, which is two separate things
in terms of stereo field. I'm going to keep hi-hat
right in the center. Same silent hi-hat rim shot. Let's pan it to the left. But differently
from this off snare just brought a level
up so we can hear it. Actually, I kind of
prefer its center. Let's see if we can
pan this one instead. Yeah, much better.
I prefer that. Yeah. Remember this one had a helpful tool that went
left and right anyways, So yeah, it didn't sound right. So let's move on. I want it the rest of it center. Because this one is
already have panning. Shaker center. Same as closed hi-hat. They kinda complement
the main hi-hat pipe. Yeah. Kinda want its center
as well, right? Definitely center. We can pan clap roles
and snare rolls, slightly to left and
right respectively. So just a little bit. We definitely don't
want every element to be centered or every
element to be panned. Some of it should
be in the center, some of it should
be left and right. So that's pretty boring, right? Let's do some fun stuff. So we've got this
return channel. Let's color it differently
and name it reverb effects. So what I wanna do is use this reverb to wash out
this area of the break. So we're going to use filter Pro for this decay
rate all the way down. Stereo width max, mix on max because it's on
the return channel, decay to about there. And what I want to do
is spice it up a bit. So let's first of all draw
a nice automation line. Like soap. We're going to have a drop-down just before that. Vocal sample. Groups on the wrong channel
going to delete this. And it was meant to go into
this pre-master channel. So that's another useful thing for this pre-master channel, is that you can route
all of the sounds simultaneously for
a return channel by just using one envelope. So that's the effect
that this is doing. Let's drop in some
saturation on this. I like this saturation knob. Increase the saturation,
keep it in neutral. She's going to compress it. The look. Maybe we can increase brightness and character just to see if it's going to improve. Yeah, nice and bright
and lush sound of the reverb going
through the buildup. Then obviously, you don't
want any low frequencies in the reverb like this because it's going to just
muddy up the mix. So what we're gonna do is just remove every band and
select this bandpass. So that's essentially a low cut and high cut filter
at the same time, and we place it somewhere here. So just removing super
high frequencies and low frequencies and having this round 1 khz
band passed into finalize, we're going to
compress this with Glue compressor
threshold all the way down because it's
quite low in the volume. Soft clip on released to auto. Okay, Let's have a
listen in a context. So if I turn it on and
off, massive difference makes things more epic. That's for sure. Next reasonable
thing to do is to copy this onto a other breaks. Like so. And maybe even have one just before the first
drop. Just like that. It works really
well in the areas where filter is turned on. That room is way too loud. Now, this one can bring this in like that. Same here. Now that we own space, we can start adding
more return channels. So this one is going to
be called short reverb, and we're going to
have one called long reverb, again, color them. So for the short one, I'm going to go into reverbs
and grab Valhalla room, set it to medium,
ambience, adjust decay. And that's really it. Just going to saturate it
with overdrive very suddenly. And then again,
makes sure there's nothing in low and there
is nothing on high. So at this stage, we can just start
increasing the center of our short reverb onto
the bits that we want. So one entire
mid-frequencies group to be routed through
that reverb. So listen. I think around there. The dry without and then when you engage it, he puts things in the room. Let's copy that same
reverb onto a long reverb. And really we can put, we can copy this as well. Copy everything. And the only difference here would be
increased decay time. So we increase it twice as much. The switch things
up. Let's see how this long reverb sound
on mid frequencies. Yeah, quite like it
longer actually. So what we can do, we can just collapse of our effects is not in
a primase to group. Let's put it in a
pre-master group as well. Like that. Let's have a listen. Way too much about that. It's fine. So the short reverb we're going to use on drums on the whole group that
we're going to put entire drum group
into its own space. Obviously that's way too loud. Always helps to ABA, just turn it on and off. That's it really, for vocals. I think they already have
some reverb on them as they sound a bit more
epic when they got lots of reverb on them and less reverb on mid-frequencies group just to make it more pronounced. And definitely no reverb
on the low frequencies. That's just going to make
the things sound muddy. The idea behind this
is that when you apply one reverb as a
sand on the entire group, good clues, the whole group together and make
sound more cohesive. Like it puts the entire
drum kit in Rome. He puts entire synth
group in a row. So let's move on. I
want mid-frequencies, especially in this main break, to have some different things going on to make it interesting, to make it one of a kind. So it's only going to
happen in this area here. It's not going to happen
in the beginning of the track or the
end of the track, just to add more tension
in this area here. So to do that, I'm going to use filter. I'm going to leave it on
gentle and map this. Like so. I want it to be open
most of the time. But then starting from
this second drop, I want to gradually
go down to about there and then back to
normal at the drop. Listen. Kinda went down to
the background. And then let's the vocal to come through
a little bit more. And then we started to
build up from this point on in opening up to Filter. And then by the time we hit
the drop is fully open. Let's use some Valhalla Delay to wash things out a little bit. I love that Valhalla plugins
come pre mapped in Ableton. So you can just select parameter you want to
automate, and off you go. I quite like these preset here. And let's see. We're going to start at the
same place where this dots. And just before the
vocal comes in, we're going to drop it down. So maybe not all
the way, like 50% Hey, just nice blush delay
with a long feedback. So next thing we're going to add this cool plugin by Ableton called Echo just
before the filter. And that's just going to add extra layer of
depth for our delay. So it's like delay
within a delay. That's just my way of doing it. Could be messy, so I have
to be careful with this. But if you want wash things
out, This is the way to go. I'm using one eighth
note with ping-pong. I'm going to start
with a break starts. Notice I have it go
all the way to wet. So it's basically almost like transforming the rhythm of
the sound is quite cool. Placing descent way back on the background to allow
vocal to dominate. And I want to finish this effect chain with
this crazy effect called histories is not even sure if I'm
pronouncing that correctly, but I use this
preset, learn time. And then I go in and I
automate two parameters. One is this one going all
the way from the bottom. Turn there, give it a little
curve and then dry wet. Quite the same pretty
much we can just copy drag and drop that. Maybe slightly less like that. This is the effect of
this kind of rings. Yeah, it's a weird one. It's a weird effect that not even fully aware of
what it's doing. But if we play it
from the beginning, you can hear how it kind
of can you hear that? As the thing is like
weird glitch effect that's creating some
unreal textures. So let's have a listen again. I hope you could catch that, but it's basically
an extra layer of complexity of delay in glossiness on top
of the main layer. So let me play this
back from here. I'm pretty happy with
the way they sounds. Our track is shaping
real nice here. So let's add
something to Trump's. I don't really like the way they are sounding consistent
throughout the, the break. So what I'm gonna
do is add filter. One filter I've been using
lately is volcano three, but I placed it in the rack and map this
knob to filter frequency. So I don't have to do
this all the time. So all I have to do is
drag this device, go here, show automation
on a new lane and I can just draw the
automation I need. So here, the drums, I want a curve like this. So on drums to gradually disappear, like so. And then when we hit the drop, they're back to normal. So we've done some
creative stuff till next thing I want
to go in and make sure each group has got EQ at the end of the chain to make
sure nothing clashing. So what I'm gonna
do, I'm going to select drop, I'm
going to loop it. I'm going to go into the low and drop an EQ right at the end. Just a straightforward
30 hz cut with this, what I'm doing is
turning it on and off and trying to hear
if it sounds better. Without or with. Sometimes, I feel like I need that extra low rumble is
just sounds better with it. So every single time
I'm doing this low car, I'm always comparing
it on and off. In this instance, it definitely
cleans things up a bit. So I'm going to leave it on. So I'm going to leave
it as is for here. And I'm going to move on to mid-frequencies is already
in the queue there. We went and done this as we went through
the sense lesson. I just want to go in, make sure everything is working. So what I'm gonna do is back that EQ and bring it in
until I hear the difference. If it starts to
change the sound, I know I need to bring it back. Right there is good.
And then like I said, we need that area space
for the high frequencies, so we'll leave that open. Next stop is the cetera. I want to make sure. That sense is this one has been mixed in. So we've cut the low-end. I'm not worried
about the high cup because when that
sinth is playing, there is simply no drums were filtering them out
at that stage. So it's all working fine
on this side of things. Let's move on to vocal. With vocal, I feel like it's lacking
a bit of lushness. So in this instance, I normally reach out to
my poor tech Pro and cranking either ten or 12 K with a broad setting and
I'm just boosting. Let's have a listen
to the other. There's another plugin I use if I'm lacking
some air and presence. Is this Plugin cold, fresh air has got quite
cool preset vocal air. Obviously it sounds way
different from the pole tech. Feel the feeling. Even if you crank
it up like this. I think I prefer fresh air. Let's leave it as is. And make sure that we've got a nice low cut here. Just to make sure I'm
cutting everything that's gonna being
aware of our baseline. The way I was doing this cut by moving this thought
on a piano roll is, as you can see, it shows
nodes in this area here. So that's a three and that's D-sharp three because
the track is in E minor, I'm basically doing a cut
just before the root node, which is the, I'm
doing D-sharp cut. I'm not sure if that's the right way or
wrong way to do it. I mean, there's no right
or wrong in music anyways, but that's just how I do it. Move on to a highest. So just moved EQ. I always want my EQ and compressor to be the last
plug-ins in the group chain. So with highs. Same here, just to make
sure that the root nodes come in through
nicely with effects. I'm not even worried about having root nodes
coming through because there's mostly noises and stuff that doesn't have
particular pitch to them. So now I went through every
single group and made sure that everything is
separated in terms of EQ. I went and tanned my drums. I don't feel anything
else needs to be panned because low frequencies, supposed to be mono
generally mid-frequencies. They pretty wide bunch of sense, so doesn't make any
sense to pan them. They pre-wired and they go in. Left and right. Vocals,
stays in the center. We applied delay
and reverb to it. So that's widened
vocal quite a lot. So one last thing to
make things louder, I recently started to stick pro L at the
end of the chain. And literally in
the modern setting, or sometimes on a bus setting, I just crank it up a
tiny little bit just to make sure that those sudden peaks
get shaved off a bit. And I use a one-to-one
ratio like this. So every time you
boost this game, this compensates
for the loudness. So as you can see,
she asked 0.2 dB, just catching those
small little peaks. And then I'm doing that
for every single group. When you boost, when you boost without the one-to-one ratio, it boosts the
volume quite a lot. We don't really want that. So let's move on. Limited to the vocal. See that feel word kinda
like sticks out a bit. This just helps tame it. And by the time we have all these groups
hitting the master, all the sudden
peaks will trigger the final limiter on a master, which as a result can
render distorted sound. So the idea behind
this is to tame the sudden peaks to give more
space to the final limiter. So with the drums, same, just going to go and make
sure this is engaged. Let's go to the most
intense part of the tune. See, even though we used multiple instances of
compression for drums, there's still some sudden
peaks every now and then. Popping through. Man, I love these drums. So yeah, this just helps glue things together
for the effects. Generally, I don't use it, but you are welcome
if you want to. So now, I'm pretty happy with
the way this tune is going. In the next lesson, I'm going
to be looking at mastering this tune and getting it ready to be played
in a club system. Let's have a quick final lesson.
11. Mastering: Hello and welcome. This is the last
lesson in this class. It's mastering. This is the final stage
where we're going to take our track to
the next level. So let's do this
first things first, we're going to drop
in an EQ on a master. We don't need any of
these spots where we do need this one at 30
hz, high-pass flat. And we increase this
to 24, like so. And then this one is
20,000 hz, low-pass flat, and we increase
that to 24 as well, just to make sure there's
nothing going above 20 hz and nothing
is below 30 hz. Let's select the loudest
part of our track, which has dropped. For me. It helps to have a spectrum analyzer at
the end of the chain. Sounds really nice. All we have to do
is make it louder. That's what basically
mastering is all about. Next thing I want to
add is glue compressor. I've got this device created, which is called clip.
It's very simple. All it has is Glue Compressor, which is set to soft clip
attack one release set to auto. The clip is mapped to
makeup and gain is mapped to the gain of
this utility plugin. I also have to Max
for Live devices, these are only meters. They don't process
any sound whatsoever. This is for me to be able to see the loudness on the
input and the output. Check this out. I'm
going to do is increase this makeup gain until I start
heating this clip light. Once it starts
blinking like this, it means it's
clipping the signal. So now to be able to compensate for the
loudness increased, I'm going to use gain to
reduce that loudness. I know I'm doing, I'm
basically matching the gain of the input
and the output. So that's the layer
of compression after which I really like to add some color to a final
mix and process as a whole. For this, I'm going to use sausage fastener and that's it. I literally going
to not touch any of these knobs maliciously
going to switch it off. And that's, that's
it. Check this out. Hopefully you can tell by
me switching it on and off how much difference it
has on the final mix. But have no idea what's behind
the whole of this plugin. But it does a lot. It widens, it, it adds color. So I really like to use
this on a master mix thing. I'm using as a part
of mastering chain is this little guy
with this one. I'm selecting 300 hz and then dipping. Let's have a listen. Hopefully you can pick
up how different this sounds when you start
to deep around 300 hz. Very easy to overdo it. But if you do it tastefully, it cleans up the
mix quite a lot. I like it between the 1.2
range, somewhere around there. Let's a and B. So that's without, again, subtle is where you want to
go for in terms of mastering. So let's move on to a
high frequency range. We going to select
ten K and broaden the width of this and boost tune 1-2. Let's have a listen. Switched 10-12 because that's the ones I like the sound of. And sometimes I like
to learn more over the 12th and sometimes
12 over the ten. This time ten sounded better. So let's again turn on and off. Much leaner mix. Sometimes I test
this 60 hz frequency as well and boosted,
that's like sublevel. Let's turn on and off. Yeah, that sounds good. Next thing I always have in my mastering chain is utility. So one doing with this is decreasing the gain
just before the drop. So I'm gradually
decrease in it to around minus three dB
throughout the break. So when the break starts, utility starts to
decrease the volume. And then as soon as
the drop kicks in, that volume is
straight back to zero, and that creates subtle
difference in volume. And as a result, you get much bigger drop because of that little difference.
Let's have a listen. Yeah. We're going to copy
that to all the breaks. So where the break starts, as you can see,
there's Marker there. It's going from
zero to minus three and then backup to zero
once the drop kicks in, we're going to copy that from
here to this break as well. And that's going to create
the same effect here. So whilst I was listening, and notice that this base is playing quiet loud
during the break. So I'm going to go
to this filter, increase it like this. And what this can
do is going to push this kick and base to the background.
Let's have a listen. Hopefully you can pick it up. But it's it's a subtle
difference, but yeah, I think it makes
break down, clean up. These weird sounds. Does
that history is for you? Thus, this plugin that makes this sounds really
loved, this plugin. So let's go back to
the mastering chain. And final thing I want
to add is a maximizer. I absolutely love this
maximizer bio zone. I'll show you how I use it. So I use IRC four. With the transient setting, I always engaged true peak. I have this at minus 03 ceiling, and then I dropped
down the threshold until I have about 34
dB of gain reduction. Let's have a look and be
careful it gets loud. So maybe turn down your volume on your
headphones or speakers. Let's go. I'm going
to switch to a drop. And also before I bounced the track, I also turn on data. I always bounced
into four and use strong data and noise shaping
turned off, so that's on. Now, gain reduction is on. So I normally group the entire mastering chain because it's significant
increase in loudness. I keep the limiter on and I turn off all the rest of the
devices and compare it with the same loudness
if these plugins do improve the track or
not, Let's have a listen. One other reference
thing is really helpful to do is drop in a utility on the end of the channel and make sure
it's mono compatible. So hit this mono and turn on
and off here just to see if the truck doesn't
break and phase and do weird stuff when it's bounced to Mono.
Let's have a listen. It doesn't change much. So we did a great job of not
having any phase issues. One last thing I'm
going to show you is how to bounce ready track. It's really simple creating midi Track rather
than audio track. Selecting everything
that I want to bounce and inserting an
empty midi clip. Call it render copy, paste, just so we know. Remove any devices
from that track, Turn it off as well,
does not attract. We had some times when you bounce right
from the beginning. It's like doing weird stuff
with the very first kick. So why do I select this much like 60 milliseconds in front and stretch
that Miniclip to there. And then I do the same
with the end of the track. So that's our crash. Maybe stretched like this
and add a little bit extra. And on the utility. I just make sure
that it goes back to minus infinity,
which is silence. So I'm basically making sure that there's at least
a tiny little bit area of silence at the end and also in front like that. So there's this much
silence, complete silence. And then the volume is going up. And then there's a cake. Sometimes I do this
as well like that. So there's silence. And then on the very first kick, it goes to zero dB. So now all I have to do to bounce this is select
this clip like this, and it highlights the area. And now I just
File Export Audio. Make sure it's 24.
Make sure it's worth, make sure there's no data. And that's it. As you can see. It's the render starts where
this midi clip starting. And then the render length is whatever the length
of this midi clip is. That's just a good
practice to make sure nothing gets cut
from the initial kick. And also everything fades down to complete
silence at the end. And you hit Export
and you're done. Congratulations. You've completed your track, and now it's ready to
be played in a club. Don't forget to play next video for a complete
track play through. Thank you very much
for taking this class. See you in the next
one. Cheers. Bye.
 MACROLEV, DJ / Music Producer