Transcripts
1. Learn Modern Calligraphy: And do you want to learn to write like this? Hi, I'm Kelly, Macintosh of Mac and Fox designs. I'm a hand lettering artist and illustrator, and I teach beginners how to write in modern calligraphy with brush pins. Good hand writing is not required for this course. I break calligraphy down to the basics and teach you from the beginning how to write in beautiful calligraphy. This course includes a workbook I designed to take you through the basics all the way to learning how to style and flourish your calligraphy. Join me and learn at your own pace.
2. Introduction: Hi, everyone. I'm Kelly Macintosh, and I'm so glad that you chose to join me in this course. I love teaching modern calligraphy, and I've taught many people from ages 10 to 60 plus on how to write in modern calligraphy. From the very beginning, I have been writing in modern calligraphy for years. I own an online shop called Mac and Fox Designs, and I sell my hand lettered signs, chalkboard signs, illustrated recipes and other artwork with my hand lettering and modern calligraphy on it. I spent over a year teaching many classes, local and in person, and I always tell my students that good handwriting is not required to learn modern calligraphy. I have a lot of people who feel like they're bad at cursive, and their handwriting just doesn't look very legible. But that has nothing to do with the modern calligraphy that I'm gonna help you create. So I'm going to break everything down into the basic strokes and the foundation that you will need to learn modern calligraphy. I recommend watching the videos in order. I'm going to begin by taking you through the supplies that you're going to need for this course as Well, some other things you might want to have on hands. Eventually that I'm going to show you how to properly hold a brush pin. And then they take you through the basic strokes and advance you through the lower case alphabet, the upper case alphabet. And then I'll show you some advanced things, like loops and up strokes flourishing and bouncing your lettering. So thank you for joining me and let's get started.
3. Supplies: Let's talk about supplies. I do have a shopping list that I've included in this course that references everything that I'm going to talk about now and that will help you when you go to order your supplies or to your local craft store. To pick up these supplies, you will only need three things to get started. The first thing is to print out one of the two versions of the workbook that I made for you . I have a small pin version and a large pin version. It's the exact same material, but both workbooks are scaled appropriately to the size of the pen that you choose to use next. You're going to need some tracing paper. Tracing paper can be bought on Amazon at a local craft store. I've found it at Target admires in the kid's coloring section, so you'll just need basic tracing paper. This is a great surface for practicing with your brush pin, and it also allows you to protect your workbook so that you can use your workbook over and over and over again as many times as you need to practice. Also, print regular printer paper that you'll probably print your workbook on is not the best surface to practice with a brush pin. It could wear down the felt tip of your pen. So I highly recommend using tracing paper as a beginner. And finally, you're going to need a brush spin. A brush pin is a pin that has a flexible point that will give to the pressure that you apply when you're holding your pen to paper. So there are several different types of pins that you can use. I am going to use the Tom Bo brand, but there are so many different brands out there. What you just need to make sure of is that it has a flexible point, and that's what you're going to need to do. Modern calligraphy in the video on how to hold a brush pin, I'm going to explain the difference between the two sizes and why you might want to begin with a small pin as a beginner. So those are the three main things you need. For this course on the shopping list, you will see me reference a few other types of papers as well. That's for you to use in the future. After you learn this course and what to continue with modern calligraphy. So check out the next video. I'm going to show you how to hold a brush pin and the differences between a small and a large brush pin, and that might determine which work but that you print out and begin with.
4. How to Hold a Brush Pen: So now you're trying to probably figure out should I begin with the small pin or the large pin? First, let me show you the difference between the two pens and what most of the beginners that I have taught have preferred at to start with. So this one is the Tom Bo dual brush pin. It has two sides to it. The larger side is the large brush pin, the brush pin side. The smaller side is what's called a model line point. So this point is not the side you're gonna be using because it is not flexible. It's just like a regular fine point marker. So this side is the large brush pin, and you can see the size of that flexible point here, the small brush pin. And this happens to be Tom Boas. Well, it's the food enough Sasuke pen, and I referenced these in the shopping list that I told you about so you can see the difference side by side of where this part begins with the color, and this part begins with the color here. The difference between those two. So you will want to use theater appropriate workbook for the pin that you're going to begin with. This large pin workbook is scaled to hold larger strokes, whereas the small pin workbook obviously is scaled down smaller because you're gonna have smaller strokes with the small pin I have found in my own personal experience and learning modern calligraphy. And with the majority of the students, I have taught that many people prefer to begin learning with the small pin, and the reason is because you tend to have more control over the flexibility of this point than you do with a large pen. But I have had a lot of people with success and starting the large pin. But the majority have chosen the small pan and have had more success. So it is up to you with personal preference. If you have the luxury of having both pins to decide between them, practice with both. Play around with them after I teach you how to hold the pin, and then you can determine for yourself which one is the best to begin with. However, if you're just going to purchase one pin on Lee to start with, I recommend the small pin and I really do love the Tom both food and Sosuke, which you can get on Amazon now to hold the brush pin. So if you're writing with a regular pen and you're just writing your regular cursive for print, we often hold our pin up right almost at a 90 degree angle with our paper and with our hands kind of a risk kind of down below. But with a brush pin, you're going to want to hold your pin at about a 45 degree angle with the paper. So instead of up like this, you're going to want it down and angled like this so you'll see the how my hand shifted. Instead of writing like this, I kind of rest on my side of my pinky finger here, and I hold it about right here, and it allows me to have my pin at an angle. And this is going to allow you to apply pressure and press down on that flexible point, which is going to allow more ink to flow and to create those heavier down strokes that you're going to need to do a modern calligraphy. So you want to hold your hand at the side and at an angle with the paper. It will take practice at first, and you might be a little bit of shaky at first. But it just it just takes more practice and getting them or experience with the pin. So to demonstrate, just to kind of play around, especially if you're trying to decide between the small and the large pin, let me show you the difference between the two. So I'm going to put a piece of tracing paper over my small pin practice sheet. The modern calligraphy is a combination of the light up strokes and the heavy down strokes . And it's not just a simple is that we're gonna go through the course on all of the basic strokes and how to make the lower case and upper case alphabet. But you do need to achieve the light, upstroke and heavy down stroke. So every time I go in an upward motion, I'm going to apply light pressure to the paper, and when I go in a downward motion, I'm going to apply heavy pressure. So I'm going to press down on my pen and it's going Teoh, that flexible point is going to give against that paper, giving us that heavy down stroke. So any time I'm going an upward motion, I'm applying light pressure. Downward motion pressing heavy against the paper. Now I want to show you the difference between those strokes with the large pen. So I got my large pin practice sheet. Now I'm going to do the same upstroke. So you notice my upstroke of my large pin is just about as thick as my down stroke of my small pin. But now watch me do the down stroke so you can see the contrast between the thin and the thick here and between the thin and the thick here and then also the contrast between a small pin and a large pin. And now you'll probably be able to see why most people find success as a beginner using the small pin just to get their feel for how the strokes air made, and more control of thes strokes with that smaller point. But, um, we'll be right to different words just so that you can see. Here's a small pen. I'm gonna write my name. You're gonna be able to learn to do this after this course is over. I've been doing this for years, so don't compare yourself to me. You'll get there eventually. So there's my name in the small pen, and here's My name's scaled with large pen, so it's definitely helpful. Toe learn calligraphy with both the small and the large, because the different projects that you might do, whether you're addressing an envelope or you're making an art piece or a sign for your home , it's going to help to be able Teoh go between the pins, but if you're just getting started, I recommend the small pin.
5. Basic Strokes: whether you're following along in the small pin version or the large pin version, they both begin on page one for the basic strokes. So, like I said in an earlier video, I'm going to do all the demonstrating of the calligraphy with the small pin. So on page one, don't forget to grab your tracing paper, as I explained in the other video, to cover your workbooks so that you can reuse it. And also tracing paper is better surface for practicing with brush pins than regular printer paper. So the first of the eight basic strokes is the upstroke. This is an upward motion with light pressure. Every time you go in an upward motion with your pin, you're going to apply light pressure to the paper. Every time you go in a downward motion, you're going to apply heavy pressure. So let's begin by practicing the upstroke. So for this stroke, you're going to begin at the baseline and go up to the waistline. I've got my pin at a 45 degree angle with the paper, and I'm applying very light pressure. As I go now, you'll notice how slowly I moved in my upward motion What you want to avoid is going fast. If you go too fast, your pin could go above the waistline. It could get larger or smaller and have wispy, faint lines. You don't want to go too fast, so a nice, steady speed will help you to remain consistent with all of your strokes. I've been doing this for several years, and I still go in a nice, slow motion. When I do my calligraphy now, you'll notice as a beginner for some people, not all that your strokes look a little bit shaky. If you're experiencing that one, it could be because you're going way to slow. If you go way too slow, your line is not could become shaky. Another reason is just because this is a something that you're doing as a beginner. Shaky lines will go away with practice your holding a pin with a flexible point and maybe have never held one before, and you're holding it at a different angle. Then you normally do in your regular writing, so you're just gonna have to practice. And the more that you become comfortable with the angle that you're holding your pin, the less shakiness that you will see, and it will become more consistent. And if you're finding when you go to the free hands portion off the workbook and you're not liking the way that your strokes are looking than just continue moving your tracing paper back and trace the lines that you see, there is nothing wrong with tracing, especially US beginner, so that you can see exactly how the Linus formed and how thick or thin the line is. And so continue moving your tracing paper and practice in practice until you get to the free hand portion. And like what you see now, the next stroke is the down stroke. So holding your pin at an angle like we talked about for the down stroke, it's going to allow you to apply heavy pressure so you compress down on the side of the brush to create a thick line. So for the down stroke, we're gonna start at the waistline and moving it downward motion kind of a slant to the baseline. And don't be afraid to press down quite strongly on your, um, flexible tip, and it's going Teoh, pick up more of the ink and the side of that brush. So here we go with the down stroke so you can see how thick that IHS again. I'm moving in a nice, slow, consistent speed. Not too slow, not too fast. The third stroke is called the overturn. The overturn starts at the baseline moves in an upward motion just like our upstroke. And at the waistline, we curve in transition back down to the baseline with a heavy down strip. So just as a reminder, every time you move in an upward motion light pressure, downward motion, heavy pressure. So for this one, this is all one consistent line. So you do not stop at the top. You're going to do one fluid motion. So this is where it gets a little tricky at first. As a beginner, you're going Teoh. Want to just continue to practice, So feel free to move that tracing paper back over the strokes and trace until you get the hang of it. So I'm going to start at the baseline moving an upward motion. And as I near the waistline, I'm going to press down heavy as I come back down so your strokes will probably not look like these at the start. Mine didn't at the start, either. I had to work on that transition to make its new That's possible. So notice though, as I'm doing this, I'm not changing the direction of my hand or my pin angle when I go from light to heavy. So watch this again. White stroke up, heavy pressure down. So you noticed my hand, nor my pen moved at all. All I did was apply pressure as I went in a downward motion. So up about right here applied heavy pressure down, up waistline heavy pressure down again Move your tracing paper and trace the overturn until you feel comfortable. I spent a lot of time practicing each of these strokes as a beginner. So while you're following along on this video, we're going from one show to the next to the next. You could do this course at your own pace, so feel free to stop this video here and just practice the first few strokes until you feel really comfortable before continuing the video and moving on. So do this at your pace. The next stroke is the under turn. The under turn looks the opposite of our overturn. You're going to begin at the waistline, heavy pressure down and then let off the pressure as you go back up. Now, a lot of beginners find that this stroke is more difficult than the overturn because you are letting off the pressure. And so some people, as a beginner, find difficulty with this area right here, this transition. So don't be hard on yourself if you're finding that this area right here looks doesn't look smooth, so it just comes with practice. You'll hear me say that a lot, and it's true. You just practice and practice. See strokes and you'll eventually smooth this area out. Even after many years of doing calligraphy, I will still take the time to just practice a basic strokes. So let me demonstrate the under turn we started the waistline apply heavy pressure down, and it about right here is where I start toe let off the pressure and round back up with light pressure demonstrate again. Heavy pressure down and about right here is where I let off the pressure gradually toe light pressure up. Have you pressure transition toe light pressure. Notice the speed that I'm going Teoh. Be patient with yourself as you're moving through The's Strokes posits video. Now, if you want to practice these trucks before moving on to the compound. Kurt, the compound curve kind of combines the overturn and under turned together in one full stroke. So you're not going to stop or lift up your pen for this compound. Kurt, you're going to start at the baseline just like we did with the overturn. Go on an upward motion with light pressure, transition to heavy pressure down and then light pressure back up again, and you'll notice that the distance between this these two in this area are the same. So going in a nice slow motion will help you to gain consistency between these two areas. Light pressure up curve. Too heavy pressure down. But off the pressure and backup light again, high pressure up have you pressure down in light. The six basic stroke is the oval. You'll notice on this oval that the thick line is on the left side. You will find when we get to the lower case alphabet that there will be some ovals that have the heavy pressure on the right side. So those are our variations of the basic strokes. But this is the oval that you will see most often in your letter writing. So we're going to practice. This one is the basic strokes, so you'll notice at where my arrow is. The start of my arrow begins over here on the right side of the oval, and that's where I will begin making my stroke. If you started the top with heavy pressure and Luke back up around again, it's kind of difficult to connect a light pressure to the heavy pressure. So instead, we're going to begin with a light stroke up, go to heavy pressure down and meet up again with a light stroke. Now the ovals are the ones that I had the most difficulty with. As a beginner, I found that that my ovals looked terrible when I was doing them a free hand. So when I was a beginner, I practiced by tracing ovals over and over and over until I felt really good before going on to the free hand. So be forgiving of yourself, especially with this stroke, So I'm going to begin right here, and I'm going to move up into the left with light pressure, transition to heavy pressure down and about right here. I'm letting off the pressure to back up light again and meat where I began. So again, start over here to the right light pressure up, heavy pressure down. We'll light pressure back up. Pick it. I'm often asked by my students how much I practiced these basic strokes as a beginner. I actually spent an entire month just on the basic strokes before combining them into letters of the alphabet. So I would spend about a week on just the upstroke and down stroke until my hand form that muscle memory and knew exactly how the stroke should look and feel. Then I would spend about a week on the overturn and under turn than another week on the compound curve and an oval and just focusing every single day. I would take about 20 minutes, 20 minutes or so and just practice the stroke over and over and over. And then by the end of the month, I felt really good about being able to do all of these strokes with no shakiness and good consistency. And then I felt comfortable on moving on to the alphabet, so that was just me, but everybody is different, so you move at the pace that you feel comfortable with. So let's move on to the last two strokes. So far, last two strokes. This is called the A sending curve, and this is a descending curb, and it's because these extend up to the A center line and this one extends down to the D centerline. So these strokes will be part of your letters, like the letter K l and D letters like that to go up to the eighth centerline. This stroke, you will see on letters like G and J that extend down to the D center line. So for the A sending stroke, I'm going to begin at the waistline and moving an upward light pressure and then transition to heavy pressure all the way down to the baseline. So here we go. Light pressure up, transition to heavy pressure down, light pressure up, heavy pressure down. And then the descending stroke. I'm going to start at the waistline, go heavy pressure all the way down to the D centerline and then let off the pressure as a transition. Teoh light pressure up to the baseline. Show you again heavy pressure down transition toe light pressure back up. So here are the eight basic strokes that we just talked about. Please spend as much time as you need to before going on to the next video, which will be on combining these strokes to make the lower case alphabet. So there is no rush to get there. You want to feel like you've got a good handle on these strokes that you feel comfortable making them. The shakiness has disappeared and your liking your transitions. So practice, practice, practice, and I will see you on the next video.
6. Lowercase Alphabet: so if you're starting this video, that means you have practice. Practice. Practice your basic strokes. If you haven't, please go back to that video before starting with the lower case alphabet. The eight basic strokes lay the foundation for making beautiful modern calligraphy. So now we're going Teoh. Combine those eight basic strokes along with a few variations to make every letter of the lower case alphabet. So whether you're following along in the small pin version or the large pinned version workbook, they both begin on page 34 the alphabet. So I'm going to demonstrate with the small pen and around my tracing paper. And so what I'm going to do is take you through every letter, showing you a couple letters that have several different variations, and I'm going to show you how they are formed by the basic strokes and their variations. So let's begin with the letter A. So the letter A is a combination of the upstroke, but you'll see it's a variation that doesn't go all the way up to the waistline, The oval and the under turn and then put together makes the letter a so you'll notice as I'm going through the alphabet that I will pick up my pen or pause or hesitate between every single stroke. So this is where this is where modern calligraphy is not like curses and cursive. You will not pick up your pen until you're done with the entire word that you're working on . But with modern calligraphy, we are going to pause, Stop, pick up your pen whatever you're feeling comfortable with between each and every stroke. So here we go with the letter A. My first stroke is the upstroke, and I stopped short before it gets the waistline. And this is because I know I'm going to combine it with an oval. And we do not want a line to be sticking up here in this area above are oval in our oval and then are under turn. So I break each letter down like this so that you can practice those strokes again before putting them together. Who so get cursive out of your mind as you work on this letter. So I'm going to do my upstroke Stop! Pick up your pen Now for my oval. We know we begin over here on the right, and as a beginner. It's going to take a little work at first in practice to figure out where do I start my oval so that everything fits together smoothly to, um, connect with our upstroke and that just takes practice. So again, just keep practicing by tracing the workbook until you feel comfy Trible and confident to do this freehand. So I'm gonna begin right here with my oboe up. Have the down stroke and light back up again. Pick up your pen and then the under turn goes right next to it so that it touches three oval. And there we have the letter A. Now for the letter B. The upstroke that goes all the way to the waistline are a sending curve. Now, this time we're going to do an oval, but you'll notice the heavy down stroke is on the right side. So this is a variation of our basic stroke. So instead of starting up here on the right like we dio with our basic stroke, I'm going. It's like a mirror image. So I'm going to start right here on the left, moving an upward white motion to the right heavy down stroke and combine back up and then we're gonna finish the letter B with another upstroke. So putting these pieces together, we make the letter b an upstroke Pick up your pin a sending Kerr pick up your pen, the oval that starts on the left side, pick up your pin again and then the upstroke. Now here is a variation of the letter B. It looks just a little bit more fancy than our basic letter B. And I like to make my letter B like this most often. So this is just a variation of the stroke. I'll show you how it's done upstroke face and incur. And now this looks kind of like a curse of s almost. But our variation we're going to start here on the baseline, go on an upward motion. So that's light transition to heavy down and then curved back up light again. So practice by tracing that several times before you begin the letter B upstroke Hey, sending curve, look up my pen and then our variation. The letter C is just its own letter, basically, so it's not formed by the basic strokes except for that upstroke. So my upstroke comes just short of the waistline combined with the letter C. So I begin here, go on an upward light motion transition heavy down and in transition back to up light again . So together I've got my upstroke and then my letter c for letter d. We've got an upstroke that falls short of the waistline because it's going to be combined with our oval. Now, here's a variation of our A sending curb, so you'll notice it goes just like the ace and encourage them to go up light and heavy down . But instead of stopping at the baseline, we're going to transition to a light up struck back up. So it looks like this light up heavy down and curved toe light back up again. So together we've got the letter d upstroke oval pick up your pen started out right here for our A sending curve heavy down and then transition back up light again for our letter de e just like the letter C. It's its own stroke. So I've got a shorter upstroke and then we're gonna begin the letter e right here a light heavy del a plight again. Sit together, upstroke up light heavy down a plight okay. Letter F is a combination of our A sending stroke with a kind of a variation of our descending stroke. Instead of going to the left like we did with the basic stroke, we're gonna go to the right. So watch how letter F is done first and upstroke. Then we're going to start right here like we do with their A sending curve up light heavy down. And instead of stopping the baseline, I'm gonna go all the way down to the D centerline and moved to the right up light and then finish with another upstroke. So together that looks like this upstroke a standing curve all the way down to a variation of our descending curves and a plight again moving on to let her g a shorter upstroke are oval descending and another upstroke The letter h is well, first see our compound curve being used. So we've got an up stroke a sending curve in our compound curves flight heavy down to a plight again together upstroke member to keep picking up your pen between each stroke and in compound Kurt the letter I is simply the upstroke combined with the under turn and then I thought your I upstroke under turned Pindar. Now for the letter J upstroke descending Kerr upstroke and dot your letter J, the letter K is a little bit more difficult at first because you have to variations that are only unique to the letter K. So I'm gonna take you step by step through this first, our upstroke that are a sending curve. Now, for this next piece, you're going to start at the baseline and move in an upward light stroke direction and curved back down with a heavy stroke. So, like this, a light curve too heavy down to meet back to your life stroke. Then here we're gonna go heavy down transition Teoh a plight again. Kind of like a little check mark. So to put all those pieces together, here's our letter K. First our upstroke pick up your pen a sending her pick up your pen. Then we're going to start right here at the base of our A sending curve and go up light curve too heavy down. Pick up your pen and then start right here with our heavy down and a plight for our letter k. Our letter l has a variation of the A sending stroke just like we used for the letter D upstroke, a sending curve that transitions up back to the waistline. So put together, we have the letter out for the letter M. I'm going to show you two different ways to do this. The traditional letter M is a combination of an overturn plus and overturn, plus a compound curve. So let's see that one first. So put together, we've got our overturn cup your pen return. Take up your pen compound curve. Now some people just as a matter of preference. They don't like to see so many of the humps that you see in the letter M's and ends. So instead of the traditional one, I often omit that first upstroke and start my letters. Letter M with a heavy down shook first. Then I dio one overturn and then a compound curve. So I often do my letter M's like this and I'll show you in a later video how you combine this letter M with other letters when making a word so very similar with the letter n two different ways you could do that. First, you can do the traditional way with an overturned combined with the compound curve. Or you can omit that first upstroke by doing a heavy down struck first and then simply the compound curve. The letter O is just the oval with this little piece here. So we've got a shorter upstroke are over and then you kind of pressed down heavy and let off light. So together that looks like this upstroke over about right here, heavy down a plate, just like the letter B. There are two ways to do the letter p using this variation that makes it look a little bit more fancy. I have to do my letter peas like this. So the first way upstroke descending curves. Then, just like the letter B. This is our variation of the basic oval By starting on the left first, going up heavy down, back up light again finished with our up strip. So together we've got a upstroke Pick up your pen descending curves pick up your pen. Start here to make our oval heavy on the right, and in an upstream or the variation of the letter P begins the same way upstroke descending curves and then just like the letter B. It's the same various variation of that stroke, But have you down, back up light again. So together we got the letter. P the letter Q Is all of our basics a shorter upstroke? Our basic oval are descending curves, but it goes to the right ended up Sure are is a variation because we have this stroke right here that goes just above the waistline so that we achieve this. Look here. So we got our upstroke just press heavy down and taper off to light and then are under turn . So it looks like this upstroke pressed on heavy taper off toe light and then complete it with our under turn the letter s upstroke. This one is a variation of the Now this one has its own little stroke here that's unique to the letter s. You're starting up here above the waistline. You're gonna press heavy down And even though you're still going to downward motion, gonna let off the pressure about right here and back up light and then another upstroke So together that looks like this upstroke. Start about right here heavy. Let off the pressure curve. Keep it all light seven upstream letter t upstroke here we're gonna dio. And then here we have our variation. We're going to start at the a center line and go heavy all the way down to the baseline and then transition back up late again and then cross your t You cross your t keep it light. The letter U is a combination of the upstroke and two under turns. Number two, pick up your pin between each stroke. The letter V is a compound curve with the little stroke. That's just like the letter O. So together we've got a compound curve and this little stroke here for the letter W It's just like the letter you. But we add that additional little stroke here. Upstroke two under turns for the X. It is almost very similar to a compound curve accepted, stretched out a little bit further, and you're heavy. Thick line is right here in the middle, so we're gonna go up light, heavy down, applied again, and then you're gonna cross your ex by starting at the baseline and going in an upward light motion. So for extra got up light, have you down a light and then a plight to cross the letter. Why I'm going to show you two different ways to write the letter y with different basic strokes so we can do what the upstroke, the under turn descending curve and the upstroke to make a why that looks like this. Or we could Dio instead of the upstroke and the under turn. We can replace that with the compound curve, then completed the same way descending stroke and an upstroke. So it looks like this, and finally, our letters e. It also has a variation that's unique to the letter z the first and overturn that I'm going to start here at the baseline, go up light heavy down and back up light again and then finish with an upstroke. And there we have the letters of the alphabet. So when you're first beginning, you're going to probably need to refer back to the workbook to see how you make each letter , which strokes make up every single letter. So in the back of your workbook. So in the small pin version, it's on page 23 in the large pin version, it's on page 31. Now, both of these reference sheets are using on Lee the small pin so I could fit it all on one page. But it's a nice reference sheet for you as you're working on practicing the lower case after that so you can see the entire alphabet in one place. Of course, you will need to refer back to specific pages of the workbook if you need to remind yourself how Teoh make each letter.
7. Uppercase: the upper case alphabet begins on page eight in the small pin workbook and on page 10 and the large pen workbook. The upper case alphabet is not based upon a set of basic strokes, like the lower case alphabet is. So each letter is individual and different from all the other letters in the alphabet. When it comes to upper case in modern calligraphy, Ah, lot of people take liberty in the creation of their upper case alphabet. So there's a lots of different versions that you will see online and on people's artwork. So what I'm going to do is take you through the traditional modern calligraphy uppercase alphabet because they're not based upon basic strokes. What you'll see in this video is of meat doing every single stroke step by step for you so that you can have that as a reference tool. As you are learning the upper case alphabet and in the workbook, I take apart every single uppercase letter so that you can see the individual strokes spaced apart and then put together, and I also have directional arrows. So using the workbook in combination with this video of me demonstrating every letter, you'll be able to trace the letters in your workbook and then work to free hand, just like with a lower case alphabet. Remember, Every time you move in an upward direction, you will want light pressure. And every time you move in a downward direction, you will want heavy pressure. So that is pretty consistent, except for a few variations that you will see as we go along with the letters of this alphabet. So make sure you have some tracing paper and turn Teoh the beginning of the upper case alphabet. I'm going to demonstrate this in the small pin. - Um uh huh.
8. Letter Connections: So now it's time to connect our letters into words. If you're using the small pin workbook that will be again on Page 13 and in the large pin workbook the page 17. So just as you see in your workbook and that I have said before, it's important to remember that modern calligraphy is not cursive. So in cursive, we keep our pin to paper for an entire word before we lift it up. But just like forming our letters of the alphabet also with words, we take the time to pick up our pen or hesitate between every single stroke of every single letter and each word. So for connecting letters. What you have to keep in mind, as you're writing is that the exit stroke of one letter becomes the entrance stroke of the next letter. So what I do is I think ahead, Teoh the next letter as I'm writing a word to know whether I should bring that exit stroke midway up or all the way up. Teoh the waistline. It kind of just depends upon the next letter so you can practice endlessly with words by turning Teoh the last page of your workbook toothy blank practice sheet, putting a tracing paper over it and just practice word after word as you get familiar with the different connections. Another practice that I like to do is to write the entire alphabet, all connected just to work on those different types of connections. So, for example, just to demonstrate what I mean by the exit stroke becoming the entrance stroke. What, me writes a word like, um, happy. So I'm going Teoh, right? My letter h Now I'm going to do the compound curve. And as I'm doing it, I'm thinking my next letter is an A. And since the A begins with an oval, my exit stroke from my compound curve should stop midway. It shouldn't go all the way up to the waistline because my next letter begins with an oval and I don't want my stroke to be all the way up here. So now I've got my oval and then my under turn for the next part of the letter A. And then this is going to connect to a P. So I couldn't go all the way up here to the waistline. Now I will begin my descending stroke for the letter P. So I'm just going to start right here, kind of touch and cover that exit stroke of a to my descending stroke. I'm going to do that variation that we talked about with the letter P. This struck right here. And this is the exit stroke that's now becoming the entrance stroke to the next letter P. Now, this exit stroke is becoming the entrance stroke to the letter Y do my under turn and then my descending stroke. So I'm sure you noticed the speed. I went not too fast. Not way too slow, but nice. Slow speed, though, so that you can maintain that consistency between letters and gives you time to think about your exit strokes as they're becoming entrance strokes to the next letter. So what I recommend is maybe first doing this exercise by connecting all of your letters of the alphabet on your practice sheet and then just write the names of your family different words as you work on those connections. What I want to do in this video, though, is to show you some special connections to consider. So on this Nets page, you'll see that I'm connecting a letter, Teoh. I m written the traditional way and to the M written with less humps, so to speak as I showed you in the other video. And then again, the A or any letter connected to the n written this way and the end written in a different variation. So I'm gonna show you that. So here is my under turn of my A. That becomes entrance stroke for the first overturn of my letter M and then my second overturn and then my compound curve. So that's one way to connect to an M the other way. Since we omit that first overturned in this M, I would do my letter a Now my exit strokes stops here. Now I'm going to take my down stroke and just cover that right up there. Then my overturn and compound curve. So just like these same thing with the letter in connected to another letter straight into my overturn and compound curve or under turn and stop, pick up my pen heavy down stroke and then my compound Kurt. So just a slight difference between those two. The next connection is one of my favorite connections. You often see words with the letter T and H right next to each other. So the way that we usually write it show you this off to the side is to write the letter T cross and then do my letter h. Another way to do this just makes a nice fancy connection is you'll notice the cross bar of the tea becomes the entrance stroke for my age. So to achieve that, you do this now I'm going to cross my tea and kind of ah, wavy flourish here. And then I'm going to make that begin to my as a sending stroke. Now bring that down there, then finished with my compound curves. It takes a little practice. I'll show you one more time, but I often find myself doing this now, out of habit for every word that has a T h in it. Upstroke stop cross your T and down stroke. The next three are two different ways to write the letter O or traditional way and a more flourished way and two different ways to write the letter are our traditional way and one with a loop. So it's just a matter of tracing and seeing the different way, so I'll demonstrate each one for you 1st 1 is our traditional Oh, in traditional are So this stroke begins up here and connects to the entrance of the letter R and I do my stroke up here heavy down and then my under turn. Okay, Another way to Dio the oh is to do an upstroke. And instead of doing an oval, our basic stroke, I'm going to begin right here and do a heavy down stroke and then loop up with light strokes until it gets into my letter. Are no finish it traditionally and finally the variation of the traditional oh, and variation of the traditional are put together. So you noticed with this connection right here, I didn't pick up my pen or stop kind of flowed from one to the other. On the next page, in your connection section is four different ways to connect the letters V and W to another letter. So I just chose to connect it to the same letter each time so you can see the differences. So it's just a matter of personal preference which one? That you like the best since most pleasing to your eye or Sometimes it might just depend upon this the particular word to writing. So the 1st 1 is the regular basic traditional connection. The 2nd 1 you'll notice that we do not go all the way up to the waistline to complete the letters B and W and this one, which is my personal favorite. We extend this line up and create a little loop here, and then the final one. We do not to do the connection at all, so you'll see no connection between this V and W with the next letter. So might look kind of strange in isolation. But if he saw this within a word without this connection, it would look perfectly fine. So I'll just write each one of these so you can see how I form these connections and you can practice in your own workbook. - So that completes the connections portion of this course.
9. Loops & Upstrokes: now the next few videos are the videos where we can start breaking the rules a little bit and develop your own style of modern calligraphy. Gets a little fun here, where you can go in, exaggerate loops and up strokes and start to create some variety among your letters and make some of your words more artistic. So I'm going to demonstrate each letter so you can see how I write them, and then you can put your tracing paper over your workbook, follow along and practice these different types of strokes. So for every one of thes, there's no really right or wrong. You can exaggerate even more so than I did or less. It's just here is where you can just start to develop your own style in your writing. So for the 1st 1 I'm going Teoh, exaggerate the loop of this, a sending curve. So you see, it does not stay touching the a center line. It goes up and beyond the a cinder line. So here's my upstroke, and for here you might want to go a little bit faster, then what we traditionally have been doing in our slow pace. It just allows your wrist and hands to be a little bit looser, which allows you to achieve a nice, consistent curve. So you can see how that letter B is different than our traditional keeping the curve small and touching a center line. So this one is just a little bit more flourished here and here I do the same letter B but instead of doing the upstroke like this are nice traditional upstroke. I exaggerate the upstroke by beginning here and kind of looping it into my a sending curve . This just adds more style to that letter. So for the letter D, I'm exaggerating the loop of a cinder for the letter F I making changes on both the top loop and the bottom one. I'm making this one larger and this one smaller than usual Upstroke exaggerate by larger all the way down. Make this one smaller, does not even touch the D centerline and in an upstroke. So these letters here that I have in the work but workbook are just like a starting point for you so you can experiment with each of these letters, my G, I'm gonna do my regular oval and then I'm going Teoh highly exaggerated this descending curves for the G. And with this letter l exaggerating the A sending loop with the letter O I showed you in the connections video about how Teoh make this loop here instead of our traditional. Oh, but now I'm going to exaggerate that loop even more so and the same thing with the letter R and would exaggerate this loop for the letter s. Our traditional way of doing a letter s is to do the upstroke, this variation and then another Upshur. Another way is to start here and just look down heavy stroke and then curved around this way enough for the next three y and J here. I'm exaggerating that descending Luke for this J. I'm exaggerating this descending loot. But I'm also exaggerating that upstroke This continues on to the next page with a couple different ways to write the letter K and the letter h. So for this letter cam exaggerating the A sending loop everything else is the same. And here I'm exaggerating the entrance stroke and then slightly the A sending lewd one stroke here for this age on exaggerating the loop. And here I'm exaggerating the entranced ruckus. Well, the next several videos will show you some more ways to add styling to your calligraphy as you're getting more and more comfortable with making these strokes.
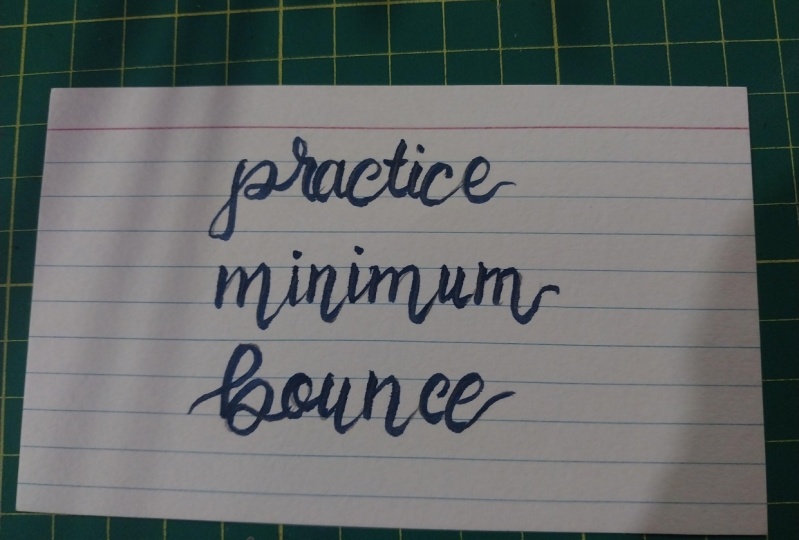
10. Bouncing: bouncing your lettering is a lot of fun because you can add more style and add your own personality to your words. If you're following along with the small version that begins on Page 18 and the large pin version begins on page 24 let's go to the basics so we can discuss exactly what bouncing your lettering means. So you've seen these guidelines labeled on your workbook and that I've referred Teoh through the other videos. We have our baseline, the waistline ta sending line and the D center line. So in calligraphy, the area between the baseline and the waistline is referred to as the X height. This is the height of all your lower case letters, except for the ones that extend above to the A center line and toothy de centerline. So to bounce your lettering means to take some of your strokes above the waistline and below the baseline, so that you extend them outside of this ex high area. So here is an example. In your workbook, we've got the word minimum written according to our guidelines and all of the rules we discussed, and then I've bounced some of the strokes above the waistline and below the baseline, and you can see how it changes the whole style of a particular word. So let me show you an example in motion. I'm going to write my business name first, following the guidelines and the rules that we've talked about staying within that X height . Now I'm going to write my business name two more times, extending some of the strokes different strokes for each time outside of the X height. Also, there is no right or wrong or strict guidelines on which strokes to bounce in, which not to bounce. What you want to keep in mind is that you don't want to bounce every stroke just because you can. If you do that, you'll notice that the word becomes very difficult to read. So now I'm going to write this again and to talk you through which strokes that I'm going to bounce. So now with my second overturn, I'm going to go up above the waistline and bring it down below the baseline and then back up again that I'm going to dio my A as usual. And now I'm gonna take my C and extend it above the waistline. not for my end. My overturn is gonna go above the waistline and then drop down below the baseline for my f . I'm going to exaggerate this loop up here. Keep that one within the guidelines. I'm going to take my own and go above the waistline. And then I'm gonna keep my ex within the guidelines. But take this bar and go below the baseline and above the waist so you can see how that really did change the look of this business name from following the guidelines to bouncing . Now I'm going to write it another time bouncing Diff'rent Strokes. So the first time I kept to the first overturn of my N within the guidelines this time I'm going to extend, get up above the waistline and stop the baseline them for the second. I'm going, Teoh, keep it at the waistline and drop below the baseline. Keep my a the same. And then my c I'm going, Teoh, keep it right at the waistline, but drop below the baseline so you can see the difference here in just bouncing different strokes that I've changed the look of this first part of the business thing. Now for my end. I'm going to bounce. That's hop of the overturn above the waistline, but then not drop it below the baseline. And so you can see the three different looks of the letter in for Fox or for the F I'm going Teoh, Keep the top loop. Correct bottom When I'm going to exaggerate it, gonna keep the O within the guidelines. I'm going to extend the first part of the X above the waistline and below the baseline, which is opposite what I did here in the crossbar. I'm going to keep it within the guidelines or within the X height, and so you can see the difference in that look just by bouncing Diff'rent Strokes. Okay, let's do another word to practice. I'm going Teoh, right? The word balance following our guidelines. And now I'm going to bounce. Some of these strips would exaggerate that loop, and then I'm gonna bounce this part of the B below the baseline. I'm gonna keep my A within the guidelines choosing not to bounce any of these strokes. I'm gonna exaggerate the loop of the L up above the ace underlying, and then I'm going to bounce it below the baseline. Keep this A. Also within the X height. Would a bounce my overturn of the in by going above the waistline ham below the baseline to keep the sea within the X height? And then I'm gonna bounce the letter e below the baseline. And so here's another example of bouncing your lettering and also keeping it balanced by not bouncing every single strip. And so here's the difference between the regular in the bounce. Refer to the workbook now were included a few words that I bounced as a starting point for you, so I would recommend tracing the word, as is the way I bounce it. Then try Teoh. Copy that freehand, and then try rewriting it again by changing some of the strokes that you bounce to get even a different look. Bouncing takes practice and really shouldn't be attempted until you have practice your basic strokes and letters a great deal and for really comfortable writing them within the guidelines. Once you're ready, then experiment with bouncing, keeping in mind not to bounce every stroke, and sometimes it's helpful to see someone writing their bounced lettering in motion. So I'm gonna write each one of these words for you, and then you can practice
11. Flourishing: the large pin version for Flourishing is on page 27 for the small pin page 21. So I've been using the small pin for this whole series, so I'm gonna continue with that size. And as you can see by just glancing over this page, you can see that flourishing just adds styling and personality to your letters in your words. So with flourishing, you want to keep your hand a little bit more relaxed with these strokes, um, and video to We went pretty slow informing our strokes to make sure they were precise and within the guidelines. But with flourishing, you want to be a little bit more relaxed so that the loops and curves flow and are not rigid or choppy. So the 1st 1 we're going to do is the letter B and with any letter that has an ace ending loop like B, D, F and K, for example, those are great letters to add flourishing because you can cross over that heavy down stroke. So let me demonstrate with the letter B. I'm just going to start just over here to the left and just by adding that one little cross year adds a lot more style to your letters. Now for the leather D. I'm going to go even further over to the left and you notice how quickly I did that loop there, which kept it nice and flowing and smooth. Now here's a couple of different ways to do the F. So, um, here, I'm just going to kind of blue around. There's no right or wrong. You could just loop however you would like, But these are just examples to get you started. Now you'll notice how different this letter f will look from this one. I'm going, Teoh, start my stroke here up instead of down and I'm gonna exaggerate that top a sending loop and I make the descending loop a little bit smaller and I'm gonna loop right around here. You can do so much with the descending loop on certain letters. So for this letter, G got my oval and then I'm just going Teoh, make this larger and then cross over that down stroke. I love to do this with the descending loop, like in this letter J, so you'll notice I'm gonna go down and loop and make one loop and then another to cross back over. And that just has a lot of style. Teoh certain letters. Here's another one with, um, the A sending loop. The letter. Q. This one's fun to Dio Got My Oval. Now I'm going to go down and the loop over like I would with the Q. But then continue. Make another little loop. Just add a lot more flourishing to that letter. So that's a lot of fun with the Cube. You could have also have a lot of fun with the letter t with that crossbar. I'll just show you a few, but you could do so many different things with the letter T. So I'm gonna curve this a little bit more than what we would normally dio. So there's by a flourish right here, and this one's a little bit more flourished. Another example. Have a little bit more curved to that cross bar open and likewise with this one, have a little loop here. Here's one example for a why spending a little loop there, couple of more variations of the why to my compound curve and then cross over that down stroke and then, like we did with the letter J on the page before I'm going to add an extra little loop right here. I love with the W and the V to really flourish that last stroke like this. And when you combine it like the leather w with the word this flourishes over top of the word and looks really pretty can. Same thing with the letter V. So now let's look how weaken at flourishing and words. So for the 1st 1 I'm going Teoh, right? My letter A and I'm just gonna add this flourish right here. Now what you want to remember when, um adding flourishing to your words is you want to create a sense of balance. So if I just cross my tea and stopped right here, this would be a little bit unbalanced. But if I continue my tea an f flourish up here, this is a nice balanced word. And now for the word wind, Hearst the end a little bit, too, by crossing down here below the baseline for mom. And so a little balance here. I've got this curving below and this one up higher and fancy bounce my end a little bit like we talked about in the last video and flourish my descending loop on the way, so have fun with it. You can add flourishing Teoh lots of different letters and play around with the balancing when you do this on certain words.
12. Conclusion: Thank you so much for joining me. I hope you learned a lot in this course. And with practice, you will be able to perfect your modern calligraphy. If you have any questions at all, please don't hesitate to reach out. I have all of my contact information on the workbooks. In the future. I will also be sharing courses on faux calligraphy and tutorials on chalkboard signs. So I hope to see you in some of those courses as well. Thank you.
 Kelli McIntosh, Hand Letterer & Illustrator