Transcripts
1. 1.Introduction to Mixing: Hello and welcome to mixing and machinic D1, which urea from Expedia music. Or let us say some Qu thickness which you out of my teaching years and over experience working as an audio engineer in this course. In this course, we'll be mixing and matching our protest song std. One uses to do wanna stop logins only. Who think our project from 0 to hero. There is no need by a distracted party plug-ins for this course. You just need Studio on wherever we'll be learning how to get the best out of our stock blogging is, is to do one. Learning by doing is the best way to achieving greater results. Therefore, there is no need wasting time or something you have little knowledge on. But Radha, consultant and learning from an expert, receiving a lot of time and resource. Thanks a lot for watching and I look forward to see you in the course.
2. 2.Workflow Breakdown: Your SAP and welcome again. I'm just going to take you through the whole session us in what I'm doing, the instrument I'm using AS well. I'm just going to take you to the or the instruments and the vocal itself. Then we can start our mics. Yes. So starting from top, you can see they're kicking your shots and that is a kick itself. And we've got some collapse over here as well. There's a club as well over here. And then we have the snaps will. And then we have some Tumblr Marines as well. And then we've got our clamp, a club that's club itself, that is what you are hearing. And then we have some tome, some low tome, some slight base over here. And then we've got pizzicato AS well. That's what we hear in here. And then I've got also the base itself is the base as a sub piece. And we have some piano as well. There's Piano also over here. So does a piano you are hearing. And we've got some guitar strike as well, is just a normal I played it with a keyboard. So that's what hearing here, right away. Yep. And then I've got some saxophone also doing angel introduction assault. So you can hear the center fun from here. I've got reverb on. It's just don't mind me. I'm just going to work with us and with other reverb and the reverb. So I guess come to revamp desk to give me some vide before the mixing process, yes. So let's go. And then we've got two different saxophones, and there's one on the background that is playing in the background, and thus this one. So, and then I've got also the Poikile itself. I've got I've got a inch over s The inchoate vest. I call it the introduction or the ves. Anyhow he call it up, go to coerce. And there's second vase and then also course and second Ted risk. And we've got the, the cause itself again, as in the last, the last thing we are doing. So the courses are lasting over here. Then we move to the catastrophe. So from here, from this section to here to like, like, like seven trucks from here to here. So I just did some reverb and delay for my vocal. And thus the tracker Haraway is just a reverb and a delay truck. If you want to have a feel of it, this is how it sounds. So that's my reverb and then there's mine delay. So I just I just like to put that on the volcano. It helps me in the mixed saw. Before I'm sad, it makes I'm just gonna drop it up on so that after we finished everything, then we choose our revamped our correct reverb bus in their preferred revamp, and a delay for our session would always stay Mike much time. Let's just move straight to the song and then have a feel of the song.
3. 3.Unmixed and Mixed Project Song: Okay. Anyway, why? And we make it way moving forward.
4. 4.Preparing for Mixing: For the backend will cost and Douala trucks is gonna hope our workflow. And it's going to make everything favorite, simple for us. So without wasting much time, let's get treating today preparation section. So we're going to start with our kick would kick drum, and we go to the clubs and the snare. So what I'm going to do is I'm just going to interchange them. So I'm bringing the snare closer to the kick. And then also as my own preference. And I'm bringing a tambourine as well. While I keep the clubs. I'll bring the Tomaso close and my hi-hat also close. So what I'm going to do is this four trucks, I think they are five. The kick snare, the tambourine, The tomes. The hi-hat CDO has struck 12345. That is what I'm selecting. Right-click here, sorry. Yes. And then go to add bass for selected trucks, shallow. So we are going to add bus. You are good at it but for the selected channels. So you just do that by clicking here. This bus is what we have over here. If you can see it on your screen, that is a bus. So you are going to name this as our drum bus. I realize you guys, when I seen the batteries are screeching, So I had to move myself to the upper right corner. Okay, so the next thing we're going to do is to create a bass for our lead vocal. And what we are going to do is just go on the lead vocals. We have four of them, 1234. So we select all by, by holding, selecting one and holding Shift and then selecting the fourth one. And then you come on a mixer section in the right-click on that mic succession and then add boss for selected channels. So thus we are going to do okay, yeah, so I'm adding the boss for the selected channels. Okay, so this is my bass and then I'm going to, I'm just going to name it the lead vocal buzz. Okay, so that's our lead vocal bus. And we are just going to go on the cross-section also. And I'm going to create one bus for this course, and I'm going to name it the clause bus. Now with a Kuros bus, our art, our end up adding the backing tracks to that bus. So I'm just going to add a backing tracks to the chorus bass. Yes. So to do that, I'm just going to move the cursor closer today, backups so that I can select the course in the two back-ups here. And we come to the section on the mixer. And you also right-click and then create a password so you add boss, select the channel that we name it as our Kuros bass. Sorry, we have one boss for Alito cos one bus for the chorus. One boss Water Club. One boss for the drums? Yes. And the next step, the next thing we are going to do is move it to the boss for the link it up. Now for the lead guitar section, we are going to get two different buses, one foreleg guitars and one for backups guitars? Yes. So that's what we're going to do over here. A guitar section, we're just going to get two different buses. One bath with a lead guitar and in the second bus for our rhythm guitar. So I'm just going to do that quickly. If you can see this is our reading, our Nikita, and I'm just gonna do this for the lead guitar. So I am going to name it. I'm just going to create goods ad bass for selector channel. And the name it Nikita. And then I'm going to do seem for for the order trucks as well. And the name, it's radium guitar. Yes. So this is our rhythm section. And creating a bass for it. Yes, I'm Christina Iridium bus right away. So that is the bass does our guitar, bass. Yep. So basically that's what we are going to do now. And we'll just move straight into mixing a song.
5. 5.Drums Mix- Full Mix: We're going to start mixin song from the reading section, as in the hot section, where they kicks and the drums and everything that comes in Edo for age or section you will, you do with that one? A little latter section. The latter points. Yeah. So we are going we are going moving straight to the Kikee. We're going to start with a kick. And the only thing we're gonna do an applicator compression and then equalization. Yes. So we would start with the presets is very good to start at a proof set because the presets were made by professionals and you start with it and then we treat things around to save time. I would like to start everything from scratch, you know, to to we save time whilst awake. So we are come to mix just a kick. So let's go. I'm just gonna go to the section and then look for a Priscilla wireless go on drums. And I think a tight kick. It'll be OK for us. Let us see how, let us hear how it sounds. Then we tricked things around to, you know, the mixing processes all your ear. So you just have to listen. Wiles, was was We go and and follow along as well? Yes. So we go into this section and then we have a compressor here and then a localization. Yes. So let's just listen to how it sounds. Okay, without the compression and equalization. Okay. So I can feel that a kick is more tighter because previously there all kick wasn't so tight, just like it is now. I just have a listen to it with a, with a compressor EQ and without it as well. So just have a listen to it and let's see. Okay. So I think they key is boosting some, yes. Okay, yes, like I said, is boosting some low frequencies this section and then also boosting the high-frequency a bit over the high frequencies overhead. We are not done with it. We can still go, come back and you know what things are run with pixel. We're just starting with the presets and walls. We get to a point where we wanted to balance. Some staff would come in and then took some naps, cuts on low ends, boosts some frequencies, and know that annex instrument is going to be our snare drum. And but a snare drum, it is going to do two things, a compression and an EQ or an NTS. So we are going to repeat this process just, let's just go into the presets and then look for something that is a little bit more rock kinda feel. I'm going to choose the rock snare. I'm just going to choose this rocks Ned, preset and just let's listen to how it sounds. But first we'd have to listen to the snow without the depreciates, the compressor and an EQ. So let's listen to it. Okay, I'm just gonna put it in. Okay, for me, I think it's not bounded, but I'd have to blend. Its width would kick in and I'm just going to be my final decision over there. So I'm doing probably let me do like 15. Sorry, eliminated like 15. And do like mannose, 15. Exactly. And I'm just going to leave the attack and the release time. I'm just going to leave it just like it is. As time goes on, we can come back with a mix section. We can mix, get a mix and then also our road fire us in the raw sound. We are getting from this itself to it so we can combine that, but we'll be doing that after we've done everything with our with our setup over here. So we have a compressor and then we moved street today localization. You can see that with cut some loads over here from the presets, some lose up in cuts over here. So we're just going to listen to how it sounds. And then after we took things to suit things you understand so that the intermediate in the upcoming producers who get things done simple, I don't want that to start. Everything was as taught EQ in every team from scratch. It's going to wisdom out of time. So we are going to start from the presets and then we build upon that. That's what we're going to do. Okay, so let's, let's just keep it like this for now. And let's move to the next instrument. But I like to blend. I liked to play the kick in the center so we hear how the two of them sound. So after listening to it, I decided to come to like negative 21, negative 21 dB on the, on just the threshold for the, for the snare drum CS. Okay, so I like the way it sounds, but it's our kick. And in our scenario like the combination and how it's sound for this particular song. I think I'm okay with that. So we have to move straight to the tambourine. For the tambourine section, I'll just do a compression on it. And if possible on EQ, depends on how it's sound together with a mix and then who still come back and do some changes, you know, so let's just find Qu compressor and put it in. There's an EKG, I just have to take it off. Just look for a compressor. And then probably you do something around here. So just trying to eat us in, gets the right to shoot for it so that the idle ended up. I don't want the numbering to be too loud as well. I want it to be a bit more compressed. So I have to apply more to troubleshoot on it. And that is what I'm doing over here. So I set it around negative 22. So I think negative 22 is cool for me at this moment. So we will just move on probably if we need some EQ to cut some heights as well, we'll come back and do that later on. So the next instrument is going to be our tone with a Tom section. I'd like us to just go into the preset and then take one of them. And whilst we use a presets, we tried to correct things we don't like. So I'm just gonna go straight into the presets and let's just look for something, a bit more rock kinda thing. Probably. Ok, let me just try this rock DOM. Let me just try to Schrock DOM and hear how it sounds. I think there is a little bit of high-end deem and that's not what I'm going for. So let me just go straight to the EQ and see or probably let me check the sponge ICO is working over here. Okay, that's sick. It we want to compress also. I think is an EQ problem. You have some high-end is boosted with our two. Yes, I said it still is here. We'd have to bring this this this high-end little bit down. It's just not what I'm going for, so let's just fix it up. Yeah, so I just, I just brought this to neutral us into the high frequencies over here. You know, there was a boost over there. If you can see. Previously, it was like this, so hard to bring it this week. Just hold here. Who this one ended makes show among probably units your animal mom or 0, if I'm only 0 and again, I think it's going to be okay for me. Yeah. Let me hear how how it sounds. Yep. I will end up cuts into the height a little bit. And if you don't understand what is going on over here, in the mid-frequencies section, you can see that there is a low mid frequency. There is a very deep cut over here. And then what is happening is this frequency. If you, if you push it up like this, you hear that it's made distorts yet. Exactly. You could hear some sound like, like very high frequency sound, you know, so that's particular sound is what has been worked on. The presets point of view. So from the point of view it doesn't work on to, that's why it was brought down here. So the high frequency, which is distorting or disturbing the mix wouldn't be hearing. It's yeah. So sometimes you do that with Voc halls with different instruments as well. You do find a sports and that is the frequency that is probably Stabian or something like that. You just just bring it down. So that is what is happening over here. Yeah. So after that frequency sticking out and then I also cuts some some high end over here. I think Tom sounds just like what I'm going for because it's more of like a raga tone conducting when it come to the section. So the high-end is also important, but in my case, I mix, mixing is a preference, so I prefer to have my Thompson this way. So I think Sounds very well and it fits inside it mix acid when I went to add my drums in my snare to this very one, I think it sounds well, he over here so we can listen together. Let's listen together. With regards to the highest sex. And also we are going to do seem I'm just going to look for some hi-hat pre sits over here. And probably I just drop it in and hear how it sounds. Okay. I think it's only hired procedure of hub we have over here. So let's just listen to how it sounds over. Hey, yeah, I'm just going to drop this very frequency down from the equalizer. And then this, I just don't like the high-end doesn't I don't want it to be like that. So let us listen to heart sounds. Before we move to the next instrument, I realized that the equalizer was a little bit hidden, wasn't under section, so you couldn't see it. So this is what I did. This frequency was mall was somewhere around this section than I just bought it down here. I bought it down here. And then I also did some cutting of the lost. I think that one you saw it. So this was just the high-frequency was too much and then I brought it down. It was sounded like or sounded something like this. And the point he doesn't know what I'm going in for. So I just want it to be more warm to more, more warmer. So I just bought it some mutual too like 0, like 0, the gain upward again of the high frequency to 0. And it will sound or something like this. And so this is what I'm calling info yet. So let's move straight to the next instruments. We are moving straight to the club and the club you're going to work on it are the boss section. You know, we created a boss for the club. That is, when you work on your screen, you can see that we have two different type of club. And we are combining the two clubs to give us the sound. One is like this, and the second one is also like this. So we are combining to collapse to give us the sound you are here. Yes. So this is the sound you're hearing now, and we have a bass for it. And if you follow the lesson from the beginning, you can see that we have your boss for, for the club. So this is our, our club BUS. Thus what we have over here. And then we are going to put a preset, like a snare kind of preset on its Edo and NB trick it around to, to hear how it sounds. So let's go. I think I may choose probably a bottom snare. Snare bottom. Yes, Snare button, snare bottom, deallocate. So it's like the microphone that is placed under the snail. So to pick the sound of the snide, those who play live, We understand what I'm talking about is, so this is what we are going to go. So let's just listen to how it sounds with presets. Yeah. Okay, I think the EQ is doing a lot of high-end. Yeah. I'm just going to bring it down. I'm just going to bring this high-end down. And then probably this, this, this low-frequency or so I'm just going to bring it down a little bit. Yeah, I think it's no sound in but I think it's okay. Probably limiting the expander. The mixed process is listening, you know, if it sounds good to you, I think that is it is fine. So I'm just going to leave it like this. Just going to leave it. Let me check also the compressor exceeded treasury around negative 15 is cool for me and tuck into release time or so. I think it should be fine for me this time around. We are doing like one is to one. So probably listen to heart sounds. We still have the chance to come back and work things around. So let's move straight to the next instrument. So this is our religious play together with, with our drum section. Okay, so I realize the club was a little bit loud, so I just have to bring the boss down a little bit, just a little bit. Okay. I'm still going to maintain, I think I ended up just reducing it to like negative 0.4. Just a little bit. Okay? But a drum bus, we are just going to do the same thing. So we are going to look for a presets here. And then we go to. Probably a drum boss. Okay, you have a drum bus over here. So we select the drum bass. And let's just listen to how it sounds and that we're just going to took things around to make it sound cool. So let's just listen. It should our way I realized that a reverb or the web here is causing a lot of problem, probably is too much for us. So we are going to do is EW release the mix or reduce the room size. The room size. This particular novel, The size of the room. So let, let me just remove, reduce, Let me just reduce the room size. And this, let's listen to how it sounds. I just bought a mixed down a little bit to like 5.5 and then also the room size, I would use a room say than the predicted pretty lazy kind of delay that comes before the party quality. The delay that comes when you hear the sound you could hear we're not, we're not when I increase it, you know, that that delays becomes more too much. I think you'd get here that delay over there. Yes. So that's why I'm getting rid off. I'm just bringing it down because you don't need it's just a drum Basu. We don't have to put a lot of delays or nets. You know, it doesn't work like that. So we just giving our drums a little bit of room to sound like it was bleeding a room, you know. So that's why I'm just I didn't had a bit of that. Fred owned that a drum Bosnia, so let just listen to how it sounds. So let's just listen to with and without. So I think the width also ought to work on it a little bit because I'm listening to it if it sounds good. Ido. So as you can see on the screen, I'm just adjusted. The width was a 100%. That is a width is like day how big the room is. So hard to, you know, the width of the room. Article II data, just like using unexpanded or some tomato to widen day Yahoo very thin. So I just brought it a little bit like 56.5%. I think that it's more reasonable either lambda2 here, some delays. I'm nude cannot sound coming into our drums and doesn't worry again in four years without it. And with it. It's just a little bit of variable and then a bit of compression going on in on our drum. On our drum boss, yes. So we are just going to move straight to the next instrument.
6. 6.Pizzicato Mix - Instrument Mix: Unless instruments as the mixing of ops CARTO. And as you can see over here, we've got two trucks for the pizzicato. We have one here, the shock and then this very tracker. So yes, so we have two of them. So what I'm going to do is I should have done it earlier on. I'm just going to create one basketball for it, a name, It's pizzicato so that we work on the two things together. So we are going to create a selected passwords. So these are bars here. It has gone to name it. Pizzicato. Yes, we have it as pizzicato boss over here. Yes. So we have our pizzicato running to the site. So I'm just going to move this struck here. So it got closer to, so we know we are working systematically from this side. We go here, we go, there we go until we finish it out with yes. So let's just move straight to the presets and then how we are going to treat our pizzicato would a pizzicato section. We're just going to use a preset and let's go in and do something like a piano cannot feel. We need something like a piano thin piano presets. It should work fine with a pizzicato and we're just going to walk around with a EQ as well. So let's just go into the precise section. Probably will look for an each domains. We have grand piano over here, and we have an, a piano we have wrote. Now, let's just go in for our grand piano. So we are going to choose the grand piano presets, okay? So these are grand piano unless this listen to how it sounds. So I could hear the reverb is a bit more. And probably there is some kind of, you know, EQ boosting this very mid-frequency, sorry, that is, that is a lower mid-frequencies here. And then there's a booster, so are the mid-frequency itself over here. So I'm just going to bring, I'd just led the way sounds and how he's got a sounded. But the next thing we're going to do is to cut some loose. So we'd have to cut like 80 heads. Yes. We'd have to cut it this low angle over here. You try and cut more to like 80 heads? Yeah, probably around 80. Should be fine. Yeah. We cut in around the site so that we don't get the low frequencies coming in because our bees who also come through, you have to make room for obese as well. So the basic K2 is also a bit deep. Yeah, there are some low notes playing in there. So I'm just going to bring this, this frequency and put down. Let's listen to how it sounds whilst we took things around. So I realized that a revamp the verb is too much would have to bring it down with a mixed section. This listen to how it sounds. So I just tried to cut an a low-frequency serves like eat tonight, probably 90 hits. And then the high-frequency here, I brought it down a little bit. I cut it. Ido brought a dows or Samos cuts emitter bringing it down. Boosting is like putting it up debt and it cutting it is coming, bringing it down. So I just bought a die, cut it a little bit. And I think it's okay for now we will come back to it and do some too accessible whilst we go. So I think that pizzicato sound well, on my preset, I've got a compressor is like negative 13. I will do probably I'll do negative 15 for it. But I like the way sound, so we just have to keep it like that. And then just move on to the next instrument. It is going to move straight to the guitar. A guitar strikes suction. And without one, we're just going to work on it on the guitar track itself. And it's very truck. The truck itself. So does the channel for it. And what we are going to do here is we are going to try the preset earlier. So let's just work on something and see, let me choose this first. I'm not satisfied with it. Let me just use a different one. Probably the phase omega phase and C phase II effect also admits. It's okay. We're just going to work on the amount of phase or the, the AMP type. I'll probably, I'm just going to keep it cool for now. Is okay. It's okay for the purpose of this lesson, let me just probably work on different channel a bit. Okay, so probably, uh, probably, let's just leave it like that. I'm just going to bring a level down later. We'll come back to it when you're doing the gender balance in digital comics. So depreciate digest to keep us to a point where we've come and say, okay, this is what we are looking for something around this section. So then we start to look into things and make it sound like the we really wanted them to sound. So let me just leave it. Let me just leave it just like this and probably balance a level to the mix. The pizzicato is also so loud, I just have to bring it down a little bit. Okay. So what I'm going to do is I'm just going to pond this particular guitar. Probably to the bits, right? Gets a bit like 30% or something like that. Okay, so I wanted 7% writes. Thus, the pond section thing that, that should be fine for me. I just like the way sound now, so we have to move straight to the next instrument.
7. 7.Sub Bass Guitar Mix - Instrument Mix: In a bass guitar section, we are just going to work when the preset, and then I chose us reset. If you go to the precess section, you can see there's a clean stuck overhead. So that's what we have over here. And let's just play them B's walls as an together with a song and then listen to how it sounds, it blends together. And if we find a nice preset, it is going to work around that piece yet. So let's go. What I'm going to do is I'm just moving straight into the first channel and choose a preset over there that suit us. And later on we are just going to work around it. You know, there will be mixing, massing, work on everything, but we need a foundation to, solid foundation to build on. So I'm going into the channel and that channel. Just go to the preset section, which should be around here. Yes. So we go into base and let's choose our electric bass one as an electric one and hear how it sounds. I guess choose the second one also AS well. I just wanted to hear how it sounds. And then from there we build upon that. So let's go. Now the point is this particular base as a, some bees and some may, sometimes you got to have to take into consideration because we are occupying, y'know, the low end to us in the zombies is very deep. And most of our low frequencies would have to, you know, come out a bit. So in this case you have to make sure that under a balanced between your peace and your kick is very, very important, dealing with some base. So the base instruments Delos was only lows are cuts to like from 0 to like 80 heads is cut off. But with a sub base, you still have those frequencies, very low frequencies inside your mix. So we'll have to take into consider thats why I want to try the preset and hear how it sounds, then we can build our, our, our base from that. So looking at this and hearing what, what is going on, I prefer using the electric 210 also, the am settings. I think I'm okay with this very AMP, this ampere. I think I'm okay with damper. What we'll do is to move straight to the next instrument, and then later will come, when we come to the mics in itself, that is where will be tricking plane or the song and be working on it's gradually and that once you take us like probably an hour. So to do that yet, so let's move straight to the next instrument.
8. 8.Lead and Rythm Guitar Mix - Instrument Mix: In this section, we are going to work on our data. Now. I'm a guitar, so I'm more political about the sound of the guitar. That's very, very important to me. And because of that, I'm just going to walk you through how the process, as in what I do, I mix with my E a, that is the most important thing, and then I'll love you guys also do same. So without wasting much time, let's dive straight into the reading section of the guitar. So this is the Guitar together with a piece. Just listen to it. So I'm just playing this looked section so that we can have a feel of it and work on it together. So I just go into the insect section here over here and look for a preset. Probably Dominican fees should be okay for me for now, will be still have chunks and time to work on it as we did to the other one. So I'm just going to choose American face over here. And let's listen to how an American face zones. Okay, So look, hearing the sound and there's a bit of Faisal and let's if you can hear them just played against the IE eight. Okay, so the next thing we are going to do here is to go to the lamp itself. And then probably changed the AMP type that you change the uptime type and then also work on the channel itself. So let's just go straight into the amp and probably choose one of these unless listen to how the sound individually, starting from here. And the main message is the encased in every financial instrument. Okay, so looking at this AMP type, I don't really like the way it sounds. Probably less checked up a Communist type and change a community like this and see, probably I like to change this ambassador O to V Vc t should be okay for me. Ok, let's listen together. Okay, so I may end up changing the MPI. 90 is a pre soreness is giving us more of a phasor kinda thing. Which I don't want alike. So our preferred, probably a chorus or something like that. So let us choose modulation, prefer cross over here. So let's, let's choose modulation and trick modulation and beta c and listen to how it sounds over here. In this section. This is the normal OS. It is a sound I'm going in full for the start of the mix. Ooh, we'll make them sound better. But one thing I'm also do is I'm just going to change the microphone's type as in dead and the setup of the microphone wouldn't are accordingly. Guitar life, sometimes you do to microphone three microphone. It depends on the kind of groovy or going for and the kind of sound mixing engineer or the one doing it sound perfect. So let's just go and change our MyType. And we adopted option also to blamed the three types Off Mike position. So in this case are like to blame to a and b. And then also see, let me just demonstrate it so that you guys can have a feel of it. Okay. We also have the option to, you know, to the mike itself, us into Mike a, B, and C. So sorry the B and the C. So we have the option to delete a mike itself a bit. So microseconds, but I didn't do that. Well, what I'll do is I will just go back straight into the channel itself. On the, on the rhythm guitar section, this is where we are working on. If he could see no shots. This is the very thing we are working on. So you go into the fat channel and probably less look for something cleaning or something or caustic and acoustic and something very king. So let's just go to the preset and go through guitars. And probably there is a caustic fingers Dao, acoustic, acoustic streaming going for the acoustic itself and less what things out from this section we go, we've got our equalize over here. We have a compress arts wall. And then there is the, hardly call it the gate itself and 2NO using the gates. So let's just move straight to, we are going to trick the EQ and compression over here in our fractional. Yeah, so you can also do the symptom. There is another option you can also put in a compressor here. And also an equalization as an equalizer. Yeah, but with a fetch, I know you've got all those trips in and you can just took them in just 11 setting. So let's just go streets in Judah. So let, let me play it so that you have a feel of the changes the first channel is bringing into this mix. Okay, so let's go. One thing I'd like us to do regarding guitars truck is too heavily compressed. A guitar a little bit. So I'm just going to drop the threshold to probably close to Teddy or some 25 or 25, negative 25. So let's just listen to how it sounds over here. So just the Treasury, just seven as some gain reduction or something like that over here. Just undone. Yeah, we're a bit louder, so rough to come down with the main level as well. So let's just listen to its walls, I believe. Okay, probably, I think negative teddies too much. So let's just compile it. Obey to like 20. Listen to it. So I just job the level down a little bit over here. I just dropped it down a little bit. So that explains a little bit in the in the mix whilst moving forward.
9. 9.Piano Mix - Instrument Mix: So let's move straight to the piano section. Now. We are going to do seem I'm just going to take a preset from here. Let's just go inside, look for something and our instruments, probably a grand piano or something like that. So we look at Instrument and go to grand piano. And we should be okay with this for, for, for our, for the beginning. So we've got the compressor on it. We have compressed over here. And then I've got a compressor EQ, some equalization going on. Also after legalization, there is that mix families like a revenge for the piano. So we're just going to continue just like it is. So let me just put a Q and a mix for possible. So let's just listen to the whole thing. I said, Harvard sounds from the school. So as I keep saying, this is just a starting point of our mics. So don't think this is the final mix, is a startup. We're just warming up. So let's just keep things using a preset and we'll get some level. We start tweaking enough to favor us as to put it into the right position us and how we want it to be. So let's go straight to our next increment.
10. 10.Saxophone Mix - Instrument Mix: Our next instrument is going to be a subtle form. And with a saxophone itself, we've got some reverb originally. Unless I did that on the region R truck itself, I could just bring down enough shock over here. It was recorded in Cubase. So Harvard here as my a, my son's a phone. And if you continue in your shoulders and your saxophone mix, as I played it with some Podunk. Exactly. So there is some reverb going on. There are some reverb going on, and this is my, my, my Auto Read. And there is some reverb already going on in this very, very mixed section, you can see there is a delay in that there is a revamp, Yes. So if you want to check the amount of reverb applied over here, you can just go here. And when you double click on it, you should see the reverb passing their density and all that, the dry. And then he was like 20% of the amount. I like the sound of the revamp, the founder of the reverb here. So you can change the delay plus reverb or you can do whatever I said, set up you want to hit? But I just loved the revamp tie for the, for the saxophone, so I left it out. So that is how come I'm harbored a reverb EQ and compression bit on MIT. And now of course I'm delays and reverb. So that is basically what I am going on. So I just wanted you guys to feel our way to okay. So let me just dq is off up here. And we've got to start us off saxophone playing over here. We have the insurer itself, which is this very one, the saxophone plane over here. And then we have some supports in stanza form. In the background. I brought a level down a little bit. What is that saxophone to this very one. So what I'm going to do is I'm going to put this to pull into one bus so that we have a mass for this selected channels. And I know you guys know how to do that already. So what I'm going to do is I'm just going to add bars for selected channels and are just name it over here as my sides form bars. Such boss. For the saxophone channel, we're just going to choose one of the presets. And let's just go in and look for appreciate over here to instrument problem gets sucks you up. Okay? Okay, so let us choose this and then probably we don't need a mixed fair, because we've got some revamp already on the saxophone. And I don't want it to be too much, so I'm just going to mute this. I don't know how it sounds, but let's just listen to how it sounds first. And if it's too much, we just split it off or we can balance them, mix them widths, signal a bit. I've already. So I just want to summarize what I did on the saxophone channel. I just did a compression is a compression compressor. You know, I brought a Trish with a little bit up on the defaulted tours around negative turkey or something like that. And then I brought it up a little bit so I didn't want it to be too compressed. And that's what I did over here. And then I've got a pro EQ aswell Indian add brought the mid-frequency little bit down and also did seem to the high-frequency, I think, I think I did to all need to the mid-frequency embodied RLE bits. So that is what I did with the saxophone channel. Okay, so let's just move straight to the next instrument.
11. 11.Lead Vocals Mix - Vocal Mix: Next instrument is going to be our vocoder. Volker is also an instrument as well. Yes. So what we are going to do is we're just going to go into the preset and Wu stats with a lead vocal itself. So what we do is we just take, oh, we are working on so logistic in this lab, I'm just going to leave it, as I told you, is a foundation. We ITS burden on licks your Burnett up for the final week. So it's a foundation Tim, you are doing. So we are going to leave it like this, just like it sounds. And they will move straight to the cross-section of the coop Volcker. And at a cross-section of a Foucault, we have something like this over here. So what I'm going to do is I'm just going to repeat, bring the same instance on the cross section. And I think we chose female vocal, yes, so let's just leave it like this and then listen to how it sounds. Lie. Lie. The point is I just like the whole compression going on overhead as not so much traceroute. We read the ratios of all k. The thing I'm gonna do over here is to also check the collider. So probably if I have something, okay, we have some high-end H22 where hey, I'm just going to release this report down a bit. You're sorry for the chorus section. I'm just going to release it, bring it down a little bit. And so I'm just doing just no more preparation for the mixed to do more. We just get into the section is where we are going to be mixing the whole thing.
12. 12.Backing Vocals Mix - Vocal Mix: In a bucket glucose section, I'd just like to put my backend for cos, it's once subgroup or into one bus. So what I'm going to do is just put them into one bus year, add boss to select a channel. And then I'm just going to name them. My barking vocals to be barking. Can we see bus? This is gonna help me, is going to make things simple for me. So I'm just moving this bus close to the corals bus. So how these two people over here? So anytime I wonder back in because I have them over here and I'm going to make this truck also my course. This is a main corrosive. So so as it corresponds with this microbes is as my lead vocal bus. Sorry, and then this is my main backing vocal. Yeah. So that's what I'm going to do for the book also for the for the backups. I'm just going to go into the the dataset over here and just look for, we'll copy said like back-end vlookup and normal one. You know, it's just you're just building things up. Sue is a normal Buck and woke up and I'm just gonna get probably a compressor EQ on it. And I should be fine for now whilst we proceed. So let's just listen to how it sounds without the compressor and EQ. And then we did with regards to the bucket for cause we have two different trucks. I rendered it's us away from Cubase. I can just show you the project over here. So that's you guys Harvey feel of what I'm talking about is a backend because over here, you can see a Harvard over here is my backing track is probably negative 60, sorry. So the first one is negative 60 to the left and the right channel is plasticity to the right. Yes. So you have two different channels for the bucket trucks so that data is already having a shorter way. So this is the bucket trucks. That is what you're hearing now in institute one, yes. So I'm just I'm just doing the two so that you guys know where I'm coming from. Yes. So we wouldn't really have to ponder over here because as I said to Chuck and I'm keeping it just like it is. So that's why you got hearing two different vocals going on those intermediate and proves I think you guys understand what I'm talking about here. And let's play everything together differently. We are going to hear some sounds so we have to eat all are just the in-situ how it should sound? Yes.
13. 13.Full Mix Preparation - Mixing: Yeah. So in many ways. So with a base we have to work on it a little bit. I don't like the way sounded here. You don't it's like an Italy, it's kinda thing. But we have to work into b. So let's just listen to everything and then try to fix things. And balanced means now you also clipping as well. So the very first thing we saw over here is bring all the levels down. But I don't want to do that because I want you guys to have a feel of what is going on. But anyway, I have to do it. So let me just do it like that. I'm just, I'm just going to select everything. Everything here. Select everything. Ever again Tao. So I'm just bringing everything that I just didn't do that. But I'm just going to bring everything down so that we can, we can get our negative six dB of headroom far before. So let's just do it. Thank you. No, wait, wait, wait, wait. So other base such unique and really just put everything off. We'll come back to the Bayes later on and to fix the installers this sram, bonanza sound and demes off level so that we don't get things getting out of hand like things blinks all loud. And yeah, so let's just do that. Alpha, who do get to the next level of morality or ethics and for what costs. The points above the line. Wait, wait, wait. Anyone cemetery was going up. No. Wait, wait, wait, wait. Wait. Well, a good way. The way we are clipping little bit higher. So I don't want to put in a plug in email to, to, to, to, to step my side. Just want to lift up our bow, bring it down. Just for me to have a good munching away. No. No. Wait, wait, wait, wait.
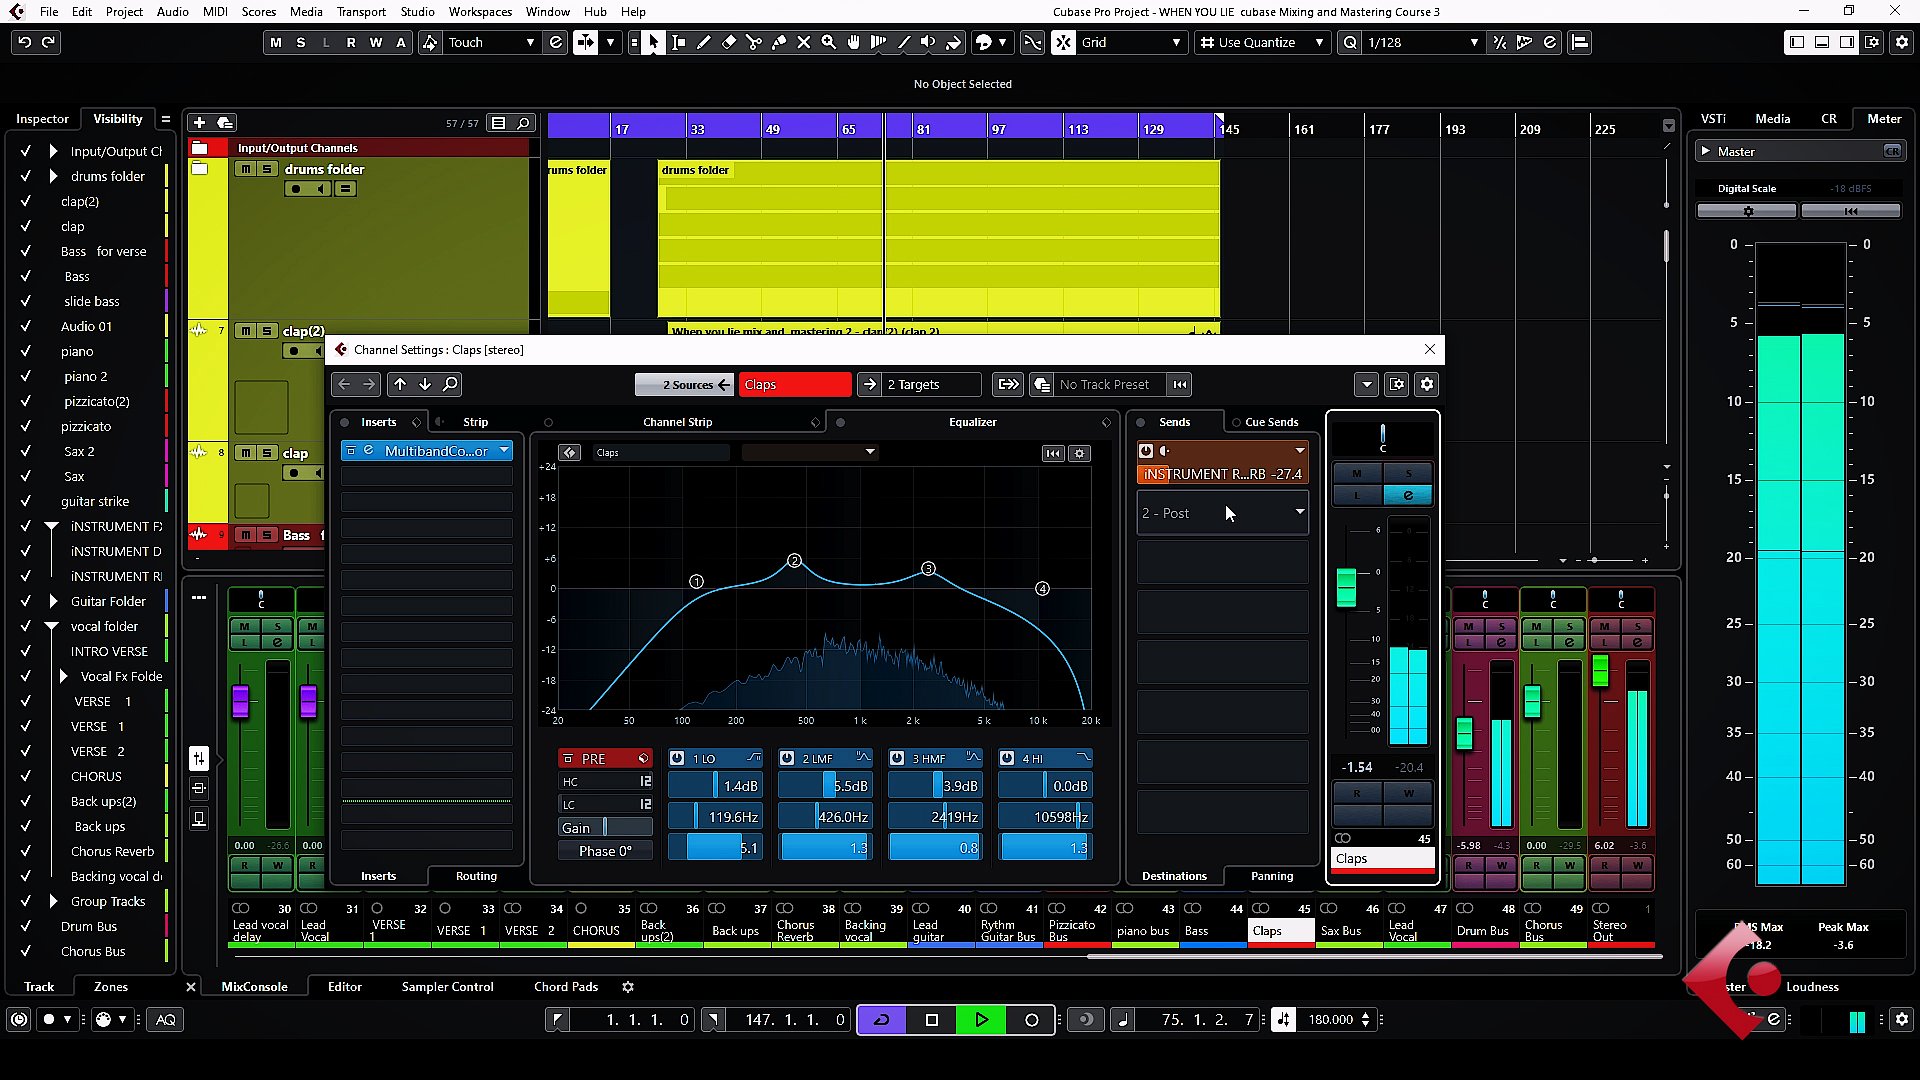
14. 14.Reverb, Fx send Creation - Mixing Preparation: In this section we're just going to create an effect saint for varchar, that is the lead vocals in the insure, the Volcker as Kinsey's a studio Chuck. But I just pushed it up to change it to a mono track so that the channel mode you can just switch here. I like it to be a mono truck over here because I recorded everything was recorded in key base. So that's why I'm having this way over here. So it looks stereo over here by the sounds. Mono does what I'm talking about. Okay, so we have to create our efforts in for this particular channel. Effects in it's very simple. You just locates your truck on the big support, a mixture, you right-click it and then just go to add f external. Yeah. Yes, go to add FX channel over here. So you just click there and you should get the FX channel over here. So we're just going to rename this effects are not as our lead vocal revamp for now. So lead vocal, lead VC. So this is our f external end. And then we're also going to do the same by applying, doing the same for the delay sections. So we are just going to add a delay also for, for this legal Korea just doing that just while our legal counsel, we add an Fx channel also over here and name it our lead vocal effects need, we'll call lead VC. Vc delay effects. Yeah. Delay, delay effect shannon. Yes. So we have this, these two chunks, these two tracks over here, this is our revamped, this is for reverb and then this is four delay. So we are going to look for our revamped and then also look for a delay that was suitable cow and place them in over here. So the reason why I'm doing that is for Voc, as I like to use a reverb on the delays as fx sent. Its mall is very simple to, you know, you could also do the insects as well, but I prefer this way, I think is the best way. So even when I'm arranging a truck outs, I can still have my clean vocal come into and so hub a different truck for my in delays. So in that way, you know, if you think the glaze too much or you don't like it, you can change it. But the moment you render everything together, ino, you'd always have to come back to the project anytime you want to get a raw files. So that's why I like doing it sweet. And this way also saves a lot of processing power aswell. So I know that those intermediate and the prose there you understand what I'm talking about? Okay, so let's just move straight to find in our revamp and finding our delay for our lead vocal. Let's take our vocal VIP for, for, for this very one. So I'm just gonna take vocab Web and to apply the amount of reverb on the Voc hard truck, that is the vocal delete will Kashyap. What we are going to do is we locate the lead vocal bus, which we created earlier on. And that is this very bass over. Hey, as you can see, these are leave or car was. So to apply the same as in the FX, we go on ST and then you click on Add. And then locates the lead vocal VIP, what we just created. So that is if you just go and add over here and he's looking at this, and then this is r. This is the knob to control the amount of revamp coming on this variable car truck. So let us let me just demonstrate disorder. You hear how it sounds like it. Okay. So this is our our revisit, this are evil by her. We've got a little bit of EQ going on over here. And then there was a delay us well, on the reverb pre-delay, it works and it is working as a pre-delay. Cannot feel. And we also have our our room, the side of the room itself, as in the type of room in the side of rumenal revamped work, which room size int the kind of space you have that depicts the prefix you're going to get. So this is our, our, our room. And then you also have another plug over here that is a binary upon. Okay, so this is also, you can also ponder with us in spread the width of the whole reverb itself, which are always do with image or something like that. The still image or something like that. What a width away. So I'll end up pushing though with a little bit more overhead. So what are you guys hear how it sounds with a width? So let's listen to it. Opens the whole city will fold of the reverb, it's obvious. So looking at this review of how it's sound and I'm just going to live it now. You don't be a prepare now mixed in there. You'll be pushing things up and down and to get things done yet. So let me just leave this one. And so at least we have a revamp for our forecasts. Starting, starting point, we've IP for our forecasts. Okay, so let's just move straight to the next instrument. In this section, we are still working, owned their vocals. Now we've got our course over here now in the cross-section, I'm just, I'm just going to make sure that we also have a channel for it. I think you've already done that. That is our fx saint for our course. Now, we have videos, a chorus revamp, FX. Let me just speeds it up a little bit. Corrosive. Re-read FOX, Yes. So what we are going to do is to get a different revamp for a course just for the corals. Because at the type of music we are doing, because the point is the introduction or the verse, the first verse over here. We would like to make it more airy out in like us to use a seam reviewer for the two versus three A's in two different reverbs for, for, for, for each instance. So for the courses, you are going to get a different Reader for the course and then a different revamp also only for the Vs. So for the cross section, we've done that for the verse. That's what we have over here. And then we have a, we have a. Eq on it. We are the delay as well as a room reverb. And then we have by narrow pond is more of like a stereo widening or something like that. You know, you can use it for the width is over here. Yes. So that's what is happening over hit. Yes. So in this section of the course, we are just going to look for something more of like a home kinda reverb is going to really help us here. So let's just go through it. Probably there, send section and look for something or on lists like this horn section view. And listen to how it sounds over here. So let's go. Oh, probably I start again so you guys can see how I'm doing it. I guess go into sand, I just go and art. And then you select the course reverb effects. So that's what I'm doing over here. So the amount of reverb, we can continue to worry. I think you guys already know how to do all this stuff already. So let's just listen to the Course section and then listen to the blend us and how the reverb is working. Probably you have to tweak some knobs to, to get it sounding dislike we want. So let's go. Okay, so probably would have to work on the gate section of this particular revert. The course revert. The gate is a little bit too tight. As in it's, it's you know, it's working too fast. So I just have to release it a little bit, make it a little bit loose. That is what I'm hearing and that is what I prefer at this point, you know, the mix is it's more of a preference and it depends on yourself and what you're hearing at a point in time and how you want things to sound. So it's also very, very important you have to consider ourself type of music are doing into concentration. So I'm just going to release this eschewed a little bit so that we can drop it in a little bit sooner. We don't want it to be so sharp indicates the amount of reverb.com in. So let's go away. Okay, so I think I just loved the blank. Now. I think it's okay for me. So I made my, my reverb choice. And you can see we are doing some EQ over here. Some reverbs. I've got everything already in. It's like when you use a far prefer for further revamp C naught if courts dequeues everything. So why this one you have to put in a reverb annoyed. That's what, that's why it looks already meet. Diff cut some lose and some high frequency also is cut. That is no malware reverse when you don't cut it loose, they are going to distribute it mix. So would reverbs, you always have to cut you lose over there. Now and the next team on it is a compression. And the reverb signal being compressed, which is very, very good. You know, so it's a normal setup. You can watch the settings that's Well, I think you also want your inhabiting std one, so it's cool. The reverb of the school system. You have to play around with it, mix the mix, the reverb mix over here on this truck. Design, if accent, You have to play around with mics and also balanced mix between us in the amount of mix VR yet we are sending here, you know, you have to balance it so that it sounds good. So to do that, let's just bleed water. We work on that. I think this is the way so here is the way to go.
15. 15.Piano Mix - Instrument Mix: And there was a piano section over here at this point. And then I'd like us to just put a priciple needs and then we'll come back to that as well. So let's just listen to the piano from this section. So what I'm going to do now is to just go business section and then go to instrument and just take my problem and grand piano. And I'm just going to play around a little bit. I'm bringing in a mix of their bed down. I don't want so much we read on this particular this particular piano, so logistics into it. And probably I'm going to cut so this frequencies a little bit. Okay, so this is what I'm going in for, probably the receivable. So I will just bring it up a little bit and hear how it sounds. Okay, let's just leave the plan section now. For now, we'll come back to that when we are balancing everything, just paintings and put things in the right position. So apparently that's all we have on our, our, our keyboards, us into piano section over here. We have a compressor and then there's a depression going on here. I'll probably do minus 15 over here, 0.24. And ok, sounds okay for me for now. So you would just move to the next instruments. We are just going to look kids instrument that, that needs some attention. And we just have to work on those instruments as well. Soldiers Piano, we've got two different kennel going on over here. There's one piano like this. So you see that the piano that tools or the piano at different, so we'd have to treat them separately. So what we can do now is to group this people hasn't put him in that bus. This piano and this piano in one bus. So we are going to give them a bus, bus for selected Channel. And probably named him as our piano bus. So we have controlled by them over here. Yes, so we have a piano bass, so we have controlled byte. We can also work on us in puts, get a whole mix bass for, for this very piano as an everything piano in there. Yeah, so let's just move straight to the next instrument.
16. 16.Lead Vocal Delay Fx Mix - Vocal Mix: In this section, we're just going to wait on lead vocals or delay. I would like to do some automation on the lead vocal delay. So what I'm going to do now is I'm going straight to the effects channel, effects channel, just looking at the effects channel. And what I will do over the ADA fs channel is probably changed the colors of the effects tunnel so they can stand out a little bit. I went to college to stand out. So I'm just gonna do this to this channel. So at least I can change them to yellow or this kinase or yellow. But anyway, that is lead vocal, our delay effects, Chuck, we created a leon. So what we are going to do here is to find some delays and blended into two to the music because we run in some automation using these delays. So let's just get straight into it. Since we've got our delay truck over here for our lead vocal is only for the lead vocal. We're just going to go through our saints and we should locate something delay is a more delay, our Arago for a vintage delay. And let's just see what that is. And I think we've got some core OS on it here. I would prefer the course. Probably I just prefer just the delayed self because I like to control it myself. So I'm going to put the chorus of binary. Let's just listen to how, how that one sound. And to listen to how it sounds, would have to send our lead vocal to this particular delay. So what I'm going to do is to send one of the lead vocals to the delay from this section. Let me just expand it a little bit so you can have a feel of it. So lead vocals after San into beautiful car delay affects over here. Yes. So I just, I just sent it over here. And what we can do here is we just Xunzi amount of, amount of delay probably you want. So let's just play one of the me because suddenly they insure your car and listen to it. So the whole point is, it doesn't it doesn't sound bad, but that's not what I am going and fall. So I'd have to probably does certain things over here. Let me just go straight into depth delay and then choose probably. Let's see. Let's try this one and see, let's try this. And then listen to how it sounds. Okay, so I think this, this delay is going to work. And I like the localization setup over here as well. We have a lot of mid-range working going, a lot of mid-range boost over here. So probably who come back and I just started about Elijah with sound didn't end. I think I guess I have to cut the low end a little bit. Probably cut it a little bit. And I should be fine with this delay, this particular delay. So let us just try it again and see. Okay, so this is what I'm going for. I like this one. I like this one very, very, very much Enda. And let's check the channel strip and you see the amount of compression going on over here. Okay, so we have our compressed over here and a bit of expansion over here going on. Okay? So let's just keep it like this. Let's just keep our delay like this. And the next thing to do is we have to run automation for this particular delivery. And I'm just going to allow it to flow towards Zhong Nong. It will come at some particular point of the interval. So a part of the mixing and mastering setup, sometimes you have to clean up the vocals, you have to do a lot of things to get prepared for the mixing is o. So what we are doing now is a foundation. We are just putting things together.
17. 17.Lead Vocal Delay Fx Automation - Vocal Mix: We are given it's a very good foundation so that we build on the foundation we can progress. Yes. So I'm just going to run an automation for this very delay. This very sorry, it is very less this vase overhead. Now the point is, it's my preference. I like to do some delay song, Wade, would you? I don't know what your preferences are. You install an app saying so you can decide to do a delay somewhere else. And that is fine. But for me, I like to do it for the, for the intro verse. And also probably somewhere in the Song Gao Su, wherever I think it's needed, I just have to initiate it. Yeah, so what we are going to do is to write our, our automation from this channel. So what we are going to do here is, you see, most of the time it is auto off or read, touch, lunch and right here, so I'm going to write my automation and this point. So what I'm going to do is our playing a song and be controlling the nub whilst I conclude an up is going to writes the automation for, for my delay. So this is the, the next step of this lesson. Before I start writing the automation, I like to bring the level of the channel down a little bit. That is a delayed truck. The delay affects track and that we're going to dive a little bit. And then so that I have a balanced between my, my, my lower and my higher point. So let me just listen to how it sounds now. Are starting to bring it down a little bit. Just a little bit. And then later on I can just work on it. I just want to find a balance. So before I start writing automation, okay, so let's go in the example. Before you're further, etc. etc. That automation is written. You just have to read automation. Folk don't forget to leave it on, right? It's going to overwrite it anytime you do that. So we are going to leave it at the rate. We should be fine with our automation, okay? So it's subjected to change it so I can just decide to change them out to mission. It is written at this very last point. So what I'm going to do is I'm going to move this truck to that's very close to the workhouse. Would you guys WE understand what I'm doing? So it doesn't look like I'm going up and down. So moving each tree to this point, very close to this section. So we can have it as our lead. The delay would hardly call it truck. The point is, after automation is written, you have to do some corrections. You know, I have to do some corrections to put the insurance like some of the point where it starts. Thus, no way I wanted to start. So after do it manually over here, and I'll be doing that off the scene and then I'll be coming back as well. And they would regard a reverb and things we are going to drop this down, but I just wanted to begin is to have a feel of the reverb bus in what is going on. And he said, well, when we get to the final mix, thus we are going to drop this down to sound well, but for beginners, that's why I've left a reverb very loud like that so that at least you guys can hear and then appreciate the revenge before we move it down. In the final mix.
18. Chorus Backing fx Reverb,delay - Vocal Mix: At this point, I like to put a little bit of delay owned are corrosive, we'll call is across Volkov and Wallace's play, you can see that there's a big difference between the lead vocal and across because so let me just play today, have a feel of the difference from the section. So as you can hear, there's a big difference between the two and you have to blend the two in the Zou. The cool thing we can do with this, this apply some delays here so that the delay would fit like the two vocals together. Because a picture in use are a bit difference yet. So what we're going to do is we're just going to apply a delay on this truck. And we'll do that under under group the group truck. So we have our cross here. So this is our, this is our choruses across group. And what we are going to do here is to just go under saint and art. Let me just expand it so that you guys can see it. Well, we move on to st, and you're going to add an instance of did the delay, that is the lead vocal delete or does the VC delay effects? Yeah, they lead VC delay effects is what we are doing over here. So we just audits and then play with the amount of delay. I wanted to do a different delay for it. But I will just do this for the sake of this lesson. I'll just do this. So you can, you can also decide to do a different delay foil for a course at different delay for your, for your lead vocal. Different delay also, feel backend Bauhaus. Yes. So I'm just going to apply it. So let's just listen to how it sounds. This is a way of saying it this way. So you just have to remember that we are doing to the friend reverbs, guarding one revamp for our rallied for car and then one also for our delay. So there's a big difference in the sound. So what we have to do is we can still come back and then you don't have to make some things to blend it in or probably would do a different delay for, for, for this one. So are we thinking of that and then we'll see what to do? The lesson progresses. Yes. So, so that is one thing I just wanted to talk about. You can do a delay, especially when one we'll call isn't blend into that next we'll call. One cool things you can do to, you don't notice a lot of space over here in this section. So I just have to find a blend between this to this vocal and this vocal. So I just have to blend this two, so that's what I'm talking about. So we can apply delay for the purpose of this lesson. I'm just going to leave it like this. But you can also try different things as well. Edward sweaty to do things like the way I'm doing it, but I'm just guiding you. I'm just teaching how to fish and I believe you can do it on your own and do something better. Yeah. So adequate in we can do to the vocalist too quiet in the revamp up a little bit. So what I'm going to do here is I'm just going to take this particular tool and then put it just under this redirect. And then walls we widen it, obliges feel how it sounds overhead. Wait, wait, wait, wait, wait.
19. Blending 2 Vocals with EQ - Vocal Mix - Vocal Mix: One could think we can also do to enhance the Voc house in the blend is also EQ equalization is most ways was one of the best to equalization and compression. But in this case, to blend these two, blend the two vocals together, we can also acute as well. So I'm just going to open an instance of the EQ on this very truck on the cross track here, that it's only group side in a cross group bus. And probably try and, you know, increase a bit of the height, the high-frequency. And then so that we can see the balance between these two workhouse. So let's just play from here and listen to it. Right now.
20. 20.Chorus Backing fx Reverb,delay - Vocal Mix: Now after the crosses, the lead vocal, we've got the backups or so for the chorus, and we are going to treat them the same. You're just going to apply just this as a group is a backup group or the bus for the for the, for the backup workhouse. And we're just going to add a little bit of reverb and delay since we have a compressor ended and EQ already on, on the truck. So we're just going to add a bit of a delay in the revamp over. Hey, so what I'll do is I'm just going to add the lead vocal revamp. And that's what I want. We can't be trying it as well. So let's just listen to how it sounds. So I think, I think that is cuz we just have to balance it and then add a bit of delay as well. Would a delay. I'm just going to take this delay for the lead vocal. Why? Why? Why? Why? Why? Remember that we can always bring the levels of the delays and revamped down when we get to the latter part of this lesson. And one thing I want you to also take into consideration is I'm recording this would resort to ask him. And the sound quality is not the same. Us went after bounce, it struck out. So I just want you guys to take that into consideration as well. Yes. Okay. So let's move on.
21. 21. Piano Mix: And this sucks and I just want to art this two-channel trucks to one us. So is the same process. We just have to right-click and go to add bass facility trucks. And we hovered over here. So let's say, let's name this at Arkansas piano bass. Piano bass. So we help our pianos come in here and probably will do a bit of compression, Latin, the Latin section. But as it stands now I'm just going to leave it just like it is, so we can proceed. So why else? We work on the Sunday Ho we'll be fixing minor, minor stuff. And I realized that at a piano sex in this very sucks and I wanted to punish today, right section a bit. So what I'm going to do is I'm just going to pan it. There's gonna ponderous piano to the right section a bit. I probably teddy or 20, or probably 25 or 30, let's say Titi. Leslie, Teddy, Teddy three. Okay, so let's just blend it with a song and hear how it sounds. And as a dad, I'm breaking the session down in an after, just going to do a second way I wouldn't be talking. And that's what we'll be balanced in India. So you watching what is going on, how picking 1, because the video we have to make things concise so that you don't end up wasting time watching a lot of videos.
22. 22.Lead Guitar Mix Bus: This section would have to mix our lead guitar and we've got two different types of guitar, good iridium and then the liquid. Now, let guitar is doing something like this in the song. If you can hear it over here, something like this. So I'm just trying to work on this guitar over here. And I'm going to do that on a link tag group, if you remember, we created a group for that, and this is the group over here, this blue one. So we just go into the guitar section and we are going to take something like are we going to find a preset? Let me just use a TPAC over here and hear how it sounds. I'm just going to try to try to change some things here and then we just have to make sure we come out with something very nice. But the very first thing I like to do here also put some delays on this very truck. So I'm just going to apply the analogue delay. Probably. I just have to get myself analogue delay and formula. We can find its an insect section. So we look for analog delay. Analogue delay. Yes, we have it here. So this is analogue delay and we can, it's a very nice delay and let's just look for something cool. Probably. We use a analog ping pong. Yeah, let's use an analog pawn here for it. So since we have the truck, we have to just bleed. So what I did here inside the ampere is, I guess change that. We have EQ we have is just like a playing guitars. You have an, a paper Divya guitars, you honest, dominant z. So this is your amplifier and this is your pedals. So we have more deletion over here. We had some something in I think it was it was probably a, it was like a crosscut, nothing. To replace it with the modulation. Yes, so I think the modulation sounds good for me, or probably I can even put it off if I wish. I think that one deletion sounds or key for me. So I'm going to keep it Now. The second tunnels or did was to add the analogue delay to it with another, I don't not delay. We can also probably change it. Put different different setups in presetting. And if it sounds good, we just keep it later. So I'll be just dm which is going to work on it. I wouldn't be talking in this section so that we can all come together. So I think I'm just going to leave it like this. Probably. Time goes on. We can do some changes and tweaks to it as well yet. So let's go streets to the next section. So you also have to blend the guitars into the mix. And let's just try to blend it into the mix together in a stack. So I'll say that. And that also is a dead weight loss. Okay, so I think the balancing is Aki for now isn't the final mix. I just outlets something's loud, socially reverb and delay because of the penis. And those who are not so familiar with reverbs and delays, soda professionals watching me, Don't judge me up and just doing that for a purpose. Or the end of the lesson, you guys will understand me. Okay, so let's go straight to the next section.
23. 22.Saxophone BUS Mix: And there is a subtle form section. I would like to increase the level a bit. That's at this section. If you can hear it as a small size of ANOVA here. So I just want to lift it up. You can just do that. Just to balance it. Does this lesson outta me talking. I just want to balance it with the song. So please listen together with me. Way back, way, way, way, way, way back in module four. And right now, right now.
24. Bass Guitar Mix: Hello and welcome back to decision. In this section we're just going to work on are kicking our base. But to start with, we are going to work on the bayes. Yeah, so with the bass section, lets just look in a base. In a previous we had one piece it on it's yes. So in this section and I just like to work with a fat channel. So I'm just gonna put it over here. And let's just open the first channel was we worked on, on the bass guitar along. So this is our bass guitar in your shorts. That's very crack. Let me just change the color property to a different color so you guys can have a feel of it. There's a big guitar shadow that's in the chalk is a bass guitar Schrock, sorry. And what we are going to do here is side chain this to the kick. That's what we'll be doing. But first we'd have to listen to it and see if if it sounds okay for us, then we can work on it. But if it doesn't sound good, there would have to change it or something like that. So let's just listen to it together. I like the threshold to be morph, probably negative ten because isis, how Bayes end. I wanted to be more suppressed in this case is not going to come up so much because the point is that particular frequency wouldn't be head on small laptops or something like that. Only when you have some interfacing your cow or something like that is when you're going to hear the bass section on that in a headphone or something like that. But on a normal, I just want it to come down a little bit. I just want to Treasury because see it working over here. And when the treasury to come down a bit, sue that I'm around negative ten dB. And in that case, I don't really, the base doesn't overshadow the hole. The hole doesn't kick in the base. There is a balance between the kick in the base. Yes. So would I EQ section for this one? I'm just going to probably leave it like that or tenet of I want to see our ship. So what I can do here is just go straight to probably an EQ or something like that. We add in an equalizer over here. So let's look for the pro VQ. The pro EQ is here. And probably let's look for a bass guitar kinda press it. So we shake to go to each domains and enlisting the bass guitar, that's very normal bass guitar. And see and listen to how it sounds with the whole mix. And let's go. Just trying to cut some loss to custom lows. But I would induce So much of it's new to the fundus. The more you the more you do it. Can't de los is going to really raise up some base year playing. So some of the low frequencies are allowed and I wouldn't like to cut so much into it just a little bit. There's a little bit, I'd just like to cut a little bit into that frequency. I say I still want the beach we heard a little bit in the mid frequency. So just going to leave this setup just like it is. And then probably do a side chain over here. Now, with a side chain, what we are going to do is we go straight to dot, kick me out. We are sorry, chaining a kick in the B. So let, let me just move the bees. Suicide of a kick. So are you guys who understand where we are working? We are working with this two very trucks overhead. And what we're going to do is we are going to decompress a section of the kick and switch on this side chain. When we put it on, what is HIn does is it's like a communication between the kick, like putting two things together, saying, hey, when I'm coming, just give me some space to come in after I'm out. You can still come in. So it is like, you know, it's like a communication between the kick and the b's.
25. 24. Sidechain Bass and Kick: In this section we're just going to side chain are kicking our base. And what a surgeon does is it communicates us in business communication between the kick in the bass. So it's like when the kids come into basis say hey, I'm gonna give you a bit of space coming after you out, also for the gap. So it's a communication between two things. Let, let me just put it as simple way. And then just when it is simple because of the beginning CS. So that chicken a base, that is what it does if they all come in at the same time, those frequencies, sometimes they have similar frequency depending on the type of beach or plane. And we are playing a sub base and we have a kick as well. So some of the frequency of the base within their frequency range of the kick. So we'd have to communicate with like two frequencies cans. They can play at the same time. But the point is, is going to be too loud for us so we have to communicate as in put those things together, joined us in. They have to a communicate to each other. When I'm coming in you go out, you, you understand? So when it tick is coming in and the b's go a bit, a bit low. When they kick out the kits out, then comes in the base itself. So is a communication between the base and just put in this simple way for the beginners, Yes. And so what we are going to do is we're just going to, most of the time you can do it on a compressor with EQ or so, you can fill it out and do a side chain as well. But in this case we're just going to use a compressor for, for, for, for this purpose. So these are our compressor over here. Sorry, this is our channel. We are using a whole fat channel for it. So we can also use a compressor for it. It doesn't really matter, but since we have fat channel on, on our, on our channel, that's where you're going to use. So you got to make sure that you swing this side chain on is very, very important. And then you, you, you click here to us and to link. The side chain is just like a cent. It's works like a saint. I get effects cents, something like that is the same thing. It works like that. So you just cited are kick, so this is our kick. So you make sure that kick is selected. So I just want you to feel the difference between the side chain and a non side chain kicking b. So let's just listen together. And with a side chain section, I just want to, you know, compress more of the base itself so that a kick and habit. Wait. So I'm just going to use a threshold on the base channel. This is their fat sandal only base channel. I'm going to use a threshold on the base channel to bring the threshold down. I'm bringing a treasure to like probably negative 40 so that the kid can have its way in the next year. So let's listen to the other walls i item which treats. With this traceroute, I think you can hear that the woman I'm around 0, you can hear more of the base and there is no what I'm going for. I wanted to kick to be more than the base. So in this case, we can do an EQ to it. But the point is, you can do a, sorry, a level as in bring the level of obese down, but that's not what we are going in for. We want to side chain. It's already can communicate together. I hope, I hope you guys get my point. So I'm just bringing the threshold of the bass guitar down. So anytime you click comes in, there is a space for the kick to flow hoping you gave up points. Yes. So the other thing we will do over here is after we've done this, we just go on the base channel. Now. All right. So whenever the kick, you know, does this portion like this where the cookies and plane, you can see from this bossing, this subsumed kick isn't playing, is only the base so we can hear the bees itself very well. And when, when it comes to the point where these two people are playing together also, there is a balanced we can see the base goes back for the kick to dominate. And that is the whole idea of what I want to achieve. Yes. So the main point and then what we can do here is to balance the sound us and bring up the level of the kick so that we get our, our sound, Sound and very well. Now with regards to the effects us in the delays and the reverse, we are going to bring them down, as I said early on. Yes. So this is what we are going to do in the next step. So let's go.
26. 25. Balancing the Music: In this section of the mix, I'm going to work on the balancing us in balance in the music. Bringing the kick up in your dues that needs to come up. You're going to do that. So I wouldn't be talking in this section. You just have to follow along with the whole of music. The flow in everything's already me talk. You just see me pushing naps because I want you to, all of us to concentrate in this section here. So let's go straight to that. I'm bringing the whole master Main out to 0. I just brought it to 0. It was around here, plus ten, plus six. I brought it to 0. So Darby mix-up to that and then have our negative six dB off. Yes, for mastering stage. So I'm bringing everything to 0 also mixed. So let's go. Here. We use the time. If you are going to be degraded. Math. In my age. At death. In a way, it is. So any ones that like no other day send a up up, up a day than a a bus outgoing yet, you know. So what is this? The same way. Okay. And maybe, maybe, maybe, maybe. And he's going to use it. And we're going to do this. Now about ten years ago.
27. 26. Chorus and Reverb Fix: Now there is an issue with the revamp four across. And then I realized that it's not only well, so let us try using the lifo car we've ever created for the cross. Yeah, we are just interchange in it, so we just go on the cross section. There's a cross-section does the old revenge. So I'm just gonna put it off and bring it a new revamped and a renewed reverb is going to be our lead vocal. Revamped does vary. One we created for the lead vocal. So this is a course. We are just replacing it with Dell evoke are hope you get my point. Yes. So let's just try that one and see. For the lead vocal reverb is smooth add-on the cross-media secreted. So we are just going to delete this cross revamped over here. It is good to remove and I'm not going to take it out. So we are using just one revenge for all of the full cost. That's what I wanted to say. And the reverb we are using is elite Bukhara review, which is this very one, does vary f x truck over here. So that's what we're using for all the forecast and I think that sounds better. Yeah, so let's move on streets to the next section.
28. 27. How to creat a de-esser: And this oxygen would have to DSR varchar. I realized the full call, the DSN us in its very, very important for booker because this star leave, we'll call over here. And if you can hear, if you want to listen to the lead vocal, is just go back a bit so we can listen to them, read book art itself. And you move, you, you find out that there is an issue with a little bit of s And all that in, in, in its end. We have to try and get those. Ssl is very, very important. So let us listen to our lead vocal and then try to build our own ds, or we are going to build our own DSA from scratch overhead. So let's go. So what I'm going to do here is I'm going to use a multiband compressor and we're just going to use one of persona's mosaic bond. Where is it? Gives us multiband dynamic dynamics here. So what we are going to do is we're going to walk around this particular frequency from the probability of 4.5 key clues to the 10 K. That's what we are going to do RDS it. So in this case, what we are going to do is we're going to compress the frequency over here. So let's just, I'm just going to solo disband alone so that we can have a listen to this bond over here. So when I, when I solo, He did this art sounds. Now we are trying to suppress this bond by compressing it. So you can just do that by just holding it this way and doing it here is where it is possible to do that. Over here. We can do that or you can also go into the trash food and bring it down here. So let's just bring it down and work on it. Fresh food and the ratio r. So walls, we, we we listen. I'm trying not to get so much of the Volcker inside. I'm trying to ds wasn't the essence that the siblings, you know, that's what I'm trying to bring out. So I don't have to get so much for calling him either. And that is going to affect our Volkov. So let's just listen to the vocal x ofs. For me, It sounds better over here. And then one thing I would like to do is probably check the EQ over here. And if there's so much as as an height, I just have to bring it down a bit on day under EQ section. I think it will cost on smooth then one at this point. So we're just going to move on to the next book haul. This is our first, let me play with the song Sutta. You guys can see the difference. So we are going to do seem to the cross-section. And with, of course, I just have to drag and drop it here since they're just going to walk around with a Traceroute and the ratio and endosome. So let's just work it out. I'm just going to solo this section as well. So we hear the frequency as in the high-frequency, what he's doing over there on our course. I think it sounds okay for me. And what I'm going to do is to move it to the backend truck. Same thing over here. And then let's just listen to the backups and hear how it sounds over there. With the backups, we have we have to go to the backup and this section. So let's go there. These are the backups, the yellow ones. You are, the more you do it. If, if you put a little DSA on it as well, is going to, you know, you're going to lose the high frequency. And also we have to be very careful on the amount of DSMB applying overhead. So I'm just going to, what I'm gonna do is I'm just gonna leave a DSR and probably go to AQ, then done boosts a bit off the high frequency on the backend truck. So as to get the balance, you know, we don't have to lose most of the SSR, so they are very, very important as well. So I think that sounds perfect for me. I'm just going to drop it down a little bit and check. Perfect. So we have our d, ds are working perfectly and alpha cos n is also going to help them make. So let's just listen to everything from probably the first verse of the course and the backups as well. So you can have a feel of how what did he is are you doing in the home? It so let's go.
29. 28 Vocal Plugin Chain Summary: And they want them back. So thank you guys. You've seen the difference with the ds and ds n. So one by Voc hace and I've got a compressor, I've got an equalizer, and enough got a multiband, which is seven as a DSL. So if you have a ds upload, Guinea council user, DSR, but I just created my own DSR with the multiband blocking. So it's very possible to do that yourself. Yes. So that is my Voc heart in and I've got a reverb on its end and outgoing or delay this as my revamp truck. This is what I have on the reader, Bahasa, half some equalization going on, on the web. And then also there is a delay, a bit of delay on the revamp, not so much. You can check the mics around 47, but a, it depends on the amount of delay that is going in. And I've got my reviewable by here, the room itself, the room verb, and then there's a binary upon, you know, there is upon us and deal with that is widening there, the whole revamp. So that is the chain on my revamp. Eq is very, very important on a river. So you can cut those low-frequency that and that is going to affect the mix very, very well. So this is one of the key things you have to take into consideration as a mixing and mastering engineers. So this is my book ha setup and we're just going to move straight to the next section.
30. 29. Bass Guitar Separation: Anyone. So you can hear that a basis is a little bit sticking too much of our music and we don't like that. So what I'm gonna do is I'm going to separate this base by just cutting this section. Cut-scene. Oh, the VS section, diverse section. This is a verse from the segment. So I'm just preaching the cross section from the, from the succeed. That's what I'm doing over here. This is also one of the verse and there's a versus over here. Okay, so, so we just have to do a double truck over. Hey, did duplicates that complete shock. And take this, this cross-section out from here. And then we take this one verse out, just like this one out, that one out of Aubio flowing. So we got to, we got two choruses over here. So we had to take one of the crosses out. Now we had to be versus we are to take one of them out. But we want to get our verse on one truck. And it only the cross or so on one truck, x2 dot is going to help. Is this like it's a little bit, I don't think it's confusing, but it's it may be confusing to someone as well. So I'm taking this grocer, so outs taking this verse out. You know, it's just like taking this one out. So a half all courses on one line and how only diverse on also online. I hope it mixing. So this is our verse. Let me change the color for this so you can see it. These are the red of her NER record. This color is the verse. And then this is our course.
31. 30. Multiband Compression on Bass: This, you can see that we are trying to separate the base where they kick is not blame. We are going to have them own the second truck and whether kick explain they're all going to be on the fast track a light whether greenness, okay, so let's just listen and cuts. You still have a lot of work to do. So let's just cut where the kick isn't plane us in separate there where the kick explain and where the kick is in plane from that, this will mix. So let's separate it. So I guess I have to move this very one up there. I'm just moving it up. Sorry. I'm moving it up to this truck. So a Harvard on this truck with this together with a would agree. Those are main reason why we did a side chain, but I realized that we still have we don't have so much control over the be Sue I guess want to have a bit of control over the base on the vest is self-aware that kick is in plane. So that's the main reason why we are doing this walk into a brain break. They know. Since this section as well, where the the basis plane alone, I just want to Harvey to under shock because I can track just like we did and where the kick is playing. Sally from this side. So I know how my kid plane from this side to side debate is playing alone. So I can work only on the base separately yet. I'm distributing myself because I know some of you wouldn't understand what I'm doing too, and that's what I'm doing is, so in this case, I'm just going to follow this base. Probably I'm going to do a bit of EQ and over here for some lucky I think, I think I'm just going to leave it. Let's just leave a key just as it is. And probably do more and more of compression overhead on a fractional. Okay, so another cool thing I can do also is I can use a multiband compressor on it. So I'm just going to bring in their multiband, this multiband one we use for ideas. And we are going to work on this low-frequency band. But it's going to work on only this bond here. It's going to work on the low-frequency band. Okay, so let's just listen to the whole mix with a base and then he held it sums. And it wasn't possible. And it wasn't like noun phrase. And he wasn't. So I'm just working on the all the three bonds disband, disband and does bunny. You can see that when the bass comes in, you see this spectral, spectral analyzer working over here. So you're going to know the exact point that at the basis is explained. So so you can see we are, we are most all the time around this, these three frequencies. So that's why I'm working on this one. I'm trying to balance the traceroute overhead district compressor side a little bit because it's bringing a loon and if you don't take time, it's going to take over the whole mix. Yeah. So you can just come back again and fix things, you know, so it's just, you have to know that things like this have to be solved during that mixing processing always come back and correct state. So as a, like a perfect mix, it's not like a fine I'll mix. But it's just giving you an idea of how you can do this in the right way. Yeah. So let's just continue going. They know when to say when he when he, when he, when he. Now there is a slight base also a way for this slide because I'm not going to do anything on its, I'm just going to leave it like that comes in probably. I don't want to compress it. I just want to balance it myself. You know, this is my personal preference for this particular song. And you can also decide to work for assess its foods, compresses, everything on it is your preference. You know, one of the things saw that things have to be left just like the media. It does sound good, especially here. So let's just listen to it and just balance it over here. When he when he dealt with it.
32. 31. Balancing Verse section: There is also one team would have to take into consideration the level of the base for this particular synth bass in the various base. It's a bit so loud, I think at a section. So probably I'm just going to bring it down a bit. And this very base shock here, I'm just going to try and bring the base down a bit here. So let's just try it and listen to it's just, just, just play around it. Okay, let's go. And this job. So that's pointing directly at that. All right. So now for you, right now, I think that base level is okay down would have to do a general level up. You know, at a mixed process, you can go back and forth, back and forth, back and forth. Like a onetime cannot team so you listen to it when there's a problem, you fix it to come back. You go back and forth until you are satisfied with their mics. So I'm just going to save this mix as seen I have seen over here. I'm just going to add this scene. Probably are destroying us, our mips one that let me take this awesome X1 and probably tick this scene off. I'm going to take this scene often good to remove the scene. So we have only one scene over here.
33. 32. Saving Mix Scene: So one thing, Abbas, u1, if you save your mixing, anytime you come, you just double-click is going to bring you back to the setup. So let's assume that if I have this master nope, down here, you can see that the level is going to go down. Okay. Was the level go down? I'm just going to save it as a scene and probably save it. And let's say this is our seemed to lessen sin2, sin2 mix. So the moment I come to sin one mix, one scene, my level will move automatically are just like it was. This is us into you see the level? Yes, we went down. There was a C1 level just went up. So this is the way you can save your scene in Cubism or depleted. It'll have something like this. You have to save the projects and reopen it, you know, is a whole lot of waste of time. So this displays is the best for mixing and mastering. I recommended to you one, okay. There isn't like a PDA or something like that. But if you want to really mix and have your peace of mind bed, are you mix Institute one? Yes. So I'm just going to drop this to 0 and probably save in buck as my scene by scene one. And this update to the scene. So you can just go back to 0. We could put this one to 0, this truck and then just go to the US in one and updates in the cell. So it's updated. So when I go to s2, I am going to harm my level down here. When I come back to seem sin one, I should have it back up here. I hope you guys let me just demonstrate Edmodo, Uganda's acanthus. I'll zoom. I'm just bringing it all these levels down from here, down, down, down, down, down, down. And I'm just going to update it to seem too. So when I go to scene one, you can see the difference. You can see that all the levels drop, c1, c2. Okay, so it's in one is my original mix. So we're just gonna get rid of this one. This one is just for demonstration secured.
34. 33. Mixing and Mastering Summary: Hello and thanks a lot for being with me up to the stage. Previously we work on the song. You had mix us in. We've broken everything down. We've done localization, we've done compression, and we've applied effects to our channels and all that. Now in this stage, I'm just going to be working us and mix in balancing stuff, you know, doing Tom Tom tweaks, changes and all that. Now and I wouldn't be talking AS well. So I just want you guys to concentrate whilst we do that now after the session or come back and bring my workflow though. So you guys would know what I did during the course of my week. So without wasting much time, let's us go streets to it.
 Uriah K., Learn the basics of Audio Recording & Mu