Transcripts
1. Introduction: Hey, everyone.
Welcome to Audacity. Audacity is a program I've
been using for a long time. I'm really excited to share
it with you. Again, actually. I made an audacity class, like, I don't know, seven
or eight years ago, and it was so popular that
I had to make it again because audacity has come a long way in the last
seven or eight years, especially in the last two
years or so, actually. So in this class, we're going to cover
how to use audacity from as many different
angles as we can. I'm going to show you
how to record with it using my voice and my guitar. We'll talk about how to
do podcasting with it. We'll talk about how
to do editing with it. We'll talk about how to use external plugins to get the best sound out
of your recordings. We'll talk about
mixing, mastering, and exporting your projects from audacity so that you get
the best sound as possible. Audacity is a great program for all of these
things. So join me. Let's learn how to use it. To take
2. About Your Instructor: Hey, everyone.
Welcome to Audacity. I'm excited to do
this program again. I made a class on using this program, I don't
know, a while ago. And it's gone through a
lot of changes since then. So I'm going to redo
the whole class now. From scratch. Okay?
So this isn't like an extension of my
previous class. This is everything you
need to master audacity. So, who am I? If you've never taken one
of my classes before, my name is J Anthony
Allen I have a PhD in music and audio
stuff. It's that right. Oh, this is hard
there. That's my PhD. That's a master's in
electronic music. That's a master's
in composition. This is, I don't know, some award from the Society of Electroacoustic Music
in the United States, and that is painting. Enjoy it. I am a composer, producer, sometimes
engineer writer. I've written a couple of
books that you can find on composition and
writing music. I have a couple albums out. One of them was in top
20 on the CMJ charts. I've written for
major orchestras. I've written for TV and films. I've done a lot of stuff. I
was a university professor. I ran a music technology
and music business program at my previous university. And last year, I left to focus on online
teaching full time. So I do lessons, one on
one lessons over Zoom, and I also make
classes like this. So, welcome. I have about 130 some online
classes I've made now. It's a lot, but I like
making them. They're fun. The music I make, if
you're interested, I do a wide variety of things. Right now, I'm working
on a big project of solo piano music and a big project of electronic sort of synth wave like music. That's what I've
loaded here. I'm not going to play you a whole
one of my own tracks, but I'll just give
you a little taste. More on that soon. So, I'm really excited to be with you here to talk about audacity. In this first section, I just want to tell you a
little bit about audacity. It's a weird program, kind
of how it came to be. We won't spend too
much time on this, but I just want to talk about it really quick so that you can understand the frequency of updates you should expect
and things like that. So let's go to a new video, and let's talk about the weird background of this program.
3. Background: Who Owns Audacity?: Okay, so audacity has been around for a long
time, actually. It was a free open
source program since I don't actually
know when it started, but it's been around
for at least ten years, probably well over
that, actually. Now, as an open source program, what that meant was that there are still a lot of
open source programs around. But what that means
is that there's a whole bunch of people that are contributing to
building this program and this tool out of necessity. A bunch of audio
developers said, We don't have a great
open source audio editor. So they donated their time
and they built this program. And they made the source, like the actual code, open, so anyone could get access
to it and change it, make improvements, make
their own version. So that's the way it
was for a long time. Now, not that long ago, a company came
around called Muse. I think it's mu SE, and they essentially
bought audacity. Now, how does that
work? I don't know. I don't really know how you can buy an open source program,
but somehow they did. And now audacity
is part of that. The program is still free, but a company does own it now, so they're going to try to
squeeze some money out of it. So we now see things
popping up like extra packs and effects and things you can
download and buy for it. But for now, I just re
downloaded it to test this. For now, the program
is still free. This exact same thing
happened with MuseScore, if you're familiar with
the MuseScore program, and it's the exact same
company that bought it somehow. So this
is what they do. I don't think it's
bad, necessarily. We'll wait and see
what becomes of it. But so far, you know, MuseScore but so far, audacity has got a handful of improvements since
they've taken it over. So so far so good. Alright, let's do a quick, like, 50,000 foot view. What can we actually do with audacity and
more importantly, what can't we do with audacity?
4. What Can You Do with Audacity?: Now, when it comes to now, when it comes to audio software, software for audio production, there are really two kinds
of apps that we use a lot. The first is called a DA. This is a general term
for an application, and it's an acronym. It stands for digital
audio workstation. These would be things
like Pro Tools, Ableton Live, Logic Pro, FL Studio, Bit Warden. There's a ton of them, actually. Those are the big heavy
lifting programs. And for me, I use Ableton
Live as my main da. But then there's another kind of program that I just kind
of call wave editors. That means that what these programs are
good at is looking at a single wave form and letting
us do some edits to it. So we can zoom way in and
adjust like individual samples. We can zoom way out and
maybe layer a few things. But we're not typically going to build whole tracks
with a wave editor. It's just a little
too cumbersome. So for me, I would consider audacity one
of these programs, this kind of wave
editor program. You can do full production in it and make your own
tracks from scratch in it. However, I would
not advise doing it because you're going
to be in kind of a world of pain if you
want to try to do that. It's just not designed for it. So audacity works
best kind of in tandem with one of those other
full featured Da programs. Now, even though I said I wouldn't produce
whole music in it, it's not that I wouldn't
make stuff in it. Audacity is great
for recording, like, a live recording or record adding single
tracks here and there. We'll probably do that
later in this class. It's great for podcasting, where you just have a few tracks that you're keeping track of, like, maybe two microphones
and then, like, a background music track or something like that.
It's great for that. It's not bad for mixing, and it's reasonably good
for mastering, actually. We'll talk about that near
the end of the class. Okay, let's talk a few
minutes about versions. Okay, let's talk a little bit about versions and versions of audacity to clear up a few questions you
may have about that.
5. Versions: Alright, in this
class, I am using audacity version 3.7 0.0. Now, if you're using an
earlier version of audacity, you're probably just fun to keep up with me in this class. There's going to be a few
things that look different, but more or less
the features are almost all the same all the
way back to audacity two. However, if you are on
an earlier version, since it's a free program, go ahead and update. Update so that
everything matches mine. If you are watching this class like a year after I made it, there may be newer versions. I would suggest to you if
there are later versions, get the most up to date version. That's always a good idea for professional
software like this. And I bet that there's really only a
few things different, so you'll still be able to
follow along with this class. If there is a major update, I will update this class
and make new stuff. So just keep in mind that we're hovering
around audacity 3.7, but newer or older versions, you should be able
to follow along in this class just fine. Okay, I also just want to point
out really quick before I forget Audacity works on a
bunch of operating systems. There's a Windows version, a Mac version, and I think
there's a Linux version, too. To my knowledge, there's
not a tablet iPad, phone version of it that exists. Maybe there is, but I'm
pretty sure there's not. Hm. In this class, I'm going to be using the version on a Mac, but they work really
almost exactly the same on PC and even Linux. So you're welcome to
use whichever you like.
6. Installation and Setup: Getting Configured Correctly: Okay, if you haven't yet, let's download it
install Audacity. So the first thing we need to do is go to the audacity website. That's audacityteam.org. Okay? Once you're there, you can click on
the Download button for your particular
operating system. Now, a new thing that
just happened that I noticed is that it asked me
to download this use hub. So that's this program. So I downloaded this use hub, and a lot of apps
are doing this now. If it's a company
that has a bunch of apps, they're
downloading, like, a hub, and then you actually download the programs
from within that hub. So the hub is its own program. So you're going to
download and launch that, and it's going
to look like this. Okay. Then you can download
all these programs. So most of them are free. Here's audacity, so you're
going to click Download, I already did, so it's there. So it just says open for me. But there are some
other programs here. I don't know what
most of these do, but there's some cool stuff. Here's a bunch of free stuff. Woodwinds, drum line,
use percussion. That's cool. I haven't tried those out
yet. Maybe they're good. But open this download
Audacity, okay? Then you can close
this use hub thing. And you've got audacity. After it installs, double click, and it'll launch right away. Or it might tell you to drag it to your applications folder. So just follow
those instructions, and then you are up and running. Now, the only setup
thing we need to do is our audio inputs and outputs, like getting audio into audacity and getting
audio out of audacity. Let's deal with
our inputs later. Once we talk about recording, we'll focus on those inputs. But we do want to be able
to hear what's in it. So let's set up our outputs. Our output means
our speakers or our headphones or whatever we're
using to listen to audacity. So we're going to go to this audio setup
button right here. And we're going to go
to Playback Device. That's output. So what
are we listening to? So for this, you won't have
this many stuff in this list. What you have in
this list might be something like built in output, Mac studio speakers, um, ASIO stuff, things like that. Whatever you normally
set as your, like, audio listening
thing, select that. I would normally select
Universal Audio Thunderbolt. That is an interface
I have right there to handle my audio for me. However, I have to keep it on Telestream Audio capture if I want you to be able to hear
it for this recording. So just keep that in mind. When you see Telestream
audio capture, it's just for recording
my recording purposes. Set that to whatever you want it to be so that you can hear it. If you're not sure, try a
few different things and get it to where you're
hearing it correctly. You don't need to worry
about your recording device or channels until we
get to recording. Now for host, you're going to want to select core
audio if you're on a Mac. If you're on a PC, you
have different options, and I don't exactly
know what those are, but it should be like
your default audio stuff. That's all you really need
to select there. Alright. Let's get started and talk about importing audio into audacity.
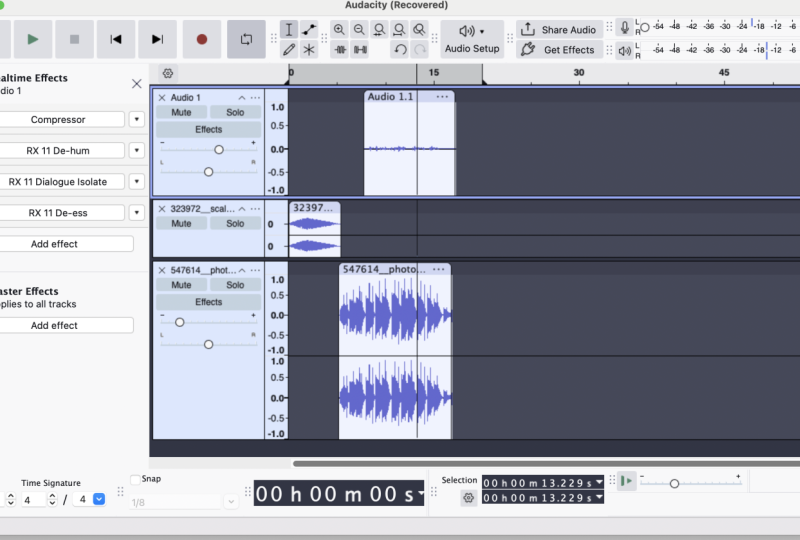
7. The Interface: Okay, so what I have here is I have audacity with just how it is when you open
it up for the first time, and the only thing I've done differently is I've added
an audio file here. We're gonna talk
about how to add an audio file in a
few different ways, actually, in just a minute. Yeah, in the next
video, actually. So just hold on to that
for a second, okay? That's how we get this
big audio file in here. But I want to jump the
gun a little bit and just kind of walk through the
interface real quick, okay? So I'm not going to go
over every single button, and that's kind of a philosophy for this whole class and
how I teach in general. We're not going to memorize
what every single button does in this first class. If you want to get
more advanced into it, you're welcome to explore
every little button. But for now, we're just kind of getting to
lay of the land, figuring out what does
what in this program. So let's look at basically the three
areas of the program. Okay? We have this top bar. We're gonna call that
the transport bar because in most DAs
that's what you call it. Even though this
isn't exactly a DA still gonna call
it transport bar. Down here, we're going to
call this the timeline. We have time passing here. We can position stuff in the
timeline however we want. Cool. And then down here, we have sort of a session
information, let's call it. So starting up here at the
top, up here at the transport, we have our main
controls to pause, play, stop, play from the beginning, jump to the end,
record, and loop. Now, whenever you see
these little six dots, that means you can move stuff. So you can really customize
this however you want. So I could take this
and I could say, I want that to be like way over here, or even
down here, I think. But I'm not going to do that. Whoops. Oops. Well, I did it. This happened to me earlier. So this moving stuff
around thing is not super reliable
at the moment. But it's okay. You can move things around
however you want. Here, we have a little
tool palette, right? This selector tool is going to let us click and
drag to highlight stuff. That's what I usually keep it on all the time unless I'm
doing something different. This is our breakpoint
editor tool. It calls it the envelope
tool, which is fine. It's going to let us do some
automation like things, making the volume
quiet and louder. We'll go over how to do that in a lot more detail shortly. So I'm going to undo that. This is the pencil
tool. It's going to let us just draw waveforms, which is a crazy idea. It doesn't work
exactly how you think. You got to actually be, like, super crazy zoomed
in for it to work. But I'll show you how
we're going to do that. A shortly. This is
the multi tool. This will let you do any of these three things with
certain key commands. So control option, and command. You can kind of get through
things using those. That was a Zoom in I just did. I don't use this
tool very often. I like to stick with this, but you're welcome
to get good at it. Moving on, we have
varying levels of Zoom. Zooming is kind of
important here. And other editing tools. These two are going
to let you kind of trim audio in specific ways. This one is trim the audio
outside of the selection. So that means it's
going to leave this and chop off those things like that, and I can hit Undo, and this one is going to
do the opposte, right? So those two are there. This is undo and redo. Zooming in on
different ways. Okay? And then we have
our audio stuff. We're going to go into
this in a second, too, but if we click and hold down, this is where we set our inputs and outputs and all that stuff. We'll go over it
more in a minute. Share Audio is a new thing that I think they've
just incorporated. This is going to let us create a feed of our audio directly to somebody
else over the Internet. Now, we have to have a audio.com account
for this to work, and I haven't explored that yet. So it looks cool. But I haven't tried it yet.
This is our input monitor. So if I turn this on by clicking here and enable
silent monitoring, we can now see my microphone coming in after we turn that. And down here is our output. If we play some tunes,
we're going to see it the volume come back
show up over here. Right? And we can
scale that back. We can turn it down,
basically with the dot. And turn it back up there. Okay, in our track, we have the info on the left. Mute, meaning that we're not
going to hear this track. Solo, meaning we're
going to mute all the other tracks
and only hear this one. Effects, we're going to
get into effects shortly, but this is where we
will add effects. And then we have our
panning and our sorry, our volume and our panning. We're going to go
through how to deal with all of those shortly, too. Here we have blank space. This blank space is where
we can put more audio, another track if we want,
whatever we want to do with it. And at the bottom,
we have our track tempo time signatures, if we're going to snap to
the grid, and if we are, what is that grid, I usually
leave snap off in audacity, and I usually don't adjust
the tempo or the meter. All that's going to do is
change your timeline up here. It's really not going
to change your audio. So you're working if you're trying to use audacity
as a full sequencer, make sure you set your tempo and time signature correctly. But if you're just trying to
do mastering with audacity or or work on certain audio files or record like a podcast
or something. There's really no reason
to mess with this. This shows where we are
hours minutes seconds. We can adjust that to be different units of
time if we want. And then this is the selection. So this is going to show
me what's selected. So right now, if I select this much sound by
clicking and dragging, it says you selected 16 seconds, and it starts at 7.2 seconds,
which is right there. And this down here is
our playback speed. If we want to play with
that, we can adjust it here. Dope. I'm going to
set that back to one. And so that's our
basic interface. There's a whole lot of stuff in the menu at the top, though. Effects, analysis
tools, other tools. We'll get into some
of those more later. Oh
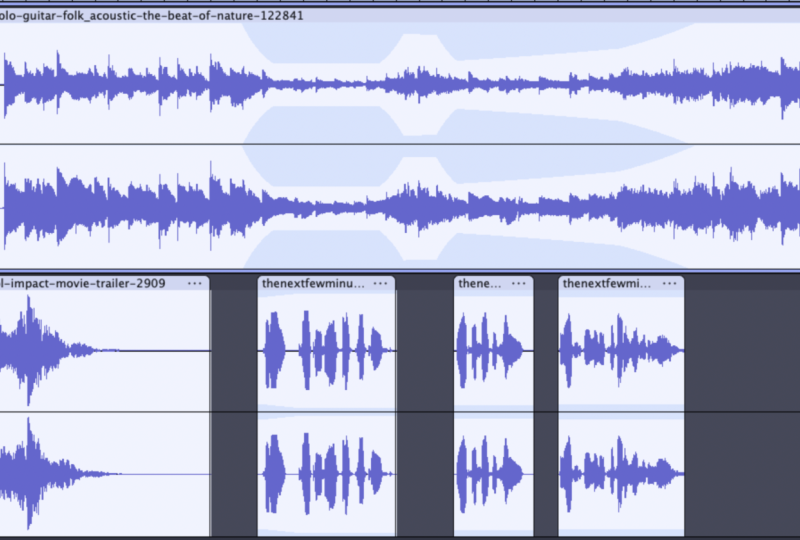
8. Importing Audio: Okay, so let's talk about getting audio into this program. Now, you'll see here I have three audio tracks that
I can move around. I just set it up that
way. Let's start fresh. So I'm going to go
Command for new. I'm going to close that
old one. Don't save it. Okay, so when we have a new
session, it looks like this. There are essentially three ways we can get audio into
the program, okay? The first is just dragging
an audio file in there. The second is going
file import audio, and then the third
is recording audio. Let's do the first
two in this video, and uh oh, actually, there's a fourth way. We can tell audacity to
generate some audio. Okay, so we'll do the
first two in this one, and then the next video, we'll do generate audio, and the one after that, we'll
do recording audio. That was weird. So basically, the two ways that I want
to tell you about right now are dragging audio
in or importing audio. So we have our main
timeline is right here. This is the main guts
of the program, right? So I am going to find. I am going to find
an audio track. Let me just pull in
that one I was using. Let's just grab one of
these audio files for this kind of synthwave
project that I'm working on. Alright, so I'm just going
to drag a file in here. Okay, so this is a file
I can work on now. We're going to talk about
editing this file soon. But I have a track in here. I can put my cursor somewhere. I can click, and I can hit
the space bar to play. And then the space bar to stop. I can also use the transport
up here, play, stop, pause, jump to the beginning, jump to the end,
record, and loop. You can see our audio
output up here. And we can scale it
back a little bit if we want by just
pulling that down. Think of this as our
master volume up here. Okay, the other way to import
audio would be to go to File Import and audio. Okay, now I got to go through
guitar clean doubled. Let's just see where
it randomly open to. I actually think I
know what this is. Okay, I'm going to
solo this track, which means I'm only going to hear audacity. I just want
to hear what this is. I think I. Yeah. What this was is, so I'm a guitar player, and I had a friend
who is a producer, who's working on a
track, and he's like, I need this chord, like this very specific and
kind of weird chord, but, like, strummed for this one spot of this
electronic track. So I recorded myself doing
it like 20 times and sent him a bunch of takes so he could use it in his track. Doing it in a bunch
of different ways. Anyway, so the two
ways I've shown you here to get audio into
audacity is to go file, import audio, and or just
drag a file in there. Even if we already have
something set up like this, if I take another audio file
and just drag it in here, I can drag it over here and it's going to put
it on this track. If I drop it right here, I'm not sure if
it's gonna put it at the end of this
track or do nothing. Oh, it put it on a new track. I'm going to undo that because
I just want to show you the smartest thing to
do if I want to add another track is drag it
onto this dark gray area. That's going to make a
new track and load it.
9. Generating Audio: Alright, let's get
rid of all of this. So now I've got
three tracks here. I could get rid of these
tracks by clicking this X and this X, and
maybe the sex too. Now let's do the third way
that we can add audio, which is by
generating something. So if I go to generate
at the top here, I can generate a chirp, which is like sound. DTMF tones. These, I think,
are used for broadcasting. They're just ways to help
us sync up audio and video, not terribly musically useful. Noise, a little pluck, a rhythm track, that's new. A reset drum. That's a specific drum, silence and a tone.
Let's select tone. We can say, Okay, I want a triangle wave at 4:40
hertz at amplitude oh eight. That's going to be piercing. Let's quiet that down,
and then we'll hit generate and now we're
just going to get a tone. I actually do this all the time in audacity to show
students waveforms, because if you zoom way in and I'm zooming by
pinching on my track pad, you can actually get so deep in here to see
the waveform, right? Like, I'm looking
at milliseconds now, and there's my waveform. You can actually even go farther and see individual samples. Each one of these
is a sample, right? And I can be like, I
don't like that sample. Get rid of it. What did
I do? I don't know. Probably nothing audible because
we're so zoomed in here. Alright, you can also zoom in, zoom out with these things
up here, these tools. Let's try that rhythm track. Let's go to generate
Rhythm track. Let's see. Presets,
factory preset, defaults. Tempo beats for a
minute. Swing them out. Let's give it some swing.
Number of bars. Beat sound. Metronome tick. Sure. Alright, let's see what we got. Okay, so this would mostly
be useful as, like, maybe a metronome or
something like that, if I took the swing out of it. But you can generate stuff
all the time, if you want. Not a whole lot of
super useful stuff, but a couple of things. Alright, let's move on
to talk about recording.
10. Recording Audio: Alright. Let's do
some recording. So, I have one of my tracks here and I'm going
to put a guitar part on it. Didn't intend on having a
guitar part, but it'll be fun. And I kind of like
audacity for this for just giving me
a really simple, like, I'm going to
record a guitar track. There's no quality reason
that you would do this in a full dot or in a wave editor type
program like audacity. We're doing digital
audio recording here, so it's going to go in the
same in either program. They're going to
sound just as good. So a couple setup
things we need to do. We need to go back to
that input device. So I'm going to go audio
setup recording device. This is what's our input. So for this one,
I'm going to select Universal Audio
Thunderbolt because that's what this guitar
is plugged into, okay? So this is plugged into
Universal Audio Thunderbolt. And then I need to go
to recording channels. Because into my thunderbolt, I have two things
plugged into it. The first one is
this microphone. The second is this guitar. So if I set this to
one, I'm going to go up here and I'm going
to click on this and say enable silent
monitoring. Okay? Now, all we're
seeing is this mic. So I could record a
vocal take this way. I've got my mic in there. So
I could sing on this track. But you don't want to
hear me sing. So let's go to audio setup and
recording channels two, because that's where
I have this guitar. So now if I do that,
We have this guitar. Now, there's a couple audio things here
that you might want to know. The first is, what is this audio Thunderbolt thing
that you're talking about? That is an audio interface. It lets me plug in stuff. You can get an audio
interface if you want. It's definitely
going to give you better recordings if
you plan on recording. If you're doing podcasting or anything like that, you
may already have one. Some mixers have them built in. But basically, it's a
little box that's going to let me plug in a microphone or maybe two or
three microphones, and it's or instrument
or anything like that. And then it's gonna send a
USB out to my uh computer. Okay? That's called
an audio interface. If you want to look
for one, There's a couple that I recommend. I might encourage
you to check out my intro to music
production master class. That we talk about
all of this stuff, like all the gear that you
need to buy and hardware. But if you just want to
look one up, a really good, cheap model that's inexpensive, but works great, sounds great, is this is not sponsored. I'm just going to say it is
the focus right scarlet. That's kind of the
go to one for, like, inexpensive, but reliable and sounds good. So check that out. It's probably like you can get the smallest
one for probably, like, 200 bucks, maybe. If your computer just has
inputs, just has, like, an eighth inch jack that
you can just plug into, you can experiment
with some of that. You can also experiment
with USB microphones. Maybe I'll do a USB microphone in just a second
and set that up. But first, let's put some
guitar on this track. So I'm going to go to
Tracks add new Mono track. Mono means we're just
recording one thing. So this guitar is basically mono unless I'm running it
through some special effects. Now, I'm going to record it dry, and then I'll put
some amp modeling on it after. So here we go. Um, Let's enable that so I can Alright. That's looking pretty good. So I'm just gonna hit record and see what
happens. Here we go. Dope. Alright, let's see
what we got here. So, this recorded it
as a stereo track. So I think this top one is this microphone,
and this is my guitar. So let's convert it
down to mono track, whoops, which is here. I could split stereo to mono. That should do it. Yeah. Now I can just delete this track. Now I have just my guitar
sound. Let's hear what I got. Okay, what we're hearing here is that there
was quite a bit of latency between what I've
played and what it recorded. Latency means the amount of time it takes for
the audio signal to get all the way through
all the gear and the interface and the box
and into the program. That can be like half a second, which is a lot in music. So there's an easy
solution to that. I'm just going to line it up. Easier to, like, cop Okay, we don't have a very
lovely tone there, so I can't wait to fix that. We're really close. Okay, so now it's lined up. When we get to the
effects section, we'll put some effects
on it to make it sound like a big
distorted guitar. In the meantime, let's
keep moving on. Ing.
11. Recording with a USB Mic: Okay, so we're recording
with a US B mic, like, this is a USB mic. Microphone that has USB
outputs at the bottom. This particular one also has sort of a regular audio
output at the bottom. But these USB mics, Work great. I used to, like, really
poo poo on these and say they were just not
up to the quality. And for some of
them, that's true, but some of them are starting
to sound really good. So the USB mics are
getting better. They're getting pretty
great, actually. So if you have one of
those, just plug it in, make sure you've installed any drivers that it might need. And then if you go to audio
setup recording device, you should see it in this list. Okay? Now, there's one
other really fun thing that's here that I
want to show you. You can use your phone. If it syncs to your
computer wirelessly, you can use it as a microphone. Let me show you how you do that. Well, I'm going into it kept giving me an error when
I turned on the phone thing. So and then the phone doesn't come up in deeper into
our settings here. So I'm gonna say that's
an experimental feature. I've never tried
it before and it doesn't seem to quite
be working yet, but it'll be cool
when it does work. Okay, let's go on to some basic audio controls and terminology.
12. Basic Audio Controls: Alright, so while we're here
and we've got some audio, let's look at our basic
audio controls here. They're over here
on the left. And so what we've got is mute. That means we're not going
to hear this track at all. Click it again to turn it off. Solo, that means we're only
going to hear this track. Effects. Now, this
is where we can add effects to our track. We'll come back and do
that in a few minutes. So let's close that for now. So here we can boost our volume. And here we can
control the panning. Panning is the left and right. So this means that
most of the time, when we're listening to music, we're listening out
of two speakers, and that's designed to
emulate our two ears, right? So the panning moves the
sound between our two ears. Okay, so those are just some of our very basic quick
audio controls, panning, volume, mute, and solo. We'll be doing more on editing
in just a few minutes. I just want to get us through some of these track options. With that, let's talk about some specific options we
have for audio tracks.
13. Audio Track Options: Okay, now, each audio track has some special options that
will be really handy to us. And we can get
those options right here in these little
three dot things. So first, we can rename the track here. We
can move it down. We can move it up. If it wasn't the topmost thing,
we can move it up. We can move it to the bottom. There's really no
reason to do that, other than organizing
your session. Multi view. Multi view is going to show us the sonogram at the same time, let us do some
sonogram work, okay? We're not going to
talk too much about the sonogram stuff in this
version of the class. But there are some cool
sonogram tools for, like, very advanced users. So I'm going to go
and turn that off. Oh, spectrogram. Sorry,
I think I said sonogram. I meant to say spectrogram. So we can see just a
spectrogram here if we want, and there are some
processing that we can do to the spectrogram. If you want to explore that, go up to effects, and you can find some
spectral tools here. That's what we'll use the sonogram, the
spectrogram stuff. But back to our menu here, you can change some settings
about the spectrogram. Let's go just back to waveform. You can change the color of
it, swap stereo channels. So what we have here
in an audio track, this is a stereo track. You can see that there
are really two waveforms, right? There's a
left and a right. Down here, if you look
at my guitar recording, this is a mono track. There's just one
waveform, right? So in this one, if we wanted
to swap stereo channels, meaning the left becomes
the right and the right becomes the left, we
could do it with this. That's actually oddly useful. You'll be surprised at
how useful that is. Split stereo track means that
we can take this track as a stereople and convert
it to two mono tracks. That is also sometimes useful. If, for example, we want to do some noise
reduction or things like that. Splitting to mono
tracks is really handy. We can also change our format
here and our sampling rate. If you don't know about bit
rates and sampling rates, here's what I think
you should do. Leave it on 32 bit float and leave your sampling
rate at 48 or 4,144.1 or 48,000 Hertz. One of these two, and
you should be just fine. Alright, let's talk about
Mi files for a minute.
14. What About MIDI?: Alright, so what about MDI? When we learn a normal Da, like Ableton or Pro
Tools or something, we are often talking about MDI. Like we can record
and play MIDI. Now, we can't really
do that in audacity. Audacity is an audio editor. It's really good
at editing audio. It's not so good at MIDI stuff. There are a few midi
things we can do. We actually can
import a MIDI file, but there's not much
we can do with it. If I go to File Import MIDI, then I point it to
some MIDI file, it does give us a
piano roll editor and the ability to
do some things, but it's pretty
tricky to work with. To zoom way in. Can't really get my hand
on individual notes. Maybe I can if I switch tool. And if I play this,
there's really nothing. There's really there's
really nothing to hear. I probably could set up a synthesizer in
here to play this. But this really isn't a strong
suit dealing with MIDI. So I would recommend if
you want to do MIDI stuff, you're probably going
to want to switch to a full sequencer program
that can handle that. Audacity is not for you if that's what you
really want to do. We can't, to my
knowledge, record. If I go to Tracks and add new, there's no Mi track. So if you want to do midi stuff, maybe think about doing it in a different program and
maybe export it as audio, and then you can pull
it into audacity.
15. Cut/Copy/Paste - Just Like Text!: Alright, in this section,
let's talk about editing. So editing means we're
gonna cut up audio. We're going to
arrange it in time. We're gonna move things around, get rid of things we don't
want, add things, maybe. We'll see how it goes. So the first thing to
remember about audio editing, and this is true, actually, kind of, no matter what
program you're in, is that all of our what I call Microsoft Word
commands still work. So like, cut, copy and paste. So if I was, for example, to go to the beginning
of this and say, I want to take this and copy it. So I highlight some
things by clicking and dragging and then
Command C to copy, and I go somewhere
else, like the end, click here, Command
V, and I paste it in. Now I've just got
that little chunk. I can grab anything,
copy, paste, put it there, and
then I can grab the top part, the title bar. If you want to move it,
you have to click up here where it says the name of the
track, and you can move it. Anywhere that there's not audio, when we play it, it's just
going to be silence, right? So silence in these empty gaps. So we tend to not want those, so you might smash those up. Now, this isn't going to
sound very good because I randomly copied and
pasted something. So I'm going to select this by clicking on the header
and press the delete key. Same thing with that. Now,
if I want to cut something, let's say I want to
just, like, make a little break right there. I can just press the delete
key after I highlight it. And now it's kind of
smooshed it together. Okay, so what it did there is what is sometimes
called a ripple delete, where it deletes it and also
compacts the space, right? That's often what we want
in this kind of editing, where we're trying
to find, like, very small things and just like a person like a tick or
an audio imperfection. We can just zoom way in and say, like, Oh, that little things sticking out right
there I don't want. And I can delete that.
That's going to be an inaudible amount of time that I just
delete it. It's great. So cut, copy, and paste work just the
same as anything else. Now, if you wanted to delete something and leave
the empty space, let's say you wanted
something right here. What you could do is
go to Edit menu and go to this remove special
and then cut and leave gap. You can also use
Option Command X or delete and leave gap. Okay? So let's highlight
something and then say, edit, delete and leave gap. Now we've got that gap there. Okay? So that's the way
to do the other one. All right. Now let's talk
about adding a second track.
16. Adding a Second Track: Now, we've already
added a second track, but let me go over
just how to do that again and how to move
things between tracks. Let's leave this
audio one track. I was just about to delete it. But one thing I can do
is paste between tracks. So if I go up here to
this little segment, Command C to copy and
click somewhere in here, Command V, so it's giving me an error saying that
you're trying to paste stereo audio
into a mono track. So let's, in fact, get rid of this track or we could just turn it into
a stereo track right here. Okay? Now it's a stereo track, and it seems to have
absorbed my guitar part. That's interesting. Let's
undo that. Command Z. Now let's just get rid of this
track and make a new one. Add new Stereotrack. Okay? Now I can go
up here, copy that, go down here, paste it, and then adjust it
where I want it. Okay? So you could in theory, like, build a beat or a whole song by arranging things like
this in the timeline. Again, that is not
audacity strong suit. But audacity is good at working with these
big chunks of audio, like, arranging big
chunks in time. And it's also good
at that, like, zooming way into one
little audio glitch and like, deleting
a millisecond. But it's not good at, like, moving snares and high hats around and, like, making a beat. It's not awesome at that. But arranging big
chunks of audio, like for a podcast or something like that,
it's super great. Alright, so let's talk
about the time shift tool for some more advanced editing.
17. Time Tracks: Okay, audacity has some time shifting tools that
work a little bit different than other
um, audio applications. If we want to mess
with the time, that means like speed
up and slow down the track and play
with it that way. Here's how we do it.
We go to Tracks, add new time track. This is weird, okay? Now, you'll see here, think of these numbers as percentages. 100% means we're doing nothing. Okay? So I'm going to click
on this blue line to make a point and click again and make another
point, and we'll go like. Maybe I'll make another one and another one
and go like that. This is called a
breakpoint Editor, where we make points on a
line and that changes things. What happens is
here we're at 100%. Here we start going up. That's going to make
this thing go faster. It's going to get all
the way up to 200%. That's twice speed. And then it's going to
stay there for a second, and then it's going to go beep, all the way down
to, I don't know, it looks like maybe 20% of the
speed or 10% of the speed. That's going to sound like this. The Weird and fun. Now, if you're like, Can I do that without
changing the pitch? Yes, there is a way to do some really interesting
time shifting and pitch shifting
independent of each other. We're going to
talk about that in the effect section next. But for now, I want to stick with this
idea and talk about this breakpoint editor
a little more because it's the foundation of
what we call automation. So let's learn how to do
some automation in audacity.
18. Automation: Okay, so this little
breakpoint editor up here gives us kind of a sneaky clue and do some
other things we can do. And that is automation. So, if you've taken any
of my other classes, you know that my standard
definition for automation is changing a parameter over
time. That's all it is. And we can automate
just about anything. Let's automate our volume. Now, the reason we'd
want to do this is, let's say we want the volume to get louder
right in this section. Okay? That's easy enough to do. We're going to go to
our automation tool, which they call the
envelope tool now. I'm going to click on
it. You're going to see a line right in the middle here. Here we go. It's kind of
on the outside, right? So what we're going
to do is we're going to leave
that nice and big. We're going to go where
we want it. Go make a point and then another point. And we want to get that audio. Let's say we want
a little quiet. Let's say we want
it a lot quieter, just for dramatic effect. So I can control the ramp to it. I can control, you know, how
long it takes to get there. And then, you know, I can make another dot
and get out of it. So we grow back to where we
were, which is maybe there. So, Audacity doesn't give us a lot of automation controls. We can't do much more than
volume with automation. But we can do that, and that's
the most important one. Alright, so next let me
show you the draw tool. This is gonna let us
do some freaky stuff. And this tool is not one that we see in other audio programs. This is kind of
unique to audacity.
19. The Draw Tool: Sample-Level Editing!: I realized I didn't
play this for you. So if I go back to our
selector tool up here, I just click somewhere
and hit Spacebar to play, you'll hear this automation. Okay, I got real quiet. Then at the end, it's
gonna get louder again. Oh, and our speed's gonna go up. Now it's getting louder,
but slower. Whoo. Alright. So next, the draw tool. That's this little tool right
there. Now, check this out. This is designed to let
us just draw stuff, but in order to use it,
we got to zoom way, wa, wa, wa, wa, wa in. We got to get down to
the individual sample. If I try to use it out here, it just says to use draw, zoom in further until you
can see individual samples. So here we go. Let's
go out here somewhere. Okay, so we're zooming in. We're zooming in. We
can also click up here. Click, click click,
click, click, click, click. Not quite. There we go. Individual samples.
Now, check this out. I'm just going to draw
my samples, right? If I want something that's
going to sound like distorted and gritty,
I'm going to do that. But you also have to keep in mind that what
we're looking at here is like milliseconds. I could just go crazy with this. But watch.Oce I zoom
out and listen to it, it's going to be
very, very short. Okay. Let's listen to it.
It was right around here. Hear that. That was
what we just drew. Okay. Neat. So you can
do stuff like that. Why would that be useful? If there's a certain kind
of distortion you want, maybe you could draw
it in that way. You could also go in and do some noise
reduction that way. Like, if you saw, like, maybe this right here, like, that's like
way loud, right? Let's see if we can I think
it was right here, maybe. Okay, so let's say we don't
want this to go up that high. So let's grab our pencil tool and just give it a
little bit of a haircut. Try to round it off
to reconnect, maybe. Maybe smooth that. There. Now, I don't think
that'll be audible, but it'll get rid of if that was a click, this
would get rid of it. I just kind of flattened it out. I don't think that. Yeah,
we didn't really hear it. But that's what it's good for. Okay, let's talk about effects.
20. The Effects Menu: All right. Next, let's
talk about effects. So we've already seen this
button up here, right? So if we click this button, we get to our effects section. So we've got two different
things we can do. We can put effects on the track. This is Track four. That's
what this one is called. Even though it's not
the fourth track, it just got called Track
four. That's okay. Or we can add master efeteffects that are going to go
on everything, okay? This is going to be we're
not going to really do this until we start
mastering, we might use it. But up here, let's
add an effect. So let's go to some of
the built in effects, and down here they have more. These VST effects, we'll
talk about in a minute. For now, let's
just add something like let's add a
distortion to our guitar. I'm going to go
down here. Now I'm on Audio two, which is correct. Add effects,
audacity, distortion. Let's also add compressor to that guitar sound to
boost it up a little bit. So if I click on
the compressor now, I can dial it in. Let's see what presets we have. Ooh, all kinds of good stuff. Let's go here. I want to make
it a little more extreme. The user interface The actual user interface on the audacity effects and just audacity in
general is not awesome. There's some really
cool stuff in audacity, but it's they spend
more time on, like, the algorithms
behind stuff than, making the user interface all, like, sexy and cool. Alwy, let's do, like
a medium overdrive on this guitar and check
out our tone here. Solo it. Whoo. Alright, so we are pushing
that compressor way too hard. Okay, that tone
needs a lot of work. So but we're not going to
spend too much time on it now. So I think we're getting
that pretty good. I'm going to do a
little bit more with VST when we get there. But for now, this
is what we got. Alright, I actually
really like that guitar. It, adds a lot of warmth to this track and kind of
an organic feel to it, too. Okay, let's talk about
a few of the effects. I want to talk about the
amplify effect just as an example and then some
of the spectral effects. So let's go to a new video
and talk about amplify.
21. Realtime and Nonrealtime Effects: Okay, I should have
mentioned there's a third kind of effect here. What we have here is
real time effects on our channel and master effects
on the master channel. So they will affect everything. But then we also have
something unique to audacity, as far as I know, and that's
non real time effects. So what this means is that
I can select some audio, let's say, Let's say this part. Let's just select our
whole guitar part. And then I can go up to the
effect menu at the top, and I have all kinds
of new stuff, right? This stuff doesn't show up
in the real time effects. So these are different. Now, the difference is that non real time effects
obviously are not real time. So I can't just turn them on and then run
the signal through it. Non real time
effects, I have to, like, highlight something
and tell it process. The computers go to think
about it for a second. Then it's going to
give me the result, and then I can listen to it. It's kind of old
school. It's how we used to do things
all the time. So let's try. There's all
kinds of cool stuff here, but let's try amplify. So let's take this. And
there's some presets. How much do we want to
just boost this signal? We can allow it to clip
if we want, but I don't. So it's not gonna let me apply here because
basically it's saying, you are going to clip
this if you do it. Okay, that's gonna let me do it. And now I have a nice healthy signal that
I can turn way down. Great. Non real time effects.
22. Changing the Pitch: Okay, earlier we looked at
this time track as a way of playing with the speed
and things of the audio. And I mentioned that there's a better way to do this where we have independent control
of the pitch while we do it. So let's talk about that. So let's select Let's do something a little more
obvious, like, right here. Okay? Now, this is going to be a
non real time effect again. So I'm going to
select something. I'm going to go up to effect. And then let's go
to pitch and tempo, and I can change pitch. I can change speed and pitch
or I can change the tempo. So let's start with pitch. Now, changing pitch,
this is not autotune. Okay? If you want an
autotune kind of thing, you want the pitch
to be in a key or something like that,
this is not it. If you want to do
autotune like things, then we're talking
about a VST plugin, which we'll get to shortly. This is just going to
take the whole audio and make it go up or down in pitch without
changing the speed. Now, I could go into all of the cool audio math
that's going on here. There's things called
FFTs happening. There's, you know, complex math happening
to make this work. And this kind of complex math is relatively new in
the audio world. Like, ten years ago,
we couldn't do this. Now we can do it
fairly commonly, and we can even do it
real time in some cases. This particular program
doesn't do it in real time. So, let's say, let's look
at our two options here. In the top, we can
do it in pitch, and the bottom, we can do it by frequencies. Both
do the same thing. It's what is easier
to think about. For me, pitch is
easier to think about. So it says from B to B. What I like to do is say, Well, let's assume this is in C. It doesn't matter
if it is or not. And I want to get it
to the key of D. Okay? So what that's going to do is transpose it up to semitones, because that's the
key of C to D. Okay, now it's not going to
affect tempo or anything. Now, if I say use high
quality stretching, I'm going to do that. In general, when you're doing
this kind of stretching, you're going to
degrade your audio. So anything we can do to lower the amount that
we're degrading the audio because degrading the audio means you're going to get like weird what we call
artifacts in the sound, just weird, like,
things, sounds in it. So we're going to use
high quality stretching. That's going to make
it take a little bit longer to process, but it's going to
be more accurate. The amount of time it's going
to take to process is like maybe three or 4 seconds.
It's really not long. So use the high quality.
Cool. Here we go. Apply. There, I did it. That's non real time, right? Like, it happens super fast. So, here it is.
Before I play it, note that where I
have selected, right? Like here, when that
selection ends, it's going back to
the original key. So let's listen to
it for right about here.'s try it again. Whoa. Alright. So you want to be
careful with that tool, right? I'm gonna undo that. If you're really
doing it, I'm gonna select the whole track. That's what you might
want to do it for. Okay, now let's
talk about changing the speed without
changing the pitch.
23. Changing the Tempo: Alright, now let's try to change the pitch without
changing the speed. And let me just sidebar and say, today's water is
ginger citrus twist. Was not excited about
the ginger citrus twist, 'cause I'm not a big ginger guy, but this is delightful. Not not a paid post. Anyway, um that was my
random to for today. Okay, so let's select something else and start playing
with the pitch. Let's go let's just
select this whole thing. And now, again, non
real time effect. So we're going to go
to pitch and tempo. And now let's go
to change tempo. Okay. So what we can do here is we can say
percent change. What percentage do we
want it to change, right? We can adjust that
there, or we can say, Let's assume it's 100
beats per minute, and I want it to be 120
beats per minute, right? I could do that. That's
just another way for it to figure out the math. What I really like to do
with this particular tool, and this is where it
comes in the most handy for me is go down here to the length because I do a lot
of work where someone says, I need a track that is exactly 90 seconds or
something like that. And so maybe I wrote a track and it's 91 seconds or 92 seconds. So I'm going to go here.
I'm going to go, Whoop 90. I'm going to make this
exactly 90 seconds. Now, this is going to speed
it up or slow it down. Yeah, it works both ways, like a little bit so that it
fits perfectly in there. Now, if I do high quality, it's not going to
get too glitchy, and it's going to sound normal. So if you're ever doing
something and you need exact timing for music, then this is a good way to do. With one caveat. The one caveat is that the more extreme this time is meaning, the more drastic you're
shifting the time, then the less real and less
good it's going to sound. Okay? So this is
48 seconds long. This clip I just highlighted
is 48.11 seconds long. And I'm going to change it to
90, so that's about double. That's going to be a lot. So
we might get some artifacts. I would not try to do this big of a time stretch
in a serious track, but let's do it just so
you can get an idea. In fact, let's do
it really long. Let's do, like, a
super long one. This is going to take
a second, literally. Okay. Oh. Oh, it said it didn't have enough room
because this was in its way. So let's do it to this one. Okay? Effect, change
tempo 39-147. Sure. Pop. There it is. Alright.
Let's listen to it. Listen for artifacts
or anything weird. I kind of love it as,
like, ambient music. That's pretty extreme stretch. So it sounds all kind of weird. So this kind of stretching
is good for, like, a couple seconds here and there, or for really extreme
stretching for, like, sound design purposes,
like what we just made, I might actually
save that and use it in some of this ambient music that I'm
working on lately.
24. Changing the Speed and Pitch: Okay, let's go back
to this first chunk, and let's go to effect. Okay, now let's go to
changing speed and pitch. Now, this one is kind of like what we did
with our time track. This one is going to
change them together. So we can change the speed. So speed multiplier. Or we could say, like, what if it was a vinyl record, and I played it at 78 when it should have
been 33 and a third. That's that big of a change, another way of looking at it, or current length and
ending length. But this way of doing it is going to change both the
pitch and the speed. So this is kind of the
same as the time track. So that's generally not
the one that I want to do. It's kind of like putting your finger on a record
to slow it down. The pitch is going to go down and the speed is
going to go down. So that's the old school
way of doing it, right? But we have all
these cool new ones. Great. Okay, a
couple more effects. Let's talk about fade ins.
25. Fade in and Fade Out: Okay. Okay, let's go to
the end of our track, and let's say we want
a nice fade out. This is there are many reasons to do this,
not all of them musical. Like, if you're doing dialogue
or you're doing anything, just fading out to zero is a really good
habit to get to on the end of any track because you prevent clicks
and anything weird like that. So here's how I'm going to do a really quick and easy fade out of my track of
any track, actually. I'm going to go to the end, and I'm probably going
to zoom in a little bit. This fade out can
be as short and as long as we wanted.
Weird voice crack. Okay? So that's the end. I could say this is going to
be a slow fade out, and I could go, I don't know, select all of this. Okay? Now, this is a
fade out that's going to start here and go
to zero by the end. This is non real time,
so I'm going to select something I'm gonna
go to fading. I can say fade in or fade out. So two fade out,
there it goes. Right? Just drew it right in. And it's gone. I can
go to the beginning. And now I'm way zoomed in here. So maybe right here, I don't want a long fade in. What if I just want a
really tiny fade in here? Like milliseconds. Zoom way in. Like way in. And let's just do that, okay? This is going to be a
super fast fade in. It's too fast to be audible, but it'll prevent any clicks. So this is just a good
habit to do for anything. So I'm going to go
fading, fade in. Okay? Now I've got a nice
smooth fade into this track. If I start it at the beginning, you won't even
hear that fade in. Of course, because it glitches
out. Not there at all. But it makes a nice, clean entry of the music,
and it sounds great. So both on a production level,
get used to doing that. Those are good habits to have, but on a software level, audacity makes it
really easy to do. So it's great.
26. Plugins: Okay. There's a very
important concept, and this is true in
Audaci and it's also true in just about every
de I've ever used. There's another kind
of effect that you can use in this program
called plug ins. Okay? So let's talk
about plug ins. What plug ins are is
they're their own program. You download them, you buy them. There's a bunch of
free ones. You can find them all over online. There's millions of plug ins. But what's important
to note is that these plugins are not
made by audacity. They don't come with audacity. They don't have anything
to do with audacity. It's just a thing that every computer knows
how to handle plug ins. So what you do is
you buy a plug in. So let's say you bought
a plug in that was going to emulate like an
old cassette tape, okay? So you bought this cool plug
in that's going to emulate your music being played
on an old casettetape. That's great. Now you're going to install
it on your computer. You're not going to install
it for any specific program. You're not going to
install it for Pro Tools for Ableton, for audacity. You're going to install
it on your computer. And then any of those
programs that are running on your computer will have access
to those plugins, okay? So if you get into plug ins, you buy a few cool plugins, and you put them
on your computer and you use them with audacity, then in a year from now, you decide to upgrade
to logic, for example, once you launch logic,
you go to plug ins, you're going to see all
your plug ins there, right? Even though you install them
and use them with audacity, they're installed
on your system. Okay? And they're their
own little programs. So here's how I get to them. I'm going to go add
effect VST three. Now, there are a few
different kinds of plugins. There are AU plugins. There are VST plugins. Audacity likes a kind of
plugin called VST three, which is the kind of
new version of VST. I think if we go to
our effects menu, we'll get even more
plug ins here. That can be used in
a non real time way. So underneath this line, these are all the
plug ins that I've installed on this
computer, which is a lot. Like, if you get to
some of these lists, these are, like,
long lists, right? So I've installed a lot of stuff 'cause I do this professionally, but you might have nothing
here, and that's okay. Search around, find
some cool effects. Find some cool plug ins. Um now, if I go to VST, let's use this plug in, okay? This is called sketch Cassette, and this is the exact plug
in I was just talking about. This is supposed to
make it sound like you've recorded this
music to an old cassette, and then you're
playing it back in. It's going to add some like
wobble to it. Let's do it. So I select Sketch cassette. And now if I click on it, I can see the sketch
cassette interface. This is going to look totally
different than audacity, because it's a totally
different program that's running
inside of audacity. So if I just set this over here, and then I hit play. There it is. Let's make it
sound like an old tape. Who. Page of the tape. Some defaults. High School mixed tape. Let's count of how they sounded. Cool. So this is just a random
plug in that I saw online, and I said, That looks awesome. I could totally use that
for some of my projects. So I bought it. I don't
remember what I paid for it. Probably 20 or 30 bucks. Some plug ins are huge
and cost a fortune. Some plug ins are
nifty little things like this that cost
20 or 30 bucks. And some plug ins are free. Search around
online. You'll find a lot of great plug ins. O
27. Guitar Effects: Okay, so I'm going to go
back to my track four here and I'm going to get
rid of the sketch castte. I could just turn it off here, or I could get rid of it by
just writing no effect here. Okay? I get rid of that. But let's go back
to our guitar part. And let's see if I can
use any plugins that I have that might be specific to guitar stuff to get a good tone. So I'm on that track. I go to Adeffcs VST. Now let's see what I
have. That might be a good um Guitar effect. Here is a fender tweed
deluxe amp emulator. I like this plug in because I have a fender tweed
amp, a hot rod devil. It's actually right you can
kind of see it right there. And this plug in is an
emulator for that amp. So saves me a whole bunch of time from lugging
that amp out. Actually, that amp
is doing something weird and it's really
noisy and buzzy right now. I need to go to the shop. But I can use this,
and it's okay. So this interface is fun and
cool, but it's all active. I can adjust the tone. I can even change my
inputs if I want. And, you know,
where the mics are, how they're positioned,
what kind of mics I'm using. It's great. So let's try. Let's see what our guitar
sounds like through this. But I do want to go back here. I'm going to turn off this distortion that
we added earlier. So now we have a halfway
respectable guitar tone. Let's listen to it in context. Hopefully, I didn't mess this up too much where it
doesn't fit anymore. I did. It doesn't fit anymore. Not bad. So those are some of the cool things you
can do with plug ins. Alright, let's move on
to talk about mixing and mastering and exporting
and audacity. Oh
28. The Mixer and Mixing Techniques: Okay. Here we go. Alright, let's talk about
finishing a song or a track. In audacity. So first, mixing. Now, both with mixing
and mastering, I'm not going to go
over in this class, a whole detailed Lesson
on how to mix and master, we're going to focus on
how to use audacity here. But I do have other classes that are all
about mixing and mastering. I have a huge class on
both of those things. And in both of those classes, I use Ableton, but
I do everything in, like, a nonspecific Da way. So I walk you through how
to do it in any program. So I encourage you
to check out those. So let me talk about how
I'm going to approach mixing in audacity and some
things I might think about. The first thing I'm going to do is I'm going to
look at the mixer. Audacity does have a mixer. If you go to the View menu
and then down to Mixer, we get this, okay? There's not a whole lot here. It's pretty simple, but
it's everything we need. So let's get to a
spot where there's a lot happening maybe
like, right here. Alright, this is soloed.
Let's turn that off. What are you doing? All. Okay. So we can adjust everything
we need to adjust here. We've got our panning here. We've got the name of our
tracks, a weird little icon. I'm not sure what that's
doing. And our volume. So we can do a lot
of our mixing here. Other tools I would
use in mixing would be the compressor
effect and maybe an EQ. And those I would all use
as real time effects. And then I would balance
using the mixer here, making sure everything
stays out of the red. Your master volume, which you can see up
here is in the yellow, then you're good.
Let's take a look. Alright, we're just
touching on the yellow here. There's the yellow. So we could be anywhere between negative 18 and
negative six, really. Anywhere in this range, if everything's sounding
good in that range, then we've got a
pretty good mix. And then we'll use
mastering to get us all the way at full volume, okay? So let's talk about mastering
techniques in audacity.
29. Mastering Techniques: Now, for mastering, this
is a little different. I actually think Audacity is
kind of good at mastering. If we let's actually
just take for a minute, let's take a new session. Let's drop a track in it. So here's a different one.
It's like a quick listen just the beginning.
Switching out. Okay, you get the point. So if I wanted to master this, what I'm going to do is I'm just going to have this
one track here and I'm going to focus
on getting this to sound as good as possible. So first, I'm going to click
effet so I can get to here. I could do effects Because
I only have one track now, I could do effects on the
track or on the master. It's going to be
the same because there's only one track, right? Let's put it on the master. And the effects
I'm going to use, again, mastering is
a huge art form. I'm not going to teach
you how to master in one video in this class. In mastering, some of the tools we use are tools
we've already looked at. We use compressors. We use EQs. We use things
called exciters sometimes. We use more EQs and we
use more compressors. There are other tools
in there as well. My favorite tool to use, though, for mastering is a plug in, so I can use it in
audacity, just fine. But it's made by Isotope here and it's designed
just for mastering. It's kind of like a single plug in that does everything
you need for mastering. It's a great tool for mastering. I encourage you to check it out. Now, we'll load here and you can use it to
master your tracks. It even has some
AI mastering tools where it'll figure out some
of the hard stuff for you. So, I have a whole class on
how to use ozone, by the way. Check that out. Check
out how to master. You can do it using your
master effects right here.
30. Bouncing and Exporting: Okay, once we're all done with our whole session
in an audacity, here's how we get it down to a file that we can play with. We have to do something
called bouncing. Now, this thing, bouncing is called something different in just
about every program. So programs call
it render, bounce, export, Share logic, I think,
likes to call it share. We can still save our
session so that we can open this session up and
keep playing with stuff. But when we're done, we're going to export this
as a single audio file. Okay? It's different than our session. So
here's how we do it. We're going to go to
File and export audio. Okay, now, what they're
saying here is we can share it to audio.com if we
have an audio.com account. I have no idea what that is
or why you'd want to do it, to be perfectly honest with you. So we're going to master it or we're going to export
it to our computer. So export to computer. All right. So what are
we going to call it? Let's call it um funky Groove. Maybe if you're very studious, you're going to put
the date in it, something like that. Where
are you going to put it? Now, what kind of
file do we need here? We have all kinds of options. So you can export this as
whatever kind of file you want, but let me tell you some of the purposes for
some of these files. AIF and Wave those two are the kind of gold standard for high
quality audio files. Are going to be your highest
quality thing, okay? I used to be that
AIFF was Apple stuff, and wave was Microsoft stuff. That's not really true anymore. Both operating systems can handle both files
pretty much fine. Wave has become a bit
more common, though. So if you're exporting as
a full quality audio file, Wave kind of is a
great one to use. So AIF and wave are
the full quality. The rest of these have some degree of compression on them, meaning they're made smaller. The files are made smaller, and that means they're not
as high of quality of audio. However, most people can't
hear the difference. So if you want to make an MP three file,
it's right there. Og files are a unique thing to, like, the og player. I don't really ever use those, but a lot of people
really like them. They sound really
good, supposedly. Same deal with flack files. I don't know what
an MP two file is. I think it's a video
file, actually. And then here's just other
things that you can do. Honestly, I only ever
use Wave and MP three. If you use MP three, you may be prompted to download
an extra thing. Um, And if you are, just follow along
with what it says. Sometimes you need to download another extension to
make MP three files. But let's make a wave
file. So it's stereo. This is our sample rate. This is our encoding, our bit
rate. You can leave that. Those should be fine
right where they are. You usually shouldn't
have to change those, even if this says 41. If it's 41 or 48, you're good. Entire project. Trim blank space. I'm going to leave it out entire project. This metadata stuff
won't really matter here because wave files don't
really support much metadata, as far as I know,
but MP three is do. So if you export
it as an MP three, you can put in metadata here. That's going to be like the
composer name, the producer, the artist names, the copyright, the track, just a
bunch of texts. Okay, so let's export that. This sometimes
takes a minute for your computer to think through everything and save
it as one file. That's how we do it. Now we have a file, and you
can upload that file directly to SoundCloud, Apple
Music, Spotify. You need to have an
account in order to upload those to
Apple Music or Spotify. If you're interested
in doing that, check out some of my music
business classes where I talk about how to do
that in full detail. But for now, let's talk a little bit before we wrap
up about podcasting, I know this is a really
popular app for podcasting. So let me just show you how
I'd set it up for podcasting.
31. Setup Options: So audacity is quite
popular for podcasters, so I thought we'd talk
about how to do it. So first, how do we set it up? So the first thing I'm going
to do is I'm going to just set it up to record audio. Let's assume we've
got two mics, okay? So I'm going to make a
new track, stereo track. There it is. Now
I'm going to go to my audio setup and
say recording device. That's the right
thing. Now, in that, I'm going to assume that I
have a microphone plugged into channel one and channel
two, two microphones. So recording channels. Two. Okay? Now I can hit record, and I'm recording on
channels one and two. Now, I actually only have a microphone plugged
into channel one. So two is empty. But if you had two
microphones going, this would be how
you would do it. Okay. Now I'm going to
rename this just to be tidy. And I'm going to name it
hosts, maybe two people. And then maybe we're
going to set up another track for Soundtrack. So maybe this is
where you're going to drag in all of your audio files, music, anything like that. Now you can mix between the two, control the volume
of your effects, and you got yourself a bodcast. Next, let's talk about a
couple of editing tips.
32. Podcast Editing Tips: Okay, so editing a
podcast, couple of things. First of all, for
your soundtrack, if you need another
a second track to because you've got a lot
of soundtrack elements, that's fine. You can dit. But I would try to do it
in one track if you can. For editing the voices, one thing you might want to
do is separate these voices. If there's things where, like, we need to cut out something
that one person said, but not the other person, then we should probably
separate these. It's going to be a lot
easier. Here's how we do it. I'm going to go up
here, I'm going to go to split Stereo track. Okay? Now I've got two files, right? So now I can say,
whoops, that was a goof, select something,
and let's delete it in that way that
leaves the empty space. So that's going
to be Edit remove special and then and leave gap. We could probably
remember that key command if we're going
to do that a lot. Now I can move this around and I can move that around and
do whatever I need to do. I can cut out stuff like
that and delete things. So maybe this was a
cough. Get rid of that. So be sure you separate
those tracks, though. They're going to be a
lot easier to edit.
33. What Comes Next?: All right. We've reached the end of this class on audacity. I hope you learned a
bunch of audacity. I hope you're able to achieve everything you
want to achieve with it. It's a really cool program. It's a really valuable
utility. I'm glad we have it. So, what comes next? What if you want to go farther. You're feeling pretty
good about audacity, but maybe there's
some things with it that you're feeling
you can't quite do. In that case, I'm
going to encourage you to take a look at
logic, Logic Pro. You may also consider
Ableton Live. That's a really good tool
if you're looking for a more full fledged
production tool. So check those out. I
have classes on both. I'll give you a bunch of info about how to get some more of my classes on the cheap in
the text stuff at the very, very end of this class. But in the meantime, when you're looking
for the next thing, consider Logic Pro. What
could you do right now? If you're into podcasting, I do have a whole separate class all about podcasting
that includes getting everything on the podcasting networks
and all of that stuff. So it's distributed on Apple and Spotify and Amazon
and all those places. It's quite easy to do if
you know what you're doing. So you might check
out that, too. Okay, one more video for me, and then we're off to the races.
34. Bonus Lecture: Hey, everyone. I want to learn
more about what I'm up to. You can sign up for
my email list here. And if you do that,
I'll let you know about when new
courses are released and when I make additions or changes to courses you're
already enrolled in. Also, check out on this site. I post a lot of stuff there, and I check into it every day. So please come hang
out with me in one of those two places or both,
and we'll see you there.
 J. Anthony Allen, Music Producer, Composer, PhD, Professor