Transcripts
1. Welcome to Notion — Let’s Build Your Metrix Dashboard!: Hi, Ryan. My name is Susan. I'm content creator and
creactivity enthusiast. Over the year, I've helped
thousands of students and professional create system that makes their life simpler
and more organized. In this class, I'm going to show you how to use
school potential of notion and transform the way you organize your life and work. This class is designed
for beginners as well as intimtd user who wants to go beyond just taking
notes and notion. Step by step, we will build ratika system together
from personal dashboard, habit tracker and
knowledge best serve to team workspace that make
collaboration effort less. By the end of this class, you will have your own all in one productivity system that's
tailored to your needs. Whether you're student
managing classes, or freelancer balancing projects
or professional looking to stay on the of headlines,
this class is for you. You don't need any prior
experience with notion, less curiosity and
willingness to experiment. Our class projects will be to design your own notion,
workspace from scratch. You will follow along with me
to apply what you learned. And by the end, you
will have personalized setup you can actually
use every day. I'm really excited to see the amazing work you
will create with Notion. So let's dive in and let's start building all in one
productive system. I will see you as in
lead course lesson.
2. Getting Set Up with Notion – Creating Your Account & First Steps: Yes. Hi, Eon Chetanar. In this do, we are down to how to get started with notion, the only tool you need to organize your life,
studies, and work. Whether a student trying
to get into topi or assignment or a freelancer generally between
multiple projects. Mastering Notion can
simplify all of them, and best part is, it is
super easy to set up. Plus, I will share
all the key tips to avoid overwhelm that trip
of the most beginners. So ready the champion. Before we start, here's
the quick question. Have you ever opened
to like notion? Stayed at the
interface and thought, This is way too complicated. Don't worry. You're not alone. Let me show you step by step
how to set up notion in the right way so you can skip the confusion and jump
straight into productivity. So if you already
have Notion account and you download the Notion app, you can totally skip this video and event over the next video. And if you don't
download notion and you don't know how to download
it or how to set up it, so was this video. So open your favorite browser. So in my case, it is Chrome. So let's go to Chrome
and let's add notion. And just go to Notion, the first website.
The low is like this. I hope you know
how Notion looks. So on Notion website, we get some basic information
about motion, like how it works and what
we can do with Quien. But now we are interested
into how to log in. Okay, now, let's
login into Notion. So it is simple, just
go over here and login. So it will ask you if you
want to continue with Google, Apple, or you want to
create your own email ID. So I'm going to go with
my Google account. If you want to add with Apple
ID, you can also do that. So let's continue with Google. And so I'm going to
choose this account. Okay, so notion is asking a few questions like how do
you want to use this notion? So in my case, I want to use
this only for personal life. If you go to school, you can choose school and if you work, so you can choose this option. So for now, let's COVID
personal personal life, and I want to find my own. I want to shared account, you can also choose
this one, but I guess this is
the paid version. So for now, let's go with
on my own and continue. So it is asking
what's on my mind. Select as ma w. So I want
to do habit tracking as well as posit taking,
career building travel. Let's select all
of them, because I want to do all of the things. So continue. And boom. So as you can see,
we got our notion. And as you can see, we
have lots of templates, but I will say stay away
from the templates for now. So this is the first method how you can get
started with Notion, you can use the
webisin if you want. But when I started with Notion, I stuck to the browser gin? Why bother downloading the app? But switching to desktop
app made a huge difference. It faster, distraction free, and just feel more polished. Trust me, try the app. So to download Notion app, you just have to go over here
or you can create a new tab and that you can type download Notion for Mac
for Windows like that. So in my case, I'm going
to go with it the app. And so it automatically
detected my OS. In my case, it's Mac and
it started downloading. And if you have
the Intel version, Intel Mac, so you can
choose the Intel, in my case, I have three Pro, so it automatically rejected
that and Cad it on its own. So I hope you know
how to install it. So just install that. So I installed my
motion app on my PCs. So it looks like this. So as you can see, this is the interface. And as you can see, it is
kind of distraction free. So in the browser version, we get this extra bar,
and I don't want that. So that's why I prefer this one, and we can use lots of
shortcut over here. So these are two methods to how to get started with motion. So I want to give advice. Start simple. It's tempting to dive into all the
flashy templates. Notion offers, but
here's the deal. If you start with a
bunch of templates without understanding the
basic, you will feel lost. You know, I made
this exact mistake. I downloaded every cool
looking template I could find. But instead of
feeling organized, I just felt overwhelmed. It wasn't until I started
from scratch with a blank page that I
really got notion. So when I logged in notion, clear all the
templates over here. So I can see a journal
personal website and all that. So to delete the
notion template, just click on this three
dot mano and click on Mototas like this and
delete all of them. So as you can see, I deleted all the templates
which Notion offers, so we can start
from this scratch. So that's a photo video. So I just wanted to show
you how to download notion and how to get
started with notion. So in next video,
we are going to see some basic fundamentals of how to use notion and few techniques
like how to add pages, order blogs, and
a few shortcuts. Before we end this video, I want to give you one task like you have to explore
notion on your own. Spend 10 minutes on Notion and
see which button do award. I know you will make
lots of mistakes while doing that,
but don't worry. We always learn
from our mistakes. So make as many mistakes you want and spend 10
minutes on Notion. So to recap, we first
learn how to choose the past platform for your
web, desktop or mobile. Then we learn how to start with blank page to avoid overwhelm. And then I gave you
the assignment that is Explore notion on
your own for 10 minutes. I know getting
started with Notion doesn't have to be complicated, so stick to these steps and you will be up and
running in no time. So that's all about how to
get started with notion. So this photo is do, and I will see you when
the next one is out.
3. Class Project : Build & Share Your Life Operating System in Notion: Hello. Hi, Ryan hadner.
Welcome to this video. In today's section, we are
diving into the phone part, creating your own live
opening system, the matrix. In notion, by the
end of this video, you will have personalized dashboard that's both
functional and inspiring. Plus, I will show you how
sharing your projects can actually supercharge your
learning. Why does this matter? Because having a system to organize your life
isn't just helpful. It's transformative,
and trust me, creating it is easier
than you might think, so grab a cup of coffee,
and let's get started. Let's start with the basic. We are creating a life operating
system dashboard matrix. Think of it as your
personal homepage. A one stop shop for everything you need
to stay organized. Doesn't have to be fancy. Simple set of work just as well. Research shows that visual
organization system boost productivity and
reduce mental load. By building a system
tailored to you, you are setting yourself up
for a long term success. I remember when I first
started with Notion, I was overwhelmed by
the possibilities, but once I created
my own dashboard, it was like a light bulb moment. I finally had a structure
that worked for me. Think about the areas
of your life you want to organize it is
your personal goal, work project, or maybe
even fitness taco. Start with one or two sections, and we will build from
there. Here's the question. Have you ever learned something new by seeing how others do it? That's the magic
of collaboration. Sharing your project isn't
just about showing off. It's a way to learn, get inspired and connect
with others in this class. I have been blown away by the ideas I have gotten
from my students. Once a students share a
habitaker that immediately adds to my own dashboard,
it was that code. After building your dashboard, you take a screenshot or share a link to
your notion page. It doesn't have to be perfect. The process is what counts. You might be wondering,
what if my dashboard doesn't look as cool as
others? Don't worry. The goal is function or form. Start with what works for you. Your iguals include on screen
examples of dashboards, showing a range of
minimalists to advance. Add rhetorical questions. What's the one thing you wish
you could organize better? That's the perfect starting
point for your dashboard. To recap, here's
what we covered. The purpose of your live
opening system dashboard. Why sharing your projects
is a game changer, and how to get
started step by step. Challenges. Remember,
it's okay to start small. Your dashboard doesn't
have to be perfect. It just has to work for you. Now, here's your next step. Take a screenshot or share a
link to your notion project. In the class project section, I can't wait to see
what you come up with. And who knows you might
just inspire someone else. So see you in next video is out.
4. Understanding the Notion Interface Like a Pro: Have you open
notion and thought? Where do I even begin? Well,
you are in the right place. In today's video, I'm going
to break down notion one oh one in simple and
a chamber steps, so you can navate it like a pro. By the end of this video, you will know exactly how
to set up your workspace, how to use sidebar, as
well as you will know a few killer shortcuts.
So let's dive in. As you can see on the screen,
we get this interface. And if you go here,
we get this side bar. And the shortcut to
open this side bar is command and this slash.
It is about the enter. In this sources, I will provide all the
keyboard shortcut, so you can access that and you can learn all the shortcuts. I will say printout
and keep on the table. So whenever you need them, just look at them and
use this shortcut. So for now, the
shortcut for us to open close your sidebar is
command and slash, and for Windows, it is
Control and the slash. This. So first option, we get this of workspace. So for now, I have the
FOR workspace over here, and currently I am in
this last workspace. So as you can see, it
is the dit O here, and I can switch in between
like this and this. So let me tell you
what is workspace. Workspace is like your
digital command center. It's where everything you create and organize
in notion lives. Think of it like having
separate binders for work, personal project, or hobbies. So when I first started, I kept everything
in one workspace because honestly,
it felt easier, but as my project grew, I realized separating work from personal stub saved me
so much mental energy. So let me show you my workspace. So this is my test workspace. I created to Gu notion, and this is my
personal workspace. And in this, I have
a few trackers. So as you can see,
this is my tracker, and I track every day what I do, and the daily task, I just dig them like if I recall video, I
just click on them. And the course I
currently working on. So if I go inside it, so I can see all the
scripts and all that, and after that, I have
few notion proms. This is my workspace. Let me
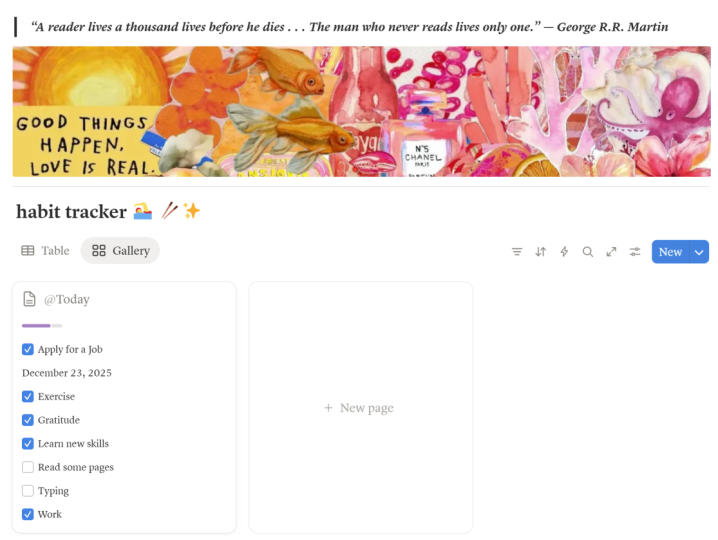
show you my habit tracker, which I used to track my habits. It is obvious. So, okay, so as you can see, this
is my habit tracker. So every day I set up
like meditation book, gym, supplements, protein
and all this stuff. And at the end of the
create the score, like, did I finished it or not? And I can also view the gallery
view as well, like this. So you can see all
my habits over here, and this is a simple log. So I know it is a bit
overwhelming and you also want to create
it. Don't worry. By the end of this course, I'm going to create one
abit video or this project, and in that we can create
this habit tracker. I also have some
shared workspace. This is my sister's workspace. So she works with me, she
edit my all the video, so she tracks which video is
edited or not and all that. So this is how you can
organize your workspace, one for personal, one for work, and all those for sharing. If you want to create
only workspace, that is totally fine. So that's all about workspace. Okay, now let's explore the
next option that is search. So you can just click it over here and you can search
anything in your notion. Let's say if you
have page like this. I will random name something. Okay, I have some name, so I can search it.
I will say home. And if I go back and let's say I have multiple
pages and I want to search. So I can use shortcut
Control P or Command P, and I can just search
it for form form one. I renamed it home one and
SOC, I can ext over here. And there is another shortcut
Control K like this. You go use this one as
well and Control I will recommend you to use Control P because
if I use Control P, and if I use it
again, it goes away. But if I use Control K, it stays there. It doesn't grow. So therefore I use Control P. And after that, we
have Notion A AI. With Notion AI, you can do
really powerful things. I will make special
dedicated video on that. So straight about that. And after that, we are home, so it will redirect us to the home where you can see
all your pages and all that. And after that, we have invoice. In invoxe you will
get free notification like you want to call someone or if there
is any reminder, it will also notify over here. It is kind of notification
center. And this is our page. Is going to see this our page. And we can create
multiple pages over here. So as you can see
in getting started, we have one page
called Home One, and I can create
separate page over here. Over here, I can
create multiple pages. So if I just click
on this button, Control the new page
and you can also use shortcd Control and N. In Mac, it is comadin use Camadin. You can name it
whatever you want. I will name it page
two, like this. So now we created this page. Now let me tell you one thing. You can create infinite
pages inside pages. So if I go into this page and if I set page
and you can see, I created one page again. So it is inside it,
and I can go inside this again and I can create
another page like this. So you can create infinitely, and it's kind of like inception. Okay, after that,
we have calendar. It is basic calendar.
I didn't download it. But if you want to download
it, you can download it. But in future, I will make
special video on that, so stud for that as well. And after that, we have setting. In setting, we can
change lots of things. First let's go with my account. So in account, you can
see my profile and name, as well as my email ID,
password, and all that. And where is your account
logged in currently? And as you can see
on three devices, my account is log in right now. And after that, we
have my setting. Or you can choose basic things like Dak mode or light mode or use system one I mostly
go with a Tak mode. Laptop, all the apps have
dark mode because I dark more because it doesn't
make my eyes soar. So there are basic few settings. You can just read it and you
can understand what they do. So I'm not going
to explain them. So after that, we notification
up that connection. In this, you can
add the apps like Slag tri and Jira sync,
if you want to add them. And after that language. So currently it is in English. I hope you all
understand English. But if you want to change
it in something else, you can also do it
over here from here. So after that, we
have upgrade plan. So over here, we get
some basic plans. So currently we are
using this one, the free one, and after that, we have plus, business
and enterprise. If you have any of them, you can choose any of them. After that, we have
sitting. So currently, my notion doesn't have any icon. So let's give this
like this Imog and I'm going to
change this into this. So as you can see
on my workspace, the logo change,
it is over here. Hm. Okay. After that,
we have team space. So currently, I don't
have any team space. But if I want to add
a few team member, you can also do that over here. After that, we have people.
If you invited a few people, it will show over here, like, as a guest or as a group, as well. After
that, we have site. Let's say, you want to create your motion page and you
want to make it public. So you can also do it over here. So in upcoming builders, I'm also going to show
that how to create your personal side using
motion. So stay for that. And if you want to add
your personal images, you can also add it over here. And these are some
basic settings like security or identity and
connection and import. So if you want to ignore it,
you can totally ignore it. Most of the time we are
not going to use them. But let me show you input. In input, you can import data
from these apps like this, and you can also import it from your caputer if
you have any data. So this is all about studying. After that, we have templates. So you can download
any templates which are available over
here and directly use them. But I already told you don't
use templates directly because you don't know how
to use notion for now, but if you try to use template, you will get, like,
What is this? I'm not getting this. A
little this happened with me when I started using
Ocean like two years ago, and I downloaded really awesome template
about habitacking, but I didn't know how to use it. So that time I learned
the basic first. Then I started using templates. And after that, we have trash. Over here, you will get
all the deleted files. As you can see. In last video, I said
all the tablets. So it is over here. If
you want to recover it, you can restore it as well. And this help center from here, you will get some help
and documentation. And this is the
keyboard shortcde. From here, it will rewrite
you to the Notion website, and from here, you can access all the Keyboard
ShortcdesO here. So you can act over
here if you want. Okay, after that, we have share. So if you want to share
your notion with anyone, so you can click on share, add their email ID, and change a few
things over here, like everyone with this link
can access your notion. You can also set your links can that person edit this page or can that person
view this page? So you can also do it over here, and we can also
publish our website, the notion page if
you want to do that. So I'm going to show
you in future videos so stdio for that as well.
And this is command. So listen, we added a few
command like what is okay. What is this? So if you add someone
in your notion, and that person can come in. This is the test page like this. And I can reply or any other
team member can reply also. Like this is page. But this and you can
also mention someone, let's see if I add add and if
I type the name of person, you can invite them over here. And after that, we have star. So star makes your
page into favorites. So as you can see, it
created over here favorite. And the last one is
this three dot menu. From here, you can change a
basic thing in motion like a fon full page
width and all that. So I'm also going to make dedicated video on
that Sadio for that. So this is all about
notion one on one. I hope you understand
all of them. I know I pro a bit fast, but you can adjust
the speed over there. But this is the basic part. So that's why I am
explaining in hurry and y. But in future videos, I'm going to repeat this 1,000 times, so you don't have to
worry about that. So that's all about
notion one on one, the interface, the
interface of the notion. So I want to give one
task now open notion. Like I showed you
a few things like about workspace, search home, inbox, and pages, how to create pages and all that
about setting as well. So go through that or try some shortcuts like I taught you about
this command slash, use this Also command and
N to create new page, so use few shortcuts
and try it on your own. That's about tourist video,
and in upcoming videos, I'm going to show
you how to work with templates as well as how to work with design
and all that. So straight over that. So
that's about tourism video, and I will see you
as for the sound.
5. Pages & Blocks Explained – The Building Blocks of Notion: Net go. No, no, go. Hi, Ron Caner. In this video, we
are diving into the absolute basic of
notion, pages, and plogs. If you have felt confused
about how notion works, I thought they seem a bit
overwhelming, don't worry. By the end of this video, you will have a solid
understanding of two key building block that
powers everything in motion. Trust me, it's super simple, and once you get this down, you will unlock notions full potential. And
here's the best part. This is all backed by
practical experience, so you can start
applying in right way. So in previous video, we created some pages
like this page too, and inside that we also
created one page again. And inside that we
again created one page. So this was just a
basic about pages, but we can do a lot more pages. But before we start, let me
tell you what are pages. Think of pages as a digital
folders or documents. They are your workspace. In notion, every task list, project or journal entry
can be neatly organized into its own page. So let
me show you one thing. When I started using Notion, I made this mistake of overloading my main
pages with everything. So as you can see on my screen, I have this page, and this is the name of pages learning course,
Notion, something like that. And in that I added
lots and lots of pages, lots of text, lots of do list, lots of buttons, the gifts, and my videos as well,
the map and all that. But once I begin creating dedicated pages for
specific purpose, like my work Os. So as you can see, it
is neatly organized. And if I open this
page, inside it, I have multiple pages, I have scripts, Troms, and all that. So as you can see, it
is neatly organized. So let me show you
another page that is Cason Life OS In this I
created this Habit tracker. So every year, I create this habit tracker and it
tracks my habits like this. So Improv, we saw on
how to create page. You just have to
click on this button. It is over here,
and the shortcut is command in or control in. So create a new page and
name it whatever you want. So, Liz, I was thinking,
for this course, I want to or for this class, I want to create one project
like the matrix page. So in this page, we
are going to build a really cool notion
tablet for us, so it will track
our health habits, maybe workout or meal or travel, like all kinds of things you can create over here and you
can track it over here. So let's name it the matrix. Okay, before we go any further, let me show you a few things. So as you can see, down over
here, we get few options. Like we can ask AI. We can create table like this. And if you want to create, um, Okay, let me delete this because I
don't own this right now. Okay, so we can create table, we can create forms, as well
as we can create databases. Let me show you how
database works. Okay, I'll create
this one again. Okay. Okay, we can also add or import templates in this from notions
templates over here. But for now, we are
just interested in creating everything
from scratch. So I'm not going to do
all of those things. So this is all about pages.
Pages are just simple. We can add icon. Let's
say if you want to add any random icon, you
can add it over here. So let's go with, like, let's say, this Imoge. I know it doesn't go with
our be, but you can do that, and you can also change it and you can upload your own imaging, or you can use
icons from Notion, which Notion provides over here. And you can also
upload your own. So there was one website
called ImogA something. So from that, I made this new Imoge and I can
upload it over here, and it totally works fine. So, as you can see, I
had the image of No. Let me show you that
website so you can also use that to create
Imoges like this. Okay, so this is the
website, go to Amogs. In Resources file, I
will add the link, so go there and
create your own Imog. You just have to
type what kind of imagery you want and
describe over here, and it will generate
Imoge for you. And in resources, I will add the SMOG as well if
I want to recreate the project we are building in this course or class,
you can totally do that. Now, this is all about pages. You can also add cover. Notion offers some
basic covers like this. If you want to
change cover, there are multiple options over here. You can upload your own. You can add a link. It is also unsplash. It is a free stock
footage website. You can use one of them as well. If you want to search it,
you can also search it. And these are the basic
gradient which Notion provides, as you can see over here, you
can also re postion them. Let's say you don't
like the position, so you can position them
like this while dragging. But mostly I like this kind of background or
this kind of code. So that's why I added this pixel animated gif kind of thing. So I will provide the
print wrestling of this. So if you want to copy this, you can totally do that. So this is all about pages. Now let's jump into what are blocks and why they
are so powerful. Blocks are the building
blocks of notion. Think of them like lego pieces. You can move, stack or rearrange
them however you like. Oh, let me show you
how blocks works. So I have this
template over here. So, let's say you
want to rearrange the start date over here,
you can just track it. If you want to move
it somewhere else, you can also do that. Like, you can move it
over here as well. And in notion,
everything is a block. So this database
is also blocked. You can move it anywhere. This one is also blocked. Whereas this page is also block. As you can see
over here, this is a page and I can
move it anywhere. Or if I want to move it
totally somewhere else or if I want to drag it on another
column, you can also do that. You just have to
drag it over here. On the right, I will
show you the blue line. Let me show, as you can see, the blue line over here and you can totally move it over here. And you can also
edit it like this. Hm so with blogs, you
can do lots of thing. If you click on
this six Tout menu, the vertical six Tat menu,
you can delete them. You can duplicate, you
can open as a page. You can also turn this thing
into another thing as well. You can copy the link.
There are multiple things. You can also log this database. So this is database. That's why it is
showing database. But if I go to page, we get
more options like M two, add to favorites, merge, color. So we can do lots of
things with loves. Let's go to Metric. Let's
add something to our page. So I'm thinking
to add this line. So in nottion blocks
are like matrix. You can went them, stack
them, create your reality. Just don't go looking
for the new blue pill. So as you can see,
this is a block. I can move anywhere I want. I can move this
over here as well. I can also move this in
different column like this, but currently, we
only have one column, so I'm not going to do that. So this is how the blocks works. Just remember everything
in notion is a block. So if I add something over here, this is also block,
this is also block. This is also block. And if
I move down any file page, let me go back side again. This is also block, and I can also
rearrange it like this. I can drag it over here or
I can move it over here. I can turn this into something else like turn into
number lag heading, call out, code,
something like that. So I'm thinking this
is kind of code. So let me for rearrange
it over here, and let's convert
this into code. Like this, so as you can see. So for code in notion, we get this kind
of vertical line, and this means it is a code. And let's delete all the
other things from this page. Just select all of them and just hit delete on your keyboard like this and it will
delete the selected part. The real power of notion
lies in combining pages and blocks to create fully
customized system. So when I built my
workows, I started small, a single page with
a few text blocks or time added new elements, like a habitaer, a
project dashboard. Now it's my go to
tool for every day. Now you might be thinking,
This sound too complicated, but trust me, once you try it, you will see how
intuitive it really is. So this is all about pages
and blocks and notion. To recap this, I
will say one thing. Notion revolves around two
main as pages and blocks. Pages are your digital workspace for organizing information, and blocks are flexible
building pieces you can customize and rearrange. By combining these, you
can create anything from simple to last to fully
functional work Os, which I build it over here. Or you can also build the
fitness tackle like this. Sure, it seems a bit
overwhelming at first, but remember, start small
and build as you go. So for this video, I have
one project for you. Create a new page in motion. You can name it matrix, or you can name it
whatever you want, add Emoji kind of this. Add a notion code to it, and if possible, add
some code like this. And you can also add random text and also play around with
ending and moving blocks. Don't worry about perfection. It's all about
learning by doing. Okay, in next video, we are actually going to build
this matrix page, which I created very long ago. So as you can see, we are
going to create this. So I added a few things
over here like live goals, daily be tracker,
meal chill planner, travel moodboard,
work organizer. Sorry, weekend phone organizer. And these are some basic tasks which we can just
select like this. It's kind of Tod list.
It is Todo list. After that, we have things to do and wipeg and quick nugget, quick nuggets, as
well as this list. So these all kind of things
we can do in notion, and in next udder, we are going
to build this whole page. And in resources, I died all
these kind of gift files, so download them, and just
telecon change upload and upload it over here. So that's the photo do, and I will see you as
in the next it out.
6. Building Our Life OS – Your All-in-One Productivity System (The Matrix): Hi, everyone, Taner. Have you wish for a system that keeps your life organized, focused, and even little fun? In this video, we
are going to build your own metrics in notion. By the end, you will
have a dashboard, trailer to your goals, routine, and habits, all using
Notion's simple, flexible tool. And don't worry. It's easier than it looks. Plus, you will discover how
to make it visually stunning, so you can actually
want to use it. So all ready. Let's get started. So in previous video,
we added this page. We also added this Imog
and we added this title, as well as this code. So in this video, we are going to create
something like this. We are going to create
this mission control, as well as the
today's dashboard, as well as this
kind of checklist. So we are going to
create all of them. And I will divide
this in two parts, so I don't want to
make a lengthy video. So there will be two
videos, and in those video, we are going to build this
whole interface, the matrix. Now let's understand why
we are building this. So your dashboard is the
home base of your matrix. Think of as a digital
command center where you can see
everything at a glance. When I first started
using Notion, my dashboard was just a blank pages with
few random notes. So let me show you how
my notion used to look. So as you can see,
this was my interface, and this is really weird. So I read this daily pander and I created this random table. So in this, I had time
and what I have to do, but this is really a four. And over here, I also
created two list. So as you can see,
as compared to this, this looks really cool. And this is bad, totally bad, and also look ugly. So introd video, we
are going to build this really cool looking
dashboard, thematics. First thing first, let's add few text or maybe
a few headings. So if you hit slash
on your keyboard, you will get a few
options like basic block. So as you can see, this
is the basic block. So let me zoom it first so
you can see it more better. So for this, you can
use Command and plus button on your keyboard
to zoom in the notion. And after that, we
have notion AI. After that, we have media,
as well as database, and at the end, we have Advanced logs, and we also have plugins, I guess. We have in line. After that, we have embeds, and I think that's it. That's all we have
in this slash menu. Okay, now I want to add heading. So I can just hit slash and
I can type heading one, two, three, or I can
select from this. So in this case, I want heading one and I want should be big. So heading one is kind of big, and I want to name it
mission Cato like this. And there is one thing, you can access heading
in multiple ways, like if you hit slash
and if you just typed heading and you
can select it from here, well let's you can do H one, H two, H three. So let's say if you choose
three and hit Enter, it will create heading
three, and you can type. And you can type over here. This is H three, like this. So far now, we don't want this, so I'm going to res this one. And let's, let's say you want to convert this H one
into something else. So you can hit Command
Option one for H one, command option two for H two, and command option
three for H three. So this is one of the shortcut which notion offers
for headings. Now, I want to
create a few pages. So in these pages, we
are going to store our information like
our daily habits, maybe what kind of
food we are eating or maybe exercise or the movies to watch,
something like that. So for that, you
can hit slash on your keyboard and
choose or type page. You can access this way, you can hit Lenter
and as you can see, we created page, and I'm going to name it
the cold trigger. And now let's cue
an icon to this. So I downloaded free
icons from that EmOGAI. So I will add in recesses
if you want to do the same, if you want to add
the same thing, so you can do that totally. So for this, I'm
thinking I will add this one and say Okay, so as you can see,
we got our planet. That is our life gold tracker. So this was the first
method to add pages. Now, if you hit slash and
just type B and hit Enter, you can also create same
thing and create page. You don't have to type
whole thing, type slash B, Enter, and you will get
new page like this. And I'm going to name
this Di be tracker. And for this, let's add an icon. I have another icon which is I downloaded
from that website, so let's go with Let's
go with this one. Save. So these are few methods
how you can add pages. And I will add more pages. I will force for this video, and I will add more pages. Now, we have added all the pages which we need
for this matrix interface. Now, what we can do is that if you click on
the six dot meno, the vertical six dot meno, so you will get few options. You can turn them
into something else. So as you can see, we can
turn them into anything, and we can choose anything from this, anything
from this list. But we are interested in color, so I want to give them color. So as you can see,
they are good, but if we give them color, it will look more aesthetic
or more addactive. So I'm thinking to give
this let's go with yellow. After that, let's
choose maybe green. And for meal, let's go
with pink for travel, let's choose right and
for a weekend weekend. Let's go with blue. So this is how we can color
our pages or maybe text. You can color
anything in notion. You just have to hit this six total vertical six
tot menu and as gonna see, you get the option to choose text color and
background color. If you choose a text color, in this case, if I choose
blue, it will look like this. And if you choose this into
this, it will look like this. But you can't do two
things at one time. Like, you can't set
background color to this. You can only set the text color. Like, as you can see over here, if I try to set background
color, it will go away. So I can only do one thing. That is this. Now we
have created pages. We can add anything to them. Like we can add tables,
forms, templates, as well as all the things board timeline calendar
gathering, all that. Okay, we are done with
our mission control. Now I want to add today's mission like I
want to create some to do list where we can add few
items and we can check them. So hit slash on your keyboard, but I want to add heading, so I'm going to type H one into, and I want to name this
today's mission like this. And let's cue emoji to this. Like we can add this the solute, but I don't know why it is hub. So let's try again it's mission. Okay, let's go undercover and I have one thing in my mind. Let's go undercover and
let's add this Imog. So I'm going to read this one. So this is our today's mission. And today, we are undercover. Okay, so I have a few
things in my mind. I have to do a few things,
so I'm going to add those. But before we do that, we
can hit slash Ono keyboard, and we can search for check. Like this, you can
also type two, and it will create a checkbox and you can click on
it. It will check it. If again, click it,
it will uncheck. So before we do that, I want to divide this
into two sections. Like I want this to be in, let's say, this should
be the top priority. So let's give this like this, top priority, and in this, I'm going to add
and top priority for two days is complete
the client proposal. And if you when you are done
with this client proposal, you can just click it like this. Okay, these are like,
really important task. Now, let's add a few tasks. They are kind of
our side mission. So we can add over here
side mission like this. And you can also give
Imago to this as well. Let's give this. Alright, it
looks real Let me change it. Well, let's go with a butterfly. It looks beautiful.
That's why I chose it. Okay, so I want this to be
in over here at the end. So I'm going to
put it over here. So this is going to
be my sit mission, or I can put it
over here as well. So, and this should be in H two, I guess, because
this is a heading. This is not a task, so I'm going to make this into heading. So for that, I'm going to hit Command Option two for H two. And also with this
one, co option two. And this should be
in HI, I guess, so I'm going to convert them
into oh sorry, H three. Sorry. Okay, this is not
supposed to be in heading. It's supposed to be just text, so I'm going to choose
text again, text. So as you can see, it is small. Okay, so in side mission,
I have a few things. Before we do that,
I want to show you another method to add too. So use the square
brackets like this. And if you hit space, you will create two to box like this. This is the shortcut. So let's go and let's
create one once again, the Too box chat list, side Square bracket, right
square bracket and space. Now, in this, I want to
add on your bookshelf. And as you can see, the box is lost were, so I'm
going to add it again. So this should be kickable
and I guess this become bolt. I don't want this to be bold, so I'm going to make it normal. For this, you can hit
Control B to make bold and unboold and
you can also press um, so if you select all of this, and you can press this. So if you press Italy,
it will become Italic. If you press underline,
it adds underline. After that, we have
strike through. It adds this kind of
line on the text. So for now, I don't
want anything on this, so I want just normal
text like this. Okay, so we have top
writing inside mission. So inside mission I want
to add a few items, so I'm going to
add them as well. Okay, so inside mission, I add a few items like
Organize the bookshel, write a letter for feature me, try any new coffee brew. And last one is film or real
about why I love notion. So this is all about how
we can create to do list. Okay, now one another
really cool thing we can do in notion is
that we can add reminders. Let's say you want
to call someone. Let's say, there's my
friend Corll Matan and his birthday is tomorrow. So I can set reminder as
tomorrow is Martha's birthday, call tomorrow at this time. So we can create
reminders like this. So I'm going to hit slash, and this should be an H one. And I want to name this
fake nuggets like this. And let's add few reminders. Like hit slash and
like remind turf. Or you can also add date. And I want tomorrow's date
and tomorrow is birthday. So I'm going to choose this one, and I can add note like this, Call Manan to wish
him a birthday. And tomorrow it will show me
a notification over here. So inbox, it will
show me this message. The whole message like call Manthan to wish him
his happy birthday. I can also add another
thing like, let's say, I want to add date and date and in this date
I can choose today. Today, I want to do this task, submit project report
by 3:00 P.M. Like this. Now let's add another reminder, and there is another matter
you can add reminder. You can use add direct. So hit Add direct on keyboard, and as you can see, we
get few options like UCS. You can set reminder for
today or for tomorrow. You can also invite few people. So currently, I don't have any people in this
people's section, but I can totally
invite them from here. But let's keep that for now. So I'm going to skip that, and I'm going to just add today, I want to learn I want to
water the plants like this. And I can also set
the time over here, include time, and it
added that well AM, but we can change it
into something else. Let's say I want to remind
at 7:00 A.M. Not this. So as you can see, I got one reminder for tomorrow
seven, what are the plants. Okay, this kind of thing you can do with notion. So
this was the part one. And before we end this, I want to change the cover
because this is not that cool. So I downloaded one file from Pinterest, and
it looks like this. And it is from the Matrix movie. If you saw the movie,
you know this scene. So that's why I added
this. But if you want to add this one, you
can totally add this. Okay, so to recap this video,
we added a few things. We added these pages. After that, we
colored the pages. And we also gave the text color, as well as the background color. We also created this
sudo list over here, and we also know how to
create reminders in notion. So these are the basic things we learn today in this video. So in Expo, we are
going to learn about embeds, how to add links, how to add EV
Spotify or YouTube, as well as how to organize
everything in neatly way. And we also gonna see
how to add divider. So these are few things we are going to learn
in second part. So we're stating for that,
and that's about todo, and I will see you guys in
the next one, this out.
7. Mastering Links & Backlinks – Connect Ideas Like a Knowledge Graph In Notion: Go. Welcome, Everyone Chetnir. We are learning how to create matrix and this is
the second part. So in previous woo, we
created this, this and this. So now I want to show you
a few really cool things. So in this video, we are going to learn about few
things like how to embed videos or Spotify
playlist, anything. You can embed
anything in motion. After that, we are going to learn how to
organize these things. So currently, it is
kind of in list format, so I want to organize
into column format. So we are going to do that. We are going to also add
der underneath this adding, so it will look more aesthetic. So let's do that.
Let's add links first. So for this, you can hit
slash and after that, type embed like this. And in this embed link box, you can add any link. Let's see. Let's say, there is one
playlist called Sythware aesthetic and it is one
of my favorite playlist. So I can just copy the link of this playlist and I
can just paste it over here embeddin so as you can see, I got my playlist and I
can play it like this. And if I want, I can
resize it like this. I can also I can
also do this all, long, small and long, like this. Now, we have learned
about how to embed links. Now, let's do another thing. Let's add one YouTube video, one random YouTube video. So there is a one video. I just got on YouTube, and this is a random video. I didn't saw it yet,
but the name of videos, it turns out we have been
sleeping wrong for centuries. And I saw the title of the
video is kind of a tactical. So I thought, Let's add it and
let's hit slash and embed. And let's embed our
video like this. And we can do the same thing. We can shrink it like this. We can maximize it like this. We can drag this and move it
somewhere else like this. We can also do this. So this is how you can embed links in notion. So
these are two methods. You can not only embed links, you can embed, I guess, PDAs on Git up link, as well as the Google
Tribe anything. You can embed anything in this. Even also embed maps.
That's really cool. So this is how you
can embed links, but I don't want this, so
I'm going to edit this one. I just add it to show
you how it works. Okay, now let's add divider. So if I hit slash over here
and if I praise Kewter, we get this really
amazing divider, but it adds another line, like write something or
something like that, but you have to
praise spec space. Now you've got your
personalized divider, and you can also select it. It is also block and
you can duplicate this, hit Alt on your keyboard. The shortcut is t
and just drag it. Now it duplicated and you can
paste it anywhere you want, like this or here as well, or here as well. I just duplicated it. You can also copy paste if you
want even press Control C, and you can paste it
over here and Control B. You can also do that.
But I like this method, the Lt I learned it from HIM. I teach YX as well
on this platform. If you want to check my course, the link is in the resources. So it is my best sello course. I want to check it,
check that out. And you can also
press Control D, select your line divider and hit Control D or
Command D like this. And it not only works with the line, it works
with everything. So let's say I want to duplicate this selected and hit
Control D. As you can see, we got this thing duplicate. I'm going to hit
Control Z to undo this. Okay, now we have learned
how to add dividers. Now let's make our
page more aesthetic. So I want to add this
ismson over here. I want to add columns. So I can just select
it all of them, the whole blocks like this because this is the tismation and I want this
should be over here. And if you drag it, you
will get this line, the blue line, and I can
just leave my mouse button. Mouse button, and it will add
the whole thing over here. But we messed up. And we kind of let this
thing over here. So it's easier to fix, select all the pages like this. Let me to set. So just set all the pages like this and drag it like this. Okay, there is a
blue line again, and this is a small line. As you can see, it got
culmified Culmified. I don't know if there
is a word like that, but it got colmified. But if I move it over
here so you can see, we get more big line, the more big blue line, but I don't want that. I want to paste it over here. So I'm going to paste
it over here like this. So it's going to say now
it looks really cool. And there is one slider. You can move it like
this to adjust, but let's keep it in the center. Okay, but we forward
our divider. Let's drag that as well and
let's paste it over here. Like this. And let's add this
Spotify playlist over here. So as you can see, it looks more cool aesthetic. Okay, so now we have
learned a few things. We add a divider,
as well as we kind of made our page
more good looking. Now, what else remaining is
that we can add toggle list. So let's say I work
out every day, and I want to plan out
my meals for this week. So I can add O here. The right arrow key like
this and I can hit space. It will create
toggle. And in this, I can add meal ideas like this. And inside, I can add
multiple things like this. But best part about this is you can click on this arrow button and it will hide all the things. And I think that
it is one of the best or one of the cool
feature in the notan. So it doesn't look that chaotic, and you can add to list
inside if you want. If you don't want to show
your todo item to anyone, and you can create you can
name it something else, and you can add your own too
list, and it will be hidden. If someone comes to, uh, watch your motion or if someone is trying to
watch your motion, it will be hidden like this. Okay, let me first rename it
because I don't like this. I have a few options in my mind. Okay, you can access
Toggle from hitting slash and search for toggle like this, and
we will get Tagle. And another shortcut is hit greater than Sibo and hit space. It can also do the same thing. So in this, I want to
add the meal planner. And in this, I want to add
breakfast, lunch, and dinner. I have a few ideas. I want
to prepare a few meals, so I'm going to add
a few items in this. Okay, so I just added
a few items like breakfast, lunch, and dinner. So as you gonna see, for
this, I used a list, the list, and after that, it also has a sub list like this. And if I place this
col pan, it hides. It hides my list, and I also added a
snack idea over here. And these are all the
I hope healthy things, not that junk food. So now I added the meal items. I also add I also want
to add the seal planner. And in this, I'm thinking I
will add a few web series, which I watched and I
want to watch it again, as well as my favorite movies, as well as a few series to
watch, something like that. So I'm going to create
toggle list over here, and in that, I'm going to
add my favorite series. Oh, same option, Sheet
better than button space, and I'm going to
name it hill Panner. And in this, I'm going
to add a few items. And if you want to add list
number list or Bullet list, you can just hit slash, and you can search Bo it here, and add Yu Bret list. And if you want number list, search for number list like this and it will
create number list. So let's go with number list
because in this section, we used Breidist. So that's why I want to
add number list in this. Total depends on Okay, so in this chill planner, I add a TV show,
movie night pack, as well as music to rejex and I used bullet list as well and
the number list as well. So these are three
things over here. So, but as you can
see, this is good. This This looks good. But what if I do this? Now, I can do this like this. So I can just go back
and forth in this. But if I add this
under this or here, it looks a bit chaotic. M. So that's why
I added Oh, here. And as you can see,
it looks really cool. So this is all about our matrix. If you want to change the
cow, you can totally do that, the icon, if you want to change, then as well that's
totally okay. In these sources, I
added all the icons. So if you want to use them, download them and use them. And I will also add the
link of this playlist. If you want to recreate
it, you can also do that. And I remove the YouTube video. But you can do if you want to add that, you
can also add that. Let me tell you one
thing. There is a principle called
Pardo principle, and it says, 20% of the things
create 80% of the result. So you don't have to
learn 100% of the thing. You just have to learn 20%. Let's say if you want
to learn any language, and you just have to learn 1,000 words
from that language, like basic thousand words. And you can kind of talk to
anyone in this language. It is kind of example. I'm
just giving you one example. So the main point is 20%
creates the 80% outcome. So this was the all 20%
which Notion offers. If you learn only this,
this is sufficient for you. You don't have to
learn about databases or maybe Adamasblogs. So this is sufficient for you. If you want to stop this
class of course from here, you can a total do that, if you want to learn
about databases, and if you want to create
cool things like this, you can stick to this course, and in upcoming videos, we are going to learn
new cool tricks like how to link pages, how to add databases, how to
add tables, and all those. Oh, to recap this
video in this video, we learn how to add
column like this. We also learn about how to create this toggle
button over here, which is Oh, yeah, like this, and we can access it like this. And what else we learn in
this? We are already divided. So these are the few things
we learn in this video. I hope you enjoy the video
as much I enjoy creating it. So that's it. That's the port
video and IS the next one. But please let me know how the videos are you
getting or not. Give me feedback. So
that's the portati video, and IC as the next one.
8. Styling Your Page – Make Your Notion Pages Look Aesthetic & Functional: Hi, on Cazenir. In this studio, we are diving in to how to style your notion page to make
them look polished, professional, and
uniquely yours. Whether you are setting
up your metrics or just organize your nodes, a well styled page can
make all the difference. The best part is it is
super simple to do, and now we will walk you
through the exact steps. So let's jump in and
transform your workspace. But before we start,
let's understand what is customizing
pages and layout. Notion gives you weak options to change the oral look
and feel to your pages, including font, text
size, and page length. I remember when I
started using Notion, I didn't realize how
impactful small changes like switching to
the full weight or adjusting to font size could be. Once I experimented
with layouts, my pages become more functional
and visually appealing. So style your pages,
we get few options, and it is over here,
the three dot menu. It is in the right corner. And over here, we
can change the font. We get only three fonts. I wish Notion should
add more fonts because I'm a graphic designer as
well as the US designer. So I want more fonts in this because I want to
customize it like, thing. It should feel and
look like mop. That's why I want more fonts, but we get only three options. But the default one is great. Mostly 99% of all the Notan
users use default one. But if you like say
font, you can use this. And as you can see, the font is changed everywhere
on this page. It is kind of nice,
but I don't like this, as well as we get the mol thing. You know, like I used to
play lots of game and game, and I was a game
in my past life, not past, but for five backo. So I used to play a
lot, a lot of games. So that time, that was my wife. So this, in that case, I could have used this font. But right now, I
don't like this. I like this phone, so I'm
going to use this one. I know there are a
few phones which are my favorites like pop
ins. Opins looks good. I hope they add pop ins in this. Okay, next option we get is, we can make our text small. So as you can see, our
text becomes small. If you want to do
that, you can use it, but I like this, so
I'm going to use this. And after that, we get
the full width option. If I enable this, as you can see, everything gets separated. Okay, now if I undo this, it becomes a bit kot, I'll say everything
comes together, and there is no past
left to breathe. It feels like that. Okay, but if you choose this,
it just looks like. And I kind of use this
everywhere in my files. Let me show you.
So as you can see, in this page, I use full weight. If I go over here,
it is full weight. That's why I'm able to
add column over here, and this is the second column. And if I go to my life voice, it is also same
over here as well. And after that, we get few
options like customizing page. In this, let's say let's
say we have back links. So if we hover on it, it will show we have
back links in this. And we have discussion. If we have lots of
comments on this, it will show us as well that if you want to
show table content, let's say we have list, something like that,
it will show that. And it is by default on, so let it be on and we have
after that, inline commands. Like inline comments are like if you have multiple commands, it will show inline. If you don't want that,
you can remove it. So these are the basic things. After that, we get
lots of basic thing. We already saw the log page
if you want to log this page, if you don't want to
edit or if any person directly comes to this page
and start do random things, so you can log this page, so no one can mess
with this page. And we have some basic
options like Undo, copy link get Moto, moto tas input export
and turn into Wiki. Okay, now, these are
the basic thing. We already use it. We can also access
them from over here. Like we can use the
six dot pin Okay, so this is the basic style
thing you can do with pages, but there is more thing
you can do with your text. Let's say, if you select this, you will get this option. From here, you can
use AI of notion. I will make the record
video on this, so for that. After that, we have
comment. So let's say you want to add comment
to this, you can do that. You can also mention
someone else, but I don't want that for now. I'm just showing how it works. After that, we can
turn this into code. Okay, we are currently in code, but you can turn this
into something else. Let's go with, um text. So this change into text, and we can again undo it
by using control side, we can make it plt, Italic. We can add underline strike through. Let me undo this again. And we can also turn this
into code as well if you're a programmer or something
like that because I'm also programmer so
sometimes I use this, but I don't use this a lot. And we also convert
this into equation. But we have to use forma and all that, so I'm
not going to do that. This is kind of
really row stuff. But if mathematician or if you work in
physics and all that, you can use this option. And we can also add links or
we can also page link them. So this is really
great. Now, let me copy some random
links from the website. So let's copy this link. I was watching W Podcast about communication
and all that, so it is that video. So I can copy that
link and paso here, and this became link. So I can click on it, and it will redirect
me to that you video. Okay, let me undo this because I don't want this in my page. After that, we can
change the color. We can kind of highlight
this like this. So as you can see, it
is kind of highlighted, but the color is not that great, so that's why it's
not that visible, but if I choose blue, as you
can see, it is highlighted. Let me change the
color of the text. I can also do that like this. As you can see, the color
of the text is changed. And the last option we get is that we get this three dot
Mino. Okay, it is over here. And we can do same thing which we can
exceed it from here. So you can either accel access it from here,
as well as from here. Mostly, I prefer
this one because this is easy and
I'm used to this. But if you want to use
that, you can also do that. This is all about how
you can style your page. So in this video, we have
learned about page layout. How can we adjust point, Te size, page width to
optimize our workspace. After that, we learned
about inline styling. We made our text
into Italic bolt. We also added underline, we also add strike through. We also added link, and we also highlighted it, and we also added the
color to this text. So now it's your turn. Take a few minutes to experiment these styling tips in
your own notion pages. Start small and have fun making your workspace
uniquely yours. If you found this video
helpful, please let me know. And that's it. That's
your portage video. In resources, I multiple things. Go to resources, check
them out. And that's it. That's the Waterge
video, and I will see you as in the
next one is out.
9. The Power of Databases skillshare: Hi, everyone, nare.
In this video, we're diving into one of the most powerful
tool in notion. That is databases. Whether you are managing
your personal CRM, tracking your projects
or organize your goals, database can transform how you work, and here's
the best part. They are much simpler
to use than they seem. By the end of this
lesson, you will know how to create and customize
your own database, and you will wonder how
you worked without it. So let's get started. So as you can see this is
my habit tracker, I showed you multiple times. I know. So I created using
this thing, databases. So databases are really simple. I remember when I first
opened databases, I was like, This looks
too complicated. And I don't want to use
database as but Nowadays, I use databases for everything. If I want to store my movies, if I want to store my books, if I want to do anything,
I use databases. First, let's understand
what our databases. A database in notion is
like smart spreadsheet. It organizes your
data while also allowing every entity to
act as your own page. You can add detailed
notes or content. Okay, now let's go
to our Matrix page, and I am thinking I will create one database in weekend
phone organizer. And in this, I want to create
one database for books. So I read lots of books. I will show you my
book collection, and if you want to see
my book collection, right now, you can
go to my Instagram, and in story highlight, I sad book collection. If you want to know what
kind of books I'm into, if you want to read it,
you can check them out. Okay, so to create
databases, it is simple. Press slash OA keyboard and search for
database like this. We get few options
like database inline, we get database, full page. We also get table,
board, calorie list, Caren view timeline, what
is the Jad all that. Okay, so we are only
interested in small database, but there are multiple
options we can use. So let's go with the
first full page database. If I click on this, Notion creates separate page
for this database, and we can do lots
of things over here. But most of the time
I don't use this, I mostly use this database.
The inline database. Because it's simple and I
can keep this in one page. I know I Notion,
we have feature. If you create full
page database, you can kind of add that data or database on your page
if you own that. So I don't want the full
page database for now, so I'm going to dig this one,
and I want the normal page. For now, I want
inline page database. So let me move it over here. So let's add some space. So currently, we
are in table mode, but we can get a board, timeline, gallery,
something like that. So straightw for that, I'm going to make a
dedicated video on that. So straight away
for that. But now I want to name it self held books. By default, we have one
thing over here. It is name. So if I click on this,
I can change the name. So let's say, I want to
name this like books. And books can be anything. So I'm just touring I'm using this database only
for self fill books, but I can create a database in that I can just
name it books, and in that I can
add fantasy mystery, sci fi, something like that. But in this video, I'm
only focused on self fill, so I'm going to create
Self fall book. So first one, I'm going to
add one of my favorite book. That is Atomic Habits, and it is by James Clear. And so I will add another
column over here, so I will name it author's name. And as you can see,
Notion is so smart. You don't show how
to type anything it automatically detesT
is the book section. So this person might need the author as well
as the publication date, the genos as well as rating and something like
that. The summaries as well. So for now, I on authors. So I'm going to
click on this author and the type of this
property is text. Oh, you might be feeling
are properties now. So in Ocean, we get
multiple properties, we can store this as a text as a number or we can
set this as a select. So in selective we get
options like let's say this is a fantasy or this is a Sci Fi, so we can select them. We can attus like currently
we are reading this or not. Something like that, we can add multiple things over here. So in future video, I will make dedicated video explaining all
of this, so stay for that. Okay, for now, let's go
with author and let's add name of author. And
it's James Clear. Okay. Okay, now I will add more books and the
authors as well. So Okay, so I add a few
books like the Power now, Deepwor and the name
of author as well. As you can see over
here. Okay, now what we can do is
that we can add date. Let's say, I want to add the publishing date.
So it is over here. As you can see,
Notion and Smart, and it already gave us the um, publishing date as a property. So we can add it over
here, and as you can see the property of this
publishing date is date. And if you want to change
it, you can change it, but date we are adding date, so we are going to choose and if you want to change
the date format, you can also do that from
here as well as time format. So let's add a date. I guess this released in 2018. So I'm going to
only add 2018 over here and let's keep
the date same. And this released in 1997, 1997, and let's check
take any random date. Okay, it took 25.
I don't want this. It should be 1997, like this. Okay. And after that, it released in I guess 2016. So let me use 16, like this. Okay, so now we have book name. We have author name,
as well as plan date. What else we can add? Okay, I'm thinking
let's add ratings. So, let's say, I want to
pass this list to someone, and that person
wants to see rating, so he don't have to go to the Lester or Google
to find rating. He can just look it over here and he will decide he
wants to read it or not. So let's click on Press button. And okay, as you can
see, we get rating. So let's click on rating
and the type is number, we can add as a bar as
well as a ring as well. But mostly ratings are
in the number format, like 4.2, five or two,
something like that. So let's add that.
So I'm thinking, so I personally
read this book and I really enjoyed reading it. So I'm going to give
it 4.8 like this. And let's this par up
now, let's say 44. And for this, again, 4.9, something like that. Okay, now let's add
reading status. Okay, so let's click
OE plus button. So we don't have reading status, so we can choose a select. And we have language as well, but we can convert this into
reading status like this. You can add MOG if you want, and let's go with this one. Okay. And if I so currently, this is a select property. So best part about select property is that you
can kind of customize it. So let's say. So currently, I'm reading this book,
so I can add really. And I finish this book so I'm going to
type finish O here, finished, and this one, I didn't read it, so I'm going
to add to read like this. So this is how set works. We also have status property. So in status property, we
can choose like in progress, done or not started, something like that. So
you can also use that. But as you can see, this
is become too lengthy. So I have we get this slider, but I don't want this,
so I can just track it. My columns like this to at my data over here
in this database. Okay, if you want to sort
this data by date or by year, which published you
can totally do that. It is over here, you can sort it by the properties
which we have. And we can also filter them
through the same thing. But let's sort them
through let's publishing date and we can set them as
ascending or descending. If I choose descending,
it will order all the books in descending
order. I have done dates. And if I choose in ascending, as you're going to
see, 1997 is up after that 2018,
after that 2015. It totally depends
on if you want to sort in something else,
you can redo that. But if you want to
delete this again, click on this, handle
it. Now it is deleted. So this is the basic
thing about databases. I know, database is kind of hard to understand
in first attem. So what this show
multiple times, try to recreate
your own database. If you want to create database for movies, you can
totally do that. If you want to create database for your workout
and also do that. So I will say, after
ending this video, try to create one
database on your own. Try to add multiple
properties and just play around
with this database and experiment with them. So that's it that's
the photo video. This is all about databases. So let me recap
this video first. Okay, there is a really
important thing I forgot to mention is that every entry
in database has a page. So as you can see, if I click on the Atomic
habit and if I click open, actually, this is a page, and this is also database. I know it sounds funny, but in this entry, we can add the data. So let's say I want to add
the summary of this data. Let's say I read
the Chapter one. I want to summarize this
or I want to add notes. So I can add notes like this. And if I want to
access it again, just click on this and
I have my summary. But I will tell you one thing. Uh you can organize
this in Toggle list. So let's say, okay, I mostly read book like this
and I also summarize them. So I add them into Toggle list. So I say day one, I read this, and
this is my notes, so I can just write
it like this. And so whenever I
want to access it, and I can just go to Day
one day two day three, and if I want to access
data from day number ten, so I can just go
to day number ten, and I can read what I learned, or I can just give another
title to instead of day one. And if you want to make
this page in full, we can do that, as well. And if you want to enclose
this, just close it like. And if you want
to open it again, click on this open button. So in this page, we get
information about this book, which we added over here. In this database, we have
information about author. We have information
about publishing date, as rating as well
as reading status. And you can change it
from here as well. So let's say, if
I finish reading this book, I can
click and finish. I can change the rating as well. I can change the publishing date and as well as name
of the author. And I can also
leave the comment. If you want to pass this
ds to someone else, so you can add
comment over here, you can specify, read
a day number five. This is really important,
something like that. So we can add it
over here as well. So this is all about
basics O databases. Now, let's recap what we
have learned in this video. First thing was
understanding databases. Think of them as smart spread
**** with pages inside it. After that, we learn how to
customize their properties. Tailor your database to your
needs with like tag date, publication date, orthame
book, something like that. After that, we learn
the power of pages. As you go to see, we can
get pages over here. Only gets over here, we
don't get pages over here. Keep that in mind, like this. In these pages, we
can add more details. And in that pages, we can create another database as
well as new page. So this is really crazy, and we can also build
a personal CRM. So I created this for book data, so you can create it for
movies as well as for anime, or maybe you want to remember
your friends databth. You can also do that.
Now it's your turn. Try creating a simple database for something you care about. Start small, whether
it's about birthday or maybe movies or maybe
about your project. So if this video helped you, please let me know and try
to recreate this database. So that's it. That's
the photos video, and I will see you as
in the next one is.
10. Mastering Database Views in Notion – Table, Gallery, Board & More: Hi, on Shadinir. In this video, we are diving into
something that will take your productivity
to the next level. Database views in Notion. Whether you are
organizing a project, managing your contacts
or tracking data lines, database views can simplify everything for you
and guess what? It's easier than you
think to use them. Tick around, and I will
show you how to turn your data into
actionable insight backed by real world examples. And tips I have
learned the hard way. Okay, so before we
start this video, I want to show you I
added a few data in this. Like, I added four more books, as well as the name
of the author, publication date, as well as
writing and reading status. So now let's understand
what are database views. Let's start with the
basic. A database view is just a different way
to look at same data. Imagine you are at a buffet. The food is the same, but how it's arranged
by the cuisine, by dis type, or even
dietary preference. It changes how easy it is
to decide what to grab. That's exactly what views do for your data. And
here's the fun fact. Studies on data visualation shows that presenting
information in multiple format improves
comprehensive by up to 80%. That's the power of views. So in databases, I mostly use only board view and
sometimes calendar. But let me show
you how it works. So as you can see on your table or O here as
well, we have table. And next to that, we
have plus button. So if we click on it, we get
few options. We get empty. We get table, board,
charts, list, timeline, current gallery,
as well as phone. So if I click on the table, it will duplicate my table that same table which
we have over here. So let me delete this first one because we don't
on the same thing. So it is easy,
select your table, and it will show a few options, and at the end, we
have deleted options. So click on delete. And after that, we have a board. So in board, board
is really creating. So listing. So I
make videos, right? So I made my board like this. Currently, I have a few topics over here that are not finished. After that, we have topics
that are in progress. After that, we have few
topics that are recorded. And after that, I have
another section in that I have edited. So
I have four section. So whenever I finish them, I just move them like this. If my editor is watching this, that person will know, Okay, this video is recorded now. Now I have to edit it like this. In this case, I want to
read this book, let's say, Power of Now, so I can
add this into to read. I can also move it
over here as well. So this is how the
board view looks. After that, we have chat. Okay, Chart is really amazing. Charts, not chat. Okay, charts is also amazing. We get bar view. If
you click on it, and if you edit a few,
we get more options. We can arrange it horizontally, as well as in line, as well as in donut, like this. And not only you can do this, you can also change it
into different data type. So currently it is
organized by rating. As you can see, it is can set it as a reading
status like this, and it will change
all the data and give you the format of data, and we can share this
into publishing date. Okay. I publishing date,
we get more options. We have option for books
as well as for others. So it is totally depend
on you and it also specify what color is for
which book like this. So this is really smart. But most of time I don't use it. I totally depends on you. If you want to use it, you can use it. And now after that,
we have list. List is one of the least
used feature in ocean. I guess Okay, so list is simple. We get a few things
which are over here. So we just organize in
list format like this, and we can see the date,
the publication date. And if you want to
add more details, you can go to Edit view again and you can
change the property. So currently, we have
publication date and book. So if you want to hide a
few items, can hide them, and if you want
to show them all, you can click on show them all, and it will show all the data. And if you want to hide them
all, you can also do that. And it will only show
the name of the books. After that, we have timeline. Time lamp, I don't
use that much, but if you like timeline a lot, so you can use that, I will show you what kind of things
you are doing in timeline, and you can also open this
in calendar if there was a book I was reading or
it was published in 2016, so it might have shown
the data here as well. Okay, so this is about timeline. Okay, so these are all
about views in databases. Let's understand all
the things again. So first one stable view. This is your default view. Great for showing lots
of detail into advance. But if you're like me and
don't want to scroll endless, you can hide unnecessary
column to keep things tight. And here's a protein. Keep only the
essential visible name and deadlines for
cleaner workspace. After that, we saw the
current review, I guess. After that, we saw a board view. Think of this as
a Cab and board. Perfect for organizing
tasks for status. I use it for video
production like idea, scripting, filming and editing. It's like moving sticky
notes across the column, but without the sticky residue. After that, we saw charts. Charts are just different
way to saw the information. And, as you can see, it
looks really amazing. And the list is simple. We just get the pages
which are available in our table
databases. This one. Mm. Let me delete a few
things so I want to show you more things which
are available over here that are calendar
and galleries. So calendar is game changer. A study by American psychologist
Association found that visualizing task on a timeline reduce risk and improve
planning efficiency. For example, if I
sit on this date, I want to finish
Atomic Habit book. So at One glass, I can see that. That's the benefit of calendar. So if I go to next
month, as you can see, I added the I intentionally added the power of
publication date to be December 2014
24, and date is 25. And there's another view, which I like the most
that is calorie view. But before we add that, let me delete a few
of them because they look a bit chaotic.
So we have calorie. So in this calorie review, we get all the animo books in this format in Gallery view. And best part about this
is we can add images. So let me add
something over here. Now, let's say I embed link
of the image of this book. So as you can see,
we got the image, and in the gallery review, we can see which book is this and how the front
cover of this book looks. And I can do it for all of
them. So that's really cool. So there's the benefit
of gallery review, but if you don't want that, you can totally remove that. So let me show you
how you can do that. Okay, click on the gallery
and go to Edit view. After that, we have
option called layout. And in this layout, we get
the option of card preview. So currently it is page cover, but if you don't
have any page cover, you can select the
none, and it will only show you name of the
books like this. So there you have it
database view domestified. We have covered table,
calendar board, gallery, and timeline view, each
with its own perks. The best part, they
all use the same data. So you can switch between them anytime without
losing thing. I know it might feel a bit overwhelming at first,
but here's the secret. Start with one or two views. That responses with
your workflow. You will get the hang
of it in no time. So let me show you my database. So in my databases, I only
have datas and the gallery. As you're gonna see
the gallery view. I don't have timeline,
calendar, something like that. I only own few things,
so I just add it. Don't add views in your database
if it is not necessary, so it will just
become more chaotic. Now it's your turn. Go ahead and create new database
view in motion. Let me know in the
comments which one you tried and how
it worked for you. And if you found this full, give this video some headline. We know how you
found this video. So that's it. That's
a photo video, and I will see you guys
in the next one's out. Or
11. How to Use Linked Database Views – Display & Sync Data Across Pages: Ever wondered how to create a personalized and efficient
workspace in notion. Well, in this video, we are diving into
linked or databases, a game changing
feature that makes managing and organizing
your data a breeze. By the end of this video,
you will know exactly how to set up linked view to
simplify your workflow, track upcoming events, and collaborate effectively
with your teams. And guess what it's
super easy to do. First up, let's define
what we are talking about. Linked views let you reference a single database from multiple location in
your notion workspace. Imagine how your
data centralized, but accessible in ways that
fit your unique needs. Sounds cool, right? Now,
here's why it matters. Link view lets you create customized perspective on same data without
duplicating anything. This keeps your workspace clean and ensures everyone
on the same page. So let me show you my database, which I created for anime. From last year, I started
watching lots of anime. So till now I finish this anime. I think I watched lots of them, but I forward the
name up anyway, and I am really bad with names, so I forward the name, so I have to
research them again, and I have to add into
this table again. So let me show you the
main the animal list. This is my anime list,
and this looks like this. In this we have anime, the rating, year
episode and status. But in linked view database, I added only a few things, the name of enemy as
well as the status. So if anyone wants
to know Why status, I can show them this table. I don't have to go
into Watches list, the Watches universe and
in World of Anime again. So as you can see,
this lengthy process. So on main page, I can get the status of
animal I'm watching. Okay, this was my example. Now, in previous we created this amazing book
organizer like this. The status. It also tracks our status as
well as the rating, public date, author name. So what I want to do is now, I just want to know the name of the book as well
as the status. So I want only two things. And I want that book
reading status over here. So first, let's create that. So for this, I'm
going to name H one. Let's go with two and
books, I'm ready. Okay, so I'm going to name it the reading list in progress. Okay, so it is simple, hit slash On keyboard
and just search linked databases like this and choose this so
it will ask you. It will ask you which
database you want to add. Or if you want to
create New one, you can just click on
the create New One. So in this case, I want to add the self help Book database. So I'm going to click on
this. Now, now it is asking, what kind of view do you want? So because we have table, board, timeline, calendar,
as well as gallery. So I just want table
want to choose other options like board
and calendar or gallery, you can do that as well. But for now, I'm want to choose table. So
let's go to table. Okay, so I only want to see the name of the books
as well as the status. I don't want to see
all of this item. So I can go to Properties, and I can hide all of them. And by default, it chooses
the books, the first column, so we don't have
to worry about it, and I want to also see
the reading status. So I'm going to click on
this. So as you can see, we have the name of books as well as the reading status,
and this is all I want. Okay, so I can just click
anywhere over here, and now I can just
select all of them like this and I can just move it over here because I wanted
to add it over here. And as you can see, few data got moved a
little bit downwards, so I can just select
all of them again like this and let's
move it upwards. In quick nuggets like this. So as you can see, it is really organized
and easy to view, and this looks more
aesthetic as compared to as compared to this one. So we don't have to go inside
the weekend organizer, because I'm going to
add lots of things to the weekend weekend
fun organizer like, like, current time
playing Badminton. So I want to also track how I'm playing on which date
I play a Badminton. So lots of things I want to
track in weekend organizers. So I just want to see the
few things over here. So I'm going to so that's
why I add it over here. So you can customize it as well, and spread it like this, so you will get more
nicer view to look at. Let me share something
the real life use case. This is how I use notion
linked view databases. In my setup, I have central
database for content ideas. Each team member like writers,
editors, videographers, has their own page with linked views tailored
to your rules. This ensures everyone who
works for same data source, but sees only what's relevant. By now, you have seen how powerful linked view can
be for organizing workspace, but you might be wondering, what if my database get too pig? Don't worry because smart
filtering and sorting options make managing even the
largest database simple. Okay, so now you have learned
about Linke database. I'm going to give
you a small project. In this video, we have
learned how to create Linkew database and
explode its flexibility. Now it's your turn. Create
a Linked View database for your page or dashboard. It could be anything you
are passionate about like movies, meals,
hotels, restaurants, workout track, whatever
sparks your interest, get creative and
make it truly yours. You don't take a screenshot of your linked database and submit
it into project section. I can't wait to see
what you come up with. Now, let's really care what we have learned in this video. First, we'll learn
about linked view, let you reference and customize database anywhere
in your workspace. After that, we'll
learn you can easily create fake views
for specific needs, and at the end,
they are perfectly for both personalized organization and
team collaboration. Now it's your turn. Try setting
up a linked database in your notion of workspace and see how you transform
your workflow. If you got any questions or want to share your
creative setups, drop them in pro section. So that's the port of the video, and I'll see you the next one. Peace out. Tattoo,
da tattoo, data.
12. Relations & Rollups in Notion – Connect Databases & Automate Information: Jo Jo. Have you struggle to organize tasks and
projects seamlessly. In this video, you will
learn how to use notions, relations, and roll ups to
supercharge your productivity. This tool may seem
complex at first, but they are surprisingly
straightforward and powerful once
you understand them. Plus, I will show you
practical examples, so you can apply them today. No advanced skills
required, so let's dive in. Let's start with the point
number one relations or how to connect your
data like a prone. Imagine you have got
two databases like one for meals and another for ingredients, alone
they are great. But what if you could link
ingredients with meals? That's where
relationship shines. When I first tried relations, I wasn't sure I had
used them much, but then I realized
how handy they are for complex projects like planning vacation or organizing content. For instance, I
once used relations to link my videos
with my scripts. It saved me hours
of cross checking. Okay, let me show you one thing. So I created this
really amazing relation and rolls in my meal
and chill planner. So nowadays, I am trying few items like
pancakes, um, cheese, stuffy, salad as well as banana smoothie because I want
to gain muscle mass. By the end of the 2025, I should be gaining 78 k of
mussel mass. That's my goal. Currently it is 73
something like that. So at the end, I
should be having five KG mussel mass in my body. So I'm trying this boring diet, like protein pancake,
chicken stir fry, as well as cesar salad
and banana smoothie. I know I didn't add that
much ingredients in it. I wanted to go as detail as possible because I had
lots of ingredients, but I want to show
you how this works. So that's why I created
this small version of this. Uh, so first, we have meal name, meal type, ingredients, go
time roll ups and ingredients. So these are the two main things we are learning in this video. So if I go into ingredients. So as you can see,
we can see meals and cost per unit category
and ingredis name. So let's recreate this
and let's see how we can use relations and roll
ups. Okay, so it is simple. Okay, I don't want to create
them on my databases, so I'm going to choose my
meat and chill planner. So we already added this like this the hill
planner. It is over here. So for this, we are going to use full databases
like this one. The database full page. So select this and name it. So first database is going to be meals, let's choose icon. Let's add this one. Th me on which looks It
looks like ramin, okay? And let's create another one. And in this, I'm going
to add same thing, the full database,
and it should be naming and I'm going to
name it ingredients. Okay, so we created these two databases,
full page databases. Now, let's go to meals. But before we do that, let me let me add the
logo, the icon. So add it over here. So
let's go to Meals again. Now, in table, I want to add
a few items like meal name, meal type, as well as
cost, something like that. So let's add them. Very simple,
you know how to add it. So I'm going to populate
this database with data, so I'll fast forward this part. Okay, so I added a few
properties like meal name, meal type, and preparation. And this is a name as quince. This is name, and this
is the select property, and this is the number property. So let's add our first
meal that is pancakes. So I'm going to add
another few items, like, um chicken and as
well as the salad. So let's fast forward with this. Okay, so I added four items. Now, let's add mary type. So this is going to
be my breakfast. And this is going
to be my lunch. And this is gonna be snack and this is going to be let's choose dinner. Okay, like there. So we have four ingredients and less thing, four meal types. And let's say for fine cakes, it takes me 25 minutes, for car salad, it takes 30 minutes or sorry for
chicken, it takes 30. For cesar salad, it
takes 15 minutes, and for banana smoothie,
it takes 5 minutes. Now we have three properties
meal lame meal type, and represent type. Now, let's go to
ingredients section, and let's add all
the ingredients we need to make our meals. Okay, so I added one property
that is ingredients name, and these are ingredients. As you can see, we have
lots of ingredients. Now, I'm going to add
cost per ingredients. So let's add that so
click on plus button, and so it is a number, so I'm going to choose number, and let's name this
cost per unit. But I have to change this into Rupes so I'm going to change it. Okay, so I added the Rubi
symbol because I live in India, so that's why I
added Rupe symbol. Okay, I don't know
why it went away, so let me try to eat again. Okay. And Rupees. Okay. Okay, now it supports. So let's say flour is, like, so I'm taking per meal cost, so it is going to be minimum
or not the whole bag price. So let's say it
takes ten rupees, chicken takes like
40 rupees per meal. Broccoli takes like 60 milk
steak, like ten rupees. Let us, let's say, 20, so I'm going to add
all the items hirups, dressing, an rupies, honey, let's say Niupes, parmesan. Parmesan is expensive, I guess, so I don't know. Sar 14. Eggs let's say we
are cooking five eggs. So let's add 30 and Bana. Manana will be cheap,
so let's add eight. So these are all the cost per ingredients or cost per unit. Okay, now, now I want to link this ingredients with our
meals. So it is simple. We just have to create
another property, click on plus bottom,
and over here, we can see the relationship. So sorry, the relation,
it is under the formula, so search it or you can select this or you
can search it over here. So let's click on
relations Gavi relations. And I want to link
these two meals. So let's click on the meals. I also want it should be
ways, two ways relation. So if I go into meals or meals, as you can see, we got
ingredients over here. We can access it or we can see the databases
in both ways. Okay, now let's go to
ingredients again. And if I go to meals, I can choose like flour
goes for pancakes, as well as, let's say, Okay, it only goes forgancake. After that, chicken goes for stir fry and broccoli goes
for stir fry as well, as well as it goes
for the salad. So I'm going to
choose all of them. Okay, so I chose for each meal, which ingredients are required, like for flour, it's only
pancake or for that. For broccoli, it also going into stir fry, as
well as into salad. So for all the
items, I did this. Now, if I go to
meals on the meals, as you can see
ingredients, we got this. Know, we can do this
in single database, but they will be, let's say you have
huge amounts of data and you want to
link them together, so this is the best
method to do that. So you don't have to
create another column and add those item
because in future, it will get more complicated. So it is easy to do this. Now, let's say, I
want to calculate how much it will cost me to make
pancakes or maybe chicken, stir fry or car salad
or banana smoothie. So I want to calculate that. So for this, I'm going
to use roll ups. So it is simple. So
before we use roll ups, let's understand
what are roll ups. Okay, think of roll ups as
your personal assistant. They summarize and calculate data from linked
databases for you. I know it sounds fancy, but they are incredibly
useful and dare I say, fun. I used to manually calculate how long project would
take based on each task. I know what a waste of time. How roll ups do the math for me. For example, I planned a weekend sub trip by linking tasks like
booking a cam and finding dates to my project and then some of the total
prep time with roll ups. So as you can see, it
is a game changer. So let's add that into meals. So it is simple,
you just have to click on the plus button. But before I add roll ups, there is one thing to remember. It only works with relations
included in your table. It will not work if you don't have relations
in your table. So please keep that in mind. You have to have some kind of relation with your databases. Let's click on plus button, and it is over here. Okay, under the relation, let's click on the roll ups. Okay, so let's
select the relation. So we linked our database, the mill database
with ingredients, so that's why it is
showing ingredients. If link multiple databases
with each other, so it will show
lots of databases. So in our case, if you only
linked with ingredients, so let's go with ingredients. Okay, so in roll ups, as you can see, we got items,
but we don't want that. We want cost per unit like this, and we can calculate them. We can count them,
we can make it into percentage or we can sum it up, and in this case, I want some. So let's click on sum. Okay. So it's going to
see in roll ups, we got cost for each item. For pancakes, it is
costing me 29 rupees. For chicken, it is
costing me 25 rupees. Let's see if I
follow this per day, so how much it is costing me. Okay, it is costing 317. That is approx $4. I know it is very cheap. Okay, so that's
how rollups works, but we can rename this. We can rename, like a
cost per meal like this. So this is how relations
and rollups work in ocean. Now that you have seen
how relations and rolls can simplify even
the most chaotic project, less rap so first, we learn what relations and
how they link your databases. After that, we'll
learn how ropes can summarize and calculate
your databases and data and the creative ways to apply this tool to your flow. Sure, this feature might feel like overwhelming or
engineer at first, but as you've seen,
they are incredibly powerful for the right use case. So are you ready to tie
them out, start small, link a couple of databases, play around with roll ups
and see what works for you. I know lots of people
even don't use rollup andons in their notion. But if you really want
to use this feature, if you really need to
organize some data or if you really need to link
databases with each other, then only use this feature. Otherwise, you can
totally skip this. You might be thinking,
Do I really need this? Maybe not for every project, but if you're juggling multiple
goals, it's game changer. And please let me know what
would you use relations for. I love to share your ideas. So that's all about
relations and rollers. So that's your photo video, and I will see you guys in
the next one. Please out.
13. Creating Notion Database Templates – Save Time & Reuse Your Structures: No. In this video, we are diving into the
world of templates. Simple tool that can
save you hours of work and make your workflow
way more efficient. Whether you are
organizing your life, planning projects or
managing databases, templates are a
total game changer. And the best part is, they are incredibly easy to
use and customizable. Plus, I will share
some personal tips and examples that will help you
get started right away. And we are also going to
look at how to use buttons. So let's start with a powerhouse of templates,
database templates. These are especially
useful when you are dealing with repetitive
task or structured data. For example, let's say you
are managing contact list, like an address
book, each entry in your database can have
a pre filled structure. Imagine being able to
click a button and have all the essential
fields like address, gifts, ideas, or file
materials. Ready to go. Why does this matter? I use this daily to manage my videos. Each video entry starts with pre designed templates that includes sections
like market research, thumbnails, hooks, and more. It saved me countless hours and ensures I don't
forget crucial steps. Okay, let's jump into
notan. So it is easy. So in previous, we created this meal planner and we
added these two databases, the meal ingredi meals
and ingredients. So let's go to meals, and let's create a one page. We all know each entry in
databases are pages like this. This one is also
page. This one is also page, this one
and this one, too. So let's open a pancakes, and let's create a
template over here. When you open this page, you can edit lots of
things over here. You can select different things, as well as these are properties which you
can see over here. So you can totally edit
it over here if you want, but we are interested
in creating a template. So as you can see,
it is over here, you can press Enter to start
writing anything on page, or you can click on
Creator Tem Blade. So let's go with a template. And it opens a new page. I know it is kind of inception
like page inside page. So I was thinking I will create a template which
includes recipe, recipe pattern
like cooking time, ingredients, as well
as a few more items. So I'm going to do
that in this page. So let me show you
how we can do this. So I'm going to name
this recipe template. Okay, let's add a first item that is going to be ingredients, but I want this to
be in list format, the number list
format like this. And inside it, I'm going to add a list and inside this list, add a bullet list.
Okay, like this. So we are creating a template, so that's why we are not
going to add any item, so I can move it over here. So this number list, and after that, we
have bullet list. So let's duplicate this. You can use Control D as well. Okay. So let me
rename this first. So second step will
be instructions, and this one will be steps. So let me add steps like this. Third thing is our cooking time. So let me add it over here. And so in cooking time, we can add to things like preparation time
and cooking time. So let me move them inside. So it is easy, just
type your item and just move them
over here like this. And last thing you
can add is the photo. If you want, you can add photo or you can
totally skip that. So these are a few things
I added in this template. So if I close this and if
I open again pancakes, so we get a template
called TB pattern. And if I click on this,
as you go to see, I got the whole template. So, this is the first
method we can use this or we can delete
this totally like delete, Walt, all of them,
and then delete. Okay, so this is
the first method, or what else we can do
is that we can edit it, and we can put everything
inside a towel. So let's create one
towel like this, and let me add everything
inside this over here, and let's select all of them. And let's move
this inside towel. And let's rename
this like, click me. Click me. Something like that. Oh, I misspelled.
Okay, I think it is. Okay, so this is
the second method. So if I go into pancakes again, and if I choose a
recipe template, as you can see, we
get this toggle, and it saves lots of space. You can do the same thing, but the method is different because it saves lots of space
and it does not flatter. And best thing
about this template is that if we go to,
like, let's say, any other page like let's say if you go to Banana
Smoothie page, get the same thing
recipt template. You don't have to
create recreate it again and again
for each page. You just have to
create it for once and you can use it
for multiple times. And not only you can
create one template, you can create as many you want. You just have to hit new template and create
new template, add it, and it will
reflect on all the pages. So if I go to banana smoothie
and if I open cp template, so as you can see,
we get the template. And over here, we can just add ingredients as well as steps, cooking time and food. Okay, so this is all
about templates, which is available in databases. Now let's look at the
templates which Notion offers. We can directly download them and we can modify them as well. So it is easy to access, just go to these three bar menu, Boger menu and go to templates. So it is O here, and we get the option to what kind of template we want,
like over here. So let's go with
um, let me check. Let's go with IT because
my background is it so let me check what kind
of templates it offers. Well, let's go
with a simple one. Okay, let's go with this one. And, okay, this one is
purchased Okay, it is for $2. Let me sort it out. And let's see. Let's choose free options. It is over here. And okay, let's go with this one and we can just
add it over here, click on add it, and it will add after a few time,
and we can access it. Okay, so as you can see,
template is added over here, and it looks like this
security operations. Just click on this. So we have
lots of options over here. Let me close this. Okay, so we have options,
communication, intelligence. So let's go with incidence. And in this, we have database. After that, in this. So we have databases. And okay, in this, we have a few things. Okay, like this, if you're familiar with these kind of things, you can
totally use this. But if you are not, then this
don't use this template. You can totally change this. You can use different icons. You can upload your own as
well. So let me change this. Like this, you can add cover. Let's reposition. You can do anything
in this template. Basically it's your template. You can do anything
in this template. Okay, so this is how you can download your template
from Notion and use it. I know this was
really bad example to demonstrate to you
how Notion works, how notion templates
works. But it is easy. Choose any template you want, and you can customize it on your own according
to your need. Okay, so this was the one thing. Okay, let me show you one
thing that is called buttons. It is also like a
kind of template. So in notion, previously it
called as a template button, but now it's called
as a button only. So, let me show you one thing. If I go to Mal and ill planner and if I go to Meals again, Uh, as you remember, we created this,
the recipe pattern. The problem with this
recipe template is that we can only create one. We can't create multiple things. So if in case, let's say, I have 78 recipe about pancakes and I want to try them
each day for a week. So I can't add them over here, as you can see over here. I can add them practically, technically, but not like this. I can't add like this. So in this case, we
can use epld button. Let me make this into
full page. So it is easy. Let me delete this first.
Okay, let's keep it. So for this, you can use
button if you want to add multiple items or multiple
things on your page, and you don't have to recreate
them again and again. So in this case, you
can use buttons. So let me delete this first. Delete. Okay, now I
can create a template. So we have a receipt template. So let's create let's
edit this first. So edit. And in this, we have click
M but I want button. But if you search template, as you can see, we
get this button. And you can also search
for button as well. So I'm going to name this
at recipe. Like this. So notion provides this option, like when this button click, what kind of action do you want? Do you want a block,
a page, page, as well as send notification,
show confirmation, as well as open page,
or define variables, and there are a few
options as well, but we need professional
plan for that. But let's go with
the basic. So let's say I want to add a block. So as you can see, I
can click on this blog, and I can totally copy the whole thing which we
created for recipe like this, Control X and do here. Control V. So as you go to see, we added it over here. Okay, let me create that block, the toggle button because
it is not over here. Okay. Let's add it on the top like this and
let's select them all. Or we can tag it like this. Let me select all of them. Okay, let's add it inside me. So as you gonna see, we
added under this toggle and let me did this
empty space. Okay. Okay, now, if I click on the
recipe attempted button, as you can see, we
get this button. And if I click this
again, we get lick me. And in this, we can add all
the things like ingredients, instruction, cooking
time, as well as photon. So we don't have to recreate
it again and again. Now, let's say I want
to add another recipe. So I can just click
on the add recipe and I can rename this like pancake two and I can
rename this into pancake. One like this. So I can add
as many recipes I want. So previously, we
are able to only add one recipe inside it or
only one thing like this, the only these things from
ingredients to photo. But now we can add
as many we want. And not only in this page, we can add them
in all the pages. So if I go into Caesar salad, and as you can see, we get the option of template,
the recipe template, and if I click on
it, you can see, we had the option at recipe, and we can add all
the recipe over here. If you have multiple
recipe for same thing, the same salad, you
can add it over here. So that's how button works. So that's all about
how templates work and how to create
templates in databases, as well as how to
create template button or how to use button. So let's recap what we have
learned in this video. Templates are your ultimate
productivity hack. Use database templates
for structured data, template blocks for
repetitive task, and explore community
templates for fresh ideas. Now you might be thinking,
This sounds great, but setting up template
seems time consuming. Trust me, it's worth upfront investment because you will save hours in long run. Plus, once a template is placed, updating is a breeze. Why not try creating a
simple template today? Start with something
basic like a task tikerO a journal prompt and see how
it transforms your workflow. So that's all about templates and the
basic home templates. So there's a photos video, and I will see you guys in
the next one. Please out.
14. Notion Formulas Made Easy – Automate Data & Perform Smart Calculations: In this video, we are taping to the exciting world
of motion formulas. Whether you are notion
beginner or seasoned user, learning formula can unlock next level customization
in your workflow. And here's the good news. It's way simpler than you think. By the end of this video, you will know how
to create formula that calculate calories
automatically. No manual math, no extra tools, just pure notion magic. So let's get started. All right, let's talk about why
formula matters. Think about them as a
notion secret source. Sure, you don't need
them for everything, but when you do, they can
save you lots of time. Imagine tracking your agent team databases or
calculating due dates. Formulas make it or less. You might be wondering, isn't
that like a spreadsheet? Yep, it is. But with notions
clean, intubity twist. And don't worry. This is not as complicated as Excel formula
that gives you nightmares. So let me show you my
version how I used a notion formula to create
this calorie per serving. So I'll just added
two columns called total calories as
well as serving size. And, so this is per meal calories number like
600 calories after that. In serving size, I added
like I had two pancakes. That's why it is 600 calories. So I just dui d 600 by two, and I got 300, and I didn't like,
did it manually. It happened all automatically. So in this video, we are
going to create this. Okay, so this is our
database, the meals database. So let's click on
the plus button and let's add serving size, as well as let's
add total calories. And this is number, so
I'm going to choose preparation time and let's
change it into total calories. Okay, so this is what I wanted.
So let's click on that. So we have serving size
and total calories. So let's see, we can swap them. Okay, we can swap
them like this. Okay, let's say I
had two pancakes and also in what is
the second item? Okay, chicken
stuff, I had, like, let's say and Caesar salad. Let's say I had 1.5. And banana smoothie, I
had, like, let's say, two. So let me explain
the serving size. But before that, let
me add the calories. Let's say, I had 600 calories from two
pancakes and from chicken, I got 400 calories, and from the salad, I got like 350 calories. And then from banana, we create, like, a three,
something like that. Okay, so this is the total
calories I got from each meal. Okay, now let me explain what is serving size
and how it works. Serving size in a
standard amount of food that is typically
eaten in one setting. It's used to calculate nutrition information
like calories, so people can understand how
much they are consuming. Think of it as a
proportion guide to keep meals
manageable and balance. Serving sign doesn't necessarily
mean the whole dish. It's often just a portion of it. Now let's discuss why is
serving size important. First, accurate
calorie calculation. It ensures nutrition value
are measured correctly. After that, meal planning. It helps in deciding
how many serving RAB provide and how much
each person should get. And third, proportion control. It prevents overeating or
understanding calorie intake. Okay, now let's understand real life example of serving size. So we added pancake, chicken stir fry and smoothie. So let's understand
about pancake. A recipe might serve
four pancakes, but one serving size
could be one pancake. If we had four, so we can just add four in
our serving size. After that, about
chicken stir fry, the recipe makes enough
for two serving. So serving size is
half of total dish. Or we can add like 0.5
in our serving size. And now let's talk
about smoothie. If we make 500 ML smoothie, the serving size might be
200 L. That is two serving. Now let's do some math. Imagine you have
pancake recipe that makes eight pancakes
and serves four people. The serving size
is two pancakes. This will help calculate
calories per serving. If the recipe has
600 calories total, then total calories
is equal to 600, serving size is equal to four, and calories per serving
is equal to 600/4. That is 150 calories. So this is all
about serving size. I don't want to explain
the serving size, but the video will
get complicated, so that's why I explain them because lots of people
will get confused, like what is serving size too. So that's why I
explain whole thing. Okay, now let's create
another property. And in this, we are
going to create formula. So just search for formula. Formula, and we can add formula over here,
the ded formula. Just click on Ed formula, and so we want to
divide total calories, divided by serving size. So we just have to
search total calories and divided by serving size. And let's search
for serving size. Okay, so this is
our whole formula. So this is our whole
formula to calculate our total number of
calories for one serving. So let's click on save,
and it will calculate. So as you can see, in
formula or pancake, we get 300 calories, and for chicken store fry, we get 133 calories,
and for salad, we get 230, 233, and for smoothie we got 190. So let's change the
name of this formula. So this is for
calorie per serving, so per serving, we get 300. So it means, like if I
had only one pancake, then it means I
had 300 calories. If I had three chicken store
five, that means, sorry. Okay, it is chicken
sto, so it will be like 133 calorie
for one serving. So this is just a basic thing
we did in this formula. We can do lots of crazy
thing in formula. But from my experience,
I have seen 99% of the people are not going
to use formula in notion. But let me show you
one thing. I created this whole thing using formula, like, as you can see,
the percentage number. So when I click
this, it increases, like it became 25. And if I click on this, click on this, so it just increases. And if I discrect this
as MC, it decreases. Whole habit tracker I
created using formulas. So in this case, it helps a lot. But if you want to
do basic operation, then you don't need a formula. You just need databases, heading, stable to
list and basic stuff. Here's the thing. Notion formula can get ridiculously powerful. You can use them
for everything from habit trackers to Advanced
propac management. But let's be real. Most users don't need formulas
for day to datas. If you are the type who loves tinkering or have
very specific need, they are worth exploring
and if you get stuck the notion community online is a treasure true of ready
made formulas and tapes. Trust me, I have
Googled my ways out of more formulas confusion
than I had like to admit. And you can also use hagibd. Charge B is like really smart. Just add your prompts. What
kind of formula do you want? And it will generate
formula for you. And if you want to learn
Pmt engineering or hagibing, I have class on that, so I will add link in the description or
link in the resources, so check that out, and I'm
sure it will help you a lot. So check that out.
I'll be honest, when I first discovered formula, I thought, why would
I ever need this? But then came the day I needed to calculate age in
client databases. It was either do it manually for your or learn one formula. And guess, which option one. Now, I use formula springy, but they have saved
me countless hours. And here's the protein, star
small and build from there. You don't need to
know every formula. Just focus on the one
that solves your problem. So there you have it
a simple introduction to formula in notion. We covered why they are useful, and we also created our calorie counter and
some tips to get started. If you are ready to
supercharge your notion, workflow, why not experiment
with a formula today? So that's all about formula. By the way, you can using
formula, create a circle. So that's really cool.
If you want to do that, just add command in Ja
GPI, add prompting JAGPR. I want to create
circle using formula. And it will create Suga for you. So that's the power of formula. So that's a fortis video. I hope you understand
how formula works. And in this video, I know I just taught
you how to add, how to divide thing in formula. But I already told you 99% of people not
going to use formula, so that's why I taught
you only the basic thing. So there's a fortig video, and I will see you then
next one piece out.
15. Notion Teamwork & Collaboration – Share, Assign Tasks & Work Together: Go. Hi, Ruan hazanir. In this video, we
are diving into something super
exciting and useful. How to work in
teams using Notion. Whether you're a student
working on group projects, organizing a holiday
with your friends or family or part of
growing business, this guide will show
you how to collaborate effectively and save some
cash while doing it. It's easier than you
think, and best of all, there is a free way to make it happen. So let's get started. Let's start with a free option. It is simple and practical
and perfect for most of you. So in our page, as you can see, we created a page called
Travel Mode Board. So let's open it. And so I
added one database in here, and I actually use ha JEPD
to create this database, let me show you
how I created it. So I just asked Ja JEPD, I want to create one table
or database in notion. So add location,
category, place, and something like that, and generate me data
in table format. So let me show you the prompt
which I used for this. So this is the whole prompt
I used to create this table. Can copy this prompt, I
will add in resources, or you can take a
screenshot of it and copy it and add it
onto had Jeopardy. And once again, I
will say, if you want to learn ha Jeopardy
or prompt engineering, I will add link of the classes in the resources,
so check that out. So I'm going to just copy
the whole thing from here and let's copy and paste
it over here in Notion. So, as you can see,
we have table, but it is not database, so we can always convert anything into
anything in notion. So we have option called
turn into database, and I can just click on it. As you can see, we
got the database. But there are a few
things I need to modify, like I need to modify
the category over here, because it is in another row, I will say, we also
have to modify place, location type, data,
something like that. And after that, it
will look like this. I didn't modify it
over here as well, so let me delete this
one first because I don't want to confuse you
with another database. Okay, so now we
have this database. Let's say, me and my
sister is going to Japan, and we want to go to
Japan from years. And so we kind of planning
this kind of thing, the page in notion. So I can just invite
her over here. I can just add her Email ID, as you can see, it is over here. I can add her EML ID, and I can give her
full access or can edit or can come or view. So currently, can edit
is kind of premium, so I can give full access. And if in full access,
you can also ed it. So I'm going to invite
to her in this page. So she will get notification
in her invoice box. So from that she can access this page and edit
anything in this page. So now, she is asking me, do you want to
upgrade this member. So currently, I don't want
to upgrade this member, so I'm gonna skip for now. Okay. Okay, so once
she accepts my invite, I will also get
notified over here. So I can give her the full
page access permission so she can edit all the pages. So we invited her
successfully in this page. So as you can see over here, her logo and email ID. So now she can edit anything on this page because she has
full access to this page. Okay, as you can see, she's typing something over
here, the food item, something like that, and not gonna I'm not even
touching my keyboard. She's the one who is doing everything in this
table like this. Okay, what is the location? The sushi, Thai Tsu Kuchi. Okay. I hope I'm
pronouncing it right. I'm not great eyed
Japanese I guess. But I have to learn Japanese. I don't know why but I'm really obsessed with
Japanese culture. Okay, at the same time,
I can do the same thing. Like she is doing
the same thing, but I can also do
the same thing. Like, I will add random
things over here. And as you can see, she's
also adding over here. So that's the best
part about this team, so we don't have to stop. Everyone can work at the
same time like this. So that's how the notion
team works, the pre version. As you can see, we didn't
even paid a single penny. But if we invite
anyone in this page, they can do lots of
things over here. I know you might be thinking,
Do I really need this? Consider your team size and
how often you collaborate. For smaller teams, the free
metal might be all you need. Finally, let's talk about keeping track of
who's editing what. No she makes it super easy to see who has access to your page. So if I go to setting or
if I go to Share button, as you can see, I can see who
has access to which page. So she has access to this page, and I'm also here. I'm the owner of this page,
so I have full access. I can also change
her access into C comment and can only,
or I can also remove her. So for now, let's
choose C Commit. So whenever she wants to add commment I will get
notification in my inbox. It is over here. Oh
so let me close that. But if I go to setting and in
members or people's I guess I can see I can see her as a guest and on which
pages she has access. So she has access on the matrix as well as on the mood
board, the tan move board. But on Metric she has
access on Can view only, and on moodboard, she
has access to C comet. This is the best
part about notion, and as you can see,
it's totally free. So we can track all
of our team members. Let me tell you one thing.
I once shared a page with a friend who went
overboard with ADTs. I know I learned my lesson. Now I always double check
permissions like this. So let me close this. If you
want to upgrade your notion, you can totally do that and you can add multiple team members
on multiple projects. But I think people who
are taking my classes, most of them are
student or freelancers and they don't need
the premium version, so let's stick with
the free version. And let's say you
invited someone and if they met some
huge mistake like this. So you can always reopen them. You can totally click on this and you can
totally remove them, and you can also change
the virgin history. Let me go here and let me
see the virgin history. And you can change the virgin history form here like this. So if I go at 2:00 P.M. So as you can see, at 2:00 P.M. My virgin history
looks like this. And at 2:34, my virgin
history looks like this. So I can always reopen my actions or my
teammates actions. Okay, now let's recap what we
have learned in this video. First, we learn about how
to use the free method to share individual pages
without adding to your bill. And after that, we
learn how can we set function to our guest. And that's all we
learned in this video. Remember, team works doesn't
have to be complicated. Notion makes it
simple and effective. Try out this method today and see the difference
for yourself. So that's all about
teams and collaboration. So I hope you like this video, and if you do, please let
me know. And that's it. That's it photo video, and I will see you
guys in the next one. Piece out. No.
16. Enhancing Notion with Widgets – Add Interactive Tools to Your Workspace: No, no, no, go. No, no, not go. Have you ever wondered
how to take your notion workspace from functional
to phenomenal? In this video, I will show
you three simple ways to level up your notion
game with embedded widgets. These widgets aren't just cool. They are super easy to
use and completely free. Whether you want
to add a flip log, live weather updates or
inspirational codes, you will be amazed at how much they enhance your workflow.
So there's div in. Okay, so as you can see,
this is my life voice. I showed you this multiple
times, maybe 1,000 times. So I know you might be curious how the heck
I added this clock. Or if I go to my
workspace workspace, as you can see, it is over here. I added this flip animation, the flip flock animation, as well as few buttons. So you might be
wondering how the heck I added them in my notion space. So it is really easy to do there are two really cool
websites called Indi fi, and the second one is Aption. So these are two
websites are really popular for these notion visits. So I created that log animation
using this Indifi co. So as you can see,
it is over here, and it is really easy to create. Okay, so let me show you how you can create this clock animation, and we will add this clock
animation in our design. Okay, so it is over here. But before you do that, you need to sign
up if you want to use any animation or any
visits from this web. So this is my account
after signed up, sign in. Okay, so for clog, just click on the
Clog animation. You can name it whatever
you want, like time. And let's continue. Okay, so first, we
got flip log widget. But if you don't want this, you can choose lots of them. There is analogue dots, as well as analog number, as well as nalotic as
well as a digital route, something like that, as
well as digital solid. And the thing I chose is
I guess this one Okay, another planet is
the one I'm using. But let's choose different
thing for this one. I'm thinking, let's
go with something digital oletRl, let's
go with this one. And we are using for dark mode, so we can change it
for dark mode as well. As you can see over
here. Use steam setting or I mostly use dark mode, so I'm going to use dark
mode and you can use this. If you hover your mouse on this, it will
show you the link, and it will redirect you to this website, conify indefine. And after that, we can change the fonts and you can set the
background color as well, but I don't want any
background color because I'm using dark mode, so dark mode will look amazing. And after that, we option for 24 hours and the showt
indicator show date. Okay, let's add
date. I'll add it. Okay, it date Om. And if I add time zone, it will show my
current time zone. It is Astin Indian
style at times. Okay. So finally, we created
this amazing widget. So we just have to copy this. Now, I copied this widget link. Now I can just go to my matrix, and I can press slash and embed. And let's paste that
link over here, mid As you can see, we forgot our clock and we
can resize it like this, make it small, big, like this. Okay, let's add it
somewhere here, under the mission control or under Misiontl,
let's add it over here. So let me track it. Okay. I hope it
looks pretty good. Okay, this look mad it over
here. I want to add it away. Well, let's make it big. Okay, now it looks
good, kind of good. But I know it is
not that aesthetic, because as you can see, in this page, it looks so amazing. Like everything is
going with this wipe, so, but I think I made
a small mistake of it. Okay, so if you want
to customize it, you can click on it, and it will redirect you to
this same interface which we are using while back Okay, so this is the first
method you can use Indifi to create these widgets, and there is another
website called Action Co. It is also same. You just have to choose any
temporary you want. Okay, let's take
any simple widget. I'm thinking, let's add
this Pomodoro tier. So just copy the link
which is over here and let's atlash H Enter. Okay. Enter and
Control V embed link. And as you gonna see,
we got our widget. It looks so cool. Okay,
let me resize it. And we can also customize it. Okay, this is really cool. Actually, when I resize it, it automatically like
kind of change its men. The Pomodoro button and
short break button. If I expand it.
Okay, nice, nice. Okay, so let me resize it. Just let me make it small. Okay, this is okay. Now let
me add it somewhere here? Oh, maybe here. This looks cool. Let me expound a little bit. So it will look more aesthetic. Okay, so whenever I want to
start new focus session, then I can click on
the Start button. And as you can see,
you started counting. Okay, that's cool. And the cool and best part
about this app, you can literally
customize this. So if you click on
this animation, gear icon, you will get the
few options, a few themes. You can change it over
here. You can also send gibber and times L
currently we have 25 minutes, but you can chide in 260, 30, whatever you want to do. And you can also set the sound. So when you session is
completed, it will make sound. So that's really cool
us make changes. So as you can see the pan, it changed and it
looks really amazing. So that's how you can add
widgets in your notion page. I will add all the
link up the website, IdFi as well as a app
notion in resources. So check that out and add this beautiful widgets in your dashboard to make your
dashboard more aesthetic. So there you have
it. The ways to level up your notion
workspace with widgets. I know you might be thinking,
I only show you two. Where is the third one? So
third one is your project. So you have to copy
any widgets from these websites and past straight into your notion workspace
and take a screenshot of it. So we projection. Whether it's a stylish clock or a planet clock or a handy weather updates or
dose of daily inspiration, this tool can make your space more functional and enjoyable. Remember, these
widgets are optional, but they are a great
way to customize your setup and make
it uniquely yours. Why not try adding one today? So this is all about widget. So that's photo will do, and I will see you in the
next one is out.
17. Turn Your Notion Page into a Website – Publish & Share with Super: Yo. Hi, everyone, Jathanir. Have you ever wanted to create a sleek professional website in under a minute without writing
a single line of code? Well, in this video, we are going to show you
exactly how to do that using notion and an
incredible tool called Super. By the end, you will not only know how to
build your own site, but also understand
why it's one of the simplest and
most powerful ways to create and manage websites. And yes, it's packed by real
example, so let's dive in. Okay, so as you can see on my screen, this is
actually website. This is not my Notion page, and I can totally
access this and I can share this with
anyone I want. And it is actually
live. As you can see, this is the link
of this website. And I created using Notion. I didn't use any
third party tool, but there is one third
party tool called Super, and we are going to
also use that as well. So this is the tool Super, and we are going to use
to publish our website. But we can do the
same thing in Notion. If you want to use
Notion, you want to use Notion or use Super. But let me show
you how it works. First, let's learn how to
create website using Notion. We will also cover how to create a website
using Super as well. But first, let's start
with Notion, the free. So let's go with
Share, take on share. And there's option
called Publish. If you're in Share,
just select publish, and we get this link, we can customize our site. We can change our FIC. Currently, we have FICO No, we can change it
to something else. We have head WN plus
plan to change it. After that, we have
Cogle analytics of if you want to make any
changes, you can do that. But for that, you need
professional plan, and we can also set. But with free, we didn't get
that much customization. But if you have plus
premium version, then you can do lots
of modification. So let's click on the share
again, then go to publish. And if you want to turn
on search engine Index, you can do that. There is also Link expiration. You can set when Link should be expiring and you can also do
bigger this as a template, and you can also share this
in our notion template, and anyone can download
it and use Z template. And okay, let me unpublish it. So if website is not published, so this will be the interface, then click on the publish and
now click on the web side. Or you can just copy
this link and you can share it with anyone so they
can visit your website. So now let's click
on the web website, website and this is
how our website look. As you can see, this
is really cool. It is more aesthetic
than this page. Let me zoom out a little bit, so it will look similar.
Okay, now it looks good. It is similar to this,
but it looks more cool. Okay, now, this is the first way to create website in Notion. And as you can see, it
is written over here, but with Notion, you
can duplicate it. You can search if you want
to search anything in it. And, okay, this is sign
in sign up, basic things. Okay, now let's learn how to create same
thing using Super. So code Super superdo so I already have a
con so I will sign in, and if you don't have sign Okay, so I logged in and
signed up as well. Okay, now let's create a site. So when I was testing Super, I added this one of
my site on this, so I was just testing
how it works or not. So let's create one site. Let's name it like
let's give my name. And now let's add the link of our notion Share
and it has to be web if you don't provide
the link, it will not work. As you can see, res over here. Sure, publish, go to
publish and copy the link, copy this link and
stay over here. Noy on create site. Okay, we got our website.
I don't want this pop. Small, small. I become big. Okay, I don't want this, okay. I can change this
as a mobile view as well as huge
screen like this. So this is how you can create website using Notion with Super. So before you make it live, you have to click
on this button. In your case, it must be
inactive or something like that. Click on that and make it live. So after making it live,
it will look like this. So this is how you
can set up Notion or this is how you can set
up your website using Super. But I will say you use
Notion publish feature. It is exactly the same.
The best part about the Super is you get lots
of modification website. You can customize lots
of things over here. So if you want to do
that, go for Super. But if you want to
do some basic thing, use notion in built thing. Okay, published website. And but I will show you
one thing with Super, lots of people created, like really amazing uh their
portfolio like this. Jason Warner, I guess, he created this
portfolio using Super, as well as there is one
girl, Shanon, something. I'm not able to
pronounce her name. So she made this notion
page using Super. And it is written
Hier somewhere. It is made using Super,
something like that. If you have premium version,
it will not show you. But if you have free version, then it will show you
somewhere in the corner, it is made using Super. Okay, so I'm going to give
one project, one assignment. So you have to publish your
website and copy that link and share with me here
in project section. So that's the whole
assignment or that's the project for this video. So that's it. That's
for today's video. Let me recap what we have
learned in this video. First, we'll learn how to set up your website using Notion. After that, we'll learn how to set up your website using SUPA. And I also showed you real life example to inspire
your own projects. So that's all about
notion and suba. So that's your 40 video, and I will see you in
the next one peas out.
18. Create Your Own Habit Tracker in Notion -Step-by- Step Guide: Go. Hi, everyone, Czinir. In this video, we are going to learn how to build
this hybrid tracker. So as you can see on the screen, this is my hybrid tracker,
and I'm tracking my habits. Okay, so as well as I
created this demo version, which we are going to
build in this video, and we went track your habits. But before we start,
I want to tell you one thing why we should
track our habits. Tracking your habits is one of the simplest yet
most powerful ways to improve your daily life. It helps you stay consistent, build positive routine, and actually see your
progress over time. When you track your habits, you become more aware
of your actions, making it easier
to spot patterns, break bad habits, and
repose good ones. Plus, seeing a streak of computed habits can
be super motivating. No one wants to break a streak. Whether you are
working on fitness, productivity or self care, habit tracking gives
you clear data on what's working and where
you need to improve. It is not about perfection, but about progress
and with time, these small daily wins
add up to the big result. So if you're looking to stay accountable, build discipline, and actually achieve your goals, habit tracking is
a game changer. Okay, now let's
jump into notion, and let's create our habitraker. So as I hope you remember, we created this page
called Live Go Stagger. So in this, we are going to
build our habit tracker. So before I do that, let me
delete this one and this 12. Okay, so it is simple, just hit slash and
search for data. We already know how
to add databases. So this is the one used in line. If you want to use full page, you can also do head.
So let's name it. I want to name this habit. Okay, so but I
want to hide it as well, because it looks ugly, so I want to make
it more aesthetic, and I kind of made my page
into full wit like this. So I can track my habits easily. Or it also looks aesthetic. That's why I choose
the full weight. But if you add lots of habit, it will become shinky. So I don't want to do that, so that's why I add
the full weight. It depends on now let's
add name to this. So let's add day. And let's add few checkboxes. Checkbox. Okay? This is the one. So first habit I want to include in my life
is meditation. And we can also change
the logo of this. So I searched the
meditation logo, but I didn't find
any meditation logo. That's why I'm using this logo, and it's kind of spiritual logo, so I thought, let's
give it a try. Okay, now we want
to add 45 habits, so we can duplicate this one. So we just click on this
and click on Lekt property. Let's duplicate four mob. Two. Okay. Okay, now we
have six properties. In second, I want to
add like read a book. And let's add icon, the book icon,
which is over here. After that, let's add third had him Let's add Dumble icon. And let's add the fourth one. Let's say protein intake. And my goal for this ear is to, like, I should be having
one 20 grams of protein. And let's add this logo. I also want to track my slip, so I'm going to add slip. That is 8 hours of sleep. Okay, let's add a symbol of bed and let's add last hybrid. That is journaling. And let's give this symbol of
pen. Okay, like this. Now we have our six hybrids. Which part about this notion is we can shrink it like this. So as you can see, it
took lots of space, and I don't want that and because I want to add
more items in this, so we can shrink it like this. Okay, now we added our habits, so let's add a date or a day. So I'm going to track
my habit per day, so I'm going to add
two day in this. And so let's add a date so
we can track our habits. And let's choose a date
property over here like this. Okay, so let's add
a date today is 652025, so let's choose that. And let's add another
day that is Estrada. Alright, it is fifth
February February. Okay, so we have two dates. Now, we want to
create one template. So in database section, we saw we can create
our template. And so we are also going
to do the same thing, but it is kind of new
way to add template. So just click on the New button, the arrow button, then
click on New Templates. So let's name it today. Why am naming it
today because I want this database should
be recurring. Like, let's say, I don't want
to add each day manually. It should add a day
after 12:00 A.M. Automatically. So now we
created our template. Now let's go to Template again. And as you can see, this
is our template today. Now click on this
three dot menu and first option we have to
choose is set as default. And choose four
all you in habits. After that, again
choose three dot menu and I want to repeat
this every day. So every day it will
repeat on its own. Okay. So as you can see, this is fault, and it
is repeating every day. After midnight, it will
add another today, and this will become yesterday,
something like that. Okay, so this is our basic kind of to do list habit
tracking thing. We can do lots of
things over here, we can add person tasting, but we have to
learn the formula. And so we are also going to
do that. So let me show you. But before we move on to the next part, let me
show you one thing. In my habitaer, I also have
gallery view like this. So let's create
that gallery view. So it is just simple
next to table, click on plus button and choose
gallery. It is over here. And as you can
see, we don't have any item like our habits. So it is simple, just go
to thestreet dot menu, go to properties,
show all properties, and after that,
choose card preview, go to layout, and card
preview is page content, but let's choose none. And this is our Cal review. So it is simple. Now, now
let's look at the formula. So for that, let's click
on the plus button, and let's choose formula. This. And I want to
name this like a chart. So I want this should
be in percentage, so I will know how much
percentage I completed each day. So let's name this the
core, something we pad. Okay, so formula is done now. Now we just have to
add the formula. It is simple, click on this empty space and it
will open ocean formula. So before we do that, let me explain you a few things
about notion formula. So first, let's understand
why we added notion formula. Okay, so we want to convert
our check boxes into number. Notion check boxes work
like a light switch. They are either checked, which means on or off unchecked. But we need number
two calculation. So we convert check
marks into numbers. Like if you take
on a meditation, it will count as a one, and if you uncheck it,
it will count as a zero. So this let us work with real data instead
of just a checkbox. Okay, now let's add
notion formula. It is simple, like
we kind of adding all our habits and dividing
it by average number. In our case, we
added six habits. So if we click on four and
it will divide by six. And after that, into hundred
and divide it by 100, so it will give us
the percentage. So it is simple and basic math. I know the formula in notion, it will look a bit overwhelming, but don't worry it is simple. And if you don't want
to write any formula, I will give you
the whole formula. Or the resources, so you can
just copy it and paste that. But keep in mind you
have to change the name. So let's say I choose meditation
and to number this one. So you have to
name it correctly. If you name something else, it will not work because it
is the name of property. So in your case, if you wrote
something else spiritual, then add spiritual
to the number. So we have this kind of
adding all the properties. So I'm going to add all the
properties over here after that read book to
number plus after that. Uh, I'm heading shipped
and Enter to get new line. It is basic. We all know if you're curious,
like how I did that. So it is shipped and Enter. Why I'm doing this because
it looks more readable. If you don't do that,
it will go in one line, and it will hard to fix later. Okay, now let's
add him and again, Zoo number plus Enter, **** Enter, and protein, plus shipped Enter, eight
hour spsleepo, eight hour sp. Let me choose that. You can
also choose it like this using arrow keys as well
if you misspell something. So plus shipped Enter and last one journaling. Journaling. Okay, so now we added
all the items in this. Now we have to divide this
by six, divide by six. Okay, I made a
mistake over here, so I forgot to add
two number over here. So that's why it is
giving me error. So let me fix that
two number Okay, now, if I divide this
by six, we get four. But we don't want this. We want this in
kind of percentage or maybe in zero point,
something like that. So, this is the right math, but we have to add
more math in this. Oh, we want this in
percentage format. So let's do a few maths, like. Let's add this into
parentheses like this, and I'm going to name this around because I want
everything in round number. I don't want anything in DML, so let me complete this box. And after that, we are going
to divide this by six. So it's going to see
we got our output, and this is how I want it. Now, we want this into
percentage format, so I'm going to multiply by 100 and divide the
whole thing by 100. So I know it is not
working because I need to add another
parenthesis over here. So as you can see, we got
our round number as well. Before it was like 6.0 6666. So we kind of rounded it, and then we got our output
in accurate format. Now, we got our taste coe. I don't want this
in this format. I want this into
percentage format. So it is easy, just
go to Edit property and now day score become
our number format. So we can change it into
different things like we can convert into percentage
dollars, anything. So let's go with a percentage. So as you can see, this
is our percentage. Now we can also set this as
a bar as well as a ring. So it totally depends on
you, so I'm going to choose bar because in my
previous habit, it is also bar, so I'm
going to choose this. Now, if I click on the habit, which I computed today,
so it will increase. And at the end, if I
choose all of them, my habit score is Dayde is 100%. So that's how you can create
your habitacory notion. But one thing is remaining
is that in calorie. So as you can see, in calorie, we don't have this thing dc. So it is simple to add this code to this three dot menu or here, go to properties again and let's unhide this and let's
move this to the top. So I can see how much score
I completed each day. So this is all about
habit tracker. So now I want to give
you one project. Now you learn how to
create habit tracker, create your own
personal habit tracker, like add multiple habits
if you want to build in your life and use
this same formula, create discord, create
interface like this, and take a screenshot of it and submit the
project section. I hope you understand how to
create this habit tracker. If you're making few mistake, watch this video again and again and compare
to your project. So that's what video, and I will see you
in the next one sa.
19. You Did It! Notion Success & Next Steps: All right. Welcome back,
and congratulations. You have officially
completed this course, and that's a huge
accomplishment. Whether you started
as a beginner or came in with some experience, I hope you are walking away
with not just knowledge, but the confidence to
make notion work for you. Let's take a moment to
reflect on everything we have covered because trust
me, you have learned a lot. We started with the
fundamentalist, understanding that notion
is a building on blocks. Every page, every section, every element is just
a building block like a lego bricks. That you can arrange
however you like. Then we move on
formatting and styling, where you learn how to structure your pages neatly, use headings, toggles, and embeds to make your workspace look clean
and easy to navigate. In the intermediate section, we tied into database, one of Nan's most
powerful feature. You've learned how to create
tables, link databases, and use relations, roll ups and filters to organize
your data efficiency. If you are felt
overwhelmed, remember, databases are just like Advanced spaceshet where
each entry is its own page. From there, we took
things up a notch with formulas from the trickiest but most rewarding
parts of notion. You got the test of how to use simple functions to automate tasks and create
smart overflows. And in Advanced section, we push the limits of notion
by exploring widgets, embeds, and even webs creation. You saw how you can integrate
external tools to extend your notions capability and make it true all in
one productivity hub. We also covered best practice for organizing your workspace, so you don't get lost in
ocean of pages and databases. Remember, the best notion
setup isn't most complex one. It's one that works for you. Now, here's the most
important thing to remember. Notion is a tool,
not a rule book. You don't need to
use every feature, every database, or every
formula to be productive. Start simple, build as you go, and create a system that
fits your workflow. If something isn't
working, tweak it. If you find a feature
overwhelming, skip it. The goal isn't to make the
most impressive notion setup. It's to make the most useful
one for your life and work. You enjoyed this course, I love to hear your thoughts. Leaving a review, help me
improve future courses and also help other learners decide if this class is right for them. I had also love to see
what you have built, feel free to share a screenshot or link up your notion setup. Your workspace
might just inspire someone else in this
learning community. If you want to keep learning, check out motion, read it, where you will find real
world use cuesses from different creators entreprenurs
and professionals. It's great to see
how others are using motion creatively
in their workflows. Finally, if you want to stay
updated on more notions, tips, tricks, be sure to
follow me on my social media. All the social media links are available in
resource section. I regularly share
tools, templates, and automated hikes to help you get the most out of notion. So that's it. This is where your notion journey
fully begins. Take what you learned, experiment, and most
importantly, have fun with it. Notion is an incredible tool, but its real power lies in how you use it to make
your life easier. Thank you so much for
joining me in this course. It's been an absolute pleasure guiding you through
this journey. Wishing you all the best
in your productity, creativity, and
everything you do. Take care and happy nooning.
 Chetan Pujari, Helping You Master AI Before It Masters You