Transcripts
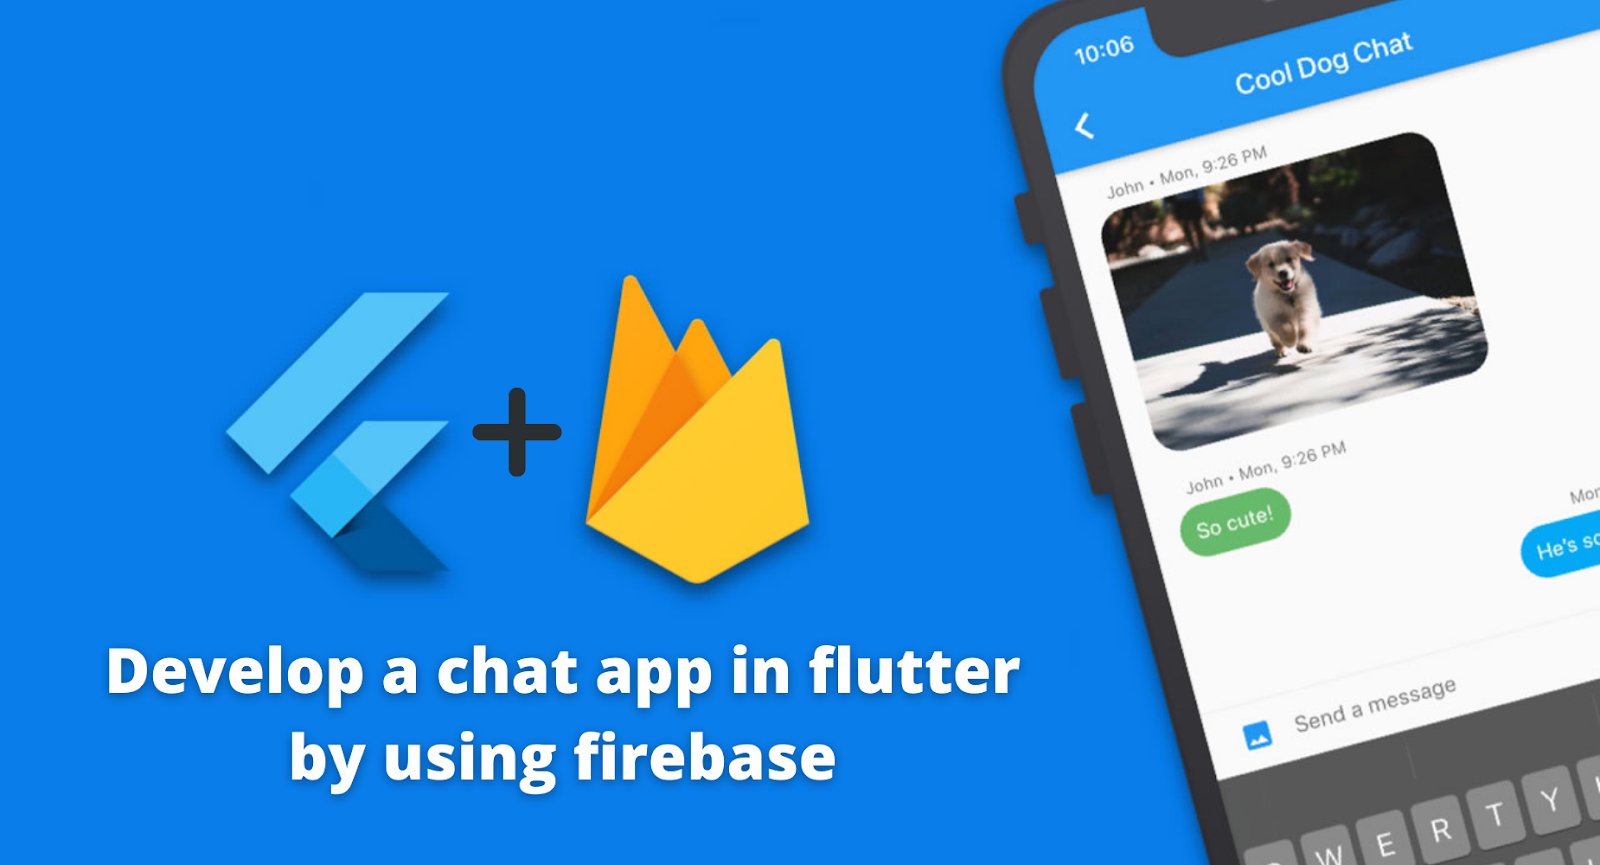
1. FlutterFire Introduction: If you had already offloaded the left and one to become a full-stack application developer, then you must know how to handle the database and other backend services. There are many options available, and among them, Firebase is the best choice when it comes to build and deploy application in market within a short period of time, by which provides us everything we need such as authentication, database, posting, and analytics, machine learning, push notification, and a lot more. Flutter Fire is a set of plug-ins that an impulse Florida apps to use Firebase Services, Board Flutter and Firebase are owned by Google and that is why they work together seamlessly. In this course, we will cover all the important topics such as authenticate user agreed, email and password. Implement Google sign-in cred operations using Firestore database, handling exceptions, uploading files to storage, image compression, et cetera. Are these concepts are enough to give you confidence as a developer so that you can apply for your dream job.
2. Setup Firebase into Project: In this session, we will set up our Firebase project. So first let's create a new flood a project. Bring out your directory, then ness CMD command line, just type, Flutter, create, and then your project name. I will name it. Third, third, five wins, then press Enter. Then I will be using VS Code. Then simply append your project in this code, like this. Now k, v have our project. Now. Okay. Now just go to your browser and type Firebase. And here you will get the official page of firebase dot google.com. Here you can see products and solutions. Then what are the extensions? Also? What are the large companies and games which are relying on Firebase. So duolingo is famous, and Lima by extremist and your tanks is famous. Lift is also a very famous app. Venmo is ready famous. So here you can see Firebase, is he being used by a lot of application? Now, you just have to log in with your Google account here and then click on go to console. Yes, see you can see my Google account and then just click on go to console. And here I have different, different, multiple projects, but I'm assuming you won't have any. You just have to simply click on this project and then give it a name. I will name it Firebase. And if you want, you can enable and analytics. I don't want to unembellished right now. Then you can simply click on Create project. After project this created successfully. Here, it will just take a few seconds. Firebase will let us know that our new project is created ready. And it will direct us to the project dashboard. Here, like this. Now, we have our dashboard and here you can see Alda products it is providing us that is authentication, database storage. And so our first task will be to configure our flirted application to use this Firebase. And I will unlock configured the Android, but definitely if you want, you can configure iOS and web as well. It's up to you. To configure it. Just click on this Android button. And now in this screen, it will ask us the Android package name. And this package name. We can get it from our flutter EPA project director, that is the Android. Then in that app, you just have to go to build credit. Here. This, this is the application ID of our flutter. You simply have to go and paste it here. I will just name in flood there Firebase. And this acid cheeky SHA-1 key is very important, but we will use it in the later videos. Then after they just simply click Register App. The next step is to download this conflict filing. This is very important. It contains the API keys and critical information for Firebase to use. Just click on this download. Google services.js IN. And after it's been successfully downloaded, you simply have to go and cut that file from the download folder and go to your flatter project. Then go to Android, then go to app and simply paste it here. That's it. This is how it's done. After that, you click on this next in the Firebase. The third step is to add Firebase SDK. Now we will need to update our credit configuration to include the Google services plugin. The first changes will be there in that project level bed. Net is we have this Android yet. Then the project level bill is this one. Here. We simply have to copy this class part and paste it here. Okay? And then the app level build debt is here. We have this app folder. And in this build-up Gradle, we have to first of all copy this implementation and paste it here. And next, you simply have to copy this, apply plugin com, Google GMS, Google services, and pasted at the bottom. That's it. This code is already there. It's already been predefined in Florida projects. Now then next step is to add Firebase plugins in our project. Because the affinity there will be some dependencies for Firebase. And here you just have to click on Next and then go continue to dark and so on. Okay. For the dependencies, we simply have to go to dev and fired with is accessed through a number of different, different liabilities. One for each Firebase product, that is, whether it's database, authentication, analytics, storage. Firebase provides a set of different plugins. We just have to write Firebase Core. The first plugin we need. Just click on installing and here, copy this, paste it in your dependency. Okay. Then next dependency we need is the Firebase art. Because we will be learning how to authenticate using Firebase depth is not copied and pasted in our Pub spec YAML file. Okay. Now we have successfully added the dependencies. Then next change we have to do is in the app level build-up Gradle here in that default config, we just have to write one line of code which is multi-decade. An evil, true. So this is one line of code which is required. When we are dealing with Firebase. This thing you have to remember. It's a configuration part. Now, okay. Everything is fine. You can see in our slide as well, our first step of setup Firebase project is done. Then our configuration of our application is done. The config file is being saved in that project. Then we have added the Firebase SDKs, then, deaf plug-ins as well. Now the final step is to write this line of code in them, Main.jack, so that our application in initializes Firebase at first when our app being Dad, when our app is started. So it should know that it has to initialize the Firebase configurations to talk are to communicate with the server. So in the main file you simply have to go the main function and make it a sink. Then you have to write widget, flirt their bindings start, ensure initialize. That means whatever code is now below it will be initialized. And then the next line is awake, Firebase, Firebase. And then initialize app that said, this is the code which you have to remember. Just trust me, whenever you are using Firebase, this is the first thing you have to write. Then only our app and integrate Firebase in it. None, That's it. The final step is to run the application. You can connect your emulator or physical Android device to test the application. And just click on this Run and then start debugging. Your app will be all set to go. And in the next session, we will be creating the UIs required for authentication app. Thank you.
3. Register and Login UI: Welcome. In this session, we will be creating our login and register screen. Because obviously when we will need some kind of UI to interact with Firebase database, our app is now running successfully. Know is there that means Firebase has been configured properly. Let's first create a few folders inside lib because I prefer some kind of folded structures instead of just randomly putting out files. The first folder I will create models, then screens, and then services where Alda API are, the database services, will be written on the inside screen. Let's create a new dark file called register screen. Let's create our first stateless screen. Import our material package, and then create a stateless region and name it registers screen. It will return a scaffold as it's a screen. Then v, Let's give AB bar and then give it a title. Text register. Let's center that Titan and give it that background color as well. Give it colors that are excellent. And in the body, I would like to give it that column. And that column we will have childrens, But before that, I would like to go to our main dot-dot-dot file. And we move that PVS dummy code. And in the home, I would like to write register screen. And in that I give it there Firebase. Let's restart our app. See, this is our register screen. Now, our index and this is also looking nice. Now it's time in that children, we create text fields for collecting user data. Let's create our first text when given decoration. Give it an input declaration of label, text, email, and then giving them border, line, input border. And also for every text field we have to create text editing controller. So let's first create the text ending controllers. Let's create first email controller. Then there will be then there will be a password controller as when bus word controller, like this. Then the final will be confirmed password controller. Because when we are registering, we would like the user to confirm their password. Cave. Text editing controller is then nine this text for in Let's give this e-mail controller. Okay. After that, gave us size box just to give some spacing height of Turkey. Then again created TextField. Give it a controller of password controller, then give it input decoration, label, text. Should be password and then give it a border of outlining, put border and index in this text will give obscured text is true so that whatever the user type is hidden. Then again, give it a size box. Says works. Then finally, our TextField off confirm password obscured the excess through. Then controller as confirm password controller. Then in that declaration, give it an input decoration, text password. And then outlining. Then good sized box. Again. Let's save it and check it out. See all that text fields are there. Now it's time v gives some padding to it because they are at debts to the ends of the screen. And as well as a submit button. So that whenever the user clicks on the Submit button, it is taken. It will be taken to the home screen or whatever color we want to execute. So here in the body, rapid baddie, and give it a padding of doing D. Then in that column, given main exists alignment of me next cell and Mendota center. So everything is centered. Now. First of all, let's give a container a height of 50. And in width of the size of the screen. The screen. Then let's give it the shape of a leeway. But then in the on-premise right now we won't have anything. In that child. I would write a text, submit and give it some styling, such as font size of 25. And then wait, wait. Let's save and check it out. See, it's looking so nice right now. After this submit button, I would like to have a new button, which will just say login here so the user can login if he has already registered. Softer this container, I will have a size box. Size box of height two indeed. And it takes, but then the next button, which will already have an account login here. And now save it. See, we have this button so that when we click on this, the user is sent to the login screen. So it's time we create lobbying screen as well. So in screens folder, create a new file called non-kin screen dot-dot-dot. Yet again, just in both material. Created state less rigid of noggin screen. Then return a scaffold app and the app, but I will give that title. Login. And center the title. And I will give background color of bigram colors dot d. It's a greenish color, shade color. Now, in that body, I will again make two text fields. But first of all, I will give you reading because I know bedding will be required. And insets dot point D. Then in that shine, I will give a column. Then main exists alignment, main exits lm.fit center. Then in that children, I will simply copy from the register screen these two text fields, that is the email and password, and paste it here. And also I will copy that text editing controllers. Okay. Now, we will have after this size, again, this button that is this container, which says Submit. Okay. We have our login screens set up. Now it's time. Whenever you use someone clicks on this login here. But then he should be navigated. For that. We just have today navigator dot push. Then in the route, we simply have to add my daily page route. Then let contexts and then send it to the login screen. Like this. Let's save it. And now check it. Check our application. We have this register screen here. Now when I click on this login here, see our login screen appears. That is the email and password field with the submit button. And when I click on this back button, again, our register screen is there. So that's all for this video. We have the UI. In. Then next session, we will implement the Firebase authentication using email and password.
4. Authenticate using Email Password: Welcome. So in this session, we will implement Firebase, email and password authentication. So for that to implement first, we have to go to the Firebase dashboard and click on this authentication button. Then under the signing that is here, if we just have to first of all, click on Get started and afternoon. And then this signing, we have to add a welder email and password by just clicking on this nimble and then save. But see here you can see older adult providers that this phone, Google, Facebook, Twitter, Microsoft. It gives us a lot of different options. But okay, we have now first of all, when this email and password, that is what is required. After that, we have to implement authentication service. And for that, we have to go to our services folder and create a new file called Art service dot dot. Okay? And here we will implement Alda Firebase authentication logic required. Now, create a new user account. In Firebase. We have to call the function that is create user with email and password. Firebase art package gives us a lot of different options which we will discuss. But first off, let's create the class name art service. And then first thing we have to do is to create an instance of the Firebase art. So we have to add Firebase art. Then Firebase art. And right, I was R-dot instance. So now we have instance. So here you can see it gives us study. It gives us the different options which we will see. But first, let's create a function to register user. The function will be a future function name registered. And this function will accept first when we e-mail. And second will be password. Okay? Now here you can see this. Fibers art gives us a lot of different options. That is verify phone numbers, signing with phone numbers, sign-in with email and password. So this is which what we required email and password. And now this email is this one. This password is password because this sign-in with email and password also have two parameters of email and password. And this result, we will store it in a variable called user credentials. And then user credential. Because if you hover over the signing with him and password, you can see it gives us a future of user credentials didn't die. Now I will just simply returned user credentials dot user. And this user is a data type of this user, which is a function that can be returned null as well. So I will just like to type statically type or types. This is highly recommended so that there is no confusion later on. So we have successfully created our first function, which will help us to register our user. And you can see with the chordates very easy. It was just one line of code. It's that easy. Now, from the UI, that is this register screen, we have to execute that function as well. So now let's go to this container and on press button. First of all, I would like to give some IF checks. That is, I don't want the email and password to be empty. So I will just write if controller.js text is equal to Mt, our password controller dot dx is equal to empty. If it's empty, then I will show a snack bar using scaffold messenger that off contexts dot show snack bar. And in the content I will seem playwright, a text of fins are required and give it a background color of colors darker red. The next check, if check I would like to do is if password controller dot text is not equal to confirm password in controller, that is, I've won both the values to be seen. If it's not same, then again, I will show a snack bar with the value return. Passwords don't match. That's it. Now in the final if statement, I called our art service class. Like this. I have created this object and this object. We'll use this register function which accepts two parameters. First is email and second is password. So for the email, I will just write the Milken to lambda x. In for the password, I will let password controller dot text. And now this returns us a user didn't type. And we'll just do it here. And I will just check if result is not equal to null. That is, it has sent successfully data, then I will just write print success. And print result dot email. That said, okay, our code here is done. Now save it and bring out our emulator. So FASTA file, I won't type anything and just click on Submit. See, I get this neck but Phil said required. Then I will just write address, not fake. It's okay. I'm not using my own and password every read. Data 1, 2, 3, and then here I will just write fled their 12. That is, if confirm password and password are not same and click on Submit then site, but doesn't match. And if I click a, if I write the confirm password correctly, and then click on the Submit button. I think I did a small mistake. Let's check it out. In the AAD service, I think I have just wrote sign-in with email and password, which should be create user with email and password. So that was a very silly mistake of mine. But now you can see that how you can sign in as well. This code by itself defines what it does, is it creates a new user. So again, I will just write email and password. And now when I click on the submit button, see in the debug console it's showing success. Now go to your Firebase authentication screen and click on Refresh in the users table. Now you might be able to see this user whatever we have registered. So we have successfully created and registered a word, first user. So the provider distinct, it is showing that this has come from the e-mail and password signing on this and this, it's, it's unique UUID. Now, we have to create a function for this login as well. So similarly in the art screen, oh sorry our services dot dot. Let's have a login function, which also is if future tense. A user didn't type like this. And it accepts string and string password. And now, just like above, we have this DevOps user can inches. And it will await. Five is odd dot. Now it will be sign-in with email and password like this. So the above one is create user with email and password. And now this one is sign-in with email and password. And after that we'll just return user credentials dot user value. Okay? So we have this login function greedy. Again. Similarly like before. We have to go to our login screen. And here we should have our if else statements. I will just go to the register screen and copy this code. And then logins. Screenshot dark, just pasted inside the on press. So here we don't want this second else-if and just import the required libraries. Okay, then next change you have to do is instead of this plugin. And that's it. You just simply this type of application. Check if everything is alright. And now tested. Now when I go to this login and type my email, which I just registered. And now if I click on the submit button from the login screen, let's see what happens. See is showing success. That means we are now I built to successfully login as well. So that's it. This is very easy. I think you might be also thinking that using Firebase is pretty straightforward. Code are very minimal and it does that job in no time. So that's all for this video. See you in the next session.
5. Exception Handling: In this session, we will be talking about error handling. So until now we haven't handled the scenarios where the user might end up entering invalid email or password while either registering are trying to login. So in the last video, you might have seen this kind of order when I accidentally wrote sign in and sign-in with email and password instead of create account or create with username and password in there, Firebase art. So at that time also we've got this kind of exception. And this was shown like this because we didn't handle it on our own. So there might be different, different kinds of examples as we enter an invalid email format while registering our enter wrong password while login, we will get an exception like below. The idea like this. And either like this and our application will get stuck. It will be a very bad experience for the end users. And that is why we have to handle it properly. So we can do it simply by using try catch block. So try catch block I use to exert how to handle those type of exceptions. So first of all, let's do it with our third function. Yes, exactly right. Try. And then since those will be fired with exceptions, and I would just like to show you at first what kind of exceptions. So register screen. Let's try to use it twice. Just since this isn't. Now, let's confirm Flow 1, 2, 3. Now, if I click on the Submit, see exception has occurred and this is if firebase are the exception, it is saying that the email is already in use. So this kind of scenarios I was talking about. And in the debug console here, again, you can see the exhibition. And since it was a Firebase odd exception. So we simply have to write that in our try-catch block. So here I will write try. Then on Firebase art exception, like this, I will catch the error. And in the end, again, I will catch if something else errors are there. Not. Cut this code and paste it in the try block. Now? Okay, we have this try-block. And if some exception occurs, we have to show a feedback to the user. And to show a snack bar, we need a bill context. So we will ask for Bill contexts as well. And he resists red pill contexts context. And now it's showing this error in the register skin because we have to send context as well. Now, read this bill contexts lawlessness simply show a scaffold messenger. Context dot show snack bar. In bar. Let's have it content, text, message dot two string. And let's have a background-color of colors start to read. Okay, and here this scatter, we just print it for now you, if you want, you can show scaffold again. And I'm saying this again that we are using odd because we know that exception will be from Firebase. And if something new comes up, it will be handled by this catch block. Okay, let's try the same thing again and see if our application gets stuck or not. The password. Ok. Now when I click on the Submit, see the immediate, this is already in use by another electron. So this is so nice Then before our application is not stuck right now. Now let's do the same thing to our login function is run. Let's give it a try. Then on Firebase, odd exception. Let's catch. Then the last answer we will have a catch block. Most simply, got this from here. They state. Here again, we will show a snag, but like before. And for this, first of all, we have to accept that bill context. And in this I will just say print. Now go to login skin dot-dot-dot. And here where we are calling the login function, we have to send that context. Okay? Our here, this portion is done. Let's check it with our login as well as give something which is not being registered. This email is not register. So let's see if I click on the Submit. Just to engage new user record corresponding to this identifier, the user might be deleted. So at least they know that the user is not valid. They should registered them first and then try to login. So we have learned how to properly handle the exceptions like this. So that's all for this video. I hope you have enjoyed today by learning something new. And Q
6. Loading Indicator while authenticating: Hi. So no doubt you have successfully handle exceptions, but didn't. Now we are not giving any feedback to the user when he clicks on Submit button while trying to either register our login. This is not a good practice as the end user doesn't even know that the request is being sent from the cellular. And he should not click on any other buttons, the base. When a user click on the submit button, he should not be able to click on the submit button again until he gives, he gets some kind of feedback from the server. Or else there will be some errors because there will be multiple requests with the same data. So the best way is to show some loading indicator so that they use also know that he has to wait. And to show a loading indicator. First important step is to convert our stateless widget do estate full rigid. So in their registers clean, It's simply go. And now convert this to a state full, rigid state full because thus state of the UI will change once it will show a loading indicator. And that's next time, it will show the submit button. And to handle that kind of true and false values, we must create a Boolean variable called loading and give it a default value of false. When a user comes to this space, that is, there is no loading indicator when this page is being rendered. Now, we have to use conditional statements. That is, if else. To output a loading indicator are a submit button. And since it just a one line of code, I will use a ternary operator. So I will just clear right here, loading. If it's true, then show a circular progress indicator. If not, then showed this container, which is the button, Submit button. Let's save it. But till now, we have just heard it then this ternary operator. But we should set this date when this submit button is being pressed. So here we have two sets. State loading is equal to true. Then this piece of line will be executed. And then after it successfully executed, we have to set the stage again to false so that if some are successes, then after that, our loading progress indicator is being removed. Let's try it out. Let's bring down the screen. In that e-mail. Let's write by Airbase. At the rate. Gmail.com gives you the value of 123123. And now click on thus somebody, but see, this is the loading indicator. And now after it successful that loading indicator is spring removed. You can go to the Firebase console and refresh so that you can check. See this e-mail address is also being registered. This third in the server. Let's do the same thing for the login screen. That is, we should show a loading loading indicator here as well. First, let's convert this into a stateful widget. Then create a Boolean of loading, gave it a false value, default value. Then here, ternary operator. Let's write if it's true, then show a circular progress in the, If not just the container. And when this on press is pressed, then loading indicator will be true. And in the end, the loading indicator set it to false so that we know that the server thing is 10. Let's save it. Let's go to our login screen. And that's right. Where base and T min.com and password. Okay. Let's click on the submit button and see the loading indicator. And we have that success. So that's all we have successfully showed a loading indicator while there is a request to the server. Because these are very small, small changes, but it will affect the performance. Or you can say the user expedience are for your application. Thank you.
7. Check authentication state: Hi, welcome back. In this session, we will check if the user is already signed in or not. So nice, suppose the user has successfully login. But what if he close our application and started again? In the case we don't want the user to enter his credentials again, again. But instead, we should check if that user has already logged in before. And this can be implemented very easily by using Firebase. But before that we should create that. We should create a new home screen file inside screen directory. Let's go to the screens and then create a new home screen, dot-dot-dot. Yeah, let's import our material as always. Let's create a stateless region home screen. Then this cafe. Then let's give the title. Text. Then centered directly through background-color colors, pink. This time. And actions, I would like to give a button of Logout. So just a text button dot icon on press will be MD. I can, I will give, I can start Love Out. And in the label, I will just simply give it text of sign out. Okay. And this sign out. Study this button. I would like to give some styling as well to that button, not label the button itself. And I will just say text, but then that style from and in that primary. And we just start like we have our home screen ready. But we should also make sure that when a new user registered our login successfully, then he should be navigated to this home screen. Earlier we were just getting a response in the debug console. For that, simply go to register screen and hear if result is not equal to null. I will just simply write navigator dot, push and remove. Until. And then new route. I will give my page layout. And I will just simply write home screen. That's it. Easy as that. And same thing, I will just copy and paste it in, then login screen here and import our home screen. So VI using helped push and remove until. You might be thinking, why not I am using push replacement? Because the only issue here is in this login screen. It is not the final scale, it is using the Push that is another top off another screen. It is, it's a stack and it is a type of resistor. So from here, if I push a replacement, then it will go to the home screen, but with the Back button. So the workaround is foster father have to use navigator dot. And then I can use navigator dot. Push the placement in this login screen. But I just simply do like it and I simply use this. Remove everything and just push the screen. That's it. So let's try it out. If it's working or not. Just wait for a while. I hope your system is powerful enough because sometimes while you are using Android Studio or this emulators, the RAM management is not good in most of the pieces. So let's try it out. Let's see. Give the correct password. Okay. Click on the Submit button. See, it's working so nicely that we add directly sent to our login screen here. But what if I restart this application? So if I restart this application, the registers screen is there and v are not directly sent to the home screen. So this can be implemented are this should be changed. Firebase art and enables us to subscribing to OTT statewide stream. That is called the stream provides an immediate event of the user's current authentication state. And after that, it subsequently provides events whenever the authentication state changes. In simple words, Firebase gives us the option to listen to that changes in the Firebase authentication. Let's go to them main.js file. Here. In the homeschooling. You simply have to write stream when they're. Then. Thus stream. We will use our service dot firebase dot state changes. So here if you hover over the sea, it gives us a stream with the uses Value notifies about changes to the user's sign-in state, such as iodate signing our sign out. And since it's a string that they take and the flows continuously, builder, we have as using context and that snapshot here I will simply write if snapshot dot data, then we would return home screen. But if not, then we will return the register screen. This piece of code means that if the snapshot is not null, then definitely get has to be some user value that sorry, we should return the home screen. And if it's null, then we should return debit is testing. Now that our application, you will see we will directly send to the home screen. See here, since our application already knows that the user has been logged in before. This is very important concept because most of the application, you don't want the user to have a bad experience of loved out automatically. That's it. For today. In the next session, we will implement how to sign when we cook as well, because email and password is fine. But now most of the modern application allows users to use their social logins as well. See you in the next session. Thank you.
8. Setup Project for Google Sign In: Hi. In this session, we will learn how to implement cobalt sign-in. So in the last few videos, we'll learn how to authenticate user using their email and password. But nowadays, in every modern application, the aid is an option to authenticate user using good social logins. That is, I did Google, Facebook, LinkedIn, whatever. So today we will learn how to implement Google sign-in using Flutter and Firebase. So the first step is to generate and SHA key. And you might be asking what is SHA key to? She key is required in order to implement Google, our phone sign-in authentication in Firebase, it is a unique key generated for your PC that can be used for signing. So debug KeyStore is a unique for each system and it is automatically maintained by the Android SDK. So you just have to remember that the debug key is required when we are testing. And there is an unlucky called a release key is required when we are submitting to place too. So now the question arises, how do we get that SHA-1 key? So first, you need to find a location after debug KeyStore file, which is inside the Android SDK folder in my Windows 10 PC, that location is Program Files, Android, android Studio. Let's go and check it out. Let's go to the File Explorer. Then. So ground files, android, android Studio, GRE, then been let's check GRE then when. Then in this location, bring out your command line. And simply after that, you have to type this command and can pause the video and write it down like this. And then you simply have to press Enter. That's it. You will get this kind of output value, will find MD5, SHA-1, and SHA-2 256. Fine. So since it's a very confidential information, so you should not share this with other people. Now, just copy the SHA-1 key. Bring out your Firebase dashboard. Go to the project setting. And then here, you simply have to add it like this and then save, download the latest Google services Jason. Then cut it. Then Android app, remove that previous JSON file and base this one. Do you name me? Just remember you shouldn't there shouldn't be this kind of 1 on again, simple Google services, Jason, that's it. So this is how you do it. After their death, simply stop your debug session and started again. Next step is to enable Google sign-in authentication. Go to your authentication screen, that is Dashboard. Then go to sign-in method. And wait, I will just stop it because we have to install dependencies as well. Here you simply have to go to Google, then enable it. Here, select an e-mail address and simply. Click on Save. Okay, Now you have successfully enabled Google sign-in. The final step is to go to dev and get the required dependencies such as Google's signing the center. And the first one you get, you have to installed in your YAML. And after that, another dependency required is Google sign-in web and install it as well. So yeah, you have successfully and Google sign-in. Then the next step is to create a button in our home screen for dead. But then again, I am using one package because I don't want to create a button on my own stuff file that the bug and the lead time it is running. I would like to go to dev and get the sign-in button. Yeah, this one. As you can see, you get different different kinds of social social login buttons. So it's much more easier for you to get that image and the desired look with this plugin. And just copy. And our learning and debug. Take some time. Authentication is a process. Can get documentation, are Via Media, more Stack Overflow. Yeah, a lot of options. Just ignored this kind of errors. That time your Gradle is running and haven't stopped. Till then, we're good to go. Okay, so I guess our app is now successfully. And good study is a heavy, softer. So I'm just assuming your system is strong enough to handle the RAM management. So since we have done this, check in that painting, that's why we are getting the home screen right now we haven't implemented this sign, not this way. I will directly go to main. And here instead of H4, far on live ones, I will return register screen so that we can work on it. Okay, Now go to that registers screen. And now below decks, but then give a sized box. Height. Duan De. Then give a divider. Rigid. Then again is sized box of doing this or that spacing is there. Now I will use the sign in button. So I will just say signing. I think I haven't I haven't I haven't install our dependencies. I will just copy. And now just wait for a few more seconds. Okay, Then I will foster fund in both signing but done. Okay. Now here I will write sane in. But then, then the first bat I'm done, I will just say, but then start Google. Then the second parameter, I will gave text and I will continue with Google. And on press for now on. I will not do anything because in the next video we will implement the functionality right now unless we will work on the UI portion. Let's check it out. See, here we get that button, continue with Google. So it's looking decent. I will say at least it is giving us the feeling that we have other options as well. So I hope you have understood how to configure Google sign-in. And this SHA-1 key, you can, if you are finding it difficult, you can go and cuckold has solutions if you're not getting it in your system. But this is very much required if you are using phone sign-in, Google sign-in, or any kind of these kind of different features that self, That's it for this video. See you in the next session.
9. Implement Google Sign In and Sign out: For now it's style when you learn how to implement Google sign-in functionality. Far that simply bring out your VS code. Go to art service. And now in the bottom portion we will write down code. Just give it a comment of Google. Sign-in. Okay, now let's play it safe future, which will return as a user, I will limit sign in with Google. Now, first step is to trigger a 10 dictation dialog. That is, the options are the dialog box to choose your Google account. For that simulate. Cookers signing account can be null. Name it Google user, and simply await glucose sign-in user. Google sign-in. Sign. Okay. So this code brings out that pop up menu to choose your Google account. So it might be none left is the user clicks on the button, are he hasn't chosen any account. So we have to check if a user not equal to null. And check if it's not equal to null, then we will obtain details from the request. That is, the code will be final. Signing authentication is equal to user dot attended a 10 ticket. Okay. After that, we will create a new credential. Create new. Great. Then shin. Shin is equal to our data DOT credential. And then access token, we will write access token. And I did though can be Google ID token. Once signed in. We will use data from fire storm. Came that fire starts 35 base. Now it's user, credential user and in Chinese will do a weight. Now we will sign in via Firebase. Earlier it was just the code required for that Google portion. Now we will finally signing with credential, this credential and send our cadential, that is the credential. This is being returned by the Google. So we have to send that to our Firebase to make sure that we are legally allowed to access. And simply rate. Finally, the user credential dot user. Also let's make this thing is in a try catch block. Because you never know if something goes wrong like this. And simply fire timing. Print the added in that debug console. So the thing is, this code, it's not like you have to learn it by heart. You just have to know it. And whenever required, you will get this code. This is a very basic code. Gets very difficult to remember, learn it, it comes by practice. So now we have the function ready. It's time to assign the Google sign-in function to that button. This button, which is in that register screen. So here in red is the area. Continue with Google. Yeah, here. I will prefer stuff. Right? Make it then a sinc function. And right of it. Services sign in with Google. But I also wonder loading individually to show. So I will just write if loading is true, then shows cooler progress. I will show this button as we did it before. And I will set the state as being true. And then said, does state as loading is equal to false. Okay, let's try it out. Click on the Continue with COVID button. See, now that will be shown. Choose an account. I will select my account. And then Yeah, Alden. See, right now we are not navigated just because of that reason. We did that change in the main dot dot simply again make it home screen. Now you can see via directly sent to the home screen because we are already authenticated. So I hope you have understood how to use the Google sign-in. This piece of code is just what is required. And then you have to hook that piece of metal with our UI like this. And this loading is just so that the user has a feedback. Now finally, we have to make sure our sign out button is working. Because without it we cannot see, we cannot practice or we cannot test our application. And I go to home screen. Yet the Bhutanese in the actions, simply make it a sink. And right, what we should do, we should create a separate function in that service. Here. We simply have to write future, sign up like this. And simply write await Google's signing dot psi naught because it is required when we are using Google package, we have to make sure we sign out so that we can choose another account if we want. And also we have to sign out from our Firebase art as well like this. So we have our function go to o means home screen. Here, simply write OT services, Dots, sign out. Make it. Okay. Now, let's test it. If it's working, I hope it will. Now what should happen is if we click on this sign out, we should automatically be taken to the logins register screen because of this code. Let's see. See. We haven't ruled and in navigation code in our sign-up. But it's, it is, it has already taken us to this screen just because we have our stream builder and it is checking on the art state changes continuously. So if something happens, we will be back to either the home screen screen. Now, finally, if I again click on continue with Google, choose my account. And now let's see if it is directed to the home screen. See, we are directly navigated to the home screen. So our authentication part is completed and it's working seamlessly. I hope you have learned a lot today. In the next module, we will be talking about that database because now it's time to reintegrate real data. And we will also create one or a very basic application as well in then next session. So that's it. Just keep practicing.
10. Get Started with Firestore: Hi, welcome to this new section. We will talk about the flutter Firestore database. So our layer, we have successfully implemented authentication. But obviously we have to have some kind of database storage. That is database where we will store all the users or the emissions data. That data cannot be just stored on the user's device because in that case, it pruned be synchronized in other devices. So Firebase gives us options of two database. When you go to the Firebase dashboard, there you'll see there is a real time database and data is a cloud Firestore. Cloud Firestore is that latest data with and which we will be using. But at least you should know that little bit difference among the two. I bought cloud Firestore and real-time database. Nosql data with that is there are no joins, no columns or tables in it. The main difference between the two is that cloud Firestore contains collections and inside these collections you have documents. And that way contains sub-collections are frills. But in real time database, it consists of a big Jason that will contain all that data. So debt is nothing like collections document. It is not it is not structured properly. It is thrown as a big Jason in real time database. Firestore is.. firebase, newest date that was for mobile app development. It builds on the successes of the real-time database with a new, more intuitive data model. Cloud Firestore also features richer, faster caries and scales further than the Realtime database. So in simple words, we will choose Cloud Firestore among the blue. Now, our first step will be to set up Firestore in our application. So already we have successfully set up Firebase in our Android as well as download the Google JSON file and initialize it. Now it's time we enable that cloud Firestore. Go to your Firebase dashboard here. Click on Firestore database. After that, you will see something like this green, that is Cloud Firestore. And then create the database. You have to just simply click on Create database. After that, you have to choose starting test mode, because we will configure the security rules later on. And after that, you just have to select the default location and click Concrete the database. And then you will see something like this. This screen is where all your data will be stored. After successfully enabling Cloud Firestore, we have to install that dependency as well, is simply good to have. Then search for cloud. Firestore. Click on the first one and simply copy that dependency. And based in New York pops back here. So okay, our dependency has been installed properly. Now the next step is to understand that cloud Firestore data model. That is how data is structured inside that file store the database. Before we define our code, my tests. Unlike SQL database, data, tables are rules in Firebase. So if you're coming from MySQL or PostgreSQL, the other tables rules concept in it. But instead here use data in US TO data in documents which are organized into collections. So here you can see users, this is a collection. In simple words, just try to understand it as a table. That is, what is the name of the collection users post. In products. This kind of trial called collections and insect collection, individual data are called documents. So here you can see there is this users and a document ID of this random ID. And this document have this values. It is address, age, immune name. Address is again a map, and this is an integer and this is a string. So this is how a basic data, how they basically tie stored in the fire store. Documents must be stored in collections. Documents can contain sub-collections. See here it is. Start collection that is inside it. Again you have is, you can walk right? Likes our post comments here again, you can write a new collection. And all these documents can contain primitive feels like strings. Are objects complex, like list, map. This can be typeof values which we can store in. So that's it. We have successfully installed Firebase and we have understood the data model as well. In the next session, we will be discussing how to do crud operations in it. Thank you.
11. Understanding CRUD operations: Hi. In this session we will understand how to perform crud operations. That is, how to create, read, update, and delete data into Firebase. Just for this example, we wouldn't be creating any separate services classified as we are just discussing the basic concepts and implementing it in a simple manner. So first we have to create a new Firestore instance. So as we did in the authentication, we have to create files Firebase odd instance. In the same way. Here if we have to create a Firestore instance. So let's do it. Bring out your text editor. Go to home screen. Here. At the top. I will simply create an instance Firebase, Firestore. Firestore is equal to five ways. Firestone dot instance like this. Our instance is done. Next is called a connexon reference. Collection reference means what should be that collection name that is here, users or whatever you want. So Collection reference is also very important thing. To let start with the create function that this create data in that database. To add a new document collection, we use the add method, Annette collection reference. Let's do it. Let's try do it. After the AB bar. It a body, that body. Let's have a container. Containers, which will mean media query, dot off contexts, dot size, dot width. Then let's have a child, give it the column. Mean X is alignment. I mean exists alignment dot center, then cross axis alignment, grass extracellular center. Then let's have children. That children, let's create a limited but let's give it a child of text and data to store. And in the arm press, let's fire timing. Keep it empty so that I can show you in the UI, the UI. See here, we have that add data to Firestore. First step was to create an instance which we have already done. Here. Second step was to create a collection reference. So here, let's create a collection reference. Users is equal to Firestore, that is our instance, dot collection and name it users. Now this is just further reference where we want to insert the data. So for inserting, but they have particular data. Here we are using the add my 10. So add method creates data with a unique ID to perform ad whether it is a future. So we will use async await concept. And we simply write await users dot add C here. Now, this is how we add data to duff Firestore. Now, add accepts data in a map that is in-depth curly braces. Then we have to send data in key-value pair 7, this name, I will use the key as name and value as. Like this. This will be our first user. So let's try it out. If I click on this Add Data, the firestorm. I guess it might show some matter just for the reason that we haven't restart our application. So whenever you install any new dependency, make sure you restart application. Let's restart means you have to stop and then start debugging again. Let's see, will it work now? They lend us wait. For them to perform. In Firestore are very simple. See here it's only with the add. We can add a data with a unique document ID. And when I say document ID, I will show you what I meant by that. We have to wait for a few more seconds. Most of it depends upon your system. Now it's compiling, dependency, this kind of dependencies. But we are not using it on authentication, it's done. And in the rules here, as we did in the test mode, that is why the rules are public. But when we're using for production, this shouldn't be like this. Okay, we have our app running. Now when I click on that to Firebase and then go to our data, I hope it is to see users. Then document and then that value that is named Nahal. So we have successfully entered our first data. And this is what I was explaining that it is a unique document ID when we use the add function here like this. So you might be thinking, okay, Then what is the second adder function? So apart from AD, there is another method called dot set. So if you like to specify your own document ID, we should use the set method on that collection reference. Like this. I will commend the above one. And then I will simply write users, that is awake, users dot doc, then give it the document ID. I will name it fluttered of 1, 2, 3. Then set like this. Then again, inside set we have to send a map. I will give the value name. And so the key is name as value as Google. Okay? Now save it and check it out. So I am explaining again, when we are using add method, it adds a new auto-generated ID, that is document ID. But when we using set my pen, we can specify our own document ID. Now let's click on the add data to file store. Go to our data and see we have this Flutter 1, 2, 3. So this I was talking about, this is not a unique ID. We have specified it on our own. And then we send a value that is name Google flutter. So we have successfully created the data. Now it's time we read data from Firestone Cloud files to give you the ability to read the value of a collection out a document. And this can be one hundred, one hundred ten grade are provided by real-time updates in simple words. And we can read one thing that is, we go to the database, we asked for w, and then we return. If something changes in the database that time, our UI doesn't care that is because it went front of one time. Let's do it. Let's create our read functions as well. So below this elevated, but then I will create a new button, new elevated button. Name it In read data from Firestore. Then in the on-premise, it will be a sinc function. Now again, we will have a collection of friends. Users is equal to Firestore collection. And remember, you can do all these in one line of code as well. You don't have to specify the collection reference like this. And just doing it to explain the concept. Then, now we have, we are creating a variable. It is results and then await users. Get. So it will read a collection that it will get the data of debt collection, all the data that is whatever value they have. So since they will have multiple values, we will write our results dot docs, dot for each. That range for each of that document. So it will have document snapshot result. And then you will simply print result dot data like this. Let's check it out what I have done. Then I will explain you again. We have our UI that is this read data from files. So when I click on it, see you have both that data that is in that map phone might you have returned output? So when we do get request on a collection that is here, this collection, it will give us all the documents. So that is why it had our results dot docs because it is fluid and you can see but you will understand that all the documents and then for each V are looping through the documents. Since we get a list of all the documents. It is as simple as that. Now you might be thinking, okay, what if I don't want to read the entire collection, but I want to read a particular document. That is, I just want to read this Flutter disvalue, how to get that particular value. So for that, again, Let's try it out. I will comment down the above query. And I will write documents snapshot, distinct documents snapshot. The snapshot. So documents snapshot result is equal to await users dot doc and what document we want, we already know the ID. So third, 123. And then bud get like this. And after that, I will simply print result data. Let's check if it's working or not. Now when I click on read data, it will it will just show us that particular day then not all documents in that collection. So this is how you fetch a particular document. We did user document ID, sorry, we did document ID. So I told that Firestore gives us two options to read data. I learned it's one time, are we will just read data and listen to real-time changes. Of Firestore gives us a option to keep listening to any data change happening to the data and then reflect our update our application in real time, that is without refreshing our page. This can be done using that concept called streams. So eight provide support for dealing with real-time changes either to collection as well as the particular document. So you just remember you just remember from here, board that collection reference and document your friends, provide a snapshot function which returns a string. You can use StringBuilder Ali, listen my tech to subscribe to that stream and listen to the changes. So let's do it with this time here again. So now what I will have a login comment that both tin and then I will simply write users dot-dot-dot. I am listening to a particular document and when there's a flood third, 123 snapshots. So this is how we get a stream. And earlier when we write dot get, it will give us a future. That is one thing. And then I will connect, Listen, that is whatever changes that stream is going through, we will listen to that changes and simply write print result dot-dot-dot. Now you will understand the difference Is one time and what is real time changes. Now when I click on again, read data from Firestore, see, you can see name Google flutter. But what if I go and change the value that is unlike Google? And update it. Now if I go and see my debug console, see you have this output on legal. That is, I didn't even touch my VS code, but it is showing all the real-time changes. And now if I go in again, right, Google flutter and update, then it will again show the new value. So this is the very basic difference between the string are if you check. So until now you might be thinking this terms that this query snapshot document snapshot water these things. When performing quality file store returns either a query snapshot are the documents snapshots. So what is a query snapshot? The snapshot is returned from a collection querying and allows us to inspect the collection, such as how many documents exist, giving exist through the documents within the collection. See any changes since the last query and minimum. To access the documents within a query snapshot call that dogs property, which returns a list containing documents snapshot. So you just have to remember all these concepts. Then what is a document snapshot? A document snapshot is returned from a query are by accessing the document directly. Even if no document exists in the database, a snapshot will always vary. Turn to determine whether that snapshot document exists, use that exists property of it. If that document exists, that is a layer in our case, we can read the data by calling the data method, which returns a map. So this is the concept we are writing, sometimes document via writing, sometimes query snapshot. So you have to understand these basic concepts by heart. Also, when we are reading data. Firestore, our first advanced capabilities for querying collections quite rings. Poor work with both one thing read are subscribing to changes via stream. So first, which is important in this filtering, to filter documents within a collection where my tech can we change, change onto a collection reference. Filtering supports equality checks and other useful queries. For example, filter users where their age is greater than 20. So here you can see fire with fire, store dot instance dot collection, dot where age is greater than type D, two in D and then dot get at these, it will just check and get unleaded that data. And second is one is another example where you can check if an array contents any value like this. The second for the other capabilities are limiting. That is to limit the number of documents returned from the query. We can use the limit method on a collection reference. So simply we have to write Firestore Firebase, firebase files stored dot instance dot collection, users dot limit to dot-dot-dot is unlinked to documents will be returned. And that tied one is ordering these two documents for bias specific value use the order BY it is either it can be descending, ascending order. So here you can see Firebase file store dot instance, dot collection users. But are there by age, should be descending order. So this, these are the ways we are. We can read data and filtered through it. So till now we have successfully add data via successfully read data. It's time we update data. So let's go and create a new button. And then text. Update data. In Firestone. Then in the armpits, it should be a sink. We have our collection, they're friends, but this time I will simply directly write await Firestore dot collection users dot doc. That is reached document I went to update, flutter 1, 2, 3, then dot update. So I left, it was ad set, but this time it's update. And update again accepts key value. So I want to change the name and change it to flex their Firebase. And then in there, I don't want it to be listening. I just want to get the value of this document. Let's save it and check. If I click on read data. See you have named Google here, but if I click on update data, it should be now. Now again, if I click concrete data, see now it's name Flutter file with. So our value has successfully updated in that database. But this is how we can update the document rather than replacing all that data just using this update function. So in that create crud operations, we have already done create, raid and update. The final thing is to delete the document from a cloud. Firestore. Again, create a new, but then after this button in that child, let's have it text and write data. Firestore. Then in the on-premise, we have an async function. And here again, we simply have to await Firestore dot collection users. Then Doc that is which document we have delete with the reflector 1, 2, 3, and then just write del dot, del dot update. It is not just start delete. And this is all that code required for deleting as well. Let's check our application. When I click on read data, which will show name flatter Firebase. Now if I click on delete data, it should be now deleted. Now if I click on read data, say it is null, I have to add data. If I want, and then click on big data. It will go with that. So this is how cred operations work in Firestore. And now we're ready to work with Firestore properly. This, I build this UI on lifo, on leaf or showing how to perform the operation. In the next video, we will be creating a real-world application and use our Firestore database in it. Thank you.
12. Building Note App UI: So now we will build in Node application to demonstrate and use stuff Firestore database. In that previous module of authentication, we already built login register and the home screen. It's tied to its 10. To continue from where we left, we will create a note-taking app to understand their current operations more deeply. And also, to start with, we will remove everything from the body section of the home screen. So I leave, we have flowed this container and on now just remove everything. And after dad Emily, I removed the body as well. And you can see here and then go to our main dot dot. First thing we will do is we will remove that debug indicator soon them materially material lab, it will simply go and write debug, should check Banner and give a default value. Then that team data, I will simply write brightness is equal to brightness dot.org. Now, if you see our app, see we have this dark Kim and I really like it. In the home screen. After the AB bar, we will create a floating action button. And let's add floating action button. Background-color of colors, dot orange. Excellent. Child. Child will be an icon name I can add. And we have the onPause function. Let's save and check. See this. But then we have use to navigate to add a note screen. Definitely before adding nodes, v must have a farm with the help of which we can add data to that data via twisted. So simply create a new file inside screens and name it, add node, dot, dot. Then create a stateful region. I'm naming it add naught screen. And above it. Important material package. Then return is scaffold. In it. Let's have an AB bar. Ab bar. Let's give that Graham color of colors transparent and elevation as 0. Then in the body. I will have a single child scroll view so that we don't have any scrolling problems. Then in the child will have a padding region with edge insets dot. And then in that child, I will have that widget. Then just give it cross excess alignment this class exists and admin dot start. And then we will have our children. So first thing what we can do is go to our home screen. In the floating action button, we can navigate the navigator dot off context that push out builder and screen. Okay, Let's check our Add Node screen here. See, we have this clean. Now let's start by Linda column widgets that is inside the column. I will start with the text and title. Give it some styling of textile. Font size. And font weight can be font-weight, bold. Save it. See we have this title. After dead. Let's hurry sized box. Then give it a text field. Text, decoration, decoration. Give border, outlining input border. Okay, Let's save and see. See, we have our text field. Now after the text field, Let's give it a size box height of 13. Then again, let's have it text. Same thing as a title. And let's say I have copied in a day delivery like description. And third description here you can see, again, I will have a text field. Now this texts will have minimum lines of five and maximum length of 10. In that declaration. As usual, border, outline, input border. Let's check, see that this maxlength is equal to 30 max line it should be. Okay. Now, check it again. See we have our description in the text field is not that narrow. X3, let's have our size box. Size box of high-tech D. Then a container reaching to give him button. Let's give it a height of 50. Then wait, media query, that context. Then in that child, let's have an elevated button. And then we will like that text. Ad. Note. I will just change slightly with this add mode. First of all, I will give styling to the text. This text style. First thing will be fun size of 25 and font-weight. Bold. Then I will give styling to the elevated, then that is a liquid. But then dot style from and then simply late primary colors, orange. See, it is looking decent now. Creating, adding notes screen. I will also create a new screen called note. The edit notebook that we have to create a file. After that, it will be similar to add notes. I will just copy everything in the Add Node and then paste it in the edit note. First of all, I will change the name. I will write edit screen. Then we have our background color as transparent alleviation. Then I will just give it in actions in the app button, Delete button. That is, it should be icon button. And in the icons I will simply write. I can, I can start delete. The alert is equal to alerts dot. Now we have single child scroll view. Padding. On only difference will be in the container. That is, it will update node, add node. And apart from this, everything will be same. So we have our add node, we have our edit note as well. It's time. We wish. Katie screen, Florida home screen that is here. Alden notes will be fetched from the database. So we have to build something for it. Let's go to the home screen. After the Barr body. Just let's first create a list view. Then children. Then start with the card. First, let's start with the card widget. I will give the card colors start. Then alleviation. I will give it to five. Then margin. I will give it adding 10. Then inside it, I will have a list buying. Okay? Now I will give it content by adding edge insets symmetric. How it isn't a less than what S. Then. Let's just give it a dummy data. Build a new app. Let's give some staining the weight. Font size 18. Font weight, font-weight, bold. Then let's have a subtitle is when this Let's read the text. Learn to learn to clone of clubhouse application from you. Let me suppose. Then. Then you just have to give it the overflow, not inset text. Yes, inset text. We have to write overflow property and just write overflow. Our flu dot dot ellipsis and give Max line says two lenses too. Let's check, save it. And see we have the UI ready. That is a simple note. It is a dummy up, but right now, but in the next session we will fetch really dies when now what I want, When someone BAPS on this list style, he should be directed navigated to the edit screen. So I will just read dot push material, page layout builder. Let's note screen. Okay, save it. Now when I click on this, see I have this edit mode screen as well. So with this UI is completed. We have our add node, we have our new TUI, and if we click on it, we can read out update as well as delete from this UIS unlinked. Then next session we will create the functionalities for that fires to that is we will create this separate services file and then attach that file with our this UI.
13. Creating Note data and Model: Hi. So till now we have successfully built off of our node application. So in this session, we will create the functionality to add that data to Firebase. Firebase, Let's create a new file in services folder and name it. Fires store, service dark. So similarly, just like an OT services, we will create a class called fires store service. And now the first thing we have to do is to create an instance of Firebase file storage is the Firebase Firestore dot instance. Okay? So this thing we already know that we have to create an instance. After that. Let's create our function, future function to insert node. Okay? Now just think what data are required while inserting a node. That is the first thing which will be required is that title. The second thing will be description. And the third thing will be the user ID. So that when we are storing the data in the database, at least we know which node belongs to which user. And then only we will be able to fetch some particular nodes which are only of Deck user. We don't want the user to access other person's data. So simply first do that, try catch block. Now here we have a Firestore dot collection nodes. Now, and I will use the add function. Let's give the JSON. Data title will be titled. This will be a description date. I should also mention that date at war when it was bringing inserted. So I will just write datetime dot now. And final thing will be user ID. That is user ID 0, k. So our function is done. So then next step is to make sure that we pass our user model while navigating to home screen. Because when we go to add, when we go to Add Node screen, the user ID is required. So let's go to the home screen. Here. I will make sure that the user model is accepted in the constructor. Okay? It is done. Now in the registers screen. It is showing because here we are navigating to the home screen here in this line. So definetly we have to pass the user model, that is this one. We just have to go and pass it like this. Similarly in the login screen, we have to do the same thing. We have to copy and pasted that result, which is a user datatype, and then just send it. Now when we go to our Main.jack. Here also it is showing edit. Because here we are returning home screen. So we just have to, since the stream builder gives us data of a particular user, that is user, they tied this being sent, see, yeah, you can stream of user. So here you just have to write snapshot dot data, that said. So now our work is done till here. Next thing is to call that insert node function that is, which is services file. We have to call it from now, add notes screen. So first thing first, what we have to do is accepting user data. In that ad note, the male main purpose of passing down the user the tub us for this screen. So that when we are adding a node, we can also send that user ID. Again in the home screen is showing edit because here in the wild when abrogating, we have to send the user. Okay? Like this. Now again, go to add notes screen. Now since we are now using the text field here, we have to create a text editing controller so that we can retrieve the value what is being written. So I will just firstName is name it Title. Controller is equal to text editing controller. Second controller will be Description controller. And we'll just write desk. It is a text editing them to alert us when. And as usual, we have to show a Boolean loading icon so that whenever some, some network request is being sent is circular, progress indicator should be shown. And let's copy that controller and assign it here, this is our title and this is the text field of the title. I will just type controller and the controller. Then this is our description below it. This is our text field for the description I will, I will just assign it a description controller. Okay? Ten, now It's going code. Now what I want is when the user types and click on this Add Node button, then the function should be called. So let's go to the elevated button, make it a sink. Then here, the first thing I will do is do a check. That is title controller dot txt. If it is not null, our description controller.js, if it is also not null, that is, if it's null, then what we should do, or simply if it is null, we should show a scaffold messenger that is a snack bar. Okay? And in that content, I will simply write. Fills are required. Required. Okay. If it is false, that is then else has. First of all, I will do the set state and make them loading indicator to true. And since I'm making a loading indicator true, I should show the loading indicator in eternity operated. If loading is true, then we will have a center child's circular progress indicator. If not, we will show a container that is the button. Now, way did we do the set state 2, then we have to await Firestore services. Make the object. Then simply ride dot insert node nine, the title I will write the idle controller dot text and the description I will write description controller dot txt. Now, for the user ID, I have to write widget. Since it is a state, stateful widget, we have to write widget dot user to access that instance variable and dendrite dot user ID that is UID, like this. And when this is done, we will again set state and make the alluding to false. And after that, I will just simply navigate out, that is navigator dot pop of that screen. After it is done. So let's save it. And now try if it is working or not. We have our Firebase file stored console as well. Now, go click on Add Node. Yet I will write that here a description of Master of gloss lead farm application. They'll buy. Meant. That said, I would simply click on Add Node C. Loading is there. Okay, popped out. Let's see our Firestore database. If some data is being inserted or not. Say you can see these nodes and then about 10 description user ID and that date. So till here we have successfully created and implemented the insertion of data. So obviously, in the next session, we will retrieve that data, all this data from Firebase. But before that, since these data are in that JSON format, we would like to convert it into objects. That is, for that we have to create our models, models for the note too, I will just write it, create a new file node dot dot inside models. Then here I will create a class node model. And here simply write that data which is required. It is string ID, string title, string description, timestamp from the cloud Firestore. Then string user ID. Then I will create the constructor and simply look, Right, required this dot ID. And it required this.title required this description. And it acquired this dotted required this.userId ID. And last thing we have to create a factory method so that it will take the document snapshot from the fire store and converted into this model. Simply read factory from JSON. It will accept a documents snapshot, snapshot, then the return model. Now we have to write that data. That is IID data value will be snapshot dot ID. Then title will be snapshot. Title. Description will be snapshot description, then date. Similarly, snapshot date and user ID. So I will just explain you one thing. That this user ID is the unique ID of them user, but this ID is the document ID that is this one. So that we can identify the document and use it to manipulate that is, update or delete in future. So definitely we always need that document ID. It is very useful. So that's it for this session. Here. Today we have learned how to upload that task and also successfully created a model class. That said 10 Q
14. Retrieving and updating Note data: So now we have successfully inserted our data, and this is the data which we will now fetch and show in our home screen. Bring out your VS Code and go to home screen. We will be using stream because we will fetch all nodes from the fires to using a stream so that any change will be reflected in real time. And this stream query I will be writing in homes clean itself and will not create a separate May 10 in services. Let's go to the home screen. Here. This is our party. I will just copy this card that is cut this car from here. We will need it. So just make sure you have it in your system that is just copy. Down here. I will use a string builder. You can use future buildup, but I just want that given a worth any data changes or anything we do, we don't have to refresh our set state. That is, I will just say fire space, Firestore that instance. Collection modes. Then we will use the where clause so that we can fetch if particular user ID. By filtering it. We tell users user ID is equal to user.email UID, that is user, this user is this one. And then snapshots. Okay, we have our co-editing. Now in that builder. And we'll have context and seeing snapshot, snapshot. And then I will just write if snapshot has data, if not, just turn a set of colored progress indicator. If snapshot has data. After that, right now, I will do another check to see if snapshot dot data, dot docs dot length is greater than 0. That is, we have some documents. If we don't have any document, I will just simply in the else I will return center. And here I will seem text of no notes. I'm available. That's it. But if the document length is greater than 0, I will return a list views.py. This if else is very much important because it might have been that the user has not uploaded anything. So here we have to check with this. Now, item count will be snapshot dot data, dot docs, dot length. And then below we have context. And that index 0 didn't allow. Everything is going really good. So this data, which we will be getting in this snapshot, will mean that JSON format. So here we will convert have rigging model. So like this, I will just write Node module, give it a name node. Then I will let model.fit. I'm Jason. And it is exerting a snapshot. So we just have great snapshot, dot data, dot, docs and index. So here between bars and convert the JSON to an object. Now, in the return statement, I will just paste, paste that card which we already copied earlier. So here in the text that is in that title, I will write naught dot title this note. And in the description as well, I would simply like Node.js scription. Okay, Let's save and we start and check in the home screen what is been shown. See learned Florida. So this data is coming from the final sto database. Finally, rehab successfully fetched data as well. You might be asking why I use StringBuilder. So let's say I go to that title and how I write none. Firebase. And then the operations in Firebase fire store. I will just said learn Firebase file store. Okay, now when I click on Add Node, see it is already being fetched. I don't have to restart our set state or whatever. Since it's a StringBuilder, it is being shown directly in the home screen. Okay? The next step is to have that added note functionality. So for that first thing we have to do is to past-time node data from the home screen and accepted in the edit screen. So let's go here. I will seem good, I know node. And here I will use the constructor and simply write this dot naught. Now in the home screen is showing enter because here we have two boss Daniel. And then notice already here, we have already assigned to a variable. But this is done. Now. I didn't know dot-dot-dot screen. We have to create two decks and being done again, when a controller, controller, then the controller name, description, controller, decks, Anything controller. Okay. And let's have them Boolean variable loading. So everything will be quite see. So now what I want is when the user clicks on this, it's data should be shown here, that is, when we're editing. So in that case, obviously the tightening description should be shown in that text field. Far, dad, have to pre-assign and given initial value, that x and think and to learn. And we can do it in that init state. Here, I will just write del controller dot txt is equal to widget dot naught dot. Similarly, description controller dot dx is equal to reject H naught dot description. And we have to make sure we assign these TI token to lead to the text field. So here like this. And here again, we have read descriptions and to learn. Let's save it and see if it is working or not. Now if I click on the Learn Firebase flutter, yes, it is working. We can see that I tell in the description. So now it's time we work on this Update button. As you shall, we're fasting, we have to create is creative function. So below in certain everyday feature, update, it will again ask for three things. String. First thing we'll read document ID because at least we care we will know which document to uptake, then String title, and then string S to make it sink. Now, let's have our catch block. I can just simply print then either heroes, so you can print data. In that try-catch that isn't a try block. We simply have to read a rate. Firestore collection, notes, document, doc, doc id, update. I really loved it. Description, description of fun Chinese done. Let's go to the edit note screen. And below we have our button. Let's make it a sink. Plus 10. We will check if he hasn't written. It is del controller.js not equal to NP and description. And x is also not empty. So here we will write if it is empty. So we'll just show a snack bar is required. And if not in that state print. Let's do set state. Loading is to use the unary operator and check if loading is to show centered and then a circular progress indicator. If not, then that button. Yeah, I will use await and Firestore services dot update, doc ID, that is document AND will be simply widget. Id. Title will be L controller dot text. Description will be Description controller.js. Next. After this, then we will set state again, loading to false. And I will just never get out. It is navigator dot dot. Let's save it and test it on our own. Bring out the editor. Sodium you later. If I go to learn Firebase flooded and a finite, just learn Firestore and updated. C. It is working in Spain. We can see that changes that is learned. Since again, it is a string builder. That is why that changes reflected in real time. So that's it for this video. In the next video, I will work on this delete button. Thank you.
15. Adding Security rules: Welcome back. So finally, the only function or the featured left is to delete a particular note. Other than that we have successfully created and updated. So let's work on the functionality to delete it as well. Go to Firestore services dot dot file. Below update node. I will create the future function called delete node. Make it sink. So for deleting a node v required document ID. So I am accepting it as a parameter. Now, use that try catch block. In the try block, it is only one line of code that is await, store dot collection nodes, then, then dot doc ID and simply 10 dot delete. That said, that is the only thing required. We have our function ready. Let's work on that delayed I can edit mode screen, that is this one. And also show it confirm dialog box to make sure the user doesn't accidentally deleted node by just pressing on this top button. Because scenarios can happen that he's less king his screen and by mistake, he click on this button. Go to Edit Mode. In the app bar actions we have this quaternion. So in the on-premise, me Kid, a sink. And the first thing we will show is a show. Dialogue. In this context is context builder. We have to write a function and it is accepting it will context. That said. Now, simply return and alert dialog box. That is alert dialog inside it. In that title. Let's give it a text. Please confirm that in that content. Simply give it a text called, Are you sure? You delete the node? That's it. And after it, we will have some buttons. First, yes. But then text. But then and in that child, simply write e, s yes. And Data button will be a text button, but it will be just simply to say no. And when the user click on this new sea smooth should simply navigate out. So I will write navigator dot pop in that no button. But in the Yes button, I will write on Prezi I will make on a sink and emulate, await Firebase. Study every store services that delete node and the ID is rigid. But node ID, that's it. And after it, first thing I will do is close that dialogue with navigator dot Bob. And after that, I will close the green. Also because now we shouldn't be able to edit it. I did it as it is already being Daley did. Okay. Let's try it out. I've saved it. Being out our emulator. If I click on Learn Firestore and now click on the Delete button. See I have this confirmation screen. If I click on No, it will directly go back. But if I click on yes, see it brings out brings us out to home screen and our debt note has been deleted successfully. So finally, the functionalities are working and we have a working properly completed that is completed mode application. So the final thing which we have to do, a final topic is about adding security rules to Cloud Firestore. So when we are using Firestore for production, we must change the security roots. As in decimal, anyone can access it with its URL. And obviously because of which data will be at risk and also can give us a big usage pin if someone misuses it. So because there are finitely, we don't want these kind of situations. We should change that condition and what condition I will be using is called the authentication required. One of the most common security root by term, is controlling access based on the user's authentication state. For example, your app may want to allow unless sign in users to write data. For that. Bring out the Firebase console. Go to the Firestore database and click on these rules. Here. The European C, this is allowing everyone to access the database, but we won't, we don't want it. We will remove it. Densa here. If if, if request dot are not equal to null, That's it. And click on Publish. From now on. On. The user has been authenticated, this sign-in user, e-mail, g-mail, whatever, then only he would be allowed to access that data base. Here. This particular part is mean that each, it can match any document in the entire database. We can also change these kind of rules as well, but I don't think it is that much important right now. Another common pattern is to make sure users can read on Lee, read and write their own data on Lee. There are few more which you can try on your own by reading the official files to documentation. But the most commonly used is this authentication required. So that's it. For this module. We have learned a lot. And that is how to create a firebase account, how to do that cred operations. And finally, build our complete Node app as well. And in the end we'll learn how to change the security rules. So in the upcoming module, we will be learning about Firebase storage and how to upload files to it. Till then, just keep practicing.
16. Configuring Firebase Storage: Hi, welcome to this new module where we will be discussing what is Firebase Cloud Storage and how to implement it using flutter. So until now, we have learned how to authenticate the user, how to store user data into fire story that was, but now it's time to learn how to upload files into Firebase as well. So now the question is, what is Firebase Cloud Storage? Cloud Storage is designed to help us quickly and easily store and serve for user-generated contents such as 42 videos and any other file. So in any real-world application nowadays, dead easy and necessity of using storage. If you see Instagram, it is all about images. And definitely we have to use a storage facility. Apart from that, if you see WhatsApp, when we are sending text only, then we are just using the database. But suppose we are changing our profile picture via either sending images or videos to other user. In that cases, we have to use some kind of storage. So obviously the first step was to configure our Firebase project, which we have already done. The next step is to add the Firebase storage dependency. Let's go to our Chrome browser, right? Pub spec, then, sorry, Pub dot-dot-dot. And here, simply write Firebase storage. The first one is you have to copy it and paste it in the YAML file. Here that says Download, dependency and install it in our project. Now, the next step is to enable storage in Firebase project. That is Firebase console. Like Va created a fire with, fire store data with, in that same way, you just have to select the storage from this left-hand menu. And as soon as you click on it, you will see that bucket part, that is this one. This is our unique bucket part and threw this on Levy will be uploading fines. And van we were using Firestore database rules. Similarly in storage also there are rules. But since we are using Firebase authentication, that is why we don't have to change any rule here. But if you need to change the rule for Firebase storage to go public for testing. That also you can do, but definitely not in that production stage. So we have our storage ready, we have our dependency ready. And we'll just check one thing here. So this also we can just copy it since it issuing some error here. I will just go to pub spec and pasted. Okay. Now it's time. We build a new screen as well. So create a new file inside spleens folder and name it, upload image dot, dot. And now create a stateful widget. But before that I will import the package and then create a state full rigid and naming. Upload image screen. As usual. Scaffold. That title. I will write decks upload to find ways. And I will just make it center. Body. First of all, I will create two buttons to select an image. Let's delete that column. Then children in the body, I will give some kind of bending is when you just give it to independent. In that children. I want faster fall. Two buttons for that. And it will create the row inside column. Give it mean x is an element, mean exist selling when dots space evenly. And that children I will have elevated, but 10 item that is elevated button dot icon. I will simply write a camera. And labor should be camera. Similarly and elevate them. But then we can and will give I can as I can add the text of gathering. So what I have created for this to show, you have to go to main.js file and comment the home screen here. And instead, instead of it, I will turn our upload image screen. Now save it. Let's see if it's working. Our upload image screen is looking very nice. This screen I have created at first, just to demonstrate how to do the operations in storage. After we do it successfully. Again, implement that story in our node application as well. But before that, the basics, we should know the basics. Now. You might be thinking, okay, I am seeing we will upload image, images and all. But how in order to access that device category, our camera and pk image we make, we need to make some uses of third-party packages. Are many in the market, but we will be using image picker. Let's go to pop there and image picker. So this dependency we will use in order to access the user's device, that is Gallery are the camera and then fetching the image and just copy it. Go to the spec dot YAML and paste it here and just save it. So our dependencies are all set. In this video. We have successfully configured Firestore as well as created the UI. In the next video, we will learn how to use Cloud Storage and what are its terminologies. Thank you.
17. Understanding Cloud Storage: In this session, we will just understand what this cloud Firestore and some of its terminologies. Because before writing code, at least we should know some of the functionalities or features it allows. So directly for using Cloud Storage. First of all, we have doing stand-up package, which we have already done. Then next step is to create a storage instance that is called the instance getter on Firebase storage like this, the waste storage is called the Firebase storage dot instance. This we have done in five best art as well as in fire with fire store. Then there is another term called references. References. A reference is a pointer to a file within your specified Storage bucket. This can be a file that already exists or one that does not exist. To create a reference, use the RDF, that is href my ten on there Firebase instance. And this is the example. In simple words, this is the location of your file storage. That is, if we had directly mention here, slash and then the final name. Then if we go to our storage that is here, that file will be stored directly in the root directory. But their friends can also be nested file or directory. Provide the full part. Rus that child my head on the return difference, it will create folders inside the dielectric. That means if you want to create a folder that is images, and then inside it, we upload the image, just for example here. First folder can be user's profile image. Second folder might be sent items like this. For that we simply have to create a reference. Then I mentioned the directory inside the RDF method, like this, images slash and then the image file are, we can do it in a way that is dot ref, then dot child, that is, this is the folder name and then dot child that is directly the image file. So this is that concept of reference. Now, what is listing files and directories? Firebase provides the ability to list the files and directories within the directory. There are two methods available which provide this ability, list and list on board function my tax return, any result which contains any files, directories, and pagination token from the request. So suppose we have successfully uploaded the image. Now when it's time to retrieve those images from the storage. In that case, we will use this material. So simply what we have to do is in B instance we have Convention. The reference depth is where that file has been stored and then list. It will give us on the files stored in our storage. And since it will come in a list of items. So we simply have to loop through it. In the example you can see this is how we do it. That items property represents file within that bucket and the prefix property represent it's nested directories. In case we have a large volume of files and directories called LinkedList. It may take a long time to return our results. In this case, calling list and limiting their result may result in a better user experience. So in the example you can see here we are asking for the data, but just for the first 10 data, That's it. So this is the concept of listing files and directories. Then it comes uploading files. So this dummy code, this is the syntax required to upload a file. Fasta file we must, we should have a file. And then in that instance Get Data View main chain data friends where we want it to be uploaded and then simply read dot output file. And within that put file, we send our file in which it is. This is very simple and this is just this code or flight. We will be implementing this code in the next session. I just wanted to give you the overview and how storage works and what are the different functionalities it offers. The final thing which is really important is downloaded URLs. In most of the use cases, we might wish to display images stored on a bucket that is storage within our application. And for that, we have requested download the URL from that storage. It will give us a link. And that link you have to show in our vision. To download the aryl, we simply have to mention the reference of the image and then use them my 10 dot download URL. This, we will also use it in future videos. Now, if you want to learn more about Cloud Storage, you can simply go to the official documentation that is here and you read everything, what references, download URLs, upload files, how to upload raw data, how to add metadata, see what our task color, different types of tasks. A lot of things. If you want, you can go through each and everything because it's a good practice to read the documentation of that plug-in. So that's in FAR WE DO. In the next session, we will upload our first image. And Q.
18. Implementing Image Upload: Hi. So now we have understood the concepts and theory of Firebase storage. It's time to create our own function. That is my big image and then upload to the server. We have already mentioned that dependencies, that is Firebase storage and the image picker. Now simply go to the Upload Image screen. And here, the first thing we have to do is to create an instance. Simply our Firebase. Firebase storage is equal to waste storage instance. Then definitely whatever I do, it will take some time and we have to show some loading indicator in the UI. That is why I am mentioning a variable. After that, let's create our function called function, which will be returning void and I will leave me alone. Image. So here you can see a person can upload image from a camera or a gallery. So when we're calling this function, we have to send the input source. That is, whether the user has chosen camera are the gallery. Now it's time we use our image as well. So I will get a variable called picker and then assign is image picker. Now I simply have to write await picker, pick image. And here, force will be a ternary operator which will check if input source is camera. It will be image source camera. Or else it will emit source. But Kelvin. Okay? So when we have our D speak image, we can see it returns a fifth future of exe file datatype. So I will just draw it here and we'll simply write final exe file which is in health safety and name it big image. So now what they were imaged, the user data will be stored here. Now first thing I have to check if a user has big sum any image or not. I will just check if peak image is a two. Now, I will simply return null and stop the execution. And if not, if the image is not null, first thing I will do is get a file name in this big image name. Second thing I have to do is create the file because this format is an EXE file. So I really like image file and then simply turn the widget, which is from that dot IO. See we have important the dot IO. And here we have to send up part which will come from. Image dot. So now we have all successfully converted it to a file. It's time we do our catch block and perform the Firebase storage function. In that tie. First thing I will do is get the loading indicator to true. Then I will await Firebase storage dot dot to reference their friends when we're filing. And output file. And input file, I will write image file like this. And after it they successfully done, I will again set to false. And as always, I like to show a snack bar. Scaffolding OFF, then show snack bar, snack bar, and guide tab content as sexes uploaded. Okay. I will just done on Firebase exception, catch and E. And if something else, then here, I mean again print. Oh, okay, So now our fun Chen is ready. We simply have to first stuff mentioned the loading indicator here in our row widget. If loading is true, then center circular progress indicator. If not, then I have to show that row. We dump buttons. Let's see, Let's try it out. This sticking in the beloved 10. But okay, first off, let me go to my storage and depress it. Let's check if there is any image or not their industrial age. You can see there are no files here. Simply bring out your emulator. I will click on Galilee, but before that, obviously, I have to mention our function to dub buttons. So I will press, I will call this upload image with a value of camera. And in this case, I will simply write gallery. Okay? Since this is an amulet that I wouldn't be using the default camera I will choose. Then in that downloads, you can see already existing images. I will choose this Elon Musk and see our syndicate is there and then successfully uploaded. Let's check our storage and see our images here. So this is the file name on the reference I was talking about. So here, this file-based storage or filename is this one that is directly it has uploaded in the root directory. So this is how we upload image to storage. But definetly. Then we have uploaded the image. It's necessary that We retrieve it as well. So for retrieving the images, the first thing we have to do is to create a method for it. Simply go to our screen only I will, I would like to write down my turn. In this file only. If you want, you can use separate files. I will just simply write future. It will give us a list of files. So I will do I load images and then make it a sink. After that, I will simply create a list mapped variable which will store all that data coming from the storage. Now, the first thing, as I mentioned, that we have to listen to get all the files. So I will write finite list result. Result is equal to await file-based storage reference list. After that, I will simply get right. A list of files is going to result items. As I discussed in my slides, as when we have our listing files. And through that result, we can get the items. And item properties represent files within the block. So now we have the phi and I will simply loop through it with Future dot. For each, for each element will be our files. And it will give us a reference. One file. If we're looping through it. Then why looping? I will just get the download URL. I relate finance training file URL is equal to await file dot get download URL. And since if it is a wait, I have to make it a sink. And file's variable above. I will add value in a map that is URL, will be fine URL and will be file dot full part. And lastly, I would like to print files as well as return files. That is, this list of map. A map will contain the image data. Url is used to show that it then this part will be used to delete it later on. So that's all for this video. We have done a lot. In the next video, we will show implement this function in the UI. Thank you.
19. Retrieving and Deleting Image: Hi. So in the last video we have successfully the functions required to retrieve images. That is this one loading images. Now it's time. We show on the immediate stall in that storage in our UI. Here. Let's do it. In our body. We have column and within column we have this draw. And below this row, I would like to show the images. First of fun, I will give some spacing. We dust size Fox, given a height of 50. Then I will use an expanded region so that it will take leftovers piece. Then here, every user future builder. In the future when bird future, we will load images and now write our function, a snapshot. Okay. Let's check if snapshot connection state is equal to connection state. Waiting. It is, it is not been completed. Then I will turn color progress indicator. And if not, then I will return a list view. Now within that Biller, I DM account will be snapshot dot data, dot land. And I will check if it is null and we'll make it 0. And I render. I will have a context and that index. Now since the data is coming in a map, I will store it here. Map image is a snapshot dot data index. And I will simply return is rho. Rho that children. The first thing I ever use is an expanded region. Within it. I will use a card. And that card, I will use container. I will give it a height of 200. And child to show our image, this image.net. And through this image video, I would simply write URL. And after that card region, I, which show a button, that is Icon button. And of which I can will be Huygens dot delete colors and see if it is working or not. We have one image in our storage. This slide showing some Azure. It shouldn't be. Okay. It is not showing a rate was slow. But see we have our image. You can see it in the debug console. Since we were presenting their results as well, we have our image here. So this is how we retrieve image from the storage. And show it in our UI. This expanded here I use so that it takes less space. And then the buttons is appeared. And height is this 200. And if there is no data, then the item count will be 0 and nothing will be shown. So now it's time to do the final thing that is the delete image from their files stored. Let's create a function for it. It will be future. Wait. Then delete and delete. Anything from the storage we need. Reference. Simply await. Firebase storage, reference, ref dot delete. And after successful of deletion, Let's set the state so that this future bill that is called again. And we will check that storage and get the data. We have the function delete, ready, it's time, we assign that to the icon button. Let's make it a sink. And right of it. Delete function and give it back like this. And after it is deleted, I will show a snack bar. Content. Next image. Let's check it out. Stuff. What I would do is try to select another new image. I would select. Mark Zuckerberg is successfully uploaded and see. We are getting our second image. Now if I want to delete this first image, I will simply click on this delete button and see immediately that successfully. So this was the image I deleted. Now if I refresh the Firebase console, you will see only one image and which is our mark Zuckerberg. Elon Musk was ugly them. But this is how we delete image from dust too late. You can check out the code. Here. It is, everything is related with the reference. I'll say I would like to mention that this app is intended to be as simple as possible. Soda or cord is shorter and Tina, it has only one screen and uses a stateful widget for state management. I know it lacks many production features such as image before upload. But first off fall, our intention is to properly understand how to upload and retrieve files from the storage. So that's it for this video. I hope you have learned a lot. Thank you.
20. Compressing and Caching Image: So until now we have understood how to upload, retrieve, and delete our file in Firestore storage. But now it's time to understand how to compress image while uploading. So large, large images take longer to upload and made insulting awful user expedience. Uses always preferred negligible load times and don't want to see the loading indicator for them for reducing image size can also deduce the monthly bills of that image storage and hosting services you are using. Image compression feature is unavoidable if your app has a feature where the user is uploading images. So in simple terms, we should use the image completion. And far that gathered is a package called fluttered native image. Let's check it out. If I go and write native image. And then let's see the first one, which is yes, which is this flood tentative image. So you can see these two is required to resize image and reduce their quality by compression. So let's go to installing. Then, copy it. Go to our Pub spec dot YAML file, and paste it. And then save the file so that our fluttered does the work of installing the dependency. It will take some time. No issue. Oh, cave. So now since it is a new dependency, we have to stop our flooded application, the desktop debugging. And then you restarted again so that our flooded knows that a new package has been installed. I know this is a very tedious process. It it is time-consuming, but this is how it is done. So till that time my app is running, I would like to again go to our upload image and try to revise what we have done till now. So we have our Upload Image function where we are sending if it is a camera. Article 3. After that, we're just using this as a draft that would find code to send our file to the storage. And after it is done, marshaling ESnet. But then the next function we created was to load images. First thing I did was create an empty array. Then get all the files reference. That is true. This command dot list-style. It gives us a list of result. And through these risks result, I get all the references of the uploaded image and then loop through it, look through it, and get that download URL. So, and after getting a dominant view, and I'm saving those in this variable and then only showing it in the UI. Ui is also very simple. You can see I had used this future when there are none. And if something, some details, Vincent, then I will check the list. You will that if delta length is not, now, if it is none that is not even one image is dead. I will write 0 on my own. We can see our compiler is done. So finally, our application, we'll be done. I know Android Studio sometimes can take a lot of time. Yes, It's done. Now let's create. Required to compress an image. It will be a future function which will return as a file. So every limit compress image. And we have to send a file data while calling definition, because at least through this file we will know which image to compress. Now I have to write native image function. For that. Simply go to the spec dot YAML file and copy it. Paste it at the very top. If it is still showing adder. What we can do is we can go to our Pub spec YAML file and then just save like this so that it does, it again tried to get the required packages. And now C is now gone. So in that compressed file, Let's write await, need div.com image. And here I have to send the file part. And then that quality, that is what percentage I want to reduce this debt is 50 percent I would like. And if you have compressed image, you can see it gives us a future file. So I will just simply write phi. Compressed file is equal to await like this. And after that, I will print the original file size. That is original size. This file dot nan sink. And I'll Sabrina come breast size like this. Compress file.com, find land. And finally return our compressed file. So this will be a future file datatype. Okay, This work is done. Now we have to do some changes in our upload image. Here. After this file. After file, compressed. Compressed file is equal to await. And call different function from here. I mean simply a compressed image and send that file. And after Let do our Firebase reference here, I will put this file, not the other file. Now let's save it. Now let's test if it is working or not. If I click on gallery and suppose choose this file which is typically four KB. Now let's see if it is being compressed or not. Here you can see the original file sizes 34 and compress was us just 10. So there is a large difference. If we use that compression. If a refresh our debug console, we can check if it is, if it has worked or not. See it was 30, 40 KP, but now it is just 10. And it is looking nice. But this is how compression is done. Now the next thing, the next topic which we will be discussing is what is cash network image that is caching? So everyone knows that images are an essential part of modern apps. Since bandwidth is costly, commodity, caching of images can prevent the downloading of image from the server every time the user views it on the screen. Caching without so improve the user experience when our flank, because it will be using the local cache copy without trying to download again from the Internet. Yet in this tutorial, we will use the cached network image package to cash and discipline input images. The thing is on the first launch, the app displays a place holder size as close as possible to the final image to suit and transition when real images are loaded. And afterwards, immediately it is being catch to that device locally. Then next time when the image is needed, that package will fetch it from the locally rather than downloading from the internet. So this is the package R. This is that dependency which I will be using. Let's go and install it. You simply have to write cache image. So I guess I should I cashed network image, the whole team. And the first one is what we need. Just copy it, paste it in the spectrum in Yemen. Now it's time we implement image caching as well. Since we have to show a place holder while we are fetching images when using CAS networking, which plug-in. That place holder can be of any widget such as text, circular, progress indicator, et cetera. But I prefer it the AMI image as placeholder. So simply, I will go to the browser and then the images and write placeholder image. And after that, I will just download one of the images. Suppose I like this one. This one I will say because I don't want a transparent background. So this one, I will just save it and name this, find a place holder. Okay? It has been downloaded now since it is an acid. So we have to mention it in our YAML. Before that. Just go to that directory. And in the root directory, simply create a folder called images. We will be copy and pasting the downloaded image. This one will just go to the images and download pasted. And to make sure it is being. Updated in our flooded application, you have to go to Pub spec dot YAML file. Below we have these assets which is being commented. We just have to uncomment it and make sure you only tap Backspace twice because this file is ready, case sensitive. And I will simply write that we in the root folder we have this images. That's it. Now this cached image login accepts trip amateurs. One is the image URL that this URL of the image which has to be cached. Second is place holder. This is this widget and the engages the space before the image is loaded. And that target is any editor widget adder we did will be displayed if there was any edit downloading that image. So let's go and implemented. First thing I will just import cash networking, which at the very top. Let's see. They shouldn't show any editor. Okay. Now, down in the future we'll learn inside this child. Instead of writing amazed.net networking image. Image URL will be this. But the other properties, as I mentioned, there is a place holder, which is a function having context and the URL. And I relate image, dot set images. Place holder dot JPEG. Let's check if it is the file images that placeholder dot JPEG. And in the editor widget, I will simply show. I will simply show. I can, I can start adder. That's it. Nothing much for here. So this is how we implement cache network image. Now I would like to share, show you the output what and why we are using this. So now that time when it will be loaded, just wait for a few seconds and see it's loading. And obviously we are getting this error just for that reason that we have not started our application. Let's do it. Just click and then start debugging again. So we have our application running. Now let's see if gash network image is working or not. Let's check it out and see, this is what I was talking about. And, and the transition was so smooth. So this is just a place holder or you can say some kind of effect that the user gets feedback and he will wait for the data to be tripped. So this is a use of cash network image. And now for the second time, when we refresh that data won't be fetched from the internet. It will be used from the cached, which is already in there. And that is why it is so fast. At the first atom. It looks a posteriori second now just took 1 second. So I hope you have learned a lot in this session because compression and caching are two important topic while using any type of file upload. So that's it for this video. Thank you.
21. Video 83 Upload Multiple Images: Hi. So until now we were just
uploading a single image. But today we will learn how to upload multiple
images as well. Because there might be
scenarios that the user want to add multiple image
and not waste his time. Just selecting one image and
then upload and then wait. This is a very long,
lengthy process. So v should always be for multiple images in
such scenarios. So first of all, I will just
delete this previous images. Then I will show you again how to select them together
and then upload it. Now, let's create a
third button here, which will say that
is multiple images, so that we have three options. Just for our reference, we are doing like this. Let's go to our
upload image screen. Then we have the column here. Then first thing is the row. And below the row, I will have a sized box. It should be sized box
and then a height of 30. Then have elevated button icon here that I can, we can choose. I can dot image and label would be multiple
images like this. Okay? After that I will just make this height a
little bit less. And then save it. Let's check it out. See, we have this multiple
images button as well. Now, let's do that
changes or let's create a new function that will
have multiple images. Score below this select
image that is upload image, I will just create
a new function. It will return a
void and name it. Upload multiple
images. Let's say. Now again, create a
picker image picker. Then now earlier we
had this exe file. But right now we will
have a list of x phi. Because we will be getting multiple images which
will be coming in a list. Like big images is
equal to await. Picker. Pick multiple image. Here you can see
our image picker gives us multiple options. We can pick image, we can pick multiple image as well as we can pick
video as well. But right now, our focus is
just to pick multiple images. After that, we will just
check if it is not null. That means the user
hasn't gone back. If it's null, I will
just return null. If not, I will set the state
to loading is equal to true. Then I loop through all
that picked images. So I will just write
Future dot for each. Then the future
will be like this. That is, we have to
loop through this. And from this we
will get X-Files. And I will just name it image. Then let's make it
an, a sinc function. Here. Here we have to do, we have to upload
that image file. So similarly, as we did in the Upload image like the
filename and the image file. I will do the same thing here. I will simply write. String name is equal
to image dot name. And then every level of phi image phi is equal to file image. But right now I'm not compressing the image because we already
know how to do it. Right now my focus
is just to make sure our and chin is working. Let's have a try catch block. When they say print. And in that try, I will simply do our
Firebase storage reference, name, dot file, and now our image
file, like this. And after this whole for
each looping is done. After that only, I will set that state again,
loading to false. And then I will show
a scarf that is a snack part of image. This image is uploaded. Sex is only like this. Okay? Our function
is ready. Now. Let's go and in the press of our button,
let's execute it. That is, our butt is here. I will just execute
it like this. Let's save and try out. If it's working. Awesome, I read is there? I will click on it. Is there. I will select these two
images and then click Open. Silver loading. Is there. All images uploaded
successfully? And we got our image. Definitely, it is working
in the Firebase as well. These are uploaded. We can see from
here only that is, it is being retrieved
successfully. So this is how you implement multiple images in
Firebase storage. That's it. We have
learned everything regarding image upload
and how to cache data, how to compress
it, lots of thing. In the next video, we will just implement this same feature in
our Node app as well. Thank you.
22. Video 84 Image Upload in Note App: Welcome back. Now we have learned how
to use Firebase storage. It's time we implement that same feature in our
node application as well. This application with
very weird building till now in authentication as well
as in a Firestore section. First, let's make home screen the initial screen in main.out. So debt, we can see our app. Now let's create a
function to select Image and then preview it
before uploading the file. Based in the previous sections, we learned we were
just uploading the image by clicking a button. But now we will learn
how to select an image. Then the user can see the
preview what he has selected. And if we click on
the submit button, then only that image will
be uploaded to the storage. Go to the Add Node screen. Here. Let's create some variables. First will be filed. That is image file. In the beginning,
it will be null. And second will be string, which will be file name. And in the beginning
it will be also none. We already know
that these two are required when we are
uploading image. Now let's create the function. Function void. Name it. Upload image. It will be a sync. Then first we have to create a instance of image
picker plugin. Then we have our x phi big
image is equal to await. Picker. Pick image. Source will be emitted
source dot cadre. As when we're picking imagery will obviously
pick through the gallery. Then we will have an if
statement where we will check if it is null or not. If it is not just returned from here known to
execute that other code. If not, we will just said that state file name by name variable is equal
to image dot name, and image phi is equal to File and Image.all part. So here we will assign those
value to this variable. And you might be
thinking why I wrote this variable here and
not inside the function. I, because I want to use this variable in
the whole screen. That is, I want to create
a Upload Image button. We take ternary operator so that show an image instead of the
button when it is not null. And if it is null, that is, if the user has not
selected any image. In that scenario, show the
Upload button, not the image. Let's go and let's see
what I'm talking about. Here. In that child, we have a column in that
children at the very top. Let's have a container. Container height should be 150. Then in that shy, I will have two things. First thing is if image
file is equal to null, then I will show a center. And inside the cell
there will be an icon. It will be, I can start, image. Size will be 100. And if it is not, nonetheless, there
is some value. I will just, I will then show an image
that is Image.all. And right now I will show file because it is stored
in that file. Here I will just say
image file like this. And it is showing that
this can be null. So I will just go and
type this null check. That is, shores ensures
that this is not null. And below the container, let's have a size box. Sized box of height. Now let's try it out if
it is working or not. To see. Since it is null, our icon showing and it
is looking very nice. Now if I click on it, sorry if for clicking on it, I have to make wrap this container with a
widget called inkwell. And here in the tab function, I will write upload image. This is a very important
step, obviously. Again, let's go and check
when I click on it. Now see, this is there. Now, if I click on this icon, see it is being previewed. So right now it is not being
uploaded to Firestore, it is just a preview. Now, this portion is done. Now, let's make the changes so that we can add when
Add note is played, then first image is uploaded, and then that data is
told in Firestore. So here in the
on-premise we have this. If else, in the first
condition I will just add image file. If it is null, then
only write alpha. It's adequate. But because I
want the image to be filled. Now in the else. Let's try and do it. First thing, let's create our Firebase storage instance
than in the reference. And the reference
will be filename. Then put file. And we have our
image file. Here. Again, we have to do null because it will show an error
that the file can be null. But we'll just write
this exclamation so that we make sure that
the file is not enough. And obviously we have done
the null check here as well. So after this file is executed, what I want is I will
just add that dot. Then. Here I will
get the result back. Within that result, I will
just return result dot, ref, dot download URL, because we need this
URL so that it will be stored in our Firestore database with all that information. When we are returning it, I will catch it here. I will just write image. It's already a string. Image URL is according to this. And after that, what I want is when we are
inserting a node, we want this image URL
to be sent as well. So here I will just, first of all print the image URL and save it because I will go and check
if it is working or not. Till here. I will go here, I will select, I will select This images here. I will just write
them or flutter. I will delete it later on. And description like this, and just add notes. And see in the print we can see that something is stored
in the Firebase storage. That means it is working fine. So now what I want is when
we are inserting a node, I want this value
to be sent as well. It is image URL like this. And obviously in
our insert node, it was not being mentioned
in that parameter. So I will just mention it
here, like string image. And then I will be adding a new value of
image, image like this. Okay? Now since we are
changing our node data, but definitely we have to go to our model class and
change it here as well. So here also just
write string image. Then here we required
this dot image. And then in the model here, right, snapshot Here, image. Because this is a very
important thing to do. Now, let's show node image, that is node with all
the images here as well. That first, I will delete all the data which is already there because
it will show a added. Otherwise. Let's go and delete everything
in the fire based storage. Yeah. Delete both of them. And also in the storage as well. I would like to
delete everything and just would like to start
with everything new. Let's go and I will show it. But before that, let's make that changes to our list
style in home screen. When we go, we have this list
style here. In the leading. Just say guest network image. In the image URL, just write node dot
image, like this. And that added rigid. That is, we have our cash
network image. Here. I have the image URL like this. Then placeholder will be context. You are in. And simply pull the
image dot set and images slash
placeholder dot JPG. And in that added widget, again, I will simply write
context you are in. And then I will write
an icon here instead. And here another pandemic
there will be added. Okay? And after the arrow, just like the width
of 70 to this image and fit of box feet cover. Okay, we have all that code DD. Now, test our application. Let's score. Initially we don't
have any notes. Let's go and insert
our first one. And we'll just write Steve Jobs biography about his awesome success story. Let's see, here. We have the image as well. This is what I was
talking about. If we go and add another
one that is Firebase, and I will just write, learn, Firebase, mastered backend
services as well. And then save it. And see here the fire
risk images as well. And that is why I
mentioned that width because I want everything
to be aligned properly. That's all for this
module as well. Thank you for joining. We have learned a lot about Firebase and let's
products. Thank you.
 Rahul Agarwal, Flutter Developer & Trainer