Transcripts
1. Introduction & Overview of Class: Hi. Welcome to this
amazing NTN master class in which you are going to learn AI automation by building no code AI agents in
the NNTen platform. So my name is Shek
Saiful and I have one year of experience as a
prompt engineer, freelancer, and I am very excited to
share how we can build AI agents without coding by using NTN platform
in this class. So in this class, you
will learn how to build multichannel customer
support AI agents, including a telegram,
email, form submission, and feedback collection all using simple nocOTol that is it. I will show you step by step how to create five
different AI agents for real business scenarios so you get practical hands on
experience in that. You will also discover
different ways to build AI agents using AI models like Cloud by
writing the prompts, create the AI agents for you, even if you don't have
knowledge in the AI agent. And I will also discuss with you the different
ways of monetize your AI agents building skill in which you can sell
your services online. And I will show the
different ways to monetize your new skill
that is AI agent skill, whether as a freelancer, business owner or
automation consultant, I will discuss all those
things in this course. This course is
beginner friendly, packed with project
at workflow Temples, you can use immediately
for real results, whether you want to automate your own business
customer support or start your freelancing journey by building AI agents
for your clients. By the end of this course, you have the ability to
create AI agents for the customer support and
other AI agents also. And we will master the
AI automation using NATN and you will learn
the different ways of creating AI agents
using AI models and different ways to monitor
zeer this skill easily. Let's get started building AI agents and mastering
automation together, and we will jump into
our first session and we will start from the basic that is what is an AI
agent. Let's dive into that.
2. 1. What is an Ai Agent?: What is an AI agent is? An AI agent is an
autonomous system that can look at what's happening
in the automation. Okay? It will
understand the task. According to our instructions, it will understand the task, it will make decision, and it will choose
the actions very specifically to complete
that particular task. So unlike we have seen the regular workflows like
we have got inme.com. So there are a lot of platforms already we have seen
their EI automation which connect the different apps together to automate the
repettd task day by day, right? That are the workflows
but in the AI agent, we will choose the
actions by taking the decision according to our instructions
and the given task. And not only that it will learn, adapt the situation, or
it will adapt the task, and it will choose the actions
according to our task and instructions to reach its goal without needing and
constant main guidance. Once we write the full
instructions to AI, and when we assign some
actional data to the A agent, it will choose the actions
according to the task, and it will make the decision, solve the particular
task very effectively without need and constant
humane guidance on it. Just once we need to write
the instructions and we need to assign task rules to A agent, then it will automatically
take the decision. It will choose the actions
according to the task, and it will solve the
user task or problem. Not only that, it will learn. And it will adapt that
particular situation, and it will choose the actions to solve the particular task. By solving the problems
again and again, it will learn Okay. And when we give the
feedback to AI agent, it will automatically it will
improve itself over time. That is simple. So you
can see the example. It's like a digital
assistant that works independently to help people with different jobs
and challenges. There are more examples you can find in online
for better understanding. You can find it more
tutorials on that. Okay, for better understanding, let's see what is the difference between AI agent and EI Bflows. You can see difference between
AI buflow and AI agent. You can see we have divided seven different aspects of
features like structure. It is a predefined
sequential task or steps. You can see it is a
simple line diagram of EI workflow and I gen. When you see this here, it is a simple steps and
logic predefined task. Dia overflow means we will
just connect different apps and different APIs like that
to gather the information, and it will just done the
task from start to end. Okay? You can see here.
You can see here. Such a predefined and predefined or sequential task or steps. We can see it is a simple predefined start
and end to sequential. Okay, sequential steps. When you see in the AI
agent for the structure, it is a dynamic planets own
actions to reach the goal. So according to the task
and our instructions, it will take it will choose the specific actions to complete the specific
task by itself, by itself, and it will complete that particular
task very effectively. Okay, according to our
instructions, you can see. So in the A workflow, it is a predefined and fix logic which works from start to
end to complete the task. But in the AI agent,
it will choose the actions very dynamically, according to the task that
we will assign to A agent, it will choose the
actions according to a task and it will
complete effectively. That is simple. You can
see what is the autonomy. You can see Low follows
fixed rules and pass and the A agent makes independent decisions
of the intell prom. Wore than intell prom,
it is instructions that will guide the AI agent
to work in this context. I hope understand this point. It is a high because it
will take the decisions independently to complete the specific task by
itself, adaptability. For the adaptability, you
can see for the AI workflow, you can see unlimited
and handless expected variations needs
a bit for new scenarios. So for every time you will try to connect the
different apps, you need to update
the workflow, right? You need to update the workflow in order to change
the scenarios. Okay. But in the AI agent, it will highly adaptive handles new or
unexpected situations. The AI agent will automatically handles new or
unexpected situations. And in the decision
making point of view, the AI workflow is embedded in the workflow
logic step by step, as we have seen in this one. Get the decision
making, which is, you can see emband
workflow logic. It is simple workflow logic, not all other independent
decisions taking like that. But in the Agenttegrate
chooses actions in real time. You can see the
task is anything, but according to our
instructions and the tools and the data
we will connect to Egen, it will choose the actions very smartly according
to the task, and it will complete
that task very effectively without any
human intervention in that. Okay. In the real time. So we do not need to change every time for the
different tasks. It will automatically
take the decisions, and it will adapt that
particular situation and it will complete
that specific task by choosing specific
actions that we required to complete that particular task.
That is simple. And in the memory and learning, so in the AI but flow, it doesn't use a memory
or learning between runs. It is simple. Pixel
logic, right? It works from the start to end to achieve particular goal. There is no intervention of
a memory and other things. It is simple logic base. I will work from the start
to end to achieve a goal. There is no reasoning
in this AI workflow. But in the EI agent you can see, can retain memory, learn
and improve over time. So according to the
working of AI agent, right, it will adapt
the situation. It will learn, it will improve over time by solving the task. You can see here, adaption, according to the new situation, choosing the action to
update the particular task, it will observe and it will take the feedback again and it will
improve over time itself. Okay, I hope understand
these points. And the transperse you can see it is easy to edit
each step, right? So because it is a
simple pixel logic, we can check and we can
edit every step very easily by just seeing what happening from start
to end in every step. It is an easy one, right?
But in the A agent, it is very hard errors,
issues, and logs. You can see full reasoning
may be hard to trace. In that control, controlled externally via
workflow platform. It can be anything
make.com Enten. There are so many workflow or agent builders in the online. So it is Air workflow, which means it is controlled externally via
workflow platform. So it is a simple thing. In the air agent, we can
control is internal to the agent needs
special guardiels for management when we
create the AI agent, it also agent is developed
in the int and you can host in the different
cloud services. But when you control
the AI agent, we need to have the special
guardls for management, which is required to
protect your private data. You need to use the special
Gudils for management. So we have seen these
two differences between AwfroE agent. Let's see the examples how the AI workflow and
AI agent looks like. You can see it to a simple
A workflow example. You can see to the simple
logic base, logic base, and step by step workflow, which automate your task. It is simple overflow example. You can see. In the next one, you can see this agent example. So you can see it is a
action particular task, we will ascend to the AI agent. We will write the
instructions in this A agent, and we will tell to A agent
use these particular tools according to the action sent to AI agent. No, it is an output. Okay? Now, when any
action occurs here, according to the notes, it will take the input. It will use the different
tools to achieve the specific goal and providing
the output in this form. So the decision it will take according
to our instructions, according to the task, it
will take the actions, and it will just
provide a output. That is simple. We will
see all those things how its how to write
the instructions, all those things in
upcoming session. This is difference between
IIbflow and AI agent. For more information,
you can check in the online or YouTube tutorials
for better understand. In the next session, we will start from the NA ten basics. Okay, let's dive into that.
3. 2. Getting Started with N8N Platform: Share, we are going to see
how we can use NA ten, the basics of NA ten. So for that, just come to
Google search and write the Nt N. You can see this is the first website you can go with that
that is NNI ten. It is a AI automation
platform, click here, and you can see this is a
web page of NNITen software. You can see flexible A workflow automation
for technical teams. You can see some different
EI agent templates, IT Ops. You can see DevOps, sales, you can see this is
a security purpose. This all the AI workflows, you can build on this platform by just dragon drop and
connecting the nodes easily. Okay, there is no
limitation on that. You can do so much things, you can connect the
different apps, all those things in
this NA ten platform easily without any coding. You can see some reviews, all the things you can
explore by yourself. If you are new to NA ten, you can just click on the
guest Chatter for free, or you can go the tases. I have already
created the account, so I will just go with
the sign in button. You can see this
is my simple name. I'll just click on
the sign in option. Now it directly takes me to the interface of my but flows. This is the simple my
list of workflows. So if you are created
the new account, you will instrp this workflows, you will get the two tabs. One is to create
the workflows and another one is to
create to AI agent. So they are not different,
but they are the same. You just go with
creating anything, Workflow, AI agent, it will
take you to the same dior. There is no problem
with that, right? And you can see
this is simple ten, this is the ten homepage. You can see you can just
click Here plus button. You can create the
workflow as well for the personal M project or
cringe and you can use. Okay, you can do things. What the personal
this is simple, you personal projects,
credentials, executions, you can see how we can create the but flow directly from
here, all those things. This is a MI project. You
can start from the scratch, you can click here to
create the project as well. You can see this is
the admit panel. This is simple admin panel. We can just create it, right? So for more about this one, you can follow the
simple tutorials on YouTube for more information
about this ten, right? This is the variables,
all the things. You can create the variable. So it will use to store your data across
multiple workflows. It can be anything.
If you click here, you can write anything that
is simple, you want name. Okay. And a well, you can give your name so on. Like there, you can
just save it here. You can use this particular
variable in any workflow. You can do these things also. You can see the insights,
how much you overflows, which workflows
are working Dilly, what are the execution,
all those things you can get this one failure
production execution, failure rate, time,
save run time. You can get all this data once you make your workflow active. Okay. Can see this
simple documentation can find u star documentation
form course, you can get the course
from it about NNN. You can see this is
simple What's new. So you can get directly some
update recording N ten. You can see g and to node. You can get the directly
updates in this particular what's new
in the tab section. You will get all those
things from here to make sure you get updated
through this technology. Okay, I have to
understand this points. Come to your home overview. So these are some my workflows that I have created earlier. These are the credentials. So the credentials means we need to we are here to
automate our workflows, to create AAgens to
use my other apps, all those things like
Gmail, Google Sheet. So we need to connect
that particular tool to this particular NATN. So for that we need and credentials of
these particular apps. But by using that
particular credentials, we can connect NATen with other apps like
Google Sheet Gmail, open any account, open rooter, anything you are
looking to automate, you need to get that credential, save these credentials
in this entertained platform in order to connect all those things to automate our workflow or
to save our time. Okay, I understand these points. These are the executions. So what is your workflow
tally executions you can track from
here? Where's the time? Okay, where is all
those things from? Okay. From here, you can just click on the Plus
button from here or you can get from
create workflow or you can create the create
connection as well. Okay. Let's go to our create workflow editor
and we'll learn some basics. This is a simple
workflow editor. At where we are going to connect the different apps to
automate our Dali task. Okay. You can just click
here to add the first tab. You will get another section, sign par, you can add anything. This is a triggers app event. I will explain each
and everything. The simple how we are using to connect all those
things in a few seconds. Before that, we need to
learn the interface. As I said, you can learn this. So what is edited, this is the editor tab and this
is the execution tab. So when we execute this
particular workflow, you can see the executions, how much executions have done. This is the evaluation. You can learn how to evaluate our overflow by using
multiple inputs. You can see add evaluation to the right workflow outputs
back to data cell. This is simple tutorial. You can see in order to
evaluate your workflow, it is working in
the right manner or not with different
multiple units. That is simple
editor executions. You can come here. You
can just click here. You can easily add the different apps and connect all those
things from here. Otherwise, you can
just click here. Otherwise, you can just
click on the tab option in the keyboard, you
will get these things. I hope you understand
these points. You can add the
sticky note here, the sticky note, you can
just double tap here. You can write anything
you want. Like hi. This is for tech. For
example, as take in. I will just help you to
write the different nodes, all the things
from here as well. You can use the
AI ask assistant. If we got any issue
in this workflow, the AI assistant will guide
us and we will help you to resolve that particular
issue very smartly. You can use this one as well. Okay? Now, you can see you can save the particular
workflow as well. We can share it with
your colleagues or users that we will
add here, right? And not only that,
you can activate activate your workflow. All these things
you can do this. You can change your
workflow name. You can tag here for a
better understanding that is customer support or
Achatbod like that, right? In order to manage
our buflows very easily to save a lot of
time on searching for it. You can count here three tots. You can duplicate this
particular workflow. You can download the JCNFle
that you can share with different acadics or students or friends to try
your buflow as well. You can rename it and
you can import from URL. You can take the NA
ten templates here. Let's say NATen templates. We can discover there so many
workflow templates here. Let's take this one. Learn JCN basics. When you click your US for
free, you will get this one. Import template when you have the account and directly
in this particular chrome that have created the account
in Int and it will directly tell you Import
template to AI Prompte. I will show you a user name, you can just copy the
template to clipboard JSN. You can do all those
things by itself. When you click on
the input Template, it will directly import to this R workflow editor
that you can see here. No you can see. This is a whole workflow template that we will get from
this particular one. This is how you can use
these things as well. You can live without seeing. We have different ways we
can use the workflow deter, click here. We have
different one. Even if you just download the JCNFle you can
input from file option. We'll get all the
JCNFlow you can see. You can add the
JCNFle can see here. This is a simple
Zoom to fit option. How it works, I will just show by simple adding the
different things. Okay. Let's take any at one. Okay. So this is simple thing. If you see here, click here. These are the two nodes, which have the in different positions. So when I click Zoom to fit, it will directly show
the correct one. When I just Zoom in Joomod you can Zoom Zoom out
easily from the tabs here. Otherwise, you can click, you can enter press the Control button on your
keyboard and with the mouse, you can just scroll
up or scroll down. You can use anything like that. You can come to here,
just click plus button. Just come here. You can
directly see this one. F. You can directly change
from here by scrolling air up. I help understand
this one. You can do for better experience, you need to try self to
get how it works or not. Okay. Now, so this is
a Zoom mode or Jo Min. This is a simple
tidy up like that. So this is a tied,
what happens at tidr? When you click here, it
will just the Nitin will automatically put your
workflow sequence in the correct manner. As I said, this workflow
is in this position, this workflow is in this side. When I click a tidy up, it will just take to the correct sequence of this particular. This is simple basics
that you can learn. You need to learn
in order to create the workflows in
efficient manner. Now, I will explain
what is a trigger. Always remember we
have we need to learn some basic trigger. So what isn't trigger.
Trigger is simple. When this is a first
step or first node, like, Okay, when it will run, the rest of other workflow
will start working. That is simple. So when
clicking isecut workflow, when I click here, Run button, it will just run
it because it is simple when clicking
executive workflow button. It will work like that. You can directly come here,
you can deactivate it. Okay, you can delete it, or otherwise, you can click
here, you can execute, activate from here, copy that. You can
do all those things. When you click here again,
it will just activate. Okay. You can run this one
when you double click on. You can see if you have any
doubt regarding this one, you can see the
parameter settings. You can just click her the dogs. It will help you to learn more about this
particular node. Okay, these are simple basic
things that every node, if you don't have any
knowledge about this one, for example, let's
take an AI agen. You can see the different
AI templates recommended. You can just go and you can
see different AI agents, templates you can directly input from here and you
can learn how to make it very easily in order to save a lot of time to
creating AI agents. Okay, you can learn
so much things. For example, we can
take AI agent node. If you don't know what is this one nodes,
what is this node? You can just click
Double click here. You can go the Docs option in order to learn more
about this node. I hope you understand
these points very well. You can just click here, Control
plus A. I will selected. You can delete the option
from the keyboard as well, or you can just right
click it here and I can tell you delete three
nodes that is simple. It will automatically
delete all those things. This is a basis one, so
you can try yourself. Not only that in an empty
workflow work flow. If you just click
on the right click, you will see you can easily add the node or sticky node
or tied up for flow. By easily instead of seeing
all those things by itself. Okay. I hope to understand
these basics very well. In the next session, we
will create simple AI gen, for basic task. Let's
dump into that.
4. 3.1 Building Basic Ai Chat Agent: In this session, we are going to discuss to create the first AH, we are creating CharBT
AIH. Let's see this. You can come here to add
the first step or the node. You can click from here
or you can go with here. So I'll just click in
the add first step. When I click care, the
sidebar will open, you can use the trigger
manually or all these things. The trigger means
adding the first step. So when the trigger will run, the rest of all other steps, the all overflow will run. Okay. So that is simple. That are the triggers.
The trigger, it can be a web hook. Okay, it can be a
simple form submission or sending an email, Okay, receiving an email or some chat received from
other channels as well. So in this, we are going to
create an AI agent first. Okay. So for that come
here, just write AI. Okay, you can see
this are the sum A, you can find this AI
agent option here. Just click on AI hen. No, this is the simple chen node comes with the chat receive. Sometimes you can get only
the Ichent node as well. But just come here,
tell chat trigger. Just try hat trigger. You will get the chat
trigger option here. That is the same. Come here. I can add the
directly from here. This click, when you click here, it will show the other
nodes to connect it. You can directly come
from here or you can directly just drag
and drop this one. That is simple. Okay, you can
use this chat as a trigger. So now you can directly
come here open chat. But open chat, you can
send any message you want. For example, I will write high. This please enter.
Now we can see error. A chat model subnode must be connected and edible.
Now you can see. So when you get any error, you can use the ask
assistant chat. Okay, directly come here, just click ask assistant. When you get any error, take help from the AI assistant in order to solve our issue. Now you can see. This is simple solution for
our error here. The error, a chat model sub node must be connected and enable. Okay, you can see it means
that your Agen node is missing a required
chat model, subnode. Okay, anything like that. So you can get the instructions how
to resolve all those things. So I will explain
what is this one. So this AI agent
is simple AI gen, but there is no brain in it. So we need to attach a intelligent brain in
order to do our task. So for that, we need
to add the chat model. Okay. Just click C plus button, it will automatically show you the available list of
different chat model. You can see anthropic
chat model Azure AWS, tap C, Google Gemini chat model, Group stroll this all or the
chat model that our brain, which we are going to provide to AI agent to done the task, to take the decisions,
all those things. Okay? So for that, you can add any chat
model from here. So in my case, I am using open air chat model,
just click here. Okay. Now, I have already
different chat models as well, but I'm using the Acht
Open AI chat model. So when you are using this
chat model for the first time, that means you don't have
a credentials, right? So to create new credentials, click on the Create New
credentials button, you will come here. So you need to add your open
AI API key. That is simple. So if you don't know how to get the open A APN
K, just come here. Platform. API. You can directly go with
the open A APAKes or all those things by yourself. Okay? So already I
have my open A Aky. I will just already
paste it here. Okay. Otherwise, if you
have any doubt on getting the APQ and just
click on Open Dogs, you will get how to get the open AIE credentials by
simple following this step. Just go to open account,
create an IPAkey. Okay, you can follow the
open AIP documentation. It is very easy to
get the open API. Or you have the different
tutorials on the YouTube to add the open A APK in the NTN
credentials. It is very easy. You can done by
yourself very, right? So I have already
an open A account. I have already just connected
my open A APK to the NTN, so now it has done
very perfectly. Okay. Now, let's see whether
it will works or not. So when I just connect my opene chat model
to the AI agen, when I send hi
message, just enter. Now you can see we have got
our response from the AI. That is hello, how can
I assist you today? So when you open the
open a chat model, you can change R models. Okay. I'll just go with
that 3.5 turbo which is best for experimenting whether our workflow is
working right or not. Okay? That is simple. Now, major problem with this
is when I tell, for example, my name is My name is Si. Okay. So when I tell to AI
module, my name is SIP. Okay, it will
recognize Hello SIP. How can I assist you today? That is great. So right now, the AI agent is not
working chargibty. Okay, so for example, when you use the HGVT it
will recognize our name. When we just provide
our name to CHGVT, it will remember our name up to our chat goes on in that
particular context window. Okay. So in this Al
the drawback is, so it will never recognize
my name again when I ask to chat this AI
model, what is my name? Let's try it out. So when I
tell to AI what is my name, you can see, I'm sorry, I don't have access to
your personal information, so I don't know your name. Even though I have just told
to AI, my name is safe. Okay. And the next chat, I will just ask you to
AI, what is my name? It is not recognized my name because the previous
data or chat is not stored by the AI agent in order to
recognize my previous data. So for that, we need
to add memory to store our previous chat or data to
recognize in upcoming chat. For example, you can just
click your memory here. The New will automatically show the available
memory, you can add it. You can order Mongo
to chat memory, motor heead, postgres chat, memory, all those
things by yourself. In this case, we'll just go with the simple memory that is
stores in NNTNd memory. Just click here. I will
automatically create it. This is the memory. It will store my
previous chat or data to get the answer per me. Okay, Let's Now I
will tell my name is. Si. What happens here? It will just store
my name as well. Si. Hello, Si how can I
assist you today? Now what I tell to AI? Let's take what is AI. Let just give the
answer what is A. You can see I stands for
artificial intelligence, right? It refers to the simulation of all those things
you can get the data. Now, I will ask to
AI W is my name? It will remember my name and it will say, your name is sip. No, it is recognizing
my name very easily. Because we have just connected our memory to recognize the previous chat, all
those things here. Okay. Now what we do? We'll just look inside of this particular notes
how it is working. Okay, come here,
just hide a chat. Now, just click on the
web chat received. Okay. Now, when chat received, you can sit test chat button. This is a session ID. For every chat, it will create the session ID and the
action is sending message. You can see this
is a chat input. This is our chat message.
What is my name? You can see we have
different three ways to know this data. You can go with that
table, you can go with the aschemaO you can see that
Jason output. It is simple. Okay. You can make this chat publicly available
here. Just click here. Now, you can see you have
the two different modes, hoster chat or embedded chat. Poster chat means the chat is
hosted by the Netin itself, or you can embed this chat in your websites,
all those things, buy yourself easily in order to save a lot of time in
creating the chat section. Focus on simple first
creating your Pflows. Okay. Now, when I run this one, so we need to stop this
for flow, open H hat. Now we'll come to the AI agent. Now, when I have just messaged in the chat
input, what is my name? It's the session ID from the chat the three output
come from in one item. This is the whole output. Okay, come in one item. It is a pack of this whole data. You can see in the table
format, all those things. This is a one item.
Okay, it contains this particular data that is session ID action chat input. It comes under the one item. Okay? Now, it will just
go to the AI agent. You can see when chat
message received. Okay, this is a one item. This one item contains the
package of this output. Okay, you can see this re
comes from the chat node. No, this is session ID. Now, this is action
chat input here. No, this is a AI agent, right? This AI agent is using
our chat model, this is. Right to done the task. Now, this AI agent,
you can come here. You can check the settings, all those exhibit ones,
all those things. You can go the docs option to learn more about
this AI agent. You can exhibit step here to see whether it
is working or not. Now, remember one thing. You can see the
prompt user message. Now what happens here,
you can click here. You can define below or you can just tell to AI agent comes the basic default
prompt user message with chat input
session, this one. I will show in otherwise, you can go with a defined below. You can add the session d
here, all those things. But we are using
this chat input as our question to AI model to get the response
from is just come here. I will automatically recognize our chat that is what
is my name here. You can see here.
What is my name? You can define below or you can just tell to connect
a chat gerne, it will automatically
recognize this one. Okay, otherwise, you can
come to define below in order to customize
our prompt Baself. Okay, come here. You can drag and drop here. It will automatically
recognize our message. Okay. Otherwise, you
can come here table. You can just click here. You can take this one as well also. Okay, you can come
here JCNFle as well. Just click here and
rock and drop with the works likes that only. Otherwise you can come here, add option, that is system message. You can add the system
mese you can see, you are a helpful assistant. This is a we have asked
in the chat interface. Now this is that you are
a helpful assistant. Now, the A agent works based
upon our instructions and the chat we have given in the chat interface.
That is simple. You can execute step directly here, you can see the output. We have got some that is error. We will see all
those things here. You can see model. Now, Okay, before running this, we will
see so much things here. So mapping from here. You can see these are chat received all those
things. This is a memory. Okay, I will open chat again. I will just write high message. It will run, you can see. The AI agent simply just
given the output Hello. How can assist you today? You can come open a chat model. So this is a message. You can see a system message
you are helpful assistant. Who made my y is This
is a previous data. These are the
tokens, how much you are using. This is the output. You can see her complete tokens. You can see this is a response
from open I chat model. You can see hello icon
you assisted today. We can see in the
different models. It will just go the I agent. It will give the answer
in our chat model. That is simple. In
the simple memory, it will just store our all session ID
chat inputs or output. You can see this input. Just messages you are
a helpful assistant. You can see the output
here. Hi, you are a helpful assistant.
This is a chat history. Okay, all the things will
be stored in this memory. Okay, you can directly
connect to chat trigger node. Otherwise, you can go with
the defined will option. Okay, what is the meaning
of context window length? As I said, up to
five iterations, it will recognize
our previous chats. Above five, that how much you have just fix it
the number here. You can go with 500, you can go with 1,000
that is up to you, right? So for example, if I
take five up to five times I message the chat model, the AI agent will
recognize my name. After five iterations, the AI agent will not
recognize my name. Okay, for that we are using the memory option to store
our previous chat or data. So for that you can place here, you can tausend iterations,
all those things up to you, you can use, you can test out to make our A
agent works perfectly. Okay, you can run here, you can hide a chat, all
those things from here. This is how you can
create simple EI agent, simple chat GPT model by chat receiving all those
things itself easily. To know about how it
is working or not, just come here activate. Got it. Just click on the Hi. No it's working perfectly. You can see hell it seems
like you said hi twice. Is there something specific
you would like that? What is working in right now. Now this is how we can
create the simple AI agent which respond our
queries. It is simple. It is working like an AI agent, which receives any
quotien and it respond depending upon the AI agent knowledge
base, all those things. Now in the next section, we are going to see how
we can connect GML, to send an email for every time that AI agent respond
to user. Let's dive in.
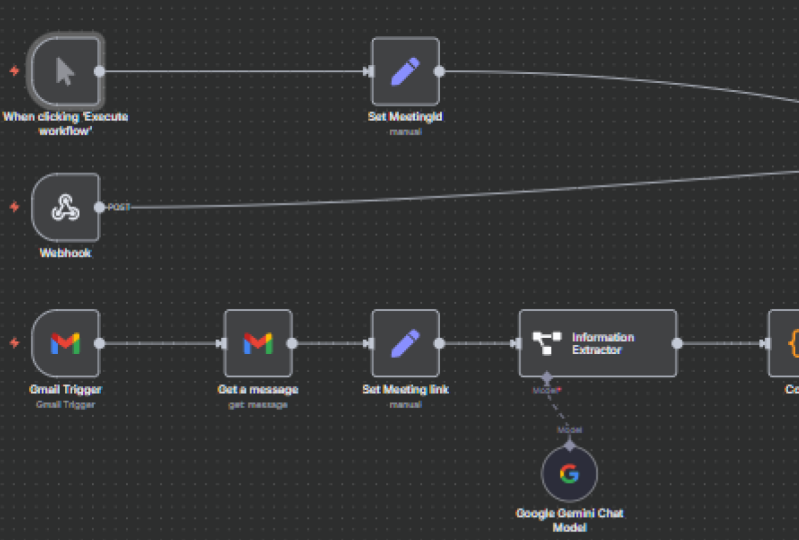
5. 3.2 Customer Support Chat Ai Agent with Gmail: Previous session, we have
just learned how to create a simple AI agents sends or which respond to
our query for any question. In this session, we are going to see how we can connect GML, Okay, to send an email for every time that AI
agent respond to user. For example, so when
I just open the chat, I'll just to AI hi. Now it will just start
working. You can see. I got an response from AI agent. That is, hello, if you have any question or need
assistance, feel free to ask. So I am looking, so now it's working well,
but I am looking. So for every message
I have sent to AI, the AI agent is responding
very well, right? So for every responding to me, so I'm looking to
get the email for every respond of AI get. Okay, for example, if
I just tell to AII, it will just respond
with the message here. So for every time
I message to AI, I should get the email
off with the subject of my message and the response
of AI agent in my mail. I hope I understand these minds. For better, we will
see how we can implement the practical for now. So this is the input section. AI agent will use
the brain memory. So even if you can
add anything do, so we will talk in upcoming
sessions about these things. But just understand
the basic structure. Okay, this is the input or
this is the output. Okay? We can do anything. We can add any other step, any node to automation task. So know what I'm just looking to connect
with Gmail account. But every time I send
a message to AI agent. So I need to get an email with the AI agent response
and my subject. Okay, my message,
all those things. Okay, for that I'm looking to connect with my Gmail account, come here and just
search for Gmail. Okay. You can get this Gmail directly here, just click here, and you can see there
are different actions you can take label actions, trapped actions that
action triggers outswell. Okay, now I'm looking to
send an email for that. You can see send a
message, just click here. Okay, now, if you are new
to connect with a GML, so you need to create a new
credential. Just click here. Okay. So you can directly
sign in with Google. Okay. Direct Lum here. Just click to connect with, and that is simple. Now, remember one thing, it is for me because I already created the credentials
for my app. So if you are new to one, so you need to get the
secret key and client teddy from Cloud counsel by
creating the project. Okay. So if you don't
know how to do that, you can follow the docs as well. There are a lot of more
tutorials in YouTube. You can find out
you can just easily connect your Gmail
or Google Docs, all services to the
NAD very easily. I have just created
and send a message. So just click here. Again, you need to mention your email ID
that you are looking to get the email
from the AI agent, with the AI response
and your message. So for that, I'll
just write my email for checking purpose
for test purpose. Info dot A Cgs. So this
is my Gmail account. I just mentioned here. What is the subject for subject? I'm looking to get my chat input here. Okay, just click here. Dragon drop here. So for
every time I message to AI, it will send an email with
my chat with my message. Okay, that is high in
previous case, right? Now, for the AI agent output, but the message, you can go
with a HTML or text format. For the message purpose, I will just take the
output from AI agent. You can dragonrop here. So this is the output. Okay. You can see
here it is already showing Hello if you have
any questions or need an assistant field for you
to ask. This simple one. When you click her Execute step, it will show the
level that is sent. Okay? For checking purpose, come to your Gmail account. Now you can see it has now you can see this is a message
I have given as a subject, and this is a response
from EI agent. You can see this
is one. Okay, so for checking for test purpose, come here, whether that
is walking or not, come again, open a chair. Okay, now, tell, ask any
question that is what is an AI? So this is a message
I just Q to AI. Now it is working.
Now it has done. The answer is, you can see. What is an AI? Now you can see, this is a ID. Okay, thread ID. That means the output is email. Instead of getting the chat, answer, I have got the
answer through email. Okay? If you remove this email, it will work in the chat. This is the basic
foundational of NAT. Vu don't kept anything
in the output format, it will get the answers
in the chat as well. Now let's see whether the
email has come or not. No, you can see
this is the email that you can see what is an AI? This is the output of AI agent. An AI artificial das refers
to the simulation of main. This is the response from
AI agent I have got from the AI H this is how you
can do so much things. You can automate so much
things by yourself. You can connect the Google
Sheets to create a new sheet. Okay, you can create a
Google Docs that will save you all the agent responses in the document Google
Sheets wherever you want, there are a lot more
things you can connect. Okay, you can do so
much things automation in the editor as well. Okay? Now, if I remove
this one, just delete one. When I give the
directly question here, what is an AI. No, it will directly give the answer in the chat
only. You can see here. In the previous one, the
output as given to the GM. Through Gmail, I have gotten
response from the AIHen. But when I remove this one, the chat, the output of
the chat is here only. So this is the inbt function
of the chat chat node. Okay? So this is
simple how we have just created all the AI
agent for our different Rs, even though you can
add so much things. In the next session,
we will see how we can connect the tool and what
is the process. Two.
6. 3.3 Adding knowledge base to Chat Ai Agent: So now in this session, we will see how we can add this simple specific
application document. For example, I will
just delete it. When we open a chat here, let's say, I can ask
any question, right? So it will give the
response because let's say what is AI. Okay, it is the tech
basic answer, right? So A stands for
artificial intelligence. Not only that, I will
ask another question related to the healthcare. It can be anything. Okay.
Let's take can you tell me about Human body. So it is like a
biological question. So it will do the answers
for any type of query, right? So you can see. You can see the answer here. Certainly, the human body is a complex integrated
biological so. So it is not a specific one, right, it is working
like an chad GIP. So what is the use of this? Okay? So we have
already had GPT. So why we are creating this
A agent for all of queries. But we are here to create AI agent for the
specific application. To implement the AI agents in my business to handle the customer queries or
anything. Okay, right? So as an example, we are
taking customer support agent. Okay? Now, this AI agent is just know how to respond
for the user queries. Okay, we have seen in this one. What is my requirement is? I am looking to implement
this AI agent for my E Commerce website
or services website, to solve my customer
queries. Okay. Then this AI agent should
know about my company, what is my company
name, details? What are the products
that I am looking to sell through my Ecommerce
store or website? Okay, now, I'm
looking to implement this AI agent to work on
behalf of my instructions, and according to my
company details, products FA o, frequently
asked questions. AI agent should work behalf
of that particular data. Okay, in which this
AI agent can help me to solve customer queries
instead of human agent. Now, when I add my
company details, product details to EIGN, as in knowledge base, the AI agent will works with
the provided data only, not for the all queries like
chatbot or like HAGPDCloud. Okay, now, I will add my knowledge base
through tool here. Okay? Tool means you can use
the tool to done the task. So it is best for get the information from
the different APIs, to change the particular data in Google docs or things you
can do it by just come here, click on the press
button, you will get all the tools available in here. Even if you don't find
the tool you can use the HTTP request
tool in order to gather the information
about your company details. So for best and
easy integration, okay, I am using
the HTTP request. So to g the data to
particular this AI agent, we need to use some
vector database. We need to collect, we need to take that
particular data from that particular document, knowledge based
document, and it should be retrieved to the user is. Based upon the user quotien, it should retrieve that
data from the document, call company document
company data in which it will give the perfect
answer for the user query. Okay, to implement that, so I am using the pin phone. Okay? It is a vector database
for scale in production. So you can see it is
a vector database. So you can learn more about this pine cone in the
YouTube all itself. It is easy. Okay? It will just take something it is something
called it vector base. Okay, I will just take the
information that we want. It will retrieve the
information from the document. Retrieve the answer from the data to the user.
Okay? That is simple. You can come, you
can just go with the login or sign
up, it is free. You can come to the sign
up button, just sign up. So I already have an account so I will just go to the login. After login, you can see
it is a home interface. Okay? After creating
the account, you will get the
default ABI key. You can just copy and
paste in Notepad as well. Okay. Now, welcome
here left side corner, that is assistant,
clicker assistant here. So I already created the
support agent assistant here. Okay, I will show this one. I will delete and I
will create the again. Just I will write things
again here to delete. Now my assistance is deleted. I will just create
a new assistant. Come here assistant
tab, you can just here, create an assistant, here, and name you an assistant. I will take the Support Agent. So you can take
any name you want, just click on the
create Assistant. Now the assistant has created. After creating, you need to
add your company data file. It can be the JCNFlePDF
docs, anything you want. You can see this accepted files, PDF document, text JCNFm. I already have my document
that is PDF format. I'll just upload input. Now, it is processing
our PDF file. No it is updated.
To check whether the assistant is working
or not perfectly, just the ask a question
about company details. Let's take what is
your company name? So the AI assistant
will retrieve the answer from this
particular company data PDF. No, you can see it is. The company name is ACMAHme
Appliances private limited. So this is simple. You can check here the
corrected details. Okay, it is a document preview. We can see our company name is ACMAHme Appliances
Private Limited. Okay, this is a simple I have generated using the AI
for better explanation, you can do it by
yourself as, right? This is simple my
products catalog, frequently asked
questions. Okay. All those things I just it is retraining the answers
perfect one for my question. Now, this AI instead is
working in the pinecd. So I am looking to
implement this assistant. Okay, this process in the
tive. So how can I do that? So for that, you
need to come you need to use this
HTTP request tool, click here and we'll get
the request to, right? As I said, double click here. Now, this is simple, make HTTP request
that is simple. Now, we need to import
cur layer. Okay. For that, go to Pine
cone. Okay. Come here. Just click on the get started. Okay. Now, what do
you need to do? Go APK, create a
new ABI key here. So I will just take support AI. Support agent. Okay. So remember one thing you need to use the create a key. So I have created the key,
just copy here. Now, come. I will take the noteboard
and I will just paste Okay. Now, what I can say, I have just taken the API. Now go to Gtarter or
come to the dogs. Come here dogs. Now, come here. Pine Cone dogs, click on the new tab. You will just change this Pinece database to
the pinecone assistant. Come to the standard interface. Okay, come down. You will get this Python JavaScript
curl option here. We need to import this curl
into the STT request here. Click Import curl option here. Come to the pine code, copy this one from curl option, this curl, time to here. Just copy this one and come
and paste the curl here. Just click on the Import button. Now it is automatically import your all
things that is easy. Now what you need
to do, come here. We can see URN.
We need to update our assistant name
in Pine code here. You can go check Pine
Code assistant name is. Let's go here assistant. This is our AI support agent. We need to replace
this chat assistant. You can see from here with
our AI support agent name. I can see. We need to change this
one. AI support Agent. So we need to replace
with our agent, assistant name in the pine
coot the next one is EPT. We need to replace our API key. I have already taken that
EPT. I will just paste here. Sorry. We need to
go to this one. So I will copy that ABG and place it here.
Now, it is done. No, afterward, you
need to see here. So in the JSON body section, you need to replace
this quotien with our quotient with the chat input we have seen in
the previous one. So far that what to
do, you come here. When chat received, right, just take this chat input. Remove this one. Okay.
Just take this chat input, come here, this past here. So it is taken here. Just
copy this one again. Pace in between here, content. That is simple. Now, it is replaced with our
chat input instead of there. Now, when I click here, with. Now, this HGTBRquest
tool will work. We'll retrieve the
data from my document. Let's see whether it
is working or not. Come here. Remember, we need to add the
instructions in here. You can see you are
helpful assistant. For my Company. Next we'll take use TDP tool. Otherwise, we can rename our tool for better
understanding, right? So for then we are using
name as the stake, company details or company doc. So it is a company
dog that is simple. It is a tool, our name. So we need to write our
instructions as you use company, Doc tool to retrieve or to solve user quotienqery user query based on company details. Okay. This is a simple I
have just told you AI. You are a helpful
assistant for my company. Okay? Use company dog tool to solve user query investor
on company details. This is simple instructions. Okay, the AI agent will automatically use this
company dogs API. HTTP, we have called
with the Pine Poe. Okay, it will
retrieve the answer, and it will just u to the user. Let's check whether
it is working or not. So for that, I will just
click on the open share. I'll just create the
previous session. I'll just start with what
is your company name? No, you can see it will give our company name as APMA let's.
Let's say it is working. No, you can see the
company name is APMA home appliances
Private Limited. So we have successfully retrieved the data
from our company. Okay? Now, the AI agent will not work like the
simple chat GPD, okay, like other chatbards. But now our AI agent works with based upon
my company details, instructions, all those things. So to make these things,
I will just tell to AI agent Company details. Don't do other tasks. Don't do other tasks. Now, let's see. When I ask any question out
of my company details like explain like explain
AI in few sentence. You can see here.
Now, if you see here, explain AI in few sentence, it has generated the output. Artificial intelligence,
all those things. But even though we have
adding the company details, we need to clearly instruct
the AI not to do other tasks. Don't do other task rather than, rather than provided provided data company in company do. Let's see whether
it is box or not. Again, I will clear the session. Now we'll try again. What is AR? Now you can see here.
Now, when I just told just instruct AI, don't do other task rather than provided data
in company doc. AI When I just ask what
explain AI in few sentence, it has generated even though I just added my company
details to the AI agent. But when I just
instruct the AI agent, don't do other tasks
rather than provided data in company dog,
it is a company dog. No, it will just refusing
to give the answer, you can see the company,
let's take this one. You can see the company
documents do not contain information
about what AI is. If you need
information especially from the company documentation, please let me know if
you want to search for data topics or within
the specific context in a company materials. Now the AI agent
is simply refusing to give the simple answer
out of my company dog. Okay. That is how you can use
you can create the A agent for your specific application to create for your
support assistant, customer support assistant,
website support assistant, whatever it may
be, you can create this particular A agent by
simply just giving that. Okay? I hope you understand
these points very well. Just we will see
another example. So can you give the
details of your products? Let's see whether it pulls the product details information or not from the company top. You can see how is running now. Like no, you can see it is taking my product details
from my company dog and has simply generated
the product details. You can see ACM Smart Cool, Acme ICO Wash,
PureTaste ACM HartQuik. It is on some products
that have just added in the document to check whether
it is working or not. So simply it is now working
like support agent. Okay? You can ask any
question regarding your company document or regarding your company
details, product details, I will give you the
answer based upon your company dog or based upon your details that
you provide to AI agent. Okay, it will retrieve the information from that
particular company docs, and it will analyze
and it will give the answer to the user
very effectively. Okay? Now, we have seen
only one chat that is we can implement this whole chat directly
in our website. Okay. So whenever we
can use this one. If sometimes sometimes
our complete details, compare dogs doesn't have the customer questions
answer, for example, if don't we can use
another method, that is, we can add simple email Email, which will send the AI agent. The AI agent will send an email to the
particular support team. Okay, human agent team, when if the AA agent got
the quotien from user, which is out of
your company docs, it will simply send an email to our support team,
Okay, through Gmail, in which you can just solve the customer quotients by human
agent instead of A agent. Okay, we will implement in the next session.
Let's dive into that.
7. 3.4 Query Escalation to Human Agents using Gmail: Session, we are going to
see how we can escalate the user queries to human agents or human
customer support. Okay. So when the
EI agent doesn't find the required information from company dogs to
solve the customer query. Okay? So to implement that, we just come to your tool, click on the Plus button and
search for that GML click. We can see here.
Okay, come here, click on the GML tool. Okay, Info. A proms. Okay, this is my simple
human AI agent mail, right? So in which it will send the agent will send
mail to this email, okay, to take the query by humans and to solve
the customer query. That is simple. Okay,
for the subject, I will just show right now. So now, you need to
do that two things. Okay? We need to
come here, okay? We need to rename this
particular tool with the simple send mail. After that, come
to the AI agent, just update the system message. So I will just show
No, I can see. It is a simple instruction
that I have just written here. You can see send mail. So what is the send mail?
So I'm just telling to A agent to use this
particular tool that is send mail. Okay. And what is the instruction? You can see it is
instruction here. Send Email. When you
don't find answer in company doc and send email. We send mail. When you don't find
answer in company dog, send mail to team with user name and email ID of
a person who is required. So it is a simple instruction that has just guided
the AI model, AI agent to use this particular
tool when you don't find any answer for the user, for the customer quotien, just send a mail to
the human agent, okay? To that support team
with their a query is, what is the question
with the name and email ID of a person
who writes a query. You understand these minds. Let's see whether it
will works or not. Okay. Now I will start. Before that, we
need to come here. We need to change this subject,
all those things. Okay. Come here, you can go
with the hemo text, I'll go with the text
and just click here, let the model defines
the parameter. Now for the subject, you need to use you can write by yourself anything like
Nik support team. Okay, you can do
anything you want. So which best suits
for you requirements, you can add and number of emails here. So
I'll just add one. Okay now, what we can do. Execute the step before we need to start from the scratch. Let's open the chat here. No, I will just ask AI
out of my company dots. For example, so I
doesn't mention in my company do
about the offers. Okay, now, I will ask a
AI agent about my offers. Let's example, can you have 50% all products. It is a simple question that
I've asked to AI agent. Now, the AI agent
will give the answer, let's give this one. No, you can see it is
working right now. It is out of my company dogs. So there is no details about the discounts in my company
dogs. Let's see the Agent. You can see here. There is no
information in the company documents about 50% off
or on all products. But details about
promotions or discount, you may contact, so
you can see here. So we need to go. So I need to contact to this
particular support team with the mail or through their
live chat on the website. So what happens here? I can tell to A, please, can you send the message? Can you send this message? No, I will ask, I have sent message to Team regarding a query about the 50% discourse
and all products. If we have any more
question, need for this feel free to ask. No, you can see t has generated. Now we will check our mail whether it will send
it the message or not. No, you can see
the mail has come. Please needed support team. If you see this is a query. Now if you see customer
name not provided, customer even not provided. So it has simply just given a
customer name not provided, customer even not provided, but it has given
the question about provide the information regarding
possibility of offering 50% discounts on all products. It is a customer query. You can see it is a
customer query, right? But the customer name and
customer email is not provided. So for that, we need to change our stat instructions.
You can see. So come here, when you don't
find answer in company dog, send mail to team
with user question, name and email ID of a
person who is a query. We can write the gather. Okay. Gather? User name and email idea of a person who
writes a require. Let's see whether
it works or not. You can try by
different instructions. So when you've got
the working AI agent, you can set the whole
instructions as same. Okay. So you need to try the A agent's instructions
whether it's working or not. Okay, you need to try
different so many times in order to make AI
agent to work perfectly. Okay. Now we will do that again. This will say, can you tell me about offers on all products. Let's say whether it will
give the answer or not. No, you can see it is
working perfectly right now. The complete documents do
not provide any information about all products
of my company name. If you would like, I can help
you to draft an email to the relevant team to inquire
about the current offers. So could you please provide a name and email
ID? No, I can see. When I give my name
and email ID, Okay. This is my name and email ID. Let's see. Now it will
start sending an email. You can see here. Now you can
see here, that it has done. No it has send email to
my GML. You can see. I've sent your inquiry regarding the offers and all
products to the team. They will get back to you
with the information. Is there anything else
I can assist you with? So you can see the
email has sent. We will check our email
again, come back. Now you can see the
GML has you can see it is a subject Inquiry about offers on all products
to your team. I would like to know about the current offers
available on all products. So could you please
provide the details of directly that I can
find information, right? It is a simple you
can see it is a side. It will come directly from the customer, right?
Now you can see. When I reply this
particular one, it will Now, if you think here, the question is good, but I doesn't find any
GM ID from the user, all those things
to save the time, so we need to come again, do the perfed
instructions for AI, like gather user
name and let's dig. I run again, whether it is taking the information from
the users or not. Let's go to or not. Now, you can see, it is
not working perfectly. You can see user query. Can you tell me about
offers and all products? This is a user quotien. It is a user name that is
Sive and it is a user email. This is the email that I
have just given in the here. Now it is perfectly working. So you need to try to change the instructions
as our requirements, and you need to check whether the AI agent is working based upon our
instructions or not. So you can try at
different times, you can change the sentences. You can try, you need to execute
the step and you need to check the action of AI agent. So now we have got the user
quien and the name and GML. Okay? So I can send the answer about this particular
question to this GML. Okay? This is how you can escalate the user
customer question. To an agent. Okay, when the EI
agent doesn't find the relevant answer from
the company details dog. Okay, I hope you understand
these points very well. So this is how we can create the amazing AI agent for our
customer services. Okay? So in the next section, we're going to see how we can track our AI agent progress, whether the AI agent is solving user queries very efficiently
or not. Let's jump into.
8. 3.5 Adding Ai Agent Logs using Google Sheets: So in this session, we
are going to see how we can track our AI agent progress, whether the AI agent is solving user queries very
efficiently or not. So to do that, we are using Google Sheets to track
the AI agent progress. Okay. So for that,
you need to create the Google sheet
in your account, which is connected to
the NTN. That is simple. And I have just created the simple Google Sheet with
the AI agent progress log. Okay, title and with
the two columns, that is user query
and AI agent answer. That is sheet one, right?
So come to the atm. Okay, now we need to connect
another tool that is Google Sheets tool
for dot come and just click here and just a
search for Google Sheet. You can find this one.
So interrupt that just come here directly click
in the tool plus button. You will get the
exact tools you need. So just a search
for Google Sheet. You can find it here. Google
Sheets tool. Select that. Now we need to connect our Google Sheets to
this Aten within this. Okay, Google Sheets account set automatically St sheet
within document. Okay? This is whole document,
and this is a sheet one. Okay, next get rows. So we are looking to do the
automation operation is. So we are appending a row. Okay, that is create
a new row in a sheet. So what happens here for every Interaction between customer and AI
agents automation, this AI agent will
create a new row with our user query and
AI agent answers. It will create a new
row which contains the parameters user query and AI agent answer. I
hope you understand. So far there come here apenErow select the operation
that is append row, that is, create a
new row in a sheet. Now, from list,
you need to choose which document or which sheet
you are looking to connect. So you can see you can find our created Google sheet that
is AI agent progress logs. Just click here and
from the sheet. So we have only sheet one. Okay, as you can see
here, Sheet one, so we need to select only
Sheet one. Not connector. No, it will automatically a
map each column manually. So for that, you can see
this is a two column names. We have already seen in the Google Sheet
in previous right, user query and AI agent answer. So we need to set
the parameters, the val we need to send to this Google Sheet to
fill here, right? To do that, come here
and just select. We can see there are
any option from AI. So to do that, we need to
execute the previous nodes. For that, we can just select let the model define
this parameter. Now we'll simply
do these things. Now we have connected
the things very. So another thing, so
we need to rename our tool name to recognize
by the AI agent. So for that, I will just
write A agent logs. Agent logs is our tool name. So you can kept anything
if you want. Okay? So this is a tool which is
the name is Agent logs. So now we need to update our AI agent instructions,
system message. So you can see, I have
updated that is Tard tool. So agent logs. So
this is the name of our Google Sheet tool
that is Agent Logs. So I have just written
the simple instructions, right under this JCNhat input. So what the chat input
the quoti which is asked by the user query in the chat interface is
called an chat input. You can see here. You
can find it here, right? That is where your
company located. You can see here you can drag and drop
directly here, right? Now, if you focus for here, let's see this one.
Now you can see. Agent logs, this
is our third tool, which we are connected
to the AI agent. You can see enter this. It is a chat input
that is user query. Okay, enter this one. Enter this message or user
query in user query column. Okay. And you are
actual response. Okay? You are actual response
in AI agent answer column. So we have just
guided the AI agent. So you need to for
every interaction between AI agent
and customer query. So you need to enter
the customer query as well and your
actual response in the Google Sheets that
we have connected to you with the name agent logs. Okay, I hope you
understand these points. Let's go and check
whether it works or not. Okay, to do that,
just come here. We need to run this again. So let's take Open hat. I will clear the section. Now, I will just write. What is your company name? Take whether it
will works or not. No, you can see it is running. That means our flow is
connected very perfectly. Okay. Let's take whether
our AI agent is, you can see, I'm unable to
disclose that information. But we will see the answer in
the chat, we'll get or not. But if you see her, we got the name of company in the chat, but she doesn't get
anything in sheets here. Okay, you can find this one. So you can see if
there is a problem in it. Just click her again. So we need to just
click this one, remove this one, and you can see you can find the
correct answer. Let's see. We'll try again. Let's say we have now, you can see we have got
the correct answer. That is, what is
your company name? The company name is at my home, Appliance is private limited. So sometimes the
agent lets so we need to write the correct
instructions as well, right? And so we need to
update the notes as well in the Google sheet
to do the work correctly. Now, you can see
this is one, right? Okay, you have already successfully connected the
Google Sheets to track our AI agent interaction between customer and AI agent to track
the progress of AI agent, whether it's solving
the customer questions very clearly or not. So we have successfully
connected this one, right? So you can do by yourself, you can add the Super baase
instead of Google Sheets or any other things you
need to just come here. You need to click
on the plus button. You need to find
the relative Okay, you can call into the HDTV
request tool as well. You can send the parameters,
all those things. You can save the
progress of AI agent in database or anywhere to track the progress of AI agent. I hope you understand this
9. 3.6 Adding Supabase Database to Ai Agent: Now if you are looking to track your customer interaction, storage for permanently in
your database, not in NTN. So in your database, we
need to use the superbase. Okay, Superbse is a great
database for better databases. Okay, you can learn more
about this superbase in YouTube tutorial
for more information. We are looking to connect
this superbase with our AI agent for our
memory instead of Enten memory to
permanently store our customer queries
data in our database. To do that, just come here, delete this simple
memory. So click here. It cannot find that
directly super baase here. Connect our super baase to
our AI agent for the memory. You need to use the
post grace chat memory. Okay. Just click here. Now, we need to connect our superbase with this
post grace chat memory. I have already connected. Okay. Now we'll just
connect this one. This is our so I
have just connected, so I will show how you
can connect this one. So before going to
that, let's take. When you click here, come here. Now we need to go through
Superbas just to go for Super Base and just click
on the Start word project. So you need to click on the Start Word project and
just sign up with your Github, if you have or email
with the password. After successful,
you will get this creating the new project or
create new organization. Okay. So I just give the name ad that is project
name as N and Demo. Okay. And I'll choose always use a strong
password to remember BU. So we need to copy this one. Strong password.
Okay, done. Copy. Now, remember one thing you need to save your database password, so we are required this information into
connect with NNDon. Okay, so just copy this
one and just click here. So you can choose your
near regien time as well. Okay? Come, click
Create New Project. Okay, you have successfully
created the new project. Now, we need to connect our
tone with the Superbase. To do that, just click on the main that is Connect
button can find this stop. Just click on the connect. We'll get this transaction
puller section. We need to use this
particular one to integrate with this one. So to do that, come to our
Natan so you can see host. We need to get this
host from this one. We can see you can use
this host name as well, just copy it and paste here
as the database, host. Port number, copy
this one port number, copy and come to use this
port number as well here. Use the database as a
postgress come here and just paste in the database as a
postgress and use the user, just click here and
user past here. Okay, for the whole mode
transaction, we doesn't wonder. So for the password,
just paste here what we have just created the
password in previous. Just copy and paste
here. That is simple. After that, you can save it, our post address account
is successfully connected to this post address
chat moment. So our superbass
connect to the AI agent to check whether it's working
or not, just double click. And we need to
find this one key, right to do that, come here, execute a previous node. So we need to write the simple
high Now, what happens? Let's see. We need to go here, we need to dragon rob. Let's take session
ID. Just come here, we need to give the session ID. Let's see whether it
is ox or not again. Now it is running
perfectly, right? So instead of NTN memory, we can easily save the
chat interaction between agents human and the AI agent in our super base permanently without relying on
the NTN memory, which is temporary one, right? And even though you can add so many extra features
this particular AI agent, adding another
google sheets which gather the user feedback
from the chat itself, right? So after the solving
customer query, so you can ask a feedback
from the user to provide it about how the
customer support is going on. Okay, like that to improve your customer support
system very well. You can implement this, so I'm giving an assignment to you. Please try this whole
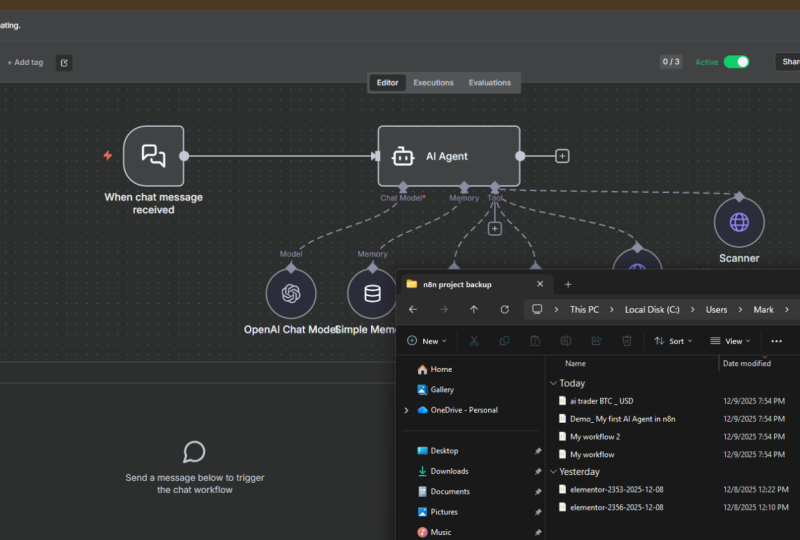
AI agent by yourself. After you can get
the template, also, you can directly input
the file from here. I will provide the Jason file. Now, you can add the extra
feature that is extra tool, come here, add Google Sheet, create another Google Sheet. After that, connect
here and write the prompt message
that is system message about how to gather
the feedback, try yourself can expand this particular AI agent
for more advanced features. As you want to open
the next session, we're going to
discuss how we can create the EI agent for
the form submission, email, and telegram as well. Okay, let's jump into that.
10. 4. Building Form Submission Customer Support Ai Agent: In this session, we are going
to see how we can create the same AI agent
for form submission. If you are observed, so many websites have
their form submission, in which they will gather
your name or email ID, anior subject, anior message. So like that, we can
create an form in NADN itself and we can host a
form in our website as well. Okay. So for that, we are going to duplicate
this exact AI agent. So instead of a chat, we are us the form
submission method. Let's see this in the session. Now, what we need
to do, come here. Just copy this one again, right? Just paste again, COP. You will get the same
thing again here. I will drap upon here. So as the default, the chat, so we can integrate the chat, only one in the same workflow. In the same ter,
we can integrate only one chat as a default. We cannot connect two charts for the two different workflows
in the same Na ten editor. I hope you understand
these points. Now, our goal is to create the EI agent for the
form submission. Whenever a user submit their query using form
submission in the website, they will get the email
from the EI agent. Or from the human agents who are taking that
particular query according to our
instructions as we have seen in this
particular chat AI agent. Now in this we will try to
connect the form submission. To do that, come here, just click on the plus button. Search for the form trigger. You will get this NATN form, even though you can add
so many form that is like a telegram form trigger that
you can easily integrate. But I recommend while you are learning this particular
basic A agent creation, just to go with the NAN form. Now you need to click
on the triggers. Just click on new N
a ten form event. So let's see. So this is the Form trigger.
Just connect this one. That is fine. Now click on the
arm form submission again. This is a simple URL. We will get the
two different URL that is test Ud in
production URL. So during test, we will use
this particular form link in order to test our
workflow whether it is working correctly
or not. Let's see. Let's reconfigure
this particular form. So our authentication is done. So our form title is let's
go with the contactors. That is simple and you can
write a form description, so you can keep this as it is. We will get back to you soon. This is a form description. Now, let's add form elements.
What is a form element? That is about name, fill name, element type, like
what is your name? You can take Enter
your name as well. Element type is text. We will just pick
this required film. Now we can add
another form element. That is what is email ID
or Enter email ID like. That is simple. Now we can select the email type here and just click on the required field and
add another email, sorry, another element
that is subject. That is we leave that is add
text element type as it is. Just click on the
required field. Now we will add the same again. Another is message. So we will leave
the text as it is. Enable the required fill. Now you can see the
respond when you can choose buffalo finishes
or form submitted. It is a trigger one, we will
choose form is submitted. Now we can execute the step. When you try to execute step, you will see this is
the form looks slide. Okay. You can see here it is
a test version of R form. It is our headline. This is our description. This is our form elements that is we have earlier created. You can see what is your
email ID, subcheck R message. So when I click in the submit, the AI agent will take that particular
message and it will respond as we have seen in
the chat according to that. But the response is go
through the email ID. Okay, I hope you
understand these points. Let's check with
that in walk or not. So to do that, so we'll simply
fill this one like my name is Leste I tic simple mi. This is my GM ID. Let's take the subject. I need you can take
anything, right? Can write anything. No my message is, what is your product or where your products
manufactured like that? In my case, I will take
just one simple quote. That is, what is your
company name like that? Or what is your company
history you can take like so this is simple question. Let's submit this one. Now the form has submitted. Now, you can see this
are some JCNFle data. You can see here. What
is your name side? Okay, email ID subject
message submitted. So this is simple, we have got the things. And remember one thing,
you can use this pin data. So when you click
on the pin data, this will be a store
and fixed here. So even though our workflow
is not started from scratch, no, I have pinned this one, so we have the data here on. Now what we will do just
click on the Agent P. Okay, now we need to so our main objective is to
solve the user Cody right. So what we need to
provide to AI agent is, we need to provide the
user message here, right? So we will just remove
this one. Now, come here. Dragon drop this UR message and just keep here prompt user
message. That is simple. You can see query that we have cut in the chat
earlier, right? You can use the same thing here. Just come here, drag and
drop your UR message here. And next one, we need to do the same thing in
the prompt as well. So just come here,
just remove this one. Even though you can just
copy this one from here. And remove this one. Past here. That
is simple, right? So we can do the
things as we can change system message
prompt instructions as our requirement. Let's see whether
it works or not, execute the step again. So we have got some error. Let's see what is that. Now we have got the AI agent.
Error in this one. Let's see, open error now. We need to remove
this particular one. We need to change
this database also, click here and we need to change this session with
the UR message. Let's try whether
it is ox or not. Or you can come here
define below again, just keep it here
key and just take this UR message again,
this past here. That is simple. Let's see
whether you walk or not again. Just click on the run again. So we have got
some errors. Okay. So we need to change
each and everything, when we have corrected on
form submission, right? So to do that, so we have
some major issues, right? When the users submit the form, so they will get
the email, right? So we need to set up
the email first here. So let's connect to the Gmail. Okay, send a message. Now, we need to just go with
the Gmail account B send. So we need to take this m form submission that is
their user email ID. Just dragon drop, what is
your email ID come from here. For the subject, you can write
anything you want, right? But the subject can
write your solution. Okay, support from
team like that. You can solution for I'll drag this
message or subject. I'll take this one as set. We can see solution
for Okay, you can see. So I will copy this one again. We'll write in this way.
No, you can see it. So it is a solution for
this particular subject. I have just written. You can
write whatever you want. Next, we will take as a email
type text for the message. We need to take the
output from AI agent. That is simple, drag and drop
this one, I put it here. That is simple. Okay? Just leave it here. Now our
message is sent very clear. So what happens when
the user submit their response
here with message, the message is
supposed to agent, the agent will retrieve the answer from the
document we have given. After that, it will send
the message to user. Okay. So in previous case, we have seen the agent will retrieve the answer
in the chat itself. But here we are using
the form submission, the user get the email what they have
submitted in the form. With the AI agent answer. Let's check either box or not. We need to check some errors
before going to that. Just click on the
company doc again here. So we need to change each
and everything here, right? So if you see here, Jason, in the company doc, TTB tool, we need to change
this one with this parameter. What is a parameter form
submission? That is message. We need to change this
one. Just remove this one. And just drop and drop your message from here
and just keep it here. Now we have done clearly. It is right. Now, just
click on the execute step. Okay, we have got the output. Now let's try from the
scratch in order to see whether it will put
in the information from company dogs
very well or not. So to do that, I will just unpin the data and I will run
the thing same again. Just click on the
execute workflow again. It will start showing the form. Let's fill this fastly. Findings Let's take in This is simple, my email ID. Now the subject is
I need product. Now your messages. Let's take what are the
products of your company? This is a potion. I will sup it
simply and you will see the workflow is
running, you can see here. You can check. You can see it is retrieving the
data from the document. Now, generating the answer. Now, you can see it has
tented successfully. Let's check the email again. Now you can see we have got
the email from the AI agent. Now you can see solution
for I need product. Okay, this is a subject, and this is the
answer from AIgen. Okay, that is simple, right? So we have got answer from
the AI agent to the mail. Okay? This is how we can automate the things with the
form submission as well. Even you can see the
agent logs as well. Okay, whether it has doing
the things or not, right? So you can connect this one, and it will work same
like the chat AI agent. But the input and the output process is different
from the chat itself. Okay, future marketing
purpose as well. Okay. So not only that you can implement much more
things with this system, even though you can add
some Google shat to see whether the email
has sent or not. Okay? So to implement
that you can go, you can create another sheet, connect the Google sheet here, and trap the AI agent whether
the email has sent or not. Okay? To do that, you can do
easily by just click here. Try to connect the sheet. And you will get the
output from the GML, that is you can get
the label as you can drag and drop this label in the similar column
you have created in the Google Sheet as status
of email sent or not. Okay? You can drag and you can track the progress in the
Google Sheet as well. So I'm giving the assignment. So to by yourself, when you
change the input and output, you need to change
the chat database and the company do input
parameter as well. Okay? This is how we
can use to implement the on form submission method
solve the customer queries. In the next section,
we will see how we can create the
telegram agent. Okay, let's dive into that.
11. 5. Building Telegram Customer Support Ai Agent: In this session, we are going
to see how we can create a similar AI agent chat
bood for our telegram. Let's see in this session. So for that, I will just
copy the same AI agent. And I will paste it here. Now you can see. So
we have got this one. Now, what we need to do we need to connect our telegram
with this AI agent. To do that, just come here, click on the plus button, search for the telegram.
You will get this. Now, we need to
take the trigger. To do that, just click
in the trigger section, come to on message.
You can find it here. Now, we need to connect
our telegram account. Just come here, click
here. I will delete. I will start from the scratch that I will show how you
can create the telegram. Now, come, set a credential,
create new credential. We need to get the access token. To do that, go to Telegram
just log in your account here, and we need to go
to the bot further. Just come here, search
for the board further. We will get this bout further. Just click here. Now you
can create a new bot. To do that, just come here. Now, Anew choose your name. So we need to
create a new bot in the bot father by
giving our name. So I will take name as AI agent. Let's take 02. Okay? This is my AI agent name. Let's do this one. Now, right. A new bot, good. Let's choose your name. So we need to create the unique user name
for our bot to do that. So we'll choose
user name for it. So remember, you need to use the bot at the extension
to create this board. Lest I will take the
name as AI agent. AI agent, 02 bot. That is done. Sorry, the username
is already taken, please try something again. I will take this one
again and I will write anything like
AI, let's take agent. AI NN 1002. The name is already taken. We will take another
one, copy this one. So we need to write
this bout in the last. Now you can see, we have created our bout in the telegram. Can see perfectly, you can see the De congulations on your new bot, you
will find it here. This is we need to get this TTP API in order
to access this spot. Just to copy this HTTP, come here NA ten,
just paste here, access token and save it. That is simple how you can connect the telegram
with your NA ten. Okay. Now we have
successfully connected the telegram to our A. No, come here, just
connect this one here. After that, we need
to run this one. To run this one, go to just
click here Exhibit step. Now come to the bot further. So you can find it to assistant
here, just click here. Now you have start this. Now we can write
the answer like, what is your word company name. So we have sent a
message to or what. Now what we need to
do, you can see here. So let's exhibite
the button again. So you can see we have got
the parameters from the pot, you can see this is our message that is what is
your company name. Now, we will configure each and everything AI
agent tools according to our telegram knock
on the AI agent too. So we need to remove
this one, right? We need to update this prompt
according to our input. So in this case, our input is telegram, right? So what we are looking to
get this is our quotient, that is text, you can see, what is your company name? So remove this one. So the prompt is the text that we have
send in the telegram bot, so you can find it here. We need to change this
particular input in every case that we have used in in
the previous AI agents. I will replace each
and everything. Now let's execute this step. We need to remove
another thing here. Let's go with the come here,
we need to change this also, right? That is done. Now we need to change each and everything with the
input we have given. Okay. You can see we have
changed all those things here. We need to remove
that is simple. Now we need to check whether
it is working or not. We need to also
change our input in the Google agent logs
tool, send email tool. We need to configure each and everything
according to our input. Let's take a message from the AI agent and the N
support team that is good. Now we'll try to run again. No it is running perfectly. Not executes successfully.
But remember, one thing, we doesn't get any
answer from the EI agent. Now, to get the answer, we need to connect the
output node also to send the text message
for the given input. Okay, to do that,
just come here, click on the plus button,
search for the telegram. You will find it, click on here and just go to the
message access, send a text message. You can find it here,
right? Connect this one. Okay, we have
collected the telegram account message, send message. So we need to get the chat dy. How we can get the chat dy, come to telegram trigger. You can find the
chat. Here are ID. Come here and just
dragon drop it. And for the text for the text, you need to take the
output of a agent, come here and just paste
in this text field. That is simple. When I
execute this butter, you can see this is
the text is sent to our agent. Let's see. You can see this one we have got the response from
nt. That is simple. When I give a list
your products, So we'll get the answer
directly from here. Okay. Let's see working
for doing this. Let's take. We need to
execute the workflow, right? Let's see this one. No it is retrieving the
information from the document. You can see it is logging.
Now, you can see, we have got the
answer that is here. You can see our AI agent
board giving the response. You can see we have
got the response from this particular
question list or products. Here the list of
products offered by ACM Home appliances you can see these are
the products list. So this is how you can simply connect the telegram for your
customer support AI agent. Not only the telegram, you
can try for the Whatsapp, Facebook messenger
not only that, you can check the logs of
AI agent and message sent. Okay, to do that,
you can come here, add a new Google sheet, track the user question
and the answer, but just come here, create a new sheet and connect
the Google sheet with the two different
columns that is user query and the
AI agent response. You can expand this
particular telegram AI agent for you
or at use cases. I hope you understand
these points. So I am giving an
assignment for you. Okay? You can create the
similar AI agent for your WhatsApp and
Facebook messenger, go just copy this, try it by yourself,
connect with the Whatsapp. It is similarly same process. If you have any issue, you can find the templates
in the Internet. In the next session, we
will see how we can create the similar AI agent for our EML trigger.
Let's dive into that.
12. 6.1 Building Gmail Handling Customer Support Ai Agent: The previous session, we
have seen how we can create the similar customer support AI agent for our telegram ball. Now in this session,
we are going to see how we can create the same AI customer support
agent for our email trigger. Whenever I got the message
in my Gmail inbox, the A agent will
take over it and it will give the answer
in the email itself. Okay. Let's dive into how
we can create this one. I will copy this whole AI agent, again, and I will
paste this here. Now you can see it has
simply pasted this one. So I will take and
Dragonrop here, and I will just take this one. And now, we need to
delete this one telegram. Now, we need to connect the GML. To connect the GML, come here. A click on the press
button, search for the GML. Now, we'll get this
one, just click here. Now we need to go to the trigger section
on message received. Okay? Select the on
received message. Okay, just click on
the simplify button. Now, whenever I got the
message in my inbox, the AI agent will take that question and it will
solve the customer query, and it will send the same email. Let's see how it will works. So I will just take
this one Gimil trigger and I will connect
this one to this here. Now what happens? We need to execute this
Wplowo before that, we need to execute
this one here, right? Now it is executing now it
is successful executor. Let's say, let's check. We need to update this
prompt user message wherever it is, we need
to update this one. So to do that, we need to find
that text message, right? So we have got the text in our GMA, so we need to find it. So we can see how where it was. Okay, before that,
we need to send message to this connected GMA. To do that, I will send a simple message that
is I Nudes solution. I need solution, and I will
ask you a question that is, what is your company name. This is a simple question. I will ask to the agent
whether Ts works or not. I will send it. Now you can
see it is successfully sent. No, I will check
my email whether it has received or not.
Let's refresh this one. Now you can see we have
received the message, that is, what is
your company name? Now I will come to my workflow, and I will run this one again. It will receive the message
or not in the workflow. I will just click a agent. Now you can see we have
got the answer like Okay, it is very more technical
bit to solve this issue. We need to click
here the simplify. Let's execute this one again. Now we will see agent. Now you can see this is a
simple one. Now you can see. So we have got the text message. That is what is
your company name. We have got this, right. So we need to change this particular
prompt user message with the text we have
got in the Gmail. So just drag and drop that
here and just paste it here. So we need to change each and everything where it
was required, right? And I will take this one
again, we'll copy this one. And I will change that is simple and we need to change in the database as well as a key. Now we need to change
in the company doc to retrieve the answer from the document in
the content session. Now we need to
change in send mail. Come here and just so it will
automatically stake that. In AIgent log we need to
change the user query with our message received that is from the mail, that is simple. So we have updated
each and everything. Now, we need to
connect the output. When the Agent retrieve the
data from company dogs, so it should send the solution, right to the user. So to do that, we need to click here and we need to
search for Gmail. Now we need to send
a text message. You can see send a message. Now, before connecting this one, we
need to execute this one. I will just delete
it. I will execute this one from here. Let's see. Not is working, it as taking the the
foundation it was saying. Now what we need to
do come here again, just click at the
GE, send a message. And now we need to take so we have got the agent three
answer as well as griger. Operation is send, so we need to send the message
right, take the gtrier, so take that email from
where it was received, just from that will respond to this particular email from where the
message has received. So take the text. And for that message, we will take the
AI agent output. That is simple. For the subject, we will take you can
take anything you want. So I will take solution
for your question. Or you can take
anything you want. I'll just take solution. We have successfully
connected the Gmail. Now we will execute
this workflow again. So it is taking answer. Now it is retrieving the
information from the document. Now you can see it
send the message. We will check again with the
sending a message, that is, I will send the message to this particular EBL which is connected with NAN, right? Now I will send the message
like I want product details. Take the question as
last product details. Now we'll send the message
to particular company email. Now, let's say we have got
the mail from the user. We can see. You can see
I want product details. List your product details,
we have got this. When I click here,
execute the work flog in. You can check this
one taking time. That's whether it
will work or not. Now we'll check our mail,
whether it has come. No, you can see this is our
solution from the AI agent. That is solution for quotien. This is the answer
from EI agent. But the question
that we have rise, we have sent to
our company mail. That is you can see this
is our product details. So when I send the email
to this company mail, okay, you can see the company mail received
this particular question. Now after that,
after a few minutes, I got this particular solution
from the company mail. You can see this
is. Okay. This is the answer from AI agent. So this is how you can connect the mail system for
your support AI agent. So connect the third
party services like Bravo or email marketing
campaign tools. In the next session,
do you see how we can add so many features to this particular email AI agent to classify the high priority, low priority, medium
priority message. Okay, to prioritize, let's
dive into another session.
13. 6.2 Adding Advanced Query Priority System in Gmail Ai Agent: In the previous session,
we have seen how we can create the agent
for our GML system. Now, we will try to integrate some advanced
future for our GML, customer support agent
system in which we can classify the EML
as a high priority, midum priority,
and low priority. Let's dive into how we can
create such a system which we can handle the
customer queries according to the priorities
of their queries. Let's dive into that.
Just copy this one. Just drag up here, right? So now we will try to integrate advanced
system here only. To do that, we have the unique node that
is test classifier. So we need to use the test
classifier in order to divide the specific messages or
queries into the high priority, medium priority,
and low priority. To do that come just click
here and you can search for the class textifier you
can see text classifier. You can use this node, right? Now, that's serious one. So this is a text classifier. So we need to integrate
this one here. I will delete this one.
Classifier, add it here. You can directly
click. You can add. Now, after that, we need to just open now what you need to do? You need to just click
in the add category. Before we go into
that, just click on the Run button, Jimel trigger. It will run. After that,
you can click on there. So you get some details
from the geometric. Now, we need to
classify the text. So in what basis
this particular text classified will dive or we divide the category
and send to the AIgen. So to do that, we need to use this nippet and you
need to mention here. Okay, now we need to
add some categories. That is category number one, that is high priority like
that. So just take high. Okay, I will take that
description as I'll take high priority, high priority. So we can use some
keywords in which this particular node C can classify and divide
the category as well. I will use these keywords. When the email contains
this particular keywords, the AI will automatically assign the category according
to our keywords. Okay? Let's see. I will take
product damage. Okay? Now we can take with
the meetings now, even you can take
any of the keywords, when the email contains this particular
specific keywords, the EI will automatic ascend this message
as a high priority. I understand these points. Now I will take with
this same category that is another category, just copy paste here. I will take this
one as a medium. Now, Medium. That is fine. Now for the keywords,
I will take refund, or you can take off
words like that. You choose you can enter as many keywords you want
according to our requirements. Now let's take the lowest
category that is low, and I will copy this again and I will just placed
here. Now what? I will just I don't
enter the keywords because this EI will
automatically solve every issue. Okay, it doesn't contains refund offers or product
damage or meetings. Now, you can come
here, add option. You can see the system
prompt template. You can see. It is already
default or prom template. This test classifier will use, in order to assign a
category, let's see. So this is simple. Now
what we need to do? We need to connect
the chat model. So you can directly
connect this from here. Okay, you can direct
it from here. Otherwise, you can choose
another chat model as well. So I will use
another chat model, I will take the GPT four mini. This is a simple chat model
we have connected to it. Now, what we need to do. According to the Gmail priority, it will goes to this agent. Now, we can add this one
directly here. Directly. According to the type of any customer send a
query through the Gmail. So we will get the Gmail in our Gmail inbox as well, right? Come here. When the customer will send
a query through the email, we will get the email here, right, inbox in the primary. So to create this, so we
need to create some labels. I will delete and I will show from starting how you
can create the labels, how you can do all those things. I will clear this one No, let's come to the Gmail, which is your company email, come and just click on
the labels plus button. You need to write the priority emails a
label name. That is high. Just create another one. Let's take medium.
Next take another low. That is simple. No, we can
easily add a label color. That is for the high
priority, will take the red, for the low I will
take as a yellow, for the medium, I will
take as a orange. That is fine. So we need to send an message which contains
the high priority to check. So to come just add here
and just set for the G. So we need to add a label. That is, can add a label. Okay. Add table
dream we need to use this one in order to check
whether it's working or not. So just come here, just click
and just select this one. Now what we need to do.
When you run this one, you need to run this as well to get the output from
this one. Okay. Now we have got the
our quotient is here. Let's see. This is
a low pratty right? That's why it get the
output from low priority. Don't worry I will show
each and everything just follow my instructions. We can do such a thing
easily. Now come here. At each thing here,
let's take this one. Now, let's see this one. Now, we have got the output
from the text classifier. For you to add a message ID, you can take this one ID
from the text flashifer. For the labels node, ID, come here and select. It is a low priority because
it is coming from the loop. When we will get the output
from the text classifier. If according to our message,
it will categorize, which it is a low priority or medium priority
or high priority, you will get the message,
our GML get the label. Let's see. I will run. Now we will see our GML
here. I will run this again. Now, come here. That
is low priority. You will find this
one. Okay. This is our solution we have
got right now. Okay. So you can see the low
option here. Like this. It comes from the low. You can check here. We have got the answer.
You can see it is ascent. It is a low priority.
Okay, you can check. We have got the low priority
in the low label section, low priority one. Okay? Now, what we'll do is just
copy and we will duplicate it. We will connect this
one very easily. I will just click
here and I will duplicate again and you can
add the same thing here. We have connected the
thing for every message. When we got any
message to our inbox, the text classifier
avail categorize based upon our priorities and
we will get the Gmail, which is one according
to our basic thing. I will just connect this
one. That is simple. Now, let's try whether
it works or not. To do that, just come here. We get the answer
from test classifier. So we need to do things
Jim and trigger as well. We need to change
each and everything. Let's take the snippet, we will change each and
everything from here as well. Let's take control
plus C. That is done. Now I will change in
the database as well. Company D HDB tool, I have done this one, now come to the logs
that is simple. Now we have done. Now we
will run this one again. That's working perfectly. But let's see if we will
get the output here or not. Now, you see, we need to remove this one
because we have error. So to do that, take
the Jimel trigger and send from where the message
has received, right. So to do that, we will take
this one as from yeah. We need to send to the user. Next, the output should be there from AI agent. We'll do this. Now, we will try this one again, we have another problem
here, the subject. Now we will remove this one. That is simple. Now
what we will do. Let's check whether
it works or not, from another male, I will send the query to
the company mail. Let's try whether it
will work or not. I will send a simple message
which product damage. I will send this
particular company mail. But the subject is
I need rg support. That is subject line. No, I will write the message. I got product. Which damage. Okay, you can write anything. Okay? I've got a damage
to product like that. Okay, let's send this one. So you can see it has
successfully sent. Let's check our inbox whether the message
is received or not. Come here, come to the inbox, check primary, let's refresh it. Let's check to execute
workflow, right? So we need to execute executing. We can see it has taken in
the higher priority because our keyword product damage has entered in this
text classifier, but can see retrieving the
information from here. You can see that's good. Now you can see it has
sent the mail perfectly. Let's check. Now you can see, I need gen I need urgent
support here. I got damaged. So you can see it is a high priity but
we have got in low. Why? Because we have doesn't change the label
here, label names. Okay, we need to change
this one as a high. Okay? We have simply forgot it. Okay, let's change
according to our node. Okay? This is a medium. Now it will works perfect. In order to check whether the workflow is working
correctly or not, you need to come here, you
need to enable the active. Now we need to go to
the customer mail and we need to send the message. You can see I'm
sending the message to the company email that
is Aponte atregmil.com. I just send the IN answer. I will take as a low
priority answer like I need some product or companies
information like where your company is where
you company is in India. I'll just send this question
to the company mail. You can see the message
has sent come to the mail. We will see, we will run this
again. I will refresh it. Okay. So we don't
find the incomes. You can see I need answer
what company is in India. Now we need to wait for 1
minute in order to see it is working or not
because our workflow is run answer for every minute. Okay. Now we need to fetch
that test event as well. So we need to activate this
one, execute the workflow. It will take on the thing it going to the load that is working in
the perfect manner. Okay. Iterative the
answer from here, it is adding logs, and it will send a
message to our return. You can see now we can
check our customer mail. You can see solution.
The company is in ACM Home Private Limited, headquartered in
Bengalur in India. So we have got successful the answer from the
workflow as well. We can check the
company mail Okay, but simple refreshing, you
can see our label has low. As successfully, we have created a workflow in which
it will categorize easily. You can see you
can find it here. Again, I'm good to Heritage. Okay, that is a
company, customer mail. I will simply ask the
question about Let's take, we can take the same
thing like Promptek as a company, mail, right? I will take this one, right? And for the subject, I will take as I need offers. And I'll just write the
message as, can I know more? Can I know more about
the offers you Okay. Can I know more about the
offers? I will send this one. Now I will wait. Now you can see the message
I sent successfully, now, I will check
the company mail, I'll refresh it again. Now we will see the message
as received or not. I again you can see we
have got the ideal offers. We have got the message
received right now. Come here. Okay,
wait for 1 minute. Now again, run this
one, execute workflow. Now we'll check whether it
will works correctly or not. Now I can see, there is a
problem in message too. We need to change
the label, sorry. I will change it to medium. That's simple. As
you got the step. Let's execute this again. You can see it is
working right now. It is taking the information
from the company dog, I will just give the answer and it will send it
to the customer. Let's check our customer mail. You can't get the solution. I couldn't find the
information about the offers, and email has sent it to the team provide
further assistance. Okay, that is simple how
we have got this one. So we have already
done the previous one. If you follow on the tutorials, you have find our function of this AI agent
in previous right. No, it is working profitly
because for the offers, we will take the
medium category. Now we will check
this one and we will refresh this one.
The alt should come. This query is labeled
with the medium because our medium we have
added some keywords, you can see in the workflow, we have added some keywords that is for the medium category offers we have
ordered as a keyword. Whenever our customer message contains offer related keywords, it will just categorize
into a medium, and it will send the
mail and it will create the label as medium
in our company mail, and automatically
the Aagent will send the answer to
the customer mail. Okay, you can see this
one we have boards. As in. Now we will try for
the higher priority email. Come here, the customer mail, I will send to the
company email that is IEI prompte and I need
the Adgent support. Okay. Let's take
this agent support. Sorry. I got a product. I got a damaged product. Okay? I will send to the company mail and you can see
successfully sent. Now we will check whether our inbox get the message
or not. Let's refresh it. As refresh, you can see, we have got the message
from the customer. Urgent support, I
got a damage pronuc. We need to wait for
1 minute in order to label this message as
a high priority because our workflow has a 1 minute trigger, We
can find this one here. Now what we need to do? We need to execute the
workflow again, right? Let's execute this one. It
will take the question. It will classify this one. You can see it is taking
at the high priority. Okay, we need to check this one as we need to select
this one high priority. Sorry, we forgot this. Now we'll execute
the step again. Now you can see here, it
is working right now. No run this one. No it
is running perfectly. It is taking this one.
It is taking this one. We have send mail
to the company. Can see it has sended this one. So you need to run
this last step. Now, we have successfully done this process.
No can see here. When I refresh this, now you can see we have got
the high priority label. Agent support Kot damage product because we have entered this
damage product keyword in the text classifier that AI can easily classify and
divide into category, which is the high priority low priority and
medium priority. I hope you understand
this point. Okay, now, our company
inbox has you can see, high priority medium
priority, low priority label. Even you can see here
what the message we have got in the
high priority labels, medium label low as well. And we can see that we
have got an answer through our customer mail that is solution we have seen
this is our answer. I have logged the
user query regarding the damage and send an inquiry to the team
for further assistance. This is how we can create
this categorized EI agent. Not only that you can add
so many advanced features like we can add here this same feature you can add in the company mail as well. You can also track
the agent response, log whether the email has
sent us successfully or not, you can track any
errors as well. You can do so much things
by yourself once you learn this particular A
agents building by USL. We have seen four different
type of AI agents. You can add this
same feature, right? Advanced feature in
this form submission as well in the chat. So I am giving an
assignment to you. So please try to
integrate this type of advance feature
in this type of AI agents as well in order to learn the advance NAN
A agent building. Now in the next session, we
will see how we can gather the user feedback about our product or company
or customer support. Let's champ in in
that next session.
14. 7. Building Feedback Collection Ai Agent with Sentiment Analysis: In this session, we are going
to see how we can create the user feedback
system in which we can gather the feedback
on our product or services or for any purpose, we can gather there, and we can easily align sentiment analysis, which is whether the feedback is in a positive nature
or negative nature, and we can send a message according to it to
the user or customer. Okay, let's tap into that how
we can do in this session. So for that come here, I will just scroll below
and I will just click. First, that is Form submission. You can gather the feedback from email as well.
You can through chat. Otherwise, you can take
any social media account like a telegram, Whatsapp. Now in this session,
I will show how you can do with the
form submission. You can gather a feedback
from user in any way. You can implement
this exact system. I will show how you can
do with the NIDNFm. No, I will just
search for the form. No I will get this Notin
form from here and choose the trigger that is
or new atan form event. This is the thing here. Now, let's tragon
drop this one here. Now we'll just
configure this one. Let's open this notin form. We will give the form title
that is feedback form. Feedback form and the
form submission you can take anything like submit your valuable
feedback. No improve. You can write anything you want. Now we will add
the form element. Let's take if we will
gather the information about user that is
name like that. Just required fill. Now add another
element that is email. I will just select the type of element type that is emailed, enable the required film and we'll add another element
that is feedback. Very simple and we'll
just enable the required. Now, we have successfully
created this form submission. Now we will execute this one
first. Then we'll open this. No, we will write
a feedback and we will submit all the details
for our testing purpose. Let's take Jnames email as, let's take feedback is you can take this
your product is good, it comes under the
positive or you can take your product is bad like the
incomes under the negative. Now we will check
for first positive. We'll just submit
it. Now we have got the information
here, so this is done. Now we will fill this. Now we will add the
sentiment analysis node. Come here just a search for
the sentiment analysis. So we'll find this one here. Hey, come here, just select
the sentiment analysis. Now, we need to submit this
one here, text to analyze. So what type of text
you are looking to analyze in order to categorize in the positive or negative? To do the sentiment analysis, take this er feedback as a text to analyze because based
upon our feedback, this sentiment analysis will divide the category that is you can see
sentiment analysis, category can come and adoption. So you can go with a positive
neutral or negative. So we will just in this session, we will see only the
positive or negative. Even, you can use
the neutral as well. Option, you can see the
system prom template. You can see how it works. You are intelligent,
accurate sentiment analyzer. Analyze the sentiment of the
provided chat text category. So this is the category of the particular
sentiment analysis. Okay. And it should come only
output in the JSON form. I hope you understand one. So
this is the prom template, which is a default the deten has wrote in this particular
system prom template. Okay? Now, we will execute this term. Before execution, we need to connect the
model here, right? I'll just search
for the open AI. You can find this
Open AI chat model. Now we will select the
model of our open AI, let's take I will take
with the GPT four mini. No is done. Now what we do?
We'll just run this one. No CCT has come in the
positive image because our feedback is your
product is good. No CC this is the answer. I should become in the
positive branch, right? In the negative branch,
we doesn't have any output because our
feedback is in the positive. Now it is done. Now
what we need to do? We can send this particular feedback
in anywhere if you want. Now what we will do. I will just connect another AI agent. Let's take AI agent. Now, what happens here? When the person
submit and feedback good feedback, now, the user, the customer should get another
mail from our AI agent, which contains thankfulness to the user for submitting
the feedback as well and asking the
permission if they want the future update
from our company or not. So we need to connect
another AI agent. Now what we'll do? Just
connect the chat model. You can do from here, but I recommend use two
different chat models for better operations
select p41 minute. That is fine. Okay. Now
what we will do, come here. So we need to select this one. So connected chat defined below. So we will got the feedback. So we need to take this
feedback and we'll need to dragon drop in the
prompt user message. Now, we need to just click here and we need to write
the system message. Now I will write based around feedback,
based around feedback, crap and images which contains thankfulness
to to user to user. And take permission if they want future product releases
or services like that. Product updates or less. That is simple.
The system message you can write by
yourself or more. Now we will execute
the step again. Let's see what happens here. Now we have got the output. If you see here, subject
and the dear user name, all it comes in the
information like passage. The problem in here is, I will add the Gmail to send it. Send a message. So we will
choose the Gmail account. Now we will send a message. Now, we will take the email from the on form submission email. Now for the subject,
for the subject, we can write our according
to the feedback, the subject need to be changed, but it doesn't have the
separate subject section here. So you can see the subject
thank you feedback. It will come under
in the message. For example, I will show how it is I will just keep thanks. Now, for the message,
I will just send this, I will execute this step and
I will check with the mail. Now you can see it has sent. Now I will open my mail. Problem of this workflow is you can see we
have gotten mail. The subject is just
a thanks, right? Now CC, the email
contains a subject, but this subject should
be come here, right? You can see here, username, also doesn't get the
username as well. You can see we have
doesn't get any your name, your position, your company contact information like that. But it should come
with the company name, a position, company,
all those things, personalize it to
the customer, right? So to do that, what we need to do come to the Mr
flow, come here. With just write
system message d use below details for mail grafting. What I do for the user message, you can use this one
or for the user name, you need to drag and
drop this from here. Let's take from the
on form submission, your name, and you
can paste here. We will see, this
is the sympathy. Let's go to the enter.
We need to tell to AI, so use our company information
and add it in our email. To do that, we will use
the company information. So let's take name is AI prompt. No, email is that is sympathy. So what it will do the AI
will automatically take username and it will send in
the user names place, right. Best records name,
that is company name. Instead of your position, you can see your company as the AI prompting gmail contact
information like this. Let's execute the step again, whether it works or not. You can see we have got the
dear user name from here. You can see here, dear side. After the best records, we doesn't get any user name, but we have written the AI prompte name and
contact information. Even you can write the name
as John, that is simple. According to our
requirements, you can edit this particular system
message in order to get the best
output from the AI. I hope you understand these
points, know what we'll do. Let's let's run this again. If you see the Gmail, so we
have got all the things. But what if I need
the subject here. The subject should be changed according to the
feedback as given. You can see that thank you for
your feedback I need here. So to do that, what we
need to do we need to use another node that is required
specific output format. So when you click here, it will show to connect a output parser. Just click in the output parser, select the structured
output parser. Okay, now we need
to change this one. We are telling to AI to extract the specific value from
this whole paragraph. To get the output in
the specific format. I hope understand these points. Let's do JCNFmat that
is subject of the eat. That is simple. Now body of the. Now you can outfix
format as well. Now we need to add the
model again so you can directly connect this one
from here to here as well. You can connect this
one model from here. You can do all the
things. Run this again that is running right now. Now, let's see what
this output will be. Now, if you see we have extract the subject from the
simple whole paragraph, you can see, we have got the specific output
format according to our Jason we have given in the structured
output parser. We can easily just dragon drop this particular
subject here and it will automatically send the
message according to our email body and feedback. Let's test out here. Execute the step again. Now we have got some error. Let's see where this node. Let's see what is the problem. Nobody to remove this
one. There's an output. Come here, just dragon
drop this email body here. That is simple. Now we have
got this will run this again. Now it has done perfectly. Let's take our mail. Now we have got this mail. Now, you can see it is done. You can see we have got the subject from the email that is thank you
for your feedback. This is a name. This is a whole mail
from the AI agen. This is the best records
company details as well. See the difference
between this one. We have got the template
right in the subject, you can see we have
got the template, email from the previous one. But after connecting the
output parser in our flow, we have got the
correct and profit mail from the workflow. Even you can add the
Google sheet which you can track the feedbacks,
a agent answer. What is the type of
sentiment analysis? It is, you can do so
much things from here. You can add the different
Google Sheet database, just to create the columns
and rename the columns like user name and user feedback and a answer and sentiment
analysis type. You can create a Google Sheet. Rename the columns, and you
can just click here, add it. You can see the collect the information in the Google
Sheet as well to track your A agent progress and the user personal information and feedback and
sentiment analysis. Now, what we'll do we'll
just take this again. Copy this one. I will paste again for negative type
of sentiment analysis. To do that, I will just
take this one here. I will here. Now, we need to check
that take sent dances. We need to craft this system
message based on feedback, craft and email whenever we got the negative feedback from the product or
support or services, we need to appreciate it. Okay, the AI agent should be appreciate user frustration,
all those things, and the A agent
should tell them, we will solve the UR
issues appreciate and not to go the customer from our hands. So we
can write this one. But that just come
here, craft an email, which contains a apiation and support support to user
in order to solve users. But the negative feedback, let's take you can write
the negative feedback, craft an email, which
contains aperation and support to user in order to
solve, these are issues. You can write the
mail as you want for better system message
working, all those things. Okay. Now, we'll just
keep this one as it is. Now, we have just edited the system message
for the negative. Now, what we will do we
will just click here, we will do for the
negative, right. Okay, unpin that. Just come
execute the step again, a submit and feedback which
contains negative words. Just run the on form
submission again, click on Execute Workflow again. You can see we have got the form open. Now, I will
write the name. I will take the same email. Now feedback is.
You product is bad. The feedback is anything,
it can be automatically, the sentiment analysis
will categorize it. You can see it is
working, it has come in the negative AI agent. Not is taking Johnson
has successfully let's check how the meal
let's refresh again. Let's see if we have
got the feedback. Dear, sir, I hope this message function,
first and foremost, I will look to express
my sincere apetiation but taking the time to share your feedback regarding
your product, we genuinely value
our piece of input. So this is one, you can
see the best email. You can say, I'm
sorry to hear that your experience has not
met your expectations. This is how you
can see this one. It has simple appreciate
the user feedback, and let's say sorry to the user for a bad experience of
product like that, can see. This is how you
can do the create the exact system for your product and
services, e commerce. Okay, you can implement
this particular system chat based AI agent,
email AI agent, and you can take from
the telegram Watsap, you can integrate this
particular form in your website as well to gather the feedback from user
and you can track them. Okay, you can improve
your product, your company, your business. So we have successfully create the feedback system and different AI agents,
multichannel AI agent. Sure of form submission, you can implement
the webhook system. Webook system means you can call the feedback
from your website. You can take the
parameters like feedback, user feedback, user name, email. You can add the Webook
simply come here. Web Hook. You can see this is a web hook. You can add, you can use
this particular copy to URL. You can page this particular
web hook in your website. You can ask the Chat GPT or
Cloud to get help with that. Even if you have so
many online tutorials, how you can create the web Hook, how you can create to NTN, and how you can send
the information from your website app to the NTN. You can do for each and
everything if you want. You can just come here. You can add this one from
this form submission, you will gather the
information from your website. From outside of the ten. Let's dive into our
anos session in which we will see what are
the different ways of creating workflows by using AI models like Cloud or habit. Let's dive into that.
15. 8. Different Ways to Build an N8N Ai Agents : No. In this session,
we are going to see what are the different
ways you can create the workflows by using AI modules to see what
time come to Cloud. I have just written
this whole prompt. I will provide this prompt in the document you
can get from that. You can see this is
a whole prompt I have used. It is
a simple prompt. You can see you are an
expert automation developer with advanced experience
in tools like NTM. Your task is to design a complete efficient
error free automation workflow based on the user
specific requirements. The final output should
be JSON format or blueprint file compatible
with the seleor platform. Ready to be inputed
and executed? No gather the information by
asking subdivided question, which is the most
important pattern. In order to get the
information from me in order to create the
personalized workflow. Based upon your requirement, it will create the workflow. So for that, we need to write this particular prompt pattern. You can see asking a
subdivided is to user. Based upon the
answers of a user, it will create the personalized workflow for our requirements, which helps you to generate
NIDN workflow JSNFle. Remember the user is beginner, user didn't know
about technology, just know the task or automation description
based on to creative. Workflow. When you
don't know about how we can create an AI agent or
workflow in the NI ten, it is a beginner friendly prom. You will just come paste
this in the cloud. It will give the
answers like this. Hi, I'm here to help you
create automated workflow. Don't worry about the
technical details. I will guide you
through this step by step with the
simple questions. Let me start by answer understanding what
you want automate. This is the information the AI is looking to gather from me in order to create the workflow based upon my requirements. So when I give the answers for
this particular questions, Cloud will automatically
create that JCN file, which is ready to
import file that I can use Import NIN Editor, which create the workflow. Focus on here. I ask you
some what triggers you want, what is your main goal, what triggers this task is required. What types of
services do you use? This is the all words. AI is looking to gather
the information from me. When I write the answer, you can see I have just
written the answer. That is AI agent knowledge base, question and answer board. I just I have written
a simple description. When I write that
description here, the cloud has automatically based upon the AI
agent description, it will automatically
think what are the tools required to create
this particular AI agent? It has asked simple that is
create you want to create an AI PO chat boord that can answer questions using your
company's knowledge base. Okay, where is your
company knowledge tool? So I need to write this one. We can gather the
information from a PDF doc that is
about company doc. We have created through the HTTP tool to the AI
agent in order to retrieve the information from
that particular document to answer the user's
query, right. So you can write this one here. So in this, you can upload company dot on Google
Drive, SharePoint. You can do all those
things from here. You can write all
the required ments of these particular questions. You can response, you can give the answers for these
particular questions in order to create the workflow without knowing the
technical knowledge. You can see all
the questions that EI has asked to me in
order to create that one. Can see I have just
told that I have using the Google Drive to add my company docs
to the AI agent. Just have taken as an example, you can see it has created. Again, it has asked some more questions for more
advanced thing. You can see Google Drive setup, how you can set up
your Gold Drive. You need to write what
is a folder name. Okay, list the main
folder names, go logs, PDF, all those things because this information is
required in the node. Okay, we need to change
all those things we have seen already in the
previous sessions, right? Email configuration,
what is the email? Lauds required information from you in order to
create the workflows. This is all the questions that I have given the
answers for you. After that, it has asked
you some more questions. I have given the
answers more depthly. Then Pufate I have all
the information I need. Let me create your workflow for the AI knowledge base
and question board. Now it has generated the JCNFle Based upon my requirements
and AI agent building, it has simply just generated the JCNFle by gathering
the information from me. In order to create the
personalizer AI agent according to my requirements. That is great right.
You can see this is a whole JCN file of workflow. Now what I will do come here, you can copy it or even
you can download the JCN. I'll just download it here. Now, I will go to workflow. I will just come to the home. I'll create the new workflow. Now, we have in the
new workflow editor. I will just come
here three buttons, import from file, select the file here now we have
just download it open. Now you can see it has
simply created the workflow, simply created the
workflow, right? Even there are so many
mistakes in that. If you are using the
Cloud latest version by upgrading the account, you will get the more accurate
EI agent workflow JCNFle. No, I'm just using
the fee account. That's why I just returning
the previous versions. Instead of taking AI agent, it has taken the
simple hat GPT Noo. Instead of that you
can add by yourself. That's why we need to learn
the basics of the nit and how we can create the when you have that basic knowledge, you can edit this whole workflow according to our requirements. So this is a simple
example I have shown. You can do so much things
by just describing your requirements by
using this simple prompt. It will simply ask questions,
just give the answers. I remember one thing, give the answers based upon
your requirements. In that case, you will
get the exact answer. I've just given some
basic description of the AI knowledge base. When you give the
clear answers for this particular
questions accurately, then you will get the best
output from the AI model. You can use the same prompt
in the char gibt itself. Not only the cloud
can take any model, but it should be the latest
version to get the best. Now, you can come here. I paste this. Okay,
that's C. No, it will ask the
simple questions. You can see. Let's begin. I will ask a few
simple questions to understand automation tasks. Please describe your task
automation in simple words. We need to write all
those things here. Where your data comes from. What should happen
automatically? Do you want conditions,
filters or delays? Do you want to receive
any alert or backup of this automation Fina checks? When I give the answers for
this particular questions, it will automatically
create the JSNFle. Try by yourself, prompt, and you can do so much things. We have another way
that is going to entertain a template section. You can find any templates
that already creators, developers create the workflow. You can find them here. Just go to the Naten dot
Iolash Workflows. You will get the workflows for every type of rows use cases, industry that is EI, sales, IT, whoops, marketing,
document oops. You can see there are a lot
of more templates you can use if you want to use this particular
template, just click here. You will get here, you
can use it for free. Just a click use for free. It will ask input the template
to this one because you have already created the same account it will show
you this thing. Okay? You can copy the
template to Clipod or JCNO you can directly
input template here. It will just automatically
take to the inner ten editor, in which you can, I hope, understand these points.
This is another way. So we have seen three different
ways you can do equal. Now, not only that if you
have the issue in writing the prompt for the system
message in the AI agents, just take the screenshot. So this is our recent
chatbot right. I will take the screenshot.
I will copy this one. Now I will go to the cloud, past it here, tell to cloud. So please write the analyze
Analyze, give you an image. Analyze, give an image, and write system message, write system message
to use in AI agent to craft email for
positive Feedback. Okay. When you have a how
to create the AI agent, just take the screenshot of
this particular A agent, come Cloud or Chatb
use this analyze, give an image and write the
system message to use in AI agent to craft email
for positive feedback. You can use for any
type of workflow, any type of requirement, any type of A agent that same similar that I'm
going to show you. Now, what the cloud will
it will analyze the image. It will write system message. You can see system message, positive feedback
email response, role if you see here, it is whole AI agent message because we have just
given the image. I have just shown as example. You can write even
more simple prompt in two to 3 seconds. If I write this one, the cloud
will automatically write the four to five prompt to use in the agent for crafting the email for positive
customer feedback. You can copy this one,
come to the workflow, good and you can just
come here agent four. You can change this
whole thing here. This is how you can write the
system message as well if you don't know how to write a prompt for A agent to work in. You can create so many workflows by describing your
requirements by using the prom that I have shown in the different AI models like
Cloud Cha JPTy as well. You can come here,
you can download it, just click on the download. The whole AI agents JCNFle has successfully
downloaded it. You can share with your friends and you can save your
computer as well. You can do so much
things from here, change Owner, rename
it, okay, duplicate. You can activate if you want. Okay? You can see the
evaluations, execution, editor, all those that is
how you can use Senten for your creating
the next agent. So go watch it and
learn by yourself, create just learn how to connect the different nodes for
the specific automation. Okay? So you can
do so much things. I hope you understand
these points. I will provide this whole
AI agents template JCNFle, come here, create the
new workflow button, import from the file,
and you can change the credentials you can use
for your businesses as well. We can sell this template to your clients can connect
the so much apps here, all those things by yourself. Okay. I hope you understand
this session very well. Okay? The next session, we will see how we can monetize this let's
dive into that session.
16. 9. Different Ways to Monetize this Skill: Now in this session, we
are going to see what are the different ways to
monetize our AI agent skill. Okay? The first ways you can
become an Enten affiliate that you can earn
passive income by promoting Enten clot
to your audience, receive 30% on all your
referrals for 12 months. That is simple.
You can see here. You can learn more about
this affiliate program, how our affiliate program works, and you can see what are
the high ending affiliates. You can see the
information here, and then you can come here
just a start building. You can just click here and you can join the affiliate
program easily. You can get started
here. It will show sign up and you
can go with that. That is simple. If
you have any doubt, you can check it in online
like YouTube tutorials, how you can become
the Nten affiliate and what are the different
ways that I can promote it. Second way is you can
become an freelancer. Which you will sell your AI agent building skill by creating the gigs in the fiber Upwork,
aguru.com, People Perard. These are the different
freelancing platforms. You can submit your projects and you can make the
money from your clients. Just post your projects, what you have done earlier, and what you can do, what are the real problem you're going to solve for the businesses. You can create the gigs in the five upworggo.com
and PeoplePerHour. There are a lot more
freelancing platforms you can search and you can
create the account for free and you can just
post your projects and services in that when the
client approach to you, just talk with
them, close the dy, solve their problem, you will get the money from
these platforms. It is a simple way to start your flancing from the
different platforms because if you are a beginner to flancing platforms or
if you are beginner, how you can communicate
with the clients, you can learn from
this fiber, right? Fiber through these
different platforms, you can start learning the communication
between client and you. When you gain the experience, you can start your
own agency like that. Okay. Now, before
approaching to the client, you need to have your
Portifilio website. So for the Potifili website, you can use the AI tool as well, lovable dot bole
dot new to create beautiful Portoflio
of your projects you have done in the NAN. You can use that particular one other than you can
use this systemitiBO. It is the easiest Al in
one marketing platform. You can create the
account for free forever. You can start for free. You can build the amazing landing page. You can post your projects. You can use this systemi
dot IBO to create the Portofll website or
agency website like that. You can sell your ten
templates through this system dot IVO platform. Come here just to create
the Landing page, you can sell your AI
templates as then. What you can do more with
this system dot IVO. Now, the third way is you
can build your own web or mobile app in which
you can connect the ten as a back end and
you can build the front end, connect them to and
web is going to live. Want the particular
course for creating whole Webb that is from
starting to advance, like adding the pricing, adding the authentication
to the Webb, just creating the full stack
web app or mobile app using this lovable bool dot Nu
with I automation tools, I agents like nitenm.com
or like that. And follow my profile, and I will try to create
these particular codes, amazing codes in future. When you gain the expertise
in the building agents, you can take the
consultancy service for the specific businesses,
small businesses, and just to show them
how you can help them, you can take the consultancy
or you can create a new agency in which you will sell your services to
the particular client. Okay, you can make the
money or as a freelancer, you can expand your team by hiring the
different freelancers to done the work
for you and you can make money through
agency model as well. Now, Everyone is becoming the
general AI agent builder. But the thing is here,
you need to become the specialist in specific niche in the creation of AI agents. For example, if you gain the expertise in creating the AI agents for the
customer support, you need to create the gig, like I am the expert of customer support AI
agents like that, you need to go with
the specific one. Okay. Don't just become the general that you can create
the agents for everyone. You need to solve
the real problems in that particular businesses. Show them your
results instead of benefits to the clients. So for that you need to learn
the communication skills. You can go in the YouTube, just learn what
are the strategies to close a deal with the client. You can create the course. You can coach in the online. I hope you understand
these points.
17. What's Next!: We have learned how to create
the five different type of A agents for the
customer support like chat based EI agent, telegram based AI agent, on form submission AI agent, email based E agent, which contains the
priority system. And lastly, we have seen how to create the
feedback AI session for the customer support
in the previous sessions, and we have discussed what are the different ways of
creating the workflows using AI models also we
have seen what are the different ways
of making money online with this AI skill. Know if you've got
any issue in creating the AI agents in the Enten, please check it out the
online tutorials or NTN dogs for more
information and don't forget to follow my profile for more
advanced courses like this, I will try to create more
amazing course for you to get help in this AI technology and you can move
forward in one life. I will try to create
an amazing course like creating the Android apps, mobile apps, webaps by using these cutting edge
technologies in the future. You find this course valuable, give you feedback and review, which helps me to know whether this course is valuable
for you or not. I will try to create the event more advanced course on AIS. Always keep stay updated with this AIS technology
because every day the EI field is emerging and something new things are
evolving day by day, you need to stay updated with this AIS
technology right now. You can follow some YouTube tutorials influences
or the newsletter, you can join different forums to get stay updated with this AI. Market to adapt the new
things very fastly and you can grow in your life
as soon as possible. Always keep learning, keep moving and keep
growing in your life. I will meet with you in the next amazing
course till then, good luck. Thanks for joining.
 Shaik Saifulla, AI Prompt Engineer & App Developer