Transcripts
1. Introduction: Hello, everyone, and welcome to the Fire and Smoke
Simulation guide in Blender. This course is for anyone
wanting to learn how to create realistic smoke and fire
effects in Blender 4.5. It is specifically designed
to take you from being a complete beginner
to being able to create any type of
simulation that you want. The course starts out by
understanding what the fire and smoke simulation is and how
to use it on a basic level. From there, we'll be jumping
into the settings and covering each one with the visual side by
side comparisons, so it's easy to understand. After that, we'll
learn about the shading workspace
and how to create smoke and fire shaders in
both EV and in cycles. Help everything really sink in, there are five full tutorials
where we use the fire and smoke simulation to create interesting animations
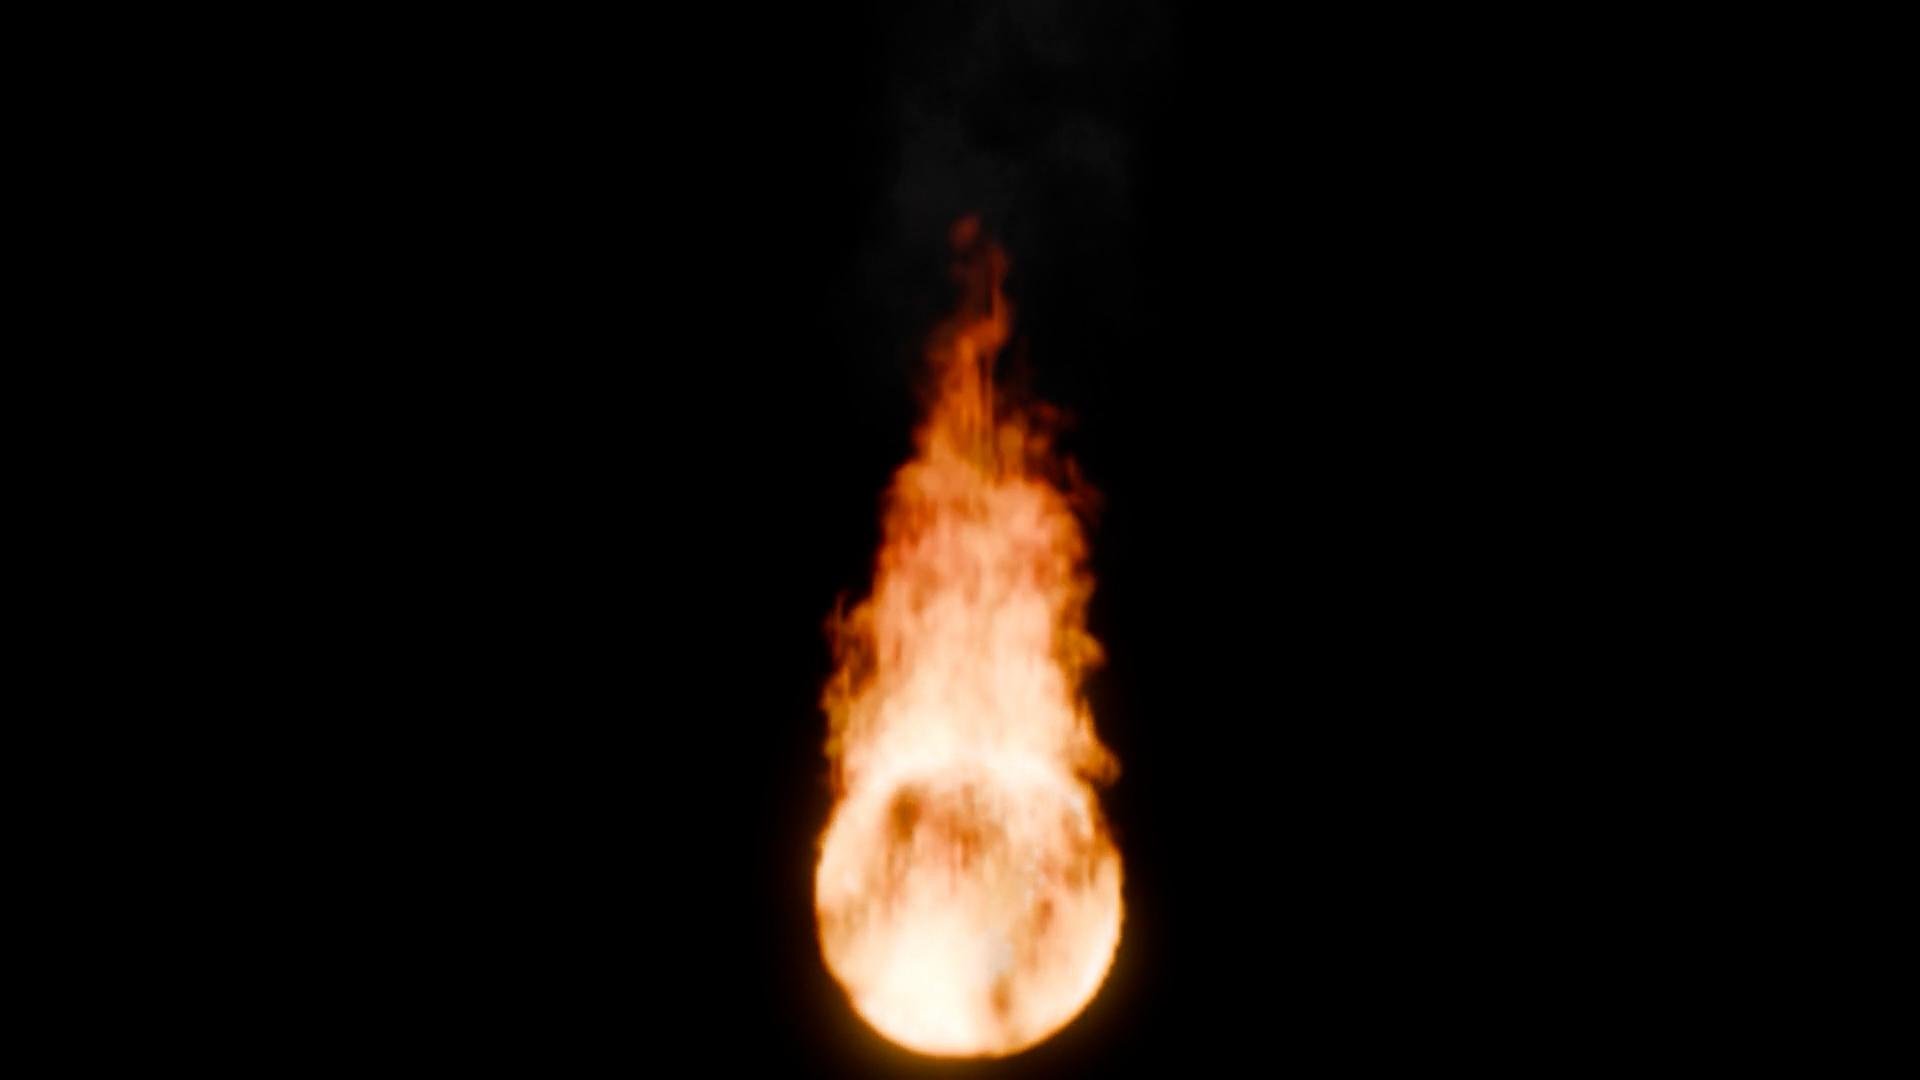
and renders. The first one is about
creating mist and blender. We'll go through the
process of changing the smoke settings to
get that misty effect, adding a light material,
and then rendering it out. The second tutorial is how to properly render fire and EV. We're going to go through
the EV render engine, talking about all the
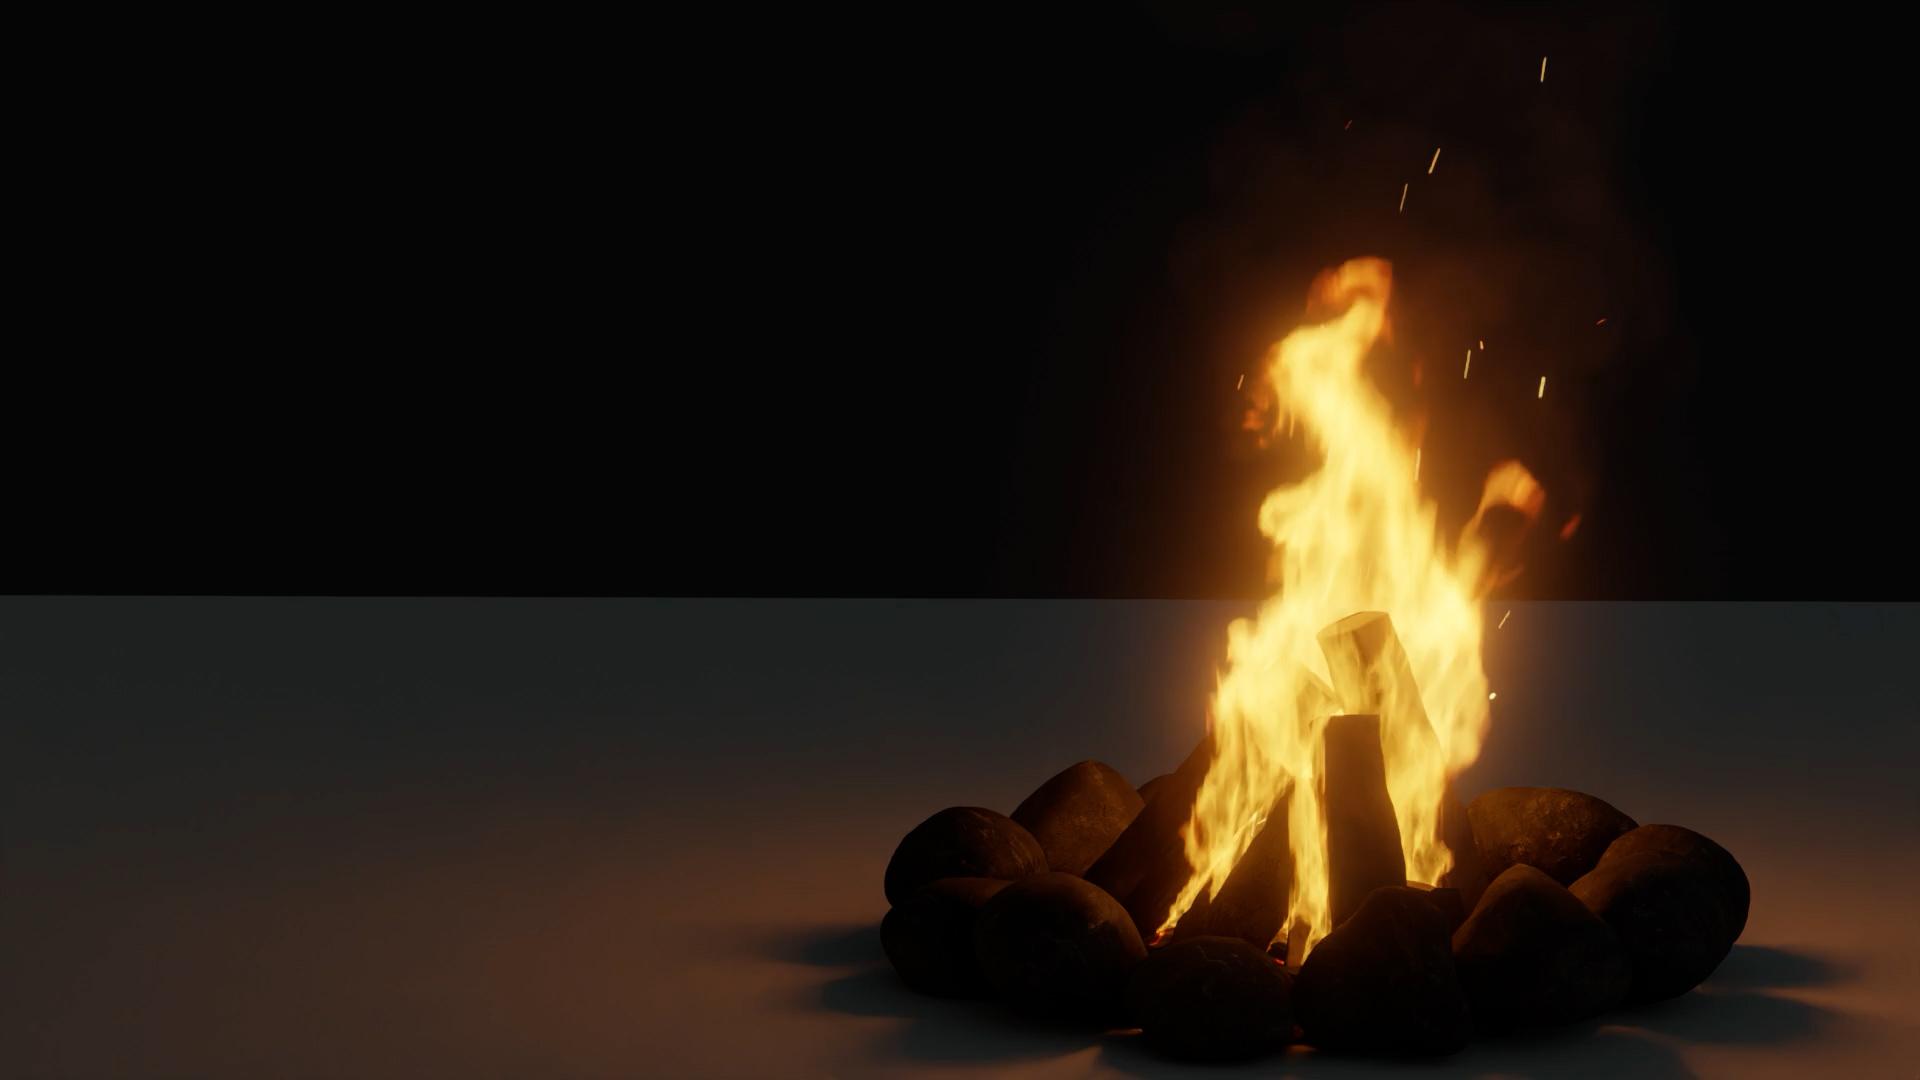
different settings to get realistic results. And the third tutorial
is a campfire scene. We'll first add the
campfire model, which is included
in this course, simulate the fire and smoke, add the spark particles,
create the materials, and adjust the render
settings to get the most realistic
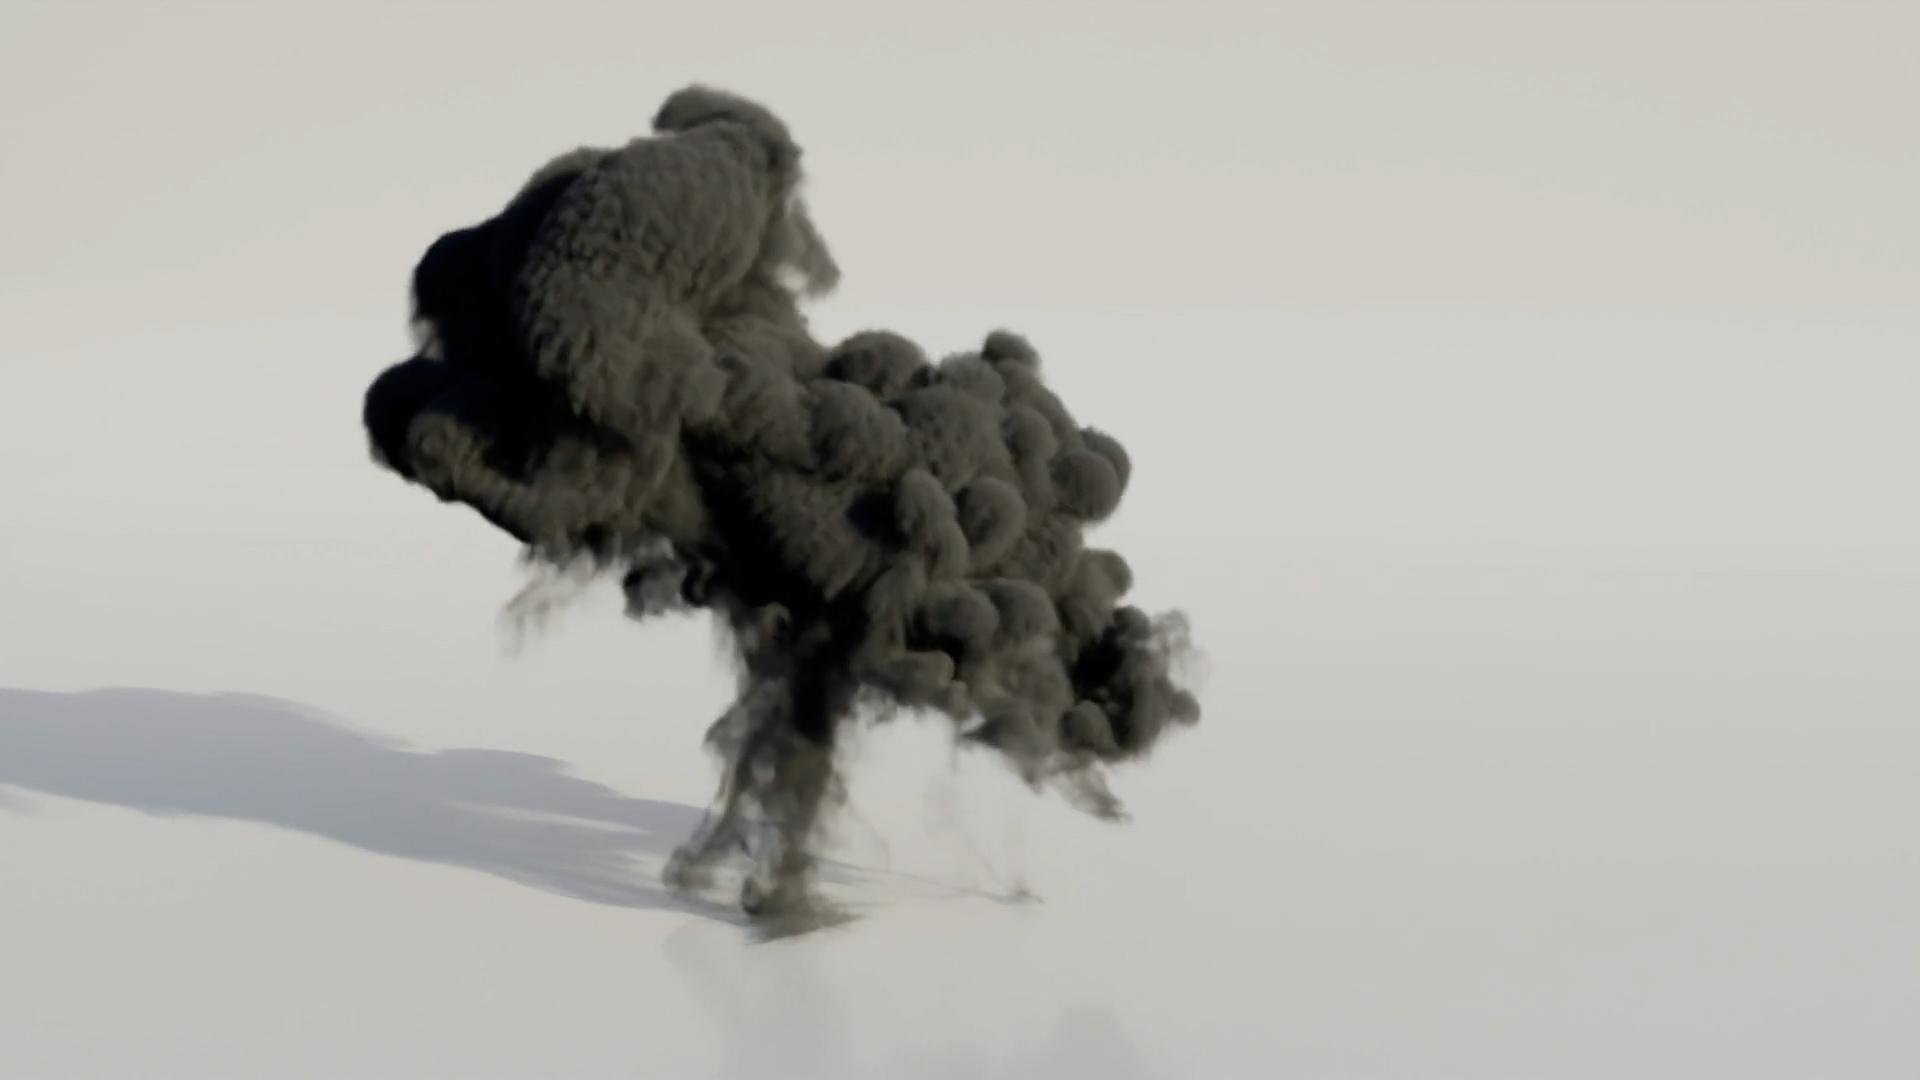
campfire possible. The fourth tutorial is
all about explosions. We'll be simulating this missile crashing down and
exploding step by step. We'll learn about animation,
particle systems, simulating two different
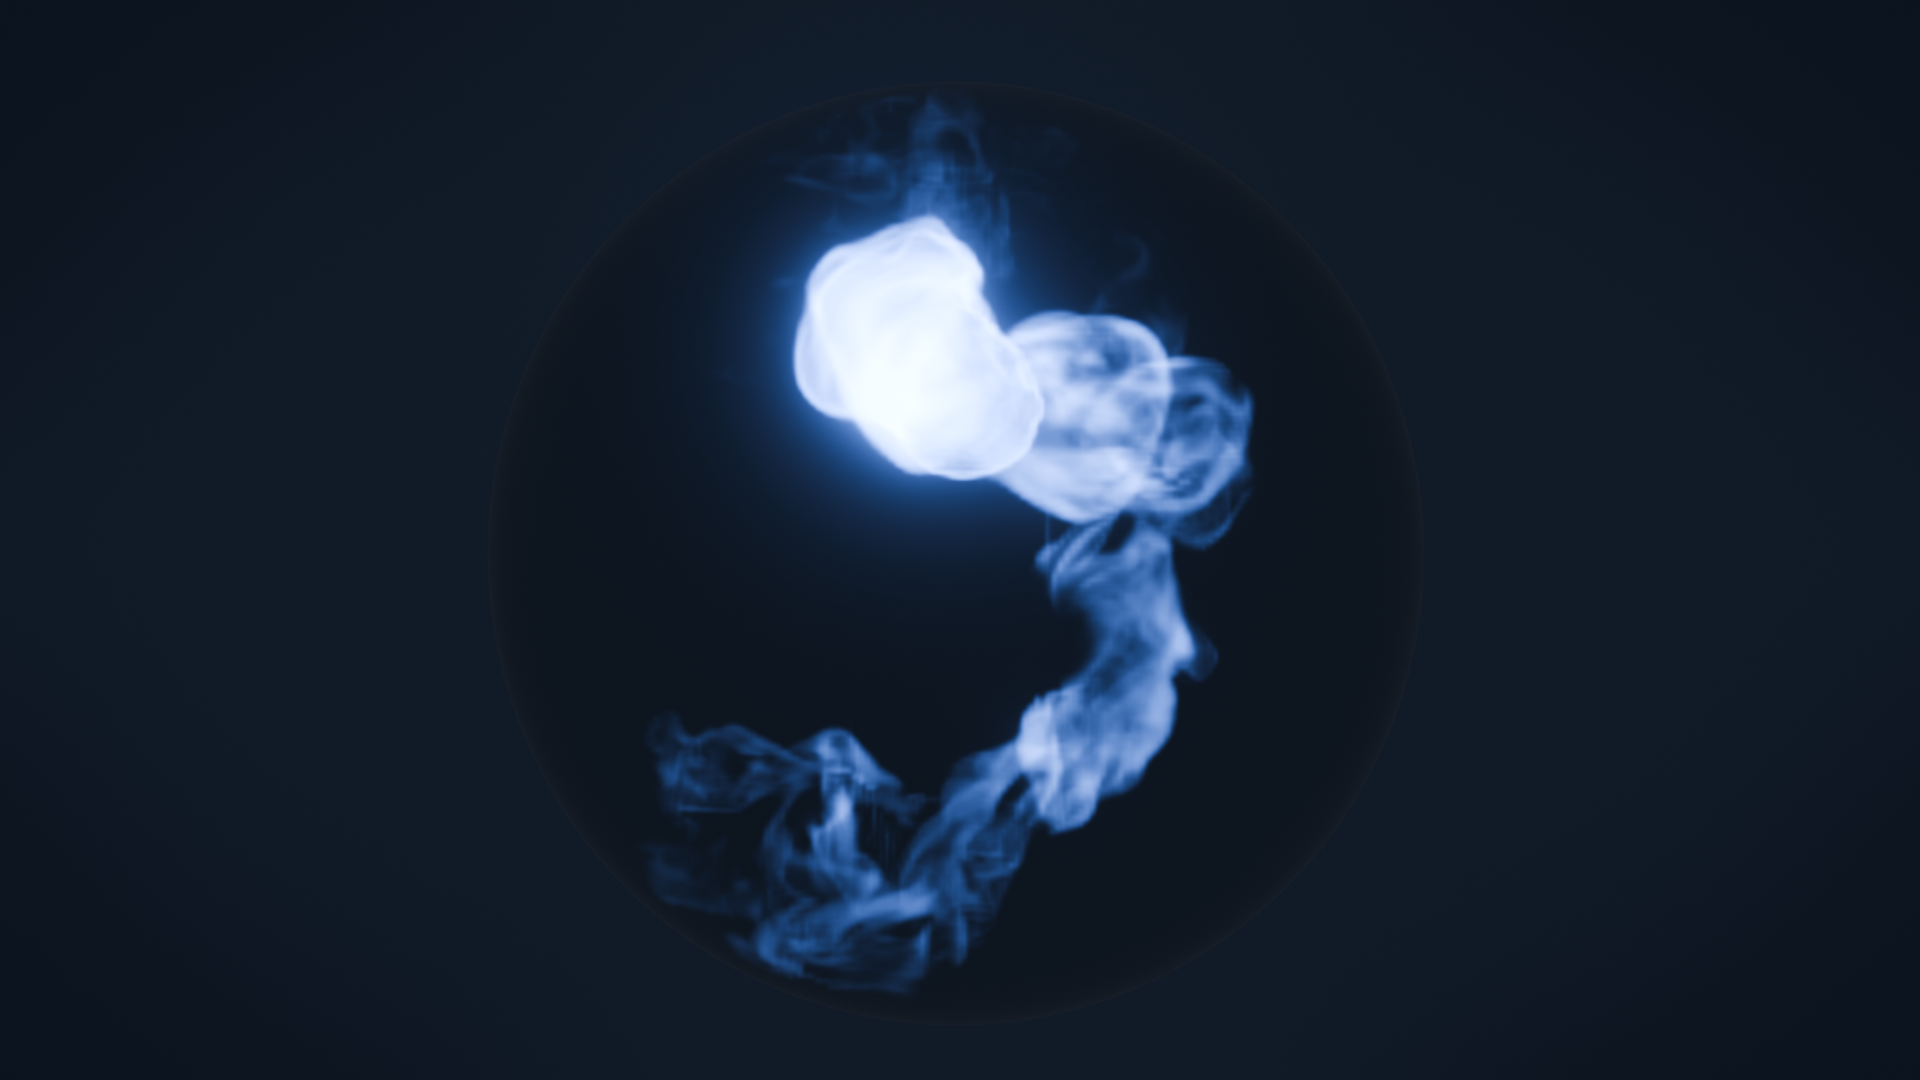
types of smoke and much more. Last but not least, the final
tutorial is about creating the satisfying
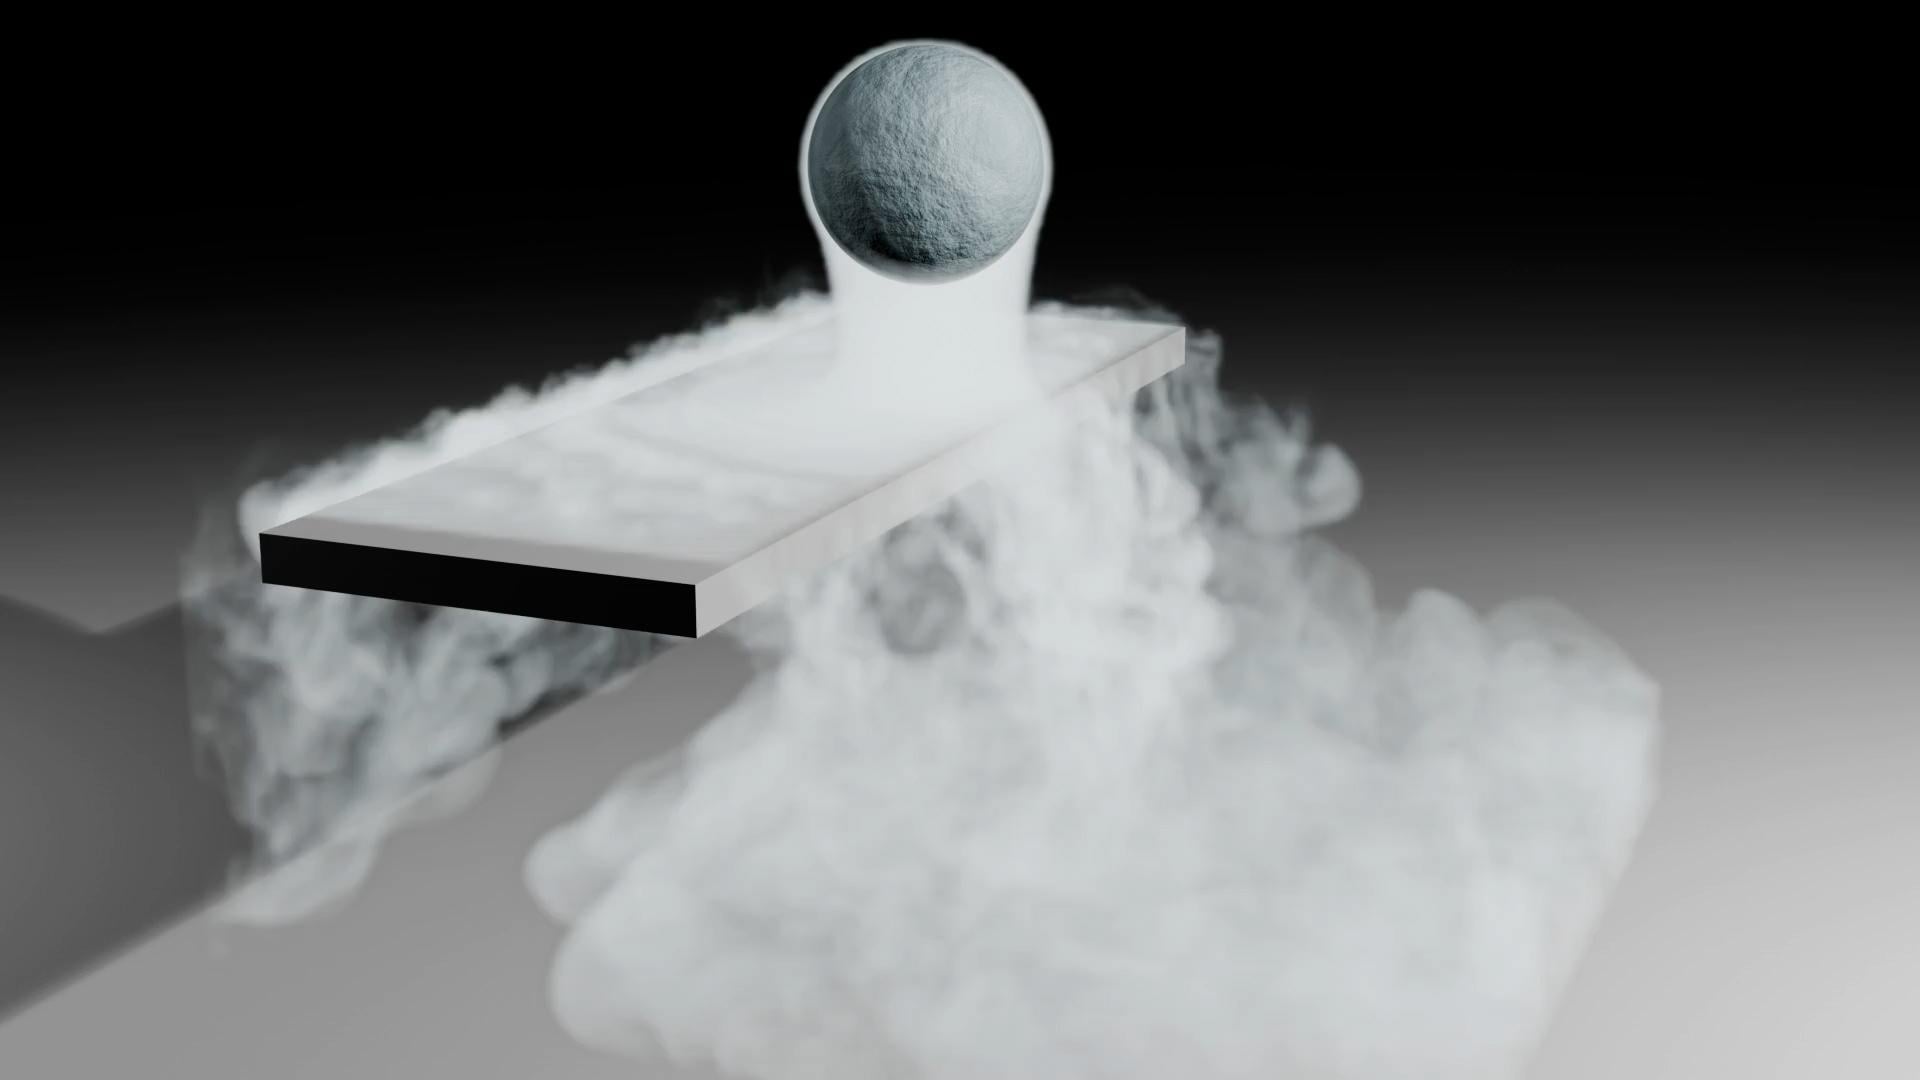
glowing smoke effect inside a glass sphere. We'll cover simulating smoke
inside collision objects, creating glowing materials, and then rendering it out in EV. If you are interested
in learning everything there
is to know about the fire and smoke simulation and how it works in Blender, hit that enrollment button
and let's get started.
2. Downloading Blender: Everyone. In this video,
I'm going to show you how you can
download a Blender 4.5. First, you're going
to open up a browser and then go toblender.org, and you should see a
big button right in the middle of your screen
that says download. Go ahead and select that. Then from here, you're
going to want to click on this blue button that
says Download Blender. This will automatically start
a download and then there is an option for you to donate to the Blender fund
if you would like to. Once the installer has
finished downloading, you can open up your Downloads folder and then just double click on this and
then go through the process of
installing Blender. Once you've done
that, you're good to go and you'll be
able to open it up.
3. Blender Basics: Hello, everyone. In this video, we're going to cover the
very basics of blender. We're going to go over moving around the three D view port, the different views, solid
view, rendered view, how to move, scale
and rotate objects. All of the very basic things
that come with blender, we're going to cover
in this video. So if you are a
complete beginner, this is the video for you. Before we get started, I
want to mention that if I ever use a shortcut
throughout this course, you can always
look at the bottom left and see what
shortcut that I press, and you can see the
mouse buttons as well. For example, if I left click, you're going to see that it displays the left
click right there. Same thing for middle mouse and then right click, as well. Shortcut keys, you can
see it displays there. If I press N, you can see this. I'll open up the
properties panel, and it'll display it on
that bottom left corner. Now, before we get
into this video, I want to quickly mention
the different render engines that Blender has to offer. We can see the render engines by going over to the render panel, which is this option here. It looks like a camera. If you select it, you can see the render engine
is displayed here. The default one
in Blender is EV. Now, IV is a real
time render engine. This means you can move around
your scene in real time. You can see the
materials lighting. All that is calculated
pretty quickly. Cycles, on the other hand, is Blenders physically
based path tracer for production rendering. It's designed to create very realistic results
right out of the box. Workbench is not really
used for rendering. It's mostly used for previewing your scene or your model that you're currently
working on. It won't really display
lighting or shadows that well. So as you're working, you
can use the workbench. It does have some nice
features in the three DV port. But when you're ready
to render, I highly recommend switching
to EV or to cycles. Here we are in a brand
new scene and blender, and this is what you're
going to see right when you launch the program. Now, there is a lot to this. There are so many
different menus, values to look at. Let's just go through
it one by one. Before I show you how to navigate around the
three D view port, let's understand what
we're looking at. So right in the
middle of our screen, this is what we call
the three D view port. This allows us to see our scene, what it's going to look like. The different models
and objects that are inside are going to be displayed in this three D viewport. On the left side, we
have our toolbar. There are a bunch of
different tools that we can use to move objects around, add objects, scale, all
that kind of stuff. On the top here, we
have our workspaces. Right now, we're
using the layout one, but there's also
one for modeling, sculpting, animation, rendering,
all that kind of stuff. We can see the
default ones here. You can also add new workspaces by hitting that
plus sign as well, and you can add the
ones that you want. Down at the bottom,
this is our timeline. This is for the animation
data in our scene. We can see the timeline
is displayed here. We can see the start
frame and end frame, how long our animation
is going to be. On the right side, this is our properties for
our blender file. Here we can change
different values for our cube that we have
in the middle of our scene. We can add modifiers,
physics, materials. All of these
different panels that you see here are selectable, and you can see what they do. We'll be covering a lot
of these in the score, so don't worry about
them right now. And then above that,
this is the outliner. This displays every single object that we
have in our scene. We can see the three
that we have here, a camera, a cube,
and then a light. And they are placed
in a collection. And you can think
of collections as different layers in your scene. You can turn them off and on by clicking the little
eye right there. You can see all of our
objects disappeared. Then I can re enable it
by clicking it there. I can also disable it, and this will make sure
it doesn't interact with the rest of the scene
with that checkbox. And then you can
also hide it from the render by selecting
the camera icon. So if we were to do a render, these objects are
not going to show up if this is unchecked. And above that is the
scene collection. The scene collection holds every single collection that's
going to be in our scene. So now that we have
a basic overview of what we're looking at
when we open up Blender, let's learn how to move
around the three D viewport. Now, to move around
the three D viewport, there are a couple of
different ways to do this. The middle mouse but is what you're going to be
using most of the time. You can see here, if I hold the middle mouse but
and I click and drag, you're going to be able
to view your model and you can rotate
around using your mouse. Now, some mouses don't have
that middle mouse button, and what you can do to help
that is you can emulate it. Back in our user preferences, underneath the input tab, there's an option for
Emulate three button mouse. If we enable that, now what's going to
happen is if we hold the Alt key or the option key on a Mac and then leftClick, that's going to do
the exact same thing. You can see here I'm
holding the Alt key, and if I left click, we can
move around the three D view. If you do have a middle
mouse button, though, I don't recommend
turning this on because Alt is used for
a lot of other things. But since I have a
three button mouse, I'm going to uncheck
that so I can actually use the middle
mouse button to move around. Now, to zoom in and out, you can use the scroll wheel
on your mouse. Another way is to hold control and then
middle mouse button, and that'll allow
you to zoom in at a smoother rate as
you can see here. You can also pan
the view by holding this shift key and then
middle mouse button, and that'll pan the
view like this. And another thing
to keep in mind is the orientation of where
you're currently looking. You can see here if I pan the
view all the way out here, now we're kind of looking
in this direction, and it's kind of hard to see that cube over there. And
now we're stuck here. So what we would have to do
is hold the shift key and then bring the orientation
back to where the cube is. So now we can see we're
looking over here. I'm going to rotate
this way a little bit, and now we're kind of looking
at the cube like this. Another way to get back to
your scene is, for example, if I go way out
here and I'm kind of stuck and I don't really
know how to get back, you can hit the period
key on your number pad. And that'll zoom in on the
object that you have selected. Another way if you don't
have a number pad is you can go over to view down
to frame selected, and this will do that
exact same thing and bring your orientation back to
whatever you have selected. So that's a very easy way to
zoom in on different objects or to get back to your scene if you've gone really far out. Now, speaking of
selecting objects, we can see our current
selection is the cube, and it's highlighted with
that orange outline. You can select different objects just by left clicking on them. We can see now we've selected the default lamp or the
camera we can select it. You can select
multiple objects by holding this shift key
and then left clicking. And now you can see we have
multiple objects selected. One important thing to
remember is the active object. The active object is the
object that was selected last, and it's highlighted
with the lighter orange. You can see the cube and the lamp are with
a darker orange, and then the camera is
a lighter orange color. This means it's
the active object. If you hold Shift,
you can change the active object to the
other objects as well. Now, the cube is
the active object. To deselect everything,
we can press Alt or option if you're
on a Mac and then hit A. You can also press A to select
everything in your scene, and then double type A is another way to
deselect everything. That we know how to move around our scene and select objects, let's talk about scaling, moving and rotating
different objects. Let's select the cube
by left clicking on it. To move an object around, you can hit the G key, and this is going
to move the object based on where you're looking. So you can see here I'm
moving it around like this. But if I move to this side, we can see here
it's moving around based on the view that I'm
looking at the object. Now you can lock movement
two different axis. There are three different
axes in blender. The X axis, which is the red going across this
way, left and right, the Y axis is the green
going front and back, and then the Z is up and down. But we can't see that
unless we enable it. We can enable it by going over to this button here on the
top and then selecting Z. So now we can see the Z, and that is going up and down. To move objects around,
we can hit the G key, and then if we want to
lock it to a certain axis, we can press the
axis that we want. For example, Y. Now it's locked to the Y axis, and it will only
move front and back. You can also right click and
that'll cancel an action. So if I press G and I
don't want to move it, I can right click and it'll snap back to its
original position. You can also type in different
values for moving objects. For example, if I press G, and then I lock
it to the Z axis, I can hit two, and now
it's moved up to meters. To undo something, I can
press Control Z or Command Z. Now that is how you
move objects around, and to rotate objects, you can hit the R key on your keyboard and
that'll start to rotate. Now, again, this
is going to rotate based on the position of
where our viewport is. You can also lock rotation
to a certain axis as well. So if I press R, then X, I can lock it to the
rotation of the X axis. Scaling works
exactly the same way as rotating and movement. If I press the Sky, I can scale my cube up and down. I can lock it to a certain axis. You can also
overwrite the axis by changing it to the X or
to the Y just like that. And if I want to
cancel that movement, I can right click. Rotating and scaling is also based on the origin
point of your object. The origin point is that little orange dot
right in the middle. Every object in blender
has an origin point, and basically it's the
center of that object. You can also change
the origin point by going into edit mode. This is a mode that allows you to edit individual vertices. For example, though, if
I select everything by hitting A and I move
it over to the side, now the origin point is right there instead
of in the middle. So now if I rotate, it's going to rotate based on that origin point
just like that. Now let's say that
we wanted to add a different object to our scene and we don't want to
work with the cube. We can delete it by hitting the X key and then
selecting delete objects, and it's going to delete the objects that
we have selected. If we want to add a new object, we can press Shift
A or go over to the Add menu right here and
selecting different objects. I like using the shortcut Shift A. I find it a lot faster. We can add in a new mesh object, and let's select the UB sphere. Now we've added a new
object into our scene, and we can see it right there. Now, where it's added is based on the position
of our cursor. You can move the cursor around by selecting the
cursor button here, and now if we just left
click anywhere on our scene, the cursor will move
to that position. Another way to move the
cursor is if you hold the shift key and then right click, that'll do
the same thing. And then if you wanted to get exact places for our cursor, we can press the enkey to
open up the Properties tab, and then underneath
the view option, we can change the rotation and the cursor location right here. I'm going to press N to
close off that panel. Let's press X and
delete that UV sphere. Another way to center the
cursor is if you press Shift C, that's going to snap
the cursor back to the original origin
of the entire world. Now, when you're working in
blender, a lot of the time, you're going to want to go
into certain views in order to rotate or move or
edit different objects. And to go into those views, we can hit the number key
one on our number pad, and this is going to push
us into the front view. Now I can hold Shift and middle mouse if
you pan the view, and now we're looking directly in the front view of our object. If we wanted to look on
this side on the right, we can press three
on our number pad, and that's going to move
it to the side view. Seven on the number pad
will go into top view, and then you can also
press Control seven, and now we're looking
at the bottom view. If you don't have a number pad, what you can do is go over to view and then select
the view port, and then you can choose the
ones that you want here, and you can see the
shortcuts on the right side. Now, working in the menus can be a little bit annoying
and take a long time. So another way to do that
is to again emulate. Remember when we emulated
the middle mouse but, you can do that for the
number pad as well. We can go over to Edit
down to your preferences. Underneath the IMPA tab, we can turn on Emulate Numpad. So now what happens is
if I hit the key one, that's going to go
into the front view. And even though it says
number pad on the side here, I'm using the top row of numbers on the
top of my keyboard. So again, three is to
go into the side view. Control three will go
into the other side. Control one will look
from the back, and so on. Memorizing the shortcuts for these s is very vital
for working in blender, and it'll save you
a lot of time. Since I have a
number pad, though, I'm going to uncheck that emula numpad because the top row is used
for other things. Now earlier in this video, I press Tab to go into Edit mode with the object
that we have selected. And what this does is
it changes our view, and now we can see the individual vertices on
our different objects. You can go into
this view by again, hitting Tab, or you can come up to this menu and selecting
Edit Mode right here. Now, right now we are in
the vertice select mode, so we can select the individual vertices on our
different objects. Also different ways to select. Up here on the top here, we can see if I change it
to the middle one, this is the edge select mode. So now we're selecting
different edges on our mesh, and then the last one is
the face select mode. So all of the different faces
we can select like this. You can change between
these different modes by hitting the top row
on your keyboard, so one will change
it to the verticee, two is for the edge, and three is for the
face select mode. So in edit mode,
let's say I wanted to make the head right here
a little bit taller. I can select holding shift multiple different
faces like this. And then if I hit the G key, that's going to allow me to
move the different faces. As you can see here,
if I wanted to lock into the Z axis, I can do that. I can rotate it. All of the different moving
and scaling options in object mode also
work in edit mode. Can also press E,
and that's going to extrude those faces in the
direction that they're facing. You can see here this
is at a slight angle. So if I press E to extrude, it's going to extrude it at
that angle as you can see. Now, you can change
this if you want to. Let's say I hit E
and I want to go straight up rather than
an angle, I can press Z, and this will go into free form, and then I can hit Z again, and now it's going to
lock it to the Z axis. Then if I wanted to undo, I can press Control
Z a couple times. There are also different
modes of editing your object. If we go back over to this menu, we can see there is sculpt mode, vertex, weight paint,
and texture paint. Sculpt mode is for
sculpting your objects. Over on the left side, you
have a ton of different tools. And if I just start
clicking on here, we can see we're now
sculpting our mesh. There is also vertex paint mode, which allows you to paint
on the individual vertices, which can be used for
different modifiers, texturing, all that
kind of stuff. Weight paint is
also very useful. It allows you to paint on the different faces
and vertices, giving them values,
which then can be used for modifiers,
simulations, all that. Texture paint allows you to paint certain textures
on your mesh. This is very useful for
making different details on your models and adding
some cool unique textures. Now let's talk about the
different views in blender. I'm going to first add
in a plain object. I'll scale it up a little bit, and then I'll press Shift A
and add in a cube object. Now we have two different
mesh objects in our seat. If I press Z, I can
go into wireframe. What this will do is it
allows us to see through our mesh and everything has
now turned into a wireframe. This is going to be
very useful for seeing through your mesh to
select an object that's behind it or to go
into Edi mode and interact with the
different faces and vertices that
are hard to see. If I press Z, we can also see
the material preview will allow us to see what the
material is on our object. Since everything doesn't
have a material, it's just going to be
displayed as white. You can also press Z and
go into the rendered view. This will allow us to see
what our object is going to look like once we actually
render out an image. This calculates the lighting. You can see the lamp
is casting a shadow. If I move the lamp around, it's going to move the shadow based on the position
of the lamp. You can also go into
these different views by selecting the
ones up top here. The left one is wireframe, solid material,
and rendered view. We've gone into the properties many by hitting N
a couple times, so let's talk about
it a little bit more. If we go over to
the item tab here, we can see the position
and rotation and scale and dimensions of the
object that we have selected. If we select the
plane, we can see the scale, the dimensions here. If we rotate it, you can see
it's going to be rotated. Those values are going
to be displayed there. And this can be very useful for finding different angles of your objects and seeing exactly how big or
small they are. Now, lastly, before
the video ends, let's talk about the timeline. The timeline down here is how long your animation
is going to be. You can play it by hitting
the play button here, or, again, you can hit
the space bar, and that'll also
play it as well. Now, since we have
a default scene, there is no animation data. So let's do that real quick. Let's create a
basic animation of the cube moving from the left side over to
the right side. So what we need to do
in order to get this done is we first need to
restart the timeline. We need to press G on our cube. Let's lock it to the X axis,
move it to the left side. Then let's add in a keyframe. Now, to add in a keyframe, we can hit the K, and we can select which
keyframe that we want. Since we want our
cube to move from the left side over
to the right side, we want to select location. Now, if you had some animation that you wanted
with the rotation, you can select that
here or scale. Let's select location. So now we've added a location
keyframe right there, and we can see it
with that yellow dot. So on frame one, we're
telling Blender, this is the position of the
cube where I want it to be. So now let's jump to
a different frame. Let's go over to frame
40, for example. And now if we press G, then X, we can move
it to the right side. And again, we need to add in
another location keyframe. So we'll press K and
then select location. So now we've told Blender
that on frame one, I want it to be on this side, and then on frame 40, I want it to be on this side. And so now if we
restart the animation, and then if we hit the
space bar ache play, it's going to move from
that location over to this new location over
the course of 40 frames. So that is a very basic
way of animating. Let's try rotating.
So on frame 40, we're going to hit K
and select rotation. Now, it's not going to
overwrite that keyframe. It's just going to
be added to it. As you can see over
on the right side, all of these values now
have that yellow color. If we go over to frame 60, we can hit R, then Z, and you can also type
in a manual number. So let's say I wanted to rotate
this cube by 90 degrees, I can hit 90 and then enter, and now we'll need to add
in another keyframe again. So we'll hit I and
then select rotation. You can also select available, and that'll look
at the values from the previous keyframe and
see if anything is changed. Since we change the rotation, if we select available, that's going to add in a
keyframe to the rotation. So now let's see what happens. We'll restart by hitting
that endpoint button. You can also press Shift
and then left arrow. That's going to snap the
cursor back to the beginning. And now if we hit the Space Bar, we can see there,
and then it rotates. So now we've created
a basic animation. Now, there we go. That is a
basic overview of Blender. Now, there is a lot
more to blender. There's so many more things
that we could talk about. But in this video,
I just wanted to cover the very basics. Over the coming videos, we're going to learn more
about Blender. And if you have any questions
throughout this course, please let me know, and I'll respond to it as
soon as possible. Thank you for watching, and I'll see you guys in the next video.
4. What is the Fire & Smoke Simulation: How do we use the fire and smoke simulation in blender
to create cool explosions, smoke effects, and VFX? To answer this question,
we need to understand what the fire and smoke
simulation actually is. The fire and smoke
simulation feature in blender is located over in
the physics properties, and it is underneath
the fluid option. Now you might be confused at
why we're selecting fluid, and the reason for that
is because the fire, smoke and liquid simulations
all use the fluid system, which is known as manta flow. So keep this in mind, whenever
I use the term fluid, I'm referring to the overall
manta flow simulation, not just the liquid itself. There are two things
that you will always need for any
fluid simulation, those being a domain
object and a flow object. The domain object
is the container for the entire simulation. No fluid can exist
outside of the domain. Another thing to keep
in mind is the domain will always be in
the shape of a cube, no matter what
object that you use. In this example, I've set up the UV sphere to be the
domain, but as you can see, the smoke is completely ignoring the shape and treating
it like a cube object. For this reason,
it's recommended to always use a cube
for the domain. To add in a domain, first,
you need to press Shift, go over to mesh, and then
add in a cube object. Emptis, curves, and any other object like
that will not work. It has to be a mesh. From there, you can jump over to the physics properties
and select fluid. Change the type over to
domain, and you're good to go. The other thing that
you're going to need is a flow object. These types of objects add or remove fluid from
the simulation. And again, you're
going to need a mesh object for this to work. There are also three
types of flow objects, inflow, which will constantly add fluid into the simulation. Geometry will only
add the amount of fluid based on the mesh size. And lastly, outflow which will remove fluid
from the domain. To add any of these objects, first, you need to
have it selected, then head over to
the physics panel, choose fluid, and switch
the type over to flow. Another optional object that
you can add are effectors. These act as collision objects. However, this slows down
the simulation quite a bit, so it's only recommended
to use them if necessary. Effectors can also be used as
guides for the simulation, which is a bit more of
a complicated subject which we'll tackle
later in this course. Now that we know what it takes to create a simulation
and blender, let's talk about what the
simulation is made of. When creating smoke
or fire and blender, it's made up what
we call voxels. You can think of voxels as
the pixels of the simulation. The smaller these voxels are, the better the
simulation will be. And you can actually see these individual voxels if we set the resolution a little bit low and then bring up the
density really high. Another way to see
the voxels is to look at the bottom left of
your domain object. You're going to see
a small cube there, and this is the size of voxel
for your entire simulation. The fluid physics and
blender are very powerful and allow you to create
almost endless simulations. As you go throughout
this course, you will start to
understand how to use this system effectively without having to do trial and error. If you have any questions on anything throughout
this course, don't hesitate to
leave a question. With that out of the way,
let's jump into Blender and start learning how to
create these simulations.
5. Basic Fire Simulation P1: Now that we have a
really good idea of what the fire and smoke
simulation is in blender, let's actually create something. In this video, we're going
to go through step by step on creating this
fire simulation. In the following videos, we'll learn about
the smoke simulation and all of the
different settings. This video is
primarily focused on just the basics and we're
going to go step by step. Here we are in a
brand new scene and one thing I wanted to
mention is that if you ever get stuck on what
buttons I press or if you get confused at the shortcut or
anything like that, make sure to look at
the bottom left corner. You can see here
if I left click, it's going to highlight
that left mouse button. Same for the middle mouse
button and right click. Then any keys that I
press, for example, if I press N to open
up the propertitab, you're going to see that
displayed right there. With that said, let's create
a basic fire simulation. Remember, there are two
things that we need to add. We need a domain object
and a flow object. The devolt cube in RCN
can be our domain object, but we're also going
to need a flow object. Let's press Shift A to add in an object or you can
come up to the Ad menu. We're going to go over to mesh, and then we're going
to add in a UV sphere. If we press N to open
up the properties tab, you're going to see the
dimensions on the right side. I'm going to set all of
these values down to one just so that the sphere
is a little bit smaller. Next, we're going
to press Control or Command A to bring up the apply menu and we
want to apply the scale. You can see over
on the right side, these scale numbers are set
to 0.5 for each of these, and that's because we
shrink everything by half. If we leave them at 0.5, the smoke and fire
simulation isn't going to be exactly perfect. We want to make
sure whenever we're working with physics in blender, that we apply the scale. Doing that, if we press
Control or Command A, we can select scale, and that's going to change all of those values down to one. The reason we do this is
because the scale value affects all other different
types of things in blender. For example,
modifiers, you'll see here the bevel modifier
with a weird scale, it's not going to bevel
the corners properly. When we apply the scale, now it bevels the
corners perfectly fine. That's the same thing with
these fire simulation. If we don't apply the scale, there may or may not be some weird scaling issues
when we simulate it. Next, we're going to
select our cube object. This is going to be our domain. We're going to press S to scale. We'll scale it up just a
little bit to around 0.1 0.7. To see how big it is
compared to our UV sphere, we can go into the
wireframe view by selecting this top button or pressing Z and going into the wireframe. We'll press S again, block it
to the Z axis by hitting Z, and then just scale it
up just a little bit, and then we can press G
and Z to move it upwards. Let's move it up
right about there. Looks pretty good. Again,
since we scaled it up, we need to press Control
A and apply the scale. Next, to create the domain, what we're going to do is jump over to the physics properties. It's this little
button on the side here looks like a circle
with a.in the middle. We're going to select fluid, and for the type, we're going to switch it over to domain. There are two different
domain types here, and currently the default one is set to gas, which
is what we want. Next to add in the flow object, we're going to select the
UV sphere, select fluid, change the type over to flow, and for the flow type, we're going to go with fire. In the last video, we
discussed flow behavior. Right now it's set to geometry, but we want to
change it to inflow, it constantly adds fire into the scene, change
it over to inflow. Let's work on the domain
settings first and then we'll jump over to the
flow object. Go ahead. Let click the domain, the first thing that
we're going to do is change the resolution divisions. We're going to talk about all of these different settings here in the later videos
and we'll go into more detail on
exactly what they do. For now, though, basically, all you need to know is
the resolution divisions controls how good the
simulation will look. If you have a lower NPC, I recommend going
with a value of 128. That will look
pretty good. Or if your computer can handle it, we're going to go up
to a value of 160. Next, we're going to scroll down a little bit and then
turn on adaptive domain. What it will do is it'll
shrink down the domain to be the exact size of our flow
object, as you can see here. With this unchecked, when
we bake in the simulation, it's going to try and bake
in the entire domain, which is just most of
the time empty space. Turning this on, which will decrease the bake
time by quite a bit. That's a very useful
setting to have on. Next, we're going to scroll
down a little bit more, open up the fire tab, and set the reaction speed, we're going to go a
little bit lower 2.7. Reaction speed controls
the height of the flames. Lower values will
increase the height of the flames and higher values
will decrease the height. We're setting it a
little bit lower so the fire is a
little bit taller. Next, we're going to
turn up the vorticity. This value controls
the amount of swirls and randomness
in the flames. We're going to go up
to a value of 0.6. Finally, over here in
the cache settings, here is where we bake
in the simulation. Right now, the type
is set to replay, which means when we
play the animation, it's going to try and
simulate it in real time. This is quite laggy, especially at a
resolution of 160. I'm going to switch the type
from replay over to modular and this will allow
us to actually bake in the simulation,
as you can see here. The other important
thing we want to turn on is the is resumable option. What this will do
is it'll allow us to pause the bake
halfway through, double check that
everything looks good, and then resume it afterwards. If this is unchecked, when we stop the bake, if it's not completely finished, you're going to have to restart and bake
the entire thing. Having this on is a
really good option. The end frame right here also controls how long the
simulation is going to be. Let's go with a
value of 150 frames. Now that we set up the domain, let's select our flow object. Over on the right side,
we want to make sure that the philic behavior is
again set to inflow. For the fuel, we can go up
just a little bit to 1.2. This will make the fire
look a little bit more chaotic and then we're going
to open up the flow source. We're going to set the surface emission a little bit lower. Let's go with a value of one. This will bring the fire a lot closer to the
surface of the mesh. Finally, we're going to
turn on the texture option. Here is where we can
add in a texture to control where the
fire is on our object. With that enabled,
we're going to jump over to the texture panel, create a new texture, change the type from image or movie, we're going to go with clouds. You can see here this is
what the texture looks like. Wherever there is
white on this texture, that is where there's
going to be fire and wherever there is black, there's going to be no fire. We're going to bring the
size down to around 0.1, and then for the colors,
we're going to bring up the contrast to
around 2.5 or so. Something like that
will look pretty good. Now, unfortunately, there's
not really a way to see this texture on our mesh, we're just going
to have to bake it in and then see it afterwards. The last thing that we're
going to do before we bake this in is we're going
to animate the offset, which means that the
texture is going to be moving around our mesh
as the simulation plays, which will give us a much
more random and organic look. To do this, on frame one, we're going to hit the button on the sign to add in a keyframe. We're going to jump all
the way to frame 150, which is the end
of the animation. We're going to go
up to a value of 0.7 and then add in
another keyframe. Over the course of 150 frames, you're going to see
this value will slowly increase until it reaches
0.7 right at 150. The other important
step that we want to do is we're going to
box select both of these keyframes because
right now the interpolation between these keyframes
is set to bezier, which means it's going to start out slow at the beginning, speed up in the middle, and then slow down right at the end. This is going to make the texture look a
little bit weird. To make it move at
a constant rate, make sure both of
them are selected, press T while hovering in the
timeline and select linear. Now it's going to move
at a constant rate. We can also set the end
frame in the timeline to 150 to match the length
of our animation. There we go. Let's
go ahead and select our domain object. We're
ready to bake this in. Make sure you save your project just in case this crashes. You can do that by
hitting Control S, navigate to where
you want to save it, and then click on
Save Blender File. With that done,
let's click on Bake. Once the Bake is finished, we're going to create the material and
then render it out.
6. Basic Fire Simulation P2: Now that the bake has finished, we can scroll through the
timeline and double check that everything looks
good in our simulation. As you can see, it does. If we zoom in on this UV sphere, you'll be able to see
that texture working and moving around our mesh
as the simulation plays, which is pretty interesting. So the next part in this
tutorial is to create the material and then
render out an animation. The first step to
that is positioning the camera so we can actually
see what we're doing. I'm going to go into the
front view right about here or so and then
what we can do is hit Control Alt Numpad zero to snap the camera to
exactly where we're looking. Or you can come up
to view down to a line view and then select a
line active camera to view. That does the exact same thing. From there, we can
select our camera, press G, and then middle mouse
button to Zoom outwards. Something like that
will look pretty good. Now, if we press Z and go
into the rendered preview, we're not going to
see anything and that's because there's
no material right now. It's just using the default
gray texture for our cube. What we need to
do to fix that is to jump over to
the material tab. What we want to do is
over on the right side, we want to remove
this principled BSD. Go ahead and select
it and hit remove. Underneath the volume tab, we're going to add
in a new shader and add in a principled
volume shader. Once we do this, you'll be able to see our
smoke simulation. Now, it might be a
little bit hard to see, but if we were to turn up
the density on our smoke, you'll be able to see it in our scene, as you can see there. That is looking pretty good. There are a couple of different
things I want to change in this material and to make
things a little bit easier, let's go over to the
shading workspace. Come up to the top here
and select shading. I'll go back into the camera
view by hitting zero on my number pad and press Z and
go into the rendered view. So here is our nodes
setup for our material. Right now we set
the density to 15. We're going to set this down
a little bit to around ten. Now to bring in that fire, there's multiple
ways to do this. One way is to bring up
the black body intensity. If we select this and go up
to a value of five or so, you're going to see our fire
simulation is in the scene. However, it looks a
little bit low quality. There's not a lot of
detail in our simulation. If we go into the solid view, we can see all of this detail. But once we go into
the rendered view, it seems to disappear. The main reason for that is because of a couple
of settings in EV, but also because of our
black body intensity. I don't really like
using this setting. The better way to add in our
fire is if we press Shift A, we're going to go
over to input and then add in a volume info node. We're going to place
that right here. We're going to be taking
the flame attribute and plugging that into
our principled volume. First though, we need to add
in a couple of extra nodes. We're going to go
over to converter and then add a color ramp node. Take the flame and plug
it into the bottom input. Then we're going to
take the color and plug this into the
emission strength. To control the
brightness of this, we're going to add a math node, converter math node,
place that right here and switch the
type over to multiply. This bottom value now controls the brightness
of our flames. Let's go with a
value of around 35. This color ramp also gives us a little bit more control over where the fire is on our scene. For example, if I
bring this down, we can clam down on some of
those values, as you can see. To actually get some
color into our flames, we're going to add
in a new color ramp by selecting this one, pressing Control Shift
D to duplicate it. That's going to
keep the connection to the flame attribute, and we're going to
take the color and plug this into the
emission color. Then for the color down here, we're just going to add in a new handle by hitting
that plus sign, select it and change it over to a nice orange reddish
color, something like that. Then for the white handle, change this color to a
brighter yellow color. Somewhere around here
will look pretty good. Then you can play around
with the location of these handles to get some
interesting results. That looks pretty
good. Now before we do anything else
in this material, I want to fix the
EB settings because right now our flame still
does not look that good. What we're going to do first is jump over to the
render scene panel, which is the camera icon. We're going to open
up the volumes tab. Here we can set the
resolution of our volumes. Right now it's at 1.8, which is the lowest resolution. We're going to go
with a value of 1.2. Once we do that,
you're going to see a lot more detail in our scene. Next, we're going to open up
the color management tab. We're going to change
the view transform from AGX over to filmic. I noticed that filmic does look a little bit
better with flames. You can see a lot more color
in our flames right here. Then for the look, we're going
to go with high contrast. This is going to really
make our fire stand out. Next, over in the
principled volume, we might want to
bring up the density. Let's go back up to 15. I think that will look a little bit better
with the smoke. Then you can also change
the color of the smoke if you wanted to by changing
this color here. I might make it just
a little bit darker. As for the background,
we're going to jump over to the world settings and set the color all the
way down to black. Now you can see
we're starting to get a lot more
interesting results. The other thing I
want to do is hide this UV sphere so it doesn't
show up in the render. To do that in the outliner, all we have to do is click on that camera icon and then we can also hide it
from the viewboard as well by selecting
that button there. Now we get this really nice
looking flame with the smoke. And that's basically all
we really need to do. From here, we're going to jump back over to the layout tab, and then I'm going
to show you how to render this into an animation. Over on the right
side, we're going to go over to the output tab. Here is where we set our folder of where we want our
animation to go to. Go ahead and click
that button there and then navigate to
a different folder. You can name it right here
and then click except. For the file format,
we're going to switch it over to a movie file. Underneath the encoding,
we're going to switch it over to
the MP four option. Then for the output quality,
let's go with high. Normally, when you render
an animation in blender, you're going to
render it as a PNG or JPEG and then
sequence it out later. Since though this is
a pretty basic scene, there's not a lot going on. We should have no problems with crashing or
anything like that, so that is why we're
rendering it as an pour. In the later videos,
when we create the explosion and other
high quality simulations, we will be rendering it as a PNG and then
sequencing it out later. I'll go over step by step
once we get to those videos. For now, we're going
to leave it on pour. With that done, we can go ahead and save our project once again and then go over to render and then click on Render Animation. Once it's done rendering, you're going to see it in the folder that you specified in the output section. There we go. We've now created a
basic fire simulation, and then in the next video, we're going to be creating
a basic smoke simulation.
7. Basic Smoke Simulation P1: Last video, we created the
basic fire simulation, and in this video,
we're going to be creating a basic
smoke simulation. We're going to go
step by step on creating this simulation
that you see on screen. I'll show you how
to add the domain. We're going to change
a couple of settings, create the material, and
then render it out with EV. To get started,
we're going to be using this cube as
our domain object. I'm going to go into the
properties tab by hitting N and then we're going to set
the dimensions over here. For the X dimension, we're going to go up
to around 4 meters. From there, we're going
to press G and Z and drag it up so it's sitting right on top of
the credit floor. For our flow object, we're
going to press Shift A, go over to mesh, and then
add in a plane object. Over in the property stab, let's bring the X a lot
smaller to around 0.3, and then for the Y, we're going to set this to around 0.8. We have this small
plane just like that. From here, we're
going to press G, then X and move it over
to the right side. Again, this is going
to be our flow object. Let's press G and Z and
get upwards so it's not completely in line with
the bottom of the domain. It's up just a little bit. There is probably good. For the height of our domain, I'm going to select it
and let's just drag up the height a little bit more
to maybe around 2.5 or so. Again, we're going
to need to press G and Z and drag this up, so it's sitting on the
grid floor just like that. There we go. Now that we
have all of our objects, we need to apply the scale. I'm going to press Control A and select scale with the
domain select it. We're going to select
our flow object, press Control A, and
select scale once again. Next, we're going to
select our domain and jump over to the
physics properties. We're going to select fluid, make sure the type is set
to domain, and there we go. We've added it in. Before we
change all of the settings, let's select our flow object, select fluid, change
the type over to flow, and then make sure the
flow type is set to smoke. Let's create the settings
for our flow object first. For the flow behavior, we want to switch it
over to inflow, so it constantly adds
smoke into the scene. Next, we're going to set
the initial temperature up to a value of six. This will make the smoke
rise a bit faster, and then we're going to
open up the flow source whenever you have a flat
object like this plane, we want to make sure
is planear is enabled. This plane R will allow an
object that is non manifold, which in this case
is our plane object. What non manifold means is
if I add in a cube object, you can see this
is a solid object. But if however I go into Eta mode and I create
a hole, let's say, I select this pace
here, inset it, and then create a
hole like this, this is a non manifold object
because it's not closed in. In this case, we need
to make sure that with our plane selected that
is planear is enabled. I'm also going to set the
surface emission down to one, so it's a bit closer to
the surface of the plane. And that's basically all we really need to do
for our flow object. Let's go ahead and select
our domain object. For the resolution divisions, let's go up to a value of 128. That'll look pretty
good for our scene. Underneath the
border collisions, we're going to enable the
bottom of our domain. A smoke that hits the
ground will actually collide with it instead
of passing right through. The other thing we're
going to enable is the adaptive domain. Go ahead and check this box. This should shrink
the domain size to be the exact size
of our flow object. Then we're going to scroll
down to the gas settings. The vorticity amount controls how many swirls are in the
smoke and for this simulation, we're going to go up
just slightly 2.1. We're also going to
enable dissolve, so the smoke
dissolves over time. We're going to open
up this panel and the time value controls how long it's going to take
for it to dissolve. Let's go with a value of 75. Over 75 frames, it's
going to slowly dissolve. Then with slow enabled, that will give it a much
smoother transition. Another thing to
keep in mind though, with the dissolve function, sometimes the adaptive domain actually cuts off some
of the simulation. And to prevent this, we can
set the threshold lower. The threshold value is
the amount of density in the smoke before
it gets cut off. With this at 20.2, you might get some
clipping in the smoke. To prevent this, we can set this all the way down to zero. This means that even if there's a tiny amount of smoke
inside the domain, it's not going to be clipped off from the adaptive domain. Next, we're going to
open up the noise panel. Here is where we can
add another level of detail to our simulation. Let's go ahead and turn it on. For the Ures factor, we're going to leave
it at a value of two and then for the
strength of this noise, we're going to go down
just a little bit 2.6. I think the strength is a bit too high at the default setting, so we're going to set at 2.6. I'll be showing you
what it looks like before and after after
we bake this in. As for the end frame, we're going to set this down to 200. I don't think we
need 250 frames. Since we've set it
there, let's also set this in the timeline
as well to 200. We're going to change the
type from replay over to modular and this will allow
us to bake in the simulation. We're going to turn
on is resumable just in case we need
to pause the bake. Then finally, to
make our simulation look a bit more interesting, let's add in a force field. This will push the smoke in the left direction causing it to look like there's
wind in the scene. To do this, we need
to press Shift A, go over to force field, and then add in a
wind force field. Go into front view
by hitting one on the number pad and
then to rotate this, we're going to
press R, then hold control to snap it
right at 90 degrees. Let's place this over
on the right side. Now, the strength of this is
way too high for our scene. We're going to set
this much lower 2.3. As for the noise amount, this is going to give it
a lot more variation, which is going to make it
look more interesting. We're going to set
the noise amount up to a value of three. With that done, we are ready
to bake in our simulation. Go ahead, select
your domain object. Make sure you save this as well just in case
blender crashes. You can do that by
hitting Control S, and once you've
done that, go ahead and click on Bake data. Now this will go through the
timeline, as you can see. Once this is finished, we're
going to bake in the noise. The first bake has finished, so now we're going
to scroll down here and then bake in the noise. Make sure you save
your project once again and then click
on Bake noise.
8. Basic Smoke Simulation P2: All right, both of the bakes
have finished and now we can play through this and
see what it looks like. As you can see, it
looks pretty good. There's a lot of detail in our smoke and it is
not too bad at all. Real quick, I wanted to
show off the noise it does. You can see with it on,
there's quite a bit of detail in the smoke
and if I turn it off, you're going to see
a lot less detail in our smoke. It's a lot more. The swirls and everything are
a lot bigger than normal, but with it turned on,
the smoke is more dense and gives us another
level of detail. With that done, let's
go ahead and create a scene and then
render this out EV. First off, I'm going
to press Shift A, go over to mesh, and then add an a plane object to
be our ground floor. Let's scale this up
a little bit and then go into the front
view by hitting one on the number pad and double
checking that it's right below the smoke
right about there is good. As for the backdrop, what I like to do
a lot of the time when rendering in blender is I like to go into Edit
mode with the ground plane. Go into the edge select mode by selecting that up there or by hitting two on your keyboard, select the back edge and extrude
it upwards by hitting E, lock it to the Z axis, and drag it upwards
just like that. From here, you can
select that corner and bevel it by hitting
Control or Command B, moving your mouse a little bit, and then with the scroll wheel, you can add more resolution. Something like that
will look pretty good. Now if we go out of Edit mode, we have a nice smooth backdrop. You can also right click
and shade it smooth. Next, let's position the
camera in the front. I'm going to go into
front view once again by hitting one
on the number pad. Position my view port right
about here and then press Control Alt Numpad zero to
snap the camera to place. Another way is to go
up to view down to a line view and then select a
line active camera to view. Then go ahead and
select the camera, press G and then middle mouse
button and you can zoom outwards until you get the
smoke simulation in the frame. Write about there
is pretty good. Then let's select our backdrop, move it over to the right, so it encompasses the
entire camera view. Let's see what this
looks like if we press Z and then go
into the rendered view. You can see we
cannot see anything. Let's go ahead and create the material for our domain object, select it, and then jump
over to the material tab. Underneath the surface, go ahead and select it and
then click Remove. We don't want to
use any surface. We want to open up the volume
tab and for the volume, switch it over to the
principled volume shader. There we go. That is looking pretty
good. Let's bring up the density to around 25 to
see what that looks like. That is looking
pretty good so far. You can also change the
color if you want to. If you want it to be a little
bit lighter or darker, you can play around with this until you get
your desired look. You can also change it to a different color if you
would like to as well. I might go with a
slight blue color. Something like this might
look pretty interesting. As for the lighting
in the scene, let's press Shift A
and add an A sun lamp. Come over to light and then
add an A sun lamp right here. We're going to drag this
up a little bit and then rotate it so it's
facing at this angle. Then in top view
by hitting seven, let's rotate it again so
it's right around here. That looks pretty good. If we go back into
camera view now, we're going to have
some nice lighting on our smoke simulation. One thing to note with IV, you're not going
to get any shadows from the smoke on
the ground plane. For that, you're going to have
to switch over to cycles. If I switch over to cycles now, you'll be able to see all of that shadow along
the bottom there, which does look pretty good. We'll be covering rendering
in cycles in a later video. For now, we're going to
be sticking with EV. Speaking of which we're going
to go through a couple of different settings to make our smoke simulation
look a lot better. First off, we're
going to open up the shadows option and then
turn on volumetric shadows. This will allow some shadows
in the volume to appear. You can see with it off,
and then with it on, it's a subtle effect
and you'll be able to see this more once we
change the resolution. To do that, we're going
to come down here, open up the volumes tab. The resolution is set to 1.8 and this is why
it looks very blurry. If we switch this over to 1.2, we're going to get
a lot more detail in our smoke simulation. The other thing I
like to do is open up the color management tab and set the look over here
to high contrast. That's going to give us
some more sharp contrast in the scene and that
looks a lot better. If you wanted to, you
could go up to 1.1, but there's hardly any
difference between 1.1 and 1.2. With 1.1, it significantly
increases the render time. I don't think it's worth
having that tiny amount of extra detail just to have
double the amount of rendering. I'm going to stick with 1.2. Finally, we're going to
come up to the outliner and we're going to
hide the plane object, hide it from both the
view and from the render. Render this, we're going to
jump over to the output tab, set an output of where you
want this to render to, and then click Accept. For the file format, again, we're going to stick
with a movie file because this will render
a little bit quicker. We're going to go
with a movie file, and then underneath
the encoding, we're going to set
the container to MP four and then for the output quality, we're
going to go with high. That done, go ahead and save
your project once again and then come up to render and then click on
Render Animation. This will bring up a new window and it'll start to render out. Here is the final result. As you can see, it
does look pretty good. We get some nice
detail in the smoke and it does not look
that bad in EV. Again, this would look
better in cycles, and I'll be showing you
how to render smoke and fire in cycles in a later video. Thanks for watching
this video and I'll see you all
in the next one.
9. Using Quick Effects: Video, I'm going to
show you how to use the Quick effects
tool in blender. Quick effects allow you to
quickly add smoke or fire, liquid, or even hair particles to your object that
you have selected. How it works is you need to make sure you have an
object selected, it needs to be a mesh object. Then over in the object
menu down to Quick effects, you can see the
four options here. The one we're going
to be covering in this video is the Quick Smoke. Keep in mind when you
select this option, the object that
you have selected will become a flow object. If I didn't want a cube
to be the flow object, I can delete this by hitting X, delete it, and then I
can add in a new object. Let's go with a UV sphere. I'll scale it down a little bit and then go over to object, Quick effects, and
then quick smoke. Again, this will automatically
add a domain object, turn the object that we had
selected into a flow object, and create a basic material. Now, before you click away, there is another menu
that we need to look at and it is at the
bottom left corner. If we open up this menu, you're going to see
the smoke style. Right now it's set to smoke, but we can choose fire or we
can choose fire and smoke. These are the exact settings in the flow type over in
the inflow settings. There's also an option
for render smoke objects, and what this will do
is if we zoom in here, you can see our
flow object is set to wireframe with
this turned on, it'll become a solid object and you can actually see
the surface of the mesh. I'm going to swich this
back over to smoke. Another thing to keep in mind is once you click
out of this menu, let's say I click over here, that menu is going to disappear. That's not really a big deal because if you wanted to
change the flow type, you can just select
your flow object and change it right here
underneath the flow type. Again, this is a quick way to turn whatever
object that you have selected into a flow object
with an automatic domain. From here, what you're
going to have to do is go through and change the
settings how you want. You can also scale
the domain up or down depending on what you
want for your simulation. This option is pretty
nice to quickly add a domain automatically without
having to add in a cube, set it to domain and
then all of that. It just saves you about
a minute or so of work.
10. Domain Settings: Section, we're going to be
covering the domain object. We're going to go through
every single setting in the domain going step by step into different sections and covering exactly
what each one does. To start out with, we're
going to be covering the top settings in
the domain object. To get started, let's
create a domain object. Now, we've done this twice in
the last couple of videos, but we'll go through
it one more time. Go ahead and press S
to scale our cube. We're going to scale this down
and then press S and Z and scale it along the C axis
so it looks like this. Then to add a domain object, there are two different
ways we can do this. We can go over to
the object menu down to quick effects and then add in a quick Smoke effect and this will automatically
add a domain, which we covered
in the last video. However, if you want
to add one manually, you can press Shift A, add in a cube object, and then scale it up and
place it how you want. I'm going to go into front view by hitting one on
the number pad, scale this up, then press S and Z and scale it up
something like this. That is looking pretty good. Then since we scaled both
of these objects up, let's select both of them,
press Control or Command A, and then select scale. Let's select the first cube. This is going to be
our flow object. We're going to go over
to the physics panel, select fluid, and change
the type over to flow. For the flow behavior, we're
going to go with in flow. Now we need a domain. Let's select our domain object
and then click on fluid. Now you might be
wondering why we're selecting fluid rather
than smoke or fire. The reason for that is
because the smoke, fire, and liquid simulations are all combined into
this fluid option. You can see this by
changing the type over here to domain and then looking
at the domain type. There are two different
options, gas or liquid. Gas, of course, is for
the smoke and fire and liquid is for the
liquid effects like water, honey, and all that stuff. I actually created an
entirely other course dedicated to that topic, if you want to check it out. I'm going to go ahead and
extend this panel just a little bit and here are
all the settings that we're going to
cover in this video. We've already covered
the domain type, so let's move on to the
resolution divisions. The resolution divisions control how good the
simulation will look. Higher values will, of course, make the simulation look better, but it's going to
take longer to bake. You can see the
different resolutions and how they look in blender with the smoke
and with the fire. Again, you can see that
the higher resolution, it does look a lot better, but it's going to take
much longer to bake. The time scale value controls the speed
of the simulation. Higher values will
increase the speed, making it move faster, and lower values will
make it move slower. Underneath that, we have
the adaptive timesteps. What this will do is it'll adaptively change the timesteps. For example, with a fast moving collision object or flow object, you might want to increase the maximum and
minimum timesteps. However, if some of
your simulation, you don't have a lot of
fast moving objects, the adaptive timesteps
will automatically change the timesteps needed for a certain frame based
on these two values. Below that is the CFL number. Basically, this determines
the maximum velocity that the smoke or fire will
move per time step. No fluid is allowed to move faster than what this value is. If however, that
value is higher, the solver will automatically subdivide that simulation step. In general, the
higher this value is, the less accurate it'll be, but the lower this value is, the more accurate it will be, but it's going to
take longer to bake. Below that, we have
the time steps, maximum and minimum values. The higher these are,
the more accurate it will be and you can
see this in this example. With a lower timestep value, you're going to notice
some of the particles tend to clip through
the collision object. A higher one, there are no
particles that are clipping through and it is
accurately being simulated. Below that, we have the gravity and right now it is grade out. The reason for this is because this simulation is using
the scene gravity. We can see this by jumping
over to the scene properties. If we open up this
gravity panel, you're going to see those
exact same numbers here, 9.81. If I wanted to change the
gravity in the domain settings, I need to uncheck this gravity. Now, if we jump back over
to the physics panel, we can change the gravity here. Might be wondering why we
would want to do that. The reason for that is
because you can have multiple domains with
different gravity settings. You can test this by selecting
both of these objects, shift D it and move it
over to the right side. This domain over here will set the z20 and then we'll bring
up the Y to around eight. Now if we restart and
play the simulation, you might get some
glitching effect and I think the
reason for that is because these two domain objects are actually sharing
the same data. If we scroll down here, you're going to see the cache is exactly the same
on both of these. What I would need to do
is change one of these to a different folder so it's
not using the same data. Let's go ahead and change
the one on the left. Now if we restart and
play the simulation, you're going to see the one
on the right is looking good, it's moving upwards, and
then the one on the left is looking like that.
And there we go. That is how you can create
different gravities for multiple domains. Underneath that we
have empty space, and this is the clipping amount. The higher this value,
the more it will clip out that smoke and
consider it empty space. That is what it's
supposed to do. However, if I set this all the way up to the maximum
value of one, it seems to work a
little bit strange. You can see it deletes
the first frame and then if I restart
and play it again, now it starts to simulate. This setting does seem to be
a bit buggy at the moment. So for now, I would
probably just leave it at the default setting and
not mess with it at all. Delete an obstacle will delete any smoke that is
inside an obstacle. Finally, the border collisions
will allow the smoke to collide with the edges of the domain that you
check off right here. Let's go ahead and check
off the top and right side. Now if we play the simulation,
it's going to play it. Once it reaches the top, it's
going to collide with it and also collide with the
right side of the domain. This can be handy,
especially with explosions. If you have explosions
that are on the ground, you want to make sure the smoke actually collides
with the ground, having the bottom right here checked is a
very good option.
11. Adaptive Domain Settings: Hello, everyone. In this video, we're going to be
looking at the adaptive domain in the domain settings, which is located right here on the right side underneath
the border collisions. With this checked, what this
will do is it'll shrink the object to be the exact size that you
need for your simulation. This will improve B time because it doesn't need to bake
in the entire scene. You can see here this is a very large domain
for a small object. If I turn the
adaptive domain on, it's going to shrink it down to be the exact
size that I need. If you have a flow
object that moves around or the smoke is moving
around in your domain, it's going to adaptively change the size based on your needs. To test this out, let's
go ahead and play the simulation and you'll be able to see exactly
what this looks like. Now there are three
options to go through. The add resolution
will add more domain, even if the size extends
past the original object. You can see here if
I go into Edit mode, this is the normal
size of this object. If we restart the simulation and I add some more resolution, let's go with around 50. Now when we play the animation, you're going to see that
even though it's this size, it's extending past it because the flow object
is going outside, so it needs to add
more resolution. And below that is the
margin value and this is the distance between the smoke and the edge of the domain. If I bring up the
margin a little bit, you're going to see extends
out past where the smoke is. If I bring it lower,
it's going to get closer and closer to the smoke. Finally, the threshold value is the density of the smoke
at which it gets deleted. To test this out, let's
open up the gas settings and open up the dissolve
function and turn this on. Let's go with a value of
around 15, for example. Now when we play the animation, you're going to see
that even right here, it might be a little
bit hard to see, but this is very
low dense smoke, so it's getting deleted. Want to be careful with this
threshold value because sometimes it's going to delete
smoke that you don't want, which will result in some
weird clipping issues. You can see this in
more detail if we go up to around 0.5, for example. Now when we play the animation, you're going to see it gets cut off way sooner
than I want it to. So for most cases, you can leave this at the default value, but in other cases, you're going to want to go even
lower than this, maybe to around a value of zero. You can see on screen that this simulation was jittering
around a little bit, making the threshold
much lower to a value of zero fix that issue and
now it plays smoothly. There you go. That is how
the adaptive domain works. In the next video,
we're going to be taking a look at
the gas settings.
12. Gas Settings: Hello, everyone. In this video, we're going to be
talking about the gas settings in the domain. The gas settings control the overall look and
behavior of the smoke. The first two settings
that we have here are buoyancy density and heat. These two values
control how fast the smoke will rise or sink. There is also another
setting in the flow objects. If we select it, the
initial temperature also correlates to how fast the
smoke will rise or sink. Jumping back over to the domain, let's talk about these
two settings first. The buoyancy density controls how fast the smoke will rise, higher values will
result in it rising faster and negative values
will result in it sinking. The heat value controls
the overall temperature. You can think of this
just like in real life, if the smoke is cold, it's going to sink
and if it's hot, it's going to rise just
like a hot air balloon. The heat value and the
initial temperature value go hand in hand with each other. If both of these values are
set to a positive number, the smoke will rise. If one of them is set to a negative number,
the smoke will sink. You can think of this
as multiplication. A positive times a positive is a positive
value, so it rises. If a positive times a negative, it equals to negative value,
so the smoke will sink. If both values are
set to a negative, this will also result
in the smoke rising. Go ahead and test
this out by playing the animation with both of
them set to a positive number, you're going to see it rises up. Let's select the inflow and set the initial temperature
to a negative value. Let's go with negative one. We'll restart and
play the animation, and now you can see the
smoke is now sinking. If we set the heat value to
a negative number as well, now the smoke will
rise because both of them are set to a
negative value. Again, the higher you set this, let's go with negative
five, for example, this will result in the smoke rising much faster as
you can see on screen. Below that is the
vorticity amount. This is the amount of
swirls in the smoke. Higher values will make
the smoke look more noisy and chaotic versus lower values will make it look
a lot more smooth. You want to be careful
about this value because sometimes the
higher you set this two, it will just fill out
the entire domain. I would probably stick around
a value of 0.2 or lower. Below that, we have
the dissolve function. If we check this box, we will now see
that the smoke will dissolve over a certain
amount of time. Let's go ahead and drag this
inflow a little bit lower. We'll select the
domain and restart it. Now we play it and you
can see it is dissolving. The time value controls
how fast it will dissolve. Lower values will result
in it dissolving faster, and of course, higher values will make the smoke last longer. The slow checkbox
allows the smoke to dissolve at a slower
pace and much smoother. You can see the
differences on screen with slow turned off and with it on and you can see that it's a much smoother
transition if it is on. There we go. We've now
covered the gas settings. In the next video, we're
going to be taking a look at the noise options.
13. Noise Settings: Hello, everyone. In this video, we're going to be talking
about the noise option in the domain settings. The noise allows you to add in another level of detail to
your overall simulation. It's not going to
change the shape or look of the simulation. It's just taking what
is already there and then adding more
detail on top of that. To see how this works, we have a basic simulation right now. When we play it, you're going to see the smoke just rises up. There's not a lot
of detail going on. It only has a resolution of 32. Once we enable noise, though, you can do that by clicking
that little checkbox. When we play the animation, you're going to see a lot
more detail in the smoke. You can see this
before and after by clicking that
little checkbox. There it is before the noise
and then with it enabled, you're going to see
a lot more detail. Again, you can see it's
not changing the shape, it's only changing the details
inside the simulation. Are four settings
that you can tweak in order to change the
look of the noise. First off is the uppers factor. By adding more uprest factors, it's going to add more levels of detail to your simulation. The strength value controls how strong that noise
pattern is going to be. Higher values will result
in it being more pronounced and then lower values will make it look a little
bit more subtle. The scale value changes the overall size of
that noise pattern. Of course, higher
values in the scale will result in the noise
pattern being a lot bigger and then lower
values will result in the noise being much smaller and you can see that on screen. Finally, the time value
is a seed for the noise. If you don't really like
how that pattern looks, you can just change the time to a random number and you're going to get a slightly
different results. This setting is not that noticeable because
it's just changing the noise pattern and noise
is basically infinite. In general, with a low
resolution divisions and a high noise factor upres, you're going to see that the simulation
looks really small. Versus the other way around, if you have a high
resolution divisions and a low uprise factor, this simulation is going
to look a lot bigger. One more thing that
we need to discuss is how do you bake
in this noise? Coming down to the
cache setting, in order to actually bake in the noise for a high
resolution simulation, we need to change the type
over to modular or all. Modular will allow us to bake
in the different modules, such as the initial bake with
the resolution divisions, and then we can come down
here and bake in the noise. Keep in mind, in order
for this to work, you need to make sure I
resumable is enabled. With this unchecked, you're going to see a
warning right here, non resumable cache enable
resumable options first. If you were to bacon
this setting here, you're not going to
be able to bake in the noise until you
check is resumable. If you don't want to do two
different bakes like this, you can switch the
type over to A, and then you'll be able
to bake in the noise and the normal resolution
divisions all at once. There we go. That is
how the noise option works in the domain settings. In the next video, we're
going to be taking a look at the fire options.
14. Fire Settings: Hello, everyone. In this video, we're going to be
taking a look at the fire options in
the domain settings. There are six different
options to go through, starting out with
the reaction speed. The reaction speed controls how fast the fire fuel will burn up. Higher values will result
in the fuel burning faster, which makes the flames shorter. Lower values will result in
the fuel burning slowly, so this equals higher flames. You can see the
differences on screen with different reaction speeds and you can see what they look like. The flame smoke controls how much smoke is going to
be emitted from the fire. Right now when we
play the animation, you can see there
is a lot of smoke, but if we wanted
much more than this, we can go up to a value
of three, for example. Now when we start,
we're going to get much more smoke
in the simulation. The vorticity
amount is basically the same thing as
the gas verticity. It just adds some more
swirls and randomness to your flames and you can see the different
settings on screen. You want to be careful
with this value because if you go too high, it's just going to fill
out the entire domain. Next up is the temperature
maximum and minimum values. They control the
height, the speed, and the overall color
of the simulation. For example, with a
low temperature value like a value of one
and then maybe 0.5, you're going to get a
much shorter flame and the color of it is going to
be a dark reddish color. The other way around,
if you go with a very high temperature like
five and then maybe three, for example, the flames
will be much taller. They're going to
move much faster, and it's going to be a much brighter, whitish,
yellowish color. Actually see this, let's
set the temperature maximum to one and then the minimum to a value of about 0.5. Now when we play the animation, you're going to see
the flames are a lot shorter and they're
not moving as fast. Now, you're not going
to be able to see the color difference until
you work on the material. Let's go ahead and
do that right now. I'm going to come up to the
top right corner and split this view and then switch this
over to the shader editor. Going to press do closed
off that panel and here is our basic material with
the principled volume. If we press Z and go
into the rendered view, you're not going to really
see anything and that's because we need to enable
the black body intensity. Again, this value right here, the temperature maximum and
minimum, they're very low. Once we set up the
black body intensity up to around a value of eight, you're going to see a very
dark red flame color, as you can see, just like that. Basically, what's happening is this principle volume with the attribute set right
here to temperature, it's taking that temperature
maximum and minimum values and plugging that
into the material. If we were to just remove this, now you're going to
see that it doesn't have that temperature attribute, so the entire thing breaks. If you like the look
of your simulation, but you don't really
like the color of it, you can actually
change that with the temperature
value right here. We go up to, let's say, 3,000, it's going to be a
much brighter flame, but it's going to keep
that overall shape. I'm going to set this
back over to 1,000. Now if we set the temperature maximum up to around
five and three, the flame is going
to be much taller and much brighter as you
can see just like that. And finally, the
smoke color right here controls the
look of the smoke. Let's go with a blue color. We'll restart and play this. Now you're going to
see that the smoke is now a blue color. If you go into
rendered view though, it's still going to be that gray color will turn up
the density a little bit. In order to grab
that smoke color, we need to take the
color attribute and plug that in right here. In order to do that, all you have to do is type
in the word color, all lowercase and then enter, and now you'll be able to see that blue smoke in your scene. We're going to talk
more about materials later in this
course, but for now, that's just a basic
overview of how the fire option works and how to use it in the
principle volume shader.
15. Domain Guides: Hello, everyone, and
welcome to another video. In this one, we're going
to be taking a look at guides in the fire
and smoke simulation. What are guides? Well, guides allow you to
take an external force or velocity and apply it to your fire or smoke or
liquid simulation. There are two different
methods that you can use, that being a domain object
or an effector object. Effector objects means that
you'll just take an object, apply an effector,
and then you can move it around and affect
the velocity of your smoke. Domain guides, which means you're going to
take the data and velocity from one domain and
apply it to another domain. For the next two videos,
we're going to be covering both of those
different methods. In this first video,
we're going to be using a domain as a guide. Now, guides are a little
bit more complicated, what we're going to
do in this video is walk through step by
step on how it works. If you want to follow along, you can go ahead and
download this blend file. It's over in the resources. What we're going to do first is create a liquid simulation and then use that as a guide for the smoke simulation later. In this blender file, we
have a basic scene setup. We have a domain, flow object, and an effector object, and then a ground plane
on the background. What we're going to do
first is create the domain, select it and select fluid
in the physics panel, change the type over to domain, and then for the domain type, we're going to switch
it over to liquid. Now, there are three main
things that you need to make sure in order
for guides to work. One of those being the
resolution divisions. Make sure that the
resolution divisions is exactly the same
across both domains. For this simulation, we're
going to set this 296. When we create the
smoke simulation later, we want to make sure the
resolution divisions is exactly the same or
it's not going to work. The other thing down here
is the format volume. Make sure unicas is enabled. Open VDB will not
work with guides. We're going to switch
that right here. The other thing
that we're going to change is the cache directory. Since we're working
with multiple domains, we want to make sure the
directories are different for each domain so they
don't override each other. What I'll do is over
on the right side, I'm going to click that button, go back a little bit right here, and you're going to want to
create two different folders, one for the liquid, and
then one for the smoke. You can see I've already
done that right here. Once you've done that, click on the liquid folder and
then click Accept. We're going to
change the type over to modular and then make sure it's resumable is checked just in case we want
to stop the bake. For the end frame, I'm
going to set this to 150 to match the end
frame in my timeline. Let's go back up to
the top here and we're going to change a couple
of fluid settings. First off, the CFL number,
I'm going to go up to four. This will just help speed up the bake time just a little bit. Then for the border collisions, I don't want the fluid to
collide with this right wall. I'm going to uncheck the right option so the fluid
will just fly outwards. Down here, we're going to
turn on fractional obstacles, so the fluid will just pass over this obstacle right here
without getting stuck. Then we don't need a mesh since we're not going
to see the liquid, so we can go ahead
and uncheck that. Now for the rest of the objects, we're going to select
our collision, fluid, change the type
over to effector. Then for the surface thickness, I'm just going to go
up to a value of 0.1. Finally, for the flow object,
select it right here. We're going to turn on fluid, change the type over to flow. For the flow type, we're
going to choose liquid, and then of course, we're
going to switch it to inflow. The other thing I want to do
is as the simulation plays, I want it to stop emitting
fluid at around frame 65. I'm going to jump
over to frame 65, add in a keyframe next
to that used flow, jump to the very next frame, frame 66, uncheck this, and then add in
another keyframe. For the rest of the simulation, it's not going to emit
fluid into our domain. Once we've done that, we're
ready to bake this in, save your project and
then click on Bake data. Once this is done baking, we're going to create
the Smoke simulation and then enable guides. All the bake has
finished and we can scroll through here to
see what it looks like, and that is looking pretty good. Now for the smoke simulation, let's go ahead and
restart the timeline, and what we want to
do is we want to separate these domains into
different collections. I'm going to box select these
three objects, press M, and move them to
their own collection, and I'm going to
call this liquid. Then I will create
that collection. Then what we can do
is press Shift D on all of these objects, right click to
cancel the movement, and then we'll press M again and move them to
their own collection. We're going to call this smoke. Then what we'll do is we'll select the domain in
the liquid collection. We're going to name this
object liquid domain just so we keep
everything organized. Then we'll do the
same thing here, which is cube 006. This is going to be
the smoke domain. Change the name right here. We'll call it smoke
domain just like that. Now with the smoke
domain selected, before we free the data, we want to make
sure that we change the directory to that
other smoke folder. Over any cache settings, I'm going to click that
button on the side, go back one and then use the smoke folder right here
and then click Accept. Now once we change the folder, we're free to click on free data without affecting
the liquid domain. Make sure you've done that,
then you can free the data. For the domain type,
we're going to switch it over to the gas option, leave the resolutions at 96, and then for the
border collisions, I'm going to turn on
the bottom right here, so the smoke will
actually collide with the bottom of the domain
and then go outwards. Now you might think to check
all these other boxes here, but I've noticed with
some simulations that the smoke goes along the top and it doesn't
really look that good. Only checking the bottom
will allow the smoke to just pass through the sides
without getting stuck. Another thing that
you're going to want to leave off is the
adaptive domain. This will not work
with the guides, so we're going to leave it off. Finally, we're going to open
up the guides option here, check this box, and now we have three different
settings to go through. The weight option is basically the lag that the guide has. Higher values will result in some smoke being left behind, whereas lower values will allow more smoke to be pulled in
because the weight is smaller. Size is the size of
your guide and it's the amount that it's going to grab in order to
move its velocity, you can see the
differences on screen. Velocity factor takes
the velocity of the guide and then multiplies
it to your object. You can see on screen
with higher values, the smoke or liquid is
moving, much faster. What we're going to do in this scene is we're going to set the weight a bit lower
so it grabs more smoke. We're going to set the size a bit lower as well, two, three, and then the velocity factor, I'm going to go with one, so
it doesn't add any velocity. Then, of course, for
the guide parent, we're going to want to
choose the liquid domain. Once we've done that, we can go ahead and select
our flow object, which is this one right here. We're going to change the type
from liquid over to smoke. Then another thing that
I want to do is turn on initial velocity so the smoke
actually shoots downwards. If we go into front view though, I want to make sure that
the liquid will actually grab all of the smoke that's
around our flow object. In order for that to happen, we're going to just
going to drag it slightly below the liquid, just like that and
then maybe scale the entire thing down
just a tiny bit. Then we're going to turn
on initial velocity, set the Z direction
to negative one, so the smoke shoots downwards, just like that, and now
we should be good to go. Select your smoke domain, come up to the top here,
Control S to save your project. Another thing to keep in mind is when working with guides, it will significantly
increase the bake time, only enable guides if
you really need it. Once you're ready,
click on Bake data. All the Bake has finished
and here is our results. If we play our animation, you'll see that the smoke is actually flowing with the fluid, which looks pretty interesting. From here, we can go ahead and disable the liquid simulation. We aren't going to
need it anymore. Now let's play animation one more time and
here's the result. There we go. That is
how we use guides as a domain in our simulation. From here, if you wanted
to render it out, you can set up a
basic material with the principled Shader and
then render out an animation. In the next video,
we'll be using an effector object as a guide
to create this simulation.
16. Effector Guides: Hello, everyone. In this video, we're going to be
taking a look at effector guides in the
smoke and fire simulation. Here I've created a basic scene with a couple of
different objects. This cube is going to
be our domain object. We also have a flow object down here and then there's
a curve object here. Now, what I want is for
the effector guide to grab the smoke and drag
it up along the curve. If you want to follow
along with this video, you can find the Blenhle
in the resources. We're going to do first
is add that new object. I'm going to press Shift
A and add in a cylinder. I'm going to hit Alt G to snap
the origin to the center, and you want to make
sure the origin of the curve and the origin of this new cylinder are in the exact same spot
which they are now. Then I'm going to press S, then Shift Z to scale
it down a little bit, and then I'm going to scale it upwards, somewhere around there. Now, to have this
follow the curve, we need to add in a couple of
loop cuts down the middle. I edit mode, I'm
going to hit Control R. We'll just add in around 20. Let's go with around
actually 50 loop cuts, left click and then right click. Then over in the modifier tab, I'm going to select
Add modifier. Underneath deform, we can
choose the curve modifier. For the deform axis, let's change it to the Z, and then for the object,
it's going to be the spiral. So you can see here
once we drag this up, it's going to go
along the curve. So now let's create
a basic animation of this going along the curve. On a frame one, it's
going to be down here. I'm going to hit K and then
add a location keyframe. And make sure you press G and Z, and that's going to
move it upwards. If you drag it along the
X direction or the Y, it's going to not work properly. So when you're moving it, hit G, then Z, and then drag
it upwards like this. So we're going to skip
all the way to frame 120. We'll press G and
Z and drag this all the way up till
it's around here or so. Then we'll hit K and add
in a location keyframe. Now when we restart and play
it, here is the result. Let's drag over both of these
keyframes in the timeline, hit T, and choose linear. Now the animation is moving at a constant rate along
these different keyframes. Now that we have the
objects in the scene, let's create the simulation. I'm going to select the domain first and over in
the physics panel, we're going to turn on fluid, set the type two domain. We're going to leave adaptive
domain off because again, this does not work with guides, so we need to make
sure that is off. We're going to turn on
guides right here and then instead of using
the velocity source, we're going to switch it
over to the effector mode. Now, unlike the
domain option here, the format volume for this simulation can
be left on open VDB. Open VDB or UNICAs will
work for effector guides, but it does not work
for domain guides. Keep that in mind when
you're working with guides, if you're switching
it to domain, you need to make sure you
switch the format to UNICAe. But since we're
using an effector, we can leave it on open VDB. Next, we're going to
switch the type over to modular so we
can bake this in. I'm going to turn on is resumable and then
for the end frame, let's match the end frame in
the timeline, which is 150. What I want for this
simulation is for the smoke to be caught and dragged
up along that curve. Over in the settings here, I'm going to bring
the weight, which is the lag behind the guide. We're going to bring
this a bit lower so it's a bit stronger
when it catches. For the size, we're
going to go down to a value of around four or so. The velocity factor, let's also go down to around one so that it doesn't fly off once it reaches this corner but actually
sticks along this curve. Now for the actual guide, we're going to select
it, turn on fluid, switch the type to effector, and then for the effector type, we're going to switch
it over to guide. Now here we have a couple of different settings
to go through. First off, the sampling
substeps option here, if our guide is
moving very quickly, you may want to
turn this value up. Since this animation though is not really moving that fast, you don't really need to
turn up the substeps at all. So we're just going to leave
it off at a value of zero. This only applies to very
fast moving effectors. The surface thickness is
the area around our guide. So if I zoom in over here, this is the area around
currently with it set to zero. But if we were to drag
this up to, let's say, 0.4 or something like that, the area around where the guide catches the smoke is going
to be pushed outwards. So probably around
four is going to be somewhere around
here, I'm guessing. Used effector option
here allows you to toggle between using this
guide or not using it. This can also be animated to create some
interesting effects. There is planar
option right here is used for objects that
are non manifold, which means it's
not a solid mesh. You can think of this as
a plane, for example, or if I was to add in another cube or something and delete one side of the face. This is now a non manifold mesh, and that means
there's a hole in it and it's not fully sealed. This would be a
non manifold mesh and I would need to
make sure that I enable is planar if I was using
that object as the guide. Below that, we have an option for the velocity factor again. Now this is for the
individual guide itself, whereas in the domain counts
for the entire simulation, all the guides
inside that domain, whereas this velocity factor correlates to its
own specific object. Now, below that is
the guide mode. Now there are four
different options and what this does is it takes the velocity factor in your domain and in your guide and then
does the math equation. For example, override will override the domain right here, this velocity factor and
then use this one here. Average will take the average
of this velocity factor and the one in the
domain and then average it out if
they are different. Maximum and minimum
does the same thing. It will use the maximum
velocity factor or it will use the minimum. For this simulation, I'm
going to leave it on override and I'm just going to leave it at a value of one. Next we're going to select our
flow object, select fluid, change the type over to flow, and then for the flow type, we're going to switch
it over to inflow. The other thing I want to
do is add more smoke at a faster rate and we can do that with the
initial velocity. If I turn this on, we're going to set the source value up a bit to around two so it
emits faster into the scene. Now, the other thing
I want to do for the simulation is
right around here, I wanted to stop emitting smoke. At frame 61, I'm going to add
a keyframe to the use flow. Then on the next
frame, frame 62, let's uncheck use flow and
then add in another keyframe. Now it's no longer
going to emit smoke. We're going to do a similar
thing with our domain. Over here on the
domain settings, let's set the resolution to 64. We're going to set the CFL
number to four as well, so it just bakes a
little bit faster. Then underneath the
dissolve option, let's do that here as well. On frame 60, we're going to uncheck the dissolve
at a keyframe. Then on the next
frame, we'll turn it on and then add in
another keyframe. Then for the time value, let's go up to
around let's say 50. With that done, we can go ahead and bake this in and
see what it looks like. Now one thing to keep in mind when working with
effector guides, the size of your
guide really matters. For example, if we go into etymde and scale this
down pretty small, this would not catch that much smoke because it's
a very skinny cylinder. If we wanted to catch more smoke and drag it further
up on the curve, we're going to need to
go into etymode and scale this up along the X and Y. It's something
like this and this would catch a lot of smoke. Now, this, I think is
probably a bit too big, so I might scale
it down slightly, something like that, and this will give us a nice simulation. So let's go ahead and
test this out now. I'm going to select
the My domain down here in the guides panel, make sure you save your project, and then click on Bake Guides. Now this will go through the process of baking the guides, and once this is
done, we can bake in the actual smoke simulation. Now that the guides
have finished, we're going to scroll up
here and then click on Bake data in this option here, and now it's going to bake
in the entire simulation. All right, the
simulation from here, I would experiment with
different guide settings and find out what looks good. You can have an object
spinning in a circle to create a really cool portal
effect with the smoke. You can also have two different effectors collide
into each other, allowing the smoke to collide and mix together with
different colors. There's a lot of interesting things that
you could probably do with effector guides if you
just experiment a little bit. In the next video,
we're going to take a look at collections.
17. Collections: Hello, everyone. In this video, we're going
to be taking a look at the collections tab in
the domain settings. Here is where you can limit
which collections the domain will use for the flow objects or for the effector objects. This can be very useful if
you have multiple domains in your scene and you have the flow objects that are in some domains and
some in others, you can select which ones that you want it to
effect right here. Example, we have
nothing selected here. Whatever flow objects
are in the scene, if it's inside the domain, it will actually emit smoke. However, if we were to select the flow object on the right, which is called in flow two, let's press M and move
it to a new collection. We'll create a new
one just like that. Now if we select
our domain object, we're going to come down here to the flow and we're going
to select collection two. You can see now if we
restart the simulation, we might need to change
a setting to refresh it. You can see the flow object
on the left now is no longer emitting smoke because we limited it to the
collection two, which this flow
object is not in. Now when we play the animation, you can see it is
working properly. This also works for
effector objects as well. Let's go ahead and
select our inflow one. We're just going to change it
over to an effector object. We'll drag it up, place it right here right in the
middle of our scene, maybe scale it out a little bit. Then we got to make sure that
we apply the scale to it. Let's select our domain
and then we're going to limit the effectors
to collection one. If we select it there, we'll go ahead and restart
the simulation, maybe change a setting
to refresh it, and then we'll play
the animation. You can see it is working and now it's colliding
with that object. Again, this is an easy way to limit which flow objects
that you want to use in your domain and this
can be useful if you have multiple domains
in your scene.
18. Cache & Bake: Hello, everyone. In this video, we're going to be
taking a look at the cache panel in
the domain settings. Here is where you can
bake in the simulation, set the start and end frame, and then export it
a certain format, and I'll be covering each
of those in this video. First, I want to
cover the folder of where the cache is located. Right now, I have not
saved this blender file, so the cache right here is
set in a temporary folder. You can see here if I
select it, local and TEM. This means that if
you were to close this blender file and
open it back up later, all of the simulation
data will be deleted because
it's a Temp folder. What you need to do to prevent that is to select the
button on the right side, which is the folder icon. Navigate to a new folder
and then save it there. You can do this by
selecting a folder. I'll just go here caches, I'll create a new folder. I'll call it cache example. Now I can select this folder and then click
except on the bottom right. Now when we bake this in, the simulation data
will be saved. Other thing to note
though is if you save your blender file before
you select the domain here, for example, if I were
to press Control S, I'll just call it cache
example dot blend. We'll save that blender file. Now I'm going to delete this, add an A fluid, switch
the type over to domain. Now we can see here if we
click on this folder icon, it's going to save it wherever that blend file is located, which is in this folder. That's one thing to keep
in mind is if you save your blender file before
you add an A domain object, the cache will be
saved in that folder. Moving on, we have the
start and end frame. This is pretty easy
to understand. Here you can set when
you want the simulation to start and then when
you want it to end. The offset right here
is currently grade out and that's because we have
the type set to replay. Before we talk about the offset, let's talk about the
different types right here. The default one is set to replay and now if we restart
and play the animation, you can see the
simulation is playing. That is what replay is. It allows you to see
the animation and simulation play in the viewport without having to bake it in. If we want to bake it in,
we're going to want to switch over to modular or all. Modular will allow us to bake individual modules,
as you can see here. We first have to bake in the initial domain settings and then if we
wanted to add noise, we can add that in
here and then we would also have to bake
in the noise right here. You're going to notice though a little warning
right here that is non resumable cache enable
resumable options first. This means that if you
have noise enabled, you're not going to be
able to bake it in unless I resumable is checked with
the modular option on. Is resumable allows you to pause the bake and then
resume it at a later point. This is actually very useful. If you're baking at a
very high resolution, you can stop the bake maybe a quarter of the way in,
see what it looks like, and if you need to
change something without having to wait the entire bake. Let's go ahead and
test this out. I'm going to bake the data. I'm going to pause it
right about there. Then to actually see this, I'm going to uncheck noise. Now if we play the animation, we can see what it looks like. It's going to stop
wherever we stop the bake and if we
like what we see, we can go ahead
and click Rezoom. Now it'll finish out
the simulation baking, which is very
useful, like I said, for baking high
resolution scenes. If you want to change something, what you're going to
want to do is click on free and that's going to free the data and now you can change the
settings how you like. Moving on from there,
the other type that we have here is and
what this will do, like the names suggest, it's going to bake
everything all at once. Now if we wanted to
bake in the noise, if we wanted guides, we can
go ahead and check that box. We can bake everything all at
once with one single click. Again, you have the is
resumable option right here. I'm going to go back
over to modular and now let's talk about
the offset option. What this allows us to do is change when the
simulation starts. For example, let's say I want to start it at around 15 frames. I'm going to type in 15 there. I'm going to click on Bake data. Keep in mind, this is still
going to bake from frame one to whenever the
frame end value is, and right now it's set to 250. What the offset does
is it just moves over the simulation to frame 15 and that's when it's actually
going to start playing. Now if I play the animation, you can see right
when it hits 15, it's going to play
the simulation. Moving on from there, we have two different format options, Open VDB and UICASH. UICASH is Blenders way of simulating fluid and smoke
and fire and all of that, then Open VDB is another format which was actually developed
by Dreamworks. There's an entire other video
dedicated to open VDBs. But basically, what this
allows you to do is export the files to any other program that also supports open VDBs. This also means that you
can export open VDBs from other programs and then
import them into blender. Again, there's an
entire video dedicated to open VDBs later
in this course. We open up the Advanced tab, there are two more
options to go through. The compression
volumes allows you to choose how the files
will be compressed. There are three
different options, zip, Blosk and none. None, of course,
means no compression, so the files are going
to be very large. Blosk is the other one and
this is the default one. Normally, I just leave
it at the default one. I've never really
changed this option. Zip is another way to
compress the file. It's effective, but
you can see it has a slow compression speed. Precision volumes right
here, half and full, half will write the files as half and it
will save on data, or if you want the
full high quality, you can switch it to full. But again, this is going to be a much bigger size
than half would be. These two values only work
with the open VDB format. If we were to switch
it over to Unicast, you're not going to
have any of those options here because again, this is just for blenders
own file formatting. Let's go ahead and
test out a BC. I'm going to switch
this over to open VDB. Once again, we're going to
leave the precision on half. I'm going to set
the end frame to 100 and then the offset
will go with zero. I'm going to click
on this folder. I'm going to go back to where
we added that initial cast, which is here, the
cache example. Click except, and now we can
go ahead and bake the data. Once the BC has done, you can open up your folder and here is where we saved it. If we open up this, we
can open up the data and now we can see all of
the VDB files right here. Again, we're going to
have a video covering open VDBs later in this course. But there we go. That is
the cache panel in blender.
19. Field Weights: Moving on from the cast, we're going to look at
the field weight options in the domain settings. Here is where you can set
how much force fields or gravity will affect your fire
or smoke in your domain. For example, we have a
basic scene right here with the smoke and fire moving
upwards as you can see there. If we wanted to, we
could turn off gravity. We can go with a
value of zero and now the smoke and fire is not going to move as
you can see there. Can also set this to
a negative value. Let's go with negative
one, for example, and now the fire will
actually go downwards. Keep in mind, this gravity
value is only a percentage. It's not going to
change the direction of the gravity or how much
gravity there is in the scene. If you wanted to change that, you're going to want to go up here to where the
gravity option is. If this is grade out,
you need to go over to the scene panel and change it here in
the gravity options, which we covered
earlier in this course. The other options like all
force, vortex, magnetic, all of these are
just percentages of how much force fields
will affect your scene. I'll do one more demonstration if we add in a force field, a wind force field, let's rotate this along the Y by 90 degrees and then maybe bring the strength
up to around five. If we restart the
animation now and play, you can see force, the wind is pushing the
fire in that direction. However, if we come back here, we can set the wind,
which is this. Again, this is a percentage. If we go all the
way to around 0.5, for example, only half of the strength of this force field will affect the simulation. The strength is now
technically 2.5. If we select our domain, restart, change a
setting to refresh it. Now we'll play it and you
can see that is working. Finally, the effector
collection will allow you to limit which collection actually has an
effect on domains. Again, this is useful. It's very similar to the
collections up here. If you have multiple force
fields in your scene, some are affecting domains or particle systems,
all of that, you can choose which
effector collection will affect this domain.
20. Viewport Display: We are almost done with
the domain settings. There are two more
panels to go through, and that first one is going
to be the viewport display. What this does is it
allows you to change what the viewport looks
like in your simulation. This can give you
accurate results for different attributes. You can see different data associated with the
fire simulation, and we're going to go
through that right now. When we open up this panel, there are three options here
at the very top thickness, interpolation and
size per voxel. The thickness obviously is the thickness of the
density of the smoke. Let's say, for example, we
go up to a value of ten, you're going to see the
smoke is a lot more dense. Keep in mind that this is
only for the viewport. This does not affect how the
actual render will appear. If you wanted to change that, you're going to have to go
into the render settings or change the material
for the domain object. Going to set the
thickness back down to one now for the
interpolation, this is the way that the voxels are meshed together
in the viewport. There are three
different options. Linear and cubic
are very similar, but closeness actually gives you a pixel look as
you can see there. Now if we turn up the thickness, this can give us some
really interesting results. If we go a value of 50, we now have a pixel
simulation just like that. As for the slice per voxl, we can see this as
if we zoom in here, this is basically how many
slices are in the viewport. We can see here if I go much
lower to 0.1, for example, you're going to see
a lot of pixelation in the fire simulation
just like that. If I move my viewport,
you can see it even more. This is basically just
the quality of it. We're going to go much higher
though back up to five. Underneath that, we have the slice option and
this allows you to slice your simulation into a two D view as
you can see there. For the axis, auto
means that it's going to automatically
change based on your view. As you can see here,
I'm in the front view, and now I'm in the side
view and it automatically rotates when I move my
camera in that direction. As for the position, this controls where on
that two D plane, this is going to slice, and then you can also change to a certain axis if you wanted to, like X, for example, and now it's locked
to the X axis. The grid display
allows you to see certain attributes of your
smoke and fire simulation. With it turned on, we
can change the field from density to
whatever we like fuel, heat, we can even go with red, green, blue, the
forces, the velocity. All of these
different attributes are available for you to view. If we select the flame, we can only see now what
the flame looks like. Then if we wanted to
change the color, we can change the
color ramp right here. Maybe we wanted to go with a blue color or a green,
something like that. Now we get this look
in the viewport. Underneath that, we
have the vector display and what this
allows you to do is visualize the actual vectors and forces being applied
to your smoke. You can see everything
turned very pink, but we can change that by
changing the scale option. Let's go with a value
of 0.1, for example, you can see all of
the needles now have become very small and all of this data is basically
just the forces being applied to the flame
and the smoke. Magnitude option allows
you to change the size of all of these
different needles based on how much force
is being applied. You can see with it off, all of the needles are
exactly the same size, and then with it on,
some of them are bigger, and then over here, some
of them are smaller. If you don't like those needles, you can change them
to streamlines, just a different way of viewing all of that different
information. Now that we've covered all
of the different settings for our viewpoint display, let's actually create
something with this. Over on the right
side, I'm going to set the thickness a
little bit higher. Let's go with a value of five. For the interpolation, I'm
going to go with closest, so we get this grid pattern. Then for the slice per voxil, let's go up slightly to ten, just to give us a
little bit more quality in that flame. That's
looking pretty good. Next, I'm going to
turn on a slice, so we actually get
this tot effect. I'm going to open
up the slice tab and then for the axis,
let's go with Y. Now when we're in the
front view by hitting one, we can press Z and tag overlays. We now have this pixelated
effect for our fire, which actually looks
pretty interesting. From here, if you
like how this looks, what you can actually
do is come up to view and then click on
Viewport Render Animation. This is going to actually
render out an animation of wherever you are
looking in the viewport. We're actually going
to be covering that specific topic in a later video in the next
section. But there we go. That is how the viewport
display works in Blender. Then one more time, this
only affects the viewport. This does not affect
the overall render when you actually render out a
proper animation or image.
21. Velocity Scale: We have one more option to go through in the
domain settings, and that is the
velocity scale in the render section right
here at the very bottom. This deals with motion
blur with your simulation. How it works is we first need to enable motion
blur for our scene. To do that, we can go over to the render panel right here, make sure that we're using
the cycles render engine because motion blur with
volumes does not work in EV. Make sure you're using cycles, and then you can
come down here to the motion blur and check
this box right here. If we open up this panel, this shutter value controls the motion blur for
the entire scene. This is for the entire scene, whereas the velocity scale is only for the fire simulation. If we want less motion
blur in the fire, we can turn this
velocity scale down. If we want more,
we can turn it up. On screen, you can see
the different values with different shutters amount. You can see with no motion blur and then with a shutter value of 0.4 with a velocity
scale of 0.2, and you can see those
different values, and then on the far right, we have a shutter value of 0.5 with a velocity
scale of 0.5. You can see there it's
very, very blurry. There's a lot of
motion blur going on. If I was to leave this
velocity scale at a value of one with the shutter
amount at a value of 0.5, there's going to be a
lot of motion blur. What I recommend for a normal
amount of motion blur in the scene is to go
down to a round of value of 0.2 or even 0.1. That will give you
a nice amount of motion blur in the scene,
but the shutter amount, you can play around
with this depending on how much you want for the rest of the
objects in your scene. One more thing to note about the motion blur is
that this is going to drastically increase the render time
for your simulation, especially if you have
volume smoke in your scene. With some of the
comparisons that I've done, it almost doubles the amount
of reno time and sometimes triples it depending on if you have smoke in
your scene or not. So while it does
look really good, having that motion
blur in the fire, use it only if you really
need to or if you have a lot of time to spare with
rendering. But there we go. That is how the
velocity scale works in the domain settings,
and that is it. We've covered every single setting over here in the domain, and now in the next section, we're going to be covering
flow objects and all sorts of cool and interesting things
with the fire simulation.
22. Flow Objects P1: Hello, everyone. In this video, we're going to be
covering flow objects in the fire and smoke
simulation in Blender, how they work, all
of their settings, and what you can do with them. So here we are in
this basic scene. I have a domain setup right here with all of the
default settings, and then we have a object
inside of our domain. This is going to be our
flow object for the scene. So how we add in a
flow object is first, you need to have it selected. Then over in the physics
panel, select fluid. For the type, you can use flow. Now, we've covered flow objects a lot throughout this course, but in this video
and the next video, we're going to be
covering all of these different settings
and what they do. So we're going to
start out right at the top here with the flow type. If we select it, there are
four different options smoke, fire plus smoke,
fire, and liquid. Of course, liquid is for the fluid part of the
Mantaflow simulation. We're not going to be talking
about that in this video. We're just going
to be focusing on the first three options. Now, smoke obviously is just
the basic smoke simulation. With it selected, if
we play our animation, we can see what this does. You can see a puff of smoke
has risen into our domain. Now for the other
options, smoke plus fire, that's going to combine
a fire simulation plus a smoke simulation. Then underneath that, we
also have the fire option. You take a look at this
example on screen right now, you can see the
differences between those three different options. The fire option will have a little bit of smoke being
emitted into the scene, but if you actually want a full on smoke simulation and fire, you're going to want to
use the fire plus smoke. For campfires or different
simulations like that, I would probably stick with
just the fire simulation. But for an explosion,
for example, I would stick with the fire plus smoke because
with explosions, you're going to want
a lot more smoke in the simulation rather than just a little bit with
the fire simulation. Below the flow type, we
have the flow behavior. There are three different
options inflow, outflow and geometry. Inflow will constantly add fluid into your scene or
in this case, smoke. You can see here instead
of that puff of smoke, it's constantly adding
smoke into our simulation. You can see the
differences on screen again with the inflow
outflow and geometry. Geometry is just
the overall shape of that initial flow object, and that's going to be the smoke or the liquid that's
emitted into the scene. Outflow will delete smoke. You can see on the right side, it's deleting everything
that it touches. Below that, we have
the sample substeps. Now, this is an
important setting here. If you have a very
fast moving inflow, you're going to want
to turn this value up. If you don't do
this, you might get puffs of smoke throughout
the animation, as you can see on screen. This is a very fast
moving flow object and the left side is leaving different gaps between
the different frames. In this case, I would want
to turn that sample substeps up to get that nice
smooth streak of smoke. Now below the sample substeps, we have the option
for the smoke color. This deals with the individual flow objects in your scene. This allows for
different colors of smoke based on what
you said here. For example, let's select the
flow object on the right. Let's set it over
to a blue color. And then for the flow
object on the left, let's set it over
to a reddish color. Now when we select our domain, let's change a setting
to refresh it. And now when we
play the animation, you can see we have
different values of smoke. Now, this can be very
useful if you want to mix different colors of smoke together using a
vortex force field, for example, or different
things like that. You can get some really
interesting animation. One thing to keep in mind though is if we go into
the rendered view, let's go ahead and
create a basic material for our domain here. I'm going to delete this
material for our domain, create a new one, and
then for the surface, I'm going to remove it and
for the volume right here, we're going to want
to switch it over to the principled volume shader. Now we're going to be able to
see our smoke in our scene. If we restart
though and play it, you're going to notice both of the smokes are using
the exact same color. We no longer have this blue
and red in the viewport. It only is using
the white color. This is because over
in the settings here, it's using this
color for the smoke. I can change it here and we
can see the different colors, but we don't see the
individual colors here. What we need to do is in this color attribute is just
type in the word color, all lowercase, and then enter, and now we're going
to be able to see those different colors
in our simulation. One thing to keep in
mind is it's going to combine this color here
with the color attribute. For example, if I switch
this to a green color, it's going to basically override what we set here and
use a green color. So if you're using the
colors in the flow objects, you're going to want
to make sure that this is all the way at white. The value is at one, and now you get the
colors that you want. Below the smoke color, we have a checkbox
for absolute density. This is enabled, the
emitter will only produce smoke if there is
room for it in the domain. If the domain is
completely full of smoke, it's no longer going
to emit smoke into the simulation unless
there is room for it. With it unchecked,
this will constantly add smoke or fluid
into the domain, even if it's already
completely full. Usually, it's a good option
to just leave this on. Initial temperature deals with the speed at which
the smoke is emitted. If I go up to a value
of, let's say five, for example, the smoke
will emit very quickly. Now, this is correlated with the heat and buoyancy density over here in the
domain settings. We talked about this early
on in this course with the initial temperature set at a negative value instead
of a positive one, and then the domain
settings here, both of these are set
to a positive number. This means that a negative
times a positive, the smoke will sink. You can see here, the
smoke is starting to sink. Whereas if the Buoyancy density, these values are set to a
negative like negative one, for example, now
they're both negative, so this means the smoke
will rise into the domain. Again, this is the speed of it. Higher values will result
in faster moving smoke and lower values will result
in slower moving smoke. The density underneath here
is the density of the smoke. It's pretty easy to understand. Lower values will
mean that it'll emit smoke at a
lower density and higher values will
make the smoke look way more thick and dense. Before we talk about
the vertex group, let's switch this over
to the fire option. Now when we switch
it over, there's another value here called fuel. Now, the fuel is
basically the flame rate. Higher values will result in
taller, more chaotic flames. You want to be careful, though, because if you go too
high with this value, sometimes the flow
object will go way too crazy and then your simulation
will look very strange. I recommend sticking
with a value 1-3, but you probably
don't really want to go any higher than
a value of three. For the last setting that
we're going to talk about in this video is
the vertex group. Here you can enable a Vertex
group to determine where you want the fire or smoke to
appear on your flow object. How this works is you first
need to create a new group. Now, you can do this very
easily by jumping over to the object data
panel and you can create a new group by
hitting this plus sign. You can then name the group if you have multiple
groups in your scene. You can just call this
one fire, for example. Now, in order to
get this to work, we can go into Edit mode, and then we can select
different parts of our object here that
we want to emit smoke. So let's say I hit
Alt A to D select, I can go into the
face select mode, and then with circle
select by hitting C, I can just drag where I
want the fire to emit. So I think that
looks pretty good. From here, I can click
Assign over on this panel, and it's going to assign that
group with a weight of one. The weight option is
basically the percentage. With a set to 100%, that means 100% of the fire will be in that
area that I just selected. Let's say, for example, I'm
going to come over here, I'm going to hit C
for Circle Select, and I'll just drag this corner. Now I'm going to set
the weight a bit lower. Let's go with a
value of around 0.5. We'll click Assign here. Only 50% of the weight is going to be
applied to this area. To see this a bit more, we can also come up here and switch it over to the weight paint and now we can see the
different values. Wherever there is red, that
means it's at 100% value. Where it's green, you can
see this is around 50%. You can also paint here as well if you just
select and paint. So with this vertex
group selected, let's go back into
object mode and then assign it over
in the physics panel. So here underneath Vertex group, you can select the fire. When we restart the
animation and play it, we can see it's
only emitting fire right where we painted
that vertex group. Now you can see over
here where it's at 50%, the flames are not as tall. That's because it has
a lower percentage, so they're going to be
much smaller flames. Vertex groups in blender are very versatile and
there's a lot of really interesting
simulations that you can do when you apply them
to the smoke and fire. For example, with
a vertex group, you can create a trail of fire or you can have
a burning up effect. You can use dynamic paint. There's a lot of really interesting things
that you can do with it, and I recommend learning how to use vertex groups
to your advantage. In the next video, we're
going to be looking at all of the other settings
for our flow object.
23. Flow Objects P2: This video, we're going to cover the rest of
the settings for our flow objects in the
fire and smoke simulation. Starting out with
the flow source, there are two different
options here, mesh and particle system. Mesh will emit smoke from
the mesh of the object, whereas particle system will emit smoke from a
particle system, which we'll cover
in just a second. Before we do that, I want to
cover these three settings. Is plane R we mentioned
when we covered the guides. Basically, what this does is
it will enable objects like a plane or an object that is not fully closed to emit smoke. For example, I'll just go
through this one more time. If you add in a cube, then we delete one side of this. Now this is a non closed mesh. It's a non manifold mesh. This means that you need
to make sure that I plan R is checked for
this to work properly. Below that, we have surface
emission and volume emission. For this, I created
a basic simulation. Let's go into front view. The one on the left here has
a surface emission at one, the one in the middle has
a surface emission at two. When we restart, you're going to see the differences
between them. One is a lot closer to
the surface of the mesh, whereas two, you can see here
it's further out from it. The higher you set
the surface emission, the further out it'll be. Below the surface emission is the volume emission and this will allow smoke to actually be emitted from inside the mesh. You can see here this object has a surface emission at zero
but a volume emission at one. That means all of the
smoke that is inside here will be emitted from
the inside of the mesh. Whereas the one
here does not have any smoke being emitted
from the inside, it's only from the outside. Let's go into front
view and play this animation and you can see exactly what
this looks like. To demonstrate the
particle system, let's create a quick
particle system with this flow object. With it selected over in the particle system tab, I'm
going to create a new one. I'm going to leave
the type on emitter. Here will not work
for this, so make sure the type is set to emitter. Underneath the field weights, I'm going to turn off gravity and then in the velocity here, I'm going to set the normal
amount to two and then I'm also going to bring up the randomness up
to a value of one. The lifetime, let's
go with around 25. It's only going to
last for 25 frames right when the
particle gets emitted. To actually see this, we need to open up the viewport display, change the display from
rendered over two point. So now what happens
is when we play this, we can see all of the
particles being emitted. What we need to do
now is jump over to the physics tab underneath
the flow source. We need to change it
over to particle system. Then for the option here, you can select which
particle system. Now since we only have
one on this object, we can select it right there. Now when we restart and play it, we can see all of the
particles being emitted just like that and they're all emitting smoke
into the scene. From here, you can set the size, the amount of area
around each particle, if you wanted more
or less smoke. For example, if I go all
the way up to three, we're going to have
a lot more smoke for each single particle. Using a particle system
for the smoke or fire is very useful for
creating explosions, and that's what we're going
to be using when we create that big explosion
later in this course. The next couple of settings
that we're going to go over is the initial velocity. What this does is it
allows the movement of the flow object to affect
the outcome of the smoke. For example, with it on with
all of the default settings, the one on the top here does
not have initial velocity, but the one on the bottom does. Let's go ahead and play the animation and
see what happens. You can see here. Let's go into front view. I'll show
that one more time. One on the top
here is not having any movement affect
the smoke here. But the one on the bottom is, you can see it's pushing all
of it because it's taking the velocity of the flow object in mind when the
smoke gets emitted. You can see here it flies and hits the edge of this domain. For the settings,
the source value is basically the multiplication
of that velocity. Let's say we go all the way
up to four, for example, you're going to see here the
smoke is being pushed out way further because we set
that source up higher. It takes the velocity of our flow object and basically
multiplies it by four. Whereas if we go lower
like 0.5, for example, it's going to have
less of an effect and the smoke is not
going to move as much. Below the source, there is an option for the
normal velocity. This takes the normals
of your object and then adds velocity to the
smoke in that direction. To actually see
where the normals are pointing on our object, we can go into edit mode. Then up here on the top here, we can turn on the vertices and then bring up
the size amount. This is the direction of the normals for each
of the vertices. Now keep in mind, it's not
going to emit from the faces, it's going to emit
from the vertices. You're going to see here, it's going to go out in this angle. So now once we're
out of Eta mode, the normal amount is set to 50. Let's go ahead and play this and you can see all the smoke is being emitted in that direction of the normals for
each of the vertices. Finally, the last
couple of settings are the initial velocities
on the different axes. Here you can
customize if you want the smoke to be emitted
in the X direction, Y direction, or Z, and you can even go
with negative values. Let's say, for
example, I go with a value of negative
five for the Z axis. When we play the animation, it's going to
initially shoot out the smoke in the
negative Z direction and then it'll
start to float up. Now again, the higher you set this two, the faster it'll be. Let's go with negative 25. Restart and play it,
and here is the result. You can see the smoke
gets pushed out really quickly and then it starts to go back up once the initial velocity
has worn out. Again, this works for all of the different axes here and you can choose which
ones that you want to use. The last couple of settings
that we're going to go through is the
texture panel here. This allows you to add in a texture on your flow object to determine where the fire or smoke will be emitted
into your domain. Now, how this works
is you first need to enable it with that checkbox. Then if we select the texture, you're not going to see
anything here until you create a new texture over here
in the texture panel. We're going to create
a new texture by clicking that new button,
and then from here, you can add in your own image if you wanted to use an
image to control this, or you can use one of the procedural options
here that blender has. We're going to select clouds for this demonstration
and now we can see what our texture
is going to look like. Where the black values are, that is where fire will not be emitted and where
the white values are, there will be fire. Here in the cloud settings, we can change a bunch
of different options to customize how our texture
is going to look. You can also change
the size of this. Let's say, for example,
we go down 2.1, we can see we have
much smaller texture. Then over here in the colors, we can bring up the
contrast to have better definition between
the white and black values. You can also turn on the
color ramp to customize this even more if you wanted to
drag these values this way. Now you can really
see how this works. Here, what you're
going to want to do is jump back over to
the physics panel. It should automatically
have that texture applied. Then if we play the animation, you can see this effect. This is what our current
texture looks like. You can see the black spots here and that's creating
a really nice look. At this point, we can
change the size of it if you wanted it to
be smaller or bigger. When we restart, you can
see this is the effect now. The texture is a bit smaller, so we have more variation. Also animate these two values. For example, with this offset, I can on frame one, add a
keyframe to that offset, we'll jump to frame 100, set the offset up to, let's say, 0.5, then
add in other keyframe. With these keyframes, we're going to want to
box select them, hit T, and make sure the
interpolation is linear. The texture will move
at a constant rate. Now, when we restart
and play this, the texture is going to move
around causing our fire to look way more
natural and random. And you can see
this is the effect. Now, this is a very low
resolution simulation, so you're not going to
get that good of detail. But if you were to crank up the resolution, bake this out, and render it, this
is going to look so much better than
having no texture. We're going to cover this in
a bit more detail when we actually create the
realistic fire simulation. There we go. We've now covered
flow objects completely. In the next video,
we're going to take a look at collisions.
24. Collision Objects: Over one. In this video, we're going to talk
about collisions in the fire and smoke
simulation in blender. To add a collision object,
we first need a mesh, and I'm going to just duplicate this flow object,
we'll drag it up, scale it along the X axis,
so it's a bit bigger, and then I need to
make sure I press Control A and apply the scale, so these numbers go back to one. Then we're going
to come over here. We'll just delete this so I can show you exactly the process. We're going to click on fluid, change the type
over to effector, and then here we're going to
leave the type on collision. Now, we do have guides here, but we talked about that
in a previous video, so we're going to
leave it on collision. Here we have a couple of
different settings that are probably similar to other
settings that we've covered. These sampling substeps, if you have a fast
moving collision, you're going to want
to turn this value up. Since our object here is static, we can leave it at
a value of zero. The surface thickness is the
area around the collision, so the higher you set this two, the further away the collision will be from the
surface of the mesh. The use vector option here is just the toggle between using the collision and not using it, and this value can
also be animated. Is planar, we talked about
that in the last video. Let's say, for example,
we delete this space. This is a non closed mesh. We're going to want
to make sure is planar is checked here. I'm just going to control
Z that a couple times. Since this is a closed mesh, I'm just going to
leave that value off. Let's go ahead and
test this out. Here we have a basic
smoke simulation with this object emitting
smoke into the scene. We're going to select our
domain and click on Bake. Now when we bake in a
simulation with a collision, this will take up a little
bit more processing power, so the bake is going to
take a little bit longer. Keep that in mind, only use collisions if
you really have to. The bake has finished, and now when we play the animation, we should be able to see
what this looks like. You can see there, it
collides with it and then goes along the edges
and it looks pretty neat. Now one thing to keep in mind when working with
collision objects, for example, this plane
here is a non planar mesh. That means for this
to work properly, we need to turn on is planR. To test this out, you can see here when we
play the animation, the smoke passes
right through it. But now when we enable is planR, we can go ahead and play this
now and see what happens. We can see it now collides with the edge of the plane because we enabled that option here. Another problem
that you might run into when working
with collisions, you can see here we
have a simulation with this cube
that's extended out. This should work
properly because it is a closed mesh, there's
nothing wrong with it. But when we play the animation, you're going to see
it doesn't work. The smoke passes right
through our collision. Now the reason this is
happening is because the normals on our object
are currently inverted. If we go into Eta Mode, come up to this menu and turn on the normals and
drag this up a bit. We can see the normals are pointed on the
inside of the mesh. This is not what we want. We want the normals
to be pointing on the outside for this
to work properly. To fix this, all we have to do is press A to select everything, press Shift N to
recalculate those normals, and now you're going
to see they're pointed in the
correct direction. Let's go ahead and select our
domain, refresh a setting. Now when we play this,
you're going to see this works properly and it is
colliding with our object. Here's another scenario that you might run into when
working with collisions. Here we have a collision object and then inside that collision, we have a flow object. On our collision, we
have the default values. Let's go ahead and play
this and see what happens. You're going to see the
smoke passes right through. Now, there are a couple
of reasons for this. First off, just like
the previous example, the normals are
currently messed up. If an object is inside
another object, we need to make
sure blender thinks the collision object is empty. Right now, when we
go into Edit mode, the normals are pointed in
the outwards direction. This means that Blender thinks this object is a
completely solid mesh. Order to fix this,
we need to press Control shift and
N to recalculate the normals or invert
them so that the normals are pointed towards the
inside of our mesh. Now we'll restart and play it
and it still doesn't work. You might think now that we
need to enable is plane R or maybe we need to turn up the surface thickness to around 0.2. But you're going to
notice when we try and play the animation,
nothing's working. It's not simulating, even
when we try and restart it. It just doesn't
really work at all. Now, one thing I've noticed
when working with objects that are inside other objects and trying to collide with them, it can behave a bit strange. Now, one solution I
found is to create a hole on your collision object. Now we can do this probably on the bottom here so it
doesn't really affect it. In Edit mode, we can select
this vertex X, and delete it. Having that hole on the bottom
here will allow blender to actually treat this a bit better and calculate it a
bit more accurately. Now one thing to keep
in mind with this hole, you want to make
sure the size of it is slightly bigger
than the voxel size. You can see here when I
bring up the resolution, the voxel size becomes smaller. So here we would be able to go into Edit mode and
make this hole a bit smaller but not smaller
than this voxel size. So keep that in mind when you create the hole for
yourself to keep it just a little bit bigger
than that vaxle size. If we restart and it's still not working,
as you can see here, you may need to
make the hole a bit bigger or the resolution
a bit higher. So maybe we'll try
going up to 64. Now when we restart
and play this, we can see it's now simulating. And if we come
over here and look at It does collide with
the surface of the mess. So keep that in mind when
working with these collisions, the hole on the bottom needs to be bigger than
the voxel size. So that was the problem
with this simulation. And now you can see it
is working properly. So to recap, you need to create
a hole on your collision. You need to make
sure the hole is bigger than the vaxl size. You need to make sure
is planar is checked. And if you wanted some
surface thickness, you can turn that value up, but it's not necessary. But there we go. That is how collisions work in manta flow.
25. Creating Open VDBs: Hello, everyone. In this video, we're going to take
a look at open VDBs what they are and how
to use them in Blender. If you didn't know, open VDBs is a file format that stands for open VauxL database or
open volumetric database. It's basically a file type
that stores information like smoke and fire and
everything volumetric. There are many different
programs that support open VDBs. Some of the common
ones include Houdini, Embrigen and of course, Blender. Means that you can
create a simulation in one of those
other programs that are specifically designed for
simulations like Houdini, export it as a Open
VDB file format, and then you can import it into Blender and
then render it out. You can also here
in Blender export the simulation as an Open VDB, as you can see down here
in the format volumes. What we're going to
do in this video is we're going to bake
this simulation out. You can find this blend file in the resources if you
want to follow along, and then we're going to
import it into another scene. I'll show you how that works, all the different settings, and then we'll render
out an animation. Right here in Blender,
I've created a simulation where some particles
explode just like this. Now, what we need to do
before we bake this out, there's a couple of things
that you want to make sure. First off, the adaptive
domain is turned off. If this is on,
you're going to get some weird scaling issues when you try to import
it into another scene. Make sure the adaptive domain
right here is left off. Secondly, down here
on the cache setting, you want to make sure
you set a directory of where you want all
of your files, your open VDB files to go to. So make sure you have a
custom directory right here. And then finally, for
the format volume, of course, make sure
it's set to open VDB. Once you've done that,
you're good to go and you can bake
your simulation out. Again, you can find
this blend file in the resources if you
want to follow along. So once you've done all that, you've set a new directory. You can go ahead and
save your project and then click on Bake All. Once the simulation
has finished baking, we're going to jump into
a new blender scene and import all of those
open VDVs into blender. So here we are in
a brand new scene, and we're going to first
delete the default cube, and then we're going to
import that OpenVDB in. To do this, you
can press Shift A, go over to the volume, and then select Import Open VDB. Navigate to where your cache
is mine is in this folder. You're going to want
to select the data. And then right here,
we can see all of our open VDB files. What you're then
going to want to do is come up to
the top here and make sure you're sorting by the name and not modified date. Modified date will
set the last frame, which is 100 and our
simulation here at the top. So it's going to play backwards. We want to make sure
it's set sort by name, and then what you can
do is press A to select everything and then
go import Open VDB. Now, if we play our simulation, we can see it in
our scene just like that. That's looking
pretty good. Let's position this over here
in the middle of our scene, drag it forward a little bit. Now if we jump over to
the volumetric tab, there are a lot of
settings to go through. At the top here, we have all of the different attributes
that our simulation has. For example, density, emission, flags, flame, which is the
flame data, we can see here. Below that is the fuel, all of these different
attributes we can then take into our material later. I'm going to go back up to
the top and select density so we can see everything else. Below this, we have
the directory of where our files is
being taken from. We have a sequence option here. If you wanted to use a still
frame of your explosion, you could import that in
and then uncheck sequence, so you have a still frame. Have the number of frames
in the simulation, the start frame and the offset. Then underneath here, if
you wanted it to loop, you could select repeat, for example, and now
once it gets past 100, it'll just repeat
itself right there. I'm just going to
leave it on clip. Below that, we have a couple of options to change how
the viewport looks. If we select this option and switch it over to
points, for example, and then we go into
the wireframe, we can see the individual
points on our simulation. Now, the detail amount
is set to course, but if we go over
to the fine option, we're going to get a lot more
points in the simulation. We also have an option for the density and this
affects the solid view. We can see here if I
drag up the density, the smoke is going to become a lot more dense in the viewport. I'm just going to leave
it on a value of one. The interpolation is basically the detail in your viewport. With it set to linear, you're going to get
perfectly fine results. Cubic is the highest quality, but it's going to be
significantly slower. If I select it, you can see my viewport has slown
down just a little bit. It's not as smooth
as it was before, so I'm just going to
leave it on linear. Then we have the slice,
and this is exactly the same as the
Viewport display slice, which we talked about
in a previous video. We can choose which
access we want to slice our simulation
and the position of it, and you can slide
it back and forth. The render tab here
only has two options, but this is because
we are in EV. If we gum over to
the render engine and switch it over to cycles, I'm going to use my GPU. We're going to get a lot more
options for the render tab. The step size here
is the quality of the simulation
when it's rendered. With it set to zero, it's going to automatically calculate how many steps it needs per frame in order to
get good results. For the most part,
you can just leave it on zero and you'll
be perfectly fine. The clipping option here will
delete smoke anytime it's below this density threshold
for this clipping amount. For example, let's go ahead
and create a new material by selecting the material
tab, clicking on new. Now if we press Z and go
into the rendered view, we'll come down here and
bring up the clipping amount. You can see here it's
starting to clip out some of that smoke
that is not as dense. I recommend leaving this
at a value of 0.001, or you can even
go fully to zero. The precision volume here is
basically the precision of the render and how good the very fine detail on
your smoke will look. I found hardly any differences
between all three of them. I actually found
that the full option saved on render time by
just a couple of seconds. For that reason, we're going
to switch it over to full. Of the velocity options here correlate with the motion
blur for the simulation. If you remember in the second
section where we talked about the motion blur and the render scale with
the velocity scale, all of these values here
is the exact same thing. You have the velocity
scale value here, which you can change
in order to choose how much motion blur you
want in your simulation. Now that we've talked about all of the different settings, let's create some
lighting, create a material, and then
render this out. So, first off, for the lighting, I'm going to use an HDR. And if you want to use
the same one I'm using, you can find it
over on Polyhaven. It's the dry field one. We're going to switch
it over to environment Texture, click Open, and the one that I'm using is this dry field four K. Go
ahead and open that in. Now if we press Z and go
into the render view, we should be able to see
what this looks like. I'm going to jump
over to the render tab down here in the film. I'm going to turn
on transparency so we don't see that background. Now for the material, we're going to come up
to the top here, split this view, and switch
it over to the shader editor. The density value here controls
the density of the smoke. Let's go up to a value of five, so we get some more dense smoke. And then for the color,
we'll drag it a little bit darker so we get more of
a dark grayish color. To actually bring all of that emission into our simulation, what we need to do
is press Shift A, go over to input, and then
add in an attribute node. Over here in the volumetric tab, we can choose whichever
attribute that we want. It can be flame, it can be fuel, temperature, any of these, we can plug into
this attribute node and then we can plug it
into our principal volume. For example, let's say I want
to take the temperature, all I would have
to do is type in the word temperature right here. Then we can take the factor, plug this into the
emission strength, and now we're getting the
temperature attribute, controlling all of the emission. Then to control
this a bit better, we can add in a color ramp, something like
that, and now we're getting a pretty
interesting result. Another thing you can do is take the velocity attribute.
Let's type that in here. Then we'll take
the color of this, plug it into the emission color, and now we're getting some
very colorful looking flames. It's taking the
velocity data and then using that to control the
color of the emission. So those are just
some cool examples, but now let's actually
create a flame look. We're going to set the
attribute here over to flame. We'll take the factor, plug
it into the color ramp, and then we'll drag the
black handle all the way over to the left so we
bring back that flame data. To control this a bit more, we're going to add
in a math node, switch the type to multiply, and then the bottom value, let's go with a value of
around 50 or so. Then to control
the color of this, let's press Shift D
on this color ramp. We'll take the factor,
and then for the color, this is going to go into
the emission color. Now for this bottom color ramp, we're going to add
in a new handle, drag this over to the left, and then this handle is
going to be a reddish, orangish color,
something like this. Then for the white handle,
we're going to switch it over to a brighter yellowish color. Now, our colors are
looking a bit dull, and the reason for that
is because over in the render tab underneath
the color management, we're using the AGX format, which I find dolls
the colors of flames. So instead of using the AGX, we're going to switch
it over to filmic and then set the look
to high contrast. And that's going to give
us a much more flame look. I might go up to 75
for that brightness, and then we'll just play through here and see what it looks like. And that is looking pretty neat. That's basically all we need
to do for our material. I'm going to go ahead and
close off this panel. We're not going to
need it anymore. We'll position the camera right
about here and then press Control all to Numpad zero
to snap the camera to place. Then you can select it, drag
it backwards a little bit. Then let's go over here and just select the
density so we don't see that velocity color and
then something like this. Now we are ready to
do a final render. From here, you can set an output and then
render this into frames and get a really nice
simulation. But there we go. That is how you use
Open VDBs in Blender. In the next video, we're again going to be using open VDBs, but this time, we're
going to take a look at the volume to mesh modifier.
26. Volume to Mesh Modifier: Hello, everyone. In this video, we're going to take a
look at the volume to mesh modifier in blender here. In order to get the volume
to mesh modifier to work, we need to bake in a simulation or use another Open VDB
that you've downloaded. For this simulation, I baked
out a quick scene where we have some fire just on
this UV sphere like that. What we're going to do
here is import this back into this scene and then we're
going to use the modifier. Over here, if you
want to follow along, you can get this blend file and then bake this for yourself. It's not that high
res, it's only 125, but make sure that the
format volume is set to open BBB and you set a custom
directory right here. Once you've done that, you
can bake this and then you can continue on
with this tutorial. Now that we've baked
this in, let's go ahead and select all
of these objects. We'll move them to a new
collection by hitting M, move them to their
own collection. Then we're just going to hide
everything from this view. Now, to bring in that open VDB, let's press Shift A,
go over to volume, and then select Import. Navigate to where your
cache is minus right here. We're going to go
to the data tab and then select A and
then choose Import. Now that we have
this in our scene, let's take a look at it. Over in the volumetric tab, you can select which attributes
you want to preview. I want to preview the flame, and that is looking pretty good. Now what we need to do is we're going to add
in a new object. We're going to press Shift A. We'll just add in any object. It doesn't really matter,
just any mesh object. Then over here in the modifier
tab, select Add modifier. Underneath the generate, we
can select volume two mesh. Then for the object,
we're going to be using the fluid data 001. We can see something
is happening, but it's currently using
the wrong attribute. Over here, you can
see the attribute is using the density value, which is the smoke, there's not that much smoke
in this simulation. What we need to do instead
is use the flame attribute. We type in the word flame
and now we can see our mesh has turned into flame and this is looking
pretty cool actually. Below the grid name,
we have a couple of different options for
the resolution mode. Grid obviously is the one
that you see right here. It just takes the grid of voxels and then adds
the mesh to it. But then we can
select the amount of voxels that we actually
want in the scene. Again, the voxel is the
resolution of the simulation. We can see here this
is the amount of voxels that's
currently set to 32, but we can go higher if we
wanted to 64, for example, or if we wanted to do
the normal amount, which is 120 because that's the resolution I baked
this simulation as, we can go up to 120. We go any higher than 120, it will add more resolution, but it's not really going to
change the general shape. You can see if I go lower, it's kind of changing
the general shape, but if I go higher, it's not really going to
change the general shape, it's just going to add
more geometry to it, as you can see. The last one is voxel size. It's just another way. You can set the individual size of voxel that you want here. Lower values will, of
course, add more resolution, and then higher values will
decrease the resolution, giving us a more low poly look. The threshold value is basically the clipping amount
for our flames. Higher values will, of course, clip out the smoke as
you can see on screen. The adaptivity right
here will basically lower the resolution in areas that it
doesn't really need. For example, right here, there's not a lot
of detail here. If I was to drag this value up, you're going to see it slowly gets rid of all of that detail. I'm going to say low polyversion while keeping the general shape. Usually, I just leave
this at a value of zero. Then of course, you can turn on smooth shading
if you want to. Now that we have a mesh though, there's a lot of
other cool things that you can do with
our simulation. For example, we can add another
modifier on top of this. Let's say we add in
a remesh modifier, switch the type over to blocks, and now we have a
blocky simulation. Which looks pretty cool. Another thing that you can
do is add a wireframe. So let's say here, I add
a generate wireframe. I bring the voxel up a little bit so we get
a lower resolution, something like that or so. And now we have a
wireframe simulation. And then, of course,
you can change the settings here if
you want thicker lines, lower resolution. You can
play around with this. It's very customizable
because now we're dealing with a mesh rather
than a volume object. You could even combine the
remesh and the wireframe. So let's say I add in
the remesh once again, I'll drag this above
the wireframe, switch it to blocks, which looks pretty interesting. From here, if you wanted
to bring in the smoke, what you could do is duplicate this object by hitting ship D, change the grid name from flame over to density,
which is the smoke. Now we'll restart.
We're going to probably need to change some
of these values here. Maybe we'll go to the grid. And now if we play
the simulation, we are getting this result. I might bring down the
threshold, though, so it doesn't clip out a lot of that smoke, something like that. Then from here, you could change the material on this top one, but leave this bottom one as an emission and then the top
can be more of a gray color, and you can get some really
interesting results. I recommend jumping
into blender, playing around with these
different modifiers, combining them, seeing
what you can create, and then render out
a cool animation.
27. Viewport Render Animation: Everyone. In this
video, I'm going to show you how
you can render out a Viewport render or a Viewport animation of
your simulation in Blender. This allows you to see what your simulation will
look like in real time. Because right now in this simulation that I've
created right here, if I try and play
it in the timeline, we can see my frame rate
is really, really low. It's only three FPS, which means it's very hard to see what this
is going to look like as it's playing at a
full 24 frames per second. To actually get this to render
out a viewport animation, what you're going to
want to do is position your camera where you want
your viewport animation to go. So I'm going to position my
viewport right around here. Then we're going to
go up to view down to a line view and then select a
line active camera to view. Or you can see the shortcut
is Control Alt Numpad zero. Here, you can select the
camera G to move it backwards, middle mouse button, and then we can place it somewhere
around here. Now, technically, you
don't really need to have the camera as your view. You could position your viewport right here and then
do a full render. But it's kind of
hard to see exactly what's going to be rendered
because our view is not at the same aspect ratio or resolution as right
here in the output. So for that reason, I like
to use the camera instead. So to set this up,
we can press Z, and then we can select
toggle overlays. This is going to get
rid of the grid, and if we're in solid view, if we're in wireframe,
you're going to see the outline of the domain. If we're in solid view, that domain will disappear,
which is really nice. From here, we can also hide those different objects
are flow objects. I'm just going to select them, and then you can
press H to hide them. I'm going to do that
for all of them. Now looking at this, we have a full view of just
the explosion, and now we can set up
the viewport render, and we can only see the
explosion, which is really nice. So what we need
to do next is set an output of where we want
our Viewport render to go to. And we can come over here
to the output tab and set a folder right here by clicking that
button on the side. I'm going to position
it in this folder, and then you can give it a name. I'll just call it
viewport animation, and then click except. Then for the file format, you're going to
want to choose the movie file of your choice. I'm going to go with
the container MPur another thing to keep
in mind is over in the Render tab underneath
the color management, if you have anything
set up here, that will change the look
of your viewport animation. For example, I have it on
very high contrast right now, and we can see the background
is like a dark gray color. And if I go over to view down
to Viewport Render Image, this will allow you to
render a viewport image. Going to see the
background is much darker than what
we see right here. Now, again, that is because
we set that high contrast up. So keep that in mind when
you do a Viewport animation. So now that we set
up the output and we've set up the color
management that we want, all we have to do
is go over to view down to Viewport
render animation. And this is going to go
through each frame of our timeline and combine
them into a movie file, and it's going to position that file in the
output that you set. Now that the render
has finished, we can go ahead and open up that folder and we can see
the movie file right there. If we select it, we
can now preview what our simulation will look like at the 24 frames per second. Now, this is very useful
for previewing it and seeing what's wrong
with your simulation and what you can improve on. So I highly recommend doing this method every time before
you do a final render.
28. Smoke Material: Over one. In this video, we're going to take
a look at creating a smoke material in blender, and we're going to
go over attributes, how to use them, and how to create some really
interesting effects. So here in this
scene, I've created a basic simulation of a cube emitting smoke
into our domain. What we're going to do is
pause it right about there. Now, at the moment, if we press Z and go into the rendered view, we're not going to be
able to see anything, and that's because we haven't
set up any material yet. For this demonstration,
we're actually going to be switching the render
engine to cycles because there's a lot of
interesting effects that we're going to go through that
only apply to cycles. Right now we are
currently in EV. Right now we are currently
using the EV render engine, and don't worry
in a later video, we're going to go
over EV how to use it and all of the different
values here in the volume tab. So for now, though, just to demonstrate how the
smoke material works, let's switch the render
engine to cycles. Now, again, we still can't
see anything in our smoke. In order to bring our smoke
into our rendered view, we need to add a material. We're going to select
our domain object, then we're going
to split this view and go over to the
shading workspace. You can do this by
jumping over to the top right corner
of your viewport. When your cursor turns
into a plus sign, you can click and drag to
bring out a new window. From here, we can switch it
over to the shading editor. Now you can jump over to the shading workspace
at the top here, but this gives us
a horizontal view of the shading editor, and I personally like
the vertical view. So again, this is just
a personal preference. You can use whichever
one that you want. Once you're in the
shading editor, we need to create
a new material, and this will add a
principled shader right here. We don't want this. We want the principled
volume shader. So go ahead and delete that. Then press Shift Day, go over to Shader and then add in a
principled volume shader. We'll take the volume and plug it into the material output. Once we've done this, now we can see our smoke in our scene. Now with this principle volume, this is an all in
one shader that allows you to control
the emission, the flame, the smoke,
density, all of that. In previous versions of
Blender a long time ago, you would have to add
in a volume scatter, which you can find
in the shader menu underneath the volume
absorption and volume scatter. You would need to
combine both of these nodes in order
to get this same look. But now in a later
version of blender, it's an all in one shader, which is very useful. Starting out at the very top, we're going to work
our way down to where the absorption
is right here. Then in the next
video, we're going to take a look at the emission and how to add all of these different values
here for the flames. The very top is the
color attribute. From here, you can change
the color of your smoke. You can see here, you
can change it to blue, green, red, all of that, you can change with this color. Below that, though, is in
color attribute value. Here is where you would type in an attribute to
control the color. Now, we did talk about this in a previous video when we
covered flow objects, but we'll go through
it one more time. Going to create two
different flow objects. I'm going to press Shift D on that and drag it
over to the side, and then with this flow object, I'm going to set the smoke
color to a different color, maybe like a blue, for example. Then we'll select the
flow object on the right. This one is going
to be a red color. Now when we play the simulation, we can see two different colors of smoke being emitted
into our domain. The problem, though, if we
go into the rendered view, we don't see that color. Now the reason for that is
because we need to take that color data and plug it into our
principal volume shader. We can do that by selecting the color attribute and typing the word color all lowercase, and then hit Enter,
and now we can see the smoke color
in our material. Now one thing to keep in mind
though is that the color right here will also be mixed
with the color attribute. For example, if we bring this
over to a light blue color, you're going to
see our colors are now changed because
it's basically combining the color of flow objects with the
color that we set here. If you don't want that and you only want to use the
flow object color, you're going to need to
make sure this value is all the way at white. Now you'll have
the colors of the flow objects in your simulation.
So keep that in mind. Another thing that
you can do is instead of using the color attribute, you can use any other
attribute that you want. For example, a really
interesting effect that you could do is use the
velocity attribute, and this will take
the velocity data of your simulation and
apply it to the color. Now we're getting this very
interesting effect here. Now when we restart and play it, you can see it's taking that velocity data and
influencing the colors, which gives us a very
interesting result. Below the color attribute, we have a density value, and this is how dense the
smoke is going to look. Usually, I bring this
value up to around ten or so and that will give
us a much nicer result. Now, the higher you go, the
higher the density will be. For example, 1,000
will give us a very, very dense simulation
here and you'll be able to actually see the individual
voxils if we zoom in here, you can see the individual
axles of our simulation. I'm going to bring this back
down to a value of ten, and now below that, we have the density attribute. Again, you can use any
attribute that you want. To test this out, I'm going
to delete that P Shift A, we'll add in a UV sphere. We'll create a flow object with this and for the flow type, we're going to use
the fire flow type and then I'll just
set it to inflow. So now we'll play the simulation and we're getting this effect. Now, instead of using the density attribute which is for the smoke in the simulation, we can actually switch this
over to the flame attribute. Now if we press Z and go
into the rendered view, instead of using the flame, it's actually
switching the flame over to a smoke material. So with this principle volume, there are so many interesting
things that you can do. You can even take the
temperature attribute, which is basically
the temperature of the entire simulation. And now when we
restart and play it, here is the effect that we get. Or if we just wanted
to use the density, we can do that as well, and
that gives us this effect. The last setting we're
going to talk about in this video is the nosotropy. This is the direction
at where the light will scatter when it
enters the volume. With it set to a value of zero, it will scatter the light evenly and randomly in all directions. You can see here this is the
effect that we're getting. Now, if we go over
to a negative value, this will actually
bring the light into the volume and then shoot it out in the direction at where the light
was coming from. It's going to shoot it out
on this side of the volume. You can see that if we move our viewport
over to this side. If we go over to the other side, there is no light
that's exiting because it's shooting it back in the direction where
the light came from. If we go over to
a positive value, this will do the exact opposite. The light will enter
the volume and then shoot out in
the same direction. So you can see here on this side on the opposite
side of the light, you can see all the light is
exiting out of this volume, whereas if we go over to this side where the
light is coming from, there is no light
to be seen here. So again, a value of zero will scatter the light randomly
in all directions. A negative value will bounce the light back
where it came from, and positive values will have the light continue in the
direction that it was going. You can also have an absorption color and this is basically the color of the
shadows in your volume. For example, if we go all the way up and give it a blue color, you can see all
of the shadows on this left side have now turned
over to that blue color, which can give some pretty
interesting results because then you
could change this to this color and now the highlights are red
and the shadows are blue. But there we go. That is the
smoke material in a blender. In later videos, when we create the explosion and other
tutorials like that, we'll be creating
more materials, but this is a basic overview
of the entire thing. In the next video,
we're going to take a look at the emission, black body, and temperature.
29. Fire Material: Hello, everyone. In this video, we're going to take
a look at creating the fire material in blender. Here for this
scene, I've created a basic simulation where we have a UB sphere emitting fire. The domain has a resolution
of 96 right here, and then the flow
object is just set to fire inflow and the
fuel is at one. So with this basic setup, we have this principle volume shader with a density of five. If we press Z and go
into the rendered view, we're not going to be able
to see anything because it's super dark and the flame is
not appearing in our scene. Now, in order to get that flame to appear in our rendered view, all we really need to do is bring up the black
body intensity. This is basically
the fire value. If we go all the way
up to a value of one, now we're going
to be able to see our flames in our scene. You notice that the flame
is not that bright, you can bring up the black
body intensity even higher. Let's go with a value
of five, for example. Now we can see a lot more fire in scene and a lot brighter. Below the black body intensity
is the black body tint. This is basically the
tint of the fire. For example, if we go
over to a blue color, you're going to
see the bottom of our flame has that
blue color now. This also works for green, for red, yellow, all of that. You can change the tint
with this color value. Below the black body, tint
is the temperature value. Now, this will also affect
the look of the color. You can see on screen
the different values and temperatures
and how it changes the flame based on how hot
or how cold the fire is. Example, with this
temperature value, if we go with a much lower
value like 200, for example, this is going to
be a lot less hot, and now we're only getting
a very small red flame. Whereas if we go much higher, like, let's say
2000, for example, we're going to get a
much brighter flame, and the fire is technically
much, much hotter. I'm just going to leave
this at a value of 1,000. There's also the
temperature attribute, and this again, you can
change to whatever you want. If you wanted to
use the density, you could switch that
here, and now we're using the density to
control the attribute. You can use the flame attribute. You can use the heat attribute. There's a lot of interesting
attributes that you can play around with to get
some interesting results. We're going to be talking about the heat in just a few minutes. For now, I'm going to bring back the temperature attribute. Now this setup right here is pretty good for
the most part, but it doesn't give us
a lot of control over the color or really how bright
we want the fire to be. Normally, I don't use the
black body intensity. Instead, I use the emission
strength and emission color here to give us a much more control over
how the fire looks. So we're going to set
that up right now. I'm going to set the black body intensity back down to zero, and what we need to
do is press Shift A. We need to add in a
volume info node. We're going to be taking
the flame attribute and plugging that into the
strength, and emission color. We'll do that first.
We're going to plug this into the
emission strength. Now we do get the
flame to appear, and then we could
change the color here. But again, this doesn't give
us that much control either. It's only one solid color. Whereas flames, if you
look at a real life photo, it has multiple
ranges of orange, yellow, white,
black, all of that. We're going to add that in here. We're going to press Shift A, add in a converter, color ramp, we'll place that
underneath here. Take the flame, plug it
into the bottom input, then the color is going to
go into the emission color. From here, let's add
in a new handle. We'll drag this
over to the left, and this is going to be a
reddish orangish color. This is the very
top of the flames. Then over here on
the right side, we're going to set this to a much brighter yellowish color. This is kind of like
the middle part. And then you can
play around with these handles to give
you different results. I might switch to
this to more of a reddish color like that. Now currently, our flame is still not that
bright in the scene. In order to fix that, we can add in a math
node, place that here, switch the type
over to multiply, and now the bottom value controls how bright the
emission is going to be. Let's go with a
value of around ten, now we're getting a much
brighter flame in our scene. Again, we can change
the color here and customize it
however we like. The other thing
that you can do to control the flame a
bit more is add in a new color ramp and
place that between the multiply node and the
flame node right here. At this point, you can tweak how much flame is in your scene. If you drag the black
handle closer to the right, it's going to clamp
down on all of those values here and make
the flames much shorter. The opposite will happen
if you were to drag the white handle closer
to the black handle, it's going to push the edge
much closer like that, and now we have a much
harsher edge to our flame. Another interesting
effect that you can do is added another handle, place this on the
opposite side of the white handle and now if we set this
one over to black, we get a pretty
interesting result here. Now the bottom of our flame has a lot less smoke
and it's creating these interesting streaks of
fire along the flame here. One thing I want
to mention is that our colors look a little
bit dull right now, and the reason this is happening is with the color management. If we jump over to
the render tab, scroll down a little bit and open up the
color management, the view transform
is set to AGx. This gives us a slightly
less saturated color than what you would
normally see in flames. To bring this color
in this color ramp with the bright orange
and saturated yellows, we need to switch this
over to the filmic mode. Then for the look, we can
go with high contrast, and this is going to really make our simulation pop a lot more. Now we can see here
this is looking a lot better than what
it was previously. This is normally
the setup that I use whenever I create
fire and blender. I have the color ramp here to control how much fire
I have in the scene. I have the multiple I note to
control the brightness and then the color ramp here to control what the fire
actually looks like. And this is a pretty good
setup for most scenes. Now another thing
that I like to do sometimes is use
the heat attribute. Now with this volume info node, there is no heat attribute. Instead, we're going
to be adding in the input attribute node and then typing the
word heat right here. If we then take the
factor of this, plug it into the color ramp, then right here,
we're going to get a much more interesting
looking flame. At this point though, the
heat is way too high. We want to clamp down
on all of these values, and so in order for
that to happen, we can track the black
value closer until we get the look that we want,
something like this. Then over here in
the color ramp, we can drag the red
over to the right, then the black also we can
drag over something like this. And this gives us a really
interesting look as well. You can see we have a lot of
detail in our flames here. If you're creating
a still render, I recommend using this
heat attribute here because this gives you a really interesting look in the flames. We have a lot of
detail all along here. Then if you were to add
the motion blur on top of it with the velocity scale
here in the render tab, you're going to get a
really nice looking flame. If you want to copy
the notes set up here it is with the
heat attribute, you definitely want to use
this color ramp to clamp down on those values to get the perfect look
for your flame. But there we go.
That is how you add fire to your
material in blender. In the next video,
we're going to take a look at creating mist.
30. Advanced Volume Settings in Cycles: Hello, everyone. In this video, we're going to cover some
more advanced settings when rendering volume
metrics in cycles. In the next video,
we're going to cover some similar settings in EV, but this video is specifically
focused on cycles. To demonstrate these settings, I've created this basic scene
where we have a sun lamp, a cube, a plain object, and then our camera
is right here. If I go onto the camera view and press Z and go into
the rendered view, here is what this
cube looks like. Now, with this cube, I'm going to go
ahead and open up the shader editor to show
off what's happening here. I've added in a noise texture, and this is controlling the density of our
principal volume. So that means you can see here the noise texture is controlling what the density looks like, and I can play around with it with this color ramp and I can control exactly what this
noise texture is going to do. And the reason I set this up is because it will allow us to demonstrate what these
settings do in a visual way. So first off, to
understand how cycles renders volumes in Blender
is with a step rate. And you can see the step
rate setting over here in the render scene panel down
here underneath the volumes, here is where the
step rate render and viewport and Max steps are. Basically, a volume step is the distance between every
single volume sample. The lower you set this value, the more detail will appear, but the longer it's
going to take to render. Example, here in this viewport, we're not going to see
anything if we turn up the render because we haven't
rendered out an image, but to see this, we can
change the viewport setting. If I bring up this viewpoint
setting, which again, increases the distance
between every single sample, you're going to
lose out on a lot of detail. Let's bring
this up to three. Already, you can see
we've lost out on most of that detail because
the distance is so high. If we go even higher, you're going to see even
more detail is lost. The max steps right
here is basically the number of samples in
our volumetric shader. The moment, 1024 is
more than enough. This is actually way more
than we technically need. If we were to drag this lower, let's go all the way until we
start to see a change here. It looks like right about there. Yeah, for this scene
in particular, we only need around
eight samples or so. You can see if I go any higher, it doesn't really matter
because the eight samples is already covering the distance
of our volume shader. Now if we were to bring
up the viewport distance between those samples lower, let's say we go by 0.5. Now we're going
to need to double our max steps here to
get that same level. If we go up to 16, now that should be about number
of samples that we need. If we go higher, we
might see some details, but again, the max steps, we only need about 16 or so to get the full effect
of our resolution. That is what the
volume setting does. The lower you go
with this value, the more samples will
appear in your volume, but the longer it's
going to take to render. Usually a value of one
is perfectly fine. But again, if you
want more detail, you could go lower and
that's going to give you a lot more crisp shadows and detail in your
volume metrics. Now the other thing I
want to talk about in this video is over in
the material properties. If we come over here and then scroll down over to
the settings here, we can open up the
volume option. It's underneath the settings
right here, this volume tab. Now there are four different
settings to go through. First off, the
sampling option here. There are three
different options, distance equiangular and
multiple importance. These three settings
allow you to change how the sampling works and
how it's rendered. Distance is used for volume metrics that are further away, as you can see in
that description. Equiangular is used for
volumes that are closer and multiple importance is basically
both of these combined. Most of the time, this
is the better option, so I usually leave it
on multiple importance. Below that, we have the
interpolation and we have two different options
here, linear and cubic. Linear is used for volumes that are pretty
thin and not that dense and cubic is used to
smooth out very dense smokes. You can see here on screen
that with it set to cubic, it actually looks
so much better and those individual voxels are now much more smooth as
the smoke is going up. If your simulation
looks very blocky, try changing it to cubic and see if that improves the
look of your simulation. Below that, we have
the homogeneous. Yes, I did look up how
to pronounce that. Basically, what this does is it tells Blender that the
object that you check it has the same amount of density everywhere
on the object. All throughout it, it has the exact same
amount of density. For this scene in particular, since we have a noise texture controlling the density,
it's not going to work. If we turn this
on, it's going to completely break what
our object looks like. Now, if we were to open up the shader editor and
remove this noise texture, then it would work because now the entire thing is the same amount of
density throughout it. Now if we turn this off
and turn it back on, not going to really
change anything in the view because again, it is the same amount of density throughout
the entire thing. Now the reason you
would turn this on is to improve render time. For example, if you
have a cup full of liquid and you apply
a volume shader to that, you could set homogeneous on and that will speed up your
render time a little bit. But if you have any textures
or your smoke simulation, leave this off because it will break what your object looks like if you have
different levels of density throughout it. And one more setting
here is the step rate, and this is exactly
what we talked about over here in
the volumes tab. This is for the individual
object, though. So for example, if I
wanted this object to have more or less samples,
I could change that here. If I go lower, you might see some improvement on your volume, or if you don't need
that many steps, you could go higher like five, and that will help speed up render time on this
specific object. So if you have multiple objects, you could mess around
with the step rate for each one to improve
your render time. One more setting I
want to go through in this video is underneath
the render properties. Down here in the light paths, we're going to cover the
transparency rays right here. Whenever you render in cycles, there are a lot
of different rays that bounce off surfaces, creating shadows
and bounce lighting and all of that stuff and all of those different rays are controlled with
the light pads. Now, there is one
in particular that we want to take a look at and
that is the transparency. If I zoom in here, you're going to see this
really strange, blocky, transparent
shadow right here. The reason this is showing up
in our smoke simulation is because we need to increase the amount of transparency rays. With a set 28 and then
we have these shadows, this means that we don't have enough transparency
rays in our render. What we need to do
is increase this to get rid of those
random blocky shadows. Let's try a value of 16. You can see there with the
set 216, that disappeared. Now let's go ahead
and take a look everywhere else in our scene. And it looks pretty good. A value of 16 did work
for this simulation. Now I have noticed, though, on some occasions where 16 is not enough and I do need
to bring that up higher. That is one small trick. If you're getting those really
annoying blocky shadows, try increasing the amount
transparency max bounces here to a higher
value and that will help get rid of all of those
different blocky shadows.
31. Advanced Volume Settings in EEVEE: Over one. In this video, we're going to cover
the advanced settings for EV when it comes
to rendering volumes. Now in a previous video, we did cover the volumes tab
here with the resolution, the steps distribution, and
all that kind of stuff. But one thing that
we didn't cover is over in the shadows. If we open up the shadows, there is an option
for volume shadows. If I press Z and go into the rendered material
preview here, and this cube is
the exact same cube as the previous video
with the noise texture, we're going to see we don't have a lot of shadows in our object. If we go ahead and enable
volumetric shadows, now we're going to
get a lot more detail in our object here. Now the amount of detail is also determined by
the steps right here. If I bring this lower
like a value of one, we're not going to get
that many shadows here. You can see most of
them are actually gone. So in order to increase
the detail in our shadows, we need to increase
this setting. I found that a value of
around 64 actually works pretty well for
most simulations, including smoke simulations. So if you're not getting
that many shadows and not that much detail
in your smoke simulation, try turning on your steps
in the EV render engine. Now, another thing I
want to talk about in this video is over
in the material tab. If we jump over to
the material tab, we'll scroll down a little bit underneath the
settings again here, we're going to open
up the volume tab. Now, there are two different
methods here underneath the intersection,
fast and accurate. Fast works for most scenes, but there is one major
limitation to it. If I go into Edit mode and I
delete this top face here, and so now we have a
non manifold mesh, fast is not going to
work for this object. If I press Z and now go
into the material preview, you're going to see this
looks absolutely terrible. There are so many weird
intersections going on. It just doesn't work. The
top side is all messed up. Now the reason this
isn't working is because the fast method does not work
with non manifold meshes. It just doesn't accurately calculate what the volume
is supposed to look like. Order to get a non
manifold mesh to actually produce a
accurate volume, you need to switch the
type over to accurate. Now, if we look underneath, now we can see this is actually working somewhat properly
at the top here. It doesn't look that good, but underneath at the bottom, now this is producing
the result that we want with it set to accurate. So if you notice sometimes that your object is not rendering properly the volumes and
it's just distorting, try switching the
volume mode here from fast over to accurate and
that might fix your issue. For the most part, if you
have a full mess here, let's go ahead and reenable
a face in edit mode there. Now if we go into renewed view, this will work properly,
and most of the time, the fast method will work faster and it will render
a lot faster as well. So I would leave it on
there for the most part unless you really need to
change it over to accurate.
32. Creating Mist P1: Hello, everyone. In this video, we're going to go
through the process of creating mist in Blender. We're first going to
create the simulation, bake it out, and
then we'll create the material and then
render it out in EV. So here in this default
scene in Blender, we're first going to use this cube to be
our domain object. And for the size of this,
I'm going to press N, and I'm going to set
the dimension for the X and Y up to a value of 5 meters. And then for the Z,
I'm going to go up to a value of 4 meters. Then we'll drag this up so it's sitting right on the grid floor. For the other
objects in my scene, I'm going to press Z
and go into wireframe. Let's press Shift A
and add in a mesh, and then we'll add
in a UV sphere. This is going to be
the emeter object. Scale it down to around 1
meter for the dimensions, and we'll just drag it up
and then maybe place it over here on the left just
slightly, something like that. The other thing I want to add is a collision object for all of the smoke and miss
to collide with, for that, let's just
add in a new cube. Scale this cube down
along the Z axis and then we'll scale it along the Y, so it's a bit longer. Then in the front view, I'm just going to
place it right about here or so so that the UV
sphere will collide with it, a lot of miss will hit it
and then go over the edge. Something like this will
look pretty interesting. Now that we have all of
the objects in our scene, let's box select all of them
and then press Control A and then apply the scale to them so that all of the
numbers go back to one. This will make sure that the
simulation works properly. Now let's create the simulation
with the object selected. We'll come over to the outliner. We'll call this object domain just to keep
everything organized. The sphere, we will
call this flow, and then cube 001, which is this cube
here, we're going to call this one collision. Again, starting out
with the domain first, let's go over to
the physics tab, select fluid, change the type
from none over to domain. We're going to leave the type on gas and before we
change anything else, let's scroll down to the bottom here and change the type from replay over to modular so we
can actually bake this in. I'm also going to turn
on I resumb just in case we want to stop the bake
and then for the end frame, let's go with 200. Let's match that in
the timeline as well. We'll set this to 200. Now let's scroll up
back to the top and start out with the
resolution divisions. For the resolution
for this scene, I found 128 looks pretty good, or you could go up to 160, which I think that's
what I'm going to do. That's going to give us a
nice high res simulation. The CFL number, I'm going
to go up just slightly, so it bakes just a little bit faster with a value of four. Down here, I'm going to enable the bottom border collision, the smoke actually collides with the bottom of the domain. Then scrolling down
a little bit more, we're going to enable
the adaptive domain, so it bakes much faster. Then here in the gas settings, we're going to change the
density and the heat values. With them set to a
positive value right here, the smoke is going to rise. Instead of having
a positive value, let's set both of these
values to negative five. Now when we bake
in the simulation, the smoke will be
emitted and flow downwards and then sink to
the bottom of the domain, which is exactly what we want. As for the rest of the settings, we don't really need to
change anything else. Let's go ahead and work on the collision next with
this cube selected. We'll enable fluid, set
the type over to afector, and then for the
surface thickness, I'm just going to go up
to a value of around 0.1. The flow object, go ahead
and select your UV sphere, select fluid, set the
type over to flow. For the flow behavior, we're going to go with inflow. And then underneath the
initial temperature, we're going to go up
higher to a value of two. Remember, the
initial temperature is how fast it gets emitted, and since the density of the smoke is set to
a negative value, bringing the initial
temperature up higher is going to allow the
smoke to flow down faster. We're also going to open
up the flow source and set the surface emission
to a value of one. And then finally,
before we bake this in, I want to make sure
that the flow actually turns off at a certain
point in the timeline. So what we're going to do
is jump over to frame 100. We're going to add in a
keyframe to that use flow. Then we're going to go
to the next frame 101, uncheck the use flow, and then add in
another keyframe. So now it's going to remain off for the rest of the simulation. With that done, we can go
ahead and bake this in. Make sure you press Control
Shift S to save your project. I'm just going to call this
missed tutorial, save as. And now we're ready
to bake this in. Select your domain.
If you want to add in a directory here so you don't lose your bake
once you close the file, you can go ahead
and set that here. Since I don't really
care for that, I'm doing this in one take. I'm just going to leave
this as a temporary folder, so it automatically gets deleted after I
close this project. So with that in mind,
click on BAC data. Once the BC has finished, we're going to jump over
into the material editor, create the material, and
then render it out in EV.
33. Creating Mist P2: Over one. In this
video, we're going to continue on with
the miss tutorial, and in this one,
we're going to create the material for our smoke. So to get started,
let's set up the scene so we can actually see the
material a little bit better. I'm going to press
Shift A and add in a mesh and a plane object. If your plane is somewhere
outside of the grid, you can press the Alt key or
the option key and Alt G, that's going to snap it back
to the center of the grid. Then you can scale
it up pretty big. For the lighting on the
scene, I'm going to use the default lamp here over
in the lamp settings. I'm going to set the
power of this right here. This is the strength of how bright the lamp is going to be. We're going to go all
the way up to 2000. Then we're just going to go
into top view by hitting seven and maybe move it
somewhere over here. We can also press
Shift D on this lamp, bring it over to this side. I want to set the strength
of this a bit lower. This is going to be
more like a fill light. We're going to go
up to around 400. And then for the radius, which is the size of the lamp, going to go up higher
because this is going to be a
softer shadow lamp. Something like that
will look pretty good. If we press Z and go into
the rendered preview, here is what our current
scene looks like. I'm going to go over
to the world settings, bring the background
just a bit darker. Something like that
will look pretty good. Now to actually bring
in that smoke shader, we need to select our object, which is this object here, the domain, and we're going to come up to the
top window here, split this view, and switch it over to the shader
editor once again. Now at the moment, it's using the principled shader,
which is not what we want. So go ahead and select this node and press
X to delete it. Then we're going
to press Shift A, go over to Shader and then add in a principled
volume shader. Take the volume and plug it into the volume of the
material output. Now, if we bring
up the density a little bit and then play
through our simulation, we should be able to see
what our smoke looks like. Now we will be using IV
for this render here, and I'm going to show you
how IV works with some of the different
settings for volumes. But at the moment, we can see our smoke is not
looking that good. It's very dark. It's not
having that, white miss color. And you might think to select the color here and drag it
all the way up to white, and that does help a little bit, but you can still see it's still very dark and it's
hard to see what's going on. So first off, we're going to jump over to the
render settings over here in EV and then open
up the volume tab here. The resolution is
basically how good the smoke is going to look in the viewpoard and in the render. At the moment, it's at
almost the lowest setting. 1.6 is the very lowest, and you can see that's
very pixelated. So instead of using 1.8, we're going to go up to 1.2. 1.1 will be the highest quality, but it's going to
really increase the render time in
your simulation here, if we switch it to 1.1, it's going to slow
down the viewport quite a bit and if
we zoom in here, we'll switch it back to 1.2. You can see there's
hardly any difference. So with a value of 1.2, the runner time will
decrease quite a bit and it's going to make our viewport nice and smooth here. I'm going to leave it at 1.2. The other thing we're
going to do is open up the shadow tab and then
turn on volumetric shadows. This is going to
allow the shadows in the volume to
actually appear. You can see here, if I turn this off, that
shadow disappears. If I turn it on, we get
some shadows right there. At the moment, this
is looking better, but we can still see it's
not looking like mist. Now with blender, it's
really hard to actually get the white color
of mist to show up. So we're going to use
a little trickery with the material to
actually get the white look. To do this, we're going
to come over here. We're going to press Shift A, add in a input and then
a volume info node. Basically, what we're
going to be doing here is taking the density of this volume info and plugging
that into the emission. The smoke is actually
going to emit light just a little bit to
give us that white look. Then I'll show you
a trick on how to get the emissive light from the smoke to not affect any other object in the scene, but only the look of
it in the camera. So what we're going to do
here is press Shift A. We're going to add in a
converter and then a color ramp. Then we're going to add
one more node here. It's going to be the math node. We're going to take the density, plug it into the color ramp, then the color is
going to go into the bottom value of
this multiply node. We need to switch it
over to multiply. Then this value is going
to go into the emission. Let's set the value here
up to around one or so and already you can see
we're getting a lot more of that white color, which is looking
pretty good here. What I want to do
is actually mix this multiply node with
some density here. I'm going to set the density of the smoke to a value of five. Then the emission right here, I'm going to go
up to around four or so and we'll see
what that looks like. That's looking pretty good.
It might be a bit too high, so maybe we'll go with
a value of three. Then with this color ramp, you can play around
with this black handle to get some more
shadow effects here. And that is looking
actually pretty good. If you want to, you can
give it a slight color, just a slightly blue color to give it more of
that misty look. Maybe the emission color,
we can do the same thing, a very slight blue color,
something like that. Now in EV, this setup here is not going to
affect any other object. It's not going to have light be emitted onto the cube
or the plane here. But if we were to
switch over to cycles, and let's just go ahead and hide both of these
lamps right here, you're going to see the smoke is actually affecting the
surrounding areas, which isn't really what we want. Maybe that's the look
you're going for. But to make this
so that the light does not affect the
surrounding areas, what we need to do is over here, we're going to press Shift D on this multiple node,
place it right here. Then we're going to
add in a new node. It's underneath
input. It's going to be the light path node. We're going to take
the I camera ray and plug that into
the multiply node. Basically, what this is doing is it's telling Blender that the smoke emission should not affect anything on the
scene but the camera. So we're only going
to be able to see the emissive light from
the camera view here. And you can see this is working. It's still emitting the light, but it's not affecting
the surrounding area. And that is looking pretty good. Then from here, if
you're using cycles, you could tweak
this a little bit, maybe go up to a value of
five. That looks pretty good. But since we're using IV, I'm going to switch back
and then I'll press Alt H to bring back
those lamps here. Next on our list, we're
going to come over to the render tab underneath the color management
down here at the bottom. I'm going to set the
look to high contrast, so we get some nice
contrast in the scene, and that is looking
a lot better. Finally, before we
render this out, let's create the material
for our sphere here. So go ahead and select it. We'll create a new material. And what we're going
to do here is add in this glass ice
shader to give this a look that it's
actually emitting like mist or dry
ice into the scene. To do this, we're going to
set the roughness here, which is how much glossiness
appears on our object. Let's go all the way down 2.1. We can also right click and shade it smooth to
get rid of all of those faces here and now we
have a nice smooth sphere. Next, we're going
to press Shift A, go over to texture, and then
add in a noise texture here. Now, what we can
do if we want to see what this noise
texture is doing, we can come up to the
edit menu down to your preferences
and make sure you have the node wrangler
add on enabled. You can type in
here node wrangler and you should be
able to see it here. If you don't see it here
in the add ons tab, you can go over to
the G extensions and then just type it in here. Node, wrangler, and you should be able to
see it right here. Since I've already enabled it,
it's not going to show up, but just in case
you can find it in the Get extensions.
Sure that's enabled. And now if we press
Control Shift and Left click on
this noise texture, we can see what it's
looking like on our object, and that's actually
looking pretty good. What we're going to do is
bring up the detail amount. We'll leave the scale at
five, and then the roughness, I'm going to drag up
to around 0.8 or 0.9. And now this is looking a
lot more like dry ice or, like, a really rough texture. What we're going to do
next is press Shift A, add in a converter color ramp, give this a bit more contrast. Something like that
will look pretty good. Then to plug it into
our principled shader, we're going to not have it there. We're going
to press Shift A. We're going to add in
a vector bump node. Take the color, plug
it into the height, and then the normal
is going to go into the normal of the
principled shader. Now the strength of
this is way too high, so let's go down to
around 0.5 or so. And that's looking pretty good. If you want to get rid
of some of that shading, weird shading issues right here, we can press Control two
with this object selected, and that's going to add in a subdivision surface modifier. And now you can see
it's nice and smooth. I think the strength is
still a bit too high, so we'll go down to
around 0.3 or so. And then for the color, we just have to go with
a slightly blue color to match the look
of our smoke here. As you can see there, that
is looking pretty good. I don't really
like how the rings are showing up on our sphere, and that's because of the lamp. So what we can do is just
bring up the roughness slightly and
something like that, we'll get rid of those rings. I might set the noise
texture roughness a bit lower so we get some
more detail right there. I think that's going to look
a bit better, around 0.6. Yeah, that is looking more
like the look that I want. Alright. Now that we've
set up the scene, let's position the camera
and render this out. You can go ahead and close off this window here by clicking
and dragging to the right. I'm going to
position my viewport right about here and then press Control Alt Numpad zero to
snap the camera to place. Select it, then you can hit G, middle mouse button
to drag it backwards. We'll place it
somewhere around here. Then over in the output tab, you can set an output of where you want
your render to go to. You can do that by clicking the directory button on the side, navigating to a folder and I'm just going to
place it here and call it miss tutorial result.
Then hit Accept. Now, since we're using EV, this will render pretty quickly, so I don't find the
need to actually sequence it as a PNG. We're just going to
go with a movie file, so it does it
automatically for us. The container, we're
going to go with MP four, and that's basically all
we really need to do. From here, save your
project and then go over to render and then
hit Render Animation. Once it's done, you'll
be able to see it in your directory where
you place the output. There we go. That
is how you create a mist effect in blender. In the next video, we're
going to take a look at EV again and we're going to
create a fire simulation.
34. Creating Fire Simulation In EEVEE: A one. In this video, we're going to go through
the process of creating a fire simulation and then
rendering it out in EV, we're going to go through all of the different settings on the EV render engine and how to render volumes and
fire and all of that. To get started, here we
are in a brand new scene, you can go ahead
and open a blender if you want to follow along. What we're going to do first is press X and delete
the default cube, and then we'll add in a mesh, and we're going to
add in a UV sphere. This is going to be
our flow object. I'm going to press N and set
the dimensions a bit lower. Let's go with a
value of around one. Then I'm going to right click and shade it smooth so we get some nice smooth shading
and then also press Control or Command A
and then select scale. All of these numbers
go back to one. Now to add in a domain object, we're going to go up to
object down to quick effects, and then we'll add
in a quick smoke. This is going to automatically
add a domain for us. Let's drag this up a bit. Actually, let's just drag all of the objects up so it's
sitting on the grid floor. Maybe scale the
domain up slightly, something like that
will look pretty good. Since we scaled everything up, I'm again going to press
Control A and apply the scale. Let's start out with the
domain settings first, go ahead and select it
over in the physics tab. We're going to go for a very realistic simulation with EV. What we need to do is set
the resolution quite high. Before we do that, though, I'm going to scroll
down to the bottom, set the type over to modular, and then check I resumb just in case I want
to stop the bake. Next, we're going to go
back up to the top and set the resolution divisions
all the way up to 256. Now, this is quite
a high resolution, and if you have a lower NPC, you could go with a lower
value like 196 or 128, that's still going
to look pretty good. But if your computer
can handle it, you can go with 256. Next, we're going to
turn on adaptive domain so it bakes a little bit faster. The vorticity in the smoke, I'm going to go up
just slightly to 0.05. Underneath the fire tab, we're going to set
the reaction speed down to around
let's go with 0.5, so the flame is a bit taller. Also, make sure that the CFL
number is also set to four. I think that's going
to be a little bit better with the baking. And then the end frame,
I don't need 250 frames. So we're going to go
down to around 200. And again, we covered this
in the miss tutorial. If you want to save your
cache in a directory, you can click on this button on the side and save it
to a custom folder. Since, again, I don't really
need to save the cache, I'm doing this in one take. I'm going to leave it at
the temporary folder. The vorticity here in the fire. I'm also going to go up
just slightly to 0.6. That's going to
give us some more randomness in the flames. For the flow object, go
ahead and select it. For the flow type, we're going
to switch it over to fire. Then in the flow source here, let's set the surface
emission down to around 0.1. This is going to bring the fire closer to the
surface of the mesh. And finally, we're
going to add in a texture because I want
the texture to move around as the simulation is
plain and that's going to give us a much more organic
looking simulation. To do this, we're going to
jump over to the texture tab, create a new texture here. For the type, it's going
to be set to clouds. For the size here, we're
going to go down 2.1. We're going to open
up the colors here and bring the contrast up a bit higher so we get
some more definition between the white
and black values. I think that is
looking pretty good. Back over to the physics tab, we're going to
animate the offset so the texture moves
around as it's plain. On frame one, we're going to hit the button on the side
to add in a keyframe. We're then going to
jump all the way to frame 200 right here, set the offset to around 0.8, and then add in
another keyframe. One thing to keep in
mind, the interpolation between these two
keyframes is a curve, and you can actually see
this if we split this view. You don't have to
do this. I'm just showing this for demonstration. The graph editor here, this is what our current
animation looks like. So basically, what's
going to happen is it's going to start out
pretty slowly here. You can see the curve is
at a very shallow angle, and then right in the middle, it's going to be
speeding up here, and then at the end,
it's going to slow down. This is going to
create some kind of weird results with the texture because it's going
to start out slow, speed up in the middle,
slow down at the end. So instead of this, we want
it to be a straight line. So what we can do is
in the timeline here, you can box select both of these keyframes and then hover your mouse right
here and press T, and you can switch
it over to linear. So now you can see here that the animation is
a straight line, and now this is moving at a constant rate through the entire animation,
and that's what we want. So now that we've
set that up, we're going to set the end frame and the timeline to 200 to match
the length of our animation, and now we are ready
to bake this in. So make sure you save
your project before you do this just in
case this crashes. I'm going to call this
EV flame tutorial, save blender file. Now we'll just double check everything is good,
which I think it is. Go ahead and click on Bake data. Once the Bake has finished, we're going to go
over the material and then we'll render this out. The Bake has finished
and here's our results. We're going to go
ahead and play through this fire simulation and you can see it's actually
looking pretty good. What we're going to do now
in this video is create the material and then render this out in the
EV render engine. Starting out with, let's jump
over to the world settings. I'm going to set the
color all the way down to black so we get a nice
black background. Then we're going to
go into front view by hitting one on
the number pad. Hit Control Alt Numpad zero to snap the camera to place,
then you can select it. G, middle mouse
button and position the camera how you
want to see your fire. This is looking pretty good. Let's press Z and go into the rendered view to see
what everything looks like. Now, since we use the
quick smoke option, it automatically added
the material for us. What we're going
to do now is jump up here to the top right corner, split this window, and switch it over to
the shader editor. With the domain selected, we can see that we have the
principled shader right here. Now, we did talk
about flame materials in a previous video where you could turn up the
black body intensity, but you're going to see it just doesn't really
look that good. It's not as bright as
I would like it to be. Instead of using the
black body intensity, we're going to be using
the flame attribute. So over here on the left side, let's press Shift A and
add in a volume info node. Then we'll add in a
converter color ramp node, and then finally a converter
math node and place it here. We're going to take
the flame attribute, plug it into the color ramp, and then also into the top
input of the math node. Take the color, plug it
into the emission color, then take the math node and plug it into the
emission strength. We're going to switch
this over to multiply. For the bottom value, let's
go all the way up to ten, so we get a nice bright flame. For the colors of our flame, that's going to be
with this color ramp. We're going to add
in a new handle and drag it over to the left here and then switch it over
to a dark reddish color. This is the very top of the flames and the very
outside, as you can see. For the right handle, this is going to be a nice
yellow orangish color. Something like that
will look pretty good. Then you can play around
with these positions. If you want more red to appear
in your flame or less red, you can play around with this. I think something like that
will look pretty good. Now at the moment,
our flame looks very pixelated and the reason that's happening is over in
the render settings, underneath the volumes tab, we have a lot of
different options to tweak how the simulation looks. The biggest setting is the
resolution right here. At 1.8, you're going to get a very low resolution
fire simulation here or smoke simulation. What we need to do
is switch this up higher to around 1.2 or 1.1. 1.2 works for most simulations, and you can see here this
actually looks a lot better. On screen, you can see the
differences in resolution. You're going to notice the
1.1 is significantly longer than the 1.2 and there's not a lot of
difference in quality. For the most part,
whenever I render EV, I use the 1.2 just because
it renders so much faster and there's hardly any difference
between 1.1 and 1.2. Moving on, we have the
steps setting here, and this is basically
the samples. You're going to see if I zoom in here and I bring the
samples much lower, you're going to see it starts
to get really pixelated. This is the effect of
what the samples is. If I go higher, you're
going to see it brings more layers of fire in and then it starts
to look a lot better. Normally, 64 is perfectly fine. You're not going to
really see any pixelation with that value. Distribution will
allow more samples to become closer to the camera, as you can see in
that description. If you go all the way up to
one though, for some reason, you're going to get some
weird pixelation here on the top of the fire
and the sides of it. Normally, I will set
this to around 0.8. That's usually a good
option for this simulation. Below the distribution,
we have the max depth. And basically, what the
max depth is is the amount of surface interactions between the different volume objects. If there are more interactions
and intersections, then the value that you
set for the max depth, it might cause an artifact or some flickering
in the render. With a lot of my testing,
I couldn't really find any difference between
a value of one or 16. But if you're having
some flickering issues, it might be a good idea
to turn this value up. Finally, in the custom
range option here, you can set the distance from the camera where you want
volumes to actually appear. For example, if I were
to bring up the start past the distance from the camera to where
our fire is right now, the flame will
start to disappear. You can see here, if I go past
it, the flame disappears. Same thing for the end frame. If I go below where the distance is between
the camera and the fire, the fire will slowly disappear. In previous versions of blender, what you would want
to do is actually set the exact distance from
where the fire is and where the fire ends from the camera and then put
those values in right here. But in this new version of EV, you don't really need to
change anything right here. The fire will still look really good no matter the distance
that you set here. But for example, if
you had volumes really far on the distance that you don't really want
to be rendered, you could set the start
and end values here. Before we render this out,
we're going to jump over to the color management tab and set the look right
here to high contrast. This is going to really make
our render pop a lot more, and the colors are going
to look a lot better. Now, you could switch
the view transform from AGX over to filmic, and that's going to give
you a more saturated flame, as you can see there. I think AGX though, for this scene in particular, looks a bit better, so I'm
going to leave it on that. Then finally, we can
hide the sphere from the render and hide it from
the viewport right there. With that done, let's press F 12 to render out
a single image. What we're going to do now is
press Escape to exit out of there and then jump over to
the compositing workspace. We're going to select use nodes, and then what we're going
to do is actually add a bit of glow to the flame. With the render layer selected, you can hit Control
Shift and Left Click. That's going to add
in a viewer node and display the rendered
image that we just had. Another thing I like to do
is hold Shift and then right click and that's going to make a connection point and we're going to put
this right there. Now, anything that
we put between the render layers and this
connection point will automatically be applied to both the viewer and the
composite, which is nice. What we're going to do
next is press Shift A, go over to a filter right here and then
add in a glare node. We're going to place that here. Now, in the glare settings, you can change it to
whatever one that you want. If you wanted the original bloom that was in EV
before blender 4.3, you could set it to bloom, play around with the
strength or sides of it, or you could set it
over to fog glow, which I think looks
a bit better. From here, we can bring
down the strength if it's a bit too
strong of an effect. If you want these size to be smaller or bigger, you can
play around with that. I might go up to value of 0.6. I think that looks pretty good. And that's basically all
we really need to do. From here, we're going to jump back over to the output tab. We're going to
switch this over to a movie file because
again, we're using EV. It's going to render
very quickly. Use in MP four, and for the output quality,
we're going to go with high. Then for the directory,
make sure you set a custom folder of where you want all of your frames to be
combined into a movie file, and then we can
come up to render and then select
render animation. There we go. Here's
our final result of our flame using EV, and as you can see,
it does look pretty good. There we go. We've now completed this
section of this course. In the next section, we're
going to be looking at creating a campfire
scene with sparks, realistic materials, and rendering out a
good looking animation.
35. Creating a Campfire Simulation P1 Setup: Hello, everyone, and
welcome to a new section. In this one, we're
going to be creating this campfire scene
that you see on screen. We're going to go
through the process of adding in the simulation, creating some different effects
with wind force fields. We're then going to be adding in some spark particles,
motion blur, compositing. All of that we're going
to cover in this section. To get started, you can
download this blend file. It has a campfire model right here with a couple
of different logs, some embers right here and a
couple of rocks around it. Once you have it downloaded, we can go ahead and get started. You can find this blenfle
in the resources. First, we're going to
need a domain object. Now one thing to keep in mind
that this scene right here, if I press N and
look at the size of this ember circle right here, it's 2 meters wide, that is a very large flame. Now the reason why
it's so big is because Blender has a hard time
simulating at a small scale. What we're going to be doing is creating the simulation
and then we're going to scale everything down
later on in this section. That being said,
let's press Shift A. We're going to first add
in our domain object. We'll add in a cube. In front view, I'm going
to hit Z and wireframe, bring this up a little bit, and then just ski it
along the Z axis. It's a bit taller.
You can probably have it around 2.8 or so. Something like that
will be perfectly fine. Then we'll make sure
that the bottom of the domain is
right about there. Then press Control A and apply the scale so that number
goes back to one. Now for the flow object, this object is going to be
a little bit different. We're first going
to add in a plane. Then in edit mode,
I'm going to press M and merge everything
at the center. Now we have a single
vertex to work with. Basically, what I
want to do is create a really random
looking inflow object because this is going to give us some more random variation. You can do is with that
single vertex selected, you can press E to extrude
and just start extruding it out and following the shape
of our logs right here, something like this, extruding until we get the
shape that we want. Something like this
will be perfectly fine. It doesn't really need to
be perfect, just random. Then what you can do is press
A to select everything, find the last two of them, and then just press F to
fill in an edge right there. Now we have this
shape like this. Then with this selected, I'm going to press
A and then press F again with
everything selected, and that's going
to fill in a face. So now this will emit
fire once we add that in. Then I also want to just
drag this up slightly. So it's right about there. I think it is probably good. Now that we have the flow
object domain object, let's start working
on the simulation. Let's first select a couple of the different
logs right here. I'm going to select
the domain and press H to hide it so we can
actually see the logs, and we're going to
be adding in some collision to these
different logs. Now, we don't have to add
collision to all of them, just the main ones
on the top here. What I'll do is hold Shift
and select all of them. Go over to the physics tab. If you hold the Alt key and then left click on that fluid, then holding the lt key again, none and select effector, you're going to see that
it automatically added that fluid modifier to all
of these objects here. Now, one thing that
we're going to want to do is drag this above everything else because at the moment with it
at the very bottom, it's going to take into account
the subdivision surface, the displacement, and it's
going to take longer to bake. When we have the modifier
at the top here, it's going to take in
this low polymesier and use that for the collision, which will allow it
to bake a lot faster. Going to do this
for all of them, drag it to the top here, right here, and then this one we will also drag to the top. Now if you wanted to, you
could also add it to this one, but since this one
is behind the flame, we're not going to really
see it in the render, so I think I'm just
going to leave it off. Next, we're going to
select all the logs that we have the
modifier applied to it. Once again, jump back
over to the physics tab. Holding the Alt key, I'm going to select
the surface thickness and then hit 0.1 and Enter. Now again, if you
held the Alt key, it should have
automatically added it to the other
objects, which it did. There we go. That is good. Let's press Alt H or option H to bring back
our domain object. Then over in the physics tab, we're going to hit fluid,
set the type over to domain. For the resolution divisions, let's go up to 160. Since we're going for a
realistic simulation, we want to go pretty high
with the resolution. The timescale, I noticed that the flame
moves very quickly. We're going to bring this down a little bit to around 0.7. The CFL number, I'm
going to go up to three. This will help make it bake
just a little bit faster. We don't really need
any border collisions, but we are going to want to
turn on adaptive domain. Then for the Ad resolution, I'm going to go up to a value
of one so the domain will actually move upwards if the
smoke reaches that height. Below that, we can leave the default settings for
the heat and density, the vorticity we
can leave at zero. If you wanted some
swirls in your smoke, you could go up to around 0.5, but I think it's fine as it is. We're going to open
up the fire tab and for the reaction speed, we're going to go
down to around 0.65. This will allow
the flames to be a bit taller in our simulation. Then for the forticity here, I'm going to go up 20.55. That'll just make the simulation
move a bit more random. Down here in the cache setting, we're going to set
the end frame to 200. We'll set the type
over to modular and then is resumable just in
case we want to bake this in. Then for the format volume, we're going to leave
on open DB right here. In the render tab right here, we're going to set
the velocity scale, which is the amount of motion
blur in our simulation. You can change this after
it's already baked. But since we're already
here, let's set this to 0.03, and enter. With a value of one,
it's way too strong, so that is why we're having
it at such a low number. Now we're going to work on
the inflow object next, go ahead and select it
right here, right there. We're going to add in a fluid, set the type over to flow, and for the flow type,
we're going to choose fire. For the flow of behavior, we're going to use inflow obviously. Then for the fuel right here, this will control the height
and how crazy the fire is. We're going to go up a
little bit to around 1.2. In the flow source, we can leave all the other
settings as they are. We could go up for the surface
emission if you wanted to, maybe 1.3, I think
would be pretty good. Now, since this object
is a flat plane, we're going to want
to turn on is planar, so it actually emits smoke
into our simulation. The object isn't moving, so we don't really need
any initial velocity, but we will want to
add in a texture here. We're going to jump
over to the texture tab and create a new texture. For the type, we're
going to choose clouds and then for the
size of this cloud, let's go down to around 0.1. We're going to open
up the contrast here, bring up the contrast
so we can get more definition between the
white and black values. Now wherever there
is white values, that will mean
there will be fire. Wherever there is black
values, there will be no fire. This is going to
give us a much more random and organic
looking simulation. Then we're going to jump back
over to the physics tab and offset the texture here as
the simulation is plain. On frame one, we're
going to add in a keyframe to the
side of that offset. Then we're going to jump
all the way to the end, which is frame 200. We can set that in
the timeline here. We'll set the offset up 2.8 and then add in
another keyframe here. Of course, we're
going to need to box select these keyframes and set the interpolation
between them to linear, so it moves at a
constant rate like this. I did that by selecting them, pressing T, and choosing
that linear option here. Now before we bake this in, there is one more thing that
we're going to need to add, and that is a wind force field. Since this is a campfire scene, we want to make sure
that the flames have a little bit of movement
like it's outside. What we're going to
do is press Shift A at an a force field, and then a wind force
field right here. Go into front view,
rotate this so the wind is facing the
direction of the flames. Now at the moment,
it's way too strong. It's going to have the flame go almost completely sideways. For the strength here
in the physics tab, we're going to go much lower to around 0.1 for the strength. We're going to set
the flow to zero, and then the noise amount, we're going to go lower as
well to around 0.1 here. Actually, for the strength, this is actually
not what we want. We want 0.01. A very, very low strength,
that's just going to give it a slight
movement to the right. With that done, we are
ready to bake this in. If you want to set a directory for your cache so
you don't lose it, you can do that here by clicking
that button on the side. I'm just going to save
it to this folder here and click Accept, and now we are ready
to bake this in. Scrolling back up
to the top here, save your project one more time, and then click on Bake data. Once this is done, we're going to work on the particle system.
36. Creating a Campfire Simulation P2 Sparks: All right, the simulation has finished baking and
here is the results. If we scroll through here, we can see the flame
looks pretty good. Now, in this video,
we're going to be adding in the spark particles. To get started,
let's press Shift A. We're going to add in
a new mesh object. It's going to be a circle. Go into edit mode
and then press F to fill in a face right here,
so it's completely full. Then we're just going to
scale this down to be about the size of our
campfire right here. Probably somewhere around
there will be pretty good. Next, what we're going to do
is drag it up just slightly, so it's inside the camp
fire just like that. Then over in the
particle system tab, we're going to create
a new particle system. Now, the number of particles you can play around
with this value, you can add in a lot of
particles or just a little bit. I'm going to go
somewhere in the middle around 300 particles. The start frame is when the particles will
start being emitted. We want to leave that at one, and then the end frame is
when they'll stop emitting. We're going to
also leave that at 200 to match the
start and end frame. The lifetime value
here controls how long the particles will
last in our scene. We're going to
leave this also at the default value of 50. Next, we're going to
come down all the way to the bottom here underneath
the field weights and turn gravity all the way down to zero because what we're
going to be doing next is adding in a
force field to have it follow the flow of the fire. To do that, we're going to press Shift A and go over to force field down here and then add
in a fluid flow force field. If we go over to the
physics tab now, we can change the
strength and we can select the domain
object in our scene. If we go ahead and
play our simulation, we'll select our domain here and we can see the name
of it is set to cube. With the fluid flow force field, you might need to go into
wireframe to select it. We're going to set the strength of the force field to three. This will allow the particles to shoot higher into the air. Then for the domain object, we're going to select the cube. Now if we play the animation, they should follow the
shape of our smoke here. With that done, let's jump back over to the
particle system. I'm going to select the circle in the outliner right here. With the gravity at zero, we can go ahead and
close that off. We're going to open
up the velocity tab, set the normal amount to zero, and then the Z direction, which is the initial
velocity going upwards, we're going to set that 2.5, so the particles move
a bit faster going up, and then also to give it
some more randomness, let's set the randomize
to a value of 0.8. Now they should follow
the smoke and fire and have a lot more
randomness going all over. You want to add some
collision to the logs here, what you can do is
select one of them. Going over to the physics tab, you can select collision. We're going to leave all
of the values at zero so they don't have any
friction or dampening. They just bounce off the logs, and we'll do the same thing
for the other objects. With all of them selected, I'll hold the Alt key collision, and that's basically all
we really need to do. Jumping back over to the
particle system tab, let's create an object to
actually be the particles, and we can do that
by hitting Shift A, going over to mesh, and then
adding in an ICosphere. I'm going to scale the
egosphere down just a little bit and drag it
over to the left side, then press Control A and
apply the scale to it. Then with the circle
again selected, we're going to open up
the render tab here, set the render as from
halo over to object, and then for the instant object, we'll use the eyedropper
tool and select the kosphere now you can
see them in our scene. Now, the size of them
is a bit too big, so we're going to go down
to around 0.02 or so. I think that's probably
a pretty good size. Then also you can bring
up the random size up a bit so they have
some different variation. I think that is
probably pretty good. Now, one more thing I want to do with this particle
system is I want the particles to
shrink down over time until they fully
disappear around here. Now we can do that pretty easily by adding in a new texture. So over here in texture tab,
we'll create a new one. Then jumping over to the
texture panel right here we'll set the type from image
or movie over to Blent. So it goes from black to white. But at the moment, this
is actually inverted. We want the white to be at the start and the
black to be over here. What we can do is come
down here and open up the color ramp and then
just flip this right here. The black is on the
right, and then the white is on the left here. Then if you want the
transition to be less smooth, we can drag this
up a bit so they shrink down a bit quicker about halfway up,
right about there. Now, the other thing that
we want to do is change the coordinates from generated
over to strand particle. Then underneath
the influence tab, we don't want to
influence the time. We want to influence
the size right here. Now if we restart the animation and play it, we'll zoom in, we should be able to see
those particles shrink down once it reaches a certain
point in the timeline. You can see here they are
shrinking down into nothing, which is exactly what I want. With that done, I think we
are ready to bake this in. If we open up the cache tab, we'll go ahead and restart, save our project, and
then click on Bk.
37. Creating a Campfire Simulation P3 Materials: Now that all of the
simulations are done, we can go ahead and
start working on the materials and lighting to
render out our simulation. The other thing though,
with this circle selected, make sure you turn
off show emitter so the circles does not
show up in the render, but the particles still do. With that being
said, let's separate a couple of these different
objects into collections, and then we're going to
instance that collection. The reason we're doing this is because this
campfire right here, if I just add in a new cube, scale it up to be about
the size of the campfire, we're going to see that the
dimensions is very large. It's almost 2.5 meters big. This is not very accurate
to the rural world. So what we're going to
do is come over here, right click and create
a new collection. All of the objects that
don't need to be in the campfire collection
to this new collection, that wind force
field, the fluid flow we don't really
need to instance, the icosphere we're going
to add to that collection. So it's just the rocks, the circle, and the
empty and all of that. With that done, we can go ahead and hide that
collection right there. Then we're going to
press Shift A and add in a collection instance
and select campfire. With this collection instance, we can scale it down and
move it anywhere we want, and it's still going to
have that fire simulation and the particle simulation. So what I'll do is I'll just add in a reference cube here. We're going to go into the
properties by hitting N, and for the size of this, let's go down to half a meter. Then with the campfire
instant selected, scale this down until it's
about that size that we want. So right about there,
and this is about the average size of a campfire. Something like that
will be perfectly fine. Then we can go ahead
and delete that cube. For the ground plane, I'm just going to add in a plane object. Make sure it's below
all of the rocks, and then we'll just
scale it up and scale it along the X axis. I'm going to position my camera in the front view
right about here. Then I'm going to
press Shift A and add in a new camera object, and then we'll
snap the camera to exactly where we're looking
by hitting Control, Alt Numpad zero, and
then you can press G, middle mouse button, and place
the camera how you want. Right about there is
probably pretty good. Now for the lighting
in the scene, we're going to go over
to the world settings and add in an HDR. Underneath the color option, let's add environment
texture. Click on Open. And if you want to use
the same HDR I'm using, you can find the link
in the resources. It's over on Polyhaven. The one we'll be using
is this one right here, the lopenhei 04. Go ahead and open that in. For the strength of
this, we're going to go down to around a value of 0.1, so everything is pretty dark. And then over in the render tab, we can open up the
film option and turn on transparency so the
background does not show up. All of that done, we can go
ahead and start working on the materials for our
fire and our particle. Come up to the top right
corner and split this view, and then we're going
to switch this over to the shader editor. Now, in order to
change the material, we will need to select
the original domain. I'm going to go ahead and
open this collection back up, select the cube, and then we'll create a
new material here. Now, in order for this to stay here without having
the cube selected, we can go ahead and
pin this window here and then we can
hide the campfire scene. Now we're still working
on there domain material, but we no longer see
that in the viewport. Go ahead and delete
the principled shader. We're going to press
Shift A, add in a shader, and then a principled
volume shader. Take the volume and plug it
into the material output. Come on over to the
left side here, we're going to press
Shift A and add an input and then
an attribute node. If you want to, you could
use the volume info node, but what I'm going to do
is use the heat attribute. For that, we're going
to need this node here. If you type in the word heat, we can then take the factor and plug it into the
emission strength. Let's go through
the timeline a bit to bring our simulation in. There we go. We can
now see our fire, but the colors and brightness is not that good at the moment. So between the heat attribute
and the principled volume, let's press Shift A,
add in a color ramp. Then again, we're going to
add in a converter math node, switch the type
over to multiply. Then with this multiply node, let's go all the way
up to around 200. That's going to give us a much
brighter simulation here. Now, in order to get that
really nice detail in the fire, we're going to drag
the black handle closer somewhere around here. Then we're going to add in a new handle right
in the middle. This handle is going to be
set all the way to white, and then the far
right side handle, we're going to drag this
all the way down to black. That's going to give us a lot of interesting detail
in our flame here. You can see if this is
all the way at white, we don't have that extra detail, but if we are going to
drag this side to black, we get all of that flame detail
which looks pretty good. Then from here, you
can play around with this color ramp until you
get the desired look. Probably around there
is pretty good. Now in order to get
that flame color, let's add in a new color ramp. Take the factor, plug it
into the bottom input, then the color is going to go into the emission color here. We're going to add
in a new handle, drag this to the right and then this is going to
be that red color. You can play around with
the position of this handle until you get the desired
amount of red in your scene, probably a little bit
more orange actually. Then for the white
handle, we're going to switch this over to
a yellowish color. Something like that
will be pretty good. Maybe the brightness, we
can go up to around 250. I think that will
look pretty nice. Then for the density here, let's go up to around 40. Maybe let's go 50 actually to get some nice
smoke in the scene. That is looking pretty good. You can zoom out
and make sure that the brightness is as
much as you want. If you want to go even higher, you could go up higher. Let's try 500. I think that actually
looks pretty good. That's basically all we really need to do for this material. For the particle material, we can go ahead and select
the icosphere right here, uncheck that pin, and then
create a new material. We're going to
delete the principle shader and then press Shift A, add in a shader and
emission shader. Take the emission
and plug it into the surface of the
material output. If we zoom in now, we should be able to see those particles,
as you can see there. We're going to set the strength
of this up to around ten, so they're nice and bright. Then for the color,
we're going to have the particle change
color over time. In order for that to happen, we're going to add
in a new node. It's going to be input and then a particle info node right here. What we need to do
is take the age and lifetime and divide
those two values, and that's going to
give us that gradient over the lifetime
of the particle. We'll add in a new converter
math node, take the age, plug it into the top input, the lifetime into
the bottom input, and then we'll set
this over to divide. Then we'll use a color ramp
to determine the color. Add in a new color
ramp, take the value, plug it into the bottom input, then the color is
going to go into the emission shader here. This left side is where
the particle begins. We're going to drag this
up a bit and switch it over to a nice bright
yellowish color, something like this or so, maybe a bit more
orange, actually. And then for the end
of the lifetime, where the particle disappears, I want it to be more
of a reddish color. So something like that
will look pretty good. And there we go. I think
that is looking really nice. Those particles change. And if we go up to the top here, it might be a bit hard to see, but they are starting
to change that color. And if you were to
drag this over, you're going to see that color of that particle
change even more. Probably somewhere
around there is perfect. With that done, we can go ahead
and close off this panel. We're not going to
need it anymore. Jumping over to the render tab, let's change the max samples
here down to around 50. Open up the denoise
and make sure we're using the GPU for the denoise. We're also going to
enable motion blur, and for the shutter amount, this is the amount of motion blur that's going
to be in the scene. Let's go up to around 0.8. Now, keep in mind this will
affect the flame here, but since we set
the velocity scale of our domain a lot lower, it shouldn't give it
too much of an effect. This value here is mostly for the particles that
are flying outwards. So with that done, let's do a quick render right
here by hitting F 12. And once this is done rendering, we're going to jump over
to the compositor and then add in a background and
glare to the flames. All right, the
render has finished, and we can see here that the motion blur is giving the
sparks a really nice look. The flame is also looking pretty good with
the velocity scale. Next, let's go over to
the compositing workspace at the top here,
select use nodes. I'm going to go ahead and
close off this bottom window and you can press V a couple
times to Zoom outwards. First off, we're going
to press Shift A, add in a filter, and then a glare node. We'll place that here. So it's
the type over to fog glow. And then for the
strength, I might go down to around 0.8 or 0.7, and then the size
maybe drag that down just a bit because I think
it's a bit too strong here. For the background,
let's press Shift A, add in a mix, and then a Alpha over node. We'll
place this right here. Make sure the image is
in the bottom input, and now this top image
controls the background. We're just going
to go to more of a black or very dark gray
color, something like that. And with that done, we can go ahead and save this project. We'll jump back over
to the layout tab, and then in the output, what
we're going to do is set an output and render this
as an image sequence. This is actually the proper way to render animations in blender. In the previous tutorials, we were using EV and it
renders pretty quickly. That is why I skip that step. But since we're rendering in cycles and this will
take a lot longer, we're going to render it
as an image sequence. To do this, over
in the output tab, set a new directory of where you want your
animation to go to. Going to place it in this
folder and then click except. We'll leave the format at PNG. Then you can go ahead and
save your project and then come up to render and then
select Render Animation. Once the render has finished, we'll jump over to the
video sequence editor and then combine them
into a movie file.
38. Creating a Campfire Simulation P4 Sequencing: Now that the render is done, let's go ahead and sequence all of the frames into a movie file. To do this, go ahead
and exit out of the rendered view and then
over in the output tab, you can switch the
file format from P&G over to a movie file. Underneath the
encoding option here, we're going to
select the container and switch it over to MP four, or you could use any of the file types that
you would like. For the output quality, we're
going to switch it to high. Then over in the top right here, we're going to hit that
plus sign and switch to the video editing workspace. First, we're going to make
sure that the cursor is on frame one and then go
over to the Ad menu, select image sequence, navigate to where your
frames are MNR right here. We're going to press A to
select everything, and again, make sure this is set
by sort by name and not modified date or it's
going to play backwards. Then go ahead and
select Add Image strip. We can go ahead and play
through this and see what our flame looks like.
It's looking pretty good. All we have to do is
just double check that the color
management down here, it's set to standard. If this is set to filmic, it's going to change what
the frames look like. So make sure standard and
then look is set to none. If you wanted to
add more contrast, you could do that,
but this is on top of the contrast
that was already added. You can see like that,
that's way too much. I'm just going to
leave it on none. From here, go up
to render and then select Render
Animation once again. This will then sequence
all of those frames into a movie file and place it
in the output directory. But there we go. That is how we create a campfire
scene in Blender. Thank you very much for watching all the way to the
end of this tutorial, and if you created something, feel free to post it in
the assignment or post it on Instagram and tag
me at Blender Made Easy. In the next section,
we're going to be working on creating a big explosion.
39. Missile Explosion P1 Curve Animation: Hello, everyone, and
welcome to a new section. In this one, we're
going to be creating this Missile simulation. We're going to be covering
a big variety of topics, including particle systems, working with multiple domains, adding curves, and
following curves. We're going to be covering
all that in this section. To get started,
make sure you open up the resources and download this Missile model because this is what we're going to be
using for the explosion. Once you have it downloaded, go ahead and open it
up and then hit Control C to copy this
model with it selected. Then we're going to jump
over to a brand new scene, delete the default cube, and press Control V to paste
in that missile model. There we go. Now let's
go ahead and animate it following a curve and
colliding with the ground. I'm going to hit
Shift A, we'll first add that ground plane,
add in a plane. Scale it up a bit, somewhere
around there is good. Now, there are two ways
we can animate this. Number one, we could
select our model, rotate it and place it up here, and then just animate the
location coming down. But it's a little bit hard to work with and we don't
really have a lot of control over the
path of the missile. Instead, what I like
to do is add in a curve and have it
follow the curve. Can do this by adding a curve, we'll press Shift A,
go over to curve, and then select Bezier curve. In top view, I'm going
to go into wireframe. Then in edit mode,
let's rotate this so we have a flat line just like this. You can hold Control and snap it to right
there is pretty good. Go back into front view and
then in Edit mode again, I'm going to place this side
right at the start here, rotate it up a bit, and place it right where we want
the missile to land. Then we'll select
the other handle, drag it up this way, scale it up somewhere around here is
probably pretty good, about seven grid units up. Now, you could, if
you wanted to add in some different
variation in this curve, you could have it go like this
and then go straight down. You can do whatever shape that
you want for our missile. I think I'm just going
to have this effect where it starts here and
just has a gradual curve. Jumping over to the
curve settings, let's set the resolution up
a bit because right now, if we zoom in,
you're going to see that this is a
little bit low poly. You can see the
individual points. Let's set the
resolution here to 32, and that's going to give
us a much smoother curve. Now, to have the missile
actually follow it, let's go ahead and select it. Then over in the
constraints tab, we're going to add
in a new constraint, select follow path, and
then for the target, choose the bezier curve
that we just added. If we were to bring
up the offset, now you can see it's actually
moving along the curve. Want to do though is
I'm going to turn on fixed position and
also follow curve. The follow curve allows
the missile to be rotated along the curve
as you can see here. Now at the moment, the
rotation is incorrect. We actually need it to
rotate looking down. What I'll do is go
into Edit mode, press R, then X, and if you hit X again, you can lock it towards the normal and then we're going
to go negative 90 and Enter. Now you can see it's
pointed upwards, but that's also
because the direction of our curve is going
up instead of down. If we were to drag this up now, you can see it's following it. Let's go ahead and
flip the direction so it starts out at the top
and then comes down. With the curve
selected in edit mode, press A to select everything, right click and
then we're going to choose switch
direction right here. Once we do that, you're going
to see the missile is now at the top here and now
if we were to select it, bring up the offset factor, you can see it's going
to go down the curve. Now, one other small issue is the origin point
is not at the center. Let's go ahead and fix
that in edit mode. I'm just going to
drag this missile down until it's
right about there. Something like that is perfect. Now if we drag this up, you're
going to see this effect. For the animation
here on frame one, I'm going to add in a keyframe
to the offset factor. Then we're going to jump
over to frame 20 right here, bring the offset
factor all the way up. Now, if you want the missile to be deeper into the ground, you could bring this up to 1.1. That's a bit too high, but you can see it's much further down. I'm going to go somewhere around here or so and then add
in another keyframe. Let's go ahead and restart the animation and play this
to see what it looks like. That is looking pretty
good. But you're going to notice one small issue. You're going to
see it starts out a bit slow and in the middle, it goes really fast
and then right at the end, it slows down. Now the reason that's happening is because the animation between these two keyframes is a smooth curve and we can fix that by
selecting both of them, hitting T, and then
choose linear. Now it should move at a constant rate and
that looks pretty good.
40. Missile Explosion P2 Particles: Now that we have the animation working properly
here in blender, let's actually create
the explosion effect. Now, creating explosions in Blender is actually not too bad, there are two different
ways we can do this. Number one is using
a mesh object. Number two is using
a particle system. With a mesh object, it gives you a lot more control over
the look of the explosion, but you're going to have to
do a lot of modeling to get the exact look that you want and sometimes it doesn't
really look that great. Particle systems, it is a little bit harder to get the
look that you're wanting, but it's easier to work
with and it gives you a lot more randomness
in your explosion. See different
animations on screen of the different simulations
that I've been working on while I was testing
for this tutorial, I found that I like working with particle
systems a lot more. That's what we're going
to do in this video. To start out with, we're
going to add in a new object. We'll press Shift A, go over to mesh, and
then add in a UV sphere. In Edit mode, I'm going to
select half of the UV sphere, actually a little
bit more than half, press X, and then
delete the vertices. Then I'm going to hit A
and drag this back down to the origin point
and scale this down a bit pretty small,
something like that. The other thing I
want to do is give some more randomness
to this UV sphere. We're going to jump over
to the modifier tab, add in a new modifier, deform, and then select
displace right here. Create a new texture, and then over in
the texture panel, we're going to
switch the type from image or movie over to clouds. Here, this gives us a lot
more randomness on our object and that will allow
the particles to shoot out in a lot more
random directions. Over here in the
size, you can play around with this until you
get the look that you want. You can also press
Control A and apply D scale to it since we
scaled it pretty down. Once we've done
that, we will need to change the size a bit. Let's go down until we get the look that we want
somewhere around there. Then for the strength of this, we need to go much lower
to round 0.1 or so. I think that is pretty good. Then we can jump back
over to the size, drag it down even further. We go. I think that
is looking good. Now for the actual
particle system, we're going to jump over to
the particle system tab, create a new one,
right at the moment, our particles are very
large in the viewport. The first thing that
we'll do just to be able to see everything a
lot easier is we're going to open up the
viewport display and bring the size of them much
lower, something like that. Now we can actually
see our mesh, and it's going to be a
lot easier to work with. Starting out at the very top, here we have the
number of particles that are going to shoot
out in all directions. Now, the higher
you go with this, the more smoke and fire will
blow out of your particles. I found that a value of around 5,000 to around 8,000
looks pretty good. We're going to go with 7,000 for this first particle system. The start frame is when we're going to want our
explosion to happen. Now with our animation, I want
the missile to come down, hang out there for a little bit, and then explode on frame 50. For the start frame,
we're going to go up to 50 and then for the
end frame, let's go with 60. And then for the end
frame, let's go with 56. So over the course
of six frames, all 7,000 particles are
going to be emitted. The lifetime here controls the
lifetime of the particles. We only want the particles to last for a very short
amount of time. We're going to go down
to around five frames. So now if we plan our animation, here is the effect that we get. Now at the moment, it's
still not looking that great and that's because
there is no velocity. They're just being emitted
and falling straight down. The first thing that
we'll do is we're going to open up
the velocity tab, set the normal
amount up to three. This will allow the normals on our mesh to have more
velocity in the direction. They're going to shoot
out here, shoot out here, and it's going to
look a lot better. The other thing that we're
going to do is bring up the Z direction, the Z velocity. Let's go up to a value up two. Now they're going to shoot
out along the normal, but they're also going
to be shooting upwards. Then for the randomized here, let's go up to 1.2. Actually, before I do that, I'm going to show you
exactly what that does. If we now play our animation, you're going to see this effect. Now this is looking better, but we have these trails of particles and that doesn't
really look that good. If we're going to simulate that, you're going to have trails of smoke and it's not
going to look good. That is where the
randomized comes in. If we bring this up to 1.2, now when we play the animation, this looks much better, and this is going to give
us a much better explosion. The other thing I'm going
to do is come down here to the field weights
and just turn gravity all the way off. Just in case it has some effect
on the particle movement, I don't want gravity to bring the particles down
and there you go. You can see that
looks a lot better. Our particles are looking
pretty good so far, but if we were to add in the
smoke simulation to this, it's going to be one single dome of smoke and it's not going
to look that dynamic. Let's add in a couple more
objects with more particles to create a much more interesting
shape for our explosion. We'll press Shift A and
add in an icosphere, scale this icosphere down and then just place
it right about here slightly above
our UV sphere, then hit Control A, and
then apply the scale. Over in the particle system tab, we're going to
create a new one and then in the drop down menu, select the one that
we just created and then duplicate
it right there. Now if we change any
of these settings, it's not going to affect
the original one. The first thing that we'll do is set the number a bit lower. Let's go with around 5,000. Then for the start frame, let's give this some slight
variation as well. Let's go up to 51 and then for the end frame,
let's go with 57. The lifetime here, we can
go up slightly higher. Let's go with six, and
then for the velocity, let's actually drag this over to the right side so we can
see what we're doing. We play our animation right now, here is the effect
that we're getting. You can see they're kind of all flying out in all directions. This is not really
what I want. I more want it to shoot off
in the Z direction. So what we'll do is
over on the right side, let's set the normal amount
to two and then the Z, let's go up to around four. And then for the randomized, let's go down till around 0.3. So here is the effect now, and this is more of
the shape that I want. Maybe we'll bring the randomized up slightly higher
till around 0.5. And that is looking pretty good. What we can do now is bring this back over to our
original location, and then we're going
to rotate this so that the particles are shooting
off in this direction. So I'm going to place
my cursor right at the center at the top
and then rotate it, and then we'll go right
about there is good. Now, let's play our animation
and see what it looks like. There we go. That is
going to look a lot better once we add in
the smoke simulation. Going to do this one more
time with this UV sphere, I'm going to hit Shift
D to duplicate it. Come up here, make sure you duplicate the particle
system as well. We'll set the start
frame back to 50 and then for the end frame,
let's go with 55. The lifetime will go
down to five as well. Down here, I'm going to set
the normal amount to 1.5. Then the Z direction, let's go down as well
till around 3.5, and then the randomize
will go down to 0.2. Just some slight variation
in our explosion. Let's also rotate this
so it's shooting off in this direction and we'll
see what this looks like. That looks pretty good. Let's drag this
back over here and then one more particle system
that we're going to be adding is a circle
and it's going to be shooting off in this direction and it's actually going
to hit the floor. With our plane selected, let's add collision to this. Over in the physics
tab, enable collision, and then we'll bring
up the dampening all the way up to a value of one. Will allow the particles
to not bounce on it, but just slide across
the plane here. Then in front view, we'll add in a new mesh object circle. In Edit mode, I'm going to
hit F to fill in a face. Then scale this
down, drag it up. We'll rotate this 90 degrees. Then in the top view, let's also rotate it this way, so it's going to shoot
out in this direction. Actually, you hit Control
A and apply the scale and then over in the physics in
the particle system tab, we'll create a new one and then we'll select the one
that we just created, which I think is this one here. The one with 5,050 and then 55. Let's take a look at
this particle system. We'll drag this over to the
left and we'll play it. That is not really what I want. I want it to be a
lot more random. Let's first duplicate
the particle system. We'll set the randomized
up till around 1.5. We'll see what that looks like. That looks a little bit better. Let's go up even higher
till around 2.5. O. That is looking pretty
good. I like that. Let's position it back
over to the start here, right about there. Now let's take a look at our entire particle
system setup. That looks pretty good. The circle particle system might be shooting
out a bit too far. Let's bring the Z back
down until around two, and that is looking pretty good. Once we add in the
smoke simulation, we're going to have a much
more dynamic looking explosion with all these particles shooting off in
multiple directions.
41. Missile Explosion P3 Simulation: Now that we have all of the
particles working properly, let's create the
smoke simulation. Let's press Shift A. We're
going to add in a cube object. This is going to be our domain. Go into front view
and then Etiode. I'm just going to drag
this up until it's right there sitting
on the grid floor. Now if we scale it up, it's going to be scaled
right on that origin point. For the dimensions
here, let's set the Z up till around
five, it's pretty tall. Then for the X direction, let's go up till around ten. The Y direction will go with, let's say eight or so. We have this big domain that we can work
with just like that. Let's play our
animation and make sure the particles are in
the correct position. It does look like we could
scale this down slightly, but we want to make sure
we have extra room for the particle and smoke to
fly off in both directions. Somewhere around there is good. Then we'll hit Control A
and then apply the scale. Over in the physics tab, let's create a new fluid domain here by selecting the type, switching it to domain. Before we change anything else, let's come down
here to the type. We'll change it
over to so we can bake this in later and
then turn on is resumable. Other thing that we're
going to do is set a custom folder for this cache. Since we're going to be working with two different domains, we want to make sure they
don't override each other. So we're going to set
two custom folders. And the reason
we're working with two different domains is
because the settings for our explosion are going
to be different from the settings for our
missile trail here. So click on the button
on the side here. We're going to open
up this folder and then create a new folder. We'll call this cache one, and then we'll place all of our information data right
here in this folder. The end frame here, we're
going to go down to 125. We don't really need that many
frames for our explosion. Now let's go back
up to the top here and start working through
all of the settings. First off, the
resolution divisions, we're going to go up to 196. I found that this
looks pretty good for our simulation here. Underneath the
border collisions, make sure the bottom
is turned on. Then also turn on
adaptive domain, which will allow the simulation
to bake a lot faster. We're going to turn
on noise right here, if you want to bring
up the uprest factor up t three, you could do that. That's going to give
you a lot of detail, but I think a value of two is perfectly fine for
this simulation. The other thing that we're
going to want to do is bring the reaction
speed much lower. The fire seems to
dissipate a lot quicker with our explosion
with our particles, so we're going to
have the fire last a lot longer by changing
the reaction speed. Let's go down to 0.3. Now let's work on
our flow objects. I'm going to zoom in here
and select all of them. D select the curve right there with this
first one selected, now before you add this
in, make sure you're holding the Alt key
and then select fluid, set the type over to flow, and then for the flow
type, holding Alt still, we're going to go with fire and smoke and then for
the flow behavior, switch it over to inflow. If you held Alt
that entire time, if we selected these ones, you're going to see it has all
those exact same settings. That is one trick
that you can do. If you hold the Alt key with
multiple objects selected, you can change a
setting and it's going to change it
for all of them. So continuing on, I'm
going to hold the Alt key, bring the sampling substeps
up till around ten or so. Then holding Alt,
I'm going to set the flow source from mesh
over to particle system, and then for the
particle system, select the one that we
just created right there. Turn on initial velocity
and for the source value, let's go up till around five. Now, if you hold Alt
that entire time, you should be able to see that all of those settings are there. One thing though that I've
noticed sometimes this happens is if we held the Alt key for the
particle system here, sometimes it doesn't really
work properly and it doesn't actually animate
the flow correctly. So one way we can
fix that is just deleting that and then
adding it back in. We can do this for all
of them just to make sure it's using the
correct particle system. I don't know why that happens. It might be fixed in the version of blender
that you're using, but just in case I
like to come through here and redo all of
those particle systems. Other thing I'm
going to change is with the icospheres here, I'm going to bring
the source value slightly lower till around four. Then for the circle right here, I'm going to bring this even
lower until around three. Since these icospheres are shooting off in a
single direction, with a higher source value, the smoke is going to
fly a lot further. So bringing that a bit lower
will help counteract that. With all of that done,
we can go ahead and save our project and then
we can bake this in. With our domain selected, save your project one more time, scroll down to the bottom here, and then click on Bake A.
42. Missile Explosion P4 Missile Trail: Alright, the bake has finished, and let's go ahead and
scroll through here and see what our
explosion looks like. And that is looking pretty good. Not too bad at all. Now for the next step
in this tutorial, let's work on the missile
trail smoke simulation. First, though, we're going to go into the front view here. I'm going to select
the missile and then press M and move it
to its own collection. We'll call this missile and then we'll create
that new collection. We want to make sure when
we add that new domain that it's not going to be
using the particle systems, and we're going to be doing
that very easily with the collections tab right here
in this new domain object. So I'm going to hit Shift A. We'll add in a new cube. In edit mode, I'm
going to bring this up and then scale this up and just make it about
the same size as the trail of smoke here. We'll drag it this
way. We about there is good, something like this. Then in the front view, I might
scale it along the Y just slightly so we get this
shape for our new domain. Again, make sure you drag this into the missile collection. Press Control A and apply
the scale to this domain, and then we're going
to add in a fluid, switch the type over to domain. Scroll down here until
we get to the cache and make sure we set a
new directory here. I'm going to go back. In our folder right here, I'm
going to create a new one. I'm going to call it cache two, and then I'll place
all of the information right here in this new folder. The end frame, I'm
going to match our end frame for our other
simulation, which is 120. Then for the type, we're just going to
switch it to modular. We don't really need to use all because we're not going to be using a noise for
this simulation. Now, before we work on
all of these settings, let's work on the missile
object itself here. I'm going to zoom
in on it by hitting period and we want to
make sure it's only emitting from the
very back here and then shooting out the fire
and smoke in this direction. Now we can do this by adding
in a new vertex group. In edit mode, we're going to select this face
on the back here. Jump over to the data
panel right here and then create a
new vertex group. With the weight set to one, we're going to
assign this new face with a weight of one
to this new group. Now if we switch over to
the weight paint mode, we should be able to
see, there you go. You can see all of the red
is right there on that face. Now what we can do is jump
back over to the physics tab, select fluid, switch
the type over to flow. For the flow type, let's go with fire and smoke and then
for the flow behavior. We're going to switch
it over to inflow. These sampling stubsps let's go again up until around ten, and then for the vertex group, make sure we select
that group right here. This will allow
only this face now to emit fire and smoke
into the domain. The other thing that we're
going to do is turn on initial velocity and
with a normal rocket, there is constant fire and smoke being thrown out
the back right here. Now we can do that by setting the normal amount up
till around 50 here. Wherever the normal is
pointing on our face here, it's going to be shooting
out in that direction. For example, if it's right here, it's going to be shooting out in this direction and
then as it goes down, it's going to rotate and then shoot off in this direction, which is exactly what we want. The other thing that we're
going to do is animate this use flow right when it
collides with the ground. On frame 50, I want the
smoke and fire to turn off. Here we're going to add in
a keyframe to the use flow, jump to the next frame
and then turn this off and then add in
another keyframe here. And that's basically
all we really need to do for our flow object. As for the domain set ins, go ahead and select it. We'll come down here to the
collections and make sure the flow collection is
set to the missile one. So it's not going to use the particle system and all of these other particles
that we created here. It's only going to be using the flow objects in this
missile collection. So jumping back over
here to the top, we're going to set the
resolution divisions up a bit higher with 256. We're going to turn on the
bottom border collision just in case some of the
smoke collides with it. We're going to turn
on adaptive domain. Underneath the gas setting, let's set both of these
values down till around 0.7, just so the smoke
doesn't rise as fast. And then we don't
need to dissolve, so we're going to go
ahead and leave that off. For the reaction speed, though, we're going to go
much higher to 2.5. Will allow the fire
to dissipate a lot faster because at the moment
with a value of 0.75, the fire is going to be way
over here as it's going down our trail here
and we want it to stop right about here or so. Having it at 2.5 will allow
it to dissipate right here. Now, there is one
more thing that we need to add to this simulation. If we were to
simulate it as it is, it would still look pretty good. But there's one
key factor that's going to be missing
from this simulation, and that is the explosion
force from our first domain. If we play this here,
you can imagine that the force of the
explosion will make all of the smoke here
all along this fly out in all directions because
of the explosion happening. Now we can do that effect by
adding in a force field and then animating the strength of it right when the
explosion happens. I'm going to hit
Shift A and add in a force field and then
select force right here. Hit Alt G to snap it
to the center here, we'll drag it up slightly so it's right in the middle
of our explosion. Now, one thing
that we want to do is limit the explosion and shock wave effect from
a certain distance, and we can do that with
the fall off option. I'm going to turn on the
minimum and maximum. The minimum is going
to set to one, and then the maximum,
let's go up till four. With 1 meter, this
is going to have a full force field
effect and it's going to slowly dissipate
from the strength value. We're actually going
to bring up to four. F four all the way to the end right here,
it's going to go 4-0. For the strength here, we
want to make sure it only happens when the explosion
actually happens. So on frame, let's
go with 51 or so. We're going to set
the strength down to zero and then add in a keyframe. Then for the next frame, 52, let's go up till around four and then add in
another keyframe here. So all of the smoke that is caught right in the
middle and all the way up till around here is going to be blown
off to the side, which will look a
lot more realistic. Again, make sure we drag this force into the
missile collection. One more setting
that we're going to change is with the
missile object. I'm going to bring the
source value here with the initial velocity
down to zero. With it set to one, when
it hits the ground, some of the smoke is
actually going to fly off and go inside the model
which I don't really want. I'm just going to
bring the source to zero and that should
fix our issue. I'm going to go ahead and
save my project one more time and then click
on Bake Data.
43. Missile Explosion P5 Smoke Materials: The simulation has
finished baking, so let's go ahead
and check it out. If we play our simulation, I'll go into front view and to see exactly
what this looks like. Not too bad. Then when the
explosion happens on frame 50, all of the smoke
gets pushed off to the side when the
force field turns on, and that is looking pretty good. Now in this video, we're
going to be working on the lighting and materials. First off, for the lighting, I'm going to jump over
to the world settings here and use an
environment texture. We'll click on the yellow button there, select
environment texture, if you want to use the
same one I'm using, you can find the link
over in the resources. It's over on Ply haven and
it's this one right here, the dry field four K. Go
ahead and open that in. Now let's go into
the rendered view and see what this looks like. Now at the moment, we don't have any materials on
our two domains, and that's why they are cubes. What we're going to be doing
though in this video is going over to the
cycles render engine. I found that cycles looks
a lot better than EV, so we're going to go
ahead and switch over. Select your plane
and we'll scale it up a little bit to
make it a bit bigger, then I'm also going to select
lamp or default lamp here. We don't really need
that in our scene, let's go ahead and delete it. Background, I'm going
to go into Edit Mode, select this edge here
over in Ed select mode, and then just extrude this up so we get a plain background. Then to smooth it out, I'm
going to select that corner, Control B to bevel, and then use the scroll wheel
to add in more vertices. Something like that
will look pretty good. Now we have a nice
smooth background. I'm going to position
the camera right about here or so so we get the
whole simulation in the view, and then I'm going
to hit Control Alt Numpad zero to snap
the camera to place, or you can go up to view down to a line view right here and then select a line
active camera to view. Select your camera
and zoom outwards until we get the full frame. Now, I'm going to jump
over to the end frame, 125 just to make sure that we have the
whole thing in view. I might zoom in a
little bit and place it right about there so we
don't see that cut off. Something like that is good. Now for the material, let's
select our first domain, and then we'll come
up to the top window, split this view, and then switch it over to
the shader editor. You could go over to
the shading workspace, but I prefer the
vertical node workspace right here rather than
the horizontal one. We'll go back into the neared
view and toggle overlays, and then we'll create
a new material. We don't need the
principled shader, so go ahead and delete that
and then press Shift A, we'll go over to Shader and then select principled volume. Take the volume and plug it into the volume of the
material output. To bring in our flame, we'll press Shift A, go over to input, and then add in a
volume infode right here and we're going to be
using the flame attribute. We'll press Shift A and add in a color ramp to control
this a bit more. We'll take the flame, plug
it into the bottom input, and then the color
is going to go into the emission strength. Now to control this a bit more, we'll add in a math node, switch the type
over to multiply. For the bottom value, let's
go with a value of 250. This is going to give us
a much brighter flame. Now, I might drag the
black handle a bit closer to clamp down on
some of the flame value. I think that will
look a bit better. Now for the density,
I'm going to control shift D
on both of these, Control Shift D. This time we're going to
take the density, plug this in, then the value is going to go into the density
of the principal volume. Now at the moment, the
strength is way too high, let's go down to 25. Then the other thing I'm
going to do is bring the black handle all the way to the left and then
the white handle, I'm also going to
drag a bit closer. If we jump to frame 120
or so right about here, you're going to see the
effect that we get. If this is all the way at zero, the edges of our
smoke is very light and wispy and not that sharp. If we were to drag the
white handle a bit closer, it's going to clamp
down on some of those edges and give us
a much better result. Something like that
will look pretty good. For the color of the smoke, if you want it to be
more of a lighter color, you can drag this up or
if you want a darker, more explosion looking
color, you can drag it down. I might drag it down just
slightly so we get that look. Now for the color of the flames, let's jump back over
to frame 60 or so. Then I'm going to select
the color ramp control shift D to duplicate it. Take the color and plug it
into the emission color. We'll add in a new handle
and for this handle, it's going to be
a reddish color. Then for the white handle, this is going to be more
of a yellowish color. Somewhere around here
will look pretty good. The other thing I'm
going to do is over in the render tab underneath
the color management. I want to set the
look to high contrast and then for the view transform, I want to use filmic to bring more of that
saturated color in. I might bring the yellow
a bit less saturated. Something like that
will look pretty good. Then we'll jump to a
little bit later frame 80 just to double
check how this looks. Yeah, there we go. That's
looking pretty good. If you want more dense smoke, you can turn up
this multiply node, or if you want the
fire to be brighter, you could go higher with
this value like 500. That's going to give
a very bright flame. But I think a value of
250 is perfectly fine. As for the other
smoke, go ahead and select your trail domain here. We'll use that same material right here, the normal material, and then make sure
you duplicate it so it doesn't affect
the original one. Now let's jump to frame 20 or 19 or so,
somewhere around here. Actually, that is looking
pretty good so far. I might drag this a bit closer and then for
the value here, let's go up to 50. There we go. Now we have a dense smoke
trail and then for the color, I'm actually going to go much brighter all the way to white. To control the flame, if you
want it to be a bit shorter, you can drag this value, this black handle a bit
closer to the right side, and that's going to clamp
down on that fire trail. And then if you wanted to
bring back that color, you can drag this orange handle a bit closer to
the right as well. Something like that
will look pretty good. For the material for the plane, go ahead and select your plane. We'll give it a new material, and then I might just
bring the roughness down slightly so we get
a nice glossy look, and I think that will
look pretty good. If now we jump to
frame 60 or so, we're going to get
some nice reflections in the bottom of the plane.
44. Missile Explosion P6 Render Settings: Now that all of the
materials are done, let's work on some
render settings and then we'll finally render
out our full animation. First off, we're going to
jump over to the first frame, and I want to make sure all of these objects are hidden
from the viewport. Over on the outliner here, make sure they're hidden from the view and from the render, and then for the icospheres, we'll also hide those objects and then finally the circle, make sure that is also
hidden from the render. The thing that we're going
to want to do is jump over to frame like 55 or so, maybe a little bit
more than that. We're going to make sure
that the missile here also disappears when the
explosion happens. Find a frame that looks
good that the missile is hidden and that
looks pretty good. We're going to go ahead
and use this frame on 58. Hover your mouse over the render icon for the
missile and then hit I to add in a keyframe
and then go one frame later. We're going to turn it
off and then add in another keyframe so that
missile disappears. And now when the animation plays and then it's
revealed later, there's not going
to be a missile shown up there in
the rendered view. The other thing that
you might notice if we go into the rendered view is we get some random
blotches of shadow here, there's a blotch
there, a little spot there and a couple here. Now we can bump up
those transparency rays by opening up the light paths. Underneath the
transparency right here, we're going to bring this all
the way up until around 32. And once we do that, now you can see those shadows are gone. Over here, those
shadows are also gone. Up here at the
top, let's set the render samples down to 50 or so. I think that will give us
plenty of samples to work with. And then underneath the denoise, I'm going to make sure my use GPU is enabled for the
denoise right here. Let's go ahead and do a
render on frame 65 or so. Something like this, this
will look pretty good. Let's go ahead and hit F
12 to render out an image. Once the render is done,
we're going to be adding in some glare over
in the compositor. The render is done
and I'm going to hit Escape to exit out of the rendered view and then jump over to the
compositing workspace. Select use nodes, and
then with this node, we're going to go
ahead and close off this bottom window
here by dragging down, and then you can hit V a
couple times to Zoom out. I'm going to press
Shift A and add an A filter and then
glare and place that right here
and then switch it from streaks over to fog glow. With the fog glow, we
can bring the strength down a bit because I think
it's a bit too strong, the size down slightly
right about there. If you wanted to
give it some tint, you could go with an
orange or yellowish color. Somewhere around here will
probably look pretty good. Now we are ready to
do a final render, so I'm going to go ahead
and save my project one more time over
in the layout tab, we'll jump over to
the output and then set a custom folder of where we want our
animation to go to. We will be rendering this
as an image sequence because this is going to
take a lot longer than EV, and then we're going to
sequence it out later. Just in case blender crashes, it's really important that
we render it as sequence. The button on the side and
navigate to a new folder. Create a new folder here
and then select it, and then we'll place
it in this folder. Go ahead and click except. The end frame in the timeline, let's match our end frame
of our simulation with 125. I think that is all
we really need to do. I'm just going to
double check everything is good. I think so. Yeah, we're good to go, save
your project and then go up to render and then
select Render Animation. Now, since we already
covered how to sequence all of your
frames into a movie file, I'm going to go ahead and
skip that for this tutorial. If you want a refresher
of how to do that, you can jump over to the
campfire section and view the last video in that
section. But there we go. That is the final result of
our explosion simulation. If you created something from this section, I would
love to see it, so feel free to send it to me on social media at
Blender Made Easy.
45. Glowing Smoke P1 Flow Object Animation: Hello, everyone, and
welcome to a new section. In this one, we're
going to be creating this spherical smoke simulation. We're going to be
animating the flow object inside and having it collide with the
edges of the sphere. The main goal of this
project is to show how to simulate smoke and fire
inside collision objects. To get started, let's add in all of the objects that we're
going to need for the scene. With this default cube, this is going to be
our domain object. Let's scale it up by going
into the properties tab by pressing N. We're going to set the dimensions up to
a value of three. Then for our collision object, let's press Shift A and
then add in an kosphere. Before we do anything
else, we want to open up the bottom
left panel right here and set the number of subdivisions up til
a level of four. Now we have a lot more
geometry to work with. Then in front view, I'm going to scale it up to be about the same size
as our domain. Somewhere around there is good. Now for our flow object, let's press Shift
A, and we're going to be adding in a UV sphere. Scale this UV sphere down to be about the
size that you want. Somewhere around
there is pretty good. We have all three objects, let's select all of
them and then press Control A and then
apply the scale to it, so all of the numbers in the
properties go back to one. Now before we add in
the smoke simulation, let's create the animation of our UV sphere here flying
around our collision object. To do this, we're
going to be adding in one single keyframe and then applying noise to the
location of this object. To do this, press K with it selected and then
choose location. Then we're going to
open up a new window by coming up to the top right, splitting this view, and then switching this editor
over to the graph editor. If we open up this
panel right here and then underneath the
object transformation, we can see all of the locations of the keyframe
that we just added. Now, what we're going
to want to do is select the location. Then over on the
right side, we're going to switch it
to the modifier tab, click Add modifier, and
we're going to choose noise. Now at the moment, if
we play our animation, this is what it looks
like, and this is way too fast and it's
jittering way too much. The first thing
that we're going to want to do is bring up the scale all the way to ten. This is going to bring
out the noise pattern and stretch it out
a lot further. Now our movement is
going to look like this. Now this is looking better, but we can have the
sphere go all the way to the edge of our collision
object for that to happen, we need to bring up
the strength value. Let's try a value of two first and we'll
double check that it doesn't go outside of
our collision object. If we play our animation,
that looks pretty good. What you can do is find
the highest point, which is right here. It looks like we still have
a lot of space to work with. Let's go up even further. Let's go to 2.2 or so and then we'll just double
check everything else. That looks pretty good. Other thing I want to do is
right at the beginning here, I don't want any noise. What I want is for a
smooth transition from the very center to where the
noise is actually happening, and we can do that with
the restrict frame range. Go ahead and check that and
then open up this panel. We're going to set the end
frame to match the end frame in our timeline and for this
simulation in particular, we're going to go
with 200 frames, go ahead and set that to 200. Then for the blend N, we're going to go up to
a value of around 20. So you can see here
if I zoom in now, if I bring this up even further, you're going to see
this blend effect, and that's going to give us
a nice smooth transition into the noise pattern. Again, I'm going to
go back down to 20. If we play our animation
and look at the top, you're going to see it's only
moving along the X axis. What we'll do now is
we're going to copy this modifier and apply it
to the other locations. You can copy it by clicking
the button on the top right, then selecting the Y
location and pasting it in. Now, you will want to change the offset value here
because at the moment, you're going to see it's using the exact same noise pattern. With the Y one selected, let's bring up the
offset up higher until we get a better noise
pattern, something like that. I might go a bit
different because I don't really like this
length of noise. I want it to be more chaotic. Let's go up until we find
a better noise pattern. Something like that
will look pretty good. Then we're going to
select the Z location, paste it in as well. Then again, we're going
to change the offset, maybe go into the negative
direction this time. Something like that
will look good. Then just go into the front view and double check
that it does not exit outside of our
collision object. It looks like it doesn't. You can go into top view
as well and double check this angle just to make sure that it does not exit
the collision object, and that is looking pretty good. One more thing that
we're going to do is right at the beginning here. What I want is for
this object to scale up and then
start moving around. This will allow the simulation
to have a seamless loop. To do this, we're going
to jump into front view. And then in the properties tab, we're going to set
the scale right here down to zero on frame one, and then hit K and then
add in a scale keyframe. We're then going to
go five frames later, set the scale amount up to 1.1, and then add in another
scale keyframe. And then again,
five frames later, we're going to go down back to the original scale
of exactly one. Hit K and then add in
another scale keyframe. Now, here's the
effect that we get. You can see right here, it goes out and
then it comes back in and that's going to give
us that popping out effect. That is one trick that
you could do with any sort of animation is you can go past the original value and then a couple
of frames later, go back down to the
original value, and that'll give you a
nice popping out effect. So with that done,
we're going to go ahead and start working
on the simulation.
46. Glowing Smoke P2 Simulating the Smoke: Now that we have all the
objects in the scene, let's start working
on the simulation. We're not going to need
the graph editor anymore, so come up to the
top and then just click and drag to get
rid of that window. Now, first off, we're going to work on the collision object. Now with collision objects, there are a couple
of things that you're going to need to do for this object to have smoke
actually simulate inside of it. First off, let's go into
Edit mode with it selected. I'm going to come up to the
top right right here and then turn on the normals and then
bring up the size slightly. The direction of
these blue lines, that is the direction
of the normals. This tells us that
blender is treating this object as a
completely solid mesh. This means that there's
going to be no smoke that's going to be able
to simulate inside of it. What we're going to
need to do is flip the direction of the
normals so that they're on the inside and now
that's going to tell blender that this
object is empty. We can do this by selecting everything and then
hit Control Shift N, and that's going to
flip the normals. Now if we go inside, now they're pointing
towards the inside. Now this is actually
a empty object now according to blender. Now that is not all that we
need to do for this object. The other thing that we're
going to need to do is delete one phase so that
there's a small hole on this object and we want
to make sure this hole is bigger than the voxel size
of our domain object. Now, I don't know if this is just a limitation with lender, but a lot of my testing, I could not get the
smoke to simulate properly without a small
hole in the object. What we're going to do
is go into top view. Let's go ahead and select our
domain and press H to hide it just so we can focus
on this kosphere. Then in edit mode, I'm just
going to select that vertex, press X, and then delete it. Now we have a small
hole on our object. Now, the other thing
that we're going to want to do is go into front view. I'm going to press Shift A. Actually, first, make sure the cursor is at the
center and I'm going to press Shift C to snap the
cursor towards the center, and we're going to be
adding in a new object. This is going to be a UV sphere. The reason we're adding this UV sphere is this is going to be an outflow object just in case any smoke gets out
of that little hole. What we'll do is
we'll scale this up to be about the same size. Then in edit mode,
I'm just going to select the majority of
the bottom right here, press X, and then delete it. Now we just have this small top and then I'll drag
it up just slightly. What we're going to do with this object is
we're going to jump over to the physics
panel, enable fluid, and switch the
type over to flow, and then for the flow type
or the flow behavior, I mean, we're going to
switch it over to outflow. This will delete any smoke that exits outside
of this small hole. Then with this object, we're
going to enable fluid, switch the type over to afector and then make
sure I planar is checked, and then for the
surface thickness, we're going to go up 2.1. Also, for this object, we also want to make sure
that this I planar is enabled right here as well because
this is a non manifold mesh. And that's basically what we need to do for our
collision object. Now when we simulate it, it should work properly. Next, for our flow object, go ahead and select
it, click on fluid, switch the type over to flow, and then for the flow type, we're going to leave it on
smoke, the flow behavior. We're going to switch
it over to inflow. For the other settings,
we're going to bring up the sampling substeps up to ten because this object
is moving very quickly. We want to make sure
the sampling is high enough for it to
calculate properly. In the flow source here,
we're going to set the surface emission
a bit lower to 0.5. Then the volume emission, we're going to go up
to one and this will allow more smoke to
enter our domain. You can also turn on
initial velocity right here and then bring up the source
value up to 1.5 and enter. This will allow a lot of
smoke to fly off and hit the edges of the collision here as the sphere
is moving around. Our domain object, we can press Alt H or option H to
bring back our domain. Go ahead and select it, enable fluid, switch the
type over to domain. For the resolution divisions, we're going to go up
to a value of 160. Then we're going to
scroll down here. We don't really need any
border collisions because the border is going
to be this kosphere. But what we will enable
is the adaptive domain. Go ahead and enable that. For the threshold
here, we're going to be enabling dissolve
for the simulation. We want the threshold value
to be a little bit lower. We're going to go 20.01 and that should allow
no clipping to clip off any of the then
we're going to turn on dissolve right here and
set the end frame to 15. If you want the smoke
to last longer, you can go up even further, but I think 15 is a good value. Down at the bottom here, we're going to set the end frame to 200 to match the end
frame in our timeline, and then we're also going to
switch this to modular and then is resumable just in case
we want to stop the bake. The other thing I
forgot to do with our flow object is
we're going to be turning the used flow option
off at frame 70 right here. This will allow the smoke
to dissolve and then it'll be a seamless loop once all of the
smoke has dissolved. What we'll do is on
frame 70 right here, we're going to add in a
keyframe to the use flow. Go one frame later, 171, turn off the use flow, and then add in
another keyframe. At the moment, it's going
to emit smoke all the way to frame 170 and then
it's going to turn off, then the dissolve will happen, and then on frame 200, it'll loop and it will be
a seamless transition. With that done, let's go
ahead and select our domain. Make sure you save your
project just in case this crashes and then
click on BAC data. Once the BAC is done,
we're going to set up the material lighting and then render out that simulation.
47. Glowing Smoke P3 Lighting & Materials: Alright, the Bake has finished,
and here is our result. If we scroll through
the timeline, you can see the smoke is
looking pretty good and it's stayed within the boundaries
of the kosphere object, and that is very nice. Now in this video, we're
going to be setting up the glowing effect and the
glass sphere around our smoke. First off, we'll jump into the front view by hitting
one on the number pad, and then over in the outliner, let's hide all the objects
that we don't need, which includes the kosphere. I'm going to hide
it from the view and hide it from the render. And for the flow object, we're going to
hide that as well. And then the outflow object, let's hide that from the
view and from the render. The first material that
we'll set up is the smoke, so go ahead and
select your domain. We're going to come
up to the top right, split this view, and then switch it over to
the shader editor. Right now it's using
the default shader, so let's go ahead and delete
that principled shader. We're not going to
need that. Then we're going to press Shift A and go over to Shader and then
select the principled volume. I'm going to press iclos off
that properties tab as well. We're going to take
the volume and plug it into the material output. We go into the rendered view, we still really can't
see the glowing smoke and that's because
we need to take the density attribute and plug that into the
emission strength. To do that, press Shift A, go over to input and add
in a volume info node. We'll place that over
there on the left side. Then we're going to add in
a converter color ramp. Take the density, plug it
into the bottom input, then the color is
going to go into the emission
strength right here. To control the strength of this, let's add in a math
node, place it here, and switch the type
over to multiply, and then for the bottom value, let's go with a value of 25. That's looking a
little bit better, but our smoke is very pixelated. So let's fix that in
the render EV settings. Over in the Bender properties, we're going to open up
the volumes tab right here and set the resolution
from 1.8 down to 1.2, and that's going
to give us a lot more detail in our smoke. Then with this color ramp, we can control how much smoke that we want to
appear in our scene. What I'm going to do first
is switch this over to ease and that's going to give us a much smoother smoke
as you can see. Then I'm going to drag it
over to the right side just slightly like
this and I'm going to drag the white handle
closer to the left and that's going to give us a
sharper edge along our smoke. Then one more thing
we're going to do is add in a new handle, drag this to the right
side and just give it a slightly gray color,
something like that. If we skip to a different frame, you're going to see here, if we drag this all
the way down to black, that's going to give us a lot
more transparency right in the middle of our flow object,
which I don't really want. I only want a little bit. Right around here
about halfway down, that's going to give
us a nice effect. For the color,
we're going to come over to the principled volume, set the color down here
to a nice blue color, something around here
will look pretty good. If you wanted to, you could
switch it over to a green, red, pink, whatever you want. I'm going to go with a nice
blue color, something around. There is going to
look pretty nice. Now for our glass object,
let's press Shift A. We're going to add in a new mesh and then select UV sphere. We're going to need to
scale this up and we can re enable the icosphere to see
the exact size that we need, we'll scale it up to match the icosphere
right about there. Then at the moment,
this is very low poly. Let's press Control two,
and that's going to add in a subdivisient
surface modifier, which will really smooth it out. Then from here, right
click and Shade Smooth. I want to double check that
the smoke is looking good, so I'm going to skip to a frame where the smoke is
touching the walls. If we zoom in along the edge, that is looking pretty good and that's basically the
size that we need. The material for this UV sphere, we're going to create a new one. Then with this principled
volume shader, we're going to bring the
roughness down to zero and then the transmission down here, this is for the glass. We're going to bring this
all the way up to one. Now we still can't see
our smoke and that's because the transparency
is also at one. What I want to do is bring this lower down to around 0.2 or so. If we toggle overlays, now we're getting this
effect and this is going to look pretty good once
we render this out. Over on the right side,
we're going to enable tracing to get some
nice reflections. And then also with
this material, we're going to jump over
to the material tab down in the settings right here. We're going to change
the render mode from dithered over to blend, and that's going
to give us a much smoother gradient
along this edge. You can see if it's
switched to dithered, we get this very noisy pattern, but blend gives us
a really nice look. If you think the transparency
is a bit too high, still, you could go down to 0.15.
That might look pretty good. With that done, we can go ahead and close off this tab now. We're not going to need
the shader editor anymore. Let's jump over to the
EV render settings. I'm going to open
up the film tab and turn on transparency. This will allow us to add in our own background in
the compositor later. Then underneath the
color management, let's set the look
to high contrast. That's going to make the
colors pop a bit more. If you think the color
is too saturated now, you can select the cube, and then over here in the
principle volume shader, you can change the
emission color. I might drag the saturation
slightly lower like this, so it's not as bright
of a blue color. Something like that
will look pretty good. For the camera,
I'm going to jump into the front view and then hit Control Alt Numpad zero to
snap the camera to place. Then we'll select it and
drag it back until we get the entire frame in view, maybe rotate it
along the X axis. Somewhere around
here will be pretty good and we'll rotate it
up right about there. And then over on the
right side, I'm going to select the point lamp
and delete that. We're not going to
need it in our scene. From here, let's do a
render by hitting F 12. Once the render is done,
we're going to jump over to the compositor and then add in a background and some glare. Once the render is done,
you can hit escape and then jump over to the compositing
workspace right here. Make sure used nodes is checked, and that should enable
the render layers, the viewer, and then the
composite node to pop up. To hide the dope sheet, we can click and drag
the bottom left here, and then to zoom out our image, we can press V a couple
times and that will zoom it out and then tB,
we'll zoom it back in. First off, let's add in that background by hitting Shift A. We're going to go
over to color mix, and then add in an Alpha
overne. We'll place that here. Make sure the image is
in the bottom input, and now the image right here, this color controls the
background of our render. I'm going to drag this over
to a blue color and then drag the lightness down until we
get a very dark blue color, maybe slightly less saturated. Something like that
will look pretty good. Then to add in the glare,
we can press Shift A, go over to filter, and then add in a glare node
and place it here. For the method, we'll
switch it over to fog glow and that's going to
give us a nice glow effect. Then you can play
around with the size if you want it to
be less or more, you can change that here, and then the strength
you can change as. Well, I might bring the strength
down to 0.7, maybe 0.8. That looks pretty good.
The size slightly higher. Right about there
is pretty good. Last thing we'll add to this
compositor is a vignette to darken the corner so that the focus is right
in the middle. We can do this very
easily by adding in a mask and then an ellipse mask. You can control shift left click on this to view what
this looks like, and then all we need
to do is bring up the sizes right here until
it goes along the corners. Something around
there is pretty good. Maybe we'll go 1.1. Then to blur this, we
need to add in a filter, blur, and then add in
a normal blur node, switch the type over too fast, and then for the size, let's
go up pretty high to 320. Maybe we'll bring the
size down actually somewhere around here
will look pretty good. To bring this into our
composite, let's press Shift A, go over to color, mix, and then add a mixed color. Take the image and plug
it into the bottom input. Now we take a look at this, we're going to need
to switch it from mix over to multiply and that's going to get rid
of all the white values, but keep the black values and then we'll bring the factor
down until around point. Let's go with 0.25.
And there we go. That is looking pretty good. At this point, I think we are
ready to do a final render. Go ahead and save your project and then over in the layout tab, let's set the end frame to match the end frame
of our simulation, which is 200 and then
we'll double check that the smoke actually disappears on frame 200, which it does. Now when the animation plays entirely, it'll loop seamlessly. When all the smoke disappears, it'll restart and
then the smoke will reappear and then go through
the entire animation again. Over in the output
tab, let's set a directory of where we
want our frames to go to. Once you've found
the folder, click Accept and then for
the file format, I'm going to leave it on P and G because this
will take a little bit longer to render and then we'll sequence it
out afterwards. After you've set that output, let's come up to render and
then select render animation.
48. Glowing Smoke P4 Sequencing the Render: The render is done,
and now let's sequence all of the
frames into a movie file. Now, we did cover this in the section where we
did the campfire, but we'll just go through it one more time really quickly. Up at the top right,
we're going to switch the mode over to the
video editing workspace. Then we're going to
hit the backspace to restart the timeline, go over to add Image sequence, and you're going to want
to navigate to where your frames are min
are in this folder, press A to select everything, and then go add Image strip. But also make sure
that it's set by name and not modified date
or it'll play backwards. Go ahead and add that in and
then over on the right side, we're going to switch
the file format over to a movie file. In the encoding down here, you can set the container
to whichever one you want. I'm going to leave
it on MP four, the output quality, I'm
going to leave on high. Then over in the
render properties, we want to double check that
the color management is set to standard with
no extra contrast. Because at the moment, if
we were to switch this to AGx or high contrast, it's going to automatically
apply another layer of high contrast on top of the high contrast that we
already rendered the frames. Make sure it's set to standard
here and it'll leave it at the exact colors that
we have for our render. Also for the look,
I want to make sure this is also set to none. Once we've done that,
double check that the output is right here in
the directory that you want. Then go over to render and
then select Render Animation. This will sequence all
of the frames into a movie file and put it into the folder that you
set for the output. But there we go.
We've now completed this section and we've made it all the way to the
end of this course. Thank you very much for watching all the
way to the end and if you did every single
video up until this point, congratulations on
completing the course. Where do we go
from here? Well, I recommend just jumping into blender and messing around with some more
smoke simulations. You have a reference of
something that you want to create that is
extremely helpful, like an explosion or some
sort of smoke simulation. Look up references and then try to create that on your own. Again, thank you so much for
enrolling in this course, and I can't wait to see
what else you guys create.
 Stephen Pearson, Founder of BlenderMadeEasy