Transcripts
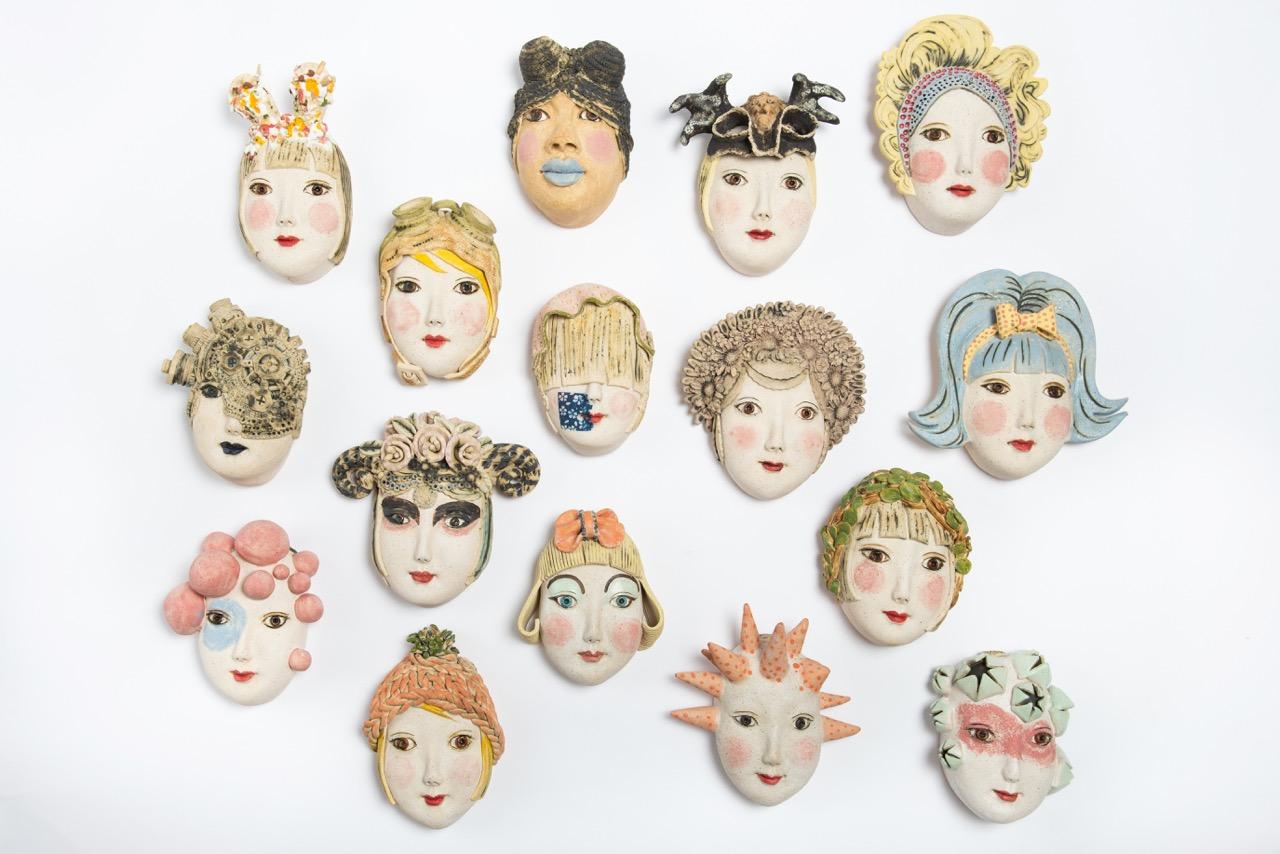
1. Introduction: My name is Jamal Chen. I'm a ceramic artist originally from Hong Kong.
Now based in the UK. I create female face
mask and sculpture. In this course, I'll
be demonstrating how I make contemporary
clay wall mask. I'll walk you through
every step of creating the mask using either air
dried or kin firing clay. We'll start by talking
about tools and materials, then to understanding the
different stages of clay. I'll show you how to make a temporary phase mode
so that we can make various sizes of mask using slap building
technique for the face. I'll break down the generic
phase proportions then onto sculpting features like
the nose, mouth, and eyes. We'll explore adding textures
and corals to the mask. How to dry your piece
slowly to prevent cracks. We'll conclude with
a coal finish using a color paint and other
pigments for air dry play. At the end of the course,
you'll be able to make your own unique face mask.
2. Clay, Tools, Work Surface: This unit, we will look at setting up our work
space materials. And to the clay we use
is water based clay. It can be air dry clay or firing clay if you
have access to a kiln, Air dry clay, there's no
need to fire the work. It will get hot just
by sitting in the air. See your work with a vanish
and keep it away from moisture There many brands
with various textures, smoothness and colors, some brands do not have the
same feel and strength. Like normal firing clay, you often need to build an amateur or an inner
frame for larger work. I particularly like this brand of air dry clay.
The clay is strong. Once it is dried, there's strength in
the finished project. You can also find this clay
if you have access to a kill. The feel of this
clay is very smooth. Some brands are just not
that smooth to work with. This brand is very
easy to work with. I find this clay is
the closest similar to the type professional
ceramic artists use. Its texture is mallable. You can push it back together, you can smooth things out is gray in color
when it is tried. Kil firing clay, you need
to have access to a kiln. In this video, I'm using
stoneware clay in demonstration. This is the clay I normally
use than high fire studio. There are many different
types, colors, and shrink clay bodies depending on the scale
of work you're building. As long as you're not creating
something really huge, not larger than a
life size face, any clay body would do. The glazing coloring
will be very different, depends on which
clay you're using. For air dry clay,
probably you'll be using color paint
and silver with primer or vanish
for firing clay, and you'll be using underglaze
size or over glaze. You will need to always
keep your clay moist for both air dry
and firing clay. Wrap it inside a plastic bag to keep it moist at all times. These are the
pottery tools I use. You don't really need
real pottery too. A lot of things you can
find in the kitchen. Okay, let's go over the toes. We need a rolling pin
to flatten the clay. We also need two wooden strips. We call the guys to roll out
clay, slap even thickness. But if you don't have
that, just pay attention. While you're rolling out
the slap, it will work. We need a rubber kidney
to smooth the clay, but if you don't have one
of these rubber kidney, you can just use silicone
spatula to smooth the play. We need modeling wooden to something like that to
bod the clay together. Another wooden to
that's quite handy. A pointing knife. This
is a pottery knife. Again, you can use
any pointing knife, very size of brush
that to apply slip on. That is like the glue
to join the play, different size and bristles hardness to paint
your finished work. Then a few sculpting tools that you can also get
it easily on line. Particular, something like
that with a pointed end, that is to scalp the
corner of the eyes. I got a few of the sculpting
to You need a needle to it? I have a special needle too, but if you don't have one,
just a bamboo stick will work. I have a to like this
with a rounded end. That is for sculpting the nose. And the same as this
is a rounded end. Two. We also need a
little container for us to make the slip that is the blue to
boil the play together. We need a bucket of water
for cleaning your toes. We need a wet cloth.
A wash cloth. We need a sponge to smooth your clay and plastic
bags to store your play. Keep it moist and not dry out. We have a little p for you to keep your play
face on the mold and two pieces of plo you to roll out play if
your play is really wet. Ideally you have a
wooden work surface. If you don't have a
wooden work surface, if you can get hold of a
wooden board that will work. Working with clay, that is very important that
play get on your hands. And then when clay dries, it becomes dust
and you breathe it in as clay got silica in it. And it's unhealthy
to grieve that you always get a
wash cloth handy. Wash your hands and your
toes in a bucket of water. This water, you cannot throw
it down in the toilet, not in your kitchen sink, not anywhere inside the house. And throw this dirty water outside in the
garden or somewhere. If you live in an apartment, you cannot throw it out in
the garden and just let the water sit and all the
clay drops at the bottom. And then you scoop up some
clear water, throw it away, and the final bit
of dirty water, you just leave it
for water to ap, orate after a few days. And then you pick out
the dry clay pieces and chuck it in the ban. Never throw your dirty
water down the drain, because it will
crock your drain.
3. Clay Stages: Hand building techniques
in pottery is another way of creating
beautiful clay objects, particularly in clay sculptures. It is most important to understand clay dries
in different stages. From really wet clay coming out from the back
to totally bone dry. And knowing when to join
clay pieces together. Building in height,
shaping the form, carving patterns and
sculpting details. Plastic stage. When clay
comes out from a bag, it is soft, sticky, wet. Different brand of air dry clay has different moisture level. Generally, it is
sticky to the touch. It is soft, It is bendable without breaking and
creating cracks. This is a good working stage. It's good for coiling, pinching, and rolling out slaps. This is a leather stage. When clay is left out in
the air and cover for a little while depends on the room temperature and the
wind flow in your workspace. It's got to be the strength able to keep the shape and form. It is not sticky to touch. Leather stage is great for
creating indent textures. You can still bend it, but there are some small cracks there which you
can easily smooth the surface if you leave your clay out overnight
or quite a few hours. This is the leather heart stage. If you bend it,
it will break and crack when attaching two
pieces of clay together. It's best use leather stage or the plastic stage to
bone clays together. When clay is totally dry, we call it boom dry, boom dry clay is very fragile. If you bend it, it will snap. You cannot attach wet
clay to boom dry clay. When both pieces dry, there will be cracks
or just simply fall off using Bogdryclaykelip. In the next unit, we'll
look at making slips. Slip is the glue joining two
pieces of clay together.
4. Slips & Joining Clay: We use the bum dry clay, crush it up, and put in a container and you
add water to it. This you mix slip. We call this slip that is like glue for joining
clay together. Spend a little bit
time as move it. The consistency that
I'm looking at is a bit like yog consistency,
not too watery. This we call slip using slip joining two pieces
of clay is better, is still the plastic stage or
the early on leather stage. Like if I want to join these two pieces together,
what you need to do, use a sharp to a knife or fork or anything
you can find and do a lot of criss
crossing here we call scoring the touching parts. Then you do the scoring. Then you put some slip
on on both sides. Be generous with the slip, put a little bit on because I need to have a good bonding, put it on, press it
hard on both sides, and then clean it up a little
bit with your wooden tool. That is how you do joining
two pieces of play together then Only do it
when it is really still, the play is still wet. Or early leather stage. Never at the leather
heart stage, or the boom, dry stage even. It seems like it's attached, but when it's totally dry, it will just fall off in crack.
5. Face Mold: When you get the clay
out in the back, you can use a wire
two like this. But if you don't have a wire to you can use a knife wire two, that is how you cut the clay. Then you get a piece of clay
from the big block of clay. If you don't have a wire, use a knife and to do little bit cutting because the knife would get stuck
between the clay. Don't try to cut all
the way through. Cut open, cut a little bit open. This is a small piece of clay, that's why it's so easy. But when you try to cut a
piece off from a big block, it can be very
difficult just use the tip of the knife cut
a little bit at a time. We've got a block of
clay here right now. We will make a temporary
mode for draping the sheet of clay over the
mode to produce a phase shape. Modes for ceramics are usually
made of plaster or wood. However, we can always
use things around the house as a mold to
produce a shape instantly, such as a big round
shape from a syllable. The mold gives the support to the face While you are
working on the features, alarm pressure on the clay
and holding the shape. Well, roll it, flip
it in all direction. How thick is this piece of
clay you want it to be then? It depends how big the size of the mask that
you want to build. For a palm sized
mask like this one, the thickness is probably, I will say is around
2 centimeters. Will do rode out a piece of clay slab is
around 2 centimeters. Once you've done that, then you use your shot knife and
then to draw an oval shape, that is the face. Then just cut that. So I want you to cut
the clay straight down. I don't want to create
an undercut because as this is a mold you
play play slap on top. When you pull out the mold, it won't have the undercut
that it will be difficult for you to pull the face
away from the mold. This, this is your
clay face mold.
6. Face & Clay Storage: Watch out for any trapped air. If there is any trapped air, if you go down the firing route and the moisture in the clay when they need
to evaporate in the kill. And it could cause crack or
even explosion in the kill that your work will be
broken, explode into pieces. So pay attention to that, to those trapped air. If you do sub see a
bubble trapped air, just pocket it then you get
rid of those trapped air. This is rolling out a
piece of clay slab. If your surface is not wood, you can get a wooden board. Or why. You can get two pieces of cloth clay on
top of the play, on top of the cloth, and put another cloth
on top of the clay. Then you roll it out that will help to absorb all the
moisture in the play. The final rolling will
be on a flat surface, then you get a very
smooth surface. If your clay slabs got a lot of line
increases and all that, you can use a spatula
just to smooth the clay, then you get rid of
all those mappings, also put a little bit pressure on it to compress the clay. That is very good. Then the
clay slab is really strong. Again, roll it. Now we come back to
the clay oval shape, the face form we
made earlier on. What we need to do is
put it in a plastic bag. Small plastic bag. Okay. It's good to have plastic bags
called a little bit of grab that you can out
from the, from your work. Then put a little
piece of cloth over your face form with the
plastic bag early on. Re, roll out a piece of slap. Place it over the form and
use your palm to press it all the way to form the face. Spend the time and making it a bit round and an oval shape. And then trim off
the excess clay. Yeah, so spend the time
on fixing it nice. You can pick it up, use your spatula to
softly payday into shape into that awful shape
that bit round the corners. So this is basically face form. When we have finished doing
sculpting the whole phase, we can just pull
out the clay form and then take the play. But meantime, the
form will give you very good support while
you're working on the face. Might not be able to finish
your work in one go. You might do a couple hours and then way for two weeks and then you have time
to do it again. How you store your clay
and still keep it wet. Then you find a rigid
surface, a board. A plate can be anything rigid. And put a piece of plastic there and put your
work on top of it. If you play a bit too dry that you've been
working for a few hours, it's getting a bit
dry before you saw it away for another couple weeks
or even a couple of months. Give a little spray
what you will do. And then put the whole thing, the rigid board and your work and cover
it in plastic bag. If you're going to work
it next week or whatever, then just one layer is enough. If you think that
you won't be able to work on your piece of
work in a few months, I will suggest that
a stronger plastic bag cover with two bags.
7. Face Proportion: After you spend some time fixing the face is a little bit, you can see that is an oval shape here is round a bit is not
so flat the face, we want this to be a bit round. Okay? We are doing a very
generic measurement with this. What you will do is just
draw a line in the middle. And another line in the middle
is something like this. You can just eyeball it. It doesn't have to
be 100% correct. Didn't do the
measurement because no face is exactly symmetry. Anyway, we got half, half. This is the eye line. And then from the eye line
to the bottom of the chin, we do another half. This is your nose line. And then from the nose
down to the chin, we divide into three. Okay, Basically here,
divide into half. This is your line
from there, 12, another two P. This is
your lips and mouth. We got this right now.
8. Nose: We've got the form of the
face and divide it into two half and the
three parts here, when you put features
on it is better to wait for the play to
dry up a little bit. It's not too tech to touch, doesn't is too
sticky or too messy is just the start of leather stage and then we
start to add features on it. But the clay we use to
add features on it, it should be very wet clay. If your clay is a little bit too dry and then maybe
you should wet your fingers a little bit and just give a bit of
moisture to this clay. The nose, we do the nose first and then w
to the mouth next. Get a tiny piece of play and then do a
little bit saucation. It is something like this. What the sausage will be, if you look at the paper here, will be something like this. Once you rolled out
that the length is roughly from the eine line
to the bottom of the nose. Give a little bit
to make the surface flat and do a bit of scoring here and a bit of scoring here. And put a little bit slip on, then you put your nose there. Use a Wooten two to
bond the clay together, compress it and
merge it together. Spend the time and wet your finger tip a little
bit and then massage it. And to form the nose
here is a bit flat. We will need to
add more wollen to the nose and then pick up the board and
look at it from the side. You can see this is quite flat. We need to put a little bit play on the, on the brown here. We need to have a bit of play
on the side of the nose. The two balls there. Keep adding play pieces. A little bit of play onto no, to form the nose
bridge and flesh out the nose a little bit
to add balling to it. But whatever you're doing is always a very good look
at it from the bottom, from the side, from the top, from all angles to see
the profile is at right. Keep working on this until
you get a correct no shape. You can use a finger or
use a wooden tool to help. Modeling tool to help you. That is good to do
with both hands. Then you get a
symmetry in a way, while you're doing
left and right, smoothing it at the same, use a needle to then to
give a little poke onto, to grade the nostrils. Just a little poke in the two. Then put the dent
here, right under the nose. And a needle two to poke the nostro and use
a round headed two and to fresh out the
nose here a little bit. Spend the time refine it and at the same time keep working
on the whole face. That is, make sure
the face is not too flat and then it's
a bit rounded here.
9. Mouth: After we've done the nose, we go on to do the mouth. Then. During the mouth
then, it will be good. We need to add some play on
the arch of the mouth here. To create the mouth are put a slip or just wet
it a little bit. We rolled out a tiny sausage of clay and put it
right under the nose. Then maybe wet your fingertips a little bit and dry
the cloth a little bit and then press it
down. Press it down. This is almost like putting a mustache right under the nose. I want the middle here
to be an arch shape. And then down on both sides, you push the play
down and flatten it down and flatten it. Use a wooden tool to help
you to burn the clay, compress it, you will get
this arch here again. Use a round needle, a tube to make the
tent in the middle. This is basically, you're
forming upper lip. So make sure that
is an art shape. Is a bit run like this. If I p out for you to see here, this part is a bit
run like this. It's not totally flat here. Again, it's like this. Once you've done
that. And then use a two thumb to push it up, that is forming the upper lip. That is the forming just the
middle there as you can see. Just the middle, not
so much on the side. This is forming the
upper lip again, the dense, more clear. Then we roll out
another piece of clay. This piece of clay will be smaller than the play
we use early on. This is more like a
be alone bean shape. Again, put a little bit slip
here and then roll it out, something like this shape. Put it under there. And use the thumb again to push the plate down on the side. This is, that is what
you get your lip. Remember we have this
line here before. If the line is lost,
we draw again. The eyes will be, here will be the E, here will be the, the
width of the nose, basically to the
corner of your eye, the inner corner of the eye, the mouth is from the
iris to the pupils, if you draw it like
this and here, this is basically the
width of the mouth. What we would do to establish
the length of the mouth, we put a dot here. Now you need a tool that
is got a shape like this. A wooden tool, or you can
get a tool like this. What you will do, we
will have to cut open, draw the upper lips and
the lower lips draw open, you want to make
a smiling mouth. Then what you need to draw up, this is how you make
a smiling mouth. You use a fine two, you go into the two dots
at the corner and go up. And then again, this is basically a smiling
mouth with smiling lips. Use the tooth and to
push the clay up. Then push this down to
open it a little bit more. That's how this is
too much clay here. You might want to
scrape it off a little bit and then round it. Your fingers again, do
the line drawing here, again, the corner of the mouse. It's really important do
a small two pops and then angle your needle two and to press it down
a little bit here. Then you can see the lips
is a little bit thin. We use some very wet clay to
fell up the lips a bit more. It will be like this once you put more play and
fell up the lips a little bit more up and down and then taint it again, run it to it, your lips. More free than mention that you need to run out inward, Use a pointed tube to push the play round and
round and round. And for the upper lip, same as for the lower lip, is round and push it in
round it and push it in. Really spend the
time, longer time. You make it nice at
the corner there. Hold your too straight
up like this and push it in up for the upper lip. Put the straight down, push it up, put
it straight down. And push it up for
the lower lip. Put it straight down
and press it down. Push it low and press it down. And use the need to how, how full your lips is. You work on that. Then once
early on we've done the nose, but then one will put in the
arch of your mouth there, they will mess up your
nose a little bit. It's very often you go and keep repeating
the process again. Massage it in a way and make your lips and then the
chin is a little bit flat. We might need to add a little bit chin here at
the bottom by adding clay. Always do a little bit scoring a little bit slip or a little bit
water depends on. And then use your fingers to keep merging the twin together. Now again, you need to pick up your board to look
at it from the side. Is the profile right? The mouth is right. The chin is right.
The lips are right. Look at it from all
angle or direction. Those bridge the chain and
the cheeks are not too flat. So that is how we do the mouth.
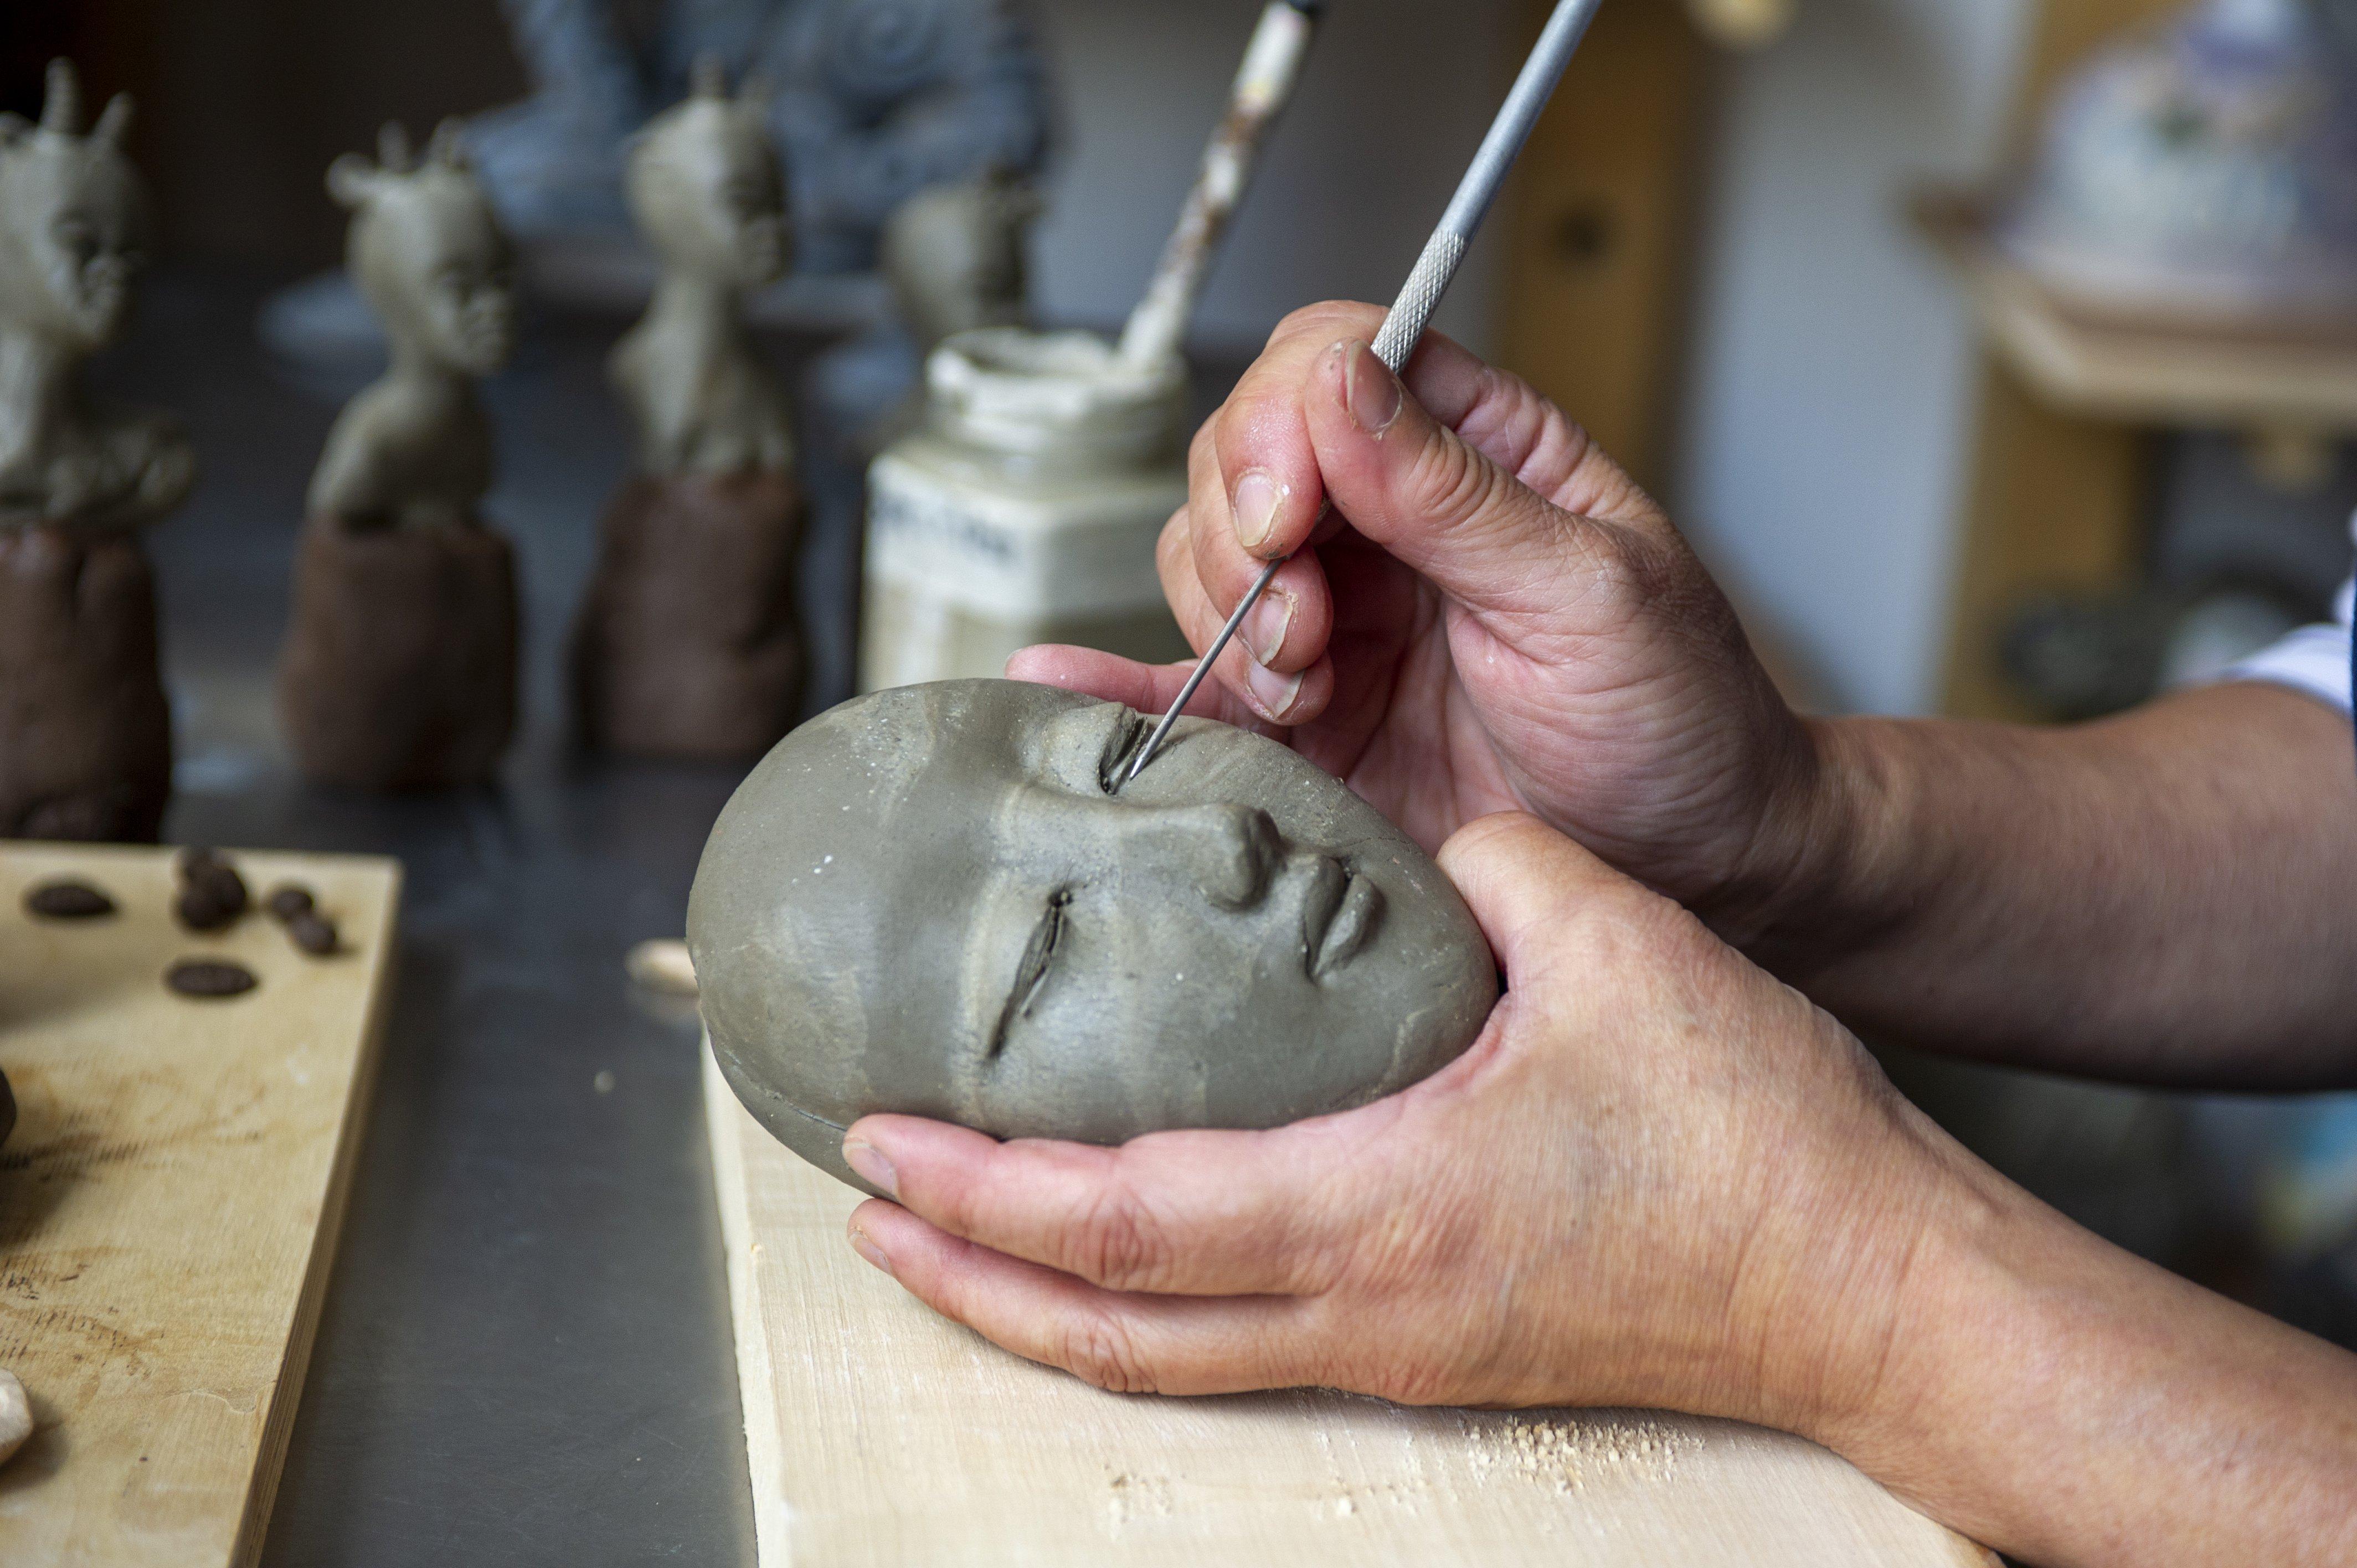
10. Eyes: The nose, the mouth,
and the chin. What we do is along the way, we always taken the line
away, so we can do that. Again, put the two thumbs here to create a
little eye socket. A little socket. The eye socket like this. Like I said, it's good
to use both hands. You get a symmetry proportion. This will be the eye
socket and the brow here. What we will do, we
get very soft again. The face is firm, but we use very soft clay. When we add features to, we get a bit of play rolled out a long piece and
cut it into half, more or less equal size of play. When you put on your eyes, I round it as a
ball, flatten it. I put it here the
same as this side. Press it down, make sure
not press it too hard. Although you have a
form to support you. At the bottom again is more
bulging in the middle, is more flatter on the
side, and at the bottom, all the way around, I
basically want it to be a bulging here. How much play to put on here? If I can see that this side, maybe from your angle, you can't see it that well. That is too much
play on this side. I might want to scrape
some play away. You don't want to have a
very scary looking eye. This should not be too bulging that this piece of play to add on
is not too much. Again, smooth this
circle really well. Before we cut open
the eye again, we go and define
that again here. What we will do, this
is the nose line here, that is the eye corner.
Starts from here. We will, the pupil will be here, roughly to the
corner of the mouth. Your eye, we cut open the eye
will be from here to here. Roughly, I put a little dot here then you can
see it more clearly. I cut it from here to here. I don't do exact measurement, it's just eye boiling it, It's just roughly like that. And look good. Now we use one of these
tools that I often use for creating the eyes once you from one
to the other end. Here we have the eye
line cut open like this. A two like this is
really good with a core it in, tick it in, and that we open the eye is like what I said again to left and right
eye at the same time. So we get a kind of symmetry
for the bottom of the eye. Again, dig it in
and push it down. We use a smaller two and
then to put more clay in. And to run that up, turn your work onto the side, and then fill that
out with clay. What you need to do
is use this two, that's the corner of the eye. I use this two with a
curve there and push it to the corner of the
eye and push it in, and that is to round
it up like this, round it up like this, put in here and go it a
bit on the left and right, Push it in, go it left to right, the same as this side. That will create a bit more
free dimension, less flat. Eyeballs are exactly flat, smooth the surface and
use a round ended two Pk create the iris
that this process. Keep repeating this
process until that is a bit smooth or
maybe the iris a bit bigger that now it comes to use your
bamboo two or I need to go into the
end of the eye here. Push it down like this.
Push it down like this. Use a flat with two. Press it in a little bit. Press it in a little bit in
a corner of the eye again. Push it down. Same
as push it down. And then hold your needle to, at the bottom of the eye. Push it in the
same as this side. Maybe close the upper
eye lid a little bit. Smooth the bottom eye
lid a little bit. Spend the time
working under eye, then use your fingers
to do a little massage. Under the eye here is
not flat, is up shape, a little bit corner, a
little bit shape like this. This is how eyes are done. If you want, then you can
draw a little line here. I may need to Oriental eyes, that is how all the features are added on the face right now. Put more volume on the face. You might need to put a little bit clay
on the cheekbones. Create this and make sure
that is attaching clay again. Is the clay is too dry. Wet clay, wet your fingers. Do this and then, and then pick up your piece. And then look at it
from all angles. Make sure the face is not too flat when you look at it also. This is a bit angle like this. It's not straight flat
is a slant angle here. Like this, wet your fingers, do a bit of massage on the face, the eye socket, the brow, the bridge, the nose
bridge under the eye. The cheeks were your
fingers a little bit. The chin is a little bit
dented on under the lips here. Here is an shape that
is your face is done. Now, if you're happy
how smooth the face is, the feature looks
good from all angles, then it's time to pull
your play mold out, pull this out, and
take the plus away. But make sure they handle
it carefully because you don't want to mess up all the time you spend on
skelting the faces. The face is a bit too wet. Use the head dryer just to dry the surface a bit so you
won't **** the face. Now you've got the face
done without the face, Form the mold here.
11. Back: We rolled out a piece
of slap not too thick. We'll put the face on top of the slap to use your needle to, to roughly draw the line of it. Take that away and Fm this off. Sees we're making a wall. We need probably a hole
in the middle for how you hang your mask on the wall. Wet your fingers a little
bit just to smooth the clay. How big this hole is is up
to you. What you will do. Again, use the knife to do
all the scoring on here. Score it a little bit deep, not lightly like this. Really the lines, the
capping lines into the clay. Same as the back of the face. Again, do this scoring really. Score it. When we do
the scoring Crits, cross it in one direction, in all directions,
then it is time to put some clay slip on to
bet some on both sides, cover it. Well, again, it's good to put your, the back here on a piece of
wood or is anything rigid. And then put your face
on top and press it a little bit so they have
a good attachment. What you can do right now is to use a wooden
tool like that. If I turn this to the
side, you can see it. Make sure that you're
bonding the clay, the back to the face, bit by bit like this. Once you've done that, then
I have this wooden too, but you can also use a knife and then turn the bot and then you can scrape all the
excess clay pieces away. Once you get rid of all
the excess play again, use a wooden tube to smooth it and then check
if it's a good ban. If there's a hole there, maybe fill that up with
clay a little bit more and see if the shape is right. If the shape is not right. And then maybe do a little bit petaling to make you see here. The bonding is not good. I make sure that I close it. Yeah. Or maybe I need
to add a little bit of play there to bond it. Well, I mean, to close
after everything, you can use a knife or
use a wooden to use a spatula or a wooden pedal just to work on the
shape of the face. Everything is done nicely. The face is there and
then we got a back, always put on a piece of board. We don't touch the
face all the time. That move distort the shape.
12. Texture: We all different tools
to create textures. Get a bit of play, not too wet, and then put it in one
of those silicon mold, then press it in and
then push it out. If the clay is too wet, it's better to dry a little bit. If it's too wet, it's
totally get stuck in the silicon mold or you can put a bit of baby
powder in here. I also have a silicon mold for leaves. You can
see it like that. Push it in and then put it out. That's how you do the leaves. Particularly with the leaves, you can always curl
it and turn it a little bit so you
can play with that. This little flower
here, that is, you rolled out a piece of slap, use one of these has shaped cut, you cut the shape, you roll it and then you get
the flower like this. Put a little bit of
play in the middle. Make sure wet it a
little bit or will slip. And then you put it in
these stand like that way. This one will be just
rolled out your plate and the cut it into half
third, basically curl it. Then you get this shape
here with the flower here. Then it is basically
using any wrong shape. This is from my lip
lipstick. I break it up. And then you can do
a little circle cut. Then you get this here, and then you cool it and then
becomes the flower petal. One by one, you make that. These are very easy to
make with silicon mold. Whatever silicon
mold you can get. Again, we use all the
things we can find at home. You create textures here. All these things we can use to create texture like this one. From this, what we will do is actually to roll
clay on top of this, but quite often the clay is wet. Then we will use panty holes, cut up a piece of panty hose, very thin, put play under, and panty holes on top. And your texture too. Here I like that if your
play is really wet, also put your play on a cloth panty holes
and then your texture. And then roll it hard, then get really
nice texture here. This is from the ribbon. Find some anti fabric or even wallpaper that you
can create this texture. This is from one
of these things. I didn't know where I got
this from a long time ago. Again, put a panty hose on top and then roll your
plate on top of it. Then you will get that texture. This is really good
lines like that, You can cut it here, it can be a very good
thing texture for here. You can see that I have done quite a few things
from a coaster. I have, again using
the pantyhose, the play won't get stop. And with, with this one, this is a floor,
a plastic floor. And create this, you can use all kinds of
things to create texture, use baby powder or pantyhose. Your play won't get stuck on it. Oh, this is also
shape like this, particularly if you're
doing anything from the sea or steam
pump type of things. Get a piece of play, just roll it here like
this. Then you get this. You can also use whatever whatever things
you can find to make indentation like this one
is just a pancreatecriver. Then you create this with this, it just rum headed thing, this is I think the cap for some super boot or a
flat tool like this. You can create all
the texture here. The next thing you can build a really beautiful coral of
things to attach on the face, like this one here is basically rolling out into a shape
like this stuck on it. Of course, attaching plate, don't forget to score
and slip with this one here is basically put it on and then use needle
two to give it a poke. And that's it with
this one here, basically a round
ball, flatten it. Use the top of a pen
and then push it in. Then you get this, this one here, a
long shaped thing, push it down, glue it on. And then use a knife
just to cut the top. Or use a needle two to poke it a little
bit, you get that. That is the same as
these, just a longer one. With this here you can
see it is really nice. You can create a really
flowing form with that. To create this, do a
very long sausage, flatten it a little bit
and then do the curl here. Then you get this
with this one here. Again, a long sausage
flatten the top. You get something by this, then you curl around to create the floating
form with this, again is just a round ball. Flatten it with the pen. Then use your fingers to pinch the top a little
bit to make the, the rich there a
little bit thinner. Same as with this one. You'll create a bigger ball then make sure that is hollow. Denis is not too thick solid. If you're going
the firing route, make sure that there is a lot of trap air here
to make sure that is a venting hole before you
stick it onto the clay face. With this here, what
you will do with sausages and then
flatten the tip. And then you do the curling around and go all the
way round and round, and that is how you do it. A coral type of fixture on
the face is really nice.
13. Design, Smoothing & Drying: Use a sponge, squeeze out all the
water that you can, really smooth the clay. Make the surface smooth, it comes to certain areas, you can use your sponge. Use a brush again, wet it, not to dripping, wet, dry a little bit. Then you can do the part
of the mouth, the lips, and the nostrils, all this, Once you've done all
the smoothing part, then we have done the
textures and all that we can go to designing the
hair or the head dress. I got a piece of play
already cut out here. I'm going to put
a head dress on. Again, it's up to you to design how your piece of work will be. With this, again, we
need to do the score and scoring and
slip and all that, then put the slip
on on both sides, then that's how you
attach something there. If you want to do a bit of hair, you can cut out another piece of clay and get the
lines there ready. You can do the hair this way. Again, make sure the slip
and scoring score and slip. And then twit it here. So then you get the hair, you can poke it up a little bit, create a bit more three
dimensional with this, with a big piece of fixture
like that's not so secure. Just with slip and scoring, you will need to
attach extra clay, get some really wet clay, roll it out in a tiny, tiny sausage like that, put a bit of water
all the way around, and then push it here and
give it a bit of enforcement. It's much stronger to have
that stage all the way around to catch that immediately you
see that it comes a live, once you put some
hair in all this, then it's up to you
to decide that, how are you going
to work this out? It's like a little
green green man. Again, the little
flowers we made before we can do a little bit of a little bit do the
scoring and slip. So then you can go all the way around to decide your piece. The little flowers
from the mode. So you can also then,
once you put it on, make sure that to use your fingers to push
it in a little bit, make sure it's a good bond like here you can see is quite
a bit of sticking out. Then I will suggest you, because when it's dry it's
quite easy to knock it off. Maybe try to round it a little bit less sticking out pieces. Because particularly if you're using a dry clay
that might be easily chipped up to you however you
want to design your pieces. Okay? Or maybe you don't
want any of these, any of these then you just want to have a big leaf like the garden green
man cycle of things. And then a little
bit score and slip. So then you put it on here, then you get quiet. Nice. If you don't have idea, just go online and
search. Ceramic figures. Ceramic mask and
then whatever thing. So then you can get
some inspiration. Then you can Triston turned, you get the idea that how we do the design of
the hair, hair, dress. The only thing I urge you
to take attention to pay attention is any
really sticking out part that you can chip
easily once it's dry. For air dry, clay
or a firing play. The drying process is
more or less the same. If you have a lot of tiny
pieces sticking out, something like that,
very thin and all that, that will dry much faster
than here when it's not in, not even bleed so it can crack. The ideal things is take
the time to dry your piece. I would suggest at least a week. Depends where you live and where you put your piece to dry. And in the sun room, direct sun is not good. Too windy is also not good if you have big piece
of attachment B here. So the chance of falling
off is not that great. If it's tiny pieces sticking
out like this here, it will as fall off. So I will suggest that
you will use a fast bag. Just drape it over
your work loosely. Right? That, that
means you still have air here to go underneath here. And try it slowly like that. The longer you take
the time to dry, the less chance that the binding places won't
crack or fall off. Take the time to dry
your piece properly. If you go down the firing route, then make sure if you have a ball shape or anything
you have trapped air, maybe you want to
attach this to here. If you have any trap, make sure a vent hole
is really important. Otherwise, your piece of wood
work is blown in the kelle. It's extremely important to
have a went hole, that is it. Then your basic
sculpture is done. Take a couple of weeks, a week, at least, to dry your piece.
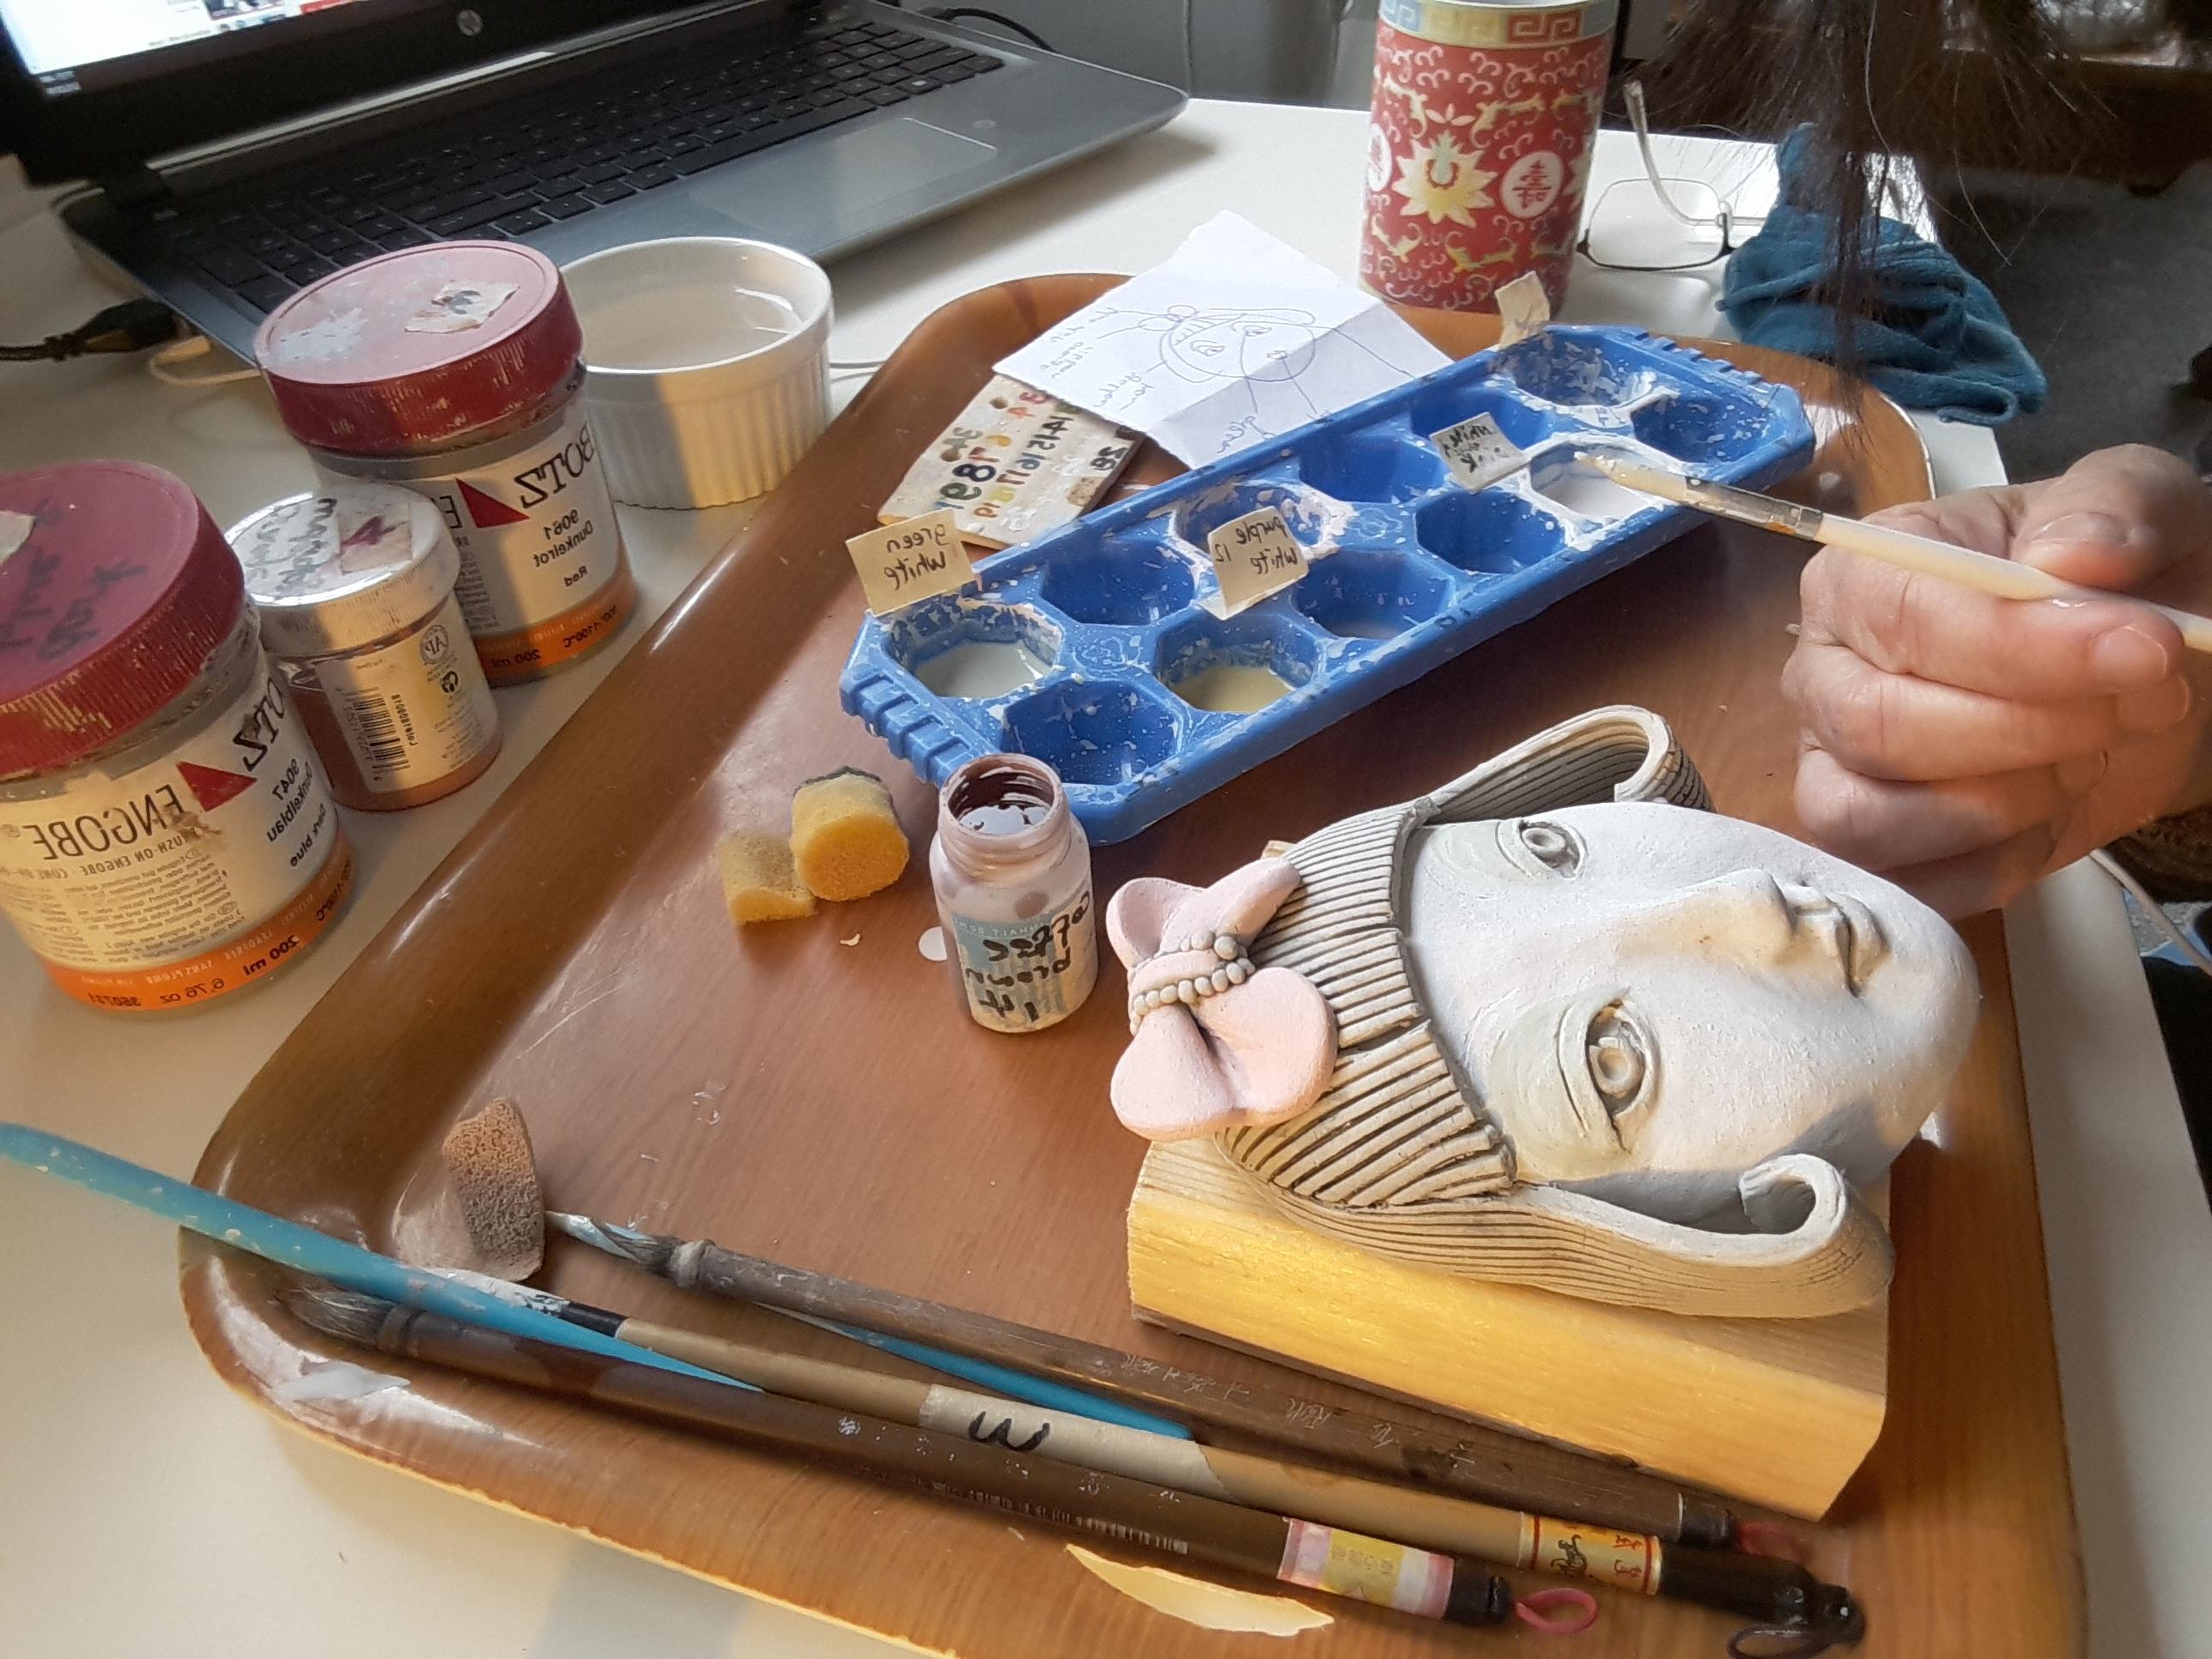
14. Colour: Make sure the mask is spun
dry before applying paint. If you're using air
dry clay to be sure, I will suggest at
least one to two weeks drying time that
will avoid cracks. You can use different
color mediums to finish the surface. A qual paint comes in
a huge color range. In cheap, you can
use ceramic paint. Oil based paint, spray paint, shoe wax, colorful
hair wax, nail polish. You can combine
different types of pigments to your
own unique finish. If you wish, you can give a couple coats of
varnish or seal, either painted on
or spraying it. This is not a mask, but it can add strength to
your finished work. There's no need to use a silla. If you're using wax as wax repel paint, painting your mask. You can use a brush
to apply paint on, or you can use
sponging technique or spray paint the hold mask. This is a personal choice and what you enjoy
doing the most. If you're using the firing play continue down the firing route. You might want to apply underglaze before
the first firing. Maybe some oxides over glaze before the
final glaze firing.
15. Thank You: I hope the techniques
I've shared with you throughout the course
proved helpful in creating a play mask using
air dry chi firing play. If you find this course useful, I greatly appreciate
if you can leave a review or even better share your creation
in your review. Thank you for taking my
course. Happy suing.
 Jenny Chan, UK based figurative ceramic artist