Transcripts
1. Welcome!: Hi there, my name is muscle the one. And in this Baking class, I'll be guiding you through the entire process of baking your very own sowed of sandwich bread and how to use it to make the most delicious VLT sandwiches. I cannot wait for you to try this recipe out, which is why I have structured this class to be a simple yet informative as possible, with short bite-size lessons, as well as a written guide top, make your cooking experience as easy as can be. Using soda in this recipe will take their classic sandwich bread, which I'm sure you're very familiar with and help elevate both its texture and flavor to something you'll keep coming back to time and time again. If for whatever reason you do not have a sourdough starter, then do feel free to check out my dedicated skill share class, which you can find on my teacher profile or through the search tab above. With that said, this recipe is the penultimate of a six part series designed to help people of all skill levels discover the amazing world of sourdough cooking. So do be sure to hit the Follow button above to not miss out on the final sowed or pasta recipe. And please feel free to check out the other amazing recipes in this series. With all of that out of the way, however, let's jump straight into the following lesson. We, we shall be taking a look at the ingredients needed to make the perfect VLT sandwiches.
2. Sandwich Bread & BLT Recipe Introduction : Welcome to the first lesson on making your very own sourdough sandwich bread, which we shall be using to make delicious BLAT sandwiches. The measurements for this recipe will allow you to create one large loaf of bread as well as enough failing to make to BL T's. Again, I'd recommend using Kikwete or all-purpose flour to produce his afterlife with more uniform air pockets across the crumb, while the MLK and butter will contribute to a fluffy texture as well. For the sourdough starter, do remember to prepare it the night before or at least eight hours before attempting the recipe, I again use the cake wheat-based daughter, to keep a consistent flavor throughout the bread. You may of course, use any other wildflower. Moving on to the ingredients required to make a BOT sandwich with our baked bread, I decided to keep it relatively faithful to its name with only one edition, which I find works quite well. We are going to be using an avocado to make Whac-A-Mole, which will provide the moisture needed for our sandwiches if avocados on not in season where you live, you can of course replace this with butter or even the classic mayonnaise. Speaking of butter, you will be needing an additional amount for gracing, as well as some vegetable oil to help fry some of your other ingredients. One final item to note is that you're going to need a bread pan to get our classic leaf shape. The one I will be using is 30 centimeters long, 14 centimeters wide, and ten centimeters high. If you have one that is significantly smaller than Don't worry as there will be directions on how to spit your life into in a future lesson. With that and our ingredients out of the way, let's jump straight into the next lesson, where we shall be mixing the dough file sourdough, sandwich bread.
3. Initial Sourdough Bread Dough Mix: To begin, this dough makes, you are going to need a large bowl. And in that, at 900 grams of KCl wheat flour, 350 grams of water, and 250 grams of MLK from their usual hands to mix that altogether until all of your ingredients had been roughly incorporated into the dough. This should only take you three to five minutes any longer and you may overdeveloped the gluten, which will make adding the three finally ingredients much harder. When that is done, be sure to scrape off any excess dirt from your hand. Then cover your bowl with a damp cloth to let it rest for 30 minutes at room temperature to perform its auto lease. In case you don't remember an auto police rest will simply allow your dose flower to better hydrate itself, which in turn will result in your bread being able to last longer, since you will most likely not be eating the entire loaf in one day, it can be quite useful for it to have a longer shelf life. In any case, I shall be seeing you in the next lesson for the second row mix.
4. Second Dough Mix: Now that your auto lease has been completed, you may add in your final three ingredients. So first porin, 16 grams of salt, and then a 160 grams of sourdough starter from their begin mixing your dough while slowly adding in a total of 60 grams of softened unsalted butter. The fats won't easily incorporate into the dough. So simply added in at roughly ten gram intervals and just continue mixing until it becomes fully homogenized. Once that is done, cover your ball backup with a damp cloth and that arrests for 15 minutes. Do also remember to refresh your starter for later use. But with that said, I shall be seeing you in the following lesson.
5. Stretch & Folds: To develop the gluten in this relatively large DOA, you're going to perform three sets of stretching folds. I will again be demonstrating this on my work surface, but I would recommend you leave your dough in your bowl to keep this step as simple and mastery as possible. So begins stretching and folding all sizes the DOE over its centre until you reach one complete rotation. Just make sure not to tell your dough in the process. From there, you may flip it over, folds face down, and then covered backup with a damp cloth to rest for an additional 15 minutes. You're going to repeat this process two more times for a total of three stretched unfolds after the second one, however, you will need to increase the rest time from 15 to 30 minutes. This will simply allow your dough to lose some excess tension and will help prevent any accidental tearing which might ruin the gluten development. Once your third set of stretch and folds has been completed, cover your bowl with a damp cloth once again and let a proof at room temperature for an hour and a half. When that time is done, you may Greece and even larger bowl with roughly ten grams of unsalted butter to prevent sticking. And then you may transfer your dough over from there covered one final time and then move your dough to your fridge to rest overnight.
6. Shape Your Loaf: Welcome to the second day of this sourdough sandwich bread and Bill T recipe to begin shipping your life. First, generously flower your work area, and then dump your dough on top. From there, you may also fly your dose surface as well as your rolling pin before flattening it out into a rough rectangular shape about one centimeter in thickness. With that said, if it begins to stick at any point, simply dust your work area once again before continuing to roll it out. By doing this, you're essentially degassing of large air pockets. And this in turn will result in a classic uniform sandwich bread texture. When baked. Once you reached the desired thickness and shape, begin tightly rolling your dough from the back to form a large and even tube. When you reach the end, just make sure that the seams that snugly at the bottom so that it doesn't open up while baking.
7. Second Day Proof: When your role has been shaped, you may now take out your bread pan. The one I will be using is approximately 30 centimeters long, 14 centimeters wide, and ten centimeters high. Yours don't have to have those exact dimensions, but if they are around half that length, you may use a knife to split your dose that it fits into two smaller pans. In any case, you will need to use approximately ten grams of unsalted butter to grease the inner surface so that your loaf does not stick off the baking. From there. Tighten your roll up if needed, and then transferred over. You may now covered with a damp cloth or another inverted pan before moving it into your cold oven with the light turned on to prove for two hours at 26 degrees Celsius or 78.8 degrees Fahrenheit. If you use the class to cover your dough and might be worth wedding it again after the one-hour mark, as it is possible for it to dry out. But with that out of the way, I shall be seeing you in the next lesson.
8. Bake Your Loaf: When that to our proof has been completed, you may take your pan out of the oven before preheating it to 220 degrees Celsius or 428 degrees Fahrenheit for 20 minutes. During that time, be sure to keep your life covered preferably in an environment away from passing air. Once your oven has finished preheating, remove the pans, cover and place your bread on a medium rack to bake for 35 minutes. Once that is done, you may use your oven mitts to rotate your pan before dropping your ovens heat to a 190 degrees Celsius or 374 degrees Fahrenheit to bake for an additional ten to 15 minutes. When that second time has completed, remove your finished load from its container and let it cool for approximately 20 minutes on a metal rack to prevent the base from getting soggy and to allow the inner Chrome to settle. While you wait, you may begin to prepare your bacon for your ALT sandwiches. So we shall be covering that in the following lesson.
9. Cook Your Bacon: You may now take out a large pan and places it on your stove top at high-heat before pouring in 20 grams of vegetable oil, make sure it coats the entire surface. And then adding as much of your 200 grams of bacon that can fit in your skeleton. Cook that for three minutes on one side and then flip it over to fry for an additional 1.5 minutes. And that is done. Remove your cook bacon from the pan and continue firing all the pieces that you have left.
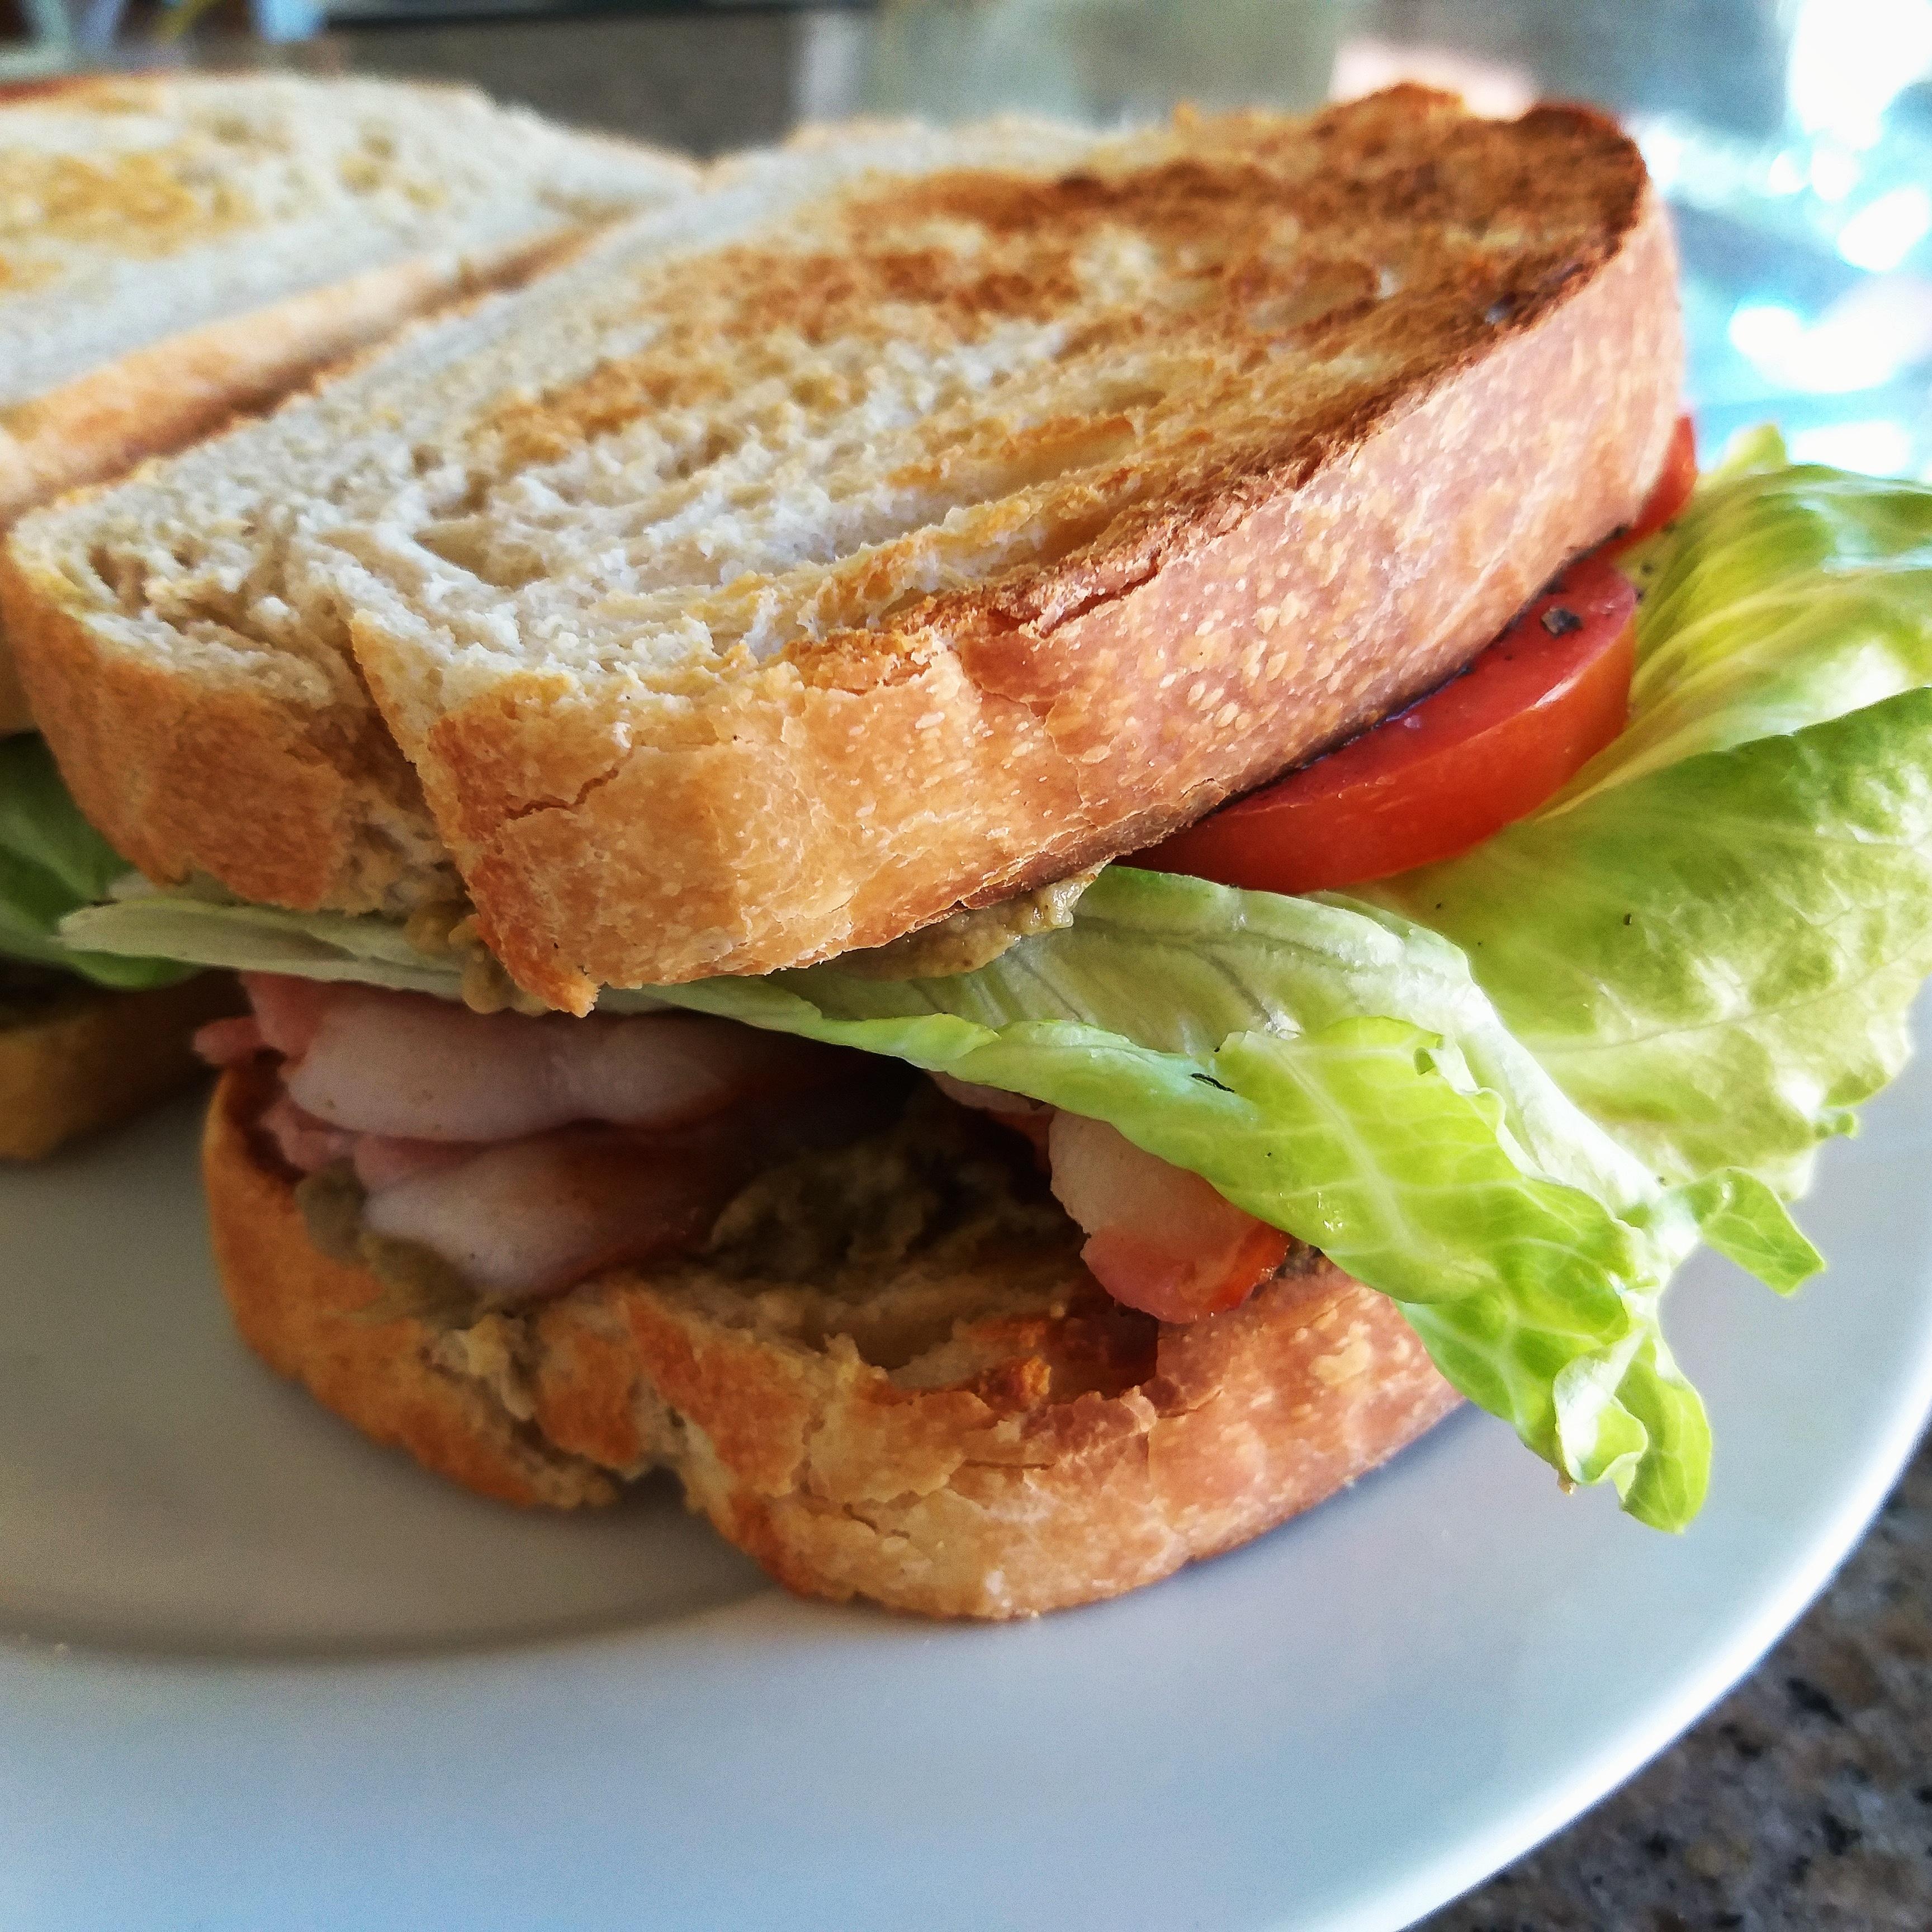
10. Assemble Your BLT Sandwich & Conclusion: Now that the bread has rested for those 20 minutes, I think it is time for a cross-section. And it would appear that I messed up the cut. Let's quickly slice it off before trying again. And there you have it. What a beautiful cross-section that is, as you can tell, the crumb is extremely even with small and uniform air pockets, which is exactly what you want to see to achieve their classic sandwich bread texture. To make a truly goal may be ALT sandwich. You may now cut too thick slices and then brown them in your toaster. While you wait for that to pop, you may repay or Whac-A-Mole. So take out a bowl as well as an avocado and then use a spoon to scoop out the flesh, right in some salt and pepper to taste. And then use a fork Damasio ato, until it becomes a Whac-A-Mole. As mentioned in the introductory lesson. However, if you don't have access to other Carter's than you're more than welcome to swap it out for some butter or even the classic mayonnaise. You essentially just want something to bring a bit of moisture, Joe sandwich. When your slices have finished browning in the toaster, you may move them onto a plate, spread a layer of Whac-A-Mole on either one or both slices depending on your preference. And then evenly place half of your baking pieces on top from there at a large leaf of lettuce. And then take out a tomato before cutting it into slices and placing them on top. Grind on some salt and pepper to taste once again. And finally covered with your second torts, that slice to complete your PLT. Now this is what I've always pictured a perfect sandwich to look like before digging in, however, be sure to complete your remaining BL t's to share with your loved ones. For my second sandwich, I have made the slices slightly thinner job bring out the flavor of the filling, but you're more than welcome to experiment with the thickness to see what you enjoy. These make for an amazing gourmet lunch. So I honestly cannot wait for you to try making your own. This sourdough sandwich bread is also incredibly versatile with a wonderfully unique flavor, yet familiar texture and uses to make all sorts of amazing sandwiches. Trustees, and even some of the best French toast you can find. There is practically no end to the possibilities. Back to LBL. He's however, one of these on its own is practically a meal in of itself. So there's no shame in attempting another cross-section to split it into, as you can see, perfection on the first try. I wish that you have enjoyed making this recipe as much as I have. But with that said, I do hope you have space in your stomach for the final section of this course, where you will learn how to make solder title Italian pasta and how to use it in a delicious chicken Alfreda recipe.
 Marceau Dauboin, Artisan Baker/Owner at The Yeastie Bois