Transcripts
1. Sora AI Introduction: Okay, so I'm going to add heavy rain change
day into night, and also I'm going to add cinematic color grade,
teal and orange. Wow. This is crazy. Welcome to Sora AI. In this course, you will learn
to effortlessly transform your texts and images into professional
and stunning videos. I'll guide you through every
step of process crafting clear and concise prompt to generate stunning and
error free AI videos. Along the way, you will explore all sora features like remix. Storyboard, Blend, hand loop. You will also learn
to use preset and SA contain only five preset, but you will learn to create your own customizable
preset as well. Whether you are a
complete beginner, it doesn't matter because
at the end of this course, you will equipped
with skill to produce turning AI content using SA AI. So what are you waiting for? Join now and discover
the new world of content creation with Sora AI.
2. Sora Interface: Welcome to Ultimate Video
Generation using Sora AI. First, if you want to
get access to sora, go tosora.com, and you have to sign in
through your Google account. Now, once you sign in, now, if you are using Sora for free, you can't really
generate any video. But if you go to
Explore in recent, you can explore some videos that are generated using SoraAI. You can get the inspiration
for your videos. And there is also
a featured folder. If you click here, you will get to see the features video, which are these videos. Now, if you go to all videos, right now there is none
because in this account, I did not upgrade. So if you go to the
upgrade your plan, there is basically two plan, a $20 a month and $200 a month. In $20, you will get 1,000 credits and you can
generate up to 50 videos. And you can generate up to 720 be resolution and
five second duration. And you will also get a one
relaxed video generation. Which means if you run out
of your thousand credits, then you can generate
extra video. And if you buy $200 a month, you will get 10,000 credits, and you can generate
up to 500 videos. You will also get
ultimate relax videos, which mean if you run
out of 10,000 credits, you can generate free
videos using relax mode. You can generate up to
ten ATP resolution, 22nd donation and five
concurrent generation. Will also have ability to download your generation
without any watermark. Now, once you buy
a plan, currently, I have $20 a month plan, and this is the
interface of Sra AI. Right here, you can explore, you can get inspiration from
other people's generations. And right here, these
are your generation. If you generate any videos, your generated videos
will display right here. Below all videos, we
have favorites folder. So if you select a video
as a favorite video, that video will display
in this folder. So for example, let's
see if I'm going to click here and let's
favorite this video. And now if we go to
Favorite folder, that video will
display right here. And if you upload
any media to Sra AI, if you go to uploads, that media will
display right here. And as you can see guys, you can also create a new folder. But right now I'm not
going to do that. So I'm going to
select this folder. Let's delete this folder. Now this is the main
interface of Sra AI. This is where all
the magic happens. First, if you want to generate
clip through the text, then you can click here
to describe your video. You can type any prompt, and then you can click on
this icon to generate clip. But before you
generate any clip, you have to hover your mouse
to this question mark to see how much credit you will lost
for generating that clip. Now if I select two videos, and if I hold my mouse
to this quest mic, my credit will change 25-50. And if I select
this to four video, if I change this to four video, now I will lost 100 credits. You can also change your
duration up to 10 seconds. And now we will
lost 200 credits. Let's change this to one video, and let's change this
to five second clip. Now, by the way,
you can also change your resolution up to 720 P, and we will lost 60 credit
for generating one video, up to five second tradition. Let's change is two for ATP. Now you can also change
your expect ratio, and expect ratio will
also affect your credits. Right now, if we generate
video using this expect ratio, we will lost 25 credits. If I select this expect ratio, we will lost 20 credits. And if I select
this aspect ratio, again, we will lost 25 credits. Let's change this
to this resolution. We also have an option
to use their preset. So basically, these are
some presets that we can use to generate our videos. And now right here,
if we click here, you can upload your image or video to generate
your videos. You can also choose
from the library. This is my generated clips. If we go to the folder, this is my favorite folder. You can also change
this to save, and I did not save
any video yet. If we go to uploads, this is my media which
I uploaded to Sra. Now I'm going to generate
this basic video, a hand cutting an apple. Now we will lost 25 credits. So let's click here to
generate this video. Now, if you click
on your profile, your credits will
display right here. So now I have 925 credits left. I have also one
relaxed donation. If I lost all my credits, I can generate do with
this relaxed mode. And now the video is generated, and there is a way to
preview your clip. You have to hold your
mouse from left to right, or you can open you can click
here to open your clip, and you can play
your clip from here. And right now, as you can see, this is our generated
video using this prompt. Now you can also click
here to edit your prompt. You can also enhance your prompt in order
to get better result. So this is the basic
interface of Sra AI.
3. Customize Interface: Welcome back. If you
want to customize the interface of SRI,
you can also do that. First of all, you
can click here. And as you can see
guys in filter, we have these options. We have prompt storyboard
remixes, blend and loop. If you have loop
video, if you want to view only the lob video, then you can check the loop. And now only the loop video
will display right here. And if you want to view
the blend videos only, then you have to check
the blend videos, and you have to
uncheck the loop. And now you can only
view the blend videos. Now right here beside
this filter option, if you can click on
this layout button, as you can see right now, I set my layout to list. Let's change this to grid, and we can also change the
square to aspect ratio, or we can change
this back to square. Now sometimes, for example, if you write a prompt and you click on this generated
button to generate the video, if you can click here
in the activity, as you can see here, these
are all my generated videos. Now you can click on any
video to view that video. And if you want to
cancel this generation, then you can also click on this cross button in order
to cancel this generation. And we have this message. Are you sure you want to
cancel this generation, and we can confirm or
you can cancel as well. Now if we go to that video, that we just canceled. As you can see, guys,
this video was canceled. Now you can click here and
you can delete this video. And if you want to go back
to any of your video, you can click here on
the activity button and you can select the video. So for example, I'm going
to select this video, and now we have
this video result. You can also click here to delete that video
if you want to. To view different
variations of your video, click here on three dot
at select variation. This way, you can view all the variations of
that generated video. Now, once you generate video, if you want to view
a single video, you can click on that video. But if you want to view both variations of that
video, then you can go back. You can click here right
here as you can see, guys, in every video, we have
these types of title. You can click on it to view both of the videos
at the same time.
4. How to Write Precise Prompt: Welcome back. Now we generated this video
using this prompt, a hand cutting an
apple, and that's it. And the video is pretty weird. So you might be thinking Sora is not a good video generation. So let me show you that if
you write a precise prompt, then you will get
some better result. So right now, as
you can see, guys, I have generated this
clip through the text. If I open my video, if we go to the edit prompt, this is my precise prompt, and this is the result
of this prompt. And as you can see, guy, the result is pretty amazing. So how do we write
a precise prompt, even if you don't have any idea? Let me show you how
you can write it. So basically, there
is two method. First, you have to go to
designer.miicrosoft.com. You have to sign in through
your Outlook account, and now I'm going
to copy my prompt. And now let's go to
Microsoft Designer. Click here, paste this prompt. Now, before you click
here to generate, if you notice we have an
option called Enhanced prompt, and if I click on it, Enhance prompt, we
have this prompt. Now if I select this resolution, let's click on this Generate. And now if I open the image, this is the result of
this precise prompt. Now, if you close your
Microsoft designer and you open your
Microsoft designer, again, you will loss
somewhat in your prompt. So to fix this problem, you have to copy your
prompt, and again, you have to past your prompt and click on
enhance prompt again. And this time you might get some better prompt than before. So copy this prompt
and generate image. Now to double check if this prompt is good enough
for your generation. Now to check if this prompt is good enough for your
video generation or not, go to labs dot Google
and go to Image FX. Copy your prompt and paste
your prompt right here. Click on Create to
generate images, and this is the best tool for generating realistic images. In Microsoft designer, the
images look cartonish, but in Labdt Google, the images look realistic. And I think this prompt
is pretty amazing. By the way, you can also change some of the keywords
that are colored. So for example, you can change
the si to airy cluttered. You can change the
rustic to modern you can also change soft to
bright dim, et cetera. Now go to Sra AI, click here, paste your prompt, and now click here to
generate your clip. So the video is generated, and before I open the
clip, as you can see, guys, if we compare
these two video, this one look realistic. And now let's open the clip. And as you can see, guys, the hand movement, the knife, the apple moment look
realistic than before. Now let's talk about
the second method to write a precise prompt. First, copy your
original prompt. Go to chat JBT and type, write a precise prompt, a hand cutting an apple. Also, I'm going
to edit somewhat. Enhance this prompt,
adding a camera moment, dramatic lighting to the scene, add dramatic lighting
to the scene. And now Chat GPD will write
a precise prompt for you. And this is our prompt. Now I'm going to
copy this prompt or you can click here
to copy or prompt. Now go to Sora AI. Now before we go to Sora AI, because Sora is expensive, we have to go to laps dot
Google and go to Image FX, past to prompt and
create some images. Now the major benefit
of using laps dot Google is we can change some of the keywords
that are highlighted. So let's change the p
apple to rotten apple. Let's change circular lighting to zooming in or
maybe panning left. Let's change moody lighting
to bright lighting. Let's change strong
shadow to soft shadow. And now let's click
on Create again to see if this result is
better than before. And I kind of like this result. So let's select press Control
A to select this prompt, right click to copy this prompt. Now go to Sora AI, and finally we can
paste this prompt. And this time, I'm going
to chain my resolution, tin my expect ratio to this, so we can save five
extra credits. Let's click on this to
generate this clip. And now the video is generated. This is the final result. Now I'm going to copy
my original prompt, and now I'm going to
paste my prompt right here and now let's
generate this clip. Now with the original prompt that we enhance using chat GBT, this is the result. And I believe Sra struggled to cut fruit because this is not an easy task because currently AI tool struggled to
cut fruit accurately. So instead of cutting apple
or cutting any fruit, I'm going to change the subject. Now if we go to
designerdmcrosoft.com, I type a prompt a luxury card
in the middle of nowhere. Let's enhance this prompt
because this is a basic prompt. And now this is a
precise prompt. Let's copy this prompt and
let's paste this prompt. In Labs std Google. And let's click on Create. Now, you might ask question
why I'm creating images using Last google because I'm getting an idea what the final
result would look like. And I think this
is pretty amazing. We can go to Sora AI. Now let's paste this prom, and hopefully this
time, it's going to generate a high quality video. So this will cost me 20 credit, so let's click on Generate. And now if we open
the final result, check out the generated video. Now I'm going to change
my expect ratio, and now let's click on Let's
pace this prompt first. Now, let's click on this
button to generate the clip. And now with a
different expect ratio, this is the result that we got. And I believe if you
change your expect ratio, it will help you to get
some better result. So this is how you can
write a precise prompt.
5. Simple vs Precise Prompt: Welcome back. So in
the previous lecture, we generated these clips. We type a simple prompt, and then we enhance
that prompt using designer.miicrosoft.com
and using chat GVT. Now I'm going to show you
what is the difference between a simple prompt
and a precise prompt. So a simple prompt
consists three things. A subject in this
prompt, we have a man, a scene which is running
and a motion in the part. Now to simply
enhance this prompt, we have to add a camera moment and we have to add
atmosphere, and that's it. Now I'm going to ask Chat GBT, write a precise prompt, a man running in a park and
then enhance this prompt. Add a camera moment. To add a camera moment, you have to describe
your camera moment because in the previous prompt, we did not describe
the camera moment. So if we go to Google and we Google different
camera moments, these are some of
the camera moments. Tracking shot let's
copy this keyword. Go to chat GPT, add a camera moment. Now we can paste
the camera moment which is tracking shot. Add a camera tracking
shot to this prompt. Now we have to add a comma, and now in the final, we
have to add a lighting. And we also have to
describe the atmosphere. Now, I write bright atmosphere of a man running in a park. Now we can click on
the enhanced prompt. Now we have sunny day. So this is copy this keyword, add sunny day atmosphere,
and that's it. Click here, and now Chat DPD is going to
enhance this prompt. So first of all, I'm going
to copy this prompt, and now I'm going to paste
this prompt right here. Now let's select
the aspect ratio. And now let's create this video. So while the Sora is
generating this prompt, we can copy this prompt. We can paste this
prompt and now we can click here to
create this video. We don't have to sit here and wait until the previous
video is generated. We can generate as
many video as we want. We don't have to wait for the previous video to generate it. So the videos are now generated. This is the simple prompt
result a man running in a park and by far, this result is surprisingly good enough until this happened. So this is the
precise prom result. And as you can see, guys, the result is improved a lot. So this is how you can enhance your prompt by
adding atmosphere, some lighting, some
camera moment, et cetera. You can clearly see there is
a huge difference between the precise prompt and
this simple prompt. Be simple prompt
contains some error, whereas the precise prompt
did not contain any error. I'm looking at this
person leg and there is some error happening
in this section. But if we ignore this part,
everything looks fine.
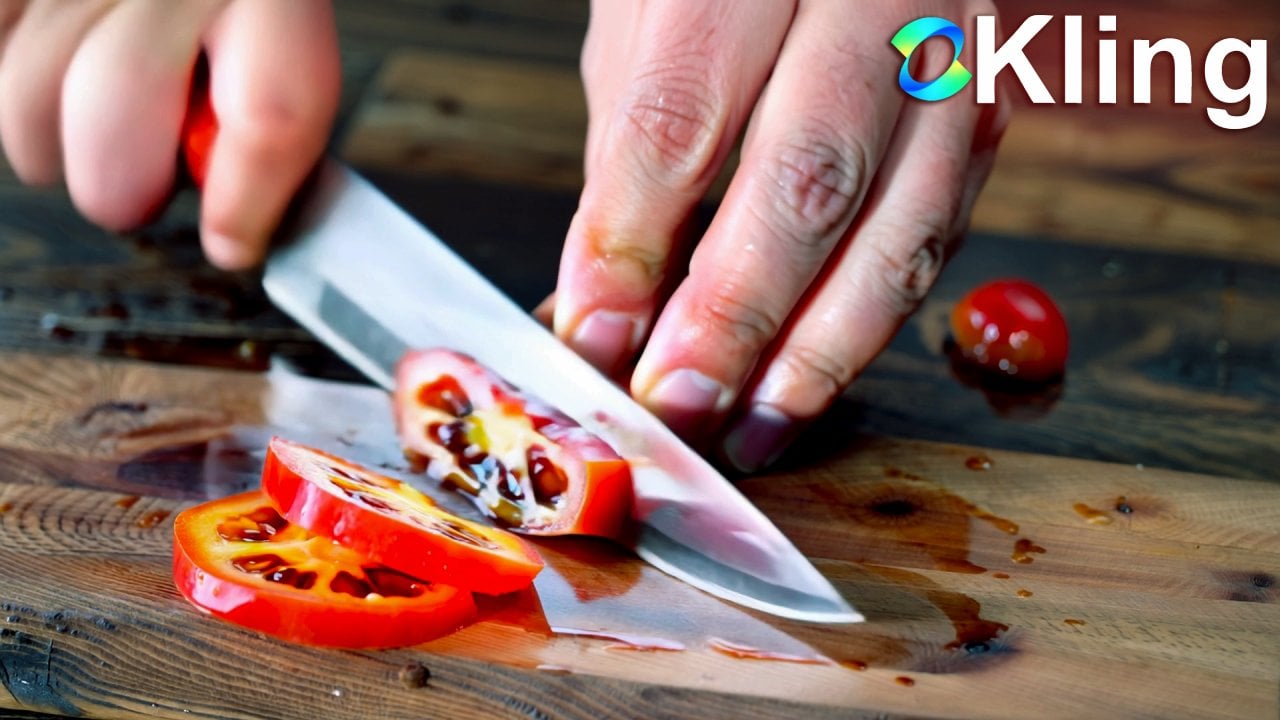
6. Generate Realistic Text-to-Videos: Come back. With
Sra AI text video, you can generate
almost anything. The possibilities are endless. If I open my prompt, as you can see this is
the prompt of this video, and this is the final output. It generate what I ask him to generate with a precise output. Now I try my classic
technique to make AI cut floats and so I fail
to cut this tomato. If you go to the prompt, this is the prompt
of this video, and this is the final output. If you ignore the pieces
of the tomato cutting, besides this, everything
looks really nice. The lighting, the colors. If you want to generate
fictional videos, you can also do that. So right here, as you can
see, this is the prompt. Two boards are in the
middle of a boxing match. This is the whole prompt, and this is the final output. If you look closely,
you can see, guys in the background,
we have a huge crowd. We have accurate moment
of these robots, and we have a camera moment. Now we have this
fictional video as well. So if we go to the prompt,
as you can see, guys, this is the prompt
of this video, and this is the final output. We have another example
of fictional characters. If we go to the prompt, this is the whole
prompt of this video, and this is the final result. Now you can also add camera angles if you
want to in your prompt. As you can see guys
in this prompt, I describe a white angle view of a Sikh red Ferrari spot car. And we have this
white angle Now, if you look closely
in this variation, Sra precisely visualize
the white angle. Let's select this video and let's select
this one as well. Now we have another example
of knife cutting tomato. If you look closely
in this variation, we are close to cutting
a tomato precisely. Now we have this example. If we go to the prompt, this is the prompt of this
video and you can use designer.miicrosoft.com
to enhance your prompt or you can use chat GPT. This is a result of this prompt. And as you can see, guys, the water movement, the flow
of the water is incredible. If I have to generate this
video in a three D software, this will to me hours in order to create
something like this. And plus, it took me hours to render these
types of water flow. But in Sra Aa, it took me three to 5 minutes to
generate this kind of video. Now if your prompt
is unrealistic, then a will decide to generate
a game kind of eclipse. So if I play my clip, as you can see, guys,
by using this prompt, the Zorra decided to generate me these games kind of eclipse. You can also generate point
of view footage as well. So I use this POV footage of an ant navigating the
inside of an ant nest, and this is the result
of this prompt. I use the same prompt,
but in this prompt, I just change B into a beef
lying through a hornet nest, and this is what we got. Now with the same prompt, I got this different result. So my recommendation if you are not getting
your desired result, then try to use that same prompt and try to regenerate your clip. We have another example
of ant walking into nest falling camera and
we got this result. Now, again, if your prompt is unrealistic or your
prompt contain violence, then a will generate
a game like clip. So by using this prompt, we have this clip. Now you can also transform
object into another object. In this example, I tie Ferrari ca transform into a Bugatti, and these are two
variations that we got In the first variation, the Sra smash all the
other AI tools out there. But in the first variation, we have just a camera shifting
from top to the bottom. But in the first variation, Sra transform car into
a Bugatti precisely. Now, this is another example
of two robot fighting. This is the prompt and
this is the final output. In this variation,
you can see we have two robot connecting
with each other. This is the reason why I'm
asking you to regenerate your clip if you are not
getting your desired result. So what regeneration means you have to go to your
prom, go to Edit Pm, and you can tweak some settings, tweak some word here and there, and then you can click on
this Create button again, to regenerate your video. Now by using this prompt, we have this mobile animation. Now, if Sa fail to
generate your video, if we go to the prom, this is my prompt and these
are two variation. And if you look closely, we does not have any
motion in these videos. These two are looking
like a photos. Now by adding some words, you can change your
generation completely. So by using that same prompt, I just add add a 360
degree camera moment, and this is what we got. By adding just a simple keyword, we'll change this
generation completely. So if you are not getting any fancy camera
moment in your videos, try to add a camera
moment using the prompt. Now by using this prompt, I have generated
this office video. With Sora you can also generate outer space
videos as well. And if I go to the prompt, this is the prompt
of this video. The reason why I'm sharing all
of these examples with you is because I'm showing you that you can almost
generate anything. If you have an idea,
then you can visualize your idea using S AI. And by the way, this is
the prompt of this video. And by using some
POV hyper speed, you can also generate these
types of crazy video. Now, this is the prompt, and we have this
underwater video. Now, if you want to
generate UFO videos, then you can also generate
them realistically. This is a prompt, and
this is the final result. You can also shift the
focus of the camera. If we go to the prompt, this is the prompt and
this is the final output. The focusing of the
camera is shifting from the cout to this fire. So we have another example
of camera shifting focus. In this example, I
ask him to slowly focusing on the cup and
these are the results. Let's these to result. Now, by using this
simple prompt, I generate this crazy video. You can also generate time
lapse video if you want to. This is a prompt, and
this is the final output. Now, if you want to generate first person videos like this, then try to use
this keyword, POV. This is my whole prompt, and this is my final output. And as you can see guy, the result is realistic. Now, again, if your
prompt is unrealistic, then Sora will
generate games clip. So this is my whole prompt, and these are the final results. Now, if you are a
game developer, then definitely you can use
Sora because it will help you to visualize your
final result of your game. You can visualize your
game mechanics as well. Not only this, you can
also generate titles. If we go to the prompt,
as you can see, guys, I ask him to generate the title, and the title say the awakening. And this is the final output. And without any video
editor, we have this title. Now, you can regenerate
this video in order to get better results. This is another example
of unrealistic prompt. Things that does not
exist in real life. We have this example, and this is the whole prompt. If you hover your mouse, you can see we have this prompt. Now if you try to generate unrealistic optexs or building, then SA will generate them
like they exist in real life. So this is my prompt, and this is my final output. Now with this prompt, we got these two variations. You can also generate
realistic human videos. By using this prompt, we got this result. We have another example
of realistic human video. This is the prompt, and
this is the final output. You can also mix fictional
characters in real life. We have a ago shark
in underwater. With this prompt, we
got this variation. And as I told you earlier, you can generate
realistic humans as well. So by using this prompt, we have this crazy result. We have another example. This is a close up of a human. We have another example. So this is a closeup
of a humane, and this is the final output. And ACI, the results
are realistic. So by using this prompt, we have this result. Now you don't need a
paragraph in order to write a prompt to get
realistic results. You can type some simple word. Like I just typed
Flood in New York, and we got these
realistic results. Now, if you are really
a game developer and you want to get
inspiration for your game, you can also type GTL game, third person view of a
person running in New York, and this is what we got. The first variation is precise. The second variation
we have some error, but in first variation, it looks like we have a
complete game play trailer. In this example, I first
person view of a car driving in a desert and
we got this result. With that same
problem with coma, I just add realistic
game like Forza, and we got this result. So you can also create games video that does
not exist at all. Now, in this example, I type walking on moon
third person GTS style, and this is what we got. So it created this video according to GT
one or maybe two. Now by using that same prompt, I regenerate this video, but I just add a comma
and type GT five style, and this is what we got. This is another example
of gameplay video, first person person shooting
at the alien abandonedty, and this is what we got. In the second variation, we have accurate result. In first variation, the
alien just disappear. But in the second variation, we have this crazy smoke
coming out of this gun. Now by typing simple keywords, we can generate realistic result like cup of tea in a microwave. Glass of water. And with just this
keyword cup of tea we got this crazy result. And finally, we
have POV of a car, and we got this crazy result. So the possibility of generating AI videos are now endless. By using Sra AI, you can generate almost anything if you have that
thing in your mind. The only thing that is
limited is your imagination.
7. Image to Video Introduction: Welcome back. So if you
click here in the plus icon, we have an option
to upload images or video to generate video. You can turn your
images into a video. If you upload any
video of a person, if you have a $20 plan, Sra is not going to generate that video because in $20 plan, you can't really generate
video of any person. So for example, if
I select my image, which is a person, and if I try to generate
this image into an AI video, the SA is now going
to show me an error. It is now going to show me a message that you
can't really generate video of a person because
you have a $20 plan. You have to upgrade
$200 plan for a month in order to generate video
of image contained peoples. So now I'm going to delete this. Now let's click here and
we can upload an image. Now I have selected this car, which is generated
using labs dot Google. You can also use ling AI. Now, if you want to type, if you want to describe your
video, this is an optional. You can generate this video. And if we go to credits, this video will
cost us 25 credits. So first, I'm going to generate this without
describing the video, and without any prompt, this is the result of image
to video using Sra AI. And so I decided to add
this random shot of a card instead of generating image to video using the
original image. So now I have
selected this image. Now I'm going to
train my expect ratio according to this image. Now let's go to designer
do microsoft.com. I'm going to paste
this prompt time lapse of a seed becoming
full grown tree. Let's enhance this prompt. So now let's copy the first line instead of copying
the whole prompt. Go to Sra AI. We can paste this
prompt and now we can generate this video. By the way, you can also
generate images using chat GPT. So the image of a seed was
also generated using chat GBT. If you ask ChaGBT generate a
realistic image of a seed. Now Cha GPT is going to
generate image of a seed. Now, if you want to
do some changes, you can also ask him, as you can see, guys,
in this prompt, I got this image of the seed and I asked him to see
it in the ground, and now we got this result. So now we have the
final result and I think Sra is not good enough for image to
video generation. It is good enough
for text to video, so I'm going to try
my best this time, and this is my final try. So I have copied this prompt, and I have generated
these images. So I'm going to click
here to open this image. Let's click here to
download this image, which is generated
using labs dot google. Now let's click here. Let's
upload this image to Sora AI, and let's change
the aspect ratio, and this will cost
us to 25 credits. But this time, I'm going to
also change my resolution, and now it is going to
cost us 60 credits. Now let's also paste
the prompt and see if Sora is good enough for
image to video generation. So the moment of truth. I don't think Sora is good for
image to video generation. It is good for text to
video, as you can see, but it is not good
for image to video because it ignored
the original source, which is this image and it just generate the video
through the text. It happens in all
the three prompt. In this example, it happened again and this example,
it happened again. This is the original source. This is the original reference, and now we have text
to video generated and mixed together with
the original image. A
8. Generate precise Image-to-Video: Come back. So if you try to generate video
through an image, then most of the time you
will get some grabby result. But using my technique that I find out and I have
used this technique, and I generated several videos, and most of the video are generated using the
image turnout rate. So I'm going to show you how to generate video through
an image accurately. So first of all, click
here and go to preset. And right here, as you can see, guys, we have managed preset, so click on this, and now you have to
open balloon world, you can copy this theme. Now go to chat GBT. You have to foster
fall paste this theme, and now you can change this preset into
modern film preset. Now, you will get this preset, you have to select
this preset theme. You have to copy this preset. Now go to Sa AI, and now you can click here
to create a new preset. Now I am going to
paste this preset, and I'm going to name
this to modern film. Now let's save this preset. Now click on Done. Now, as
you can see, guys right here, we have this image to video generated video using
Sora without any preset. Now I'm going to
edit this prompt, and this time I'm going
to change my resolution, change my preset to modern film. Now we can click here
to generate video, and now we have this
example as well. So this is my original
reference image, and so I decided to generate this random
video through text, and it mix these
two video together, and now we have this video. So let's try this with
our customized preset. So I'm going to
select modern film. And let's delete the prompt, and now we can
create this video. And now we have two
variations of the video. And as you can see, guys, the result improved a lot. In the second variation, we have a text to video generated
together and mixed together. But as you can see overall, the video is improved. In the first variation, as you can see, guys, it did not generate a text to video. I animate the image, and we got this video. Now, if you look at
the first variation, we have the grass moment and we have the ocean
moment as well. And now we have the
second example. And as you can see, guys, these two variation is improved
a lot from the previous. The second variation, it animate the whole image,
and we got this video. But in the first variation, we have this text to video mixed together because as you
can see guys from here, it transition from
the original video, the original image
to a text to video. But in the second variation, as you can see guys, it
animates the whole image. You don't have to use this
preset all the time because sometimes Sora generate image to video with a high accuracy. And if you have some
images like these two, then thera will screw you up. But if you have a
real time image, it generate the image to
video with a high accuracy. I'm going to show you
some few examples. Have this example,
and as you can see, guys, this is an
image of a tiger. If I open this image, this is the original image. I download this image
from pexel.com, and this is the
title of this image. We can go back and now,
as you can see, guys, it generates this image to
video with a high accuracy. The water is moving, the tiger moment is accurate. Even in the second variation, we have a less
moment of the tiger, but the results are
pretty convincing. We also have this example, and as you can see guide, this is the original image, which I also download
this image from pxel.com. Now, if you go back,
as you can see guy it generates this image
into this video. If it generate the video
without the preset, then you don't have
to use the preset. But if it failed to generate
your image to video, then you have to use the preset. We have this example which I used my image with
this modern preset, and we got this video result. I have two variation. This
is the first variation, and this is the
second variation. You can also generate
animation videos using soda. So this is the image, and we have this result
without any preset. This is the second variation. Now, if we go to the preset with a modern film preset,
this is the result. This is the second variation
of modern film preset. Now if you get this kind of
result, even with the preset, try to write a prom like I we animate this image
and I got this result, which as you can see, the
result improve a lot. This is the second variation
And without any preset, with this simple prompt,
animate this image. This is result of so AI. We have the second
variation as well. So as you can see, guys, the modern film preset will
improve your animation a lot. Now with the modern film preset, this is another example. And without any preset, with this simple prompt,
animate this image. This is Sra dessert. Now, if you try to regenerate your images without any preset, you might get some
better result. In this example, as you can see, guys, without any preset, we got this result
because I regenerate this image into video
without any preset. Now in this simple example, if we go to the prompt, I did not use any preset, and this is the result
without any preset. This is the second variation. And without any preset with this simple prompt
animate this image, this is the first variation, and this is the
second variation. Now, without any prompt, with a model film preset, this is the first variation. And this is the
second variation. Now with the modern film preset, we have another example. This is the first variation. And this is the
second variation. We have another example
of modern film preset. This is the first variation. And this is the
second variation. Now we have this example of
modern film preset as well. This is the second variation. And without any preset, with this simple prom, animate this emit, this
is the first variation. And this is the
second variation. So don't use your
preset all the time. Try to generate your images into video without any preset. Then use a modern film preset if you don't get
your desired result. If you want to generate these types of three
D animated images, go to Labs dot Google
and go to Image Fc. Now we have this simple
problem to young boys in a Pixar style driving
a car together. And for this image,
I just change the car into riding a
motorbike together. And in this example, I just changed riding a bike together. You have to write pizza style in order to generate these
types of three D images. To improve your prom, you can use
designer.miicrosoft.com. To generate these types of
images, write this prom. As you can see, guys, I have several examples right here to generate these types of fictional characters,
write this prompt. This is another example
of fiction character, and I use this prompt. To generate these types of animated colorful images,
write this prompt. For these types of images, I use this prompt. This is another example
of modern film preset. I use this image with
a modern preset, and this is the result. This is the second variation of this image with a modern preset. This is another example. If we can go to edit,
as you can see guys, this is a modern preset, image to video, and
this is the result. This is the first variation, and this is the
second variation. As I told you earlier,
you have to generate two variation because if
one variation is bad, then the second variation
will look great. This is another animated
character image. With a modern preset,
this is the result. If we go to the dit prompt, if we go to the preset, I use modern preset. This is the second variation. And without any preset, this is the image, and
we have this video. This is the second variation. And as I told you earlier, you have to generate
two variation because most of the time, the second variation look bad and the first
variation will look great. This is another example of animated character using
the modern preset. This is the first variation, and this is the
second variation. We have this example as
well with a modern preset. If we go to the preset, I have used modern preset. This is the first variation. And this is the
second variation. So we have another example. So if you use complex image, in this image, as you can see, we have five characters, and I write animate this image, and I have used none preset. I did not use any preset, and this is the result.
These are the example. If you use complex image, you will get some crappy result. Even with the modern preset, if we go to the preset, I have selected Star
motion preset and this is the result of
stop motion preset. This is the second
variation of stop motion. And if we go to the preset, this is the fill
noi preset effect. And if we go to the
modern preset result, this is the modern
preset result. So if you have a complex image, then the modern preset
won't help you. But it will improve the
result a little bit, not too much, but
it will improve the result a little bit. Even with this image, I have
used stop motion preset, which is the Sra
original preset, and we have this result, which is not a bad result. This result is based
on the preset, and this is the second variation
of strop motion preset. And without any preset,
this is the result. This is the real image. That is why we are not
getting any error. This is the second variation. Now, sometime if you are not getting the
result that you want, try to regenerate your clip. So in this example, I have the image and I
try to generate image to video without any preset and without any prompt,
this is the result. And with the prompt, animate this image without any preset, this is the second result. And if I open this result, if I go to the edit prompt, if I click A, as you can see, guys, I use my modern preset. And this is a result
of modern preset. And if I open this, if we go to the preset, I did not use any
preset this time, and I try to regenerate
this image to video. Now with my modern film preset, if I open this generation, if we go to the preset, this is my modern film preset
and this is the result. This is the first variation, and we have this
second variation. So if you are not getting
the result that you want, try to regenerate
your image to video and try to use different preset in order to get better result. For the seed image, I use this prompt, and I also ask TBD to write
the prompt for these images. And this is the
prompt of this image. Now, Sora will work best on those images which are
shown in real life. So this is how you can
turn your images into beautiful AI videos using SA AI.
9. Preset Introduction: Welcome back. So
if you click here, as you can see, guys,
we have some presets. If you go to the
mange right here, as you can see, you can also
create your own preset. But first of all,
let's use this preset. Now I'm going to select
this balloon world. Now go to Microsoft Designer, and I'm going to type
a symbol prompt. We have this prompt a giant soda can in front of BgKalifa. Now, click on this
enhanced prompt. Now copy this prompt. And now I'm going to paste
this prompt right here. Now we can also now select the preset and now click
on this create video. So the video is now generated, and here we have the result. As you can see, guys,
the can look like it made out of
inflatable balloon. Now I'm going to
copy this prompt, and now I'm going to paste
this prompt right here. And now let's click here and I'm going to change my
preset to stop motion. And now let's click on
this Create button. So the video is now generated, and here we have the result, and as you can see the
result is pretty amazing. Now let's try some
other presets as well. So this time, I'm going to
upload this image and let's change the aspect ratio to
match the image aspect ratio. And now let's
select this preset. So the video is now generated, and here we have the result. And the result is pretty amazing because if you try image to
video generation of Sara, you will get some
pretty crappy result. But if you select a preset, then you will get
some better result. And now we have this prompt, and these are some image
generated with this prompt. Now I'm going to
copy this prompt. Now let's go to Sra AI, and I'm going to paste
this prompt right here. Now, this time, I'm
going to select flam noll and let's click
on this Create button. Now we have this prompt, and these are some images
generated with this prompt. Now, I'm going to
copy this prompt, and I'm going to paste
this prompt right here and let's select
our final preset, which is cardboard and paper. So the videos are now generated. First, we have film no preset
with this dragon prompt, and I'm surprised
with the result because the result
turned out to be great. Now let's view the
cardboard result, and I kind of like
this one also.
10. Custom Preset: Now if you want to
create your own preset, I have a easy method for you. Go to palab dot t, and if you click
here in Pa effects, as you can see, we have
several presets right here. So let's create melt it. Go to the presets and
go to Managed preset. Now, in the first preset
balloon world, copy the preset. Now go to chat GBT, and you have to
paste this preset. And now you can type
change this preset, and I'm going to make
a melted preset. So let's change this preset
into a melt it preset. And now let's click here. And the TGT will define
this preset for you. Now, it will define lighting, frame, stock, color,
theme, et cetera. Now, simple we can
copy this preset. Go to Sra AI, click on this button. Your preset, melt it, and now we can paste this theme. Now, let's click on
this save button and the preset is now saved. Now to find out if this
preset is good or not, we have to select this preset. And now I have typed a
giant pizza on building. Let's enhance prompt. These are the result
of this prompt. Let's copy this prompt. And now I'm going to use
this prompt in Sra AI with our melted customizable preset because the pizza will
melt in the video. That's why I'm selecting this
prompt with melted preset. So the video is now generated, and we have this message. Pick the best videos from this
set to help improve Sora. So now we have two videos. So in order to help Sora
you have to select one. And I kind of like
both of these videos. So I'm going to select this one. Now I'm not going to
click on this keep selected video because
I kind of like both. But let's select this video. As you can see, guys, the preset is now working perfectly fine. Let's create some
other preset as well. Now go to Pica lab and I'm going to create this dissolved preset. And we don't have to copy this all over again.
We can just type. Now I have type, now change this preset into a
dissolved preset. And we have this preset. We can copy this
preset, go to Sra AI, go to Manage click here, paste your preset and
name your preset. So in order to make the dissolved preset
work perfectly fine, we have to select a prompt
where we have some object or subject close
up to the camera. So I'm going to
copy this prompt, and I'm going to paste
this prompt right here and let's select
dissolve it preset. Let's change aspect
ratio as well. Let's click on this
Create button. Now, final I'm going to create levitate preset and
here we have the theme. Let's copy this preset. Go to manage, click
here past your preset. Now we can name preset. The video is generated
with the dissolved preset, and here we have the result. This is not close to the PIA lab effect because
this is our customized effect, and I like the creativity
in this generated video. Now let's try the
levitated preset. For this, again, I'm going
to select this picture, and now we can click
on this Create button. Let's double check if we selected the levitated
preset or not. And now let's click on
this Create button. So the video is
now generated with our customizable
levitated preset, and here we have the result. And this is not what I expected, but I think we used our
customizable preset. That's why we are getting
this kind of result. Now you can ask JGBD to improve
this preset furthermore, but I'm not going to do
that. This is up to you.
11. Storyboard Introduction: Welcome back. Now, if you open any of your
generated video, for example, let's
open this video, and right here, we have
a recat button up here. If you click on this button, it will take you
to the storyboard. Now, if I close this video, if you go back to your
homepage and in the homepage, as you can see, guys, we have a storyboard button right here. So let's click on this button because we are going to create a storyboard video
from the scratch, not from a generated video. So you can select an image or video or you can
describe your scene. Let's create a three
scene storyboard video. Go to hat JBT, and now I'm going to ask JGBT to write a
three scene for me. Now I have died write a
prompt of three scenes. First pirate ship in a
stormy ocean, second, pirate escape from the storm and third pirate ship catching
a giant sea creature. And I have died also enhance this prompt and keep
consistency in this prompt. Because if we keep the
consistency in this prompt, then the result will convincing. And now, as you can see
here, we have three prompt, and to see if these prompt are
good for the scene or not, we have to copy this prompt and we have
to paste this prompt. Right here in
desindmicrosoft.com. Now by creating the image, we can visualize the scene. So now we can copy this prompt. Let's go to Sora AI. We can describe the scene, and you can also trim the
scene if you want to. And after C second, let's create a second scene. So you have to click
here, you have to click on this keyframe. And if you hover your mouse on this timeline,
as you can see, guys, you can click here anywhere to create
your second scene. Now let's change this to
ten second video as well. And for the second scene, go to Chat GPT and
copy the second scene. Now go to Sara and paste
your scene right here. And now for my third scene, let's create a scene right here. Now I can copy this prompt and let's paste
this prompt right here. And you have to make sure if you select any preset or not. I have selected this
levitative preset. Let's select none. And this
will cost us 50 credits. Now let's click on
this Create button. And now Sra is creating
a three scene for us. So the video is now generated, and here we have the
storyboard result. And after seeing this result, the Sa impressively merges
the scene together. We don't have a monstro
catching scene, but I think the result is pretty convincing because if you
notice in the first scene, we have the same board,
and in the second scene, we have that board in the
second scene as well. Now let's create another
story board video. And this time, I'm going
to type simple prompts. So in my first scene,
I'm going to write. So we have three
scene in first scene, a fighter jet in war scene set two 90s flying
in high speed. And in second scene, jet firing blood to the
jet in front of him. And in the third scene,
we have jet escape from the bullet from the jet
that is behind him. Now you can also drag the scene, and you can change the location
as well in the timeline. So I'm going to change this
scene location to right here, and let's change this scene
location to right here. And this will cost us 50 gradit. So let's click on
this Create button. So the video is now generated, and here we have the result. And as you can see, guys, you might be thinking
the result is crappy. But on purpose type this complex prompt in order to explain how the storyboard work. So if you notice in
the first storyboard, we have two scene moised
together pretty convincingly. But in the third
scene, we don't have the ship catching the monster. So in order to create a
perfect storyboard video, you have to define your
video scene by scene. So what does this mean? In this example,
I'm going to create a simple storyboard
of 10 seconds, right? So in order to write
the story board, you have to write
your scene like this. Write a two scene prompt, a person standing outside
the car of a Ferrari, and then person open the door of the car and enter in the car. Enhance the prompt, keep the
consistency in this prompt. So first, a person
standing outside the car, then it's open the door
and enter in the car. So now I'm going to
copy the prompt, go to a AI past or prompt. Now, right here, I'm going
to copy my second prompt, and now let's paste
this prompt right here. And now let's click
on this Great button. So the video is now generated, and here we have the result. So in the first scene, a person
standing outside the car, and in the second scene, person open the door
and enter in the car. Now it generates the
video what we ask him to generate because I did not
review my prompt of hat hept. Now, first, review your
prompt then generate video. But I think the storyboard of this video is better than
the previous two results. So now we have to
tweak some word here and there in order
to fix this video. Let's go back and create a
storyboard from scratch. Now for this storyboard, I have this example. These are the result
of this prompt. I'm going to copy this prompt. Now less space this prompt. A car has crashed through
the wall of the building, leaving a gaping
hole in the side. The car is partially
inside the building with the front end of the car
visible from the outside. The car appears to have been
traveling at the high speed. Now, in my second scene, I have time a big sparking
happening from the car hood. And now let's create this scene. Let's change this scene
to a five second scene, and let's place this
scene right here. And now this is the
result of our storyboard. Now you can also preview
your storyboard from these cards so I have made three videos of storyboard in order to explain how
the storyboard works. So in the first example, I have type person man
walking in the park, man stopped, start
walking again. Now, in my second storyboard, I did not explain that
man stop walking, and he just keep walking
in this storyboard video. And the video is also 5 seconds. So in my next example, I fix this problem. Man stopped walking. Then he starts walking again. So we fix the prompt
in the storyboard, but the duration is too
small for this video. And the person keeps walking
and he did not stop at all. So in my final example, what I did, I made
a ten second video, and I placed my
first storyboard, man walking in the park, and I have made a huge distance
between these two frame. Man stopped walking. And the last we have, then he started walking again. And here we have the result. As you can see,
guys, this result is better than
previous two results, and now he has stopped walk. And now he start walking
again right here. So in order to create
a good storyboard, keep the distance between your frames according
to your video. If you have a huge
distance between your frame and you did not
get your desired result, then try to make the distance
shorter between your frame. It will help you to
get better results. In this example, we made
a good story board, but the problem is we did
not review the prompt. That is why we are getting
this weird result. So always review your prompt before you generate your video. So to understand the story
board in a short word, in my first frame, I have
closeup of a person I, and in my second frame, I have person blink, and as you can see, guys, I maintain a less distance
between two frame, and this is a five second video, and this is the final
result of storyboard. Now this is the
second variation. And I kind of like
this variation because we have a transition. We have I transforming from hey to here and we have
person phase right here. This is the basic
story board example. If you play around with the
distance between your frame, you will get different result. As you can see, we
have the same prompts. Now this time, I just place my second frame furthermore
than my previous story board, and this is the result. If you notice we are getting
more than one Blink. In my previous story
board, we got one Blink, but in this example, we are
getting more than one blink. This is the second variation. So if you play around with the distance between your frame, then you will get
different results. To make a good storyboard, make your storyboard
as simple as possible. Don't generate too complicated storyboard or
complex storyboard. In this example, I write car
passing by a second car, and then I write,
then car turn white. I have placed my second
frame in about 2 seconds, and this is the result. You can generate
realistic storyboard. By typing simple prompt. So make your storyboard
as simple as possible. Try to explain
everything step by step.
12. Storyboard Using Image and Video: Welcome back. So we generate story board
through the text. This time, let's go
to the storyboard and let's generate the storyboard
through an image and video. So click here if you
want to add an image, and I'm going to choose
my image from Library. Now I'm going to select this image so if you
select an image, Sora will automatically write a prompt based on your image. It will describe your
image in a prompt, and you have to decide
if you want to use your image or if you want
to use the Soda prompt. I'm going to delete
this prompt because I'm going to use my original image. Let's change the aspect ratio, and now I'm going to
place my second image. And as you can see, as soon
as I select this image, Sra, write this prompt. So I'm going to
delete this prompt. Let's select two variation, and I'm going to create
this storyboard. So let's create storyboard
using video this time. So click here and I'm going to choose my video from library. So now we have this video. To preview your clip, you can hover your mouse
from left to right. You can also hover
your mouse onto this track in order
to preview your clip. Now, if you notice
under this layer, we have the three dot, and if you click
here onto three dot, we have three options. We have split. We have slip, and we have delete. The split shortcut is S and the delete
shortcut is backspace. If you select your video, you can press backspace
to delete your video. You can also undo this action
by preressing Control Z. And if you want to
split your clip, I'm going to select my clip, and if you want to split
your clip from here, you can press S, and it will split the clip
where we have this playhead, where we have this
vertical line. And now, as you can see,
it will split the clip, where we have the playhead. And if I select this clip, if I press a, it
will split the clip. Now we can press Control
Z to undo this action. And now we have original clip. Now we can also
drag this corner to the left side in order
to trim this video. And if you want to view the
thumbnail of the trim part, you can click here and
you can select slip. And now we can view the
thumbnail of the trim part. So I can select this
portion of this video, and I can click right
here to undo the slip. Now I can click here. I can add my second
video right here, and now I'm going to
select this video. So we have two videos. We have this video and
we have this video. Let's create Storyboard. So we have the result
of image storyboard. And as you can see, guys, we have this weird transition
between these two images. Now we have second
variation where we have a simple transition. Now we have this example, and if you review the image, as you can see, guys, we have a slight mobile motion
change in these two images. And this is the story bottle. This is the second variation. Now the Sa creates story board according to the
distance between two frame. As you can see, guys,
this is my first frame, and this is my second frame. Now, in my next example, I have used these two images of a seed and I have
this small plant. And this is the storyboard
of these two images. And as you can see, guys, I keep the huge distance
between these two frames. This is my first frame. If we go to the added story,
this is my first frame, and this is my last frame, which I place at four second. Now we have also a
second variation. This is second variation. Now, if you have a less
distance between two frame, you will get different result. And this is the example. If we go to the dit story, as you can see this time, I have less distance
than before. In the previous clip, I
have four second distance, and in this clip in
this story board, I have two second distance. So if you keep the huge
distance between two frame, you will get
different result and if you have a shorter distance, then you will get a
different result. Or in some cases, you might get some better results than
the huge difference one. If you want to generate consistent images
like this, go to GBT. Use this prompt, write
a two prompt in first, a seed in a desert, and second a full grown tree. Keep consistency in the prompt location
lighting camera angle. Now you can also ask AGBT
to generate these images. It will help you to get
visualization of your images. Now, once you get the
prompt, copy these prompt. Go to labs dot Google
and paste this prompt. You will get realistic results. And as you can see,
this is a seed image, and this is the tree images. For the seed image, I use this prompt, and I also ask BD to write
the prompt for these images. And this is the prompt
of this tree image. And now with the video, this is the storyboard. This is the second variation. So the storyboard by using the videos are just
like a video editor. You can split two clip and
you can mix them together. Now, if you try to generate
your storyboard using video clips and you have a lot of empty frames
in between your clips, then Sra will automatically
generate these frame for you. So let me show you the final
result of this storyboard. I use two clips. This
is the first clip, and this is the second clip. And as you can see, guys,
in between these clips, I have a lot of empty frame, and this is the result
of this storyboard. And this is the
second variation. Sra will automatically fill
these empty frames for you. If you want to
generate a good story, then I highly recommend
use text to video and image to video in order to build or generate a good
story and try to generate storyboard by having a
shorter distance and having a huge distance in order
to get different result.
13. Remix Introduction: Welcome back. Now in the Sra AI, we have a great
feature called remix. To use this feature, you have to open your
generated video. You have to click on this remix button and it will take you to
remix interface. Now, right here,
you can describe anything that you want
to add in this video. You want to remove anything,
you can describe here. And if you want to
replace anything, then you can also
describe that right here. Now you can change your
video variation right here. So I'm going to
select one video. Now you can also change
your resolution, and you can also change
your remix strength. Now we have three strength. We have strong milt
and we have sirtle. You can also customize
your strength, and you can select point
between the strength. Now let's select the strong, and now I'm going to replace
person walking with a robot. Now I have the replace
person walking with a robot, change the day tonight. And now let's remix this video. Now we have two variation. Replace person walking with a robot, change
the day to night. And as you can see, guys, it changed the day
tonight impressively, and we have a robot walking
instead of the person. So I kind of like
both of the result, but this is consistent
with the result. And in this result,
we have some error. I'm going to select this result. Now we can again remix
this video if you want to. So let's remix this
video further. So I asked him to remove the robot and change
the season into summer. And now let's click
on this remix. So the video are now generated, and we made two variation. So this is the first one. We don't have the robot and
we have a summer season. And I kind of like this result. Now, go to the next variation. And the people right here I look like a
star motion people. So I kind of like this result. So this is how you can use
the remix feature in Sra AI.
14. Remix Like a Pro: Welcome back. There is a lot of possibility when you use
remix feature of the Sra AI. In this example,
I'm going to open this video and let's
go to edit Remix. This is my original source
video, and if we go back, I type replace
weather to Sunny day, replace person into robot, replace the background
into a part. And as you can see, guys, we have this amazing result. This is the second
variation of this video. Now in this example, this
is my original video. And I ask a replace
person into robot, add dramatic color grade. And as you can see, the
original source video does not have any grading in it. And in this video, we have a dramatic color grade as well. So not only you can add or
change anything in your video, you can also add color
grading if you want to. This is a second variation. And in this example, I ask Sora stormy
weather, add heavy rain. And as you can see guy, this is my original
source video. And this is remix video. We have the second
variation as well. Now you can also change your video game into
a realistic video. In this example, I use gaming
clip of Forza Horizon, and I ask Sra to change
everything realistic. And this is what we got. This is another example now I did the same
with the GT one video. And if we open this up,
as you can see here, this is GT one NI type, make everything realistic,
and we got this result. We have second
variation as well. And this is without any prompt, and this is the
second variation. You can also remix
without any prom, but it is better to use prom
because without any prompt, you won't get better result. We have another example. This is my original
source video. And I ask soda to
add cloudy weather, and this is a result
of cloudy weather. This is the second
variation of this example. Now, in my next generation, I use this remixed video, and I ask soda to
add heavy rain, and this is a result
of heavy rain. This is the second
variation of heavy rain. And then I use this remix video, and I type heavy storm
and add flying object. And we got this result. So you can remix one video
as many times as you want. And this is my second variation. Then I use this remix video
and I type flying leaves, and this is what we got. This is the second variation. In this example, I use that same video that
we remixed before, and I typed replace car with a motorbike change weather
into sunny day, cloudy sky. And this is the remixed result this is another example of replacing a person into a robot, and I also asked him to change colour theme
to a warmer color. So in the original source, we have a cooler color, and in this, we have a little bit warm colour in the video. Now we have this example. So this is my original video, and I asked Sora to change the color of the car
into a red color. And this is what we got. As you can see, it realistically changed everything in the video. And again, I use
this remix video and Sora change sky
color to green, and this is what we got. If we can go back, this is the second variation
of green sky. And I ask Sra change the
day to pitch black night. Car headlights rays
are visible in dark, change sky to Milky Way. And we have sky to Milky Way, we have headlights on, and this is the final
remixed result. This is the second variation. Now, if you click here, you can upload a video
to remix your video, or you can choose the
video from Library. So I have this video. Let's remix this video. So first of all,
I'm going to change my car change the car
into a red Ferrari, add heavy rain, make track wet. Now let's remix this video. Now you can click here to see if your video is
generating or not. You can also cancel this
generation if you want to. Now we have this result. As you can see guy it changed
the car into Ferrari, and we have a
little bit wet rod. Now we can again remix
this or you can add it remix to remix
your original video. But if you want to
remix this video, then you have to
go to remix again. Now we have to select the
variation if you want to remix variation one
or variation two. So I'm going to
select variation two. Now I type, add little bit in, make video darker, headlights
rays visible in dark. And let's type, add
cinematic color grade. Now let's remix this video. So now we have this result. And first of all, I have
noticed that we have a cinematic color grade
in the original video, we did not have any
cinematic color grade. But in this update, we
have a cinematic update. I'm also noticing that
the headlights are now visible than in the
previous version. Let's remix this video. Furthermore, let's go
to the variation two. Now I have type Jane
day into night 1:00. Let's remix this again. And now we have the result. And as you can see, guys, the time is now changed. If we go to the original source, this is the original source. And if I pause my clip, as you can see guys
in the background, if you look at the sky,
this is the morning time. And now if we go
back, as you can see, guys, right here, now
we have the nighttime. And if I play my clip, if you notice we have
these track lights on, that is why we have these kind
of lighting in our scene. So this is how you can remix your clip as many
times as you want. I
15. Blend Introduction: Bag. So we have another great
feature in Sa call blend, and it helps us to blend
two videos together. First of all, I'm going
to create this video. A juicy red apple sits on a white plate on a wooden table. Now let's create this video. Now I'm going to again
paste this prompt, and I'm going to change
the apple into orange. And now let's create
this video as well. So now we have two videos, one with the apple and
one with the orange. Now we can click on this video, and right here, we
have Blend feature. Click here and we can upload a video or you can choose
video from your library. So I'm going to choose
the orange video, and it will take you to
the Blend interface. Now this graph define this is the point where
the transition happened. If this line appear, on top of the Apple video, then the Apple video will
play until this section, and it will transition
from here to this video. So you have to be carefully
define your transition. And from here, I'm going to
transition to this video. Now you can also change
the position if your video is longer than this duration. And right here, we
have the option to blend videos together. We have three
options and you can customize your blend drive. Now we have selected the customize because
I'm going to customize my graph But if you
want to choose the C, then you can also choose
your blend curve as well. Now let's create a blend video, and now we have
the final result. And it simply blends
two videos together. Now let's try some
other option as well. So now I'm going to select this video and go to Blend,
choose from library. I'm going to select this video. And this time, I'm
going to select sample and let's
blend this video. So we made two variations. First of all, this
is the first result, and it just blend two
videos seamlessly together. As you can see, we transition from one video to another video. Now we have the
second variation. And they both look great. Now, if you want to blend two
videos together seamlessly, then you might have to have the same object and the same lighting
condition in both videos. But if you have different
lighting condition like I have in both
of these video, then you might have same
object in both video if you want to blend two
videos together seamlessly. Like, for example, if you have everything difference
in both clip, then you might get
this kind of result, a simple transition from
one clip to another. Because in the first clip, we have 360 camera moment, but in the second clip,
we have this top shot. Now if you have the
same camera moment in both of these clip, then you might get some
results like this. Now, if you want to get
this kind of result, then I highly recommend don't
customize your blend curve. Just use the curve
that Sra offers because those curve work better than the
customizable curve.
16. Blend Like a Pro: Welcome back. So if you want to blend two videos
together like a P, then you have to understand what these blend
options are used for. In this example, I
use mixed Blend. And if I open my clip, I have this Apple video and
I have this orange video. Now, this is the
result of mixed Blend. Mix Blend will mix two videos together and
it generates one video. This is the second
variation of mixed blend. Now with the same videos, I just use transition blend, and transition blend will blend from one video to another. As you can see, the apple is gradually changing into orange. We have the second
variation as well. Now with the same clips, we have sample blend, and this is a result
of sample blend. This is the second
variation of sample blend. Now we have another example to better understand these
three blend options. So with this clip, if I open my clip, this is my first clip. If I go back, this
is my second clip. And as you can see, guys, these are totally
two different clips. Now, by using the sample blend, this is the result
of first variation, which is not good, and this
is the second variation. Now with the same clips, we have mixed blend. And if I play my clip, as I told you earlier, mixed blend will mix
two videos together. So what does this mean? As you can see, guys,
in the background, we have the ocean and right
here, we have the track. And if you notice, it mix two cards together. This is the first car and
this is the second car. This is the first variation, and now we have the second
variation of mixed blend. And with these same clips, we have transition blend. And as you can see,
we are transitioning from one clip to another clip. This is the second variation. We have another example. So first, we have this video. And if I go back, we
have this second video. Now, by using the
transition blend in between these two clips,
we have this video. This is the first variation. And as you can see, we
are transitioning from one clip to another clip, and this is the
second variation. If you notice the
car is changing gradually from blue to black. Now with the same videos, I just use sample blend. And we have this result. This is the first variation, and this is the
second variation. And in the final with these same clips, we
have mixed Blend. It will mix your two videos together and it will
create one video. So you will get two
videos object and subject mixed together and generated
into one single video. This is my second
variation of mixed Blend. Now we have this
example as well. So in my first clip, we have these two gloves, which also generated using RA, and this is the
prompt of this video. Now, if I go back, this is my second video which I
downloaded using pexel.com. Now, as you can see,
guys, these are two totally different clips. In first, I use transition
blend using this clip, and this is the first
variation result. And this is my second variation
using transition blend. Now with the same clips, I just use Sample blend, and this is the result
of sample blend. This is the second
variation of sample blend. And this is the
result of mix blend. This is my second
variation of mixed blend. Now, if you have totally
different backgrounds and totally different camera
angles of two videos, you might get some bad result. In this video, I have
this robot working, and this is the side view. And in this video,
as you can see g, this is the closer view
back of this robot. I use mixed blend. This is the result
of mixed blend, and this is the result of
mixed blend second variation. Now with this sample blend, sample blend try to copy the first video camera angle and it transitioned from
one to the second location. In the second variation, we are transitioning from one
location to another. And finally, in
transition blend, we are transitioning
to the second video. Because we have this
different camera angle, we have wide angle and we have closeup that is
why we are getting this weird result in these
three blend options. So to summarize these
three blend option, if you want to mix
two videos together, try to use mix blend. It will mix two videos together. Now, if you want to transition seamlessly from one
clip to another, try to use transition blend. Transition blend will seamlessly transition from one
clip to another. Now this is the
final brand option, and this will confuse
a lot of people. If you want to influence your primary clip
with another clip, then try to use sample blend. In this example, as
you can see, guys, I have this video, and
this is my second video. There is no camera motion. In this video, that is why
we are getting this result. This is the second example of failed sample blend because
in these two example, we don't have a
different camera angle. We have the same camera angle. That is why we are
getting this result. And this is the same
video that we are here. And this is our primary clip. As you can see these
two are identical. There is a little
different at the end, but most of the video is
identical to the original clip. Now, in this example, if we open the sample blend, we have two different
camera angles and we have totally
two different videos. That is why we are getting
this result, which is great. And in the first generation, we have the failed
result as well. If you want to use a blend option that works all the time, try to use transition blend because in my all
generated example, transition blend
is the one option that works all the time. So this is how you can blend two clips together like a Pro.
17. How to Loop in Sora: Come back. So now we have
the final feature of SA, which is called loop. So you can loop any of
your existing videos. So now I'm going
to open my clip. You can click here
to loop this clip. Now we can select the duration. So I'm going to loop this video from here because we have a car passing
in front of camera. So now it will loop like this. Now you can choose
the normal loop. You can use short loop or
you can use the long loop. Now, it will cost us 70 credits. Now I'm going to
select one video. Now I'm going to
select normal loop, and now the video will
have seven second. Now let's click to
create a loop video. So the loop is created, and here we have the result. And the loop is seamless. We can't really see
the cut in the video, and this is how we can generate a loop video with a few
clicks using Sa AI.
18. Generate Video With ZERO Credits: Welcome back. Now, if you are thinking the
soda is expensive, because in the starter package, we have $20 a month, then consider this before you think the soda is expensive. If we go to the profile
and write the credits, as you can see, guys, I
have zero credits left. Now, if I change my view to grid view, as you can see, guys, I have generated these videos, and these videos cannot be
generated with 1,000 credits. So how did I generate
all of these videos? Now, if you buy Sora
for $20 a month, you will get one relax
more generation at a time. It's means you can generate
as many video as you want, but at a time, you can
generate only one video. Let me show you an example. So I'm going to write
a simple prompt. Now you can also change
your resolution. You can also change
the video variation, but if you have zero credits, then you can only generate
two videos at a time, and you can generate
only five second video. You cannot generate 10 seconds because if you run out
of credits index mode, you can only generate
five second clip. Now we can generate
this simple video. And if we go to the activity, as you can see, guys, the
video is now generating. Now to generate video quickly, I have a tip for you. Right now, the video
is now generating, so we can't really
generate any other video. So let me show you. So if I type, and if you
click on this Create button, we have this message. You can only generate
one video at a time. So now, as you can see, guys, the video is now above 90%. Now we can generate any video before that video is
finished generating. Now as you can see, guys, if we go to the activity, this is the video
that we generated. And the cup of T video
is now generating. So if you have 95%
generative video, then you can also generate
the second video. So quickly, I'm going to
go back to my homepage. And if we go to the main menu, as you can see, now I
can describe any video. Now I can enter to
generate this video. And as you can see, guys, before this video finished, we have a new video generating, and this is a result
of the previous video. So by using this technique, I have generated all
of these videos. And if I have to use my credits
for all of these video, I may be used almost 50,000
credits at this point. So this is how you can generate unlimited videos with
the relax mode of Sa AI.
 Faizan Amjed, Video Editor,Filmmaker & Youtuber