Transcripts
1. Class Introduction: Traditional or digital
paint on paper or iPad. It's a question many artists
forever ask themselves. But what if I tell
you that you can do both in the same art project. Hello, lovely creatives. I'm inviting you to
join my new class. Magical beings, traditional
media meets propri. My name is Irina Young. I'm a UK based illustrator behind the brand of
Busy Miss Studio, and I'm a big fan of both traditional media
and digital art. If you follow me
on social media, you know that I find a lot of inspiration in
traditional watercolor, pastels, colored pencils, and
I also love my procreating. Usually, it's either
this or that. But in this class, I'll show you my favorite kind, a mix of both. Whether you already
love your watercolor or you do exclusively
digital art. I encourage you to
broaden your horizons and join me in this magical
journey where I'll share my secrets and
techniques of combining traditional watercolor
with procreate and together we'll create an
adorable whimsical character that you'll be able to use
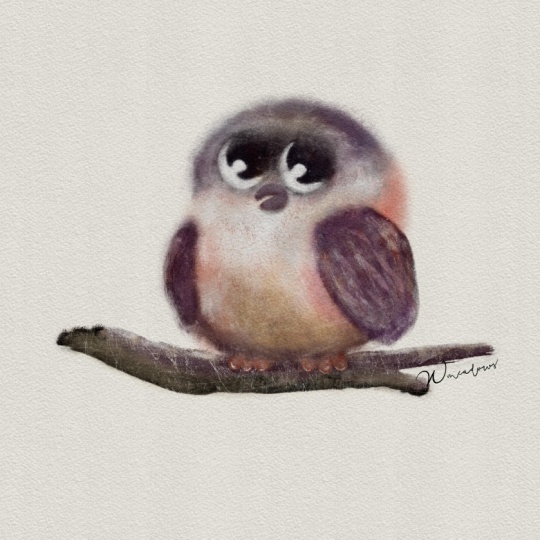
for your illustrated story. In this class, we'll
create this owl full of texture and character using traditional watercolor
and procreate. I'll walk you through
every single step from the tools and
materials you'll need for this class to adding finishing touches to your
character in procreate, making it unique and adorable. I'll share my
inspiration sources, give you tips on watercolor
and digital techniques. And in the resources
section of this class, you'll find a very
detailed guide with my recommendations on
tools and materials. So if you are ready
for something magically new let's begin.
2. Tools & Materials: Tools and materials you
will need for this class, I'm going to start with the ones that you
will definitely need. And in the end, I'm going to mention the ones
that are optional depends on your preference or depends on the mandatory
materials you use. You will most definitely
need watercolor paper. I've prepared three
types of paper for you. For this type of class, for this type of
activity, wet on wet. I personally use
cold press paper, which is quite
textured, quite gramy. But I've also prepared some
smooth paper, hot press, just to show you how
different your sort of shapes will look on
different types of paper. I'll be using some
hot press paper. This is called press paper. This is the brand I'm using. Honestly, I'm not
really sure where I got it from and when and how
the circumstances of it, but it's quite a nice paper
for that kind of exercise, that kind of art. And one of my favorite things
is this caddy sketchbook. I'll leave all the
descriptions of the paper, all the information below in the description
for this class. So this is the paper. It's soft. It's almost like fabric, and the fact that it's sketchbook also gives
at some winning points. What's the most thing
to remember about watercolor paper is that it needs to be at least I
would say 200 grams weight, but preferably 300 grams your
standard watercolor paper. And because if you
take thin paper, like cartridge
paper or something, this is just going to disappear. It's your paint and water
going to destroy it. So make sure that your paper is suitable for watercolor use. Next thing that you
will definitely need, you will need some water. You will probably
need big brush. See, I've got these two. So it depends on which
one I see first I use. I'll be using them for
wetting the paper, larger areas because
with smaller brush, it might be quite
difficult to use to cover larger areas with water and we will
need to do that. You will need smaller brushes. I leave all the
material descriptions below in the description
for this class. I would take a couple of
different sizes to experiment, which you prefer because
some larger shapes, obviously you might
need the bigger brush, some smaller ones, you
will need smaller ones. I wouldn't take a tiny one
because that's not the point because all the details will
be adding and procreate, but we'll need these
brushes to create our large width on width shapes. Of course, you will
need watercolor paint, and I would like just to
dwell a touch longer on that. I use my sort of custom
made watercolor set. I've built it from
different brands, different materials, materials, different
brands, different colors. I selected the colors that
I mostly use in my artwork. See, I created like this little, um, pans, like half
pans, this rather. And I made little sticky labels where I put the brand of the
watercolor and the color. So in case I run out, I, um, I can refill some
of the watercolors. I've actually handmade myself
using this natural pigment. I'm not at this point, I'm not hugely
encouraging you to do that because that's
quite a big exercise. And unless you do watercolor
painting on a regular basis, you probably don't need to complicate your
life in such a way. Um, you also don't need to buy some expensive watercolors with granulations like
Daniel Smith, Schmike. Again, if you can afford it, if you know that this
watercolor painting is something you do on a regular basis or you
intend to keep doing, I would definitely
recommend to invest in some better brushes and
better watercolor paint. But if you are a beginner, if you are just starting
with watercolor, I'll list down below the
brands that I recommend, which are very, very
much on budget. And they will give you
beautiful results as well. Just the rule of the thumbs is just don't take
the cheapest one. I also have some
handmade watercolors here that I ordered, I think, from EtS, and
I'll be using them. But as I said, you know, use any watercolor
as long as it's not the cheapest worst quality. You might need a piece of cardboard and some
bulldog clips. I use that kind. So
why we need them for. So when we wet our paper
and especially when we start making shapes
on the paper, obviously, watercolor paper will
start buckling, warping, easier to clip a little bit like that just to make sure that the paper stays in place. And that's it. So if
you use a sketchbook, if you use pieces of paper
like separate sheets of paper, you might need some
sort of cardboard, which you will clip it on this. That's what I do sometimes. And that's probably
enough two sides because it's not going to
warp in a horrible way, once it's clipped like that. But again, that's
optional. It's up to you. Paper towel, also optional, handy to have it in
case you need to remove excess water from your
paper or from your brush. I also have some
pencils here that's just a generic HB two pencil quite soft and here I
have a watercolor pencil. That's for sketching your
shape if you have to, but I encourage you not
to because especially once you start using a
simple graphite pencil, you immediately want to use an eraser and that's
where the trouble start. You just start um
drawing drawing, raising and you're
not happy and, if you absolutely have to, if you feel more confident
creating your shapes first in the pencil,
then go for it. But again, watercolor pencil, for example, I use it sometimes
for sketching shapes, but that might not work for our wet and wet technique
because if I sketch something on the paper and then cover the paper with water, it will just dilute the pencil. The water will dilute the
pencil and you won't see it. So see yourself. But again, remember that
once we start working on our watercolor stains digitally in our procreate software, we can obviously remove
all the imperfection, anything you don't like, it will just be more work for you. That solves so if you want
to be more time efficient, I wouldn't use pencil at all. I also use such a
thing as heat gun. It helps me a lot, especially when I
don't want to wait for the watercolor to dry
because obviously it can be quite a long time and you don't want
to spend hours, absolute hours and days
on one type of artwork. This helps me a
lot in my process. If you don't have it, you don't
really need to go and buy it because you can just
use a simple hair dryer. Of course, in the second
part of this class, we will need your iPad with
procreate installed on it, and you will need Apple pencil. In terms of procreate, we'll be using default
procreate brushes in the group charcoals and maybe in sketching if
you need thinner lines.
3. Preparations: Right, guys. So in this part, we're going to do some
preparations for our work. This step is optional. You can omit it, but
I strongly recommend doing this sort of warm
up testing exercise just to make sure that you achieve the results
you are looking for when you actually create the shapes
for your character, and particularly in this class, we are creating owls. We spoke about the paper, we spoke about the paints and what we will need right now, we will need your
paper and you paint. Whether you have more than one
type of paper or just one, let's just try and test it how our paint is going to behave on wet and wet using
this or that paper. As I mentioned in
the previous lesson where we talked about
tools and materials, I've prepared three
types of papers for you. This one, I used it before
and I didn't like it, but I decided to include it in this class just to show
you that some papers are not going to be probably the
best option for this type of exercise for this type of artwork we are working on
right now on this class, but I'm still going to show
you just so you can compare. Maybe we'll save you
some time as well. And I'm going to use
some of these pins. And also, in this lesson, I'm going to give
you an idea of what exactly we'll be doing when
we create our owl shapes. So let's start with testing
this sketchbook page. So I'm going to
take my big brush, one of my big brushes, and I'm going to dip
it in the water, and I'm just going to cover
my page with the water. This paper in this
sketchbook is amazing. It's like as I said,
it's like fabric. It immediately absorbs water
and creates this lovely, lovely base for our
wet and wet shapes. Usually, to make sure that
you properly wet your paper, you just check your paper
like that on the light, so it should be glistening. It shouldn't be dry, but it also shouldn't have big puddles. So I would say mine is prepared. And what I'm going to do?
I'm going to take my brush. One of my brushes I prepared, and I'm going to start
making shapes wet on wet. I'm going to drop some of
the water on my watercolors, or you can just spray
them with water. Depends on what you prefer. I'm going to take some pigment, and I'm going to
create some shapes. This one, for example, is going to be a round shape. I can try mixing
different colors. This exercise is
actually going to help you get yourself familiar
with your watercolors. To see the pigments because
some of the, for example, see this English red type
color is less pigmented, but this orange red is
much more pigmented. See almost like guash. I'm just going to
create random shapes, trying different shapes and seeing how they look
on the wet paper, trying to mix in different colors together
and see how they work. See, I'm creating no
geometric shapes, but more organic shapes. So like adding some
different colors into the same stains. I encourage you to experiment
different techniques. See like I'm adding and the colors start bleeding
into one another. All these techniques you can
use to create your owls. You can see because it's wet on wet technique and the
paper is so textured, you get this beautiful
beautiful texture coming through your
watercolor panes. And the most, I think, amazing thing is that look
how it bleeds on the paper, creating this fluffy edge, and that will be very handy for our owls because owls
can be very fluffy. I tried one type of paper. I'm going to try another one. I'm going to set
this aside to dry. And next paper I'm going to try is quite similar to the
one I've just tried. It's also quite textured. This time, I'm going to
experiment with slightly bigger. Watercolor brush. See this paper, despite the
fact that it's also textured, you can see through
it very nicely. However, it's not a textured
as the previous one. Look how the paint is flowing. It's beautiful, isn't it? See what I was talking about
when the paper buckles, that's starting to buckle now. It will be flat
again once it's dry. For this type of exercise, for this type of artwork, I don't see any
problem with that. For me, that's enough
that it's fixed on the paper on the cardboard, so I can just experiment
with different shapes, sizes of shapes, colors. And now let's try my least
favorite type of paper. I'm going to set it
aside to dry as well. And this time I'm
going to try this one. It's smooth paper, hot press. It's also a little bit bluer, a little bit colder, tinted it. So I'm going to cover
this paper with water and you can
immediately see that it's not as
absorbent as the previous two because it's
harder, it's smoother. But let's see how it's going
to work with our watercolor, how it's going to interact. We're going to take
the same six colors, and I'm just going to
create a little circle. Here, makes sense. This exercise is also good not just for
testing the paper, but also remember for
testing your watercolors. Which ones work together best? Which effect you prefer? Maybe you prefer three
colors and one stain. Maybe you prefer just one. This paper also, I can
tell immediately I've not properly read the
specification for this paper because I just
didn't like it, and that's it. I knew, to be honest I didn't buy it. I
think it was a gift. But I can tell that it's
not a cotton type of paper. Previous ones was cotton. That's why it almost
felt like fabric, and that's why it
stayed wet for longer, allowing me to create
these beautiful shapes. And this one, see,
it's already dry. I didn't really have time to experiment with
different shapes. See, it's dry. That's it. There is a slight effect of the paint bleeding into paper and the paints
bleeding into each other, but not really that much. So now let's try our stains
and let's compute them. That's how stains dry. And let's compare them. So I'm going to unclip
it from here and see. You can immediately see that. Obviously, the best,
in my opinion, the best paper is
this one, of course, in the sketchbook because not only it stayed wet for longer, allowing me to think about
what colors and shapes I want to use instead of rushing quickly, making random shapes. Sometimes rushing
is not that bad, but in this case, I quite like the piece
it was drying with. This paper is not too bad. I also like this fluffiness. See the fluffy edges it created. She's quite nice. This
one that is what it is. You can see that for me, this paper is just
slightly thicker than printer card paper
and the effect. Because the watercolors I
use are quite nice handmade, good quality that pulls it off, and I suppose you can
work with it as well. But if you have a better type of paper with cotton and a
nice grainy structure, I would encourage you to use
that one because this kind of paper will give you the
best results for your artwork.
4. Inspirations: Now, guys, let's talk about inspiration before we
start creating our shapes. We want to know what exactly what we are
looking to create. In this listen, I'm
going to tell you about my three main
sources of inspiration. And the first one I'm going to start with is the one that's available for everyone is
Pinterest. What I usually. I create a new board and
they start adding images, illustration that inspire me in this or that
particular topic of art. You can see that in my board, I've created the sources of inspiration from different
types of Owl illustrations. Some of them are from different artists from
the past like this one, for example, and there are also illustrations from
my childhood books. That I remember and that bring
me so many nice memories, and that hugely affect
my art as well. You can tell, probably. And yeah, I even added a few pictures from
other illustrators, but be careful because we're
not going to copy anything. We're not going to make
it in such a way that it's going to be
recognizable that it's definitely someone
else's illustration. No, we're not going to do that. We just want to
inspire ourselves with different shapes because
see some owls a setting, some are flying,
some are fluffier, some are smoother, some
have bigger heads, some smaller heads, some
are not outs at all, but I just like the
textures of them interest. Another source of
inspiration can be books. I think in one of my previous classes I showed you the books that inspire me. For example, I've
got loads of books that I absolutely love and I use all the
time for inspiration. So see, different
types of vowels here. As shown in different
ways, different postures, different motions, different
types as well I see snow. Just so much inspiration you can draw from the sap
of illustrations. That this book is Birds
of Britain and Europe. I also have my go to massive encyclopedia
of birds of the world. And of course, there
are owls here as well. And they're also
presented in different. They're mostly
sitting, of course, because you probably see better all the sort of features of
owls when they sit like this, and that's the probably
normal position to be because they're watchers, they sit and they look and they watch and they're ready to hunt. But you can also
see some in motion. Yeah. I even have this
little pocket guide. It's called Scottish Birds
and sometimes I use that. Usually, I don't
use this type of book as my illustration
inspiration, but it also contains quite
interesting information about different birds if you
want to learn more about dols and little
pictures and yeah. But obviously, not
everyone has books, so Pinterest is probably the first go to tool
of inspiration. Finally, I highly recommend
watching some videos, paying attention to
the way owls behave, the way they move, imagining how their feathers
feel to the touch. Perhaps you even
have some owl place nearby where you could go
and see with your own eyes, take some pictures,
and film some videos. We are quite lucky to
have an owl center not far from where we live. I always bring tons of
owl pictures from there. Finally, always pay attention to the way other artists
create their characters. For example, there are
some cartoons from my childhood that still
hugely inspire my art.
5. Owl Shapes in Watercolour: Now we've got
everything prepared. We are ready to create. We've got our Pinterest
inspirational board. We've got our sketchbook, in my case, a sketchbook. In your case, it could be individual sheets of paper
or maybe paper block. In this case, you won't
need bulldog clips. But I'm just going to clip
my paper a little bit just to prevent it from
buckling too much. And I'm going to begin
with wetting my paper. I know that this paper is
going to stay wet to complete. I'm going to use my little
palette that I have here and I'm going to experiment with
different brush shapes. Looking at my Pinteres board, where I've collected some of the owls and shapes
I'm going to use. First of all, obviously, I'm going to use shape of a sittingol sitting on the
t branch or something, and I'm just going to
start making a shape on this side of the owl's head. S I'm going to use
this horn type of owl mixing in different colors. Guys, again, to reiterate
what I'm doing right now on the wet paper with
the watercolor brush and watercolors I'm creating a shape that I'll be using in procreate to
make my fluffy owl. I'm mixing in different paints, different colors just to
make it more interesting. You see, that's the shape of an owl sitting on the branch. Now I'm going to create
one with a little bit of a side view Let's again, like a little horned owl. It's all very, very
approximate shapes. Whatever we don't like, we
can adjust and procreate. That's why we love
that magic software. See I'm adding different
colors here and there. I'm going to create another one sitting like this
but flipped over. Why I'm creating a few because
I want to see which ones I like best because
I'm only going to choose one for this class, but I might choose the rest
for some other artworks of mine because I can see that I already love those out shapes. What's important, guys? Obviously, on this stage, we're not going to add any details and
probably we couldn't even if we tried because
the paint is flowing. Is colors are bleeding
into each other. So we definitely not
going to be able even if we try to add eyes or
little feather details. All of it we're going to
do and procreate once our shapes are dried
and we've transferred them into our iPads. Look at this fluffy
look so funny. Now I'm going to swap the
brush to a smaller one and I'm going to try and create
maybe a little baby owl, which is just going
to be a fluffy ball. Just here with a little bit of different colors
combined together. Yeah, I can see that my
paper is already drying, so I want to little wings here. Little feet. We'll see. I'm going to
create a few shapes here as well on the side
of my sketchbook. Yeah, the paper is still wet, but it's already drying. I'm going to try and work
a little bit faster. I'll probably do one
out flying as well. I'm just going to maybe
wet the paper a little bit more to create more
of this fluffy effect. To All the details like weak eyes, definition of feathers, I
can add already Procreatee. Just wanted to wet the
edge a little bit. And that's the
shapes I've created. I'm going to try them now and
see you in the next lesson.
6. Photography: So, guys, now our
shapes are dry, and I've still not decided
which one I'm going to use. I'd love to use all of them
because I absolutely love. I can already see in what way I can utilize each
of these shapes. However, this class obviously
we're limited in time, and I'm going to use just one. But again, I've still not
decided which one to use. Let's do the next stage. Next thing we're
going to do is to photograph our shapes and
transfer them and procreate. There are many ways to do that. Some people scan their
watercolors. I don't scan. I've not really
scanned my watercolor works for a long time
because I believe that camera is rendering
the color so much better, especially in the daylight. What I would do just to
make your job easier. If you work on your iPad, just photograph your
shapes with your iPad. I prefer if your camera
is better on your phone, for example, which could
be quite the case as well, photograph them with your phone and transfer them to your iPad via airdrop or just email them to you or save them
on your iCloud, et cetera. The main things that I would
consider is First of all, use as best camera as you
can. Just the best one. If your best camera
is on your phone, use your phone to
photograph the shapes. If it's on your
iPad, use your iPad. If you have a professional
camera like Cannon, use that one as well,
whichever you prefer. And second most important thing is that you need a
lot of daylight. Is the best light for photographing your watercolor
is during the day, either morning or very, very early afternoon depends on where geographically you are. Should be sunny weather or avoid direct sun
rays of sunlight. But you can always cover your window with a little bit of white curtain
if you have one. But the best time
is kind of like a beautiful bright daylight
without direct sunlight. In this case, your colors will be at its best despite
the fact that we will obviously have to do
some manipulations and procreate to clean
up our shapes. Still, the more
daylight you get, the easier it's going to be to work with your shapes
and procreate. I'm going to photograph
my shapes with my iPad. So I have them directly there. So I'm going to bring the
camera of my iPad as close as possible so I can see all this beautiful
texture of my shapes, and I'm going to photograph
each shape individually because I'm going to create high resolution of my artwork. Now, let's check. That's it. That's my photographs ready
to be transferred and proclq. This beautiful
texture you can see.
7. Procreate: Part 1: We photographed our shapes. I use my iPad camera
to photograph them, and now I'm going to
transfer them in procrade. As I said, we are limited in time in this skill share class. That's why I have to use only one shape of mine
though they are all amazing. Trust me, they all turned
out to be really nice. Um, so now I'm going to show you the basic manipulations
you can do with your shape to create your nice
owl fluffy owl character. So I've picked this shape. So today's owl is
going to be this one, and I'm going to show
you how I create a lovely cute owl full of character using this
watercolor shape. In Procreate, I'm going to select choose this plus icon and I'm going to
select a four paper. Partially, the reason is
because it's high resolution, and I'll probably
use it for printing, a card or something. I've created the A four Canvas, and now I need to add my OL from camera
roll to my canvas. I'm going to click
on this range icon. I'm going to select insert
a photo because obviously, after photographing
the pictures, they've been saved on my
iPad and here is my owl. I'm going to make sure
that I stretch it enough to fill most of the canvas
because in this case, you can see all these
beautiful textures there because obviously the camera photographs,
it's really well. And now I'm just
going to click on the layers to make sure to fix the photograph on my canvas. Next thing I'm going to do,
I'm going to get ready. You see like we've got a
lot of other stains and objects around that we
don't need for our artwork, at least not on the stage. I'm going to choose
the select too, and with the free hand option, I'm just going to
roughly draw around my to select only
the shape I need. Close the selection line and I'm just going to
click Copy and paste. You see, if you switch
this layer off, you can see that it's created cut out of my my
watercolor shape. I'm going to get rid of this layer because
I don't need it, and that's a very
important part right now. We're going to try and
make it look nice and organic on our paper,
on our canvas. First of all, it's very important to mention
guys that in this class, we're going to be using light
background for our owl, which means from pure white to some different
shades of milky white, cream of white, et cetera. I'll explain to you why. Um, so the color I'm going to choose from my
background is this cream white and now you can see that I can see the cutout edge of my owl and
I'm going to get rid of it. For that, I'm going to go to this adjustment
section of the menu, and the very first thing I'm
going to choose is carves. And now I'm going to do some
manipulations with curves to make sure that I get rid
of this dark edge of my owl. What usually works for me, see this very bottom
corner of the curves, I'm just going to
drag it a little bit along to the right
and what it does, it brings the colors up, makes the colors more
saturated because obviously the camera
does distort colors. And you can't help
it. It is what it is. And this top corner, I'm going to drag
along to the left. You can see that the
edges start disappearing. They definitely turning from blue to more yellowish white. And that's pretty much it. I'm quite happy with that. You can always try and
move this metal thing. But I can see already that this is how it's
going to work for me. And now you can see that
there is still this cut out. You can still see it. That's when we're going to use darker color blending mode. You can see that at least
in the top part of our owl, the edge has blended in
nicely to the canvas. This edge that you can see, we're going to remove
with eraser tool. But now going back to my comment that the
background should be light, why I did that Because to
get rid of this cutout edge, I had to change
the blending mode. If our background color is dark. You can see that
our just disappears because darker color mode
only brings up darker colors. If we go to normal, it will be still cut out. If we go to try different
other blending modes, you can see that darker color
is still not going to work. We need to get rid of the edge. Of course, there are
ways to do that. You can always use the eraser to erase the edges of this l. I'm not going to dwell on it
because for this technique, I'm going to use
lighter background. But maybe in my next class, I'm going to show you
how I use shapes on the darker background and
how I erase the edge. So going back to
darker color and changing our canvas back
to this milky white. I'm going to choose u charcoals, it's a default set
of brushes and procreate and I'm going
to use fine charcoal, erase it, raise it
to vine charcoal, and I'm going to reduce
the opacity a little bit and reduce the
size of my brush. Very gently with gentle motions, I'm going to erase
this paper edge. From my owl. Try not to erase this nice
fluffiness because that was the whole point of
using wet on wet technique. You see I'm erasing here, just defining the feet
a little bit better. Now, this edge, I'm
going to delete erase and I can see this bluish paper. I still see it here. Again, very gently. I'm trying to preserve this. I remember how paint
floated when we put this watercolor
stain on the paper. I'm trying to keep this
effect as much as possible, but adjusting the shape to
create more of an owl shape. I think I'm just going
to stop right here. I think that's already
quite beautiful. You can see all these
color transitions. You can see all this lovely
texture of the paper. You can see these
granulations of the watercolor and I'm
quite happy with that.
8. Procreate: Part 2: S What I'm going to do next? I'm going to give my owl eyes. I think I mentioned in
my previous classes that I always try to
give my character eyes because that what
brings it to life and it kind tells
you what to do next. Once the eyes are in place, you know already where
to go from there, what to do, what to look for. So, um, I'm going to
create a new layer, and I think I'm going to use
vine charcoal brush again. But this time, I'm going to
bring the opacity to 100%. And the size maybe
to around 10%. This time, guys, I'm
not going to give you any color palettes
because I gave you the freedom in the
previous lesson to choose your own color
palette for your watercolor. But now, depending on your colors that you
picked for your owl, you will be using your palette based on these chosen colors. What I suggest that you do, you can create a
new palette and add different swatches and that's what we're going to do
create it on top of it. Now I need the light
color because first, I'm going to create
these two circles for the owls big eyes. Now I'm going to
put my finger on this little square between these two sliders and it's going to activate
the color picker. Using my own colors, my own owl, I'm going to pick the
color, the light color. I think this one is quite nice and I'm going to
immediately add it in case I want to go
back and use it again. I'm going to make the two eyes. I'm going to create a circle. If you don't trust the
steadiness of your hand, just create two and
place them side by side. I would probably
pinch them together. You can always play around
trying to adjust them. And now I'm going to add
darker parts of the eyes. I'm going to create a new layer and using vine charcoal brush, I now going to try and pick
darker color from my owl. I'm going to put my finger
on the color picker, and I think that the darkest
part is somewhere here. I'm going to try and pick
some dark brown color. Just this let's draw circles for the middle part of our owl's eye and put it here. Now we've got eyes,
some sort of eyes, and I'm going to just
add a little bit of light just to make the eyes
a little bit more alive. For that, I'm sorry, let's add the color swatch to our palette for the
highlight of the eye, I'm going to just
use white color. I'm going to reduce the opacity a little bit and reduce
the size of the brush. I'm just going to add a little
bit of a highlight here. Hoot hoot. See, it's
already looking quite nice. Now I'm going to add the beak. Our owl's beak, it's an owl
so the beak is going to be more crooked type
with the same brush. Basically, vine
charcoal is one of my favorite default procreate brushes that I use all the time. The beak, I'll probably
make it this reddish color. Again, I'm going to
select the color pica. I'm going to add this color to my palette in case I want
to go back and use it. Let's play around
with the nose shape. I'm going to try
maybe different types of noses, noses,
beaks, obviously. Yeah, I think I
quite like this one, a little bit of a side view. And it just makes our character
a little bit even more adorable and you've got
personality already. Now what I would
like to do next is, I'm just going to
define a little bit more of the wings of the body, only a little bit because I don't want you to spend
hours unless you want to, of course, creating
your character because let's be honest, I think you will agree with me that this is already
a character. It's already. You can
already put it in the book. It does look to me
slightly unfinished, so I'm just going to literally
do a touch of work here. But now adding darker colors to define the parts of the body, I want to make sure that I don't make this lovely
texture disappear. What I'm going to do, let's put all these facial features
in the same group. Sorry, I actually forgot to add some blushy checks,
which I always do. Six B compressed. Brush I'm going to use, and I'm just going to
pick a shade of pink. I usually use this
type of shade. You can add it to
your owl and I'm just going to add
little blushy checks. I think that's quite nice. That's our facial features here. As I said, I'm just going to define the wings a little bit better and just generally make more of an outline of the body. I'm going to try immediately use the multiply mode
because I'm going to add darker colors and
the brush I'm going to use, I really would like to use the most delicate one
of these charcoals, and I would say it will
be to be compressed. And the colors, I can use the ones that I've selected
already in the palette, but I would like maybe to
pick some other color. I think this may be reddish,
brighter brownish color. Let's add it to our palette. We have it in case we
want to go back to it. Let's try and experiment. I'm going to increase the
size of my brush opacity. I'm just going to try
and define the wings a little bit because you
see the body is here and the fluffy wings
are on the sides. I'm just going to use my brush, pay attention guys
that the opacity is reduced because I
don't want any harshness because I don't want this
beautiful watercolor paper and texture disappear, and maybe I'll pick
some other shed. Maybe this shed. Let's add it. Add a little I would like to add a little bit of dark
brown on the feet. So I'm going to choose some
darker brown color here. It's really dark. That's added to our palette. And I'm just going to
add a little bit here. I think I'm going to add
a little bit of darker shading here on the horns
or ears or how you call it. You can always see,
I can see that there is a little bit of a lot of whitish areas, lighter areas. I'm going to again
select some orange brown and I might just
add a little bit of that shading around the face. I can see that there is a lot of darker concentration here, which is actually really nice, but I just want to
soften it a little bit. I'm going to add the new layer and change the blending mode to lighten and I'm going to select some lighter color with the same brush which
is to be compressed, I'm going to increase the size, and I'm just going to
Maybe not lighten. Let's try screen. Lighter color. Sorry, guys. Lighter color. I'm just going to soften this dark
apart a little bit. I love this brush
because it also creates this extra fluffiness. Let's add little feet. I'm just going to use one of the colors I've already picked. I'm going to grab the smudge two and using vine charcoal
with reduced opacity, I'm just going to blend them the feet into
the owl's body. Obviously, going
forward, you can add a G branch or something, but it's not the
point of this class. The point of this class is showing you how you can utilize the traditional media to finish it up and procreate to create this lovely character. The last thing, I'm
going to add as I always do is hand drawn texture. I'm not going to dwell
too much on it, guys, so I only tell you what
brushes I'm going to use. But if you check out my class called texture
Magic 300 texture, I think it's about
sleeping rabbit. That will give you the idea on how I use different textures. The brush I'm going to use is vine charcoal and I'm going to reduce the size of and just
remember the rule of thumbs, when you use darker colors, I would select multiply mode. When you use lighter
colors later, I'll use normal
mode and just play around with different textures. And now it's time to use
some lighter textures. So I'm going to add a new layer, keeping it on the normal mode. I think I'm going to be using the same brush which
is fine charcoal. The only difference is that I'm going to reduce the size really, really down, right down. So it's quite a thin,
delicate brush stroke. I'm going to choose
the lighter color, and I'm going to add some
textures which are lighter. And just like that, our character is adi. I don't know if we can call
it a finished illustration, but it's definitely a
finished character. This can give you
the inspiration to create maybe a story
about this character. You can try and create
different shapes on the watercolor paper with the same character
using same colors, but in different
situations in life, one sleeping, for example, one with babies, one
flying in the air, one hunting a mouse
or something. You can create a whole
story about them, create a whole book if you like. And yeah. Here I've added
some elements that I've also hand painted
with watercolor, but just not wet on wet effect. I see you guys, here I
set my owl on a branch. I created also using
the same technique, watercolor on paper, and it's already looking more
complete, more finished. I encourage you not only
to create your character, but also if you can, if you feel inspired, add different elements around
it or even a whole story.
9. Final Words: Thank you so much for joining me in this class. I
hope you enjoyed it. I hope you've learned something, and I can't wait to see
your illustrations here. Please make sure you share your magical characters
here on Skill Share or upload them on
Instagram and don't forget to tag me at my
Underscore Busy underscore. May, thanks again
and see you soon. Mm.
 Irina Young, Busy May Studio