Transcripts
1. Welcome & Class Project: Something happens when you
sit down and make a painting. You have that blank canvas, and it could be so daunting because every
brushstroke matters. So, let's not do that. Let's make four. Hi, I'm Anna. I'm an artist. I'm a professional mess
makeer from the Netherlands. I'm an online teacher. I love to play and
experiment with materials, I love to inspire others
to do the same to let go of their perfectionism and to fuel their creativity. And that's exactly what we're
going to do in this class. In this class, we are going
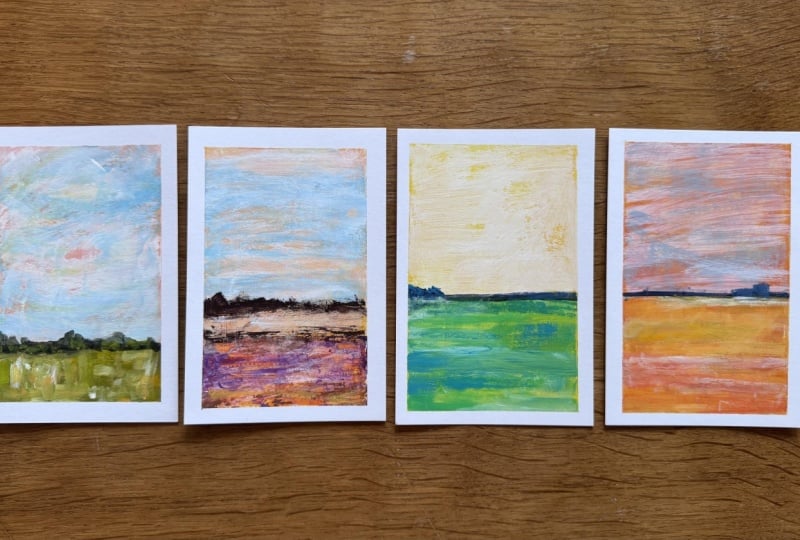
to make four landscapes, a one sheet of paper, lots of tape, and just
three tubes of paint. Yeah, of course, some
black and white. But no, drawing skills, blending techniques or anything
involved, you having fun. This class is for
anyone who have never painted a
landscape before or who freeze when
sees a blank page or when you have
a drawer full of painting materials
you've never used, or when you're
experienced artist and you just want to play. This class is short. So there's no excuse. You can do this project
on a rainy afternoon or just when you have 20 minutes while something
is cooking in the oven. And our class project
is going to be that you upload your
favorite version or maybe all four of them because
four images will always say more than
only one image can. And tell us, did you do some experimentation too while you were working on
your landscapes. For now, just grab
your paints and your tape and let's get di.
2. What You'll Need: For this class, you're
going to need some paper. I'm using some
mixed media paper, and this one is very thin, 160. You're probably better
off with 200 plus because then it can take
some beating and some water. You can also use
watercolor paper or just some cartok or
carton, whatever you have. And then of course, you are
going to need some tape. This is just real
cheap sensitive tape. So it's not too strong. And if it is too strong, if that's the only
painless tape you have, just grab a piece and tap it
on your arm or your clothes, so it gets less sticky before you put it on your painting. And then we are going
to need some paint, and I love to work with
limited color palette. I am using yellow oxide, usually I'm using
a yellow ochre. And my favorite blue
is Prussian blue. And for the background, I'm using this neon pink. You can use whatever you have. If you rather just use
your greens without mixing a blue for your sky,
that's perfectly fine. It's just about you
getting familiar with your paints and your supplies
and talking about supplies. We are not only going to use
brushes in various sizes. Now, we can also use
squishes or credit cards. You can use a palette
knife or maybe a brayer. Just use whatever
you have on hand. I put my paints down
on a pair of palette, use again, whatever you have.
3. Taping Down Your Paper: Before we paint, we tape, and there are two
ways to go about it. The first one is
to take a piece of paper as a whole and
tap it down as a whole, and then take individual
four sections. When you're done painting, your painting is
dry, you can cut them in four different sheets, or you decide to cut the sheets beforehand and then tape those
individual sheets down. One isn't better
than the other one. I usually do the first one because when I don't like
any of my paintings, I'll just keep it as a whole, or it's a study material and because I a lazy
painter, I'm not sure. For this session, I
will tape it down just as four separate paintings. When you tape it
down, just tape it down firmly, press them down. Make sure the paint
can't go underneath. As you can see, I'm taking
it down as a portrait because landscape
painting usually go in the landscape direction, and I just want to
spice things up. So I just taped them down
in a portrait orientation. But you can choose
whatever you want. Portrait or landscape. They're going to be
four different images of a landscape when
you're done painting, and the orientation is
completely up to you. You can fuss over how
you tape it down. You can measure it. You can do really precise. I usually don't. I just eyeball it and see where it takes
me. That's fine for me. That helps me being more messy artist and keeping everything
loose while I paint. But if you're really
a perfectionist and you really want to measure
it out, that's totally fine. Do what feels good for you.
4. A Loud Layer Underneath: First, we're going to start
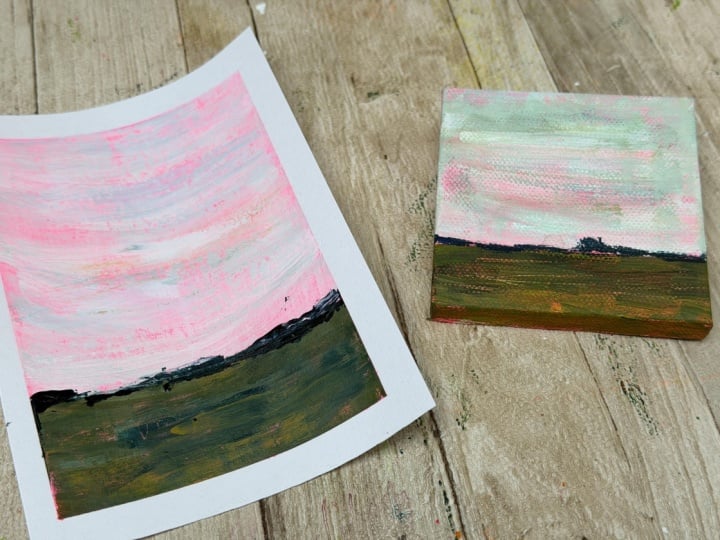
with our underlayer and I am using Non pink,
bright pink for this. Why? First of all, because it's my
absolute favorite color to use when I'm
painting with a critics but also because it can give a great effect on the
overall painting. I don't have to start
with a blank canvas, just a bit more. Add
a bit more water. I'm just going to use a wash. I'm doing this all over the tape because every one of them is going to have
the same background. I need more paints. And I'm going to make them all pink. Now I'm actually putting it
here on my palette, but, you know, usually I
just I do it like this. I mean, I'm getting
fairly easy in this. I mean, you need to
be fun and playful. Don't do it too precise. Just put some paints on. If you don't have neon pink
or you don't like neon pink, please choose another color. But I'm going to use
greens today and greens go really well on pink because I'm going
to work a bit sloppy, I want to have the bright
pink come through the sky. That's why this bright
pink is really fun. But if you want to say
with the neon colors, please use neon
yellow or orange. That would look fun as well. Or just use a regular
pink if you want to get those nice pinky skies, otherwise, maybe you're
not going to use the colors that fit
a regular landscape, then please experiment and choose whatever color you
want for your background. Just remember that you're
going to see some of this on the rest
of your painting.
5. Taping Your Horizon: Now that it's completely dry, we can tape off the horizon. The reason why I
need it completely dry is that this layer will otherwise come off
with the other layers when we are going to put our
next layer of paint on it. So it's dry, and I think it's dry enough
to put our paints on. And when I'm going to put my
tape on for my next layer, it's going to be the horizon. And with the horizon, a lot of people say, Well, I put it in the center. So over here, I'm going to
have my grasses and over here, I'm going to have my sky. Absolutely fine. But if you
know the rule of thirds, this is not the best option. If you want to have an
attractive composition, you usually use your
land, for example, to be one third of the painting
and two thirds the sky or give you land let's say two
thirds your sky one third. But since I'm just
making this my rules, I'm not really going to bother about the rule thirds
and this is just my way to play my way to find my ideal composition
to play with my tools. I'm just going to put my
horizon line wherever I want. Only thing that
I'm going to think about is that I'm going to start painting here with the crosses. I'm going to see where I want the horizon line to
be underneath the tape. Over here, let's say between
the one third and half. I'm just going to put
it. Why? Because I can. Just make sure that it's
not sticking out over here. Otherwise, you're going to block or have a white
blob or not really white, pink blob in your
color painting. Now it's so taped
and you're ready to start with your first
layer of paint.
6. Painting the Land: And I usually mix my paints
while I'm on the go. I'm not really going
to be too precise or give you a precise way
of mixing your paints, but I'm just going to show
you just a few things since I'm using my yellow
ochre or this yellow oxide. I'm putting it down, and I'm putting down the
Prussian blue because that's one of my favorite blues and I put it bow
came out already. I'm putting it next to
it instead of in it because blue can
be really strong. I like to have control over
what color I want to have. I'm grabbing my padded
knife my knife. This one is well loved. I'm just grabbing something
in here and mix it until I see I have
a color I like. This is a little
bit of light green. I'm going to love
this light green. But let's say I'm going to start with
a little bit darker. This is a fun part.
It's like making your own sweat shoes
on here instead of making a swatch list of
what your paints can do. But if you don't
feel comfortable, just grab an extra
piece of paper, swatch all the
colors you can make with those two paints before
you put them on here. I don't like to work that way, but if you're like
perfectionist, I can totally understand and you don't know your paints too well, you want to put this on
your swatch sheet first. But now, I'm just going
to do it like this. And well, since I'm
having my palette knife, nobody told me I
was supposed to put on my put my paint brushes
to put my paint on. So what if I would
use my bed knife? What would it look like? Looks fun. Not really precise,
but it doesn't have to. Or if I don't use my
palette knife, if I use, this is some scraper,
what would it look like? Actually, this would look a lot like when you're
using a credit card, for example, or a squeeze. You can play with the opacity. How much paint do you
want to put on there? I just play and of course, you can just wrap your brush, and this is a dry brush
that looks like this. But what if I make
it like a wet brush. This is a little bit more paint on air. What does it look like? Or, for example, if I would use my brayer,
what would it look like? Just putting down the color
in a way you think is fun. I just mix my yellow ochre
with my Prusian blue, but I could do more yellow ochre and just
a bit of Prusian blue. I can use only yellow ochre. I could add, for example, I'll show you my yellow ochre
and bring a little bit of black to the mix because I
don't want to put it down too much because black and yellow
makes some green as well. A bit more. Is this a
green I want to use? When I have, for example, this small grassy land, let's put some more color down. I like to move my brush, my prey or whatever
in this direction, like the grassy lands you usually see some
grasses and things. I like to move in
that direction. But over here, I have my large composition here for the land and
small over here. I would really like to put
them in this direction. Let's say you have crops. And you put your crops down. So you're going
towards Horizon line. And I'm playing with that, too, because this is all about play, using my materials, using my paints, using my composition. So I'm just going to put my paints down so you
can watch me play. You see me. I'm not really
digging this color. It's not really
doing what I like, but just play I'm just seeing what works
and what doesn't work. I'm being messy. It doesn't matter if I can
see the ground underneath. I can actually even say I want extra texture. Go like this. I like a variation of
darks and lights and medium colors to give my
land some depth, some fun. And I don't mind if the colors mixed when I'm
putting them on here. Going over the tape. I'm just playing and
seeing how it goes. They're different.
They're the same. They're absolutely fun,
lovely in the way they are. I actually don't really
wash my brush in between because when I
don't wash my brush, you can see the stripes
that are still on there here in the landscape and that's just something I
like and looks really fun and carry all
the colors with you. I think I'm going to stop here. I am going to dry this and
go to the next section.
7. Moving Tape & Making the Sky: Now I'm going to move my
horizon line and it's dry, it's more or less dry and
that's absolutely fine. We're going to use
those same tapes. I'm going to peel off flat, so I won't ruin the
paper. I like this. Now I want the sky to
come till the grass. I put the tape down top of
the tape to the horizon line. And I do it with all
sections, of course. I'm peeling it off. You see I'm having a light smear here? I don't care board. It will disappear
in the sky or not, but it will add to
the composition. I got everything taped and
now I'm going to do my sky. I still have these colors
here on my palette, but I actually can use them because the sky is never
just blue and white. So if I put this down because I'm probably
going to use this later. But for the sake of
it, I'm just going to get a cleaner brush. I can take some white. Put it down. And I like to put
it down in motions. That's why I like to
use a drier brush. Because if I do motions, the sky is always moving. I started with my whites. Ready I just put in here and some blue greenish
thing in there. There is some blue. We can add it. If I take my white over
here you got steels that come blue put a little bit in here,
see what happens. I think it's maybe
a bit too bluish. Still, I see it's a bit
dark, but it could work. I do. I'm not going to
wet dry brush too much. I'm going to wet
brush a bit more. See what happens. It's
more a bit too dark. It's going to be almost grayish, but that could be totally
the vibe you're going for. Since I did it here through
the white over here, you don't see as
much blue anymore. But the sky is never
just blue and white. Sometimes there's even
a bit of yellow in there and it sounds
scary, but try. Sees maybe just a bit too much. Well, when it's a bit too
much, I can paint over it. Or I can just take a bit of kitchen roll and
it's gone or almost gone. But still, if it's
not completely gone, that's totally fine. It's just a way of
putting down the sky. You can experiment
with more water. Less water, and
see what happens, taking the blue,
taking the yellow, the green, the white. You see this lovely
pink coming through. And this one needs more white. Again, I'm doing
this with my brush, but you don't have to. If you want to do this
with your squeeze, for example, I want
to take this one. I can do that,
too. There's still too much green on
there, I think. You can do that, too. You can do a combination. You can actually scrape
away if you don't like it. Just go and play with
the materials you have. I think I'm going to call
it quits, I call it done. And again, I'm going to let
this dry. Not completely dry. But to the touch it
already is because I hardly used any water
except for this one.
8. Trees, Houses and Tiny Shapes: I can really peel off the tape. It's not completely dry yet. But while I'm peeling it off, it's easier to peel when
it's still a bit wet. And when I'm peeling
it, the sky can dry. I don't need this anymore. They're fun to look at
already. They're lovely. But I want to give it
a bit more character. Since I still have this
blue on my palette, don't have any black anymore. I think I'm going to put
some black with the blue. And if there's some green on
here, it's absolutely fine. There will be because
I'm mixing it on this palette where there
is still some green. We're on really dark color, but I don't want black because I think it could be too harsh. But if there are some colors
from this palette in there, it's more cohesive
with the rest, so I can actually
do it on purpose. Let's say scrape, get this
green, put it in here. What shall I do? Shall
I use my palette knife? I could. I am just going
to make the horizon line. I could just do it like this. Because I just need the
illusion of horizon line. These could be forms. I
can do with a brush too. There could be
forms, there could be trees if you
want to or bushes. There could be anything. I want up here. See? I'm not making any particular shapes. I am just putting
something down. Or I'm putting
almost nothing down. I'm keeping a straight line. My lines are never straight,
so add something to this. If you like to have
straighter lines, use a credit card or squeeze and just put
it down like that. But actually, this is it. You got these lovely
landscapes and maybe you think, I'm not done. I want to add something.
You still can. Maybe you think your skies are just a little bit too
blend, boring or whatever. You could still d it, but
just be careful because you don't have any
tape underneath. But you could also say, Wow. I'm playing, and
when I'm playing, it always asks for
something more. What, for example, I want
to put a little bit more of crayons in here to get more depth and more playful
because I have those crayons. These are oil pastels, and I hardly ever use them. Well, I do maybe youu. So why not add this to the mix. And when you think you're done, we're going to get
to the grand finale, we're going to go
to the peel off. Oh
9. The Big Reveal: Okay, I put everything aside
because I want to focus on your four pieces of art because they really are
and maybe you're in doubt, but now it's going
to be the best part that's peeling off the tape, and I usually do it when
still a bit wet because then it's easier on your
paper and I haul it flat. And if you think
it's going to be tough and your paper doesn't react really well to the tape, please use a hair dryer or heating gun because
if you heat up the tape, it's easier to pull it off. But my studio is
pretty warm right now, so and you see these
crisp white lines coming. This is absolutely
my favorite part because for some reason, they box it in and make it
look more of a piece of art instead of just hoping
down some paints on there. To. These are my pieces of art. You know what? I can give
a grand review and say, well, the sky is too pink. I needed more white just to
bence off a bit more blue, and the sky would be better. Yeah, I probably would. Or I see the yellow here. I love it. I should have put it in
everywhere. Yes, I could. But instead, I'm going to
enjoy these pieces of art because it was not much work
and they look fabulous. This is just something that
I could actually frame. One thing that should
really add to the image is I signed it and immediately, it looks like a
lovely piece of art.
10. Where to Go Next: You made four landscapes. How cool is that? Actually,
you got more than that. You got a method, a method you can repeat and a method you can
change over time. Just go for a background color, tape it off, do the
landscape, do the sky, and maybe put in some
horizon line to make it more forgiving and
you could stay on paper, or why didn't you go larger or why didn't you go on canvas. Or maybe you don't want
to do a landscape, maybe you don't
want to do a field, maybe you want to do a seascape. Possibilities are
endless. Most of all, I hope you had fun, you enjoyed yourself and
you're going to repeat this. I would love it if
you would upload your favorite one or maybe the four of them to the
project section so we can all see them and
maybe comment on them. If you like this class, please leave a review that won't only make
me a better teacher, but it would also help others find this class more easily. While you're at it, just
follow me here on Skillshare. You know when the next new class lands. Hope to
see you next time.
 Anna Berends van Loenen, Professional Messmaker