Transcripts
1. Introduction: What's up, guys? It's Tony holiday and welcome to my absolute 0 beginners course where people getting
started with Logic Pro, if you know nothing about music, music production or Logic Pro, the software, this is the
right place for you because what I'm gonna be
doing is breaking everything down from scratch. If you've never opened
Logic Pro before to helping you create
your very first song. This course is going
to go over how to get started on your journey
as a music producer. Whether you're trying
to make it a career or if you're just trying
to take it more seriously as a hobby, or it's something
that you're just doing completely for fun. This course is for
you if you know absolutely nothing
about Logic Pro, we're going to be going
over the following topics, basic terms and definitions that you should know
as a music producer, what to do when you open
Logic Pro for the first time than layout and
landscape of Logic Pro, where things are, how they work, how to start a project
and start making music that you like using loops. How to take that
starting point from the project and turn
it into a full song. How to finish your
tracks so it's ready to listen and share with
your friends and family. And a bonus section which has some directional advice on how to improve as
a music producer. By the end of this course, you'll have a basic
understanding of how a song is produced and made, how to confidently
navigate logic, prose that you can
actually build songs, and you will have your very own song that you've produced. This course is designed to be a hand-holding course for people who have never
used Logic Pro. If you're already familiar with Logic Pro and I've been
playing around in it before. This course might be
a bit slow for you. However, there
might be tidbits of information for you to really solidify the foundation of music production in case you're having some
issues with that. I encourage you to watch and re-watch what you
need to and you can navigate throughout
this course using the timestamps down below
in the description box. The last thing that I
want to add is I will save the project file
for this following that I'm gonna be making with
you guys and I'll make it available for download within linked down in the description. This way, if it's a certain
concept that you're trying to revisit and you want to
use my project file, it's fully available
to you to use for free download link is down
below in the description, you're going to be
making some progress today and who knows? Maybe it'll be the first step
to something a lot bigger. But the most important
thing is we take the first step and that's exactly what this
course is going to do. With all that being said. Let's get started and
jump into Logic Pro and start exploring the
world and music production.
2. Basic Terms and Definitions: All right, you guys, let's get started with the first lesson in music production and using Logic Pro before we actually
jump into the program, I'm just going to go
over some basic terms and definitions that will really be helpful for you when it comes
to producing music. This will be a really
quick section. And then after this, I'm going to show you some
things that you should absolutely do to get started when you
first open Logic Pro. And then after that,
we're actually going to dive in and start
making a solid. Here are some basic
musical and music production based definitions
that you should know. Melody in basic terms, melody is essentially the tune. It's what you hmm
back when you have a song in your head
or maybe you heard a song on the radio and you keep hammering it as you
go throughout your day. In a more specific definition, it's a collection
of musical pitches that make up a musical phrase, drums or percussion in basic
terms, this is the beat. Maybe you've been at
a family barbecue before and your
aunt Cathy has had a couple too many coolers
and she starts to clap your hands to the song
is playing on the speakers. That's the beat.
And in this case, we're especially if production, it's used by drums
and percussion. That's what creates the beat
or the tempo of the song. Drums are a very
important part of music. They're used to keep tempo, which is the speed of the song, and also to keep other
musicians and instruments in time so we can all
work cohesively together. They create a basic rhythm that we can attach
onto very easily. Base, base is a lower
frequency melody, usually but not always, basis a little more simple in variation when comparing
it to a regular melody and a higher frequency base fills
out the low frequencies of a track and helps fill up
the melody spectrum samples. Now, the term sample
and sample is has taken on a lot of different
definitions over the years, especially as music production has become more
accessible to people. In today's terms,
a sample typically refers to a pre-recorded
audio piece of music, and it can be used over and over and over in new productions. These could be
anything from a loop which we'll be talking
about shortly. And we'll actually be using to create our song, a one-shot, which is a single
sound that doesn't loop over and over
and a specific tempo. And also old songs that have been pre-recorded
and chopped up in different ways and forms to make a newer sounding song loops. Loops are short pieces of music, typically at a specific tempo. These can be used in
your productions and are usually made
by other people. And the reason why
they're so popular is because you
don't have to have any musical background
in order to use a loop and
make a production. Loops will go from
start to finish. And at the finished,
they'll go back to the start and loop nicely. As a piece of music, a loop can be defined
with any type of music. Melody, drums, bass, vocals, so on and so forth. Pretty much anything can
become a loop and is therefore a very powerful tool
to use and creating music. If you have no musical
background or understanding, we're gonna be using loops to build our track today, midi. Midi is actually an acronym for Musical Instrument
Digital Interface. This is the technology
that we use in order to write music instead
of digital programs. Imagine if we wanted to create
a song from scratch today, having all of the
fake midi instruments that are in the
software that we have, we would need every instrument
that we want in the song, in a space where we
can record them, we would need to know how
to play every instrument or have someone there that can
play different instruments. And we would need to
record them without mistakes and in the
perfect tempo every time. Luckily for us because
of technology, we have. Now, midi gives us access to almost any instrument
at our fingertips. And if you don't have
it stuck in Logic Pro, you can usually purchase very obscure instruments
that work in Midea, and we can create
different parts of a song using the same process. So if I grew up playing guitar, but I wanted to play piano, the musical theory behind
each instrument is the same. However, it's hard to take
your skills knowing how to play a guitar and immediately
apply them to piano. Middy actually attaches a
bridge between the two. So it's the same process
for each instrument. We won't be using midi very much in this course, if at all. However, this is something
that you will definitely get used to if you want to
start writing your own music. And last but
certainly not least, is dot or a DAW. And where this stands for is
digital audio workstation. Dog will be used as an acronym. And a lot of online forums are people talking about
different programs. This refers to the
programs that we can use to make music digitally. In our case, it's Logic Pro. This also refers to Ableton
FL Studio Pro Tools, et cetera, et cetera. Any program that makes music
falls under this umbrella. Those are some
basic definitions, especially if you've
never made music before that you should
understand and how they work. It's a way that you're
going to communicate with other music producers
and also talk about different
parts of music when you're trying to explain
things to other people. Or, you know, a track is
missing a certain part. With all that out of the way, let's actually jump
into the program now and we're gonna go over
some basic things that you should do when you first download Logic Pro and you're opening it for
the very first time.
3. First Steps In Logic Pro: So I'm simply on
my desktop here, which you should be able to see because I'm screen
recording now. And to open up Logic Pro, you can do this by
using Spotlight are going into
your applications. I'm going to use spotlight
because it's easiest for me. So what you can do is
press Command space on your keyboard and type in logic. This is provided
that you've actually downloaded Logic Pro. So if you don't
have the software, you're going to need to
go to the App Store, purchased and pay
for it and download the actual software.
I have it here. So I'm going to click
Logic Pro and press Enter on my keyboard so that
I can go into the program. I'm going to create a
brand new empty project. Now, like I said, I
wanted to remind you I have the project files down
below in the description. If you want to follow
along exactly what I do, you can download those. However, I encourage you to use your own brand new
project because that'll give you the freedom to change certain things that maybe
I've already done in there. So we're gonna go Create
New Project, okay, here from the very
beginning it's going to ask us to choose a track type. We're gonna go to
software instrument. However, it doesn't
really matter in this case because all
I'm gonna be showing you right now is how to get started when you first
download Logic Pro, we're not actually going to
be making any music yet. But this is just a basic window that you'll get every time
you start a new project. So lets do software instrument. This is what Logic
Pro will look like as a basic blank, empty project. And yours should look
something similar, but you might be noticing a few differences
right off the bat. However, just keep in
mind that if something doesn't look quite the
same, don't panic. This section is totally okay
without doing any changes. There's three things
that we need to do when we first opened Logic Pro, especially if you
want to have all of the features available to you when opening
Logic Pro, number one, we need to download all
of the additional samples and content that comes with
the purchase of Logic Pro. At the time of this video, it's around 80
gigabytes. I believe. You don t have to
download all of it. However, I highly recommend doing so because it
gives you a ton of instrument libraries that you
would otherwise have to pay money for it to get and
they sound pretty good. The other reason why
we need to do this in that additional content is
what's called Apple Loops. Now, Apple loops are loops of music like I talked
about before, that we can use in
our project royalty free at no extra cost. And we can use them
any way we like. We can even sell the music that we're making
using these loops. So they're a very
important tool, especially for getting started if you don't have any
musical background. Now, here's how you can
download the content. You're gonna go up to
the left window here under Logic Pro,
near to click that. And you're going to go down here to where it
says Sound Library. Now, this little window opens
up on the side and you're going to do download
all available sounds. I recommend doing this
typically overnight, the 80 gigabytes
can take awhile, especially if you don't have the best Internet connection. And then what you can
do is open it up the next day and be ready to go. I actually have all of
them already downloaded, so I'm not going to do this, but this is what
you should do for sure to start number two of the things we need to do the first time we opened Logic Pro, this isn't an
absolute necessity, however, it will help
you out in the long run, especially when you start to
accumulate lots and lots of samples and your projects
start to get a lot bigger. That is, we're going to move
that sample library that we've just downloaded onto
an external hard drive. If you don't have an external
hard drive, that's okay. They're pretty affordable at this time and I recommend
getting something that's at least a solid
state hard drive or SSD and something at
least 500 gigabytes, I would say that
way you can move these samples over to
the external hard drive, which actually eases the
CPU load on your system. So as your projects get
bigger and bigger and bigger, what happens is your computer actually runs the
whole project file. And then your sample library will be where your
samples are held. So they can actually work
together to even out the CPU load when you
have large projects. Now it's very simple to do this. Once you have all of the
additional samples downloaded, simply go back to the same
menu Logic Pro sound library. And we're going to do
relocate sound library. Now once you've clicked that, it'll give you the
different options as to where you can move it. I have mine actually
stored on this one here, which is called
files, and that's an external hard drive that
I have that I used to. How is all of my musical samples last but certainly
not least, in fact, this is probably the
most important one, is we need to turn on advanced
settings for Logic Pro. A lot of the capabilities
that Logic Pro has aren't available
right out of the box. We need to tell logic to allow
us to have those options. Now this is how
we're gonna do that. Logic Pro Preferences Advanced. And from here you
just have to click this box which is enabled
complete features. And then you can
close this one out. Now with all that being said, let's actually jump into logic. And I'm going to
start showing you where things fit in logic. And I'm going to give
you a layout and the landscape of it in the next video, I'll
see you in a second.
4. Layout and Landscape: In the last video, I told you
about some basic terms and definitions and some
general housekeeping for us to get started
with the program. In this video, I'm going to show you how to navigate Logic Pro and the different areas of the program that provide
different features. This is what Logic Pro
looks like when you've opened up a brand
new basic project, I've made a few changes, but this is what yours
should look like as well. Before we get started, I'm
going to close a few windows here that do come up every
time you open a new project. I'm going to press Y
on my keyboard and I, and now we have an absolute
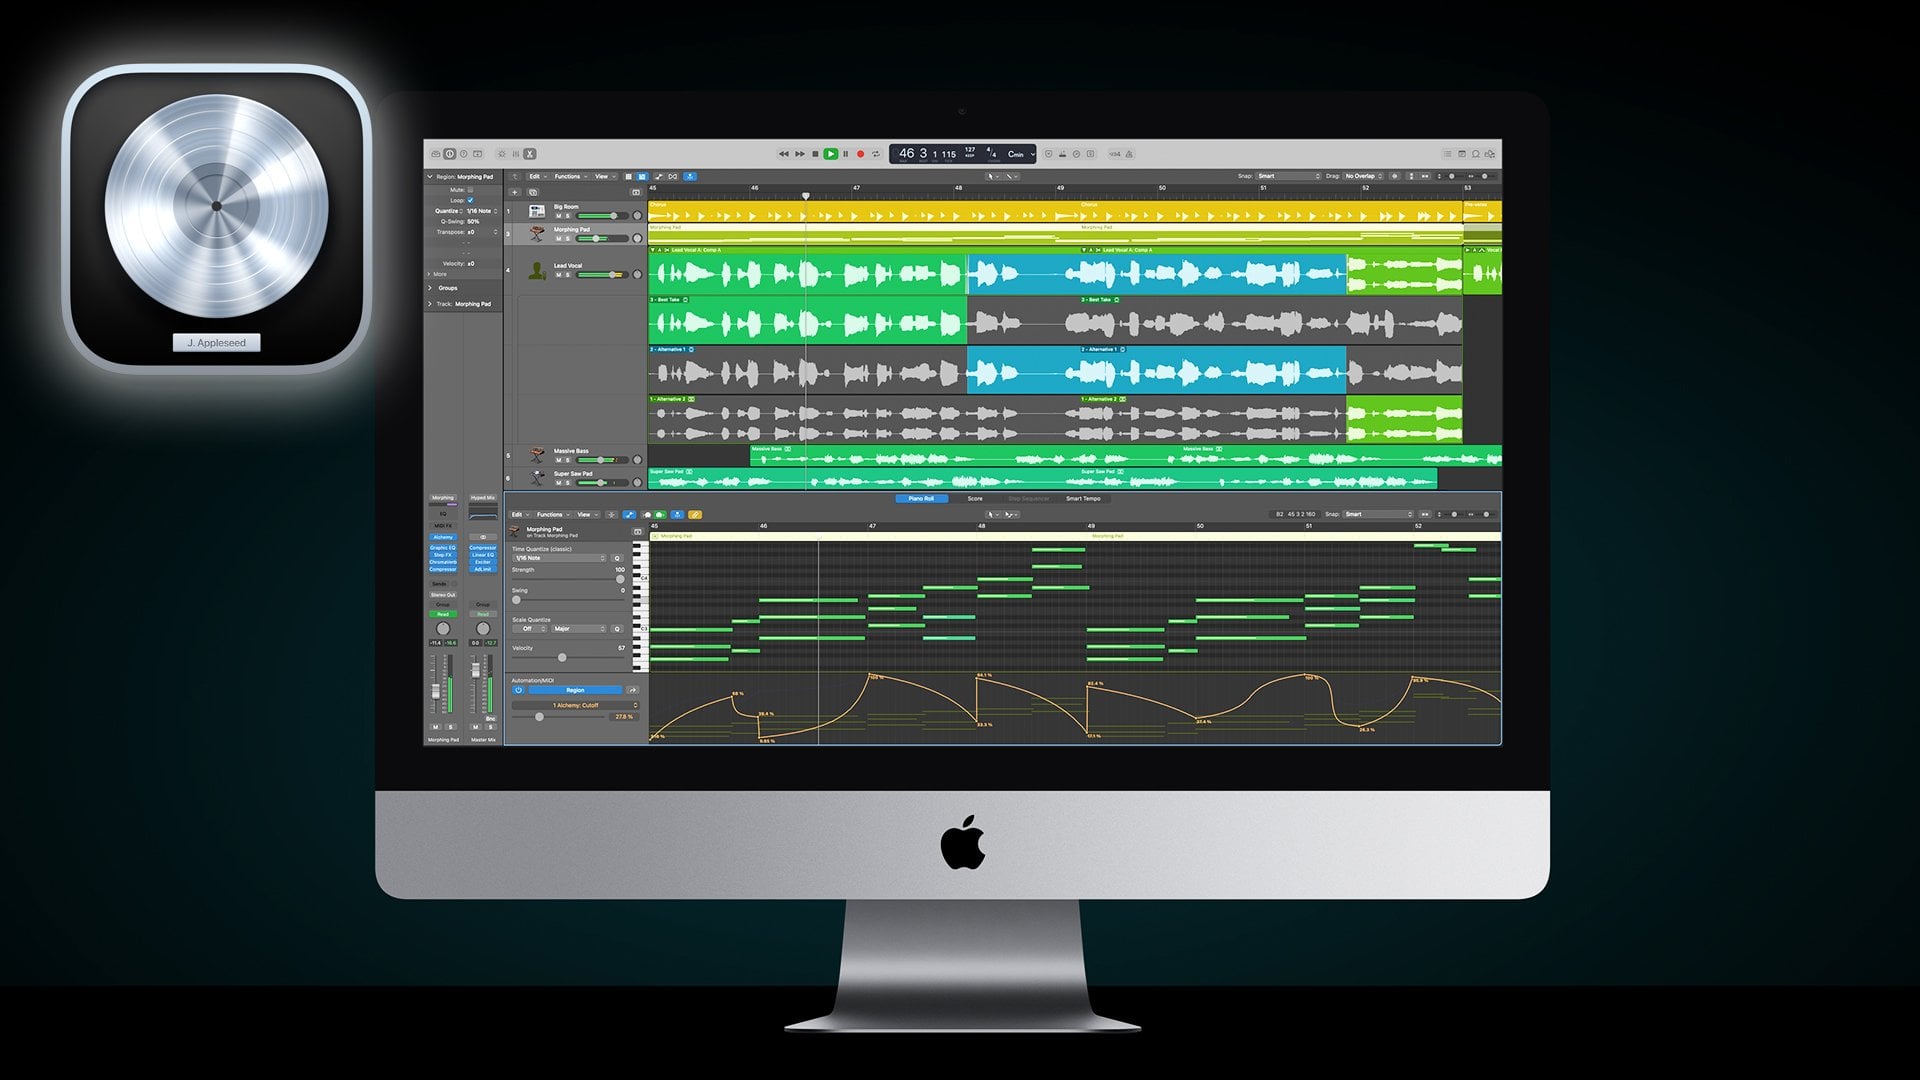
basic look at Logic Pro. What we're looking
at right now is actually the arrangement window, and this is where you build
or arrange your tracks. You'll have different pieces of music and all of
these sections here, these are tracks which the
music is played through. So when we stack new tracks
on top of each other, these are gonna be all different tracks with
different parts of a song. One could be melody, one can
be drums, one can be base. And we have the option
to choose when they appear in the track and when they don't
appear in the track. And that's what we'll play
back in this section here. This is our timeline. And as you can see when I
move this marquee here, the time at the
top here changes. And I can also change by the time and it'll
move the mark key. So when I move this
along and I press Play, if there was music here, it would play back for you. This is probably
where you're going to find most of your time
being spent in Logic Pro. Next up, as you can see, I've made these tracks here. Well, they have something
attached to them, what's called an inspector. Now I can open up
the track inspector by pressing I on my keyboard. And this is kind of like the housing parameters
for each of these tracks. Now, you can see that these ones all here, our
software instruments. And what that means is
that they're using midi. They're like the fake
instruments I was talking about in the terms
and definitions section. We can also have
a different type, an audio track and
with this one is, is actually used
to record things. So if I had a microphone and I wanted to record myself singing, I would use an audio track. It's an external audio
recording track. Now, as you can see, if I click this one here, which is a software instrument, and this one here which
has an audio track. Some things actually change on the inspector
here on the left. And that's because there's
different rules and different parameters
for each of the tracks. Now a software instrument here has this little
instrument dropped down. And this is where I can
explore all of logics, different plugins, and different things that
we can add to the track. With the recorded track, we don't have that because the sound
that we're using from an audio track is actually
being recorded externally. However, one thing
that they do have in common is this one here, which is audio effects. And these are different
effects that you're going to apply to what's actually
playing back the music, whether it's a
software instrument, a fake instrument
in the computer, or audio someone's singing, or maybe you've recorded
somebody playing guitar, you can add the
same audio effects on top of the base sound. Now as you can see as
well at the top here we have the middy defaults
and this is the region. So this is different parameters
that we can actually apply to things if we make a
software instrument track. So this is a midi region here. We can apply different
parameters using this region inspector and the
audio region here as well. We can apply different
parameters here too. It all depends on the
type of track that it is. Now, what type of tracks
can we actually create? Well, if I do this
plus button here, this will help us make a new
track so I can click that. And these are the track types that we have for the options. I primarily use software
instrument and audio track. I would say 95% of the time, logic has a feature
here called drummer. And what this is is an
algorithmic drummer that will play along with
your track based on tempo, type of song, genre, et cetera, et cetera. I actually never
use this feature. I haven't found it to be good
enough sounding to replace the percussion and drum sounds that I want to have in a track. So I'd never use
this external mini. I wouldn't worry too
much about that. That's going to be if
you're actually using an external instrument, but you want to
record it to midi. And guitar or bass is
kind of like a preset for things that if you
were recording an audio track that
has guitar or bass, you can find the same
parameters in audio, but guitar or bass actually just has more effects
pre-built on top. So it can be useful
in some instances, but primarily I use software,
instrument and audio. We can cancel this
because we already have the two different
types of tracks here. And I'm going to keep
going with the explaining of what happens in the
Logic Pro landscape. Here we have two
different sections open. Now, we have the
arrangement window, which has our tracks host. And we also have
the inspector here, which is the housing for different parameters at
each of those tracks, going to get rid of
this mini window here. And I'm also going to get rid of these two software instruments. The next window that
I want to bring up is the library or the
instrument library. And we can access this by
pressing Y on our keyboard. Why? This is the library here with all of the logic instruments. As long as you've downloaded all of the additional content, you should have access
to all of these. If you haven't, you might see little download icon next
to you, these words here. That's because you
need to download the additional content and that gives you access
to those sounds. A lot of people don't really like the stock sounds of logic. But I've found that if you
can manipulate them, right, there's actually some really
great sounds in here. So we have different
electronic drum kits. These are all from different
areas and different genres. We have keyboards, mallets,
orchestral instruments. There's quires, fake
chamber quires. We have different pianos, a Steinway grand piano,
Yamaha grand piano. So on and so forth. One of the most traditional
ones that I use a lot of the time to start tracks is I'll use a
Yamaha grand piano. So I'll go to piano,
a quick Yamaha grand. As you can see here, the actual icon on my software
instrument just changed. Its a piano. Now it says
Yamaha grand piano. I grabbed my headphones. I can also bring
up a midi keyboard within the software by pressing Command K. And this is a
musical typing midi keyboard. So a, S, D, F refers to
my actual keyboard keys, but it'll play C, D, E, F on the actual musical notes. You can also move
in octaves with this by pressing X to go up an octave or Z to
go down an octave. The point I wanted to
show you is that with this Musical Typing and
the analog grand piano, we now have a piano sound without having a piano
anywhere in this room. Super, super helpful when it comes to us and making tracks. I wanted to change this. Let's say I wanted a malate.
Let's go with marimba. Now if I play the same keys, we have the sound of a marimba. So you can already
see how powerful the Libraries section is
here because you have literally a library of
instruments at your fingertips to be used with Midea and you can add them
into your track. You can have a whole
orchestra with just Logic Pro and the sounds that it's giving you
pretty powerful. Another great way to
explore the library is if you go up here to
where it says all sounds, you can see different sound
packs that they've given you. And some of my favorites
that were more recently added to Logic Pro or
the producer packs. So I actually
really like some of the producers that they've
got for Logic Pro. I really loved him, Mish, take a day trip, track
girl selection, OK, Felder, to be honest, I love all of them in
one way or another, but you can actually click them. So if I do selection,
shadow Joe K, these are going to be the
sounds that selection made for Logic Pro to
emulate their sound. There's different base years, drum kits, keyboards, okay, if I go to take a day trip, they have all these different
sounds that they've probably used in popular
songs on the charts. And you have them in your
library with Logic Pro. Now one thing that
you won't have in the Logic Pro Library is
access to third-party presets. What I mean when I
say third party is, I mean additional
instrument libraries that you've downloaded elsewhere outside of the
Apple ecosystem or Logic Pro. And to access those, what you're going to
need to do is make a new software instrument and go here to where it
says instrument. Now, as you can see here
in my most recent ones, I have some third party ones available on a sphere, serum, vital contact, vinyl, guitar, et cetera, et cetera. You can access them
in the logic library, but what you'll have
to do is actually make it onto the track and then save it as a preset and go into user patches
and find it. I find that takes
too long personally, I just access them with the instrument dropped
down on the inspector. Moving on now,
we're gonna go from the left side of the screen
over here to the right side. Now what I'm going
to press to start off is there's two
separate windows. We're going to start
with the Finder, and I can press F
on my keyboard and that's going to appear
on the right side there. Now, this one I typically use to find my third
parties samples. If I go to All files here, you can see that I have
bookmarks with my drum kits, midi loops, et
cetera, et cetera, things like that to help
me make music faster. My suggestion to you is make a folder on your
computer somewhere. Call it samples or drum
kits or whatever you like. And every third-party sample
you get quoted in there and then create a
Bookmarks and you always can access it in logic. It's as simple as pressing F on your keyboard to get the Finder. It's kinda like a browser of your computer outside
of the program. And then go to this one here, which is bookmarks,
which will give you all of your
bookmarked folders. Really easy way for you to
find the files that you need for your project without
making you search for them. Other than that,
you can also go to these different icons here, and that's going to explore your internal Finder
folder on your Mac. Now the second window
that I want to show you on the
right-hand side here. And this one is gonna be
very important for us today. He's called Apple Loops, and we can open that by
pressing O on our keyboard. Now, we have two
different options here, and I want you to focus on
the Apple Loop section here. These are all loops
that have been given to us as part of those
additional content downloads. These are essential when it comes to getting started
with music production, especially if you don't
have a musical background, because you can
sort by instrument, by genre or by descriptor
to find what you want. It also gives you a
really good idea of what certain genres sound
like broken down, if you're wondering what
a house drum sound like, we can go genre, house
instruments, drums. And now we have 933 samples, have different house drums to give us an idea of
what they sound like. If we want to do something like, I don't know, jazz drums, we can do the same thing. Go down here and
we have 76 samples of different jazz drums. So it really gives you
the flexibility to create any type
of track you want simply by using the
additional content given to you by Apple at
no extra charge. Very cool. Something else I want to
note about Apple Loops is these sounds are
royalty free and a lot of these samples and loops
have been used and actually very bid and popular songs that have been
released in the past. I can't remember the names
of them at the moment. But if you do some
Google searching, I'm sure you can find it. This is the section
that we're going to be using to build our track today. So we'll come back
to this shortly. Now, I've shown you
the majority of the features that I want to
go over with you in logic, There's a couple more
that I'll show you, but we won't necessarily be using. And there's two of these. Number one is Live Loops. So I can close up Apple Loops, close up the
librarian inspector. And that's this one here. If I click that, you can
see that it actually opens up a separate
arrangement window. Now this is logics version
of like Ableton Live. Now it's more used for playing live using Apple's
live loops feature. I never use this, or at least at this
point in my career, I haven't used this. So I'm not gonna go over that. I just want to let you
know that it's here. And if you want to
learn more about it, you can go on
Apple.com Logic Pro. It'll explain to you how to
get started with using that. The other one that
I want to showcase to you is the toolbar, and that's at the top here
in this light gray section with this clock *****
large section as well. I very rarely use the actual
icons on the toolbar, which is why mine is quite bare and it might look a little
different to yours. I strongly recommend you
get good at using hotkeys. Hotkeys will make your workflow
better, easier, faster. And once you have them in grand, you will wonder why you weren't using them
in the first place. The whole point of creating a good workflow is that
so you can stay in flow state and really create the tracks that
you're hearing in your head as quickly
as possible. Or at least get the ideas in the software as
quick as possible. For that, you definitely
need to learn hotkeys. But I will show you how to add certain icons and change different parameters
up here because you might find other
things useful that I don't do that you can
right-click the toolbar, go customized control
bar and display. These are all the different
parameters that you can add to your toolbar
or take away. I like a nice clean
look up here. So I don't really
have very much. The only thing that I
have a lot of things clicked is maybe the
LCD because I find these to actually
be useful pieces of information that I can use. Other than that, I
don't really use it. So once you've set
this the way you like, you can simply go
Save as Default, and then you can click off this. And this will open that way every time you open
a new project. Alright, so that was kind of a general overview of the
actual software Logic Pro. In the next video,
what we're going to actually be doing is starting to build our track and
taking the steps to know how to build the
track that we want to build. So stay tuned for the next video and let's
start making some music.
5. Starting A Song: As you can see here, I have just the project that
we had opened before. I'm actually going to delete all of these and we're going to start fresh with a brand
new software instruments. And the Library
opened up nicely on the left side here for us
to have a starting point. That's great, but we're actually not going to be
using that today. I'm close that and
we can press O on our keyboard to open
up Apple Loops. This is where we're going
to actually drag music into our orange and window to
start to build our song. Now, I know I said
that we're gonna be making music in this video, and I do mean that, but there is a few things
that we need to get right before we start
looking for loops. As you can see here
in Apple Loops, there's over 30 thousand
different samples. So it really helps them we can narrow down
what we're looking for and what kind
of track we want to make before we
even start looking. Because that will give us a nice starting point and it
will be quicker for us to actually get samples
that we like and do our track. Here's the best way
to start a project. You need to know two
things to start. Now they don't have to be
this way for the whole track. You can change these later on, but it's a great
starting point for you when you start
looking for loops, when you start writing music. And those two things are the
BPM or beats per minute. And this actually tells
you how fast the track is. And the second thing is
the key of the song. And this tells you which group of notes we want to
kinda hang out with. Let's start with the
key. Key is a variety of musical pitches that all
sound good together. Remember when we
talked about melody before and how it makes
a musical phrase. Well, to make that musical
phrase sound good, we need to use notes that
are in the same key. In modern western
music, there's 12 keys, and each of those 12 keys has notes in it that fit together. The notes that fall outside
of the key are out of qi. Now this is subjective. There are certain notes
that are in these scales that can and can't be used
based on certain parameters. But we won't get into that. Please take everything I'm
saying as not as a rule, but more as like a basic guideline for you
to get started. The important thing
is that we need to know the key of the
song before we start. So we know which notes
to start with BPM, or beats per minute is exactly
as the definition says. It's how many beats fit into a one-minute timespan
or 60 seconds, we can determine that in our LCD clock up
here in the toolbar, you can see here
we have this 120. That's the tempo of our song, or the beats per minute. I can change this
by double-clicking and typing in different things. So I could do 60
beats per minute, which is half the one
that we just had. Now 60 beats per minute. There's 60 seconds in a minute. So this is going to be
one beat every second. Something else you can
do as well as turn on your metronome to know
how fast the tempo is. I can do that by pressing
K on my keyboard. And because this is
60 beats per minute, and you can see the clock here, the beats fall every
single second, 60 beats per minute, 60 seconds and a minute. They're exactly in time. We wanted to do it every 2.5th. Well, we could change it back to the default that we had, 120. And now if we play this, It's twice as fast as
the 60 beats per minute. Now this is very
important because different genres have
different tempos, sometimes radically
different tempos. For example, something like lo-fi hip hop might fall
in-between like 70 bpm, all the way to the
quickest, maybe around 95. Whereas house music
or dance music sits around one twenty
one twenty eight. Trap or hip hop these days
is kinda falling between 140 and usually even
up to 177 times. So the tempo can differentiate
based on the genre. And it's super important to
know this before you start, especially if you're using
loops because loops are dictated by the tempo and key
that they've been made in. So sometimes if you drag a loop in that is at a certain tempo, it'll actually
sound kind of off. You need to use it at
the specific tempo and key that it's been made to be used at
or something very close. Now we can actually
get started on making our track and we're going
to use a basis for that. Chances are why you got into music production is you'd
like listening to music. Now, if you want to start making music like the music
that you listen to, this is a great way for you to have a starting
point to do that. The tempo and the key to find loops that are similar to the music you like listening to, and then use them to
actually create the track. We have a great
website for this, which is called tuned bad. We're going to use tune
bat to get the BPM and the key of a song that we like. And then we're going to
build a track similar to that song using loops
with the same parameters. If that doesn't make sense,
just follow along and you'll have a better
understanding of what I mean in just a second. So first step is to
go to tune matt.com. This is a very helpful tool
when it comes to finding BPMs and keys of songs
that you already like. So as you can see right now,
these are the top tracks that are actually being
searched on tune back. We have Harry
Styles, jack Harlow. Obviously this cab probably changes time to time with
what songs come out. But for us, we're
going to actually search a song that we like. And we want to emulate or how to sound like this is the part of the actual course where you can fork off from what I'm doing and start doing
your own thing. The artists that I'm going
to try to emulate is a pretty standard popular
artist, Calvin Harris. Now, Calvin Harris has
been around for awhile. So there's a couple
of different genres that Calvin Harris is made. I'm going to stick to the
house, Calvin Harris, like 18 months
album kind of era. So something that's kinda
how sea dance genre. And we're going to
find the key and BPM of some of those songs. And we're going to
use that to start using loops to create our song. I'm going to search
Calvin Harris. And then I'm gonna go search. And now we have all these
Calvin Harris songs. We have the key here and
the BPM right next to it. So the pieces of
information are here. Now we just need to decide which song we kinda
want to sound like. More modern. Calvin Harris would be potion with duly
been young thug. That kinda 18
months one was like summer that era There's
slide feels so close. And you can kind
of get an idea of how fast tracks are based on. Thinking about these songs
are listening back to them. So for example, like
summer is kinda older, Calvin Harris now, and
it sits around 128. Well, that's like a house,
kind of a dance, see, BPM. Whereas now he's kinda laid back into the funk
wave, volume one, volume two vibe where
he's getting a lot of popular artists to feature
wrappers and ****** well, rappers don't really jump
on house tracks so much. So for example, Potion, it's sitting around a 100 slide. 104, fields are 101, so it's kinda sitting
around there. I'm going to stick to the house, Calvin Harris for this one. And that's because
Apple Loops has a ton of house loops and they're really easy to kind of showcase what I'm trying
to show you guys. So summer, let's
look at this one. It's an E minor around a 128. So let's just remember
that for the moment. We'll move down here,
feels so close is kind of around the
same timeframe, and that's in G major. And funny enough, G major is actually the same as E minor. It's just starts and ends
on a different note. We won't get into that
too much right now, but that's just
interesting to note that the relatively sound the same. And they're also at 128 BPM. This is what you
came for with Riana, a minor and 1234. So we're starting
to see a trend here that in that era
of Calvin Harris, the 120 BPMs are sort of
where we want to sit. Let's go back to our project. We're gonna do one-to-five BPM, something kinda average
in the middle there. We'll go back to tune bat. And let's see a minor, E minor, G major for the sake
of summer and feel so close being the
similar keys like that, we're going to use E
minor for our track. And we know that we're
gonna be searching for loops that are around G minor. And we can also do
that in our track by going back to the
custom control bar. And we can add key signature
and Save as Default. And now we can change
this to E minor. Now what this is going to do is all the apple loops
that we dragged into our project now are going to be automatically tuned to E minor, so we don't have to
do any of that work. This is super, super
helpful for us, especially when
we're just testing different sounds,
different loops. If I was to change this to D minor and it's going to do
the same thing with D minor. If I didn't change
this to C major, it's going to do the
same thing for that, so on and so forth. But for our sake,
we're going to use E minor and one-to-five BPM. The two crucial points of
starting our track are done. The rest here now is trial and error of you exploring
different loops. What sounds good together? So now let's open up Apple
Loops and let's start to search for loops based on the parameters that we've
just given ourselves. So we can press O
on our keyboard. And now we can start searching
by instrument and genre and adding them into the project to make a loop that
we're happy with. This is the fun part and we're actually going to
create our track. So for genre, I'm
gonna go to house because that's kind of the
genre that we're looking at. That's the Calvin
Harris that we're trying to emulate here. For instrument. I'm going
to start with some piano. So I'm gonna go to piano. Now we've only been
given for samples here out of the whole
Apple Loops library. So we might want to not
restrict this so much, but let's start with
just taking a listen to some of these and seeing if
we want to work with them. It's almost a little
too of Vici for me. I don't know if I want
that, in this case. Cascade piano stabs sounds like something we would
use in this case. So to bring this
into our project, all we need to do is drag that, put it into our Arrange
window and release it. And now I want you
to take note of a couple of things that
just happened here. Number one, you can see that this loop automatically went
to this point right here, and that is at the end
of the fourth bar. Now, music is typically told, especially in modern
western music, in lengths of four bars
or a multiple of 4481632, et cetera, et cetera. The loop didn't go to six, It didn't go to seven, it didn't go to three, it went to four. This is a very important part. I'm making a loop.
The other thing that I want you to notice as well is that we have
this up at the top here, which is a little bit lighter gray than this one over here. This is actually the loop
function of Logic Pro. And we can turn
that on by pressing C on our keyboard and it
goes yellow like that. This is important because
it allows us to play the loop over and over and over and over again without
having to drag this back to the
beginning pressing play. It plays to the end. Then we drag it back to the
beginning pressing Play. This is going to go to the
end here and it's gonna loop, and then it's gonna go
back to the beginning. So let me show you
this really quick. You see how it went
to the end of the four and then right
back to the one. That's because we have
this loop function on. And like I said,
you can do that by pressing C on your keyboard. Let's get rid of this
software instrument track. And we're going to
keep this piano track. I think it's a nice start for a Calvin Harris style song
at this BPM in this key. So let's search for
something else. The thing is that
I'm looking for here is I want to have a melody. I want to have some drums, and I want to have some base. Those are the three
elements that we have. We might have two
different melodies, one being the main melody and one being the
counter melody, and then one base
and one drum loop. And then we'll kinda mix that
together to be our track. So the next thing I'm
going to search for is a lead or like
a counter melody. I don't want to do piano
because we already have that and that's going to sit as
the chords in the background. So I can uncheck piano, but I'm going to stay on house. And Calvin Harris
sometimes it's kinda like an electro House
kind of feeling, especially in that era. Now I'm gonna go to instrument
and maybe do synth. And let's see what we
can find this area, something that I forgot
to mention as well before when you're
looking for loops. We have two little sections here and one says
Tim dot-dot-dot, which is actually tempo. And that is the BPMs
of these loops. Now, they will
automatically change to our project tempo
because these are Apple Loops and they've
been analyzed by Apple. So when we drag that
in and we'll actually sit as this four bar section
that we had there before. And the second is the key. And this is going to be the
key of the original loop. We can change this
parameter down here, play in Song Qi or
playing original key. So if I play this
area Vox synth here, what I'm just listening
back to is the song key. So that's actually
being played in E minor because we've
set that up here. The original one,
if I change it, playing original key, we
can hear it's a lot lower, and that's because it's
being played in C minor. That's also something
important is you can play it in the
song key when you're searching for different
loops to give you a better idea of how
it's going to fit in. You're already made loops. Let's look for lead. I'm going to search
the loops for lead. Let's try this
aftershocks and lead. It's at tempo one-to-five, also the same as our project. And it's in C minor, which isn't too
far from E minor, so it should sound cohesive.
So let's try this. That's very Calvin Harris
like from that era. So let's drag this in,
click and hold that. We're going to drag
it just underneath our cascade piano stabs. And now we see we
have aftershocks, Synth Lead, and we
haven't just underneath. It's the same length as
cascade piano stabs. And it's been automatically modified to be in the same key, E minor that we've set up here. I'm going to zoom in on
this one a little bit. And what I'm doing
for that as I'm just holding option and then I'm pushing with two
fingers up on my trackpad. And this is our new
four-bar loop here. So let's play it together
and see if it sounds good. See if it sounds like we
want to keep building this. I like it. I definitely know some things that
we need to fix with it, but that's gonna be
later on in the video. But I think that this is
going to be just a nice, a combination of
something we can use to build this Calvin
Harris style of track. Now something to keep in
mind as well is you don't have to use the same are
the first one you find. You can look down
this whole list of things that
you're looking for. So for the sake of this, I'm going to mute this one. And I decided that by
pressing M on my keyboard. You can also use this one here. And let's just find another lead to see if maybe
there's a better one. So let's try this memory
Synth Lead 128 BPM, close enough in G minor, little farther away than C
minor, but it should be fine. So let's try it. I already know this one's not going to sound as good as the other one, but let's just drag
it in so we can test. So make sure you drag
to the beginning. We see that it ends at
the fourth bar here. So let's play it. A couple of
things I just want to note. I don't like the way this
sounds versus the other one. It's too low. It's clashing with
the piano too much. It's too similar of syncopation. And what that is, is the way that it's being played is too similar
to this piano. So they're just actually going
to clash with each other. It's not going to
be complimentary. So let's delete this one. Let's try one more. And if
we don't find anything, we're going to stick with
our aftershocks and feet. So this one's a
little bit different. New day Synth Lead O3. It's different than the piano in the way that it's syncopated. It's still around
128 and G minor, so it's going to be automatically a bit lower
when we drag it in, because it's going
to be similar to that memory is Synth Lead. But let's just test it
and see how it sounds. That's the beauty of
having this software, is when you have the
tempo and the key set, you can test as
many loops as you want and see where
they fit together. So bring it back
to the beginning. What I'm doing to do that
is I'm pressing Return on my keyboard and
that'll automatically bring the play head
back to the beginning. And then I press space bar
to play the track through. So that one actually sounds a lot better than
the previous one. Let's test it against the
aftershock since these, so we'll unmute the
aftershock and we'll now mute the new day synth.
So let's play this. I think I still like
the aftershocks and the just the way it sounds. But this is my
point is that it's a lot of trial and error, especially if you're
working with loops to finding something that
you liked sits together. But it's also the beauty
of the software of Logic Pro is if you have
the BPM and the key, you can drag in
whatever you like. And it's going to automatically analyze it and make it the same. All you need to do is drag
loops that sound good together so we can delete
new day synth or three, I just highlighted that and I press Delete on my keyboard. And these are going to
be our main melody, the cascade piano stabs
and the aftershocks Synth Lead is going to be like our counter melody
on top of that, we still need two more things. Let's make it three,
we need a base, so something to sit as the lower frequency melody
underneath these two, we need a drum loop, something that's just kinda like
a kick and a clap. And then we're going to add
a percussion loop as well. And the reason
we're gonna do and separately is because we want
to affect them separately. You can drag in a full drum
loop without question, but you don't have the
same freedom that you have if it's separate tracks. And the reason for
that is because sometimes we want
higher frequency things to sit down a little bit. If we want maybe our chords and leads to really stand out, we want the low-end to
be up a little bit. So this is again the
freedom of loops. Sometimes you can use
just a regular drum loop, the whole thing on top. And sometimes you need
to actually break down the loop and
each individual part. And then you can
mix it differently depending how you
want to do that. Let's look for a base. Let's stay in house. We don't need to
be electro House, but let's go to instrument. And we can take out lead
here in the search, which will give us more options. And now we're going
to search for base. Let's try this
80's forever base. Underneath these house
dance, leads and courts. It still has the
tempo of one-to-five. The key is F sharp minor,
so it's a bit different. But like I said, the software is going to analyze
it and change it for us. So let's take a listen
to this loop. Not bad. Let's drag it in and
see how it sounds. Let's play it with just
the cascade piano stabs and without the
aftershocks Synth Lead. So we can go about
this two ways as well. We could mute the
aftershock Synth Lead. But another thing you can
do is if you're testing different tracks
without certain ones, as you can press this S here
on the ones that you want. And that's what's
known as soloing. So you can solo the cascade piano stabs and it automatically mutes
the other two, because the only ones
soloed is the piano steps. You can also do
that with the base. So now we've just added the
base to the piano stabs. This becomes very
useful when you have large projects
because you're going to want to be testing multiple different
tracks at one time. In this case, we'll just solo piano stabs and
the forever base. I don't mind it. It actually
sounds kind of cohesive. It definitely is playing at a similar syncopation,
not quite the same. The differences sound
not too bad together. So let's try maybe
one more base loop. And if we don't like it,
we'll stick with this one. I can already tell that's
gonna be too busy. Let's try this
analog wonder base. So I'm going to
drag that one in. Now what I can do here
is I can solo that one and I can un-solo
the 80s forever base. Now let's take a listen to the piano and the
analog wonder base. So let's take a listen to the
80s forever one more time. I think in this case, I'm gonna go with
the 80s forever. So we can solo that. We can delete the
analog wonder base. We can actually take the solo off of the whole thing as well. Then they can do that by pressing this one
here, which is clear. Recall solo, which will automatically un-solo
anything that is so low. Alright, two last pieces
for our track here, and they both fall under drums. So we can unselect base, we can go all drums. And now we can search by beets, and we'll stick
to house as well. Now these tempos are all
sitting around the 120 range, which is what we wanted. The keys don't really
apply to drums. This is a bit subjective. Some people say
that there actually are pitches with
certain drum hits. With something like an
808, there definitely is. But typically drums
don't have a pitch. There are transient that has
too many pitches going on. You can't definitively
say what one is. A lot of people will argue with me on that in the comments. That's okay. But
I'm sticking with that for the basic
purpose of it. You can tune a kick drum, you can tune a snare. But there's so many different
frequencies going on. It's hard to say that snare is a sharp or that snare is D-flat. Let's find a drum loop. I'm going to use this
complete package B here. We're going to drag
that into our project. And now you can see this
one's only half the length of our other loops here. This is an easy problem to fix. All you need to do is highlight this region here by clicking it. And then you can
press Command R, which will duplicate it. And that way you
can have another exact duplicate over next to it. If I drag the play
head out here, you see there's this little gap, and that just
signifies that there's two different audio regions. We can also change
that by highlighting the track and pressing
G on our keyboard. Non-contiguous audio
regions require the creation of a
new audio file, create, and it creates a
brand new loop for us. I like to have all my loops the same length with no
breaks in-between because this comes into play later when we're arranging and I'll explain that later on. But for now, I'm just gonna
show you how to do that. Now let's take a listen
to our whole loop here with the drums. Without the drums
that we just added. Now this isn't mixed
properly so you can't hear them exactly the way you want to. We'll
do that later. But I can already tell that
drums add so much to attract, especially in the house genre, where drugs is kind of
like the focal point. Everything else kinda fits
around the drums because house is meant to be for dancing. It's meant
to have tempo. It's meant to have
beat. The last thing that we're going to
add to our track here, this is what's known as
a topper or percussion. And usually what
kinda loops these are is they're
things like hi-hats. Maybe some often beat cow bells, claps, snares, things like that. And what they do is
when you play them with something with a
kick drum and a clap. So just a simple boom, boom, like a four on the floor. It really adds movement
and feeling to it. So that's what we're
going to look for next. So what I'm gonna do, unmute the drums and I'm
going to solo the drums. And when we add in
the top or there, we're going to test it
against the drums first. Because if the topper doesn't work with the basic drumbeat, it's not going to work with the rest of the track anyways, the rhythm needs to
be different and accentuate in different things, but they still need to be
cohesive and work together. So let's take a look in our
apple loops for a topper. Let's try this
daybreak beach topper. As you can see, there's
no kick drum in that. When we listen to it,
That's perfect because we already have our kick drum
and the other drum loop. This is going to accentuate
the kick and clapping or other loop by having all these different hats
and other things in it. So we can drag that
into our project. And we can solo it and we'll test it against the drum loop. Sounds pretty good to me. If this is your
first time producing music and you're
listening to this, you might not even be able
to tell the difference. But if I actually un-solo this, you'll notice that
the drum loop now sounds very hollow.
It's missing something. And then if I add
the topper end, there's so much more movement. And just, it, just, it
literally makes you want to dance more by
having that in there. So it's important to have those two different elements together, especially when you're getting started because it's so easy to drag the top or on top of
just a basic kick drum. And it's gonna be very important later when we are gonna
be mixing this track. So now we actually have all the elements of our track
and what we want to use. So let's play all
these loops together and kind of take a listen
to what we've just created, using different loops
to make a new creation. I don't mind it. I know exactly
what we're gonna do going forward after this to make it
all sound better together. But this already I'm
really happy with. And if you're not
happy with yours, pick it apart and find out
what you don't like about it. And get rid of that loop and get a new loop it and test
different things. Never settle necessarily. Like don't put something there
just for the sake of it. It doesn't necessarily
have to make you wow. But everything together
should at least sound cohesive and sound good and not clash too
much with each other. Now one more thing
I want to mention before we move on to
the next section. This is likely going
to be our chorus. Why? Because it actually has all of our loops that we've created
in this particular track. Obviously, if you have a
project with a 100 tracks, you're not going to
have all a 100 playing at the course that
doesn't make any sense. But for the sake of this basic
music production course, I'm showing you that these are the basic elements of what
goes into a track melody. Bass, drums, when they
all work together. That's what creates
the biggest section of the song are
most full section, which is typically the chorus. So going forward after this, what we're gonna be doing is
we're actually going to mix these tracks together so
they sound a little better. Some of these
already sound a bit overwhelming at certain parts, and we're not able to hear other parts of the song that
we really want to hear. And we're going to
arrange this loop. So like I said, we've kinda dictated that this is
going to be our chorus. Well, we need to
work backwards from this full loop into actually telling a
story with the song. The verse might be a little more quiet and might
have just the piano, or it might have just
the drums and bass. We don't know yet.
We're going to get there when we
start arranging. But what I want you
to think about is that we're going to
work backwards from this particular loop into making a full song
starting at the chorus. So I'll see you in
the next section.
6. Mixing: In our last video,
we learned how to go from having a blank, empty project with no ideas to having the starting point for a song and starting
to add loops to fit together to emulate the song
that we're trying to make. We chose a key and
BPM of the song that we really like or the genre we really like and
want to sound like. And rebuilt a four-bar loop using the parameters that
we set for ourselves, the key and BPM, to make ourselves a chorus or something that
we're going to use to build the rest of our song. Now what we're going to do is
cover very basic mixing and arrangement in order to
turn it into a full track. Let's start with mixing. At this point,
guys, we've chosen all the loops that we
want for our track. So we actually don't need
Apple Loops anymore. So I can press O on my
keyboard and get rid of that. What we can do here is
we can see our track. We've made this four-bar loop. We have the cascade piano stabs, the aftershocks and lead the 80s forever base the
complete package beat, which is our gar, kick
and clap or snare. And the daybreak beach topper, which fits on top of
the kick and clap. Let's start mixing these together so they sound
a little better. If I play this back right now, it sounds good,
everything works. It's in key, it's
in the same tempo. But some frequencies are, some tracks are
actually battling for room against other tracks. So if I was to what's called
Bounce this right now, which is kinda make it
into an MP3 or WAV file. If we listen back
to it, it would be really taxing on our years, there'll be a lot
of information, a lot of musical and
audio information going in at one time. We don't want that.
We want it to be nice and cohesive together. This is where mixing
comes into play. What I'm about to
show you is simply a drop of water in comparison
to a large iceberg. It's not even the tip of the
iceberg as to what proper mixing engineers and mastering
engineers do with music. What I'm showing you is very, very basic steps to get
a track that you've started using loops to sound a little bit more
cohesive together. What I'm about to
show you is not mixing in comparison to what
a mixing engineer can do. This is simply some
basic volume leveling, some basic EQ compression. And later on, I don't even
want to call it mastering, but we're going to say
it's finishing the track. So I just want you to understand that before we go into this, mixing isn't simply leveling volumes and calling it a day. But that is what
I'm going to show you in this particular video. One of the most powerful things you can do when mixing a track or mixing tracks together is
simply level the volumes. You'll find that by
taking volumes down, you actually create more space than if you just keep
pushing volumes up. We don't want to
have a loudness war here with our tracks. We want to simply allow them
to fit together better. So let's get started doing that. Now the first thing
that I noticed already is that the
drugs need to be louder. House music, hip hop music and pop music these days is very, very focused on the beat, the tempo, and how it
makes you feel in dance. So immediately I'm going to turn down all of the instruments
and base here to 0. And now we just have the basic complete package B and the daybreak beach topper. From this one, I'd probably take down the
top or a little bit. It has lots going on. And we kinda just want
that to fit nicely amongst the kick and clap. We don't want it to overpower it or make
it really present. We want our body to kinda feel that with dance music anyways. So let's turn this one
down a little bit. Another really good technique
for mixing is rather than bringing it down from 0
and finding where it fits, just started at
no volume at all. And bring it up until you feel
like it fits in the track. I like it's sitting right there. This is around negative 5.5 dB. And we're sitting are
complete package be at 0 here are plus one.
Let's make it 0. Now, a couple more windows
that I want to bring up here to help guide you along
the mixing process. Number one, I'm mixing
the volumes by just dragging these simple volume
faders down and up here, you can actually do this
with a more visual look by pressing X on your keyboard to bring up your mixing window. And we now see here we have
all our different tracks and we can see how loud they are in relativity to each other. As well as the Stereo Out, which is what we're
going to use to imbalance this track afterwards, if you like the visual of having the mixer and all the
different knobs this way. This is what a
actual mixing studio looks like with the hardware. You're going to have it laid out in front of you like that. Please use that. Please use
whatever works best for you. For me personally, I like
to have them like this. If we only have a certain amount of tracks, it's
just easier for me. The second one I
want to bring up, which if you don't want to
use the mixing window here, is pressing I on your keyboard
to bring up the inspector. And that's gonna give
you the level of volume here or the gain
level on the left side here. If I play this, I'm on the
complete package beat here. You can see that we're
peaking at around negative 9.2 on that track. And the Stereo Out
is negative 7.4. You don't need to worry too
much about the numbers. The only thing that
you need to do is make sure that you're
not going over 0 because that's going to introduce something
called clipping. The point is if it sounds
good and you can keep it sounded good when
you've bounced it out to a finished MP3 or WAV file, then it is good if you're
happy with the way it sounds and other people
are too, who cares? But the point is that
this is a tool for you to understand when
your volumes are too loud. If they go over the
clipping threshold, there's going to be
certain distortions introduced to your track
that you might not want. So to avoid this simply makes
sure it doesn't go over 0. Let's just level the volume so they all fit together nicely. So I've done the two drums. Now let's add in the base. So I'm actually going to solo
these three here just so it gives you a better visual of what we're actually
working with. The base is currently at negative infinity.
So you can't hear it. We're going to add
it in nicely with the actual kick and the daybreak topper so
that it fits in nicely. So I'm going to have
it sit around there. It's sitting at negative 0.5. This base isn't
really that present. I can show you how to make that better later, but for now, it's just sitting nicely with
the complete package beat. Now let's add in
the piano stabs. And then last but not least, we'll do the
aftershock Synth Lead. So cascade piano staffs, we'll solo it to bring
it into the track. And now let's actually
make the volume fade so we can hear the piano stabs nicely without taking up too
much of the other space. So I like that one around
there, negative 4.5. Last but not least, let's add the aftershock Synth
Lead. Let's solo it. Or in this case, because it's
last thing we need to solo. We can simply clear the solo that all the
tracks are playing. And we'll just move the volume fader up so it fits nicely. I like it to sit around there. It's coming in louder
than the piano stabs. And they want that it's a
very focal point of the mix. We want to know that it's the
course when this comes in. So now we've leveled out
are different levels of the tracks here by moving the
volume fader up and down. What I want us to do now is play the whole loop together with
our newly leveled volumes. And I want you to take a look
at this stereo out here and see where the actual
gain gets to you. So let's do one loop of this. The peak of this is
it negative three, which is great.
We're not clipping. We're not introducing
any new distortion or sound into this
that we don't want. A lot of people
will tell you, Oh, go to negative 0.1 or go to negative six
or negative three. Please don't worry about
that for the moment. For now. Let's just
not go over 0. You might be asking
yourself, well, Tony, in this case, we shouldn't just
bring everything up to 2.9 dB. So we're
at negative 0.1. No, let's not do that
because we're gonna be adding in some effects and other things that can alter this Stereo Out gain
output as well. The only thing I want you to do, level out your tracks and
keep the stereo hello 0. Now, the next part
of mixing this, we are going to add
in some basic EQ, or it's short form
for equalization. What equalization is, is
you're actually taking a specific plugin that can do
more than just the volume, but it can boost
certain frequencies. And the track, these loops are made for the full
frequency spectrum. That means that in
this piano here, there's actually going to be low-frequency
information that we maybe don't want because it's interfering with the base. With a kick drum.
The same goes with parts of the drum loop. Maybe this daybreak,
beach topper has certain frequencies and the high end that
we really want. The mid ones we don't want as much because that's
where the piano sitting EQ is kind of like
a box that you have a finite amount
that you can fit in and you want everything
to fit in perfectly, like a Tetris game almost so that when your listener is
listening to your track, everything fits in nicely. The base isn't too loud,
it's not overpowering. The kick drum is present. It makes you feel the beat, but it's not
overpowering the melody. The whole thing needs to work
together and fit together. And that's what EQ really,
really helps with you. So let's do some basic EQ
on some of these tracks. And I'll show you how
it's going to help you fit them together better. The first one that we're
going to do is we're going to take this
aftershocks Synth Lead, and this cascade piano stabs. And we're going to take away
the low-end frequencies because those aren't
what we want to hear from these
particular tracks. To add an EQ, you can
do this two ways. What I always do is I just click this box that says EQ
and it adds it there. This is the basic channel
EQ that comes of Logic Pro. I'm going to close that for a second because
we're going to add another one on
aftershock Synth Lead. And the other way to
do this is go into the inspector here
under Audio Effects. Now it's in my recent
because I just added it, but I can go to EQ Channel, EQ stereo, and it adds
one there as well. You can do whatever
works for you. I suggest clicking the
box because it's quicker. This is where it gets a
little bit more tricky. And you might be
asking yourself, well, Tony with EQ, why don't I just turn the volume down of this track to
fit the other one? Well. This is a good example. In the aftershocks Synth Lead, this will give you a visual, this gain knob here is kind
of like a volume knob. So if I push this up, you see that we've just added all this frequency information here across the whole spectrum. They bring this back down to 0, which you can do by holding
Option and clicking. You can see these little colors here with the little dots. And these are known as bands. You can move up
certain frequencies or down certain frequencies. And you can decide how thin or fat you want
that Dan to beat, takeout or boost
certain frequencies. And now if we bring up the
whole volume of the track, you can see that there's this
little notch missing here. This is super important
because what it's doing is leaving that space. It's boosting the
rest of the track, but it's not
boosting that space. Or it might be, but
you've actually taken away most of it to begin with. So it's not going to clash with other instruments trying to fit in that space.
Let's go back to 0. Same with this band will
bring it to 0 to make a nice even looking
Channel EQ curve with the piano stabs. Let's go to our AQ
here. Let's solo it. Let's play it. And let's look at the frequency spectrum and
see the low-end information. To do this, we can
actually click on the analyzer and click
pre or his pardon me, click Post and turn it to
pre. Let's listen to this. You probably didn't
think beforehand that all this information
down here existed. The piano is a high-frequency instruments being
played up here. You assume it's a melody
and melodic instruments. So we can actually add
this one down here, which looks like a little
hockey stick. So click that. And this little red
portion comes up. We can click and drag
this all the way up to, let's do right here
at around 200 hertz, wherever this red area is, it's taking out the frequencies that we've told it to by
dragging over top of them, we set this to pre beforehand. So we can see this
here, this EQ. If I click this
now and I do post, when I play this next, you'll see nothing
will appear in this red area. So
let's play this again. If I do pre, you see that there is all
this information here. So those frequencies have
been eliminated now. We don't need to hear them
anymore and we've just created space for our base and
for our kick drum, because they also reside in those low frequencies
simply by just taking out the frequencies
of the other one and we couldn't even really
hear them anyways, another example there'll be
very common is your base and your kick drum will
compete for frequencies. And that's because they're both sitting in a low
frequency range. So here's a trick to help
you put them together. Let's listen to the
complete package B. We're going to solo that. We're going to add an EQ to it. And we're simply
going to look at the spectrum and we're
going to listen to the beat. Right away. I can see that this area
down here is the primary, a kick drum frequencies. We're simply going to
take this orange one, which is what's
known as a shelf. And we're going to boost it, let's say three dB. And I'm going to sit this
around like this area 90. So now this whole
frequency spectrum down here been risen by
three decibels. We're also going to take this green band here
and we're going to lower it may be around 200
to 400 in this area here. And I'm making this skinnier by using two fingers on my
trackpad and going up, down or make it fatter, we want to make it maybe
around here. This is a test. We will likely move
this one later. But let's close this
and just know that we're ducking it
by three decibels, which we can see down here. So we'll close this EQ. And now we're gonna go
to the 80s forever base. And we're going to add an EQ
and we're going to solo it. And we're going to listen to
this before adding anything. Let's test this out
by taking out all of this low-frequency
information where the kick drum has a lot of frequency information
and just see if we can actually tell
a difference with this. So there definitely
is some sub bass in there that could really
fit nicely in the track. But we want it to work
again with our kick drum. So what we can do is we're
gonna make this at a 100. And we're going to
take out all of those frequencies
underneath that. And that's going
to save room for that little boost that we made with the shelf
for the kick drum, if you remember correctly, on the kick drum EQ, we also took these green
band and we ducked around 300 for three decimals. So let's do the reverse
of that with this one. Put this up three decibels. Let's listen to this and see the difference
with and without it. So that was with,
Let's check it off. It boosts a little bit. Let's just turn it on. But to use this hurts
parameter here. And we'll drag it
up and down and see where the most frequencies
sound the best. And we can also boost
the gain on this a lot to test and really hear it. After doing that, I
actually want it to sit around 300 over them more. So let's do plus three
decibels at 300. This is going to
accentuate that midrange, that kinda distortion
byte of the base. And we'll go back to the
complete package beats and make sure that we're ducking 300 at three
decibels as well. We're making space for that
base to be a little more crunchy because on this
complete package B, this kick drum is a
very big focal point. And then some of the
high-end slash mid, where the snare and clap is. So now let's listen to them
together with the EQs. And then I'll take the EQ's off and we'll see if
there's a difference. While solo the 80s forever base. And we'll solo the
complete package beat. And we're going to play this. Let's take off the EQ's. It's very subtle.
The difference is, but I can tell from
listening to it, that they sound so much better together when you help
them fit together by taking out certain
frequencies you don't need in certain tracks and adding them in the other
track and vice versa. In this case, we took out the frequencies of the eighties forever base under a 100 hertz. Why? Well, because it didn't accentuate enough of what
we wanted in the base. But in the complete package beat the kick drum is really
what we want it to here. So we boosted that
frequency under a 100. It just makes
things fit together better and gives you
more optionality and how to actually
fit things together instead of just boosting
and lowering volumes. This is what EQ is
and it's so, so, so important, especially when it comes to the later stages of
your music production. When you start to get better and more and more tracks
get involved, everything needs a space
in the frequency spectrum. Let's do a couple more
simple EQ tricks that I'll go over very
quickly without explaining the theory of it. But just know that I'm
carving frequencies out and adding frequencies
where they need to be. The daybreak beach
topper, let's solo it. There's all this
low-frequency information and we really just want
it to be high frequency. So we can take this and we can cut out everything down there. Again for people that are mixing engineers or people watching this that do know how to use EQ. What I'm doing is a very
simplified version of this. I don't think that you
should just automatically add an EQ and take
out the low end. The purposes of this course, I want to show you how
things fit together. It sounds the same way
that we wanted to. We can add the complete
package beats. And after adding that EQ, I think we have a little
bit more room for volume with the
daybreak beach topper. So I'm going to boost this
up, maybe another DB. Let's play the
whole loop now and make sure that we've
set the EQ is where we want to make things fit
together in the best way possible. I know
what we need to do. We need to make the
aftershock Synth Lead, and the cascade piano
stabs fit together better. There's too many clashing
frequencies. There. We really need to
differentiate them in the cascade piano stabs, I'm going to cut out frequencies that the
aftershocks Synth Lead really, really needs to
accentuate width. I'm going to click
the EQ on this. And we're going to simply watch the EQ of the aftershock Synth, Lead and boost
where we want them. I can see here that
around 800 hertz is where the majority of that bussiness is coming from the lead that
we really like and want. I'm going to boost it by
three dB at 800 hertz. Now I immediately am going to go to the piano and I'm going to test to make sure
that when I take out three dB, it still sounds good. So let's go to 800. Let's take out three dB. And let's play it. You can definitely
tell a difference because it's a melody. And this is starting
to get into the mid to the high range of where the melody frequencies
kind of lead. But it's not enough to keep
in here at the expense of making the aftershock Synth Lead not work.
Let's leave it in there. Let's add the aftershocks and
lead. Let's take a listen. So we did that to make
room for the Synth Lead. Well, we should actually
fill in part of the piano that we don't
need and the Synth Lead. So let's take a
listen to the piano. I think what we can do is add this wide shelf towards the end. I read around 2 thousand hertz and will boost it by three. And we'll do the same thing
to the aftershock Synth Lead. We will take this
to 2 thousand and we will take it down by three. Now let's listen
to this together. And with the whole loop. Now what we've done
is we've added some basic EQ to the whole loop and different tracks and different frequencies to
help it fit together better. The first step is always
doing the volumes. Afterwards, EQ out what
you don't need an ad, what you do and
make your mixture sound cleaner and
more glued together. Something I want to
talk about which we're not necessarily going to go too in depth on in
this particular course. Compression. Compression is also equally as important as EQ. What compression is, it's taking the quiet parts of a track
and making them louder. Has taken a loud parts of a track and making them quieter. I'm not going to
use a compressor on any of these
particular tracks because compression becomes very useful when you start to
have groups of tracks, which we're not
going to get into in this course because
this is a basic course. But what I just
want you to know is that compression is
something that you should research and learn at the earliest stage possible of you getting any
music production, especially when you start
to have projects that are over five tracks. Because it's so helpful. We are going to be using
compression at the very end of this course to help glue
our final track together. I don't want to use the term, but mastering uses compression to bring up certain parts of the track and tame other parts to make it
fit together better. What we're doing
is not mastering its finishing the track, which is going to
be a very, very, very basic mastering lesson. I just want you to
know that compression is very important and you should without question be using it and researching how it
works in your tracks. Another thing that we won't be necessarily using
on these tracks, but something that
you would definitely want to explore is using different audio effects on different parts
of your tracks. So luckily, these
loops that we got from Apple Loops all sound
pretty good out of the box. But if you're
recording a guitar, just plain basic
guitar or piano, or you're using the
Yamaha grand in logic, they sound very dry. Now we're dry is, is there isn't any effects
on top to bring it to life. A very popular one is reverb, which basically
makes an instrument feel like it's an actual space. So for example, this cascade
piano stabs if I solo it, there's already reverb on
this track from the loop. But what I'll do is I'll add a reverb so you understand
what I'm saying in terms of adding more ambiance
and space to the track, you can do this with not just
reverb at any audio effect, and we're not going to be
adding any onto these tracks, but I will show you how
to access them and you can add them onto your
tracks if need be. So we have the cascade piano
stabs here in the inspector. We can go down to just
under the channel EQ and it says Click to
insert audio effect plugin. So we'll click that.
And now we have all of our options
for audio effects. This can be a little bit
intimidating off the bat, especially if you don't know
what certain things do. But the more you spend in here and the more tracks you use, the more you
understand and you'll have about what
audio effects do, what we're going
to go to reverb. And we're just going to
use a Space Designer, which is a stock
reverb that comes with logic and it's sounds great. Stereo. And now we have this reverb plugin on top of our cascade
piano stabs track. So let's listen to this
cascade piano stabs without the reverb to start. And then I'll add it on and
you can see what I mean. Now, let's turn the
Space Designer on. You can see that it's
actually bleeding into each other a lot more.
And that's the reverb. Like I said, there's
already reverb on this actual track that's been printed into
this audio file. So we don't need this. You can click there
and you know, plugin. But if you feel like a
track is very dry and it actually needs some
more feeling to it. Reverb is a great
option for that. And these audio effects here, there's tons of different
ones for you to explore and add your tracks and
see where they fit best. And you'll start to recognize certain effects that you've
maybe heard in the past. We're not going to
be using any on this project except for the EQ. So I'm going to turn
the solo off of that. But I just wanted to
show you where you can find audio effects and start exploring with different
ones on different tracks. We've done some basic mixing with our five audio loops here. Now in the next section, what we're going
to do is we know it fits together all the tracks, but we want to start
telling a story using the arrangement of moving
tracks across the board, taking certain tracks out at certain parts to keep
our listener interested. And this is basically
the beginning of you starting to make a song. The journey of the actual
song being played through. I'll see you in the next
video in just a second.
7. Arrangement: Now we're going to actually
take our loop that we've mixed and make it
into a full song. This is called arrangement. And what we're going
to be doing is taking our eight bar loop and duplicating
it across our project. And then we're going to take out an ad parts of the
loop in to tell a story to keep our listener interested for the full
length of the track. So we can see our loop here that we had in the last video. We have the piano, the lead, the base, and the two drum
tracks underneath there. So to arrange this loop out
to start telling the story, what we can do is we can
highlight all of these by either pressing Command a and you can see all the
regions highlighted there. Or we can click and drag all of the regions that they're
all highlighted. Now at this point, we're going to press Command R to duplicate across our project, across our arrangement window. So we have multiple
of these choruses and we can start to take out
an ad, things that we need. Now, arrangement is a
very interesting part of music production because
it's very subjective. Some people tend to like different parts of the
song more than others, and therefore might really accentuate that part of the track when
they're producing it. The most important thing
you can do is just try to tell a story with
what you have available. So that's exactly
what we're going to do with our loop here. We're going to change our
cursor to the eraser tool. And we can actually
do that by pressing T to bring up this little menu. And you can see all of
these little letters on the side here when I go down. Those are the corresponding
letters that I can press. And it will give me the tool
that's listed next to it. So if I press E, we can get our eraser tool. And now you can see
that we can erase regions throughout our
arrangement window there. And this makes it
a lot easier for arranging tracks
because you have capability for you to actually
visually see what's being played and where you should and shouldn't add
things back and forth. So I'm going to add
those regions back in because I don't want
to take those out there. But a couple of
things to keep in mind when you are
arranging things. If we were to just play the four-bar loop
across the whole track, our listener would get
very bored very quickly. We need to start with something small and then
bring it in slowly. And then at the chorus, like we said, that we're
working backwards from, That's where we're going
to have the maximum tracks playing with a chorus
loop we created earlier. But I'm going to do is think
for a second what I would like to start with and then start adding
elements to this. Something else to keep in mind
is that music is typically arranged in bars
of 448 bar loops, depending on the genre
and how fast it is, is sort of the section
amount that you want to give a track without adding
or taking anything away. Now as things get
more complicated, you can definitely have little nuances and things
throughout the track. But for the sake of
keeping this simple, Let's just think in portions of four bar loops because that's exactly what we made
for our course. I actually really like the cascade piano
stabs to start off. I think that it's a nice part of the track to introduce two
people at the beginning. So we're going to get rid
of everything underneath that and just have the
piano stabs to start. Introduce something after that. We'll start from
the beginning and I'm going to play this through. And this is what it will
sound like when the person clicks play on our track
for the first time. I'm going to stop it
right before it goes into the next loop
there because we haven't taken anything out
yet and it's going to be just a lot of sound coming
at you at one time. Now we have to
think to ourselves, what part of the track
do we want to add next, if we played the piano stabs
over again for one loop, chances are our
listeners gonna get bored and probably
turn our track off. So we need to add at
least one more thing. And what I think we
should do is add either the base or we should add this
daybreak beach topper. I think it's
different enough that the listener will
notice something has been added and realize that we're building
them up to something. But it's not easy enough, like the aftershock Synth
Lead or the package beat that it immediately feels
like we're in the course. Let's try the daybreak beach
topper and not the base. And we'll see if
that sounds good. If not, we will
maybe add the base. So we'll start from the
beginning. Press play. After this first eight bars. I think that we should go
into the course because that really is bringing in what we're trying to give the person. Let's also take the base out from this nine all
the way to 13 here. And we'll use the base in the
second half of the course. So this part is going
to be the intro. This part is going
to be the chorus. And after here at the 700s bar. We're going to start a verse. Like I said, there can be
different amounts that people use for the intro or
four Vs are course. But traditionally, in a
lot of popular music, you'll find an intro being
maybe eight bars are 16 bars. Then you move into the
chorus or the hook, and then you drop
into the verse, which is going to
be a bit longer, typically twice the
length of a course. So in this case, we're going to make the
verse this long here, which is a total of 16 bars. 481216. After the course, we're gonna go back into, bring it back down, to strip down to nothing. And then the verse, we're
going to build it up and drop it again
at another course, we can start to take things
out after the chorus here. Should we do the piano again, or should we actually do something even a little
bit more stripped back? Let's try just start
with the base and the topper and see how that
sounds after the chorus. So I'll turn the loop
function off by pressing C. I'll start on the second
half of the chorus here. And really take note
of what happens after this course finishes into this section here at the beginning of the verse where we don't have much going on. See if it sounds
pleasing to you. And then keep moving forward. If it does sound
good, if it doesn't, we'll re-approach and we'll have a different track
in there to start. So that sounds more
like a breakdown to me. I think that we
made a mistake by just having the base in
there with the topper. So what we're going to do
is we'll get rid of these. And we will simply highlight
the whole stack again. We will click and hold and then press Option so
that little plus ads. And we'll move it
back so that we have the full stack again and
we can re-approach this. Let's keep it simple, like what we did
with the intro and we'll just have the piano. We can erase everything
here except the piano. And now we can start adding little things all the way
up to this point here, in which will make a bit of a breakdown before the course. I think we can get rid
of the topper, the base, and the lead so that it's gonna go with the piano
and the kick drum. Then from this point, we can actually get rid of the
Synth Lead and the topper. So it has the base. And then this breakdown here we'll approach
after listening to these first three sections of the verse. So
let's take a listen. I actually really
liked the way that, that sounds so far. If this track sounds very
bare, It's because it is. And this is actually
something where a vocalist really comes
into play nicely. A lot of the times
instrumentals can be very boring or very basic. And when you add a
vocalist on top, that's the right amount
of differentiation you need in order for it to really
bring the track to life. In this instance, like I said, because this is a hand-holding
beginners course, I just want you to
start thinking about the arrangement concept of how tracks are
actually arranged to tell the story for
the breakdown. I liked the way that the base
and the top or sounded that we tried for the beginning of
the verse at the beginning. So we'll take out the package B, the Synth Lead, and the piano. Now the verse is going to lead into this
little breakdown. And then we'll go back to
the chorus right here. So let's listen from the end of this little verse section
through the breakdown. And we'll go into
the beginning of the chorus and see
how that sounds. Usually when you listen
to tracks that are on Spotify or that are really
popular amongst people. There's so many more
things going on. There's things like audio
effects, risers, sweeps, sweep, upsweep downs, white noise, all to make you really notice that there's
changes going on. And this is a very
stripped down version. However, I'm going to show
you a little trick that is very commonly
used and is actually a great trick to use
when you don't have many tools to work with
right before the chorus. If we zoom in here, this is the last bar and our little breakdown
before the chorus. Well, we can take out parts of the drum loop so that it really just accentuates the base. And that's our last thing. Or taking out as much frequencies
and sound as possible. So that when the
chorus comes in, there is absolutely
everything going on from previously
having nothing going on. So we can grab the edge of this daybreak beach
topper region and go to the bottom
right corner. So we get that icon there. Now, if you click and you drag, you'll notice that
it disappears. And now this track
space is vacant. So the daybreak beach topper
goes all the way from here. Here, so three of the four bars and then
it drops out at the end, leaving just the bass playing on the 30-second bar
and the 33rd bar. We have the course. So let's listen to this
break down one more time. And it'll kind of give
you an idea of how we accentuated the base to bring everything stripped
down to nothing, and then drop it
into the course. The other thing that I
want to do is get rid of the synth lead from the
first portion of the course. And that kind of just gives it another addition when we move to the second part
of the course here. So it'll drop in like this. We created an intro
Hooker course. We've moved into averse, which has a little
breakdown at the end, and into the second chorus. Now at this point, we're kind of starting to rinse and repeat. We would create a second verse, another chorus, then maybe
another bridge or breakdown. Then finally another
chorus and an outro. We won't go too much in
depth for that right now. But what we're going
to do to just get to the end of this song so I can
show you how to finish it, is we're going to
duplicate this across. So we have another set, another verse and a chorus. We can erase these two
particular blocks. We can grab from here. We know this is the
beginning of the verse. So we'll grab all of these. And we can do Command
R to repeat that. So now we have another duplicate of the verse right
after the chorus. So we can reuse certain
parts of our arrangement. They're far enough away
from each other that the listener still thinks
that they're different. To finish off the track, we're going to make another
breakdown or bridge. And then it's gonna go
into one last chorus and an outro to
finish off the song. So the breakdown, I really liked this base and top or
breakdown that we did before. But maybe we should
change it up by using the actual synth lead to make the listener really
wonder what's going on. So we're going to duplicate
this Synth Lead across twice. We can hold Option and click this and drag that
over once and again. Or you can also highlight the region and press
Command R twice. It's up to you. And I
think what we should do is have this topper as well. So I've highlighted
those regions and pressing Command R
to repeat it over. And we know that after
this eight bars here, we want to have another chorus. So we can grab these
ones and we can click Option and
drag it over there. This is where you'd
have the vocalist come in and really accentuate an important piece of the
music where it's tying it all together before a
big chorus at the end. So let's take a listen. Let's do the same
thing that we did with the topper here where
we take it out and it really accentuates the lead before going back
to the big chorus. And we'll actually put the lead in there on the chorus as well, because it's nice to
continue that onward. Now we can add an outro. I'm just going to use the
piano like we started with, which kinda ties the
track altogether again. And then that will be
the finish of our track. Now if we put the
playhead right at the end of the last region here, and we look up on the LCD here, we can see that the
time of the track is two minutes and 41 seconds depends how many versus
how many chorus is, how long your sections are, how long your regions will determine the
length of the track. In a typical house track, this is pretty short, but again, for the
purposes of this course, I just want to show you
how to actually arrange tracks and what you can do to make different parts of the track sound
different from each other despite using the same sounds all the
way throughout. So we know this is going to
be the end of our track. We can zoom out and we can
grab this little arrow in the corner and just drag it right to the
end of our region. So that when we end up
balancing out this track, the length of the MP3
or WAV file will be the length of exactly where we have the end of the track at. This is a very basic
overview of arrangement and how you can take things out and add things in
to tell a story. Just by starting with
your eight bar loop. I won't play this for
you start to finish, but you get an
idea of how things work in terms of
where the piano is, where you should
use certain things, how long certain parts
of the song should be. Now if you want to
get better at this, the best way to do
that is simply by listening to the songs
that you want to emulate. You'll notice some deep
house tracks are maybe ten minutes long and the
intro is three minutes. Well, in our case, our intro is only 15 seconds. Everything is different
in that sense. But really notice
when you're listening to music, what's coming in, what's leaving,
and what parts of the song have certain
elements in it. That's a really great way to improve your arrangements and also just have a
better understanding of where things fit together. In the next section,
the final section of this logic Pro and music
production course, I'm going to show you how
to finish your tracks. So what we've done is
we've made the loop, we've mixed the tracks, we've arranged it into a song. Now what I wanna do is show
you how you can get it ready to bounce out to
an MP3 or a wave file, upload through
streaming platform, share with friends and family, or simply just listen
to it yourself and move on with your music
production career cell. Let's get into that section now.
8. Finishing Our Song: All right, ladies and gentlemen, we are finally on
the last section of this Logic Pro crash course for how to get started
using Logic Pro. From an absolute beginner. We're going to
finish off our track here and prepare it
to be bounced out to an MP3 or a wave file
so that we can share with friends and family or listen to ourselves and
try and improve. Now what I really want to reiterate to you
is that what I'm about to show you is
by no means mastering. What I'm about to
show you is simply finishing this track so that
when you bounce it out, it's not really, really
quiet and you can't hear it. We're going to be taking
the track that we've made. We're going to put on some
simple logic stock plug-ins that are known as
mastering plugins. And we're going to
finish it off and bring the volume up so it sounds full. But I suggest that you just follow along here
with what I'm saying, knowing that it's not
professional mastering. Now because this is a
basic logic Pro course, I'm going to use stock
Logic Pro plug-ins to show you how to
finish your tracks. We have our final
track here that we arranged in the last
section of the video. What I wanna do is I'm going to loop the loudest part
of our track here, which is going to be the
second half of our courses. And you can see that here
it's because we have all of these tracks playing
at one time. The next thing that we
wanna do is start adding mastering plugins
to the stereo out. The stereo out is the second
one in the inspector here. We can also pull up our mixer by pressing X and we can
see the stereo out here. And this is the area
where we're going to add our mastering plugins. Number one, we're going
to do is add what's called a linear phase EQ. This differentiates
from a channel EQ. I can't tell you exactly
the differences for it, but what it is, it's
a more heavy-duty EQ. I don t think that I
have enough mastering skill to really show you
how to use this properly. But one thing that
I want to show you is in this drop-down, you can go to mastering. And this is a preset
that's included when you download all of the additional
content for Logic Pro. So you see there's dance music type EQ, there's final mix, ballad, final mixed dance, HIPAA, pop, rock, et cetera. Let's do a dance music
type EQ because we were trying to emulate Calvin
Harris in the sense. So it's like a pop dance. You track the loops. We've used our
house dance loops. So let's start with
this particular preset and see what they're
doing with the EQ. And if we actually need this or if this isn't
what we're shooting for. So we'll click that. Basically what we can
see is they've increased the gain across the board here, and they ducked out about two decibels, around 3500 hertz. Now, I can't tell you again the specifics of why
they've done this. But let's just play it
with this preset on it. And then we'll take the
preset off and we'll compare. If it sounds better,
we'll keep it. If it doesn't, we'll
get rid of it. And now let's play without. I actually liked the
way that it sounds better with that
particular preset. Mastering isn't about using
presets and templates. It's definitely a process that
involves you diving in and learning about why you're boosting certain things or
taking certain things away. In this particular
instance, I'm going to say, let's use the linear phase
EQ with this preset, and we'll move on to the
next plugin below this one. The next one that we
wanna do is a compressor. Now I know I
mentioned compression beforehand in the mixing
part of this course. And I'm going to explain some basic parameters
of compression now. But compression is something
that you should really research and look
up but yourself. And the best thing that
you can do is just test, use it on your
projects where it's necessary and know
when to use it. Let's go over some basic
parameters and I'm going to add the compressor to squish this track so that it sounds
like a nice cohesive wall of sound that we can bounce out to an MP3 or WAV file
underneath the linear UQ. We can click this open spot
and we can go to compressor, which is under dynamics
compressor stereo. Now this is what the stock Logic Pro Compressor looks like. And you'll notice here under the factory
default and that the drop-down there is all these
other presets as well. And I believe there is a
set of mastering presets. Now, I would like to use just
the compressor tools and these are just some
options that we can use as a baseline, again, for compression on our stereo
out for the final track, I think what I wanna
do is something like platinum analog tape. So we'll click that one. And now it's set these
different parameters for us based on that template. I'm gonna go over these
parameters really briefly for you and just give you an
understanding of how they work. But again, this is a
plugin that you should really dive into separately. Watch compressor videos,
how a compressor works, as I explained briefly before, what a compressor
does is it takes the quiet parts of attract
and makes them loud, loud parts of a track
and makes them quiet. This is especially useful in mastering because we've
already done all our mixing. We know where things want
to sit in the track, but there are probably
little pockets that we need to
fill in with sound. This helps bring
those pockets up or tame certain
frequencies so that they're not the focal
point of the track and really clipping our
track in certain ways. So let's listen to this with the preset that we've said here, and then we'll make
changes as we go about it. The first thing that
I noticed right off the bat is we actually just clipped with this
being put on top. Now that's gonna be based
on certain parameters here. Most likely the auto
gain being at 0. What we can do is
we can turn all of our tracks down
by selecting one, holding Shift and
selecting the top one. And then we can bring
all of our tracks down so that we no longer clip. So let's play this again. We're still clipping by 0.6. Let's bring it down
a little more. Now we're getting negative 0.9. Now let's go back to the
compressor and let's take a look at the meter and the graph and see
what it's doing. So right away we noticed
the needle is kinda hanging out around negative
four, negative three. That's not a lot of
compression and that's actually pretty much what we want in this particular case. If you absolutely
squash your track, you're gonna be bringing
up parts that are quiet, way too loud. And it's just not what we
want in a mastering process. Mastering is about how using subtle compression and subtle EQ to really bring out or take away parts of the
track that you don't want. In this case, let's listen
to it without and with, and we'll see how it sounds. The first thing that I noticed
is it really brings up that aftershock synth lead to really sit as a focal point. It also really
brings up the base. Now, these are two things
that I think maybe needed a little more life in them in comparison with the drums
and the other piano. I think that sounds pretty
good for the chorus. Let's take a listen now as
soon as we leave the chorus, because at that point we
just have this piano. It sounds better
than I expected. However, I will go over some of the parameters
and we can make some subtle changes just so you understand what
they actually do. Threshold. This is the point in
which the signal is going to start making
the compressor work. So as soon as our song
goes over negative 12 db, That's when the compressor
is going to come in. If it goes below that, it's not going to be
affected by the compressor. The ratio is how much the compressor is going
to take the track down. So as soon as our
audio signal goes over negative 12.5 dB, It's going to be reduced
by a ratio of 1.6 to one, therefore, taming the
transients that are going over that
particular threshold. These are the two main
components of a compressor. Makeup gain is the
amount of gain that you're going to add that
is lost by compression. So if we're gonna be taming certain parts of
the actual signal, there's gonna be certain
parts that need to be brought up in order for it to
be equal at that point. Now ni is going to be
how sharp you want the compressor to actually act when it breaks
the threshold. So when it's at one here, we'll take a look
at the graph for this example and we
turn it down to 0. You can see that
the knee changes. It's a lot sharper when it
goes over this negative 12.5 versus if we
bring it to one, it's actually a more gradual
curve before getting there. What this means is that if it goes over the threshold
and it's at 0, it's going to immediately be
compressed by 1.6 to one. Whereas the other way is maybe a bit before
negative 12.5, it might start to
compress it a little bit and a little bit more
and a little bit more. So it's a little bit
smoother of a compression. As we approach the
threshold that we've set, attack and release are two
different parameters to tell the compressor
when we want it to act and when we want
it to release attack. This is in milliseconds
here is going to be how long after the threshold do
we want it to start acting? Now, you might ask yourself, why would you want
a delay on that? I certain example is, if you really want a
kick drum transient to really be present in a track and you want
it to thump like that, even just delaying it by
47 or 50 milliseconds, it will allow that initial
transient through and then compress the rest of the kick drum now releases the
opposite of attack. How long do you want the
compressor to hold on for versus when do you want
it to start attacking? All of these other parameters
are also very useful, but these six are the main that you need to
worry about and really. Train your ears to
understand what they do. Now a limiter is what we're
gonna be using next on our finishing track chain or mastering chain, if you will. But we're not going
to be using it inside this particular
compressor. I liked the way that
this preset and template came out because it gives us some subtle compression and
it brings up the part of the tracks that needed
to be presented more, but it doesn't compress too much in the sense that we're now presenting just a wall of sound and it's
uncomfortable to listen to. We can close up the
compressor and we can add our last particular part
of this mastering chain, which is going to be a limiter, will click this one here. We'll go down to dynamics, will go down to limiter,
and we'll do stereo. Now this is a basic limiter
that comes with Logic Pro. So the purpose of the
limiter is to make sure that the audio signal
does not go over 0 dB. It's going to limit
our audio signal. It's not, we're
not gonna have any of that clipping or distortion. And we can do that by pushing the audio signal with
this gain knob here. Let's turn our
loop function back on by pressing C. You can see that that yellow section is highlighted again and
it's at 0 gain right now. So we're not adding
any additional gain. Let's play this and let's push the gain until we
hear distortion, and then we'll start to backoff. So you can see when
I push the gain around plus four and beyond, we actually started
to go over 0. And then it gave
us this red output and the yellow warnings here. And you could start to hear some distortion
being introduced. So that's what we don't want. The reason we want
the limiter is to limit the signal and keep it clean while bringing loudness
and fullness to the track. I think that we should
sit here at plus 3.2. So we can close this up. And now we have this basic
chain here that we've made to help finish off our track and really
bring it to life. So let's take a listen to
the track without these, and then I'll add
them afterwards and we can do a bit
of a comparison. Another way to remove
plug-ins very quickly, if you have them in
sequence like this, you can click the top
one and then drag down and it will actually
turn off the other ones. So watch this. Now we have nothing
on the Stereo Out. Let's take a listen to
this without everything. And now we'll add
everything on top. It sounds much fuller,
it sounds better. It sounds more like we could listen to that
in our head fonts. It's not going to
be super quiet. Now we're approaching the end of this Logic Pro music
production crash course. And I hope that you've learned what goes into music
production and the different stages in
which you really need to improve at in order to become a really good
music producer. Again, I really want
to hit home that a lot of the topics
that I touched on, we're just a raindrop in terms of the tip
of an iceberg for how you really can dive in and learn and get better at and
become more skilled at. Music is a process that I don't think you ever truly conquer. It's just something that
you could always be adding to your tool belt
and getting better at. But this is an absolutely
bare-bones Cliff Notes version of how to take a song
from absolutely nothing. Just an idea in your head or someone that you
admire listening to, at least turn it into a
finished track that you can share with your friends or listen to or share
with your family. The absolute last step
of this is we're going to do what's called
bouncing our track. Now I did some prep work for this and I didn't
tell you about it. But what we've done is we moved the end of the
track two right here, which is the end of
the last region. That means when we
bounce this track, it's going to be
finished right at the region here at 241. We did some mastering or finishing of the track
using the linear phase EQ, the compressor, and
finally the limiter to bring up the signal to make sure it's at a level
we want to hear. Now what we can do
is take our track and bounce it to a
wave or MP3 file. To do that, I'm going to
select one of the tracks here. And then we're going
to click off of it to an open area on the Arrange window so nothing is highlighted. So you
don't want that. You don't want that. You
don't want any of this. You just want to make sure
nothing is highlighted. Then we're gonna go
to the beginning of the track, press Return. And now we're going
to bounce a track by going up to File, Bounce, project or section. And you notice here on the side you can also do Command B. That's typically
what I do because I like hotkeys. So Command B. And this is the section you can use to actually
bounce your song. I don't really know much about these different
parameters. Pcm here is the destination. This is a wav file, and you also have
MP3 here as well. I usually bounced
away because it's a lossless audio quality. It's always good to
double-check the start. So this is 1111. That just means that we're
at the very beginning of our track and the end
is in the 85th bar. So if I cancel this and
go out and we see that the end is at, in fact 85. Go back to the beginning
Command E for bounce. And then what we can
do is hit, okay, and that's gonna give us
our finished wav file. We can name this logic
pro free course track. I'll save it to my desktop. And then we can
just click bounce. Now will only take a second. And what it's doing is it's
compressing and it's writing it to the WAV file
or MP3 file format. And that's pretty much it, guys. Thank you so much for
sticking with me throughout the whole process of
this Logic Pro course. I really hope that if
you were approaching music production and you
had no prior knowledge that you learn something and you can at least piece
together yourself a little bit of a
map so that you can start to track
and finish a track. I think that one of
the hardest things to do as a producer is
finished tracks. It's so easy to make eight bar loop after eight bar
loop after eight bar loop, and never take it
farther than that. However, it's very, very necessary if you do want
to progress as a producer. With that being said, this is the last
lesson of the course, but I am gonna do one
little bonus section of this course just after this. So I suggest you stick around. And what that's going to
be is my suggestions and directional advice
for how I think you can get better as
a music producer. This is the absolutely
basic bare bones. But what I wanna
do is point you in the right direction
in getting better. So stick around and check
out that last video. But thank you so
much for following along in terms of
the course content. And I hope that you
learned something and progressed as a music
producer today.
9. How to Improve as a Music Producer : Alright, you guys, so
this is the last section of my Logic Pro crash
course for you guys. Again, I want to reiterate how much I appreciate you
sticking around and I hope that you've
learned something to help with your foundational
music production skills. Now before I leave you, I just want to leave you
with a few more things in terms of how to get better. Like I said today, I showed you the absolute
basic bare bones of what it takes to
make a track and what it takes to
go into a track. But I think it's super
important to push yourself and really see
results from day one. And we've just made
a track from scratch today and I've given
you the steps to do so. Keep making tracks,
keep finishing tracks, keep pushing through when
you're not into making tracks. And I promise you, you'll get better as a producer. Here are some other resources
that I want to share with you that really helped
me progress as a producer. And I think that
they're there for a reason and will really
help you as well. So let me show you these. The first thing that
I want to tell you about the logic also has built into it with all
the additional content is demo projects. Now this happens when
you first open up logic. You'll get this prompt here so you can do the new project. Your recent projects start
our grids for Live Loops. There's different tutorials
to actually walk you through logic and they're
done by Logic Pro as well. But this one here,
demo projects. Now, these are actual projects that are professional songs. As you can see, there's Billie
Eilish, there's Lil Nas X. What they are is a great
way for you to explore how a professional producer
approaches a track. So quite literally, if you highlight on Billie
Eilish ocean eyes, you can see composed and
produced by Phineas O'Connell. So that's Billie Eilish, his brother, who's producer. If you click into this, which I will go Billie
Eilish, Ocean Eyes choose. So this is the actual
project file that Phineas used for Billie
Eilish, ocean eyes. He uses Logic Pro. He's quite an avid
supporter of Logic Pro. And you can see how he puts things together
to make this song. So it's very cool
because you can see Bailey's vocals here. So there's the reverse vocals, the harmony vocals stack, which you see if you
hit this little arrow here is the lead
vocal, the layers, you can go down and see
the vocal textures, the Dark Pad, everything
that went into this track. This is the broken down version, and you can see how different
elements are used in a professionally produced
and popular track. One of my favorite
things to do is open up these demo projects and look at parts of the song that
I'm struggling with and seeing what they've done to
really produce a full track. So for example, on
this Dark Pad here, it looks like he's done
some basic queuing. He's brought up
certain frequencies, Dr. few, and then
the custom piano. He's again EQs some things out. He's added a compressor,
a bit crusher. It's really cool to turn on and off plugins
and see what they do with real professional
produced tracks. I strongly encourage
you to open up these demo projects
and explore them. Solo different tracks
and play them so you can get an idea of what
different sounds sound like. A couple of other things that
I want to tell you as well. We used Apple Loops
to make our track. Those loops that were given to us by Apple included
in Logic Pro. There's also a great
website called spliced.com. Now splices become
a forefront in the music industry in terms of providing one shots and loops. And I really liked the way that they've presented leaps to you. And you also get a
monthly credit system. So I believe at this time it's 999 a month and you
get a 100 credits, which equals 100 samples or
100 downloads per month. There's a lot of great producers that release packs
on splice in some of my favorite packs are also coming from
there and they're at a pretty affordable price to the thing that I
love about splices. You can actually
search by genre, BPM and key, just like in logic. And it's a good way
to just explore some loops outside
of logic as well. Like I said, there's 30
thousand loops in Apple Loops, so it would be pretty hard to go through all of them
and know everything. But you will find if you go down rabbit holes of certain genres, you eventually will get to a point where you're not
finding anything new. This is where splice
is great because they always have updating
loops coming in. Lots of different sample labels. And some of those
sample labels are being used in professional tracks
all across the world. Highly recommend checking
out spliced.com. They're great for finding loops. The last things I want to
say is just a few words from me and this is
just more words of encouragement and some
directional advice. Things are, explore
your curiosity. If you find a genre or
a song that you like, take note of how fast it is. Notice the tempo, try and
download it from the Internet, put it into your project
and try and find out the key or add things on top
better take things away, put it in your project and
see how the arrangement, and see where the Vs, see where the chorus is, see what they take out
and what they bring in. Just listen and always be studying when you're
listening to music. Music is without
question for enjoyment, and I think it's
important to set aside time to listen to
music strictly for that. However, if you're
sitting on the bus or in transit or you're going to work and you want to improve
yourself as a producer. And really listen to
the track that you're listening to and how
it's put together. I guarantee you'll pick
up little things that you'll want to add
into your track later, or different arrangement tips
and tricks and techniques. Trying to copy in
emulate people is great. And in my opinion, it's the
best way to get better. However, just because
someone tells you not to do something in music production doesn't necessarily mean don't. I try new things. Don't be afraid to
push the boundary because that's truly where
innovation comes from. Just because I told you something in this course
that you should do. And that's the way it is, does not mean that you
should listen to me. What happens if you
push the limiter past the gain and it
introduces distortion? Well, this is actually
how the birth of a lot of the South
Florida rap scene happened. They were just using limiters and pushing
them and putting them lots of distortion and that actually created a whole scene. Listen to tracks, emulate them, but also don't be afraid to try new things and
push the boundary. And last but without question,
not least, practice. You always need to put
the time and you need to train your ears to
learn what you like, what you don't like, what works in certain situations
and what doesn't. You're never gonna get better
just by taking a course or just by downloading
another sample pack or getting a new plugin. You absolutely need
to put the time in. There goes with it. Practice is going to be your best friend and at
times you're gonna be very frustrated and maybe not want to produce music
for a little while. And that's totally okay
because we've all been there. But the most important
thing you can do is just open up
your door when you get some spare time or if you have an hour and
you want to just put a little loop together,
absolutely do it. Everything that I've said
today is useless without you actually putting
it into action. So if you can do that, I guarantee you
you're going to be a better music producer every single day if
you just show up. Thank you so much for
sticking around and watching this Logic Pro crash course
for absolute 0 beginners. I think it's about time. I get so many questions
and comments in my email, DMZ, and also on
YouTube comments. I hope that this course
provided some insight for you. If you liked it, please
do hit the like button, subscribe to my
channel and check out my more premium
courses as well. Because those are going
to actually take you to the next level if you're trying to learn how to maybe
write your own music, use things like Midea, use different instruments rather than just dragging and
dropping and live. With that being said, you guys, thank you so much
for sticking around. This is Tony holiday, and hopefully I'll
see you again soon. Take care.
 Tony Holiday, Music Producer, YouTuber