Transcripts
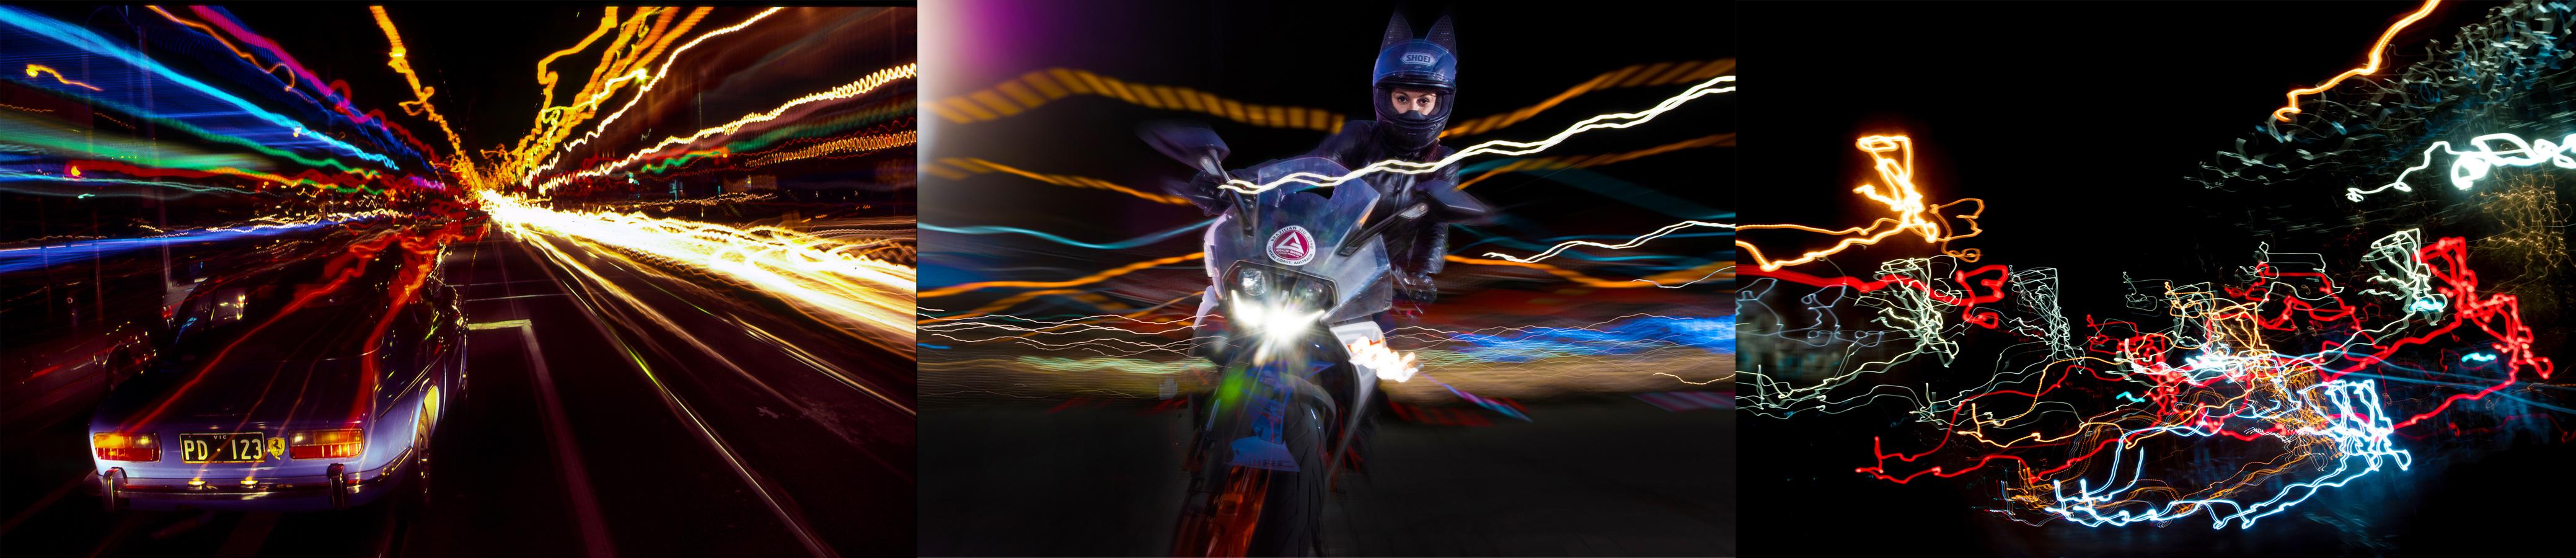
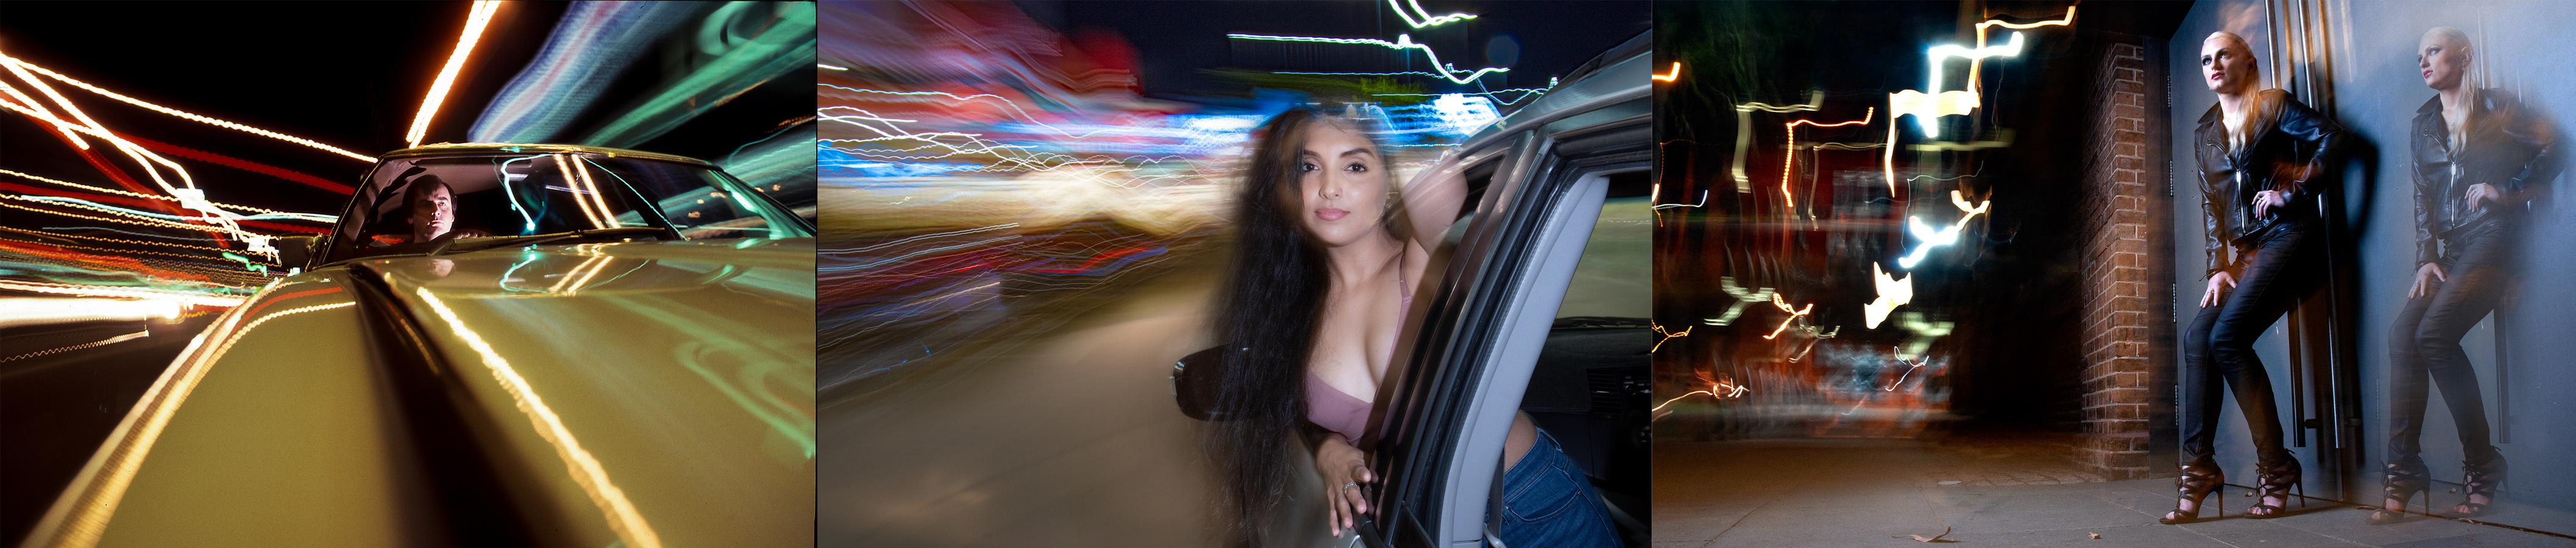
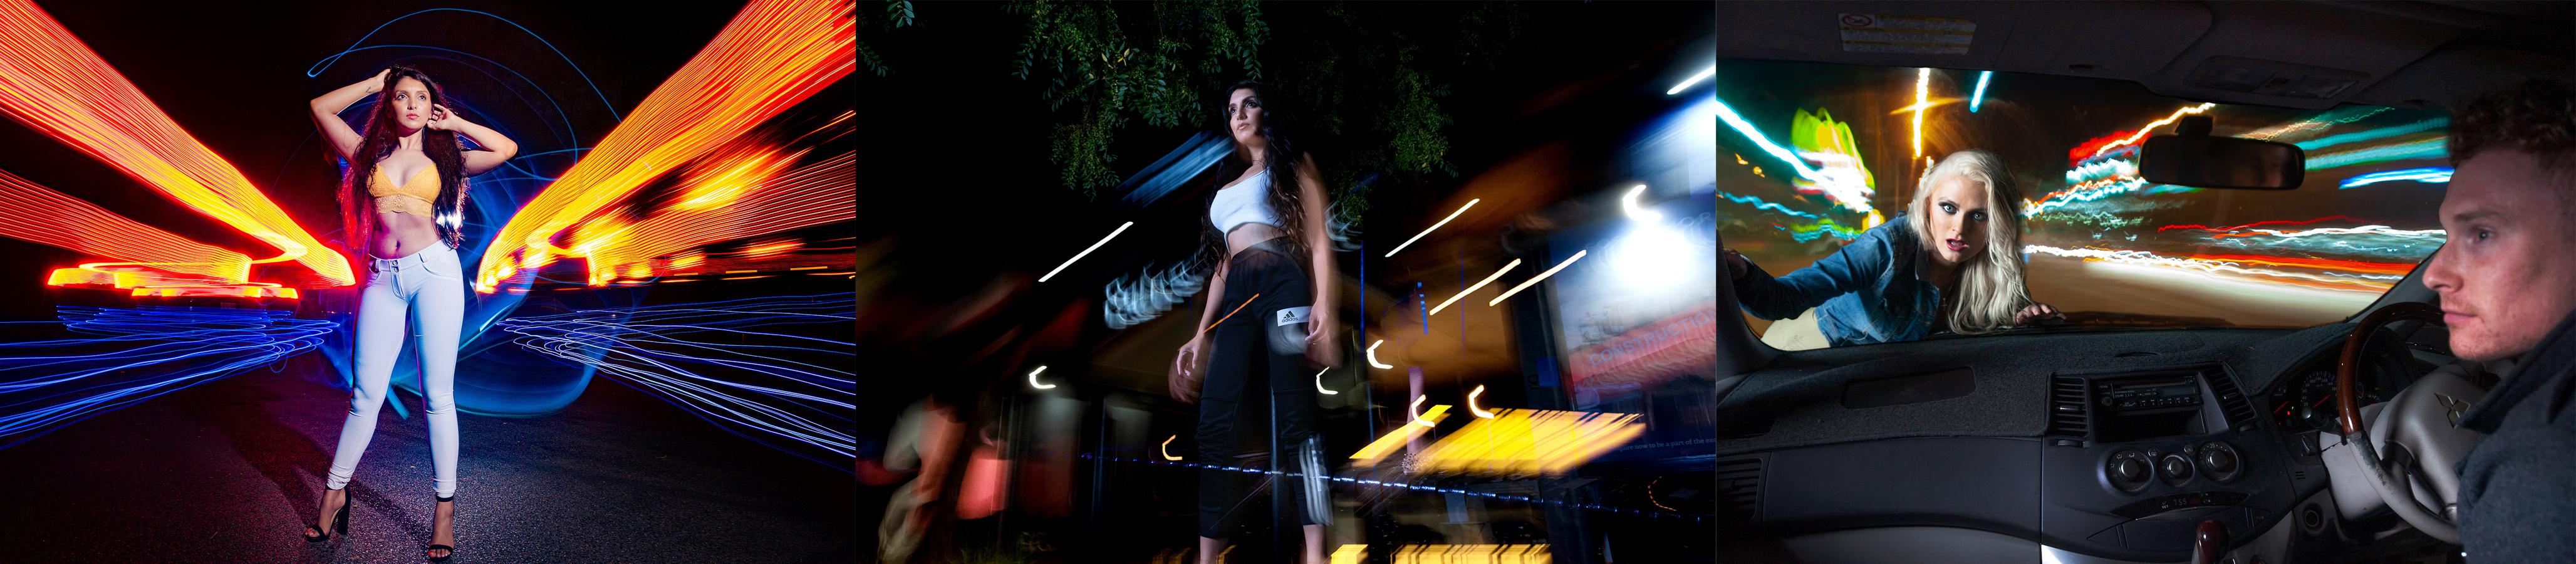
1. Introduction to Car Light Trails: My name is Warren Marshall, and this class is a bad car, light trails. I'm really excited to put together this class for you because I'm sure you're gonna learn a lot of really cool stuff. Stuff that I love to do. Anything to do with long exposures. Moving lights is something that I really enjoy. And I'm sure you're gonna get a big benefit out of this class. Good day. My name is Warren Marshall. I'm a photographer from New Castle, Australia. This class is a bad car, light trails. It's something that I've been shooting for a long time, probably 35 years or so. It's a subject that I love to do, anything to do with long exposures and moving lights is something that I really enjoy. The shots that you can get from his technique are amazing. Whether you use a phone or a camera. You're going to be able to do most of this stuff yourself. After you've done this class, you'll be able to go out and shoot amazing images that people will look at and think, wow, how did you do that? Photographing light trials is fun. It's exciting. You can never tell exactly what you're going to get. But building up a bit of skill in this area can allow you to do images that other people just can't do. Every image that you produce is an original. As I said before, I love doing this stuff because there's so many options for you. There's so many possibilities available. Here are some of my light trail images, stuff that I've done recently. And a lot of these shots are the ones that I'm gonna be teaching you in this class. Right? After watching this video for ten or 15 minutes, you're going to be able to go out tonight and produce some amazing images. The possibilities are endless. I will give you the tools and the techniques to be able to do this stuff. I'll take you from basic light trial photographs through to more complex images. So come along, do this course and learn all about light trial photography. But iodine millimeter with their IPS sensor. And that's going to give us enough width to get this shot. Cause a lot bigger than mine. Maxine, just turn your face towards the light a little bit. Yep. Still looking at me. I can't write. That's it. We can pack up.
2. The technique: Now what is light travel photography? We do this technique pretty much at night because we need to use long exposures. We need to use an exposure that's going to give us some movement through the image of our car headlights or tail lights or other cars. We can do this from a static position. We can shoot it from a tripod, or we can do it from a moving platform such as their car itself. Safety is a major factor when we're doing these things. We don't want to be driving along, taking attention away from the road. So being a passenger in the car is probably the better way to do this stuff. When I do it, I tend to do it in car parks or areas that are safe. We do it at slow speed. Even though you are travelling at slow speed, the images still give you a feeling of fast movement and excitement. To do lie trail photography, we need to use long exposures, which really means a long shutter speed. Most cameras, all phones can be switched to manual exposure settings. That means that we can adjust L, ISO, aperture, or a shutter speed. Now, when we're shooting light trial photographs, we generally are looking for a longer shutter speed, a slower shutter speed, something in the range from maybe 1 second through to thirty-seconds. And most devices can do this well. So that's our priority. We need to set a long shutter speed depending on the light conditions, depending on how long a trail we want and the situation that we're in that will determine how long our shutter speeds going to be. But once we've set that shutter speed, then we need to think about our exposure, getting our image bright enough, which is what we do with our aperture and our ISO. I tend to stick to the one ISO when I'm doing this stuff, I tend to stick to 200 ISO so that it helps me to be able to repeat the results that I do. So your ISO is not as critical. So a $200. So unlike sit a shutter speed of maybe five seconds. And then my aperture is just opened up or close down to get my pixel brightness the way I want it to be. So it's quite simple if you don't understand about aperture and shutter speed and ISO, just follow the techniques that we do in this class and we'll give you some settings to use as we go through. So you'll be able to replicate these images. It does depend a bit on your environment, how bright the light is at night where you're shooting, how many lights there, what colors are in the lights. So that will all vary depending on your situation. But the settings that we give you will be reasonably good as a starting point. And then you can just tweak it to suit your own purposes. So just to explain it in another way. Generally, when we take a photograph, we record an instant of time. As shutter speed is very fast, we're shooting in the daytime, so we're recording it maybe 1 500th of a second, which is quite fast as small instant in time. When we shoot at night, we can extend that time range to multiple seconds. So because it's dark, we can extend our shutter speed to a longer period of time, maybe one seconds, two seconds, anywhere up to 30 seconds. And that allows us to record that period of time rather than just the instant. So anything that happens within that time is recorded on our camera sensor. So if we have moving lights or moving people or anything moving in that image, it's going to record as a trial or a blurred in our photograph. And we can be very creative with these trails and blurs when we're doing night photography, it's no good using these long exposures during the daytime because there's just too much light and your image will be blown out to what we need to wait until they are. Conditions are reasonably dark, maybe half an hour after sunset, so that we can use these longer shutter speeds to achieve the results we're looking for. Light trails are produced when the light source is moving in relation to our camera. So we can do it in two broad ways. We can either move the camera so that the fixed light sources appear to be moving. Or we can have our camera fixed if we have moving light sources such as cars or buses. And that allows us to control those blur or those Movement lines through the image. As I said, we can do this with either a camera or a phone. It doesn't matter. You're going to get great results with your phone just the same as you would with an SLR camera. We can also combine a still image with a moving image, as I do a lot with my photography because I love photographing people. So I'd like to have some sort of human element in my images as well. Now because those longer shutter speeds would mean that I would have a bit of blur in my human. In the shot and list a stays completely still. I tend to use Flash in conjunction with these long shutter speeds. So flash allows me to freeze my person. And then my long shutter speed continues to give me those light trails. You'll see a lot of examples throughout this course of me using that technique. And it's not all that difficult. If you understand a little bit about Flash, you'll be able to create these images just the same as I have. Some of them are more complex than others. Some of them rely on unusual viewpoints. I love shooting from unusual viewpoints in the down low or up high. And these sort of things are the things that make your image special and make your images stand out from other photographers. So camera settings are exposure settings. A good starting point would be 200 ISO, f.16, or F11 at five seconds. So that's going to allow you to get some really nice images. You can vary that a little bit. If you need your images a bit brighter, you can open up your aperture a little bit more to maybe fight. If you want longer light trails, you can change your shutter speed to ten seconds or 20 seconds or more. Shooting manual focus is probably the best way to go as well. Simply because a lot of autofocus systems are fooled by night photography because there's nothing for the census to grab onto in that darkness. So shooting on manual focus is probably the best way to go. We've got an aperture of F 16 or F 11, so a depth of field is reasonably good. So we've got a lot of room for error. But try to get your image as sharp as possible by being careful when you're pre focus. Also, if you're shooting from a static camera, a good quality tripod is a great asset. A good solid tripod. This not too heavy, is going to allow your camera to keep still, particularly in windy conditions that can sometimes be a hassle. So having a good quality tripod is a huge asset. So we're going to begin by talking about and showing you some techniques that are quite easy to do. One technique is where we simply move the camera around during the exposure. And that allows us to move those like those small light sources that we have in every image will create lines and patterns in air image. I'll show you some of the shots that I've done recently. Another technique that's quite simple too, is to simply put your camera on the dashboard of your car and drive along. When you open up the shutter, press the shutter on, maybe 101520 seconds, the converging lines of the streetlights and the City Lights as you're driving along the road will converge and give you some great patterns. Particularly if you're on a road surface that's a little bit bumpy, you'll get a little bit of a jiggle in those lights as well. But you'll be able to get a range of different shots depending on the location that you're at and the direction that your cows traveling.
3. The Jiggle : The first technique I'm going to describe what I call the jiggle technique is very simple. All we need to do is point your camera at some light sources, some pin light sources, preferably something with a bit of colour in it, a few different colors as great. Focus on the nearest light to you. And then simply GIGO your camera around during the exposure. So if we have an approximate setting of ISO 200, if 16 at maybe two seconds, that will allow you to spend that two seconds just to jiggle your camera around a little bit. Don't move it too much because you're going to get lines that go outside your frame. So just jiggling a little bit, try various different techniques up and down, sideways, random round. And you'll get some amazing images you have. Look at your screen and see what you've got. It works so much better when you've got nice colorful lights, a few different colored lights. You can do this while you are a passenger in a car. You can be driving along at various different spots. Just point your camera out the window and just jiggle those lights. You can do it on foot as well. It just means that you can't cover the distances that you could in a car through the city to get you all of those different types of lights. Now recently I had my wife drove me around their local town and I did a few of these shots. Here's some examples of the sort of things that you might get. Check them, make them, make sure Excel, right boys.
4. Dashboard method: The second technique is the dashboard technique, where we place our camera on the dashboard of the car. You may need to support it just so that it doesn't fall off if you move around the corner or go ever Bump. Set your camera on those same settings that I've just told you, ISO 200, if 16 at two seconds or five seconds. And as your car is driving along, pushed the shutter and just allow those lights to record on your image. Because you're moving forward, those lights will converge around you. It's a good idea to have a clean windscreen because otherwise you may get a little bit of ghosting around the outside of your lights. So try this technique is very simple. You can do it pretty much anywhere in the township in whether more lights is going to give you a better result, particularly colored lights, just the same as that last technique we're talking about. But using a wide angle or a telephoto lens will give you slightly different results. Also, you can turn your camera to one side if there are more lights on this side of the street, turn your camera to one side slightly. The dashboard's going to help to hold your camera still. You can just press your shutter and let go of it. And that's going to keep the shutter open for that certain amount of time, which is going to record those converging lines for you. So give that a go. It's a really easy technique, but remember, don't do it while you're driving, do it as a passenger in your car. You could also do it as you're walking along the footpath. You can hold your finger down. A nice low ads will be converging, but it just won't be as noticeable as it would be if you are moving in a car. Here are some examples of some shots I did on the same night with my wife driving me around, my camera, sitting on the dashboard of my car, and just taking an array of different shots depending on the situations we're in. Some are more colorful than others, but you'll see those lines converging. You can see the little bumps in the road as those lines have little dips and bumps in them. So it's a great technique as well.
5. Intro to night shoot: Now because I love shooting people, I tend to include people in these shots that I do. It complicates things a little bit more when you've got a person in the shot, because we don't particularly want them to be blurred or moving in the image. We want them to be nice and sharp, which generally means that we need to have a flash in there somewhere. We need a flash that's going to light our person instantly because our flash duration is very fast. So I person's gonna be nice and sharp in that image as long as we're focused on them. And then our shutter stays open after that flesh exposure to create the light trails that we made in the image. So it's a combination of two techniques because we're shooting it not, we don't need a really powerful flesh. So you could use a speed light flash on top of your camera. Or why female camera? If you're using your flash away from your camera, you'll need some sort of device, some sort of little light trigger, some sort of small device that's going to allow your camera to fire and the flesh to fire at the same time. So there are small radio triggers that I used that you'll see in one of these videos that quite inexpensive, but they allow you to have your flesh away from your camera and still synchronized with it and produce some great results. Now, when we include people in the photograph, as I said, it does get a little bit more complicated. We need to make sure that those people are looking good when we take the photograph, we may need to take multiple shots to make sure that we've got one where people look good and we have good light trails in as short as well. So just take a few shots, just keep taking the shots. Different situations may be different flesh power and create images that are going to be really worthwhile. The images that I take, as I said before, I love shooting from unusual angles. So we'll often attach the camera to the car in a safe way or make sure that it's very secure. And because I'm working in a car park, there's not a great danger. I'm shooting at low speeds. So it's not going to be a danger to anybody. But I love attaching my camera to different parts of my car. 35 years ago I used to boat my camera to the roof rack on my car or make a bracket to fit on the front of the bonnet of the car and look back at the, at the driver. There are lots of different ways that you can do this. And it creates unusual viewpoints. Unusual viewpoints are the things that make your images standout. So a few of the videos you're going to see later in this class incorporate people. They incorporate light trails and I have unusual viewpoints because of the position of the camera. If you don't have a spade lied to shoot your Flash. You can shoot with your pop-up flash on your camera. That's quite adequate for these sorts of shots. Or you can use the flash in your phone. Your most phones have a flash that you can use that's going to give you an instant flash of light that will freeze your subject, your person. And then those long exposure's going to allow you to do those lot trials in the shot as well. You'll be amazed at the shots that you can get.
6. Onsite explanation: Good, I wear here at Qatar in New Castle in Australia in this car park because we're going to do some light trail photography. We're gonna do a range of different shots tonight, various different things, some crazy things, I'm normal things. But you're gonna see a lot of the results that we get and see how we do it. We're going to do most of this stuff in camera. So we're going to capture the whole image inside a camera and you'll see the results. As I said, we're going to start off fairly simply. We're going to do some light trails just at a set of traffic lights. Some basic Maybe 10-second exposures. Now, because I shoot people, I love shooting people. I love to have people in the photographs that are takes. So we've got a model here tonight who's going to star in most of the shot set we shoot. Maxine is our model. You've seen her in some of our other videos. You can do these shots without a person. The shots just look amazing because of the long exposures were doing, We get those light trails with the car tail lights and various other lights that we shoot. So have a look at this video and see what you can learn.
7. Intro to traffic lights shots: So the first shoot we did on this night was that we shot from a tripod next to a reasonably busy road at an intersection, will shooting from the footpath. So it was nice and safe. We used a flash in a large soft box because I wanted to make that light, nice and soft and attractive on m model. But you could use just a bare speed light, as I said before, we shot with an instance of flash to freeze our subject, our model. And then we use that long shutter speed to give us those nice light trails as we move through. So at various different times we had different mounts of traffic. We had some traffic going around the corner of the intersection. We had some going straight. I wanted to get as many lights in there as I could, so we simply waited until the traffic lights had stopped a few cars. Then when the lights turn green, we opened up the shutter and we did our shot as the cars took off from the traffic lights. So it's a very simple technique to do. You could also do it with the ADA model. You could just position your camera, frame your shot up the way you want to with their composition that's attractive. And then just shoot with those long shutter speeds and allow those cars to go past. You can shoot cars going around a roundabout, which is a quite attractive sort of a composition to use this shot I did in the center of New Castle a few weeks ago. Just set up my camera on a hill right next to the roundabout. And I'll use long shutter speed to expose the cars as they went around the roundabout. So I used various different shutter speeds are found that the longer shutter speed of thirty-seconds was better because it'll lay out for more cars to go around that roundabout and move up the street as well. So with that longest shutter speed, I had to reduce my aperture down a little bit more. So I shot it about F22 or if 25 for this shot. But you can see the results. They look amazing.
8. Fixed camera position: So we'll attach this to that. But then on the grand Christian, so he got caught a parallel. So can you hold that? Ok. So we're going to get you to hold it just there on the grass. Maxine, you're going to be over here. Maybe with your back, with your back against the poll to start with. And then we'll just get various different spots. And the reason why I've chosen this spot is because you're facing this way. We've got a green traffic light or a couple of sets of green traffic lights. And we've got red tail lights going down, which are gonna give us those complimentary colors, which are going to work out really well. Okay, so that's good. The way guy, Maxine maybe crusher feet over a little bit? Yep. And maybe look down that way. And now it's a bit bumpy on your back. January might get you down here. Place. That's it. You just look down there is if you look into the lights, here we go. Yeah. Right. Yeah, that's looking better. Okay. We'll just wait for another set of lights. Okay. We go. Yep. That's good. We got what we need, but I'm just going to wait until we get a few more cars lined up here. We'll do it that way. She didn't write Maxine chemo cause you regard Jan. Jan once again? That's okay. Here we go. Once again. I can get some shuts down around the corner as well. We could be nasty and push them pedestrian button. Well, it's good. I'll fire when I'm ready. Bossy people. Ideally what we want to do at the traffic lights, those ones red and a couple going around the corner. Here we go. Alright, we might do some right turn is, and then we'll finish this up. Okay, here we go, Maxine. All right. Yeah, that's true. I'm happy with that. That'll Diaz. Thank you. Everybody. Head back to the car.
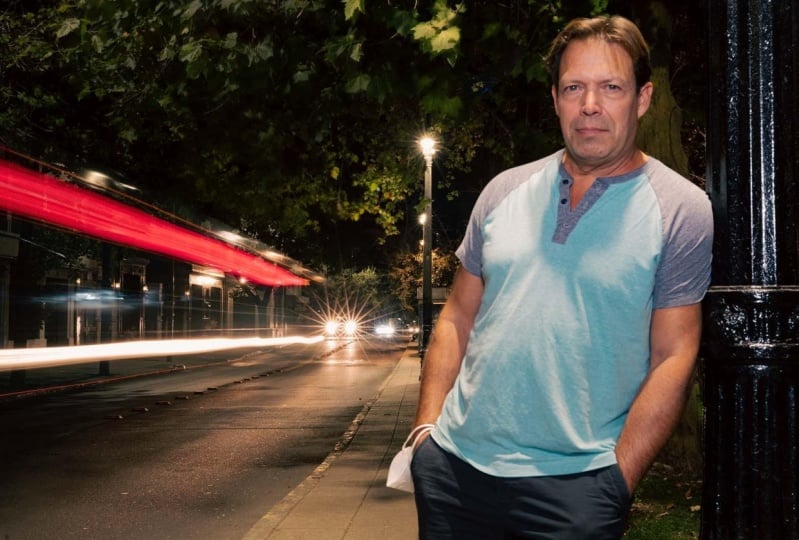
9. Roof rack explanation: For the next set of shots that we did, I attach the camera to the roof rack on the car. I taped my tripod to the refracts securely and I attach my camera to the bull head on the end of my tripod. That allowed me to change my framing and to get my modal in the right position within the frame. Now I shouted upside down because that was just the way that the tripod set when I put it on the roof. It was quite easy to flip the image later on in post-production. But framing it up upside down and getting everything right while it's upside down was a little bit of a difficult thing. I used the flesh to light our model, Maxine, I had one of my assistants in the backseat of the car holding the speed light just out of the window to phi that flesh onto Maxine. And then as we drove the car along, we had those light trials in the background. Now it's quite important for a lot of these shots that you're going to see in these next few videos for the model to stay relatively still. Because if she moves after that flesh has gone off, you're going to get a little bit of light trails impinging on her face. So some of the shots you'll see a little bit of blurriness there inside the sharp image of the model. But it's still looked quite exciting and it still looks good to me. So have a look at this video and we'll run through some of the other techniques in a little while.
10. Camera attached to roof rack: From the camera. Always make sure that your cameras attached properly before you let it go. Back saying vigor second place to the left of the window. Then. We also want to try and get your reflection in that mirror. Now, we won't worry about that because you're facing vectors right. Now. This is where things get difficult when you're focusing upside down and trying to frame your shot. Yankees together window. Okay. Now I want you to get a little bit further out the window because we're just going to be whatever's easiest. That's good. Exposure. Which is gonna be pretty much the same as it was before. Okay, that's good. Now I'm going to be firing the camera with a remote shutter. So I'm going to use this shutter to fall out from inside the car, dr along to light Maxine, We're going to use a flash, a bear bulb flash. We're going to have one of my systems in the backseat with the window down just holding that flesh so that it fires in Life Magazine. Ok, so we'll do that now and sit air exposure. So what we want is this flesh to be up here. Okay. Because he wanted to come down on Maxine. Ok. Maybe that might be a bit better. So it can we do an explosion now just to check the exposure on Maxine, Singer? And then here we go. Alright. That's a perfect sparkly Gin. Yeah, Let's go to the left. And I'm well.
11. Bull bar explanation: The next thing we did was we attach the camera to a bouba on the front of Scott's car. The bull bar, is that the big structure on the front of a car that protects the front of the car from hitting balls and kangaroos and things like that, which we have in Australia. And it gives you a mounting point that you can attach your camera to aim backwards towards the driver or the passenger in the car. So I used the center column on my tripod. I pulled it out of my tripod and are taped it very securely to the bull bar on Scott's car. I framed my shut up so that I could see Maxine in the passenger seat and focused it properly. So all of this preparation makes a difference to how your shots will turn out. We placed a flesh on the dashboard of the car so that we lit. We had some reflected light back off the wind screen onto Maxine and some off the who'd lining of the car to light her. Then we simply drove along. I was in the backseat firing my remote shutter so that the camera just went off and took the exposure. We had the flesh to give Maxine's sharp image, and then we had the light trails outside the car. So have a look at this and you'll see those results.
12. Camera attached to bullbar: We're going to do it the opposite way. We might do this on your car. If that's the case. Got just hang on to this form. Agent. Just little Gromit recon in. Q. Now EBI came to Dr. Scott. Scott. I think he has an automatic, isn't it's got manual, is it? Well, you can be in the passenger seat. Yeah. I'm idea that way. And the water again. Okay. I'm Scott, can you grab the LED edit? My Becker, My car basis, an accent that will get you in the pheasant. Just sick please. Now I think this will be just as good. Just given this gap cider for like, we're just using that to focus on here. And again, we'll just do a few laps around here. Maybe to do a bit different markdown. Might just set up that way rather than we'll do a few around with that van is just such a different background as time. Make these cars are fed photographers. Ik and Scott. We put this flash plays on the dashboard up against to appeal on screen and name it backwards. I mean, apnea were getting bounced off the ceiling. Now. So I've your way having your side of the car. Yep. It's still exist.
13. Seat mount images: The next thing we're gonna do is we're going to use this homemade mount that I've got here that will fit into the headrest mount of the car, the front seat or the back seat. These little bolts fit into the headrest mount and I can map my camera on top of the headrest of the seat. So that allows me to turn my camera around to be able to film Maxine driving the car while we're driving along. So we're going to get the light trails coming towards the car and Maxine in the car driving, we're going to again use the Flash user speed light just bounced off the ceiling of the car. Or we might use a direct one to light Maxine. What this little bracket fits into the mounts on the top of my head rest. I've got a little universal joint on top of that mount and that allows me to position my camera in a spot. We're all can have Maxine in the driver's seat, as well as get some lot trials through the front of the of the wind screen. Okay. Okay. Max saying can you have a say in the front safe place? Okay. Yeah. Euro. Now we got to position the camera, so we got Maxine in the right-hand side of the frame and we're looking through the windscreen to get it a lot trials. We've got a wide-angle lens, we've got iodine millimeter with their IPS since a, and that's going to give us enough width to get this shot. Has a lot bigger than mine. Okay. Yeah. But isn't this a laughter has been and gone.
14. Hand held passing car shots: Okay, ladies, what I want you to do is to drive down towards me here, okay. Once you get over the speed bump, I'm gonna shoot you here just where these arrows are. Ok. Now one, maybe Maxine, if you can get up on the seat, you're a little bit higher in the shot because you're the focus of the image. Gens just here in black, just because she's here. So I won't be able to see you a little bit more if I can. Brag Jackie gang place with the headlights, I think make a difference. Headlines might have a good definitely. Yep. So Shama couldn't get a better Calvin. And our last last last minute call and get as again, can you get up via beyond the state or something if you can. And yet, Eddie, push your hair back to one side so I can see the top. And I still think when he Maxine to be a bit more stand out in the car, a much assuming closer to her and not try and get the whole car inertia. I'm going to come in a bit closer. K common jane. Yeah, that's great. Gaia. And wearing a very sharp Robbie off over time it just makes too much noise. Heavy steepness chimp can sustain on the Sacre. Yep. Stand and say, yeah, that's that's good. Okay. So yep. That's good. Hair Heaviside. I came back. I haven't yet. Great Palmer place. Okay. You can stop Jen. Facing backwards chair. So when you standing maybe with yet answer the side, face part and a right. They want to get the tail lights and the shadows became so do the same thing Jen, and will just shift it around a different way. And going depth. I MAX data interfaces where yeah. Okay, that's good. Great. Much more place. Yes. Epic and running in the background, but I can cry anemia. I just get so many videos is rubbing of economics. Some people get a Hollywood when they want to be a star or we just get into vacuum. Pick going. Okay, that's great. That loved awesome that time. For say, hey, right back mixing. Yep. You again. Right. When asked why narrow their Maxine, just turn your face towards the light a little bit. Yep. Still the PMA? Yep. I can write at it. We can pick up a camera on first. Oyster like that. Okay, so that's a wrap for tonight. We've got some great shots, Thanks to all air systems that helped out all my students. I'll show you some of the shots in the video and we'll get onto something new Soon. I love shooting this stuff that's a little bit different, a little bit unpredictable. But if you follow the instructions in the previous videos in this class, you'll understand how we do it and you can go out and do it yourself. So I'll see you in the next class.
15. Intro to motor cycle shoot: Now this next shoot that we did was a little bit different. We did this on a different day at the same location. Remember, we're shooting in a car park, were travelling slowly for safety reasons. We don't want any dangerous things to happen. We don't want any accidents to happen. What I did with this shoot was that I wanted to shoot the shots from a low angle. So I decided to make a bracket that i could attach the camera to the toe br of the car, which sits about 30 centimeters or one foot from the ground. So that gave me a viewpoint that I could be looking up at the motorcyclist who was driving behind us. Now, that viewpoint worked really well and needed to be careful to get my focus correct and that the motorcycle rider stayed a reasonably close distance behind the car so that she would be reasonably large in the frame. I also built another bracket that set the camera further out to the side of the car, to the back corner of the cast still shooting from a low angle, but that allowed me to get a different perspective. Now, plotting l motorcyclist meant that we had to use flash. We had to get that sharp image of her with the blurriness around the outside. So I sat in the back seat with my large Flash, but I could have used a speed light just the same. It just happens that I had that one there on the nut. I aimed it back through the windscreen of the car that lit the motorcyclist instantly so that she was Lawson shop and then that longer shutter speed gave us those light trails in behind her. We shot various different positions, various different places within the cap OK. And it turned out really well, have looked at this video and see the technique that we did for this.
16. Camera attached to tow bar: We're here in a car park in Qatar. Were going to do is shoot tonight. We're gonna do a night shoot with a motorbike and a motor bike rider. We're going to do it a number of different shots. We've got various different techniques that we're going to try out. But mostly we're shooting with long shutter speeds. We're going to use flash combined with long shutter speed. The idea tonight is to attach the camera to the car. We've got an SLR camera attached to the table of the car. We're gonna be shooting remotely from that camera. We're going to light Julia, who's riding the bike with a soft light from the flash within the car. So we'll see how we go. Good stuff. Well, we're gonna get a little bit of blurring Julie that the flash is going to sharpen her up. But because she's there for the whole exposure, she's going to be a little bit blurry. We'll, we'll see how we go through using a better for second exposure. And we might do a little bit longer later on. So we just say now, the determining factor is what sort of light we're gonna have here too, to be able to create those blue lines. Because everybody's got, I don't have neon lights anymore. Most they just have the big Big Ben assign. So we're going to have to try and get a little bit of light in there. My study actually, if you can take your bike over here in the middle of those parks and we'll just check out that loyal because that light is going to travel a fair distance. Okay, so just there, we'll try that. All right, so now what I want you to do is to get any riding position, okay. And just get off the side of the black a little bit is if you're going around the corner, you know, imagine you're in the shed, just pretended nobody else's around here making engine noises and pretending you guarantee on Byethost. You can do the same thing just exactly as you'd been doing. So it won't be quite so blurry. As it gets darker here, there's going to be less blurriness in there because the light the light levels pretty low. But just what you've been doing fine. Comfortable to do it again. Yeah. All right. Good. And this has gotta be the bounce in it. But I think that might enhance the short. Julie is still going to be fairly sharp because the flesh will freeze. Right? Okay. The way we've got our cameras set up tonight is we've got a remote trigger and we've got the other one attached to the camera via a cable. We've also got our flesh radio trigger on top of their hot shoe to fire flesh. So let me push the button on the radio trigger here. It triggers their shutter. Radio trigger will trigger flesh. So that's how we got to setup my shutter speed is two seconds because we need to get a bit of shutter drag to get those lots in the background. And yet we want that flash to give the sharp image of Julia and the bike 2222.
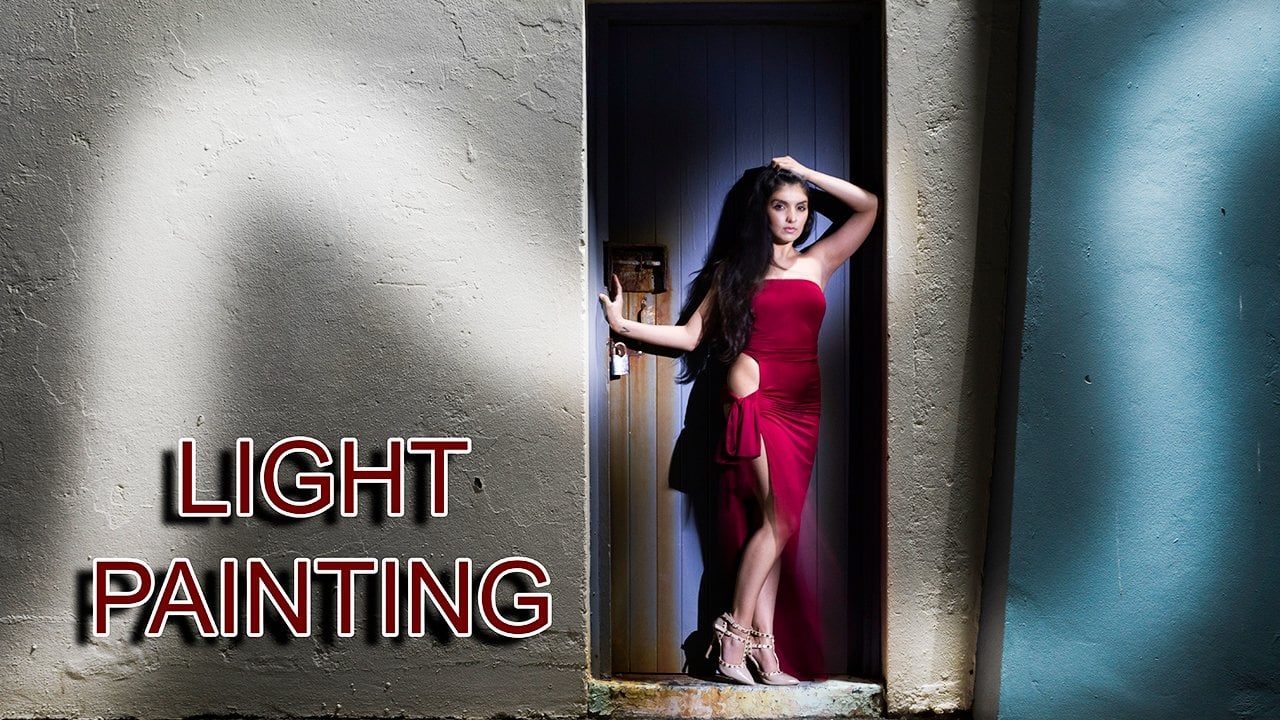
17. Complex Light Trails with a Model: Can I wear here at creditors by boat ramp where you're going to do a lot trial shot tonight, but it's quite a complicated light travels shoot. It's a bit more complicated than the others you've seen in this class. We've got quite a few helpers here. We've got a few of my photography students here all dressed in black, will look like a street gang here in a car park and bad debate everybody up. But the reason why we're wearing black is because we don't want to show up in the image. If a walking through our image, we want to keep the light strikes to a minimum so we're wearing black. Now. They shoot, light trial shoot, as I said. So the elements that we're gonna put together include a car. We're going to use a car and the tail lights of the car, the actual brake lights actually, we're going to drive the car off in a zigzag manner so that we've got the tail light trails through the shot. We're also going to use some small blue LEDs in the shot to add a little bit of the complimentary color, a little bit of blue to the shut down around the roadway. We're also going to have a blue light stick that comes through the SRI, the shot when Justin sweeping sort of shapes so that we get a little bit of interest in there. Not only that, but we've also got a model in our shot which we're going to have to place in the perfect spot so that she's not obscured by any of this stuff. And we're going to live her with two flashes, are going to have one light to light on her face and the front of her. And we're going to have another light, this backlighting her. So we've got a lot of things to coordinate here. Hopefully always Paypal will behave themselves and do what they're told. If they don't, they won't be invited back again. So we'll get stuck into it and you'll see what we can do. Okay. I'm erotica. Everybody's ready. Okay. When you're ready, Michael, I tried for you ready, Scott and I said, you just find out one for Mac s0 ten. Alright, we're ready to go. You're in behind vaccines, so yep. Okay. That strong ties. All right. When you're ready, Marco Good skin that are distinctive that we might drop, drop the angle. The animal with lower server. Later come up a little bit, michael K4. However, this white matter, I have a bit more power if I shoot from Danilo. So think I'll get the lights will look a bit more dynamic and I think Maxine's angle, we'll look at a pair of zeros. I'm shooting up. I kind of wacko. Looking up to the light Maxine. Okay. Flash, fire, Danilo, I am. Okay. As good. Hey, I'm not sure if the Allied side is sort of adding to the to the short. Yeah. We don't either. Less than they are Marco. Right? And that'll there. Yep. Yep. That's good. Great. Thanks. I say yep. That looks good. So maybe say a little bit further apart. Maxine is ten. A guy though. They glass. Okay. Here I've just taken prisoner and yet Danilo upaya, as good like I turn it off now. Right now that's working code that was dry. Sensitive modulator. So guys, stop. That's good. Oh, I'm ready to go, guy, Marco. I flash nauseous. This demo here, right? Yes, that's right. I think we've now that table. I guy, I would say there is mixing their singles case. I can write Java, everybody could work.
18. Your project: Now your project for this course is to produce a light trail photograph. You can use any of the techniques that we've talked about in this class. You can use the jiggled technique, you can use the dashboard technique. You can use any of the other things that we did in the car park. Think about the safety of yourself, your friends, and your camera, particularly. So, choose a location that's not going to be dangerous. Shoot in a car park should in an area that there isn't any traffic. So try to produce something that you haven't done before. Anything you do that you haven't done before, ads to your repertoire as a photographer, it allows you to incorporate these techniques in your future work. Every little bit of information that you learn makes you into a better photographer in the end. And that's the aim of these courses that I'm teaching to try and help you people to extend yourself, to come out of your comfort zone, to try techniques that you've never tried before. So post your project in the project section. If you have any questions, please post them in the discussion section. I'll get back to you as soon as possible. If you have any difficulties with trying these techniques, let me know what you've done and I'll try and help you out to improve the technique that you've done. So stick those projects in and I'm really looking forward to seeing them.
19. Last words: If you are planning on doing any of these techniques, make sure that your camera is nice and secure where you put it. If you're bolting your camera to a car or any moving object, makes sure your camera is secure. It's often a great idea just to purchase a cheap second-hand camera to do these sorts of things with. That is what I often do. Oh, oh, look for a $50 or seventy-five dollar camera on eBay that's going to serve the purposes and give me a good quality results. And I'll use that camera rather than my best one. Because if I do have a disaster, if something happens and I damage the camera, it's not a great loss. So think about doing something like that. Also, obviously when you're doing this, the safety of yourself and your friends is paramount. So make sure you're doing it in a safe location. Travel slowly. You don't have to travel quickly when you're doing this stuff, it still gives the impression of speeds simply because of that slow shutter speed. Think about ways that you can extend this technique. The way I tend to put these things together is that I look for an inspiration that I can work with to produce something that's really unusual and something different then our planet. Or sit down and plan how I'm going to do it, what settings I'm going to use, what sort of factors are involved in the image to make it that little bit different. And then I go out and execute it. Sometimes it doesn't work first time, which is fine. I've learned something, I can come back the next time and do better. Often they sort of shoots, take two or three goes to get things right. The more you learn about photography, the quicker it will happen. So you don't may not need to use two or three goes, You may know let first-time, but the best ways to get out there and try it. Have fun. Create fantastic images, enjoy photography. That's what it's all about. I love teaching you this stuff. And I hope to see you again in another class.
 Warren Marshall, Passionate Photographer