Transcripts
1. Introduction : Have you ever wanted to draw a landscape but didn't because you are afraid to draw trees? Then this is the class you are looking for. Hello, my name is Menakshi. I'm an artist and illustrator. I love to draw and paint flowers and trees. I welcome you all to my class. This class is all about trees. I'm going to take you from scratch how to draw trees. To start with, you'll be learning all about the different tree structures. I'll also be teaching you more about the foliage, patterns, tree trunks, and also about the lights and shadows to bring your drawing to life. The class also includes two different ways to sketch a pine tree. You will also have a separate lesson on a birch tree. Then finally, we will do a project to combine everything we learned in the class to sketch a beautiful landscape. This class will definitely improve your sketching ability. If you think this class is for you, let's meet in the next lesson. Bye-bye.
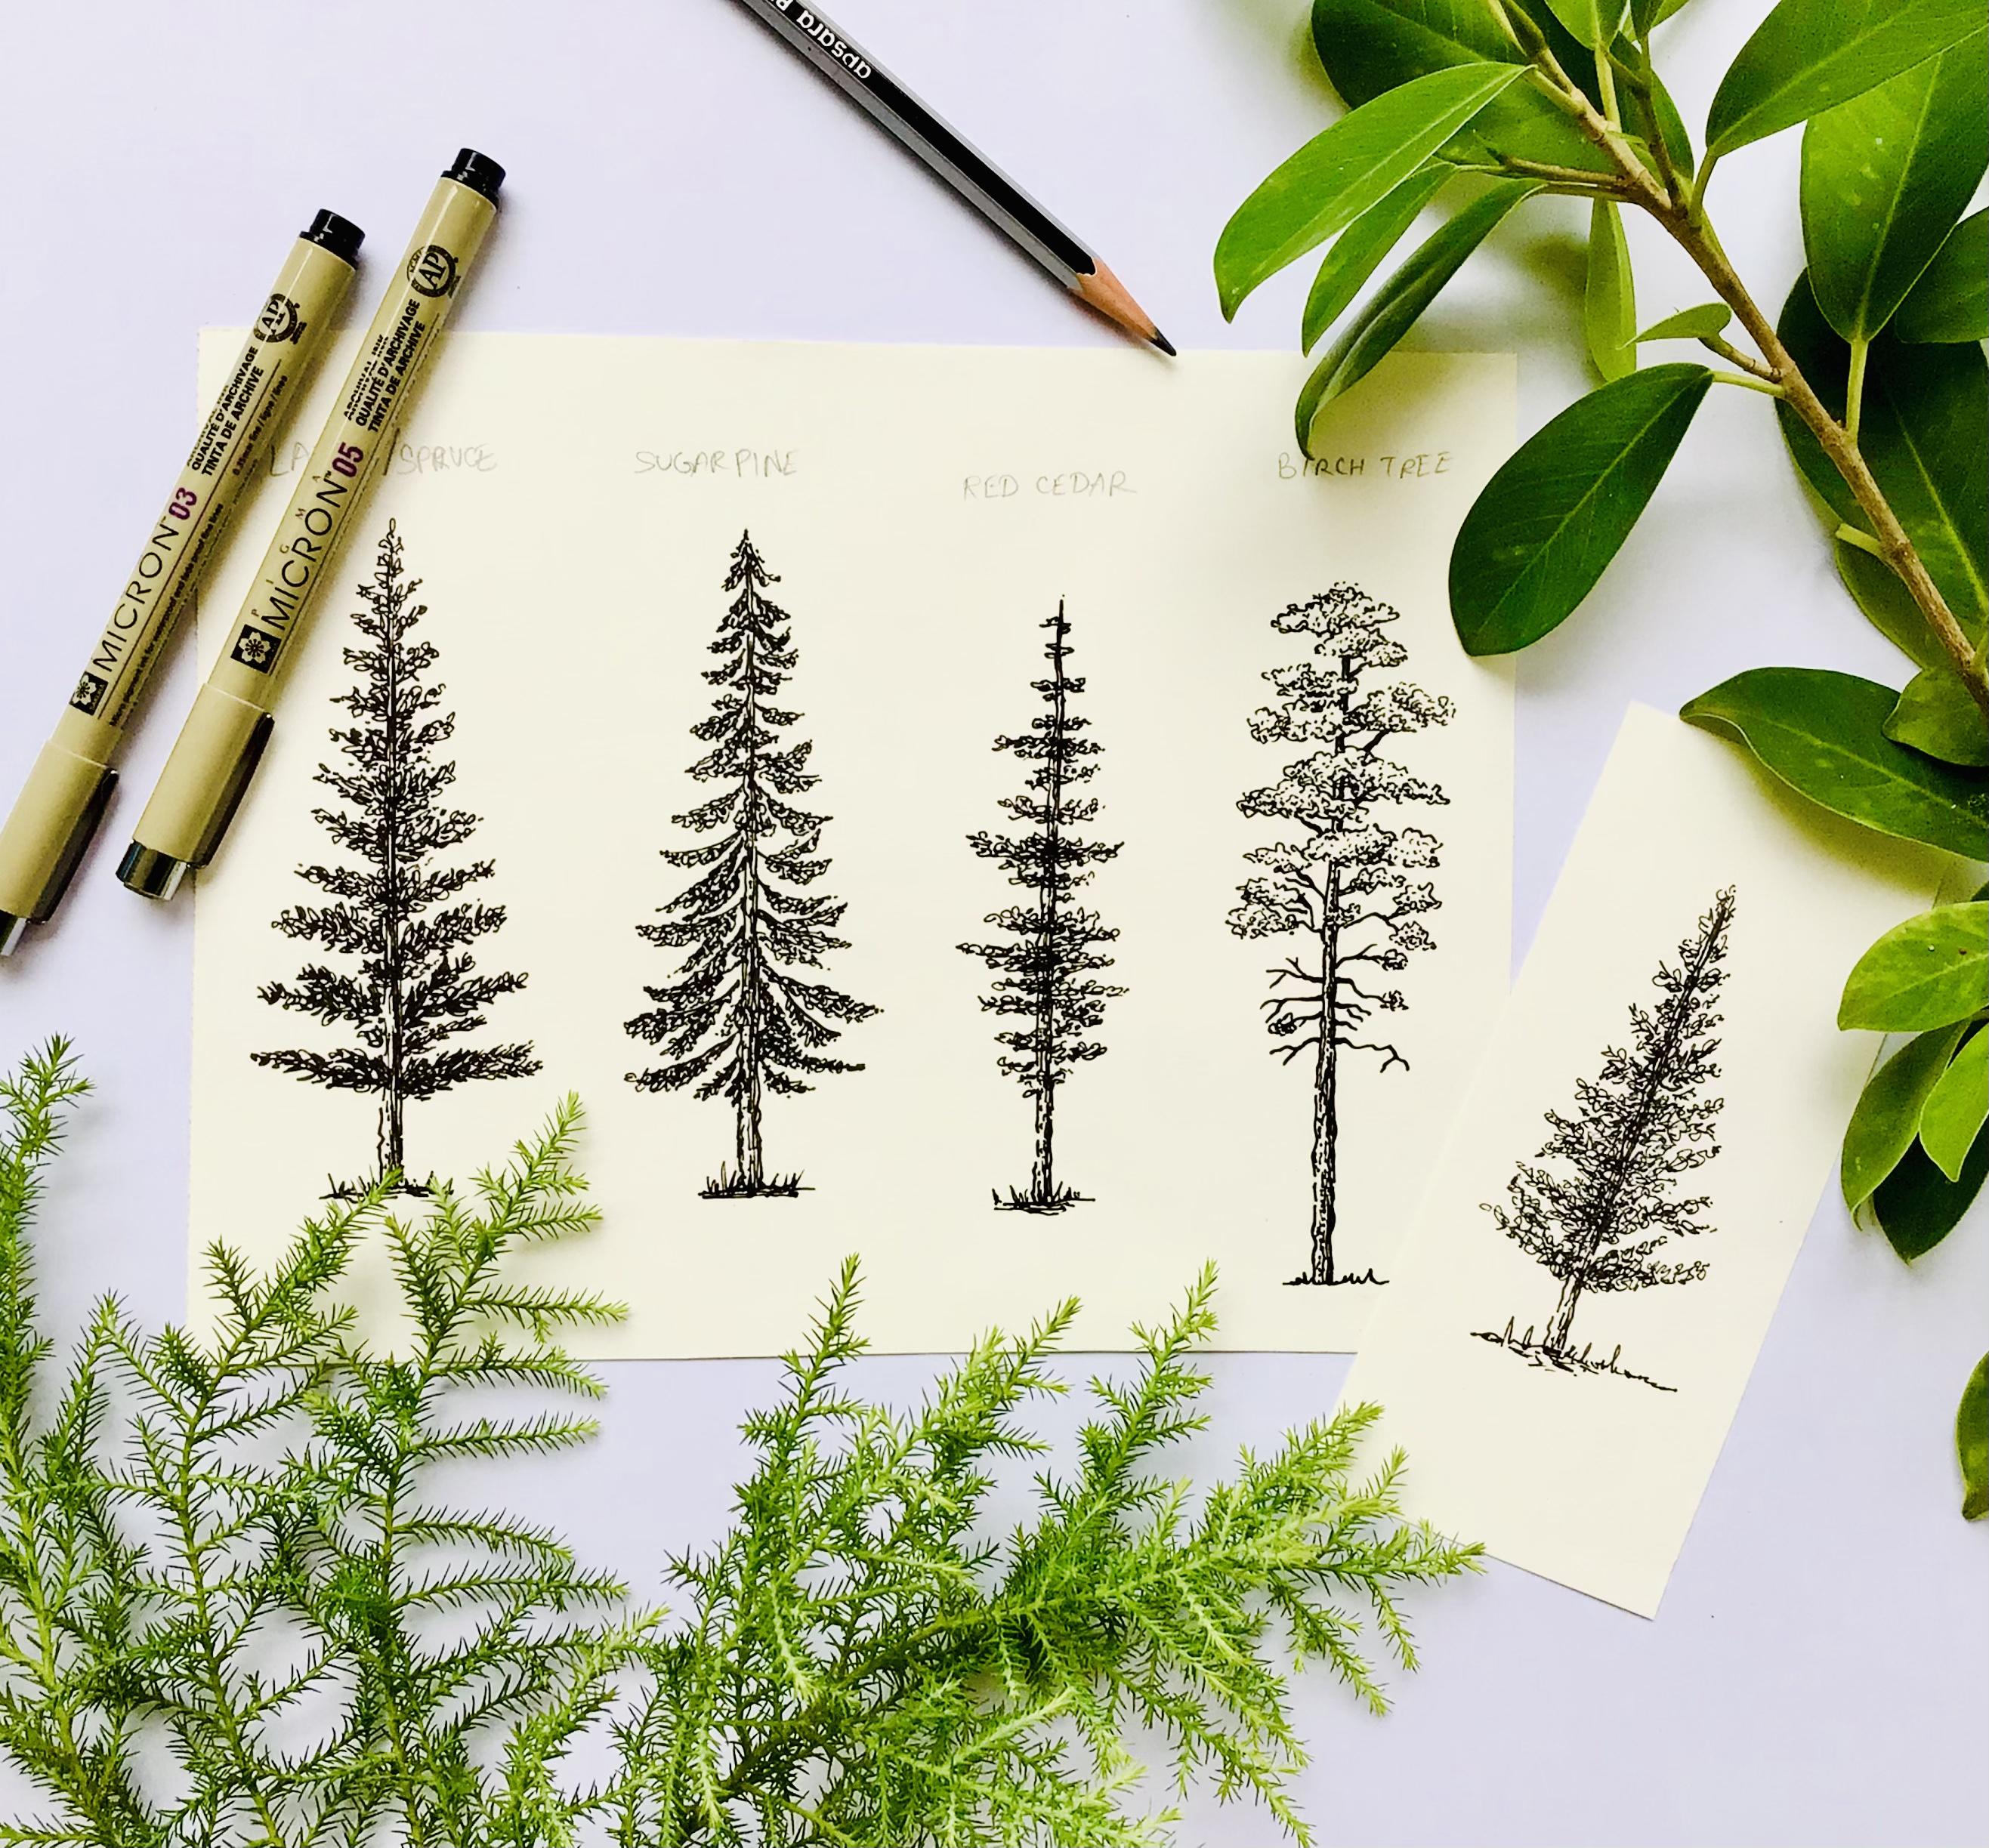
2. Requirements : Let us take a look on the requirements for the class. First of all, you will need a pen and a paper to draw. I use my regular sketchbook, which is of 130 GSM. Make sure your paper is thick enough to hold the ink to prevent any leakage, and the size is absolutely a preference, however, they're using an A6-sized sketchbook. This is the sketchbook that I usually use for my drawing purpose. Regarding the drawing pen, I'll be using Pigma Micron size 05 and 02. You can use any drawing pen which is of good quality. You'd also need a pencil and an eraser to help you draw the outline. You'll also need a paper tape if you are using a single sheet instead of a sketchbook. These are all the things you'll need before we go into the class, grab your supplies and let's get started.
3. Basic Tree Structures: The trees come in different shapes and structures. Let us take a look on the basic tree structures that you must know before we move into the main lessons. The first one are the columnar trees. These trees are shaped just like their name implies, a column. They generally have a single trunk and their branches are of a uniform length and spacing. This gives them a neat and a formal look. Trees like English Oak and Linden have this shape. The next shape we are going to discuss are the box trees. Box trees are small shrub-like and makes for an attractive border, sometimes they are also called as bonsai. Regarding the height, some box trees are short and some can grow as tall as 15 feet. Based on the variety, some are box-shaped and some are pyramidal-shaped. The next shape we're going to discuss are the round or oval-shaped trees. These trees are upright with a central strong trunk that branches into a dense round or oval-shaped crown. They have dense foliation and the branches are concealed. Some of the trees that have this shape include: Sugar Maple, Bradford pear, White ash, Sourwood etc. The next tree structures that we are going to discuss are the pyramidal or conical-shaped trees. These trees are wider at the bottom with the main center trunk and horizontal branches. The branches may start at ground level or high up the trunk. These are the easiest trees to draw. Some of the trees that have the shape include Larix and Red cedar. The next tree we're going to discuss are the pine trees. It has a single main trunk which is broader at the bottom and pointy at the top. These trees are somewhat similar to the previous tree structures that we have seen, but these are usually more slender and well achieved. Sketching these pine trees are very much interesting and I have a separate lesson on this. Pine trees are the basics that you have to learn first before you move into the complex drawings. We will learn more about this in the forthcoming lessons. The last tree structure that we're going to see are the birch tree. They're usually large trees and they have a long trunk. Small branches branch out from the main tree trunk like so. These tiny branches have clusters of leaves which makes them more attractive. They come in different colors and shapes. These are the basic tree structures that you have to know before you move into draw the trees. In the forthcoming lessons, we will take a detailed look on the foliage patterns and the tree trunk patterns. See you in the next lesson. Bye. Bye.
4. Foliage Pattern: Drawing leaves can be challenging. Each leaf is in different direction, has a different angle, and it's overlapping with other leaves. Now, I'm going to share with you some tips and tricks to make the leaves drawing much easier for you. To start with, I'm going to share with you some patterns that you must avoid while you sketch the leaves. One main mistakes that most of the beginner artist make even I, when I was a beginner, is that join leaf-like structures for the leaves. What happens to your drawing when you do this? It loses its life and it makes your drawing more artificial. Avoid leafy structures when you draw the leaves. The next pattern that I have seen people do are the rounded patterns. Doing this rounded shape will make your drawing more artificial so never do this. You know where the problem starts when you try to sketch each and every leaf that you see on the tree. I myself did this mistake when I was a beginner. I learned through experience after a lot of tries that it's not going to work. I'm here teaching my students not to do the same mistakes as I did before a couple of years. Don't make leaves with patterns with a specific shape. Coming to the point, the form and texture of leaf is abstract and messy. To draw that, we need to be sketchy, loose and avoid any pattern. Just go with the flow and make some irregular marks. Create some regular lines, commas and just be sketchy. Coming to the point, the foliage pattern is abstract. However, you can observe the pattern as flat and as not three-dimensional. In the forth coming lesson, we will see in detail about it how to give a three-dimensional look to your drawing. It's got to be super interesting so stay tuned. Good bye.
5. All about Tree Bark: Now let us see how to draw a tree trunk. Look at some reference they made to actual trees before drawing the tree trunk. First draw the outlines, to create the form. Then focus on the brightness values. I'm assuming the sunlight is coming from this direction, so which indicates this part is going to have shadows and the opposite end will have the highlights. On the shadows part, I'm creating a regular mark-making to add depth. I'm keeping my hand loose and going with the flow. At last, on the bottom, I'm drawing the ground. I'm creating some vertical lines for the grass and some slanting lines for the ground. One more time for you to understand, I'm drawing the tree trunk pattern again. I'm just scribbling some slanting lines, some vertical ones, and some horizontal lines with some curves. That's all. I'm just being loose and sketchy.
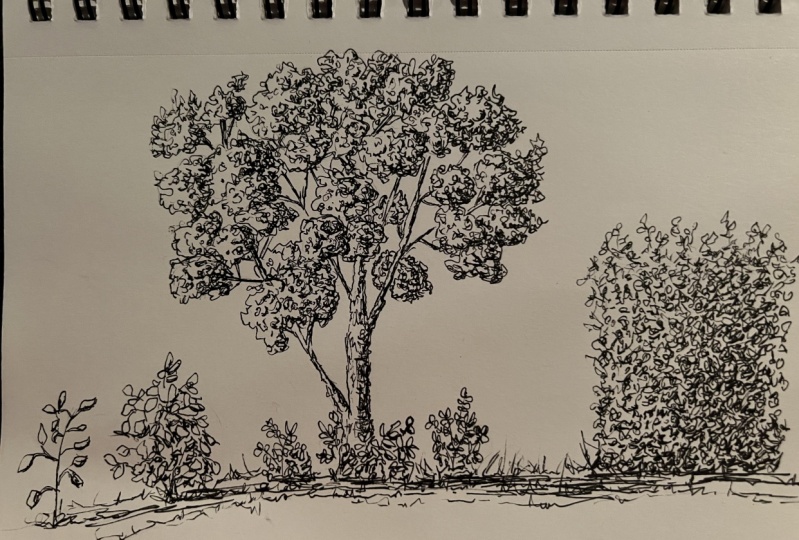
6. Lights and Shadows : In this lesson, we will pay attention to brightness values. How to create a three-dimensional illusion and not the flat one. I start by drawing an outline to indicate a cluster of leaves, then I'm creating an abstract mark-making inside it. At first, I make the marks evenly along the surface. When these marks are evenly spaced, it is flat and it does not have any three-dimensional look. As you can see, I create more marks on one side of the illusion to indicate the shadows. Nothing much, I just create some irregular curves, lines, and commas. Now it is nicely visible that we have added a special element for life to add illusion. Let us go one step further and see how to implement this technique in our drawing. In this, we're going to see three examples, the first one is the simplest of all. The first example has a single large crown and a single trunk. Let's assume the sunlight comes from this direction so that the pot will have the shadows. I mark the shadows area for your better understanding. Similarly, on the trunk, the right pot will have shadows. It all depends on where the sunlight falls. Keeping this model as a reference, try drawing the tree. First, start by drawing the outline. I just use some broken lines and curves to draw the outline. On the shadows area, I create a lot of abstract patterns. As they move towards the other part of the crown, I create less mark-makings. This will create a three-dimensional look to our illusion. As I said before, these mark-makings include irregular lines, curves, and commas. Then at last I make the tree trunk. I create more drama by adding a small branch to it. Since there's a light coming from the left side of the pot, we have shadows so I'm darkening the tree drunk on the right side. Other than that, I'm creating some more branches on the top to make it even more attractive. At last, I do some vertical lines with the grass. Now our first tree is ready. The second example is a pine tree. I create a conical shape for the outline. Again, on the right side, there is going to be shadows since the sunlight is coming from left side. Similarly, the tree trunk. The sunlight is coming from this direction, so the other part of the crown and the trunk will have shadows. To draw the main illustration, I start by drawing the outline. I use some broken lines and curves for it, then I start to mark inside the crown. I start with the shadows area because it is going to be dense, and I slowly move on to the other part. As I move along the other part of the crown, I'm making the marks less dense to create the highlights. I draw two parallel lines for the trunk. Again, I go back to the crown and I do some more markings on the bottom of the crown, where the crown and the trunk meets to add more volume and to make the drawing even more realistic. Then I make some more lines to the right side of the trunk to indicate the shadows. Finally, I finish it off with the grasses and the ground. This time let us go one step further and create a large tree, say a walnut. I start by drawing the tree trunk. I'm creating small branches on top of the trunk to hold clusters of leaves. I'm drawing circular outline for the clusters. They are overlapping each other. As we go beyond, they're more overlapping, so I'm creating the crown out of it. Now keeping this as the reference, let us do the main drawing. Again, I start with a tree trunk. I'm assuming the sunlight is coming from the left side, so the right side of each clusters will have shadows. Also, when it is overlapping each other the one which is behind will have shadows like so. The main step is to determine where the light falls and which part will have shadows. If you determine that, then the illustration process is very much simple. I'm going to give you a small project in this, by using this model, try creating the entire tree all by your own. We have already discussed all the techniques you'll need to create this. Be courageous and take your pen, I'm eagerly waiting to see all your projects. This has got to be your first project for this class. In the next lesson, we will learn more about the pine trees. We will meet there. Bye-bye.
7. Pine Tree Method-1: In this lesson, let us see how to sketch a basic pine tree. Let us start with the outline. I use a drawing pencil for it. In general, the crowns of the pine trees are in conical shape. I draw a conical-shaped crown, and then I do two parallel lines for the tree trunk. Let us move on to sketch this pine tree, and for that, I'll be using O5 of Pigma Micron. Let us start with outline. I'm doing inverted V shapes all along the outline. This will give a natural look to our drawing. I just do this inverted V shapes all along the outline. After you are done with outline, I just move on to sketch inside the tree. Assuming the sunlight is coming from this direction, the opposite side will have shadows. To indicate the shadows, I create a lot of texture on other part of the tree. Again, I'm doing inverted V shape patterns all along the shadow part. Draw the patterns in different angles for a realistic and an organic look. I also add a little bit of commas and dots to portray the area to be dense. As you move along the other part of the tree, make it less dense to indicate the highlights. On the shadows part, you can do a little more of mark makings to make it attractive. How long you want to do this mark-making totally depends on your liking. If you want your sketch to be more detailed, it's going to consume a lot of time. It's totally based on your opinion. After you're done with the crown, let us move on to the tree trunk. I'm using my same pen, O5 of Pigma Micron. I shade the right side because it is going to have shadows, and finally I do the ground and some grasses and some regular mark makings for the ground. After your sketches dry, erase off the unwanted pencil marks, and your pine trees now complete. In the next lesson, we'll see another method to sketch a pine tree. Meet me there. Bye bye.
8. Pine Tree Method-2: In this lesson, we will learn to sketch a pine tree with much more details. As usual, I start with a rough sketch using my drawing pencil. I make two vertical lines, which meet on the top. This will form the trunk for our pine tree. I join the two lines on the bottom. Then I do a triangular-shaped outline for the crown of the tree. I'm joining the two lines on the bottom to complete it. Then I make side branches all along the outline. These side branches branches out from the center and they are parallel to each other. Then I make some more branches which branches out from the side branches. Just drawing there a few lines. This is to make the drawing even more natural and organic. Having done the outline, it is time to paint our work. For this, I'll be using 05 of Pigma Micron. I start with the tree trunk. Don't just bend straight using your pencil guide, give some ups and downs on the lines and make it broken for a natural look. Assuming the sunlight is coming from this direction, let us give some mark makings on the other side to represent the shadows area. I do this using some broken lines, dots, commas, and irregular patterns. I'm darkening the right side of the tree trunk to represent the shadows. Then I do the grasses and the ground. Some irregular vertical lines and with no specific mark makings, just making the ground. Now finally, let's move on to the crown of the tree, which is more interesting. I do some abstract patterns along the pencil guide. What patterns do I make? I just scribble some irregular curves. With no specific pattern I just scribble some irregular curves that's all. I'm drawing this pattern all over the pencil guide. When you observe this on your screen, it may feel challenging, but I tell you take your pen and try this out. It is one of the easiest methods. I'm making the pattern to be more dense when they are overlapping each other. This will create volume and add depth to your drawing. Doing the scribbling on the other side. One more point I want to share with you all regarding this technique is that the areas which are near the tree trunk should we dense when compared to the other parts. This will create volume and add density and a realistic three-dimensional look to your drawing. Using the same technique of abstract curved patterns, cover the entire tree. This is a very good meditative process. It keeps your mind calm and you just go with the flow and enjoy the process of sketching. We are using the same method over and over again to fill the entire tree. I'm telling you the result is going to be so stunning and attractive. It is going to be good even to frame it and hang it on the wall and lay it on your living room. It is worth the time you spend on it because it is a little bit time-consuming process. I go with the top and I do the same irregular curved pattern all over the tree. Finally, to finish it off, I'm making the tree more dense near the tree trunk, I'm adding a little more mark makings near the tree trunk to add volume and depth to our drawing. I'm making it even more dense near the center. Once you're done with the sketch, wait for the paint to dry and erase all the pencil marks. That's all. Our beautiful pine tree is now ready. Isn't it much more detailed and attractive? Do try this out. In the next lesson, we will learn to sketch a birch tree. We'll meet there. Bye-bye.
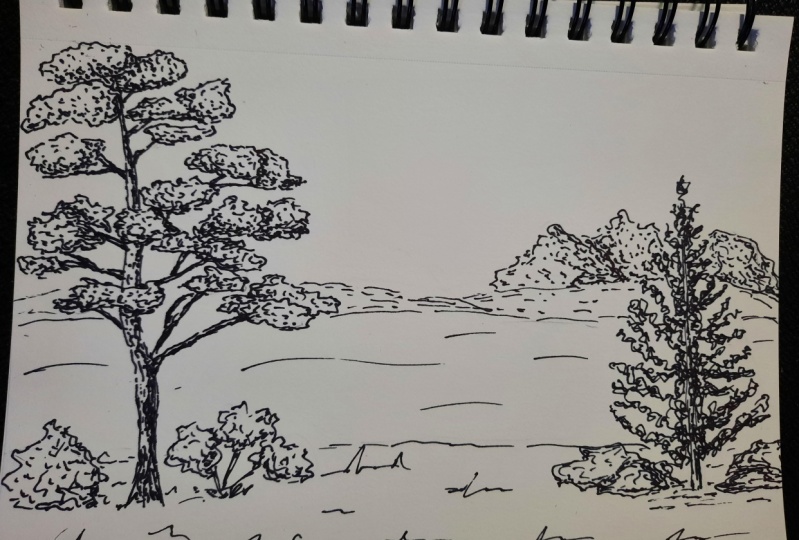
9. How to sketch a Birch tree: In this lesson, we will learn to sketch a birch tree. As always, I start with outline. I use my drawing pencil for it. I draw two parallel lines which meet on the top for the tree trunk. Birch trees usually have a long trunk. I made these lines long enough. I draw some small branches which branches out from the tree trunk. These trees usually have a single trunk that quickly branches out into the pyramid shape. Each one of the main branches gets a few branches of their own, but smaller. Draw the branches with some ups and downs for a realistic look. As they move up, I'm making the branches wider and wider to occupy a much larger crown area. Now, I'm drawing the branches, leaving some space for the crown. As I said before, the top part of the birch tree has a better middle chip. On the top, I'm making it pointy. I'm giving some outline for the clusters of leaves. This will form the crown area. Make the clusters overlapping each other for a realistic and an organic look. To make it even more attractive, I draw some clusters on top of the tree trunk. I'm just making a lot of clusters on top of each branches. Sometimes you may fully dwell on it or do bypass few branches and that is totally fine. As they move down, I'm making the clusters much smaller. I think I'm done. Now, I'm going to lighten my sketch using an eraser. Don't erase it completely. Leave some marks behind to help you do the pen work. I'm going to start my pen work and I use my Pigma Micron of size 0.5. As you can see, I do the outline using broken and irregular lines. This is the most comfortable step in the whole project. I just go over the outline. You don't have to be cautious. You're just going over the outline. Feel free and enjoy the process. After drawing the crown, I'm moving to the tree trunk. I'm using the same pen. Just like before, I'm giving some ups and downs with some broken lines. I make a horizontal line for the ground and some vertical lines for the grasses. All these things are irregular. Just feel free and go with the flow. Now, let's just start to shade the tree trunk. I'm assuming the light is coming from this side. I'm giving the shadows on the other part. I'm using the same pen for the shadows. I do some dots and irregular lines to do the background. I'm making the right side of the tree trunk darker four to three-dimensional look. I'm making few patterns on the left side of the trunk also to achieve a balance. Just few dots, and that is sufficient. Now I move on to paint the branches. Just like we've done before, go over the outline. Give some ups and downs, for a realistic look. I connect the different clusters of crowns using the branches. Sometimes you may feel to eliminate or to bypass the pencil guide and that is totally fine. Just do what do you think would be good for your sketch. Go with the flow and don't complicate it. After this step, you no more need your pencil guide. Once the ink is dry, get rid of your pencil marks. Now let us move on to shade the clusters of leaves. Take one cluster at a time. Shade the lower part of the cluster which holds to the branch. How do you represent the shadows using some dots, irregular curves and commas? I use the same pen 05 of Pigma Micron. Follow the same steps for the entire tree. When the clusters are overlapping the area which is behind, we'll have shadows. Like what I do now. You have to darken the overlapping areas. Complete the shading process, keeping all these points in the mind. That's all. As you can see, our tree has got its life. It's in the process, so simple. Do try it out and let us meet in the next lesson.
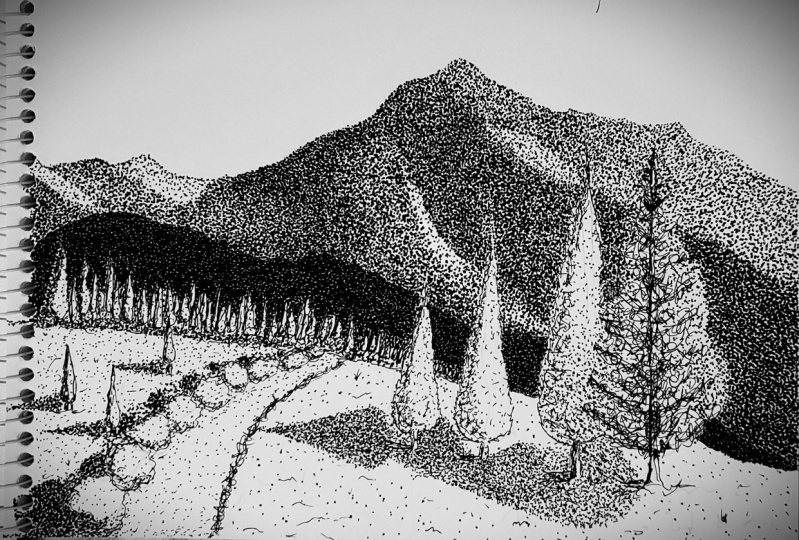
10. Landscape Part 1 : Now, let us try to implement the things that we learned in the class by sketching a landscape. The first step is to plan your design. Use your drawing pencil so you can always go back and change your design if you don't like it. I first draw a line, and then I do a curve to act as my reference. Then I arrange few shrubs all along the curve. Starting from the shrub which is on the front, I'm arranging it one after the other. It is more or less a semicircle. Now, I'm going to the other side of my landscape. I'm making few bushes overlapping each other and also I'm varying the size to create a contrast. On the side, I'm planning to add a pine tree. I'm drawing two lines for the tree trunk and then the crown. The crown is pyramidal shape. We already had a lesson on this. We'll do the details later, we're just doing the outline. On the other side, I'm planning add a birch tree. Again, two lines for the tree trunk, and then drawing the outline for the clusters of leaves. This is to make the pen work much easier. I'm just implementing all the topics we covered in the class, nothing new. We already had a lesson on pine tree and birch tree, and also the shrubs and bushes are much like the same. I'm drawing few branches which goes to the clusters of leaves, and we are almost done. Then the next step is to pen the outline. I'm using my Pigma Micron of size 0.5. I'm starting with the shrubs. I'm drawing few broken curves all along the outline, similarly on the bottom. We'll do the shading part later, let us first pen at the entire drawing. Use broken curves and abstract pattern to pen the entire outline. As I said in the previous lessons, this is the most relaxing and simplest step of all. Just sit back, relax and go with outline using your pen. Do the same for the entire drawing. I'm now penning the shrubs. Let us do the pine tree and the birch tree with all the details in the next lesson. It's the same thing that we did in the previous lessons, however, to make you feel comfortable, I'm going to show it again. Using an eraser, I'm getting rid of the pencil marks. Let us meet in the next lesson. Bye bye.
11. Landscape Part 2 : The third step is to create depth and dimension to our sketch. We will start with the bushes along the curve, and to achieve the shadow effect, I do some abstract patterns, curls, commas, and lines. I'm doing a lot of patterns on the lower part of the bush when compared to the top part. This is to create depth and radiation. As you can see, there's a gradual transition from the lower part to the top part. Likewise, try shading all the bushes using the same abstract patterns. One more thing you have to keep in mind while doing this is that, when the bushes are overlapping, the one which is behind will have a lot of shadows, like what I'm doing now. Keeping these points in the mind, try shading more the bushes. Now, let us do the shading for the straps which are on the other side. Follow the same steps we did before. Using some abstract patterns, do the shading. The shading is more on the lower part and on the overlapping areas. Use some irregular curves, lines, and commas to do the shading. This bush which is behind the other two, will have a lot of shadows, so I'm darkening it on the edges. Similarly, shade the other two. For these two which are on the front, will have a lot of shadows on the bottom area. While you move up slowly, diffuse the pattern. This will give a much more realistic and an organic look to our drawing. Now, let us move on to make the grasses in the ground. I'm making few grass like patterns near the bushes. Don't try to copy what I'm doing, but just go with the flow to make it look more realistic and making a lot of patterns near the bushes. Keep your hand loose and just go with the flow. After you finish the ground, it is more to the trees. We already did a lesson on pine trees. I'm not going to show each and every step, just an outline for you to catch up. I start without light to form the crown. Use broken reshaped patterns to outline the crown. Then assuming the sunlight is coming from the left side, I'm darkening the right part of the crown. I'm trying to create a shadow effect using broken lines and commas. Slowly move on to the left side diffusing the pattern to indicate the highlights. Then finally, I'm shading the right part of the tree trunk. I make some grasses around the tree. Let us finish off the sketch by shading the birch tree. First, start by outlining the tree using your drawing pen. Just go with the pencil marks, giving some ups and downs, and making the outline broken. Then I make the tree trunk. Assuming the sunlight is coming from the left-hand side, I'm shading the right part of the tree trunk using some broken lines. Then I pin the branches which goes to the crown. After the step, let your paint dry for some time and erase off the pencil marks. Then I start to shade the clusters of leaves. This bush tree again, we already discussed in the previous lesson, I shade the lower part of the cluster and the areas which are overlapping each other. We have just combined everything we learned in the class and put it together in a single sketch. With this, we have completed our sketch. Isn't it so pretty and also easy as well? Please hold on for one more minute to discuss about the class project. Let's meet in the next lesson. Bye bye.
12. Class Project: We have come to the end of the class, I hope you enjoyed it. If you have any doubt in any part of the class, feel free to contact me, I will get back to you as soon as possible. Now let us discuss about the class project. First of all, search for a nice photograph for your reference. There are thousands of photos available in the internet. Then try to implement the things that we discussed in the class to sketch a beautiful landscape. You can either do the same landscape drawing that we did in the class, or you can come up with your own idea. Finally, do share your projects in the class project area, I would love to see them. Also share your feedback, it will help me create better classes in the future. Thanks a lot for joining my class, it really means a lot to me. Thank you. Bye bye. Have a nice day.
 Meenakshi Muthuraman, Artist and Illustrator