Transcripts
1. Introduction: Hello and welcome. My name is Michelle Tabares, I'm a cartoonist, illustrator, and traveler based in sunny Tampa, Florida. I love comics of all genres. But more recently I've been focusing most of my work on making autobiographical comics. Autobio comics are a great way to share your experiences and stories with other people. It can give others an insight into what it's like to be you. It can give an audience and insight into your mind, your thoughts, and feelings in a way that is really personal and that you don't find so much in fiction comics. Because the subject of an autobiographical comic is you, there's a special connection that you create as the author with the reader because it allows you to really intimately express who you are, some of your thoughts or feelings or specific experiences that you've gone through. I think there's something really special about that. I think that there is great power in being able to voice your own thoughts, experiences, and stories with others. Since you are the author and the subject, you have the power to reveal whatever you want about yourself. Autobiographical comics are also a great way to explore different things that have happened in your life. In this class, I'm going to walk you through my process for making an autobiographic comic from the very beginning to the very end. We'll talk about all of the preparatory work that has to take place before you make your comic, like selecting a memory and writing a script, along with planning your page. Then we'll get started on making the final comic, by placing frames, penciling and lettering, inking, and adding color if you'd like. While you'll watch me make my final comic digitally through Photoshop, I want you to feel free to create your comic in which ever medium you prefer. This class will also be a great entry point for beginners, since not only will I be breaking down the comic making process, I'll also be going over some commonly used terminology that will help you continue making comics in the future. If this class interests you and you want to get started on creating an autobiographical comic of your own, why don't we head on to the next video and get started. I'll see you there.
2. Why Make Auto-Bio Comics?: Before we begin with the lesson, I want to pose the question, why should we make autobiographical comics in the first place? To start off, if you enjoy making comics, that's already a great reason to make an autobiographical comic. But I think autobiographical comics in particular give you the space to explore personal feelings, experiences, and thoughts that maybe you haven't had the chance to before. It can allow you to be vulnerable but in a safe controlled way. Some autobiographical comics can be really cathartic and therapeutic to make, especially if they're about serious events, illness, death, and so on. Autobiographical comics can create a great space to explore that pain in a way that is helpful and constructive. But of course, autobiographical comics don't have to be about trauma or pain either. They can be fun and lighthearted. Autobiographical comics can also be a great way to express positive emotions like gratitude and it can also be a great way to share heartwarming or funny stories with other people. The great thing about them is that you're not starting from scratch. You're working with an actual memory that's happened to you, something personal and in some way meaningful to you. While I have really enjoyed making fiction comics, autobiographical comics are a great way to get a story out and get the creative juices flowing since each person's life is full of rich experiences that are worth talking about. Before we get started on making your own autobiographical comic, I would encourage you to go out and do a little research, take a look at some other autobiographical comics made by other creators and try to get a sense of what are the stories that interest you the most. Do you like funny or silly or do you prefer something more serious or something maybe even angry? There are dozens if not hundreds of amazing autobiographical cartoons that are worth and exploring and taking a look at. Also feel free to share your favorite autobiographical comics with the class and tell us about some of your favorite cartoonists that make autobiographical comics and why they're your favorite. I'd love to know. Thanks for watching and whenever you're ready, let's get started in the next video.
3. Selecting a Memory: Welcome back. In this video, we're going to talk about selecting a memory to base your autobiographical comic on. You may already have an idea that you feel strongly about. If that's the case, you can go ahead and just work with that idea that you have in mind. But if not, here's a process that I like to go through when trying to determine what an autobiographical comics should be about. This process is fairly simple and just has two main parts. First, you're going to want to write a shortlist. Don't overwhelm yourself with too many options, but also give yourself enough to really consider things. Keep it to maybe five or six memories. For the second part, you might want to consider how you want to present your story and in some way, how you want to present yourself through your auto bio comic. Are you trying to relay a specific message or moral for your reader? Are you trying to come across as heartfelt or sincere? Do you want to poke fun at yourself and just make a comic that's based on a funny experience that you had? Or are you trying to relay something really deep and meaningful about yourself? You can make a great autobiographical comic from any of these ideas. But I think it's really helpful to have a clear understanding from the very beginning of what it is you're trying to convey. For me, I've decided that I want my readers to feel cynical, but also amused while reading my comic. Verifying that your autobiographical comic doesn't have to satisfy all readers. But if it satisfies you, it will definitely reach at least some people. Now that I've established how I want my comic to come across, I'm going to go through my list and eliminate the ideas, I don't align with being cynical and amused. I'm going to eliminate this idea because even though this strange dream was interesting to me, it might not be very interesting to other people. It doesn't really convey a sense of cynicism or amusement. Now, I'm going to eliminate this particular idea because I don't personally like to write or read stories about awkward conversations or humor. Since it doesn't satisfy me personally, I'm going to take it off the list. While writing about a favorite childhood memory would be great for a more sensitive and heartfelt comic, since that's not what I'm going for, I'm going to eliminate this idea. While auto bio comics can be a great way to explore inner turmoil and trauma and unpack various life events, it's also important to talk about the things that you're comfortable talking about. A really embarrassing event would make me feel vulnerable and exposed, even if it would be amusing and cynical. For that reason, I'm going to eliminate this particular idea. Now, I'm left with this final idea that his cynical and a little bit dark, but if I write it correctly, I can hopefully try to insert some humor in there and make it more amusing and entertaining. Now, I have the memory that I want to work with for my autobiographical comic. Let's move on to the next video, where we'll take this memory and put it into a script.
4. Writing a Script: Since most comics contain dialogue, inner monologue, and narration, I think now is a good time to discuss writing a script for your auto bio comic. Comics are a marriage of words and images, so it's important that your script is cohesive and works well for a comic format. If you want, you can write your script something like the way a play script would be written by including details like someone entering a scene or exiting. But personally, I prefer to only focus on writing the title and then anything else that would be included in a written out caption, speech bubble or a thought bubble. This particular comic features mostly just inner monologue and one main character, but if your comic has more than one character and spoken dialogue, feel free to include that. As you can see, I'm not too precious with my writing since this is meant to be edited. You don't have to worry about making your handwriting perfect or anything like that. This is mostly just so that you get your ideas down. Now this particular comic is supposed to be just one page long, so it's important for me to get to the point relatively quickly and to have an ending that has impact. Usually, comics end either with a joke or if you want to write a more serious comic, you can end yours with a statement that's thought-provoking, something that will leave the reader wondering. Now, my introspective thought-provoking moment happens in the middle of this comic. I actually want to end this particular comic with a joke to bring some levity back to it. Once you've written your script out, you can go ahead and start editing it by taking out unnecessary words and determining whether or not some lines could be cut altogether. You can see here that there is a solid paragraph here of writing, and while this is fine for the script writing stage, visually, this amount of text on a single panel won't look good and it will feel sluggish. Through the editing process, I've decided to split this particular paragraph into two panels so that it will flow more nicely on the page. Once I've figured out that I want to divide this particular paragraph into two parts, I then go ahead and number each panel, and it seems as though six is a good number, but this really varies on the story. In some cases, one or two panels is enough to get the story across, and in other cases, you might want to use nine or more panels. It really just depends on the script. Before we go, I want to address the fact that if you're able to read through my messy handwriting, you might have noticed that my script contains some relatively dark humor. Now of course, you don't have to go with dark humor if that's not to your taste. I'm putting it in there because it's something that I like, and I find that the autobiographical work that is the most emotionally resonant to me personally as a reader is work that reflects the author's personality and mindset. For you, if that means writing work that is really slapstick and silly, or work that's very serious and heartfelt, or work that's cutesy and whimsical, it's all valid because autobiographical work, and of course, autobiographical comics are all about the author being able to express who they are, and that's something that no one else gets a say in like you. I hope you keep that in mind while you're writing your script. Thanks for watching, and whenever you're ready, let's move on to the next video.
5. Planning the Page: Now that we've finished our script, let's use it to plan out our page. At this point in the process, you're still going to be working pretty roughly. Since you find that you might have to continue making changes. Here, you're going to want to start roughly drawing out your frames and figuring out where the text will go and how it will interact with the drawings, and if you determine that you might have to use less or more panels, that's fine too at this stage, I've determined that my first panel will be the largest, since it will be an establishing shot, which will show the environment, and will hopefully give the reader a sense of place. My drawings are not meant to be perfect, but more to get a rough idea of where things should go. These drawings will be further refined at a later stage. Now another thing that I want to address is that this planning phase can also be considered as a second editing phase. For example, I noticed that in my fourth panel, the writing seems almost to be a little bit too morbid. While I want there to be some darkness in the writing, I'm afraid that if it's too dark, it will take away from some of the humor that I'm hoping to have at the end of the comic. You can also tell that in this panel, the text doesn't quite fit correctly either as the word decompose is awkwardly jutting out from the right hand side of the panel. I'm going to erase this text, replace it with a euphemism that is hopefully a little less morbid, but still gets the point across, and also fits within the panel much better. Hopefully you'll agree this is an improvement to what I had before, and that's why in this phase I really like to use pencil and to draw it out by hand so that I can make these changes on the fly and quickly. However, if you prefer to use digital programs such as Photoshop, in this planning phase, that's perfectly fine. It's best to use what you're most comfortable with. Finally, I've noticed that my title is pretty long and awkward, and since I have plenty of space in my first panel, I can just as easily take this same line of text and incorporated into a caption and just make this a titleist comic, and this is a perfect example of why I think the planning phase is so important. The title seemed fine while I was just looking at a written script. But by incorporating panels and images, I was able to see that this line of text wouldn't work as a title, and I was able to find something that worked better. All right, so now that I have my comic more or less planned out, let's move on to the next phase.
6. Placing Frames and Getting Started: Welcome back. So at this point, we're going to start working on our final comic and before you continue, you have to decide how you want to work. That could mean using a brush, pen nib, an ink, or in my case, I'm going to go ahead and make a digital document on Photoshop and work digitally to make my final comic. Now the first thing that you're going to want to do is draw your frames. So as you might recall, during the planning phase, I established the number of frames that I wanted and also the size and orientation for each one. So I'm going to go ahead and pull up this landscape document, as you can see here, and I'm going to go ahead and draw in my frames. If you're working digitally, you can use a ruler tool like this, tab straight lines and that's a big reason why I like to work digitally. But if you're working traditionally, I'd recommend using a ruler. Although, if you're lines are intentionally meant to be a little bit crooked or wavy, some cartoonists prefer that because that has a little bit more character and that's perfectly fine. Just make sure that whatever decision you go with is intentional. In deliberate with your decisions, can make the difference between a comic that has a lot of personal and individual character versus a comic that looks rushed or sloppy. So I think enjoying the process is always important when you're making comics, but I think that this is especially true when you're making autobiographical work, since this is the work that reflects more of who you are as a person. I think it's really important to make decisions that you're comfortable with and that you enjoy. To be honest, I prefer the look and the overall feel of handmade marks and frames, but the fact that I can save a lot of time working digitally instead of traditionally makes the process more enjoyable for me. Even if it means I'm sacrificing some of the visual aesthetic that I like. That's not to say that you must work digitally, there's more of just an example of, you have to make decisions that are right for you as an artist. Decisions that no one else can make for you regardless of what your choice is, it's all valid. Now that we've placed our frames, let's continue on to the next video. I'll see you there.
7. Pencilling: Penciling is when a cartoonist will begin laying out their page, applying text and lettering and drawing their images for what will eventually be their final comic. Once you reach this phase, you should have made most of your edits but since the idea is that you're working in pencil, you can still make any last minute changes if needed. Before you move on to the inking stage, which is a little bit more permanent. Of course, that only applies to comics that are made using traditional tools. If you're working digitally, you have a little bit more freedom to make changes as needed even in the inking stage. With that said, it's worth mentioning that even though this is hauled the penciling phase and it's traditional to use an HB or mechanical pencil, you don't necessarily have to use one for this phase. Some cartoonists like to use a cyan or red colored pencil, which will scan and liftoff of the page more evenly when erased. For this project, I'll be penciling on Photoshop, but feel free to use whatever tools you prefer. This is what my document looks like before my pencils and this is what my document looks like after my pencils. No, if you wanted, what you could do is you could actually just clean up your original planned drawings and make them your pencils. But personally, I prefer to draw everything over again because I feel for me it gives me a fresh perspective and gives me new ideas. While most of these panels are pretty much the same from my planning stage, the first panel, which is an establishing shot, has a slightly different angle. You can see here that I have chosen to put a bird's eye view, which I think is more interesting and provides more variety visually than the first pencil drawing that I had in my planning stage which is much more static and pretty similar in terms of camera angle to the other panels but if you're the person that looks to just dive right into your work, you can clean up your planning page and turn that into your pencils. I think the key thing though here is that even though you can see my pencils are still pretty rough and loose overall, there's more detail here than in my planning phase, so you can see now that I have actually gone ahead and added not just tables and people but also objects on the tables, cups, plates. I have added a purse here resting on this bench and even a couple of architectural elements to ground this particular place in a room. Some cartoonists prefer to have really immaculate, clean, perfect pencils. You just have to determine what is the best way for you to create work. I feel autobiographical comics are the best way to explore this since the subject is you and you have complete control of not just the written story, but also the visuals. Another thing that you can do with really rough pencils like this is you can erase as you go along to make things even cleaner. Here if I want to make this shape a little more concrete, I can just erase some of the excess lines and now we get a better sense of this menu that my character is holding. Again, you can clean up all these little straight lines right here. This is, I think a pretty effective thing if you've got really loose or sketchy lines that just need some tidying up and you don't want to spend too much time redrawing things. Of course, this also works with a regular eraser and pencil too. Now that we've talked about our pencils, let's move on to our inks.
8. Lettering: Welcome back. Let's now take some time to talk about lettering. As you might guess, lettering refers to any and all topography that might be found on a comic page. This includes dialogue text, captions, display text, and sound effects. But lettering also refers to caption boxes and speech bubbles too. Oftentimes in comics, lettering can be overlooked. It's really important to pay attention to your lettering since it is part of the story. Having clear, easy to understand lettering will help the reader know what's happening and will encourage them to keep reading. In this day and age, computer made typefaces and fonts are most commonly used for comic book lettering. Sometimes I like to use computer lettering but for this particular comic, since it's based on a story about me and my life, I thought that doing some lettering based on my own handwriting would add a little more character and a little bit more of my personality into the comic. To do this, I just went ahead and took a comic style font, placed the text roughly where I wanted it to be, and wrote on top of it with my own handwriting. If possible, I would really encourage you to try lettering by hand, since I do feel like it adds a little bit of uniqueness to the page. That said though, if you feel like your lettering isn't very clear, or if you don't enjoy doing it, then by all means, go ahead and use a typeface instead. Lettering is its own art form and there's no way that we could address every important thing to know about lettering in one short video. But I want to leave you with a couple of tips which will hopefully help you out. I'm writing my lettering out on Photoshop, but of course, you can do this by hand with traditional tools too. Tip number one, make sure that you have an appropriate amount of text per panel. Too much texts can make a reader feel disengaged. If you find yourself with a lot of text in a single panel, remember that you can break it up into two or more panels if needed. Make sure that your lettering is clear and that there is enough space around each letter and each line. This will help make your text easier to read, but also be careful not to overdo it by adding too much space. Last tip I want to leave you with is to make sure that your lettering is simple. Now, this doesn't mean that your lettering has to be boring, but it does mean that you have to be careful not to select a typeface or to draw out letter forms that are overly complicated and as a result, will be difficult for the reader to make sense of. You want your reader to be engaged from beginning to end and bad lettering that is difficult to understand will discourage the reader from continuing. Now, I have a lot more to say about lettering and if there is interest, perhaps, I will do a whole class on it at some point. But those are the main tips that I want to leave you with for now. Whenever you're ready, let's continue on to the next lesson.
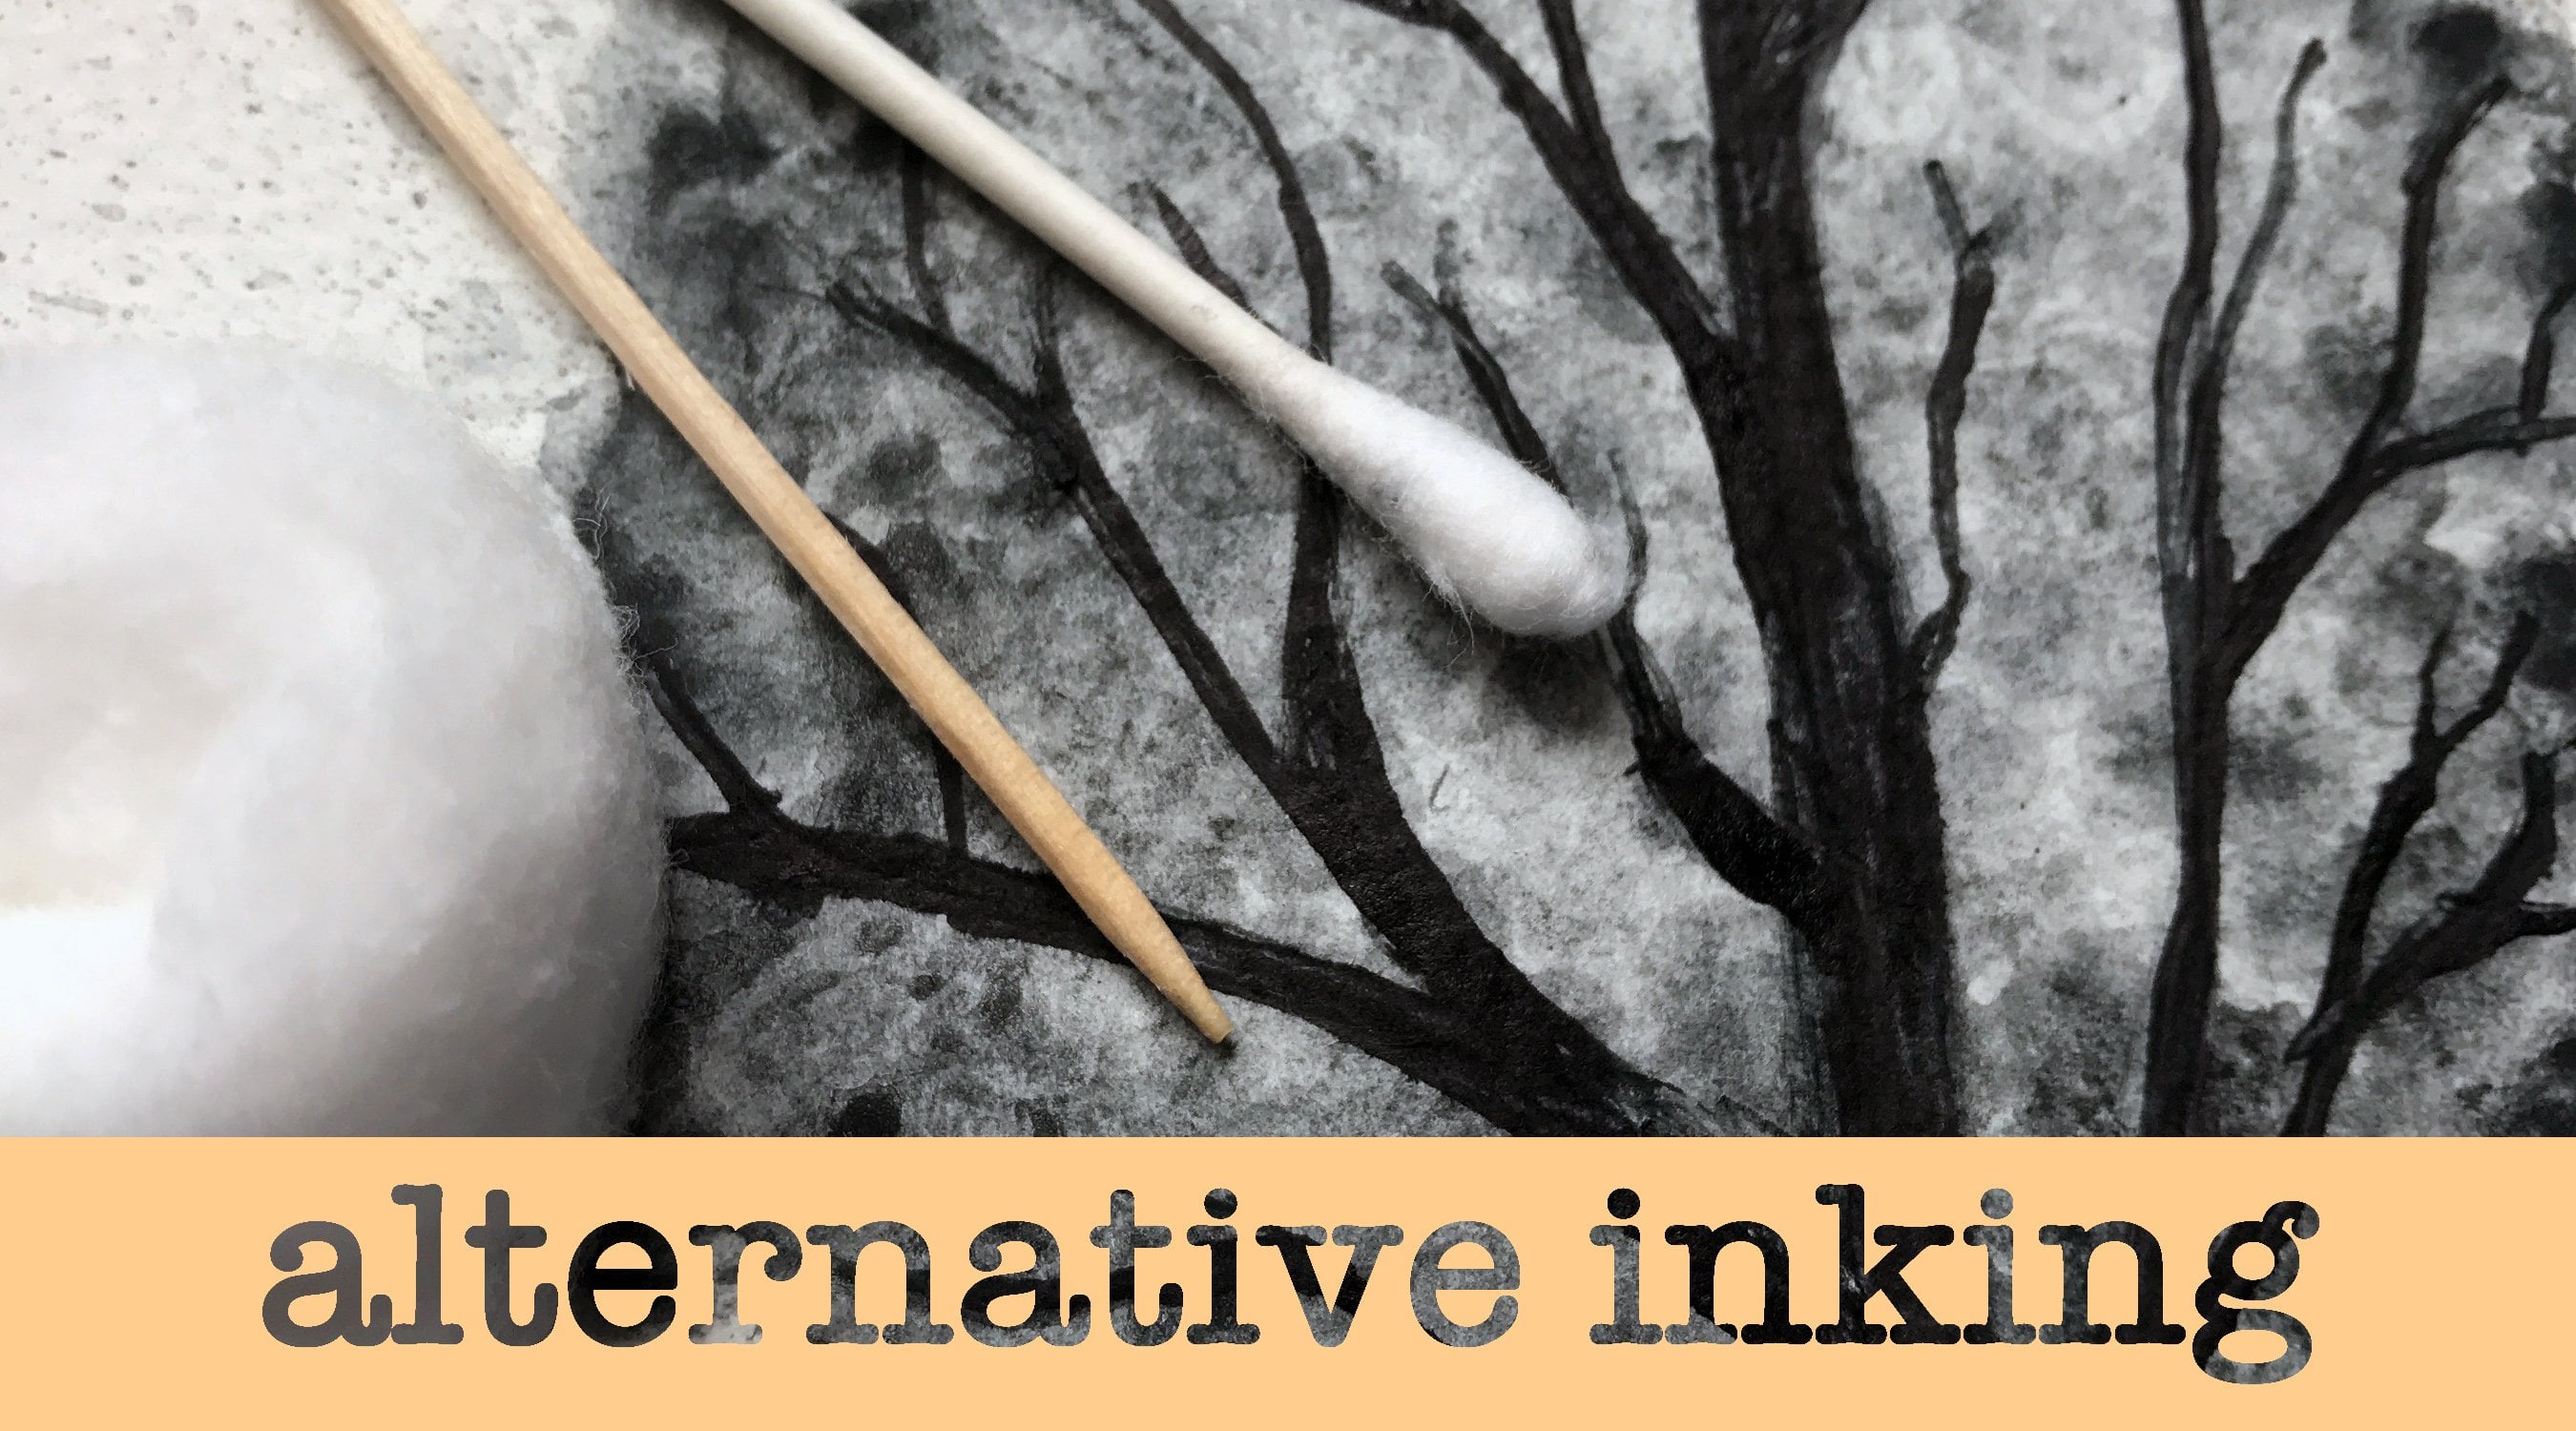
9. Inking: Welcome back. In this video, we're going to talk about inking. The term inking comes from the traditional practice of when cartoonists would create more refined drawings on top of their rough pencils and to do this, they would use black ink applied with either a Pen Nib or Crow Quill pen, or brush. But these days you can ink with all kinds of tools not just digitally but also with things like markers or pens. Now the inking process is related to the penciling process, but there are some differences that are worth mentioning. While pencils can be loose and fast and messy, inks tend to be cleaner and more precise and have more structure. That is, unless of course, the incur, has made the artistic decision to ink in a way that is loose and fast and of course, it's totally valid if that is how you wanna Ink, I think it's just important to be very intentional with your inking. It helps to look at how other people ink their comics, the kind of inking styles that attract you and to figure out how you can incorporate some of those styles into your own work, like many other parts of the comic-making process, I believe that there is no real right or wrong way to do it. It's all a matter of personal taste. Keep in mind that your inking is not just a reflection of your personality in an autobiographical comic, but it will also help you tell your story. Think about how you want your reader to feel. If you want your reader to feel may be more nervous or panicked, using a lot of short lines and inking in a faster, looser sort of messy style might help you achieve that and if you want your reader to feel maybe more at ease or calm, a simple, maybe more minimal style of inking might be best for you. If you want to give a sense of delicacy or softness, maybe you would want to ink using thin lines. Whereas bold lines and heavy blacks give more of a sense of impact and make more of a statement. It all just depends on what it is you're trying to convey. But even though at the end of the day, I think it is important to consider your inking style and how it makes a reader feel. The most important thing is that you Ink in a way that you find enjoyable. It's important to make work that you feel good about and if it doesn't strictly adhere to any of the rules or guidelines that I've given. That's totally fine. Lastly, don't forget that if you're working traditionally, you should wait for your inks to dry and then erase your pencils so that your inks will be cleaner, clearer, and easier to see. I hope this helps as always, let me know if you have any questions and whenever you're ready, let's move on to the next video.
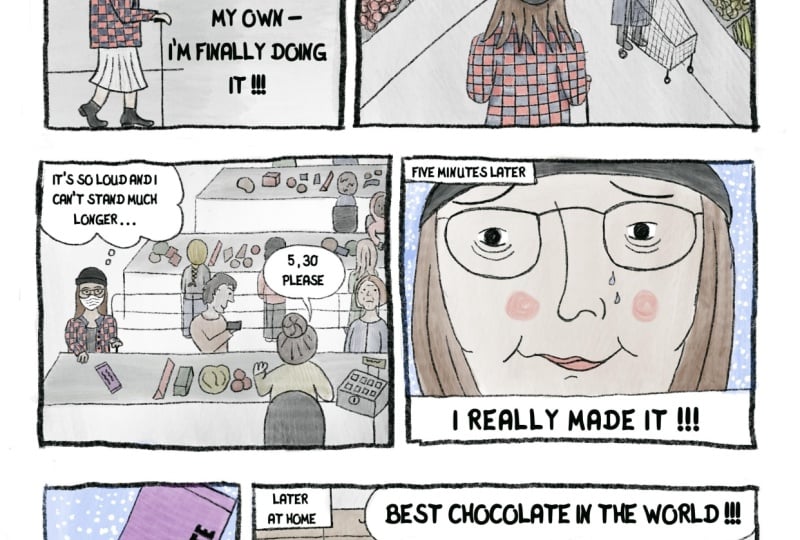
10. Coloring: Welcome back. Let's finish up this class by discussing color. There's a lot of cartoonists that work exclusively in black and white. If you're not interested in adding any color to your comic, you can skip this lesson. Consider it as more of an optional or supplemental lesson. But since I'm coloring this particular comic, I want to take a little bit of time to address my process and some of my thoughts on coloring. Coloring not just refers to the flat colors that are placed in a comic, but also things like shadows, highlights, and other various gradients like say, the flush in someone's skin. However, you can't just use flat colors if that's what you prefer. When considering a color palette for your comic, it helps to once again go back to the original feelings that you want your reader to feel while reading your comic and to choose colors that reflect that feeling. The tone of this comic is dark and it takes place at night. So I wanted to make sure that there were a lot of dark colors to convey that literal darkness that happens at night and also that sort of metaphorical darkness. I did want this to be a funny comic too at least towards the end. So I also added some pops of bright color, which you can see in the orange and yellow in an attempt to brighten up some of the darker spots. I think it's also really helpful to consider the physical location of your comic. Since this comic takes place in a franchised diner style restaurant, I wanted to use the colors that I typically see in this type of restaurant, which tend to be more of beige, warm brown tones, which you can see pretty clearly in the first and last two panels. So there's quite a lot of colors on this page. For that reason, I decided to keep my inks black and my speech bubbles white so that they would stick out a little bit more. But another thing I like to do sometimes in my comics is to create color holds, which basically means changing the color of your inking. That can also lead to some pretty interesting visual effects in your comics. The final thing that I did was use a couple of strategically placed gradients. First with a warm yellow, emitting from the overhead lamps and a few soft shadows to help imply space and a sense of darkness. You can skip that if you like. As I've already said in previous videos, I work digitally, but if you prefer to color using watercolors, wash, colored pencils, markers, and so on, then by all means, feel free to color in that method instead. Thanks for watching, and whenever you're ready, let's move onto our assignment video.
11. Assignment: Hello and welcome to your assignment video. So for your assignment, you're going to create your very own one-page autobiographical comic and you'll make it based on the process that we went over today. Although, feel free to make any changes to the process if that makes you more comfortable. Even though I worked digitally, you can work with traditional tools if that's what you prefer. Remember that you can tell whatever story you want, whether it's funny, or sweet, or romantic, or scary, or angry, it's all valid. Just make sure that it is appropriate for a classroom environment. Your autobiographical comic can have as many or as few panels as you'd like, but I would recommend keeping the number between maybe two and nine. Once you've finished your comic, feel free to post it with the class if you're comfortable doing so and telling us a little bit about what inspired the story and any other details that might help us better appreciate your autobiographical work. Don't forget that if you have any questions or concerns whatsoever, feel free to reach out, I'm here to help you. I can't wait to see all of your autobiographical comics. Best of luck, and don't forget to also have fun.
12. Closing Thoughts: Congratulations on completing this class. Thank you so much for taking this class and hopefully learning a little bit more about making autobiographical comics and taking the steps forward to make your own. I really enjoyed making this class for you and I can't wait to see all of your work since I love making autobiographical comics myself and I always feel like I learn a lot and forge a personal connection whenever I'm reading an autobiographical comic. Once again, if you have any questions at all, feel free to reach out and I'll get back to you as soon as I can. I hope that this class empowers you to continue making autobiographical work in the future and also inspires you to continue telling your stories to others. I'm really looking forward to reading all of your work. Thanks for joining me, and I hope that you guys have a great day. Bye-bye.
 Michelle Tabares, Cartoonist, Designer and Illustrator