Transcripts
1. Welcome to Class: Hello Skillshare. Let's design repeat
pattern scenes. Illustrated pattern scenes
are a great addition to your collections in your
surface design portfolio. Just like the Illustrated
scene that we learned about in
my previous class, scene patterns are a
great way of adding a little more personal narrative or cozy vibe to
your collections, plus they're really
versatile too. In this class, I will be
covering everything we need to know to illustrate
repeated pattern scenes. I'll share how I
gather inspiration, sketch, add flat color, and fun little details
as well as my process of building out a professional
pattern in Photoshop. Hello everyone. I'm
Kristina Hultkrantz, an illustrator and surface designer from Mariefred, Sweden. Like I mentioned in
my previous class, if you watched that illustrate
scenes in Procreate. I consider myself more of an illustrator and
I love to bring illustration into my
pattern design work or my surface design work. In this class, I'm
really excited to share with you how to go about adding pattern scenes to your collection that have
that narrative vibe, just like we did with
the illustrated scene. Without further ado,
let's get started.
2. Supplies & Class Project: To follow along exactly how I'm going to be doing
things in this class, you should be using an
iPad with Procreate, and then have a computer with Photoshop to finish
your pattern. But you can of course
try out any of the programs that
you prefer to use. I'm sure that you can
follow along just as well. I personally preferred
to finish my patterns in Photoshop because I think it has a more professional
finish than procreate, but if you are comfortable creating patterns in Procreate, you can feel free
to do that as well. The class project for this
class, will of course, to be creating or designing
a scene pattern of your own. You can choose to use
the previous class, your scene that you
created to inspire your pattern scene to start the beginning of a
fuller collection. Or you can just start
from scratch and create any patterns scene
that you would like to. I'll make sure to link the illustrated scene class below in the class description. If you haven't taken
that class before, you might enjoy that as well.
3. Intro to Pattern Scenes: Now it's time to learn all about the illustrated pattern scene. I would just want to jump right into the computer and show you tons of inspiration and what scenes that we can
create so you can get your inspiration and
your excitement going. This is going to be so much fun. Let's jump into the computer. Welcome to my Pinterest
board for scene patterns. We're going to gather
lots of inspiration here. I hope that you're
going to get an idea of the different scenes and the different scene patterns
that you can create. Before getting into what
scenes and inspiration, I just want to quickly go over
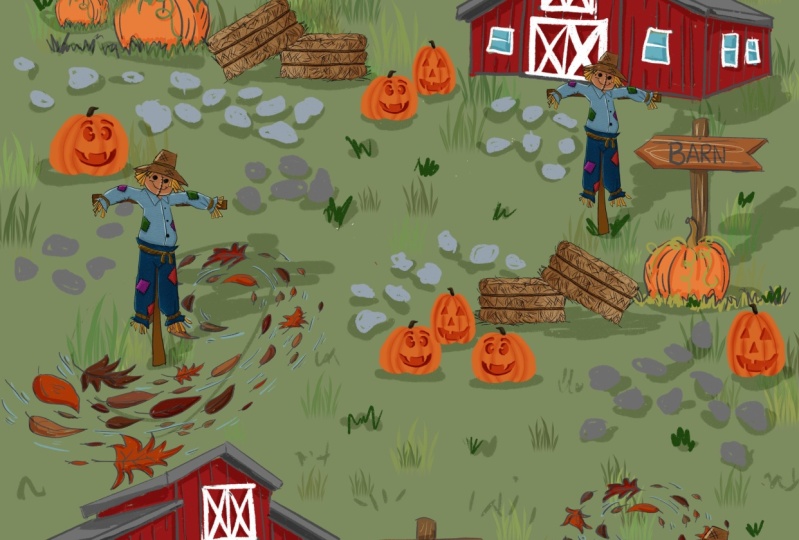
what I classify as scene. Mainly a scene I see it as a
landscape or a cityscape or something that feels like
you go into the pattern. It's not just florals, it's not like a flat wall
of icon like a floral, like an abstract,
like a polka dot. A scene pattern is
like you're looking at a little view of a street or cozy little cottage village
in the Christmas time or farmland or garden
or something like that. It's narrative, it has more of a story
that you're telling, and it's really versatile again because you can do it for so many different themes like we talked about in my
previous class that you could do this for occasions
like Christmas or Easter. Imagine a cute little
Easter egg hunt and you have little
baskets around a different garden with
little eggs poking out behind little bushes
and things like that. It's a little bit more narrative and fun and I really like these. From outside, maybe
the pattern scene feels a little
complicated to create, but I feel like there's
three different levels of these that we can look at. Starting off the simplest one, and it will be
something like this. You can feel like there's
depth to the pattern, but it's just a couple of squiggles and a
couple of figures. Same thing. Let's see. Can you organize Pinterest? Maybe. Here's another example. It's almost like a
traditional tossed pattern with some icons. This is like boats and clouds, which I find slightly weird. But if the background was blue and you just had
a couple of waves, it would look like
also that it's just a never-ending
lake or ocean of boats. This is really easy
to set a scene like this because mainly just like
a regular tossed pattern. Like here with the little wave, just adding little
waves makes it feel it's like a
never-ending sea. That's really fun and easy way of creating a scene pattern. Let's see some other examples. Here even there's a little
bit more going on in this, but it's still built up
like a tossed pattern. You're just creating different
motifs and displaying them so that they look
like a scene like this is a street scene with lots of different
trees and houses. It's really small image, you can't really see
that one very well. Let's see. This is another
good example again. There's a lot going on in this
image and in this pattern, but it's still quite simple
the way that it's created. All the motifs are individual. But because there's
a little swirly, that makes you move
through the scene, which is really interesting. Here's another example
of just having lots of icons that are just
placed individually. But you have some things
that help your eye move around the pattern. Whatever these
little details are, it's like a path or something. That helps to make it feel like it's moving
through the scene. But this is the first level of pattern scene
that we can create, and I will show you how to
create one of these in class. If you're interested in creating something a little
bit more complex, we can move towards
a scene that's a lot more overlapping. An example of that
would be these houses. There's a lot of overlapping. That can feel complex, but it's the same concept
I'll use on Pinterest here. It's the same concept of
designing motifs and then just overlapping them when
you create the pattern. But of course, it does take a little bit more work and you have to make sure that
it fits together nicely. But it's totally doable. I'll show you how to create
one of these patterns as well , more overlapping motifs. Same thing here
with these houses. This feels like such an
intricate pattern with so many houses and they're overlapping.
How did they do that? But if you just draw
individual houses and then overlap them when you're creating a pattern in Photoshop, it's going to be a little
bit more easy to manage and not as difficult as you
would think, which is fun. But here it is colored
version 2, whoops. Colored version, easier to see. But houses like this, it really feels
like you're moving. A lot going on, it's a very busy pattern, but that can be really exciting, especially if you
have little items in the windows or little curtains
and things like that. A pattern like this,
it's not overlapping, but because there's
so much detail, obviously, this would
take a lot of time. This isn't a repeat, but this could easily be
turned into a repeat if you just create motifs that
are in this wavy shape, and then you'll be able to fit them together quite nicely. I really like this image. I'm just going to quickly save that in case I didn't
save that before. Let's see another example
of these more overlapped. Here's an example that's not
necessarily like a scene, like a landscape but the background color
feels like it's the ground that the
horses are running on. This feels different
like a scene to me because the horses
are slightly overlapping and there's so much movement
that they're running towards something rather than in a
traditional like this one. It just feels like
they've been placed. It's not as much movement or this even more
traditional pattern is just this very still. Go back. Another
example of these, see, example is overlapped
more intricate patterns. Here is something
a little bit more abstract and that's of course something that
you can think about. It does it have to be a scene with little houses and people and animals doing things. You can easily do this technique and do it
in more abstract way. This looks like clouds
or bushes or mountains, but it could be nothing. It's just wherever it wants
to be. Same with this one. It has some landscape and it's also mixed with
polka dots and stripes, which I thought was so modern
and so fun and so cool. This is another way of
incorporating this cool scene, but make it more
modern and abstract. That's an idea for you
that sparks something. A second. Let's see what else. Here is again,
another example of the scene with lots of
little houses placed in. Because they are overlapping, it feels like it's more
intricate and difficult to draw. But it's not really,
I'll show you. There's so many cute examples of these little scenes with
little street scenes or houses like city
scenes, landscapes. There's so much
inspiration to be found on Pinterest and some of these examples that I have in this board aren't
necessarily put into repeat, but they could easily
be put into repeat. Here's another example
of that scene. Because there's
been more work to this rather than the previous examples
that I've showed you, that are mainly just like
a plain background with a couple of details
on the background, occurs more shadowing
and details that there's some sky and
sand and that really helps to make this
feel like it's a scene with more
depth and there's more intricacy and it
feels a lot more work. I love this section
where there's a lake with a little sailboat. But it easily melts into the next section that goes
up to be the sand again. I can't wait to show you how
to develop these patterns. Last but not least,
if you really want to push yourself to
create something a little bit more advanced and have a lot more
depth in your scene, you can try drawing your
scene isometrically. I'm not going to be
covering this in this class but there's many isometric classes on Skillshare if you want
to learn about that. But it's a type of perspective
that looks like this. If you look down on
something and you can see everything's in the
same perspective, that can be an isometric design. I don't think that this
is eyeballed, isometric, but this is really intricate and it looks
like you're coming down at an angle and
looking at this image. But it's just a matter of how you would just set
up your Canvas. You're drawing
everything instead of drawing everything flat, front-facing, you draw as if you're looking like
bird's-eye view. Here's another example
that I really enjoy. Just drawing all your items in this angle will make
your pattern look really like you're looking
into a little world rather than looking at something that's
like front-facing. You're just going to
have to work a lot more on perspective and that, again, it's not going to make your pattern more
difficult to create. Patterns are still like you
create them in the same way, but you would just draw
things in a different way. I hope I explained that
so you understand. In this class, I'm just going
to show you how to create a more simple pattern
scene like this that has individual motifs in how to make it a
little bit interesting with some movements such as little rocks like this or trees. Then I will also show
you how if you want to overlap your items to make it feel a lot more immersive and detailed and how did
they create that? I don't know if we
go this detailed, but this is amazing
just layers and layers of different houses
and things like that. For my pattern, I
thought that I would use my previous class
illustrated scene as my inspiration
for my pattern. I'm going to use the same
color palette and I'm going to use the same
brushes that I used here. I'm going to use this
theme of a flourish shop. I thought that
maybe my patterns, I could do some greenhouse
garden as one of my patterns and the other one
could be a flower shop and then I would have
a really fun start to a mini collection
where it have an illustrated scene illustration
and then I would have two complimentary patterns
that would go with that. I would have a beautiful
mini collection to add to my portfolio and I think that
that would be really fun. It's also nice that
I can show you two different patterns so that
you will see that process. I hope that you
have now gathered some inspiration for the type of pattern that you
want to create. I will make sure to leave this scene pattern
inspiration board from Pinterest in
the links below, so if you want to
check out any of these images, you can do so. But otherwise, in
the next section, we're going to jump
into Procreate. I'm going to show you my
process of sketching out these patterns and
it's going to be fun.
4. Project 1 & 2: Sketches: Now that we have learned
all about patterns, scenes, and the different kinds
that we can make and we've gathered tons
of inspiration, and we know what route
we want to go down, it's time to get started
on our class projects. In the following sections, you can follow along in my full process of
creating pattern scenes. We're in Procreate, and I'm
going to take a quick look at the illustrated scene that I created for my previous class, illustrating scenes
in Procreate. Because I want to use this as inspiration for my two patterns that I'm going to be
creating in this class. First off, I just want to remember what
brushes I was using, but I recall I was just using three. I also want to take
this color palette. I'm going to open up
that layer again, and I'm going to click
it and copy that. I can uncheck it. Then I'm going to go
and make another, just a screen size
because I want to do some sketches with you. I can put the color
palette in if I want to, to put and paste. There's the color palette in
the corner if we want that. Otherwise, I'm just going to get a regular sketching pencil and the dark colors we can see, and a new layer of course. Then I'm going to sketch
out my ideas for you. Here's one pattern. I can use my second pattern. The first pattern I'm
thinking it's going to be that more simple design that's just on a light background and I'm just going
to place some items. Nothing's going to
really overlap, but you're going to get a
hint that it is a scene. The illustration that I
created was the flower shop, so I want something in-between, so maybe this is a garden or the backside of the
flower shop or something. Definitely just something like
pots with flowers in them, just randomly around
the whole piece. But then I saw it to
give it some atmosphere, maybe there could
be some bush things with different flowers. They come in different shapes
but they're freestanding, they're not going to
be overlapping or touching or not
building some space. I was also considering if these could be flower
beds that were a little bit more in shapes of
flowers different rows of different flowers could
be interesting to give it something a little
bit more structured. I can't really see that here, but in my brain, what else could we have? Because I had a cat in
the other one and birds, there could be a little
cat behind one of the parts just to
give that little, just to show that it's similar to the other piece
that has a connection, and maybe there could be
just to give some life to this pattern
like a butterfly. Some butterflies are
fluttering around, and then so that these
don't feel they're standing on anything I could
give them some stones, like a little stone
path or something. When I create my patterns, I like to just do it by chance and see what's
going to happen. I'm not going to test this
out and see if it works. I'm just going to go for it and then I'm going
to make it work. With just the way
that I like to work, I don't mind if maybe I draw some elements that I won't use. But just to get the
ideas out there and draw lots of different items that I can then use
to make a pattern, I think it's fun. I might do a cat. It's just walking around
too. It's a great cat. What else? For this simple pattern
that could be enough. I want a couple of groupings of different things,
maybe 3-5 groupings. I think that that would
be enough to make this pattern feel it is
interesting and good. If we want to just quickly
add some color here and we can put the color on
top, make another layer. I'll put it under the sketch, and I'll get another brush. I just do this watercolor one. In the background for this, I want this one to
be quite subtle, so maybe just a very light
green as my background. Then the bushes would
be other greens, swampy green, and then
the flowers would be, of course, different colors. They would bring the
color into the piece , these as well. I can't do the white
cat like I did in the other piece which was
on a dark background, the cat will have to be a darker color so
that they stick out. These parts will have to be a nice yellow color maybe
this brownish color. The cat maybe could be
orange instead. We'll see. This is just a very quick
sketch of what I'm thinking, and I feel that could work. If I have three bushes, if I have three groupings
of the plant pots, I like three or five, I like when it's uneven
amount of numbers, I think that when you
have three things, you can bounce your eye around the pattern in a triangle
at different things, so that's an excellent
way of doing that. I just have two cats, but I might consider
doing a third maybe if I feel
that would sense. You don't have to do
everything in threes. I think that's a good start. I'll go back to my
sketch and I'm going to do the sketch for my
more complex pattern. For this one, I want it
to be a lot more lush. I want it to be overlapping
bushes the whole thing, so the whole thing is
going to be overlapping. Again, just because I'm going to place
them overlapping, I'm going to still draw
them individually so that I can move them around
when I make the pattern. Then in between these bushes, I would love to do some
greenhouse design. I have to look up what
greenhouses look like. [LAUGHTER] Like that,
and then I will flip it, and use the same design
and have it the other way, so this is going to
be the main thing. Again, maybe I could add some fruit trees to
give it more life. So it feels a garden with trees. You could have some
plant pots too just to mimic what's going on
in the other pattern. Even though it's bushes and
we could do some awesome. There could be spaces in
between the bushes where it could have some birds, a little suggestion that there's birds in the sky or something. I like the idea of having
lots of little trees and things in different
sizes so that it feels little bushes
everywhere so it feels it's not just clumps of things. We could do little
individual flowers that are growing on
the actual ground too. That's my chicken scratch and how that's all
being sketched out. It gives you an idea of what
my brain is at, but again, I'm going to draw
all these elements separately and then build it together and see what happens. But I'm just going to make
sure that I have enough stuff that I'll be able to make
something out of it. I'll do threes again.
But maybe bushes, I want a couple more options, so I might do five these background bushes,
five of those, one greenhouse, and then do maybe five different
types of trees, three different types of clumps, a little flowers,
and then some birds. If we're going to go in and
do some initial coloring, I would love if this
pattern was then darker. This one's in a
darker background. We go and then
some of the bushes will be even darker green, and then I want some of that
weird swampy green in there. They're going to like that. Then some of the trees, the trees could be a bright
pink tree that could be fun, or an orange tree. The trees don't all
have to be green, everything and I think that will bring some of that color in. I want the flowers in here to be purple to get some of
that color in there. Again, things get more of
these fun colors in there, because if otherwise, it's
going to be very green. On the bushes too to mimic the image that I
created for the class, I want the little
flowers, the greenhouse. I think it's going to
have to be quite white to stand out from the rest. But again, I feel this is
enough information for me to start planning out my pattern and understand how
these will look. The one on the left
is going to be a lot more airy and simple, like a simple coordinate. The one on the right
is going to be full on really illustrative and
have a lot of detail, but still I'm going to
show you it's not going to feel like it's overwhelmingly
so much more to create. These are my sketches and
I'm going to take away this. I'm going to save this image
so I can bring it into my final file and be able
to use it as a reference, at least something to reference. Let's see. Share. JPEG and I'll just save it to my device. There we go. Now I can then work on
jumping into the first image, which I will start
with the simple one. To do that in the next section.
5. Project 1: Procreate: Let's get started on
our first pattern, so I'm going to open
up a new file I use. Even when I'm creating a
pattern or illustration, I always start with an
11 by 14-inch canvas. We're in RGB 300 DPI.
I like this size. I think it's a nice
swatch size to repeat. I don't like the square swatch when creating a pattern that's
just personal preference. I feel you see the repeat easier when it's
a square and it just looks, I don't know, I
just don't like it. I start with this a
regular rectangle and this is a big enough size, so it's a good size for
any application, really, and for the most part, you don't need to
worry about what your patterns swatch
sizes doesn't matter and you can change it later. If there's a company that has a specific size that they use, usually it's always
just the widths of the pattern that
makes a difference, and the length of
the swatch can be as short or long as you want. It's pretty easy to adjust
patterns, swatch sizes. That was just a side note, so don't worry about your
patterns swatch size, just make sure that it's a big, high-quality Canvas
that you're working on, definitely at least 300 DPI, and I am choosing to use
again 11 by 14 inches. Again, I'm going to
paste my color palette, so I have that to work with. Then I'm going to also
let's see, insert a photo. I'm going to insert my sketch here and I'm going to
use this as a little, I don't know why they call, there's a reference for what
I'm going to be drawing, so I'm going to make sure
that it's really light because we don't really
need to see that, and I'm going to start
sketching on top of this. In the previous class, I mainly use this Azure Orlando pastel
pencil that I really like. I'm going to use that
to make all my forms. To start off with, I will, let's see, I need to put the color
palette on top so that, yes. Again like I said
there,s a new layer, I'm just double-checking,
new layer. It's difficult to talk and
think at the same time. But I was going to
say, like I said, I like to just
jump in and create stuff and then see what's
going to happen later. I don't like to plan out my pattern and make
sure that it's in a sketch mode and that
it's repeating perfectly, and then I go back, I feel like that's
too much work, and then I'm wasting
time when I could just finish it and then make it work. But that's just my
personality and how I prefer to do things. I'm going to make some
nice fluffy bushes that are going to look great. Then these, of course, I can use them multiple
times in the pattern. I can flip them horizontally and just use them
in different ways. Who's going to be
my bed of flowers? You can erase that a little bit like that. Also the background color, I don't want it to be perfectly
white, so I like this, a grayish color I
thought would be nice, or even this green, but maybe make it a
little bit lighter, so I'm going to choose that because it's a little too dark. I feel maybe we'll test it out. I think it's a little bit
darker than I had imagined, so I'm going to lighten that, so it's a very subtle
a grayish green. I think that would
be very pretty. Now that I've drawn those, we want to put some
definition on them because be boring otherwise. Let's see. I'll just draw on top of it,
so another layer, and I'm going to pick some
of my little colors here, and I'm going to do like I did my other illustration for
my Illustrated scene, just like that doesn't show
up very well on that color. Do some more of the purple. Don't like that. [NOISE] This bush looks really boring and
flat because it is flat, so I need to add dimension
to the actual bush as well, but I like to do
things in batches, so I'll just add the flowers
first to all of these three. Let's see, on this darker one, I think the purple will pop
a little bit more, yes. Random dots here. It's going to look good. Let's add a nice pink as well [NOISE]. Then for this other one, I want it to be more
structured as if it was in flower beds but
not like perfectly. To purple, like if it was rows of tulips in different colors
or something [NOISE]. I'm going to go back
to my little bushes here and I'm going to do a
clipping mask on top of that and I am going to add
some definition there. I'm going to use, I like the wet crayon. I'm pretty sure that's what I
used in the previous class. I often do adjustment layer. I chose a charcoal black but not quite black,
just dark gray. I'm going to go where
it says N, normal. I'm going to move
it to soft light, then I'm going to test that out. By doing that, then I
don't have to change the color green that I'm
using on all of these, I can just use the same, as you can see I
adjust so they just darkens the color
that was underneath. By doing this, I'm
able to quickly add some definition under all of these flowers and make
this come to life. Love that. See this is just so
much easier if I choose a darker color and
then I'm going to use that pastel pencil, and I'm going to reduce
the size a little bit. I'm going to add
some stems here, just to give that
even more definition. It looks like
little plants here. Add some as if there's
little grass or something, brings that to life. Not just like a
random blob of green. Now it looks like it came
to life all of a sudden, which is really fun. Because I did the adjustment
layer at soft light, now I don't have to change
to do a different green over here just automatically
switches so that it matches. I think I'll make my
brush bigger here because I think they look better with bigger pieces here
as if there was leaves. This bush I feel
would look better. Yes. Then the same
thing over here again. Look, it made it a light
green. I love this. It's a huge time-saver as also, if I were to change the
colors of these bushes later then I don't
have to worry about changing the color
of these shadows. See, I can just show
you if I change this bush to this
orange color instead, I go like this, just pull
the color and then it automatically the shadows
and everything has changed. I don't really want
that color right now. I'm pretty happy with my green. I just want to show you the joys and the wondrousness that is the soft light adjustment
layer helps you out so much. There's my three bushes, and I think that
could be enough. I'm going to be an overachiever
and do a third because I really liked how this
one at the bottom looks, so I want to do another one. But I like this dark green, so I want to have two, I want to make it a little bit smaller because I think
that could look nice. We'll see. Again, I have no idea how
I will be able to fit these all in the pattern, but I am sure that I can manage. The other ones that had a
diagonal leaning that way, so I makes sure that
my little flowers are leaning another way
in this other one. Maybe a little bit bigger brush. I have all the colors. Again, I'll go back to this, the Adjustment
Layer layer and go find my nice charcoal grayish, black, my wet crayon here. What crayon? That's a Shelley Laslo
brush if you're wondering, you're going to give
them some definition here in these rows, and then again I will
make it almost black, and use the Pastel
Pencil but smaller to give some little stems. Those are my cute
little bushes done, I really like how
that turned out. Now I'm going to get
started on some plant pots. I'm going to create a new layer, and I think in my
previous piece I used this gross greenish-yellow color to make some plant pots, which will be great. Then again, I want
to do a couple of different little
clumps of these. I'm going to do three little
arrangements of plant pots. The first one is just
going to be by itself. Another one, the sketch is a little bit too
close to that bush, I'm just going to do
my sketch over here, but I'm going to, and I'm doing very simple shapes here because that's how I drew
the other illustration. I did very simple
forums and just used very simple coloring and just
simple amount of brushes. I like to switch it
up and not always create my artwork the same. Sometimes with
simple objects like this and I just want to
add some definition, I might just alpha
lock that layer, swipe with two fingers
on that layer, or go in and press
Alpha lock here. I'll just pick a
slightly darker color. I use a wet crayon again. No, I think, did I use my
other favorite the other class? Where are you? Pressure cooker from Lisa Glanz, I'll use that for these that instantaneously give
some cool texture, so there my plant pots are done. Now I'm going to
add on top of that, I'm going to add with
my Pastel Pencil, some bush stuff so it looks like a little
flowering tree or something. We're going to choose
different greens there. I need to make this bigger. Just random, leaving
some spaces there. Do that, random greens. On top of those, I think I'll do my clipping
mask with the dark gray and a soft
light filter again. We'll use the wet crayon
and go in there and get some definition going on
in there to begin with, and then on top a new layer. With the Pastel Pencil, I will start to add
some flowers here. These swatches are in the way, so I'll just move those. Make sure I'm on
the other layer. Let's see. Then I'll go back to my
shadows layer and I'm going to do a darker black so that I can do
some leaves in there underneath the flowers to give
them even more dimension. [NOISE] There is some simple plant pots. Again, I want this
pattern to be really simple and match the
vibe that I created, which was a simple look in the illustrated scene,
so I'm matching that. Sometimes I like to
add tons of layers and details and leaves
and things and sometimes I like to keep
it simple like this time. Around those plant
pots to give those some there's a ground
underneath the plant pots. I'm going to do
another layer and I'm going to choose this warm, pinky gray to draw some stones and just give it some like there is a pathway. Let's see how that looks. I'm not sure if that's going to work out or
if it's going to look bad, we'll see, but if I have the option some
stones like that. I'll even have some
around this cat maybe. The last thing we
need to work on for this is some cat details. I'm going to do another layer. The cat moves down
with a butterfly. I'm going to use
this dark green for the middle of the butterfly, that's too thick. Let's see. Then just simple, again, everything
in this collection. Just a simple butterfly. Here we go. Then I'm
going to create two more. I take that dark green light, lilac color. These columns could be there on the side and that
nice peachy color. Here we go. Now we have some butterflies. In the last step,
we need some cats. For the cat color like this
orange could be interesting. I'm going to see if I can
clean up this cat shape. Doesn't have to be perfect. You just have to be able
to see that it's a cat. That front leg is not the best
possibly but that's okay. Then again, I'm going to
choose that dark green, reduce the size of that so I can just simply create a
little cute cat face here. Maybe the ears need to be
a lighter color in there. I think that's a good enough cat for this very small detail maybe a little claws
could be cute. That reads as a cat. Then I just want a little cat
face peeking out over here. Again, I think this orange
color works well for a cat. I will overlap it over here. There's a little cat picking
out towards the tail. Does that make sense? No. Then I'll do the little
face again with the ears. Dark. Cat-like fox-like too. That's okay. Let's see. Ears are too pointy, the wrong way. Let me see. Ears are pointing wronged. Cats need to be more like this. Better. I need to look at
what would cats look like? [LAUGHTER] I can figure it out, I promise I swear. I know I can. I believe in myself, let's see. I feel maybe smaller
ears. There we go. This feels better. I feel like adding the arm,
stop ruining it. I'm satisfied with this. I'm going to turn
off my scheduling in the back I'm going to turn
off this color palette. I'm going to see if does this feel like it's going
to turn into something. I think we can make
something under this. Maybe possibly this
cat, I like it. I think I'm going
to do it because I talk about threes.
I like doing threes. I'm going to use
this selection tool. I'm going to copy-paste it. I'm going to flip it
horizontally and oh my God, doesn't it look messed up. I'm going to just switch it
slightly because when you flip step is so weird that
actually looks wrong. I'm going to make it a purple cat because I think
that would be fun. I'll put you up there. Now, if you're this is
a very simple scene, but you still get
an idea of you have that idea you're stepping into a garden and there's
some cats and butterflies walking around and it's really sweet
and really simple. That is how I create a
simple scene pattern. I hope that you enjoyed
following along. We will jump into creating the more complex scene pattern, the illustrations first
before we jump into Photoshop later and build
them both at the same time. We're done with
this one for now.
6. Project 2: Procreate: Time to get started on
our second scene pattern. This one's going to be a
little bit more complex, a little bit more full-on, but we're still going
to do the same process. I'm going to open
up my file again, that is 11*14
inches, RGB 300 DPI. I'm going to paste in my
color palette and I'm going to insert my sketch so I can at least have
that as a starting point. I'm just going to zoom it
in here so we get that. I'm going to reduce
that opacity, so it's not overwhelming. I'm going to bring my
color palette to the top. Then I'm going to start
drawing on top of this. Like I said before, I am not going to build
this out so that I know that it's going to
fit together perfectly. I'm just going to make it work, and I enjoy the process of trying step and
then making it work. If I'm missing something, I can always go back
and draw some more. But usually works
out fine, I feel. Again, I want to create some
more bush designs here, and these, I'm going to
make maybe five of them. I'm going to use my
pastel pencil again, make it quite big. I'm going to do these quite large. Just like this traditional
normal bush shape , like a mountain. I think this is going
to overlap well. I going to do them into
different green colors and different sizes and
different shapes so that when we
put them together, they're going to be really nice. I think I definitely want
some different sizes, maybe it would be useful to have something
that's quite small, if there's a weird gap, you can just shove a
little cute bush in there. Same thing will do, like this. Maybe one is a little
bit more shallow, not very tall, it's quite slim. Could be nice to print shape. Here's some nice little
bushes that we can use in the background
to build up that. I also want to help
out the whole process. I want to add a
background color that is going to help fill out
the space. Let's see. I'm going to just turn off my sketch and that was the same color as
some in the bushes. I'm going to either make
it darker or lighter. Let's see what it looks
like if I make it, I think I'll go with darker. I think that's subtle enough so you see
those lighter ones. That's really nice. Again, to give some definition to these nice little
bush thingies. Then we're going to
add a clipping mask. I'm going to go to the
normal here, the N, and I'm going to pull
it down to soft light. Then my color, I'm going
to choose a charcoal gray, and I'm going to use
my wet crayon here. Let's try for this one now, the pressure cooker
one from Lisa glance. Because this one has
really nice texture. Because this is going
to be background stuff. I like how random that is. If it's too much, you can always click on
the SI and then here, opacity, you can
pull that down if you wanted to make it a
little bit more subtle. I thought it was a
little too intense. Problem is these lighter ones are melting into the background. But to fix that, we could do a white
instead on top of those to make those the shadow
instead of dark, we can make them light, I'm going to use a white
there in the soft light mode. There we brought
our bushes back, so that could be good. No, I don't like it. I think the white is
going to be too much of a contrast compared
to the other ones. I'm taking away that I'm
just going to darken these. Let's see. There we go. I'm just going to
make them more green so they stand out
from the background. On this, again, I think
for some of them I want to add some little flower
details on there. I'm going to do a new
layer and make sure I'm on the pastel pencil and not too big and give them
some, that's too small. Trying to do something random can be difficult sometimes, you're like it can't
be too perfect. It's pretty good. I don't want to put flowers
in all of them. But I adjusted to
make sure there's some color going
on in this piece. I love this lilac color. I think that that could be good. There's some that have nothing. Also, this is something
that I could turn off so I could use some
of the bushes again, without the flowers on top. I'm going to do a
second layer for these with a clipping mask, which the gray on this soft light to
make the leaves underneath the flowers on these. But I want this separate from the other layer
just so that I have the option to turn
it off if I want to, if I want to use the
little bush clean instead. That gives so much
definition of cool, and I want to give some
definition on this as well. See like that, is when the randomness that this all of
a sudden do not look good, I don't know. Let's see. Can always decrease the gray
so it's not as intense. Maybe I go back to this. Here I want to do some
swirls like I did in the other illustration. I think this looks
a little bit more subtle for these and I think
that would look better. Sometimes when you
just go for it and you're not too precious, I think you can get some
cool stuff going on. There we go. I have my
little bushes ready, so I'm just going to
open up my sketch again, see what I was doing. I had lots of trees. I have my greenhouse. I have to fill that in, so what's great about doing this and we have
two different layers, so I'm going to do
a greenhouse now. Let me just pull
this up a little bit and see if this
can even be some help. But maybe I'm going
to do it in white. I'm going to use
the pastel pencil and I'm going to do a simple little
greenhouse design here. It's going to have a nice roof. We need some details on
the roof, would be cute. We need some painting. like this We need the
doors to look a little 3D. It's getting messy. Let's see. Does this look better if
I close it a little bit? The door here. Bring down the opacity. Give it some shadowing
there because some of these in the
background were too intense, I'm just going to erase them to give them some transparency. Because this is supposed
to be made out of glass. Now I can go back maybe and make this door a bit more pronounced. Let's see. I'll give some door knobs that are big and bright and yellow. Does that look like a
greenhouse? I think so. Inside, I want to make
it another color, so on the ground, I'm going to make it that
stony grayish color. I'm going to color
that in so it gives the idea that it's solid. That looks like
greenhouse to me. I want to also give it some
definition. Let's see. Just slightly, I'm
going to Alpha lock it. The white that I was using, I'm going to just do
a very light gray. I'll try the Pressure Cooker
and I just want to give it a little definition there
on the sides and the back. That looks cool. There's my little greenhouse. Now I'm just going
to do some trees. In my sketch I did, 1, 2, 3, 4, 5, 6, 7. That could be good because you want some
items to be a lot. Because the greenhouse
is going to be repeated twice in two
different directions. It's just nice to have different
amounts of things and to trick the viewer into
thinking that you drew this, took so much time, that you intricately
designed this so much. But, I don't know, this is going pretty
quickly, I think. Using the white again, I'm going to do the little
birds so that I have some fun, nice little birds to play with, to put in here just to give it some life like the other one has with the cats
and the butterflies. Here, just going to add
these little simple M-birds are just going to give it that, like something's happening, there's some movement in here. Now we need some trees. My trees, I think I'll do with all the tree trunks
in this dark green. I'll just start making
some tree trunks. Let's see how many we do because we're making sure that this is in
a different layer. We're okay that we're drawing
on top of tons of stuff. Then I think I'm
going to close out this sketch because it's really difficult
to see anything. I'm going to move the
color palette down to the bottom where I'm not
drawing anything at the moment. I'm going to use some of these colors because I thought
that that was a fun idea to do the trees in different
colors rather than green, since the bushes are all green. I'm going to do that. Let's see. No, I'm on the wrong layer. Start over. I'm on
the same one with the trunks because I want
to keep the trees together. Just do some different
sizes and shapes. It's okay to leave some. Doesn't have to be
fully filled in. It's nice to leave some gaps, and things so it looks like
wouldn't even be a real tree. I want a big purple
tree because it's my favorite color in
the color palette. Maybe I'll do some
actual green color too, just because it's darker. I want a yellow trees,
so I'm going to do one more trunk and then
I'll do a yellow tree. Yes, that's a nice pop color. To give these some definition, we're going to create a
clipping mask on top. Again, we're going to do
switch from normal mode to soft light so that
we don't have to switch out the colors when
we're designing this. We're going to start
with a charcoal gray. I'm going to use this
wet crayon and I'm going to go in and give some definition there to make some swirlies here so it feels like something's
happening in there. We can even give some
definition to one side of the trunk so it feels
like a little shadow. I'm not sure how
much more detail I want to put into the trees, but let's chose a darker, black. I'm going to go back to the
pastel pencil and I can do some as if there's
some leaves going on. Again, that perfect amount of not being too
much or too little. I feel like there's too
much, I'm not sure. It's like subtle
amount. Let's see. Looks random but also
defined and nice, but not just like a weird
blob of polka dots. The whole of the tree
feels like polka dots. [NOISE] I think that looks okay. I like the idea of some
flowers, just random sprigs. These ones, another new
layer and for these, I'm going to choose
this dark green. Let me make those
little too big. Random patches of
grass with flowers, some of them can
be a bit bigger, a couple of small ones. I just want some nice
little flowers on those. [NOISE] Is this all that I
had in my sketch? Let me just open that up and
put them on the top and we can see if I didn't
forget any of my ideas. But I had some flower bushes and I have some trees that
are in different colors. I have the greenhouse, I have some birds. I didn't do plant pots. Doesn't need it. Let's see. Is that going to make it
even better? It could. I think I'm going to
keep it like this. I like the idea of
the floral trees and the bushes and the
little floral thingies. I feel like this could be
a nice little pattern. Again, there's enough
information here. I think, that I'll
be able to overlap and repeat and flip and do fun stuffs with this to make this a
really interesting, fun pattern as well. That is the second slightly
more complex scene pattern that I have completed
for this class. Now we get to do the fun
part and that is jumping into Photoshop and
now we're going to turn these into patterns. I'm going to export these
to Procreate images. I'm going to select
them, select, and then I press "Share" and
I'm going to use the PSD. I'm going to export these
to my Dropbox folder. Here Dropbox. Hello. Then let's see, pick a folder, 2023, that seems fine. I'm going to save
it to my Dropbox and open them up in Photoshop
in the next section.
7. Project 1: Photoshop: Now we are in photoshop. I have brought in both
of our illustration, so we created in Procreate, but we'll start with
this first one. What I like to do
is I'm going to make this more flattened and I'm going to make sure that
all of the motifs are separated so that I can move
them around really easily. I am going to make
sure to delete that color swatch
I had it in here. I'm going to delete my
sketch and then I'm going to combine things. Here's my little bush and
here is the flowers for that. Yeah, those are my stone. These three for the bush
I'm going to highlight, and I'm going to do Command
E to bring those together. Now you can see they're on
one layer, just flat end. I want to separate these out. On this layer, I'm going to lasso so that you press L and then I'm
going to come in to J, that's going to make
a copy of that. Now I have a second one there, and I make sure I'm on that
original layer and I'm going to highlight last of this one, Command J, go back down there, you get to pictures. I'm going to do that
for all of these items, so that I have everything
on individual layers. I suppose you could
do this kind of work in Procreate,
to begin with, you can make sure
that you're drawing every motif on a separate layer, but I like being able
to have that edit to the Procreate file
quite editable easily that I can have lots of different things
on one layer, so I can just easily
move stuff around, but that might not
be your preference. Now we have my stones and I want to make sure that's layered ten. I want to separate these out so that I can move those around. Those J and K. What's this? Other my pot, so I need those and these, so layer 9 to 6, we're
going to flatten. I highlight those Command E
and then I'm going to lasso, that's not going to include
the cat, but that's okay. J. Can we turn off that layer? The last one, let's
see, is this one. We already have the purple
cat is by himself so we have our last layer with these
last cats and butterflies. [NOISE] Levin. Last thing, the last butterfly. There we go. Now I have
absolutely everything. I'm going to make sure that auto select is on a
layer rather than group. Now, I'm going to
be able to move absolutely everything
individually like this. When I'm going to make my pattern now, but
before I do that, I'm just going to make sure
to save this so that I don't accidentally mess
something up. Let's see. What do we call this?
Garden pattern. Now, I'll like to use
the pattern preview, because it just makes
your life of making patterns as easy as it
can be in Photoshop. It's not as excellent as the
illustrators pattern tool, but it's at least something. Now I'm just going to
move stuff around in here until it feels good. I feel like these two are
too close to each other, so they need to be moving. I really like this one, so I'm going to copy this one by pressing Alt or the Option key, and pulling it down
and then I'm going to command T to transform it, and then right click and then flip horizontally to make that look a little different
than the other one. Then I'm going to move my
plant parts around. Like cat. I think cat, they want
him somewhere else. It's purple cat. This one I want to be quite
airy so I'm not going to overlap very many things or anything at all Just because I want it to have
that simple look. Let me just make sure that this cat doesn't
look like any speed. Closer there. These plant parts
need to be moved around with these stones. I have my butterflies that are
going to make this field a little bit more playful as well. It's a pretty simple pattern, but still feels like a scene. These ones I need
to be used as well. Open up that empty space here, I'll use these ones there. I thought that one look
nice with that cat. I'm going to again copy those. Let's see, any of these
butterflies that we could reuse. I'm going to duplicate
one of these butterflies, so I'm going to press it
with the Option key at the same time and drag
and then Command T, and then right click to flip it, and then I'm going to
see what that should be put maybe over here. You go zoom out a little bit, see if this pattern, I feel like there's
some fields empty, so I'm going to put one of these little beautiful
butterflies. I'm just going to flip
that one as well. You zoom in, and I'm
going to flip in, maybe moving a little bit. This is a simple scene but I think is quite
cute and this would look cute on a fabric for kitchen towel or
anything like this. These butterflies are
in a line like that. It's annoying me. Disrupt that. It's a line no matter what. Yeah, so this is a fun, sweet little pattern
and you can switch it up in many different ways by creating different
clumps of items. You could even make a
little one that looks like a little stream or some of
these could have been lakes. There's so many details or simplicity that you can put
it into a pattern like this, that you can make just so many different
versions you can make or so many ideas for little storylines that you could do with a pattern like this. I think these are
so fun to make. There's my first one. In order to make it into a
pattern here in photoshop, you go to edit, define pattern, you can give it a name if
you want to and then it's in your pattern library right
here we can open up, if you have a sello sheet
which is a good way of showing up your work, is another pattern that
have recently created. If you have a sello
sheet like this with a rectangle that you'd
like to fill with a pattern, you go down here to
whatever this is, this circle, I forget what
that option is called. Adjustment Layer Pattern. In-between these two layers
where that finger is, if you press the Option key, you get this symbol
with an arrow, with a square, that's
a clipping mask. You do that. Hello? Oh, it doesn't want to because
this is open, sorry. Here you get a clipping mask. Now you can see that
it's clipping just to that and then you
just double-click on the pattern that you've just created to see how that looks. If you want to adjust the size, this is a little too zoomed in. I'm going to double-click
right here on the pattern, double-click there and
here you can see scale and just reduce it down
to maybe like 67. That seems good.
You see enough of it to see that it's
repeating nicely. Here again in here,
you could also change to one of your other
patterns that you've created. Yeah. If you want to move what part of the pattern
you're looking at, you could just simply just
move the pattern in here. Now you know how
to professionally show your pattern off too. I would just change the SKU
number and the title of this, whatever I decide it would be. But that's how you would test out your
pattern and show it off when you're sending
it out to your clients. That is our first
pattern, complete. I think it looks really cute. Oh, and we can compare it to the illustration that I created and I have that open up here. I feel like is a nice
match to this one. This is full art, quite a lot of color
and detail going on. This one's a little
bit simple and areas, so I think that this
is going to look really nice and then with our other pattern
that's going to be full on and a lot of color, I think it's going to be
really complimentary to each other and our little
mini collection is going to be so cute. That's enough. For me let's
get started on the next one.
8. Project 2: Photoshop: Now we're going to work on
our more complex design. It's just going to mean
that it's going to involve a lot more layering and duplicating and a
lot more transforming. I hope that you're
going to be able to follow along with that part. Hope it's going to be fine, going to be alright, but first off, we've got
to clean up our file. I'm going to take away, delete that sketch and
the color palette. Then I'm going to start to separate out all of
these different items. Let's see what was this. Those are my little
clumps of flowers, so I'll start with those. Press the L for lasso. Then I'm going to do the
same thing Command J. Go back to that and
do the next one, Command J, and then
the last one here. So that I won't confuse myself with all these
different layers, I'm going to just hide those
ones that I've already done. Let's see what's up next. Now we're going to do our
trees so those are those two. I'm going to combine
Layer 10 and 11 by highlighting them, Command E to flatten that. Then I'm going to lasso them and make them individual motifs. To double-check that you
have done everything, if you hide the original one and everything is still there, then you know that
you've got all of them. Now I'm going to hide all my little trees so I know
that those are all done. Let's see what's next
to my little birds. I'm just going to lasso those, we'll keep these two together. It's 24. Get rid of the
birdies, they're done. See what's next. Now it's my little greenhouse
and here's the floor. I'm going to make sure
to combine those two, Command E and then
here's my greenhouse. I don't need to lasso that out because it
was just one thing, so that one's done. What's next? Now I have to decide
if I want to save two different versions of
the little bushy you guys, or with or without flowers, I think I'm going to keep them with the flowers
so flat and everything. I'll flatten all
my little bushes here and then lasso them out
so that they are individual. Enjoyed this part of separating everything
out so that I have the little motifs. Now I have everything, so I'm just going to get
rid of the original one. Now before I get started
further than that, I'm just going to save this
as a greenhouse pattern. I'm very creative with my names. I want to bring in the bushes and the
greenhouse to begin with. Let's see, to situate these first before
I start adding in all the trees and
stuff so that I can really see what's going on here. I know that I'm going to want
to have two greenhouses, so I'm going to immediately
press the greenhouse, clicking the Option and
pull it and then I'm going to again Command
T. There were two, I'm going to right-click
and flip horizontal so then I have that also ready to go. Now I'm going to go into Pattern Preview and I'm going
to start layering these up. Now we've got to figure out
which bush goes on top. Let's see. Now it's like, this is the part where it
could be annoying with how it is going to
layers underneath, so we put that on top. You're just had to pay attention to where your
layers are sitting. If something's
underneath something, you just have to find that
layer and put it on top. I think it's okay to have
some spaces like this. Let's see if I can
situate one of the greenhouses in here. Then I would have put him
behind this bush a little bit. Let's see, where's that
little bush? You here. Let me put this one lower. You just have to
move stuff around. But that looks so nice as situated in this
little nook here. Now we need to get
some color up here. We're going to pull
this up and over. This other greenhouse would figure out where that's going. I want it to be a nice
balance like this. This seems like a
good spot for it, so we need to figure out
where this push is going. This one needs to go in front
of this one a little bit. Let's see where's that. Let's see, seven and
that was this one. Yes, 27 needs to go
on top of seven. I'm just going to
continue with this until I move stuff around
until it makes sense. Already I think that
looks so sweet. Let's see if we can get that push in
there. It looks nice. I want to reuse this
nice regular green one. I'm going to Option
and hold it and then I'm going to flip
it so it feels like a totally different bush. That's one thing about
this pattern tool. If you have one of the items outside of the
pattern-making thing, it can go wonky like this. That's something to think about, but it's usually fine. This one I want to
pull it to the back. Make sure that's in the
background and that can just hang out there. Looks good. Maybe we need another
one of these ones. Make sure that it's
inside of there so that when I flip it, again, this one I
want behind stuff. There we go. I like this little
flowering bush. I'II now flip here
and move him around, like an eagle, I want
this one in the front, so he needs to move up a
little bit. Let's see. There may be, where do you go? I want him here. But then underneath this,
so we need to figure, which one's this 29
and this one's 28. We put it just underneath there. See? Now these are
starting to fit together. It's just a matter of
moving things around. I think this looks pretty good. I'm going to start adding
the trees and stuff in here. Let's see, let's start adding. Let's see, what was Number 9? We're add in some of
our little birdies. Let's see, we can
put them over here. Our Number 9 was the one
that we did together. Let's see. I have
them separated. Put one there and then the
other one. Where are you? The other one can
be right there. That looks nice, and then we add
all of our trees, but these are the ones
that salt together, so I skip that one, and I will go on to
opening these up. I'm going to place
them nicely around. Let's see, was that it? There's my notch, now to place these so they
make sense like that. This one is on top of this bush, so it can't really tell. It doesn't look like it's
sitting on top of this, at least I don't think so. I think I couldn't
get away with that. I'm going to move
around some stuff. This one is sitting on
top of the greenhouse, which is no good. We want to move that,
this one as well. We need to move that, and put these in a clump together then I want
to just move around. Maybe I don't even
like these drab trees, I like the colorful ones. I think with these drab ones, it's like not doing
anything for me. I'm going to delete those. Maybe I'll keep this one.
Does that look good? Because this one is so bright, this red one, and this purple. I might want to repeat
that one another time because you can see
it so pronounced. I'm going to copy that, and I'm going to do the
whole flipping thing because when you do
that automatically, that turns it into
a different tree. See where we can put that, maybe in here between there. Another one that's
really sticking out is this purple one because
it's so large and again, like you want things
to bounce around, so we might consider
doing that one too. Flip it and maybe put it over
there and I want it behind. I think. Would you
want it to cover? Does that make sense?
It's covering there. I think I want it behind, so let's see how we
can get that behind this This one's Number 19 tree and this greenhouse you could go in and name all
these if you wanted. I don't want to do
that. Number 19, copy. We're going to pull you down. It was Number 7, I believe. Come on there. Number 7? No. That was the other one. Number 7, copy. We put it underneath Number
7 copy. There we go. Now, I just want
to move the birds then because I don't
want them on the tree. This is going to look good. I can command save just to make sure that this is saved
if something weird happens. That nice trees, and then last but not least, we had those little piles
of flowers just add in those last a
little empty spaces. We have that one. We have this one. We have the smaller one. Where can you go?
Around the trees? That may be another
really big one. Let's pick what I want to pick it here where there is a
lot of open space there. Again, I want to make
sure to duplicate some of these just so that
we get that movement again. I'm going to pull some
over here, flip them. This feel too disconnected, against the tree there.
Against the bush. What do we think of this? I think it looks really pretty. I like that, this rose. This is yellow tree. I feel like it
bounces nicely with this red one, so bounce, and the two different
greenhouses and then the little spots
of flowers everywhere. I love the little birdies. They give a little
sense of this sky. I think this turned
out really lovely. I'm really happy with this. It feels simple style, but you can see that you could add even more
and you could go in and add layers and layers upon
layers and just keep moving stuff around and make it
feel like a little garden. You could draw even more
than just one greenhouse. You could have drawn five
different greenhouses and move them around as you had a whole city of
greenhouses and gardens. It depends on how much time and intricacy you want to
put it into a pattern. This was relatively
simple, I'd say. Again, once I'm happy with how the pattern is
looking and I'm making sure that everything
feels like it's overlapping the
way that I want it to and should be overlapping. I go to edit, define pattern. Then again, I can
test it in here. I'm on this pattern fill section so I can just
double-click on that one. Again, I can move
it around so it can show part of the pattern
that I like best. If I wanted to change
the scale here, maybe I want to show a little
bit more of this pattern. I can just reduce it even more, 56, something like that. Then you just save out this
file with your information, of course, and change
the SKU and the title. Then you have another
professional pattern to show off. Let's just do a simple
screenshot of that, and before we go, I want to see your whole little
mini collection together. I prefer this one a
little bit bigger. Then just quickly going to look at these together. Here's my original with so
much stuff open, sorry. Let's see the desktop. Here's just a simple look at the final mini collection
that I have here with these patterns and the scene that I created with you
in my previous class. You can see how they really go together because they're
in the same color palette, and I used the same
way of drawing in this collection and
the same brushes. They have the same sensibility, I'd say, I'll make this one a little bit smaller to match. We have the cat's
going on in here, and there's one
full illustration, a simpler pattern, and one is a little
bit more going on, and I really love this
little mini collection. I think it's so sweet, and I can't wait to see what you are going to
be creating with your patterns, your scenes, what scene are you
going to create, if you do happen to make a
mini collection like this, please do share it
in your project as well because I want
to see that definitely. But I really hope that you enjoyed watching my process and seeing how to create
these scene patterns. I hope that you're inspired to use those in
your collections. In the next section, we'll just talk about some next steps that you can work on.
9. Next Steps: Now I really hope
that this class has helped to make you
feel a lot more confident when creating
illustrated scenes and pattern scenes and adding those to your collections
in your portfolio. I really think that they're
really fun and narrative and something
different to try than the usual tossed pattern
or applied or a polka dot. I really hope that you'll be inspired to add them
to your portfolio. I'm sure that your clients are
really going to love them. They're also just fun to create. Your next steps are
to consider building out a full collection with this pattern scene
that you created. Maybe you did design
it in conjunction with the Illustrated scene that you
did with in my last class. Then you can add some coordinate patterns or other illustrations
to that collection. I would also love
for you to consider going through some of
your older collections. Are there any of them
that could be if new life with a scene in it or
something like that. Then like usual I
just want to stress that there's no one
way of creating art and to learn from many
different teachers and to try new
things and you might learn something new and discover something that you enjoy
creating and love making. I really hope that you enjoy
learning with me about this pattern scene and
that it has inspired you to learn other new things. Thanks so much for being here.
10. Final Thoughts: That's it. Thank you so
much for taking this class with me and learning all
about the patterns seen. I really hope that you
have been inspired or learned a lot about how to make a pattern like this
and that you'll want to add them to your
collections and your portfolio
because I certainly have been re-inspired to
create more of these. Please upload your project to the project gallery
so that everybody can see what you've
done and then I can give you any helpful
feedback that I can, if that is something
that you would like, let me know when you post your project if you'd
like some feedback, or if you just want some
nice encouragement. Also, remember, if you
did enjoy this class, always remember to
leave a review, it's helpful to me as a teacher to get my
class out there, and let other students know that you really enjoyed it
and got lot from it. That'll be really appreciated, and then if you'd
like to hang out with me outside of Skill-show, you can find me on my
website emmakisstina.com. Instagram, sometimes
@emmakisstina. I have a beautiful private
free Facebook group that's really supportive
and we can chat every day. Then last but not least, I also have a really
amazing pegion group called Collection club, and we design collections
together every month, and we put each other with
deadlines and accountability and learn about different themes in surface design world, and it's amazing place. I would love for you to
join and see you there because I love this place
that we have cultivated. I really hope to see you
there or anywhere else. Otherwise, follow me here on Skill-show so
that you will be notified when I come out with my next class until then, bye.
 Kristina Hultkrantz, Illustrator & Surface Pattern Designer