Transcripts
1. Welcome to the Class: The joy of observational
drawing is having the ability to
accurately recreate what you see onto paper.
Hi, I'm Claire. I'm an artist and designer
and I especially loved drawing flowers and animals
and a semi realistic way. One of the most
common struggles I hear when someone
is learning to draw is that what they
end up drawing looks nothing like what they
were trying to draw. In this relaxed,
slow paced class, I'm going to teach you some basic skills to get you started drawing in an observational
or realistic style. So you can get better at
drawing what you see. I think observational drawing is a really great skill to
learn because the more you observe the anatomy or structure of both living and
inanimate objects, the more you're
able to accurately portray them in a
believable way, even in a stylized drawing
or from your imagination. Secondly, being able to express your ideas accurately onto paper is a wonderful ability to incorporate in all
styles of drawing. And therefore, I think it's an essential skill for
any artists to cultivate. As you practice your
observational drawing, you'll start to notice your own drawing quirks and preferences, and you'll begin your journey of developing a personal style. This class is for
complete beginners who may even feel
a bit nervous or intimidated to start through a series of lighthearted
warm-up exercises, we're going to quiet
limiting beliefs and have fun exploring
our creativity while learning valuable applicable
skills that can be applied to any other style of drawing you may develop into. Later on. I'll teach you how to choose
a good reference image and get into the basics of
observational drawing, finding shapes,
observing details, and adding finishing touches. For the class project, you'll combine all the skills
you've learned to create a finished black and white
drawing you can feel proud of. In future classes. I'll build on the
fundamentals you're learning now and teach more
advanced skills like perspective composition
and the use of color and shading to
add depth and interests. So be sure to click
the follow button if you're interested in
those topics as well. But for now, we'll
be sticking to the very core basics to
keep things light and easy. So you can see how fun
and achievable drawing realistically can be. We'll be using plain old paper and pen and pencil
for this class. But don't worry,
you can transfer your new found skills to
any medium you'd like. Painting, watercolor,
even digital. Thank you for taking my class. I'm so happy to have you here ready to start
your drawing journey. Then join me in the first
lesson where I'll go over all the tools we'll
be using in the class. Let's get started.
2. Materials You Will Need: To take this class, you'll need five simple tools. Plain white or
natural online paper, a pencil, a soft
eraser, sharpener, and a pen with black cake, and one random objects from your surroundings to draw
in a warm-up exercise. While I hope you'll be super proud of the drawings
you're going to make. The purpose of this
class is simply to learn and to try all while having as much fun as possible not to create some
serious masterpiece. So with that in mind, and to remove as much
pressure as possible, none of these items need
to be expensive or of any particular brand in case you don't already
have them at home. I blinked a few purchasing
options for each of these five tools in the
discussion section of this class. Most likely you can
also find them in your local office supply
or art supply store. Paper wise, this means stick to something
basic and lightweight. I'm using thin white paper I bought from a local
art supply shop. I like it because
it's longer than the standard letter
size paper and gives me plenty of space to draw large shapes or attempt
the same drawing again, without getting a whole
new piece of paper. But you could even
use printer paper. Just keep in mind
what pen you're going to use and make
sure your paper is thick enough so
that nothing bleeds through an onto your workspace. Use any pencil or pen you
have available to you. Just make sure the
pencil is nicely sharpened and the
pen writes evenly. This ensures you have more
control over the lines you make while you draw and
stick to black ink. So you're not distracted
with color choices just yet. For the eraser, I recommend a soft round one separate
from your pencil. In fact, I'm going to go so far as to ask you
to place a piece of tape over your pencil eraser so you don't accidentally
use it out of habit. The reason for this is
depending on the pencil, they can be a really
poor quality and leave streaks or
even rip the paper. I also want you to get
in the habit of only using the eraser when
absolutely necessary. This is because as a beginner, it is very normal to
be more focused on perfecting your lines than
on practicing and trying. I want you to let
mistakes come and go and focus more on drawing. With all this in mind, I recommend using
a gum or kneaded eraser as they
tend to be softer, don't rip your paper
or leave marks. As for the sharpener, it doesn't need to
be anything fancy. Just make sure it sharpens
your pencil to a nice point. Now that we have our tools, Let's get into the fun
stuff and pick what we would like to draw
for our class project.
3. All About Reference Images: Normally and
observational drawing, we want to draw from real life, sometimes known as a still life, because we can see many more details and subtleties and our subject that are often lost
in a flattened 2D image. Besides learning to relax and approach your drawing
with playfulness, the main takeaway I
want you to have from this class is that observational
drawing is all about, you guessed it, observing. This is the main skill we want to train and that's
what I'm going to ask you to do over and over
as we complete each lesson. So naturally, the more
things there are to observe, the better you'll get at it. However, since this is a digital class and not
taught live in a classroom, I'll be using a reference
image so you can use the same one if you want
to follow along with me. After watching this class, if you don't have the space or option to leave a still-life up for several days
while practicing and creating your drawings. Or you want to draw something you can't create a still life with like a flower that doesn't grow locally or a wild animal. A reference images,
again, perfectly fine. Just try to switch it up between a reference image and still
life whenever possible. Before we get into actually
sourcing our image, I want to quickly
mention the subject of copyright for this class. It doesn't matter
what image you use as a reference as
it's purely for educational purposes and
it's just for you to learn and practice your
observational drawing. Since copyright laws
can differ from country to country
and the subjects, derivative art and copyright can be very confusing
and overwhelming. Just to keep things clear
and simple for yourself, if you decide you want to
share your drawing outside of this class based on
Instagram, for example. Sell your drawing or put it
on products and sell those, give them as gifts, etc. It would be a wise
idea to only use reference images you
have the copyrights to. These can be images you buy from a stock photography site. Images with a Creative
Commons license, meaning they are free to use. Or of course, images you
have taken yourself. So keep your end
goal in mind when sourcing your reference image. Here's some places to
find a reference image. Pinterest, when you
aren't going to share your finished artwork
outside of the class. I've curated a board with images I think are
suitable for beginners. The link can be found in the discussion section
of this class. But remember, these
images aren't necessarily open for
derivative artwork and therefore are just for practicing stock
photography sites. Just be sure to check
the license agreements before downloading
or purchasing. I like Unsplash
and Pexels as they offer free images and clearly state what
you can do with them. Your own photo library. I recommend making a
reference image album on your phone so you can add images anytime you are out and about and see something
you'd like to draw later. Go out and take some pictures, or arrange a simple still-life. A few key things to look for in a reference image or to keep
in mind when setting up your still life as a beginner are the image has
one main subject, also known as a focal point. A simple background. No more than too many subjects. And easy perspective, meaning
it's not angled or has multiple perspectives and
a minimal color palette so as not to overwhelm your eye. If you find an image
you just love, but it has too many colors, I would recommend
downloading it and lowering the saturation until it becomes
a black and white image. With this criteria in mind, I've selected these two
images from Unsplash. If you'd like, you can use the same reference
images I'm using by downloading them in the resource section
of this class. Please note, you
will need to be on the desktop version of
Skillshare to find and download the images to help
make sure I wouldn't get distracted by all the details in the background of
the original photo. I removed the background and replaced it with a solid color. If you however, would prefer
to use the original photo, you can find it as well under
the resource section of this class on the desktop
version of Skillshare. Also, I think it's
worth mentioning. Drawing organic objects like flowers and trees
allows you a bit of wiggle room as you learn to get proportion and
perspective, right? Flowers and plants
are expected to have varying sizes and
interesting shapes within each bloom or leaf, while the face of an
animal or human can very quickly look wrong or off. If you don't get
the placement and sizing of the
features, just right. But no matter what
image you use, you'll be able to apply
the steps and create your finished illustration by first listening and watching me, and then applying what you've
learned to your image. So now that we have our
reference image all picked out, looking at it, you
may feel a sense of nervousness and
overwhelmed creeping in. Your brain might be offering thoughts like What
are you thinking? You can't draw this, or you're just going
to mess this up. Or if you don't have a unique
style, what is the point? So to combat these very
normal feelings and thoughts, I'm going to ask you to
put your reference image aside for now and join me
in the next lesson where we'll loosen up with some
lighthearted drawing exercises meant to get us away from analytical thinking
and self critique and into the mode of
creativity and play, which is essential for learning.
4. Observational Drawing Punctuation: Before we get into the
exercises, however, here's a quick story
you may relate to. Once upon a time in a classroom
not that far away, sad, unsuspecting students
who wanted to learn how to draw with
and his a patient. They watched the
teacher and she wrote her first lesson
on the chalkboard. Reading the words, the students felt a chill run
down their spine, has the terrifying
truth emerged. Each new drawing begins
with a blank page. Alright, so maybe it's
not that dramatic, but seriously,
this can be scary. From the beginner
to the seasoned professional and
everyone in-between, the blank page can
induce feelings of overwhelm artistic
block and frustration. But why is that? Usually it's because
we're putting some form of pressure
on ourselves. The outcome needs to
look good or realistic. We have doubts about our
abilities to produce such artwork were too concerned with not
only the end result, but even with each mark
in line as we make them, no wonder fund goes
right out the window. So instead, let's draw
without too much thinking, without any idea of how the end results should
look or will look. And therefore, without
any critique as we go, as we go through the exercises, don't just watch me draw. You won't get
anything out of that. You need to actually do the exercises to
reap the benefits, to tap into your own creativity, to release your own barriers, and to start learning
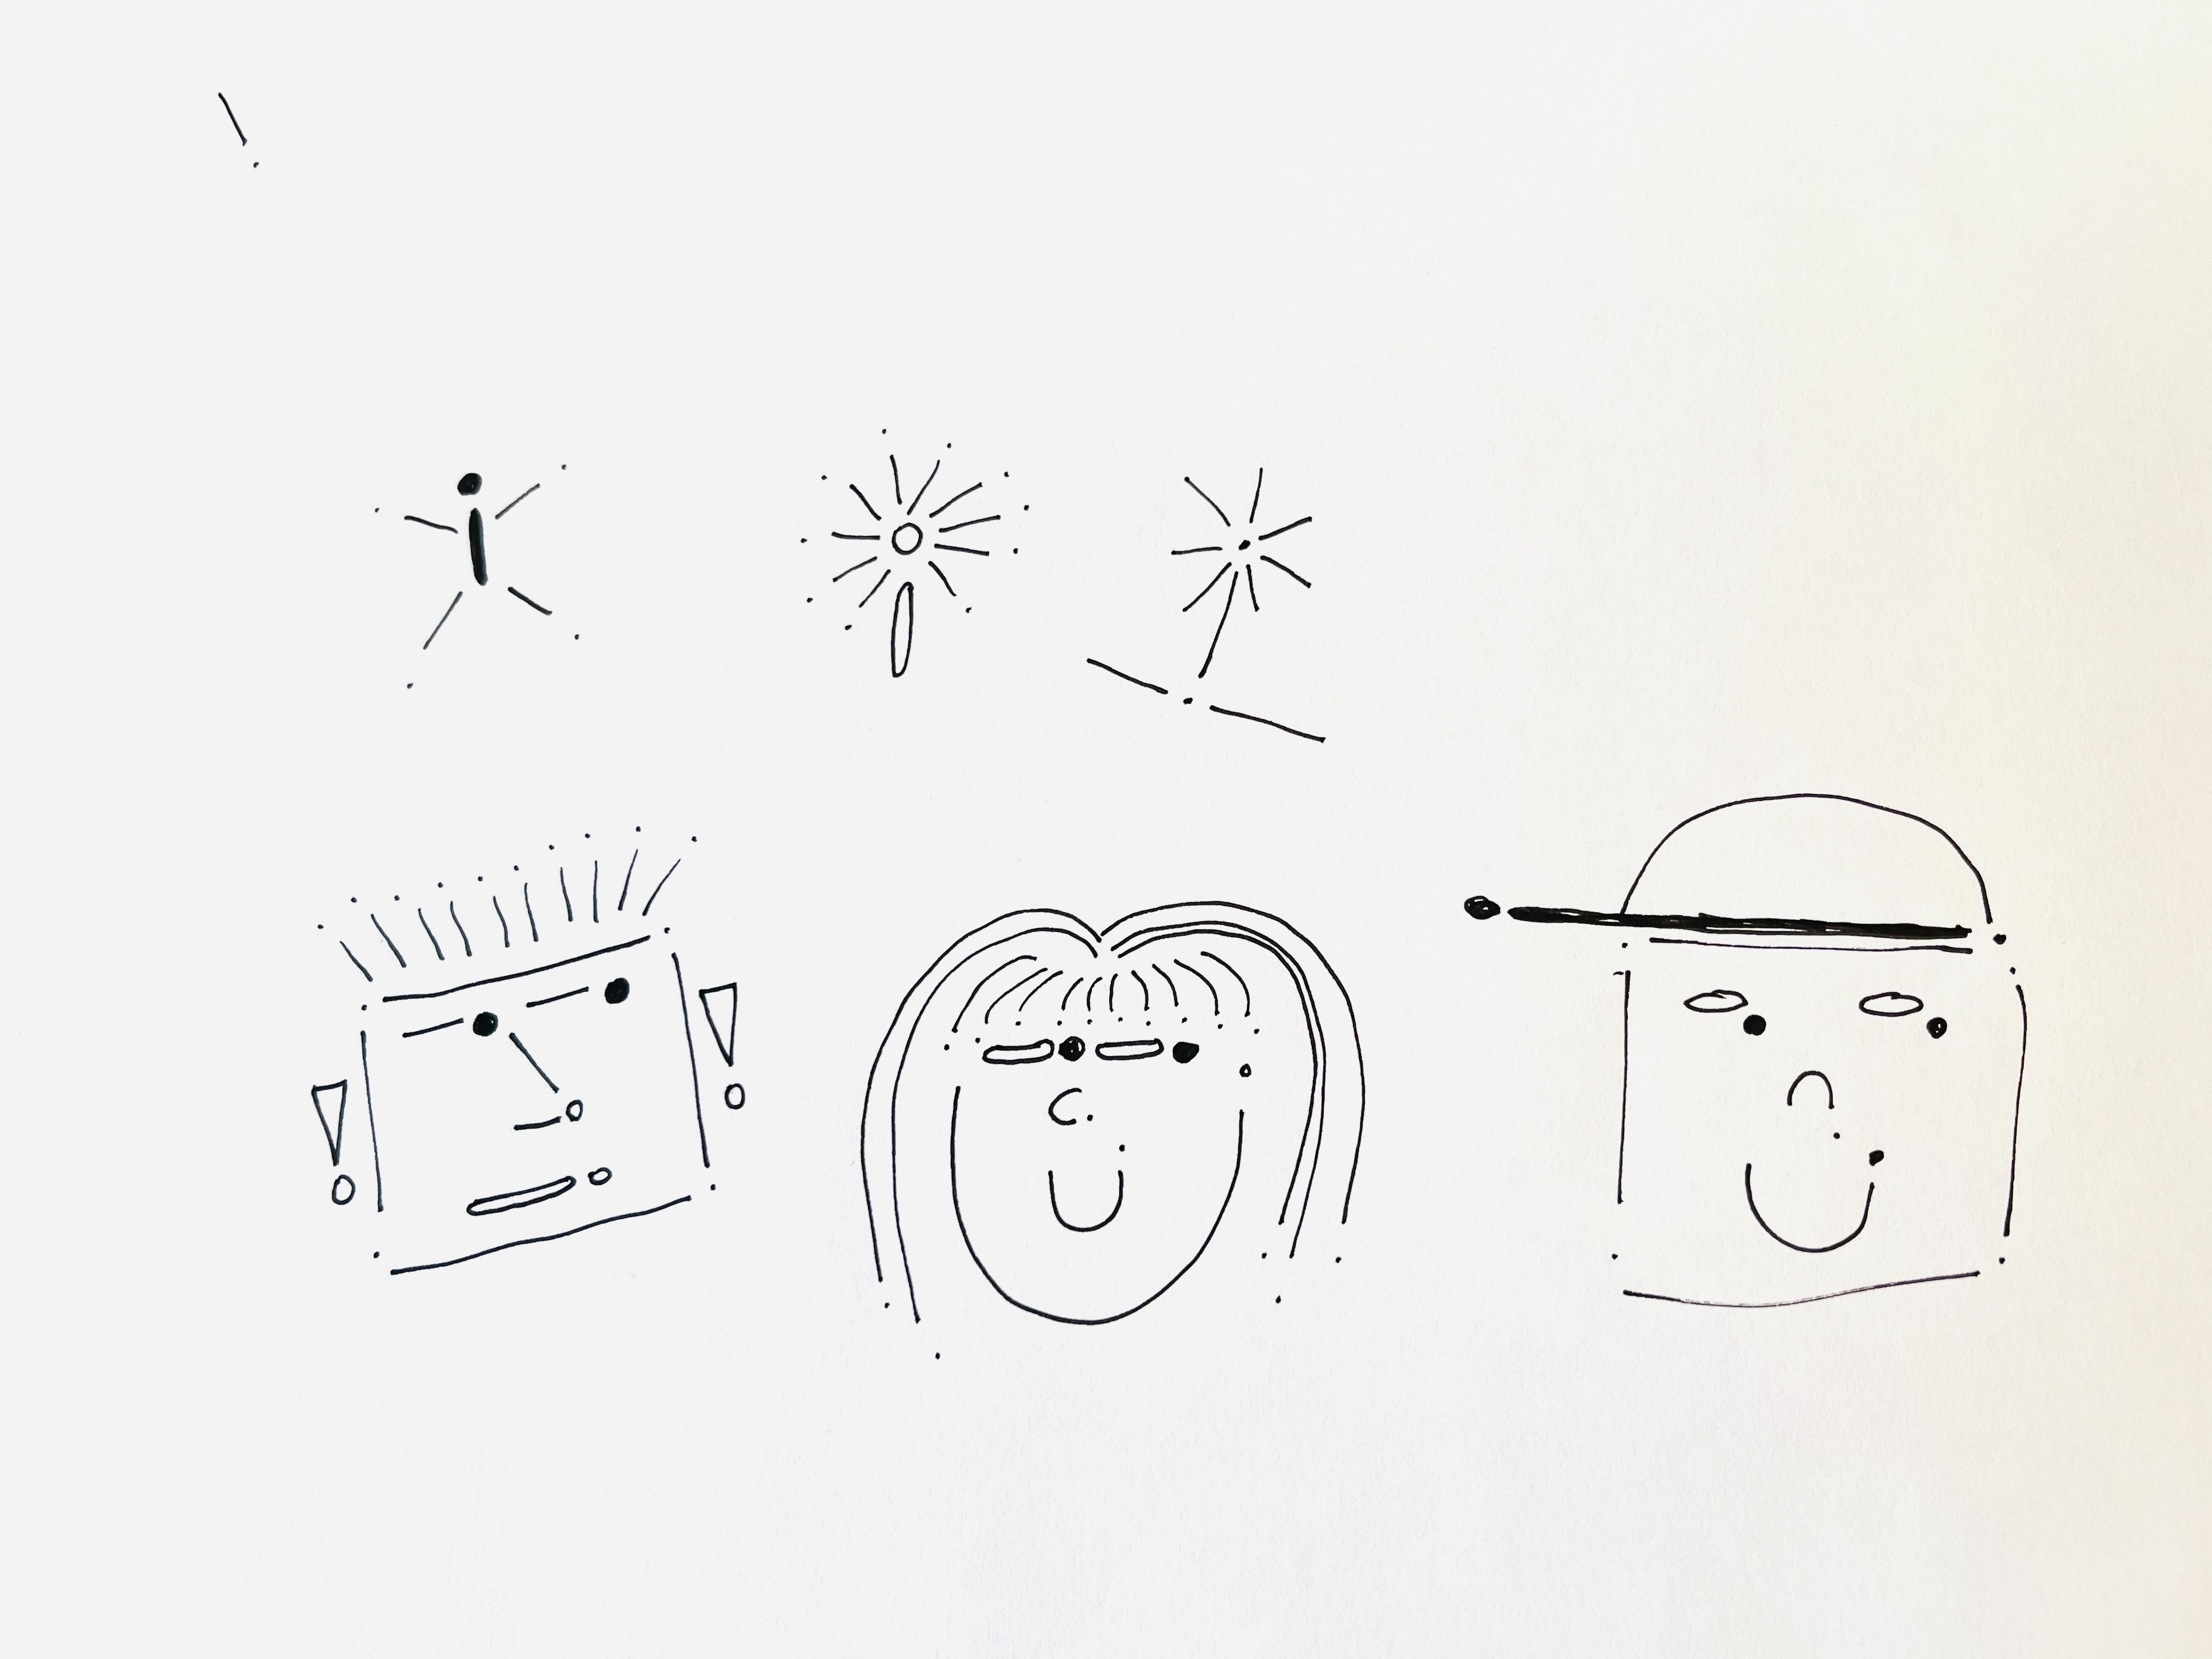
how to observe. For the first exercise, we're going to think
a little outside of the box and use punctuation
in a different way. We're going to make a
series of faces and objects using up to three types
of punctuation mark. Think about using
your chosen symbols and different styles and sizes filled in
or just an outline. What can you create? Take three minutes and draw as many different pictures
as you can come up with. So make sure you have
your paper and pen ready. And let's do this together. We'll use pen for all three
warm-up exercises because the images are not important and therefore you
can't make a mistake. There is no need to be able
to erase what you draw. This exercise is
meant to help you start tapping into
your imagination and freeing yourself from rules and expectations by taking symbols normally associated
with words and language and using them
instead to create a picture. We're engaging both
sides of our brains, but blurring their
role a bit and playing with the
idea that things don't always need to
be used a certain way or look a certain way. They can look different and be different than we
expect them to, and that is completely fine. It can even be great. This is not about if you
liked the unresolved. In fact, it has nothing
to do with the pictures. I just want you to push
yourself to create as many pictures as you
can in your three minutes. This may seem counter-intuitive for an observational
drawing class, since the desired result of observational drawing is to
produce a realistic image. But in order to go from
not knowing how to draw to someone who can not only
draw, but draw realistically. There's a lot of learning and practice that needs
to take place. And learning requires
a certain level of openness that can only
come from letting go. Openness to new things, new ideas, new techniques, and an openness to try to seemingly fail and to try again. This might sound a bit woo-woo, but in order to master
rules and techniques, you must first be free
enough to not have any. And done. How did you do even though the end result was not the
purpose of this exercise, you may still find that you
like some of your creations. For example, I think
this dandelion puff out of exclamation
points is super cute. Even if you don't
like your drawing, be proud of yourself for
what you came up with. You've tapped into your
creativity and pushed yourself to think outside of the
box. This is great. Share your creations with the class in the class
project section. I would love to see them and
feel free to come back to this exercise anytime you
want a creative push.
5. Warmup with Contours Part 1: So now that we're
starting to get away from the critical
mind and becoming less attached to
results and more into just having fun and trying. Let's explore some
classic drawing exercises based on something
called contour drawing. Contour drawing is
basically using lines to produce a sort of
outline of your subject. There are many different
variations of contour drawing, including continuous line
where you don't lift your pen. Cross contour, which
is when you draw lines across the form
you're creating. And many others. We're going to start
with the variation called blind contour drawing, meaning we won't look at our paper the entire
time we're drawing. So just like our
punctuation exercise pushed us to let go of
overthinking and analyzing. This exercise builds on that, but adds the skill of observing. As I said before, observing is the most important skill
needed to draw realistically. Most of us spend far
more time looking at our paper while we draw than actually looking at our subject. We're going to practice doing
the complete opposite of that by making a blind
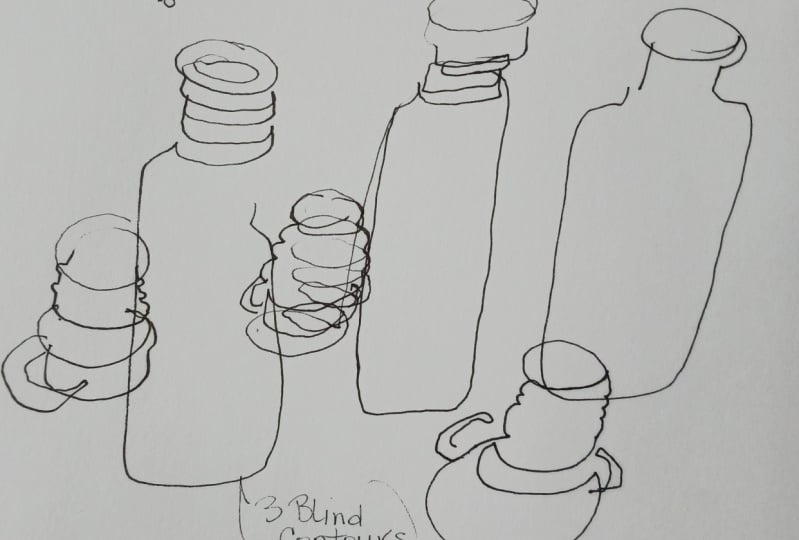
contour drawing. For this exercise, we're
going to draw something. And the only rule is
you can't look at your paper while you draw.
Hence the blind part. I want you to draw the
small random object I asked you to source in the materials section
of this class, we're using a real life objects, so we have as many
details as possible available for us to
notice and draw. I'm going to draw my stapler
because I really liked that. I can see all the
inside details and I'd like to see how that
looks as a contour. Once again, simply watching me won't help your
drawing practice. So make sure to make your
own contour drawings as well and pay attention when it
starts to feel hard or boring. This is where the
growth happens. You're pushing yourself to
observe more way to go. Throughout the whole drawing. Don't look at your paper. You can lift your pen if you
want, but don't look down. If it's easier, put your paper under the table in your lab. Before we begin, take a
moment to think about placement and what part of the object you will
start drawing first. I'm going to start with the top left corner of the stapler. So I know I need to start
my drawing a bit more to the left of my paper to give
enough room on the right. We want to think
about this to help ensure we don't run out
of paper when drawing. Take at least a full five-minutes
to draw your object so you have enough time to add
as many details as you can. Now without looking at the
paper, Let's start drawing. Draw as slowly as you can. Paying attention to each detail. You may notice that the
analytical organizing part of your brain will
try to take over and help you out by offering up ideas to streamline or
speed up this process. It may suggest that you
make a sweeping curve or simple shape in order to get the gist of the item
and be more efficient. But just push through and
ignore those suggestions. We don't need to be
efficient with our time. This time was made
for one thing and that was to draw this contour. Contour drawing is a
wonderful practice and recording details in our
subjects that we often overlook. Practicing contour drawing
will also help you develop good hand-eye
coordination, which is key when
learning to draw. First showing up in the 1920s and gaining popularity
in the forties. Many famous artists have used contour drawing
throughout the decades, including Henri Matisse,
Alexander Calder, Egon, Schiele, and on and on. With regular practice, contour drawing
exercises will help train your hand to follow
your eyes movements. And you can apply that to any style of drawing
you grow into. If you try this exercise again, you can also switch
things up and try not lifting your
pencil the entire time. Making just one continuous line. Drawing with your
non-dominant hand. Meaning if you usually draw with your right, draw with your left. You could use different tools like paints or colored pencils. You could draw the
image once with pencil and then again
over top of that. But with watercolor, there
are so many possibilities, all still building on releasing expectations
and self critique. Building the hand
eye coordination and practicing the
skill of observing. And time is up. Congratulations, you made a step closer to being able
to draw what you see. For this, you had to overcome the urge of looking
and through that, denying your brain to judge
and guide your actions. This can be a very
unsettling feeling at times, but going through this
is like putting coal under pressure and turning
it into a diamond. The more you expose
yourself to this pressure, the more it will make you
shine as an excellent artist. Later on. Next up, we'll step it up a notch.
6. Warmup with Contours Part 2: For our final warm-up exercise, we'll be drawing an
upside down contour. For this contour, it's alright for you to
look at your paper, but try to still
look at your subject about 90% of the time or do what we did in
the second exercise. And don't look at
your paper at all. I'm going to do that because I think it's really
fun and relaxing. Normally, we have a
few less details in our contour drawing than
we had in the real object. So this time we'll set the
timer to just four minutes. But just like last time, draw slowly and pay attention
to each detail as you go. So now let's take our
blind contour drawings and turn it upside down. And now draw this. Since everything is upside down, your analytical brain will have a very hard time guessing how
to make this image correct. And you will need to
resort even further to actually observing
and drawing what you see instead of what your brain thinks you see
are wants you to see. Again, this exercise has nothing to do with
the EM picture. And it's purely
meant to help you tap into really observing. Looking more than guessing, noticing, more than
thinking. You already know. When you draw observationally, we really want to get
away from drawing from our head and move towards
drawing from our eyes. This exercise is meant to force you to become
aware of when you're getting impatient and simply
drawing what you think is there and bring you back to patiently drawing what
you actually see. And done. Great job. I'm pushing yourself through
another exercise and growing your hand-eye connection as well as letting go of judgment. Next, post all your
contour drawings in the class projects section, along with a photo of
your reference object. I'll look at each
of them and give feedback as soon as I can. Just like if we were
in an actual classroom together to post your pictures, simply click on the Create
Project button under the Project and Resources tab on the desktop version
of Skillshare. Now that we've completed some warm-up exercises and we're all loosened
up and having fun. We're ready to start drawing our chosen reference image with much less trepidation
and anxiety. Let's dive into the next lesson where you'll learn
the first step of observational drawing,
finding basic shapes.
7. Step 1: I realized starting at the
beginning and learning basics can feel painfully
slow and downright boring. But I want you to
think of this class like learning to ride a bike. Most likely you learned how to balance and move forward
on the bike before you learned any
tricks or discovered that you preferred
mountain biking or two, or bikes are just
cruising around town in the same way before
finding your favorite medium. Meaning painting,
watercolor, ink, etc. Developing a personal style, or even before
learning aspects like composition, perspective,
shading, etc. You must first learn
the fundamental basics. The drawing equivalent to balancing and moving
forward on a bike. Then with this firm foundation, you can build upon these skills
and start branching out. So although this may seem slow, the time it saves you in getting proportion and
perspective, right? And producing a more
realistic image more than makes up for it. And one day, you'll
just do these things naturally and it won't
feel slow at all. But I also wanted to say, there is no right way to draw. There are only the
techniques and methods you can learn
and then decide if, how and when you
want to use them. The centuries old, well-established
method we're going to use to draw observationally
consists of three steps. First, we'll break our image
down into basic shapes. Second, we'll add the details we observe through looking
at our reference. And third, we'll use finishing touches to
complete the drawing. In this lesson,
we're going to cover step one, basic shapes. This step can be further broken down into three mini steps. 1. First, we identify
the shapes we see in our reference image too. Next we make a note
of the largest shape, as this will be the
first shape we'll draw. And three, we start drawing on our paper
using light lines. We do all this for
three reasons. To ease into the
drawing process, to get proportions right, and to give ourselves a helpful guide for when
we start adding details. So to begin, we first break our image down
into basic shapes. They don't have to be
recognizable shapes, but it helps to start with
these common five squares, rectangles, triangles,
circles, and ovals. Of all these shapes. I think circles can be
the most intimidating because we think they need
to be perfectly round. But even artists with years
of experience can't draw a perfect circle and the quick
adjustment compass exists. So don't worry about it at all. Simply practice drawing circles when you find yourself waiting around or talking on the phone and they will
get plenty good enough. Ovals are similar to circles
but not perfectly round. You can have a more open
oval and a more closed oval. The more open and oval is, the closer it's
getting to a circle, and the more closed and oval is, the closer it's
getting to a line. Ovals are super important when drawing different
perspectives, but you will find them
even in very simple images to help draw ovals so they look closer and accuracy
to how you see them. It helps to recognize
their main axis. To do this, simply
identify the two points farthest apart from each other and connect
them with a line. This is the main axis. Let's practice identifying the five common shapes
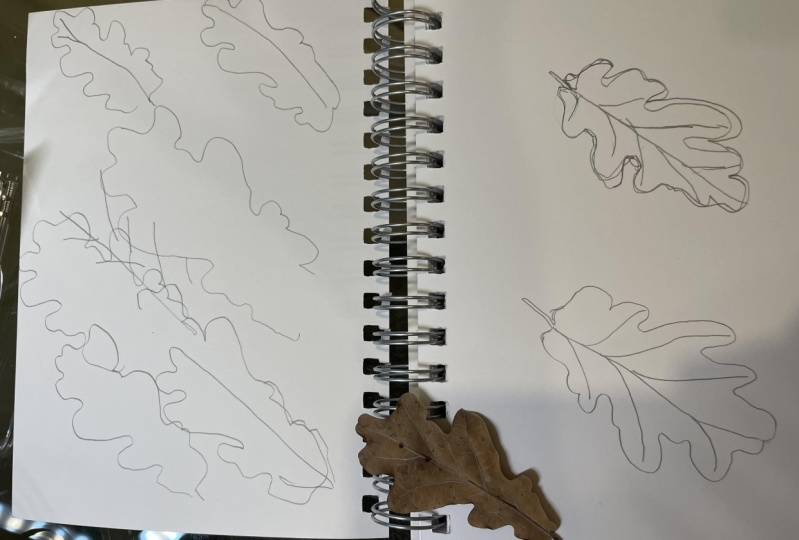
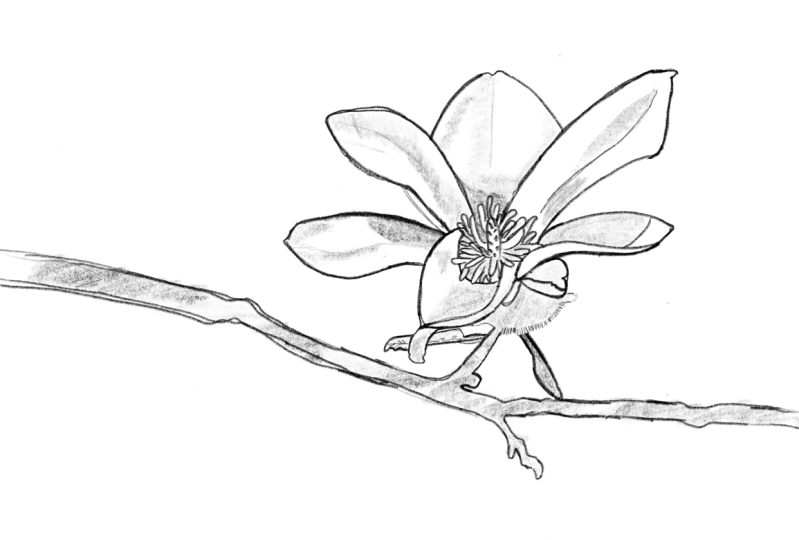
using some examples. Looking at this bird, we can see the head and
body are made up of ovals, while the feathers and legs
are made up of rectangles. The beak and one foot can be represented with
triangle shapes. Looking at this flower, we see that the different
layers of petals can be broken down into several circles
of diminishing size. While the leaves are
made of triangles and an oval and a rectangle
represents the stem. Now let's find shapes in
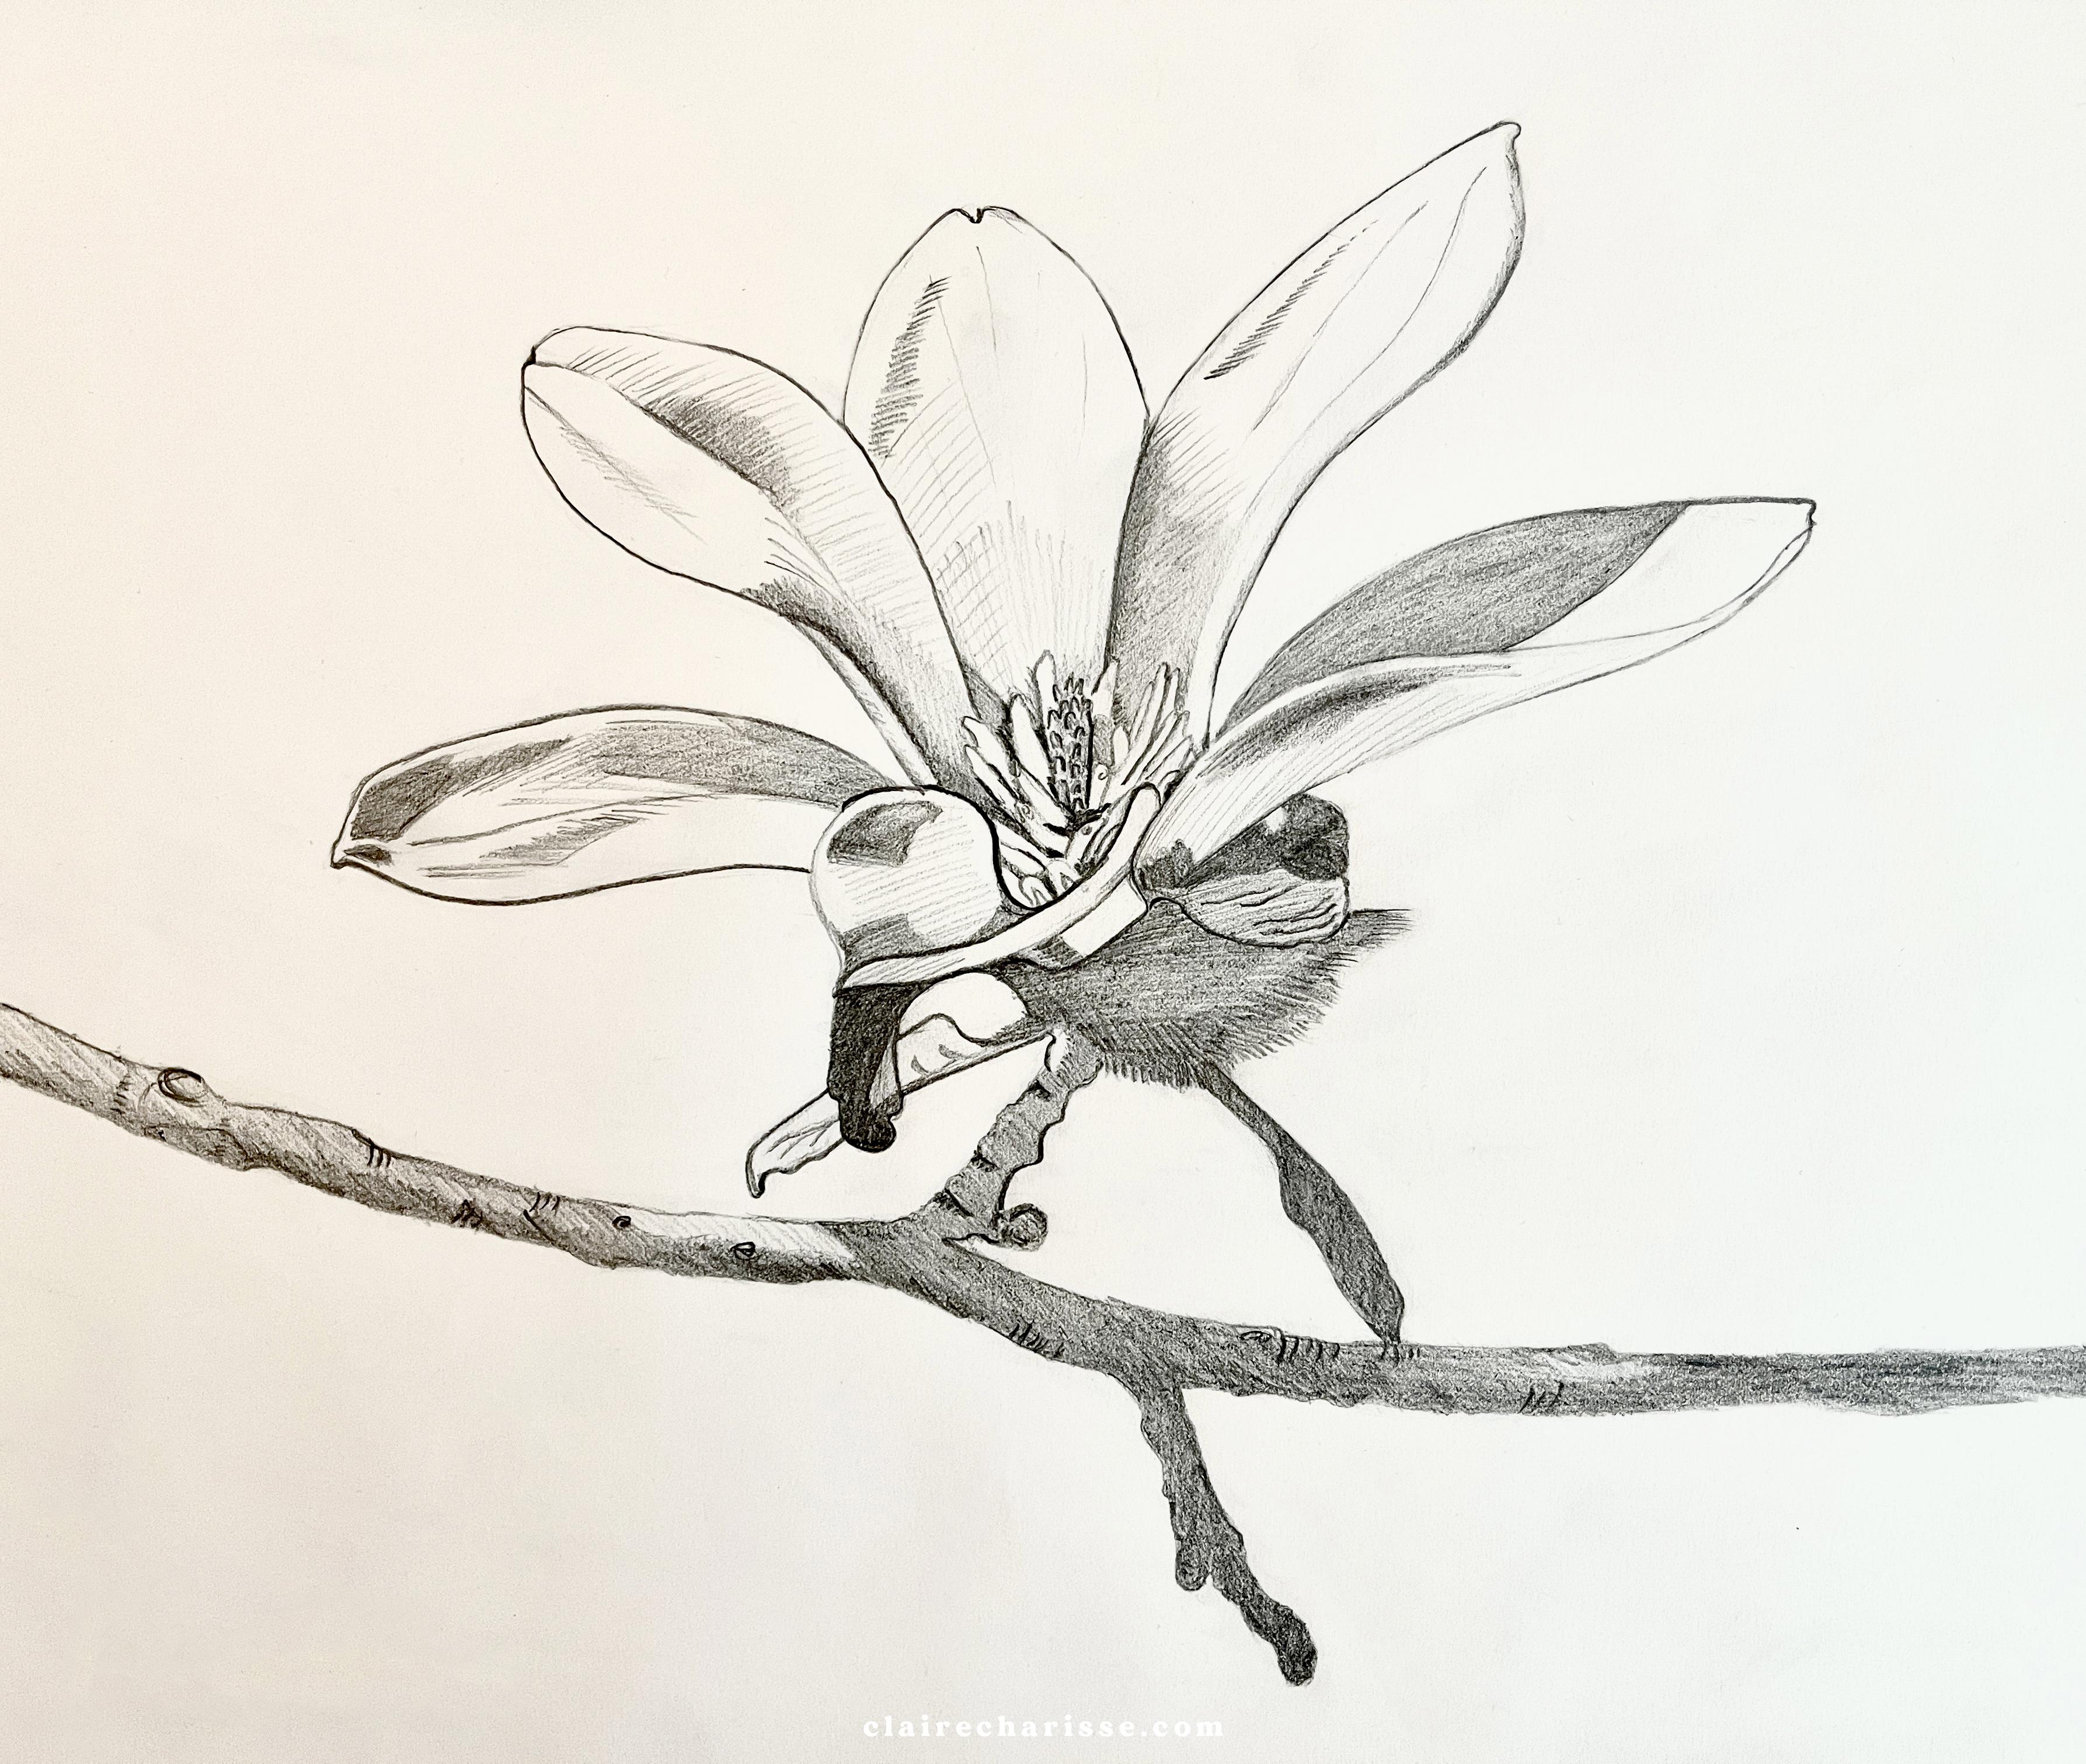
the class reference image. I see that the flower
is made up of ovals, circles, rectangles,
even some triangles. When looking in the
negative space. Negative space is
the empty space around and between the
subject of an image. Once we've broken our reference
image down into shapes. But before we start drawing, we want to identify
the largest shape. As I'm drawing this
shape first helps us make sure everything
fits on the paper. Consider it like an anchor
point for your drawing. You may wonder why this matters. So to give an example, let's say in my excitement
to start drawing, I draw this leaf quite large. By the time I get to the flower
head with all the petals, I might find that I
have run out of paper. We avoid this by identifying the largest shape and placing that proportionally
on the paper. This anchors the
rest of the drawing. And we can then build our
picture around that point. Now that we've visually
identify the shapes, we're going to draw
them on our paper using very light lines as right now, we aren't so much
drawing as setting up our drawing and we don't necessarily want to
see these lines later. I'm going to draw them a bit darker than I recommend you do, however, you can see
them in the video. So let's quickly
recap what we've learned before we start drawing. To begin an
observational drawing, it helps to break down your
image into basic shapes. Remembering to think about the shapes in the
negative space. Draw the largest shape first to anchor the drawing
and draw lightly as these first lines are simply guidelines helping us
get proportion right, and mostly helping us begin and get away from
the blank page. So with all this in mind, let's start drawing using one of the five basic shapes
we discussed earlier. I identified the largest
shape as an oval, but I'm going to
go ahead and draw a slightly more
detailed free shape to get even closer to
the correct proportions. Remember, you can use
any shape you want. The main five are
simply the most common and therefore a good
place to build off of. Next, I'll roughly sketch in some of the
other basic shapes. I identified. A couple of circles represent
the middle part of the flower and a
few triangles in the negative space begin building the leaves
and branches. To figure out where on the page I want to
draw these shapes. I look a lot at my
reference image and observe the proportions and
placement of each element. And then try to draw each new shape in relation
to the previous shape. All the while checking
the reference image. As I go. Don't put too much pressure
on yourself right now though, as it's totally okay
for the placement and size of your shapes to be
a rough guess for now. After this initial
sketch will use to time honoured techniques
to refine our drawing as we go and I'll explain
them in a moment. The first, I want to make sure my petals will be pointing
in the right direction. Since I identified
the flower petals as ovals to get their
direction right, I'll start by drawing the
main axis of each petal. To do this, identify the two points farthest
apart from each other, and connect them with a line. Once I'm happy
with the direction of the line or main axis, I want to draw the
actual oval shape to help draw them as
proportionally as I can, I'll use technique number
one unit of measurement, using one element of your image as a sort
of measurement for the other parts is a
very helpful technique to get overall
proportions, right? So to see this technique in action using our
reference image, I'll use the middle
of the flower as my unit of measurement. At first, make a note of the
length of the middle part of the flower by placing my
finger on the pencil. I then count one being the
middle part of the flower, then 234 and a bit. So this main petal is a bit more than four
times the length of the middle part
of the flower. To transfer this
knowledge to my drawing, I first draw the middle
part of my flower, make a note of the
length on my pencil. And I want my pedal to be a bit more than four
times this length. So I'll count 12, 1234 and a bit. This is the height
of my first petal. I was a bit too
low and my guess, so I'll correct that
and draw the petal. Let's do that again. In the reference, the
second petal is 1.52345. So in my drawing,
I count 1.52345. I was pretty accurate
with my guess. So I'll go ahead
and draw the petal. I'll use this technique to
draw each of the petals. Going to speed up the video
throughout all the lessons, so nothing gets too repetitive. But if you would like to watch the full video of me drawing, you can find it on
my YouTube channel. The link is in the discussion
section of this class. Technique number two, comparing elements is exactly
what it sounds like. To check what you've
already drawn or to help you
draw new elements. Simply look at your
reference image and compare two elements to each other to understand their
size and placement. Especially making sure to notice the space between
elements like here, between these two petals. I can see that the
pedal and the front connects to these
petals here and then goes to the side in-between this pedal and
the middle of the flower. Knowing this helps me to place it in my drawing
more accurately. I'll switch between
these two techniques throughout my drawing to get the proportions and placement of each element as
accurate as I can. Let's look at a
few more examples of one I used these techniques. Here is another example of
the comparison technique. I see in my reference image
that the side of this part of the flower lines up
with the tip of this leaf. But in my drawing, the leaf
is too far to the right. So I'll go ahead
and correct that. Once again, I'll use the
middle of the flower as a unit of measurement to gauge
the thickness of the stem. Doing so, I see that it's about half the length of
my unit of measurement. So I'll make a mark and then repeat this along the brands. To draw this little twig, I'll use both techniques and start by comparing
the distance of the leaf and the
middle of the flower to gauge where the first
little bump will go. And I'll record that with a dot. Then I'll use the
negative space in my reference as my
unit of measurement. And I can see that the length of negative space is
about the same as the distance the tip of this
twig is from this leaf. So I'll make a second
mark to represent that. I'll double-check
my measurements and then I'll draw in the tweak. Finally, I can see that
the far left end of the branch is in alignment
with the tip of this petal. So I'll draw it in my
drawing accordingly. The amount of measurements
and comparison you could do is quite daunting and
can seem almost endless. So please don't feel like
you need to be super precise or to measure every
little part of your drawing. These are simply
tools you can use to be more efficient
and accurate, but they shouldn't take
away from the fun and relaxed feeling of
learning and trying. This is why in the reference
section of this class, I recommend starting with
images of plants and flowers. So you can practice
these techniques and still produce
drawings that look perfectly natural and
believable without getting too caught up in
details and endless measuring. Once you have a basic
image that captures the overall form of
your reference image, you most likely have a good beginning and can
move on to step two. Since I drew my guidelines
darker than I normally would, I'll go ahead and erase them
to finish up this step. Now that we have our
basic shapes and form, it's time to move on to step
two, adding small details.
8. Step 2: Now it's time to take our
basic image and refine it by adding in as many details as we see in our
reference image. Just like your eyes
can adjust to see something far away or up-close. Your brain needs to adjust from looking at your
reference and seeing broad shapes to looking at your reference and seeing
all the small details. Once again, your ability to observe will be the key
skill to your success. So with that in mind,
let's get drawing. Personally. I think
my favorite part of drawing is this
part right here. I feel like I have
this safety net of a form to keep me in
line and I can just slow down and observe as much as I can and commonly add
the details I see. This is why the warm
up exercises were so important to
help you switch off your critical brain and tap into observing and drawing
what you actually see. Every so often, pause and compare your drawing
to your reference. As you pay more attention to details and carefully
compare the two, you may notice you
are a bit off with your proportions when you
made your basic shapes. This stage of the drawing
is all about refining the basic shape we created
in the previous lesson. And that not only
means adding details, but checking
proportions as well. Notice how I move around the
drawing, filling in details. This helps to contribute to an even balanced image
since no one section is more detailed
than another and the finished image will
look more unified. Since my first reference
image is a bit too small to see all the details inside
the middle of the flower. I'll use the second reference
image to help me out. Never feel like you have to just rely on one reference image, especially as you grow and start drawing more complicated
subject matter, it can be very helpful to have several references for different sections
of your drawing. They could be zoomed in like
this second reference or show different angles or even be a completely
different subject. For example, if I wanted to draw this flower with a
different kind of center, maybe I would use the middle of a sunflower as a reference. Since we aren't worried
about shading just yet. When you get to a shadow, think of it as just
another shape and don't worry about filling
it in at this time. We'll do that a bit
in the next lesson. If you get stuck on
a certain section, ask yourself if you can break it down into simple
shapes or lines. And remember the two techniques you learned in the
previous lesson. Unit of measurement and
comparing elements. Purposefully adding details you don't see or omitting details you do see as part of your personal aesthetic
and style as an artist. Even as a complete beginner, you may notice you want to add or take away
from the drawing. Pay attention to these impulses. They are the beginnings of you developing a personal style. Further on in your
drawing journey, you may no longer
like those decisions, but that's completely
normal and totally fine. You needed to try to test things out and to slowly
cure rate and build your repertoire
of techniques and personal touches to get
to the style you love. And then others instantly
recognized as your own. Just don't confuse
purposeful curation with poor observing. There is a difference between omitting details because you choose to an emitting them
because you didn't see them. Practice your observation
to make sure you are doing the former
and not the latter. Now that we have our details are images almost complete and we can move on to step three,
adding finishing touches.
9. Step 3: By this stage of the drawing, you have a lovely
proportional image with as many details as you observed and purposefully chose to put into your drawing. Things are looking pretty
good and you should feel really accomplished
for getting this far. You've made it past
the hardest parts, gauging proportions, and making sure to really look
at your subject. To really observe. Well done. To finish the drawing will make our lines a bit darker
and more competent. And observe one more time to see if any part
needs refinement. So with this in mind,
let's get back to drawing. Since this class is all about
cultivating the skill of observing and having fun exploring your
interests in drawing. I don't want to
overload you with lots of shading and
tonal techniques. Having said that, however, I do want to teach you two very common techniques
used to darken an image. Because knowing and using them will help you
achieve a more finished look in your
drawing and they can be quite fun to
play around with. The first technique
is called hatching, or simply drawing a
series of parallel lines. The closer together
you draw your lines, the darker the area will look. The second technique is
called crosshatching or drawing both parallel
and intersecting lines. Once again, the closer your
lines are to one another, the darker the area will become. Both techniques gives you much more control
over your drawing. Then if you simply
colored in the area haphazardly because each
line is drawn on purpose. In general, I use hatching
when I want to add light, softer shadows and crosshatching when I want to make
bolder, darker shadows. To know which technique
you may want to use. Observe your reference
image and ask yourself if the shadow
looks delicate and soft, or super defined and strong, and then draw accordingly. Keep in mind, when using
either of these techniques, it's advisable to start
light and buildup. You can always get darker, but going back to a
lighter shade will require erasing and can get
cumbersome quite quickly. So go slow and build up until you reach a shade
you are happy with. You'll see me use hatching and crosshatching over and over
as I complete the drawing. Sometimes going over
the same area again and again as I build up
the level of darkness. If you want, go ahead and pause the video while
this is all fresh in your mind and play around with hatching and crosshatching
in your drawing. Once again, notice that I move all around the drawing
now that we're adding darker lines and bits of shading moving around the
drawing is especially important to ensure that
one section of the drawing doesn't feel heavier or
more complete than another. Sometimes drawing
certain sections will feel more comfortable
when you turn the paper. This may remind you of our upside-down contour
exercise when we practice looking at our subject
and not relying on our brain to know what
our drawing looks like. As I continue refining
and darkening my drawing, I want to talk a bit more
about personal style. Because even though this
is observational drawing, I'm sure you're eager to develop your own unique,
illustrative look. Don't worry, you
definitely have a style. It will naturally flow out
as you draw more and more. As a beginner, it's
not only important, but actually helpful
to your development to not focus on finding a style. But instead, I'm
trying out techniques and tools, building
muscle memory, the eye-hand connection,
and having fun, letting yourself be free
and creative with time. And as you produce
picture after picture, your style will start
showing itself. What you like will
come up time and time again in the
work you produce, you'll notice quirks and
patterns and how you draw. And you can choose to lean
into them and refine them. And eventually you'll have
a style all your own. Once again, remember
that purposefully adding details you don't see or omitting details
you do see is also part of your personal aesthetic
and style as an artist. Some parts of the class
reference image are super dark and I can't
see many details at all. But I wanted to add
some in my drawing. Like these lines
on the branch and the softness in the body
of the flower here. These are artistic decisions and even an
observational drawing. You should feel free to play around and see what you like. Having said that,
sometimes it can be hard to know when
the drawing is done. A certain pressure
might sink in. That says you didn't observe enough or you should
keep tweaking lines and levels of shading
until they are some kind of quote unquote perfect. I think my best
advice for knowing when to stop is
to set a goal for yourself at the beginning of each drawing and possibly
even a time limit. You can even write your
goal and how long you spent drawing on the back
of each illustration. So as you improve, you can look back
at your work with a clear understanding
of what you were trying to practice and achieve and how long
it was taking you. After a few weeks
of regular drawing, you'll be super impressed
by your improvement and how much faster you're
able to draw in general. For this class, I would
call your drawing done when you feel
you've observed all you can from
your reference and each area of your drawing
has been given attention. Meaning you've drawn details. You've played around with
hatching and crosshatching. So some areas are lighter
and some are darker. Once you've done all that, then tada, you did it. You've made your first
observational drawing. Well done. All that observing and
trying has totally paid off. And you now have
a finished image that represents your
artistic growth. You should feel really proud. Now that you have a
completed drawing, you could outline it
with pen, color it in. Use a laptop or iPad
to digitize it with a program like Illustrator
or Photoshop, or Procreate, or simply frame it as is
whatever you decide to do, make sure to take
a picture first, then be sure to
upload it along with your reference image if you
weren't using this one. So we can see your
final drawing. Give each other
positive feedback and encourage one another. You have all taken
great strides today in your drawing practice and you
should feel really proud. Henri Matisse Juan said, another word for
creativity is courage. And I think you are
very brave trying a new skill and sharing
it with others. This is how you will
grow by trying and sharing with supportive people who wants to help
you get better. I check out each
class project I get. So be sure to let me know
if you want me to look at a specific part or
if you have a question.
10. Next Steps: Thank you so much for
taking this class. I hope you love your final
drawing, but most importantly, I hope you learned some
valuable skills you can apply to your drawing practice to help you draw more accurately. And that you had fun and
learn to be more gentle with yourself as you try new
things and grow as an artist. If you enjoyed this class, please consider leaving me a review as it only
takes a few clicks. And it helps other students know this is the class
they're looking for. I would also love to know
your favorite part so I know what to include
in my future classes. Especially since next up, I'm creating a draw
with Me series where I teach you a new technique to further your drawing repertoire. And then we practice our
skills and draw together. It'll be a lot of fun. So hit that follow button under the title of this class or on my profile page to be notified when they
become available. Thank you so much for watching, happy practicing, and I hope to see you in
the drawing series.
 Claire Charisse, Artist ✿ Creative Maker