Transcripts
1. Figma Make Intro: Hi. My name is Greg Kang. I'm a Canadian content creator, IT technologist and
leader of over a decade, vibe coder of various apps
platforms like bolt dot NU. I have my vibe coding course, generative AI course,
Open AI SA for AI videos, synthesiaF AI videos, as well as the Google VO three
AI video course. Now we have Figma make. What is Figma? Figma is the leader in
the UI and the UX space. They recently had
a successful IPO, and they've introduced
a very exciting feature into their platform
called Figma make. So Figma Make is an AI
powered vibe coding platform where you can actually create working functional
prototype apps. We're talking about
golf scoring apps. We're talking about
online dating apps. We're talking about
cryptocurrency dashboards with real live data. I've already built all these
apps using Figma make. So I bring my experience of vibe coding across
various platforms. I've also participated in the world's largest
Hackathon with bolt dot U, and I'm going to be bringing this cutting edge experience
to the Figma make course. This is a beginner
friendly course. You don't need to
know how to code. But what you do need
to do is to be able to communicate and
articulate your vision or your idea in natural language to the AI platform to
help build your apps. And I'll be teaching
you some of the tips that can actually make that
easier and Fast Track. I'll give you an introduction
to the platform. How do you get started? And I'll be giving
you a comparison of the other leaders in
the space like lovable, like replet bol dot NU, Google's OPO, Google's
Gemini Canvas. So look forward to
seeing you in the course and teaching you this cutting
edge knowledge. Let's go.
2. Figma Make Tour: Hi. And welcome to the
Figma online platform. So, I purchased a
$20 US subscription, and this gives you access
to this platform here. Hi. This is Greg here. I'm going to give
you a quick tour of Figma Make the vibe coding
application for Figma. Going to remove the camera because I want to show you
all around the interface. So here we are. The main area that you would
work in is the prompt. So the prompt is in
the bottom left, and this is where you would
use natural language to basically ask the AI to
create what you want. So I've actually used up
all my credits right now, so it's showing this message, but because it's still very new, it'll still work for me. So they have some sample
prompts here on the left. So this is the sign up flow one, and I can basically click here and ask it to
create the signup flow. I'll do that a little bit later. I want to show you some other
features on the platform. So the top here, we
have refresh preview. So after your preview, if you make changes,
you can refresh it. Here you can open
up the console, and here you can actually get the mobile view for different
phones and devices. Okay, so preview is once
you've got your prototype app, you can actually see it. You can use it and
interact with it. The code view is the actual
code behind your app. And then on the right side, this is where you can actually open the full screen
view of your app. Here you got your settings. So you can name your app, give it a meta description,
Google Analytics ID, favicon image, social
sharing image, and even give it custom code. You can set the domain as well
as database integrations. The published button
will actually publish this app with a Internet URL, and you can also share it with other Figma users as well as the community on the top right. All right, so this
is the main view. Just going to take us
out of here for now. So we're going to
click on the top left and click back to Files. So this is more of
the actual dashboard. And over here, you
can see your account. You've got the theme,
you can make it lighter. That might be easier
to see actually. You've got your settings
with your email, community notifications
and security. And on the left,
you've got your admin, if you want to manage your
team, you've got trash, all projects, drafts
on the left side, and then you've got your start
projects here on the left. And you have community
resources at the top over here. And to access the different
Figma applications outside of MAC, this
is in the top right. So design, FIG
Jam, slides, buzz, site, but we're focusing on MAC, which is here on the top right. So let's go to make again. And let's just use one of the default prompts,
so sign up flow. So gives us our prompt here. And just notice on
the prompt area, we can change the text. We can import from Figma if
you have other Figma assets. You can upload an image as a reference if you want a
particular design or style, an image says a lot. And over here is your
point and edit button, if you have a preview and you want to
specify certain area, you can actually use this. And then This is your Enter button once
you've got your prompt. So let's hit Enter. And on the left side, you can see the AI is
thinking, it's reasoning. And then on the center, it's actually building out your profile as well
as building code. So yeah, this phase of the
project can take some time. So what I'll do is I'll
this is a good chance to go to the bathroom or get a coffee. And then when you come back, you can actually preview
and interact with the app. During this phase, you can also go to the co
Vew and you can actually see it
building the code here. Okay, I'm going to
go back to preview. And then when it's done, we'll actually check
out the preview, the app, and interact with it. Okay, so we have our preview, and we can check out the code. We can actually go to
different mobile views. I'm just going to close
the console here. So this is iPhone 16, Android, et cetera, we can go
back to the desktop. Go back to the desktop view. And actually, let's just click the full preview window
and then we'll try the up. Okay, so we can actually
continue with Gmail or Apple. We can make a copy
of this and remix. Um, so we're interacting
with the app. We can actually change
the images here. How does this look? So this actually test out email login. Greg H Okay. Welcome aboard. So
that's the flow. This is a preview app. So from here, we can use the prompt on the bottom left to reiterate, make some changes. So you basically just ask
it to make certain changes. Could be design, color
or functionality. We can share this
with other people. We can publish it out to the
Internet or the community. So if you want to feature
this on the community, you can turn on that radio
button and then click Publish. So this will take a few minutes. But basically what I've
done here on this video, I've introduced you to some of the core features in Figma make. And we went ahead and we created a basic app with one of
the default prompts, and we published it out. So that concludes
this video lesson.
3. How to make an app using a reference image: Okay, we're at Figma make, figma.com flash M. So
slightly different view from the one I did on the tour. But we got the same default
prompts here onboarding flow, data dashboard,
gradient gallery. So we're just going to
basically try to create an app using the
prompt with one shot. Make an online video editor
that is mobile friendly. And let go. So it's actually opening
up Fig Mamek now. So it actually didn't
process the prompt. So this is where we can actually upload a reference image. Okay, so I'm going to use
this reference image. See how I attached it there. You can see the image
preview on the bottom left, make an online video,
edits mobile friendly, and use the attach file
as design as inspiration. Okay. Now I'm going to hit
Enter. Now it's thinking. So rather than the Figma
making assumptions, it's actually going to use that reference image and hopefully build a
video editing up, that's similar to
what I attached. So I can actually take a look at the reasoning, the
reasoning part. I'll create a mobile
friendly online video editor inspired by your image, main video preview with
playback controls, collapsible tools sidebar with editing styles and
quick actions, touch friendly
timeline with video, audio tracks, responsive design, dark theme matching
the inspiration image, export and save functionality. So this sounds good. Let's
see what actually transpires. Let's take a look
at the code here. Wonderful. Okay, so we
have a preview here. How does this look? Looks good. And I don't expect, you know, this to be
a one shot prompt. This is your opportunity
to test it out, see what works, see what
needs to be proved on. So the first thing I'm
wondering is where can we actually import the video? It doesn't look like I
can adjust the timeline. Let's try out the
auto edit styles. That doesn't seem to work. Does the save button even work? Okay, so visually wise, we've got a good starting point, but functionality, there's a lot that needs to be worked on. We need to import videos. We need to actually
resize the timeline area, and we need the ability
to actually export. So my follow up prompt, I can make all
these suggestions, but as a best practice, you
don't want to overdo it. You could start
with one feature. Add an import video button
with the ability trim the clip in the timeline and fix the save and
export video. Enter. So hopefully we can fix
these three basic asks. Just for the sake of
time, but if it doesn't, one ask at a time is best. So you can just
test that option. But it's easy to be
greedy and ask too much, but that can also
confuse the AI model. Okay, it's process
my second ask. So I've noticed there's
an import video button. Let's actually click it
and see if that works. So here's a video. And let me see if I
can actually trim it. This is actually function. So it looks like I
can actually trim it. Looks like the save
button is working. Basically, that's how
vibe coding works. You test it out, you add the new features
until you eventually get the polish and working app. So I'm actually just gonna share this project with my team and continue on working
with the later. So what we did here
is we came up with a preview using a reference
image for video editing app, and we did a follow
up prompt after testing it to fix the
missing features.
4. How I made a Variant of Uno Called Bruno: Okay, we are on Figma make, and I've made a variation of
the game Uno called Bruno. And I'll show you the
prompts of how I made it, and we'll go through and
publish this together. So let's just start
with the game. I'll just do a sample game. So I'll just refresh the
game here, start a new game. All right. So that is the co view, and this is the preview
where we can actually play. So this is basically a playable version of Uno,
but it's called Bruno. So I'm going to put my name. I'm going to add an AI
player, the computer. And basically, we match
cards by number or color, call Bruno with one card left. I'm actually not sure how
we do that with this game. And yeah, the goal is
to empty your card. So let's start the game. So the deck is in the middle. So it is a skip turn card. Uh Okay, so I use the same
color. So now it's a seven. So I can either use the eight or the same
number, so I'll do seven. I'll click it, and I'll
click Play Card. Okay. So you see the computer
went. It's currently two. So I can select more
than two cards, I hope. So that's a change I need
to make to the game. Like, if it's the same
number, technically, I should be allowed to stack, use both these twos. So this is actually what we call the testing phase,
user acceptance testing. So we have a workable version. We have to test it to
see if there's any bugs or enhancements that
need to happen. And that's where we
would make an iteration. So play current card is four, so I have to pass now because
I don't have anything. What is that? Rainbow card? Okay. Bruno bought wins. Okay, so let's look
at the prompts now. So the first prompt was make a multi mobile friendly version of no called Bruno and said, I'll do that support for
two to four players. And yeah, I asked me initially if I
wanted to create a database. But I think for
this type of game, you don't need a database because you just basically
start a fresh game, you don't need to save any data. So then my second problem was
give a cute Bruno logo to the back of the cards and give the ability to play
against the computer, AI. And that's what it did. And it gives version three. And now I want to say, give the user the ability to
select more than one card. If applicable, for example, if a player has multiple cards with
the same number as the deck card. All right. So that's an example
of revising or iterating. Oh Okay. All right, so code
has been updated. And basically, once
this has been done, I'm going to test that
same feature again. I'm not going to go
through that here, but while that's going, let me just show you around the other menus at the top here. You can see the mobile preview. You can see the desktop view. And then with the mobile view, we have the ability to
change devices here. So that's the
advantage of Figma. On the top right side, we have the ability
to publish the game. We can even give it a favicon. We can give it a
Google Analytics ID. And we can publish this
game, which I'll do after. Okay. I'll add the ability to select and play multiple
cards with the same number. Great. So that's something
we need to test. Other things we can do is we can actually link
it to a domain. So once we publish it, we can actually have a URL like no.com fordlash Bruno or something like
that, bruno.com. But you need to own
that domain name. So once this is finished, I'm going to publish it. Let's also look at
the Share button. So you have the ability
to share it to anyone, and you can give them the
ability to edit it, view it. You can password protect it, publish to the community, which I might do. Just waiting for this to finish. And it looks like version
four is finished, and we have an error. So it's autofixing the errors. And the underlying model, I believe, is clode anthropic. So similar to other vibe coding
platforms like bolt dot U. So it's got a similar
type of logic to it. So it's quite smart. You can speak to it
in natural language. And if you need
to fix something, you can just say fix the error. Alright, so what I'm going to do is just publish this out. So basically, if I want to
feature it on the community, I could do it here,
and I click Publish. And that's something
I'll do after the agent fixes these
autofix errors. So there we go, behind the scenes of a
multiplayer Bruno game.
5. Introduction to the Figma Make Community: Alright, so now I'm publishing this game
to the community, so the community can
actually play it. They can remix it and make their own
variations of the game. And in the community, you can actually look at other applications.
So here's mine. All right. And see, we can actually see other community
applications. Let's just take a look here. Fortune Cookie, Button effect, Mini Controller, E Commerce, Figma branded calculator,
even a business website. Okay. Let's try Let's
try this app here. 180 degree production
rotation view. So you see we have the
ability to heard it. We can save it and remix
it in our own vision. Okay, and I can also see the
prompts that this user use. I want a 180 degree
rotation for my product. Okay? And then we
see the output here, and then we see another prompt. This users using uppercase
for his prompts, so it'll be easier to follow. Yes, add all these and make
the rotation smoother. Tell me if I can
import more images, angles from Chachi BT, tell me the angles,
and I'll get them. So this users actually having sort of a conversation
with the AI agents. For the colors, we have black, white, red, navy
blue, make a $30. Okay. So here we go. It's got his hoodie here, and we can actually rotate
it. So this is pretty cool. You can This would be a good mockup for different
types of products. It's nice that he
shared this here. We have auto rotates. It was very cool.
I'm actually going to play around with this one. So that's an example of using publishing to the
community and then also remixing another Figma
app from the community.
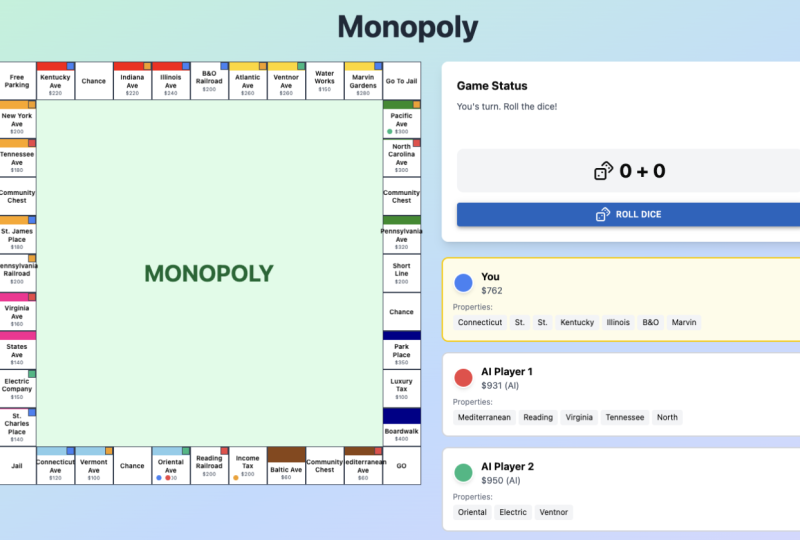
6. Figma Solana Monopoly: I'm going to demo my vibe
coded game, Solana Monopoly. So this game is meant
to be a fun prototype. Playing monopoly with slana. And this can actually
connect your wallet. It's not real, but it
could be very real. And basically, this is a
good way to get familiar with the Salana crypto token while playing
a fun classic game. And Salanas one of those energy efficient
blockchains that isn't expensive, so that's why I was
inspired to use Solana. So I'll just take
you through the game first and then we'll look
through the prompts. I use the platform Figma make. So we started by selecting
our character here, and we need at
least two players. And let's just see.
Maybe we need four. Okay, so we've created
some key players here, and we have the silana board. So player one has 0.1
500 so zero properties. Let's roll the dice. Okay. So where the D line? One, two, three, four, five, six, seven, eight, nine, and All right. So player three has
the opportunity to buy Rainbow Bridge
for 0.022 SOL. Alright, so player three
owns Rainbow Bridge, which is over here. So they own this property, and now we're gonna
roll the dice. I could make these players
a little bit bigger. It's hard to see. But this is definitely a game
that can be iterated. So anyways, it's a game of accumulating a crypto asset,
accumulating properties. And let's take a
look at the prompts. So first prompt,
create a fun game of monopoly that uses the salon and cryptotken as
rewards to play. Make it a fractional amounts, so it's fun to play, so
it's not expensive to play. And it said, Sure, let's make that game and
created version one. So version one wasn't
really nice to look at, wasn't very visual friendly. And there were a lot
of spots on the board. So I said, Make the board more visually
appealing, mobile friendly, and less spots on the board and colorful and allow
a cute character to be picked as a player piece. So it said, Okay, we'll reduce
the board spaces 40-20, added the cute player
pieces that we saw. And completely redesigned
Salana Monopoly. And that was Version three. And just one more prompt. I put fix the text as it is
spilling out of the board. So we had these board
description names that were spilling
out of the boxes. So it fixed that. And that
gets us to our card version, which I'm pretty happy with. Let's just take a quick
look at the code. 206 lines. And this is something I
don't mind publishing. And so we would go publish. And I don't mind sharing
with the community, so we just click Publish. So that is it. Hope you enjoyed that
intro to Salana Monopoly.
7. Remixing an Ecommerce Store with Stripe Integration: Okay, I want to show you
a remix that I've made. So this app here, 180 degree product
rotation viewer. So I remix this, and I'll just show you
the finished product. So here's the paddle lounge. This is a pickleball
ecommerce site. And the key feature
of this site is the ability to rotate
the paddles like this. We can also zoom in over here. Reset. And if we choose the paddle, we can add it to
a shopping cart. So add the card so we
can view the cart there. So this is just in demo mode. We're not actually going
to process a payment, but this could easily be functional if you
get the API key from Stripe and just
in your prompt, just tell it that you want to
have real payments process, and then you would
share the API key in a secure folder,
and there you go. You have a pretty
good prototype, even a functioning app where you could focus on one product,
you could demo them. And these are just I wouldn't
say the best screenshots, but yeah, you get the
idea that we could do auto rotation and view the product from
different angles. So let me take you behind the
scenes of how I did this. So let's go to my project. So I remix that
original project. So I started off with the remix. Okay. And I can see all the
prompts that they used. So I'm just going to
scroll down until I find where I started
on this app. Okay, it's Version
six, I believe. So my first prompt, I attached an image of a
pickleball paddle and I said, Use this pickleball attachment
for the product image and call it VaticProPrism flash. Okay, I went ahead and created Version seven and successfully replace the hoodie with a pickleball paddle and
gave me an image like this. So then I thought, Let me take it a step further
on Version eight. Let's upload more photos. Well, before that, I wanted
to change the header image. So attach an image
of pickleball, and I asked it to use this image on the header
and call the store the Powdle lounge
and list the prices. Alright? So that
created Version eight. And then the next prompt, I added another screenshot of the Pickleball paddle
at a different angle. I said, use these
additional paddle images for the autorotation function. That created Version nine. And then I added another
angle with the same prompt, use the positional palimages
for the auto rotation. That created version ten. And then I added one more screenshot with another
angle, exact same prompt. And then the last one was, can you add a shopping cart
with stripe integration? So that brings us to Version 11. So in order to set that up, it wanted a database, so
superbse integration. And that brought
us to version 14. So you can see here how we
started off with the remix, and I basically adapted
it to another product. And the main feature
of this site was this auto rotation
of the product. But I've also enhanced
it with a shopping cart. So let's take a quick
look at the code here. I think this is quite
a detailed app, just looking at all this code. So if we wanted to add the API, so I'll prompt if I have a stripe API key to
process real payments, where can I securely share it with update it in the app. So Walt dot New I'm
familiar with the process. There's a ENV folder that we can actually just
copy and paste it in. Okay, so basically it sets up this area and you basically
just paste it in here. Paste it in here and click
Create Secret. So there we go.
8. Figma make summary: Thanks for taking the Figma make course. I hope
you enjoyed it. I hope you learned a lot, and it got your creative
juices flowing. It takes a lot of all your ideas and can
actually make it come to life, a functional prototype,
whether it's a golf scoring app,
cryptocurrency dashboard. Now you have the power
as whether you're a UI or UX designer or just a content creator
or business owner, whoever, you can now use Figma make and build functional apps. You can also use
the community to get ideas and also share
your app with the community. And this space is changing
so rapidly that I expect changes to
happen regularly. So I will try to keep
this course up to date. You are interested in other vibe coding
platforms like bolt dot U, then I do have courses on that
if you want to deep dive. You got a short introduction
to the other competitors. I gave you a comparison. What I do like about Figma M is that you can get
the team involved. You can share it with the team. You get access to a
lot of visual control, the most visually
appealing vibe coded apps, and Figma strength is in the UI, so that's a that's
to be expected. So anyways, hope you
enjoyed the course, and thanks for joining us. Bye.
 Greg Hung, Travel Videographer