Transcripts
1. Intro: Hello and welcome to this week's class. My name is Emily and I'm a watercolor artist and I teach watercolor classes here on Skillshare for beginners. Today's class is going to be this beautiful rose bouquet in a glass jar. Is going to be really simple. Yet it looks complex. I hope you guys enjoy it and we're gonna go ahead and get right into it.
2. Supplies Needed: We're gonna go ahead and go over the supplies needed for today's class. So starting, you're going to need a pencil and an eraser. We're just gonna do a rough sketch of the bouquet today. You're going to need two brushes. So the first one is a size 10 and the second one is a size eight. You'd basically just went to different round brushes. One a little bit smaller for more details, and one a little bit larger. Your paper. You're going to need a mixing tray. And then your paints, a dish for water and the reference photo. So these are the supplies that you're going to be needing for today's class. I'm gonna go ahead and go over the colors in more depth. And then we'll go ahead and get started.
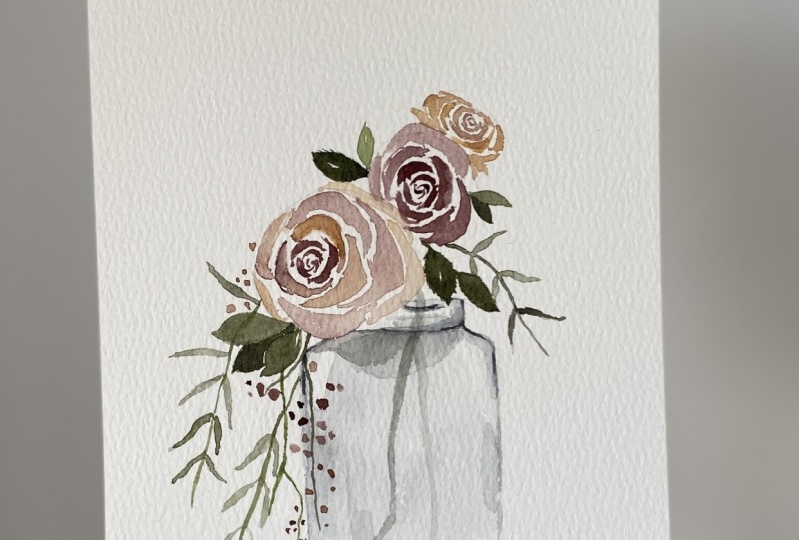
3. Choosing Paint Colors: So going over these colors here, I've picked five colors for today's class. Now, these are going to depend on what you have available at home, but you're going to want an orange that's more on the yellow side. And go ahead and put that in your tray. You're going to want a violet. Now, this is, as you can see, it's not super, super purple, so we're looking for something more on the pink side, but this has a little bit more of a resting vintage kind of color. It's like a pinky purple, but it has a lot of brown to it. So you just want a violet? I would choose something more pink than purple. You're going to want some black just a little bit. And then two greens. So the greens I've chosen are actually a green and a gray. So this is Davies gray. Now Davies gray has a green underlying, so it kind of makes a very faint like more of an aquatic gray. And that's what we want for today's painting. So you want something that's softer and more faint gray. So if, if you don't have something like this, then I would recommend getting a little bit of blue and mixing it with your green to make that teal or aqua color. And then we just want a basic green. And those are your colors for today's class. Set those aside and then we'll get onto sketching out our bouquet.
4. Creating Our Sketch: So for this portion of the class, what I'm going to be doing is just creating a rough sketch of where I want my flowers to be. So we're going to deter from this a little bit. This is more of just like a reference for the shape of our bouquet, but we're going to use it anyway, even though it won't look exactly like this and we're done. So to get started, we're going to map route where this flower is. So I'm just gonna put it right here. Let's draw circle as kind of towards the upper half middle of your painting. And we're going to put a circle right next to it. This is our other flower. Since this is a beginner class, it looks intimidating. There's a lot of details. We're going to simplify this. So we're going to put a line down like this for our branch. And then we're going to add another brand tray here and it's gonna go outward a little bit. This one actually curve it down a little bit. So we have this branch and then this one and I write here, there's another one that comes out. So we're going to put that on there. And then we're going to simplify this for you. So right here you can see one little bud and on that a little bit in some berries and then this flower behind it, we're going to just create one large flower right here in the center. To make it a little bit less confusing, a little easier to follow. Now for our jar, we're going to have you write the base of that flower, draw a line outward. And then towards the base of this branch, we're going to draw another line. This is going to represent our jar. So just drive basic curved line on either side of that for where you want your jar to be unwelcome and perfect it in a second. So that's the basic of our bouquet. Let me adding some branches and whatever, that's the base.
5. Practicing Painting Rose Petals: Taking our larger brush, we're going to go ahead and practice some of our brushstrokes for painting our roses today. So you're gonna go with your purple color. You're just gonna get it wet. You just need a little bit of it. So what we're gonna do is we're going to practice some of the ways to paint the rose petals and then also the way to paint the center of the rose. Now the other thing I'd be a very fluid, very easy rows. There's not going to be highly detailed. So keep in mind that a lot of color in the tip of the bristles when you're painting the center of your roses. And then you want the collectively diluted as you paint the petals farther out. So I'll show you what I mean. But we're gonna go ahead and get started painting some of the petals. So getting your color and dilute it just a little bit. We're going to start making a C. So what we're essentially doing is making a C shape like this and bolt directions. But for your C that you, what you want to do is lightly touch your brush to the paper. And as you curve around, you're going to push all the bristles into the paper. And as you come back to the bottom, you'll see you're going to lightly touch again. This is just a rough version of what we're doing. So lightly touch, pushed down and lightly touch. We're going to do six of these and then we're going to have six the other direction. Lightly touch, push, and then come back up and lightly touching. Now if you can see with these three, the center of my pedal was very, very faint. And that is because I didn't have a lot of water on my brush. So what I'm gonna do now here is add more water, but just pick up a lot of that colour, but it's a diluted version of this color, so it's not going to be super dark, but it is going to have a lot of water. Now we're going to start going the opposite direction. The lightly touch, push down. Lightly touch. Now see all that water pooling. That means I have enough moisture in my bristles. That is our basic rose petal. Now what we're gonna do is just build on top of that to create the actual type of petal that we'll be painting in today's class. So get your color and dilute it a little bit. And now you're gonna do the same thing, but you want this edge, this outer edge to be a little bit more wobbly. So what you'll do is you'll paint here, see. And then before it dries, you'll come back over n like rough up the edge a little bit. So paint your C and then a rough up the edge. And that just adds a little bit more to the petal. So that looks a little bit more like an actual rose petal. We're going to practice painting the center of our roses. So you can do that with the same brush if you practice the technique and you have a light hand and get used to the feel of how much water to have on your bristles are, how much color to have on your bristles. But for the sake of today's class, we're going to practice it with our smaller brush, so we're gonna get our color. But you want to very, very concentrated and you want a lot of it. Your bristles. We're going to do the same kind of see a very tiny, so you're going to do a little c like this. And then where that hall over the sea is, is where you'll put the end of one of the other Cs. So you're gonna kind of create some little c is like this. Now I like to do either three or five of them. And then from that point, I would just lightly dip my brush in the water and start building my actual sees, my big for my petals. So that's your basic center of the rows. And then you start building along the outside with these larger petals. So we'll try it one more. So put some sees your brush a little bit and then start making some larger ones. And it's okay if you cross over a different one that you've already painted because that is how rose petals fold. They fold inside of each other so they usually pretty tight and kind of on top of each other. So now we're going to put this all together and we're going to paint a row is right here on the bottom corner of our papers. So you're going to start with a little brush. And you're gonna put your knees down and do that first layer of petals. So here I'm just doing three as a demonstration. Lesson center ever rows. And now we're gonna take our larger brush and we're going to get that color. And we're going to dilute it a little bit. But make sure that your brush is full of it. And then I'm going to start painting the outer petals. And now these ones, you want to be a lot more bumpy and wobbly like a real rose petals. And then usually what I would do from here is make some tiny little ones on the edges like this represent just the tops of those outer petals. Like that. Go back in with your small brush, get some more of that concentrated color and just add it to the center petals right there. Can even dilute it a little bit to help it spread out a little bit better. But that's it. That's how we're going to be painting roses in today's class. So that's a good practice. We're going to set that aside and we're gonna go ahead and move on to practicing painting. Some leaves and some vines.
6. Practicing Painting Leaves: Grabbing a separate piece of paper, we're going to practice some leaves so your large brush is what you'll want to use for our large leaves. And I also like to use it for a lighter shade of leaves that are gonna go in here with our Davies gray and Rutter, a practice making a basically if so, what for basically what you'll do is something similar to the petals, but instead of a C, you're going to just be going down. So you're going to start very lightly on the paper and then push and then come back up. Then what I like to do is retouched the edge, the leaves. So basically for an ideal, a whole row of these, so maybe five of them. And I lightly touch, come down and lightly touch again and do the same thing on the other side. Now I'm running. I'm going to grab some more color. So the first row of really large leaves and then practice that same technique but doing some angles. So what I find helpful is to start at the base of relief. So what would be this point when you're doing it at an angle? And then you're just going to curve it up like this. And add on that a little bit. Is when a practice making that first line coming from a different direction. So I'm going to make like a fan, straightforward one. So there are certainly is from different directions. A little better. And we're going to practice with our smaller brush and with a darker green. And this is just a generic green. I haven't added anything to it. So it will look a lot brighter than it will in the actual painting. But we're gonna do the same kind of concept, but was short fat leaves. So your curve around like you do for your rose petal. But you're keeping them fairly short. These are a little bit longer. And you can evenly that center open. That kinda adds a nice little element to your leaf. You can come from the top or the bottom. Either way, I always find that when I'm coming from the top, it makes for a longer leaf. Whereas when I'm coming from the bottom, it usually makes for a shorter, fatter tip leaf. It's just a matter of getting used to these brush strokes and practicing them. But I find leaves to be one of the easiest things to paint. What I'm gonna do is I'm going to take a little bit of this lack and mix it in with a little bit of this green to make it darker as mean. And we're going to practice putting some leaves on a little line. So we're just gonna make a little vine going horizontally, but we're going to swirl it around a little bit. Have it have some curves. And then taking that little brush, we're going to put some little leaves. I outside of that vine. Alternate your leaves so that they're not both coming out from the same spot. This will just give you an idea of how to paint leaves on a vine because they're all coming from different directions. So it can sometimes make it a little difficult to know how to approach relief, but they're very forgiving, so it's really not something you need to stress too much about. Okay, so there's our good practice sheet of leaves. Now we're going to get everything ready and we're going to just start architecting.
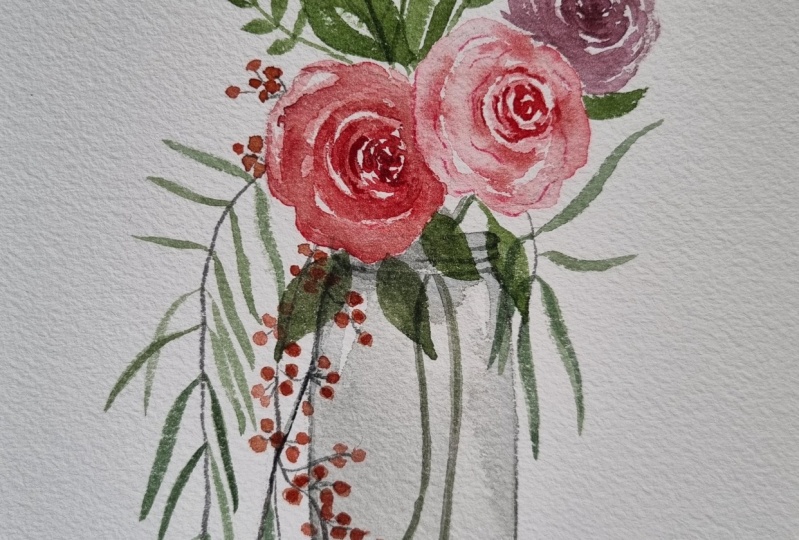
7. Painting Our Jar: Bringing mass our paper and our inspiration photo for today's class, we're going to go ahead and get started. The first thing we're going to work on though, is going to be our little jar that our plants are in. So what you're going to be doing is taking that gray ever so lightly and a little bit of that black and creating the faintest gray. Now we're going to wash it all over the jar, but we're going to leave highlighted spots. So right here in this corner and this corner, and then this lower corner, we're gonna leave actually a little bit right here too. We're going to be leaving a highlighted area. So what we're gonna do is take this light gray. Just cover the whole pot except for the little highlighted area. We wanted to kinda be like a little sliver or two. Remember this corner one, we're gonna make you be very small. And then we're going to paint the lip of the DR2 and leave a little highlighted sliver as well. So leave a center where you don't have color. And leaving that to dry. I'm gonna go ahead and mix up some more of that color bell a little darker this time. Herself, a tester paper ready? And with this color now we're going to go over these corners a little bit. And then across this bottom of this lip. And then right here at the base, you're gonna make a little line or behind. Or that base of that jar is on top of the slit. Now bear in mind this rose. We'll be covering this part of the jar so you don't want to do too much right there. See you know, how the top of a jar usually has lips where the lid could screw on. So we're going to create that. So you're gonna make a line, but have it moving slightly downward. And then right above that, you're going to have an inner line angled into where that Rose is going to be. And then taking a little bit of that color, we're going to just create a little swipe right here to add some dimension to the jar. And then right here at the bottom, just complete that little edge. Usually a little bit up there. And then once that dries completely, I'm going to take more of this black and more this gray. And this has gotta be our most concentrated version of it. Make sure it's nice and dark, but not straight black. And you're just gonna go in, in certain little areas. So we're gonna put a little line right here. Actually it's not dark enough to put a little line right here and a little line right there. I'm going to put one directly under this little light area in coming down a tiny bit. Then on this bottom corner, do a little bit like that, just a little curve and then a little bit across here, not much. And then on the top corner you and do the same thing as well. You're gonna make a little line over here and then a little line curving this edge. And then another one right down there. The next step is going to be your roses.
8. Painting Our Roses: Our next type is going to be our roses. So we're going to be painting the two large ones and then one at an angle. Using your small brush. Get some of your color for your roses. Now, I'm going to just use this. I'm going to add a tiny bit of my orange. Because I'm going more for like a vintage G, going more for like a rustic kind of color. I'm going to be mixing the two together, the orange and this purply brown. What makes a very dark brown color, but it still has a little bit of that pink and purple to it. So I'm going to use that color from a rosy. So what you're gonna do is start with your two large roses. Start with this one right here in the center. And you're going to start by putting your little season. And then you're going to pick up on your color that you're going to use for the petals and start drawing some C's around the outside. Now right here is where you're going to want to dilute your color even further. And you're going to want to hit just the outside of this routers. Now this one's going to overlap this one. So you do want to have a pedal that covers where this one's going to be. And the same thing over here. It's going to overlap this flower a little bit. Great. Now, taking our dark color again, we're gonna go over those little Cs and then into these first set of petals. And I'm going to do the same thing. But right here, we're not going to be piling our second rose petals on top of this petal. We're going to just have them stop at this edge so that it looks like the roads is underneath that first one. So grabbing more of that first color, you're going to put your seeds still in the center. So you don't want to offset it because of that pedal. You want to still have it be where it would have been. And then picking up your color. I'm going to copy that first round of petals. And then diluting your color again, you're gonna do that outside set of petals. And then this is where you're gonna go over the jar a little bit. Now to paint this one that is at an angle. Because like in our photo it's a different flower. In honor of that, we're going to just make it a slightly different darker colored rose, but it's still going to be arose. So we're going to just take that purple color. And we're going to put our season, but they're going to be more like little lines on top of each other like this. So instead of C's, there are longer little lines. In the same thing with that first set of petals. We're going to make a long, but they're going to, they're going to be kinda of a sharp curve right here so that they're filling in this back area. And then diluting your color. We're gonna just don't cover these pedals member. You're going to work underneath them and around down. We're going to make it look like the rows is thin and narrow. And then what you're gonna wanna do is kind of mate. Some petals that curve outward right here. Going in with that color. Can deepen these ones. We're going to leave it at that. So that looks really good. Now what you're gonna wanna do real quick before you add too many leaves and greenery to this painting is you're going to want to take a little bit of that black and that gray again. And you're going to want to create a shadow under this rose. So deepening this shadow right here, but also just making a shadow under where the roses. And then soften your edges a little bit by diluting the brush or just clean off completely. And there you have it. You'll want to maybe go in with the actual black to deepen that little corner.
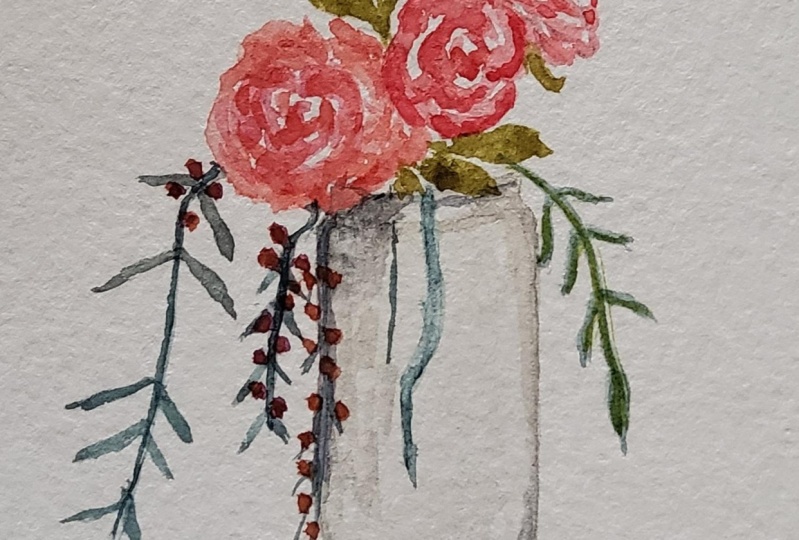
9. Painting Our Vines: Now what we're gonna do for our leaves, get some freshwater, and get your small brush. And we're going to go in with this black and a little bit of green. And your gray create these vines. So they're going to come from behind the roses. So that first fine. But first-line, it comes down and it stops and then it branches out. So we're gonna do something similar. We're going to have one stop and then another one kind of branch out a little bit. I come down like this, stop and then kind of branch out like this. Now you're going to make the two bright vines that hold these leaves, these long skinny leaves, which can I make those came down and out. And then that third one right here behind the jar. Now before we get any further, we're going to paint the branch that's in the water. So what you're gonna do is take a little bit of that gray with a little bit of that green. You've got something kind of light. And you're going to paint the branch. Not right here about where the center is, is where the water is supposed to be. But we don't have water in here, so we don't have to do anything to make it look like it has water in it. But you do want the branch to be very faint. So we're going to kind of just make that so light. And then right here where there's lips, you can, I want to make it a little bit off centered so that looks like the glass is making the branch looks strain. So we're going to come and just paint a very faint branch coming up. Getting started on the leaves are going to start with these long thin ones. And then we'll finish with these big fat ones, but we're going to in the long thin ones first, then the berries, and then the fat ones to end. So what you're gonna do for this. So you're gonna take your green, going to elevate this purple to our green to make almost more of a brown. Because we want a few different shades in this painting. Now if you can see in our reference photo, the leaves are going downward and out. And we're going to do that the same. So we're going to have the two going up with the 2 down. So let's start with that. He almost just want a long straight line and you can just kinda thick in it a little bit in the center area. And then kinda cluster these ones together over here. Now, unlike in our practice, we are actually painting these right across from each other instead of opposites on the vine. Then we're going to do the same thing here. I can also help us like I'm doing right here is paint the one side of the leaves first and then move on to the next side. And then these ones over here on this third branch are going to be little bit more difficult because you're going to have some going up and out and then some going straight down. So for this inside we're really just paying two. But then we're going to have this top one going up and out. The next one kind of going straight. And then two more that will be coming downward at different angles. So that does make it a little bit more difficult. Moving on from here now we need to add our little pink berries to Irvine. So what we're mostly going to be doing for that is our orange because we don't have a pink today. I wanted to keep the colors very vintage, inspired and rustic. So we're going to just be doing an orange for that Barry. And if your oranges too bright, you can add a little bit of that purple or even that black to make it more of a dark orange because we really don't want something too vibrant. And we're really just going to add some little dots. Essentially. Are the barriers are just make it a little clusters of dots near where that vine is. And we will attach them to the mind later. Because we don't really have the ability to paint too many details. And this is a very small painting. So you'll make kind of clusters of dots to represent berries. I do clusters of two to three and alternate them as well so that I'm not right across from each other. And then if you see in our photo There's some berries over here. So that's what I'm doing up here. It's just adding some more berries to add a little bit of depth to the painting so that it's not all just in one spot so that the berries are around the painting a little bit.
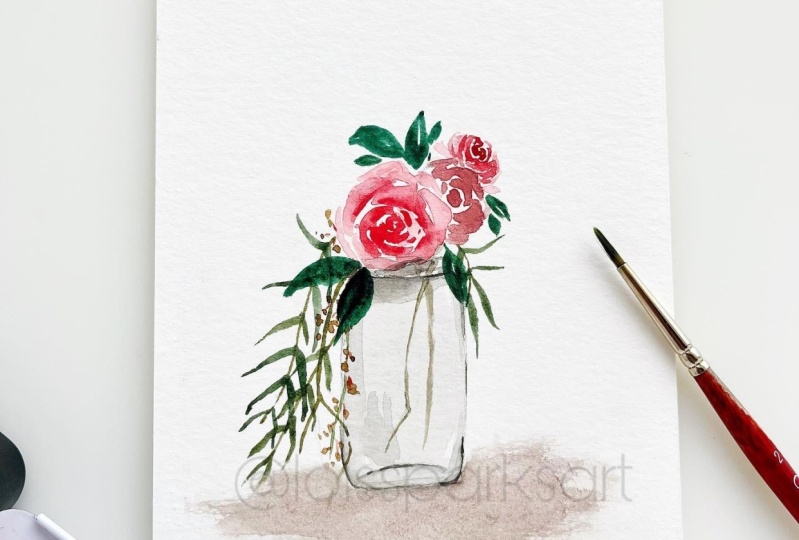
10. Adding final touches: We're gonna take a little bit of this green and this gray and just attach rate the tiniest little line if you can through the berries to kind of attach them mentally to this branch so that it feels like they're actually attached. Set of just floating. Taking our small brush still get some of that green and some of that black together. Kind of like what we did in our practice. We are going to paint larger leaves. And since these are darker, we're just going to paint over everything that's in their way. So we're going to paint one right here, where this is paint you do your two sides and fill it in. And then another one right next to it. And then we're going to have a few coming out from the top right up here. And these ones are going to leave for one, kinda leave the center a little bit open and empty like that. Dr. Third little leaf right there. And then we're going to draw another one, but add a little stem this time. Under this first rows. And then one more. Right out here. Behind this is now you just need to let it dry completely. And then we got to remove our pencil lines before we're done.
11. Outro: And with that, we are done. And today's class, I really hope it was easy to follow along and that you enjoyed it. I hope you're happy with your work. I would love to see you guys is recreations of this. So if you feel comfortable, please share that. And the other students I'm sure would love to see it as well. And with that, I'm going to say goodbye and I'll see you guys next time.
 Emily D., ARTIST || watercolor artist