Transcripts
1. Welcome to the class : Ever wondered how to
paint realistic objects, how to pick the perfect colors, determinonal values, and incorporate shadows.
Hello, everyone. My name is Zanna Abel, a passionate watercolor
and Cache artist, an art educator, a Skillshare
top teacher, and an author. Join me on the Skillshare
class as we delve into the art of painting a
realistic cantle with ache in the simplest
way possible. Gua is an exceptionally
versatile medium, providing beginners with
an easy way to create vibrant artworks compared
to the other mediums. While painting realistic
objects can be tricky, I have broken it down into simple steps in the
skill share class, making it both understandable
and achievable. We will begin with an overview of the materials you will need, followed by a quick walk
through of the steps to provide better insight
into the process. It's a short and simple class, but there is no
doubt you will leave the class with increased
confidence in using guage, and also the knowledge needed to start crafting
your own artworks. So, if you have an artist spare, grab your guage paints, and join me for a fun and
creative painting time.
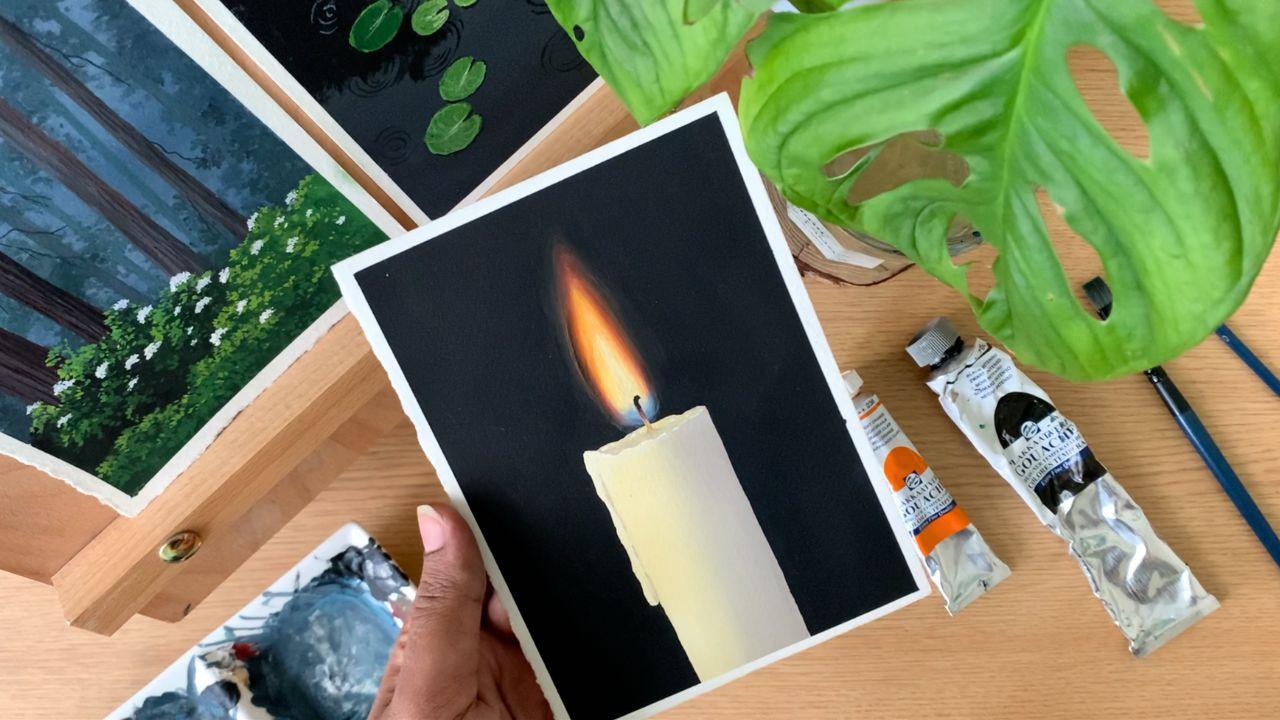
2. Before We Begin : Hello, my lovely friends. So here's the beautiful cantle painting that we're
going to try. It isn't a difficult painting. The major thing here is the body of the candle, which
is quite easy. Then we have the flame
and also that thread. So basically, it is three different elements
connected together. Before we start, I will quickly show you the four
different steps. Then we can start
with our painting. The very first step
is to add the sketch. You can go for a
thicker candle or a thinner candle, that's
totally your choice. Then onto that, we
will apply the colors. We'll be using burnt
umber and yellow. We only need a rough blend
of these colors here. And right after that, we'll be applying black onto
the entire background. At this stage, while you're applying paint onto
the background, we will also define the
shape of the candle. And right after that, we
will paint the flame. We use ermalin, yellow and a bit of blue
towards the bottom. And the final step is
to add that thread, connecting the flame
and the wax candle. So, yeah, those are
the steps involved. I want you guys to try
it without rushing. Follow the steps carefully. There is no need to rush.
Take your sweet time. At any point, if you
want to take a break, stop it right there
and come back and finish your painting
when you're ready.
3. Materials you will need: Let's start by
looking at the art supplies for this class. We'll be doing one
small artwork. That's the size of the artwork. It is A six in size. Now I'll show you the paper
that I'm going to use. It is Canson Hitage, hot pressed aticol paper. Cancer is a big brand and they have a lot of
varieties of paper. This one is from the
Heritage series, and it is a hot
pressed atic paper, which means it
doesn't have texture, and it is also 140 B, and that means the
paper is quite thick. This one is also 100% cotton. For my Gach artworks, I always prefer
going with a paper, which doesn't have much texture. But it's absolutely your choice. If you want to go with
a textured paper, that is totally fine. You can see the paper. It doesn't have much texture. I will show you a closer look
of this artwork as well. You can barely see
any texture there. This one is a hot pressed
watercolor paper, and that's the reason why it
doesn't have any texture. The size, as I mentioned
earlier, is a six, you can go the slightly bigger
size or a smaller size. That's all about the paper. Now let's have a look at
the colors you will need. We'll be doing this art
work in three steps. First, we will paint the
candle, then the background, and then the flame to paint the candle
and the background, you will need plaque, white. If you don't have burnt umber, you can just make some black
with burn Cena or brown, then you will also
need some yellow. To paint the body of the cantle, you will need burn timber, some kind of yellow and white, and then to paint the background,
you will need plaque. Now let's take a
look at the flame. Obviously, you will need
some orange and yellow. I will be using ermalin and the same yellow I
use for the cantle. Then along with that, I
will also need some blue. We'll need to apply this
towards the bottom. Okay. These are the three colors
you will need for the flame. The rest we have there already. These are the colors you
will need for this painting. You can go with any
blue and yellow. It doesn't matter. In short, you will need burn
scena or burn temper, then some black, white, vermalin, any kind of
yellow, and kind of blue. The next thing you will need is a mixing palette to
mix your colors. This is the one I'll be using. Now, coming to the brushes. I'll be using four different
brushes for this painting. The first burn is a size
number eight flat brush. I'll be using this to apply
paint onto the background. Then we have three more brushes here, three round brushes. The bigger one is
size number six, then I have size number
two and size number zero. Now, please don't
worry, if you don't have the exact same
size of brushes, that doesn't matter at all. You can go the brush
size that is nearly similar or just use any brush
size that works for you. We basically need a
medium size brush. It could be round
brush or floodruh, and a smaller one for
the minute detailing. Okay. Now the next thing you
will need is a jarra water. Whenever it is getting dirty, you can replace the water. So just one jars enough. Now the next material
you will need is a masking tape or a washi
tape or an arter tape. I always get questions
about this masking tape. So it's actually a clear
tape from the brand three M. But it doesn't need
to be a clear tape. You can go with any kind of tape that works on your paper. Now, the next thing you
will need is a pencil and an s. There isn't a lot
of sketching involved. We just need to
add the sketch of the candle and the flame. For that, you will need
a pencil and an eraser. Last but not the least, you will also need a
paper towel to dap off the ex amount of paint
or water from your brush. That summarize all
the materials you will need for this
beautiful artwork. Keep them ready, and
let's give it a try.
4. Part 1 - Painting the Candle: All right so let's start
painting our gorgeous candle. Here's the paper that
I'm going to use. It is Canson Heritage hot
pressed watercolor paper. You can go with any paper
that you normally use. I've always prefer using
100% cotton paper. This one is a very good brand, and the one I'm using here is hot pressed watercolor paper, which means it doesn't
have a lot of texture. This paper is 140 LB thick. That says the paper
is quite thick. It doesn't buckle, even if you apply multiple layers
of paint. Okay. You can see the texture here. It is very lightly textured. When I'm applying the paint,
the paper won't be bumpy, it wouldn't have any texture. I can blend the
colors quite easily. I already have a
piece of paper here. Now I'm going to start by
fixing that onto my table. The size is a six, you can
go with any size that you prefer and here's the tape I'm going to use
to fix my paper. It's an EC tear clear
tape from the brand three M. You can go with any normal
masking tape or washi tape. This one is EC tear. I can just tear it off
with my hand itself. I don't need a sister. Now, I'm applying that along the border. Unlike what a cola doesn't
float and flow on the paper. If you don't want to apply masking tape or washi tape,
that is totally fine. You can go for an
irregular border with a very rustic and classy finish. The masking tape or washi tape or any tape is not
really necessary. Or if you want to go
for a clean border, you can apply it. I have fixed my paper
directly onto my table. The next step is
to add the sketch. I'm starting by adding two
lines first line here. Now, another one here. That's the thickness
of the canton. You can make it more
thicker thinner, that's totally your choice. Also if you want
to make it a bit more taller, even that is fine. Now, over here, I'm going
to add an irregular shape. See that. So just
an irregular shape. Now we need to add another
line right behind that. Again, an irregular line. That's a basic shape
of the cantle. Now from here, I'm going to add another irregular sheape to make it look like
the wax is dripping. Okay. That's a basic shape. You can modify it
however you want. Maybe you can make it
more shorter or taller, or you can add any modifications.
That's totally fine. Now the next thing I'm
going to add is the flame. Over here, I'm
adding a short line. And I'm adding a
thickness, and on the top, I'm adding an irregular shape to give it a more natural look. Now over here, I'm adding the flame a long flame.
That's a sketch. Now, in case if you want
to modify anything, you can do that as you paint. For now, we just
need a basic shape. Next, I'm going to
prepare the colors. The first color I'm going to
squeeze out is burnt umber. If you don't have burnt umber, you can just add a bit of
black with burn scena. Into burn Cena,
add a tiny bit of black and create a color which is similar
like burnt umber. Burnt umber is nothing
but a darker brown, more of an earthy brown.
That is burnt umber. The next color I
want is a yellow. I'm going to go for mid yellow. You can also use yellow
ocher or any sort of yellow, not lemon yellow,
any warm yellow. Now let me squeeze
out a bit of that. We have burnt umber
and a yellow here. The next color I
need is a white. Go to squeeze out
some next to brown, as well as yellow. We have all the colors ready. These are the colors
we're going to use for the body of the candle. And the pressure I'm using a
size number eight flatrush, go with any of your medium
size flatrush, to apply paint. Now, I'm starting by mixing some burned number with white. See that. Just mix
them together. We need a lighter brown. This is the color I'm going to use on the right
side of the candle. That's where I'm going to
show most of the shadow. Then as I come towards the left, I will switch to yellow. On this side, I'm going
to apply this color. It can be a bit more lighter or darker according to
your preference. Now, don't worry
about the shape. We're going to fix
it later as we apply the paint in
the background. We're going to
apply black color. At that time, we
can fix the shape. It is totally okay if the paint is going out of that outline. That is burnt umber. You can just apply that in irregular way and
just leave it there. Now we're going to switch to our second color,
which is yellow. Let's clean our brush
and go with yellow. Again, I'm going to mix
some white with yellow. I don't want a very
bright yellow, I want a soft and
a subtle yellow. Color of yellow, mix
that with white. Okay. Now, I'm going to apply that color onto
the remaining area. Then I will blend that
with the brown I have applied earlier. See that. Keep running your brush
up and down and blend it. I'm going to apply this on the top asple doesn't need to
be a clean, perfect blend. Just apply the paint
however you can. Also, forget about the outline. D won't worry about that. Just add the paint and blend
it however you can for now. So that's a right side. Now we have some more
area left on the top, and over there asple I'm going
to apply the same color. It's a mix of white and yellow. You can see I'm totally ignoring the outline and I'm
just adding the paint. Now onto this side,
I'm adding a bit more white to make it a
bit more lighter. Okay. So that's a colors. Now, I'm going to
clean my brush, and with a slightly damp brush, I'm just blending it. So I'm just running my brush
up and down. That's it. You can see my outline is totally go, especially
on the top part. It is not at all visible. W is totally fine,
you just need to have an idea about how we're
going to apply the paint. The sketch is more
like a reference for us to know where we
have to apply the paint. Gage is opaque. However
you apply the paint, it will be covered. That's the body of the candle. Now, there is one more
thing we have to do for which I'm going to
go with a smaller brush. It is a size number two on rush, and I'm picking some white. I'm just going to
add some highlights. On the left more side over here, I'm adding a bit of white. To create a light and shadow. We added more darker
tones on the right, which means all the
shadows are over there, and the light source is
falling onto the side. To create that impression, we need to add in some
lighter tones here. Now, I'm adding a bit on the top along that
irregular line we added. Just a little. Go the paint
which is not too opaque. We just need a subtle line here. See that. It is barely visible. Go in a similar way. Don't pick up a lot of paint. Once you've applied that, make your brush damp and
just smudge it. Go very light handed, don't apply a lot of pressure. Smudge the paint in
a very gentle way. That part is done.
Now, we need to paint that area where
we have the flame. That is the next task. I know at this point our
candle is a total mess. It doesn't look like a candle. But stay with me in
a couple of minutes. You're going to see how beautiful it is
going to turn out. This is just part
of the process. The process can be messy, but the end cell is going
to be really gorgeous. Okay. There is a little paint missing on the right
side on this top part. So I'm just adding that back in. Okay. So that's the
body of the cantle. Now we're going to be the
top part of the cantle. Okay. And for that as well, I'm starting with the same
color we created earlier. O which is a mix of
burnt umber and white. For this tip, it is good to use a smaller brush as we're
going to define that shape. The brush I'm using here
is size number two. It has got a pointed tip. So go any of your smaller
brush for a better result. Okay. Now, with
that pointed tip, I'm going to add
the shape first. That looks a bit dark. Okay. So that's a
color I'm using. I added a tiny bit
of yellow to it. The color was pretty dark. Okay. So carefully define
the shape of your candle. Go with an irregular
shape to make it look more natural
and realistic. Now onto the top, I'm going
to add that lighter yellow, and I'm going to fill
up that entire shape. So towards the bottom,
we are trying to show all the shadows
and the deeper tones, and along the top, we're going
to make it more lighter. Pick up that color which
you created earlier. It can be mix of burnt
umber and white, or you can just
mix your own burnt umber by adding some
black with burn Cena, then add some white into it, and add that color
along the top. While you're applying, define
the shape of the cantle. Next, clean your brush
and go with that yellow, that light or yellow, which is again a mix of
white and yellow, and apply that on the top. Use a smaller brush so that
you have a better grip. I have applied the paint and you can see the
shape is complete now. This is the first and the major step in painting this candle. I know it is still
looking quite messy, but trust me, with
the next step, when we add plaque
around that shape, it is going to look a
lot more beautiful.
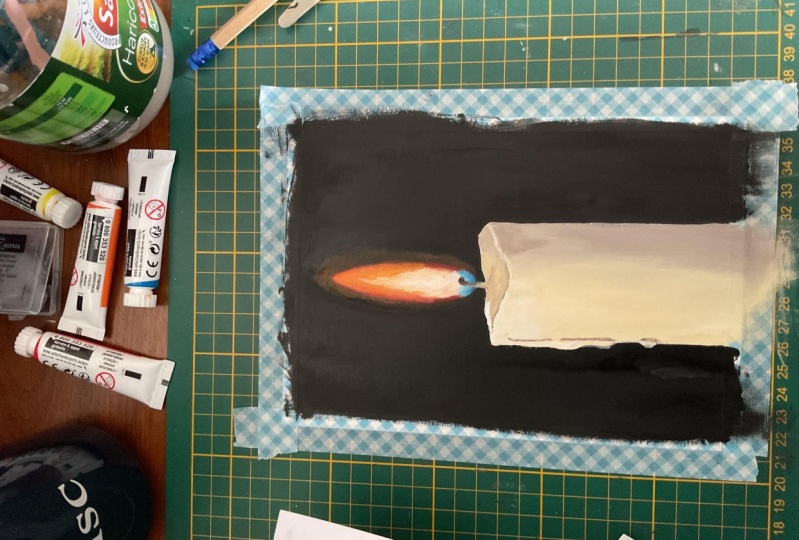
5. Part 2 - Painting the Background: Have finished
painting the candle. The next step is to
paint the background. For that, I'm going to
squeeze out some black. You will need quite
a bit of black. We're going to cover
that entire background. So squeeze out enough of paint. So I have taken
out some black ash and to apply paint
onto the background. I'm using my flat brush. To apply paint onto
the background, you can either use a flat brush or a round brush.
It doesn't matter. Now I'm going to apply black paint on to the
entire background. We you're applying paint along that top shape
of the cantle. Obviously, you'll have to
switch to a smaller brush. But for now a flat brush
or any brush will work. First, I'm going to add a
line here. A straight line. This is going to define
the shape of the candle. Be very careful
and apply a line. If you prefer using a round
brush, that's totally fine, maybe you can define that
shape using a smaller brush, then apply paint
onto remaining area. This line is really important. That is what defines the
shape of the cantle. Be very careful when you're applying paint
around the cantle. The remaining area,
you can just apply the paint however you
want with any brush. But over here while
you're adding the paint, you're also defining the
shape of the cantle. The line is not straight. I'm just going to
apply paint again. I'm carefully running my
brush from the top to bottom. I'll have to do
it one more time. I'm just running my bridge
from top to bottom in a straight line.
That looks fine. Now I'm going to apply paint onto the remaining area we
have on the right side. I can just simply fill that out. Then gradually we'll
have to go around the cantle and fix
the remaining shape. Honestly, the only area you have to worry is around the cantle. Onto the remaining area, you can simply fill up
some black paint or you can go for a darker brown instead of black if that
is what you prefer. I'm just going to add paint
onto all the remaining area, and I'm going to
leave out the area closer to the cantle so that I can come back and fill up those areas with
a smaller brush. For now, I'm just
going to go with my flat brush and I'm just applying paint onto
the anterior area. On the side asple you have
to be really careful. We need to create that profile
of the wax dripping down. So be very careful when you're
adding paint over here. Towards the bottomst area, you can add a straight line just like we did
on the other side. But on to the top,
we need to create that profile of the wax. Oh, All right, so I have applied paint
onto the entire area. Now we only have that
crucial part left. And for that, I will need to
switch to a smaller brush. So I'm just going to
keep this brush aside. And I'm going to go
with my smaller brush. I think by now you
can already see the difference that
messy shape is gone. We have defined the candle. Now with the next step, it
is going to look at better. I'm picking some black
with my smaller brush, and I'm going to carefully
define the shape here. On this side, we are trying to create that waxes melting down. Just add an irregular line. The sketch we added earlier might not be visible right now. In that case, if
you want to start with the pencil sketch,
you could do that. Take out your pencil and add a line of that profile
you want to follow. Then just follow that line using your brush and fill it up. Just follow the way that
you're more comfortable with. You can either go with your pen or with your pencil first. Okay. Now, there is a
little more I have to fix. So with the tip of my bridge, I'm fixing this corner and
towards the bottom as well, the shape is not that proper. Okay. Now I'm
changing the profile here a little to make
it look more natural. I want to create
that feel of the wax dripping down, that melted wax. On the right side, it was
just a straight line. But over here, we need to follow a irregular line to make
it look more natural. You can see the shape
I have gone in with. You can modify it as you like. Next, I'm going to add
the paint on the top. This area is also
very important. Go with the smaller brush. We have to add an
irregular line, and that's how we're going
to define the shape. It is nothing complicated, just like how you define the
shape of the melting wax, add an irregular line with
any of your smaller brush. For the casple, if
you want to start with a pentel sketch,
that's totally fine. Maybe add a sketch, then follow with your brush. Now I'm going to fill
up the remaining area. That's a shape I'm gone in with. For now, it looks okay. Maybe we can fix it later
if there is a need. Now I'm going to quickly fill up the remaining area as well so that we can start with a flame. As I mentioned
earlier, be really careful when you're defining
the shape over here. That top left also needs a little fix. I'm
picking more paint. And I'm defying this part. I want to make it look like
this area is a bit higher. What I'm going to do is I'm just going to fill
this tiny part. See that. This is giving us an impression that there's
a little bump on the left, where we have that
wax melting down. That part is also done. Now I'm going to fill up
the area around the flame. Now there's one thing
you have to be careful about when you are filling up
the area around the flame. Don't follow the outline. You need to leave a cap. That's where we're going to add some orange. Take your black. Then add it around the flame
while leaving some cap. Don't follow the outline. Leave a little offset like
a four MM or a five MM. See that? I'm not following
the outline here. In a similar way, I'm going to add paint on the other side asp. Use any of your smaller brush so that you can
get a clean shape. With this step, you're
actually done painting the background and also the candle, the
body of the cantle. We will add some
minute details at the end once we're
done with the flame. At this date, this is
what we have to do.
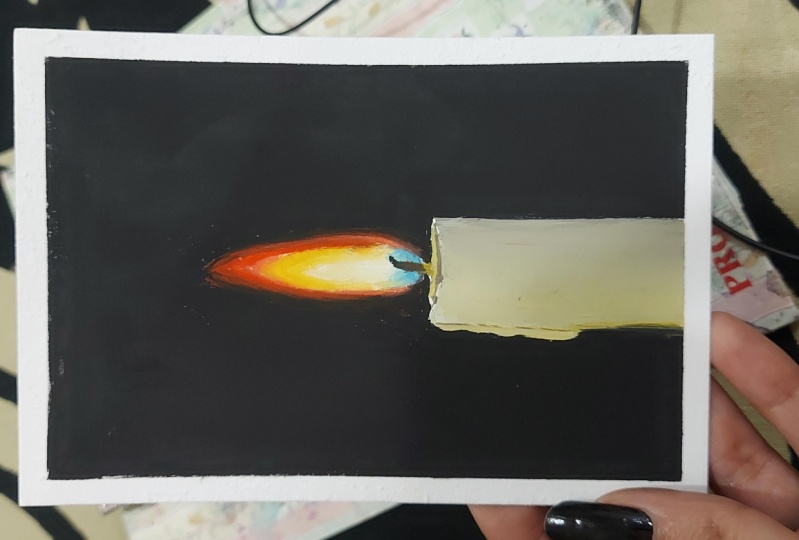
6. Part 3 - Painting the Flame: We have the canton and
the background ready. The next step is to
paint the flame. I have some leftover
yellow on my palette. Along with that, I will
also need some vermin. It can be a scarlet or
vermelin, or any kind of red. Take out a little.
Now, clean your brush. An brish that you're
going to use. I'm using size number
six ton brush. It can be a smaller brush
or a medium size brush. Now pick up some
paint on your brush, and add that along the outline. Right where you
have stopped black. You can apply your
vermelion or scarlet. For now, just apply the paint, and towards the
bottom, don't apply any paint that's something
you have to be careful about. Only along the top,
add your paint, leave some cap at the bottom. Now, gradually smudge the
paint into the background. Ermalin scarlet, yellow those colors
are very transparent. Maybe we can add a tiny bit
of white to make it opaque. That's not necessary
only if you want to and adding your paint again. This will help you in
smudging the paint. I have applied some more vermin. Maybe we can add a bit more. You can see I haven't applied any paint towards the bottom. Almost like a U shape. I have left that part as it is. Next, what I'm going to do is, I'm going to clean my brush. I'm going to wash out the paint. With the tam brush, I'm
going to smudge it. Okay. It is just dam. It is not watery. Now with
that slightly wet brush, I'm just mudging the paint. Okay. So you have
black, smut the paint. Over here, I think there
isn't enough orange. I'm just going to
add some more paint. Then I will smudge
it with a wet brush. When I say wet, it is just amp. Don't go the watery brush, just like you do with
water c. Clean your brush, dab it on a paper towel. Just to be sure it
is not too watery. If it's too watery, you will
start pitching the paint, and your painting will
look transparent. With a tam brush, smudge
the paint gently. See that. That's the first
part of painting the flame. We have applied paint
around the shape. Now we need to paint the
inner part of the flame. But before that, if you
want to smudge the paint, if you want to introduce
some more vermin or scarlet, you could do that right now. But don't add any
paint over here. Towards the bottomst area, we'll be adding some blue. Okay, so go ahead and add some scarlet or vermin
onto your flame, if you want to add a bit more. Once you have applied the paint, go with a damrush and smudge it and give it a softer look. Also, one more thing when
you're smudging the paint, go very light handed. Don't put a lot of pressure. B as gentle as possible.
That's a first step. Now we're going to paint the
inside part of the flame, for which I'm using some yellow. The same yellow I used earlier, mid yellow, and I'm adding
some white with it. That's a color I'm going with. It's an opaque yellow. Now I'm going to
add that towards the inner side of the flame. Go any of your smaller brush or a brush with a pointed tip, minus size number six, but it has got a
good pointed tip. I don't need to go
for a smaller brush. Now apply that along the
inner side of the flame. You can go for a nice
shape, a long flame. Now, while I'm adding the paint, I'm not adding any
paint at the center. It's more like an
inverted U of a shape, or maybe like a hat. See that. With the center. I'm deliberately
leaving some cap. Over there, I'm
going to introduce a much more lighter tone, which I will do in a
couple of minutes. Right now, go with that paqueo and add that in a similar way. The next task we
have here is to make that outer shape blurry.
Clean your brush. And dab it on a paper towel to make sure it is
not too watery. We just need a damp brush. Now, just the same way
how we did earlier. We need to make
this area blurry. We don't need a
clean, sharp line. Go with your damp brush
and smudge it a bit. Again, go light handed. Don't put a lot of pressure. If needed, you can introduce
a bit more orange. In case if you fail,
there isn't enough. Now, slowly and gently
smudge the paint. It is not a difficult task. You have to go
with a damp brush, and run your brush along
that sheep very gently. Only use the tip of your brush, don't scrub hands,
scratch, and make a mess. Go in a very gentle
and slow pace. I will smudge it a bit more. Then I'm going to go
with a lighter tone, and I will fill up the remaining area we have at the center. Be very gentle when
you're doing this. Otherwise, you will end up disturbing the background layer. All right. So that's
the second step. We started off with vermin. We applied that
around the shape. We made it glory. Now
I'm adding yellow. It's a mix of yellow
and a bit of white. And that's the second step. Now we're going to go
with the third step, for which we'll have to make
some white and yellow again. But this time the yellow has
to be much more lighter. Looks like that paint
is a bit muddy. Let me try that on the paper. Or else, I need to squeeze
out some new white paint. Yes, it is a bit muddy. I think it is better to go
with some new white paint. This one is ending up muddy. I think I will take out
some clean white paint. All right, so have the
color ready on my palette. Now, I will apply white first, then I think I will gradually introduce some yellow,
that is going to be petal. First, I'm adding
some white here. You can fill up that tie
your remaining shape at the bottom. Atom white. Then gradually we can smuch that with a yellow with a dam brush. Along the outer shape, we have some vermin. Then we have some yellow, and then at the center,
we have some white. Now I'm picking some
yellow, and I'm smuging it. Go with a damp brush. If needed, we can pick some
yellow and just smug it. When you're creating a flame or when you're painting a fire, it is very important to have different tonal values
of orange and yellow. That is when you get that
warm feel of a flame. Otherwise, it will end up looking quite flat and lifeless. To make it look like a flame, it is very important to play
with different tonal values. Also the outline
has to be blurry. That is another important thing. That's how it has turned out. For the next step, I'm going
to take out some blue. This one is cobalt blue.
You can use any blue. It doesn't need to
be cobalt blue, and we only need a tiny bit. Take a tiny bit of blue
onto your palette. Now, I'm going to apply that at the bottomost area of the flame, mix that with a bit of white, and go with any
of your ram rush. Now add that in a in
a shape over here. You can see we haven't applied any orange towards this part. We only have some white
in the background. Now, clean your brush and
go with a damp brush. Make sure it is not too watery. Now, gently smudge the paint. This is the same way
how we did earlier. The only difference
here is the color. The technique is
exactly the same. Apply blue paint, then make
it damp and smudge it. Maybe we can add
some more paint. Smudgy is really important. Whenever you're
smudging the paint, you have to go light handed. You should not put
a lot of pressure. If you put a lot of pressure, all the paint will
start coming off. It won't have a clean look. It will have a rough
and patchy look. Okay. So gently smudge the paint using the
tip of your brush. Don't scrub and scratch. So only towards the bottom, we have that bluish color and towards the top,
I'm smudging it. So where we have that thread, where we put on the fire. I don't know what is it called. It's a read right.
Yeah. It's a thread. Yeah. Over there, I'm
smudging the paint. I'm doing that very gently and every time I'm
cleaning the brush, I'm dabbing that
on a paper towel. I don't want to go
with a wet brush. I only need a damp brush. I'm adding some more blue
then I'm smudging again. I feel the blue wasn't
that prominent. That's why I
introduce a bit more. Now I need to smudge it. I'm very generally smudging it. Maybe it is a good idea
to pick some white. Okay? As we have used
white in the background, it won't turn into a green. Otherwise, you all know when you mix blue and yellow together, you will end up getting a green. The blue we have used
here is really light, and the background we have
white or a very light yellow. Okay. That's how
it has turned out. I'm pretty happy with it. Now, in case if you want
to smutch the paint again, you can do that right now. We're not going to come
back. Go the damp brush and smutch the paint gently. If you feel there is a need. Otherwise, you can
just leave it acts. Only if you want to, you
can smutch the paint again before we go with
the final details. We're going to add that
thread at the center. With that step, we'll
be done with the flame. Then we'll need to add
some minute touches on the candle, the
body of the candle. Okay. That's how
it has turned out. I cannot tell you how much
happy I am with a flame. You can get the real warmth
and feel of your candle, if you take a step back from your seat and have a look at your painting
from a distance. Anyway, right now, we
have one missing element, which is that thread. We need to connect the
candle and the flame. First I'm starting with a
mix of yellow and white. I'm creating a lighter yellow. Using that, I'm going to
add a line right over here, connecting the cantle
and the flame. Right now, the flame is
just floating in the air. We need to connect
that into the cantle. So first add a short
line like this. Next, I'm going
to go with brown. I don't have any brown here. I have no plans to
squeeze out any paint. I'm just going to mix
some vermalin with black. First, I'm going
to clean my brush, and I'm going to take
a bit of vermalin, and a tiny bit of black aspo
to create a brown color. You can use brown
or burn sa actus, or you can just make some
vermalin worth black. I'm guessing you have some leftover paint
on your palette. Just mix that and add that, right about that
yellowish color. Go with any of
your smaller brush or a brush with the pointed tip. Now add that brownish color. Above that line. You can make it a
bit more longer. Take that into the flame. I'm picking some more paint, and I'm making it
slightly longer. We have that yellowish
color and brown. Next towards the top, I'm going to
introduce some black. With the same brush,
I'm picking some black, and I'm going to add
the remaining shape. Be sure to go with
a smaller brush. We don't want this
to be too thick. Now I'm going to
turn that a little. I'm going to go with
the curvy sheep, and I'm adding black on the top. See that? Go the similar sheep. These tiny details and tiny modifications can add a lot of realistic
value to your painting. We have black on the top, then some brown and a lighter
value towards the bottom. Now, with a dam brush, I'm
going to smug the paint, especially towards
the area where we have brown and that
yellowish color. Gently smug that a bit.
That's how it has turned out. Maybe we can add
a bit more brown. I'm adding that in. Now with a clean brush, I'm smudging it. You can see the difference
that thread made, now the candle and the
flame is connected, and it looks a lot
better than earlier. Next, with the same brush, I'm just smudging the paint onto either side in a
curvy way. See that. Just push and pull that
paint into the candle. Maybe you can pick a
little more brown. Not a lot, just a
tiny bit of paint, and then push that
into the candle in a curvy way. More like a tree. Okay? And smudge it very gently. You can see it is
very soft and subtle. When you're adding
these details, try to go with the
paint that is watery. Don't go with an opaque paint. That part is also done. Now we need to add few final
touches onto the candle. The first task is to define that melting wax by
adding a shadow. We have added a shape on
the left side over here, but we haven't added
any details onto that. The color I'm going
with is burned tumber, I'm adding some drops of water. It's a watery paint. See that. It is just a little pigment
and a lot of water. So that's the kind of
color I'm going with. And with that, I'm adding a very gentle line
in a broken manner. Once you have added the line, you can dab it on a paper
towel and smudge it dip it. We don't want that line
to be too prominent. That's the reason why we
went in with a paint, which is very watery. If it's an opaque paint,
it will stand out, it will be a lot more prominent. This way, it will have a very
soft and a subtle effect, and that is exactly
what we need. That's a candle. If you want to add a bit more,
you could do that. But not a lot. You have to be really careful about
the tonal value. Now we have one final task remaining for which I'm
going with some white, some clean white paint. So I'm using the same rushio. Go with any of your
smaller brush and pick some clean white paint,
and opaque paint. Now, with that, I'm going to add some highlights
along the top line. I have taken some
paint. See that. Now on the top, along
that irregular line, I'm going to add a white
line, a broken line. It doesn't need to be
a continuous line. We're just trying to
add some highlights to show that glazing
on the candle. This line has to be super thin. You can see the way
how I'm adding it. Add that in a broken manner. Don't add a continuous line. Now in a similar way,
I'm going to add a line on the top asphalt
on the other side. Again in a broken manner. I'm picking more paint, and I'm adding a few tiny
lines here and there. One right there, leaving a gap, adding another one
and one more there. It's just some highlights
here and there. It doesn't need to
be too prominent. Go with a very thin line and
add that as a broken line. Don't go for a thick
continuous line. That's how it has
turned out. We are actually done with
our candle painting. But just in case if you
want to modify the flame, if you want to add some more
paint or if you want to make it a bit more soft,
you could do that. I'm just showing you
how you can fix it. You can add more yellow
or orange or vermin. If you feel like there
is any color missing, and if you want to modify
it, you could do that. Also you can make the
outer shape blurry. If you're not really
happy with the result. If you're happy with the result, you don't even need to touch it. But this is something that
is very unique with gage. You can always go back
and fix your painting. You can just go
the damp brush and smut the paint to give
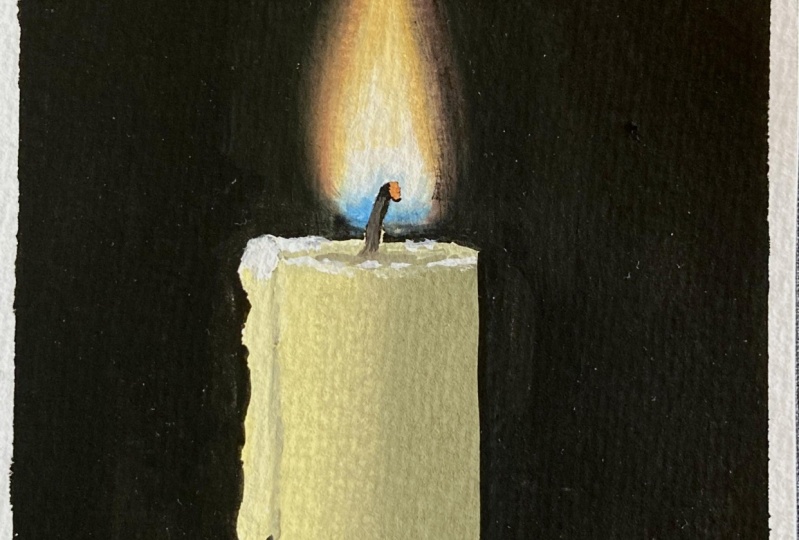
it a softer look. These kind of
modifications can be done even after you're
done with your painting. But be very gentle. Don't put a lot of pressure when
you're smuging the paint. Now there's one last
thing that I want to do for which I'm
picking some white, and I'm adding a long
line at the center. A very subtle line. I'm adding that
only at the center, this will enhance our flame a
little more, and that's it. That's a realistic
cantle painting.
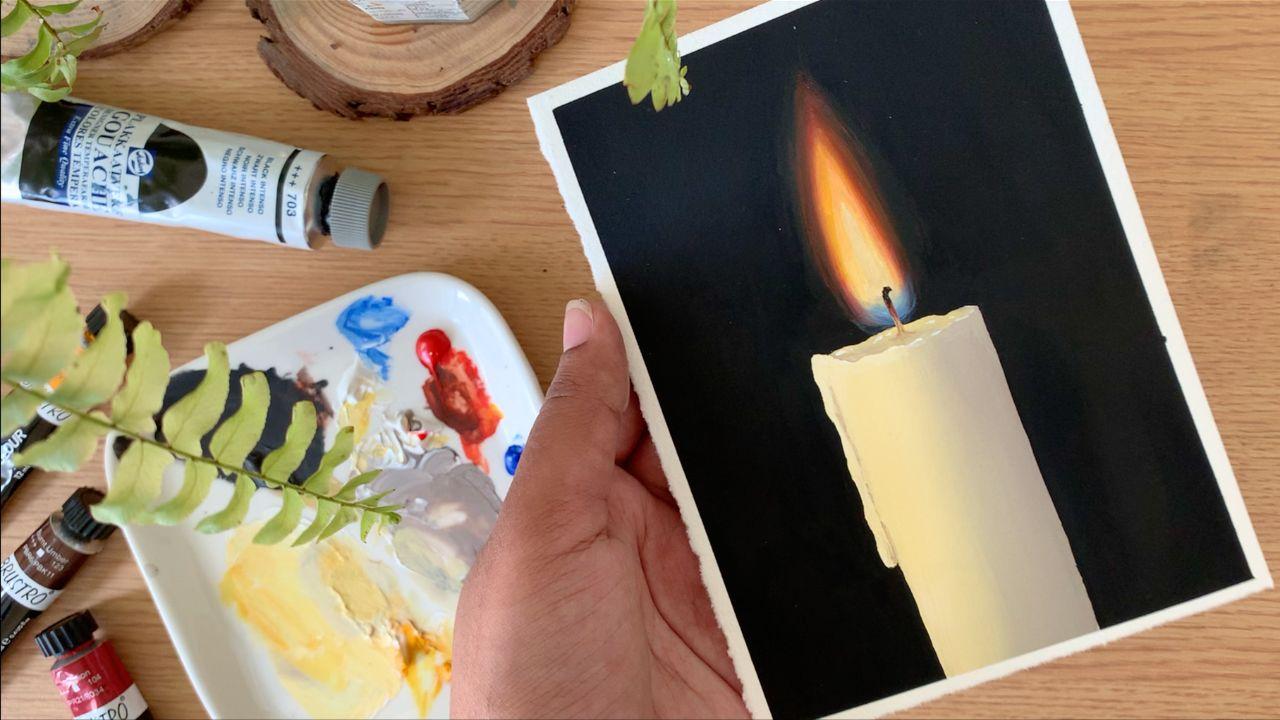
7. Final thoughts + Thank you :): I wanted to explain
each and every step. I went in with a very slow pace. But you can do this
quite quickly. Maybe in less than 15
minutes, you can paint it. There's only few places where you have to be
really careful about. One is when you're
adding the flame, when you're adding those
colors and smuhing it, obviously that you
have to be careful. Then the next thing is
adding black paint around the candle while you're
defining the shape. That is another important thing. Then the rest is quite easy. Try it out if you
have to try it. Maybe you can try a group
of two candles or three. You can even change the color. Maybe you can paint
a red candle. A red candle against a black background will
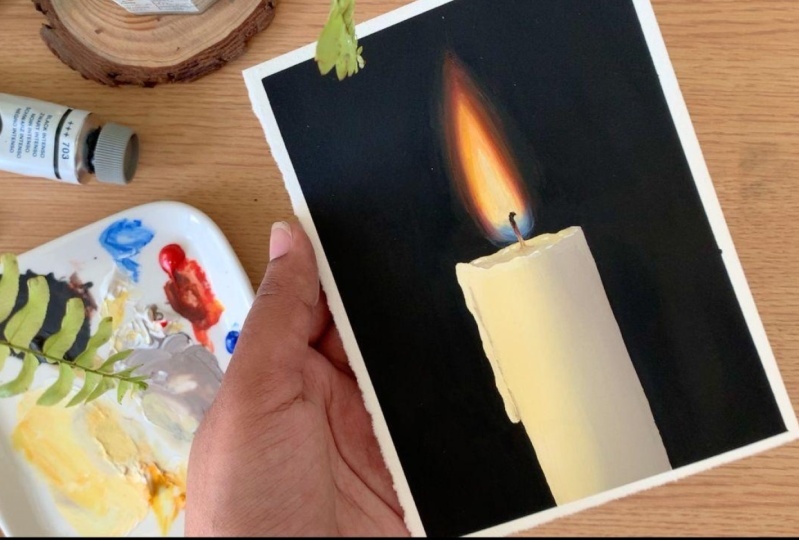
be really beautiful. Anyways, that's a painting. Here's a closer look of the
flam and the entire candle. I really like the
way it turned out, especially that
black background is enhancing the entire
cantle a lot more. It looks like a photograph. All right, so thank you
so much for joining. Give it a try, fair to try it and let me
know if you liked it. And also, don't forget to aplod your gorgeous artworks into
the class ridge gallery. And if you enjoyed this class, consider leaving a well. Okay, so thanks again for
joining and happy painting.
 Zaneena Nabeel, Top Teacher | Artist | Author