Transcripts
1. Welcome: Hey guys, I'm Anthony
and Educator, Course Leader,
Speaker and YouTuber. I've worked in large and
small organizations and over the years had more than
a passing obsession with productivity, learning, habit formation,
and task management. This course is all about how Microsoft plan that
can help you to get organized in all areas of your personal and
professional life, your family, and your business. We'll be looking at how this task management tool can help you get
better organized both as an individual
and set systems and routines that will help in
your organization as well. Microsoft Planner sits between Microsoft To Do and
Microsoft Projects. It's not a free tool. You'll need to have
a subscription to a paid Microsoft account, which we'll discuss
along the way, I'm going to be showing
you the various versions for web and mobile apps, which can work together
to ensure you're never without a way
to organize your own and your team's tasks
and projects and create a shared understanding of how to organize them as all my courses. Rather than going to
the menu by menu, we'll explore planner
in the context of practical examples and
scenarios that give you a sense of the different
ways it can be used and how it can scale
to small teams and larger organizations
will be learning about how to make use
of the various layouts of planner and how to
make new plans and control their settings,
Sharing and permissions. We'll learn how to organize tasks into buckets
or categories, and how to create lists
of tax in different ways, and how to assign tasks
to others and view yours and other tasks
independent of the team tasks. We will learn how to use
the various properties of the task cards to make
sub-tasks, set due dates, and make notes and comments for your team or yourself will also learn to use labels and as an alternative to buckets. And how to filter and search using all of these criteria to make truly customized systems to suit yourself or your team. The progress view for
gathering data and schedule view to see a
calendar of task deadlines will also be explored
as we're exporting tasks and lists and connecting to other
for Microsoft tools. This is very much the course I wish I'd been
able to take when I started trying to manage personal and team tasks
in any purposeful way. I hope you'll join it
and enjoy the process.
2. Getting Planner: Let's first look at
how we get Planner. Planner is part of a
Microsoft 365 account, sometimes called M365, or it might also be
called Office 365. Now, you can have a free Office account or
a free Microsoft account, in other words, but you need a paid subscription
accounts to have Planner as part of
that subscription. And that can be a business and enterprise or an
education subscription. You can find out about those for your region by clicking we get off this button
here at office.com, which is where we've
initially gone. And that will give
you the details for the various subscriptions. You might also
have it as part of your work or organization. Today we're going to
have a look at lots of contexts to use it in
both those situations. What we want to do now having that account is to
click on Sign-in. At which point using your organization's
email address and password will take you
through to this page. This is the office.com homepage. We're still at www.office.com. And here you can see it's
taken me through to show me my most recent files as the
part of the landing page. With all of these areas. I can filter it by
searching here or upload something new if I want to
install Office to my device, and I have that as
part of my license. I can click the Install
Office button here, the dropdown to
allow me to select just certain apps from
within the Office offering. Now we're interested today
in going and seeing planner. When I look down the shortcut links down
this left-hand edge here, I can actually see the
planner icon here. It's this one that looks
like a green triangle, if you like, sort of
pixelated green triangle. However, if it's
not in that list, then I want to go to the waffle, which is this icon in
the top left corner, and click on that, which is called
the App Launcher. Otherwise, when I click
on it, it will bring up, as well as recent documents below some of the
apps that I use most. Again, if I don't
see it in that list, then I can click on
this all apps link here and open the
alphabetical list, at which point now
I definitely know when I scroll down and
reach the p section, planner will be there. Wherever you find it. Let's click on
that Planner link, at which point it will
take me through to the planet app itself
in the browser. Here you can see now I'm
at tasks.office.com. You can go straight to that
address and login there, and it will have
the same effect. Let's have a look at how we get to Planner on a mobile device. On iOS. If I go to the App Store on my phone and then
search for Planner, there are a number of apps
available with that title. So the one that we're
wanting is this one here called
Microsoft Planner. Then I will hit
the download link on the right by the title. Then open the app. At which point I need to
use the email address and password to
match my account. Once logged in, I will then
be able to access all of the various planner boards
available through the account.
3. Layout in Planner: Now, what is Planner? Planner is a tool for managing
personal projects and tasks and shared
projects and tasks. It sits between several
other Microsoft tools. Planner uses this
Kanban style layout we can see here with
cards on boards. And as part of the
productivity suite that would also include free offerings such as
Microsoft ToDo app, which you can see here is
about making to-do lists. Now I have an entire
course on to-do that. You can also access
from my profile. And that would be
on one side and on the other side of the offer
would be Microsoft Project, which is a further
subscription-based tool that you can see offers much more comprehensive project based task management
options like this. As we get to know, planner
will realize that it uses a cards or Kanbans style layout that is very
reminiscent of post-it notes. And in this way
is very much like third-party offerings
such as Trello. However, this one is built
into your office subscription. Now there's several ways
to start a new plan. When we have none, we have this button
in the middle creates a plan that will disappear when we have
some plans available. We also in the top-left corner have this new plan option here. All of our existing plans will be available from this
link, the Planner hub. And we'll see that as
soon as we create one. And all of our tasks amalgamated
from any plans that were part of will be available
from here under my tasks. There's also a favorite
section which we'll come back to once we have
some favorite plans. And then under more we'll
see the plans that are not selected as
favorites as well. Down here we see the
get's planner app link, which will allow
us to download it for our phones or
mobile devices. Additionally, like
all Office apps, in the top-right corner, there's a **** that opens up settings and other
preferences that we're looking at later Help section that allows us to search
for our own support. Then clicking on your own
initials will open up links. Then clicking, then clicking on your own initials
will open up the options to sign
out of the account or to access further
account information. Whatever part of the plan
or app we're viewing, we can see that this small
area down the left-hand side, about a sixth of the screen is going to be how we navigate between different
areas of planner and different plans themselves. And then this other large area, the five-sixths of
the screen over here, he's going to be the working
area where we will view different plans and different
tasks within plants. From this small icon here
that looks a little bit like a burger and is often
called the burger menu. You can see that it's called
the left navigation pane. By clicking it, we can contract that menu area
down to Icon only. And if we click it again, we can expand it back
out again as well.
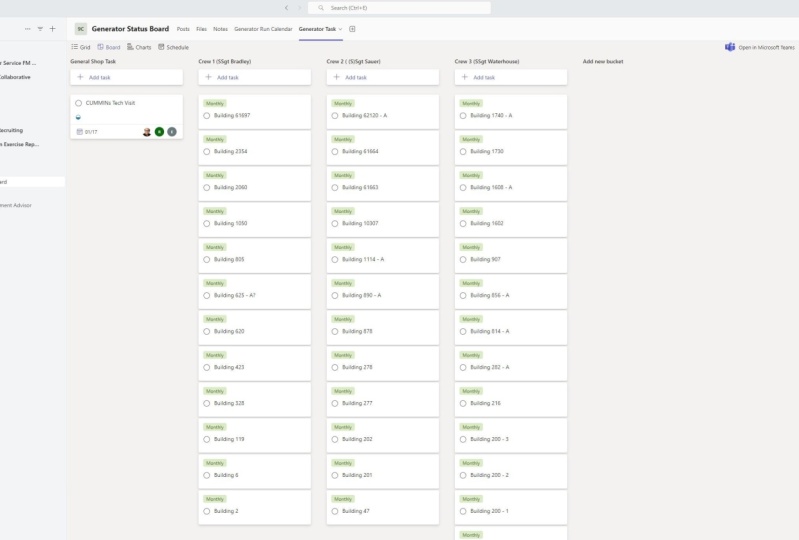
4. Making a New Planner Board: Let's make our first plan. Now there are two
ways to do this. We're going to start off
using the new plan link within the planner app
at tasks.office.com. This would be the main way
that people working for themselves or in very small organizations
may well-managed planner. The alternative to this is
to use Microsoft Teams. Now remember, Microsoft Teams
is part of our app list here It's within our M365
subscription, very likely. And through this, we
can set up teams of groups of people
that work together, collaborate on documents
and communicate regularly. We can set up planner boards through Microsoft Teams as well. We'll come back to that later
because there's lots of good reasons why there might be times that you
want to do that. Let's close that
for now and just concentrate on working
within the planner app. I'm going to click on new
plan and give it a title. Public means anyone
in my organization, as it says, there can
see the plan contents. Private means only members I add, concede applying contents. Now for most situations, private is the more
appropriate option, but you can choose to make it a plan that everybody can see. If I click on the further
Options drop-down link, then you can see currently the only option
that's available at this time is to give a
description to this group plan. I'm going to click
on Create plan. As you can see here, it takes me straight
to my new board. Unless I said before, if you're familiar with
something like Trello that is post-it note style
based or Kanban, it's often called
that you can see the layout looks fairly similar. We've got what are called
buckets along the top here. I'm within it. We're going to make lists of tasks that we can move
around afterwards. Plan can be for a single project or it could hold a number of
projects within it. We can repeat this and
have as many plans listed down the side
available as we choose. If I click on the
favorite star here, then you can see this list of personal tasks move
straight to this area. If I uncheck it, it becomes available in
my recent list here. Now that we have
a plan available, Let's click on
Planner hub again. And we can see this
time as well as a reminder to get the mobile
app which I will just remove. It now offers us
this personal tasks plan available within our
recent list of plans. Clicking on that will take me
straight back to this view. Once inside this view, I can use that burger menu in the top left corner
to once again minimize or maximize
that side menu just as I could from
the other screens. Each plan board we
create will have some similar features
across the top here, we'll have some
links to navigate the different views
of the board. An ellipsis or three dots there, which will give us more options for ways to manage this plan. In the top-right corner. Ways to view the membership. Remember at the moment it's
just shared to ourselves and ways to filter or
group the contents. And it's these powerful
ways to navigate and view the planner boards that make
them incredibly versatile. So we're going to
explore lots of different ways that
we can use this tool, not just as an individual, but then shared to
others and as part of groups and
organizations as well.
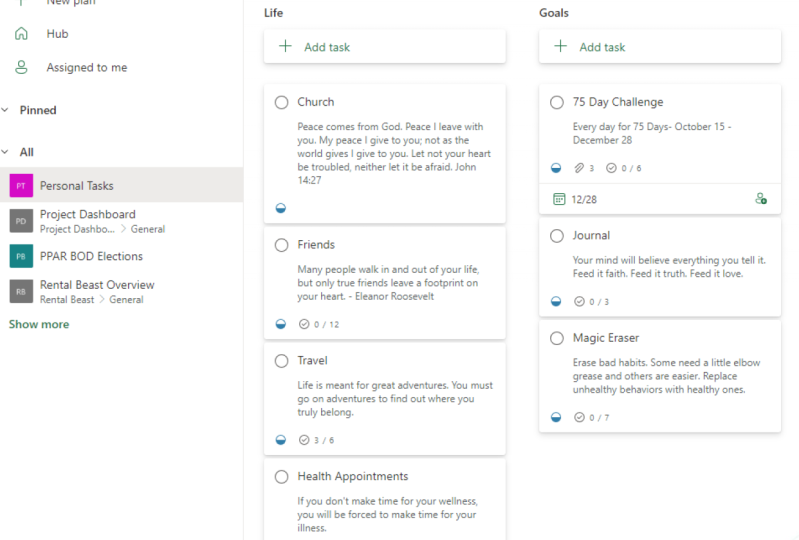
5. Using Buckets: Let's look at our first plan, personal tasks, and
start to get organized. Now, first of all, if you're not happy with
the title you've given it, you can go to that ellipsis or three dots menu and go straight
down to plans settings. And from here, you're
going to be able to change the plan
name straightaway. You can do some other
things in here, such as change the color of backgrounds and make
things more interesting. For now, I'll leave it playing just while we get our
head around things. Then additionally, can change
the settings for this plan, including that public
private option, and give a description. And also then control
notifications. So let's also control
notifications. This menu will come back
to a little bit later. Okay, so let's look at the
way the plan is organized, which is in buckets here the default
immediately is to do. And if I click on that link, you can see it opens a text box that lets
me change that title. Well, I'm gonna change this to some of the other
things I might want. I'm just going to type personal. And you can see just by
hitting Enter at the end, it's not changed the title
of this bucket by bucket. I mean, this area here
underneath this title that is going to become
the location where tasks in this bucket are kept. Next to it, I have the
add new bucket link. Let me click on that
and it's going to let me add new titles. So I'm gonna type
finance and hit Enter. You can see it's made a
completely new bucket with a similar task link
to the first bucket. And move that out,
new bucket link up. Let's add a couple more. Hopefully straightaway,
you can see that it's possible to add an increasing
number of buckets. In this way, I can move
back and forth between them using the scroll bar at
the bottom of the screen. On a touch device, I'd be able to touch the screen
and drag left and right. And I can also use
the arrow keys on my keyboard as I am here, you can see which is why I get
out slightly jumpy effect. So straightaway, one of your best practice decisions
for yourself is going to be, do you have very few buckets within a plan so that you
can see all of the buckets. This is about average on a wide screen monitor
to be able to see four to five
buckets at once? Or do you want to have more? In which case you're
going to have to do some scrolling left and right to make sure you
don't miss out on things. But that will mean
you probably have less different plans overall. It's a question to think about. Let's just look in
more detail a bucket, as well as being able to
click and rename the bucket. I can also, when
I hover over it, access these three dots menu
to the right of its title. If I click on that
for more options, I have that Rename
option there as well, but I can also delete the bucket and move it to the left
or right if I choose to, let's just move it to the right. You can see it swapped
with finance equally. I can grab it and pick it up. And you can see whilst
I'm holding it, the location I
might take it too, is being grayed out to show me that that's the location
it's going to drop into. Let me now let go. And you can see it drops
into its new location. So there's lots of flexibility
to create bucket size. You need them to delete them
when they're not needed, but also to move them around and find the most satisfying
order for you. Here on the iOS or mobile
version of the app. If I click on the same
plan, personal tasks, it then takes me through to
the mobile view of that plan. You can see I've brought
up the first bucket here, and by scrolling left and right, I can then access the other
buckets within the plan.
6. Creating Tasks: We've made it, let's
actually add some tasks. So we have our buckets that we set up in the previous lesson. I'm going to click on one. I'm going to click on finance on this Add Task button here. Let's click on it and you can
see immediately that opens a text area to type the
text of the task itself. And it also straight out, goose me some quick
links to things that are most often
needed in planner. The first one such due date, which I can then
click on and choose the date from this drop-down
here if I wish to. Secondly, assign,
which will allow me to assign this task
strike to somebody else. Now, at the moment, I don't particularly want
either of those things. Remember, this is my
personal tasks board, so I don't really need to assign it to me because
they're all mine. The first thing I'm gonna do
is type the name of a task. Now that I've done that, I'm going to hit Enter. And it adds the task below here. Now that I've done that,
you can see it adds that task as a small card in this finance bucket and gives me back the empty Add Task
Link. Let's add another. This time, rather than
just hitting Enter, I'm going to click on the
Add Task button below. You can see it has
the same effect. I have now both
tasks in that bucket below the empty Add Task area. Let's add a few more tasks in these buckets just
to get the idea. Right, we've got a few more
tasks to work with now, but let's have a
little look at what we can do just at this level. Well, this one here, fire
last month's receipt, probably if I'm want a
super organized myself, really this should be
in the finance list. So I've got a couple of
ways I can move this. One way is to click here and
I could go to move task. That would allow me to take it to a new bucket
within this plan. If I had other plans,
it would also let me click here and
choose other plans, so that's worth
remembering for later. However, the easiest way is probably just to grab it
once I'm hovering over it. And you can see just
like before when I was moving buckets between
different orders, now I have a gray area to suggest where the new
task is going to move. Let me bring it across
to this finance area. And you can see in
this bucket now I can move not just the bucket
the task is saying, but the order within the bucket that the
tasks will appear. Let's put it down there. You can see it's now moved from personal to that finance bucket. Well, let's look what happens
when we complete a task. The easiest way to
show I've completed a task is to hover over the circle marked
area where it's now shows Mark task is
complete with the text. I'm going to click in there. You can see it's ticketed off and straightaway
disappeared. So how do I get back to that task if I wanted
to look at it later? Well now I've got
this show completed. Drop-down area appeared with a number of things that
have been completed. Numbers one, let me
click on that dropdown. And now you can see
that it's showing me the card for that task that I've completed is in this
hidden completed area. So let's do that again
so that we can see it. Now if I want to bring it back, if I didn't really complete it, I can go back to its
tick box and untick it. There. You can see
it's moved back to the active tasks list
within the finance bucket. And that completed task
list as disappeared again completely because there are no completed tasks at this time. Here on the mobile version, you can also see in
any bucket I have the ADA Task option
and clicking in that space allows
me to add a task. In the same way, I have
the Add button in green, but I also have options to add a due date
directly that way, or assign the task to somebody.
7. Organising Tasks: I'm going to click on new plan. This time. Make some shopping lists. Again, it's a private plan. I don't want anyone else within my organization to see it. This time I'm gonna go
back to the buckets, but change these to be more reflective of certain
shops that I use. There we go. I've added some
buckets now that are the names of places
that I shop regularly. And while we're at it,
we can just see that in this side list of recents, we now have two completely
different plans available. We can still jump
between the two of them. Remember? And if I go to plan a hub, I now see both of these listed. We can see that the initials of the name of the plan appear
on the colored icon as well, just to help us
differentiate them, Let's get back to
shopping lists. And now I'm going to quickly add a few things. Right there we go. I've added some tasks
into each of these, which are actually my shopping
lists for each location. Now thinking about it actually, I'd rather get my tomatoes
from Sainsbury's, so I'll move that across. And I'd rather get my
potatoes from M&S. But I really like a
certain sparkling water that comes from Tesco. You can see I can move items
around in the same way. I've noticed here, burger
roles is spelled wrong. How can I correct that? Well, I'm going to click on this card and you can see
it opens a much larger, more detailed version of
the card for that task. If I click in that
side leg area, actually, there we go. I can just add to
it and change it. Now from there I
could just click away and it goes back to that view but with
the correct spelling. Well, let's get back onto that expanded card by
clicking on it again, I look at a bit more
detail about this here. So it tells me when it
was last changed by who? Remember at the moment I'm not sharing my boards to anyone. I'm just using them myself. I've got that assigned
to somebody link where I can click to
assign to other people. Labels which we'll look
at in more detail later. Some information
about where it's contained the bucket
within the current plan. I can change that from here. It's progress status, priority. So there's lots of
flexibility here. There isn't really appropriate
to a food shopping list, but would be appropriate
in other situations, start and end dates. But what I want to
is this notes area here so that I can
add more detail. You might have noticed
when I typed in the box that this link here appeared saying show
on card with a checkbox. If I tick that box, then when I move
away from the card, you can see the text I've added appears on the card as well. Let's just check what
undoing that does. Remove the show
on card tick box. Here it goes back to not
showing that detail, but you can see that
having this option to turn on or off where
the note appears, just like some of
these other features is a really useful
way to be able to add detail to each of my items on my shopping
list or task list. Let's go into the shopping lists plan on the mobile device. And here you can see all of the same items of
food are available. What I want to do now is drag
and drop in the same way. So let me hold down
sparkling water. Now you can see I
can pick it up and move it between lists
in the same way, icon on the desktop. If I click on that item, it then brings up a more
detailed card view, exactly the same
way that I have on the desktop where I can go in and edit various qualities
on properties of that task.
8. Task Checklists: We've looked at a
couple of ways that buckets can be used for
different subjects. Let's look at one
more. This time. Let's think about what
the bucket titles could be to do with making content. Here's some bucket
titles that are more appropriate for a
content ideas plan. Let's just scroll along. Here you can see
where there are more, it's harder to keep track of. So some people prefer to
have less buckets in a plan, but have more plans overall. But you can do this as well. Let's quickly add a few ideas. Here we go, a few
tasks that would be appropriate for
this particular plan. So if my job was to create content for a one main project, then having a plan
called content ideas with tasks like this within
it seems really useful. But something we want
to do is get a bit more in depth with
each of the cards. I'm going to go into
this idea here, head shots for the whole team. So I need to get photographs taken for everybody in the team. And maybe there's
five or six people. But to do this, I
don't want to make a separate task for everybody. I'm going to go down to
this checklist tool here. And in here, start to type
the names of the people. Let me hit Enter. And when I do it gives me the
option to add another name. Here we go. You can see now that I've added all of those names
and it's now given me just like before when I
clicked on notes and I had an option above it
to our show on card. Now that I've added
to this checklist, I also have an option here
to show this on the card. So let me click away from it. And you can see now
headshots for the whole team shows the subtasks that are contained within
it, the checklist. And I can tick off any of these from that list
as they happen. And you can see the tally at the bottom has changed to show that one of seven has been done. Let me click on the task
card to expand it again. And you can see now
as well as having cross through and
ticked off that item. It also shows me a
progress bar with an appropriate amount of the
borrower already colored in what I had before. Let's just untick
show on card just to prove that those disappear. So the names disappear
of the checklist items, but the progress
is still visible. Let's click on it again. Actually in this case, it's really nice to
have it on the card, but I'm going to uncheck that one and it will
reappear out unchanged. And none of seven to
show me that though, all those are still
needing to be done. Let's add another checklist item here on update this
year service page with the new agreed options. I'm going to click there. Go to the checklist on here. I don't know what the services
would be for this option, but let's add some n. Again, I'm going to leave
it as Show on card. So that then when I click away, you can see the options
to make sure I've ticked those are visible as well as the amount
that's already done. How else could we use this tool? Well, let's go back
to personal tasks. And here on the right-hand
side I had a shopping list. Well, I'm going to click on
shopping until the task. This time I'm going to go into that task and used the
checklist this way. There we go, and I can see all of the things that
I need to get and it's available as part of this layout and how
my personal tasks with a shopping bucket, rather than having to have an entire shopping
lists plan of its own. So there's some
flexibility there as well.
9. Assigning Tasks: Okay, let's take a look
at assigning tasks. Now. So far, remember
these three plans we've made are all personal. So we haven't really
assigned tasks to anybody including ourselves
because they're all hours. When I click on any particular
task in the assign field, it doesn't show anybody's name. And they were all like that. So if I go to my tasks remembering
this area at the side, we have new plan Planner
hub and my tasks. If I go to my tasks, I don't actually
see any tasks in this view because nothing has been specifically
assigned to me. Let's go back to that
content library area. And this time we'll go into this task landing
page header one. I'm going to click on Assign. And from the list of people that are available
that this plan is shared too because it's just AS then this is the account
that the plan is made in. So I'm going to click
on that name. Now. There we go. We've assigned
it to Kate leaves. And now you can see here
in the assigned to field, it shows Kate lease. And also down here
it shows that name against the most recent action
here, Let's click away. Now we have the name associated
with this task as well. And look, we also have an
assigned to box that we can click on that will allow us
to add further names here. We now have one task assigned. Now when we clicked on Add task, remember here, we also
get an assign box there. So I can click on Assign and add the assigned person to the
task are, so I make it. There we go. Now as I've made the task, I'm gonna hit Enter. And as the task is made, it's assigned to
a person as well. Let's get back over to my tasks. And we can see now that
both of these tasks, I'll now listed as
being part of my tasks. Even though we know in reality, we have lots of tasks from these three boards
that we've set up. The only ones that
are actually assigned and therefore appear
in my tasks are these. So depending on how you
want to use planner will depend on whether the My Tasks facility
is useful to you. In which case, you
need to actually assign tasks to yourself. Or whether you don't need it because you're
going to be using planner always with
just yourself. Now, I would suggest that
one of the core strengths of planner is the fact that you
can make different plans. And some of them are
shared just with yourself. They're personal, and some of them would be shared
with your team. And therefore assigning
yourself the ones that are definitely yours is probably
a really good way forward. Well, which ones wouldn't
you do this with? I would suggest perhaps
my shopping list items. The minute I start assigning things like burgers to myself, Let's do that here. Means that when I go
back to my tasks, I see just a shopping list item like burgers on that list, which isn't particularly
helpful as a way to do it. That's something just
to be mindful of. Let me click on that name. That means that here it shows it's already assigned
and then I can click on the X and remove
that name as well. So now it's disappeared from the my tasks list because when I go back to shopping list, burgers no longer has anybody assigned to
that specific task. You can do any mix of those two things in the
way that you organize, assigning or not assigning tasks as items to a
particular individual. You may have noticed then
that when I went to my tasks, the burger task
appeared here as well, even though that's
from my shopping list. And these other tasks listed here are from my
content ideas board. Let's go into personal tasks. And I'm now going to assign
some of these to myself. We'll see now that in my tasks, all of these appear and that's the strength of the
My Tasks facility. It collates all of the different
tasks that are assigned to you across all of
your different plans. Now here we're seeing
it as this not started in progress
and completed view. As we said before, both Planner hub and
my tasks on each of the different plans
have view options. At the moment, up by group, it says By progress, if I click on that and
change it to buy plan. We can now see these tasks are from
our content ideas plan. These tasks are from our
personal tasks plan. We could also
organize by due date. And at the moment we
haven't used date, so they will appear
with no date. And we could also
organize by priority, but again, we haven't set a
priority for any of these. So at the moment they all
show with medium priority. In that way, you can customize the view of my tasks as a way to collate all of the
tasks that have been assigned to you from each
of your different boards. Now again, this is really helpful because
it's another way to identify key tasks at that time. Although I have lots of items
on my personal tasks board, and also lots of items on
my content ideas board. I've only assigned myself the ones that I want to
deal with at the moment. It may be that more of
these are actually mine, but I don't want to see them all in the My Tasks area yet. I only want to see the ones that I'm currently working with. So again, that's a
flexibility in the way that you can use assigning
tasks to yourself. In a little while,
we're going to look at assigning tasks to others. Let's come out of shopping list. And when we look at the
bottom area of the screen, you can see just like on the
desktop or browser version, I have settings Planner
hub in the center, which is the view
I'm seeing now. And if I click to the
left on my tasks, it then takes me to
the same view of my tasks that I see when I look at my tasks in the browser. Here by because of the
way we're filtering it, I can see not started. And if I scroll to the right, I see in progress tasks and completed tasks
there as well. Just like in the desktop
browser version, I can click on the Filter
icon in the top-right corner. I'm changed the way I see it. So now let's change
to plan view. Straightaway. It's showing
me the content ideas plan. I can scroll through and see
some other plans that I have setup as well in the browser
version here on my phone.
10. The Task Card: Let's take a proper look at
what the task card can do. I'm back here in my
personal tasks board. I'm going to click on book
next month's MOT service for my car in the car bucket in here you
can see I've assigned it to myself so that it appears in the My Tasks area. I'm
happy with the title. I don't need to change it. Let's take a proper look at
some of the settings in here. Now the first one is labeled. Now if I click on
that labeled area, it's going to give
me a drop-down choice of existing labels, which you can see a color
coded named at the moment, let's just choose one, pink. Now you can see it adds
that label to this board. Let me click away from it. And you can see now
on this card it has that label as
part of it as well. You can rename these
really easily. So for example, I've named
this one phone call. And I've done that by going across to the pencil next to it. And once you click on it, you can see it lets
you, It's that area. So now that I've done
that, let me click on it. And you can see it sounded both. If I click away, we can see now that it has both
labels currently, let's go back into that. We should look at
labels properly in an upcoming
session because it's a very powerful and
very useful feature in lots of contexts. I'm happy that it's
in the car bucket. I'm just going to mark
this in progress. And the reason for that
is because when I go down to my checklist of
tasks that needed to happen, this task is more like a
mini-project, isn't it? Like lots of things. It has several steps
to be achieved. Well, I've already researched garages and found
my old paperwork. I can mark that
completes already. And because of that, it is definitely in progress. Notes creeping closer. So I'm gonna mark
it as important up here rather than medium, so that it gets prioritized about other
things in a minute. There is a due date. So let me click on that and set myself the due date that's
coming up There we go. Now, down here, I have
this attachments at all. And if I click on that button, I get a choice of needing
to attach from computer, from a team file if I'm using
Teams or a link to a URL, and that's a way that I can use any other storage capacity
if it's Cloud-based as well. So let me click
on from computer. Then I'm going to click on
Service report document, which has now been uploaded
and added to this task. You can see I've got the
option to show it on the card. Now I tick that you can see appearing into that space
above there as well. And actually let's
show my subtasks to that's a useful thing
to help me as well. If I hover over that file, clicking on it is going to open it so I can view it from here. But I also have an ellipsis
or three dots on that file. So if I click on the dots, it then gives me the choice
to either edit the document or remove it completely
from the attachments area. I've got another art
attachment button so I can keep going and add other
things if I want to. This is a really useful way to manage documents to do
with projects and tasks, to have it part of the
actual card itself. And this is great when
I'm using it on my own. But if I'm using it as part of a team and using a shed planner, then that's even more useful. Below that is a comments
area which I can click in and send a comment
straight to this card. Now that's really helpful
in lots of situations. You can see here, although this plan that is only
shared to myself, I'm actually using it to keep comments of what
I've done so far for me because it means that
their date and time stamped already as I type them. And that's really
helpful, especially when you're on the phone or
something like that. If I'm sharing a
board with others. And we all need to stay
in the loop about what's going on to do with
a project or task, then this is even more
valuable because it means that everyone can see the comments that everyone else has added. More on that in a little while. Here, Let's add
another attachment and adult URL just to see
what that's like. When I click on that box, I now get like any URL tool, the address that I'm
going to put in, and then the text to display. So I'll put in something
nice and safe. Bbc website. It's not very
appropriate to the task, but at least it shows
how this will work. And then once I've done that, I'm going to click on Add. And now it's added that website as a
secondary attachment. Again, I can embed
any of these in the card when it's
shown if I want to, as we mentioned before, if I click on a task card
on the mobile version, then it opens an expanded card in the same way as the desktop, where I now have
options to change. The bucket that
it's assigned to. The task is assigned to
its progress status, its level of importance. To tick off or untick any of
the checklist sub-items to access and change any of the attachments to adjust
the due date or start date, to add or remove or
create different labels. Then to view the history
of the task at the bottom, including adding a comment, should I feel I need to. In that way, it's a fully featured experience comparable to using
the browser version.
11. Filtering and Grouping: I mentioned earlier that one of the most powerful features of
planner was the ability to filter the view and changed the way that items are
grouped on any plan. We started to look
at that a little bit earlier when we
looked at my tasks. And remember, we saw that the initial view was
to do with progress, so it was not started in
progress or completed. And then we realized
that we could go up to group and we could
change that to plan, to see items reorganized by
the plan they were Fromm and also to do with due
date such as this. All to do with
priority such as this. Well, let's go into a
plan and have a look. So I'm gonna go back
to personal tasks now. Here I've been through and added a few due dates and priorities and things like that
just so that we can see how this palms out. So now that we're in a plan, remember any plan will
behave this way as well. Let's go up to groupby again. Here we're grouping by bucket. But if I click on this, we get a similar tool that we
found in the My Tasks area. I can reorganize by
who it's assigned to. Which remember, is going to be my account or nobody
at the moment, because this is a personal
plan to progress, which again shows us
that not started in progress and completed view. Then due date, which gives me today future or no date and it would give
me past as well. If there was anything over two. Then labels which we haven't
used particularly yet. But let's just look at that. You can see that all of
the different color labels can be used as of you. Then finally, priority. That's a real powerful, There's a real versatility to the white planner can
display any of your tasks. Um, I would say just using
the groupby option gives you lots of different ways
to see what's going on. Now secondary to that, if I just take this back to bucket so we're
familiar for you. We can now go to Filter. Next group BY is
the filter option. You can see it's got
a 0 to show that no filters are in
place at the moment. If I click on that drop-down, you can see I have a
lot of options here. The first thing I can do
is filter by key word. So let's, for example, choose a word that
I know is in here. Let's go for email. And if I hit Enter, then immediately you can
see it's filtered out. Anything that doesn't
contain the word email to only show
me those tasks. Let's clear that. But I also have all these predefined ones to do with date. So let's put look at next week. Let's look at this week instead, or as well as, let's
look at the future. There we go. And it's putting us things
that are in the future. If I want to look at
things that are overdue, I could click on late. There are none
currently thankfully, as well as do I also have
other things such as priority? So having set some priorities, I can then see what's important. And you can see it pulls up the dry cleaning and
the book in booking a car service that we know we
are set as being important. We also have progress. So let's see those things that
are in progress currently. There we go. There's two that I've
marked in progress. Let's go down to label. Well at the moment, we haven't set many labels, but let's just go and choose phone because we know
there's one of those. There we go and it filters
out everything except those. If we add additional
labels, remember it will, it will filter by more
than one criteria. And actually I could
be choosing criteria from all of these could if I wanted to find everything
that was labeled phone call that was overdue, but in progress, it would be very easy to set those
filters, wouldn't it? Let's remove those
now, hold that up. Then assignment is to do
with who it's assigned to. So at the moment I can click on assigned and it'll give me everything that's assigned to the accounts I'm using equally. I could click on
unassigned and it would show me everything that's
not assigned to anybody. If there were other people
that things were assigned to, they would also
appear in this list. Now that's very similar to the next option on that
is members up here. If I click on members, it's going to show me anybody
that this board, so sin2. So at the moment this
board is remember only assigned to the
account I'm using, Kate leaves, so I don't
see anybody else. But if I did in the same
way that I use to filter, to choose people or
unassigned down here, I can do the same thing
very quickly from haha. Also here on the
mobile version in the top right corner
where the menu link case, I then have the option of the Boltzmann to
change groupby again. From there, remember
I can change to show other things such as
organized by the level of progress or any of the other group BY
tools that we could use on the desktop as
well, such as labels.
12. Buckets as a Runway: So far we've looked at
buckets, two main categories. We've looked at several
different contexts across three different boards where
this works really well, but it is possible to use
them in a very different way. I'm going to click
on new plan again. This time creates
another new plan. Here we go, and I'll
keep it to myself again. This time I'm going to use the categories
quite differently. Now let's look at the way
I've created these buckets, rather than being
different categories that are task would
fit into one off. This is more like a
runway or a ladder going left through to right. In this context, it would
be content to be published, maybe to a website or a magazine or brochure
or something like that. So let's put it in something
and see how it might work. Quickly added in several tasks so that we can see
how this might work. So let's look at this
July issue summer suits for every occasion. So if I click on that task, then we can use every
facility within the card. I've added the document here. That would be perhaps the
text that could be used to remember now it
lives with the plan. So anyone that can access this plan or open it can use it. And once we've had the idea and we're ready to where it's fully formulated and ready to draft. I'm going to grab
that task and move it across into the drafts column. So now we're going to
draft out the text. Once that's completed, I
can grab that task and drag it into the writing
column to be fully returned. Once it's been completely written and it's
ready to be checked, I can drag it across
into the proof column. Once it's been proof
read by somebody, I can drag it over
here, ready to publish. And then finally, once
it's ready to hit print, I can take it and put it in the published column
where everything that's published can live
and we could even at that point ticket
as being completed. That then in this column, we only see things
that have been completed and all the way
through to the published row. In that way, we're using the idea of buckets in
a completely new way. We're not using them to separate
things into categories. We're using them as steps on a ladder or a
runway if you like, that, we can gradually
move content through. That's one way to organize
content over time. In the next lesson,
we're going to look at a slightly different way
of managing timescales. Remember on the mobile app, a similar drag-and-drop
experience, his possible. So as I want to move
an item from an idea into draft or from
draft into writing. I can do so by pressing my
finger on it and dragging it from left to right across the screen in the same way
I would in the browser.
13. Managing Members and Using Teams: Let's take a look at
adding members to a plan. Here I am in a slightly
different plan this time, the account that uncertainty
is called Anthony leaves. And if I click on
members this time, then you can see that's the
only accounting it currently. However, if I click on this box that says Enter name
to add a member, here I'm going to type a name. You can see it brings
up a couple of options at which point I can
choose the one that I want. And now that account is also argued as a person that
can access this planner. Now at the top, I see
both icons rather than just one in
the filter options. I now also see that other account that I
can filter the results by. It's no problem to manage
and add and remove members from a planner board
that you've already created. However, there is another
way to manage the membership of a plan that is probably more useful for
lots of people now, rather than doing it through the new plan link
inside planner, I'm going to go up to the
waffle and choose Teams. This will now open Teams. And if you're not familiar
with Microsoft 365, then Teams comes bundled
with all business, enterprise and
education accounts. It means that you can
use the Teams app. It's another app within
the office we environment. And it gives you lots
of facilities that are not really found in
any of the other apps. So here we have a team
that already exists. What we're going to do is
we're going to create a team. Then we're going to
use that team to be the location for a
new planet board. And it means that we
can manage who is allowed to access that
board through the team. So let's do that now. I'm going to click down here
on Join or create a team. From that, I get a choice
to either join a team that already exists with a code or the option that
I really want, which is to create a team. Let's click on Create team. And we have some choices here, either from scratch, from a group or team
that already exists, or using some
different templates for it to be part of a project, to manage an event, to onboard new employees, to adopt Office 365. And you can see
there's a whole range of different templates here. Today. We're going to
choose from scratch. We're going to make
it a private team. We're going to
choose support desk. And I'll explain to
you in a little while how we're going to use this. Let's click on Create. This point the team is created. And it will let us and
allow some people. I can choose any one
that already exists. Here we go, I'm going to add that account because
that already exists in our office directory. And as well as being people that already exist inside
your directory, you can add guests as well. You can see it can't find
that e-mail address. So it's offering to add it as a guest and I'm
going to click Yes. What I'm gonna do just
before it does it, I'm going to click on
little pencil mark there. And I'm going to change that to be the actual name because it could show
the email address, but showing the actual name
is two more tidy, isn't it? Let's click on the tick. There we go. I'm going to add
those two accounts as well and click Add. Then I'm gonna click on Close. And it means now that in this
team called support desk, there is already, you can see a post-its channel
here where I can click on new conversation
and type a message. I can click across
on files and access the Microsoft OneDrive
that is part of this team. There's a wiki which will have, have no pages currently, but you can see
that I can access. And by managing the
membership of this team, all of the members
of the team can access any of these resources. So let's just go to the
ellipsis here next to the team. I'm going to choose manage teams so that we
can see who's in it. Here, inside members. You can see there's owners. Okay, please. Because
that's the account we're using right now
to make all of this. And if I expand the
members and guests, then I can see this
gas dive at it is shown here with this account. And that means that
they can basically experience the team
and participate, but they can't control the team in the same way
that an owner can. I can remove this person with by clicking on
the X over there. I can change when there's
a drop-down arrow, the status of any owner or member using that
drop-down there as well. So that's how I control
the membership. Now we're not gonna
go too far down the teams rabbit hole because
that's for another course. But what I want to do is use this team to control
their membership. Of a planner board. And that's one of the things
that Teams is great for. You have one location
here called Manage Team, and then any of the resources and
facilities and tools that you link to that team can all have their permissions
controlled in that way. So it's a really easy way
and very transparent and open as a way for
an organization to see what's going on and
who can access what. I'm going to click on
plus here to add a tab. We've got these three already, but I want a new one, so I'm
going to click add a tab. From here. There's a wider range of things that I can
add to this team. We're going to want to
add a planner board. Let's find planner. Here it is, tasks by planner. And we're going to
call IT help desk. There we go. So we're creating a new one. We don't want to use
an existing one. We can see there
aren't any currently, so we definitely want
to use a new one. Now if I leave it ticked post to the channel
about this tab, then the minute I hit Save, it will put a message
in that posts string, which is the ongoing
conversation of this team to show that
this has been created. So let's just do that. I'm going to hit
Save. Now we can see that we've created
a planner board called Help Desk up here, and it's inside that
support desk team in this general channel. Let's go back to the posts tab. There we go. And it's told
us that a new channel, a new link has been added at the top of the channel
called helpdesk. When I go through, I can
click on that again. There we go. It takes
me back to that board. If I click on the
drop-down there, then I've got some
things that I can do, like rename this title
controller settings. Let's click on that now
just to see what it is. And again, it's going to
let me chose to rename it or change it to
be a different plan. But I don't want to do
any of those things because I'm very happy
that I've got this. Now that that's in place. We have this Help Desk
planet board setup that is controlled by the team. So when I go into Manage Team, I can add and remove
members of the team and it will control
it in this board. Now when I come out
of Teams and go back to the planner app itself, we can see here now, I have helpdesk already within
my recent boards as well, so I can still use it and work it from the
app if I wish to. Or I can go to the team and manage it there
and use it there. However, the management will be controlled through
this link here. Let's just check from this team. We can see up here, both of the people that
we know are members of this help desk planner are already added there.
I see them there. I see them in this list, and I see them in the filter
options there as well. So hopefully we're really
clear now that we can make a new plan and control who
can contribute to that plan, either through the
new plan link here, and then via members here. Or alternatively,
we can go to Teams. We can create a team and then
we can add a tab and choose that option tasks by
planner that lets us make a planner that is then controlled as part of that team. So two different ways to
achieve the same thing, depending on probably who you want to be part
of that planner.
14. Buckets vs Labels: Let's see what we can
learn about organizing buckets and labels using
the help desk idea. I've made here three copies
of my help desk plan, and let's see how we can
organize them in different ways. So here I've got in
the first version a tasks in the to assign
bucket ready to hand out. And then my other
buckets are using the names of the different
technicians available. So I could say, this task needs to
go to this person, this task to this person, this task to this person, this task to that person there. And then by moving
the tasks around, it's very easy to
assign tasks to people. Now in that situation, you can see I've
made labels as well. So if I click on one here, then you can see my
labels that I have available are to
do with location. The site maybe all across different aspects and
different campuses perhaps. But if I come out of this, you can see then that names are the way the
buckets have been chosen. Now, this isn't a
particularly great way to organize it when we
consider that each person, Anthony, Steven, and Jody, will want to use the My
Tasks facility or to filter. Now they can filter
by the bucket, but it makes much more
sense for them to filter by them their own names. So this arrangement doesn't
really allow that to happen. Let's look at helpdesk be. In this situation, we've
got the same tasks needed. But here we've made the
buckets, the location. So campus one, campus
to campus three. Now in that way, Let's assign these as well. So room five is on campus
one, so we'll put it there. This printer stand is on-campus
three rooms seven is on campus to conference room
two is on campus one, and max is laptop maximum
lives on campus three. So we'll put that across that. Now we've assigned
the tasks again, and we've done it based on the location that each task
needs to be performed, assuming perhaps that
somebody works on each site. That means now that when
I go into this task, I then need to assign this task to the person
that's going to do it. And I can use the assigned tool. In that way. It means that when this
person, so Caitlin, goes and looks at my tasks, they will see the tasks
assigned to them from high up. In this way, I've used
labels in a different way. So I've used labels more
like the way we were using categories at the very
beginning of this course. If I open this task
maintenance issue, we can see that the
labels available here are more
situation dependent. Software issue, a V issue. Now for myself, if I
want to be able to check how many of each issue there are currently and what's open. I can then go to group by. And instead of grouping it by bucket or any of these other situations
that we've used before, I'm going to click on Labels. Now when I grouped by label, you can see that I see all of the software issues together. It still shows me the bucket
there from the campus. But the AV issues are separate, maintenance issues are separate. Again, it's another way
to be able to resort, regroup, and visualize the tasks to be done in a different way. Let's now go to Help Desk see
and look at a third option. Here. If I go to the to
assign tasks bucket, I can see that I
have other buckets. It's to do with software setup, audio visual issue,
maintenance, and site. And these are the names that
we were using for the labels in help desk bay that are
actually now our buckets. Let's see, print a stand. Well, that's an AV issue. Toner cartridge. That's a maintenance issue. Re-install Windows,
that's a software issue. Add the display driver, that's a software issue. Now that I'm going into these, I can now see the
different types of issue. Again, if I open one, I can assign these
different tasks to the different people that
they need to be assigned to. But let's now go
and look at label. And here I would need to use
labels in a different way. Again, I could change this
label to be building a. Let's change this
one to be doing Bay. This one to be able to say. And then I'll account allocate
this one to the building. It's actually from this
is in building Bay. Now it has that label as well. Which again means, although in this way I've still
assigned things to people, my bucket's up by the type of task or category if you like. But now I can again go
to group and choose labels and see the location of each of these
projects as well. Which is again,
another way that it's a really versatile solution depending on how you best
wants a group your tasks. In that way, a combination
of buckets and labels provide a really versatile
cross-referencing system. The difference between
the two, of course, being that a task
can be moved very easily between buckets by dragging and dropping
as a practical thing. But you can have
more than one label. A task could have multiple labels and be searched
or filter to all of them.
15. The Charts View: Planner has some really
useful visual aids built-in. Here I am on helpdesk see, and you can see I've added a few more tasks and finished a few just to help us with what we're going
to look at next. Up at the top,
we've been focused entirely on the board view. We haven't looked at
charts or schedule yet, but let's do that now. I'm going to click on Charts. And that's going to
change the way that I see my task information
completely. Now, I see first of all, a status area that tells me
there are four tasks left outstanding according
to the key to have been completed for
are yet to be started. Then I can see my
buckets view here, and it shows me how many tasks there are
in each bucket currently. So we see that the gray
means not started. And if I come over to here, we also have some green here, which means these are completed. So that's a helpful
way to view that. And then again, I can see my
tasks according to priority. Everything at the moment is medium priority because
I haven't changed it. So you can see there
are four here, two of which have
been completed. Now underneath that view, when I scroll down,
I see members. Remember at the moment
this helpdesk board, I didn't add anybody to, so it only shows the owner, which is the cake
leaves account. Here. It shows that
there are two tasks not started on this green
side to complete it versus the number
assigned here, of which there are two which
have not been started. If there were many
people in this team, it would show me all of
their graphs here to help me assess how well those people are
managing their tasks. Down the right-hand side
of the charts view, I see the tasks that
are irrelevant. So all of the tasks
that are being shown in any of these grasps, these are the tasks here. Just like in any other view, if I click on the card, I can open and
therefore edit and work on the expanded
card for that task. Charts is a really great way to get a really clear picture
about what's going on. This is something that lots
of people would screenshot and use as evidence may be
as part of the presentation. So you could screenshot
this into something like PowerPoint or Google
Slides or Keynote. So this chart's view
forms the basis, not only for a way to be
able to report back and show what progress has been made across different tasks
and different buckets. But also to be able to support
people that you live in, manage in seeing not just how successful they're being
at completing their tasks, but also helping manage the workload and
ensuring they don't have a disproportionate number of tasks versus the other
people in the team. Take this slightly further. So at the moment,
remember we're looking at the charts view
for this planner. Let me go to my tasks and here I also have
the three options, board charts and schedule. Let's click on Charts here. And now I can see
my own progress and outstanding tasks across my
different plans as well. If I go to plan a
hub, initially, I just see the cards that
leads me to each plan, but should I favorite
some of these? Let's do that now. Let me
favorite helpdesk see. Then you can see I then get a
slightly expanded card that shows me the progress I've
made on that project. Let's go to published tasks and also then to personal
tasks and favorite those. And you can see I can
favorite a number of projects which then appear
in this favorite list here. But also that I see this
expanded more detailed card for the Planner hub
itself on the mobile app. Some of this functionality
is also available. So let's go into personal tasks. From the tasks view here
I'm going to click on the top-left corner
where you see the bar graph underneath
the clock there. When I click on
that, it opens up the charts view for me where I can access the same charts that are available
through the browser, albeit in a vertical
scrolling format instead.
16. The Schedule View: And finally in views, Let's move on from board I'm charts and look up
the schedule for you. This now gives us a
calendar view of our plan. Here you can see the tasks
that already have due dates. I can move them around
by dragging them, just like anything else. I can click on the Task and see it's expanded card
as well if I wish to any task that does not
have a scheduled date yet, I can grab on odd in this wife, this is the way that I
think most people find the easiest to manage dates and timelines within
planner is to grab the task and drop it
on the date it's due. And if you then
need to change it, you can just pick it up and
move it around really easily. So really it's a combination
of using the board view and the schedule view that makes managing tasks in a
plan most successful. If you have a great deal of tasks to manage in
a period of time, you can change from month view here and click on week instead. Then move between weeks
and months using the view here or the arrows here to
move forwards and backwards.
17. Copying Tasks: Let's look at copying tasks. Now. I'm back in my
publishing tasks board. I'm going to click on July issue here and open the
expanded card for you. And up in the top corner
I have this ellipsis, which is going to give me certain options
working backwards, I can delete the task. I can copy a link to the task, which when I click on that, you can see it brings
up a URL and puts it on the clipboard that I can
paste into other locations. I can move the task between
different plans and buckets. But now we're interested
in copy task. Copy task. If when I click on that, he's going to bring up a
smaller card here that lets me decide what the
copy is going to contain. It can be an exact copy
and I can leave the title of the task and the planet bucket the same,
or I could change it. Let's just put a two on the
end to see the difference. And then down here, you can see I can
choose what to include. It says some task
information cannot be shared across
plans or groups, and I can click
to find out more. But otherwise at the
moment it's saying that the description of the
task, the checklist, it contains, the attachments and the labels will be
parts of the copy, and that's by default. I could also click on date, progress, and who
it's assigned to. So let's do that and
I'm going to click, it's going to put it
in publishing tasks. So let's just change ideas and put it into draft just so
that we can see it appear. Here we go, Let's click on Copy. Now that I've done that, we should see a
copy of this task, but with a two on the end. There we go, has appeared
in the draft bucket. And in that way,
we can make copies of tasks really easily. So I'm going to go now to
my personal tasks board. Over here. We had a weekly task which was pickup
groceries on way home, and I had some things
in there that I'd created a list of already. Let's just take that as
if I've completed it. So I've completed
that shopping list. Now this may be
something where I pick up the same
things each week. So let me go to complete
it, expand that. And here I can do
the same thing, but we can do this
in one of two ways. I can either click on
the board and then use the ellipsis in the top corner
where I have coping task. But what I might also want to do is just to go to
the ellipses for more options on
the small version of the task card. Let's do that. Down here you can see I've
got some familiar options, including copy task,
which brings me back to exactly the same
way of doing things. So let's do pick up
groceries on way home. We'll put this in shopping. Again. Copy. There we are. Now as well as the
completed shopping list that's hidden out of the way. I now have next week's
grocery shopping list ready in the active tasks here.
18. Collaboration Tips: So up until now, we've covered all of the
features built into planner. The next set of
lessons are going to be to help you get the best out of it and work most
effectively and most efficiently. Next, we're going to look at collaboration tips in planner to help you get
the best from it. So planner is a great
way to save on having as many meetings to keep in touch with your
team more closely, to help you support
those you lying manage, and to give you a powerful
tool for feeding back to others the progress of
projects and tasks. But there are some ways that you can do this most effectively. The first one would be
to comment on tasks. So let's go into content ideas. Let me open up a task. And down here we remember we
have this comment facility. Making a comment
when you progress. Task in some way is a really good way to leave
notes for your future self. But also so that
the other people that the project is shared to see what steps you have taken and the history
of that task. Number two would be to use
the conversation tool. When I go up to
the ellipsis here, remember this is the
menu that controls all of the settings of the plan. I'm going to go now
to conversation, which has brought me
into Outlook and open the conversation in
Outlook for this group. Now I can click on Send, Email and draft a
message that will go to everybody that the
planet board is shared to. The third way to
collaborate most effectively would be
to use attachments. So by adding links
and documents to the expanded card
for any task is a great way to keep
track of that document. Avoid having multiple
copies and make sure that everybody associated
with the project can access the documents needed. Number four would be
using links to tasks, where a task needs
to be discussed, going to the ellipsis and
choosing Copy link to task. Remember, generates a URL
on the clipboard that you can then paste into a
Teams message or an email, or however you correspond
with your teammates, which means that they can
click it and it will bring them directly back to
this task in planner. Number five would be to use
those charts to ensure you have a really clear picture
of everybody's workload, how much support
they might need, how they're progressing with their own tasks
within the project. And be able to keep that
bird's-eye view on everything. Number six would be to
control notifications. I'm going to go to the plan menu and go down to plans settings. And at this point, go
into, first of all, group to check my
privacy permissions and then to Notifications. Here in notifications,
I have some options. So let's have a look. Email is always
sent to the group when a comment is
made on a task. And I have a tick box
for send e-mail to the group when a task is
assigned or completed, which it tells me that
group owners only can change so I can check or
uncheck that setting. Then for myself It
says half planner, send me notifications when
someone assigns a task to me, it will send me an e-mail and push notifications
through the app. And then also a task
assigned to me is light due today or do in the
next definite seven days, which which will
then email me about. I can toggle on or off ether
and both of these things for myself and this one for everybody within the
group because I'm an owner. Finally, number seven
would be to train your team to update and use
the tools as well as you do. So that when you are all within a board and you set up a task, everybody knows how to update the progress
and ensures that it nothing gets out of date and doesn't reflect the true
state of any project. It's time well-spent.
19. Settings and Notifications: So now we want to spend a
couple of minutes checking in on some of the settings
we haven't yet looked at. There's two levels of settings. One is for all of planner, and the other is for
an individual plan board to access the global
settings for Planner, let's go to the cog in the top right corner
and click there. And here we have, when we look in the themes area that are the most eye-catching, the most popular themes. And if I click on view all you can see it expands this out. Now this isn't all
the backgrounds, this is the headings. When I click on these, you can see the title
row where it says planner at the very top of the screen, changing each time. Let's take it back to the
tasteful blue I started with. And that's the most useful thing to be able to do in here. Probably. Additionally to that though, I may wish to change my
notifications for all off planet. Let me click on
Notifications now, hand near the top. Here you can see I can set globally what I want
my preference to be. Have some planner,
send me notifications when someone assigns
a task to me, a task assigned to me, it's late due today or do
you in the next seven days? So these settings we
access through planner earlier for a particular plan, but here we can access
them for every plan. Let's just counsel
that not to change it. That's our global
settings for the planner app completely or close that, remember that's from the
caulking the corner. But for each plan, we can go to the plan menu
and down to plan settings. This is where we have setting
specific to the plan. The most fun part that we
haven't even touched at all really is looking at some of
the backgrounds available. Some of them are very tasteful. Some of them are a little bit
more busy and I think a bit hard to see through
what you're doing, but you can see for
yourself what's available. And the content of this changes depending on the title
of the plan itself. So you'll find different
backgrounds are available depending on what
title you've given the plan. If I go into group, then we recognize that public
versus private setting and the group description
that we accessed earlier and into notifications. Remember, we have
the same options that we access to minutes
ago from the COG. But unlike the COG, these take effect
specifically for this plan.
20. Exporting to Excel: The next few sessions are
based on ways to integrate or use planner with other
apps and programs. We're going to
start by looking at exporting content from planner. I'm going to go up
to the menu for this plan and then go down
to export plan to Excel. If I click on that, you can see it's downloaded
an Excel file that if I now click on open that file here
is that open Excel file. And you can see now I have
first of all, the plan name, the plan ID that identifies
that plan to office, and the date of the export. Let's just look at that
plan ID for a moment. And the way to identify the plan ID should
you ever needed, is that it's part of the URL or the address of the
original plan. So let me bring that
down slightly so that we can see the
browser behind. Here. We can see at the end of the
URL after these equal signs, that part of the address there
matches to this part here, that is the plan ID. Now the exported Excel
document contains everything that was found within the plan
itself for each task. So here we have a task ID
that does the same thing. It identifies two planet which task we're
discussing the task name. Let's just expand that so that we can see all of the texts. The bucket it was contained in, its progress status
and priority status, who it was assigned to, as well as who created it, the creation date, start date, due date, whether
it's late or not. And then let's let's bring
the rest across here. Then the completed date and
completed by and description. As well as that, Let's
expand here so that we can see completed checklist
items if there were any, and eat their status and
what the items were. You can see it here, separated by semi-colons and any labels that were
assigned to the task. In that way, you can get all of the information for
each task in the plan out of planner into an Excel spreadsheet where you then might want to use
it for other purposes.
21. Planner and Teams: In Microsoft Teams. So rather than using
the new plan link here to make plans,
alternatively, going into Teams and
making a team with the creative team
link down there means that you can integrate
plans into 18. Remember this Support Desk
team we made earlier, you manage through the
Manage Team link there, which then allows you to see who are the
owners and members, including potentially guests
of that team from there, by clicking on the channel, remember we had that
help desk tab that had the plan belonging to the general channel
of this team here. And we created it by going
to the Edit tab button. And then in this recent section, tasks is the one we've
used most recently. Tasks by planner is what
it's currently called. And you may find over
time that name changes. It may just become tasks
or just become planner. And when I click on that, it then let me either
create a new plan or use an existing plan that
already exists to add there. So let's just cancel that because we want
to come out of it. But remember, we can manage and use Planner through Teams. The bonus of viewing
it through Teams means not just you get this
Kanban board view, the charts view,
the schedule view, but you also get a list view that is more
like the to-do app approach, where you can see things
as a horizontal list. When you click on a task, you get the same expanded card
view that you're used to. But it gives you this
fourth way of viewing tasks that again is
slightly different. And for some people
they might prefer, the horizontal lists facility
may be the main reason why using Teams is a good
way to manage your planner. Additionally to that, remember, you can access posts to
start conversations, nested conversation,
as well as having a file store associated
with the team as well. And the other things that
you can add such as wikis. When I go back to Help Desk, then gives me access
to what I think is the third reason that might be really useful to use Teams. And that is that it's
very easy to start a meeting or organize a meeting with the
people in the planet. So up in this corner
I can click on meat and it will
start a meeting now. Or I can click the dropdown and choose schedule a meeting. From there, it takes me
through to the Teams meeting scheduler where I can
give a title to my meeting. Adding the people that
need to be shared to, it's going to go straight
into the support desk. General channels will be posted. And then I can add any
additional examples. So let me just type it in, so I'm meeting the title
so that we can save this. Let us do that and click Send. I know now that when I go
back to the general channel, two posts here it is, the account that I'm
using Kate lease has posted right now,
scheduled a meeting. And if I click on that meeting, it will give me details
of that meeting, which I can then choose to join from the link
up here as well.
22. Planner and To Do: The next integration
we're going to consider is another Office app to do. This could be completely life-changing to the way
that you use Planner. If I go to the waffle, remember, I will have to
do available in that list. And if it's not obviously in that shortlist that
I can click on All apps and go through the alphabetical list
until I find to do there. Let us go into todo. Here I am in the browser
version of to do. There's also a desktop
and mobile app as well. I'm to do is Microsoft's Task Manager app
for making lists of tasks. Here tasks is the default list. I can click and start a task. There we go. And like anything else, I can tick that task off, like a pleasing sound into
do when I've completed it. I can follow that list up out of the way if
I don't want it. And I can also uncheck that
to add it back to the list. The way that to-do works is
that I have a tasks Lester is the default list that I can also make other lists
using the new list. And what it wants me
to do then is to use the My Day tool to prioritize things that
are important to me. So let's just
right-click on buying milk and choose Add to My Day. And we can now see up in my day, there's now one thing
in my day to do. Well, that's all well and good. But how does this
link to Planner? Well, here I have this assigned to you option as part of the available lists. When I click on Assign to you, it then shows me
all of the tasks in planner from all of my different plans that
are assigned to me, exactly the same
ones if we go back that we found when
we went to my tasks. So all of these tasks
here from my tasks, because they're assigned to me. When I go into to-do and
click on assigned to you, they appear here as well. It's a very, very
tight integration. Now that means that I can
then, let's choose one. Right-click and add
that to my day. Let's right-click on orders, paint for spare
room, add to my day. Let's do the same for
gas spell out to my day. You can see now it says
up my day as well there. Now if I go to my day, it has four items and if
I click on that list, my day remember, is
my working list. It's the one that I will
attend to each day as the things that I've
highlighted in some programs. It would be things that
maybe you'd favorited or start or highlighted as being
significant at that time. And you can see here, there's a color-coding
in effect to show me things that have come
from lists within to do, and things that have
come from lists within planner as well. I can see the
different color there. I can tick them off here, mark them as complete, and it will mark them as
complete in planner as well. So you can manage everything to do with your
planner tasks through planner, through the My Tasks links. Or you can use
Planner to organize your tasks and
collate all of them into the My Tasks area by
having them assigned to you. And remember, this is true not just for your personal plans, but also all of the
ones that you're part of with other people
that you're collaborating on. And then for your day-to-day knowing what job you
actually want to do, you can use the to-do app
and click on Assign to you and choose which of these tasks you actually
want to add to your day. And see as the working
list that you're using to do is an
enormous facility. It's a huge tool, very easy to use, very intuitive, but has a lot of tight integration with
the rest of Office. I have a whole course
completely separate, totally dedicated to do. If you're interested in
that and knowing how to use to-do and get
the most out of it. Then go back to my profile
page and find that course that
23. Planner and Outlook: Next, let's look at
integrating with Outlook from the plan menu
for any plan, remember, we can choose conversation
that will immediately launched the conversation tool in Outlook for that
particular plant, I hear half send
email which remember, will allow me to write a message
to everyone in the plan. I can go back through
previous messages as if I'm checking
email exactly the sign. So that's the first integration. The second is to consider
how I might be able to get the plan schedule
into my calendar. I'm going to go to
the menu again, and this time go to
the bottom option, Add plan to Outlook calendar. Here I have they don't publish, keep private or publish
share with anyone. So I'm going to choose
the second option that allows me to publish it. At this point, I
know I have an icon, a link that I can
copy down here, paste into other
calendar programs. But if I want to use Outlook, I can click on Add to Outlook. When I click on that
ad to Outlook box, it's going to then open this within the web
version of Outlook. Here we have Planner published tasks as well as
thoughts address. Let's give it a
color and it's going to add it within my
range of calendars. So down the side
you can see I have my calendars or other calendars. Let's just feel those here. My calendars are the ones
that I see in this group, and then other calendars
will appear below. So let's choose other calendars. Let's give it an icon. Then let's hit Import. Which point you can now
see the planner publishing is now available down the side as one of my
calendars that I can view. And here's that example
calendar event that we added previously
inside Teams.
24. Planner and OneNote: Next, let's look at using
planner with Microsoft OneNote. Onenote is Microsoft's
note-taking and Notebook App. I'm actually each plan includes a Notebook
associated with it. So let's go back
to the menu again. And then here as well
as files and sites, you can see I haven't notebook. When I click on notebook, it's not going to open
this notebook separately. The browser version of OneNote. Now the notebook is completely
empty to start with. So as it says, I'm going to hit Enter to create a new section. Then at least we can see how
it's going to be organized. Onenote is split into sections or section groups and pages. Here is this section I've
named contents which is like a section in a ring
binder or a filing cabinet. And then this untitled
page at the moment. So I might call it intro page
just to give it a title. And we can see then
that in the side menu it's title has changed
to intro page. Down the bottom, I have
options to add a section, which we'd let me add a new
section below contents. And also add page which adds
another page underneath. Like all browser versions
of The Office programs, I can still right-click and access the quick tools
menu here as well. Let me click Delete Page
and that one disappears. In this way, it's possible to
build up a reference book, built off sections,
section groups, and pages, just like any other ring
binder that contains all of the content associated with the project that the
planner is part of. You can right-click and choose
Copy link to this page, and copy the link to that
page to paste into a task just the same way
as you would paste a link to a task itself, as well as having
the browser version, like other Office apps, you can click in open
in desktop app and add this notebook to your desktop or mobile version of the opposite. Well, I have again, another course completely
dedicated to organizing absolutely everything both personal and
business projects through Microsoft OneNote. So if you go to my profile page, you'll be able to find the
link to that course as well.
25. Planner and SharePoint: The last integration
we're going to look at as part of
the main course itself is with SharePoint
and SharePoint sites. I'm going to go back
to the menu here. This time, I'm going
to go down to sites. When I click on sites, it's going to open the SharePoint site associated
with this planner project. And once insights, you can see what a fully formed
experience there says. If you are wondering why
this might be useful, this is a great way
to be able to have a central focus for a project that is already created
out of the box. But you can use with everyone that's working
on that project, but also other people that
may want to be able to keep taps on the project
and see it progress. So all we did for
publishing tasks, remember as a planner
was create this planner. But having done that, it now exists fully in
this form in the browser. If I go to the side menu, we can see this homepage
area has collated news on the latest
activity below that. It has a document store, which we can access
here that remember, these documents
are the ones that we added to those planner tasks. It's the same document and we can get at them in
the folder here. That's the same as going to this document link
at the side here. If I want to add to this
news area to make a blog, I can click on Add news here. You can see it's
going to let me add text and pictures, either, giving me some tips if
I've not don't know what I'm doing or if I
know what I'm doing, it's going to let
me just go for it. Let's close that for a moment. It's going to guide me
through this which sludge approach to how to make a blog. In this section,
let's choose facial, but some more interesting layout is never skillful basic texts, which gives me a slightly
different layout. And if I go for
blanket will just give me that style as well. I think that probably
might be the one I would want most for this purpose. Once I've been in
an edited the text, I can click on create post. I'm gonna Council it for now. But at least there you can
see that it does give you that blogging facility
that's part of this page. I can go to conversations. It's gonna take me
back to Outlook. If I go into documents, is going to take me to the
document library or the OneDrive belonging to this plan. Remember, here we're
seeing documents that we uploaded as
attachments to plan. So this is not a good way
to get at them as well, because this is
part of SharePoint and therefore parts
of all of Office, I have useful tools up here, such as adding documents
and links direct from here, uploading files
and folders here, and also synchronization tool. Now if I click on sync, that's going to
then in cash a copy of this folder and all
the files in it to my desktop device and keep them synchronized using the
OneDrive sync tool. That is an incredible
facility that if it's plans you use a
lot and therefore documents that you
need access to a lot, then being able to synchronize
them to your device, even when you're
offline and keep them synchronized up to date when
you are online is a really, really useful tool. You can see. It also gives me access to
tools like Power Apps and Power Automate that
we're going to cover in something
later bonus classes. Let's go down to notebook. We can see it's taken
a straight back to the same notebook we found
from within the plan. That's just a flavor of some
of what you can do with this SharePoint site
for this planner board. And remember every planner board that you create in
this way, well, have this SharePoint site available for it that
you can bookmark, that you can share to
others and that you can use as the central
home for the project. Again, it's one of
those hidden links that you may not even
have noticed was there, but adds an enormous
amount of functionality. I'm can completely
change the dynamic of the way that you
use planner as a team.
26. Summary and Course Task: Right, the class project, the class project
is going to be to create a project
board of your own. Now you could use
a fictitious as in a made-up project to work
with just to have a go. Or you could choose
something real that is gonna be of
actual benefit to you. You need to do it either using the new plan link
in planner there, or to go through
Microsoft Teams and make a team and then add a new tab with a planner and
built it that way. And then to go in and
you're going to need to set up the buckets that you need and then add the tasks to each bucket to assign them to who they're
going to be used by. Perhaps then add
some other detail, possibly using things
like the labels, but adds so much
versatility to it. I'm really looking
forward to seeing your screenshots of how
you use Planner and all the different diverse ways
you use it to help manage your personal and
professional work through planner to unsee that in the discussion
group for the course. Good luck. Thank you very
much for taking my course. I hope you found it
productive and useful. I look forward to
seeing your comments in the class discussion and seeing what you've made of
the class project. Thanks very much
and see you again.
 Anthony Lees