Transcripts
1. Class Introduction: Hey everyone, my name is Brad and I'm going to be teaching you how to edit using Final Cut Pro. I've worked professionally as a video editor for the last ten years. And in all of those years I've used Final Cut Pro to work on TV shows, TV commercials, corporate videos, social media ads, YouTube videos and so much more. In this class, you will learn about the Final Cut Pro interface and where to find all the features and tools in the software. You will learn how to manage the footage and your library and in your projects, how to cut clips together, add titles, transitions, end effects, do basic audio editing, how to export your final video properly, and how to backup and save your projects. If you are totally new to editing or you have some editing experience, but you're new to Final Cut Pro. And this is the class for you. Even if you're not new to Final Cut Pro. This class is packed with editing tips, shortcuts, and tricks that I've learned in my career as a video editor that'll help give you a headstart and will help you improve your editing skills, gain a better understanding of Final Cut Pro, and ultimately, to get you creating better videos. By the end of this class, you will possess all the skills required to properly edits a video from raw footage into a final product is also a practical project that you can do, which I will give you personalized feedback on. Thanks for watching and hopefully I'll see you in class.
2. What to Expect from this Class: This is the first of a series of classes I've planned. So if you want to stay up to date on my newest classes, be sure to click follow below. I also share different resources from time to time and my followers will be the first to hear about it. In this class, you will learn about the Final Cut Pro interface, different tools and editing techniques, adding titles in transitions to your edits, Adding video and audio effects, exporting and backing up your projects and more along the way, head on over to the next section to get started. See you in class.
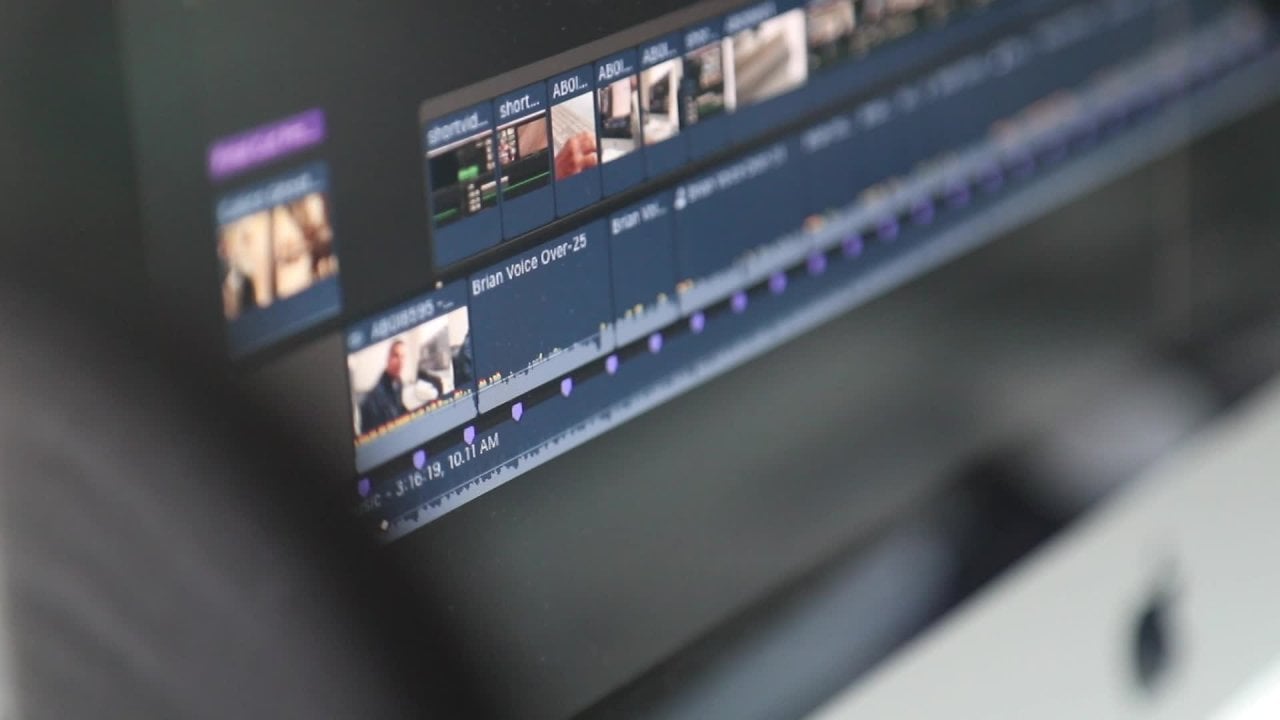
3. Introduction to Final Cut Pro: I'm going to introduce you to the Windows panels and tools within Final Cut Pro that you need to know in order to get started, I'm going to explain what the different windows are used for and where to find certain features within Final Cut. While it's not necessarily the most exciting section, it's super important to know where to look to find all the tools that you'll need in order to edit your videos. And it's also important to understand how Final Cut Pro Windows work because that'll allow you to edit faster for the sake of giving you as much information as possible during this class, Let's dive right in. The first window we're going to learn about is the browser window. The browser window is where you'll find your library event and project files. I'll explain the difference between all of these things in the next section, but this is where you'll manage your next project. You'll also find all of your important media files here, like your footage, images, music and sound effects. You can toggle between a filmstrip view and the ListView. And the filmstrip view, you can change the size of the thumbnails as well as the duration of each them. Now, another little handy feature is the ability to search for media by name. Let's move on to the viewer window, which is where you edit will play back. Here you can change the size of the playback screen and you can choose to show and hide other features like your video scopes, your title and action safe zones, as well as how you immediate plays back on your computer. You will also see your time code at the bottom of the viewer window. And this shows you the location of your play head in hours, minutes, seconds, and frames. Next up is the timeline, which is probably your most important window because this is where all of the editing is going to take place. This is where you'll be dropping your footage and cutting everything together. At the top, you'll see the name of your timeline as well as the duration of your timeline. As you edit clips together, you'll notice that you have a white line running through your timeline, which is called the playhead. This shows you wearing your timeline. The footage is currently playing back from when you're not playing footage back, you can skim through the timeline by simply scrolling across the timeline. This is shown with a red line. If you're not seeing this skimming maybe turned off and you can turn it back on by using the shortcut S or by toggling it on and off here. You can also toggle the audio skimming on and off. But I find that quite annoying and very distracting. So I almost never have this turned on. Moving on to the inspector window, which is another panel that you will use often. And this panel updates every time you select and you clip. With a clip selected, you will be able to adjust the video properties as well as make adjustments to fix that you add. You will be able to make color correction adjustments, audio adjustments, and you can access a bunch of other more advanced features. There are a few other windows and panels in Final Cut Pro, but these four are the main four that you need to know in order to get started. Now that you know with these four windows, do, we can move on to the next section where I'll go over how to set up your project before you start editing.
4. Library & Project Management: It's important to know how Final Cut Pro organizes your project files before you start editing. There are a few important topics that I'm going to cover in this section. And they are the difference between libraries, events, and projects. How fund managers media files, that types of files that Final Cut Pro generates an auto saves and backups. In Final Cut, you have libraries, events and projects. You can think of a library as your entire project and event as sort of a subfolder. And projects are essentially your timelines. For example, if you are planning to edit a video of your vacation, you might create a library called Europe vacation and then create a separate event for each day of the vacation or each city that you're going to visit. And that way you keep it neatly organized by creating a new project. You are creating a new timeline to edit him. In my personal experience, setting up multiple events to organize your footage is a good idea. If you have a huge amount of footage, it helps you to keep everything organized and easy to find. For simpler projects, creating too many events can be unnecessary and confusing for simple projects, I would only make use of one event in the library. If you do need to create a new event, you can simply go to File New event or use the shortcut Alt or Option in. Give it a name and hit OK. Once your library and events are set up, it's time to set up your project. You can create one by clicking on File New Project or by using the shortcut command in. You can toggle between automatic and custom settings. And if you're unfamiliar with frame rates and resolutions, you can choose to use automatic settings, which will automatically select your frame rate and resolution based on the first clip that you drop into the timeline, I would personally recommend using custom settings so that you have control of the frame rate and the resolution of your final video. For most edits you'll want to edit in 1080 P or HD. And you'll want to frame rates of either 30 frames, a 2.9725th, 29, or 23.976 frames per second, depending on what frame rate your footage was shutting. 23.976 frames per second is the most common cinematic frame rates. And most Hollywood films use this. If you live in the US or Canada or parts of South America, you might use 29.97 frames per second. And for most of the rest of the world you'll probably use 25 frames per second. I personally use tin ATP and 23.976 frames per second for 90% of my edits. But it'll depend on where the edit will end up, like an Internet or if it's being broadcast on TV. And what frame rate you shooting the footage in. If you find frame rates so confusing, then I'd suggest that you stick to leading Final Cut Pro decide your frame rate automatically for you. Now that you know the difference between libraries, events, and projects, let's talk about how your media files are managed within Final Cut Pro. In the next section, I'm going to go over how to import your footage. But before we do, you need to know the two ways in which Final Cut Pro handles your media files. Click on Final Cut Pro, select preferences, select the import tab and take a look at the first option. By default, fun could proble copy any files you import into your library file. What that means is that if you import a 100 gigabytes of footage, that 100 gigabytes will be on your hard drive wherever the footage is located, as well as in your library. This wastes hard-drive space and it also makes it more difficult to backup your projects when you edit stem. So the first thing I would recommend you do is to change the setting to the second option, which is leave files in place. What this does is tells Final Cut Pro to reference the footage from the original location and not to copy the files into the library file. Proper file management is important yet and it's important to keep all of your files organized properly. What I typically do is I have a bunch of folders where stole everything I need for the project. The folders for a typical project usually look something like this. And FCPS folder where I store my library file, a footage folder for my clips, images, sound effects, graphics, music, and then an exploits folder for all my exported files from Final Cut Pro. There are three other types of files that Final Cut generates to help you in the editing process. And they are optimized media, proxy media, and render files. Creating optimized media transcodes your footage from whatever four methods currently in, into Apple's progress 4.2.2 codec, which improves performance during editing and reduces render times. Proxy media files can be generated, which is essentially a medium quality version of your video files. And it improves your editing performance. If you're working with lots of 4K footage, it can be quite handy to generate proxies and to do your edit using the proxies so that you can work faster. The third type of file that Final Cut Pro generates is render files. Rendering creates temporary video and audio files that Final Cut Pro would otherwise struggled to playback in real-time. When you add effects, transitions, titles, or anything like that, they need to be rendered before they'll play back at high-quality without stuttering. The last thing you need to know about your Final Cut Pro libraries is how they are saved. When you create a library, you choose where to save that file. And you'll notice there's no way to manually save your progress by going to File Save, that option just doesn't exist. And it's because Final Cut Pro automatically saves your progress as you edit. In the event that your project corrupts or goes missing. It's important to note that Final Cut Pro also automatically creates backups of your libraries at regular intervals. You can find those in the movies folder and a Final Cut backups. If you look in the folder with the same name of the library that you're looking for, you'll see a few versions of the library saved with the dates and time of the backups. That's enough of how Final Cut Pro works under the hood. Let's get to the exciting stuff. In the next section, I'll be going over how to import footage that you can get started on your edit.
5. Importing Footage: There are three ways to import your footage into Final Cut Pro, and I'll go through them from the method I used the least to the method I use most often. The first method is to go File Import media. The shortcut for that is command i. A window will pop up and you can navigate to the footage you want to import selected, and then click on import. That will import the footage into your library. And from there you can drop it onto your timeline. It's important to note here that if you import directly from an SD card, that voltage will be copied into your library file. The second method is to select all the files you want to import in Finder, drag and drop those files into the event. I find that this method works really well. If you have multiple events and you want to organize your footage accordingly. Using the vacation example I referenced earlier, you could select all the footage from day one and drop it into your day one event and then do the same for each day oh, event. The third method is select all the files that you want to import in Finder and drag and drop them directly onto a timeline. This is the method that I use the most often because it's the fastest and easiest. Throughout this section, I've talked about the ways to import footage, but you can import images, music, and sound effects in the exact same way using any of the three methods I've just gone over. Now that you have all your media and Final Cut Pro, it's time to start editing it altogether.
6. Editing Basics Part 1 - Timeline and Tools: The first thing you need to know about the Final Cut Pro timeline is the fact that it's a magnetic timeline, which means it behaves differently to how it used to work in the much older version of Final Cut Pro seven and how it works and some other editing software. The footage on this first layer of clips here is called your primary storyline. And if you trim the clip, the footage on the other side of a clip will move according to the cut. If you have connected clips above your primary storyline and you move a clip on the primary storyline, it'll affect the connected clips. Notice how this clip is attached with this tiny little line to the clip on the primary storyline. In order to edit clips together on your timeline, you're going to need to know how to use the various tools in Final Cut Pro. These tools allow you to manipulate clips on the timeline as well as to navigate around your timeline. The different tools can be accessed by a dropdown menu here, or by using the relevant shortcut key. I'm a big fan of shortcut keys because they allow you to work and edit so much faster. Two of the biggest pieces of advice I always give new editors is one, to learn the basics of the software you're using to learn the shortcut keys. Let's run through the different tools to see what they do, starting with the three that are most important in my opinion. And then how using the rest of them can help you become a better editor. Here you can see a list of the different tools. We've got. The Select tool, that trim tool, the position tool, the range selected tool, the blade tool, the zoom tool, and the hand tool. The three most important tools in my opinion, are the Select tool, a blade tool, and the trim tool. The Select tool is used to move clips around the timeline and to select clips allowing you to change the properties of a clip or its effects to switch to the Select tool you can use the shortcut a. If you hover your cursor on the edge of a clip, you'll notice that the cursor temporarily changes to a trim tool icon. This is great because you can still trim clips while the Select tool is active. That brings me to the trim tool, which can be activated using the drop-down list or by using the shortcut t. Notice how the cursor changes to the trauma icon. I'll swap between the Select tool and the trim tool using the shortcuts a and t so that you can see the difference. But the trim tool activated, you can trim clips like you would using the Select tool, or you can move your cursor in between two clips to adjust the edit point between the clips. Dragging the edit points to the left will shorten the duration of the clip on the left and extend the duration of the clip on the right. And dragging the edit point to the right will extend the duration of the clip on the left and shorten the duration of the clip on the right. You can also keep the duration of a clip of the same, but change the start and end point of the clip using the trim tool. To do so, you put your cursor over the middle of a club and click and drag to the left or right, you will see two frames pop up when you do this. The one on the left is the first frame of your clip and the one on the right is the last frame. They change as you drag left and right so that you can see where the clip we'll start and end. Next up is the blade tool, which is used to make cuts in your clips and can be activated by selecting it in the drop-down list or by using the shortcut b with a blade tool activated, you can make multiple cuts in the clips on your timeline by simply scrubbing to the point where you'd like to make a cut and clicking. I can go through here and make multiple cut points like this. Now this is where shortcuts come in handy. Like I said before, learning and using shortcuts will help you to edit foster. Let's assume you made the cuts using the blade tool in order to delete these parts. You can't select these clips in order to delete them while the blade tool is activated. If I tried to click on the parts of the clip, I'll just end up making more cuts. So I would need to go back to the Select tool instead of going over to the drop-down list and choosing the select tool and coming back to those parts of the clip to select them, you can just hit the shortcut key to switch to the Select tool, select the parts you want to get rid of and hit the backspace key. You can then switch back to the blade tool, make more cuts, and back to the Select tool to select and delete again. Notice how much faster that process is when using shortcuts. Now, let's briefly go over the other tools that you'll use, even if it may be a little less often than the three tools we've just covered. The position tool can be activated using the shortcut key P and is useful to position clips exactly where they should be on your primary storyline. With the position tool activated. Notice how I can move the clip exactly where I want it to be, even if that means overwriting part of another clip, which essentially cuts that clip shorter in the process. The difference between the position tool and the Select tool is that the Select tool is not able to override parts of another clip. And you can only move a full clip to where there's a cut and edit. When working with clips that are not in the primary storyline, the position tool and the Select tool work in the same way. The range selected tool can be activated using the shortcut key are, and I find it useful in two ways. The first is that you can select a range in your edit to determine how long a specific section is. And by selecting that range, you can see exactly how many seconds and frames your selection is. The second is to select a range and then change the volume of the audio. For example, if you had music playing and in someone's speaking like in this editor hotel with Jacqueline and refreshing that the music is too loud and you might want the music to play normally drop in volume as the person speaks and then go back to normal again. To do this with a range selector tool, you can simply select the part of the music that you want to drop in volume and pull the volume down by dragging down on this line. Final Cut Pro will automatically create keyframes for you, which we'll get into in more detail later. But keyframes allow you to drop the volume and then go back to normal like this. So we find that hotel we've checked in and refresh and that we feel like a million bucks. The zoom tool can be activated using the shortcut key SSID, and it allows you to zoom in and out of certain parts of your timeline. You simply click on a point on your timeline to zoom in. And you can click multiple times to zoom in as much as you want. To zoom out, simply hold down Alt or Option. And you will see that the little plus icon on the magnifying glass will turn into a minus click to zoom out. You can also use the zoom tool to zoom into a selection. Click and drag across the area that you want to zoom into. Final Cut Pro Bowl folio timeline with that selection. I personally don't use the zoom tool all that often because our allowance shortcuts to zoom in and art. Let me show you those three shortcuts quickly. To zoom in, you hit Command and the plus key. To zoom out, you hit Command and the minus key. Final Cut Pro will zoom into wherever your play head or curses. The third shortcut I use for zooming is when I went to full my entire screen with my entire timeline. And to do that, you hit shift SSID. This will zoom out or in to reveal your entire timeline. The last tool is one that I almost never use, but it's good to know about in case you find it useful. And that is the hand tool. You can activate it by using the shortcut H, and it allows you to click and drag to move around your timeline. Some people might enjoy navigating around the timeline like this, but I find it easier to just scroll with my mouse or track pad. Okay, so you have your footage on your timeline and you know what all the different tools do. Now it's time to start editing. In the next section, I'll go over the different ways of cutting clips together and how I actually use the tools while editing.
7. Editing Basics Part 2 - Cuts and Managing Clips on the Timeline: In this section, I'm going to show you how to turn your raw footage into an edit by adding clips to your timeline and cutting them together to tell a story. Along the way, I'm going to show you how and when I use certain tools and shortcuts to help me edit foster, let's jump back into Final Cut Pro and we can get started. If you watch this section earlier about importing footage, you should already have footage in your project. The spacebar is probably the shortcut that you will use most often in front of Kaprow and it starts and stops playback on your timeline. There are multiple ways of selecting the parts of each clip that you want to use in your edits. Let's go over those briefly. If you drag your footage into your library or event and it's not yet on your timeline. You can go through each clip by hovering over it and selecting an in and an out point by pressing I for an end 0 for an hour point. This will create a selection on the rule clip in your browser window, which you can then drag and drop onto a timeline. You can continue doing this for all of your clips. Or if you drag and drop the footage directly onto your timeline, you can just cut away all of the parts you don't need. This is the way I do it because I like to see all of the footage I'm working with on my timeline, but it's just personal preference. So you can do it whichever way makes more sense to you. If you drop all the footage onto your timeline, there are a few ways to cut out the parts that you don't want to use. You can hit the B key to activate your blade tool, make a cut in the clip, hit a to activate the Select tool, select the clip and hit the backspace key to delete that part of the clip. Without switching tools, you can scrub along to the point at which you want to make a cut and hit Command B to make a cut at your play head, you can then select the clip and deleted using the backspace key. You can also trim the beginning and the end of the clip simply by clicking and dragging the edges of the clip like this. If you want to make more precise edits, There are a few things you should know. Using the left and right arrow keys will move your play head backwards and forwards by one frame at a time. And holding down shift when pressing the left or right arrow keys will move the play head backwards or forwards by ten frames at a time. This is useful if you want to cut to the clip at an exact point in the clip, like in this example where the guys kicking a ball, let's say you want to cut from the first clip to the second clip at the exact moment that is foot touches the ball, I can use my left and right arrow keys to find the exact point that is foot touches the bowl. Now if you have snapping turned on, you can make your cut snap to that exact point. Notice how my play head jumps or snaps to that exact point when I get close as my cursor. This is called snapping, and you can toggle it on or off using this button over here, or by using the keyboard shortcut in, just so that you understand exactly what it is doing, I'm going to toggle snipping off. And you'll notice when I'm trying to make a cut that it doesn't jump or snap to the playhead. But snapping turned on. I'll make the precise cuts I wanted to make on both clips and I'll delete the parts that I don't need. When I play that back. It looks like this. Snapping can also be toggled on or off scrubbing through footage. So watch as I scrub through the edit with snapping turned on. See how it snaps to each cut. I'll hit end to toggle snipping off and now watch how it does not snap to each cuts as I scrub through the timeline. Using the arrow keys and a combination of snapping is useful when cutting to music and more specifically to the beat of the music. Let's have a quick look at a practical example. I have these few clips here and this music track that I've imported, I'll play the music back to identify roughly where the beat is and where I'd like to make the cut. And then I'll use the arrow keys to find that exact point. Okay, so I've gone a little bit past that point. If you look at the audio waveform, but I'll use my arrow keys to find the beat I wanted to cut on. And you can listen out for the beat because fun coupled play back the audio of each frame as you move between frames. There, that's the beat that I want to cut on. Snapping is turned on so I can just drag the edge of this clip to snap to the playhead. I'll play that back and you can see that the cut takes place exactly on the beat. Perfect. Let's talk about changing the order of your clips. You can do that with the Select tool activated by simply clicking and dragging a clip into a new position. Notice how the blue line tells you where that clip is going to move to once you let go. If you remember me talking about the primary storyline in the previous section, you're probably wondering how to lift clips up from the primary storyline. There are three ways, and yes, you guessed it one of the ways is using a shortcut. The first way is to select the clips that you'd like to live. Right-click on them and then select lift from storyline and the clips will pop up off the primary storyline. The second way is with a shortcut which is Command, Alt or Option, and the up arrow. You can also click and drag clips up. And as of the primary storyline, you'll notice that if you lived multiple clips, the clips are grouped together in what Final Cut calls a storyline. You can tell this by the gray box around the clips. These groups or storylines on magnetic, Just like the primary storyline, meaning if you trimmed clip left or right, the other clips ripple left or right to follow. Now, you can live clips from a storyline in the same way you live clips from a primary storyline. Let's use the shortcut because it's so much faster. I'll select the clubs and hit Command Alt and the up arrow. Now There are no longer part of the story line. So if I trimmer clip left or right, the other clips don't ripple to follow their independent flips. The last point about storylines is that you can also create a storyline. Let's assume that you have a couple of clips that are not part of a storyline. You can simply select them and hit command G that will group the clips together into a new storyline. There is one last basic editing trick I want to show you in this section, which you can apply to any kind of footage that you'll be editing. But I find it particularly useful when editing interviews or talking head videos like YouTube videos or blacklist class. Let's have a look at what I have on the timeline. It's three different talking head clips. If you look at the audio wave form, you'll see that there's some silence before and after the speaking of each clip which I went to cut out, I can play it back to find the point at which I want the clip to start right about here. Now instead of using the blade tool to make a cut, switching back to the Select tool to select the club and hitting the backspace key to delete the parts that unwind, I can use one shortcut to trim the beginning of this clip to the play head. The shortcut is alt and open square bracket. Notice how that cuts everything before my playhead to where my play head is. Let's find the endpoints of the clip and do the same on the other side of your screen, you can click on the Share icon and select master file from there, right about here as good. This time, I'll hit Alt and closed square bracket. That'll troubled everything off to the playhead and deleted. You can even scrub through the footage with the plate and make those cuts really quickly just like this. If you haven't already noticed by now, using shortcuts dramatically speeds up your workflow and lets you focus more on the creative side of editing. In the next section, we're gonna go over clip properties and titles.
8. Editing Basics Part 3 - Clip Properties and Titles: In this section of the class, I'm going to go over clip properties that you can change on your clips, as well as adding titles to you edits. Let's dive into the first one on the list for this section, click properties. You can access the properties of a clip by selecting it and looking over here at the inspector window, there are a bunch of different properties you can change and some of them are more advanced than others. So I'm going to stick to the basic ones and the ones you'll probably use the most. The first property I'll go over capacity and this affects how transparent your clip is. If I lower the opacity, you'll see here how it gets darker. And that's because there's nothing underneath this clip. It's just black, which is why the clip appears darker. If I move this club over another clip in the timeline, notice how you now see both clips. If I adjust this opacity slider left and right, you'll see how the clip becomes more or less transparent. A quick note here, which is important to understand now before we move on, when you add effects Eclipse or change certain properties, Final Cut Pro might need to render those changes in order to play it back in real time. You can see sections of your edit that needs to be rendered by these little dots over here at the top of the timeline. If you're having trouble playing back a clip after adding an effect or transition or changing eclipse properties, then you may need to render that section. By default, Final Cut Pro will start to renew your timeline if you don't move the play head around. If I don't move my mouse in the timeline, I can go up here and open the background tasks window. Notice how it shows your render progress and the dots start to disappear. I'm going to dive into rendering in more detail later in the class, but it's important to understand this now as you add effects and titles and change clip properties, the next sets of properties is known as transform properties. And there are a few settings here that you'll use quite often. For example, you might want to adjust the size of a clip. You can adjust the x and y axis separately or together. Let's assume you want to zoom into your clip a little bit. You can do that by using the Scale property. If you went to adjust the position of a clip, you can do so on the x and y-axis over here. Movement along the x axis will move a clip left or right, and movement along the y axis will move the clips up or down. Be careful not to move too much or you might reveal black edges behind the footage like this over here. If you went to straighten the clip maybe because of a skew horizon, you can adjust the rotation property. If you're having trouble getting the clip perfectly straight, you can head on over to the viewer window and choose to show the horizon overlay. Without visible, you can easily make sure your horizon and straight. And you can turn it off again by simply de-select horizon overlay. The crop property is pretty straightforward. By k, you can adjust the slightest to trim the clip from the left, the right to the top of the bottom. If we scroll further down here, you will find the stabilization section of the clip properties. If you turn this on, Final Cut Pro will analyze the motion in the clip and I'll attempt to contract the motion in order to stabilize the clip. Stabilization is one of those things that can really make your editor look more professional if done right, but if done wrong, it can be very obvious that you tried to stabilize the footage and it might look terrible like this. Without getting too technical and getting too deep into stabilization as it can be a tricky thing to get rides. Let me break down the basics. Final Cut Pro has two stabilization algorithms it uses to stabilize footage and they are smooth cam and inertia cam. By default, Final Cut Pro will select the algorithm it thinks is best to stabilize a certain clip and you can net Final Cut Pro choose by selecting automatic as the method of stabilization. If Final Cut Pro decides that the smooth Kim algorithm is the best or you decide to use the smooth cam algorithm, you'll be able to adjust the translation rotation and scale smoothness, translation smoothness adjusts how much Final Cut Pro tries to stabilize movement to the left and the right. Up and down. Rotation smoothness adjust how much any rotational movements are smoothed out by and scale smoothness will adjust how smooth zoom in and zoom out movements are stabilized. The other algorithm is inertia camp. And I find this generally works better with handheld or walking type movements. With the smooth Kim algorithm, we often see the edges of the frame warping. And it looks really strange in those situations or when I know I'm stabilizing a clip that was shot while walking, for example, I'll use the inertia cam algorithm. You can adjust the overall smoothness and in certain cases where there isn't too much movement in the shot, Final Cut Pro will give you an option to turn on tripod mode. This will try to stabilize the clip to the point that it looks like a static tripod shots. Let's move on to adding titles to edit. Final Cut Pro has a wide variety of different templates that you can just drag and drop onto a timeline like those basic title. There are so many properties to change and each title might have slightly different properties. But let's go over two of the basic titles in order to show you most of the properties that can be adjusted. The first title we're going to look at is the basic title. I'm going to delete this one that I added so I can show you another way to add a basic title. And that is to move your playhead to where you want to insert at the title and hit Control T with the title selected, you can head on over to the inspector window and click on the lines here to show you the Text Properties. You can change the actual text in this box over here. You can also change the fund size alignment and a bunch of other takes properties. If you scroll down, you can expand a few other properties like face to change the color of the text will outline glow, and drop shadow to add those effects to the text. You can also select the text in your viewer window to position it exactly where you want it. You'll notice that you can also snap that takes to the middle of the screen horizontally and vertically. If snapping is preventing you from placing that takes in the exact place that you want it. You can temporarily disable snapping by holding down the command key while you drag the title around the screen. The second title we're going to look at is the basic 3D title. It has the fewest similar options to the basic title, like all titles do in terms of the actual takes, the font, the size, et cetera, you'll notice a few extra properties like lighting material and substance. You can play around with these to see what they do. But the main difference of these kinds of titles is the way that animate on an off screen. If you played this title back, notice how it animates onto screen and off-screen again. And you inspect the window. You can select the title properties by selecting this T icon. And here you can change the way the title animates on and off. And by unchecking these build-in or build-out checkboxes, you can disable the EN or outgoing animations. As you can see, titles have a lot of properties that can be customized. So feel free to play around with the other title types and properties to customize your own titles even further. In the next section, I'm going to go over transitions and effects.
9. Editing Basics Part 4 - Transitions and Effects: Transitions allow you to go from one shot to another in ways that a simple HOD cut just cons to find the transitions that come with Final Cut Pro, click on this icon over here. This will open up the transmission window. On the left hand side you will see the different transition categories. And on the right-hand side you'll be able to preview each transition to see what it does by simply scrubbing across the thumbnail of each transition. There are a few ways to add transitions to edit, you can drag and drop the transition you want directly onto the cutaway. You want the transition to take place like this. If a play that back, you'll see how it transitions from one clip into the next. You can also add the default transition, which is a crossfade. By selecting the cutaway you want the transition to B and hitting Command T. If you select a clip and hit Command T, you can add a transition to either side of the clip. This works on titles to, for example, if you want a title to fade in and out, you can select the title and hit Command T. This shortcut also works on a selection of multiple clips and we'll add a crossfade at the beginning and end of all the clips in the selection. You can adjust the duration of each transition by simply dragging the left or the right hand side of the transition. You can also adjust the position of the transition by grabbing the middle of the transition and dragging it left or right. Lastly, you can replace a transition with another one by simply dragging and dropping the neutron division on top of the old one. Let's move on to the effects that come with Final Cut Pro. And there are loads of them. They all have different properties, but let's go over a few of the basics with some important ones. Firstly, to open the fixed window, click on this icon over here. You'll find the various effects categories on the left and they fix themselves on their rights. As with the transitions, you can scrub over them to see the FEC they'll have on your footage. Not all of the fixed will show this preview though. If I scroll through here, you'll see that there are a bunch of different looks and effects. You can apply it to your footage from age, paper and bad TV to mosques and borders. To add an effect, simply drag and drop the effect onto the clip in your timeline. You can adjust the effect properties by selecting the clip and heading over to the inspector window. The effect you're probably used the most often is the color board, which allows you to color correct your footage. You can find the color board in the color category and drag and drop it onto your clip. Instead of dragging and dropping it onto a clip with your clip selected, you can come up to inspect the window and click on the color board over here. You'll see the color would pop up and currently there are no corrections, as you can see here. As soon as you make a change, the color board will be applied to the clip. With the color board, you can change the exposure or clip, meaning how bright or how dark it is. You can affect the shadows, the mid tones or the highlights independently, or the overall exposure with this master slide over here. The color board also allows you to change the saturation of a clip, which determines how vivid or muted your colors are. As with the exposure section, you can adjust the shadows, the mid tones or the highlights independently, or the overall saturation with Maslow slider. You can also effect the colors of the various tones of a clip. Dragging one of these dots will either add more of a certain color if you drag the dot upwards, or will remove more of a certain color if you drag the dart downwards. For example, if your shed his field to red or orange, you can drag the shadows over to the red or orange section and drag downwards if you feel like the highlights are now two blue and lack a yellow orange tone, you can lift the highlights up in that color area. See how the brighter areas, the highlights now appear more yellow, orange in color. If you went to remove effects, you can simply select the effect and inspector window and hit the backspace key. Some other commonly used effects include a vignette, which darkens the edge of the frame, focusing the viewer's attention on the center of the screen, or adding a key, a plugin to remove a green background, also known as chroma keying. I'm not going to go over these effects or any of the others that Final Cut Pro has. Maybe that's another class for another time. Let me know if that's something that you'd be interested in. Player under the different effects and tried to create some creative looks and edit to them. Finally, it's worth mentioning how to copy and paste clip attributes from one clip to another. Let's say you've added a bunch of effects to club to get the exact look you're going for. And now you need to replicate that look across multiple clips. Instead of redoing all the steps it took to get there, you can copy those effects from one to the other. First, select the clip that has all the effects and properties that you want to copy and hit command c to copy the clip. Then select the clip you want to copy the attributes to. You can even select multiple clips at the same time and hit Command Shift V to paste the attributes. You'll see that a dialogue box pops up where you can choose exactly what attributes you want to copy. You can choose to copy effects and, or any other attributes who went through earlier in this class. You can do the same for the audio, but I'm going to ignore that for now since the next section is all about audio. Once you've selected the attributes you want to copy, simply had paste and the new clips will have the same attributes applied to them. And there was a lot to take in here over the last two sections. But if you've made it this far, you're well on your way to becoming a video editor. So keep going and I'll see you in the next section, which is all about audio.
10. Editing Basics Part 5 - Audio Basics: In this section, I'm going to show you how to edit and mix your music, dialogue and sound effects, and audio effects fades, volume automation, and a few other things. So let's start with the music. By now. You've probably already added music to your project, which you can do by simply dragging into a library event or timeline. But you can also add music from your iTunes library by coming over here, selecting iTunes and then dragging any song from the library into your timeline. I personally don't ever do this purely because most of the videos I edit or person online or for clients, and then I don't have the rights to use that music. But if you are just starting out creating videos for yourself at home, this is a good place to start getting your music from. If you'd like to get access to a library of music that gives you a license to use the music and videos you upload to Facebook, Instagram, YouTube, or for clients, then I would recommend looking for an online music library that you pay a monthly subscription for. In the resources section, I've added a PDF with links to a few of the Music Library's I'd recommend as well as the one I personally use. So that's worth looking into. While we're here in this window, I should just add that you can also get a bunch of sound effects from this audio browser. By coming over here to sound effects, you'll see that there are a bunch of sound effects here that come built-in to Final Cut Pro, and you can simply drag and drop them into your timeline from here, notice how the music, sound effects and audio from footage of imported are all different colors. If I right-click on a clip, go to assign audio roles. You can see that there are roles that you can assign to various clips. Think of these roles as categories. I like to make sure that all my audio is categorized as either music, sound effects, or dialogue, just to make the project more organized. And I can easily identify audio in my timeline just by looking at the color. Since we're talking about audio, it's important to be able to monitor your audio levels of your edits. You can do this with the audio meters, but it's really small over here in the viewer window. By simply clicking on the meters, you can open up an expanded view to the right of your timeline. You can also drag this line to make the meters bigger or smaller. When you play back any audio, the meters will show the level of that audio measured in db or Decibels. There are a few general rules when it comes to audio. And without getting too technical, here though, when you're audio is too loud, it'll go into the red and that's known as clipping. That's really bad and you don't want that to happen. Ideally, you want your audio to never go above 0 dB. Most music tracks on mixed as loud as possible. And if you play a track in your timeline, it's likely to play back at around 0 dB. A good range that is not too loud or too soft is between minus 12 GBs and 0 dBs was dialogued bouncing around the minus six dB mark. With that in mind, you now need to know how to adjust your volume. It's pretty straightforward, but there are a few ways. The first and easiest way is to grab the volume line and drag it up and down. Notice how the new level is shown in dB as you drag it up or down. Another way is to select the clip and head on over to the inspector window. Here you can drag the slider left and right to change the volume. Or you can type in a specific value if you like. Let's move on to creating fades. Each clip on your timeline that has audio, whether an audio-only clip or a video clip with embedded audio will have handles to create fades. If you hover over the front end of the clip, you'll see a small handle pop-up which you can drag to the right to create a fade in. So instead of having the music starts suddenly, it'll gradually increase in volume like this. You can do the same at the end of a kleptocratic fade out, which sounds like what's that about, sums up the basics of audio editing and Final Cut Pro. And the next section we're going to dive a little deeper into Final Cut Pro is audio features.
11. Editing Basics Part 6 - Audio Keyframing and Effects: If you want to have a bit more control over the audio in your edit, it's important to understand Keyframing. Keyframing would allow you to sit a fixed volume for a clip at 1 and change the volume and another, creating a gradual change in volume. Let me show you what I mean. Let's assume that you have a few shots that had been cut to music and that you have some dialogue. If you play it back as it is currently, you can't hear the dialogue clearly because the music is too loud. Started our second full day here in Rome, in the Vatican City. This is where Keyframing comes in. I'll put my plate over here a little bit before the dialogue comes in and select the music. Then I'll head over to the inspector and creates a keyframe. Now can move forward in the timeline to just after the dialogue starts, making sure my music track is still selected. And then I'll create another keyframe. I could either click on the Add keyframe icon or simply drag the volume slider to where I want it to be. And another keyframe will be created automatically. Let's pay that back to show you what those key frames are doing to the music track. Started our second full day here in Rome, in the Vatican City. We've got you can also adjust the timing of the keyframes by simply dragging them closer together to make the change in volume even Foster started our second full day here. Or you can drag them further apart to slow down the change in volume. So we've started our second full day here in Rome in the, now there are a few clips at the end of the dialogue. And you can do the same thing to bring the volume of the music backup. San Pietro, the square root of the word with the word. I'm going to show you another way to do it that's Foster. You can quickly and easily create a keyframe by holding down the Aalto Option key and clicking on the volume line of the clip, I'll click to create a keyframe here. And again to create one over here. I can then simply click and drag the keyframe or the line to the right of the keyframe upwards to get back to minus 60 dB. Do you remember the range selector tool you learned about earlier in the class? I'm going to show you what my favorite use of the range selector tool is. Let's first get rid of all the volume changes we made. And I can do that by right-clicking on each keyframe and selecting Delete keyframe. Now I'm going to activate the range select tool by pressing R. I'll select the range on the music track that starts just before the dialogue and ends just off of the dialogue. When that range selected, I can drag the level of the audio down and you'll notice how it creates full keyframes. I can go in and adjust the keyframes as necessary, but that's a super easy way to drop the volume of a music track for dialogue and to bring it back up again, you can also add cross fades to audio clips. Let's take this example where we have a forest scene and an ocean scene. You've got your FAR sound effect and the ocean sound effect. And it looks and sounds like this. If I decided to put a crossfade on the visuals and to have one seen fading into the other, it doesn't make sense to have a hard cut in the sound effects. You can add a cross dissolve or a crossfade by selecting the cut between the two sound effects and hitting commodity. In the last part of this section, I'm going to go over a few audio effects that you can apply to your clips. You can find the audio effects by going over here to the effects browser and scrolling down to audio, there'll probably be a few categories habit you don't have. And that's because I have a few extra plugins that I've bought, it'll show up here. But don't worry, you can do a lot with Final Cut Pro is Bolton effects. If I select all audio effects, you'll see that there are a ton of different presets and effects that you can add to your audio. But I'm going to cover the three effects that I think you'll use the most. And that's the EQ compressor and the de-noised. Let's start with the channel EQ. You can add audio effects to your clips like you do with any video effects, and then edit the properties by clicking on the speaker icon in the inspector window. Here you can see that an EQ Effect has been applied. And if you click on the mixing icon, you can open up the effect window. If you're not sure how to use an EQ, There are a few presets in the drop-down menu that you can apply it. But basically, an EQ allows you to manipulate the frequencies of an audio clip. You can adjust the lower frequencies, mid-range and high frequencies. I'll move the points around the graphs. You can get an idea of what an EQ does to the audio. So we've started our second full day here in Rome, in the Vatican City. We've got Saint Peter's Basilica behind this. So we thought about second holiday here in Rome, in the Vatican City. We've got Saint Peter's Basilica behind us. So if you have a hissing sound, a hum or audio sounds like it was recorded in a boxy room. You can come here to enhance the quality of your audio. Next up is the compressor. Put simply if you have loud parts in your audio and in some really soft parts, a compressor will help you achieve it more uniform level of loudness by making sure that the loud parts don't get too loud. And by bringing up the level of the softer parts, you can find the compressor in the levels category, or you can simply search for a doubler. I'll drag and drop the compressed onto my clip, head on over to the inspector and click on the mixing icon to edit the properties. As with the EQ, they are presets you can choose from, but let me give you a quick rundown of how it works. Before I do that, I'm going to just change the size of the clips in the timeline so that you can see the audio wave form and what the compressors doing to the audio. I can do that by going over here to the clip appearance icon. And then I'll drag this slider to increase the size of the clips. Notice how the audio in this wave form is loud and innovate here it's clearly quieter. If I hopped back on over to my compressor, the three settings, I'll change other threshold, the ratio and the makeup gain. The threshold determines at which level the audio will begin to be compressed. The ratio determines how much it'll be compressed. And the makeup gain is a way to increase or decrease the volume after the compression. In this case, I'll drop down the threshold slightly to make sure that the compressor is going to catch the softer parts. And I'll increase the ratio to increase the amount of compression. If you look at the waveform, you'll notice how it's changed. The soft deposits now look like they match the volume of the louder pots. Look at the audience eats as apply that back. I seem to be at around the same volume now, but overall it's a little soft. I can use the makeup gain to compensate for the drop in volume. And now we have a clip that sounds more uniform. So we've started our second full day here in Rome, in the Vatican City. We've got Saint Peter's Basilica behind us and a beautiful view of Piazza San Pietro, the square. And lastly, we have the denoised if there's background noise and you'll clips like traffic or a humming sound or just general ambience. You might want to use the denoise it to try and remove some of that audio. Bear in mind that you often can't remove it all or push the denoise or too hard without making the audio sound unnatural. The de-noise that can be found in the specialized category, or again, by simply searching for it. Let's go into the properties to see what we can change. The threshold works similarly to the compressor, where you can adjust the level at which the noise is present that reduce slider determines how much noise reduction as applied to the clip. And you can adjust the noise types ladder to try and get better results. Here's a before and after of a clip with a bit of background noise. So we've started our second full day here in Rome, in the Vatican City. We've got Saint Peter's Basilica behind us and a beautiful view of Beatrice and square. Now, let me push the denoise of too fast that you can see what I mean when I say you don't want it to sound unnatural. See how process That sounds. In cases like that. You'll want to rather use the denoise a staring me. In the next section, we're going to talk about the final steps before exploiting your video and more about the actual exploiting process.
12. Exporting Your Video: At this point, you've learned how to put an edit together. You've learned how to add transitions, titles, and effects, how to edit and mix-up music sound effects and dialogue. And now it's time to export your video and share it with the world. There are few things you need to check before you export your timeline, but let's talk about how to actually export and the different ways to export your video first, and then I'll go over those few things. Let's have a look at the export preferences by heading over to fun Cut Pro Preferences and then selecting the destinations tab. You'll see you have a bunch of different presets here. The one I recommend that you use for everything is the master file preset because then you have more control over the final codec, more so than with the other presets. If you are exporting specifically for Facebook or YouTube, you can use one of those presets if you like. I personally export or master file and upload that file directly to YouTube. And I use free third-party software to convert exploited files to mp4 for Facebook and Instagram. The free converting software is called hand brake. If you'd like to check that out, you can click on Add Destination to make your own preset from netlist. But as I said, I always export a Master File and I would recommend that you do the same. Let's select that and have a look at the settings for format. I wanted to have both video and audio selected, and I want my video codec to be H.264. It's a very popular codec and it's widely compatible. This is also the recommended codec when uploading to YouTube, since that is always the way I wanted to export my videos. I want to sit master file to my default export method. I can do that by right-clicking on Muslim file and selecting make default that allows me to use a shortcut to export my timeline. So let's close down the Preferences window and go back to my timeline. Now I can hit Command E to export as my default settings. I can also come in and edit the settings as needed. On export, I can hit Next and then choose where on my harddrive to export the video to. Once you've chosen which saved the file, hit save and Final Cut Pro will begin exploiting your video. You can open up the background tasks window to see its progress. I'm going to cancel this to show you two other ways to export. You can also go over to File, scroll down to share. And if master file or in the top right-hand corner of your screen, you can click on the Share icon and select master file from there. Now it's time for those few things that you need to be aware of before exporting. It's important to note that by exploiting and all of these ways that I've just gone over, Final Cut Pro will export your entire timeline. If you wanted to export just the section of their timeline, you need to sit in an R points. This is useful if you have your edit, but you've left a few backup shots to the side that you want to keep their setting in an ad points is very easy to do. You describe your play into where you want to set an endpoint and had I, and then you scrub it to where you want the end points B and hit her. You can use any of the export methods that I've gone over. I'm just going to hit command E. And once the file has been exported, you can see that it just export your selection. We touched on rendering earlier in the class. And as I said, rendering is done automatically by default. You can check those settings by heading over to Final Cut Pro preferences and selecting the playback tab. Background rendering can be turned on or off here, but I recommend keeping it on. You can also change how long Final Cut Pro or wait before entering. Once you stop moving your played in the timeline, you can manually force Final Cut Pro to render by selecting the clips you want surrender and hitting control are all by selecting one of the two window options in the modified drop-down menu. You can view the render progress by opening the background tasks window over here, or by pressing command nine to show and hide the window, you'll see the progress bar moving as it renders clips on the timeline. Another thing that you'll want to make sure it is complete before exporting your video. Is any transcoding or analysis that Final Cut Pro does on your files. This includes things like stabilization. If you haven't led fun Kaprow complete the analysis of a clip for stabilization, then it'll export the clip was no stabilization applied. Chances are if everything on your timeline is rendered and then everything has been analyzed as well. But sometimes that's not the case, but no worry. Final Cut will warn you. If I choose to stabilize this clip and before giving Final Cut Pro the chance to analyze it and I export the timeline, I'll get this warning that says there are background tasks that are not yet complete. I'd advise you to let it finish the background tasks before exporting again. And just like that, you've finished your edit from import to export and everything in between. One more section on backing up your projects. And it may not sound like the most exciting section, but you're definitely going to want to check it out if you want to save hard-drive space and backup your project's correctly.
13. Backing Up Your Projects: During the editing process, fun Kaprow is going to generate a bunch of random files, some of which will be used in the funnel exports, and some of which are used in the editing process and install it on your drive, even if you don't need them anymore. Final Cut Pro will store any clips that are transcoding proxy files and random files within the library file. Let's have a look at an example. I went on a month long trip to Europe and I had a huge project filled with random files, proxies, and transcoding files. Here's the library file and if I select it, you can see that it's 1.00, six terabytes. Now, I want to back their project obtained on the hard drive, but I don't want the project to take up so much space. Let me show you how to reduce the size of your library. Open the library in Final Cut Pro. And once it's open, you can select it in the browser window. Then go to file and select Delete generated library files. Here you can choose to delete all the files, the ones that are no longer in use, or all of them, the optimized media and the proxy media. Let's select all of the boxes and make sure that all render files is selected and hit OK. It might take a few seconds to process, and once it's all done, I'll quickly close the library. The reason I close it immediately is because background render is turned on and I don't want Final Cut Pro to start regenerating those Brenda files. Let's head back over to find there to see how much space we saved. The library is now only 5.93 gigabytes. This is much smaller than before. Another library is ready to be backed up. Bear in mind that Final Cut Pro references all the files used to make up your edit and they're not stored in the library. So you'll need to backup the footage, images, sound effects, and music files that you used in your edit so that you can reopen your project at a later stage to change it if need be. If you remember from earlier in the class, I suggested that you create separate folders for all of the different kinds of media that you'll be importing into Final Cut Pro. If you did this, you'd be able to just back up the main folder with all of these subfolders in its and everything you need will be in there. It's important to know that if you move files around or move your Final Cut Pro library and then reopen it or delete files that are in use, you may get a missing files error message in Final Cut Pro. I'm going to show you how to deal with that quickly. I'm going to move the footage folder used in the project to a new location. And then I'll open the Final Cut Pro library. See how all the missing files have this read and missing files error message. I can relink these files to tell Final Cut Pro where these files are located. You can do it individually for files if need be, by selecting them in the browser window. But it's much easier to do them all at once. You can do that by selecting the event in the browser window and going over to file and selecting relink files, you'll have the option to relink all files or only the missing files. I'm going to select Missing only and choose locate all. You can either navigate to the first file that Final Cut Pro is looking for and select that Final Cut Pro will then select the rest automatically. Or you can just point Final Cut Pro in the right direction by selecting a folder. And Final Cut Pro will do a search for you. This is handy if the missing files are located in different subfolders. Select, choose to let Final Cut Pro check for file matches once then you can simply hit relink and all of your files will be linked back to your project. In the next section, I'm going to go over the project that I would like you to complete so that I can give you personalized feedback. See you there.
14. Class Project and Conclusion: Congratulations, you've made it through the entire class. Thank you for watching and I hope you've learned some valuable information and tips to help you start editing videos in Final Cut Pro, I went to see you put what you've learned into this class interaction. So the project for this class is to create a one to two minute edits that I can give you feedback on. I wanted to see you cut some clips together, add some music and sound effects, add transitions, titles, or anything else that you want to add to your edit. And then shared with me a lot of giving personal feedback to everyone who completes the project. I'm excited to see what you create. As I said at the beginning of the class, this is the first of a series of classes that I have planned. So if you want to stay up to date on my newest classes, be sure to click follow below. Aside from being the first to know about new classes, you'll also get access to the resources that I share from time to time as soon as they become available. Thank you for taking this class and I hope to see you in the next one.
 Bradley Van der Westhuizen, Video Editor. Motion Graphics Artist.