Transcripts
1. Introduction: Welcome to this course. It's the ultimate
beginner course for everybody who
wants to dive into the world of coding and
programming games. Hi there. I'm your instructor and
I'm excited to guide you through this fun and interactive journey
into programming. Whether you have never
written a line of code before or you're looking
to brush up on the basics, this course is perfect for you. In this course, you
learn to create four exciting games from
scratch in scratch, a popping Malon game, a space exploration game, a point and click adventure, and a basic jump and run game. Along the way, we'll
introduce you to essential programming
concepts like variables, messages, control
structures, such as if then and repeat,
lists, and cloning. You see how these concepts
come to life in your games. With the step by step instructions
and hands on projects, you'll gain the
confidence and skills to create your own games
and projects in scratch. Are you ready to start
your coding adventure? Join me in programming
with Scratch, Let's make coding fun and
accessible for everyone. And roll now and start
your journey into the exciting world of
programming with scratch.
2. Open and install Scratch: Here is the scratch web page, and this is the place
where you need to go in your favorite browser, which browser I'm
using Chrome here. It doesn't really matter
which one you use, but maybe for one feature, I would like to show you
at the end of this video, you may want to use
Chrome or edge. I don't know exactly if this is also possible
in other browsers. Maybe Safari also. But let's start here
on this page and you need to go to this
URL scratch it dot U. So put that into your address bar in
your favorite browser. As I said, I'm using Chrome here. But it shouldn't matter. Then we have this nice
scratch page here, you have featured projects
that you can look into, and you have also
tutorials here. But at the moment, what
is really important is this button here,
start creating. You don't need to
create an account, you don't need to register. You can do this though. But we will do this without registering,
without joining scratch. This is here this button. You can make an account and
then save your projects in this account and then you can edit the projects
anyway you like. But for the moment we're just using this year
Start creating, just click on this. And then you will get into the studio, the scratch studio, and here you have your UI, your Canvas, and this will be your workplace,
so to speak. I will explain what
the different regions here are for and how they
work in the next video. But for now, there's one
more thing I want to show you how can you
install in e this app, or how can you make an app, a web app from it? This is here in Chrome, so you need to press on
this menu button here. So you open this menu and then Safe and share is the
right menu item here, Safe and share, and then
Install page as app. So click on this. And then you can also
name it here, rename it. It's already called Scratch
Imagine Program Share. So click on Install. The web page will open in
a new window as a web app. And here you can, for example, maximize the window, you don't
have the address bar here. You have much room
for your projects, and also you can pin it
to the task bar or to the dock on Mac and just use
it like a normal program. You don't have to do
that. You can also use it in your browser. But I prefer to
use it like this. In edge, it's a
little bit different, so this will be
somewhere here under apps install the site as an
app, something like this. In Safari and
Firefox. I'm honest. I just don't know how
to do that there, but I think you
can figure it out. Okay, here we have it. This is our work place here, and we start creating projects. But before that, I will show you around here and show
you how you can make sense of all these regions and all these tabs and
the menu items here. So see you next vide.
3. Overview Scratch UI: So here we are in scratch, and this is the app version, the web app version, but you can also do it, of course, in the browser. That's no problem.
I just install the app just like I
told you before to have more space and to have an extra window in the task
bar or in the dock on the ma. Anyway, you can do
it in the browser, you can do it in the app. This is about the scratch UI, and the first thing
I want to show you is how to set the
right language here. This is set to
English, of course, because this is an
English course, but you can set it differently. To do that, you just
go under settings. Here, this menu, drop down menu, click on it, and then you have
this globe with language. And here you have many many
languages, for example, Spanish or German,
because I'm German, I will just switch
it now to German. Then you have all
the strings here, all the texts here in German. Also the blocks. You see, there is a gear, S now
Schritt. This is German. I I said it to English, Again, then I have moved ten
steps, turn 15 degrees, and everything here
in these blocks, which will be the
building blocks for our scripts, of course, everything is in the language
that you chose here. This is where you choose
your favorite language that you want to program in because everything will
be then in English, including all the blocks here. So the first section and the first concept I want to show you here in scratch in the Scratch I is the concept of Sprites. For that, I just close
this tutorial video here. So just click on this X here, close and then it
will disappear. You can also watch
it, of course, and get the first impression of the mechanisms here
in the Scratch. But, let's get to the Sprites. The sprites are
here and These are the characters or like the
things you have in your game. For example, this cat here
is the default sprite here. You can select the sprites here. If you have multiple, then
you can select each one. I can make a new one, but let's check the first one, the default sprite
here, the cat. You can see the cat over here, and this is the game canvas, so you can see a preview
of your game here. This will be the look of
your game when you started, and here you can also
move the cat here, move the sprite to
anywhere you like. So here you will have
all your sprites, and these are, so to say, the main characters
in your game. So everything that moves, everything that is controlled, everything that is dynamic in
your game will be a sprite. So here you have the
list of sprites, and then you can
name the sprites. So here you can change
the name of the sprite. I can name it the
cat, for example. Then here in the list
will also be the cat. It's a thumb nail here. You can also erase
the sprite here, but let's not do
this at this time. Here you can set the
position as numbers. The position at
the moment is -46, and I can move the cat
over here on this canvas, and you will see that
this changes also. So this is -149 now. But we will get to that later just to mention here that you can set the coordinates the position of the cat
on the Canvas here. By dragging the cat here
by dragging the sprite, or you can also change these
numbers here, x and y. So this is possible here, and then you can show
the cat or hide the cat. If you want it to be invisible, then you have to choose
this i that is strike out, or if you want it to be
visible, then choose the i. Then here, you have a size, so this is 100%. If you want it to
be half the size, you should enter here 50%, then it's only half
the size or can also choose to make
it double the size. Then you have 200%. Then we'll be double the size of the normal default sprite here. So this is default size, 100, and then 200 will
be double the size. One quarter will be 25 here, so just one quarter
of the default size. And also, of course, 400%
will be four times bigger, and then you have
this giant cat here. Okay, but let's put
it again to 100, and here you can also rotate it. So this is the
default angle here. And as I drag this here, this arrow, I drag it
here in this circle. You see that the cat
is rotating here. So this will be the
angle zero here, so pointing upwards
and then pointing to the right with 90
degrees, 180 will be Pointing downwards
and then to the left. It's a negative number, so -90 will be
counterclockwise, 90 degrees. Then the cat is upside down
and pointing to the left. Let's put it to the
90 degrees again. Can also change it here with
your keyboard, of course, 90 will be exactly
this 90 degrees, and you can also flip it
So can kind of mirror it. So then it will be mirrored here to the
left or to the right. So this changes the
mode here, so to speak, from rotation to mirroring, to the left or to the right. And here I change it
back to rotation. And here I can switch
off rotation completely. So there's no more change here
if I change the direction. Okay, but we will get
to that later, also, just to say that here, you can change the direction. Let's put it to 90
degrees and rotation, again, the default values here. And here you have
it. Your sprites, and I can make a new one here. So just press on this button. And then you have some
presets to choose from. You can also search here
or choose a category. For example, all the
animals, a bear, cat flying, chick,
dinosaur, duck, whatever you like, or
maybe you want people, a person, or fantasy
like dragons and elves. So on. You can also
have letters here. If you want to write
something on your screen, you can choose
these letters here. But let's maybe take a balloon, and now we have a
balloon sprite here. We have the cat and the balloon. Now we can also
delete the cat here. We don't need it anymore.
Because our first game will be about balloons,
let's delete the cat. Now we have just the balloon. If you accidentally deleted
something or change something and you want it to
be reverted to be undone, then you can press
control Z or command Z, or you can also
choose here this menu added and then restore
sprite in this case, and then we have the cat again. Here we have our sprites, and I will again delete the cat because we
don't need it anymore. Here, we can also
move the balloon, of course, here by
dragging it on the Canvas, and you see that also, all these numbers here, so x and y will also change
the same as with the cat. Okay, that's it for
the Sprite section. We move on to the next section. Let's move on to the next section and this will
be the code section here. It's related to Sprites. If you have a sprite
here and you selected, then you will actually add it here the code
for this sprite. That means that this code here, the script that you're creating here will be attached
to the sprite. You can also attach a
script to a background. So here you have
backdrops stage. So here is the stage. This is another
section, and this is kind of the back
ground of your game, and here you can have
multiple backgrounds and then exchange them dynamically
with code also. And also you can have
multiple backgrounds, as I said, and then depending
on what you select here. So if you select stage, then you will addit the
code for this stage here, or if you select Sprite here, and you will addit the
code for this sprite here. I've selected balloon, as you can see here, that's
the difference. Here I have selected backdrop, and here I have
selected the sprite, and now I can dit the code, the script, so to
speak, for this sprite. For that, you have all
these blocks here. So scroll through it completely
here with the scroll bar. So everything will be here, but you can also
switch to categories, so you can jump to the events
category, for example, or to the M blocks category
by choosing a category here. So first categories motion. Here we will find
everything that is related to the movement
of the sprite, to moving it to
also rotating it. So you can also
set rotation here dynamically during the
run time of your game. We have looks,
everything that is related to look of
your sprite here. For example, you can let
the balloon say something, so you have this call out then, or you can change the costume
to make animations here. You can set also the
size here dynamically, so you can make it
smaller, make it bigger, you can show and hide and so on. Here you have sound, so you can play a sound. For example, if the sprite is clicked with a mouse button, you could play a sound here. Here you have events. When
certain events occur. For example, when
the game is started, this is this event here. You can use it to trigger
different blocks then. But I will show that later. Here you have controls, so everything that is related
to loops or conditional. If this is the case, then do this, that
stuff you can do over Then we have sensing. If the sprite touches
something or touching a color, for example, or touching
another sprite, then this can be found here. Operators, very important, mathematical operators,
for example, equals or less than greater than everything or
picking random number, very important for games, to make it more interesting, to make it not deterministic, this you can find here. Then also very
important variables, and of course, I will
explain variables later. But here, very
important variables. You can store values in variables and store a
state in a variable, for example, and that is
essential for a game. Without variables,
you cannot make much of a game
even with scratch. Here under my blocks, you can define your
own blocks that contain different sub
blocks, so to speak. But that will cover,
of course, later. And here, you can
also add plugins. You have these extensions here, so something like
text to speech, so you can let the game
engine speak something, so a text that you enter can be spoken then by an
artificial voice, or you can play
instruments and drums, you can draw and so
on, also translate, and also you can use this
whole scratch code to actually control a robot or something like this
with leg or Minetorms. If you add an extension here, this will be a new category here, and then you can choose. So for example, if I
choose music here, There will be a new
category of music, the end, and then you can use, for example, to
play a drum sound. Okay, so that's the code here. We will spend much time
here in this code section. This is very
important, of course, but there are also
other sections, and next will be costumes. Costumes over here,
right next to code. We can select it, and
then you can see case. This is the appearance
of your sprite, the graphics for your sprite. And in this case,
it's a balloon. It's a vector graphic here, so it's not pixel by pixel, but it is composed out of shape, so you can also
add a shape here, for example, a circle. Just click on this icon here, and then you can make a circle by dragging this rectangle here. It's not even a circle. No, it's a circle. Okay. So you can make circles or ellipses
or something like that, or also you can of course, write something here, a text. So balloon, for example,
in different colors. We will cover all of
that in later chapters. Don't worry if you
don't get all of this. This is just an overview. Here you can choose which
appearance your Sprite has, and also what you can
do is make animations. Here you have all the
frames for animations, and you can in the code then switch to the next
frame, for example. You can do things
like in a loop, then cycle through all
these animation here. So this is also very important
for animations here. You can add many, many, many frames here. All can look different, then you can by changing, cycling through all
these frames here, you can then let it appear
like it's kind of a motion, a movement, something like that. So this is animation
here, but at the moment, we only have this
first frame here, we can also delete
the other frames so that we don't get confused. So now we have only one frame, so no animation at the moment. We have this balloon here, I can also delete. So you can select the shapes here with this select cursor. So select tool, selected
here with this rectangle, and then I can delete
it, for example, with this button here or
pressing the delete key. Now it's gone and
also this text, I can also delete
here. So it's gone. Okay. And also, you can do
something like flip this vertical horizontally and also copy it and then paste it again, and we will all
cover that later. This is the costumes
very important, also for the appearance
of your sprite, the look of your sprite. So in this case, it's a balloon made out of
different shapes here. You can also just
paint something here. For example, so free form
painting is also possible. That's no problem. To revert something, you can
also use these arrows here so I can revert everything
that I've done so far. Then redo it again. Let's get rid of
these dots here. Now we have again our balloon, just a balloon, and that's it. That's it for now for the costumes and
more on this later. Next section will be the sounds. So the sounds are over here
right next to costumes, and here you can add more
sounds to the sprites. A sprites can have sounds. Here we have this pop sound. You can play it with
this play button here, and you hear this pop. Also very important for games are the sounds so that
you have a feedback, also acoustic feedback of
your actions as a player. Here you can also add as
many sounds as you like. So for example, here you
can add a new sound. There are some
predefined sounds here. You can also play them here by hovering over this button
here, this play button. Also, music will be there or just different
sounds, clang, chord. And the clicking sounds, or these also piano or
saxophone, drum, trumpet. So many, many sounds
here to choose from, but you can also upload
your own sounds. So you can also record
your own sounds here. So if you have a microphone
attached to your computer, and you can record
something here or you can choose
a random sound, or you can upload an
arbitrary sound that you have recorded somewhere else or that you downloaded somewhere, and then you can upload it here and use it in your
game as a sound here. And then you can trigger the sounds from code
from this section here. There's also this
category sound, and there you can play sound. Pop, for example, there's
only this one sound here. But if you add one, let's add
one For example, this one. Now we have two sounds, and then you can hear play
sound, also electric guitar. I can just move this here, and then you can
choose not only pop, but also the second
sound, a electric guitar. Then if you press on this block that I've
just placed here, I've just dragged this here over to this also a kind
of canvas here, where all your blocks live, where your code lives. And then when I click on it, it's immediately executed, and it will already play
the sound here. That's it for sounds like
costumes, but acoustic, so you can trigger both, or you can change
costumes by code. You can also trigger
sounds by code. Now what is left is what
I've already mentioned also is this stage
here backdrops, and here you can have
multiple backdrops. We can make a new one here, for example, a bedroom, maybe, and then we can choose
another one, maybe a beach. Then here, if we
select this stage, we can have look at backdrops, and this is kind of
like for costumes, but only with the backgrounds. So you can choose which
background here you want, and then it will switch here, and you can also, of course, switch from code here, the background so that it
will dynamically change. So first, we have an
empty background, then we have this bedroom,
and then this beach. So just choose stage here, and then you have under backdrops all these
different backdrops, just like with the sprites. So I select balloon
again, our sprite, and then you can have
different costumes here. So first one will
be the balloon. You can also change the
order here by dragging it. We can change it
to this girl here. It's almost the same
here with backdrops. Just select stage, and then you have all these
backdrops here. Also delete. Now the last one,
we cannot delete. Just let's take another one, maybe blue sky that
fits for our balloon. So we have a balloon
over a blue sky. That's kind of nice. So
I just let it like this. And here in the backdrops, you have almost the
same possibilities as for the costumes of
your balloon, for example. Almost the same or
it is the same. You can also name the costume
or name the backdrop here. That's it for stage
and backdrops. Almost like a sprite. You have the sprites, and then you have the stage, and the stage can have
different backdrops, which you can switch then
during runt of the game. Okay, so these are the
sections, and of course, this very important section, you can run the game
here with this flag. So if you press the flag,
it will run the game, at the moment there is no code, so nothing to be executed here. So it just stays like that. But if we add code, you will notice then
that you will have also the stop button here
where you can stop the game, stop the code from executing, with at the moment, we
don't have any code. So this is doing nothing, and you can also
make it a little bit smaller here with this or make it a little bigger or
even make it full screen. So you have full screen game
here, almost full screen. You still have these
buttons here, of course, to start and stop the game, and then a button to exit
the full screen here. Okay, that is your Canvas, your game canvas here, where all your game
graphics are rendered. This is basically it for the UI of scratch of the
scratch editor here. And also you have
these menus here. This is really
important your file, so you can make a new game, and you can also load
something from your computer, from your hard drive, or you can save it. And
this is very important. You should always
save the game here. So then it will be downloaded
to your download folder, and then you can
later re upload it with this menu here,
load from computer. So you can then upload
this file again, and then you have your
complete game project again. And here you can
restore costume. So for example, I have
deleted the speech backdrop, and then I can here restore it. So undo the deletion
here of this backdrop. And also of your sprites, maybe if I delete the sprite, I can delete the sprite, and then I can restore
the sprite again. So that's it for the brief overview of
the scratch I here, and we will go into every
section in more detail, of course, into
the code section. This will be the main section
that you have to deal with, but also costumes, of course, for animations and other stuff. And the sounds will be also important and also the
backdrop, of course. But Most important will be
the code because this is the place where you
actually program your game and actually
make it dynamic, make it interactive, and
make it fun, of course.
4. First game, first code: So we are starting with our first game and this game
will be a balloon game, so it's about balloons
rising up and moving from the bottom to the top so I can show it here with
the mouse dragging. They should move or this one balloon
should move from here. To the top, and then
it should disappear, and the player has to click on it to make it pop,
something like that. And then he should get points, or she should get points for it. So there should be also multiple balloons
then in the end, and the more balloons
you can pop, the more points you get. So this is our challenge here. So we have to move this
balloon from the bottom. Place it maybe around here to the top in a steady
motion, I would say. This is our first challenge
and we can do this. We can achieve this by using
a code snippet or script, so to say, a program. We need to program here. This is our first program that we w. And this is the starting position
of our balloon here. So if you want to follow along, then just place the
balloon somewhere here, maybe, then this should be okay. Then how can we start our code? How can we start our script? Most of the times, you want
to start it with an event. So in this case, it
is the start event. So whenever the player clicks on start on
Go here on the flag, we will get this event. And what does that mean? So Whenever the flag is clicked, the code that is underneath
this here is executed. So I have dragged this when
go clicked from events. Go to the events category, and then the very first block here is this when go
clicked green flag, and this is like
run, run the game. This means that every time
that the game started, that go is clicked, that the code underneath
here will be executed. This is what we do now. We add here another block. This is how you code in scratch. So you add these blocks here, so maybe we can go to
motion here, for example, and then we can say, go to random position, for example, just to show it. So whenever this go
button is clicked then, go to random position.
What does that mean? The balloon will go
to a random position. Let's see how that looks like. So we click on go and we see this balloon is going is placed to a random
position here. We can do it again,
and each time, it is a different
position, random position. This is not what we
want, of course, because we want a motion
from the bottom to the top. And this is not how you do it, but just to show you how
coding here is done. We need to stack
these blocks here. After that, we can
maybe do the same. For example, we
can do this twice. This won't make any difference because this will go
to a random position, but you won't see it because
directly after that, it will go to a different
random position. That's not very good or it
doesn't make any sense. What do we do? We can make
a delay here in between. Let's go to control. And then we see the first block here under control is
weight. That's what we want. Control weight, and then I
drag this here over here. You see this snapping here. This will snap here
and it's a little bit gray so that you see that, if you drop it, will end on this position here, beneath the go to
random position. Then this will be placed
beneath the weight one seconds. If you want to disassemble this, you can just drag it away. And then all the blocks
that are beneath that here, the first that you
clicked will be moving, and then you can drag it here. And then it won't
be executed anymore because there's no connection
to this event here. So if I just start a game, there's no code executed
because here's nothing beneath. So I need to connect this
to this when go click. Again. And now we
can see that first, the balloon goes to a
random position and then waits for 1 second and then goes to another, a
different position. So this is not what
we want either. We want a continuous motion. So let's get rid of that here. How to get rid of
it, how to delete, you can right click on it, and then can delete block. So that would delete only the
one block you clicked on, and then you can delete
every block here. But more convenient is to just drag this
here to the side, and then drop it here, and then it's gone also. And you move around
this canvas here, your code area by dragging here, so you can see, You can also use the mouse wheel, of course, or you can drag,
and then you can reach different positions here, and you can also
zoom in and zoom out with these buttons here with the magnifier
glasses here. And this will reset the
position and the zoom here. This button. This is how you navigate here
in the code area. So let's put that over here. And what do we do to
move this thing here. What we can do is, let's
place it here again, Maybe here, what we have to do. First, we need to
position the balloon again at this position because this is the
starting position, but when the program
moves the balloon, it will maybe end up here, and then it will
just stay there. So we need to reset it each
time that go is clicked. So we need to set the
starting position. And how do you do that? Just
drag it where you want it? So maybe, for example, here, and then we have the
x and the y here, and that's what we can use now. So let's go to motion. Then you have this go to X, go to y, and this is
what we use here, we go to x, go to Y and use
these two coordinates here. Conveniently, these are
already here filled out, so we don't need to
change anything. Just drag this block
here to when go clicked and everything will
be set to this location here. I can change it
now to maybe here. Then when I click go, will be reset to this starting
position. That's good. That's what we need also. Now we have to move the
balloon to the top, and that's what we do
in the next video. But for here on the motion, these blocks are all for moving your sprite or
rotating your sprite. For example, here you
have set rotation style, so you can switch from
left to right to, maybe don't rotate
or all around. In an angle, this will be more like mirroring, like this here, this will be mirroring
or flipping, this will be a rotation, and this will be no rotation. And the same thing here, you can set this
style also here. That's the same as here. This is just an example, and you can also use
something like set y to a position or
set x to a position, or you can set
both in one block. Also you can glide to
a random position. We can try this maybe, set it to a starting position,
and then afterwards, we just glide maybe like 4 seconds to a random position or
to the mouse pointer. We can also do that.
Let's try this. This is actually
not what we want, but anyway, let's try it and
see how this looks like. 4 seconds, this balloon will
go to a random position. So each time I start here, it will go to a
different position, but it always takes 4
seconds to go there. That's quite nice. We
could maybe use it and then the user has to click
it to get the points. But I don't know.
Maybe it's not that interesting to do
the game like that. But we could use this. But this will be quite easy. Anyway, we have to hide the balloon when it reaches
the random position here. Otherwise, it would be too
easy for the play to click it. We can just maybe hide
it after 4 seconds, or maybe we do 2 seconds
and then it will be faster. Here, and this will be faster. But it also depends on the
position itself, of course. If the position is not very far away from the
starting position, it will be slow if it's very far from the
starting position, then it is fast. This will be easy to click and it's a little bit harder like
this or maybe like this. We can also reduce
it to 1 second, or we can also use
decimal numbers like 1.5, for example, That's a little bit faster because it was a long way to
go for the balloon, another long way and
this is a short way. Let's hide the balloon when it reaches the random
position here. How do we do that? This is
under the category looks. Let's go to Ls and
here at the end, almost at the end, you
have show and hide. This is what we need. Just drag the hide to this position
here after the glide, and then when it
reaches this here, this random position,
it should hide. Let's try that.
Now it disappears. Let's do it again. Okay. So
you see that you see nothing. It is gone. It is
hidden. And why is that? Be we have hidden it. So with this hide,
you will hide it, and it won't reset to show. But we can do that, just move show or drag show
here to the beginning. So when go is clicked, then show the balloon, then go to the
starting position, and then glide to these random positions here
and then hide the balloon. So let's try this.
So it's shown. It goes to the
starting position and then glides to the
random position. And then it is hidden. And then every
time I click on G, it will be shown again, and this will be executed here. Of course, the code is always executed
from top to bottom. So this is the starting
event when go is clicked, then there is show, go to x and y,
starting position, then glide in this amount of time to a random
position, and then hide. So that's okay. We could use this as a
starting point for our game. Probably we won't
keep it like that, but it's kind of a start. So then we need to, of course, make it happen that the
player can click the balloon, and then it gets stopped, and then the player
gets points for it.
5. Improving the balloon motion: We are continuing with our
game and in the last video, we had our balloon here going from this first position
to a random position, and we've made this
little script here, and this is our first
program or first script. Whenever the start
button is clicked, we show this balloon, then We go to this starting
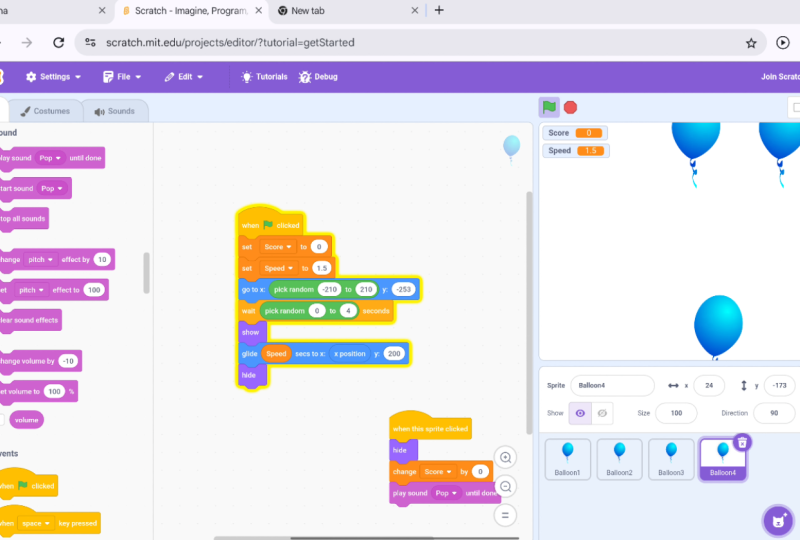
position of the balloon. This -207 and f x and -200 534, y, and then from there we
glide to a random position. This will always be a different position each
time we run the game and the time it takes to glide to this position is
1.5 seconds here. Then when it reaches
the position, then we hide the balloon. I want to now
exchange this here, the glide to random position with a similar block,
and this is this one. I've already prepared
this So this is glide in amount of
seconds two x and y. There is a predefined position
here that we can glide to, and it won't be the
random position. Because the problem with
the random position is it is sometimes harder and sometimes easier to hit the balloon or
to click the balloon, because that's what
the game is about, clicking the balloon or clicking all the balloons that you
can until they are all gone. This is the problem
with random position. They are not going upwards, but in maybe this direction
or direction or whatever. It is not clear where the balloons go with
the random position, so we exchange it for
a fixed position. This is the block for
the fixed position, and I'm dragging this hide
here away and the glide also, and we can get rid
of this glide block by just dragging it over
here and it will disappear. This block is deleted. Now we can take this
block, put it here, so that it snaps there
and then put back the hide block again so
that we have it like this. Let's start the game and
see what it looks like. You see, it's always the same motion here each
time I start the game. The balloon will always go up in 2 seconds to this
position over here, and it's always the same. This is much better
because the balloon will go only upwards, but it's also easier
because you already know where the balloon is going from and where
it is going to. This is quite easy
to play this game, but we will be having
more balloons, not just one balloon, this will get a little bit more difficult to hit
all the balloons. Maybe this is already okay
and already a fun game. But we need something
that is more random here. Let's say it is not the target
position of the balloon, but it may also be the starting
The starting position, the x position here
could be random, and the balloon would then start maybe one time from here, one time from here. That would depend on the position that is
randomly chosen then. How do we do that? We need a random number for
the x coordinate. Let's check how this is done. We go to operators here and there we have it
already pick random a random number between
and then you can set between which two numbers the random number
should be picked from. Let's drag this here
onto our canvas, our script Canvas,
and then we can place it somewhere
here in this block. We can place it here to go to
x and then this field here. Let's try it. We drag
it over here and then let go and now we have
it in our x coordinate. The x coordinate will be 1-10. This is not very good, Let's
maybe say -200 102 plus 210, that will be the range. Let's try this. Let's start it, and then we have a random starting
position. This is nice. Sometimes it starts
from here from the x over here or maybe over there. So the player never knows from where the balloon is
starting. That's better. But also the target position
is always the same, and that's a problem
here because we always know that the balloon
will go over here. This is the target position so we can place our
mouse cursor here, and then we would be able to click just here when it
comes to this position here. That's not so nice, so we need to set the target x this here to the same
value as this year. We could use a variable
for that and first assign this random number
two A variable and then use this variable
on these two places. First here in this block, go to x and then variable, and then glide in 2 seconds
two x, and then the variable. But we won't do this because
this is a little bit advanced and I will in
variables in a later chapter. Here we do something else. There is a block another
block here under motion, and this is this block here, x position, and you can
drag this x position here to anywhere you like
in these rounded fields. For example, here
in this x field, so glide in 2 seconds two x, and then x position.
What is position? X position is the ex
position of the sprite at this point in time when
it gets to this block here. This will always be updated
if the balloon moves. Or changes its x position, then this will always be
the current x position. And you can also display it by just clicking here
on this checkbox. So just checking this here
will display it here, and then we can always see the current value of the
balloons x position. Okay, so what do we have now? We go to a random x position
here and a fixed y position. So the y position will be -253, and the x position
will be random. So that means that the balloon starts somewhere
between here and here. And then it will go
to this y position -253 and then keeping
the x position. So we set the x position here
with this random number, and then this x position
will be the same. It stays the same, so
it's not changed later. It will always be this here. By this, we are setting the x position to
a random number, and then this will be in this block here in
this position block. So the balloon
will always go up. And here we can also see. You can also drag this to
anywhere you like here. We can also see that this
x will always be the same, but it will be randomly set
at the start of the game. So this time it was -166, and the next time it's -107, and the next time it's -69. But here we are gliding to the same x position that
we went here randomly. Okay, I think this is
clear, should be clear. So this x is just keeping
the x position and the y and the target
position of 200 here. And this way, this is kind of the game I had
in mind at the start. So we have one
balloon starting from a random position
going straight up, and then the user or the
player has to click on it. So we can also go into full screen and see
what that looks like, so starting the game, and then the user
needs to click on it, and then it should disappear, and the user gets points for it. So we at the moment, have only one balloon, not very interesting,
but if we have, let's say, five balloons. It will be quite
difficult to click on all the balloons before
they reach the target here. Okay, so that's it for our improvement of
the balloon motion, and I think we can
keep it like that, and we can just
make more balloons. And then the motion logic here will be, of
course, the same. But before we do that, we need to implement the click logic so that when the player clicks
on the balloon, then it will disappear, and then the user gets
points, for example. Okay, so let's do this
in the next video.
6. The clicked event: Now that we have the
balloons motion in place, I can show it again here. The balloon goes from a random horizontal
position straight upwards, and then it vanishes. Disappears here out of bounds. Now that we have this, the one important thing
that is missing is, of co, that the player needs to
click on the balloon and the balloon will then disappear and the
player gets points. That's quite easy. We only need two blocks for the click and then the
hiding of the balloon, and we can find the first
block here in events, because the clicking
of the balloon of this Sprite here is an event. We have this when flag, when go is clicked already here, but there underneath is
when this Sprite clicked, and here we also have
when space key pressed. This is for keyboard events, but this here is for
the click event. We drag this into
our Canvas here, and then we have this event. When this sprite is clicked, then do the following and
what needs to be done here, we need to hide the sprite here. This is very easy.
We already had this. We have show here and
then a hide at the end, we go to looks again, and then we have hide here. Just drag the hide to
this position here, and we can try it. So let's go. And
then we click it. Oh, I've missed it here. But now I've managed
to click it and you see that the balloon
disappears here, is hidden. Okay. Let's do it again. So this time I was
better prepared. So it's not very difficult
to hit the balloon. But if you have, let's
say five balloons here, all in random positions, then maybe it's a little
bit more difficult. So this is quite easy. We can also use the full screen, and then We can test it under
real gaming conditions. That's quite easy
with one balloon. We can also use, of course, a higher velocity, a higher
speed. How do we do that? We just change the time here, the time span glide
2 seconds to x, so we can just make it a little
bit less than 2 seconds, 1.5 seconds, and then the
speed should be faster, and we can also use. Let's try 1 second, and then it will be quite fast, and then it will be also
very difficult to hit it. Let's see. I've
managed to do it. Now, this one I missed, it again. Let's do it again. Yeah. That is quite difficult. Maybe it's too difficult, but let's just
leave it like this. And now we have the basic
game mechanics in place. The balloon starts to rise, and then we can click it
and then will disappear. We might want to add later an animation so
that the balloon pops. At the moment, it is just
hidden here with this block. So each time when the
sprite is clicked, then the balloon is hidden. Now what we need to
do is, of course, the player needs to get points for this so
that at the end, when all the balloons are gone, the player can see how
much points he or she got. This will do in the next video because it's not
quite that easy. We need to use
variables for that. I've already
mentioned variables, but this is quite an
important concept, so this will be in
an extra video, and then we can also count the points and then
display the score.
7. Play sound and counting the score: Now that we have
hidden our balloon, when the player clicks on it, we need to count the score. But first, I will introduce
another feature here, so we have to play a little bit of sound here
when the balloon pops, then we need to
play a pop sound. The sounds you have here
under the category sounds, just drag this block
here underneath height. After height, we need
to play a sound here. This is the electric guitar. This is not the right sound, so we need to change it to pop, and then you can hear this
will play a nice pop sound. When the player clicks
on the balloon, this sound will be played, so let's try working nice. Okay, that's it for
the sound for now, let's get into variables and
counting the score here. What are variables and
why do we need them here? At least we need
one variable here, and we needed to
count the score. Each time the player hits the
balloon pops the balloon, then there should
be a let's say, ten points should be added to the score and the score should
be displayed somewhere. We already have a variable here and it's already
displayed here. This is the exposition of
the balloon, have it here. And how did we get it? It's here under motion,
so category motion, and then we have this check
box that will display it. We can also display
the y position and also the direction. Let's just add all of these and we get back
to our variables. These are also variables, but we cannot set the variables. We cannot change the value of these variables
here directly. This is internal to
the game system here. But it's similar to a
variable because this here stands for a value and
a value that can change. We can use this everywhere where these rounded fields are. We can just drop it there, and this is a
placeholder for a value. This -210, for
example, is a value. This is a fixed value. We know what the value is, -210. But here, this is not obvious
which position this will be is only clear at run time or is only
defined at run time. At the moment, the position it will be determined
at the moment. We can also display it here, but if we run the game, then this will change. Variable. Also, of course, the name
stands for variable value, so it can change and it has to change to make
it really useful. A variable is a placeholder for a value that will change,
that is variable. Let's make our own variable, and we need to name it somehow. So we make a new
variable called score. Make a variable is
the button here. Go to variables here,
the category variables. We already have one here. It is predefined. We can also delete this variable because
we don't need it. So right click on this predefined variable and delete the my variable variable. Let's make a new
one make variable. And then we can choose a name. So we choose the name score. We can also write it like this. Then you can also decide if this variable is for
all the sprides, or only for this spride. I would say since we have
more than one spride, we should define
the score variable here for all Sprides.
What does that mean? The value of score will be
available to all Sprits, not only to this spride. That's what we want,
not only for this srt, because we want to show it. Maybe we want to use it in a different spr maybe in a
script for a different spride, so let's define it
for all sprides. On K, and now we have this
variable here under variables, and it looks similar to this motion x position
here, y position. I also rounded here, rounded rectangle,
the rounded corners, this is blue, but
this is orange, so this is our own variable. We can use this variable anywhere we like in
these rounded fields, for example, here, here, here, we can see that we can
drop it everywhere here. Okay, so this checkbox
is also here, so you can show the value, the current value of this
variable also by clicking here, and then it will
appear in the game. Let's get rid of this
balloon position. So just remove the
checkbox here. We don't need that anymore. But the score, we
should display, so keep the checkbox
checked here. Now we have the score
displayed here, but it's zero. This is the default
value, the initial value. And if we click on the
balloon, we hear the sound. But of course, the
score stays the same. Now that we have our variable, we can use it. We can change the
value at runtime. This is what these
blocks are for. This is one of the blocks
set score, in this case, 20 or change score by one
with these two blocks, you can change the
value of the variable. What do we need? Which one of these blocks do we need now? Well, we need the
second one because the first one will set the
score to a fixed value, but we need to
increase the value of score by a certain amount. Let's use this
block, drag it here. Right underneath, let's say after hide. Just drop it here. Change score by one. Let's see what this does and to make it a little
bit easier for me, I will change or
increase this time here, maybe let's say 5 seconds, and that would be very easy then because the
balloon is very slow. Let's pop it and you see we
have two. Why do we have two? Because every time I
click here on this, this will increase, and
I just clicked it once, and then I started the game
and popped the balloon. So we have two. But of course, we need to reset the score
at the start of the game. So that's what we need to do. For this, we need to Use
the first block here. So set score to zero, which is already kag set it here just after when go is clicked, drop it here, and then the score will be set to zero here. So each time we start the game, we start with a score
of zero, of course. And then we pop the
balloon and we have one. So since we only
have one balloon, I cannot get more than a
score of one at the moment. But anyway, this
nicely works here. So I pop the balloon, I get a score of one. So if we had two balloons, then the player would be
able to get a score of two. This is how you use variables. You can change the variable
by a certain value. In this case, one, I
can also use maybe ten. So when I pop the balloon, I will get ten points, not much of a difference, but maybe there are
bigger balloons which only gets the
player five points, so you can use ten and then five for the bigger ones because
they're easier to hit. That's it for variables. It's not everything that you need to know about variables, but how to use them. So you can set them here
to a certain value. You can also set it
to a random value. So for example, you can maybe
go here, pick random 1-10. So just drop it here. And then the score will be
set to a random number, not very useful in this case, but to show the point. This will now be five and
another time we will be ten, another time we'll be six. If I pop its the balloon, it will be increased
by ten here. We can sell it to fixed value or to this random value here also, and we can increase it
by a certain amount. Or we can also increase
it by a random amount. You can put this pick
random here also in this change by field.
Let's try this. Pop it and we get four points, and then we get three points. And the next time,
we get nine points. Not very useful
here, but anyway, this is possible, let's get
rid of that and use ten here. So each time we pop the balloon, the player pops the balloon, then he or she gets
ten points here.
8. Making more balloons: Our game is working
with one balloon. It's not that interesting, not that difficult also, but it's working, and
we have also the score. But we need more balloons
and how do we do that? It's quite easy. We just need to doublicate our first balloon. Right click on the
s here in the list. So Balloon one, right click, doubl and we have a
second balloon here. Let's try what happens
if we run the game. We have two balloons. And we can hop both of them. And we will always get
20 points as a score, of course, because we always
pop the two balloons. So this is quite nice because we just
duplicated this balloon, and it all works. So there was no need to change anything here in the script, but we can maybe change
the color of the balloon. Let's go into balloon
two selected here, and then let's go into costumes, and then we have
this blue balloon, the same as the first one, so we need to change it here. Let's go to this
little button here, and then it expands
with this list, so we can upload a new costume
We can get a random one, or we can paint it, or
we can choose a costume. That's what we do. Let's choose a costume, and then we search
here for balloon, there we have the balloons. We already have
the blue balloon. Let's use a yellow balloon here, and there we have
the yellow balloon. We can get rid of the first one here of the
first costume here in the list because we only need
this yellow balloon here. That's it. Now we
have two balloons, one blue, one yellow,
and let's start a game. So that it looks nicer
with two colors here. We can make more of
these, of course. We can also make
it more difficult problem is that we
now need to change two of these sprites here because each sprite has
its own script here, so we need to change
both scripts. For example, 5 seconds here
is a little bit too much, so we set it to two, but now we need to change
both scripts because if I just change the one
for the yellow balloon, then we have only changed
it for the yellow balloon, of course, not for the blue one. So let's change to the blue one and also set it to two here. Now it's set in both
scripts in both codes, we have the same amount of time or the same velocity here. This it gets more difficult now, but it's still doable. But if we had a third balloon, then it would really be
difficult to do that. We have two balloons now, but we have the problem
that we need to change the script of
each balloon here, of each to make changes
like the speed here or maybe if we want to change the sound here
to a different one, one that we uploaded, maybe. We can also record a sound here. We need to do that here
twice. That's a problem. At the moment, the
solution will be to prepare one sprite here
and prepare one script. And if you're really sure that
this is the final script, then duplicate the sprite. So let's say we have
the final script here. No need to change anything here. Then we can duplicate it. Let's say, four times. Now, let's start the game. So we have three yellow balloons and one blue balloon here. But we can also
change, of course, here, the costume
of the third one. Let's go into costumes. Hoose a costume. Search for
balloon. There we have it. Take this purple one. Ease the first one
here and here. Well, let's do the same. Search for balon. But we only have
these three colors here. That's a problem, maybe. So let's go back and
change the color here. So select the balloon or the
main part of the balloon, and then we go to fill and
change it a little bit. Let's put it more to the red. We have a more
reddish color here, and you can also change
this one For example, also make it a little
bit more red, like this. Yeah, that's okay. You
can also of course, change the costume here or you can load a different
one as you like. Now we have four balloons here, and let's see if we can pop all. No, not successful. Let's go into full screen mode. Yeah. 40 is the maximum score we can reach here in this game, and this is quite nice. But if the balloons
are further apart, maybe, then that's not
possible to pop them all. I've managed to do it. Missed one. Yeah. Now I've
got all the balloons. Okay, so I would say that's
it for our first game. But there's one more
thing I can do to configure here the
number of seconds. Each balloon has to
reach the destination. We can use also
variables, of course. So let's make a
new variable here. Make a variable here, under the category variables. Let's make a new one, and
also for all sprites, because we want to use
it in all sprites. So we call it speed,
just call it speed. It's not accurate because it's a number of seconds, but anyway, let's call it speed, and the lower the value,
the higher the speed. But anyway, I think that's okay. We don't need to
display it here, so we can remove the
checkbox and then it is goe. What do we need to do? We need to replace
this two here, glide 2 seconds two x and y, we need to replace
it with a variable. So the speed variable here, So let's drag this
over to this here, and then drop it
and we have glide speed seconds to this position. So we need to set, of course, the variable here, the
variable value, to, let's say, 1.5, and we can
do this here when go click. Here, we drag this set
variable two value, and then we choose speed and
here in the value field, we just enter 1.5. That's it. This brit
here has now this 1.5, this one, so let's check this. One is faster, you see, and this we need to do for
all the balloons here. Now we need to just put the speed variable
here into this side. That's easy, go to the
purple balloon and then drag the speed
variable here to glide, and then for the yellow
balloon the same, and for the blue balloon also. Then every balloon has
the same speed here. Let's try it. Now it gets really difficult to pop all the balloons,
so let's try it. Just one also one, three, that's high score. Now, three is my
high score here. It's almost impossible
to do all four. Anyway, now we can use
this variable here, and we also need to set
the value of the variable here in the first or in the fourth right here
in balloon four. We can really use this set
speed to 1.5 anywhere here, but we just need to
do it in one sprite. Let's leave it
here, and we don't need to set the score
to zero in each sprite, so we can also get
rid of this maybe. Remove it here and
remove it here. You can also leave it there
It's not that important, but it's not necessary
to set it in each sprite here in each script. So we only need to set
it here in one sprite. And the same for the
speed speed and score are set in the last sprite
here in the red sprite, and then every other sprite
can use these values. Let's try it. Working. We used variables here in two places. On the first place was this
score that was increased by ten every time the player hits a balloon, pops a balloon, and the second place
was here in glide and the amount of seconds that is used to get to
the target position, so to speak the speed
of the balloon. That's it for this part. Now we can also improve on
the game at bit, for example, we can use a random delay
for each balloon so that not all balloons are moving at the same time. We do
this in the next.
9. Adding delay to the balloons: A. So Let's make the game a little
bit more interesting by delaying each movement, each balloon movement
by a random time. That's what we do, and
this is quite easy because we have this block
here. Under control. Go to category control and then the first block
weight number seconds. This here can be a fixed number, for example, one seconds,
2 seconds, whatever. We can try this first. Let's do this on the balloon
four on the reddish balloon. We can just insert it here. Or maybe we should
just move it here below these set variable blocks. So before we start the movement, we wait for 1 second, and let's check what this does. And we see the red balloon is delayed by 1
second. That's easy. But this is not very interesting because each time
we start a game, this will always be 1
second, so it's predictable. We don't want that to be
predictable because it's a game, and it should be fun, of course. So let's fix this. It's easy. We go to operators
and this block here, pick random one to ten
picks a random number. We just put it here in weight
in this rounded field here, and then we have weight
pick random one to ten. Ten is a little bit
long, 10 seconds. So let's just say four, 4 seconds, and then we try this. So each time we start the game, it should be one, two, 4 seconds randomly,
and here we have it. This is maybe it was 4 seconds. Let's try it again.
And now we have maybe 3 seconds.
Let's do it again. 4 seconds, and
let's do it again. We can also do it 0-4. See if I do that, then you see that the
reset of the position here will always happen
after the weight here. I think we need to
move that here. Let's move that go to x
and y above the weight. It will immediately reset to this position here and
then wait and then glide. That's better. And
there's the balloon. Okay, so we have this weighting mechanism
here for the red balloon. We need it also for
the other balloons. So I will show you something so that you
can copy a block, a complex block like this, like this weight
with a random number of seconds to the
other balloons. For that, just
extract this here. We can just separate this
and then drag it out. Then this block here can just drag to the other sprites here. For example, this one is
it wiggles a little bit, then you can drop it here and this way,
it will be copied. This block here stays here, but it will also be copied
here to this sprite. Here we have it,
and now we can Just put it here right before the glide and then back
to the red balloon, and then we can also drag it
here to the second spride, drop it, and also to
the first spride. Now we need to place it at
the right position here. Right before glide, we wait for a random
number of seconds. The same for the
blue balloon here. Right before glide, we wait for a random number of
seconds. That's it. Let's try and we see the balloons wait for a
random number of seconds. Again, of course, the red balloon is not working anymore because we
have dragged this out, so just let's put it back
here Together again this way, the red balloon
will also work now. There's one problem. You
might have seen it already. If I start again, you see that all the balloons
are waiting to rise here. That's too easy
because the player can just pop it there at the bottom. We have a little problem here, but it's just easy to fix. Let's see what we have here. We're setting score to zero here in our
red balloon script, we're setting speed to 1.5, and we go to this
initial position here, and then we show it. After we have shown the
balloon, we are waiting. The problem is that
here at this point, the balloon is already shown, and then it waits for, let's say maximum of 4 seconds, and in this time, the
player can see the balloon. The fix is very easy, change the order here. We need to show the balloon
right before this glide here, and this will need to
do in each sprite. We've inserted the weight
in the wrong position. Or the show is in
the wrong position now, Let's correct this. That's it for the
purple balloon, and we do the same for
the yellow balloon here and for the blue one also. The show should be right
before we have the glide. Here, that's correct.
Let's check again, show right before the glide. So that should be correct. Let's try it. The balloons are not shown before
they start moving. That's nicer now, and I can try to pop the
balloons. Yes, Yes. No. Yeah. That was a miss. Let's try it again. This time. I have the maximum score of 40. Now we have a nice game and
it's quite entertaining, and it's not that easy
to hit all the balloons, to pop all the balloons. For example, now,
I only have 30, and you can also, of course, duplicate here more balloons so that you can have
maybe ten or whatever. Also this delay could
be a little bit longer or this random
delay could be maybe 5 seconds so that it
will be easier to pop the balloons or more
difficult as you like. But I think this should
conclude our first game. In my opinion, this
is quite nice, or maybe we should
get rid of this year. This Y position need
not to be displayed. That's one more time.
Let's start the game. Already missed one balloon. Now I have also 30 as a score. Please feel free to play
around with it and have fun. Maybe you can improve on the
one or the other thing here. Can improve maybe on game
mechanics a little bit, you can doublcate more balloons so that you can make it more difficult or the game is longer than if you have
more and more delay also, then the game gets
longer, of course. You can also maybe change
the costumes here. If you don't like this balloon, you can draw your own or you
can import a new costume, upload costume here and
then choose, for example, a PNG JPEG or an SVG, then you can replace
this balloon here with your own balloon or maybe
you can also exchange it. With the preset costumes here. This concludes our
first game and the next game will begin
in the next section.
10. Create an account for cloud storing and sharing: Before we continue with
our next game project, I will show you how to join
scratch and how to make an account so that you can store your projects,
your games online, and also share them with others so that others
can play them, and also can have a look at the code at our scripts and then make
adjustments to the game, make their own game based on your game and all
this great stuff. Let's do this. You have to
click on Join Scratch here, and then input a user name. For example, I put in game Def teacher and then a password, So you may want to uncheck this checkbox here to
not show your password, but I can also leave it checked so that anything you type
here will be visible, I'm not doing that,
so I will create a new account here and then
use a random password here. I won't show. So
you have to type in your password twice to make sure that you typed
it in correctly, and of course, you have
to remember the password. So put it maybe in
a password manager, something like this, or
write it down and hide it. So then if you
correctly typed in the two passwords,
identical passwords here. You can click on next, and then you have to
choose your country. So I am choosing Germany
because that's my country, but please choose your own year and month of your birthday. So that's mine here. I'm a mail, and then next. What's your e mail? And then scratch will
keep you informed about new stuff added to
scratch, something like that. So just put in your
e mail address. I will put mine here, and then create your account
with this button over here. And it takes a little bit. Then welcome to Scratch
Game Df teacher. So now I'm locked in here. I'm also having this menu here, profile myStuff
account settings. So let's go to profile
first. Here's my profile. You can write something in
about me, what I'm working on, and also you can change
your picture here. Just get rid of this confirm your e mail to enable sharing. To share a project, you have to click on a link in the e mail that
you have received. I should have received by now, I will just click
that away and you can enter here your about me, what I'm working on, and also
change your picture here. Also here, you have a list
of your shared projects, of your favorite projects and scratches that
you are following. But that's not that important. You have a message here. Here
are messages from scratch. Welcome after you make
projects and comments, you get messages
about them here, go explore and make a project.
That's what we'll do. L et's get back to
our project here. See our project page here, and also we can save now here, or we can save as a copy. So that a copy will be
made of your project. But for now, we
save project saved, and then we can have a
look at our project page. Here it is. You can
also change, of course, the name here, balloons pop, and here you can
also play the game. And instructions is
instructions to play the game, and other notes and credits
can also be entered here. But for now, this is not shared. You have to click on share, and then other
scratches can also see the project and also play it and edit the project
who they're liking. Let's go back here,
close this tutorial. We are logged in in our account, and as I said, you can save online. You don't have to download. You can also download it, of course, and load
from your computer, upload a project,
but you can also save now online in the
Cloud, so to speak. Or you can also make a copy. Now we have made a copy and the name change
to Balloons pop copy. Now you have two projects. Here, if you click on here, this button, you
can see your stuff. My stuff is two
unshared projects, zero shared projects because I haven't shared
any project here. This is private now here, but you can also delete
the projects here, see inside to edit them, play them, and share them. That's what I
wanted to show you. Let's get back to our balloons. Pop. And here we
have our project. So every time you log in on
another computer, maybe, then you can still edit your projects here because
they're saved online.
11. New game controlling the space ship: So here we are. This is
the start of our new game, and this game will be
called Space Explorer, and the player controls
a space rocket ship that travels through space and encounters stuff
like meteoroids, rocks, something like this. But also maybe raw
material resources, something valuable
that the player then gets points for,
and if the player, the rocket ship hits a
meteor, for example, then, there will be damage, and this will be the idea. And let's start. So we
have this CATs year. I've started a new project. We can delete the cat and
create a new sprite here, choose a sprite from the resources here from
the predefined sprites, and we can search
for a rocket ship, and there we have
it, our rocket ship. Just click on it. You can see also that it
has an animation. So let's check the
costumes here. And you can see that it
has five frames here, animation for five frames, and we can use this to make
the visuals a little bit more interesting to have
an animation of the player object
here, the spaceship. But first, let's get to
controlling the spaceship. The idea is that you can control the spaceship by using
the cursor keys, the arrow keys up will move the rocket ship downwards left. To the left and
right to the right. Easy, but we have to
learn a new concept. So Let's make our spaceship here a little bit more
suitable for the game. Let's make it a
little bit smaller, maybe like 30, set
the size to 30, then this will be much smaller, but also there will
be more room for other things like
meteoroids and other stuff. Here we have it, and let's
jump into the code here. Let's go to the event
section and then move this go click here to
our script Canvas. Okay. When go clicked, then what, we have to set the
starting position. Let's go to motion and then go two and then
the starting position. I would suggest that you will start from the
center of the screen, and the center of
the screen is zero, zero, that will be
the start position. Right in the center,
then here it will go to the positive ys and here
into the negative ys. You can see it here
if I just go to y position and I check
this check box here. The value will be
displayed here. At the moment, it's
zero, of course, because I started the game and this block here is
setting it to zero, and also the x will be zero. I can also show you the x here. If I move this to the top here, you can see that the y gets more into the
positive values. If I move it down, you see
that this is minus something. This is positive y, this is negative y,
and to the left, you can also see for the x, this is negative x, and this is positive
x to the right. Okay, so now we have this. We are centering the
rocket ship and now we need to let the player
control the ship. Let's get rid of these, so uncheck these two boxes here, and then we have more
room for the rest. So how do you control it? We are introducing
here something that you might call a game loop. And what is a game loop? Game loop is something
that loops forever. No forever, but as
long as the game runs, it will just loop infinitely.
So where is that? We go under control, and then we have this forever. And it's also called forever. So just to drag this
here under this, go to x, go to y. And here we have this loop, and what does loop mean? It means that everything
inside is repeated infinitely. So if you do something
after this here, it will never be executed. So if I do something
like this here, move ten steps, for example, cannot even attach it here because scratch knows that
after this forever loop, it doesn't make any
sense to put something there because this
won't be executed. So this is not possible. You can only move this
inside the forever loop. So what happens if I do this? So move ten steps.
Let's do this. Let's start this, and you
see it goes to the right. And then yeah, it's
kind of stuck here, so you cannot move
it more than this. So the x will be of
maximum 242 here. So moving this more to the
right, it doesn't work. So this is forever
doing this here. And if you do two
things in the loop, it will do these two
things also forever. So let's do something
else. Let's Go to random position
after moving ten steps. Run this and you see it's going all over the place
as fast as it can. That's not very
useful, but we can also insert a delay here. Let's go to control, and here we have the
wait 1 second block, or we can wait 1 second
or two or whatever. Let's try this. You
see it's moving ten, then it waits for 1 second, and then it moves to
a random position. But anyway, we don't
need this here. What we need is something else. I hope you get the point that
everything that is inside here will be repeated
forever. There's no exit. It will be always repeated
and repeated and repeated. There's also a
different loop here. You can have a repeat ten times. Then it will just
repeat it ten times. Or you can have repeat until, and this will repeat
the inner blocks here until a condition is met, and then it will exit. And you notice that these
have these little notch here. So you can do
something after that. But in the forevep,
you don't have that, there's no way to attach
something here after forever, which is kind of logical, so but you have to keep in mind that you will never exit
this forever loop here. So it will always be here. But you can also add a
different event here. So When you want to do
something in parallel, you can always drag another when go click here and then
add a script after that. That's possible. You can have
two things running at once, or three or four or
whatever, how many you like. In this for eve
loupe, what do we do? The idea is that we check
if a key is pressed, and this block is under sensing. We have this key space pressed and we can drag
it to the canvas here. But we need something
else, also. We need something that
is also under control. In English, we can say, if key is pressed, then do something,
and here in scratch, it's the same if something,
then do something. This condition
here after the if, this can be this block here. Let's put this here after
the if. Just drop it here. Then you have if key
space pressed then, and then under this condition, if the space key is pressed, then we can do something here. But we don't want
the space key here, we need, let's say we
start with the up arrow. If the up arrow key is
pressed, then do something. What do we do then? Of course, we move the spaceship. Let's check how this is done. We change Y. We change the y position
by a certain amount. So let's stick
with the ten here, change y by ten. So whenever the up
arrow key is pressed, then change y by ten. And ten means to the top, so the y will be increased. So let's check if this works. Press go, and then I'm
pressing the up arrow here, and we see this works. Cannot go down, but I can go up. So I need to stop
it and restart, and then and then I
can do this again. Okay, so let's do the down also. Click here on the if,
right mouse button, and then you can say Duplicate, and then you have
to put this second duplicated if lock here right underneath
right after the if. This is the up arrow, and
this will be the down arrow. If down arrow is pressed,
not the up arrow, then we need to change y
in the opposite direction. Here this is positive because
we want the spaceship to go up and here this
needs to be negative, and then the y of the spaceship will go
down. Let's try this. I'm pressing up Now
I'm pressing down. This seems to work, very nice. Now we need to move
it left and right. Again, duplicate this block. You have this if, and then we change the key here. Let's start with
a left arrow key, and then change not y in
this time because left is x, and also right will be x. Let's remove this
here, delete it, and here we take the change x y, put that here, and this time, x will be changed by ten. Let's try this and it
goes to the right. This is wrong. This needs
to be the right arrow. Let's try this again
to the right yeah, pressing the right key, the right arrow key. This works. The only thing left is left, and let's duplicate it
again one more time. Put it after the previous if, and now if key left
arrow is pressed, then change x by, and now we need to
move it to the left, that means we have to
subtract ten here. Let's change it by minus ten. Again, let's try it, left, right, up and down,
and this works. So the play can
control the spaceship. If this is too fast, maybe not smooth enough, then we need to change
these values here. Maybe we can say,
let's put five here, and that will be
then minus five. And this will be five, this will be minus five. Now the speed will be
a little bit lower. Let's try this again, and now the speed is slower. Now, we have the controlling
of the spaceship. This is one very
important step here. Let's go through the code again. When go is clicked,
we're setting the spaceship to the
initial position, the starting position here, and this is zero and zero, x is zero and y zero. Then we have a loop. Loop through these blocks
here inside forever, so repeat this forever or
as long as the game runs. What we do is we are checking in each iteration
here if the key, up error, the down
error, right error, and the left arrow, or the
left error is pressed. And if this is the case, we're changing y and
x here in this case. Let that s in a little bit. This is very important. This is the way you
do the movement, the controller movement. This is the standard
way to do it. You have this forever loop, which is like a game loop in
more sophisticated games. This is always repeated
as fast as possible, and here we are sensing which
key is pressed and then changing the x or the y
position of our spaceship here. So in the next video, we will replace this
constant value here, this five in this
case with a variable so that we can change the
speed here to our likings. Don't have to change four
values here all the time. Maybe there's something like a power up or something that
can increase the speed, so we need to replace these constant values
here by a variable. But let's do this
in the next video.
12. Adding the background: We're here in our
space explorer game and now it's about
making the background. You might think, it
is the background, so we have to go to
back drops here. But there's a reason
for not doing that. We're doing it with
another sprite. Let's create another sprite. Here you have this
choose a sprite, or you can also paint a sprite,
and this is what we do. Of course, there are
also these options to upload a sprite picture, SVG, something like that. And also get a surprise
and have something. Let's do this, Let's get
a random sprite here. This is not what we
want, of course, but we can of course
delete it again. This is our random sprite. If you do it again, you get a different one. This
time it's a bowl. That's the surprise option, and we can check here if
you find something like space or universe or stars, but you won't find
anything here. We find a sun, but
that's not what we want. We want a black background
with light dots on it, white, maybe white dots on it, and this is not in
the library here. Let's do it ourselves
just choose paint here. Then we can paint
our background. Let's start with a rectangle. Choose this rectangle tool here, and then we choose
a different color, of course, it should be black. We set the brightness to
zero, and that's black. If you want white, you have to set the brightness to 100 and the
saturation to zero, and now you have white. But we want black here, so brightness to zero will
make everything black. It doesn't matter what
you set here or here. Everything will be black if you set the brightness to zero. Now we have the
foreground color black and the rectangle
tool activated, and then you have to
drag a rectangle here. So try to adjust it to
these boundaries here. If you create the
rectangle here, then you can adjust it
with these dots here with the little circles here. Let's make it more or less exactly the same as
this inner area here. You can also zoom in. To check if we have made it. Now it's not exactly. Now, this is okay. Doesn't have to be exact. If you did something wrong, then you just can do undo here, so this arrow is undo, and then the last
action will be undone. Let's make this correct here. The left side, always go
to these circles here, and then you can adjust it, and then, that should be
fine. Let's zoom out. That's our background. But, what is missing here? The stars. So stars are circles, at least in this game. So choose the circle, and then we need to change
the foreground color of co, brightness to 100 and
then saturation to zero. This will give you
white here. Okay. Then we zoom in a little bit
and we drag a circle here. It won't be circle if you
don't hold shift here. So on your keyboard, hold shift, and then it's
a perfect circle here. But it's a little bit too big, so let's make it a
little bit smaller. Something maybe like that. Let's check this. Maybe a little bit too big,
let's keep it like that. We have one star here, not much. We have to make more stars. Let's go back to the
select tool here. Select the select
tool, this arrow here. Now we can select our star here, and we can now copy it.
How do you copy it? Press copy here, this button, or you can also command
C or on windows, it's Control C, and
you have copied it, and then you can paste it. Pasting is this button or command V or Control
V. Let's paste it, and then it's here and you can then drag it to a
different location here. Let's drag it somewhere
else. Maybe here. Let's make another copy. Command C or control C, control or command V, and this will make another copy. We drag it somewhere else. Again, moving it. We made a little
pile of stars here. Now what we can do to make
things a little bit faster is, we can select them.
Let's zoom out. Select, and then we can
drag a rectangle here. Now you have also selected the background,
which is not good. So let's deselect
the background here. Press shift, and then
select the background, and then this will
deselect the background. Now we only have
these here selected. Let's copy them, Conti or Komaz and then insert,
paste them again. Let's zoom in a bit
and then we can move these new stars somewhere else. We have to drag one
of the stars and then every other star will
also go with it. Let's put them
here and make them a little bit adjust
them a little bit, we select this one and move it. Maybe this one also. This one. It's a little
bit different here. Like this. Now we should make another copy of our
star field here. Again, select these,
deselect the background, and then you can copy it and
move it to somewhere else. Like here, you can also
rotate it with this one. This handle here can
rotate the whole thing. And then copy it again, moving it maybe over here, rotating it a little bit, maybe this time the
other way around, and another copy, and then
we move it over here. I think that's okay. Maybe we move these stars
a little bit to the right. Okay, I think that's okay. So this is our star background. I think that's okay for now. So this is our
background sprite here, the first background sprite we have, but there's a problem. It's not in the background. You cannot see the
spaceship anymore. So if I click on the spaceship, it's not visible here, but it should be visible. What's the problem here? It's
behind the second sprite, behind the background sprite. And this is, of course,
not what we want. How can we fix this? We can
move it to the background. And this is here in
Los, select looks here, and then you can roll down, go to front layer. This is this block here. So drag this block into the canvas into
the script canvas. And then we can change
this not to front, but we want it to go to the
back layer. So do this. And since we never changed this, we can just do it once here in the editor and just
click this block here. If you click the
block, this will be executed here this
block. Go to back layer. Now this spride is
in the background, and of course, our rocket ship
is now in the foreground. That's it. That's our
background spride. It's okay like this, but it's static,
it's not moving, and we want a scrolling effect, so that it looks like that the rocket ship is actually
flying through space. This is what we do
in the next video.
13. Moving the background: Here we have our
background again, and this block here is
not needed anymore, so we can erase it, just drag it over here, and it will disappear. Okay so we need to
move the background so that the player gets
the impression that the rocket ship is really
flying through space. So how do we do that? It will be like this here. But of course, it will
be in the background. But let's first set the location of the background
to the starting position. What is the starting
position starting position will be here
somewhere here in the center, so it should be 00. That's what we do
next. Go to events. When go is clicked, then we are setting
the start position. Go to x and y, and this is already
the case here, x zero, and y also zero so that It will be reset each
time the game is started. Let's try that. Just move the background sprite
and then start, and now we have it again
at the starting position. But our rocket ship
has vanished again. So to avoid this, we should maybe still use
this go to layer block here. So just set it to back, go to back layer here. After go two x and y, our rocket chip is again, visible, no longer behind
the background sprite. How do we move this
background sprite? It's just like the rocket chip, but without the controls, the controls will be automatic, so to speak, so we
need a forever loop. Something like this,
and of course, this will be after the
initialization here. First, we set x and y to zero, and then we go to the
back layer to ensure that the sprite is really
in the background and the rocket ship
is in the foreground. Now we have this game loop here for our background sprite. Speaking of background sprite, we could just rename it here, so you can rename it,
for example, BG one. Maybe we have a second one, so we're calling
it BG one return, now it is renamed. What do we need here? We need to move the background, and this is of course
on the motion, so go to motion and
then change y by ten. Let's try this. This is
the wrong direction. I wanted to go down,
so it should be minus. It's a little bit too fast, so ry minus two here. Let's try it again and now
it moves to the bottom here. This is what we want,
but we also wanted to start again here at the top, so we need to reset it if
this position is reached. The position here is -346, and this is what we need
to have in mind here. We need a check if the position is place
here at this y position. How do we do that?
We go to control. This time it's not about loops, but it's about a condition, if a condition is met, then we want to reset
this Sp location, the Sprites y location. This is if A condition,
then do this, and here we can already put in, go to x y, x is okay, the way it is zero, and y should be the
starting position. No, it shouldn't be
the starting position, but it should be
something like this here. Let's move it all the
way to the top here. This is the topmost
y location here. And here we have 346. So it's the same,
but in the positive. Okay, so this is the
position that we need to reset this sprite two. And now we need the condition. So the condition
goes right here. How do we do a condition simple? We've already done this. Here we have operators. So it's not sensing this
time, but it's operators. What do we need
to check? We need to check if the location, the y location is below a value. And this is this block
here. Put this here. And drop it. And now we need the y location of our
sprite. Go to motion. Then here we have the y
position. This is what we need. We check the y position
if the y position is less than this minus 4346, then we need to reset
to this location. Let's try that. This condition
is not met at the moment, it's not fulfilled, and
then it's not working. Y? Because the y position
will never be minus three, 47, it will always stay here. We need to decrease this. We need to decrease this by
one or increase this by one, it's not 36, 345. If the y position
gets two minus three, 46, this will be fulfilled here, this condition. Let's try this. And it's working, very nice. The background sprite
will now move to the bottom and if it
reaches the bottom, then it will be reset here
via this conditional. If the y position is
less than minus 36, five, then reset the
position to this. That's the movement
of the background. It works very nicely. The problem here
is that you have this empty white space here. For this, we need to have another sprite and this should
be a copy of this sprite, but it should move a
little bit differently, or at least it should start
at a different location, and we do that in
the next video.
14. Second background sprite: Now that we have our moving
background like this, We need to doublicate
this background sprite here because you have this empty or white space
here in between, so we need to fill
that of course with a second sprite here. How do we do that? That
is very, very easy. Just doublicate this sprite
or first background sprite. Now we have a second one,
and then start again, you will see that it still
has this empty space, this white space here, of, because both sprites are
just at the same position. But that is very easy to change. We just need to change the start position of the
second background here, and we set it to this
three, four, six. Let's just disconnect this here to see what
this looks like. It will be set at the beginning
to this location here, and then it will
start from here. This is what we see if we
just connect this again. The second one is starting
from here and then it goes down and the other sprit is
also going down, do down. You cannot see it because
there's no gap between the two. What we can do is we can go to costumes here on
the first background, and then we can select this rectangle here
where the fill is black, and we set the outline
let's set it to red here. So this will have a red outline
so you can see it here. Let's take care of
the other one here. Change to the second
background sp. Select again, the rectangle, then change the outline. Oh, you can also change
the fill, of course. But let's change
the outline here to let's say this blue here. Now we have this blue border. Here we have the red border, so you can see how they
move together in sync. Let's start it and you can see here is
this separation line. Of the second, the
top border here, and there's no gap in between the two background sprites here. This is very nice and it was
quite easy to achieve this. The second sprite is just the same as the first
background sprite. Only the starting position
needs to be changed. Let's check again the code. We are going to the
initial position, which is on the second
sprite a different one. It starts right at the top here, and then we go also to
the background layer of. Then we do for eup here. And we change y by minus two, meaning it goes down. Each loop iteration, it
will go two pixels down. And if the position, the y position reaches a certain point reaches
the bottom here, which we check with
this condition here, then we reset it to the
starting position here. The same for the
first background sp, What is different here is
only the starting position, it starts right in the middle so that it covers
everything here. You can see this red here, this red top border
appears here, and then it goes down, down, down, down, down, down. And if it reaches this position, it goes up again the
same for the second one. That's our moving background, and I think that's
really impressive. We haven't written or
constructed much code. Just everything is very simple, and we can move the
rocket chip here. And the background is
scrolling from top to bottom. We can also change, of course, the stars so that it gets a little bit more interesting
because at the moment, we only have a copy, a clone of the first
background here, and it has the same stars. So we can of change it here, costumes, and then you can move all these dots here around. Remember to deselect
the rectangle here, and then you can move
them, rotate them, A. Same here. Deselect the
background and then move them or rotate them so that the pattern is
a little bit different. Maybe like this. Here, let's
rotate it a little bit. It looks different now. Let's try it again. We can also get rid of the borders now. We don't need them. Select
this rectangle here, and then reset
outline two black. Et's also remove the other one. Here, set it to black
again, brightness zero. Let's start the game again. I put it into full
screen so that you can see it better start, and now we can move the
spaceship here around. There's nothing to be
collected or something like that or the spaceship cannot
hit anything at the moment, but it can float through space and the
player can control it. That's very nice. That's
a very good start. We have a scrolling
background with two different
background sprites. Now in the next
video, we will add some more objects here so that the player can maybe hit a
meteoroid and get damage.
15. First obstacle the rock: Now that we have our spaceship
floating through space, traveling through space,
and our background moving, we need an obstacle. So let's stop this game here and make another
sprite, of course. So choose a sprite, and we have something
like a rock here. So search for rock
here in this field, and we have rocket
chip and rocks, and I'm choosing rocks. Now we have this one here. So we have to adjust
it a little bit. So we go into costumes, and here we have the sprite, the costume, the main
costume of the sprite. So let's first get
rid of this here, to make sure you have the
select tool, this arrow here, and then just select it and
You can use this button your delete or you
can press delete on your keyboard or
backspace, also works. Now we have this and it's
a little bit too big. I think, so let's change the size Here you can
change the size over here. Let's make it 50%. Now, I think that's
the correct size and move it a bit here. That's a bit better. Now we can change also the shape a
little bit if you want. How do you do that? You can, of course, rotate it like this. But with this tool,
you cannot access the different points here
inside this vector image. You have to use this one here. This is the correct
tool to really access these points here of the SVG. Now you can zoom in
a little bit and then change these points
here. This is the inside. Then here we have the outline. This is also the outline. Let's make it a little
different shape here. This is of course a little
bit tinkering here. We have to be careful to select, click on these circles here. Just make it a little bit
more miss the circle. So let's make a
little curve here, something like that,
something like a rock. Now the other side. What you also can do
is move this here. So this will change
the curvature here. Something like this. You can also make it curved or pointed. This way you have a
sharp pointed edge here or a curved one. Here you can change the curve. You can fiddle
around a bit here. I will limit it to
changing it a little bit. This is the inner area here. T I think that's enough. Still not very pretty. But I think it's okay. If you want, you can of course, do better here, put some
more effort into it. Let's make it a
little bit better. How you can add points here is just click on the
line like this. Then you have a new point. Maybe we need one here. Just click on the line, and then you get a new point
here that you can use. I'm not an artist, so that won't be the prettiest meteoroid
that you've seen. But I think like this,
maybe it's okay. Let's leave it like this. What's important is
use this tool here to get access to the single
points here and use this, if you want to, for example, move this or rotate
it this here. Something like this. But I
put it in the middle again. I leave it like that.
This is our meteoroid, but I want to change
the color a little bit. Let's go again to this tool, this point selector here, and let's select this
inner area here. Then we change the
color of that. This is a green color, but I change it to brown. Something like this, maybe. I think that's okay. Now
we have our meteoroid, and it's just sitting
there, not moving. This is, of course, not correct. What we can do now is copy our script from
the background, from the first background here, maybe or maybe the second one. Let's take the second one.
Here we have the script, and we now copy this script
to this meteoroid rock. Just drag this here
until it wiggles, and then just let go of it, drop it, and now you have
copied it. Select the rock. Here we have this script. This script is a copy
of the other script. Let's look at what happens
if I start the game. It's moving downwards,
it's moving to the bottom. That's good. But it
is also stuck here. We need to let it disappear here if it hits
this bottom here. This is this condition here if y position is less than -345. This is different here.
You can see here is that this meteorod is
stuck at a position. Let's do it again. We cannot see it because it's not
in the foreground. Of course, we need
to change this go to back layer to go to front layer. Now it should go
to the foreground. There it is. We
see it stuck here. That is -187. We need to change this minus
8186, it should be. If it's below that and
187 is below that, then it should go to
the first position. This is the correct one here. Let's check this.
There's the rock, and then it hits
the bottom and then it comes again here at the top. That's nice. It's
repeating Of course, this is very easy for
the space ship for the player to avoid
the obstacle. But it's a start. This is our first obstacle here, and the rocket ship or the player should
avoided to hit that. There is no hit
test at the moment. But we will of course
implement that. Also, it's always at the same position
here, so it's boring. But we have our meteoroid.
16. Hitting the rock: Now, we're hitting the rock or the spaceship is
hitting the rock, and then it should disappear, and maybe we should
decrease some points there or increase some damage. But at least in the end, the spaceship should reappear, and then the game goes on, but maybe with one live
less, something like this. Let's do the hitting
part. How do we do that? When the ship hits the rock, it should disappear for now, and then let's say
after 3 seconds, it should reappear, then in the middle of the screen,
something like this. How do we do this? We have
this game loop here on our rocket hip and there we
can test for the hit event, or it's not an event, but it can be found
here under sensing, go to sensing, and then we
have touching mouse pointer. This is the block
we are looking for. But it's not about
the mouse pointer, it's about another sprite, and this is rocks. Touching rocks. This is the condition, and for a condition, we will use the if
block. This here. If touching rocks, if the
rocket ship touches the rock, Right, then we will do
something. What will we do? We hide the rocket ship. Under looks, and then here at
the bottom, there is hide. Just put that in here,
and this we can test. Let's put this if block here. At the end in the forever loop. This is important, not outside. You cannot do it
outside because you cannot do something
after forever. This is the place you
need to drop it here. We're going through the
game loop forever and then if the rocket
ship hits the rock, if it touches the rock, then it should be hidden. Let's do this. We're not
controlling the ship, and now it disappears. That works. Now we want it
to reappear after 3 seconds. We have to wait 3 seconds
and within these 3 seconds, this control here
would not work. We go on the wait for. Put that behind the hide, wait for, let's say 3 seconds. Then within these 3 seconds, this forever loop
will not iterate, and then after the 3 seconds, we want to reappear. We need to show it.
Drag this show here. After wait 3 seconds. Let's try this and we see
the ship is not visible. Why? Because we haven't
shown it at the start, we need to show it over
here when go click, then show the sprite. Now we can see it and
now it disappears, because it hits the rock, and then it reappears. Then we can control the ship and move
around the meteoroid. Let's hit again the rock and
then it should reappear. This is nice. But of course, we need to do something if
the spaceship hits the rock because There should be a
penalty for hitting rocks, and let's say the
ship has lives. We have three lives maybe
and then one live is subtracted if the
ship hits the rock. Then if the ship has zero lives, the game is over. Let's do this in the next video.
17. Damage and Repairs: In this video, we
will count repairs. You have a certain
amount of repairs. You have money for,
let's say three repairs. If you hit the rock more than three times
then the game is over. We need to count the number of repairs and how do we count? We already know that it's
variables with one variable. Let's make one. Go to variables, delete this one,
the my variable. We don't need that.
Make a new one, and this should be
for all sprites. This should be repairs or maybe repairs left,
something like this. Of course, we need to
set at the beginning. Set repairs left two, three, the player has
three repairs three or money for three repairs,
and then the game is over. We can see here
repairs left zero. We need to start the game. Now we have three, and of
course, this doesn't change. This is what we have to do now, and it's super easy. Just a change repairs left, this block here by one. Now that's not the
right amount minus one, should do the trick, so it
should decrease decrement, repairs left by one. Let's do this either before or after the weight maybe
before is better. Let's do this. Now we have two If we hit
it again, we have one, and if we hit it again, we have zero, and now the next
crash should end the game. But in this case,
we have minus one. We need to check if we have
repairs left below zero. If this gets to minus
one, the game is over. Where do we do this? We do it here right before
the weight maybe. We need to check a
condition for this, we have the if then block
here, drag it here. Now we also have this
less than block, we need that too, and we
need to drag it in here. Now we need to get the value of our
variable repairs left. Go to variables, and here we have repairs left, our variable, and we can drag it here into this condition into this
less than condition. If repairs left is less than
zero, the game is over. So we have to check what
we do if the game is over. For example, we
can say something. It sounds funny, but this
is how you can do it. So Under looks, you have
say hello for 2 seconds, and this will show a
bubble with a text. Let's try this. Let's
try first to show this message whenever the ship hits the rock. So say hello. It's not maybe the
right text here. Say crash, for 2 seconds. Yes, I think that's
okay. Let's try this. Here you can see, no, it's hidden, that's why
you cannot see the bubble. Let's change the order here. We need to hide it
after this message. Let that put in. We change
the variable by minus one, we say crash, we hide, and then we wait for 3 seconds. Let's see this. Crash. And again, crash. Now, if the repairs left
variable value is below zero, we need to say something
like game over. Let's put it again here. Game over and try it again. First crash, Second crash. Now third crash is still okay, but now we have no repairs left. I should say game over.
It's not the case. We have to check, and I
know because it is hidden. Of course, wrong order again. Let's hide it after this. Let's try it again. Now let's this time, decrease
the number of repairs. Let's put it to one repair,
and then game over. So next crash will be game over. It works. First
crash, of course, because we crashed, and
then we have game over. We have both, and then
it takes 2 seconds to display this and then it
checks for this variable. Maybe it's better to say the crash right after
this check here. Let's change again the order
and then we try it again. First crash, zero repairs left, and now second crash game
over. And then crash. How do we end the game actually? If this is the case here, we need to stop the game. It is also possible. We go to control
and then stop all. Put that here in the game
case. Let's try it again. First crash. Second crash, and then game over. This is nice. It's even a game. It's not very
exciting because we only have one rock,
one meteoroid, and also there is
nothing to collect and maybe fill up the
repairs that you have left or there's
no goal to reach. So it's boring. But it's a game already, so we can make it, of course better, and we will. For example, first thing
I would improve here is that the rock here is
in a random x position. If we reset the rock,
so that is here, go to x and y, we will set this to a
random x and not to zero. Let's do this in the next video.
18. Random start position and custom blocks: For making the game
more interesting, we want to introduce a
random start position for our meteoroid. Let's check the game again. The rock is always starting from the same x position here. Of course, it's also starting
from the same y position, but the x position is
the interesting one. So the player here knows
where the meteoroid is, and it's very easy just to
fly on this x position here. You don't have to
do anything else. So that is not very interesting. So we need to change that, and that's quite easy. We use this block here. So operators pick random. So we have used this before on the balloons in the
popping balloon game. So this is generating a random number between
these limits here. What limits do we need? So let's just set this meteorite to the left side and see what the exposition is. Something like this maybe, and then we have this -221. So let's say -220, and then I would say plus
220 then on the other side. That would be like
to put that in here like this. I think that's okay. So between these two numbers, there will be a random
number picked here, and this we need to
set here for our x. So here, but before we do that, let's right click on the
block here and doubt it. We have two of these, Let's put the first one here, go to x. This is when the game starts. We go to this reset position, and this is the random number here for x and the y is 346, and also the same here when
we reset the position. If this y position is reached, then we reset and go to also a random number x and
this fixed y position. That's easy and
let's try it here, and we see This time it's this
position here of the rock, and this time it's
this over here, so the player cannot just
leave the rocket ship here in the middle because there
will be a random number, a random x position
in the middle, and this is the one and crash, so the player needs to
steer off of the way here, and this is a little
bit more interesting. Still, we have only
one meteoroid, only one rock, so not very
difficult to avoid that, but at least it's random and
the exposition is each time, the rock is reset, the position is randomly set. Okay. So what is not so
nice about this here is the fact that we have
to put this in twice. So this block, this pick
random number block. We have to put it in twice. So if you want to, for example, change the limits here, we have to do it here here. So if we want this rock
to be more in the middle, then we need to change it in two locations here. Not so nice. And this is why we introduce
a new concept here and this concept is
customized blocks. You can make your own block. Here it is my blocks. You can make your own blocks, and you will see what this looks like and we will
use it here for our resetting the rock to
this starting position and also to the
starting position when it reaches the bottom. Idea is to replace these
two calls to go to x, go to y with a random x
with one custom block. Let's do this, make a
block under my blocks, and then you can choose
a block name here. Just put the cursor
here or you can just write type your
name for the block. I will say this is
reset random x. It should be a name that somehow conveys the meaning of what
is done inside the block. A block can contain other blocks something
like a sub routine. The name should describe what is done in this
block. So just click. The other options are not
important at the moment. So just click k, and then we have this
block here already. And here we define what
is done in this block. So you can put any
blocks you like here, Just like after
the W go clicked, can put anything you want
here. So let's do this. We want to reset the rocks position to
the starting position, so we need to extract
this block here. So just pull that apart
and then pull this out and put it here in this
define reset random x. This we will leave it like that. And also, this can
be dragged out here, and you can erase that
one, lead that one. So just drop it over here. Okay, so how do we
call this block? Very easy? We go to my blocks
and then have it here. We set random x, and this is our custom
block and we can just use like any other block drag
this custom block here, then we put it all together. And also the second
location is here. If this y position is reached, then reset also to this random x position
and the fixed y position. So let's try this first, and it should work
the same as before? Rocks exposition is randomly chosen each time it
hits the button. So that's what we
wanted, and that's the same as before, so
nothing changed. But the good thing is that
this code is easier to change. What do I mean? If
you want to change this range here from which
the random number is picked, and you just have to change
this one location here. For example, if
you want it to be more in the middle
in the center, we could say it's between -100 and plus 100,
and that's it. We only have to change
this one location here of this code in these two
positions, function, as you might call it,
also, or this procedure, or this sub routine
is called from this position code and
from this location code. This way, it is
easier to change, and you can do whatever
you like here inside. So each time when G is clicked, this block is called. What does that mean,
the blocks under this reset random X under this defined reset
random X, are executed. And then when there are
no more blocks here, the execution is resumed here
after this custom block. So the next one will
be go to front layer, and then this for ever loop. The same here, if this
y position is reached, and we jump to this reset
random X block here, and go to x is executed
and after that for ever. Will continue. So
this is a nice trick. It's not necessary to
use custom blocks. You can always go without them. But it's easier to make changes if you use
this script here, these blocks inside
this custom block in more than one place. We are calling it here and here, and this way we
only have to change this one location inside
our define reset random X. Will use this possibility to create custom blocks also later, but here is the first
introduction to this concept, and this is very important because it makes your
code more readable. So imagine if you have like ten blocks here in
this custom block, and you would have
to put it in here, directly without
this custom block, and you have this twice same in two locations here in the code and you want to
change something there, then you always have to
change two locations. If you need this
functionality in ten places, for example, then you need
to change these ten places. But if you have this
custom block here, you only need to change
this one location. Of course, also, it makes the code more readable because
you can name this block, what exactly this block does. It's like writing a comment
so that this block here is resetting the x position
to a random number, and this is what the
description here says. The name of the block
says, reset random x. You can put in good
description so that you can read your code just like an English sentence,
for example. When go click reset random X, then go to front
layer and so on, and we can also maybe
we can also put this forever loop into a custom block not necessary, but to name it. We can do that. Let's do this, make another block, game
loop, and then okay. Now we can define our
game loop custom block, put that forever loop
here and just use this game loop block here, and this will be the same. Let's start the game again. And you see this is working
the same as before. But now we have structured
our code a little bit better, and you can read it just
like normal language here. When go click, re set random X, go to front layer, game loop. And if you want to know
what is done in Game loop, you just have to go here
to define game loop. So you can leave
it like that, but I will put this for
everop back here. I was just an example. Put that back here, and we
can get rid of define here. What you have to do first is
get rid of this block here. Then you can get
rid of the defined, and then the block is
also deleted here. That is how you define your own custom blocks that
can contain arbitrary code, can have your complete
script here inside. You can also call another block here inside that's
also possible. This way you can structure your code more
nicely so that you or other people
that might work on this game can understand what
the script is all about.
19. Cloning our rock: Our game is kind of fun
or at least more fun than at the beginning because we have introduced
randomness here, and this is this random
position of the rock here so that the game is a little
bit more difficult to play, but still of, it is very easy
to avoid this rock here. So what do we need? We need more rocks, of course. So this way, the game
will be more difficult. And of course, we could
just copy the rocks here with right click on
the Sprite Dublic, and then we have two rocks, and we could just
do it like that. So let's try it. So there we have two rocks, and everything is okay. So let's check it one more time. So they are closer together. We have limited the
range here to 100, -102 a positive 100. So let's put that
back to I think it was 220 and then
two positive 220. So that's a little bit better, then it's more random. Here we can see that the
rocks are further apart, which is of co better. And the game is
more difficult now, because you have to
avoid two rocks. And of course, we can
make another one, double kit, and so on. So we have three now
They're together here. And there you have
also the problem. These two rocks
are more together. But the problem is here, I've changed this 220 only for this rock and the first
one stayed with 100. So we have to
change it here too, minus 222 positive 220. Let's start it again. So nice. But you have seen the
problem Now they are distributed evenly
here, not anymore. But you see the problem
that if we make copies duplicates of
these rocks here, and we need to change
something later. We have to do it on
each sprite here. So if I have to change
the range here, I have to go into
each sprite into the code and then change
it for each sprite. That's not very nice, so we need to come up with
a better solution here. So let's delete the
additional rocks here. We can do it with just one rock. And how can we do it? This is a method called cloning, and every Star Wars
fan knows what I mean, what cloning is, of course, because in Star Wars,
you have the clone wars, and a clone is a
copy of a source, let's say, a source entity. So you have the source entity, and in our case, it's
of course the sprite. You're making clones of it, so exact copies of it. But these copies have their own, so to say, life, and they're independent
of the original clone. Or of the original entity. How do we do that and how
does it work in scratch? We select our one
and only rock here. And we're making copies
or clones of this rock. So we need to go to control. So here we have when
I start as a clone and create clone of myself
and also delete this clone. So how does this work? We need to create a clone first. Let's drag this block
here to the Canvas here. So just insert this
create clone of myself here right after
when go is clicked. Okay, let's check how
this affects our game. Let's start it. And
now we have to. But only one works as expected and the other one is not working is always
here in this position. That's not enough.
We have two rocks, that's okay, but the second
one is not working somehow. Why? Because what create
clone of myself is doing is it's just creating a
clone at this point in time, and after that, the rest of
the code is not executed. Here it starts with
when go click, create clone of myself, then the clone is created. So this code is not executed
again for this new clone, but only for the
original sprite. And only the original
sprite works. So everything that comes
after create clone is only executed for
the original sprite, not for the clone.
How can we fix that? That's very easy. This is
what this block is for. When I start as a clone. This is somehow the
same as when G clicked. But this is triggered
whenever this is called here. Create clone of myself
will trigger this, but for the clone sprite, not for the original
sprite, of course. How do we use that here? We have to move this here. To this event when
I start as a clone. When go clicked, then we're just creating a
clone of ourselves, and then this is executed
in the cloned sprite. Let's start. Now we have
still one rock here at the top and it's
not moving or it's not coming down to the
bottom, but this here. This is actually the
clone. Let's stop this. So this is the clone, and if I stop the game, the clone will
disappear, is deleted. Only the original
sprite is remaining. So every clone that
is created during run time is deleted
if I stop the game. So this way you can also
see that this here, this moving sprite is the clone. And of course, the
original is only creating a clone
a copy of itself, and then it's not
doing anything else. This is why the original
sprite is not doing anything. It's just sitting there. And the clone is now working. That's what we want. We can also create
another clone. So just put another block here, create clone of myself, so we have two clones now or we should
have two clones now. Let's start. And
this is correct. We have two clones.
And every clone has the same script here. If I change something here, then this will change
it for all clones. What is not so nice
is that we have this original sprite
here still showing, that's easy to fix. We can just go to
looks, and then hide. Just put a hide here. Then when I start as a clone, this is called for each clone. We need to show it. This is the first
thing that we do, we show the new clone, the new copy, and then the rest will be the same
as for the original sprite. But the original
sprite is not doing anything here is
just hiding itself, and then creating two clones. So this is a template now. The original sprite
is a template, which is also hidden so
that you can't see it, and the actual sprites that are used in the game
are these clones. Let's start the game, and
we have two clones now, and the original
sprite here is hidden, but the clones are visible
because we are doing this show here whenever
a clone is started. This is very nice. We can also
have like ten clones here. No problem. We can
just duplicate this. Right mouse click here in the context menu,
click on Duplicate. You have four clones now. Let's start the game
again four clones. This is getting
more difficult for the rocket ship to
avoid all the rocks. They are still the
same y position. It's not that difficult. You just have to spot
the gap here and then steer your rocket
chip into that gap. So that's still easy. But we can also make
it more difficult. But I don't want to copy all
this create clone of myself. I want to do it in a loop. And this is something that
we haven't done before. We have this forever loop, which is of course looping
forever and not stopping, but there's also a
different loop control, and then we have this repeat and then a number of
iterations here. We can repeat, for
example, for ten times. This is going here ten times. We don't need that,
create clone blocks here. It's not necessary this way, we are creating ten clones, this loop is iterated ten times. Let's check this. We should
have ten clones now. This is correct, and
now it is really, really difficult, and I would say it's
impossible like this. So you have no chance
to avoid all ten. Maybe now I have a chance, so this is okay, but now it gets very
difficult because maybe there's no gap between
all these rocks here. This is very difficult, but I think I can manage. But anyway, we have
ten clones now, and this is very nice because we haven't
duplicated the sprites, but we have created clones, and the advantage is
that you don't have to change the code
in ten sprites here, but you only have to change
it here in this script. For example, if we want all the clones to be
in a narrow range, we can just change it here, we can Maybe go back to
this -100 100 range. All the clones are
inside these x range. Let's see how this looks like. And now it is quite easy for the rocket ship to avoid
the clones because you can just go here to
the outer border. That's not the problem here. But you see, you can change
it for all the clones here. All the clones use
the same script, and this is a very
big advantage. The original sprite
is just used here as a template to create
the clones, not more, and it's hidden
right at the start, and all the clones are
showing themselves right at the start when they
are created as a clone. This is somehow this Wen
go click for the clones, similar, but it's
a different event. Here I use this Wen go click, when game is started to create all the
clones that we need. This is also a very important
concept, the cloning, and this way you can avoid
code duplication here, which is very important, or for example, if
you have something like shots or also, for example, we have resources to pick
up not just the rocks, but also some objects that
the player can collect. You also need maybe ten of
them, something like that. Then this can also be done
very nicely with cloning. If you would do it with this
duplication of sprites, this would get very,
very messy here. If you need to change
something in the script, if you have ten
duplicates of one sprite, this is very annoying to change. This is the way
to go if you have similar objects of
the same template. In this case, it's the
rocks, the meteoroids, and this is the way to
do it here in scratch. So you have this
template sprite, which is also here defined with the costumes
and the sounds, and also the scripts. This is the template
for the clones, and whenever the
clone is created, you will get this event
when I start as a clone, and then the main script, for example, can
be executed here. And this way, we
have ten rocks now. But, of course, it's
not very nice that every rock is in the same
y position all the time. So we need to distribute
them a little bit, and this we will do
in the next video.
20. Random delay: This will be a short video. We will make the game more interesting by
introducing delay. What was the problem or
what is the problem? I just remove that here again because I've already
introduced the randomness, but I will remove it for now and show you the problem again. Every rock here is on the same more or less the
same y position here. So everything is starting at
the top at the same time. That's why there's virtually no way to get around
these rocks here, except for the times that
there are some gaps here, but for example, now this is almost impossible
to pass here. How do we fix that?
It's very easy. We need to introduce
a random delay here. So I've prepared
this already here. Wait random number of seconds, and we introduce that to the beginning of
the script here. When I start as a clone, this is waiting for a
random number of seconds, and then the movement begins. We can put that here, or maybe we can also put
that inside the loop, or we can also put that
inside reset random x here. Let's put it here. And reassemble this. Each time we start, or maybe we should also don't
show it before this delay. Show will be after
this reset random. When I start as a
clone, reset random, this will wait for
a random time, and then it will go to
the starting position, which will also use a random
number between -200 2,220. We are using this
randomness here twice by waiting to reset the position and also
for the x position here. Let's try this start and here
we can see that this works. Some are in the same y position, but we can also see that this is not completely
correct here, because everything is visible
here still at the bottom. Let's fix this. Why is that? Because we're not
hiding the sprite here. Let's go to looks and then hide it just before
the reset random X. This way, it should not stay
there visible at the bottom. Now it is disappearing
at the bottom and then with a random delay
reappearing from the top. But we've forgotten to show it again, that's the problem here. Let's put that show into this reset random X here
and then show and this w, it is also called
here after the delay. Let's restart it. So
there are the rocks and then disappearing
at the bottom and reappearing at the top
with a random delay. This way, the game
gets quite difficult, I guess, still doable. But we will also introduce
some objects to collect. This will be then more interesting for the player
because the player has to collect the valuable objects
and avoid the rocks here. And that is of course,
more difficult. At the moment, ten
rocks are fine, I think, should be okay, and now we can introduce our valuable resources or maybe or or something like that, something that the
player can collect and maybe sell afterwards.
21. Collecting stars: In this video, we will introduce our resources that the
player can collect, so it's collectibles, and we are implementing it very
similar to rocks. The first thing that we do is to doblicate the rocks sprite, or we should better call it rock because it's just one rock. So just rename it to rock, and then you can right
click on the Sprite. Choose Duplicate, and now we
have a second rock sprite. The first thing that we
do is rename this to resource and now we need to change the
costume, of course. Make sure you have selected
the resource spray here, and then go to costumes. This is the rock costume. We're choosing a different one. So we are choosing the
star costume here. Search for star, and
then you have it here. Now we can delete the first
costume, the rock costume. And now we only have
the star costume here. Okay. So we have stars, and we have also code here. The script is exactly the
same as the rock script. So we can just maybe start this, and then we have ten
clones here of our star. So do that. Maybe not ten, that's too many. Let's start with four. And then we start the
game. So let's see. There we have one and
there we have 12. But it's not doing anything. If I hit these it's
not doing anything. Also what you see is
that all the clones are stuck here at the bottom. Let's fix that. Stop the game. Why are they not resetting here? Because this co y
coordinate is not correct. Let's see, it's this coordinate here because we have to
select resource, of course, and it's also hidden, so we need to show
it for the moment. And then we can
drag it over here, now, like this here. And then this is
the maximum or the minimum y because if I try
to make it less than that, it's jumping back to -180. So -180 is the limit here, and this is what we
need to check for here. So it's not -180 that
we need to input here, so it's minus 179 because the y position
must be below that. So let's try this and
see if all the stars are disappearing Okay, so
that seems to work. They're all disappearing at the bottom and reappearing
at the top here. This is working. We
cannot collect them. But of course, this is
something we will implement. But for now, it seems to work. Maybe it's a little bit
too many of the stars. I think we changed the
wrong script here. These are ten, and here, we need to have four, now it's more rocks than
stars, so that's better. It's it's more
difficult this way. But in the end, I think
ten is also too many. So let's put seven here. Let's check this again. Yes, I think that's reasonable. Of course, we need to add the hit test now.
So let's do this. The hit test for the rocket
chip for the rocks is here, but we cannot put the hit test for the
stars here also because we need to hide the
resource here and reset its position when the
rocket hip hits it. So this is nothing we can
do here because from here, we cannot make the resource disappear, the star disappear. So what we have to do
is do the same thing, or almost the same thing
that we are doing here. So the if touching rock, needs to be in the
resource here. So let's go to sensing
touch rocket chip. So touching rocket chip, and now we have to
pull in an if here. If touching rocket chip. This is the condition that
we need to check for. So I touching rocket chip, and this is something we
have to do we have to put in the Fevepe
here at the end. Let's do this if
touching rocket chip, then what we can, of course, hide it. So let's hide it
and test it again. If the star is hitting or
touching the rocket ship, then it should vanish, and this seems to work.
But the problem is. Once I hit it, I don't
get any points for it, of course, because
we're not counting anything here.
Let's do this then. What do we need to
count the resources? Of course, we need a variable, so let's go to variables, make a variable, and
we call it resources. And this can be for all sprites. Now we have resources, and I put this over here on
the other side of the screen. If we hit the rocket ship, then resources needs to go up, we can set it to one more, so just change
After this height, we can change resources by one. Remember, the rocket chip, if it hits a rock, then we change repairs
left by minus one, so it's decreasing, and here we are increasing the resources. Let's try this. And
there's the first star. Yeah, and it works. Resources is one
collected resources, and now we have two, three, 45, and so on. That seems to work, and I think it's quite easy. Maybe we should increase the
number of rocks here again. This is maybe too easy.
Okay, let's do this. Number of rocks is here,
repeat seven times, so maybe nine times
would be okay. Now it gets more difficult. Of course, A crash. First crash, and let's see. There is a star. This
one is out of reach, but I get this one, so I have 21 stars. Of course, we forgot something. We've forgotten to reset
this variable here. Let's do this set, and we're doing this at
the start here when go click resources to zero. We're starting at zero
resources and three repairs. And I have four now. This one I cannot
reach five, and so on. Still not very difficult, but sometimes it's really
close. I think that's okay. We're having a functioning
resources system, so the player can collect
with the spaceship, the stars and the variable
resources is counting up, and what we can do
with the stars. We decide later, maybe we can buy upgrades
for our star ship here, or we can maybe buy repairs for it so that we have more lives than
something like this. But for now, collecting
resources works, and this is very nice. This is almost a game. So you can already see how good the player is by looking at
the resources he collected.
22. Landing on a planet: Now that the player can collect
resources, collect stars. We need an opportunity
for the player to sell these resources and to
get something in return, for example, an upgrade to the spaceship
or another repair, so another life, so to speak. And this we will
do with planets, so the player can
land on planets. So we have to add
another sprite here, similar to stars,
similar to rocks. So we just copy here
our resource sprite, so just right click on
resource Duplicate. And then we change
the costume on that, so go to costumes, and then choose a costume
and we enter planet, and we have this earth here. But we will take this
planet two here. And now we can erase
the first costume here. We don't need that anymore. And then we go to code. And here we might want
to change this here, maybe repeat four times. So do we need four
planets? I don't think so. Maybe we can do with
two planets here. So the player has to touch, has to collide with a planet, and then it will be automatically a landing
on this planet. We also need to change
the backdrop here. So at the moment, we just have
this empty white backdrop, and we will add another one. So choose a backdrop. And then we can search
for a city here, and we will take
maybe this metro. So this will hopefully look a
little bit futuristic here. And the problem now at the
moment is you cannot see it. So we have these two background
sprites here, of course. If we move them, you
can see that there is, in fact, the backdrop, the new backdrop here. But if we start the game, you will just don't see it. And there we have our
planet, the first planet, and this is the same as a
resource at the moment. So this is just the same code, so it will also increase
the resources here. But this is not what we want. We want something else. We have to hide
these two backdrops in order to see the
real backdrop here. So this is the first background sprint
and the second one, and we need to hide them. How do we hide the
background sprites? We select the first one here. What we will do is we go
inside this forever loop here. And we will wrap it
with a condition. This time we won't take the
normal if then condition, but we go over to controls here, and then we take the if
then else condition. So drag that over here. So we have the same
almost as here, but we have this else case. And this else case
will be executed if this condition here on the
first if is not fulfilled. So let's put that
first block here, this one that was
in the for evlope. Let's put that here
in the first if. So we have if something, we need to come
up with that two, of course, then do this. And if something
is not fulfilled, meaning if not this
condition here, then we will do this else. Let's think of what
condition do we need here? I will use a global
variable here. We've used variables before, so you should be
familiar with that. I make a variable here, and for all sprites, that's very important because all the sprites
need the variable, need the axis to the variable, and we will call
it travel stopped. The traveling through space will be stop if this is somehow true, but we will see how
this looks like. Travel stop at the
moment is zero, as you can see here because
we're displaying it. But this is not what we want. We won't display
this in the end, so let's put that off. Now we need to check for travel stopped here
with an operator. Let's check for equality here, take this one and drag
it in this if condition. And then we go to variables and drag our travel
stop variable here. So I travel stop equals zero, which is the start value, then do the things we have done before
in the for evelope, and else we need to
do something else. And that is we can
hide the sprite. So let's do this. If travel
stopped is not zero, Then we will hide
the sprite here. Now we can put that block here back
inside the forever loop, and there will be no
change, of course, because we will always be in this case here if
travel stop equals zero because this is the
initial value of the variable and the variable is not changed at the moment. Okay. So nothing
gained at the moment. But we will do this if
we hit resource two, and by the way, we should
rename that to planet. So do that now. So we
have the planet here. And if we hit the planet or if the planet hits
the rocket ship, at the moment this is hide and then change resources by one. We will leave that hide here. But get rid of
change resources by one because this is not a star, it's a planet, and this
should hide the background, sprite here, or both of them. Here, we need to set this
travel stop variable. So go to variables and choose this block,
set, repair, left. We change that to travel stop and put that here
after the hide. So set travel stop two, one. For example, anything else, except for zero, we'll do here. So if the starship, if the rocket ship
hits the planet, then travel stop
will be set to one, and this will cause
this if to fail. So if we're inside
the for evepe, and we get to this point
where the if is checked. So if travel stop equals zero, this will be no longer true, and it will go to
this else case here. Let's try this. And Let's see when the first
planet arrives, there it is, and we
see it's working. Of course, it's only
hiding the first one, O background one here. We need to duplicate
this block here. We need to put something
into the second background. Let's do this, go to control, and we have this if then else, and we put this block
inside the if then, and then we can copy
this condition here. I. This one, drag this out. It will go back, but drag this
here into background two, drop it, and then it will
return to the former place, and now we have it here. So we can drag that
here into the if then. Now we have if travel
stop equals zero, then we do what we
have done before, and else we can also
hide the sprite here. So else hide the sprite. Put that back into the Fp, and now both backgrounds
should disappear. So let's do that again, and we see the problem here
is the backgrounds are not shown anymore because we are not showing them when go is clicked. Let's do this. Drag
this show here. And also in the second spry, drag the show here, and
now it should work again. So go. Why isn't it working? Because we have travel stopped. If we can display, you will see travel stop
is one and not zero anymore because the script
here set it to zero, and it won't be reset. Automatically, we have to do it. Since we are doing it here, we can do it maybe also
here the resetting. So just set travel stop
20 when go clicked, and now we have our
background again. And then we have the
planet, let's see. Okay, now we see the
background here, this brack drop here. But one problem remains or several problems here because
everything is still moving, except for the backgrounds. But the whole rocks
and the stars, everything is moving still. So we need to apply also this
logic here. The if else. No, where we do have it here, the if travel stop equals zero s to the other
sprites here. So let's do this, go to rock. And then here we have the
Feverop, the game loop. So let's get our if else here. We can drag this
inside the if then. And then we can also drag this here over and
copy it to the rock, and we go to the rock again, and then put that travel stop equals zero here in
the if condition. And in the S block, we will hide the sprite here. Then we will put that back
into the forever loop. So now the rocks should all be invisible
here. Let's try this. Maybe we have the planet coming, there it is, and you see that
the rocks have disappeared. The planet also
needs to disappear, and also the stars, of course. Let's go to the stars and we do the same thing
here, if then else, get this and put it
here in the n case, and also we copy this condition
here over to resource. Use it here, and then hide
the sprite in the else case. Okay, put it back
in the for evo. What is missing is planet. So we do the same here. If else. And then we drag that condition
here to our planet. Put that in the if condition. And then this block will
go to the then case, and then in the else case, we will hide everything. Okay. Now let's try this and let's hide
the variable here. Ravel stop. We don't need
that to be displayed. Let's try this. Oh, there is a planet. But we did something wrong. Of course, we did
something wrong. We didn't put this whole
if else into the Favepe. Let's do this again. And there we have a planet. And now we have the rocket ship. Still, of course, the rocket
ship maybe also disappear, because here on this planet, it is landed, so it shouldn't
be movable by the player, and the player shod have
to do something else here. The player should trade
the resources here. So let's do this
for the rocket ship also control if then else. And everything inside. The forever loop will be
moved here in the the n case, and that's a very
long block here, and we get the
condition from here, maybe it doesn't really
matter because it's the same, but it's just faster that way. Here we have it. Put that here. We can already put it in
the forever loop again, and then in the else case, we hide the ship. And then let's try this. And there is a
planet, but there's a second planet, and
we'll take this one. And now everything is gone, nothing more, just
the backdrop here, and this is what we wanted. So nothing will be done here. This forever loop will loop forever and always
hide the sprites. Every sprite here is
hidden in this loop, and maybe we should put
something else here in the else because now everything is
just looping and hiding, and we can also save a
little bit of resources, the CPU cycles, if we wait here. So we can wait let's
wait for 1 second here. So everything is inside
this forever loop, and it will hide and
then wait for 1 second. And in this 1 second, the CPU for this spride, at least is idle. So I think that's a good idea. Let's do that in every spride. We'll save some CPU cycles here, save some performance here. So in each else, we wait for 1 second. But of course, if we restart
the traveling through space, there will be a delay of 1 second maximum because it will probably be in the waiting
state here if we change back, and if we change travel
stop to zero again, the sprites will be or
some of the sprites, at least will be in
the waiting here. So there will be kind
of a short delay maximum 1 second. Okay. So here's the last one, I guess. L et's wait 1 second here. Okay, now we have in each sprite the
waiting for 1 second, then that will be
easy on the CPU. Now we can land on a planet. Everything is
stopped and hidden, and here we can
implement our trade.
23. Refactoring the rocket ship script: Before we are doing
the trading here, I want to do some refactoring. Refactoring is if you
restructure your code to make it more readable and to make it more maintainable. If we look at this script here, this block inside the for
loop on the rocket ship, you can see that it's
a little bit too long and not very understandable,
not very comprehensible. So what can we extract here? So I would say we will
extract this here. So the outside if else, we leave it like it is, and this here, we can
separate into two parts. First part is if key up arrow pressed and
the whole keys here, and the second part is this
here if touching rock. So we separate them like this. We have torn this out here, and we have separated these two parts of
this long block here, inside this if travel
stop equals zero. And we are creating two blocks
for these two parts here. The first block would be
the player control part. This part checks
for dekeys which are pressed and then
control the spaceship. Let's call this player
control and just hit. Now we have this
defined block here, and just drag this first
part here to this define. We are defining player control
with these four ifs here. All these ifs check for a key, and arrow key, if this is pressed and then changing
x or changing, y. Okay, so the second part
is this one here is about the condition in the case when
the spaceship hits a rock, and this is what
we call the block, also hit test, or maybe
let's call it rock hit test. So here we have this
define for the rocky test, and let's just drag this here. So we have these two functions, or these two blocks, procedures, whatever
you might call them. Here in scratch, they're called custom
blocks or M blocks. And now we need to call
these two blocks here in our forever loop in
our I travel stop equals zero. Let's
put that in here. Player control first
rocky test after that. And now the game should work
as before. Let's try this. Here we have the
controlling is working, and we can also,
I've hit the planet. So let's try again. I want to hit a rock so
that I can see the crash. And there was also a planet. That's why we are
here at the city. So let's try it again. Just hit a rock here. Okay. There you go.
Everything working the same as before. And that's, of course,
also the advantage of refactoring or requirement for
refactoring also that the functionality should
be the same as before. So here we are just replacing these two parts of this long block with
two custom blocks here. And we're just
calling them here. And maybe we should
also write this with a capital P here to make it the same as the
rock hit test. So this is what
refactoring is about. You're not changing
the functionality, you're not changing
how it works, but you're changing
the structure and make it more readable, make it more maintainable. What do I mean
with maintainable? So you can see here these are two blocks with
separate functionality. Here is the player control, and here is the rock hit test. Somebody who's not
familiar with the code, or maybe you yourself, who is maybe not any more
familiar with the code because it's maybe a month ago that you've changed
anything here. So now you're not sure
how this code works. But if you do it that way, if you separate the code
into your own custom block, and then calling
these blocks here, then you can better maintain it, meaning you can better
locate the code that needs to be changed
or needs to be extended. And then you can also understand
the code that is there. So here I can immediately see that this is player control, and this is the rock hit test. So it is very easy
to, for example, put another key here in
this block player control. So I key, let's
say, space pressed, then and then shoot something like a laser
beam or something. So this can be extended here. In this custom block, and for the rocket test you may want
to test for something else, not for the rock only, and then you need
to rename this, of course, or you define
another block here. For example, we can test
for another obstacle, I don't know, maybe a black
hole, something like this, and then you can define
another black hole hit test, or you can put that here inside this rocket test and rename
this to Just hit test, for example, that
will be an option, or you have two blocks. One for the rock hit has, one for the black
hole, hit test, that you can decide. But the advantage of
the refactoring of this refactorm here is it's
much more readable here. You can see which
block does what? Because you can name them, and also you can easier find the place where you
have to make changes. Okay, so that's our
first refactoring or not the first one. We've already used
the custom blocks. So if we go to the rock itself, we have also this reset random, and this is also
kind of refactoring because we had this before, here inside this
long list of blocks, and we refactored it, so to say, into this block and called
it here reset random x. And also when I start as
a clone, reset random X. So this was also refactoring, but this is here more explicit. I've announced it before. We are doing a
refactoring and we're not changing the functionality here is still the same as before, but here we have a more readable code and a more a better
extendable code here.
24. Switching backdrops: One more preparation
before we go into the trading screen. Let's have a look
again at backdrops. So far we've only
added one backdrop, and this was set
if we select here, the stage, then we
have backdrops here. We've added the metro one, and we've had before this backdrop one,
which is the first one. We could theoretically just delete that because we only
need one at the moment, but I want to
demonstrate here how to switch between backdrops. We make this first one
maybe in a color like, let's make it, maybe
completely black. Set the brightness to zero here, and then we have
a fill of black. Use this rectangle with
black just like that here. We'll just span this rectangle
here with the mouse, and we have the backdrop. Okay. So this is our first backdrop, so we need to set it also. So let's put that into
the rocket hip code. When flag clicked,
when go clicked, then we need to
switch the backdrop, and this is here under Looks, so you can switch costume
here for the sprite, but you can also
switch backdrop. So let's do this,
switch backdrop two, then backdrop one,
can also rename it, but let's leave it like that. Backdrop backdrop one
is the Black one. So we have this, and now the problem is why we don't
see anything if when we start a game is that I
have put in something here in planet for setting
travel stopped to one, so I can skip the whole traveling through
space stage and then directly go to this screen here because we want to
implement this screen next. So this is why I put
this shortcut here. Setting travel stopped to one at the beginning
here at the start, we'll just jump to
this state here, which is the same as if the
rocket chip hits a planet. But I will leave it
like that for now. Let's get back to
the rocket chip, so I switch backdrop two, backdrop one, or I can also
switch backdrop to Metro. It's the same. So depending
on what I choose here, this will be our
starting backdrop, either the black
one or the metro. So this is how you can switch
to a different backdrop. And this is also what we
should do at the start, switch to this backdrop here. And then if we hit a planet, and this will be here. So if touching rocket chip
on the planet sprite, then we hide the planet
sprite, of course, and then we set travel
stopped two, one. And also then we have to switch to this
backdrop metro here. And also, if we want
to see this backdrop, we should also set it here because I have added
this shortcut here, I can take it out
for the moment, then we would see, I have to put it back in
and set it to zero. Of course, otherwise,
it will stay on one. Now we have the same behavior here and if we hit a planet, we go to this backdrop here. And also everything
else is stopped. This is how you
change backdrops. You can also change or switch to the next backdrop
here with this block. That's also possible. You can have an animation of backdrops, that's
also possible. But what you can't do is you
cannot move the background. Move the backdrop. That's why we have made these
two sprites here, for a moving backdrop,
and moving background. The stage here, the backdrops in the stage are not movable. This is why you have nothing on the motion here if
you select stage, and you can change backdrops. So to speak, change costumes of the backdrop with
these blocks here. Switch backdrop to
metro and weight is also a possibility and
also next backdrop. We have used this
one switch backdrop two and then a
specific backdrop. Why do we have this switch
backdrop two and wait? This is because there is also an event when
backdrop switch two, and this block here
is waiting for every script that is triggered by this
switching of the backdrop. Let's see here under events, when backdrop switches to, let's say metro, then we can also execute a script here
blocks here underneath. That here we'll wait for these scripts to finish
and then continue here. Will have a similar behavior
if we take this year, when I receive message, but we won't be using
messages for now, so that's why I won't go
into more details here. Just that you know that
this will also wait for every script that
is underneath here, when backdrop switches to, and it will wait before
continuing here. These are the backdrop blocks here and we can switch
between the backdrops. At the moment, this
doesn't make much sense because we're starting with this one switching to the metro one, but you cannot see the first
backdrop anyway because we've made our own
background sprites here. It could be something else. We could just make our costumes here in the sprites
without this. Let's say we would just not have this black rectangle here, so we can get rid of that. Now we only have these circles
here and the same here. We can select the rectangle deleted or press delete
here, delete button. And now we still have
the black background. So that is because we have this backdrop
in this color here. We would change this color. So let's change the color here. Let's make it red. Let's
see how this works. So now we have a red
backdrop, and the stars, these dots here, these
circles are still white, but with the black
line here outline. We can also get rid of that, but I won't be doing that
here because in space, it's usually black, so let's
put it to black again. Now we have the
same But this way, it is important that we switch backgrounds if we
hit a planet here. If the player hits a planet, then backdrop is changed
to the city so that we can have different scenarios in which the game takes place. In the next video, we
will really be trading.
25. Buying repairs: Okay, let's implement
the trading, so the player can trade in, sell the resources
and get, for example, the first thing we want
to implement is get a repair in additional
repair here. At the start, the player
has three repairs, and then he can collect
resources and then trade in the resources to
get one more repair. For that, we need a button, so let's create a
new sprite here. Click on this, choose a sprite, and here in the search field, you can enter a button, and then you have some buttons here. I will take this one. You can also take this one.
It doesn't really matter, but you have to consider
having a little bit of space inside the button
to display a text inside. I will choose this one and
here we have it and we can go to costumes here
and insert a text. Let's do this, choose
this text tool here, and then click where
the text should be. Then we enter y repair. We can also change the color
of the font here to black. Let's do this build
color to black, and it's a little
bit too big here. Let's make it smaller.
You can drag this corner here and make it smaller.
Something like this. We can also put another text here stating how
much this will cost. Let's say five
resources is the price. Let's make this smaller two, put it somewhere here. Yeah, I think that's
okay. If you want, you can change the
background color here, select the arrow here. This one and this
can be changed here, so you can also choose
a solid color here. Not a gradient.
This is a gradient. This is solid, and this is also a gradient
from top to bottom, and this is a circular gradient. So as you like, I will choose a solid
background color here. Yes, it should be
something very bright, I guess, to have contrast. I think that's okay.
And now we can place the sprite somewhere. Maybe here, and maybe the border should be
a different color. Let's choose solid
some kind of blue, maybe, maybe a
little bit lighter. I think that's okay. Also,
let's leave it like that. We can also erase this year. We don't need the second
costume here for the button. Now we have the button, and
now we need, of course, to display it at the
moment it is displayed, and that's not good
because when we start the game, it
shouldn't be there. So we go to code and then
events when go clicked, then we need to hide it. So that's unders, of course. And now it is hidden
when we start the game. Of course, it should
be displayed when we go to this city here
to this planet, and now it should be
displayed. How do we do that? We could make a loop here, also forever loop and check, for example, for
this travel stopped. But it's not necessary to
have forever loop here. There's a different
mechanism we can use here, and this is about messages. In scratch, you can
send messages from one sprite to other sprites
to all other sprites, and you can have
different messages, and this is under events here. From here, When I
receive message one, broadcast message one, and broadcast message
one and wait. These three blocks here
are about messages, and this is important
here because this is a very good way to send a message to other
objects in the game. What message do we want to send? We want to send the message that the trading screen here
should be displayed. At the moment, we just
have disappearing of all the sprites of all these rocketship
planet rocks background, implemented with this for evepe and with this check
for travel stopped. But we could also
do that, of course, for this new sprite for this button sprite and check for travel stop and if
travel stop is one, then we can show the sprite, but there's a much easier way in my opinion to use the
message mechanism here. We need to send a message if the trading screen should
be displayed and also, then the button
should be displayed. So here we're setting
travel stop to one, and this makes
every other sprite here disappear, except
for the button. Here exactly in this case here, in this if after or before
set Travel stop to one, we can broadcast a message. Broadcast a message
means we can just send a message to
every other sprite. And if a sprite like the
button, for example, want to receive a message, then we can use this block
when I receive message one. I don't want to use message one because the name
is not that good, Let's create another
message. It's very easy. Click here on this drop down on this arrow and
then new message. Let's call it show
trading screen. This is the name of the message, and then we can put it here
after Set travel stop to one. Each time the rocket
ship hits the planet, we are setting
travel stop to one, and we are broadcasting
this message here. Now in the button, we can
have this block here, when I receive, not message one, but show trading screen.
This is the events. When I receive this show
trading screen message, then I can show the
sprite very easy. When go is clicked,
the sprite is hidden. When this message is received, then the sprite is shown. You can also click
on these blocks here and have them execute
each time you click them. So when I click
this, it is hidden. When I click this, it is shown. So that was a good test, but let's test it in the game. So here we have our rocket ship, and we need to find a planet. There is one, and there
you have the button also. Okay, let's rename the
button to buy repair. So this way we can identify the button better
here in this list. Now we have this button, and what do we do
with the button? Of course, the player
has to click the button. And then the repairs left
will be increased by one, and the resources will
be decreased by five. So each repair costs
five resources. Let's implement that. First,
we need another event, when this button is clicked. Let's go to events when the spride clicked.
Here we have it. If the player clicks
on this button, then we need to
increase repairs, increment repairs by one
and decrease the resources. Let's do this here
under variables. We can do this, change
repairs left by one. This will increase repairs
by one, incremented. And then we need to
decrease, of course, the resources because the
player has to pay for it. So change resources
by minus five, so that we decrement
the resources by five. So let's try this in the game. Again, I restart the game. And hopefully there will
be a planet there it is. And then I click on
this button here and we see repairs left
is now four was three, four, and resources
are minus five. So minus five is not good
because then you are in debt, but this is not how
this works here. You have to have the
resources to buy the repair. So we have to check
if this is possible, if the player has
enough resources. Let's go under control
if and let's take this if then s block and put it around
these two blocks here. This way, these two blocks
will be in the if then case. Like that. In the else case, what can we do in the else case? We can say something. T's unders, say hello,
we change the hello. You don't have enough resources. For 2 seconds, maybe
that's enough. Now we need the condition here. Conditions are under operators. We need to check
if the number of resources are minimum of five. Let's check for greater than variables, and then resources. If resources are
greater than four, five at five or more, then we can just buy the repair or the
player can buy the repair. If this is not the case, then we say you don't
have enough resources. Alternatively, you can
also use this less than. Let's do this also. If resources are less than five, that means four or less, then we can say, let's exchange that,
drag that out. Put that in, and now we
need to exchange these two. If resources less
than five, then say, you don't have enough, we
need to separate these two, you don't have enough,
and in the case. We do the trade. So you can either
do it like this or the other way
around like this. The advantage here is
you have the five, and here you also have the
five, so that's much easier. Here, you have to subtract
one from the price, and here you can use
the price directly. So that you can do
really as you like. We can also set another
variable to the price, and then we can replace these with the variable.
Do we do that? That we will do in
the next video. But now let's try it in the
game if this really works. I'm not collecting
any resources, so my resources are zero now, not enough, we should get this you don't
have enough resources. Now I will collect some
Let's collect five. Two, three Now we have five, and now we need a planet. There it is. So we
have exactly five, and after the buying,
we should have zero, and it works, and repairs
left is four now. So that seems to
work. So you need minimum of five here
to buy the repair. And of course, if you have ten, you can also press the
button twice as a player, and then you get two
repairs, so that's easy. So in the next video, we will have a price
variable here, a price for the repair. And then we will use it in this place here in this
location, and also in this, of course, and this way we can use one more operator here.
26. Varying the price randomly: We want to replace this
constant value here of five. This is the price
for the repair, so five resources for one
repair with a variable. So let's go to variables, make a variable, of course, and we can this time, set it for only this srt, because the other sprites won't need it because this
is the buy button, and only the buy button has to know the price at this time, so we make it a
local variable here. So let's call it repair price, and for this sprite only. And now we can use it here
inside this button sprite. And for example, you
cannot use it here in this planet sprite because it's not available
here under variables. It's only now available here in this by repair button sprite. So here it is, repair price, and we need to set
it to the price. So let's say each time we
show the trading screen. So when we receive this
message show trading screen, We can set the price here so that maybe next time we
show the trading stream, the price can be different. But let's set it
to five. For now. So we set repair price to 55
resources we can get rid of. And now we can use
this variable here. And instead of using this five here and this
five over there, this minus five, we can
now use the variable. So let's drag it again. Here. So if the number of resources is less
than repair price, then the player doesn't
have enough resources, so this message
will be displayed. And now we need to, in the else case, decrease the resources
by the price, but not like this, of course, so we cannot just put that in
here because that's wrong, changes the resources
by plus five. So we have to change
it by minus five. How to achieve that? Let's
drag this out once more. And then we go to operators, and here we have this
multiplication operator. So let's take this one. So we multiply the
price with a constant, and this constant is minus one. So we have repair price set to five times minus
one is minus five, and that's exactly what
is here as a constant. So let's put that in here
and now this should work. So we are setting the price
to five here in this case. We are checking for
this lesser than here. And if the player has
enough resources, we are decreasing the number of resources by repair price, and we get this with this
multiplication with minus one. Okay, so let's try this. There shouldn't be
any difference. So this is kind of
a refactoring here, but we will use
that refactoring to our advantage by setting the price here to
a random price. So let's try this first. So I will first
collect the resources. Let's collect this
time maybe six or seven before going
to the planet. This time it's more difficult. I have five now, one more. Here. Now we need a planet. There it is. And now I can buy one repair, and this works. One resource is left, and we have four repairs. So this works. And now I
can change this here to, let's say ten or two, whatever I want, and I don't have to change these
two locations here. They will just also work. So that's the advantage. And this way, we can also
set this to a random price. So we can just replace the two here by pick random one to ten. Let's take one, 25 here
or one, two, six, maybe. One is maybe a little
bit too little, so let's take two, two to six, so the price will always
be 2-6. So let's try this. Let's just go for
the planet now. I know we need to
collect resources first, let's say five at. So we will probably be able to By this. Okay, we can
also collect more. We have seven now, and that
should be always enough. So buy repair repair
price is set to six now. We can see it here because
here under variables, there is this check box here, and if I uncheck it, it will be hidden. If I check it, it
will be displayed. We know that we need six
resources to buy one repair. We have seven, so let's buy one. And now we have one resources
left and four repairs. So that's working Only problem is the price is
not correct here, so there is five resources in this text here
and this text is, of course fixed because
it is in the costume. So here we have this
five resources, and it's not variable. And here we should be displaying the value of
the variable repair price. Okay. What we can do is we can move this here to this place. So first, let's
right cling on it. We have different
display options here, normal, readout, large read
out slider or hide it. So we can just take the large read out.
This is very large. So we can just put
it maybe here, and then we can get
rid of this text here. Just delete that text here
in the sprite costume, put that maybe in the
middle slightly above. That's okay. Now we can also make that a little bit
smaller here in the outer 12. That looks better. And here we have the value
of the variable, and maybe we should
put some text in front so that the player knows that this is the price of the repair. So let's make another sprite
just to display this here. Can just paint. So let's just put
in the text here. Price colon, maybe yeah, that's I think k.
The size is okay, so let's put it in
the center here. But the problem is we need
a background for that, let's drag a rectangle here, and this way, the
rectangle is in front. But first, let's change
it to white here, so the fill should be white. The saturation needs
to go down to zero. Okay. But one more problem, it is on top of our text here. So we need to change. You have these buttons
here, forward, backward, front back. So we put it in the back. So click on this button. This way is really in the back. So to speak the background is the rectangle and the
price is above that. So we can also select the
price and put it to the front. This is the same. So nothing changed here. But now we have the price, but it's a little bit
too big, of course. Let's make it smaller. Here we need some room
for this variable. Let's make it like this, maybe still a little bit too big, we can make it smaller here also by changing the size here. Let's put it to 80, maybe, still a little bit too
big, something like that. Then we stop the game here. Put this button here, put the price here. And then on top of that, we can put that here. But the problem here
is you cannot change the background of this display here of the variable display. So that has to be like that. But we can display the price
with this new sprite here. And let's put that
a little bit above, so that it's centered here. Okay, so that looks okay. But now we have to
show this sprite also, and also we have to
show the variable. So let's first get
rid of the variable. So we unchecked this here, or maybe we should do it in the code, that's
better, of course. Because we need to initialize
it, to be hidden here. So let's first go to Sprite one, and when we start the game, we need to hide ourselves because the rocket ship
hasn't landed on this planet, so we hide it, it's the same as for
the button here, and here comes something
tricky because you could drag this here to
the price tag sprite, but I won't do that, and
there's a reason for that. Here is the problem
with local variables and this copying of one
block to a different sprite. So if you drag this here, This set repair price
two pick random 226 to this price text
sprite here. Let's do this. You will see that it will
appear here, of course, it's a copy, but also there is this repair price
local variable here. Scratch created also a
local variable here. We have two local variables
here. One is here. And one is here, and they have the same name.
That's the problem here. So you could say,
Okay, repair price, that is the same as this one, but it is not, and
here's the proof. I'll show the repair price here, and it appears over here. And if I do the same here, it appears here next
to the price text. These are two different
values, also, four and two, because there
are two different variables. Each is local to the sprite. So this is local to this bride, this repair price, and this
is local to this spride. So what does that mean, if I set here the repair
price to a random number, this repair price will
still be the same. So if I set it here
to something else, for example, we can
set it to, let's say, to zero or to minus
one maybe so that we can see that it is
really this value here, and I start the game. We see here we have two. So if we hit a planet, then we can see that this price text repair
price is minus one, and this one is four. This one is still minus one, and this one here is four randomly set
by this block here. So here you really
have to be careful. If you drag something
with local variables, a block that is using a local variable or
setting here in this case, then it will be
creating or scratch, will be creating a new local variable
in the other sprite. But these are not
the same variables. They are both local
to each sprite. This is a problem here, let's get rid of this one, delete repair price variable.
We don't need that. But we need to show this here
in the buy repair button. So each time we show this here, when I receive show
trading screen, we need to show
this variable here. How do we show and
hide variables? This is here, these two blocks. Show variable repair price, hide variable repair price. So when G is click, let's hide this because at the start of the game,
we don't want that. And whenever I receive
show trading screen, the message, it will show the variable repair price
here, this local variable. Here, the price text will
only show and hide itself. We need to add here this event when I receive show
trading screen, then we just show
ourselves here. That's it, or that should
be it, let's try it. I'm going straight to the
planet and here we have it. Price is four. I don't have any resources collected and you don't have enough
resources is displayed. That's okay. Let's
collect some resources. At least five, I would say, maybe more if there are. Yeah, I have three now. Four, and maybe two more. O crash. There is one more, and now we need a planet. Okay, so here we have
it resources eight. So I can buy two
repairs. Let's buy one. We have five now. And
let's buy another one, and now I have two
resources left, and I don't have enough
to buy one more. So repairs left are four
because I had the crash. So that's I have four now, but I bought two, so
that's all correct. Okay, so this is
how you can make the price for the
repair here random. So it is always chosen
2-6 a random number. So this gets a little
bit more unpredictable, what the price will be, how
many resources you need. So if the player goes to this planet and then doesn't
have enough resources, then that's bad luck, of course. And then the player
needs to go back to traveling through
space and collecting more resources and then
go back to the planet. But the problem is there is no way to go back to traveling. So that's what we have to
implement in the next video.
27. Correcting the background code: In this video, I want to
correct a mistake that I have just realized that we
introduced earlier, and we introduced it when we changed the costumes of
the background sprites. So we have deleted
this rectangle here. That was kind of
the background for this for the stars,
the black rectangle, and we've deleted it because
we had this backdrop here, the black backdrop, this one, and we didn't need
the other one then. You also see that this is
not correctly in the center. But that's not the problem here. The problem is we have changed this costume here and with
deleting this rectangle here, we have changed the size
of this sprite here. That's the problem here. If this y position
is not correct, then this background sprite won't be reset to
this position here. I have intentionally made
this value here wrong, so it's not the correct value, and you will see
what this causes. Only for the first
background sprite. I have made this. The other
one I corrected already. You can see that the first
background is stuck here. Here you can see a star
of this background, and it's not reset. That means it's not
coming into this if y position less than
minus 350. Why not? Because you cannot change the position more than we
can check what the value is, -320, you cannot
set it below that. I can just set it to -500. But if I do that, it will
automatically go back to -320. It is not possible to
change y below that value. This condition here
will always be false, and it won't reset. That's why we have
to change that. We have to adjust that to the size of the
sprite. Let's do that. Here we have minus 320, we have to check if
it is below -319. And then we also have
to reset it to red 20. Let's check if this
fixes the problem. Crash. But it seems that it really is fixing the
problem because we can see that the first background
sprite is correctly moving and is correctly
reset. That's okay. Mistake fixed, and
you will always have these bugs that
you need to debug, that is fixing mistakes. For fixing mistakes, you first
have to find the mistake, and that is the
debugging process. You first find the mistake, try to isolate the cases
where the mistake happens. And then you fix the mistake, and that is debugging. Scratch is not really supporting debugging
as other languages, other programming
languages or environments can do that because
it is not able to set break points
where you can halt the script and then
inspect the variables. But you can inspect
the variables, of course, by showing them here. So this is why you
can under variables, make these variables display
here with a check box. So we can always display the travel stopped
variable value here, and we can see if
this is correct. Then we can also show the y position of the
sprite, for example, so we have to go to motion, and here we have the x position and the y position,
and also direction. We don't need that
at the moment. But here, y position, you can check it, and then it will also
be visible here. And then you can see the y
position of background one. And then you will see that if it comes to the bottom here, it will be reset
to the top again. That's about fixing the mistake. That I've just realized
at this point in time, but during coding
during programming, there will always be the
need for debugging also. So this was an introduction
to debugging more or less, but there was no
intention to do that. It was just a mistake before. But here's how you fix
it, and also again, how you can set these
limits here, these -319. If you do it wrong,
something like this here, then this background will be
stuck and it won't be reset. And then you can see what the minimum value is
of this background, and then you can use
this value here minus 320 to make this condition here, so it should be one more. One pixel, so to speak, more than this extreme position, and then you can use this. And then you set
the same as here in the negative as a positive y to reset the background here. And there's also one
more thing we can do to make it a little bit
easier here on our brain. So we can exchange this here. So with the knowledge that this Y position will always
be a minimum of -320, we can exchange this
here with a equals. So if y position equals
and then minus 320, then we will reset
the sprite here. This is easier, but we
can only do this because this y position of
the sprite is always -320 if it is set below that. It is always reset, so to speak, to this
minimum value here. So it will always
take on this value. If we would use a variable here and always change
it by minus two, then we could land on
something like -321, and then this condition
won't be met. But since this is really a special case here
with the x position, we can do it like that,
and then you won't have to add one to this limit here. So it's just if the y position
is at the minimum of -320, then go to this
starting position here. So let's try this. And we
will see that it also works. This way, you can use the
same value here, 320. This time it's -320, and here it's positive, 320, and it is a
little bit easier.
28. Exit the trading screen: R Now that we have the
trading screen running, we need to exit it
again, of course. So let's go to the screen. Again, here we have the
trading screen, we can buy. If we had enough resources, we would have been
able to buy here, but we won't so we have to exit this screen to be
able to travel again through space to collect
resources and then actually buying repairs here in this
kind of shop, which it is. Okay, let's get rid of
this position here. First thing. So where
do we have that? It's BG one, so back ground one, and here is the position. You're down there,
Uncheck the check box, and then it is
gone. Travel stop. We don't need that
either. So let's remove the check box here. Remove the check on
the check box here. So now this is also gone. And for the exit, we need a button, of course. So We have to paint
another button. Maybe, no, not paint. Let's use a preset button here. Maybe this one will do. So just erase this one. This is the right one, and
now we can customize it. So at least we have to put
a text here that says exit. Make it a little bit prettier. Maybe make the color, the text color black here, and putting it in the
center or maybe here, a little above the center. That's okay. And also the color, the background color
here should be something else, maybe duration. Yeah, I think that's better,
something like this, and also the border here, this is a gradient
at the moment. Let's make it solid here, and then maybe just black
in this case, is okay. And then we need to make
it a little smaller. Okay. So I think that should be okay. And here we change
the size also to 80%. Okay. Nice. Let's place it over here so
that the player can see it clearly that this is the button to exit
this trading screen. Okay, let's go to the
code here to the script. And we need an event, of course, when
sprite is clicked. When this sprite is clicked,
what do we do then? Of course, we need
to set the variable. The travel stopped
variable needs to be set, so set travel stopped 20. This will cause
almost everything to reappear here
and to move again. Let's try if this
already does something. So we immediately go
to a planet here. First one we see, there it is, and we try the exit. Okay, so we see the
rocks are moving again, the stars are moving,
planets are moving. The rocket ship isn't moving, or at least it's not visible. So let's and also the
background is not visible. Let's first fix the
rocket chip here. Why is the rocket
hip not moving? Because it is stuck
in this forever loop. And then it will just if
travel stop is again, zero, it will just player
control and rocky test. And here is nothing
to show it again. Okay. So we have to show it. So go on to looks and then show or we have it already here, so we can get rid of that
and use this show here. And put it here in this if
travel stop equals zero. So first thing we do
there is show and each time it goes through this loop and travel
stlop is zero. We show it. It doesn't really matter that we show
it multiple times. It's almost a no, no operation. So this should be okay. So let's move that back. And now each time that travel stop is in this
forever loop zero, the rocket ship is shown.
That should be okay. Let's try this.
There is a planet, and we exit, and then we
have the rocket ship again. Also this is working. Take some time for
all the rockets and the stars to come down, but it's okay. I
think that's good. What is missing
here is, of course, the background
also needs to show itself whenever
travel stop is zero. That's also easy. Remove
that here, put that out, and then put that back in here in this I travel
stop equals zero, the same for the
second background. So show it each time that
it goes through the loop, each iteration, that
travel stop equals zero. So background should
be also okay now. Let's try it. Of course, everything you do
you have to test. So just make a small change and then test if this small
change really works. So that's how I do it. If you do many, many things and
change many blocks and insert there and
change of value there, then test it, and then you
realize nothing works anymore. This is not so good. So change a little bit and then
test this change. That's the better way to go. Okay, so let's do this. Background should also work. Should also reappear if we
click on exit. Yeah, it is. But what is still missing is
the backdrop is not changed. So we need to change here to
this first backdrop here. Okay, where do we do that? Also, on this sprite. Let's rename the
sprite here to exit button or just exit. We'll do. Set travel stop to zero, and then we can also
set the backdrop here, switch backdrop, two,
backdrop one and test it. We can also test if we can buy something with the
resources and then exit. Now, it's too expensive here. We cannot buy repair,
but let's exit. And now we see everything is back to the way it was
before, except for, we have the buy repair And
the price button here, so they have to go, and also
the exit button has to go. How do we do that? That's
a little bit different? I would suggest to
use a message again, so broadcast a new message here. So we have show trading screen, and we need hide trading screen. So create a new message
high trading screen, and this way we can react. In this sprite, we
can also react. So when I receive
hide trading screen, then we will just
hide the sprite here. So hide like this. And also, we need to
show the exit button. This is something we
haven't done so far. So whenever I receive
this shot trading screen, I want to show the sprite here. So that we have the handling of this Hides trading
screen message and also the show
trading screen message, and we have to do
the same here for price text and for buy repair. So I can just copy
this when I receive high trading screen height to the price text and also
to the buy repair button. So this will also do the same here in the
other Sprites. Okay. And also, what we need to
do is what is done here, when go click, hide, or let's take this
one, when go clicked, hide and copy it over to
the exit button here. So this way, also this exit button is hidden
when the game starts. Let's start the game.
No exit button. Let's land on a
planet. Here it is. There we have the exit button, we have the by repair button, and the price text. So we have no resources.
Doesn't matter. We exit, and we can again
gather resources here. Okay. What is still
missing is, of course, this variable needs
to be hidden also. So we need to do that because
it's a local variable. We need to do that in the
by repair button here. Let's do that. Variables,
Hight variable. Whenever I receive
hide trading screen, Hide variable repair price. So let's test it again. Exit, and there we have it. So now we can switch
between this mode here, the traveling and
collecting mode, and this trading mode here. So I can buy actually
two repairs here, exit and collect more resources. So that I can buy more repairs here.
Let's try that again. I can buy one more, and then I have no
more resources left, and then exit, and I
can continue the game. So very nice, we can
exit the trading screen. We can enter the trading screen. So we have these two modes traveling and collecting
and the trading mode, which is very nice.
And we're doing it By using a variable here, as you have seen, this
travel stop variable, which is always checked in the controlling game
loop for each sprite, and we are doing it
also with messages. So we have this high
trading screen and show trading screen messages
that are used here. This way, we don't need
that forever game loop for each sprite that
is not necessary. It's also called
busy waiting here. So if we're in this mode here, travel stop is not zero, but it's one, We're here
in this busy waiting loop. Forever and then else hide
and wait with just waiting, waiting, waiting all the time. And here, this is not the case. We are actually
not busy waiting. We are only waiting in this case for a notification
here for a message, and then we're acting on the reception of
this message here. And that's a little
bit different. To different methods to kind of achieve the same goal
or similar goal, maybe. But here we also have a control game loop and
this is easier to check it here in the loop than to do it via a message
reception here. Okay. So that's our game. I think it's a very nice game. It may not be very
difficult at the moment, but you can tweak
it a little bit. That gets more difficult, maybe not so many planets, maybe more rocks
and less resources. We can, of course, also add an upgrade here
for our rocket chip, so maybe the rocket chip
can shoot laser beams or something and then destroy the meteorites, the rocks here. And then maybe the rocks, also reveal some more resources, I don't know, maybe hidden
planets or I don't know. You could do that, and you
can also upgrade, of course, the trading screen here so that you can not only buy a repair, but you could also make an upgrade to your
rocket ship here so that you can maybe then shoot a laser something else or missiles
or something like this. Or you can also
settle on planets. So if you have, let's say, 50 resources may be able
to settle on this planet, and then you can also harvest resources on the planet
and with time passing, this could be really
give you more resources, so that you can settle on
more planets and so on. But at the moment, this is
our final state of this game. So you can, of
course, extend it. It is not so hard to extend it. So for example, if you want to sell or let the player
buy something else, you just need to copy this here and then make
another variable, maybe the upgrade state of
the rocket chip, for example. And then you need to
check, of course, maybe here in the
rocket chip control, can check for space
for the space key. If the space key is pressed, you can shoot this laser beam, and if this laser
beam hits a rock, the rock will just disappear, or you can then later, if we go into animations, you can also do an explosion, maybe animation,
something like that. Okay. But that's it
for this game here, in the next section, we will begin a new game, and this will require us to explore more
functionalities here in scratch because there are more So you not only have
these variables here, but you also have lists, and this will cover
there in this next game, and we will also make use
of more custom blocks, and also there will
be animations.
29. New Game Controlling the main character: This will be our new game, and it will be a adventure game. Just like some old maybe
point and click adventures, we have a main character, and this main character
is called Avery because we have in scratch a
preset sprite called Avery, which is a girl that
has also an animation. We will be using this sprite, and so Avery is going
on this adventure, and the player can
control Avery with the cursor keys and then
interact with objects, collect them, and solve puzzles with the
help of these items. What we need to do first is, of course, create a new project. Name it Avery's adventure. I've already done this here. Then we need to create
our first sprite. Normally, you have this cat. I have already
removed the cat here. Let's add Avery. Here we have Avery
standing and in two poses. Let's check the costumes. This pose and this, let's change the order here. You can drag this here. Let's have the
standing Avery first, and then this may be
talking Avery as a second. We need more sprites here, more costumes, not more
sprites, more costumes, and we can insert them
here, choose a costume, and then we have these
walking costumes here. Let's select the
first one of it, and then the second one, and then the third one
and the fourth one. Now we have the
walking aviary here, and here we have the standing every and the speaking aviary. Let's move the speaking
aviary here to the end. We first have the
standing every, then the walking aviary, and the last costume is
the speaking aviary. With the help of these costumes, we will make the walking
animation, of course, and also standing and speaking. That's it for the
costumes for now, and let's check the code. Let's make the player
control the character, our main character aviary. First, we go to
events, of course, when clicked, and we need
a forever loop here. This will be our game loop, and here we will check
for the controls, and the controls are the keys, left arrow, and right arrow. Let's get an if here. This will check for
the left arrow. So we go to sensing key pressed and here
from the drop down, we choose left arrow, and then we can also
already doublicate this and make one
for the right arrow. So what do we do? We
are changing x for this sprite by a certain amount so that the character will
move in this direction. So go to motion and change x by. Here, this will be the left so. Let's say we move x by, or we change x by minus three,
it will go to the left, Duplicate this, and
here we move it by or change x by plus three, k. We can already try this. Let's see how this works. Let's start. And we are
able to move the character. Okay, next we'll be
changing the orientation, so Avery should be facing right when right arrow is
clicked or is pressed, and of course, to the left if
the left arrow is pressed. We need to move the orientation of Avery of the main character, and this is done by a block
that's also under motion, of course, and this is this
one point in direction. We can tell scratch to
orient this character to the right direction or to the left direction and
also other directions, but in this case, we only
need right and left. Let's do this. If left arrow pressed then
point in direction 90 degrees, that must be -90 degrees, so you can change that
here to -90 degrees. In the other case, point
in direction 290 degrees, if right arrow is pressed. So if you click here, you can see that this is the
right direction here. Let's try this. And we
see it's not correct. And this is because we haven't set the right rotation style, and this is this block here. Set rotation style. This is the last block here. We can set it here
at the beginning, set rotation style
to left, right. Default is all around, and we set it to left right. Let's try this, and it works. Now we can flip the main
character from right to left. And now to the animation
in the next video.
30. Walking Animation: I. Now we want to add an
animation to the movement here. At the moment, we can just move and change the orientation
of the main character. But we also want an animation,
a walking animation, and we also have the costumes here for a walking animation. This is the first frame, so to speak, this is the
second third fourth. We need to cycle through
these frames here, the four walking frames, the four walking costumes here, and this can be done
in a second loop. Let's go to go
clicked, then forever. Here we will do the animation. Okay, so how can you
do an animation? You have to switch the costume to a different one to the
next one, for example. This is underlooks. So let's see Undos switch costume two. A specific one,
here you can choose any costume in the
sprite that you like, or you can also
say next costume. So for example, if we have
the standing costume, next costume, we'll go to the
first walking costume here. If we are animating, doing the walking animation, we will just change to
the next costume here. Then if we reach this costume, we need to check for
this and then set it to the first walking costume
here. Let's do this. First, we just switch
to next costume, choose this one here, and then next costume
and this forever. Let's see how this works. Yeah. There's obviously
an animation here. It's not the correct one, but it's switching through
all the costumes here. But it's way too fast, so we need to add a weight here. Let's go to control wait. And then we don't
wait for 1 second. That's too long. So
let's say 0.2 maybe. Let's see how this looks. It looks quite okay.
We can try maybe 0.3. Let's try this. I
think that's okay. Here you have the animation, but the problem is we don't
need the first one here, and we also don't need
the last one here. We need to check in which
state the animation is and then set the costume
correctly. Let's do this. For this, we need an if
here or we take an if else. Then we need to check
in which costume the character at this
moment in time is. This can be done also
here under looks. So here we have costume
number or costume name. So this is kind of a variable, Let's drag that in here, and we check for,
let's say the number. So we check for equality, if costume number equals, and then we have to
check which number the last walking
animation frame is. So this is first one, the standing second, third, fourth, fifth. So it's five. So if it reaches five, or if the current
costume is five, the number, we need to set
it to a specific costume, and that is the first one. So one, two, two is the number of the
first walking costume. Okay. So we go to looks
and then switch costume. We don't need the number here. We can just set it
to this frame here. I guess that's correct. Let's check it
again. No, it's not. It's every walking, every
walking A, of course. If it reaches the
last animation frame, then we switch to the first one. And the first one
is every walking A. And if this is not the case, we just change to the
next costume here. And of course, we need also
to wait in the forever. So that the animation
speed is not too high. Let's check this and
this seems to work fine. Avery is walking here. We can also let her walk in
the different direction. So left and right,
everything works. But she doesn't stop walking. She walks all the time, so the animation is
not stopping here. And this, we need to
do with a variable. So we need to set a variable to a specific value and then check this value in the
forever loop here. So let's introduce
a walking variable here, make variable walking. And we only need that
for this sprite. For this spride, only, all the other sprites have
their own animations, if any, so we just need
it for this spride. And we need to set
it, of course, to zero at the start. So set walking or already
had a walking variable here. Let's get rid of this one, and also let's get rid
of my variable here. So set walking to
zero at the start. Then if we are here in this left arrow or
right arrow pressed, then we need to set it to one. Let's do this here, we set it to one, and also And then we need to check
in this for ever loop if we should continue the animation or if we should just wait here. This year inside, I
can drag that out, needs to be in another if. Let's go to this if, and
we need an if then else. Here it is, drag
that in forever. If walking equals, we need
an equal operator here. Then we need our
variable walking. If walking equals one, then we can continue
e animation. We put that here in the then
and I walking is not one, then we should stand still. We need to switch to
this costume here. Switch costume to Avery. I think it's B, let's do this. Switch costume to Avery B, and let's try this. Left, right,
everything is working, but it's not stopping here. That's a problem, of course, we need to set walking 20 again, and where do we do that? Set walking to zero, we could do it here, but the problem is it
should be conditional. There are multiple
ways to do that. We can have a nested
if then else. Let's drag these ifs here
out of the for evepe. This way it gets easier, and we need to use if
than else for each one. If an else and this
here needs to go here, and this needs to
go here, of course. If key left arrow is pressed, then set waiting to one, so that's the same as before. Can get rid of this if then. But in the else case, we check for the other key here, but not with if then, but also with if then else. So let's take this here. Drag the condition over here and drag this block over here. This might be a little
bit tricky because we're nesting here if conditions. We are first checking for
the first left arrow key. If this is pressed, and
if this is not pressed, we're checking here
in the els case for the right arrow key pressed. If this is also not the case, we are getting here
into the els case of this inner if then else. There we can set
walking to zero because left arrow key wasn't pressed because we're
in this els case, and also the right arrow
key wasn't pressed either, so we're in this els case. No key was pressed, and we can set
walking to zero then. So let's put that all here
into the for eve loupe again, and let's try it out left, right, stand, and it works. Now we have our animation here. So how this works is just
by switching costumes, and if the costume is
at a certain point, in this case, is
costume number five, we need to reset it to the
first frame of the animation, which is every walking
A, and otherwise, we're just switching
to the next one, but only if walking is one, and if walking is not one, we're just switching to
the standing costume. How do we determine if walking
should be one or zero? We're just checking if
any key was pressed, so not any key but the left
or the right arrow key, if neither of one is pressed, then we set walking to zero. This way, we have this
nice walking animation. Now we have every walking and
the player can control in which direction or if
she should stand still. I think this is nice? We can control the main character here, and we continue in
the next video.
31. Setting up the first room: Since we can control our character here our
main character now. So like this, we need to
prepare for our first riddle, our first puzzle
in the first room. And speaking of first room, we need to choose a
different backdrop here because this is just empty. So let's check
what is available. And my idea is that we are
starting in a bedroom. So let's take maybe the
second bedroom here. And place avery in this room. Let's move her a little bit, so the starting position maybe should be
something like here, and since she needs to
walk left to right, she cannot move up here. There needs to be enough room and no obstacles here below, and this way, she can walk freely to the
left and the right. Let's fix the starting
position of Avery. We can just set go to x, go to y here, and these coordinates are current coordinates,
so that's okay. She's always
starting from there. If we move her and then go, she will be reset to this starting position
and from there, she can move in her bedroom
to the left and the right. That's the moving part, and
that's the background part. Now we need objects so that Avery can interact with
them and solve a puzzle. The first puzzle will be that the door to her
bedroom is locked. We need to find a key and
how has this happened? My idea was that she was
sleepwalking last night and accidentally
locked the door and put the key under the bed so
that now she needs to find the key under her bed and then unlock the door to
leave the first room. Let's implement that. For this, we of course need a key. Let's look for a key sprite. Enter key, and
there we have one. Fortunately, this is
a little bit too big. Maybe just 50% or 30%. Yeah, maybe that's okay. Let's move this key somewhere. Under the bed,
maybe in the shadow here close to the top
of the bed, maybe. I think that's okay. So it's not immediately
visible here and the player has to spot it
first and then pick it up. This is the key, the object for the first
room to solve the puzzle, and now we need to think about how the player should
come to the solution. So first thing I would do is if every wants
to leave the room, she should go to the
left or the right, and there should be a door, but the door is locked, so we can decide now if the door is on the right
side or the left side. I would say it's here, so we have to tell the
player that this is a door there and the door is locked. So how do we do that? We have to check for
the x coordinate here, and if the x coordinate is
greater than a certain value, then we can let Avery speak. But there's a different
solution to this problem. We can do it by checking
the x coordinate here, but we can also put
an object here, maybe an object with
a certain color here. And then if Avery hits this
object or hits the color, then we can let her speak. Let's try the second solution. We put a special color here
and if Avery hits the color, then we let her speak. So we go to the backdrop. Again, backdrops here. We can also erase the first
one. We don't need that. So let's change first the
color to something brown, think that should be okay, a little bit darker, maybe. And then a rectangle. So let's put that
rectangle here. And this is, so to
speak, the door here. Avery could just
walk to the door, and then we need to somehow check if she hits
this color here. If this sprite is
touching this color. Hopefully, this color
is unique here in the room and is not
found somewhere else. So then we need to
change the color, of course, but that's not
the problem. We can do that. But let's first try
it with this color, and then we need to check
for the touching of a color. How do we do that? Sensing, This is the right category here, but we are in backdrops. So let's change to Avery. So here we have the
possibility to. Color is touching color or sprite touching color, and this is the right one. So this can be the condition, and we can put that here
in an if statement. So let's get an if if then. It is, I touching color, and now we need to
pick the color. Here you have the color picker. Just click on that,
and now you can pick a color here
from the screen. We take, of course,
the color of the door. So that's our color. And if we hit that, we just let Avery
speak something. Let's go to looks
first and say hello, and that should be ok for now. Then we can put
this into the for velope and each iteration, it would check for the
touching of this color, and if it touches the
color, it will say hello. Let's try this walking
over to the door. Hello, and this works. Of course, she's always
saying hello now, and we should put
that in an if else. Again, we replace that
here with if then else. Move that condition over here and move the
hello over here. And how do we get rid of
the speech bubble here? Let's put that first
into the F everop again. We say nothing. So again, say and not hello, but we erase it completely. So there's nothing,
no character is here, completely empty, and this way, the speech bubble disappears. Okay, let's try that. Walking over to the door. We're hitting the
door. She says, hello, and we're moving away from the door and the hello is gone. The speech bubble is gone. Also, we noticed that
this is the right color. This is unique to this room. So we only have this
color here on the door. This works, and let's
change this hello to the door is locked.
The door is locked. I must have locked it while sleepwalking at night and put the key somewhere
long explanation, but this should be a hint for the player what to look for. Let's try that
again, restarting, going over to the door, hitting the door,
The door is locked. I must have locked. There's spelling mistake it while sleep walking at night
and put the key somewhere. Let's correct this
and now it's correct. Moving away from the door and
the speech bowl disappears. This is our first
mechanism here, and it's based on
this touching color. You can use this with
special colors you choose, and then you can
sense a collision of a sprite with a color and then say something,
for example, here, or you can also do
something else Okay, so that's the clue
for the player here, and now we need to check how
we can get the key here, how the player can
pick up the key. If the player has the key, then Avery can open the
door and exit the room.
32. Display key info: Let's now create the
code for the key object. We have the key here, the sprite, and here
we have the code. At the moment we
don't have any code, but we will insert it now
when go clicked like always. And then what we do
when go clicked. When go clicked, we
make a for everop. And we check if the mouse pointer is
touching this sprite here. Let's go to if else. If else, put that
in the four velope, and then we need the
sensing category here. If touching mouse pointer, if this sprite is touching
the mouse pointer, then let's say something or let's think something. So think. No, not, but it's a key and in the other
case, in the else case, we think nothing so
that this is only displayed if the mouse pointer is really touching
the key sprite. Let's try that.
Hovering over the key, it's a key, it works, and if I put the mouse
point away, then it's gone. That's nice. But we
want something more. This bubble here should only appear if Avery
is near this key. If she's, for example, here, so a few pixels
away from the key, it should then display this. It's a key if I
hover over the key, and if she's like here, example, then it
shouldn't be there. This way, we make
the player move the character to explore
the surrounding here, and it's not only the mouse pointer that needs to go everywhere and search
for something to, for example, pick up
or look at or use. Let's do this. How do we do that? There are certainly multiple
ways to do it. We will use another
sensing here. Then we have this distance
to here it is mouse pointer. It is a default, but we
can also choose Avery, so I'll sprite here. Distance to Avery,
and the distance to Avery should be
below a certain limit. So let's go to operators
and choose this here. Less than, distance to
Avery should be less than, let's say, let's leave it like
50 or something like that. We can adjust it later also. No problem, leave it like that. Then we need to check if the mouse pointer
is touching the key and also that the distance
to Avery is below 50 here. And this end we
haven't used before, but this is here also
under operators. So here we have this end. So let's drag that here. Distance two is the
second operand here, and the first one is the
touching mouse pointer. So we have two conditions now, and both must be fulfilled
to display this. It's a key. First condition is
touching mouse pointer, and second is distance to
Avery is less than 50. So this is the complete
condition with this end here, and we put that here. So you have to be careful
when you insert this, then the left edge here should be aligned with
this if shape here. So it's highlighting if you put it on the
right place here, and then you can drop it, and then you have if
touching mouse pointer and the distance to
Avery is below 50, then you can display this. It's a key, otherwise,
display nothing. Let's try this. First, we try hovering over the key
when Avery is here. The distance is of course, more than 50 here, and it's not displaying
anything, so that's good. Let's walk nearer Oh, here we see that the Z
order is not correct here. But it's working, it's a key. Now it is displaying,
it's a key, and if I move Avery a
little bit to the right, it's not displaying it. That's what we want.
Avery has to move near the key to really
get this message here. It's a key. That's working, but we need to fix the order here so that the key is
always in the background, but that's easy
when go click then, we need to set this
to the back layer. Here, go to front layer, change that to back,
so go to back layer. And then put that directly
after when flag clicked. And now that should be okay. The key should be in the
background, and it works. Let's hover. It's a key. Also on the other side, it's working It's a key, and if I move away from the key, then it doesn't work anymore. That's what we wanted, and
that's what we also achieved. This end operator here is new. So you can combine
two conditions here, this touching mouse
point condition with this distance to Avery
below 50 condition. This here is the second operant, and this is the first one. Only if these two are true, then we display this
thought bubble, and otherwise, this thought
bubble will disappear.
33. Picking up the key: Now that we can show a description of the
object of our key here. We need to be able
for the player to pick it up and to put
it into the inventory. Let's try this. When the
player clicks on the key, and we need to switch
to the key, of course, for that, then something
should happen. We go to events when
this spride clicked, and then we need
to do something. First, we need a
new variable here. For all sprts so that it
can be accessed everywhere, not only in the spride. We call it key picked up, and this will be zero if
the key wasn't picked up yet and it will be set to one in this case here when
this bride clicked, but we have to also
consider this if here. So we need this if touching mouse pointer
and distance two, not specifically
touching mouse pointer. I think that's not necessary
because the distance to Avery is this important
condition that we need here. So let's duplicate this right click on this
distance to Avery, and we put it here first. And we need a control here if then So if distance to Avery, when the sprite is clicked,
when the key is clicked, is less than 50,
we can pick it up, and we set the variable here. He picked up two or one, and at the beginning, we need to set it, of course, to the default
value of zero here. Okay, let's try that. Here we have the display of
the variable value here. Key picked up zero at the
start, that's correct. And we need to try to click
on the key at this point. It's not possible. That's
okay. That's what we want. And now we can see it's a key, and now we should be able to pick it up and
it's working here. So again, let's
restart the game. We try to click on the key. It's not working, and as soon
as it's a key is displayed, we can click on it
and key picked up. The variable will be set to one. What else do we need to do here? We need to go to looks and hide the sprite first so that it disappears
here from the screen. So let's try this
going over here. Fine. The key, it's a key, and now I can click on it, and now it's gone, very nice. This is the picking up part
and it's working quite okay. Now we need to have
an inventory where we display all the
items, for example, this key here that are
currently in the inventory, in the pocket, for example, or maybe she has a backpack,
something like that. Then we need to display all
the items at the moment, we only have one
item here, the key, and this needs to be
displayed in the inventory.
34. Moving the key to the inventory: Now we want to put our picked
up key into the inventory. So let's make an inventory. It should be something like a backpack or
anything like that. But in practice, I think it's only a rectangle with a
background color, and that's it. Let's just paint a new sprite. So choose paint here, and then we just make
a rectangle here. So like this, put it
in the middle here. Maybe that's a
little bit too big. So Maybe something like this. Now it's not the
right color, I guess. Let's change that to
almost white, I would say. So brightness little
bit lower than that, that should be okay. We can tweak it later. And also the position and
the size is not correct. So let's put the size here to eight, see what that looks like. And then let's move it
to the bottom here, and we can see that Avery or sprite here is
a little bit too low. So let's move her. Let's go into her code. And when we set the
starting position here, we can maybe set it 250 -50. Let's see how this looks like. Now a little bit less than that. A little bit more B
precise. Let's start again. Yes, maybe just a tiny
bit more like 42, and now we have the
correct position, I guess. So let's control her at bit. That looks okay. And also this can be a
little bit smaller, maybe. So we just resize here, go to the arrow here and then
resize on the edges here, something like this, or even smaller maybe
something like this. I think that's okay, so
we leave it like that. For now, this is
just the background for our backpack, let's say, we need to move the key, which is here over to this inventory if the
player picks it up. Here we have the code
when the player picks up the key now at the
moment we hide it, but instead of hiding it, we should move it
to the new location inside the backpack here. Let's get rid of the
hide and instead, we take the key which is
invisible at the moment. We haven't initialized
it to show. So to be safe, let's do this. At the beginning, we show our key press on it
here on the show, and then it's visible here. Let's stop the game,
and then we move the key over here
to the inventory. Maybe here is a good place. And then we go to
motion and go to x y, and this is the
current position here. We just drag that here over
to when the sprite clicked. Now what needs to
happen is or what will happen is if the
player clicks on the key, it will move from here to here, so it's in the backpack. And also this key picked
up is set two, one. We can use this
variable value here, we can use on the door if
the player hits the door, so let's start it again. And the problem here is we haven't set a
starting position, so that's why the
key at the moment, we can click on the key
here on the sprite, and then it flashes up. You look here, and you
can see that it flashes. So it's below our
inventory right. So let's put that sprite
into the back layer. So when go clicked
Then under looks, we have this go to front layer and this will change
to back layer here. This will be under the
key now, should be. Let's see where the key is. No, it's still not. Maybe we also need, we have
this go to back layer here. We should change also
to go to front layer. That was a mistake.
Here we have the key, but it's not in the
correct position, so we need to set it back to this place under the bed.
Let's move it there. Something like that
here. That looks good. Go two x y should be
the correct position, and this is the starting
position of our key. Let's try it. Go
over to the key, and then try to pick it up. That's the problem here. It's not in the
right layer here, it's shown over ay here. That's a problem, but we
can solve that later. And we also have a problem here because the door is locked, I must have locked it
while sleepwalking, which is the color that is
the same as the door here. So that's a problem too. Well, now let's
click on the Sprite, and this at least works. So this key is moved to this location here
in the inventory. Okay, let's fix this
layer issue first. So here, of course, we need to go to the back
again because we have to make sure that the key is behind our main character here. But then if we move it
over to the inventory, we need to make
sure that it's also going to the top layer
to the front layer. So whenever we move it here, we can just go to front
layer. So let's try that. So now it's behind Avery. Everything. There's
this color issue here, but let's click on it and we
have it in our inventory. Let's get rid of
this color problem. So obviously, the
key has a color, which is also the
color of the door. So we need to change the color of the door or
the color of the key. So let's change this color
here in our backdrop. So we can zoom in
a little bit here. Or maybe it's easier to change the color of the
key, so let's check that. Yes, it's one color here, everything one color, so we
can maybe select all here. Select all is command A or Control A on windows and
on Mac it's command A. So just select all, and we can choose a
different fill here. Maybe it's a green key,
something like that. So brightness a little bit
darker, maybe that duration, a little bit less and a little
different in the color, not very pretty, but I
hope it will do the trick. Now it's not very nice here. The contrast is not very nice. So let's make it even
darker. Now it's better. We have a green key here. So let's try this. There
is still a collision. Oh, I have selected it here and accidentally moved it
with a cursor keys. So we should undo that. Let's change the code and
then restart the game. Okay, so we don't get this color or this message about the door, so
everything okay. So let's click on the
key, and here it is. Okay, now we need
to go to the door, and it's of course, still locked because we haven't implemented something
to open the door. Let's do that in the next video.
35. Unlocking the door: Now that we have the key in our inventory or that the player has the
key in the inventory, we can open the door,
at least theoretically, the player could open the door, and this is what we
implement in this video. It's quite easy. We already
have the variable here, set key picked up to one, so we can just test for that. And for this, we need
to go to the player. And here we have the
touching color part, and in case that the player touches the
color of the door, Avery says, the door is locked. I must have and so on. And here is what
we need to change. So we need to check or
insert a check here. So let's go to control. And then this if, and we
have to check the variable, of course, for equality. Or we better take not if
the n but if then else, if then else and
this equality check. If it is zero, so we
need the variable, if key picked up equals zero, then we can say the
door is locked. But if key picked up isn't zero, but one, we can let the
player speak something else. Say hello for 2 seconds
or maybe is 3 seconds, and we let her say. Since I have the key now, I can open the door. Now I can unlock the door
and finally leave my room. Okay. The seconds
should be enough. And now we place this back
into this if touching color, this brown color of the
door here. Let's try that. We first pick up the key, or let's try first not to have the key and then touch the
door, the doors locked. That's okay. That's fine. Now we have to pick
up the key here. Move a little closer. Now we can pick up the key, and then we should be
able to open the door. Since I have the key now, I can unlock and
finally leave the room, or I can unlock it. That's better. What we have seen is that Avery should
stop walking. That's why we need
to switch costume to Avery B to the standing
costume to duplicate, and then we also do that before saying this
sentence here. Let's see if this works.
Let's get the key. Now she's still walking. The problem is that this
here causes the program to be stuck or the script here
to be stuck for 3 seconds. So this animation over
here is still progressing, so that's why this doesn't work. But what we can do is we can set we can get rid of that here, and we can set the
variable walking to zero, set Here set walking 20, then this animation here in this code here
should not progress. Let's try this. First
getting the key. That's near enough. Now I have the key and Avery is standing still and
saying the sentence. That's nice. But of course, we also need to leave the
room actually now and go to the next room and we
will do in the next video.
36. The action menu: Before we take care
of changing the rooms and Avery leaving the room
going to the next room. We will improve our
inventory a little bit so that you can click on any item in the
inventory at the moment, it's just the key and then
get a menu with commands that you can or with actions that you can use on this specific item. So in this case, it's our key. For that, we are creating
a new sprite here. First we rename this sprite here because it's
just cold Sprite one, we will just call it
n tree like that. Then another thing,
we need to fix. Let's start a game again. Just go to the key, and now what you see over here, if I click on the key, you see a flashing here, and this is the thought bubble. The problem is the
thought bubble is visible here when the key is
moved to the inventory. We need to hide the thought
bubble if we move the key. Let's go to this if
touching mouse pointer. Think it's a key and
else Think nothing. Here, we are displaying the
thought bubble, if the p, the mouse pointer is
touching the key, and then if the
sprite is clicked, we need to hide the
thought bubble. Just dulicate this
think nothing. Before we are moving here
to this new location, we think nothing and this way, there should be no flashing
anymore. Let's try that. Stop here, and then click on the key and then
this is not flashing anymore. This is now, so let's create
a new sprite for our action. This action will
be the use action so that we can use the key. And then if you click on use, the door should open and Avery unlock and Avery can
go to the next room then. Let's draw a new sprite here, and we need some
kind of rectangle. I guess, let's put
a rectangle here. The fill should be white, like that, and we can leave
the border here, black. That's okay. But it's
way too big, of course. Let's first write the text here. Text will be use, and of course, we need to set the fill here to black so that we
can read the text. Then we move this here and then selecting the
rectangle again, making it a little bit
smaller here, still too big. So maybe something like this, and the sprite, of course,
is too big at the moment. So let's say it's 60%. That seems to be right. So let's move that here over to this place so that it just appears here when the key is
clicked in the inventory. Let's go to code. I think that the appearance
here is quite okay. Events, when go clicked, we need to hide it first because shouldn't be
displayed at the start. Choose hide and move that here. Let's try this, and it's gone. That's good. When
should it display? It should display when
the key is clicked, but not when the key
is clicked over here, but if the key is
in the inventory. Let's go to key. Here we have when
this sprite clicked, and here we need to tell this
new sprite to show itself. And we have already used
something like that, how to tell another
sprite to do something. And this we can do with
broadcasting messages. Here we have broadcast
message one, and we need to put that here and let's not call
it message one, but we will call it display
actions and this way. It can also be used
by a second button, a second sprite, which
will execute an action. This case, we only have one, and let's rename this here
to use just like that. This key needs to tell the
sprite here to show itself, so we broadcast, the message, and let's go to the
use sprite here. And here we need to
receive that message. When I receive display actions, then show So this way with
the click on the key, it will be displayed. Let's try that,
and it's working. So whenever I click
here on the key, this is displayed here. Of course, this is not correct. It shouldn't be displayed if the key is not in the inventory. So that's what we need
to implement now. And this is a simple if. So let's go to variables
here, key picked up. This is the variable
we need to check, so go to operators. If key picked up equals one, and now we need an if control if then and here if k
picked up equals one, then we can do the
broadcast here. It's sometimes not that easy to put the if around blocks here. I just do it like that, and then I move the second
if here below this if. Please be sure to
have it like this, not nested because
then it would also be only executed or only checked here if key picked
up equals one, and that is, of
course, not correct. You need to put it
under this first if. Be sure to do it like that. So if key picked up equals one, then we can broadcast, and then the use
commands can be shown. And when the user clicks on use, we can just hide it, maybe. So we go to look, of course, and hide, and then we need an event when this sprite
clicked hide it. Let's try that. We go over to the key so that
we can pick it up. Now we have it in the inventory, we click on the key,
the use command, the use action
button is shown and I click the button and it's
gone, not displayed anymore. This works. But now, of course, we need to implement
something that you or the player needs to click
here on the use button, and only then the
door can be unlocked, and only if Avery is
actually near the door, then the player can
unlock the door with a key by this use key use, and then the door
can be unlocked, but only if Avery
is near the door. So let's implement that
in the next video.
37. Unlocking the door with the use action: At the moment, the door
is unlocked as soon as the key is picked up and Avery hits the door or
touches the door, then the door is unlocked, and we want to change that. The key is necessary to
be used on the door. So let's start the game again. Walk over to the
key, pick it up. And in this case, you do nothing, of course, because Avery is not
touching the door. And if she's now touching the door, it's
automatically unlocked, but we want it to be unlocked whenever use on the key is pressed when Avery is
touching the door. So what do we need
to do for that? We need to go to our
use sprite here. And whenever this use
sprite is clicked, we are hiding it. That's okay. But we're also broadcasting
a new message. So here broadcast, no, we need a new message here, and this new message
will be use clicked. And this needs to be, of
course, received by Avery. Let's go to Avery, and
then when I receive, use clicked, and
that's when we need to check for Avery
touching the door. So let's introduce a
new variable here, make a variable only
for this bride, and we call it touching door, and we will set it whenever
the door is touched. So in this case,
we're setting it to one touching door one, and in this else case, if the door is not touched, we are setting it
of course to zero. Let's check if this works. We're going over to the door. Touching door is one, and if
I move away from the door, it's zero. So that works. And now we need to check here in use clicked when I
receive use clicked, that means that the
user has clicked or the player has clicked
on use on the Upright, then we need to check if
we are touching the door. So let's do an if then else. I don't know if
we need the case, but let's do it with that. And then equality check, and now we need our variable. So touching door, if
touching door equals one, Then we're touching the door and we're receiving use clicked. And in this case, we can say, since I have the key now, I can unlock it. So let's move that from
here to this if then, and this should say
this sentence here. But the problem is
in this for evalue, we're saying nothing
here all the time. So let's remove that
temporarily and then start the game
again to be sure. Clicking on use should
now do nothing. So that's okay. So now we
need to touch the door, touching door is one, and now we click on use, and this should display. This the door is Unlocked now. That seems to work, very nice. Let's restart the game, and let's walk over to the door. The door is locked is displayed, so that's k two. Let's go away not touching, and now this message, this bubble here stays. So that's a problem.
So we can just put it back here if not
touching in the else case, we're just erasing
the bubble here. Let's see if this works. Let's start again,
collecting the key and then make use of it
while touching the door. And this is working. And I can also move away
from the door. And if we restart the
game and then just go to the door, it
should display. This door is locked, so that's working too. That's okay, like it is. But of course, we need to think of other items coming
into the inventory. And this is was assuming that
the key is selected here somehow so that
we pick it up and then click on the key
and then click on use. But if we had another item here, let's say we have
something an apple maybe, and we click on the Apple
and then click use, then this wouldn't work because everything is assuming that this use is clicked on the key. We need to generalize
here a little bit. If we have more than one
item here in our inventory, we need to check which
item was clicked and which item this
use action is for. I, for example,
an apple is used, every needs to eat the apple and not unlock
the door, of course. That's what is not working in this special situation
here like we have it. The logic is a little
bit too specific here. We need to generalize
the logic here. But first, let's go
to the next room, and there we might have a second item which
we can pick up, and that might be maybe it's
the kitchen, the next room, and there we can find an apple and pick it
up and use the apple.
38. Custom speak block: So there's one more thing
missing here in this screen. If we start a game again, Then we're going here,
the door is locked. We have to first collect the
key. Everything is okay. But the problem is if we
then collect the key, and we use it, and we are not touching the
door, then nothing happens. This is exactly this case here, and in this case, we need
to say something else. Maybe let's say we double this, and then we say something like, I cannot use this key here, and this may be for
2 seconds here. Let's do this, collect the key, try to use it without
touching the door. And it doesn't work.
Why it doesn't work. It's because here
we are saying it, but the problem is here
in our forever loop, we are in this case,
not touching color. So not touching the
door and in the s case, we are saying nothing here. So that's why it's immediately erased the speech bubble.
That's the problem here. To solve it, I want
to refactor our code. Refactoring we had this
already is changing the code, but not changing
the functionality. In this case, it's
like we have an arrow, we have a bug, so to say, but we're not solving this
in this structure here, but we first make a refactoring and then we can solve
with this refactoring, we can easily solve the bug. Let's do this. The idea is
to have a custom block here. We've already done
this, make a blog, and we call this block, speak. We can also do it like that, speak in lower case, and what we also can
do is add inputs here. So we can add a
number or text input. We can add a bleen input
or we can add a label. So let's focus on this
first one, add an input. The first input will
be the actual message. So we call it message, and we need a second
input to this block, which is called duration, and this is the duration of the speech bubble that the
speech bubbles displayed. So we have two parameters here. So first is the message
that should be spoken, and the second is the duration. So let's click on, and now we
have our custom block here. So we have this define So
Let's move it down here. So we have enough
room to implement it. How do we implement it? We
can use our parameters here. We have message and duration, and we can use it
like a variable. We can drag this
out here and put it somewhere where also
variables are allowed. Let's first speak here. That's what it's called also, and we are going to look and
getting this say hello here. But we don't want
to say hello here, but we want to say message. Whatever is supplied here
as the first parameter, and we will see
how to do it will be set here, will be spoken. Let's call this block here
with this message parameter. So here, we have say I cannot
use ski here for 2 seconds, and we are getting this out of the ls and we go to my blocks, drag out the speak
here to the else. And now we can supply
two parameters. The first one is, as
I said, the message, so we copy this over to here, so this will be the message, and now we can try it. So just get the key. And we use the key over here. So maybe you have seen it. I can do it again, e, and you see the bubble, the speech bubble, but it's
immediately erased here. Why is that? Of course?
Because of this say here. We can get rid of the say. This say nothing will delete or erase the speech bubble here. So we get rid of that
and try it again, e, and now this stays, of course, it's staying
forever, so to say, or at least until there's
another message to speak. So she's always
speaking this now. I cannot use this key here. But we can of course, use the key here and now
she is saying this here. And now she's not
saying anything. Here, we say since
I have the key now, I can unlock it and
finally leave my room, and this is said for 3
seconds and after 3 seconds, this speech bubble is deleted. That's why it's
disappearing here. But anyway, we need to take the duration
into account here so that we can also replace this with
our new speak block. Let's do this. For this
to work, we have to wait So we wait seconds, and these seconds here
are the duration. So let's drag duration here, the second parameter to wait. And then after we have waited the time that was supplied
here in the parameters, we can say nothing. Looks say and then delete the
text here, so it's empty. S message, wait for the duration that we have
got from the caller here, and then say nothing. Here, we can say 2 seconds
maybe, and for this one, we can drag that
here and first we copy this message to the
first parameter here. And then the second
will be 3 seconds here. So now we can get
rid of this one and replace it with
our custom block. Let's try this.
Let's get the key, and then we can use it here, and we should I cannot
use this key here, and then it's disappearing. So that's this here.
But now we go to the door and here
we can use the key. Since I have the key now, I can unlock it and
finally leave my room. That's okay. Everything fine. Let's get rid of this say here and replace it
also with our block. We drag that in here, speak. The first parameter
is, of course, our text, and the second,
we can maybe say, let's wait for 3
seconds because it's a long sentence and we
need 3 seconds to read it. The average player might read it in 3 seconds. Let's try this. Going over here,
if we're touching the door, the door is locked, and then Avery is still
walking, as you can see, and I cannot move Avery when this message
is displayed here. I cannot move her. If I
go further into the door, I'm also having problems
to leave the door. So that's not a good
user experience, I guess. What's
the problem here? It's not reacting to
my arrow keys here. Why is that? Because
we are waiting here. If we call speak, we are waiting for
this duration, and if it's 3 seconds here, then we're waiting here,
we are blocked here, 3 seconds, and this is why this whole forever loop
here is not continuing, and we cannot go into the
if left arrow pressed, if key, right arrow pressed. This is not possible because
it's stuck over here, and it needs to wait for the
duration to continue here. That's not nice, but there
is a way to get around that. We can make is asynchronous. Meaning we don't
have to block here, but still after the duration, we can delete the speech bubble
here. How do we do that? We are working with
broadcast messages. Let's go over to events and create a new
broadcast message. If we say the message,
then it is, of course, displayed, and then we have
to wait in another event. Here, we have a new message
and I call it remove speech, and this will do
the waiting for us. This will do this here. But here we can just broadcast. So then we can react to this
message with when I receive. When I receive this new
remove speech message, we can wait for the duration and then say nothing.
Let's try this. It seems to be working, but not completely because the speech bubble is
immediately going away. So why is that? It's because this duration here is
not taking into account, but it is always zero here. Because this is a parameter
here in this function, in this custom block, but it's not known here when
I receive remove speech. We need to somehow
transfer this value here, this duration value over to this when I
receive handler here. How do we do that with
a variable, of course. Let's make a new variable, and we call it remove speech
time or let's say duration, or let's call it
speech duration. It's shorter, not for
all sprites because we don't need that for
the other sprites just for this sprite only, and then we have this
new variable here. And of course, we
need to set it here. So when we get it,
speech duration, we can just set it here, set speech duration two duration to the second parameter here. And now we can use it also here. So our speech duration
variable needs to go here, and this we can get rid of. And after this speech
duration seconds, we are deleting this speech
bubble here. Let's try that. Now it's deleted
after the 3 seconds, but not if we are touching, if we are touching, it will
always be spoken again, so that's why it's
not disappearing. But I think that's okay. So if we are not
touching the door, then this disappears
after 3 seconds. And what is nice here is that we can still control
the character even if the speech bubble is
displayed. This is very. We always have the control here. And we can move Avery still, even if we display
the speech bubble. And we have the control
here of the duration, how long it will be displayed. So that's very nice, and we have this speak custom block here that we can use
in all these places. And if we want to
change something, the functionality, if we
want to improve on this, then we can just change
this custom block here, and then this will be
changed for all the callers. So here we are using it. Let's see if we have
another say here. No, we haven't, so that's okay, so have replaced all
the occurrences of say with our new custom block
here. That's very nice. We have defined a custom block
with two parameters here, message and duration, and both
parameters are used here. First thing we do here is set this local variable to the duration that
was supplied here. Then we are saying the message that was also supplied here, and here we are doing
this broadcast, and we're doing this
broadcast because here, this is no longer blocking our function here,
our block here. So this is completely
non blocking here. It's just doing a broadcast and there's also
another command here. Broadcast and wait,
and this would block. So we can try it here. So we're moving that here, and then remove speech. If we do it like that,
remove speech and wait, you will see that now
it is still blocking. So that's not the
correct way to do it. But here we are blocking
our forever loop and we cannot handle all the
key commands here. So that's why it's not
the right solution here, so we need this broadcast
just without the wait. Because it is not waiting here for this receiver to finish. It is just continuing
this forever loop here, and we can still control Avery. That was our new custom
block with parameters, and that's a very
nice way to make the code more maintainable
and better structured, and you have less effort
to make changes here. This way, this is good
practice in programming to have functionality that is used in many places in a function, or in this case,
it's a custom blog. You can supply this custom
block with parameters here, and this way we can make every speech while still be
able to controlling her.
39. Change the room: Let's change the rooms. And for this, we
need, of course, a new backdrop, so
let's go to stage. And here we have the backdrops. We just have one at the
moment, bedroom two. And now we are
uploading another one. I have generated a kitchen
image or kitchen with the help of AI with co
pilot, respectively D three. Here it is, go to
choose a backdrop, and then upload backdrop. Choose an image here
from your hard drive. I have made this one
with the help of AI and we can use it for
this game. Here it is. I need to resize
it a little bit. Doesn't have the correct size. Control A or command A, and then we have
selected the image, and then we can
stretch it a little bit and also move it over here, where, for example,
the chair and the table is not visible, no longer visible here, or maybe just this
part of the chair, and then we can stretch
it a little bit. I think that's acceptable. But of course, you can
generate your own or paint your own picture of a kitchen or wherever
you want to get it from. I have created it with the
help of AI. So can you. But you can also, as I said, paint it yourself or download it from a
different source and upload it here like that
upload backdrop and then just choose it from
your file chooser. This was the finder because
I'm on a MC here in Windows, you have the windows explorer. So that you can
upload here images. It can be a JPAC or PNG
or it can also be an SVG. So now we have the
backdrop here as a second. So the first one will be this. And, of course, at the
start of the game, we need to set it
to the first one. So let's get into the
code of the stage here. So you can change from
backdrops to code. And here we can also have
this event when Go clicked, and here we change to the first backdrop,
switch backdrop two. Kitchen now, bedroom two, so that's correct, so we always get back to our first room here. And of course, if we have solved the puzzle
for the first room, we need to change
backdrops here. So let's go to Avery, and this is the case where
the puzzle is solved, since I have the key
now, I can unlock it, and finally leave my room. And after that, Avery can change the room
and go to the kitchen. And that's very easy.
Switch backdrop to kitchen. And this way, we have the
changing of the room. So let's try this.
First solve the puzzle. Click on the key. Use it. That's too
early because we're not in the door or not in
front of the door, and now we should use the key, and then we go to the second
room, which is the kitchen. Here we can move Avery
just like before, and she can explore
the kitchen here. So that's no problem. But of course, we
need an object here, and we need another puzzle here, of course, to be solved. To leave the house, maybe, she should go to maybe school
and to leave the house. She should find
something to eat, to take with her to school, maybe an apple, or she might want to take her
school bag with her. So that's what we need
to come up with here. So first, we needed to
change the backdrop, and this is done very
easily with this block, switch backdrop to kitchen. So we can also go to
the next backdrop. This is also what we could do. But I think this is easier
here to do it like that. So to go to a specific backdrop because you might want to
go back to the other room, and then we need to go
to a specific room. So let's get rid of that. And just switch
backdrop to kitchen. But here we might have
to do something else. And also, if we want
to exit this room, we have to do something else. And this is why we should
define a new block here, which I call go to Room. And here we can, for example, have a number or text input, which will be the room to go to. So let's do it like that and define go to room
here, switch backdrop. We should do that here. And here we can choose
number or text. Switch backdrop two. So that should be here
in this case, kitchen. So we should better rename this. So right click on
define and add it. So here we call the
first parameter room. That's much better.
So we have this room, which is a text, the name of the room, and we need to
call it over here, to room after the speak, and here we set it to kitchen. So let's try if this works. So we reset to the beginning. We need to solve
the first puzzle. Let's go to the
door, use the key. We are here, and it works. That's nice, so we can also
do something else here. Switch backdrop
two, and then what is supplied as the
room parameter here. For example, we could
place some objects here. Let's create a new sprite, and this time it will
be this apple here. Let's put the apple. We make it a little bit smaller, just like 60%, maybe. Now that's too
big, like 40, 40%. In the code, we need to set
it to hidden if go click. So let's hide it first. And then we can place
the Apple somewhere. Let's place it over here and make it a
little bit smaller, maybe 30%. That's better. So let's restart the game, and the apple is
gone. Very nice. And now when we change
to the kitchen, the apple should be
shown. How do we do this? We are broadcasting. So here we should broadcast that we have changed the room. Let's go to events and
then broadcast here. Room changed. Now, of course, we need to know which
room is the current room. We're setting a new variable, and we call that current room and that's a variable for
all sprites, of course. We need to set the current room here to this parameter supplied, set current room two room here. Now we can use that room or current room to
show the apple. Events, when I
receive room changed, then we check with
an control if the if the current room variable
is set two kitchen. Current room equals kitchen. Then we can show the apple. Let's try this. Start the game. Pick up the key, go to the door, and now we have the
apple here. Very nice. We have successfully
switched the rooms. We have shown the apple, and that's our code for
changing rooms for now. This will be expanded, of course, but for now, we can change from
the starting room, the bedroom to the kitchen.
40. Changing game objects to clones: Now that we have the
second room and the apple, we will change a
few things here. In the last video, I have added the apple as a sprite here
and here in this video. I've removed the Apple again. Why? Because we
want to implement all game objects with clones of this sprite here. What's the
reason behind that? The reason is we can then just handle every object
the same way, and we can also
make use of lists, and how we do that, I will
show you in this video. First, we have this sprite here, the key, and we will add
another costume here. And the second costume is
already here. It's the apple. So if you don't
have it, already, go to choose a costume and
then choose the apple here. Then we have two costumes here. The first one is the key,
the second the apple. And the idea is to have
for each different object, we have another costume here. Okay. So that's
the first step so that we have two
different costumes here. And of course, at the
beginning of the game, we need to set the
right costume. So let's do that when
this bride is clicked, is not the right function here. But when go click, when the flag is clicked, we need to set the right
costume for our first object. So let's switch costume to H, and then we can start a game, and it will be a key again, and there's no
difference in the game. We can still go to the door
and make use of the key, and here the apple, of
course, is missing. But how do we display
the apple here? That's when clones
come in handy, so we are going to control and then create clone of myself. This is the block we need, and we need to create, of course, some objects
here, some clones. The idea of clones is
that you make a copy of the sprite in this case of the very same
sprite of myself, so that will be the key. But we will also rename
the sprite here too. Let's say game object so that this is more generic
than just the key. Okay, so we can create a clone of this key of this
game object here, and we will do this, of course
at the start of the game. So we could just create, let's say two clones here,
and do it like that. And of course, we can also
do it with a repeat loop. So repeat ten times here. So maybe we can just
repeat two times. And then just one
create clone is enough because we are repeating
this two times, so we have two clones. How do we recognize
the clones here? So when I start, I don't
see any difference. First thing we need to do is
hide the original sprite. So let's go to looks
here and then hide. So we are hiding the key, in this case, the first costume. So the key is gone. We
are creating two clones. The first clone will be the key. The second clone will be
the apple, of course. What we need now is, of course, the event when I
start as a clone. So this one What do I do
when I start as a clone? We need to do the same
as when flag clicked. So we just move this whole block here to when I start as a clone, and we can get rid
of this one here. So now two clones are created, and for each clone, when the clone is started, this is done here. Let's see what it
does to our game. It's displaying the key
again. That's nice. Let's try if we can pick up
the key. That's also working. But we see that here actually
the key is still there. This is the clone of the key and not the
first key itself. Of course, because
the first sprite, the original sprite here is hidden and hidden sprites
cannot be clicked, so this is of course
a clone here. But the second key here
is the second clone, of course, but the second, the second object
has to be the apo. How do we differentiate here between the first clone and the second clone.
This is very important. What do we use for this, a variable, of course, let's make a variable here, and it doesn't have to
be for all sprites, but only for this sprites. Because it's for
this sprite only, it's also for the clones. So it's accessible
also for the clones, and let's call it just index. And we are increasing the
index here in our repeat loop. Variables change. So let's change index by one. Of course, we also set the
initial value here to zero. So the first index will be one, and then the clone is created, the first clone, and then again, index is changed by one. So then it will be two, and then the second
clone is created. And to check what value is
available here in our clone, we say the variable here. So let's say hello and
then variable index, and we will see what
index is shown then. So let's start the game. So of course, nothing is shown because we do the show after
the S, so let's change that. We first have to show it, and then we can say, otherwise, the bubble, the speech bubble won't be visible.
So let's do that. And why is it not working
because we are thinking here. And if you think nothing, then also the speech bubble
won't be visible anymore. So let's get first, get rid of this here,
and then let's see. So here we have
ten, why is it ten? Because we have set the
wrong variable here, so it's not current room, but it has to be
index, of course. So let's try it again. And now we have two, of course. Don't we see the other one. First clone has to say one, second clone has to say two, but of course, they're
the same location, so that's why that doesn't work. We have to put them in
different locations to see if this really works. Go to x and y and y has to
change depending on the index. First clone should be
at a specific location, specific y location, and the second one should be
in a different location. Let's do this with
the operators here and we multiply with the index. So let's get the index
here. That's not multiply. We go to multiply here index, and then we can
just maybe say 40, and then we go to
y 40 times index. So first, sprite
should be at 40, second should be at 80. So let's see how this looks. Now we can see they have
both different indexes. First one has one, of
course, second one has two. And the second one should
be an apple and not a key. So we need to change costumes
depending on the index. So the first object, of course, has to
be the key costume. The second one has to be the apple costume.
How do we do that? That's quite easy.
We just go to looks, and then next costume here. So in this repeat loop, we will just switch to
the next costume here, and let's see how this works. Doesn't work because we
switch costumes here also. So let's remove that. Here, we switch to the next
costume and now it works. So Index one is the key costume. I next two is the apple costume. This way, we can say
which clone is which. The first one is the key, and the second one is the apple, and the first one be
in the first room, the second one should
be in the second room, of course, and this is what
we do in the next video.
41. Introducing lists: So since we now have our two
costumes here at the start, we can make a small
adjustment here to be sure that the first one will
always be the key costume. We need to switch
costumes at the start. So switch costume to not
to apple, but to key, and we should maybe
do that after we have hidden the key or the sprite
here, the original sprite. So let's try this, and this should be okay. What we need to do now
is to make sure that the two different
objects are now placed at the right location
on the correct room. So the first key has
to go over here again, and the second one needs to
go in the second backdrop. L et's switch to that
somewhere over here. So first thing, the first clone should be visible
in the first room. The second one should be visible in the second room in
this kitchen here. So that's what we need
to achieve first. And how do we do that? We
are introducing lists. So what are list lists are
kind of like variables. So that's why we can find
lists here on the variables. Here we have make
a variable and, here, we have make a list. So let's make a list. And we have something
similar to make a variable. We can name this list
object rooms, maybe. So that's where we store our starting rooms for the objects. And
how do we do this? I will show later. Okay, for all sprites, no, we don't need
that for all Sprites. We just need it for
the sprite here. So Object room means
for each object, we need to store where which room the object
will be starting. Okay, here we have the list, the display of the list. You can toggle that with
this checkbox here. So if you don't want the
list to appear in the game, just uncheck this checkbox here. What do we have here? We can manually add items
here to this list. So with this plus here. You can just add as
many items as you like. And inside each of
these lines here, you can just write something like for a
variable, for example. So just like this text
here or like a number. Okay, so we have a list of
variables, so to speak, and this list is here over here, you can use it with these functions here,
with these blocks. So what can you do with a list? You can add another
entry to the list? Can delete an entry in the list. You can clear the
list with delete all, and you can also insert something at a specific
location inside the list, at a specific index. So maybe you can insert it here at the end or
somewhere in the middle, and this is what this
block does here. Also, what you can do is
replace an item an entry here in the list at a specific
location at an index. Also, you can get
a specific item from the list at a
specific location. Here's the index,
and with this here, you get the item at the position one here
in this example, or let's say two, and we can enter something here and
let's check the value. Here we can choose
different lists. At the moment, we
just have one list, so enter this here object room. This list should
contain for each object in which room this object
should be placed at the start. If you click on this,
you can see which values inside the list at this location at location two at Index two. Click on this block and you can see that at the position two, there is this string here. You can also just
maybe do it like that. This is first, this is
second and this third. And here you can see, if you click on that,
you have second. If you choose one for the
index, you get first, and of course, if you
choose three for the index, you get third, and so on. So what we can do with that, we can store in this
list in which room each of the objects should
start and should be placed in. Let's do this, and for this, we need to receive the
message, room changed. So let's go to events when
I receive room change. Then we have to set
the visibility of our sprite here to be more
specific of the clone. So that's why we
need to consider, of course, this list here. So we need to first change
the entries in the list. So first room of the
key will be bedroom, and a second is kitchen, and a third object we
don't have at the moment. So we can erase
these entries here. Okay, we have bedroom for the key and kitchen
for the apple, and how do we get or how do we check
for the correct room? This is, of course, an
if here. So if else, And we check for
equality, so this here. And the first operant will
be if item of object room, and here we of course
need to take the index. So the index will be different
for the key and the apple. For the key, it will be one. So Item one of object
room will be bedroom, and for the Apple,
it will be item two of object room,
which will be kitchen. And here we have, of course, to check for the current room. And if we change the rooms, then current room will
change to kitchen. So this is what we
have to check here. Let's make a little bit
room here for this. Oh, I have not the if then else, but the if then only, so let's take this here. Let's exchange that and
this we don't need anymore. So if the item at index of Object room of this list
here equals current room. So for the second room,
this will be kitchen. And for the first room, I think we haven't set current
room for the first room. So let's check Avery. And at the start of Avery, when go clicked, now, we don't set current room here. So what we can do is
we go to current room. So we go to my
blocks, go to Room, and at the start,
let's go to bedroom. So this is where we start, so we should go there, go to room bedroom, So current room, will be
bedroom at the start. And this way, we
have for the key, we have the equality here. So at the start, it
will be bedroom, and then the second room,
it will be kitchen. And if this is equal, then we need to show ourselves
here, show the clone. If not, we hide the clone. Okay, let's start a
game and try it out. And here we have two
objects still. Why is that? Let's click on this
sprite here game object, and we see this is the original, and it's also visible. And here this is the
key, the first clone. This is the second clone. So I didn't work. When I receive a room changed, then this check is done. Item index of object room
equals current room, and we show, otherwise, we hide. Why is it not working?
Because here we show each time we
create the clone, let's get rid of the show here. L et's try again. Now
we have this key here, and this is the original sprite. And we have the apple here, which is also wrong. So let's check again if
item index object room, and here we can also get
rid of this 40 times index. We don't need that anymore. Both objects are at
the same place here. But that's okay because the first one should be
in the first room, the second in the second
room, so that's okay. So let's tackle the
first problem that the original sprite is still visible here,
which is not good. It shouldn't be visible
because we hide it here. But the problem is it also
receives this room change, and then it will show itself. This is what we
need to avoid here, Let's go to variables
and make a new variable, and I call it let's
call it is original, and it's only for this sprite, and this is for the
original sprite to be able to identify itself. Let's set it here at the start. I original is set to one here. And here in the when
I start as a clone, we are setting it to zero. So each clone will
have the value zero, I is original and the original
will have the value one. And now we can make an if here. So if, and then now again, quality check, and we
take this is original. And we only check
for the clones here, so this is why we
set this to zero. So if is original is zero, which is always the case, if it is a clone,
then we can do this. Otherwise, we won't do it. Let's check again,
and the key is gone. So that's okay now, but at the moment, nothing
is displayed here. I start as a clone. So let's duplicate
this for the moment. And put it here. So if this check for the
room is positive is true, then we show the clone, otherwise, we hide the clone. Let's try this, and it works. So here we have the clone, the key clone, the
original is hidden, because we hide it here. It won't be shown
here in this case because we have this
check for original. And also, when I
started a clone, we also doing this here. So here we have a
duplication, of course, It's nicer to get rid of this duplication by
creating a new block. Here, let's do that. Block name will be
the set visibility, and this will set
the visibility, of course, depending on
this condition here. So we just have to
move this here to this set visibility
custom block here. And then we call set
visibility here. In this case, if it's
not the original, then we set the
visibility here on room change and also
here at the start, doing the same by
calling this block. So here's set visibility, and now we try again. And it's working. Let's get
first rid of this list here. It's a little bit too big here, so let's hide that. Let's also hide this here. And we pick up the key first. Let's see if this
works, it works. We go to the door. Use the key, and here also, we have the apple, so that
works as expected now. So now we can change the visibility depending
on this list here. So let's again show
the object room list, and make it a little
bit smaller here. So we have bedroom for the first clone and kitchen
for the second clone. And this dynamic check, if when the room changed, then we are setting
the visibility of the game objects here by using this list here and
this works as expected.
42. Placing the objects: Now that we have the visibility
of the objects correct, so the apple will be
visible in the second room, and the key is visible
in the first room. L here, here's the key. I can pick it up and
then use it on the door. Here we have the apple. That's all fine.
But as you can see, the apple is not at the
right location here, x and y of the apple is not correct. How
do we correct this? How do we fix this
with more lists? Let's pick our game
object sprite here, and we make more local lists. Local means for the sprite only, so choose this, and the
first one will be object x. So a mapping from the object from the index to
the x coordinate, and then of course, a second
list for the y coordinate. So Object y for this br and
now we have two lists here. We can make them a
little bit smaller. In each list, we need, of course two entries
because we have two objects. The first entry will be here
the x coordinate of our key. Let's check where this is. This should be this
coordinate here, 102 and y is -28. Here we have to enter -28. For the apple, we have to check. Here we can go to the
second backdrop kitchen. And we can here move our key. Maybe we first we change to apple here so
that we have the apple. I. And place it somewhere here. So here we can see y
is 11 and X is 127, that's what we enter here, 127, and here the y for
the apple is 11. So now that we have
our lists here, we can go back to the code. We try to start again and see if it's the correct initial state or if you've
forgotten something, no, everything is okay. Here we have the coordinate, and we have to use
the coordinates here in our define set
visibility here. If the object should
be shown, for example, a key or the apple
should be shown, we need to go to X and Y. Motion, go to x y. We need to get these coordinates here x and y from the
lists we've just made. Go to variables, and
then here we have item of object room
which will be x here, Object x, and it's not item one, but it's item index. Item index of object x
is the x coordinate. The y coordinate is
of co the item index, of object to y. Again, we're taking
the coordinates here from our two lists,
and of course, the number of the entry is always index the same
as for the room, and we have the two
lists for x and y. Let's check if this works. Starting in the game. And then picking up the key,
going to the door. And it's working fine. The Apple is at
the right location here, everything works. So now that we have
that, we can also hide these two lists here and
also this list here. If we need the lists, we
can always show them again, and also we can hide this. So if you want to show a list, just make the check
here on the list, and then if you want to
add another object here, maybe, then you have to make a new entry in all
of these lists here. At the moment, we want to be able to pick up
the Apple, I guess. So that's our new challenge.
43. Inventory list: To pick up the Apple, we
need to make another list, and this list will be
available to all Sprites. Let's make a list
here for Sprites, and this will be object list. Y for A Sprites because then the object Sprite can add
something to the list, and also the inventory
Sprite can access this list. Now we have object
list and it's here. What will this list contain? It will contain all the indexes of the objects that
are in the inventory. To pick up an item,
at the beginning, it's the key, we need to add an entry to
object list here. Let's rename the list
here to inventory list. That is clear that this list is for the objects in
the inventory. Okay. The first item that needs
to be picked up is the key. We can go to the code that is picking up the key,
and this is this here. If key picked up equals one, then this is already picked up, so we have to go here. If distance to
Avery is below 50, then we set key
picked up to one. We can leave the
code like it is, but we need to
additionally enter a new entry into this list or add a new entry to
this list here. This block here at T two inventory list is
exactly for this purpose. Add thing to inventory list, will add a new entry. You can already test that. If you click here, you see that thing is really added
to the inventory list, but we don't want to do that. We want to add the index
of this object here. Add Index to inventory list, and we can test it here. And we see that thing is
also here still in the list. So what we need to
do is, of course, we need to delete or erase the list at the
beginning at the start. And this you can do with
delete all of inventory list. Let's start again. And you
see the list is empty now. And if we pick up the key, you see that the index here
is in our venture list. Now we can go to
the second room, and here we can also
pick up the apple. But you see it doesn't
work. And why is that? Because the distance here
is to a little here. So we need to increase that. Let's say 80, and
let's try that. Now we can pick it up. So here, the apple
is also in the list, but you see the key
is not in the list. And this is why we need to
modify the code here ale bit. So Here we have the defined set
visibility, and of course, in the second room, the
key is not visible, but the key should be still visible if it
is in the inventory. That's what we need to
check. That is easy. We go to control, and we need to hide it only if it is not
in the inventory. If then and now we need to check if inventory
list contains thing, In this case, it's of
course, again, the index. If inventory list
contains the index, then hide, that is not correct. We need to test
for the opposite. If it is not in the inventory
list, then we can hide it. What we need is a not, and this is this one here. Drag this here, not, and this needs to go here. If not, if it is not the case that inventory list contains index, then hide. Let's try it. Start the game
again. Pick up the key. And go to the door, use the key, and now we still have
the key here visible in the inventory and also the
Apple is visible here. But the Apple is at
the same location as the key and that's a problem, and this we fix in
the next video.
44. Placing objects in the Inventory: We need to place our objects in the inventory down here
at the right positions. At the moment they're at
the same location here, and this is why we cannot see the key here or just
parts of the key. So they need to be in line here, and we do that in the
inventory. So let's go there. And what we need to do here is whenever something
is picked up, this needs to be refreshed, so the placing the placement of the objects need
to be refreshed here, and we do that with an event. Whenever I receive a new event, and this will be refresh in, for inventory, what
are we doing then? We repeat and repeat
is under control. So repeat No ten times, but we are going through
this list inventory list, so we need to know the
length of the list. For this, we have a block here, length of inventory list here. That's already correct. And we also need to count
the iterations here inside. So we need a new variable, but this variable can be local, so make a variable
for the spot only, and we call it in
inventory index. And we are setting this 120
and at the start of the loop, we are changing it by one. So in inext now we can count the iterations
here of this loop. What else do we need
to do inside here? We need to send a message, a broadcast to the objects so that the objects can place
themselves here in on top of the inventory
sprite here because just the objects
itself can do that. You cannot place an object
from outside of the sprite. So they need to receive a message and then
place them here. Okay, so let's create a new message, broadcast,
display actions, new message, and
we call it go to x because just the x
is important here. The y is the same for
sprite here for each clone. So just the x must be different, and we can do that after
we've changed the index here. And then in the key, we can receive this. So whenever I receive
go to x. Yeah, we need to place ourselves
here to this position. And what is this position? With this message, you cannot supply, provide any parameters. So what we must do here is
create another variable for all sprites and call maybe
current x in for inventory, current x for the inventory. Here, of course, before
we send a message, we need to increase that. Also at the start
before the loop, we need to set it, of course. First, we set it two. We can start at zero and then see what we need to change here, or we may be starting at maybe
-80, something like that. Starting at -80 should
be somewhere over here, and then we will increase with each iteration
the x coordinate. Current x inventory, and
then let's say 40 by 40, use this current x in
in the game object. So here. And of course, when we pick up something, then we need to send
this refresh If. So here we just
insert broadcast. Refresh Ip. Let's first
see if this is correct. Let's start the game again. Pick up the key and
the key is over here. Let's open the door, use the key that works, and then we pick up the apple. Now we're not close enough. Now we can pick up the
apple, but it's not working. Current x is not
increased correctly, I guess, because
current x is zero. Still, let's check here, change current x in
zero is okay, I think, because the current value needs to be zero because we have two items and -80 plus
40 plus 40 is zero, so the zero is okay. But the problem is that both of the objects here are receiving this and both are setting themselves to
this x here in the end. So that's the problem here, so we cannot do it each time. What do we need for
this to be solved? We need another variable. So make another variable for
all sprites, and this time, it's the current in object, it's the index of the
current in object, inventory object, and we need to set it here as a
global variable. So set Current inf object to the index. So how do we get the index? We get it from the
inventory list, of course, but not in item one of
inventory list, but in index. So we're counting up this
inf index and we are setting this current in object to the value at this location here, and this is the index
of the game object. And here we need to check if we just have to go there or not. So we need control if and
here we check for equality. If current in object is index, then we go and otherwise, we don't. Let's try this. So that looks better. Here we have the key here, the apple. It's not at the correct
position, of course. So I guess -80 was not correct. I think we need to shift
it like to -120 maybe. Yeah. That looks better, but the y is not correct. So we need to check for
the correct y here. Ole bit to the left
would be good. So this is not necessary. Go to here, but
the y is correct. We can use this -160
here and put it here. And here we need to
correct this maybe by ten. Let's check this. So picking up the key, clicking on the key. First time, clicking on the key, we don't get a change. And second time,
it is not correct. So there's something wrong here. Let's check our variables
here, our list. Inventory list ctates two items. That's all correct. So let's
go through this loop again. This seems to be a problem. We're setting this current
x in to -130, that's okay, so we're repeating it as
long as the list goes and the first time this is just one item in
the list should be. Then we're setting
current object two item in index
of inventory list. I index is at the start zero, and this is not correct because item zero of inventory
list is not existent, so this would be I
guess empty here. Current in object is empty. This doesn't work,
and then we change in next by one, and
here's the problem. The order is wrong here, so we need to first change it. Like this, and then we can
set current in object, and then we change
the x by 40 here, and then we do the broadcast. Let's try this. Now it works, and the position is
also quite okay. I would say this is almost
the same position as before before we
introduce this loop here. Let's see how this
works with the Apple. Use, and now we can pick up the apple and
here it doesn't work. It's the same position. Let's see what might
be the problem here. We go through the loop again. We're setting current x to
this -130 starting position. Then we repeat this and change the index by
one, that's okay now, and current in object
should be okay now, and then we change
current x in by 40. And then we do the broadcast. Then the second time
we pick up the Apple, this event will
again be sent and received here Then we set
again current x inf two -130. And here is the problem. We're not setting in
index to zero again. So this here is not correct. Let's drag that out here
and put it over here. So each time we
seeive the message, we have to reset this
inf index to zero, and then here it will
be changed to one, and then it should work. So let's try this again. Now, Apple, and this time
it worked very nice. First is the key and secondly Apple and in
a very nice distance. That's okay. And here we can
also collect more items. If we had a third item here, this will be displayed here. This is very, and we can
add arbitrary objects to the game they can be picked up and displayed in
this inventory list.
45. Fixing object descriptions: Now that we have a
universal mechanism for picking up objects, we also need a
universal mechanism for the descriptions
of the objects. When we start the game, we have this description of the key. It's a key, and if I pick it up, then I can use it here
on the door like that. But for the Apple, We don't have such
a description here. If we hover, put the mouse
pointer here over the apple, we don't see any description. For the description,
we, of course, or for both descriptions, we need now a another list. Let's go to variables
and make a list. Here we make a list, for all sprites, no,
for this sprit only. Because the
descriptions are only needed on the
objects themselves. So we call it just descriptions because this is a
localist description, we don't need to put
anything more here. So description is enough, description for the
sprite, of course. Anyway, this is for
the sprite only. And if we look here, we have game object
colon description, So that should be okay. We add two entries here. The first is it's a key, and the second, it's an apple. Of course, you can put
something else here, a more descriptive text, but I want to keep
it short here. First, it's a key for
the key, of course, and the second is for the apple, and we differentiate between
these two by the index here. One is a Index one
is always the key, and Index two is
always the apple. Okay, so we don't
need to display this. We can hide this and
also inventory list, we don't need to display
this and also the others and also the others we can hide so that we can see the
complete screen here. What we do with the
list should be clear. Instead of this
here, it's a key, we simply pull out the description from the list from the new list description. So here we have this
item one of description, and in our case,
it's not item one, but item index of description. And we just replace
this fixed text here, it's a key with this one. Let's check if this
works in the game. It's a key, still okay. But to be sure we need to
check if it's working also for the apple. And it is not. Why not? Because we have this condition here
that the distance to Avery should be at least
50 or should be below 50. So we can increase that here and see if this
works and now it works. 50 is too close A centers maybe over here somewhere
and 50 is smaller than that, it's difficult to
reach this distance. We set it to 80 the same
as here and this way, we can display it's
an apple here, but we can also see that as soon as we put it
into the inventory, cannot see the
descriptions anymore. This is what we
need to fix also so that after putting
it in the inventory, you still can see
the description that will be nice and this is what
we do in the next video.
46. Showing the description in the inventory: We still have the problem that the object description is not visible if we hover over the
object in the inventory. When I pick up the key here, I hover over the key
in the inventory. There is nothing displayed, and this should be possible. Let's fix this. It's quite easy. We just have to rearrange
this part of the for evepe here in the key
object or in the game object. For that to work, we have to consider also if the
key or the object, in this case, was
picked up or not. We have to think nothing only in case that we are far
away from the object, and also the object is
not in the inventory. How do we do that? We will
pull this here apart. And we will insert another one of this if then, like this. We have two if then
blocks nested here. The first, the outer one will only contain a touching
mouse pointer. So everything
inside will only be executed if the mouse
pointer is touching, and this is, of course, also the prerequisite for the display
of the description here. If the mouse pointer
is not touching, then we think nothing. The second condition must be a little bit different
than the one before, we had this end here, and now we need another
logical operation. This is the or block here. One of these two conditions
need to be satisfied. One is, of course,
distance to Avery, needs to be below 80. Or the object should
be in the inventory. If the object is
in the inventory, then key picked up, which is not the best name
because it's not only the key, it should be something
more general because also the apple
could be in the inventory, but we can take
care of that later. First, we need to check
key picked up equals one, and this is why we can duplicate
this and put this here. If we just consider
this condition here, it is either key
picked up equals one, so the object is in
the inventory or the distance to
Avery is below 80. This we can check after we are sure that the mouse pointer
is touching the object. If the mouse pointer is
touching the object, and this condition
here is also true, then we can think
the description, and this is either
key picked up is one or the distance
to Avery is below 80. This way it should
work. Let's check this. Here it's working and now we
have it in the inventory. Let's hover here. It's a key. It's also working here
in the inventory. Then let's check if it's
also working with the Apple. There should be no difference. It's an apple. That's okay. And if we hover here
in the inventory, it's an apple also. Very nice. And this is what we
wanted to achieve so that everywhere we
get this description, except if the object
is not picked up, and Avery is too
far away from it. This way it doesn't
get that easy, and Avery has to move to examine the environment here
so that the player really walk around to see all the objects available
here in this screen.
47. Fixing the game logic: S. Now we have to adjust our game logic
to the inventory list. At the moment, the problem is that we can solve the
first or the player can solve the first problem by clicking use here when
the sprite is clicked, the use button is clicked, then we broadcast Ue click, and this is received in the Avery sprite at
this point here. Then it is checked
for touching door, and here it is decided whether the player can
go to the next room, kitchen in this case, or answer with this
sentence here. I cannot use this key here. This is very specific to the
key and the first puzzle, and we have to adjust that to the inventory list because
we don't have only the key, but we also have the apple
then in the second room, and the Apple of course is
a little bit different. We can use the apple, but we have to define what
that means using the Apple, and we cannot use the key to
solve the second room here. This way, we have to adjust
the logic in Avery so that we know which item was clicked here and which item should
be used, for example. But first, we need to
correct one arrow here, and this can be found
here in game object. When this sprite clicked. If it is in the inventory, if key picked up equals one. First thing we have to maybe change is this key picked up is not the right name for this variable because
it's not only the key, but it can also be
the Apple, of course, or another object
that we add later. This variable needs to change. Also this is another problem. This is a global variable here. We go over to variables
and we check this here, we can see this is
not a local variable. It is a global variable, and this way we cannot
use it like this. Because picked up needs to be a local variable for
each game object, it needs to be a separate value. The way it is used
here, this is not true. Actually, we need to change
this here a little bit also because this is an if then and also
this is an if then. That means if the key
is in the inventory, we broadcast display
actions, that is okay. But if also Avery has a distance which is
smaller than 82 the key, for example, in the inventory, then this will also be
executed, and this is wrong. I show you what I mean. We start the game, and
we adjust this to, let's say 120, so the
distance can be greater here, and I'm picking up
the key first Now if I go with Avery to the key just above the key here and
I'm clicking on the key, then we see that there's another entry in the
inventory list added. So this code here is executed, and this is wrong because
we cannot execute this code if the key or the object here is already
in the inventory. So that means we need
to change that here. To and if then else. Let's drag that out here. If ke picked up equals one, then broadcast display actions, that we can leave like it is, but we need to replace the control here to
an if then else. We can just drag that
from here to here. This one comes to the then
case and this we can put here. We can get rid of But now we have lost this event,
but that's no problem. I can re add this here
when this side clicked. If the variable key
picked up equals one, then we display the
action, that's okay. If not, if the object is
not in the inventory list, then we can make this
the distance check, and if the distance
check is fulfilled, then we can add it to
the inventory list. Let's try that.
If it fixes this, so we pick up the key here. We can do it without this being added another time
to the eventualist. So this is not executed here. Always only this is
executed and not this two. So before it was the problem that this and this was executed. Now only one of these. Okay. This we fixed, and we can set back this distance here to
something smaller, so 80, I think it was okay, and the 120 was just to make the point here that
this was an arrow here. This is fixed. Now,
what we need to do is just our game logic, as I already told you,
this needs to change. This needs to be
a local variable. Otherwise, the different
game objects will all be picked up if one
of them is picked up. At the moment, this
is a global variable, and we need to replace that
with a local variable. So let's drag this out here and replace it with a different
variable. We make a new one. This time we say for
this bride only, this is important so that this is a local variable
and for each clone, for each game object, this will be a
separate value here. Let's just call it picked
up, not key picked up, but picked up, and this means that it is really
in the inventory. Key picked up, we
can get rid of and picked up We can put here. Here you also have game object. This is a local variable picked up equals zero at the moment. Now we need to replace
all the occurrences of key picked up
with this picked up. Here, here we have one. Now, here we cannot
set it like this. We need to choose from
this drop down picked up. Anywhere else here, Also, this works or should
work, at least, so no more key picked
up here in this sprite, but since it was a
global variable, it is also checked
here in Avery. Here, key picked up. Of course, this cannot be
the local variable picked up because you cannot access it from outside of the
game object here. This is something we need to
replace with something else. And here we can take this block. Inventory list contains thing. This thing must be, of course, the ID of the game object
key, and this is one. If inventorist contains one, the index of the
key game object, then we don't need
this equality here. We just need this here. If the eventualis
contains the key, then we can speak
the door is locked. I must have locked. No, it's different.
It's not here. If it doesn't contain one, then the door is locked. We need a not here. This is here, this block, and we drag this
here to the not, and then we drag this
not back to the if. If not, inventoralis
contains one, one is the index, the so to speak, ID of the key object, then this sentence should
be spoken for 3 seconds. Otherwise, walking will
be set to zero just, that was one occurrence
of key picked up. I'm not sure if
there's any other. I think there must be. Let's check use. No, this is not the case, and here is also not used. So I think we have really replaced every occurrence
of this variable. So we can try to
erase that variable. So right click here. On key picked up, delete, and there's no warning, so that means that
we probably have deleted all occurrences
of key picked up. Let's try to solve the
first puzzle again. It should work. Picking up
the key works, using it. I cannot use this
key here is correct. Then we go to the door. Use the key on the
door, that works too. Now we have the apple, we can pick up the apple. Let's try to use the Apple, and then Avery says, I cannot use the key here. This is something we need
to adjust, of course. In the first step, we have
replaced this key picked up variable with this
local variable here. This was necessary
so that we don't use the global
variable because we need separate values for each of the game objects here for
each of these clones. O here, we can get rid of this. This was the first refactoring or the first fixing
of the game logic. But of course, we need to do more because if you use the key, there should be
different outcome than if you use the apple here. Of course, we need to define
what is the puzzle here. What does the player
need to do here or to have here to
go to the next room? Also, there's a small problem here if we start the game again, we leave this room here. And we enter the next room
here on the same side, which doesn't make any sense. So we should enter
the room here, so we need to move
Avery from here to here so that she's entering the kitchen
from the left side. And this will do
in the next video.
48. Placing Avery on the correct side: Let's make Avery enter on the correct side of the
room of the next room. At the moment, it's
the wrong side. Because if we pick up here the key and leave the
room through the door, we end up on the right side, or at least Avery is not moving. So this is why she stays
here on the right side, but she needs to go
to the left side. How do we change that?
That's quite easy. Here we have our
define go to room, so our custom block go to room, and this needs
another parameter. Right click on this define here, choose at it, and here we
can then add an input. Let's add an input
and call it side. And this will be a number
or a text, and we can say, let's say it's a text,
so we can click on, and now we have
another parameter. The second one is the side here, and this we can use here in
our function in our block. So to check for the side, we have either left or right,
no other possibilities. We go to control if then else, and we have to check if the side is the text left or right. Precisely, we have only to
check if the side is left, and otherwise, it's right. So we check side. You can drag this
parameter here, side to this if I side, and then we check for the text
left here, and otherwise, it's right or something
else other than left, and then we go to a
different location here. If the site is left, then we go on the motion
and choose set x two, and here we need to check for
the right coordinate here, for the right value for x, and in the other case, we have to choose
a different one so that on the left side, every will be
somewhere in minus, I would say maybe
really minus this, and in the other case, in the right side case, we can leave it like that. This needs to go somewhere here, I think this would be okay right before
the broadcast here. If side is left, then put Avery to
the left in -197, and if not, then put her to the right side
in x equals 197. Now we need to call it with the right parameter here with
the right second parameter, and this is here,
go to room kitchen, and here we need to enter left. So that we can if the
second room here, the kitchen has to be
left on the right side. We can then go to room
whatever room that might be, and then on the right
side is the exit, and then also on the left side should be the next room, maybe. But let's see. Here
in this block, in this calling of this block, we can choose which side Avery
should enter the room in. Let's try if this works. Start the game, pick up the
key. We already know this. If I use the key now, Avery should go to the
left, and that's correct. Everything is working. We can also try to put here right just to test
the other case. Then it should be
the same as before, and Avery so more or less
stay on the same x position. Yeah. That's also working. So Avery would be
on this side, but, she's not facing the right the left side here in this case, but I think that's okay. We don't need to change that. Let's put left here again, so both sides are working and
Avery is on the right side, which is the left side here. Okay, let's continue
in the next video.
49. Adding the satchel: To advance the game
logic here and also to complete
our second puzzle. We need to add another object, another game object, which will be used to solve
the second puzzle. For Avery to leave
the house for school, she needs the apple, of course, to have
something to eat in school, and also she needs her
satchel for the school. We need to add the
satchel, and for that, we need to add a
new costume here. Let's go to game
object, costumes. We have the key as the first, the apple as the second, and the next one
will be the satchel, but this we have to
paint ourselves. So let's do this. I want to keep it
pretty simple here. Let's choose rectangles here, and maybe as the fill, we can set something like brown, maybe like that, and a little bit darker, something like that. And we make our first rectangle here, something like that, and then we make a
second rectangle here, and then we choose the select tool here to
adjust it a little bit. That was not so nice. Okay. So the outline or the border is a
little bit too thick. Let's make it two pixels here. Something like this.
Yeah, that looks okay. And then maybe something
to close the satchel here. Again, two rectangles,
this one and this one. This we need to send to the
back here. Let's undo that. This we need to
send to the front. Let's first select this
one. Send it to the front. Now it's okay, and the fill should be something like gray. So let's say saturation is zero, and that's a little
bit too light. So let's make it darker,
something like that. Also for the other one,
let's choose gray. Also or let's use the
color picker here. So the eye dropper here,
choose the same color. Now we can adjust
it a little bit. Put it somewhere in the center, and also this somewhere
in the center. Okay. I think that
should be okay. Of course, you can always
make it nicer looking, but for me, this is okay, so everybody should see a briefcase or satchel
here, at least. That's what it's meant to be. Let's switch to code now. And what do we have
to add here to add our new game
object, the satchel. We need to make
our lists visible. So description, we need a new description
for the satchel. We also need the
object room list because we want to say
that in the second room, the kitchen room, the satchel will be and should be visible. So, let's get rid of this
picked up display here. And we also need
object x and object y. Okay, let's make
first a new entry, add a new entry here in
game object object room. So the third is the satchel, and that should be
also in the kitchen. So we have to enter
kitchen here. And the index of the
third game object of the satchel will be three. Also here, game object
description in this list, we need to add another entry, and we say it's your
satchel, and that's enough. Also here, we need to place
it somewhere in the kitchen. So let's add another
entry here and also here. And now we need to check for the right position
here for the Satchel. Okay, so what we
can do is we can make this game object
here, this right visible. So just click here
on show on this I, and now we have it visible, and we can move that
to the right location. So we can move that over here. We can also put Avery a
little bit to the side here. And we see it's a little
bit too small here. So we need to go back to the
costume and readjust that. But let's take the
coordinates here. So we have 219 for x. So enter that here. And for y, we have -70 and enter that here in
game object object y. I've created mistakenly
a fourth entry here. Not a problem, delete that. Okay? So now we have extended all the lists
with our Satchel, game object room, game
object description, object x and object y. Okay, so now we need to check if we are already creating
enough clones here, and here we can we
repeat here for two. We can of course,
put three here, and that's okay, but
to be more flexible. So the next time
we add an object, we don't have to
change anything here. We can also use length
of and then a list, and I would say length of object room because this is something we need to
add, of course here. We always need to add the entry here in
object room to make the object appear whenever the object whenever
the room is entered, so we're taking the
length of this. Here we choose object room. And this will be
automatically now three. So each list already
has three entries. So it's also possible to use game object description
or one of these, but let's just take this list here and the length of this
list to create the clones. Okay, so now three clones
should be created, and we can uncheck
all these lists here so that we can see our
game screen here again, and let's start a game again. And here we cannot see
the Satchel, of course. We need to go to the next room. So let's pick up
the key and use it, and here we can see
the apple is there, and also the satchel is
there is a little too small, as I said, so we need to
enlarge it a little bit. This is a very tiny satchel, so I don't think it's adequate, so let's resize
that a little bit. But let's see if we can pick
it up, and it's working, and here you can also see
that the order is dynamic, so we can pick up the apple and the apple will be then
next to the satchel. If we do it the
other way around, we can restart the game. And quickly do it again. And here we can also
pick up the Apple first and the satchel second. So here you have the right order in which you picked
up the objects, and this will be dynamic. Okay, let's make the satchel
a little bit bigger. So we go to costumes. The satchel costume
zoom out a little bit, and then we select all. So just drag this
rectangle here, and you have selected all, all of these sub shapes here. And then we can just
enlarge it a little bit like this and put it
again into the center, maybe a little bit
more. Like this. Let's test it. Yeah, that's okay. I think that's big enough. Maybe a little bit
bigger would be nice. But I think that's okay because if we make it bigger here, and then we have to
do it here also, so it's the same size. Otherwise, we will have to resize it when it is picked up, and I think that's not
worth the effort here. So just leave it like it is. So that's the size and the apple is then also
the correct size. Now we have the third object, and in theory, the player
can solve this puzzle. H or she needs just to pick
up the apple and the satchel, and then Avery can leave the
room on the right side here. Of course, we need to
check for the inventory if the satchel and the apple is in the inventory, and
then she can leave. And if not, then she cannot
leave this kitchen room.
50. Placing the use button correctly: In this video, it's about
selecting items objects in the inventory list in this area here so that we can
then afterwards, use these objects with the
help of this sprite here, with the help of the use sprite. How is it at the moment, if we get rid of all
these lists here, hide them all and
pick up the key. The next room, we
have all the objects. Now first the key,
then the Apple, then the Satchel here, and everything is working
with the description, but if we click here on
the key, for example, or if you click on the Apple, or if you click on the Satchel,
there's no difference. And if I now click on the
Satchel, for example, and then use, then
Avery is saying, I cannot use the key ere. So that's of course wrong
because we don't know which object here is clicked
before use is clicked. Also, you noticed that, if I click on the Apple
or the Satchel, Then this use bride here is not moved to
this location here, but it should be somewhere
over here for the Satchel, or if I click the apple, then it should be somewhere
over here above the apple, but it is always at
this place here. And this is what we
want to correct first. So this action button here, this brite has to move to
the object that was clicked before or that was selected here in the inventory.
So let's do this. So we go to game object and
when this bride is clicked, and if it is already
picked up here, we do a broadcast of display actions And this
broadcast is received here. So when I receive
display actions, then this button here, this use button, this action
button is just shown. And we need also something
else to happen here. We need to move this or at least to change the x coordinate here for this button to be just above the inventory item
that was selected before. Okay, so how do we do that? We need another
variable for that. And this variable contains the index of the object
that was clicked. So for all sprites, this is necessary here. And we can call it
selected in object, so selected inventory object. And each time an object is
clicked in the inventory list, we set it to this index. So let's go to the place where this game object is clicked
and is in the inventory list. This is here, where
we do the broadcast. And here we also need to
set our new variable. So set selected If object here, and this needs to be
set to the index. Index is, remember, Index is
the ID of this game object. So for the key, it will be one, for the Apple, it will be two, and for the stil, it's three. So now that we have
set this variable, we can use it over here
to set the x coordinate. Setting the x coordinate
is this block, set x two, and we do
that before we show it. Otherwise, we will we might see a movement and
we don't want that. Before we show it, we set
the correct x position. At the moment, this is -75, and what we need to do is
add additional space or add additional x space to
this coordinate here so that the action button is moving with a
selected item here. There needs to be an offset and then something is added to that. We go to operators, and then we need
to add something. Let's go from -75 first. We might have to
correct this later. Put that here, set
x two -75 plus, and then of course,
we need somehow to consider the selected object. But not directly,
we need this here. Item number of thing
in inventory list. So let's put that here. Item number means the
index for the number, that belongs to the
thing in inventory list, and the thing is, of
course, index here. And since we don't have the index of the game
object that is selected, we have to take selected
in object here. And for the key, this
will be one, as I said, for the Apple two
and a stale three, but this will
depend on the order in which the player
picked up the objects. And this is important. So if the Apple, for example, is at the third place
in the inventory list, and the Apple is the
selected inf object, selected inf object will be two, since the Apple has two
as the index as the ID, and item number of two will be three when the
apple is at the end. So let's check this. So we are picking up
the first item here. And we need to use
it, of course, and it's okay here because -75 is the correct
position for this year plus this will be one since selected inf object will be the only object in
the inventory list. So this number will be one, so it's -75 plus one, -74. We can already see here selected in object is one,
so that is correct, and we go here picking up, let's first pick
the satchel here, and then we pick up the apple. So the inventory list
will be like this. First entry is one, second entry is three, and the third is two.
So let's check this. Inventory list, we can
display one, three, two. So this is correct because the key has the
ID, the index one, the satchel has the index
three or the ID three, and the Apple has the ID two. So far so good. But of course, this is not correct here because this is just
one, two, three. This is not enough to put the use action button
somewhere else. We can try maybe Maybe
we see a difference. Yeah, we can see a difference. It's just one pixel, but you can notice that here it is
one pixel to the left, and then one pixel to the right, and another pixel to the
right if I pick the apple. You can see it slightly moving. That's okay, but we need
to multiply this here with 40 because 40 is the distance between the
objects in the inventory list. Let's go to operators and the multiplication
operator here. Now we need to multiply
this here with 40. And then put it back here. It's -75 plus 40
times and then one, two, or three, depending
on the position here. Let's try this. I think we already will see a difference.
Yeah, it's over here. Okay. Let's see what comes
if we click on the Apple, the Apple is the last
one, and it's over here. And the state is over here,
the key is over here. It seems to work, but this
offset here is not correct. And this is because we always multiply with at least
one and never with zero, so there's always -75
plus 40 at least. So this is why we need to
change this offset here, two -115, which is -75 -40.
That should work better. We should see the difference
right here with the key. So that works very nice. Use it. And now we can go to the
apple and the satchel and we see it's always center, somehow centered over the
object that was clicked before. Here it is right over
the satchel over the apple and over
the key right here. This works, you can find
tune a little bit so that maybe it is not here, but slightly to the left here so that it's always
centered here, can move that a little
bit maybe like this. And we see now it's centered here over the apple also
and the satchel also. I think this is good enough, and the player can now
see what this use is for. In this case, it is, of course, for the key because it
is right above the key, here it is for the
apple and here for the satchel. That
should be okay. But the problem is,
if I use the satchel, Avery still says, I
cannot use the key here. This is what we need to
tackle in the next video.
51. Displaying different messages for each object use: We have seen that this logic here also applies
to other rooms. If I click use on the Apple
or click use on the Satchel, then also this will
be spoken here. I cannot use this key here. What do we do about that? We need another check here. The puzzle for the first
room is solved here, so we should check for the
room before we do that. Let's go to control if then
and put that around here. Like that, you see that in gray, how it will be, and
it is like that. Let's go to operators, and we need to check for
the room. Equality here. Now we need the count room. If count room equals bedroom, which is the first room, then we can do these checks. Otherwise, we do nothing here. Let's try this and let's get rid of the inventory
list here. Hide. Picking up the key
should work still. U and then we are
in the next room. Now we pick up the
apple and the satchel. And here if we use the
satchel, nothing is displayed. If we use the apple, nothing is displayed, and
also the same for the key. So the key doesn't do anything. If I use it in the second room. If I use it in the
first room, this works, and if I use it in
the second room, nothing is done here. So that's okay. But of course, we need to do something when we are
in a second room, the players in the
second room and the satchel and
the apple is used. So at least we should display something or let's
ever speak something. Okay, so this is easy because we just check
the current room. Another if then, let's
first drag that here, and we can clone
this condition here, so just right mouse
click Dublicate. And put it over here. If the current room is kitchen, we are in a second room now, and now we can say something, so duplicate this, for example. Of course, we can now check which object is being
used at the moment. But for now, just we speak, I cannot use this object here. I cannot use this object here, and then we put this here under the other if current
room equals bedroom, like this, move it
a little bit. Okay. So if current room is bedroom, then we have the old
logic for the first room, and if current room is kitchen, then we just say, I cannot
use this object here. We can be more specific later, but for now, let's try. This shouldn't change
anything here. But here, after we've
picked up the two objects, we can now use and Avery is
saying this sentence here. It's the same sentence for
both of these objects, of course, or even for
the key, it's the same. Of course, we can now check
for the selected object. So that's in viable
selected in object. This is this here. We can
do another if then here. And check for equality. I selected object is and
then the idea of the object. Maybe if it is
one, it's the key, and we can say something like I have used the key all ready, for example, put that here and we can duplicate
this. Put that away. If it is two, then
it's the apple. We can say something
for the apple. Move that a little
bit. I better. Let's say I'd better
not eat it here, but take it with me to
s, something like that. Again, right mouth. Then for the Satchel, so this will be case where
selected info object is three. I have to take that to
school, just like that. In the end, this
means that you cannot use any of the objects
in the second room. So to solve the puzzle here, we make it very easy. You just have to pick them up, and then you can leave
to the right here. And of course, you can think of a different puzzle here where you have to use the apple on, for example, the satchel, and then you can leave
something like that. We can extend that, maybe not. But let's first try this here. So for each object, there is a different
message here depending on which
is selected. Okay. So first, the key, of course, Use it. That's okay. The apple and the satchel.
First, use the key. I have used the key
already and here, Apple, I'd better
not eat it here, but take it to school. It's not long enough. You cannot read that, so
let's make it 3 seconds here. Use it. I'd better not eat it
here, but take it with me. That's okay. And use the Sach. I have to take that to
school. This is it. Now we have to take care of
Avery leaving this room here. At the moment, this
is not possible if she tries to leave the room on the right
side. It's not possible. So this we have to implement, and we have to check if both the satchel and the
apple are in the inventory, and then Avery can leave the room and can leave the
house to go to school.
52. Check exit conditions: We need to adjust
the exit conditions for the two rooms we have. For the first room, we
already have a check. This is here, if touching color, then we assume that Avery
is touching the door, and then we check
if she has the key, if she hasn't got the key, then we say the door is locked. I must have locked it while
sleepwalking and then she picked up the key and used it on the while standing
at the door, then she can leave the room. So the first thing we need
to do is refactor a little bit because this is
quite a long block here, so we need to extract
this if here. So let's drag that if out, if touching color, we drag that here and put it in
a custom block. So we make a block and call
it check bedroom exit, just like that without
any parameters here. Then we put that here. And then we need an if, and we check for
the current room. So if the current
room equals bedroom, So we need the current
room variable here. And here we put bedroom. Then we can call our
block check bedroom exit. Okay. And this we put here
into the F ever loop again. So this shouldn't change
anything because we just refactored here this check
into this custom block here. Okay, so let's check if this really is not changing anything. And it seems, it works. Also this is doing nothing here if Avery
tries to exit here. Nothing is being said here. This is what we need
to check, of course, if Avery tries to exit here. We need to check
for the condition to leave this room here.
How do we do that? We just check for the
position here of Avery. Under motion, we have
this x position here. Let's drag that in, and
we define another block. Check exit kitchen. And here we can
have also if then, we check if the position
is greater than the exposition greater
than let's say 200 maybe and then we
can speak something. Let's first say or speak. We use our custom
block speak here, because this way it
won't block anything. Just doublicate
this, put it here, and we I cannot leave without my satchel
and something to eat, and the seconds should be okay. Let's first check this. We need to go to
the second room, of course, and now
straight to the exit. Of course, it's not
working. Why not? Because we haven't called it. So let's duplicate this here. Put it right beneath the
other if current room. And then current
room equals kitchen. Then we call our new block here. So check exit kitchen. Oh, I see now that is a
different order here, check bedroom exit, and
check exit kitchen. But anyway, let's
leave it like that. So if current room is kitchen, we check for the exit condition for the kitchen, which
is defined here. And at the moment, it's just not possible to
leave the room here. Let's try again. From the start, Okay, who can go and now I cannot leave without my satchel
and something to eat. Yeah. So that's correct now. But of course, here we have to check for the satchel
and the apple. If both are in the inventory, then Avery can
leave the kitchen. We can leave the house
and then go to school. This is a simple. Let's do this, make a bit room here. Inside this if exposition
greater than 200, we can put another if
but now it's if else, so we have to check
for variables. If inventory list contains, and we need to check
for two things, and this is why we need
the end block here. First is inventory
list contains, and then we have two, which is the index or the
ID for the Apple, and here we need again
inventory list contains three, which is the satchel. If both are in the inventory, Then we can say
something and otherwise, we say I cannot leave as before. Let's doulicate
this also and here. We can just say for the moment, it's okay, I think to say, I can leave now to school, and let's try this works. Let's start again.
Using the key. Let's pick the apple. Pick the satchel, and
now we can leave. I can leave now to school. For the moment, now Avery
could leave the room. We could change rooms here, but I think that's okay for now. She says, I can leave now, and if you don't have
both picked up here, the apple and the
satchel, then she says, I cannot leave without my
satchel and something to eat. That's I think
great because this is the solution for
our second room, and this way, the player can
solve the second puzzle, which is quite easy. Just have to pick up two
objects and then leave. But of course, you can always make it more complicated that the player has to combine
maybe two items together, maybe create another
item from it, or put the apple maybe in the satchel,
something like this, or maybe you have
to use the apple on a knife to cut to
slice the apple, and then you can
take it to school. Maybe that's the solution, but here you have the
pattern how to do this.
53. New game Jump 'n Run: All right, we're here
to start our next game, and this next game will
be a jumper run game. So we have this cat here, and we stick with a cat. This cat will jump. It will go on platforms. It will collect jams,
stars, whatever, and this is the
opportunity to get our jump control and run
control here in scratch. Until now we just made our spaceship controllable
by the player. And also Avery was
controllable left, right. But this is about jumping, about animation, about gravity. So let's get started. First, what we need
is a floor, a ground. So let's paint something here. Let's go to stage
and then back drops, and here we can take this rectangle here
to make the floor. So just make a rectangle,
something like that. Maybe we change the color. So something like that
and the color will be like brown maybe or
let's make it green, a little bit darker, so that
could be some kind of grass. So that's okay. Now we have the ground, and also we have an
outline here or you can decide to get rid of the outline by
selecting this year. So we can do that, and then you don't
have the outline. But for now, I think we
take black as the outline. Now, I have to make it
a little bit thier, maybe just like this and a little bit wider,
something like that. Here we have the ground,
and here we have the cat. The cat is a little bit too big. Would say, so just
let's select the cat, and then we can
change the size to 50 so 50%, which seems okay. So let's leave it like that. And here we can have a
look at the costumes. The first costume is the
cat in this position here. The second is kind
of a jumping cat, so this is what we can use
in the jumping phase then. Speaking of jumping, we will set our first starting
position here of the cat, so let's drag the cat maybe somewhere here,
and from there, the cat will drop to the floor, drop to the ground here, whenever the go is clicked, whenever the game starts. So let's go to events, and then when start click.
What do we do here? Of course, we need a
game loop, so a forever. This we can drag here, and we need to set the
starting position of the cat so that each time
we restart the game, the cat will be
at this position, so drag go to x and y here, and the coordinates should
be the current coordinates. So we can start, but nothing will happen because we just set this position here, we can drag the cat
away and then start, and it will reposition itself here to the
starting position. So how do we make the cat fall from there to the ground?
That's quite easy. We have to change y of
the cat, and not by ten, but by something
like maybe five, but this way it will go up, so it's minus five, and the cat will go down. So by changing here, it automatically falls down, but it of course falls
below the ground here. So that's what we need
to avoid, of course. But for now, the cat
is just dropping here. But there's no sign of
gravity of acceleration here. The cat has a constant speed, which is, of course, not good, but let's first get our
collision detection running with the ground. So how can we check
for the collision of the cat with the ground
here? That's quite easy. We need to go to sensing, and here we have
this touching color, and this color needs to be, of course, this green we have. So click on this eye dropper here and select the
green off the ground. So now we have the
correct color. And we need a control
here if then. So if touching color,
what do we do? For the moment, we can
just stop the script here. So this is stopping the
complete game like it is. Stop all will immediately quit all scripts and do nothing else. So then everything is stopped and no script
is running anymore. So also this velop
won't run anymore. So this will completely
stop the cat from falling. Hopefully. So let's
see if this works. So if the cat is
touching this color, then stop the script
here, stop the code. Let's see if this
works, and it works. And let's take a
closer look here. We can see that the
foot of the cat here is inside the green area, and that's, of course, not what we want, so we
have to fix that later. But for now, we have
the falling cat. And then it stops whenever
it hits the ground here. But of course, this is
a little bit too late, so the foot needs to
be above the ground, of course, so we have to
think of a solution for that. But for the moment,
the next thing that we will implement
will be gravity.
54. Simulate gravity: So the cat is falling
already as we can see here, but it's not realistic because we don't have anything
like gravity, which would accelerate
the speed here. So this is just uniform speed, which is, of course,
not physically correct. Okay. But how do we simulate
gravity? Very easy. We change y by, in this case, minus five here, and this
is a constant change, and we need this constant
change to be changed, to be dynamic, and this should be adjusted
in the for evolut. I show what I mean,
but before we do that, we will introduce a
variable which we call speed or we better call it speed y because we want also a speed
for the x direction. So we call it speed y, and only for this
spride, of course, because this bride
is doing the motion. Okay. Now we have speed y. Now we set it at the beginning of the
game to a certain value. So let's set it to
one, not my variable, but speed y here, and we can erase or delete
this my variable here. We don't need that.
And by the way, we should name our
jump and run game. So we call it jump around, not very creative,
but of course, you can name it differently, but I will call it
like that here. Okay. So now if we've set the speed y to one,
we need to use it, of course, and we use
it here in this for evolut instead of this
constant minus five. So let's drag speed y
here to the change y y, and we have change y y speed y. So we can set it to minus
five and then try again. So we get rid of this here also, hide the display of speed y so that we can see
the cat falling. Now the cat falls again. No change, but now we have the possibility to introduce a gravity stimulation.
How do we do that? We change speed y, by a certain amount in each iteration here
in the four evolpe. So at the end, we
can change speed y by minus, let's say 0.5. Let's start with this
and see how this works. This is a pretty
strong gravity here. So the cat is really
falling fast. But I think it's okay. We
can also change this to, for example, minus
one and then test it. So it's starting slow and then getting faster
very quickly. You can experiment a little
bit with the settings here, so change that and change
the initial speed here. But you can see
that this is more realistic than having a uniform
speed here all the time. A constant speed is not natural. So this is kind of a simulation for the acceleration here, for the gravity of the Earth. And I think this is a
little bit too slow. So maybe let's start with minus two. Yeah, I think that's okay. Maybe we should
start a little bit faster like this
and then make it this a little bit
less. Let's try this. Now, that's too slow. Let's
make it a little bit higher. That's too fast. You can see the cat is stuck in
the ground here. So maybe that was
quite okay here. We can always adjust it later because we have
this variable here, so you can adjust
these two values here. Or we can, of course, also put a variable
for this value here, so we can make a new variable
and call it gravity. And maybe it should
be for all sprites, because gravity should be
the same for all sprites, not just for this sprite. So let's say for
all sprites here, and then we can set
gravity here to -0.5 and then put gravity here in
this change speed y by gravity. Let's try. It shouldn't be the difference. So here you can explicitly
see in a very nice way that the cat is sinking into the ground because the
speed is much higher now, and the collision
detection is slow, so to speak, the cat is falling
into the ground this way. So this is what we tackle
as the next problem, but it's not very
hard to do that, but we can make use of another feature of custom
blocks when we do it. So next video will be about pulling the cat from the ground
again up to the surface, and for this, we need a
new feature for blocks.
55. Digging out the cat: So the cat is falling down. That's okay, but it's
stuck in the ground. So what can we do about that? The answer is we can
dig it out again. And how do we do
that with a repeat? Or, in this case, it's repeat until So drag out this repeat
until loop here. And now we need a
condition here. And for this condition, we will use the touching
color again. So touching color. If this sprite is
touching the color, and it must be the same
color as the ground. So pick the color
from the ground. It must be this color. Otherwise, it won't work. And we repeat until touching color. No, we repeat until
not touching color. This not here under operators, this green not, we need to
use it not touching color. Drag that in to the not here and this not
needs to go here. This, we need to repeat
until not touching color anymore so that the kitty is really outside of the ground. Something like that maybe. And then we can stop it so
this loop won't continue here. What do we do until the
cat is out of the ground? We need to move it, of course, out of the ground. And this is by changing
the y of course. We need to change y by one
because one is upwards, so we need to change y in this loop As long as
it's touching the color, so when it is not touching
the color anymore, then this loop will exit, and the cat is on the surface. So that's the theory, and now we need to put
it somewhere here. And of course, we need to do it here in this if touching color. If touching color, then
the cat is already inside the ground inside
this green area here, and we need to go upwards
by changing y by one. Step by step, we're
going upwards again. From going down, falling
down into the ground, we go up again until the cat is not touching
anymore this color. Then after that, after
the loop has exited, then we stop all, and the cat
should be on the surface, not touching the color anymore. Let's try it and
you can see that it's working So it is slowly, I emphasize, slowly coming
out of the ground again, and then stopping
on the surface. So this way, this is
good because you can see the procedure
here, what it's doing. So the cat is one pixel
by one pixel going upwards until it
reaches the point where it's not touching
the color green here. Anymore. So this is working, but it's not very nice for the player because
this is visible. This rising of the cat is
visible to the surface. So we need to do
something about it. And this is possible with
the help of a custom block. So we make a block. And we call it fix Y. This is to fix the y cornet, which is a little
bit too low to be on the surface of the color
of this rectangle. But don't click K right now because we need to
check this box here, run without screen, refresh. What does that mean? We
can see it right now. So check this box, click OK, and then we will put this here, this repeat until inside
our define block here. So define fix y. So we're going to repair the
y position here for the cat, and we call this of course, whenever the cat is touching the ground or is
touching the color here. Let's try this. And we see we don't see this
rising of the cat anymore. So this fixes our issue. But why? As you can see if
you click again on Edit. This is the checkbox that we have checked run
without screen refresh, and this is exactly what
it's supposed to mean. So you cannot see anything that is done here
inside this custom block. So everything that is done here is not refreshing
the screen. So that means that this
rising here is not visible. And this is exactly what we
need for this procedure here. And also, there's another
advantage to this, and the advantage
is that it's much faster without screen refresh. So this block here or this
code here inside is executed much faster than all the code that is here in
this forever loop, for example, because
there is no need to refresh the screen
to draw the screen. And in scratch, there
is a frame rate, a fixed frame rate of
30 frames per seconds, a screen refresh is
done 30 times a second, and everything you do here
will trigger a screen refresh, and that's why you cannot
reach a certain speed here. So it's limited to this
frames per second, 30. But if you use a custom block here with this check box here, you are not limited anymore. There is still a limit here
because you cannot block the whole CPU of your computer here while doing this
here inside the loop, but it's much faster than
with screen refresh. So we can see here that the cat is completely solid
on the surface of the ground, so there's no sinking
in and coming up again. And this is very nice
because this way, on the one hand, it's faster, and on the other hand, you
cannot see anything on the screen that is done
here inside this block. Very important. So if you have something that needs to be done very quickly and with faster performance
then, for example, the normal screen refresh, then you can do it here inside a custom block with
this check box here, run without screen refresh. As I said, there's still a limit to what can be done,
performance wise, but here, this is much faster, and you cannot see the effects until this block is finished. So after, of course, this block finished,
then you can see the effects on the screen. But here inside, for example, if y is changed by one, this change here is not
rendered to the screen, but it is continued here in this loop until this
block is exited. Okay, so now we have the
falling of the cat, and yeah, and the cat is standing on solid ground without sinking
into a mud or something. So this is nice, and now we can
actually implement the controls for moving
the cat left and right, and also, of course,
for jumping.
56. The cat jumps: Before we do the controls
here for the jumping part, we need to switch costumes. So if the cat falls, we need to set this costume, which is already there, the first initial costume, but we need to make it explicit. So when go is clicked, then the right costume
should be picked, so it's costume, which is
this kind of jumping cat. And if the cat is actually
hitting the ground, we should switch to a
different costume here. If touching color, then fix y, and before that, we can change the costume
here to the first one. And let's try if this works. And we see it works as soon as the cat is
hitting the ground, it changes to this other
costume to the first costume. Okay, so this is working, and now we need to add
controls for the jumping, and this is with the space
bar, I would suggest, so we have to put
an if here, if, and then we need to check for the space key to be pressed. So this is here under sensing, and we have this
key space press. It's already space here, but you can also jump with a
different key if you like, so maybe up arrow, something like that, but I'm
using the space key here. So let's put that here
in the for evelop. So maybe here, and we
need to drag that out. So make sure that the whole
code that is already there is not positioned
here inside this if because we need to
put something else here. So I space key is pressed, then we do something otherwise, or after that, we do the rest here that we
already did before. Okay, what do we do if
space keep pressed? This is surprisingly easy. We need a speed to be
faster than it is now at the moment this is some
unknown a value here, so we can display it like this. So let's get rid of gravity. We need that. It's a constant, so we don't need
to display that. And here we have the -16.5. This is the value at the moment. So if the cat falls, it reaches this speed, and then it's no longer changed. But I think there's
still a problem. First problem is that
now the game stopped, so we cannot interact with the cat anymore or
with the code here. So we need to remove
that stop all here. So put that away.
The other problem is that we are not setting
speed y to zero. This we should do. If
you go here to fix y, and then we can do that here behind after
the repeat until we change speed y to zero. Then it should be zero here. But it's still fluctuating. And this is because we are
always changing here speed. So change speed y by gravity. But let's not talk about
that at the moment. So there's something
we need to do here if key space is pressed. So that's what we need
to implement here. This is a very easy
method for the jump. We need to just set the
variable speed here, speed y, to a certain value. Let's say eight, for example. And what this does is it
resets speed y to eight. So eight is upwards. And this causes y of the cat to be increased
to this eight, and then gravity will change it, then back step by step, two gets lower again. So let's see how this works. So the cat is falling
and pre space, and the cat is jumping. So this already works, and this is just by
setting speed y, two, eight here in this case. And with this eight, you can
say how high it is jumping, so let's maybe set it to 16. And then we can see this
is a very high jump here. It's much too high, so I think eight is reasonable.
Now, that's a good jump. You can always adjust it later, of course, and eight is a
good value, I think for now. So what did we do here? Actually, we just
introduced here, the switching of the
costumes, of course, which is not that important
for the jumping part, but this is the
important part here. If key space pressed, then set speed y to
eight, and that's all. And of course, gravity will
take care of the rest. The speed eight here is causing
the catch to go higher. But then again, here, the gravity is always
subtracted from the speed y. So the speed will then
negative or zero, and zero, it will be on
the peak of the jump. Here somewhere here. This
point, it will be zero, and then speed will
be again negative, and then the cat
is falling again. Whenever speed y is positive, then the cat is going up, and if the speed is zero, it's not doing anything, and if the speed is
negative, it goes down. So that's all nothing
more to do for the jumping or maybe just one
more thing, we need to do. We need to switch costumes
again to the second one. So looks and then
switch costume. And if the key space is pressed, then we can switch to
the second costume here. So let's try this. And
each time we jump, the cat is going to the next costume or this
jumping or walking costume. And this is nicely working. Okay, now that we did
that, we need, of course, to control the cat in
the horizontal space, so going left and right. And also, if we are jumping, we need to also control
the cat in mid air. So that's what we do
in the next video.
57. Moving the cat left right: All right, so let's move
the ct left and right. This is what is missing
now for the cat control. Let's do this. What do we need? We need this if here. Let's copy that, doubicate this. And you will see that double get the whole block here,
the rest of the block, so let's get rid of
this lower part, and we need now
not the space key, but the right arrow key. Of course, we're doing
something else here, not switch costumes and
not setting speed y. Speaking of speed y, we need something else here. We make a new variable speed x. This is what we need
for the x movement in the horizontal
direction here. For all sprites, of course, only for the cat sprite, and we can use that. First, we need to
initialize this. Speed x is at the beginning zero because the cat
shouldn't move at the start, and then we can set it
to something else if the key is pressed for the left movement or
for the right movement. For the right arrow
key, we need to change, we need to set speed x to
something like five maybe, and five is the direction right. Dubicate this and I
left arrow is pressed, then it's minus five. Minus five would be
then to the left, and we need to, of course, change x also, not only y. So let's go to motion, change x. Not by ten, but we have
this new variable here, speed x, and we need to
set it to speed x here. Change x by speed x, change y by speed y. Sounds logical and it is, and now we need to
insert this here into the right space to
the right spot here. So that should be right below
the if key space pressed, and this gets a little bit long, so we might have to
refactor that later. But for now, we try that. If space key pressed,
then we jump, and this means speed y is set, and if right arrow
key is pressed, then speed x is set to five, left arrow key is pressed, then we set speed
x to minus five, and then we change x by speed x just as we did for
the y direction. That's it. Let's try it, and we can see we can control the cat with
the cursor key. Now I'm pressing right, now I'm pressing left. But you already see one problem because the
cat is not stopping. Now I'm pressing no key at all, and the cat is still moving. Now it's not moving because
it's on the right edge, but let's check why
this is the case. We're setting speed x
to five or minus five, and at the start with
setting it to zero. But if in this for everop, we set it to non zero value, it is not reset to zero.
That's what we have to do. We set speed x to zero at
the end of the forever loop. This way, it goes
through the loop and setting the speed
x25 or minus five, if any key is pressed,
left or right, and then changing x by speed x, and then setting
it to zero again. If in the next iteration, no key is pressed, then it will stay zero, and the cat will stop. Let's try this. It works, so we can also stop the cat. Actually, that's it.
Nothing more to it. We can move the cat left, all right, with left, all right arrow keys. But the problem here is the cat is always
facing to the right, which is of course not correct. If pressing left, it
should face to the left, of, this we can also fix, but we do this in
the next video.
58. Facing the right direction and fixing double jump: In this video, we
will fix two things. The first one, I've already
hinted in the last video. The cat is not facing
the right direction. If I walk the cat to the right, it's okay, but if I
walk it to the left. It should face the left side. But this is easy because we
already had this with Avery. Avery also needed to turn left
and right. Let's do this. We already know how to do that. First thing we need to do is set rotation style
to left right. This is this block
here under motion. So when go click. Set rotation style left.
That's the first thing. Then we need two
depending on direction, of course, depending on
the arrow left or right. We need to point in the
right direction here. Let's put the point in
direction 90 degrees here. Now that's the wrong place. Not space, but right arrow, and then point in
direction left arrow. We need to turn that
around -90 degrees, and this way, we should be fine. Let's test this, and it's working as it already worked
in Avery's adventure. This is no surprise here. So that's the first challenge and the first problem
we have solved now. So the second problem we have to fix is the jumping problem because the player can jump as many times also in the air, as he or she wants. So that's not good. How to fix that is very easy. We need to remember that
we are already jumping. If we are already in the air of the cat is
already in the air, we don't jump again. So we need another
variable here, a local variable for
this right only, and we call it jumping
and we need to set it of course to zero
at the start jumping, and then we need to set it to something else when we jump. Key space pressed
set jumping to one. And if we hit the ground here, we set it to zero again. Here if touching color green, then we set it to zero again. Let's try this first.
Here we have jumping. It's starting with zero, and this is one. If we hit the ground,
it's zero, so that works. To avoid that the
player can jump twice, we need this if here
and operators equality. And now we check our newly
created jumping variable here. If it's already one, we shouldn't do anything. If it's zero, then we can jump. So here it is. We need
to set this here, drag that over to this then. And then we drag
that again into the if key pressed here
for the space key. So if the space key is pressed, then we check for jumping, so jumping must be zero, and then we can set
jumping to one, we can switch costumes, and we can set speed
Y to eight here. So the cat will jump, otherwise, the cat will not jump. Let's test this, and I can only jump once until I hit the ground, then
I can jump again. So that's nice.
The cat can jump, but only this high
and not higher. Okay. Now we have a nice
control of our cat. But at the moment, we just
have this plane here, the ground, and this is
not very exciting here, and there's no challenge. We need to jump on
a new platform, maybe or we need to be able to fall from a platform
to the ground. So this is not very engaging. So we need to fix.
59. Fixing collision detection: All right, so we can
move the cat around, the cat is falling, and we have collision detection, as you can see here, the cat
is not stuck in the ground. But there's a problem, and
to show you that problem, we need to change a little
bit the backdrop here so that we introduce another
obstacle, another platform. First thing I want to do is get rid of the outline
because I think that it's better to see everything and to reason about the
collision detection, for example, if we don't
have an outline here. So click on Outline
and select this year, and the outline is gone. And now we make another
rectangle somewhere over here, maybe Maybe that's a
little bit too high. The cat should be able
to jump on the platform. So something like this, and
to make sure that the cat is really able to
jump on the platform, we will increase the jump
force here a little bit. Here, we set the
speed y to eight, and I would like
to increase it to, let's say ten, So let's try
if this is really high. Yeah, it's okay,
but it's not high enough for the platform. So let's make it 12. And this way, this
should be easy for the cat to go
onto the platform. And you can see that
the collision detection is working here also, so the cat is not falling from the platform or
through the platform. But if I go off the edge here, then it is falling. Okay, so far so good. But now let's see the problem. If I go under the platform
here with a cat and then jump, we see that the cat is really teleported
through the platform. And to explain that, this is quite easy because
here we do this fix y, we are always fixing the y in one direction,
and this is up. So we always as soon as
the cat is touching the, the background color here, then we are fixing
y by going up. And of course, here in
this case, this is wrong. We need to go down here. If the cat is jumping from below against the
platform, this is wrong. So what we need to
do is fix this here. What we could do is we could decide whether
we need to go up or down for the correction
for this fixing here by checking speed y, if speed y is below zero, then we could make the
correction upward, and in the other case, if it's more than zero, then we could make the correction
in the other direction. But this leads to
some more problems if we also consider the
horizontal movement. So for example, the cat can now just go upstairs
here like that. If you can see that,
I just need to go to hit the right edge
or the left edge here. So the right edge of the cat is hitting the left edge
of this platform here, and it's automatically going
upstairs, so to speak. So this is also wrong. We need to also consider
the X movement here, the movement in the
horizontal direction. Okay, we need to change a
little bit strategy here. So this strategy is
we are fixing y as soon as we notice that The
cat is touching the color, and I will change the
strategy now that I will go in steps into
the right direction, into the speed wide
direction, of course. And then for each pixel, we check if the cat
touches the color, and if it touches the color, then we go back one step. So this is a little
bit different. Here we are backing from the cat stuck in the
ground or in the platform. Then we're going in this case, we're going up until the cat is no longer
touching the color, but I want to change it so that we can say the
cat should move, let's say five steps
or three steps. And for each step, we look for the touching, and if it is touching, then we are not doing the step, we are backing up one step
in the other direction. So let's see how to do that. First, we need to
change this here, repeat until needs to be repeat. So let's drag that here away. And now we go under control. We drag this year
out, repeat until. And now we need to
say how many times this should be repeated and this Is the number of steps we
want to take in this round. We need to stop the script here. Otherwise, it's doing
this endless loop here and doing nothing in the
loop. That's not so good. So if you are experiencing stuttering
and everything is slow, then you might want to
stop the game here. With this code here, you might get slow performance
of the whole browser here, so please make sure to
stop the game then. Okay. How many times
should we repeat this? The number of times is
depending on the speed y. We need to cover this
distance, speed y. For example, minus three here. Of course, you cannot
do it minus three here, but we need to
absolute value here, and there's a block for that. Here we can take the absolute
value of Speed y. Oh, this was the wrong block here. We need to do repeat this, repeat ten, and then we need to set this here. What is absolute? You can also choose
different functions here mathematical functions. If speed y is minus,
let's say minus three, this will be three, and if speed is three, then this will also be three. It's getting rid of
this minus if there is one because we cannot
repeat this loop, of course, minus three times, but we need to
repeat three times. So what do we need
to do in this loop? So we're going step by step in the direction of
speed of speed y, and we need to make
a check here if speed y is above
zero or below zero. So let's get this if then and
the operator greater than. And then we doublic
the speed y here. If speed y is greater than
zero, then we do something, or if let's do another if
here, Duplicate this one, and then below if speed y is below zero, so
that's this one. Okay. So I speed
y is below zero, then we do something else. And what do we do?
We change y by one. So if it's above zero, then we change it by one, if it's below zero, then we change it by minus one. And if it's zero, then we don't change y at all. Okay. So this is going in the correct direction and and the correct
number of steps here. So this should work. We've gotten rid of this year, so it is not working. So the cat is falling through at the moment. Not a problem. This is because we're
not correcting it here. So we're just moving
in the direction here. But also, we need to
get rid of this year, so change y by speed
y. So this is double. We should replace this by fix y. So this is not only
in case of touching. So this we need to get rid of we need to do this instead
of this change y by speed x. So this we can delete. Let's remove that. The name of this block is, of course, not correct
anymore, so we can change it. Add it, and then move. We can just call it move, maybe. I think that's okay and make sure that you have this
check box checked, run without screen refresh. Now this is move, and at the moment, it's only moving in the wide direction, but that's okay, and it will not move into the
background color here. This is what the goal is. We need to check, of course, if the cat is touching the
color and then back off. Okay. So now in the F velop we are just moving
with speed y here, and we are checking if this
is above zero or below zero, and we are doing step wise
here so that for each step, we can check if the sprite
is touching the color. Okay, what do we do if
this is touching color? This cat is touching the color. We need another if here. Put that below, and
then if touching color, then we have gone too far, of course, and we
need to back up, so we need to go to the
previous y location. So this is where we introduce another variable,
another local variable. So let's make a variable
for this right only, and we call it old pus value. So this will be the old pus
value before the moving. So before we change here y, we need to remember
the current y. So Let's do this set Not gravity, but old pose value, our newly created variable here, and we set it to, go to motion, and
then here down here, we have this y position. So put that here. Set old pose value
to y position. So we want to remember this y position
before we change it. So we either change it
by one or by minus one. And then if we are sensing that the cat is
touching the color, it is already too late.
It is touching the color. We don't want that, so we go back to the old position here. So let's set y set y to the
old position in this case. R So this is the backing off. So we noticed that we
are touching the color, and then we reset this to the old value that we set here at the beginning of
the repeat loop. Okay? And there are other
things we need to do. We need to set jumping, and we need to switch
costumes here. So set jumping to
zero because we're not jumping anymore
because we hit something, we hit the platform
or the ground, and we switch the costume
to the standing cat. So let's try if this works, if this really works, and let's get rid of all these
variables here. So hide everything here, and let's see if this works. Okay, so far it
works seems to work. And the movement in the
horizontal direction still works, of course, because we
haven't changed it. And now let's check if we can
jump against this platform. Oh, we're stuck. So it's
not completely working. The cat is stuck here. Why is that? Because we
haven't set speed y to zero. So this is what we
have here already. So let's put that here
if touching color, then we need to set
the speed y to zero. Then the cat is not
moving anymore, and it will just fall down. Let's try that. This is better, and this seems to
work very nicely. The cat can jump very high now, but I think that's okay. We can always adjust that
here with set speed y to 12, and we can maybe set it to 11. Let's check that.
That's okay, too. But there's still a problem. So let's see if
we can jump here. So the cat can be
stuck over here. You can see because this is caused by the
horizontal movement. So we need to also take care of the horizontal
movement here. We need to replace
this change x by speed x with the same or similar
logic than this year. So we need to do the
whole thing also for the x for speed x
and the x direction.
60. Horizontal movement correction: Now we're handling
the x movement here, so the Y movement
is already working. Let's just copy this repeat loop here with right
Musk click do it, and let's put it here
right below the first one. What we do now is
we just replace everything that has to
do with y here with x. Speed y needs to be speed x. Let's do this here is speed x, and we change every
occurrence here. We delete this speed y here. Speed x, speed x, and
here also speed x, and here we need to set
speed x instead of speed y. Okay, here we need to set x. Go to motion set X
two old position. We can delete, right click on this block here
and delete block. We'll only delete this single
block here, only set y. So this is gone now. Set speed x20. We've done that. Change y, change y, we need to change that too, so change x and change x. First, change x by minus one is the second
one and here by one, and now we can delete this here. But this in and also this. Of course, this here
needs to be x position. So this is down here.
Set old pause value. We can reuse this variable here, so it's no problem
to use the same here because we're always setting it here at the
beginning of the loop. Set old pause value two, x position, speed x
greater than zero, change x by one, speed x, less than zero, change
x by minus one. That should be okay. Okay.
Let's try that. Seems to work. But one more problem
it's a little bit fast because we have
left this year, change x by speed x. We need to delete that. So delete here,
and let's try now. Okay, so this seems to work, and let's try to hit the
platform here from the side. So this is how we
see a problem here. So we are stuck here with
our cat with the whiskers. So this is something we need
to tackle, but not now. At the moment, we
can see that we cannot go into the platform. But we can be stuck
here on the edge. But fortunately,
we can get around that by jumping then and jumping will free us from
this being stuck here. You can also see that our
cat is not symmetrical. The tail is a little
bit more to the side. If we flip the cat, then we have a collision here, then we have a touching,
and this is a problem, and this is what we need to fix, and we will fix that
with collision boxes. But for the moment, the movement is working. It is improved. So we cannot
hit the platform from below and also not directly
at least here from the side. But we can still get stuck here, and that's a problem
we need to solve, and this we'll do
in the next video.
61. Hit the box not the cat: So I have already hinted
in the last video what we can do about our collision
detection to improve it. And I want to show you again
the problem that we have. So if I jump here
onto the platform, you can see that we can get
stuck here with our heads, for example, with a cat's head. So this is a problem here. We can still get stuck, and also with a
tail here because the costume is flipped
or the cat is flipped. And then after the flipping, the tail is inside
this platform here. So it is touching
this specific color, and you cannot move
the cat outside, except for what is working as jumping here
in this position, then This works again, but we can solve this
problem quite easily. And we do this with the help of collision boxes or hit boxes. Let's call it hit box, and what is a hit box. In our case, a hit box
is another costume, so we need to create
another costume here. Let's doblic the first one. And now we have a costume
that will be the hit box. So let's call it hit box here. Okay. So now we
don't have the box. So we make a box
with this tool here, with a rectangle tool, we drag a box here, somewhere here, maybe, and
then we put it in the back. So press here back, and now the cat
is above the box. Okay, what's the purpose
of this hit box? First, let's get
rid of the outline, so click this here, and we don't have the outline. Okay, this is not so important, but I'd rather have it this way. So what is the purpose
of the hit box? The hit box should be
used to do the hit test? We in our case, it is this touching color. This box will be used to
test for touching color, the color of the backdrop of the ground and the obstacles
here and the platforms. This will be the box
that is the collision or the color touching
is tested for. This means that we have to get rid of the cat
here, of course. But first, let's adjust
the box here a little bit. First, it should be centered. Drag that to the center
here and it should snap into this cross here
with the circle. If you have it centered, just adjust here, the size. So put that right under the last line maybe of
the feet of the cat. And then here, we also need
to put it somewhere here. So everywhere where the cat
is touching the ground, also the hit box should be. And here we need to get it maybe until it reaches the ears
here, so something like that. So I think we can
live with that. We can test it later a little bit or adjust
it later a little bit. But now let's get
rid of the cat here. So select all the parts of
the cat and delete them. We don't need them here.
So this is our hit box, and let's move
that costume here, maybe to the end. It's not that important, but I'd rather have the
two animation frames here at first and
then the hit box. Okay, so now we have a
hit box for our cat, and now we need to use it. What's the idea for this? So this touching color test
here is the important one. To determine if the cat
is touching the color, the background, the
ground, the platform. So we need to switch to this hit box costume
before we do the test, and this will be at the
start of this defined move. So let's switch to
our hit box costume, switch costume to hit box. And then of course, at the
end, we need to switch back. So let's switch back to, let's say, to costume one. Okay, so we don't have this
jumping frame here anymore, this jumping costume anymore, but we will fix that later. Okay, so what we have now is Before we're
doing the hit test, the collision test, this
touching color test, we are switching to our hit box. And then we're doing
this hit test, this collision or touching
test with this hit box, and not with a cat sprite. No with a cat costume, at least. And then at the end of this function of
this custom block, we're switching back to
the normal cat costume here. What does that mean? It means that the,
the player won't see any hit box here because this is all done without
a screen refresh, so the player won't see
this hit box costume, which is good because we
don't want the player to see the hit box because it's
ugly and it's not a cat. So let's try if this changes already something.
Here we have our cat. Let's jump a little
bit and we can immediately see we're
not stuck anymore. Also the tail doesn't get stuck, and everything seems
to work okay here. Also, if we go to the
edge of this platform, we see we immediately
fall off as soon as this leg here leaves
the platform. So one more, and
then it falls down. So let's have a look
a little bit in bigger screen here.
Let's see that again. So as soon as this leg
goes off the platform, then the cat falls, which is very nice. And this is of
course, because we have our hit box for the testing and not the
cat costume anymore. So it is not tested
for this tail, for example, or for everything that is
outside our hit box. So there is still
a problem here. We have to get rid of
this switch costume to costume one because then we won't have our hit box costume, and we need the hit box costume inside this costume block here, and only at the end, we can switch back to the original costume
to the cat costume. So we need to replace this year and this year
with something else. So first, let's remember what costume we had
at the beginning. So for this, we need a variable, make variable for the
sprite only old costume. And we set it at the beginning
of our custom block here. Set old costume, and how do
we get the current costume? We get it from here costume
number is not what we want. We want the costume name. So old costume is set to
the current costume name. And then at the
end, we need to set it back to this costume name. So drag that here, set costume to costume. O is not the right choice
here but old costume. So here we are setting
it to hit box, and at the end, it's set
back to the old costume. And now for these
two places here, we need to switch that to
a set set old costume, two, and then costume, one. So this will do the same as switch costume
to costume one, but at the end, so here it will be costume one and not
the old costume anymore. So we can doublicate this and also do that here instead
of this switch costume. Okay. So now we remember which costume the
cat had at the beginning, and then we are resetting
this here at the end. But these two places
can also change the old costume or the
costume that it is reset to. So let's test it here. If it's still working, it shouldn't be a
big difference. But now, the hit
test should work always with the hit box and not with a cat costume anymore. So you can see this is working nicely and the cat falls off, and the tail, for example, goes through the platform,
which is very nice. So we can change the
hit box a little bit so that we can
see how this works. So go to hit box and
make it much smaller. So something like this, maybe. And then we start a game, and we see that the cat is
sinking into the ground. We can still move it,
but it is in the ground. At least the costume, the cat costume
is in the ground, but the hit box here
is not And of course, this is not a good idea to
do it like that because we need the cat to stand on its
feet and not in the ground, so let's readjust that and
undo the changes here. Let's try it again. And now the cat is really
touching the surface. Okay, so that's
the hit box trick. I would say, this is a very important trick because this way we can
do the hit testing, the collision detection much better than with the
cat costume here. And the trick is to switch
costume to hit box, our hit box, and then
change it back at the end. And everything inside
this custom block is, of course, not rendered
to the screen. So you won't see the hit box, but you will see the result. And the result is
that the hit test is now very much improved, and the cat shouldn't
get stuck here.
62. Puzzle and 2nd room: So now that we have the
player control at work here, so let's check them again. So we can jump, we can
check for collisions, and the cat at least at the moment,
doesn't get stuck here. So that's all very nice. I think this is something
we can start with too. Add a puzzle to leave this room here and to
go to the next room, and also to make this room a
little bit more challenging. So we need to add
some walls here, maybe another platform
or maybe two platforms here and a little gem that
the cat needs to collect. And then if the catch reaches
the gem, for example, a star, then the exit
will reveal itself, and then the cat can
go to the next room. So let's start with a backdrop. So we make walls here
Let's copy this one. Select here the arrow, and then this platform here, make a copy from it, and we make a wall from it. Something like this, maybe, and then we copy this again
and put it on the other side. So now we have two walls, and the cats cannot escape. And we have this one platform, we make a copy again. Make it maybe a little
bit smaller here, put it over here,
and then we make a copy again where
the star will be. So now, I think we have it. So we have to check, of course, if the cat can reach
all the platforms here, So I think this
should be possible. And here we see a problem that the cat cannot
jump higher than that. So maybe we should put that a little bit more
to the bottom here, lower and make this
maybe a far jump here. Now, now the cat is falling
onto the platform here. That's not good, so make
it a little bit smaller. And now the cat is
falling at the side. And let's check if
this is reasonable. Yeah, I think it's very easy, but it's okay. We
can live with that. And of course, we
need now the star, the gem that the cat
needs to collect. So we make another sprite here. Search for star. Click on it, and now we have the star. It's a little bit too
big, so make it like 40%, and that's the right
size, I think. So let's position it
somewhere over here, and let's see how the
cat can handle this. So that's easy.
That's easy, so that. And now we could collect it. Okay. So now we need to check if the cat touches this star here. And the idea is that if it
really collects the star here, then here door will be open or will appear so that
the cat can exit. So let's paint another sprite. So we can make the
rectangle here. Something like this way
too big, of course. So let's make it
smaller like 20. Yeah, that should be okay. But we cannot make it this color because it
has to be a pass through color so that the cat gun can go through
the door to the next room. So let's make a brownish color. Something like that.
I think that's okay. And now let's position it. So let's move that here. Yeah, I think that's okay. Let's have a look in
a big screen. No. It's not okay because we
have green color here. Still, so we need to move it
to the left a little bit. So let's check again, no, still. So maybe something like that. Yeah. Let's make it a
little bit smaller also. Let's check again. Yeah,
I think that should work. Okay. So let's see if the cat
can walk through the store. Yeah, I works. Well,
I think I have accidentally moved
this door here. Let's put it back. Okay.
Let's check again. If the cat can pass the door. Yeah. It's okay. Now, of course, the door needs to be hidden
when the game starts. So let's put that here when
lag clicked and then hide. So when we start a game,
the door is not there. So it needs to be revealed by
collecting this star here. Okay, so how do we check for the collision of the
cat with the star here? That's easy. We already
have this for ever. Our game loop, and here we
can check for the collision. So let's get an if here. And we have to sense touch, not touching mouse pointer
but touching another sprite, and this will be Sr, of course. So if the cat touches
the star, then what? Then we need to reveal
this sprite here. We can rename it door, and we need to reveal the
door. And how can we do that? We can communicate with other sprites by sending
messages, of course. So we go to events. And then when I receive and we need to
define a message, of course. But when I receive
this new message, then the door can show itself. And here, of course, we
need to send the message. So broadcast, let's call
it new message here. Let's call it show exit. So that here we can receive this show exit and
show the door. Okay, so this needs to go
here into this for velop. So if touching star, then broadcast show exit, and then the door so show
itself. Let's check this. I going up here to the
star, and it's working. Now, the cat could theoretically
go to the next room. But, the star here has
to disappear, of course, because otherwise the cat
won't be collecting it. So we need to send another
message here to the star. Or maybe we can use the
same message for now. I think that's also ok. So if this show exit is
received here, first, let's show the star at the start to reset
everything to the start. And then we can receive
this message show exit. And then we can hide the star. Okay, so testing it. Make sure to always
test your logic. So as soon as we have
something new, a new message, or a new reaction
to your message, something like that,
you need to test it. So this works. This
star has disappeared, and the cats can go through
the door. Okay, nice. So the next room should
be another backdrop. So that's why we
need to draw one, and we can doublic the first one and just change
a little bit here. So first, we need
this door, again. So let's go there,
choose the arrow here, and then copy it, and then go to backdrops. Again, the second backdrop,
and then paste this. You can use this button
here to paste it or control or command
V. And of course, we have to resize it. It's way too big here. Let's make it smaller,
smaller, smaller. Still too big, something
like this maybe. Okay. So let's put that here. This will be the entry. I think that's okay, and
here the cat will enter. And to go to the next room, we need to switch backdrops, of course, here we go to
the code again of the cat, and this we can do here if the door is touched
maybe another if here, if then sensing, touching, door, then we can change
backdrops, so go to looks. Switch backdrop, and
then backdrop two. And we can put this,
we can put here, and then at least the
backdrop should change here. Let's try that again,
and we see that we have to reset the
backdrop here, of course. So go to stage here and
when Black clicked, we can switch backdrop
here two, backdrop one. Okay. So now we are
back in backdrop one. We go here to the star, and then we can leave the room. And we are in the second room. Of course, we need to
hide the door here. Again, so let's go to the door
when I receive next room. We haven't had this
message so far, so we need to create that. So broadcast here. We change the backdrop,
but before we can Make a new message
and send this message here next room so that
the door knows that it can hide itself next room and then hide and the
door should be gone. Let's test it again.
And the door is gone, and only this door is there, but this is part
of the backdrop, so we cannot hide that
and we don't have to. There's one more thing for now. We need to reset the cat
here to this position. So let's put it maybe
somewhere here. So x position is 208 -208, let's reset the t two -208. Let's go to motion set
two, now let's test it. Hey, there's the
door pass through, and then we start here,
which is correct. We cannot go back, of course,
and we don't have to. And here, this is
the same obstacles are here and the same platform. We need to change that, of course, to make it a
different puzzle here. But for now that worked. So we have two rooms now. The first one has this
very easy puzzle. The cat just has to get the star and then leave the room
through the door. That's it. And the second room can
be harder to solve. Maybe that's up to
you. What you do here. I think you have
the capabilities to do harder puzzles here. So we already know how to
handle collisions with sprites, and this way, you can do a lot. Maybe here, you have
to collect two stars before the door appears
to exit the room, or you have to maybe jump on
a switch or something like that to reveal the next
door, something like this. But I think we have a nice, simple, but nice platform
that you can extend. And this is something
you can build upon and make your
own games with it. Of course, this is not perfect. So, for example, The animation of the cat is not that nice. And it doesn't have an animation here if you're
walking or running, then it's just changing
directions, but nothing more. So this is of course,
something you can add here. We don't have a real animation with frame by frame animation. We are just switching from
one frame to another. So one costume to the
jumping costume. That's it. But you have seen how to do it with the Avis Adventure game, so you can do the same here. And because we're using this
hit box here, so remember, we switch to this hit box
and do the hit testing, there's no problem with
the animation costumes. Always this hit box
will be tested for, and it doesn't matter
which costume you have here and which
animation you use here. Okay, so that's it for this
simple jump and run game, this platform or game, and I hope you
have fun extending it and crafting maybe
more levels here, more puzzles, and maybe
you have some enemies, and the enemies are hindering the cat to
collect all the stars, or maybe you can also
use power ups to make the cat use a bigger jump
force, something like that. That's all within reach. I think you have
the tools to do it, and I hope you
have fun doing it.
 Stephan Haewß