Transcripts
1. Introduction to 3D modeling in Unreal Engine 5: The wonderful world of Unreal Engine allows us
to create video games, virtual production,
and cinematic renders. It feels amazing to bring together different
assets and dream of a world that you didn't
really actually create. Like, how do they even
create this stuff? I mean, I want to make
my own TreD models, too, but does that mean I have to learn something like blender, a whole new program? I feel your frustration. Luckily, there is a solution. Unreal Engine five
offers a vast array of tools to design and create
your own TreD models. Simple and you stay in your trust at Unreal
Environment. Hey there. I'm Jordan and you might
know me from CN Com, but I teach Unreal Engine to
millions across the world. I'm super excited to
show you everything I know about modeling
in Unreal Engine five. Now, it might sound
crazy because Unreal Engine is not
a modeling software. However, we can find a vast collection of
different tools to shape, edit, and even sculpt
our own custom models. You'd be very surprised at how
much is actually possible. By the end of this class, you'll be able to utilize all these different
modeling tools to create anything
that you desire, like a small house
with a couch and some furniture all created
with lots of realistic detail. And the best part is with a little bit of guidance,
it is pretty easy. We'll start off with
basic shapes and learn some techniques for
architectural design. Then we'll get
into materials and how to apply them exactly
the way you want. We'll use various
tools to extrude, offset and manipulate any
model to our likings. And finally, we'll get into
morphing and sculpting to really get creative and make
custom and realistic models. Along the way, I'm going
to share dozens of tips on what to do
and what not to do. I can't wait to share
everything I know with you. So let's get started creating
together and jump into the wonderful and
very creative world of T D modeling and
Unreal Engine five.
2. Create Basic Meshes: Hey, they are so cool
to see you in my class. I am super excited to
teach you everything I know about modeling
inside Unreal Engine. It's going to open up a
whole new world for you, especially if you don't have any experience with modeling before. Now, obviously, we are limited. We still got to
keep in mind that Unreal engine is not
built for modeling, but it has a lot
of modeling tools. There are many basic creations
and edits anyone would do, like cutting pieces
off, existing models, creating walls, or adding a
displacement to a surface. And then there are some
more advanced things like sculpting a
couch from scratch. The pros will tell you
it's better to make that in a dedicated
program like blender. And they are right. But trying these things
and unreal makes you really understand the
modeling capabilities, and it is a lot of fun. So, let's get started. In the top left, we're going to change the mode to modeling. This is where most of
the stuff happens. I won't show you
everything because some of these are very specific
or so obvious. Like, if you know how
to make a box, well, you can also create a sphere, it's pretty much the same. So let's click on Box, which allows us to place
a box in the world. After that, we get a bunch of different
straightforward settings. We can change the size, width depth and height. And really, for a box, that's all we need. I mean, you could
reposition or rotate it, but once you click on Except to actually create and place
the box in the level, well, you can also just do that. Now, what's interesting is that when we go into
the details penel, we can see from its properties
that the aesthetic mesh is actually a brand new
box that we created. I can browse to it and find it back in the
generated folder. Everything we create
will end up right here. And this is very different from if we were to
go to the ad menu, go to shapes, and
then take the cube. Now, you might think this
is the same, but it is not. The static mesh right
here is the cube, and browsing to it, you'll find it's back in
the engine content files. So we're using a mesh that comes with the
engine files itself. Each time that we add
a new box like this, we just import the same
box every single time. And if I were to make
any edits to it, we'll actually do that on the original box from
the engine files. So this is only good to place
a temporary box somewhere. But for creating new
meshes or models, you always want to create
them via the modeling modes. That is very important
to understand. All right let's explore the
modeling features a bit more. Under the Create tab here, there are a bunch
of other things we could create like a stair, and we get some
really nice controls to choose the step height, the width, the number of steps, the depth, et cetera. So you can really customize the way the stair needs to look. And from the stairstype, we can even get some
different looks like floating or curved or spiral, really fun stuff to
play around with, and even the curve
can be adjusted with a spiral angle and radius. Let's click on Except. And as we're doing this, you might notice that
we don't really need that much to
create something house. You know, we can
create a simple box with a depth of, let's say, 20, make it like 300 high, which are always in
centimeters, by the way. So that's 3 meters high. Now, if you are from the US, I don't know how many
feet or elbows that are, but you might need
to have, like, a converter open as
you do this because all the units are in
centimeters in unreal engine. Now, on the bottom left, we can find you in
the position better. So if I want my wall
to be on the ground, I set the Z position to zero. Alright, let's hit Accept. So obviously, you don't have to create a new
mesh all the time. If your walls are going
to be exactly the same, just hold down Alt and drag the wall to a different
position to make a duplicate. But keep in mind that
these are the same meshes. So that's how you can go
ahead and create four walls, perhaps a second floor with a
staircase that leads to it, and always keep in mind
that you can still rotate and scale any
model that you make. You don't have to
create a new box if you wanted to slant a bit
more for the roof, for instance, just take one
of your walls and rotate it. There's no right or wrong
way to do anything. Just visually create
what you want to create. We're gonna deal with materials and stuff like that later, so don't worry too much
about any of that. Alright, so what I'd
like you to do now is create a simple house
with a staircase. It doesn't have to
make any sense. It can be a box with a random
stair to a second level. You know, just to
get familiar with some of these very basic tools, and that'll see you
back in the next lesson in which we're going
to explore geometries.
3. Working with Geometries: You will come back.
I hope you had some fun building that
house and thus getting a bit more familiar with creating meshes and placing
them in your scene. Now, one of the
problems that we run into when creating meshes is that when we create something like a box and hit Accept, all of those properties
are baked in. The mesh is created,
it has a certain size, and we cannot change
that anymore. And that is where
geometries come. Geometries are not
models or meshes. They're called brushes. So we won't find them
in the modeling view. Instead, we're going
to go to the at button and look for geometries. We only get a few
very basic shapes. So yes, geometries
are very limited, but for a lot of simple
creations like walls or floors, these will be very amazing. So let's drag a box
into the scene, and with it selected, go to the detail spinel and
locate the brush settings. Now, we can define the size of the cube right here,
again, in centimeters. But interesting is that we
can change this all the time. Even if you're not satisfied
with the shape itself, you can just change the box to something else
like a cylinder, then choose the
amount of sights you need to has to make
it more round or not. And one of the interesting
things that we can also do with geometries
is make it hollow. And for that, I will
first change it back to cube and perhaps make it
a bit bigger like so, and now enable hollow. And if you like, you can change the thickness
of the walls, but now we can go
inside of the cube, and immediately, we have a room. So this goes much faster than having to stick together
a bunch of walls. Now, something very interesting
that we can do with geometries are either adding
or removing something. I'm going to create
a new geometry box and add it to the scene. And I'm going to
position it like inside the wall of
the large cube. Now, from the details panel, I'm going to change
the brush type from additive to subtractive, and that removes a part
from the other box. And what's cool about geometries is that we can
always change this, either the size of that
substractive box, like, make it smaller perhaps or
just move it somewhere else. None of this is baked in, and that's what's
so great about it. Now, selecting these invisible substractive cubes
can be tricky. What you can always
do is just click on the edge where it cuts through
another object like this. Now, obviously,
you can also just select it from the outliner, and you can even see here
which layer is additive or substractive by the
plus or minus on the icon. But still, when you have
hundreds of these layers, selecting an inner edge
is easier, to my opinion. Now, if you want to
create more holes, I can also just use the t plus drag technique again to duplicate the geometry, and it will take over
all of its properties. So this is a great way
for making windows or a door opening when
modeling a house or something. With substractive geometries, there are a few things
to keep in mind, and that is the order of
when a geometry is placed. Now, currently, these
long cubes cut into the bigger cube because
they were placed in the level after the big cube. But if I were to
create a new box now, so let's go to add geometries, box, and drag it into the scene, you will see that
it will not get cut through by the
subtractive box. And that's because I placed this one after the
substractive box. Now, sometimes you want that,
but other times you don't. So a quick fix is to simply
select the subtractive box. You can hold down Control to
select multiple boxes and then hit Control X to cut
it or Command X on the Mc, and then paste it again with
Control or Command V. Doing this places the
subtractive boxes again after we
placed the er cube. So that's definitely
something to wrap your head around a bit
if it's all new to you. Pay attention to the
order of when you place these objects and how
they affect each other. Now, if you would get
more into architecture, there are a few settings and shortcuts that
are going to be very important because
designing buildings need to be very precise. I want to show you guys a project that I've
been working on. It's entirely made with
geometries, very basic shapes. I used the floor
plan as a texture and scaled it so that
a one by 1 meter cube, unreal engine matches
with the plan. So in the next lesson, I'd like to show you how
something like this is possible and how to be more
precise with geometries.
4. Architectural Design: Created a very
simplistic floor plan. It's absolutely not
architectural correct, but it's great for
practicing in this class. It's a simple PNG, which I'll import into lengin. Important to understand
is that this image has a square aspect ratio of
3,000 by 3,000 pixels. So what I'll do first
is go to modeling, and I'm going to
create a rectangle. Place it somewhere,
and for the size, it really doesn't
matter that much. Just make sure you
respect the aspect ratio, which is going to be one
by one, a perfect square. So I'll take something
like 1,000 by 1,000. Then hit Accept and we're going to go back to the
selection view. Now simply take the
imported texture and drag it onto the
rectangle to apply. It will automatically
create the material for. Next step is going to be
sort of a calibration, and this is going to
look very unintuitive, but keep in mind, we're
modeling inside real engine. We don't have a
lot of tools that dedicated modeling software has. So we often got to
figure out workarounds, definitely with architecture
design where it needs to be pixel perfect or millimeter
perfect, I guess. So looking at the floor plan, my house is going
to be 500 units wide and 400 units deep. So I'm going to create
a new geometry, choose box, and drag it
onto the floor plan. Now from the detailed spinel, I will then set the dimension
exactly as 500 by 400. So this box represents perfectly the dimensions
of the house. That means I'm going
to have to scale and reposition the rectangle with
the floor plan to match. Very important is that
you always scale by all axises to stay strict
to one by one aspect ratio. And if your step
count is too much, you might want to decrease that from the scaled snapping option. So that gives you more
precise scaling, basically. The same thing for
position, you know, just decrease the step size for its snapping that should help to match the
floor plan better. What I also like
to do is go into the detail spanel and adjust
the values from there. But just make sure
that for scaling, the proportion is locked. And now all you got to do
is just make sure that the two opposing
corners kind of match. It doesn't have to be perfect, but the more aligned, the easier it's going
to be to work through. So it's really just
a one time thing. Alright, I've got it in place, and now we can build. The left wall is 400
with a thickness of 30. I'll change that in the
details panel for my box, you know, and perhaps
set a height of 300. And now I'll just move it in place to fit on the floor plan. You can see now how
easy that goes. I need to move the wall up a bit as it sticks
through the floor. So there we go. And now it's just a matter of
building out to rest. I always like to duplicate
by old dragging. So let's do the top part
here at the window. That's going to be 440 white as we subtract the
wall thicknesses. Always make sure to
keep your snapping on, by the way, and check
if your walls align. Now, just to
demonstrate something, I want to make one of
the walls 29 thick. And you'll notice that
with the snapping on, I'm like, unable to
get it in place. My position snapping is
already set to the lowest, so that's a problem, right? When doing more precise work, even with the lowest option, it's just not enough. But this class is here
to solve problems. Well, we can easily add
more options in there. So let's go over to
the menu on top. Select Edit, and then
the editor preferences. And here I'm going to
look for grid snapping. Down here, we'll find
the decimal grid sizes from which we can
add a new value, and I'm going to
give it a value of 0.5 and drag it up so it
nicely sits in order. Close, and you'll
see now that we have a more precise snap option, and I'll be able to move
my wall into place. So if needed, you can add
any value in there and do the same thing
for the rotation in scale two, if you want that. So I'm just going to
fast forward a bit as I built this out
using geometries. I'm keeping it very simple as it all comes down
to the same thing. You just place walls
where you have a window, you add a substractive box, and you'll notice that
I always make a copy. So it puts the next
geometry already in place. And I immediately have this same size or I just
need to adjust a little bit. And here we go. A
nice little house. You know, it could be a cabin
in the woods or something. Now, there are a couple
of great things to know. Like for starters,
each square on the default material is
exactly 10 centimeters. And so each bigger square is
100 centimeters or a meter. I'm really sorry if
you're from the US, but this is how real works. But good news, the metric system is really easy to
learn. And much better. Another great trick
I'd like to show you is when you
select an object, you can hold down Alt and then click with
your scroll wheel, which allows you to temporarily drag the anchor point
somewhere else. This is very useful
for if you have a big wall and you're
trying to match a corner, so you can then
focus on that corner while having the
gizmo close to you. But if you deselect the object and then select it
again, it also reset. So it's really just
a temporary thing. If you want to actually save
the position of the Gizmo, you got to right
click the object, then go to pivot and choose
set as pivot offset. So now if you deselect
it and select it again, you'll see it still sits there. Anyhow, I don't want
to go too deep into architectural design as it's
a whole different class, but these basics already allows you to create
some really cool stuff. Just like this project
that I made right here, it's the exact same thing, just a whole lot more work. And you can also make
it more detailed by working with outer
and inner wats. And the more that
you separate things, the easier it will be to
turn layers on and off, apply materials or
mesh displacements. So it really depends
on the purpose of the house that
you're building. We're going to
learn all of that. So take it step by step, practice to build your own
house now using geometries, get familiar with
additive and subtractive, tweak your snapping grid, move the gizmo, and just
experiment the bits. And then I'll see you
back when we're going to add some materials
to the house or to the cabin the cabin in the woods or on the beach,
that's going to be up to you.
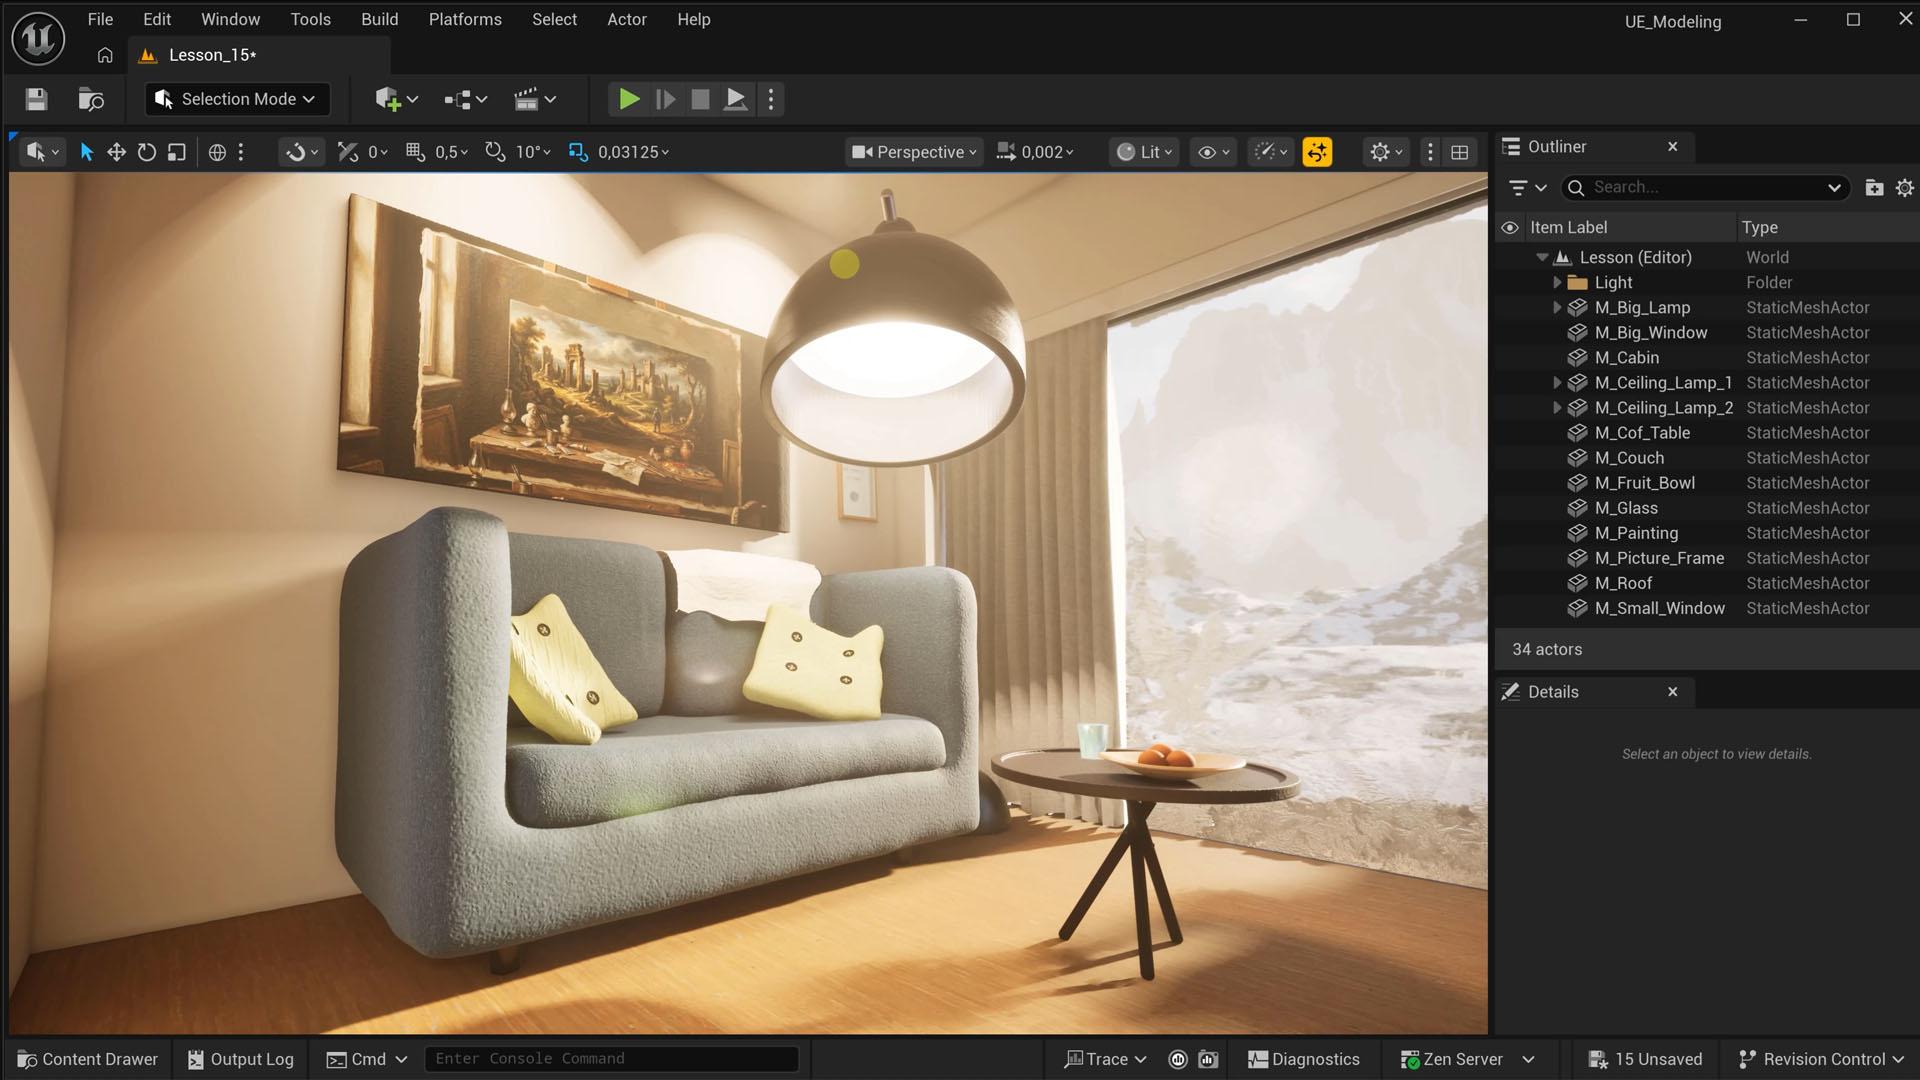
5. Applying Materials: A house without materials
is just a house, but a house with
materials is a home. There we go. The first picture frame
will hang to the wall. So let's turn this
house now into a home. From the content browser, I'm going to click
on the fab button to open up the marketplace. Now we'll not create
our own materials. That's, again, a whole
different class as well. But you can find a lot of free
materials in here as well, and I'm sure you've already explored the marketplace a bit. If you were on time,
you could have claimed everything from
Quicksil for free. It's a publisher
who creates scans from real life objects
and materials. They have a huge collection, but it's no longer free.
You got to pay for it now. So if you don't have it
yet, I'm really sorry, but I'm sure you'll find great alternatives in here
as well, which are free. So let's look for a
brick to start with. And so if you do have Quicksil, you can filter by publisher and then check Quicksil mega scans. Then from the left side bar, let's only look in the
materials section. And I'll just take
anything you want, and choose the quality you like and add it to your project. Can go ahead and find
some more materials. You know, we're going to need something for the inner walls. So perhaps some white
paint or let's go for this cracked paint to
give it some more texture. Perhaps it's an old cabin. And eventually, we're
going to need a floor. So I'll look for a wood
material, perhaps. Now, some glass is also going to be
something that we need. And if you look for glass and
then set the price to free, you'll actually find an
advanced glass material pack. This one is really good
and completely free. So let's add that one
to the project as well. You can always add more
materials later on. For now, let's close the window and check out what we have. Now, to make it
myself a bit easier, I'm going to first dock
the content browser. And then I'm going to create a filter for the
material instance. So just search for
it and enable that. I can now easily toggle that filter to only show materials. And if you select
a specific folder, it will only show you the
materials from within. Now, there are a few ways to
add materials to geometries. You can drag it to a
surface and we notice that the material is only applied to that one surface
and not the rest. So that's already
very different from a traditional mesh where it would just apply
to the whole thing. So that's interesting because it means that we can
have a brick material on the outside and then use that white paint
on the inside. Now when you select a material
in the content browser, you can then also
just shift plus click any surface to
apply it to that. Holding down Control, you can
also select multiple faces and then drag the material to apply it to all
those selections. And finally, if
you wish to apply the same material to old
sites like this inner wall, just select the geometry, hit Shift plus B. Which selects all the surfaces and then just apply
the material to it. So those are a few shortcuts
to really pay attention to. Now, I'm going to continue to give all the rest
materials as well, fast forwarding this part again, as it's pretty
straightforward now. Now, I do notice that I forgot
to add a floor somehow, so let's create that real
quick new item geometry box. But hey, wait, what is that? Why is it suddenly covered
in that white paint? Well, that is because I still have my paint material selected. So if you don't want that, de select any material
before you create a new geometry or simply just hit Shift B to select
all the sites, and then from the DDL spinel, you can just reset the surface
material. That also works. So don't panic. With geometries, you can always make any change. That's the beauty of it.
Alright, let's change the size of the box so
that it fits as a floor. And then reposition it in place. And finally, let me
hit Shift B to select all surfaces and then apply
the wood material to it. Now, maybe you're not really satisfied with how
the material looks. Well, from the details panel, we have some surface properties, and this is for every surface
specific that you select. So, again, if you
want to make a change to the material
for all the sites, then you got to select them all. So that really depends
on what you want to do. So from the surface properties, we can nudge the position
of the material. You have different step sizes, or you can input your own length that each step needs to take. We get some rotation options and finally some scale options. Prehps set it to
three and hit Apply. So these are the most important settings to kind of know about, but later in this class, we're also going to learn about a very different technique
to apply and match material. Don't worry too much
if your materials don't align like right
here with the bricks. You can clearly see a line where one geometry ends and
the other one starts. So you could go ahead
and nuch its position, but that is just so tedious, there's a much
faster way to do it. But that is for later. And because first, we
got to convert what we have right here into
an actual mesh. I know that's kind
of sad because geometries are so
nice to work with. But unfortunately,
they come with their own problems and a lot
of limitations, as well. You could never use them
in a final product, but they are great
to build stuff, and once you're satisfied, you can easily convert
them into a mesh. But that's for the next lesson, which will also create
some actual glass windows and combine it all
into one model. But go ahead now, give your
house some materials first, and then I'll see
you back in a bit.
6. Building and Merging Meshes: The house or the cabin is
starting to look really cool, but there's one big problem. You see, when it rains
outside, well, it gets wet. I'm not talking about
the missing roof, but the windows that
don't have any glass. Yeah, the missing roof
is just to more easily show you what's going
on inside of the cabin, but it's a good practice
for you to make one. Now, when it comes
down to windows, you most probably want
to create a frame first. And this is very
straightforward now. Just create some small beams, and I'll leave the
creativity up to you if you want aluminum
or wooden frames. I'm not sure which one is more energy efficient,
but it's a cabin. We only use it in the
summer, so it's fine. Alright, and we're
done with that. I'm going to go to
the modeling mode now because geometries don't
have flat rectangle shapes, which we'll need for the glass, but that's not a problem. From the create model, I'm going to add a
rectangle and rotate it. By default, it's a
one sided material. So if you can't see it, just rotate it to
the other side. Alright, adjust the size of the rectangle to make
it fit in your frame, then position it correctly. And when done, just
hit on except. We can then close
the modeling view. Now, from the advanced glass back that we downloaded earlier, I'm just going to take one
and apply it to the window. And I think by default, it's not two sided. So if you want to see your
glass from both angles, just open up the material
and search for two sided. Make sure it's enabled, and that will solve the problem. There are a couple of things
that I don't really like. The frame of the windows are
four different geometries, and then the glass is a mesh. Let's put everything together
into one model, one mesh. Now, that does mean that
we're going to lose out on some flexibility that we currently have with
the geometries. Once we're converting
this here into a mesh, we're putting the clay in
the oven and baking it. So always check if your
box is aligned correctly. Make sure that you have all
your materials applied. Now we can still change
the materials afterwards, but surfaces are
going to be baked. Don't worry that's going
to make more sense once we're going to convert
the entire house. Now, what I usually do is keep
a backup of my geometries. And there are two ways
you could do this. Either just make a duplication
of all your geometries. So Control C, Control
V to copy them, and then I'll create a folder
and name it geonderscore, big window or something. A second way to
create a backup is by first designing your entire
level with geometries. And once you're done, you could make a copy of
that entire level, and you could name one Geo followed by the
name of your level, because you can always copy layers back and forward
between levels. So that's up to you, but I do recommend to just keep a backup. I guess it depends on the
project that you're working on. Enough yapping. I'm
going to select all the beams that make
up the window frame. Hold down control as you do. Don't select the glass because
that's not a geometry. That's already a mesh. Then head over to
the detailed spanel and under the advanced section, find create static mesh. Give it a name like
big window frame and choose where you
would like to save it. I'll put it in with the rest in the generated folder for
now. And there we go. We turned our
creation into a mesh. Congratulations. Now, we just need the glass to be
part of this, too. And for that, we're
going to have to open up the modeling mode again, and I'm going to go over to the form tab from which
you'll see a merge button. Now you will have to select more than one mesh, obviously. So control click the frame and the glass to make
the option active. We can choose now to
create a whole new mesh or to replace either the first one we selected or the last one. So that's going to be up to you. There's no right
or wrong way here. It all depends on
how many backups you'd like to keep,
basically, because, yes, we are putting it
in the oven again, and once it's baked,
you can't undo. So I'll just go for new object. Give it a name and hit
Accept. And look at that. We Gutter sells one mesh, much easier to handle, and it also makes
much more sense. From the detail s panel, you'll see that the mesh
now has two materials, the wooden frame and the glass. So if I want an aluminum frame, I can simply replace that
wood with something else, and all the beams have
changed together. So that is very useful
for, let's say, if you want to try out
different bricks on a house, it will just be one material
slot instead of having to deal with hundreds of geometries
and each of its surface. I hope that the
difference between geometries and meshes
makes sense now. You can see that the
window frame has only one material slot
now, which makes sense. We gave all the geometry
surfaces the same material. But with our cabin here, we got bricks on the outside, white paint, and a floor. Once we're going to create
a static mesh from this, it also means we'll only have three different
material slots for the surfaces that currently
share the same material. If you think that you
might want to have a different color
on a specific wall, just add something random to it that you haven't used yet. I would suggest to work
with something temporary, like I downloaded this
wallpaper material, and I'll add it to this wall. I can now go ahead,
select all of the geometry layers,
including the substractives. That's very important. You can
make a backup if you want. I'm just going to
go ahead and create my static mesh from
the details panel. Let's name it cabin, where M stands for
mesh, by the way. What you'll notice
now is that we have an extra material slot
for that wallpaper, but I can also just put
in the white paint into it if I eventually decide not to add
some wallpaper to it. But the option is always
there for that wall. Alright, this is a longer
lesson than I thought, but we've gone through
everything about geometry. So pat yourself on the shoulder. You've done an amazing
job so far and already learned a ton of new
tricks and unreal engine. For a practice, go ahead
and create those windows. We have one on the
site here as well, and combine it into a mesh, and then I'll see you
back in the next lesson.
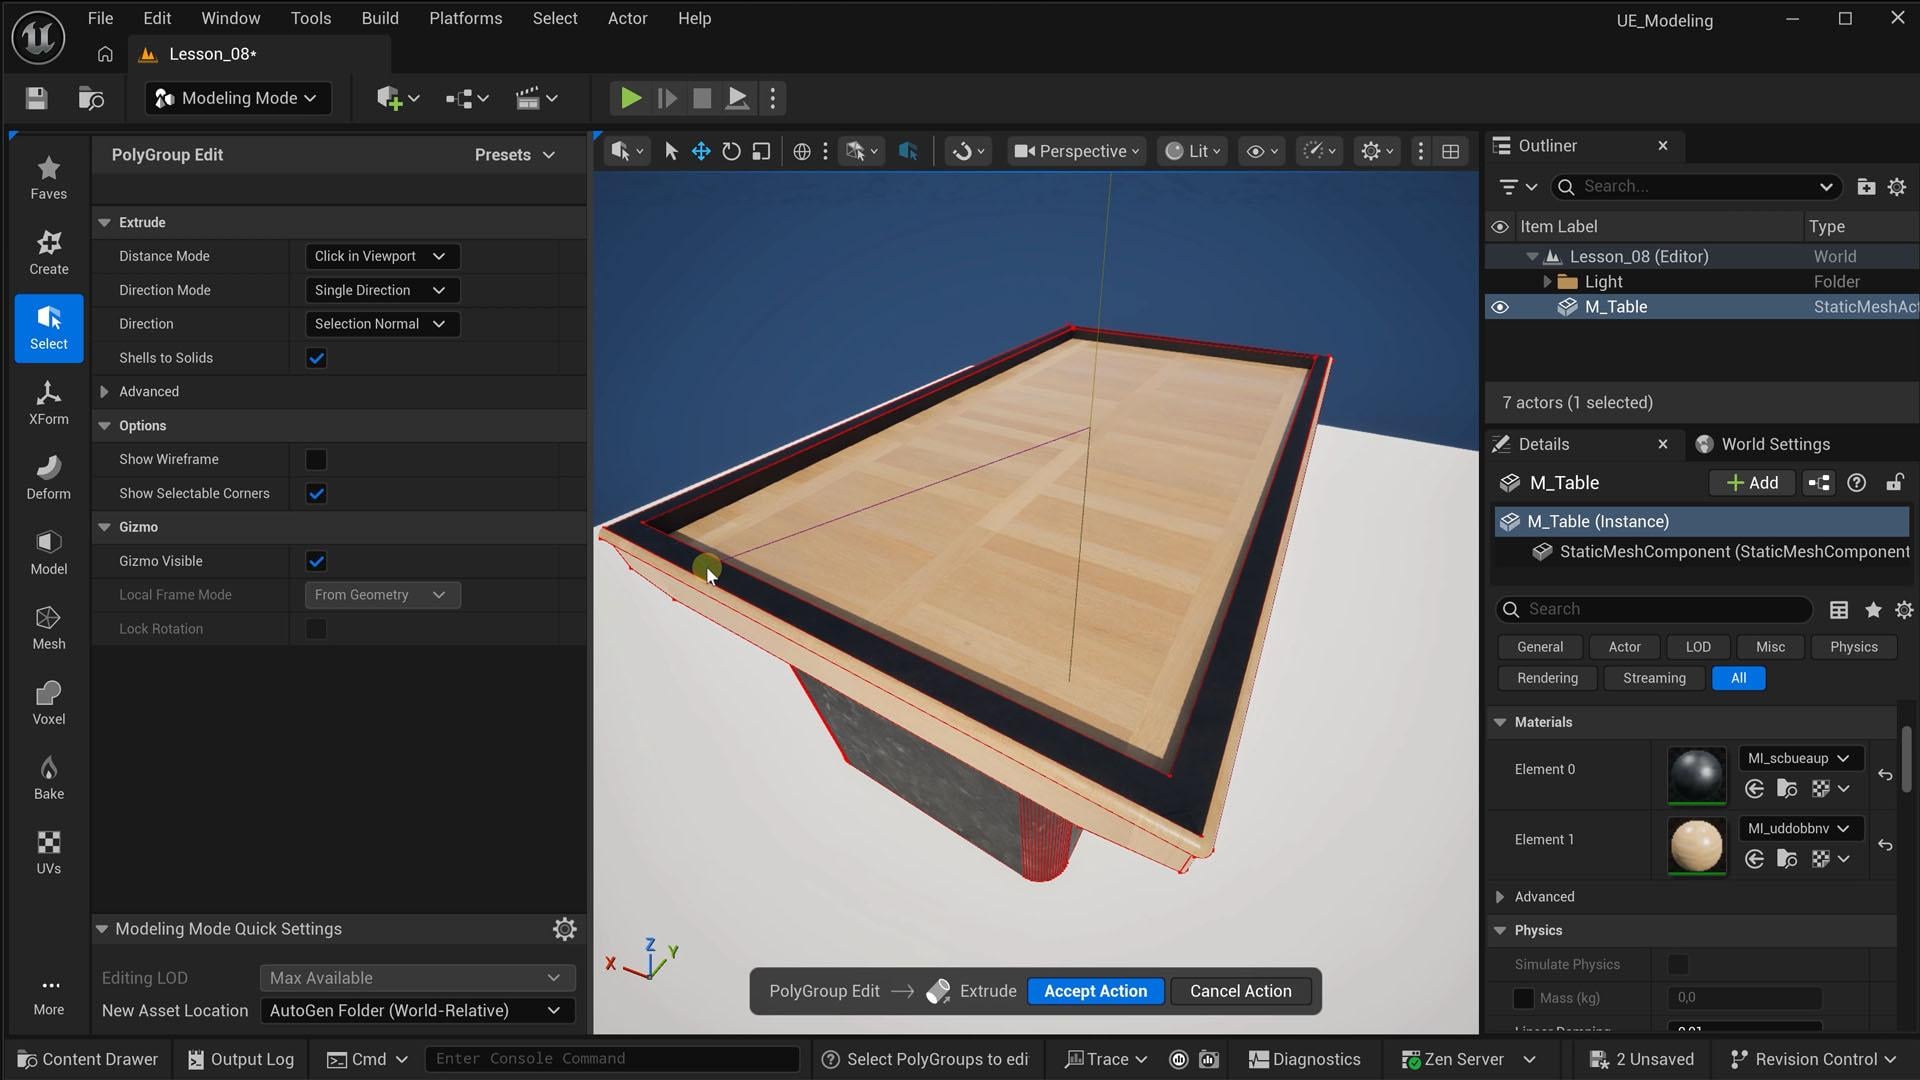
7. Create Extruded Meshes: Alright, guys, let's step out of the house
for a moment and focus on some props that we
can perhaps use in the cabin. That means that
we're going to need some more exotic shapes
other than cubes or boxes. So let's open up
the modeling panel, and we're staying
in the Create tap because there are
still a few things that we haven't explored. One of which is the
extrude polygon. You're going to see a grit, and the idea is
that you first draw a two dimensional shape on
the grid and then extrude it. If you like, you can
rotate the grid to draw something vertically rather
than on the it's up to you. Then from the draw mode option, we can choose what
we want to draw. We get a few presets. Some are pretty boring,
like the rectangle. But there's one in there
which might be very useful, and that is the
rounded rectangle. You simply click to add some points and then draw
the rectangle on your grid. For each different
shape we draw, we get some more options. Like here, we can choose
the corner radius. So that's really nice.
And when you're done, you just click again, and
then you can extrude it. This can be interesting for like a rounded cabinet or
something like that. Definitely explore
these draw modes. I'm going to show you one more, and that is the free hand one because this is where things
get really interesting. We can draw anything by just clicking and thus creating a pat and see it as drawing a slice from an object like
a slice of bread. I'm currently drawing
a slice of a table. This freehand tool allows me to create an
interesting corner. And so when I close the pat, I can extrude it and then click once more
to create a mesh. That gives me a tabletop with
this interesting border. I'll use the previous mesh
we created as the legs, try to position
the table onto it, and when they're in place,
then I'll just duplicate that leg to the other side by holding
down Alt while dragging. Now, all it needs
are some materials. I'll give the legs that
dark metal material, perhaps, and the tabletop
will become wood. Finally, select everything, go over to Form and choose merch, name it underscore
table, and there we go. We modeled a table in
less than a minute. No, I went very fast over this, but these things
we've done before, you create just a bunch of different models,
design something cool, make sure that you
all have a material, and then just merge
them all together. One of the next tools is
called the extrude Pat. It's very similar as the free hand tool from
the extrude polygon. Only here we get a whole
bunch more options, just like before we
can draw a custom pad. But here is where
things get interesting. There will be two
kinds of extrusions. First one is a border thickness. So we're using the pad extrude if you want
a hollow object. The thickness of that is
currently set to interactive. But if I change it to fixed, I can set a specific
value for it. The next option we get
are rounded corners. And just like before,
with interactive, you just change it by
moving your mouse or set it to fixed to
enter a specific value. So each time you want to go to the next step, you just click. The last step allows you to
extrude as we've seen before. And when you're happy, just click again and
then hit complete. Also a very interesting tool
maybe a bit more specific, but at this point,
we're just exploring a bit of what's possible. We're going to combine
some techniques later on and do something
useful with this. But there's one last extrusion tool that I'd like to show you. So there are about
only tree to remember. The next one is the
revolve polypat. Now, this one is crazy.
It works the same. You create a custom pat, but this time you're not
drawing a full slice. Instead, you want to
draw half a slice. That's going to make
more sense in a moment. So I'll draw like half a bottle. And when I close the pad, it gets immediately
extruded to a bottle. Magic. Now, from the options, we can choose the degrease, and that immediately
explains how this entire tool works and why you want to draw that
half of a slice. You can offset it
or make it more low poly with these
options right here. And then finally, there's a very interesting
setting in here. But for that, I'm going to
have to draw a different. So let me put these values
correct so that I have a bottle and then accept
my beautiful creation. I'm going to click on Revolve Pat again to
create something new. Important to understand
is that the extrusion always goes around
the anchor point. So if I were to create
something over here real quick, it will make a long loop
around that anchor point. So that's going to
depend on if you want a hole in the middle
of your model or not. You know, with the
bottle, we didn't have that because I drew
on the anchor point. But now let's check the option. Something called height offset. And when I increase that, you can see what it does. And the moment we
have an offset, we can also make
the extrusion loop a whole lot more than
just 360 degrees. So I can kind of create
a spring or something. So this could be
like the suspension of a car or a motorcycle. And especially with
shapes like these, the steps get more
interesting as it allows you to create more
interesting objects. And although this
is very abstract, just give it a rust material, and it could be some
junk at the scrap yard. If you play around a
bit with the settings, create a symmetrical
ornament or sculpture. Yeah, these extrusion tools
are definitely more specific, but know that they exist. I want you to play around
with them for a bit, see what is possible, and just get familiar with
these three extrusion tools. And we're also kind of done with everything that can be created. In the next lesson,
we're going to step into a new chapter in which we'll learn how to
make adjustments to any mesh, and that's really where
things are going to lift off. We can start from a cube
and end up with a couch, but that is for later. I'll see you back in a moment.
8. Edit a Mesh: Far, we've only been
creating models, and we start to notice that unreal engine is pretty
limited in what it can create. It's either a box or some
wicked tool to bend stuff and create a spring for that one time you'll ever
need it in your life. So we're going to explore a whole different
way of modeling now, which is by editing
existing meshes. And there are two
different approaches which we'll get both into. Either you start off
from a simple cube and edit it in such a way that it becomes something
completely different. Or you edit a model that
is already a proper shape, maybe to fine tune or customize. For example, we created this table in the
previous lesson. It's okay, but it's
very low polygon. Let's, for example, make these
corners a bit less sharp. So open up the
modeling panel again, and we're going to go over
to the select tab this time. That also means we're
going to have to select a model to make some of
these options available. And one of the items
is polygroup edit. This one here holds a whole bunch of different
very useful tools. There are three sections. Either we make a
change to a face, which is any of
these flat surfaces. We can edit the entire shape, so the volume, and finally are the edges. Let's
start with that. I would like to have
some rounded corners. It's obvious that
I first need to select all the edges that
I want to make round. So hold down Shift as you click
to select multiple edges. You can also drag to
make a selection. Do pay attention to the
select filters from the side panels because we can select points,
edges, or surfaces. We're dealing with edges now. So let's only select that, which will now select edges. And you can also select just
everything with this button, and then by holding
down Control and then dragging out
a selection box, you can unselect
what you don't want, like the leg this
whole selecting stuff is in itself already something
to get familiar with, but don't worry
too much about it, as you will use these
tools more often, it will become
autopilot eventually. Alright, we've got all
the edges selected. So under the edge edits, we can find all the tools with what we can do
with these edges. And one of those is called Bevel, and that's
the one we need. Immediately, you can see how that takes the
edge off the table. You get some options
to further tweak that bevel like the amount
and the roundness. Now, it's possible
that you suddenly see a different
material on the edge. Like here, it's put the material from the legs on the edge. Maybe you want that,
but maybe you don't. And that's where set
material ID comes in. It's set to zero, which is the first material slot in the mesh element zero. If you want the second, which is the wood, just
change it to element one. Okay, it looks good. Let's hit Accept action. That brings you back
to the polygroupTols. Now, the Bevel is not baked in. We can do other edits first. But if you want to
save your edits, you got to click on except. So now your mesh is
actually edited, and as we've learned
before, it's baked in. We cannot undo. I
mean, we can undo. You can always hit
Control or Command Z. But if you were to
restart unreal, then we cannot go back, so just keep that in mind. Anyhow, the edges
are rounded a bit this makes it much more
natural because in real life, nothing has sharp
corners like that. Even if your real table
has sharp corners, there's always a little
roundness to it. Always use the Bevel tool. It really makes your model
so much more realistic. Let's explore a few more tools. Now keep in mind that if you
want to select surfaces, you need to enable that
selection filter again. I'm going to select the top
of the table and you'll notice that we can move that
surface and even rotate it. This can be useful
in some cases, but it also stretches
out the neighbor faces. Instead, you could
use the extrude tool. And we kind of know what this does from a
previous lesson. I'm going to select
a few more faces to include all the corners. You can hold down Shift to
select multiple planes. Going back to extrude, you can see that
it will still be forced to move up or down. If you like, you can change
the direction and make it extrude from the X
or the Y axis instead. But what if I want to make it
thicker to all directions? Well, that's where the
push or pull tool comes. This is great to
make a specific part of your model bigger or smaller, a different kind of extruson
sort of inflating a part, a great way to add some
more detail to the table. Like, I might want to pull
this out a little bit more. And you notice that this
creates hard edges again. So the Beffel is
usually the last step. Otherwise, you're dealing with
these hard edges non stop. So let's wait a bit to fix that. I first want to do
something else. Like, maybe turn this into
some sort of a pool table. And for that, we're
going to have to make the bottom part of the
table a bit thicker first. And we're getting into edits that have multiple
different solutions. Like, I just could go ahead
and select a top surface, all the bottom surfaces, like so, and then just use the gizmo to move
the top part up, which stretches out
the bottom part. And the thing is, there's
no right or wrong way of doing something as long as
you can achieve your goal. So this is fine. Alright, so I'd like
to cut some sort of a hole to make it look
like a pool table. So we're going to need to add a new smaller phase
to this table. One way you could
do this is with the inset and outset tool. This allows you to create a smaller rectangle face
on top of the table. The problem is, though, that since we inflated
the top part, it has removed the
polygroup and thus the rounded corners are messing
things up. There you go. Another reason that you
should bevel on the end, but we're stuck with it now, so let's problem solve. We basically lost
the polygon group after we pulled out
the top of the table. So I'm going to just
close this tool and locate the trislect tool. With this one, we
can create or edit those polygon groups that we have been working
with the entire time. Polygroups are nothing but
a collection of triangles, the basics of what
a mesh is made of. Like, real stuff is
made out of atoms. Virtual stuff is made
out of triangles. And with this tool, we can
select those triangles. It uses a brush
to select because some tree D models can have
millions of triangles. So this makes things
easier to select. For our example, we just need to select the two triangles
that make up the top part. And then from the mesh edit, we choose Create
polygroup. And that's it. Click on except and go back
to the polygroupE dit, and you'll notice now
that we are able to select the top without
the rounded edges. Now I can click on Inset to
create an inner polygroup, and this is the one that we would like to extrude
inwards a bit, creating our pool table. And just like that, we're able to move planes around and bevel edges to create
unique designs and make models that look
much more realistic. Now I'm finishing it up a bit, but also giving these new
corners a bit more roundness. It doesn't have to be much. Just take the edge.
Now, only one problem that we run into
are the materials. By making these
adjustments unreal doesn't always know which
material to apply where. And unfortunately,
not all tools gave us the option to choose which
material we wanted where. But don't worry too much about it because in
the next lesson, I'll show you how to take back control over your materials. But first, I need you to
make this pool table, get familiar with
these polygroups and different tools
to modify them, and don't forget
about the triselect to manage those polygroups.
9. Materials and UVs: Getting to a point where we already have a lot of
tools to work with, and you'd be surprised how many things you
can create now. There's just one last thing
missing from our tool set, and that is editing materials. So let's get back to modeling, and we're going to start
in the attribute step. I need to click on Me to
Reveal because I have my display scale set to very high so you guys can
see everything better. We get a whole bunch
of options here to edit stuff like LODs, collision, even some
more options to create polygroups which we've seen in the previous lesson. But we don't need to
go over all of this. You know, sometimes
unreal just offers us ten different tools
to do the same thing, but slightly different for a
slightly different scenario. So feel free to explore, but it's unnecessary to hit you with too much
niche information. There's basically just one
option in here to remember, and that is the edit
materials option. This allows us to select triangle surfaces and
change their material. So let's start by fixing this weird book where the material of the
legs are in the table. Now, we can again use that
brush to make selections, and it's okay if you
select too much. We're going to apply
the wood texture to it. So if you already
select a surface with that same texture, it will not make any difference. Now, the brush doesn't always select all surfaces correctly, especially around corners,
so pay attention to. You could change the selection
mode to all connected, which is going to select
the entire table without its legs because those were
initially a different object. And in this case,
we can do that. Then we go to the
material section, expand the materials property in which you'll see the
two materials applied, each with their index number. So for the active material, we'll pick the first index, which is the wood,
and then simply locate and click on
assign active material. And just like that,
we've fixed the issue. For a pool table, that insight needs to have that
typical green fabric. So we're going to have
to add a material slot, which we can do here. You click on the plus, and I'm going to add a green
fabric material that I found in the fab store and apply it
to the third material slot. We can then select it
as the active material. Change the selection mode back to brush so that I can select only the insight and finally
assign the active material, which is the green fabric
to that selection. Click on Except and all
our changes are baked in. So that is where you can
change and edit materials, but it's not perfect yet. You see, we have been stretching
some parts at the table, and thus the material is also
stretched in certain parts. The corners don't look well. You know, just a
whole bunch of stuff that can be done a
whole lot better. To fix that, we're going
to go to the UV tab. From here, we'll not assign
materials like we did before. Instead, we'll change
the existing materials, their position, scale,
rotation, and all of that. So that is a big difference. Now, you can try the
AutoUV which will automatically try to fix
your material placements, and you can change
the mode to original, by the way, so you can
actually see your material. And we get some more options
to tweak the process. But the moment you have
some sort of complexity, it's really hard to get it. I typically don't use this. Let's hit cancel. Instead, I usually
get the best results with project Ufes. Like the name implies, it's going to project the material on the object
from a certain shape. By default, it's a plane, so it's coming from
one side and thus creating a very stretched
surface on the sides. You can rotate and
aim at projection, but with a two D plane
on a three D object, you'll never get good results. So you want to take the box or this cylinder option if you really have mostly round stuff. I'm going to go for
a box since we have a rectangular table
for the most part. You can move the gizmo to
reposition the material the way you want and even scale it
from a dimension option. 100 is default, normal size, but we can double that to
make the texture bigger. And of course, it's
going to stretch if you don't scale
all axises the same. If you ever worked
with decals before, it's practically the same. But, yeah, I like this. Let's hit except. And I would like to
do the same thing with the house that
we built earlier. Select it, choose project UVs, and with the box projection, it's going to look really good. The texture now seamlessly continues where the walls meet. Might want to reset the
scale to the default size, though. Alright, looking good. Now, one small detail, though, and that
are the corners. The bricks don't match up here. Some textures like bricks or other prominent patterns like a wallpaper will be more
visible to mistakes like this. With a wooden table, nobody noticed because it's
a subtle pattern. And the reason for that
is because we're doing a perfect square projection on a house that is not a square. It's a 4 meters by 5 meters
dimension and 3 meters high. And you could enter that value, which was also set by default because it recognized
the size of the mesh, but that's also going
to scale the bricks too much because we're no longer using the original
scale of the material, the bricks are aligned
in the corner, though. So the idea is that
we choose a value that is closer to 100
the normal scale, but with the correct
aspect ratio. You know, for instance,
we could take away a zero from every value, and this will make
the bricks smaller, and we retain the aspect ratio. We could double
it, so 50 becomes 140 becomes 80 and
30 becomes 60. So if you want that
seamless corner, always do a multiply or a divide on your
actual mesh values. That's going to be a
little bit of math, so feel free to take out
your calculator for this. But let's hit Accept and you'll have now
beautiful corners. But I still see problems. You see, we have a brick wall, but it's pretty flat. What if these bricks
would actually come to life like an actual brick? Well, that is for
the next lesson.
10. Nanite Tessellation: Might already be familiar
with Nanite Tessellation. It's one of those
new features in Unreal Engine 5 that
really stands out. The brick wall that we
have here is still flat, and it would be so cool if those bricks would
actually have depth. Now, this is completely done
within the material itself, but before we can do that, we first have to make sure that our aesthetic mesh
has Nanite enabled. Otherwise, it wouldn't work. So from the details panel, let's locate where the
static mesh is stored. I'll right click on it, go to Nanite and make
sure it's enabled. Now we can locate the material, and I'll just
double click on it. Now, this material
is from Quixel. They always create their
materials in a particular way. So the next step
is going to be how to enable it for
Quixel materials. Unfortunately, it
might be different for materials that other
creators have made, so I can't show every
single way of doing it, but I'll do my best
to explain so that you understand at least
what's happening. So we're looking here
at a material instance, which means that this is
not an actual material. It's an instanced
version of a material. That gives you this
user interface with a bunch of options to further
customize the material. I can change the color, the tiiling, reflections, and a whole bunch
of things in here. A material instance is basically a user friendly way
to adjust a material. But the real
material needs to be set up in such a way to
give me those options. Otherwise, a material instant
is not going to be useful. Under the general
tab, you'll find the actual material which
is here on your parents. Now, Quixel uses a
master material, one material that takes care
of all their materials. That's why they had
to create a lot of options for their
material instant, including the texture itself, which you can find
under the base color. So let's open up the
master material. This style right here
is the actual material, and the nodes that
are connected to it define the properties of that material like
what it looks like, how much reflections
it has, and so on. And on the bottom, we
can find displacement, an option that tells the material to take
on a specific shape, and that's the one we need. This is our tessellation, but by default, it's
great out or disabled. So from your detail panel, I'm going to search
for tessellation, and there it is enabled, and the displacement option
will be highlighted. We can now go ahead and save this and go back to
the material instance. And by the way, you
can already see the bricks doing
something weird, but it's not doing
the correct thing just yet because
we've learned that Quixel materials have
almost every parameter as a customizable option in
their material instance. So that means we also
have to look for tessellation or
displacement options in. And here they are.
There's an option to enable tessellation again, but we already did that
in the master material, so we don't have to
enable it here again. If you already see
your material have this position offset,
then it's working. Now, I do want to enable the
displacement scaling because these two options allow me to choose how much those
bricks need to stick out. And let me resize the
material window real quick so that we can actually see the view port
at the same time. Changing these values,
the displacement gets bigger or smaller. However, Unreal still doesn't properly know how
to displace this. I mean, the wall is just
displaced as one flat surface. So I'm going to locate
the displacement texture. Yeah, Quixel should really
update your materials to have this already set up
correctly, but it's not. Maybe in the future, it will, but if you see the default
displacement texture in here, it's the wrong one. So I'm going to browse
to the brick texture. We can do that from the
base color texture. You'll see that it comes with
some other textures, too, a roughness map, which can give different kinds of reflections
to a single material. There's a normal map, which is this blue texture which takes care of lighting and adds some fake depth
to your materials. And then this yellow
texture which holds multiple
properties like also a displacement
telling the texture which parts need to be
displaced more than others. So I'm going to drag that texture into the
displacement option, and immediately you can
see it working now. So this texture basically
tells the displacement, Hey, the bricks need to
be displaced a bit further out than
the mortar between. So now we can go back to the displacement scaling
and adjust as needed. The magnitude will define
the overall displacement, and the center is
an offset to make sure that things like
corners align correctly. So this is how it works. You enable tessellation
in your material and then put the displacement map
into the displacement pin. If you don't have
a displacement map or you're making
your own material, you could try to just use the texture itself
and take one of its color channels to see which one gives you
the best results. Now, in fact, let's try and do that to give you guys
the full picture. I really want you to understand what's going on right here. I've created this rectangle
with the modeling tools, and the first thing I'll
do is locate the mesh, right click on it, and make
sure that Nanite is enabled. Next up, I've got this
texture of some pebbles. It's just that, a single
very simple image. And after importing,
I'm just going to drag it immediately
to my rectangle, which is automatically going to create the material for it. And when I open up the material, you can see how basic it is. It's only using the
texture as its color, and that's you might want to re scale and
position this material. There is a UV option and
the material for that, but I don't want this class
to be about material. So let's take the easy route, which we all know by now, open up the modeling panel, go to project UVs,
and this time, it can be a plane because we're dealing with a flat
model anyways. And I'm going to scale it down
to 50 and then hit Accept. We can close the
modeling panel now. All right, let me zoom in on the pebbles to see better
what's going on right here. Now, open up the material again, and I will resize the
window a bit better so that we can see the pebbles and the
material at the same time. So first things first, enable tessellation from the
material details, and that will enable the
displacement option. And I'm going to start with the red channel of that texture. Just drag it into
that displacement. The safe and you'll immediately see the
displacement of the pebbles. You can try some
different channel, see which one gives
you the best result. Now, it's never going to be perfect without an
actual depth map, but it's a quick and super
easy way to add some depth. Now, if it is too much, we need to scale the
displacement down a bit. But because we have
no material instance, we got to reduce it a bit
in the material itself. And a very easy way is to take the channel from the
texture that you were using and connect it first
to a divide node and then bring the output of that
node into the displacement. So we are literally
dividing the scale by half, and you can tweak how much
you want to divide it by. Alternatively, I'll
delete the divide node and instead look for
the multiply node. Then connect it to
the displacement and choose by how much you
want to multiply it. So now it's double the size. Crazy. And with that, we have learned how Nanite
Tessellation works. So instead of actually modeling
these bricks or pebbles, you just look for a
material and displace it, especially in situations like here where the pebbles come in contact with the brick wall see how much more depth
we're getting from it. It are not two flat surfaces meeting each other in a
straight corner anymore. But enough about materials now, this is a modeling
class, and thus, that's what we're
going to continue with because there are a whole lot more tools in the modeling panel that
we haven't explored yet. So let's explore them
in the next lesson.
11. Lattice Deforming: Hey, welcome back. From
the modeling panel, we can find a very
interesting category, deform. And as the name implies,
with these tools, we can really shape
any model we like, like needing a bread. So that allows for very
interesting and custom models. But these are tools
which are also often used to edit
existing models. I've got this right here
from the fab store. I find it a bit underwhelming. I want to make it bigger,
but only the metal part, so I can't just scale it up. So let's see what
we have right here. One of the tools
is called lattice, and it's going to
divide the mesh into a three dimensional raster. You can increase the resolution
of that raster if needed. I will actually
decrease it a bit so that it covers
the blade better and it's not divided
too much because the higher the resolution,
the more work you'll have. Now, you'll find that out when you're working with
a tool yourself. Now, what I can do
is select points and move those to
stretch the model out. And you'll see now
how it automatically deforms the mesh based on
the resolution we've chosen. So you can really pull and push the mesh to take on
a different shape. And since it's a tree D raster, we can also make it thicker. And you'll notice that we're definitely stretching the mesh. So it could start to
look a bit wobbly. So it's obviously
not for every model. But for this old axe, a slightly more bended grip or blade is not going
to be noticeable. But yeah, look at
this. We've got a much bigger blade now. Except and the
changes are saved. Now let's hang it to the wall on our cabin next to the frame. You know, it shows
that we're more tough with these bigger axe. Look at that. Now, I
also like to use this on patches that I find to
look too flat, as well. I got this patch, for example, of some small rocks
on the ground, and I will choose lattice
again, and by the way, you might notice that
Unreal will have loading issues with
very complex meshes. That's why I'm working on a lower quality version
of this model. I had Unreal crash
several times before. Yeah, you can see how
good we're able to add much more dynamic
height differences in it, especially against the wall. You know, those rocks might have been piled up a bit
more over here. So this is something
that I really love to work with on patches of pebbles or ground surfaces
or anything like that. I'm going to click on Except, and we can then just
duplicate this patch, have them overlap to make it seem like one giant
pile of rocks. Also merge a whole lot better with these
height offsets now. And to avoid repetition, I like to rotate and scale
some of these patches. Obviously, your
custom adjustments to have these rocks a bit
higher near the wall, are also gone now
because you rotated it. So you might want to
duplicate the source mesh and then create a
different lattice adjustment, but make sure to duplicate the mesh in your
content browser, because as we've learned with every change we make
from the modeling tools, it's going to be baked
in into the mesh. Now, we've got a few more very fun deform tools to explore. So in the next lesson, we'll have a look at
some sculpting tools.
12. Mesh Sculpting: It is time to get really creative and start
playing with some clay, morph a mesh into
an organic shape. So that means we got to
start with a block of clay. Here I have a cube to
demonstrate first. From the modeling panel, go to deform and then locate
the dynamic sculpt. We get a brush from which
we can shape the cube the way but you'll notice that
it doesn't go so well. The sculpting tool is looking
for triangles to deform, but a cube doesn't really
have much triangles. So you're just nashing
it together to a clump, and then you'll start
to see more triangles, and the morphing will go better. So unlike real clay, a cube doesn't work so well. We need more triangles
to begin with, and a sphere is a
perfect example of that. Taking the dynamic
sculpt tool you can see immediately more triangles and the sculpting goes much easier. Now, we can click
to move an area, both inwards or outwards so you can make
mountains or craters. Hold down shift to
gently undo the deform. So if you move
something too much, you can just reduce that by demorphing it a little
bit with the shift key. Now, by default, you're
using the move tool. But from the brush type, we can find a whole lot more. I'm not going to
cover all of them, but I will touch upon a few. One of which is the smooth tool. When sculpting, you can
easily get hard edges, but with that smooth brush, you know, it smoothens that out. Alright, next is the inflate. Similar to the move,
but this time, you don't need to drag. Just click and hold to
inflate a specific area. And with every brush, you can hold shift to
make it do the opposite. So now it deflates. However, that shift only
deflates what you inflate it. If you want to actually
reverse the inflate, you got to hold down Control. Now, I'm making it seem more
complicated than it is, but I hope that the demonstration
shows you what I mean. Just try and play around
with the shift and the control keys as you
use one of these brushes. In better English, you can carve out holes with
the control key. Make a bowling
ball or something. Now, not every tool has a control variant because it
doesn't always make sense, so just be aware of that if your brush
doesn't do anything. Now let's actually
create something useful other than
playing with this ball. I'd like to create a
couch for the cabin. And there are
different approaches. It's a personal preference. But here's how you
could design a couch. Let's first delete
these two examples and then head over
to the create tab. I'm going to start with
a box and I know it doesn't have much triangles,
but we can fix that. I just didn't told you earlier. Let's create a new polygroup on top so I can extrude
the sitting part. So go to select polygroupE dit, and we could do an inset, but we need the front of
the couch to be open. So instead, I'm going to
use the insert edge loop. That will create a new edge
straight through the model. So I'll do that
for each arm rest and also finally the back rest, which might be a
little bit thicker. Then hit Done, and
now we can use the push pull to
bring that part down. And immediately we see some
sort of a couch appear. So hit Accept and we're done. Now, for some, this
might be a good couch. I like it to be a
bit more softer, so let's also do
some morphing on it. But first, we need
more triangles. Otherwise, it's
not going to work, and we'll end up with a small
abstract sculpture again. I'm going to click on mesh from the tabs and pick
the remesh tool, and immediately you see how it will create a
bunch of triangles. And you can increase
the couch for even more detail.
That's basically it. Just click on Except. Now, let's go to deform and
pick the dynamic sculpt. And I'll start with
the smooth brush tool. Adjust the size if needed, and then I'll just go
over all of the edges. A soft couch should
not have hard corners. You know, I don't
want to hurt myself. So smoothing all of
these spiky corners out, both the insides
and the outsides. Of course, you can
always undo by just pressing Control or
Command Z, by the way. So don't be afraid to try something out like here
on the back corner. And if you think,
maybe it's too much, just undo that action
and try something else. Perhaps adjust a
brush strength a bit. It all depends on what
you're going for. So this is sort of a bevel, like we talked about before, but much more organic. Now let's take the inflate
brush and add some cushions. So I might want to
increase the size and also decrease the strength because
this has to be more subtle. So let's inflate the
back a little bit, and you can go over
it a couple of times, you know, sometimes, hold
down chit to deflate again. You know, it's a process, and sometimes it doesn't
always work, so you got to undo all of
your actions and start over. Then you inflate parts again, deflate a bit,
adjust, et cetera. I'm very bad at
sculpting, by the way. Don't ask me to clay something. It's going to look like
something a 2-year-old would. Hey, I'm showing you the tools. The creative part is up to you. But you can see that
mixing different brushes, like going over it with the smooth brush can give
you somewhat good results. Alright, this is starting to
look a whole lot more like a real couch or at least
as real as I can get it. Now, sometimes you'll end up
with some weird triangles sticking out somewhere or you feel like the shape is
not what you hoped for. It's a bit too rough. Well, under the deform, there's a smooth option, and this will do a
general smoothening over your entire mesh. Get some options for the smooth
type and then of course, the amount, so you got to see which one works best.
Look at the details. It's not always needed, but the tool is
there for if you do. Alright, looking good.
All it needs now are some pillows and a
couple of legs to stand on. But we're going to
create separate meshes for that and then
bring it all together, but I feel like you no
longer need me for that. Let's take a break from this
class and create something, create a couch if
you haven't already, and then create some pillows. I'll leave the
creativity up to you, and then in the next lesson, we'll give everything materials and bring it all together. I'll see you back in a moment after you've created
those pillows.
13. Modeling a Couch: Here it is, folks, a
couch with a pillow. As a blanket, which we'll
get into in a moment. I deliberately chosen a pillow because it's probably the
easiest thing to sculpt. All I did was use the move and the smooth tool until
I ended up with this. Now, you might ask,
how did I get it to sit there so nicely
in that corner? Well, here's the original
pillow that I sculpted. I made a backup of just
a straight pillow. That's how I started
because it would be a mess to shape this while already
sitting in that couch. So I just rotated
and repositioned it as much as possible
into that corner, aiming where it somehow
is going to be, and now we just got
to morph it again. But we need more
control over that, so we can't just use the sculpt. I mean, those that
can can probably use the deformed tool
might be even better, but I need an easier tool. I'm going to go over to the
deform tab and find lattice. We've worked with
this one before, so we already know what it does. I just select a whole bunch of points and then move that part. But I also rotate some parts. Don't overdo it because you want to retain the shape
of your pillow, the more you're going to
stretch and pull stuff here, the softer the pillow
is going to look. So it doesn't have
to perfectly match. Just don't have it stuck
through the couch. And a great tip here
guys is to just take a real pillow and
lay it in your couch. See how it looks, how it
deforms in real life, and try to mimic
that and unreal. Alright, so I also created
this blanket from a rectangle. Same thing, increase
the triangle count, sculpt and lattice. Alright, I'm going
to throw a material on it, and immediately, you can see that it just still
doesn't quite look right. Now, it feels very stiff, more like a leather patch and not like a soft
blanket at all. Now, that's just my
sculpting limitation, but again, I've got a tool. So don't worry about me. I can always find a tool to
help me out of trouble. And this time, it's the displace option
from the deform tap. Now, it will look
crazy by default, but we have some settings. Now, this tool will displace your mesh depending
on a certain pattern. Can have a noise
type displacement. This is just something random. And this is useful
for various things. Like if you set it
to a low value, it adds much more
dynamic to the mesh. And I start to believe more
that this is a blanket, but it can be better. There's also an option to
displace by a texture, and we are kind of familiar
with this already. It's what Nanite
Tessellation does. It looks at the texture and it displaces the mesh
based on that. So it's a different way
of tesslating your mesh. The major difference here is that we're baking
the displacement in, so we can't change it
anymore afterwards. Now, I have a texture
of a crumpled blanket, so I'll just use that
as a displacement map. The texture is not an actual displacement map, by the way, but you can often still get decent results with
a regular image. Try a few color channels to see which one gives
you the best results. And then you can tweak the
scale and the position. Or go back to the top and adjust the overall displacement. So yeah, this is a
very simple trick to make the material look better of the stuff that
you're trying to sculpt or just to create
it more realistic. And you could bake
that displacement in and then further
tweak it if needed. Alright, let's give
everything some materials. I've got a few from
the fab store. So let's drag one of
these onto the couch. And if you haven't
noticed already, you will now these are
hard edges right here. The material doesn't
flow through, and that's coming from the box shape that we started with. What we're seeing here are the polygroups a group of
polygons or triangles. Now, we could remove or
merge all of the polygroups, but that's not going
to solve the issue. You see, materials
are always baked in, so under the hood, they'll keep remembering the
current polygroups. Is there a fix? Of course. I've got a tool for
everything, guys. You know that by now. We're
going to go to the modeling. By the way, don't get too overwhelmed by the so many
tools you find in here. I don't know why, but a
lot of these tools just appear back multiple
times in these tabs. Like, here's the
polygroup edit again. Anyhow, we're looking
for the subdivide tool. We don't want to
deform our couch, so let's set the scheme
to loop, and that's it. It's going to recalculate triangles and thus kind
of reset the material. Hit except, and it can take
some time before it loads, but eventually it
will solve the issue. I'll do that for
my pillows, too. Maybe first apply
some materials to it, as well, a different color, and I'll do the
same for these two. So choose subdivide
settings are still correct, so I can just go
ahead and click on Except and also do the same
thing for the Outer pillow. Alright. We're
getting there, guys. Now, custom models always look better the more
details you add to it. We've already seen a couple of such techniques like with a displacement here
on the blanket, but there are some
more things we can do, which we'll explore
in the next lesson.
14. Tips and Tricks for Realism: Creating your own custom
models is not easy. Even though we get
a large tool set, what makes a good tree D model stand out is its creativity, and that's all in the details. Whether you're going for a
low poly style look or try a photo realistic approach,
both need details. Now, looking at the couch, we started from a
rectangular design, Playstation one graphics,
but then we smoothed it out, adding filling and
created more dynamic. But it's still just one blop. If you look at a real couch, it exists out of multiple parts. So you could go ahead
and design the seeding, the back crest, and
all separately. And I actually went
ahead and do that. You can see it right here.
These are two models, same process as we did before. I smoothen out the corners,
fix the triangles, and added a texture displacement like we did with the blankets. I've got two separate models, and together they fit great. Now, I'm just missing
the be cushions, and I could go ahead
and go through the entire process
to make those again, or I can take another route. I already have the seating. The back crest is basically
the same, just half the size. So let's make a
copy of the seat, and I mean a true copy. Always remember that
these modeling tools actually change the mesh. Drag the copy into the level and also apply the
same material to. Let's already positioned the bit in place to the backrest. Now, to make it feel
more different, I'm also going to
rotate the cushion, so you can see, like the
backside of the seat. Now, scaling it down will just crush everything together.
We don't want that. So let's go to the model tab
and locate the mirror tool. And it's quite self explanatory. You just mirror the mesh
from the center point. So you can rotate it where it has to mirror from
and then adjust. With organic models
like dis cushion, you could see the line
where it mirrors. Times by moving that
mirror point up and down a bit or even rotating it slightly, you can
get rid of that. If it's really a problem, then I do suggest to not take the easy route and just design something new. But look at that. Super easy. Hit except. We can now go ahead, duplicate the back cushion to the other
side by holding down Alt, and perhaps it's a
good idea to also rotate it so that it doesn't
look exactly the same. When duplicating
something, make sure that you don't see that
it's an exact copy, and this is a way to hide. And here we go, another one of those details to make
it look more realistic. This is starting to look
like an actual couch, guys, but it's still
missing a few things. I'm going to go to create
and look for cone. Let's adjust the size because I want these
to be the legs. I'm going to go for
a radius of five, and I will take a
height of around 30. It's way too much, but I don't want that sharp
edge of the cone. I want to cut it off later, so that's why it's a
bit too big right now. Hit except, and I'm going to rotate this
around 180 degrees. And now let's cut
off that spike. Otherwise, we'll get
scratches on the floor. I'm going to go back to
model, and this time, I'll take the plain cut, which will just cut it in half. Rotate it so that it
cuts off the spike. I actually use this
tool very often as well when I find a model
on the fab store, and I just kind of, like, knead one piece from that model, so I just cut off all
the rest from it. Very useful.
Alright, hit except. Let's apply a material
to it, and look at that. We've got a leck. Let's
push it in place. Now, you can take
this really far. I've got a leg piece right here that I worked
on a little bit. I added a separate mesh to it that functions
as a small rubber, and even that rubber got some small imperfections from
the weight of the couch. So I'll go for these legs,
delete the other one, and I'll go ahead and
duplicate this leg to the right side and eventually duplicate both front
legs to the back. You got to ask yourself, A
people go to see these legs? Is it needed that I
spend so much time and effort into all these
details right here? Alright, it's awesome. I can't
wait to sit in this couch, guys, watch a movie,
and maybe take a nap. Now, let's bring those
pillows in again. And when you're
working on something, it's never a straight line
of tools that you use. We sculpt it, fixed
the triangles, morphed it using lattice to
fit better in the couch, but we might need
to go back into sculpting or something
else to redo the material. So, the more familiar you
get with these tools, the more you'll see yourself
switching between them. Now, I would like to add some
buttons to these pillows. Again, adding more detail. Create a cylinder and
I'm going to resize it so that it looks
like a flat disc. Don't worry too much. If it's not the correct size, sometimes it's easier
to work on a model that is too big to
eventually scale it down. Alright, let's hit Accept. And now let's go
to the select tab and choose polygroupE dit. I'm going to select
the top surface and take the inset option. This allows me to create a
smaller polygroup insight. I will then make sure
that the inner surface is selected and use the push
pull to bring it down a bit. Hit except. Going
to need a couple of holes in it now so that it
looks like an actual button. Now, from the model tap, we've learned that we can find various options to cut a mesh. But there's one last
tool on here that we haven't explored
yet the poly cut. With this one, we
can cut through the mesh depending
on a certain shape. It's currently set to circle,
and that's what we want. But we can also change
it to something else, you know, even dry custom shape. So that's good to know.
Let's bring down the size of the circle and make it fit
correctly on the button. Perhaps increase the subdivision for a higher quality circle. And just like the plain
cut or mirror, we can, of course, rotate it, as well, but that's not needed right now. All right, it's in
place. It looks good. Let's hit Accept. We have to do this
three more times. Fortunately, we can't
duplicate a cut through, but luckily it remembers
our last setting. So all you got to do
is just move the cut through to a new
position and hit Accept. So let's do that a couple
of times until we got four holes in the button so that actually
looks like a real. Alright, we got a button.
I'm saying button a lot. Button. Now, we can't
call it finished yet. We learned that sharp edges don't exist in the real world. So let's go to the select tab and choose polygroup edit again. And I'm just going to
select everything, but first filter out to select points because we
can't bevel points. If you do try, you'll
just get an error. So if you see that,
try to disable one of the selection filters
and just try again. Great. I'll adjust it a bit so that the bevel is just subtle. Alright, looking good. Hit except action and except. Look at that, guys.
A perfect button. No, I hear you thinking,
and you're right. Aren't we just wasting time on such small things
that you don't even see the details
of? Of course. Alright, let's continue. I'm
going to apply a material to the button and then move
it to a pillow and, of course, scale it down a bit. It's a bit messy to get
it in place, though. I will also duplicate
it a couple of times to have the
button in each corner. Just try to mess
around a little bit, get it in place. Alright,
something like this. Now, the pillow still
looks pretty bad. Also just a blop. It's missing detailed shapes. So I will go back to the displaced tool under
the deep form, then pick the texture option for displacement type and actually reuse the crumpled
blanket texture. And here's something
interesting by changing the scale of
one of the axises to, let's say, 20 can get
an interesting look. Of course, adjust the amount of the displacement and
tweak it a little bit. But yeah, this feels now more
like an actual fabric now, and it's really nice to
see those fine details. So often, you can use a certain
displacement texture for different looks when you tweak the scale or offset settings. And if we put our
blanket in there, too, we could do the same thing. It has that blanket
displacement already, but I'm just going to apply that same texture
displacement again to it. But this time with a very
large scale on one axis, also adding these lines and perhaps make it
much more subtle. You can see how it's
possible to stack multiple texture displacement
on top of each other, maybe use different textures or the same with just
different settings. And just like that,
we have transformed the couch into a more
realistic model. I'm very happy with this, so I will actually go
ahead and select all of the meshes that make up the
couch from the outliner. Then let's go to X
form and choose merge. I'll make a new object
and name it Couch. Hit except and our
beautiful couch is now merged into one mesh. And if we go to
the details panel, we can find all
the material slots for if you want to
change something. And this brings us to the
end of the class already. We've gone through all of
the most useful tools. I've got a great
exercise for you, which I'll explain
in the last video, so I'll see you back
in the next lesson.
15. Conclusion: Well, let's start by
saying congratulations. You've made it through
the entire class and learned how to model
inside Unreal Engine five. That is huge and a
big step forward. You're no longer dependent on Tre D models that you
have to find online. If you have an idea
for something, you just create it yourself or edit an existing model
to your likings. All the tools recovered can be used on models you
download from FAB. Somewhere else. Now, I went
ahead and finished the cabin. I put the couch in
there, but I also added some more interior objects like a big painting on the wall. I gave it a bit of
noise displacement to add more depth to it. Then I created these
ceiling lights, and as you can see, I put
some details into it. I tried to think what a realistic light fixture
would look like and what it needs to be able to aim the light,
hence these joints. The same thing is with
this big light right here. If you have ever something
going through an object, make an actual hole
like just in reality. The more you can mimic reality, the better things
are going to look. Same here, where a
pin goes through. Then next, we got a
little table right here, and you can see the
same pins again, which could be like the screws holding
everything in place. I got those on the legs as well. Right here a drinking
glass, a very simple shape, and by adding a glass texture to it, it immediately works. We got a bowl with some oranges and natural objects like this. These are a lot of detail to really make it look realistic. So it really depends on
whether you use these models. Are you taking a close up
or a long shot from this? I just created some spheres and added a noise displacement. From further away, it's perfect, but you don't want to
take close ups of. Very important right now is that you practice everything
that we've learned. Use all the tools that I
covered to create something. It's by doing that you learn
and improve upon yourself. So I've got two
assignments for you. You can choose or
do both of them. First of all, is to try and recreate this entire cabin
with all the elements inside. It really helps to
have an example so you get a sense of direction. So that's why I advise you recreate the lights and the
table and all of that first. I provided to the project
file for you to download. However, I cannot include all the materials
because they are from Quixel so you just got
to apply those yourself. For the landscape outside. I did that just to
make it more pretty. Now, furthermore, the cabin
is still pretty empty. We don't have a door just yet. Maybe there should
be a television at some wall switches
for the light. And then there's this
corner right here. I have no idea what it could be, but I'll leave that
creativity up to you. So that's the second assignment, just adding more stuff to it. Now, go and create your own
models in Unreal Engine five. I really hope you've
enjoyed this class. Thank you so much for watching and as always stay creative.
 Jordy Vandeput, Filmmaker and Youtuber