Transcripts
1. Welcome & Introduction: Hello and welcome to this class where you
will learn how to play this amazing
instrument called a lawyer. It is basically like
a very small harp. So it is often also
called a liar harp. The lawyer is an
ancient instrument often used to portray
angels and divinity. And it is truly one
of the most relaxing, magical, and beautiful sounding
instrument you can play. The best part is that it
is very easy to learn, even for beginners who never played a music
instrument before. My name is Mike and I made
this class for you to give you a great foundation for playing
this beautiful instrument. So now I want to welcome you to a new amazing
adventure in music. So let's start your journey
on the liar right now.
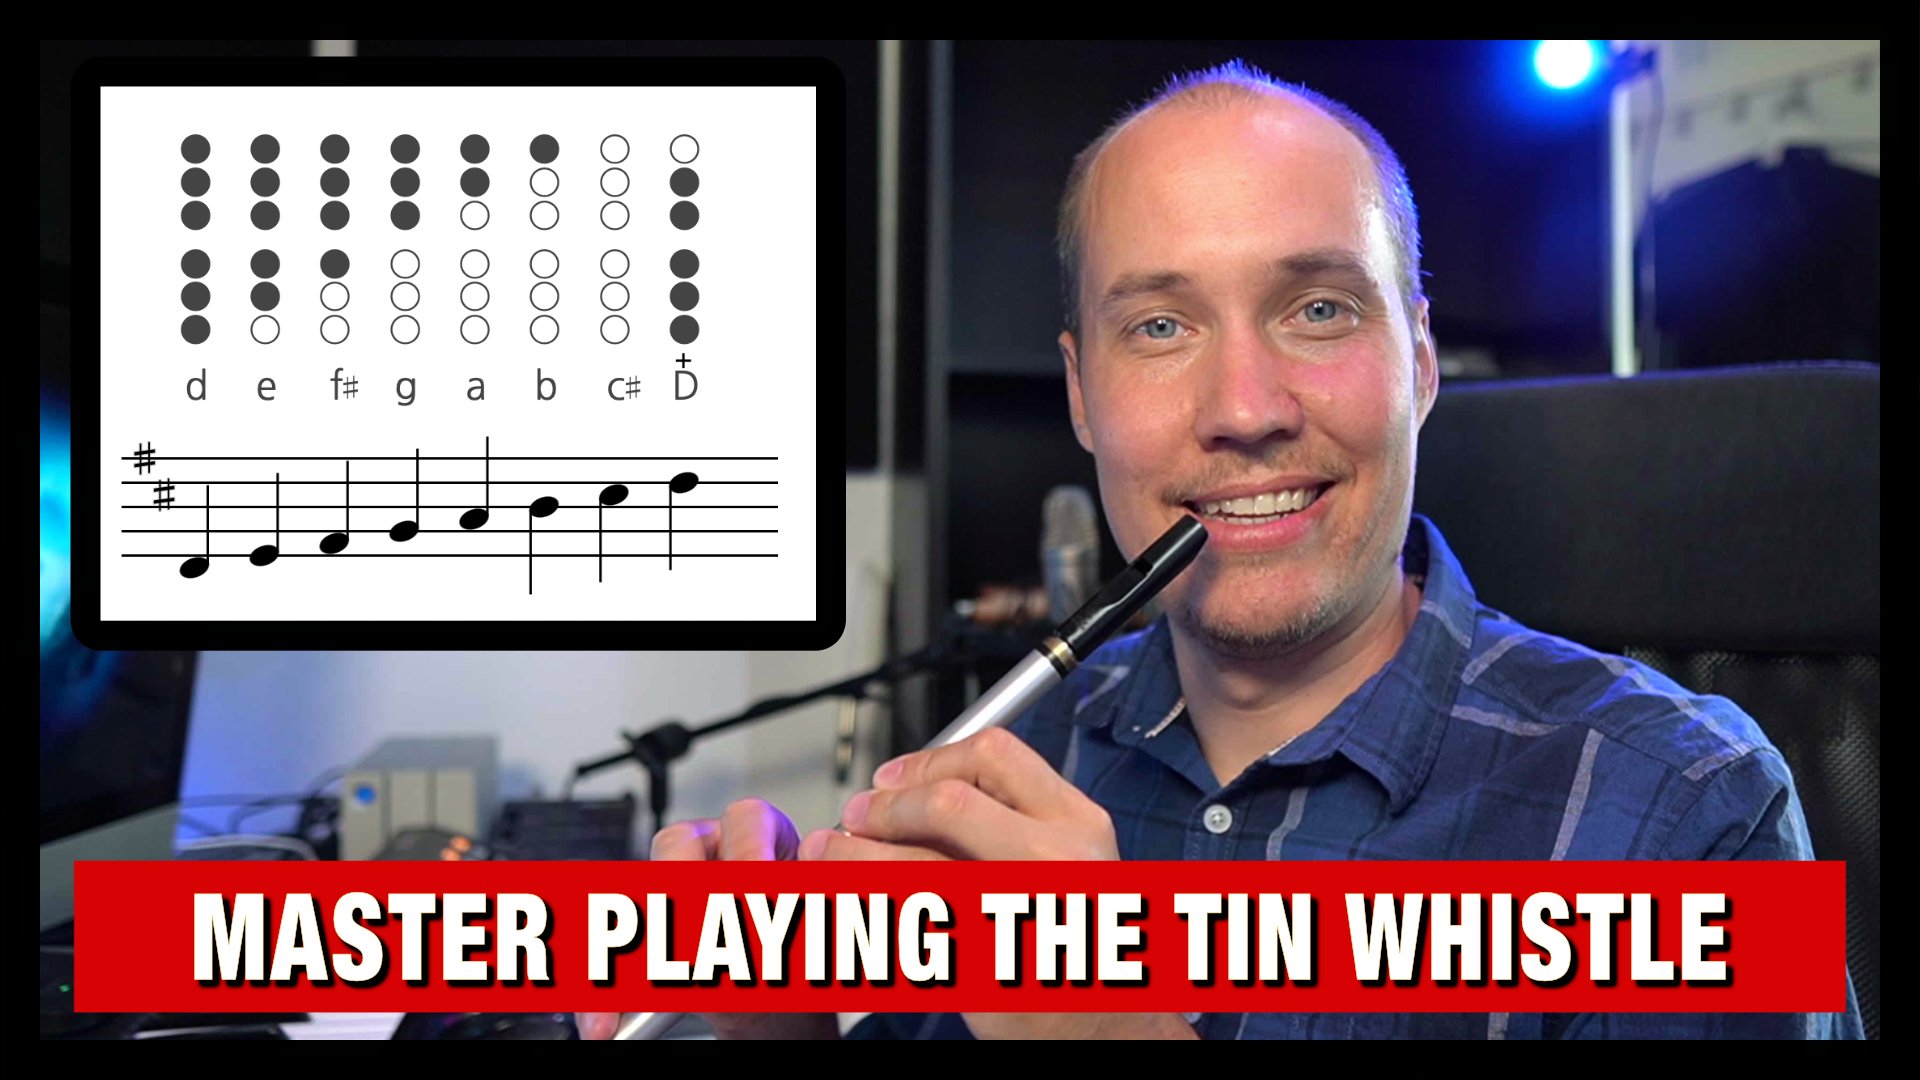
2. The Amazing Lyre Harp: What is this instrument and why is it so incredibly amazing? Let's find out. So this is called a
liar or via harp. And it is an ancient
instrument with a magnificent, peaceful, relaxing
and beautiful sound. It has been used in
many cultures around the world for
thousands of years. But it is mainly associated
with ancient Greece. It is what is called an
open string instrument, meaning there is nothing behind the strings here to
push them against. So now fretboard. And compared to the
guitar, for example, which has a fret
board with Fred's. Instead, each string
is its own note. This creates a very
open and rich sound. And the strings are laid
out in a very simple way, starting with the lowest on one side on this particular
layer, this is G3. And then going up,
note by note for each string until you get to the highest string
on the opposite side here, which on my layer is a five because this is a
16 string layer. So another big
difference is that a traditional layer
like this is what is called the
diatonic instrument. And that basically means that the strings are tuned
to a specific scale. In most cases, it will be tuned to the white keys of
a piano keyboard, meaning that it will
play naturally in C major and the
relative a minor scale. And you can see this from the note names
from the top here. That's the standard tuning. The advantage of this is that it is easy to start
playing melodies, harmonies, chords,
arpeggios, glissandos, etc, on the layer. However, there is a
downside as well, which is that you
will not be able to play accidentals on your layer. An accidental is
a node that goes outside of the scale and key of the particular
song you want to play. Basically, you want to
choose any songs that stick to the notes of whatever scale and
key it is written in. This brings us to the
tuning of a liar, because even though the
liar is most commonly tuned to C major or
a minor, meaning, like all the white keys
on a piano keyboard, you can in fact
tune any string up or down a half step to
get a different scale. Let's say you play
a song written in D minor and you want to
play it on your liar. Well, D minor has one black key, which is B flat. So what you do is you take the nodes labeled
B on your layer, like here, B3 and B4, and then you tune them down
so they are in B flat, and then your liar will naturally play in
the D minor scale. There are a lot of different
designs of the liar in various shapes,
would, colors, etc. But most importantly, they come in different amount of strings. I have seen liars
with everything from seven strings all the way
to 21 strings. And beyond. The more strings you have, the more range of nodes
you will be able to play. But the downside is of course, that you have to tune more
strings, which is tedious. I will not lie. But I have a liar
with 16 strings. And I think that is
a good compromise. I would not personally want fewer strings than
this because with two fused rings
that are songs and tunes that will be out
of range for your layer. The layer is simply an amazing, relaxing and a
beautiful instrument, perfect for beginners who
never played an instrument, because it is so easy to
learn and to play it. But also incredible for experienced musicians who want to expand their sound pellet, add that relaxing, rich and open sound that the
liar is famous for. So I asked you now, my fellow musical friend, are you ready to learn how
to play these ancient, magical and almost heavenly sounding instrument
called a liar.
3. Choosing your Lyre: So did you already
buy a liar harp? Or perhaps this will be
your first instrument, or simply, you want
to get another one. Well, in any case, I still want to give
you my advice and recommendations for
choosing and buying a liar. Sadly, there are so many cheaply produced
liars on the market. Some instruments, or even unplayable because they cannot
hold the tuning at all, have strings that break all
the time or simply sound bad. You will do yourself
a huge favor by avoiding these
cheap instruments. So make sure to read the reviews on the
website you buy from. I also suggest picking a liar like this one with
16 strings or more. Because then you will be
able to play more tunes and songs compared to one
with too few strings. Also make sure
that the layer has a knot which is this
raised bar here. So the strings are attached at the bottom and the tuning pegs, but this little bar here, we'll make the tone better and the tuning for the
strings as well. Your lawyer should
also definitely come with a tuning
tool like this one, which attached to the tuning
pegs for tuning each string. And hopefully as a bonus, it will count with an
extra set of strings. Minded. Regarding other design choices, the color does not
really matter, just choose what you prefer. But I do recommend getting a wire with strings in
metal like this one. Because they hold the tuning on the string is much better
than nylon strings. I also personally
recommend a liar horse with a sound hold this here
and the resident body, meaning that you
get a resonant like a guitar almost inside here
when you pluck the strings. Also, Take a good look. Look at the top of
the layer up here, above the tuning pegs. Where are the note
names should be clearly labeled so that you can easily read them as you hold your liar horse
and play any tool. If the note names or engraved, like mine is here, meaning they are
carved into the wood. That is much better than simply painted or printed because those note names can lose
their clarity over time. With engraved labels like this. That is much better. Okay, So where should
you buy your liar? Well, you can of course
buy it on Amazon, eBay, or any
marketplaces like that, and perhaps you will get lucky. But in my experience, there are a lot of bad products on big
marketplaces like this, especially for
music instruments. So what I recommend is buying
from an actual music store, or even better,
directly from a vendor that specialize in
life your harps. I bought this
particular layer from an online music store in
Europe called full mm, which I basically bought all
my music instruments from. So I can recommend
that if you are in Europe, but basically, if you stick to a music
online music store or a real music store
or a vendor and, or make your own viral hopes. I think you will have
a much higher chance of getting a good instrument. So good luck, liar hunting. And I really hope
that you will find a great instrument that
you are happy with.
4. Tuning your Lyre: How to tune your liar harp. So tuning any string instrument, and particularly the layer, is something you will need
to get used to do often, because strings go out of tune over time regardless
if you play them or not. I strongly recommend that
you always have a tuner available when you practice
and you play your liar. And of course when you tune it, you can use a standalone
tuner device, but I suggest installing a tuner app on your smartphone
like this one I have here, there are plenty of free
ones to choose from. This is called tuner light. Then opening that
app up every time you pick up your layer
to play or practice. You should also start
every session by tuning all the strings of your liar when you first
get your instrument. So when you have bought
it and it comes home, or if you just put on news
strings on your layer, it will take time quite awhile. In fact, before the strings
and tuning will settle down because the strings have to get used to that
stretch, stretch. What I recommend is that you start by tuning all the
strings when you get your new layer or
the new strings according to the note
names here on the labels. And then leave the layer four a day without playing
or practicing. And you may have to do this
procedure for a few days. So tuning them again
the next day, leave it, put it aside a few days until the strings have
settled and the tuning will actually hold good
enough to be able to start playing tunes
on your layer. Also be very careful and
delicate when you tune, especially on the higher strings because strings on the
layer or very thin, so they break easily, do very tiny adjustments, you will eventually get
a spring that breaks. So I recommend having a set
of spares springs available. So if you don't have
that for your liar, start by getting a set
of strings as well. Now, let me demonstrate
how you tune your layer. First, start up your tuner app, like I have done here. You've watched this line, you want it as close
to the center point or 0 as you can and you can
see the note name here. Then use the included
computer tool, which looks like this. And it is basically you
put it on the tuner, tuning peg up here. Then you start on
the lowest string, always taught in
the lowest ring and go string by a string
to the highest ring, pluck it without turning. And he watch the tuner app. So you can see, I
don't know if you can see this little line here. You can see it's
slightly below the 0, as long as it is between
these two extra arrows here. About minus two to
plus $0.15 overtone, then that is okay tuning
this one was a bit flat. So what I do is pluck the
string and while it's ringing, grab this tuning device with
your hand and just slowly, you turn it at a very minimal, very slow and tiny amount. You turn it clockwise
to go up in pitch and a counterclockwise
to go down in pitch. So in this case it
was a bit too flat. So pocket and then
beat up too much. I can see already, even
though I just turned like one millimeter or
something super tiny, it was still too much. So this is one of the biggest frustrations
of this instrument, is how hard it is to tune. Just be aware of that. So again, I have this on my knee here
so I can watch it down. Beat up. It's like half a
millimeter EBIT up. It's so small until you
get it too in-between, in-between those two lines. Then you move on to the
next string, which is a, in my case, this on
a 16th Marine Corp, they started on G3,
then goes to a, it doesn't matter what
your heartbeats just start and then go string by a
string. Do the same thing. Okay. It's almost too flat. It's almost there. Just he and I usually just hold it with my fingers
and then put a bit of stress here on the tuning
device so you can even, you can even hear how it
goes up or down in pitch. If we are used to
playing guitar or any fretted
instrument like that. This is the most
tedious because there is no gears for the tuning. It's just friction. So it will be tiny
amounts for each string. But what you do is to go through all the screens
like this with your tuner, try to get it to
the CRO position. Or I actually prefer to have
it just a tad over CRO. So Ted sharp, just a
slide because strings are generally go down in
pitch when they settled. Go through all the strings. Once you tune all those things, you will need to go
back and recheck if they still hold
the tuning and you may have to do some adjustments to go
through them quickly again, again, just test them. Okay, So what you do is you will always need to check and
reaching new layer like this. Like I demonstrated, that
historical each practice or playing session. So it is tedious, especially that's why
I don't recommend having too many strings. I think 16 strings is
the perfect compromise. Perhaps. You may
want to choose 19, but anything beyond that,
it's, gets annoying. But if you only have
seven or ten strings, there's fewer strings to tune, but it will make some tunes and songs out of
range for your layer. However, in time, these tuning will become
a habit and you will be able to do it much quicker
than your first time. So good luck tuning
your heart now, tuning to tuning app
string by a string. Let it settle, recheck, and then you can start
playing songs on your layer.
5. Holding your Lyre: Alright, now that your
layer is in tune, let's learn the basics
of how you hold it. How do you pluck the
strings and how to play nodes and the tunes
on your layer. So there is no perfect
way to hold a liar hoard, but I will teach you a
good starting point. And then you can choose
to adapt to what suits your playing
style and comfort. So start by picking it
up with your left hand. If you're right-handed like me. And a grip the forest
side of the opening here. This is the opening
behind the strings. With your left hand. Your thumb should
be on the inside here for the best
grip and support. Then place your liar, push it so that it leans like
this against your chest. Here. For extra stability,
the node labels and tuning screws should
always be clearly visible. So I recommend having them
slightly below your eye level. So here's my eye level, so I can look slightly
down when playing. Then you'd tilt your
layer a bit so that it is at an angle
with a top bit, a bit farther away from you. So instead of having it
like this tilted down, you have your strings
at an angle and you will get a better view
of the node labels, you will get a good
stability holding the liar this way
as well as nice comfort and accessibility for plucking the strings
with your fingers. So another way of
playing the liar, if you do not prefer to have
it to the body like this, is to place it flat on a surface like a table or I
have a shelf here behind me, so I put it like this and then you can
play it looking down. But when you played like this, I recommend not having it. A top-down angle like this. Rather, you have it at an angle like this when
you play slightly, either vertically like this
or a bit angled like this, because it is easier for
your fingers to pluck this comparative
plugin like this. So again, the main way is
grip it with your left hand. If you're right-handed, thumb
here inside the opening, push the layer towards
your chest for stability, angle is slightly down
and perhaps a bit away or towards you depending
on what you prefer. So you have easy access. Two strings, clear sight, looking slightly down
on the node labels. And you get stability
for the good grip and pushing the wire
towards your body.
6. Plucking the Strings: How do you pluck the
strings on your layer? So now that your layer is in June and you have
learned how to hold your instrument properly
for easy access, stability, and playability,
it's time to pluck some strings and make
beautiful songs on your layer. What fingers to use? As a beginner on the liar, I will recommend sticking
to using your thumb, index finger, and middle finger as all of these three fingers. When you get more experienced, you can add the ring finger
and pink as well in order to play arpeggios and bigger
intervals, easier. And without having
to move your hand as much around the liars
rings when you play. But start with three fingers, thumb, index, and middle finger. Pluck direction is
actually really simple. You pluck the strings
in the direction your fingers are
naturally facing. Your thumb will pluck the
strings away from your body, from your body and outwards. And your other fingers, all other fingers will play
back towards your body. Because that is how they
are naturally facing the direction where
to pluck the strings. Well, I recommend plucking the
strings over this opening. So note down here, but actually up here. So you have this opening
behind the strings. Because it is the
place where there are actually a bit more
space between the strings. As you can see if
you check this here, It's actually be tighter between the strings down here
compared to here. And that way it is easier
to avoid accidentally, accidentally like
packing two springs. I'm touching another string rather than the
one you were going to play is also closer
to the string labels, so the note names
here so you can keep track of what
nodes you play. If you pluck here, you will
need to watch your fingers. You don't really
see the note names, but if you pluck
up here and have it slightly below eye level, you can actually see your
fingers when you pack a. While. You also see the node labels. How to pluck the strings. You simply place your finger
on the side of your strings. So in this case, the
thumb here to decide, oh, let's see, this
is the E string. Then you likely
pluck it by pushing your finger outwards and a bit outwards towards
yourself as well. So in the direction on
the finger plus outwards. And the reason you go
a bit out as well as a bit in this way towards you, is to avoid if you keep
just the direction of the wire is easier to accidentally
touch the next string. But if you just pluck and go a bit outwards
at the same time, that is easier to be. Get those clearer sounding knows when you
pluck the strings, how to improve your plucking. So a mistake many beginners on the Lionheart make is
to allow your hand and fingers to get too far away from the strings of the pluck
the strings like this. That is not practical
or efficient. So what do you want
to do instead is to always keep your fingers. Let's see if you can see this as close to the strings
as possible, even if you don't play them. This way, your fingers have
way less distance to move. When you plot, any string
will go to the next string and you will increase your aim
and efficiently like this. So those are my tips
and recommendations for how to pluck the
strings on your layers. So go ahead and
practice this now, and I will see you in the
next lesson. My friends.
7. Congratulations - Now Practice Playing your Lyre: Congratulations, you now have a nice overview and
foundation of the liar. And you have learned
all the basics like things to consider
when choosing a liar, how to tune, or the strings, how to hold it for the
best grip and stability. Tips for improving your plucking of the strings and so on. I will now give you a few basic exercises
that you can do as a daily routine as
a beginner to get used to playing your
liar in the beginning, you can stick to using only
your first three fingers. But when you feel
you can handle it, I recommend starting to add the ring finger and eventually
your pinky as well. Especially when
you start to play bigger intervals like an octane. And so on. Because longer distances
mean you will need to otherwise move your hand more, which is not as
efficient as having it played with fingers
that are further apart, like your thumb and
your pinky like this. In the next few lessons, you will get one
exercise per lesson. Let's go ahead right now.
8. Exercise 1: Welcome to your first
daily exercise, which is the pattern 123 to one. So basically up three strings and then down through
the first again, you use your thumb
and your index finger and your middle finger. And then you pluck all
the strings one by one, starting from the
first, which is one. And the lowest string here, G3, in my case, plaque that with your thumb. Let's do number two
with your index finger. Number three with
your middle finger, 123 and then back
to index finger, and then thumb for the
first one to three to one. And then you start over, but you move your hand and start with one being
the next ring. So a3, in my case, the second lowest
string will be one. And then you do the same
one to three to one. And you should do this
for all the strings going up until you get to the
highest strings here. So this is number one here, the third from the top, 123. So this is one of the
most basic patterns you can play just in threes, up and downs or one
to three to one, so that it is a good start
as a daily exercise, number one for you, let's check out the next
lesson when you all ready.
9. Exercise 2: Basic exercise number two, which is the pattern 1323. So again, as with all exercises, start on the lowest
string first, plug it with your thumb. So that is one. Then three, meaning you
skip the second string and your second finger and go to the middle finger on
the third string. And then two, which is your
index finger, the second row. And then the three is your middle finger. So
you get this pattern. And then again move
up through this ring. It's like they start
the New, start with B. The next node to
the second string will be one with your thumb. Three, skip the
string in the middle, and then two, index, and then third middle finger. And you get this kind of
pattern going up the scale, and so on until you
get to the highest. So that is another good
exercise and you will practice some string and fingers
keeping this way. Let's move on to the
next exercise now.
10. Exercise 3: Basic exercise number 3135. So since a chord
on your layer is based on skipping a
string between the nodes, you should also practice
playing in the strings up and down in a 135 pattern. So for example, if you
play the note C here, skip a note or a string here, E, skip a string. And then G, that is those
strings or the C major chord. And this goes throughout
the entire heart. If you skip a string in
between your fingers, that is actually a chord in
music played on your layer. So a good way to
practice learning this with your ear and how to
play it with your fingers, is to do this exercise and you start to skip
a string like this. So g, the lowest
ring is the thumb, escapist ring, and then
the second finger here, your index finger will
be the third string, skip a string, and then your middle finger will
be the fifth string. So you can play this 135 up and down if you
want to like this. What you're essentially
playing here is an arpeggio, that chord as an arpeggio. So that is actually
installed on the G here, G major chord. And you can play it up and down. And you can do this
all over the liar. So starting on the
second string here, a, skip a string. Then play the third skip string. And there's these
three strings now, or I really recommend you
played both going up and down. So 135, you skip the second and the fourth string
in this pattern. And then you do this
going up all the way until it stops right here. Because there is no higher
string and this highest. Then you can, if you wish to
go down the scale as well. So this is a great way for
practicing both your ear, ear training and your fingers to play chords and
arpeggios on your horse. So, so do this on a daily
practice routine as well. And then let's go on to the next basic exercise
on your layer.
11. Exercise 4: Basic exercise number four, which is the pattern 1458. Because the most important
intervals in music for nodes, or the root node, which is the one of the
key the song is in. The fourth, the fifth,
and the octave, which is eight tones
above the root node. So those nodes will be
by far the most used for chords and melodies in
all styles of music. So of course, it
makes sense that you practice playing
them on your layer. This means you
will also exercise bigger leaps of strings,
like an octave. All the way up here
is the next note. So you start from the
lowest string as always, the thumb on the low
G in my case here. Then skip two strings, 12, and then you get here to
see which is the fourth. You can pack that with
your index finger. You can pluck the next one, the fifth, which is D, In my case, with your
middle finger, like that. And then you get to the
highest string here, the eighth, but
this is the octane. So another G, the
same as the first, just an octave above or
higher in the sound. Now, it is also a
good time to practice playing with the ring
finger or the pinky, because when you stretch here
all the way to the octane, it's too much for your
hand to move around. It's getting tricky. So what you can do is
thumb on the first. Then you can do index
finger on the fourth, middle finger on the fifth. And then choose, for example, to have your pinky up here or
your ring finger like this. Or pancake. Because that way your hand can only
already be placed so that they are over the
respective strings. Meaning you don't have to
move like you do if you do it with only three strings, 15. And then you need
to move and play it with one of the three
strings for the octet. But when he started
playing this up and down, you will immediately feel how much more natural
it feels to include a fourth finger further
away from your thumbs, either ring finger or
the pinky like this. Up back to five. Then once you get used to that, you can move through the strings like the other exercise
this is starting on, the second string will be one. So you can also watch here for the node
labels as you do this. So you can see a
fourth escape again. Two strings get to the D, and then you get to
the E is the fifth. And then you see the
a, the octane here. Fight with your pinky like this. So psi, which is the a, and then you can go down
again and go through all the way until we
get to the highest. So this until you are comfortable
playing this pattern. Again, do it as a daily
exercise to practice your ear training
for recognizing the notes and your
finger dexterity, agility, and control when
plucking the strings. Then let's move on to the next basic
exercise on your liar.
12. Exercise 5: Basic exercise number five, which is the pattern 12345678. Why? Well, because playing
scales in music is super important for practicing
any music instrument, it will train your ear to recognize all the intervals
of nodes and music. It will improve your finger
control for both plucking the correct strings as well as moving your hand and fingers
around when playing. And overall, it will
make you more familiar with all the nodes and
strings of your liar. So you should exercise playing all the strings from the
first to the Octave, both going up so
one to eight and then down so eight
to one, like this. So starting with your thumb on the lowest ring and
then going up like this. And then down that was
the Octavius of g. You can also watch the node
labels as you do this. Down again. So you playing the scale
up and down like this. And then you start over
from the next string. So the a here, the second
string will be one, and then you can see it
ends on a four or a three. Okay? And then down eight, from eight, down to a three. And Octavian. Then
you can go through all the strings like this, playing the scale
up and down again. And also this is a
very good opportunity for you to practice
using for strings. Again, meaning you include your ring finger or
your pinky as well. I recommend the ring
finger this case because this will feel way
more natural when playing a scale since you end on the final fingers
or the ring finger, in this case for the octane and then a thumb when you go down. And it will also
be more efficient, efficient because you will not move your hand and position as much like you saw me do when I use only three
fingers like this. Start with thumb here. But we're not finished yet
because we have the f and g. You needed to move again if you use your ring finger as well. So you get first thumb, next string, index finger, next string, middle finger, next, ring, ring finger. Then you move again. Your hands start with your
thumb on the fifth string. 5678 will be your
ring finger here. So the octane will
be your ring finger. And then you start with your
ring finger going down. Thumb on the fifth, then you move your
hand only once. So you start with
the ring finger. Like that. Much more natural,
much more efficient. So I highly recommend
that you play your scales like
this on your layer up and down as another
daily exercise routine.
13. Learn to Play the Lyre: Welcome back my music friends. So now that you have learned the basics and the
foundations of the liar, have started to
practice holding it, playing strings and so on. You are going to
learn all the basic, intermediate and advanced
playing technique. So you can actually
start to play songs and tunes and improvise, and play basically anything
you want on your layer. You will learn the nodes
how to play rhythms and keep the timing for playing
each node in a tune. How to play melodies and harmonies and chords,
arpeggios, glissandos, and even expressive variations
and advanced techniques to add variation and emotion into your performances
on your layer. So let's get started learning all the playing techniques
on the liar right now.
14. The Notes on Your Lyre: Now you will learn how to
play notes on your layer, which of course you need in order to play tunes and songs. Of course, you can
see up here on the node labels which
node you are playing, as long as you tune the strings according to
this standard tuning. And this is one of the best
parts about the liar horse. That is, you don't need to
use any sharps or flats. If you look at these nodes here, there are no sharp
or flat signatures. It's only the music note
language from a to G. So seven nodes that
repeat in octaves. The nose I have on
the screen now is for a 16 string layer, which is the one I
recommend you use myself. If you have too few strings, you already learned this, then the range for
tunes and songs will be less and some songs
will be out of range. Now, if you're a liar
has, for example, 19 Strings, which is also
pretty common or more than 20. You can look at this
short and note. The lowest note will
simply continue from G three here to F three, E three, and so on. The lower side and to the higher side you can see a five is the highest string here. On the sixth string, I have. It continues of course
would be five and then, and then C6 and beyond. Now, I want to make this even more clear for you
by showing how the nodes and strings
of your liar horse correspond to the
keys on a piano. So here you can see
the piano keyboard. You have the lowest
note down here, highest down here, huge range. Well, we only have
16 nodes on myelin. Perhaps yours have
19 or whatever. But first, we want
to find a middle C. That is C four. Check
your liar horse and play along. Play this C4. You will hear that
is the same note on the string that says C4
on my 16 string, liar. And that is, it
is pretty common. It starts on D G3,
which is this. Third obtain. And then on all liar
hope to standing standard tuning is to tune
all the strings to all. White keys are no black keys, no sharps or flats, meaning that you can
play naturally in C major or a minor. Okay, so the range
for my 16 string, liar, and perhaps
yours as well is G3. And then all the
white gaze upwards. First string, second, third. Fourth is C4, and
then it continues. 5678910111213141516. So again, J3 is here an octave
above it, the same note, but at a higher octane for, and then g five, that is two octaves of
range plus a node above it. If you have a 19th
string, line hall, perhaps it starts on and
continuous a few nodes higher. But that is the nodes of your strings on your layer hop and how they correspond
to the case. And the notes on music sheet. Now make sure that your
layer strings are in tune, because now you
are going to play all these nodes from
the lowest B32, A5 layer has more
than 16 strings or perhaps a different
starting note. Look on the node
labels and play along to the 16 strings from G3 to A5. Because I have prepared an
example where you will have a playback track with the metronome at a
fairly slow tempo. So you can just play along D3, A3, B3 to the beat. And this way you will practice not only your finger dexterity, but keeping the rhythm
and timing of the nodes. You will learn to recognize
the nodes on a piece of music sheets so
you can play along to tunes and learn
songs on your layer. And you already
learned how the nodes correspond to the white
keys on a piano keyboard. So find the middle, see C4
here, when you're a liar. And that is basically the center point for the music sheets when you
start to their songs. Okay, Good luck practicing and learning the notes
on your liar harp.
15. Rhythm & Timing: Now, music is not only
about what nodes you play, meaning the strings
on your layer, but the rhythm and timing
and length of those nodes. So what I recommend
you to do is to practice your rhythm and
timing on your layer. How well, the main way is with all instruments to
actually have a metronome, which is basically a
beekeeping device, is steady pulse that you can play in time with
on your instrument. You're a liar in this case, I really recommend
installing one on your smartphone and
stored very slow. 60 BPM in 44 time
is the default, I think for beginners
on any instrument, it will sound like this. 12341234. You can feel how slow it is. So start installing
a smartphone app for a metronome like this, putting on 60 BPM in 44, and then start practicing
to play the string, pluck the string exactly. All those beads,
those pulses. Okay? So for one, you can
put it any strings. We don't have to
stick to any melody now just jump around, improvise as you want to. The point is to practice
keeping in time. So that is the first
main exercise. It may sound boring, but it is super
important because music is about the
nosey play and the rhythm of those nodes. So practice keeping in
time with the metronome. However, once you
get bored with this, I have actually
prepared an example. You can do this on
your own as well. Simply a drum loop that
I programmed in 60 BPM. And I will include
it in these videos. You can play along to it
whenever you want to. Basically in a low volume,
it sounds like this. Simple, super-simple, very
slow, cool groove here. And if you don't have to
stick to quarter notes like 1234 and so on. You can play notes and whatever, just keep the groove and tiny. Let some monitoring to make sure that you feel
this pulse and that that pose synchronizes with the
plucking of your strings, regardless of how fast
or slow you play. If you can play. Renowned, been 34. And just let those rain,
you can play half nodes. So one four quarter notes
and anything you want, just keep the timing and
synchronized to the groove, the powers of the beat. So now I will play this
beat as full volume. You can have it
on your device or smartphone wherever
you watch this lesson, pick up your liar and practice
playing into a drum loop. But after that, you
can simply play any song as a background
on Spotify or wherever. And just play along. You don't have to
play the notes. Just focus on the
rhythm and timing. You can even stick to tune strings or three strings
don't have to jump around. The purpose of this lesson is
to practice your rhythm and timing for plucking the
strings on your layer. So good luck and
have fun with that. And I will see you in the
next lesson. My friend.
16. Play Melodies: Now let's learn about playing
melodies on your layer. A melody in music is simply a series sequence
of a single nodes, one of the, another, meaning on your
life that you pluck one string to another string. It could be the same string
twice, several times, but you only pluck one
string at a time like this. Okay? So the main way to play, learn and how to play
melodies for any tune and song is music sheets
or music notation. I haven't included
this onscreen. As you have already learned, the main tuning for relier is C major or a minor
meaning no black key, so no sharps or flats,
that makes it easier. I also included the note names inside the notation here to
make it even easier for you. Most of you have never played music sheets or read
music like this. So you can simply start any junior learn regardless
if you see it in music notation form or
just the note names. So the labia, so C, C, G, G, and so on. In this case, by going
through all the nodes and seeing where are
they on your layers. So you learn that this lower see there in the notation is
C4. Start with that one. Okay, So we know c4
will be one node, G above that will
be up here. So G4. And you can see a, as a one to be aware of which nodes are
coming in the melody, that makes it much easier, then you can start
practice the melody without a metronome,
without even trying, keeping the timing just
go through like c, k then another C. This is the beginning stages
of learning in a melody. And then analogy. Once you get used to
playing notes like this and seeing them in tab
form or in notation, you can start to
practice playing along. And I recommend using
your metronome, again, having the sheet music
or tabs in front of you, starting the metronome at
a very, very slow tempo. So 60 BPM, perhaps even slower. And then just playing along
to the melody and the notes. So I prepare an example, one of the more simple
tunes to learn how to play on basically any
new instrument you learn. But it's a good practice to
just start playing melodies. And eventually you
will be able to play any song you want really. So I will now play
back this at 60 BPM. And I want you to practice
playing along on your liar. But before you do,
as I recommended, just go through the
nodes you can see on screen and start to play along to see which nodes are
coming to see its energy. Now the g a's. Okay, So you appropriate oral already here what Melody
are going to play? Okay, so practice
this song at 60 BPM. I will stop the playback. Make sure all your
strings orienting and have fun practicing
this simple melody. To start learning how to play melodies on your
liar, ***** plow. Congratulations, you have
now learned how to play your first melody on your layer harp is simple
one, but each systole, the next one will be a
bit more challenging, but in much more inspiring, an interesting tune, which
is the sound of silence. Again, start by going through all the
nodes you will play, find them on your layer, go through them, and then, first play back the tune
without keeping the time. No metronome know
playbacks track, just play all throughout,
all the nodes. And then start practicing alone to the backing
track I created on piano here and try to keep in time with the
rhythm of the notes. I made it in 50 BPM,
which sounds slow, but there's a lot of a
double nodes and so on. A bit more rhythmic
interest in this tune. So it will be a bit
more challenging. But I know you will be able
to deal with, with practice. Good luck playing the
sound of silence.
17. Play Harmonies: In this lesson, you are
going to learn how to play horror minis
on your layer harp. So hormone is in music
is basically when you play two notes at the same time, instead of only
playing melodies, you pluck two strings. So for example, like
this, like this. So what string is to
plug together depends on what kind of harmony you want to add into
your performance. In most cases, on your layers, since this is a
diatonic instruments, the main hormone
is will be this. First, if you pluck any string, let's say C here. If you add the E,
that is the third. So you skip a string that
is the first main Harmony. Skipping only one string. The next Coleman
harmony to use on your layer is skipping
two strings like this. That is a fourth, and of course the fifth, which is escaping three
strings like this. And you can use your ring
finger and thumb in this case. So again, skipping one string, playing a harmony of a third
anywhere on your home. Seeping into strings
with harmony over forth. And Harvard horror minute or a fifth is keeping three
strings in between. So what I recommend
you to do first is not to think about what
hormone is to play, but get into the habit of practicing plucking two
screens at the same time. So go ahead and take your
thumb, the lowest string. Then you take your
index finger and skip a string and
pluck the next string, playing it a harmony of a third. And you do this all the
way up and down like this. Up all the way up
to the highest. And then down again. Thumb and index finger. As you can hear,
harmonies and music adds a lot more complexity, richness and these overtones and magical overall
texture compared to just paying one note
at the same time, which works great for melodies. Now, I also want to show
you the next exercise here. So the first one is
play harmony or third, with your thumb and
your index finger. Next, do the same exercise
but with a hormone or fourth, you will doing this,
you will practice both. Your ears were, recognizes
these harmonies, but also your
dexterity and muscle memory in your fingers for
playing, plucking the strings. So doing a fourth, I recommend using your thumb
and your middle finger. And do the same and start
with the lowest thumb and middle finger on skipping two strings and playing
it forward like this. Let's see if you can see. Do it slowly so you
really hear that harmony reading
else and go up, up, up onto the highest, and so on. And finally, the third
most common harmony used on a layer
hawk is the fifth. Now I recommend that
you use the thumb and your ring finger, plucking the lowest, skipping 123 strings and then
playing the next one. So G3 and G4, in my case, my layer here, up to
the highest hopes, like this, three strings
skipping in between. Okay? So those are three exercises for playing and plucking
the strings in harmony. The third, the fourth,
and the fifth. When you get used to that, I want you to also go ahead and practice adding
these harmonies into a melody because you
can add harmonies to make your melody richer, add variation and
expression to it. So let's say you play
like this from A4 here. The Sound of Silence is
the middle to hear BIPAP. Now, try to add a
horribly on any of these nodes in that melody
is not on A4, let's say. And then when you pluck
this one, ******* the a, again, creating
your homie harmony. And then perhaps
if E and F here. And then when you go to D, you might want to add
a harmony and try it. Which harmony sounds
best to you because there's no perfect
answer for this. It all depends on. What your vision is for that, for what hormone if you want to add into the melody
of your performance. So again, you can even start
with the first node here. I'm playing harm
and forth below. Just a tip here. In most cases you want to keep the highest string you pluck as the actual melody note
and the harmony being lower. Because what we hear our ears pick up the most is
there will always be the highest string you pluck or the highest melody note you press on a piano
or any instrument, meaning that the harmony is basically strengthening that
richness and complexity. But you still want to keep, in most cases, the melody
note as the highest. So let's say again here, A4. Let's put the harmony
here, the fourth below. So skipping two strings and playing with the middle finger, the melody for the
sound and silence. Start with the harmony
on E here, E4. Then, then on this final
note in this phrase, I want to add a harmony
so the melody is d. Try a third. Sounds good, right? Thumb and middle finger. Then you can try another one on the final note in the phrase. So in most cases, the first node of a phrase and the final multiple phrase works great for adding hormones, but basically any where
you want to create it, make that melody note
stronger and come out more, make it richer, then it is a
good place to add harmony. So we can try different
hormones that are on this d phi note here. Hormone over third, meaning
skipping one string. Sounds great. Let's
try a fourth, meaning skipping 23 strings. Well, perhaps you like it. It sounds pretty good, but I wanted to go and
fight of faith as well. So skipping three strings, so it means like this. Finishing on d Phi, Let's try skipping
three strings. That means G4 with it, there'll be the harmony below. Somebody even better
to my ears at least. But of course, no
perfect answer. You have to choose what you feel works best in your performance. Okay? So there you have it. Playing harmony
is on your layer. Practice these. And remember there's
no right and wrong. You can even go
ahead and try out other harmonies because you
can plug any other strings. These are just the
three most common, the third harmony in one string, skipping to strings and forth, skipping three
strings in between, which is a fifth, and it works for up and down. So if your melody is d4, we can add a harmony on top, but that is the middle note
you will hear the most. And in most cases
you want to keep the melody the highest rings. So going down instead
when you count, the harmonies works better, but you can also try adding, for example, OK tastes, meanings, playing
the same G4 and G5 to make it even stronger. Or any other string. And so let's say
G4 and F5 or E5. And then we go to d Phi, which is the faith that
you already learned. So that is how you play
harmonies on your layer. You want to practice
your ears so you can recognize these intervals
to what they sound like. The hormone is your dexterity in your fingers for how to pluck. The hormone is third, and so on. And also finally,
for adding them, when you play any melody, you can even play it out in entire melody by
adding a harmony note. Any, any string you
plug like I did here. Or you can choose to
add it only when you want to accent
that melody notes. So go ahead and practice these, and I will see you
in the next lesson. My friends.
18. Play Chords: You already learned about how to play hormone is on
your life horror, which is to play two
strings at the same time. Now, let's take that
to the next level, which is to play chords. Chords in music is basically hormone is stacked on
top of each other. Or in other words, you play three or more nodes
at the same time. In this case, parking
three strings or more. So let's stick to three
strings because that will be the main chord
types in music. Major chords and minor chords meaning happy courts
and said chords. So since this is a
diatonic investment, you will be in the correct key if you start, for example, in C, That is C major, or if you start on a and go
up one string at a time, that will be naturally
in a minor and you will get the corresponding
calls automatically. So I suggest when you play any melodies or
songs on your liar, if it is in a minor scale or like a plate with
a as the root node because that will be the
minor scale on your liar or see if it is a
major sounding song. Now, to play chords
in your layer, remember what you learned about the hormone is the
most common ones, or the third meaning
skipping one strain. You play one string, pork fat, and they skip a string and
they play the next one. Your thumb and
your index finger. That is a third. That is the first harmony
used for making chords. If you continue from there
and skipping and other string again and then pluck the string. You remember that is the fifth, because if you pluck
the first ring, let's say it is a 3123
and then blacklist, one. That is in fifth power money. So chords in music,
especially on the layer, will be skipping one string and plucking the one next to it, meaning a, C and E in this case, will be a minor. So I want you to practice
playing chords like this, skipping one string at a time. So thumb is first string,
skipping one string. Index finger is the next string, skipping most ring
and middle finger is the third string here. So one root node, third, fifth. You can go to the next string and do the
same playing a chord here. And since you started on a, This next one will actually
be a diminished chord, which is not used as much
when you start on B, on your layer and play that he's taught on this
B, it's the same. It's a diminished chord. It sounds kind of spooky almost. So if we take this concept
to the major scale, if you start with
the root node C. Because both may minor scales
and major scales all have three Happy course
Omega courts and three minor chords and
also one diminished chord. So if you start on C, C, E, and G, so thumb, index, and middle finger. Practice that with me Now, plaque these three strings. You playing a major chord
when you start to see, when you go to the D,
That is a minor chord. So since this is a
diatonic instruments, meaning it's achieved you
one specific key and scale. You will get these
automatically. You don't really have
to think about if you play a minor or major
chord like you do, want to get tall or piano, you just go on and skip
one string and you automatically get D minor. Then you continue
just like this, skipping one string for
all your fingers here. You can do this all over
the place if you want to. You want to get into habit
of this string skipping. So the first root note of the chord will be your
thumb skipping one string. The third will be your index finger
skipping one string and a fifth will be
your middle finger. Start with that. Now, that is the main
way to play chords.
19. Play Arpeggios: Alright, so now that
you have learned how to play chords
and what courts are on your liar hope you
will learn the main way to play them on a harp type
instrument that Ally race, which is to play
them as arpeggios. An arpeggio is
basically a music term. That means a broken chords. So that doesn't mean
that the cords or bad. It means that the core
nodes are broken up, played as a sequence of single
nodes that flows together. And that is really what creates these magical sweeping type of sound that the
horse is famous for, the liar as well. So let's start with,
for example, C, E, and G. You already learned
this code is C major, so C is the root nodes. Keep one string, e, skip one string and G. And you can play them as a core, plucking all strings
at the same time. You already did that. Now, a more common way, as I mentioned, is to
play them as an arpeggio. So instead of plugging all of these strings
at the same time, start with C and then pluck
the other one in a sequence. The main way, the most
common way is to play them in a sequence going up
and then down again. So C, E, G is the same fingers, first three fingers
and then going down, up and down in
creating basically a wave and flowing like water. It sounds super
beautiful likeness. You can buy slower,
faster. Even. When you get really advanced, you can speed up or slow down over time to create that
emotionally expressive style. Try this all over the liar, the same way you
did with the core. So the one string
escaping technique, meaning you can start on G here, skip the a, sleeping wellspring go to be
skipped one string, go to D and play it
as an arpeggio going. One, the second finger, third finger, second finger. So one above about it as 12321. You want to get used to the shape of the main
shape of playing course, which is this
skipping one string. Then you go to the next one. Up and down all the
way to the highest. You hear how beautiful
that really sounds. This flowing type of motion. That is the main way you
play chords on a liar harp. So once you get used to playing
this one to three to one, you can try different types
of patterns for the arpeggio. So let's say starting
on the lowest energy, one, we can start with
one and then go to three, then two, then three. Like that. Well, 1232323. You can do this exercise going
all the way up and down. So that 123, you can do, for example, 12131213, do that exercise. Basically, any pattern
you can come up with. This is the equivalent
basically to have all these strumming patterns on a guitar type instrument
like this bazooka, any type of fretted
string instrument. You add this variation by
the strumming on a layer of the main ways to
shape these patterns for how you pluck the
sequence of strings. And again, this is the main
way to play the chord, the skipping one spring, so rude, skip one string thirds,
keep monitoring your faith. But as you will learn
from the harmony and from the chords, listen, you can play this
in another shape, another pattern of the
note in the chord. So let's say G3 be 3d3. Move the G up to the
next octave, D4 up here. So you have B, three, d four, and G for another pattern, you skipping one string for the first and toString
is for the text. And you get the
same G major chord, but a different
pattern of the nodes. Inversion as it's called
the music theory. Can move this be up
an octopus you play, let's say D4, G4, and before. And that is also
a G major chord. You can play, pluck
those as an arpeggio. As you can see, you
have various shapes for the same chord
All around the liar. This, as long as you
use the same node. So G, B, and D with
all will always be a G major chord
regardless of its g3, g4, B3, B4, and so on. The next dimension
you add to add expression is to create your own plucking
pattern for that. So let's say the C major
chord, C44 and D4. You can play that in any way. When you flow
between the strings. Go to the next chord. I say that is an F chord, F, a, and C, and so on. You get a lot of
variation expression, even when you don't
play melodies. In this case, when
you play it as arpeggios or chords like this, you are making basically
a backing track for someone who plays the melody on another
instrument for yourself. If you sing along to it. Whatever the lyrics
are for your song. You can play the chord as arpeggios like
this, child is rich, flowing and magical backing for the leading melody on vocals,
any other instrument? So what I want you to do now is practice going up and down. First. Different kinds of
patterns for the arpeggio. The main one is 123 to
one, but again 123. So now the one thing
you can come up with, then the next exercise, once you get used to playing different patterns of arpeggios, shift out one of the notes
of the chord up or down. So let's say you say play
a C chord, C44, MD4. You can either move
the G4 down to G3 or you can move the C up to, from C4 to see five. And then you can
try out different patterns for the plucking of the arpeggio on this
other shape for the color. Until you are getting
familiar with that as well. So either you play your
layer in a melodic way, playing the leading melody
and adding, for example, a harm and it will record as an accent degrade and
more rich emotion. Or you played like
these playing chords or even more useful arpeggios
playing in the course. If you want to play
your layer horse in a backing type of way for another instrument or vocals
doing the leading melody. So go ahead and practice
arpeggios on your layer now, and I will see you
in the next lesson. My friends.
20. Play Glissandos: Alright, so you have now
learned all the foundations and basic of the liar harp and
all the main ways to play it. Let's go into more
advanced techniques now that you can add to
spice up your performance is the first one is called
the glissando in it's basically one of the
main special techniques that the harp, harp type instruments
are most famous for. This type. You always hear in movies when someone
is dreaming or something like that.
What does it mean? Well, it, this
basically means that you pluck the strings and you're flowing sequence from low to
high or from high to low. The reason for why
this works so great on a liar or harp is that
it is to diatonic, meaning when you
do it, you do it. It's almost like you
drag your fingers across the white
keys on a piano. So you're plucking one string at a time in a pattern or down, you can do this
going slow or fast. So like this, speed it up
or slow it down over time. And you can do it in either an upwards or
downwards direction. Now, in order for this
to work the best, it can work if you do
it all over the place. But there's rarely works in
tune to the key of the song. So if you have a
song in C major, but remember, you're
a liar horse, naturally, the most
standard way is that it is tuned to the white
keys of a piano. So it will play naturally
in C major or a minor, that will be the root key. So if you have a song in major, you want to transpose
it is C major song, and then it works
best if you start to see the lowest C and
then go to the highest. See my horse is 16 strings, so that will be one
octave to C5, like this. Okay? You can continue all
the way up if you want to. In most cases, it
will work best if you stop on the root node, like I showed you see, you can stop on the G
here, which is the faith. You remember this
if you could skip and skip three
strings, we get there. For me. If you are in a
minor sounding song, if you start on a here
and strum, I have an A5. So here I can actually do to
Octavia glissando like this. And it will be perfect
and natural in a minor glissando or down. I find it works best with
your thumb when you go up. When you're eating index
finger, if you go down. I want you to practice this. Start if you have a 16th
string layer like me, start on the a and do the glissando with
your thumb up to a5. If you don't have
that big of a range, you can start on one
on a and stop on A4. It will be tricky to
its east to stop. It will be tricky to
learn how to stop on that final string. And then you do it
for the city as well. See, forward to C5. So if you have a
bigger range, lie, I recommend doing it even
more like two octet. So C4, C5, I don't
have it on my layer. If you had more strings, perhaps you have
it. See C6 there. I also wanted to practice
doing this in various speeds. So start with a very slow
speed from A4, A3E2, A5. Try fastest speeds. Try medium speed. Try speeding up the glissando that is actually a very common. So starting slow and
then speeding up as you run your thumb here
across the strings. Or slowing down. Starting Fast and Slow it down in the
last years rings there. Okay? So it is actually more
of a special effect, but it works amazing
for transitions or feeling little spaces for spice in a song
or performance. And again, if it is a
song in a major key, you want to have it in C
major to play it naturally. If you tune it to according
to this string labels here, then you want to do a C. But you can start anytime
if you just start on bond, let's say the D and go to the next day. That will be good. Handle on the d. Start on the a. What you obtain. In a. So practice this and you
may not use it that often, but it is actually super fun
and it's sounds so dreamy. I guess that's why they use it in dream sequences in movies, especially for
those transitions. So good luck practicing
these sandals on your layer. And I'll see you in
the next lesson.
21. Muting Strings: Another advanced technique on your life is to
mute the strings. So let's say a park
a, C major chord, C, E, G as an
arpeggio like this. Okay? As you can hear,
an open string on a liar hop continues
to resonate for a long time and you
get this reverb and echo from the sound hole here. But let's say you think that
sustains for a bit too long. You can always mute any string. So let's say play C
and G as a chord. If you'd just slowly put your fingers on
top of the strings, you will mute them
so and you play, let's say an EF Core. You to strings like this. Or you can put just
your fingers down. Instead of your entire pole. You don't have to
mute all the strings. Let's say you want to
mute only two of them. Let's say you pluck this
E coli D&C for E4 and G4. Then slowly put your
first two fingers on the first or
third string here. Those two. Then you are muting them, but you let the G continue
to resonate and sustain. So what I like to use these for is when you play something and he wanted
to stop abruptly. So let's say, see, you want to control for how
long that code is Pi fours. As I said, it's a
special technique. You want to use it so often
because in most cases you want that dutiful, sustained, continue
to wring out, but especially with backing. Think about strumming, unmuting, poor muting on the
guitar, for example. Just putting down your string, your fingers on the
strings like this. And they will mute. Still here. Some of the sound continuing
in the echo chamber here, because the entire body of your line will
continue to resonate. But compared to
letting the ring out. And again, with muting unmute, you hear that you all dampening the
sustained quite a bit. So playing chords in most cases will be when
you'd use muting technique. Sometimes you want to just
new to shrink or one of them. And then you just
put down one or two of your fingers on
those strings to mute them. So you can practice this. I want you to practice
this on playing chords C, E, and G. Put down your fingers again,
I'll duplicate them. Let's do an F chord, F, a, and C. When you put them down, before you pluck them again, you're actually
muting the strings. Compared to letting
them ring out. Then you can play it More rhythmically because
you control this is stained a length of how long
this string ring out for. So practice doing a bit
of muting like this. And put down your fingers to mute the strings and
dab in the zone. And let's continue in the next lesson where
you will learn how to add more dynamics and shape the tone for you when you pluck the
strings on your layer.
22. Dynamics & Tone: Now you will learn about
how we can control the dynamics and tone in your
performances on your layer. Dynamics and music
is basically how loud or soft you play any node. So for example, if you
take an F major chord, a4, a4, and C5 and
played as an arpeggio. You can play or pluck
any string very soft and a medium all
the way to very hard. And you will actually shape
and change the sound, the tone or that string, as well as the loudness
at the same time. So if I play them at a medium, balanced TO like this, without shaping
how hard I packed. You got to learn that
first of course, the play them all the
strings if plaque, I didn't medium level. But in time when
you practice an add these variations for
shaping the dynamics, you will see how much that
actually effects the motion, an expression of how you play. For example, one
common thing to do is to take the root note of the first string
here and make that a bit louder as if our
plaque that louder. And then these A4 and
C5b, a bit softer. You can do this. Basically, you just
park it a bit harder. And it will be louder
and different tone for that string makes them. So all the way from soft, I want you to practice
playing very soft, basic. Just touch with your
first job, your fingers. Even here, a bit of
a scraping sound as you brush over the strings
with your fingers like this. I don't know how
much you can hear. Start to increase the
pressure and then he will feel more of it. But you almost get a bit
of a grip of the string. Increase the pressure.
They getting louder, brighter, more focused. Back again. All way from the
softest whispered. And that is what I want
you to practice first, how to shape those dynamics, meaning how soft or hard
you pluck a string. So practice from
super whisper quiet, do it on any shape. You don't have to do chords. You can do it on two strings,
or even a one string. I don't recommend
since you are going to play a lot of
our periods doing it as an arpeggiated
or patio cord. So C for E for G54
for the C major. And practice from soft, the softest whispering and increasing I've already planned. And do we do all the strings? So pack all the strings, super solve two all the
way to super hard black. That is the first
exercise to basically get used to the different dynamics. You can pull up any string. And then next exercise is to play these
arpeggios or patterns, any strings you want
to plot like this. And then choose any of the
nodes that you want to accent, meaning emphasize plate plug
that hole is so C44, G4. Again, try. I recommend practicing duty
on the root node versus C4. And then the other nodes, the plaque softer or medium. And you can do that
for any chord in a sequence of a
string and supply. You can then choose to park a different accent,
a different string. So let's say you do this
F major chord, a4, a4, and C5, do the
first two strings, for example, soft or medium. And then pluck the sea
hoarder or the middle string. So if first ring, soft, whatever you feel
like to add in the pattern, because this is one
of the main ways you can add that expression, your own emotion into your
performance is on your layer, choosing how soft, medium or hard you pluck any
strings in this sequence, the phrases you play. So practice now to shape the dynamics on
your lighter harp by how hard or soft you pluck any strings in your
performance for arpeggios, melodies, phrases, or
anything you play. So good luck with
that, and I will see you in the next lesson.
23. Variation & Expression: Alright, so now that
you have learned all the basic and
advanced techniques of playing the lyre. Let's put it all together, and I will sum it up with five tips for adding
variation and expression and emotion
into your lawyer performances from everything
you already learned. So number one is
adding harmonies. So let's play this
sound of silence. Tune a CC, DD. Any node you want to add a
richer harmonic texture too. You can add a harmony, so ACC. And then play D and the
G4 below, for example. Or for example, D and B. Or starting for example with
a and then playing a EMC. And perhaps a and E. And then fit, finish
off with a d five and d for any horror
movie you want to add tried out and you will see how much variation
and expression that adds. So that's the first thing here. First tip that you
should really practice. The next thing is adding
an octave as an accent. You already learned
that you can add an octane because
it's the same node. So let's say the d
here, D4 and D5. If you play both together with
your thumb and your pinky, it will get a much
more stronger, denser sound because you're
playing both these in octets and all
surrounding nodes, you play off that single
strings will be much more soft. So you really,
again D and D five. So that is another thing. It's almost as harmonies, but it's basically
not a hormone. It's an octane. It's the same note, An octave up or down. So that's the second
thing you can do, the add any type of
variation and expression. Let's say, let's do
it on the F here. Anywhere you do want
to add an extended, more richer tone and sound. You can add the octave, either the octave
above or below. The third is playing harmonies. And this of course works when
you want to play chords. But let's take, even if
you pull it in melody like this one again, ACC. And then the D, instead
of playing in harmony or a single node signals
the D or harmony. Well, let's finish off with this cool board, G4 before MD5. But as an arpeggio like this on the final note of that
phrase in that melody, a, C, C, and then D, five, G4 and before. So again, and so on. So that way you can add or patios even to a melodic phrase, at least on those cases where the node should sustain
and wring out this day. Then you can play that
final chord as an arpeggio. Of course, you can also play that as an entire code
if you want to as well. Then number four is
shaping the dynamics. So as you already
learned, already learned, it is about how soft
or hard you pluck it, so you can pack that order
any, any melody plays. So let's say, let's say
C major chord like this. If you put any string you want to make stronger in that phrase. Just pluck it harder. So that's final third finger. I pluck that string holder. Then you shape the
dynamics and you can even shape it over time. Not only one string
like starting, let's say, let's do an a minor. Here's A4, C5, and E5. So let's say you pluck
it as an arpeggio installed soft and pack,
harder and harder. Like this. Super soft whisper
to harder over time. And then perhaps
back to soft again. You can shape the
dynamics over time or to send in an old in a phrase to create
variation that way. And finally, something
that is very common, especially on playing arpeggios and sequences of
strings like this on a horse or a liar hope is to slow down or speed
up your playing. So let's take, let's
take a D minor chord, D4, F4, and A4 as an arpeggio. Well, if we played very slow first and speed it up,
it can sound like this. Then you can slow it
down as well like this. Of course, when you do this, speeding up and slowing down, you can also shape the
dynamics over time. So you start soft and go plugging harder
or, or vice versa. So you can shape the
dynamics and speed if you're playing during that
specific phrase you play, which could be, for example, the chord played on arpeggio. It could be a sequence of any strings you play
as a sequence like that, shaping both Dynamics
and this speed. Those are basically the five
main ways, in my opinion, for shaping the emotion and expression in any performance
on your layer horror. But I want you to practice
all these now and everything you learned
in this class. And eventually, when
you feel ready, you can start to learn to play songs and tunes on your layer. So good luck, and I'll see
you in the next lesson. My friends.
24. Tips for Learning Tunes: Congratulations my
musician friends, you have now learned all the foundations
about this instrument, all the basic techniques
of playing the liar, as well as advanced
expressive styles you can use to spice up your
performances on your layer. Now, I will give
you my best tips for learning tunes on your liar. And after that, you will
get a series of videos with actual notation for
different tunes you can start learning. And I included the note
names to make it easier. So my first tip is always tune your layer
before you start to play it. If it's a practice
session or if you want to learn how
to play any tune, it will sound way
better if it is in tune to check all the
nodes of the tune. So that means that
you check if you have the notation or
tabs or anything, just go through the notation. So let's say this song, sound of silence in a sea. And then just check so
it's an a there is for C5. And you can even
write them down. So you know, all the
nodes that will be used in the tune you
are going to learn. Tip number three is to
practice in phrases. By that I mean, all music can be divided into smaller sections, which are called phrases. So if you take this
song again, Let's see. That could be phrased one. Anyway, that's the first phrase. Then you can learn on
the second phrase. So learn any new song
or tune in phrases, stop after each
phrase and then just check through your play the correct nodes. And
then the next one. Looks like this. If you have the
nodes, you can even write the notes in phrases. So the first one will be k CCD. You can even write a four s5
to get the correct octave. And the next phrase, the p, b, t, d, c. And write that on
a separate lines. You learn the song or tune in phrases and you can even write it down in phrases. When you practice. Tip number four for learning
tunes on your layer Horn is to always learn
at a very slow tempo. This is a mistake beginners
make on any instrument. It could be a bazooka
guitar I have there, I have a ukulele. Any instrument. Almost all beginners
do this same mistake, which is to try to play the
songs and tunes too fast. The first try, always, always learn at a
very slow tempo. So I recommend that you
use a metronome app on your smartphone and set
it at a super slow tempo. Good starting BPM, which
is the pulse of the music. So the tempo is around 60 because that is a very
relaxed and slow tempo. So set your temperature 6000 PM, starting a metronome and
then start learning. But even before that, you can start to
learn how to play the tune in phrases and then play it through without any
metro normal timing at all, just going through like this. Until you played all
the nodes of the tune. Then learn with very slow
tempo with a metronome. So that's tip number four.
And tip number five is to always thought in
what I call EC mode. And easy mode basically
means that you play the song in the most
simple way possible. So if you take this
again, the same example. Yes, play a single note. Melodies, in this case, don't add any Harlem Nights, don't add any code. Don't add any dynamics. All these advanced and
expressive techniques you'll learn in this course. Don't use them at the
first try when you learn any tune just played
as simple as you can, at least in the beginning, until you get comfortable
playing it at this easy mode. Then you can start to try add Any expressive
techniques that you already learned in this
course on that tune. And then when you move
on to the next tune, it starting easy mode again. So those are my best
tips for learning to play any tune on
your liar horse. Finally, I want to
mention again that the Lionheart is a
diatonic instruments. So if you find a tune in
G minor, for example, you won't be able to play that on your liar if it's tuned
the standard way of life, their note names instead
transpose it to find nodes, which takes this G minor
down to a minor so that the, it is transposed to a minor
because only rely on Hub, you can play naturally without retuning any of the strings. If the song is in C major
for a major sounding song, or happy uplifting
song, or a minor. In that case, all
the nodes will be naturally tuned here on
your layer to that key. Okay, Good luck now and start to learn these tunes in the
next few videos that I prepared for you with notation including a slow tempo
and backing track, plus the note names
you can follow along on your layer
when you practice.
 Mikael Baggström, Music Composer | Sound Designer | Video Producer