Transcripts
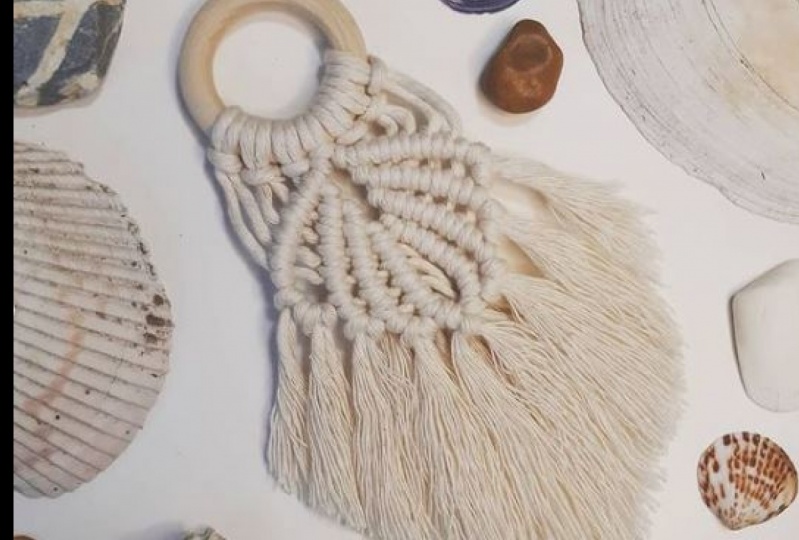
1. Intro: Hi, I'm Megan and I'm self-taught. macrame artist. I'm also the owner and creator of my own little business, Luna Crafts Online. So in today's class, we are going to be learning how to make this. macrame seashell wall hanging. I think it's really pretty and is quite different because of the unusual shape of it. So it really stands out on your wall. I created my small business, Luna Crafts Online back in December 2018. Since then I've fallen more and more in love with macrame and fibre art and the process of creating bespoke wall hangings. I find creating something with my hands, very therapeutic and relaxing. and I'd love to now be able to teach other people about this craft and hopefully inspire others to be creative. My hope is that my lessons will teach you some basic knots and patterns so that you'll be able to create your own wall hanging and plant hangers. And even macrame bags, not only for yourself but for friends and family too, as they make really amazing gifts Some of my other hobbies include yoga, running, baking, and house plants. I have probably about 60 houseplants. I have a lot of different plant hanger tutorials to share with you. I really hope you learn some techniques from me so you're able to create your own unique, beautiful wall hangings.
2. Supplies & Materials: So the supplies you'll need will be a tape measure. You will need a wire brush and a comb. This is just a pet brush that I bought specifically for my macrame The wire brush does a really great job of combing out all the fringe at end. You'll need some scissors, these are very old and rusty These are some jewellery pliers, these are optional but they really, really help at the end stage. So I would really recommend getting some sort of pliers. And obviously you will need to macrame cord, this is my favourite cord. It's a 4 ply 3 mm cord. You can use 3 ply too, It'll still work out perfectly. I just wouldn't really recommend doing this with single twist as when you come to brush out the fringe of the end, single twist tends to curl up every time you brush it out. Whereas this one will stay straight and stay flat. So you will need one wooden ring. This measures about 7.5 cm. It could be bigger if youfancied, you will need 9 lots of a 120 cm lengths of cord. And lastly, you'll need 24, lots of 50 cm lengths of cord to create the tassels at the end.
3. Larks head knot: Okay, so find some where to hang up your hoop and then we're gonna take these 9 lots of a 120 cm and you're going to fold one cord in half, like so, and then take that middle point through your hoop and bring those two through the loop there. Then that creates a larks head knot So we're gonna go ahead and attach all the other 8 remaining cords using this knot. Ok, so once you have done that, we can go ahead and start on the next lesson, which will be creating rows of double clove hitch knots.
4. Double clove hitch knots: Okay. So now all the cords have been added using the larks head knot we can go ahead and pick up the middle cord, which will be the fifth cord. And then you can split that. So the left side will go down to the left like this and the right cord from that set will go towards the right. So take the cord next to the left, cord that's directly next to it, take it up and over that, cord and through the loop and pull that tight. And then repeat once more on this strand. So take the cord up and over the cord, behind and then through the loop and pull it tight. So that is one double clove hitch knot So we're going to be repeating that for all the other cords on this side. Making sure as you see here I'm going at a diagonal angle down towards the left, so make sure to follow this angle with all those cords. And then we're gonna do the same on the right side. So I'll be taking the right cord from the middle and then creating a row going towards the right. So we take that first cord, and we go up, over and behind and then through that loop. And then repeat again on the same cords. And try and go at the same angle as the left, but going towards the right so they match up. Okay, so now we've got one row done on either side. We can go ahead and create a second row. So you go again to the middle and you split it so the left one from the middle will go towards the left side, like so So with this row, you want to start off quite close together to the first row and then slowly increase your gap. So at the end of the row there's about a one cm difference between the first and second row. As you can see him slowly increasing that gap as the end cords are where we're gonna attach, our tassels so they need to be about one cm wide. So once we've done this, we can go ahead and repeat again on the right side, making sure to try and mirror that second line on the left side. So they all match up and look symmetrical. We can just carry on like this until we have seven rows on both sides. And then we can join the two sides together. So now that we have seven rows on either side, we can go ahead and take the last 2 end cords like this, and we can join them together by doing one double clove hitch knot it doesn't matter which direction you do this double clove hitch knot in just whichever feels comfortable to you. I'm just going towards the left and then pull them together. So it closes the gap like this. And you can see your seashell shape starting to form.
5. Adding tassels: Okay, so now you can grab your 24 lots of 50 cm and your small pliers if you're using them, I really do recommend them. And you can see these small gaps in between the rows, which is where we're going to attach the tassels. So again, we're going to do a larks head, knot, so fold the tassel in half and then take the midway point. I like to put my pliers in from behind and pull that cord through. And then just push those two middle cords through, the loop of your cord. And then that is a larks head knot and that's attached one tassel So we're going to do 2 tassels per gap. So it'll be 12 on either side. So now the seashell is really starting to take form I'll move on to the last step which is to comb it all out and trim it.
6. Combing & trimming: Okay. So I've just bought it over to my desk to do this because it's a lot easier. So if you can find a table or something like that, it's much easier. So first of all, I'm just gonna do a very rough trim just to get off some of the length. just to make it a bit easier to comb out. Now I really recommend taking each cord and just splitting it into the groups of cords like so this makes it so much easier to comb it out and it will save your arms and hands. A lot of work later on. Okay, now that we have unraveled all the cords here on the front, and I've done that middle section, as you can see in the back here, I've done all of those cords too we can take our wire brush. and just comb everything out and you can see it goes through so much easier and quicker now that we've unraveled all the cords. It's a lot easier to do. So just comb it out until it's completely tangle free and everything has separated. Make sure to do the back of it where all the cords meet in the middle. Okay. And now we're going to trim it. So I just like to try and mimic the form of the seashell that we created. and try and follow that shape with my cut but you can cut it however you want. You could do a straight across which would look really pretty you could do more of an angle than I'm doing. You could do a point rather than a curve. I like to do a curve but it's completely up to you and your preferences. As you can see, I'm just turning it and smoothing out the cords brushing them as I go to make sure everything is laying flat. And then I will just keep going until I'm happy with the shape. It's better to just cut a little bit off and then stand back and have a look and see what it's looking like rather than just going all in and cutting a lot off and then have to go shorter and shorter every time to get the shape that you want. And that is the seashell complete, I will give you the class project in the next lesson and also show you it hanging up on a wall, it looks really, really pretty.
7. Final thoughts & class project: I really hope you loved this. macrame seashell wall hanging class. I have three other classes on here as well, including a macrame mandala, which you might like if you like this shape. So I really hope you love them and check them out. And for your class project, I would love you to create your own macrame seashell. You could do an alternating colours which would look really pretty, or you could do the whole base as one colour and then all the tassels as a different colour. You could use a bigger a hoop if you wanted, I probably wouldn't recommend going any smaller than a 7.5 cm hoop. Though. You could trim the tassels any way you want. And I'd really love you to share your progress and final result in the class protect section below, and I would love to see what you have created.