Transcripts
1. Introduction to this class: If you're launching a
Facebook campaign and looking how to install a pixel or
even where to find it. This course is for you any
advertising campaign that is sending traffic to a landing page or to a
website for whatever reason, if is to purchase a product to promote a service, and so on. Must truck activity
on the website in order to understand how customers are interacting
with your website. If they are reading articles
that you want them to read, if they are clicking buttons
that you want them to click, or they're simply
leaving after 3 s. You need to track all
of their interaction in order to understand
what you can improve on your website or within your campaign in order
to get better results. That's why whenever you're
using a lending page or website in your
advertising campaign, you absolutely must track your results with
Facebook pixel. For marketer or a business owner who runs their first
advertising campaign, pixel can be quite confusing. In this course, I'm going to simplify the pixel
topic for you. And you're going to see
that you don't need to know any coding or anything complicated in order to install
picks up on your website. Today, everything
is super automatic and Facebook is
updating all the time. So right now, it's super easy to easily pixel almost
on any website. And that's what we're going
to see in this course.
2. This is what you should know as a Marketer: In this video, we're going
to talk about what you should know about Facebook
pixel as a marketer. As a marketer, you are not
really expected to know coding or to be a developer
at your free time. But it's nice to know how to install a pixel by yourself
because it's super easy. First of all, and you
don't really need to know coding for that is just
a few clicks away from you. But there are few things
that you need to know first, before you start with
your pixel installation. First thing is, what platform is your website or your
landing page based on? Today, there are a lot
of different platforms, e.g. weeks or WordPress. They are platforms that are
used for website creation. And you need to have
access to that platform. So if you are running
campaigns for your client, you need to ask for a username and password to Wix WordPress. If you are an owner
of that website, you must have this information. And another thing
that you should know and we are
going to learn in this course is where to
find your Facebook pixel. So let's see
3. What is Pixel Presentation: In this lesson,
we're going to talk about a Facebook pixel. Why do you need It's, why do we need Facebook pixel? Pixel is rarely useful to track all your ad
performance and you do need it in order
to understand if you succeeded or
something went wrong, in order to understand
who actually were visiting your website and
what they were doing there, it's always possible to improve the results and that's
why you need to track everything that's happened
when you enter ties in order to know what
actually can be improved. Where do we install the pixel? Well, you install it
technically on your websites, or you'll end in page. You can install it directly on your website or via
Google Tag Manager. How to create a pixel? You can create a pixel
via Facebook ads manager. How many pixels do
you actually need? Usually, you need just one pixel in case where you
have one website, we're one landing page. But sometimes if
you want to track different events on
different landing pages, it's better to have separate
pixels for each landing page
4. Pixel Overview: In this video, we are
going to get familiar with Facebook Pixel and where to
find it or how to create it. Right now you can see that
I'm in my Ads Manager. Facebook didn't change
it for everyone, so the interface stays the same. You're going to see the
same screen on your ends, perhaps with different name. But still, you're going
to see three tabs, campaign, ad sets and ads. That's Ads Manager on Facebook. Whenever you're using
business manager or you login into Ads Manager directly from your Facebook
profile like this. If you have Facebook
profile on your left, you will find as manager. And that's how you can get here. So when you are in
your ads manager, you can find pixel by
clicking on all tools. This is free lines that are located on the left on
top of your screen, just click here and you
will see events manager. If you don't see it among
shortcuts, just scroll down. You will find it underneath, manage business Events Manager. Click on Events Manager. And you will get to
overview screen. Since I already
have active pixel. That's what I'm going to see. I can see my pixel
name and my pixel id. Let's talk a little
bit about your pixel. The pixel ID is unique. Each pixel has its
different ideas. Sometimes websites have
more than one ATP, and that's what you need to
make sure that your pixel id, the correct one, is installed on the website that you are
using in your campaign. So if website has more than
one pixel id, that's alright. As long as your pixel is
already on that website, I will show you how to check
pixels a little bit later in this course and in this
lesson we are going to continue analyzing the pixel. So since I already
have my pixel active, I just need to click
on my pixel name and I will get into the data. If you don't have your
pixel creators already, you will have an add button. Whenever you're going
to click on Add button, you're going to see two lines, first-line pixel name and
a second line, the URL. But you need to input here from your website or
you'll end in patriots. So you need to name
your pixel e.g. test, free website, URL, let's say google.com,
and click on Continue. We're going to get to
the installation part a little bit later in this
course and try it now, I want to review the
active pixel with you. So whenever you
see active pixel, you will see these graph. It means that traffic is
going to your website. And underneath this graph, you're going to see
different events. These are events either costume created or automatically
created by Facebook. Facebook has a list of
different events to measure, basically every bean that is
going on, on your website. The main events is
usually called page view. It means that everyone who visited your website
and like when any of the pages there will
receive patriot events, then there is a scroll events, something that is created
automatically by Facebook. So whoever is crawling
down on your website, scroll down on all the
pages, then click events. It means that someone is
clicking on a specific button, Contact event or leads or
complete registration. These are all events
that you can choose. So contact or complete
registration or leads can mean different things for
different websites or different landing page. So e.g. contract, I can choose
to call an event. An event whenever someone
clicking on a phone number and when someone is signing
up to my blog post e.g. is going to be called
completes registration. Whenever some potential customer leaves their details
on the website, it will be called lead. So there are different events for different activities
on the website. This events that you see
right here with this sign like dog and a star in them. These are all created
automatically by Facebook. Because it recognized
when someone's scrolling, when someone is
clicking on a button. However, these events contact, complete registration and
lead are created by me. I wanted to measure contracts, complete reputation and
leads on my website. And that's why I created
this events separately. You can see how many page views, how many scrolls and
clicks on your website from the screen whenever
we are locked into pixel. And you can see these events. We, as the Ads Manager. For each of your campaigns. Your campaigns can measure
a different events if you have more than
one campaign, e.g. one campaign, again
collect leads and other one can collect
sign-ups and so on. You're going to see
different events. For each campaign. We're going to talk
about how to set up these events later
in this course. For now, let's review
the pixel menu. So we are getting familiar with the overview option
of our pixel. Then there is test event screen. Whenever you want to check that your events are
working properly, we're going to test them here. That's just automatic
diagnostics by Facebook if there is a problem with
the domain and so on. We're going to see the
message right here, history. You can see that everything that was done with the pixel
whenever I changed it, or there are settings. So the useful screen to us
is going to be settings. In settings we are going
to see the pixel, IT. And there are different
tools that we can use in settings in order to set
up our pixel correctly. On the website that we're using. In our view, we can see if pixel is actually
active and settings we're going to use
in order to set up different events
on the website
5. How to Install a Pixel: In this lesson, we're
going to install a pixel together and see
how we actually do that. In previous lesson, we saw that if we want to create pixel, we simply click on ads. And this is the
screen that we got. So in order to continue our
installation or our setup, we're going to click
on Setup the pixel. Now, take a look at this screen. This screen, we have three different options as code using a partner
integration. Manually add pixel
code to websites and email instructions
to a developer, emailing instructions
to a developer. Obviously the easiest option, but not everyone is
using a developer. And let me tell you that it's super simple to do
it by yourself. Now let's review
other two options. First option is used
partner integration, and we're going to talk about
each partner separately. And another option is manually
add pixel quad to website. Let me show you this option. So in so-called manually, this option is rarely used
today because we do have partner installation which is automatically and it's
super easy to use. But if you want to get
familiar with the pixel, this is how pixel code
actually looks at me. Try to open it. We don't need to
understand any field here. What we need to
see in these cold, that our pixel id is right here, That's our pixel id. And for tracking event, the default option is page view. That's how it looks. We don't need to understand
anything from the squad. We don't really need
to even look on this code anymore because everything is done
automatically. But if you are going
to get familiar, you need to know that you
need to see here your pixel id and the events name, which is going to
be page you if it's a new pixel that your
insulin on your website. So if men or option isn't
useful to us anymore, the only other option that
we are going to learn in this course and is going to
be super easy for us to use, is use partner integration. Whenever we're going
to click on that, we're going to see all
the different partners or Facebook. Today, facebook works with
a lot of different apps. Google Tag Manager, like
CRM system, HubSpot, like Shopify,
WooCommerce, WordPress, Wix, and even with G spring. So that's why when you want
to install Facebook pixel, you need to understand what platform is your
website based on. If it's based on weeks, you're going to choose weeks. If it's based on WordPress, you're going to
choose WordPress. When you go in to choose
one of the partners, you're going to receive basic instructions and
you need to follow them step-by-step in order
to install your pixel
6. Setting Custom Events : Now when your pixel is ready
and install on your website, Let's see how we
actually customize different events that we want
to measure on the website. We need to be in
Events Manager menu. We need to choose our pixel. If you don't see the graph, it doesn't matter if
your pixel is new, you probably won't see all the traffic
that comes in here. But you're going to see
all of these options. So we need to start
with settings. We need to scroll down. And we're going to use event setup tool is the
easiest tool to use. It's super, super basic. So let me show you how
we work with this tool. Click on that tool. Now, we are asked
to put in the URL of our website where a
pixel is already setup. So I'm going to paste the URL of my website and click
on Open websites. Now, let's see
what we have here. You can see why websites. And you can see the
tool from facebook that will allow me to set up
different events on my website. Right now, I'm going to
work with my homepage, but I can switch between
different pages of my website. I can scroll down. So it's rarely costume. You can track whatever you
want or whatever you need. For tracking, we
have two options. We can track a new button. So basically we
can track buttons or we can track a full URL. Url tracking is usually used whenever we want
someone to sign up for some activity and
that someone will receive a specific page in
the end of the registration. Usually it called Thank You page or maybe just
a completion page. So whenever someone is purchasing products
from our website, he will receive basically
a thank you page. Or if someone is registering to some or someone
easily when they are details in the form that
we have on the website. Usually, they will receive a thank you page with unique URL. So that's when we
want to track URL. In other cases, we would like
to track different buttons. If it's the generic
website like mine, you can click on
Track New button. So e.g. I'm going
to try this button. And now I have a list of different events that Facebook
lets me to choose from. Unfortunately, I can't create a custom name for my events. I need to choose from the list. So let's say I would like to
call these events a contact. You can choose whatever is
the best option for you. There are a lot of different
options obviously. And whenever you are done, you need to click on Confirm. So the two is still here. You can see that
you're adding up different buttons and different activities
on your website. So e.g. let's say that
I will track button. It even shows me which
buttons I can drug. So this e.g. can be a button. The blog post is just e.g. let's say that's a
contact as well. I can use the same event
for different activities on my website in case where you have one number and
foreign feeling, that's all going to be underneath the
category of contact. So it doesn't matter
to you if someone is really clicking the
phone or fill in the form, they are making a contact. So you can call
them both contexts, or you can customize your button and call it
something else, e.g. someone who clicks on home. And now facebook asks me if I would like to
include a value. If that was an e-commerce
website, I definitely would. But since it's just Home
button, going to refuse. So no value for that button. Let's review. I have three different
activities on this page. I can add more buttons or
I can add URL tracking. If I would like to track URL, I click on tract urinal. And my options are
select an events. Still need to select events, let's say it's a donate. And then there are different
options right here. So either you are equals, so it will be just this address. Nothing else can be
added to this URL. Or I can choose
your old contains. Usually, I like to
choose your old contains because in cases
where it's a thank-you page, it can be customized
for each customer. If it's a purchase, It may be other word that
describes that activity. So I'm adding whatever is
relevant to that page. And once I'm done, I click on Confirm. Now when we finish the setup, we're simply going to
click on Finish Setup. Or if we want to
change anything, we're going to click on the pencil or if
we want to delete, we just click on
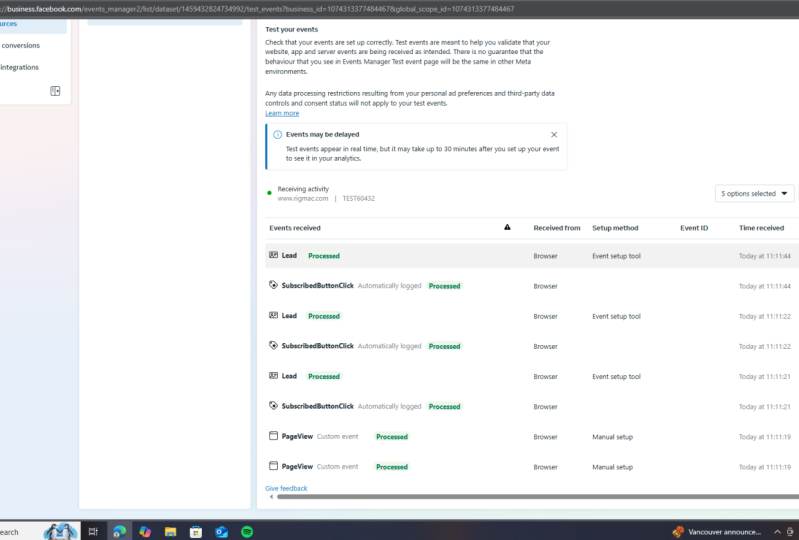
Delete and we're going to delete a specific events. So once we finish, now, if we've finished
setting up events, we are still not
finished with our work. We want to test it out. We went to test that everything
is working correctly. In this line here, we are going to
type our website. We're going to click
on Open Web site. We're going to get back
to Events Manager. And we're going to
see that it shows us page view as a
default events. And once we're going to
click on different buttons, it will show us new events
that are happening. For me. It's customized
event right now because I didn't save
previous options. But if you're going
to choose events from the list as
you saw right now, like contact or lead. That's what she going
to see in your testing. You need to see that
every event here is similar to whatever you
choose with event setup tool
7. Install Pixel to Wordpress website: If you would like to choose
WordPress as a partner, let's see how to install your pixel directly
to your WordPress. By clicking on WordPress, you will get this
instructions step-by-step. You should follow
it but insulin, the plugin connect to
Facebook and so on. So in this case, it shows you which
plug-in you use. You should find Facebook
for WordPress and install it into your
WordPress website. Then click on Next, click on, get started. You have rarely full instruction
here with the pictures, which makes it more easier
for you after you did it, after you install the plug-in and connected it to Facebook, you will see that it's active. So it means that
everything works good. And then just to finish
your setup here, you don't need to
install events manually. It will happen for
you automatically. And we're going to
review how to do it with other tools on Facebook
8. Install Pixel to WIX based website: Now let me show you
how you connect your Facebook pixel
via a fixed directly. By clicking on v6, you have this step-by-step instruction
that shows you exactly where to click on your fixed menu in order
to install your pixel, just follow it exactly. So you are in
marketing tools menu, then you should click on
marketing integration. From there on it's super simple. In your marketing integration, you will have Facebook
pixel, click on Connect, and after you will
connect your Facebook, one thing that you
need to do here manually is to add
your big idea. But in this case, since you're following
instructions on Facebook, you don't need to close
anything from this point on. You simply need to
copy the AD that you see down here, this big number, and click on Save
in your fix menu, you will see that
everything is active, that your pixel is active. So it means that everything
is working properly. For next step setup events, I recommend keeping it completely because I
will show you how to do it from pixel
menu on Facebook. And more than that, Facebook's pixel is
already a super smart, so it knows how to recognize different
events on your website. It means that you
didn't really need to set up events manually anymore.
9. How to use a Pixel in the Campaign: In this video, we're
going to see how we use Facebook pixel in order
to track traffic. What do we create new campaign? We have the different campaign
objectives to choose from. There are two different
campaign objectives that allow us to use our pixel in order to track
the traffic from the website. And they are traffic and sales. And if you don't remember
which objective does what, you can always see on your right explanation
from Facebook, what this campaign does for you. And in our case, if we're going to select cells, we can see that we can
track conversions. At the campaign level. I don't see the pixelate the, or any other settings
that I need to change. I will leave campaign
level as it is, and I will go ahead to the Ad Set level where we
actually choose our targeting. At the ad set level,
I have conferring. This is where we're going to use our pixel. The conversion. We have website, up websites and up messaging app and calls. We can track a lot of different
things with Facebook. For this lesson, I'm going
to concentrate on website. Only. When the
website is selected, I can see my pixel. Right now. I don't see any numbers here, and that's why I need to
click here on this slide. And to choose the exact
pixel that I want to use. In my case, I have different pixels from different accounts and
different clients. But if you are running
one specific campaign, you will see just
one number here. Let it load. And after this,
you're going to see next line that called
conversion vans. I see a lot of
different events here. These different events appear
because Facebook pixel is recognized in different
activities on my website. In your case, you will have
page view or view content and you will probably
have another event like lead generation or
porches or add to cart. If it's an e-commerce website and you're selling
different products, you will see more events. If it's just a sign up, you will see just few
events like Start Trial, the event that is
relevant to you, and continue with the
rest of your campaign. Setup like targeting
and choosing your ads
10. How to check if Pixel is working: In this video, I'm going to
show you how we actually know that Facebook pixel
is working properly. Right now, you can see
the Ads Manager screen. And here I have three different campaigns
that are generating leads. The fact that you can
see the number here at the results means that
pixel is working. But let me show you
the setup behind. First of all, I'm
sending traffic to the lending page and I would like to know how
many people are signing up on that landing
page for that. My campaign objective
is conversions. Then the second step, I'm going to go to
the Ad Set level. And on ad set level, underneath the asset
name, I have conversions. This is a different
campaign events that I would like to count. And I can choose on the
one here I have website because I would like to see how many sign-ups
from my landing page. Since my landing
page is a website, that's why I have website here. And former pixel, I have
different conversion events. And one of them is a lease. Obviously, you can have different conversion
events, events like clicks, scroll, sign up, get a quote, and so on and so on. And once I have this
setup and ready, it means that the
results that I'm going to see is exactly that. I'm going to see the number of elites or number of sign-ups. The only thing that you should keep in mind that this number isn't accurate 100%
because of the iOS update. So we basically receiving data from computers and from Android. We don't see data from, from iOS devices, which means
that no iPads, iPhones. So this is the data that we see, but it's pretty accurate
for elites counts, I can definitely see that one ad set is better
than another one. The conversion rate,
the press release. So it's enough for me to know in order to
optimize my campaign. Another way for us to know
that pixel is working, and it's counting
the events that I want is actually to
go to Event Manager. From your main tools here, you can click on Events Manager
and in invents manager, you need to choose
your pixel id. And you need to choose
data source because right now there are
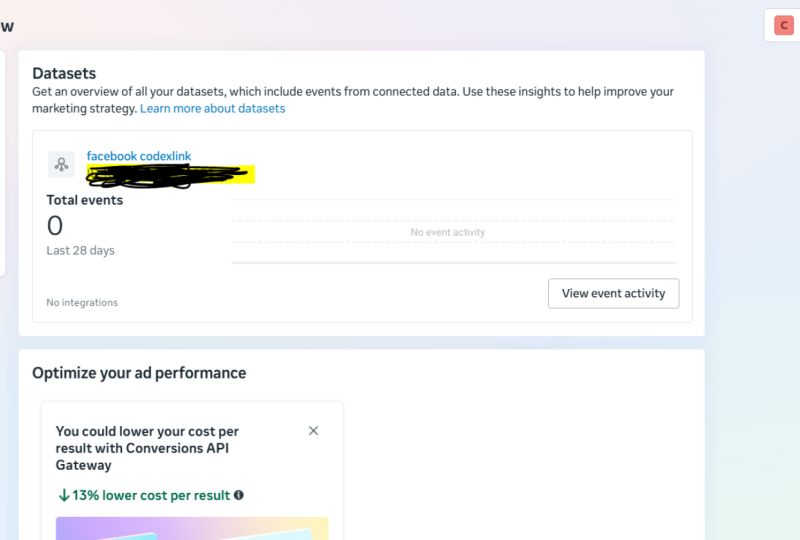
different options here. And overview is a default
option that you will receive. Your screen will look a little
bit different like this. In order to get where
I am right now, you need to switch
to data sources. Once you're here, you're
going to see this graph. This actual graph means that your pixel is
already working. And here you're going to see
if that it's recognizing. So for me right now is lead. And if I want to
check that this is the correct event in it
actually calls sign-ups. I can click on this specific event and
then click on View Details. And in this breakdown, I can choose URLs
instead of data source. That way, I can see each and every URL
that was counted as an event since I'm
counting leads and I have a thank you page, it means that I'm going to see this specific URL here that
goes to my thank you page. That's the URL that I
want my pixel to count. And if I see it here, it means that everything
is working properly
11. Pixel Helper Extension: Now let me show you
how you can check if your Facebook pixel
is working properly. I have an extension that I use. I use Google Chrome extension
called Meta Pixel Helper. When you click on the extension, you're going to see pixel
id and you're going to see different events that
are active right now. If it's green, then it's active. So whenever you click on
anything on the website, the events will change. You will see different
number of events. Right now you can see page view. You can see GTM, the most important part of that. Your pixel ID needs
to be similar to what you actually
have four pixel id. And she needed to see
that page view is active. The extension called
met the Pixel helper. You can find it in Chrome Web store or if you're
using any other browser. So it should be there as well, met the Pixel helper. You need to install
it to your browser. You will see it in your
browser like this. You can click on it
and you will see all the data about your pixel
12. Summary: That's it for today. I hope this class was
helpful to you and it was easy and clear and now
you are a pixel master. If you still have questions, please send me a message where the platform and I will
gladly assist you. Goodbye
 Rita Zinger, Digital Marketing Expert