Transcripts
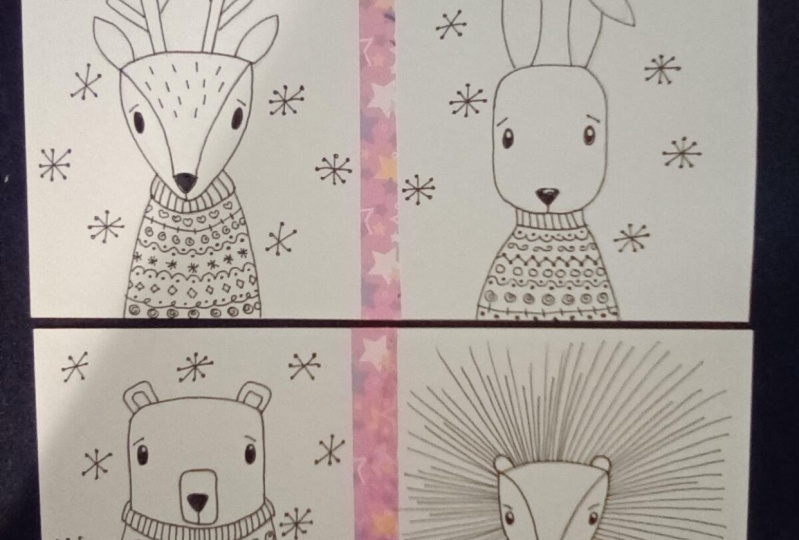
1. Introduction to This Project and Supplies You Will Need.: Hi friends, how are you? I hope you're having a really good day today. I'd like to introduce you to this collection of projects. These are drawing projects that were designed especially for beginners and kids. You do not have to have any drawing experience at all to be successful with these projects. I will take you step by step. So you will know what to do at all times. What we're going to do today is we're going to create some animals in cozy sweaters. So we have a bunny, we have arranged here. We have a porcupine, and we have a little bear, and they're all in their cozy winter sweaters. To create these artworks, what we're going to need is some sort of a writing utensil, a drawing utensil. I'm using a sharpie for these artworks. And you can also use pencils. You can use crayons. You can use colored pencils. Or you can use markers, or you can use a combination of any or all. If you'd like to paint your projects, you can do that as well with some watercolor paints or some temporary or acrylic paints. So I hope that you enjoy these projects. Let's get started.
2. Sweater Patterns: Hi friends. So take a look at this. This is a pattern page that I created for you for some examples of some patterns that you might want to use on your sweater. So what I'm going to do with this sheet of paper is I'm going to take a picture of it. I'm going to put it at the end of your video. I'm going to ask your teacher to pause the video at that point where this image is showing. And what that will do is it will give you some examples and a reference for you to look at. So if you get stuck on creating patterns for your sweater, you can just take a look at my examples. Do yours have to look exactly like mine? Nope, yours have to look like yours. But these are just some ideas, just some examples of patterns that you might want to consider. So I will put that up at the end of your video. So keep an eye out.
3. Draw a Cute Bunny in a Cozy Sweater: Already friends, so let's get started drawing are cute, funny with his cute sweater. What we're going to do first is take the cap off of our marker and put it on the back of our marker so that the CCAP doesn't get lost. Now we're going to focus on the middle part of our piece of paper right here. And we're going to make our bunnies face and head. The way that we're going to do that is we're going to make a shape that looks like this. It's kind of roundish, but it's also kind of rectangular ish. All right, now that we have our shape for our head and our face, we're going to go back up to the top of our piece of paper. And hopefully you'll have some room here at the top. Some bunnies have shorter ears, some have longer years. So I feel like my bunnies ears are going to be not too long, not too sharp, just medium-size. So I'm going to make curved line, coming up almost to the top of my piece of paper, and then a curved line coming down. Now for this ear, I'm going to show you a different way to make any ear. This ear is kind of bent. Alright? So we come up with our curved line, and then we come over with another curved line. So it looks like it's coming down. Now, we come in with a curved line. And then right here, coming down from this part where these two lines meet, we're going to make another curve line like this. So it looks kinda like the, the ear is a little bit bent. How cute is that? Now what we're going to do is come down to the face of our bunny. And let's create a cute little nose. And that's going to be a little triangle. And we're going to fill that in with our black. Make sure that you do a really good job on this goes slowly and carefully. And then put a little tiny line down to the bottom of his chin. Now let's come back here into the MID area of his face and we're going to make some eyes and those are just going to be some small but not tiny, some small ovals for his eyes. We're not going to make them up here. We're not going to make them down here. They're right in the middle. Now we're going to put some whiskers, two or three little whiskers. And there's his cute little face. Now that we have our bunnies face, we're going to make his sweater. So to make the sweater, what we're going to do is we are going to come down just a little tiny bit with two lines. And then we are going to make a curved line like this. This is going to be the top part of our bunny sweater. All right? Now what we're going to do is we're going to come down with a curve line and we're going to come down with another curved line. And that's. Sweater of our bunny in his arms are coming down. All right. Now that I'm looking at my bunny, I noticed that I forgot to put his little eyebrows in, so I'm going to go ahead and do that. If you'd like to put eyebrows, you can do that as well. You don't have to have eyebrows if you don't want to. What we're going to do is we're going to decorate the background before we add the details to the sweater of our bunny, let me show you how to make a snowflake. So it looks like the bunny is in some snow. So the way that I mix a snowflake is this. I make three lines that intersect in the center. So I make 123. And then at the end of each one of those lines, I make a dot. It's just a really easy way to make this snowflake. So when you're making your snowflakes, you don't need to make your snowflakes in a straight line. You can just put them all around your bunny. And I'm going to take a moment to do that. See you can watch me and you can work on your own snowflakes already. So I'm finished with my snowflakes. Notice I don't have a huge amount of snowflakes. I just have a few just to add a little bit more detail to my artwork. Now that I have my snowflakes, I'm going to come back and I'm going to put my focus back on the sweater of my bunny. And for the neck part, I'm just going to make some straight lines. This is the neck of my sweater. And then what I'm going to do is I'm going to take my piece of paper with all my examples on it. And then I'm going to choose some patterns from my examples. And I'm going to put in on my bunnies sweater. So I am going to put this up on a video that your teacher's going to show you and see you can do that as well. So watch me really quick and then when I'm finished, you can get started as well. I'm going to start at the top and I'm going to make some patterns going down. Am I going to use all of these patterns? No, I won't be able to fit all of them, so I'm just going to choose my favorites. So I'm going to go in straight lines going across like this. So I have hearts chosen first, and then maybe I'll choose a line that looks like this double data. Maybe put some dots inside. And I'm going slowly and carefully so I'm doing my best work. So I'll see you back here in just a minute. Already friends, I'm finished. I put the cap back on my marker. I wanted to make sure that that cat got back on because I'm not going to be using this anymore right now. So I hope that you enjoyed this project and I can't wait to see your bunnies. I'm really excited about that. And I will see you next time.
4. Draw a Polar Bear in a Cozy Sweater: All ready, for instance, let's get started on our drawing of our polar bear in his cute sweater. The first thing that we're going to do is we're going to take the cap off of our marker and we're going to put it on the back so it doesn't get lost. Let's find the middle of our piece of paper. My middle of my piece of paper is about right here. And what I'm going to do is I'm going to make a curved line and I'm going to make it pretty wide because a polar bears neck is pretty big. So the sweater neck is going to be pretty large. So I'm going to find the middle, it's about right here. And I'm going to make a very large long letter U. It's a curve line. All right, So this part is going to be, the top part of our piece of paper is going to be his head and face. And this part is going to be our sweater. All right, so what we're going to do first is we're going to make our Polar Bears head. Let's do this. Let's come up, come over, and then come down. Do you see where I started? I started right at the end of our lives. I came up, I came over and I came down and I ended up pretty close to the end of this slide. Now we're going to make some little ears. Remember, polar bears don't have giant ears. Their ears are produced small. So put that right at the corner, at the top of your shape. And then let's add a little bit of detail on the inside. So little upside-down U. Now we're going to come down here to his nose area. And we're going to make a shape that looks like this, right in the middle, at the bottom. So this is a rectangle and the angles are pretty soft, meaning they're not really sharp and pointy. Now we're going to come inside of this shape and we're going to make a straight line close to the bottom. And then o letter U. And then we're going to come down with a little tiny line. Let's fill that in with some black. Go slowly and carefully when you're doing this because we wanna do our best work. All right, now let's come over here. And we're going to make some eyes. We're not going to make our eyes way up here or down here. We're going to make them more towards the middle of this shape of this head. And we're going to just make some small ovals and fill them in. Polar bears have kinda small eyes. Then let's make some little eyebrows in just a little bit of detail for his cheeks. Let's put a few little dots for his cheeks already, so that's it for his head and his face. What we're going to do next is we're going to make our sweater. So sweater is going to be pretty big because our polar bears body is pretty big. So we're going to make us a little slanted line coming down and a slanted line coming down. We're just going to add some snowflakes to the background. This is how I make snowflakes. If you were curious, I make three lines that intersect in the middle right here. And then I add little dots to the end of each line. So let me show you that one more time. So I make three lines and then I add little dots to the end of each line. And that's how I make a snowflake. Now that we have our snowflakes, what we're going to do next is we are going to create some patterns and designs on the sweater of our polar bear. So the first thing that we're going to do is make the top part and this is going to be the neck. So we're going to follow along this line right here. And then we're going to make the top part of our bears sweater, our polar bear sweater. So I'm going to come down like this just with some lines. All right, now that I have that top part of my sweater for my cute little polar bear. On going to start putting more designs down here. I'm going to create patterns for my bears sweater. So I am going to put this pattern sheet up on the video and you can look at it and decide what patterns you'd like to put on the sweater of your bear. If you want to put completely different patterns, go ahead and do that. You can put whatever you want as long as it's a pattern on your sweater. Okay. So you can watch me, I'll, I'll speed up the video. And then you can have some ideas when I put this sheet up and you can follow them if you want to. All right. Friends, I'm back I'm going to put the cap back on my marker and I'm going to make sure that it's on there pretty tight because I don't want that to dry out. All right, friends, I hope that you enjoyed this lesson. I'll see you next time.
5. Draw a Deer in a Cozy Sweater: All right friends. So let's get started with our cute deer in a sweater project. The first thing that we're going to do is we are going to put the cap back on the back of the marker so it doesn't get lost. And we're going to take a look at our piece of paper. Let's go about a third of the way down our piece of paper. And we're going to make a slightly curved line, slightly curved line like this. Alright, now what we're going to do is we're going to come down here and we're going to make another slightly curved line. And then it's going to end up about the middle of that line right here, that initial line, and then make enough they're curved line. So this is going to be the face of our dear. Now what we're going to do is we're going to make some little ears at the top. And let's make some antlers. The way that I like to make antlers is like this. You can make antlers any way that you'd like. But I just like to make little, I guess they're like really long, upside-down u's. And then just add some little parts to the antler. So long, upside-down U. And then just got a little bit more detail to the sides like that. All right, let's go to the face of our dear and we're going to go down to the bottom. And we're going to make a nose and a little mouth, which is just a little line. And then we're going to fill that in very, very carefully. Now let's go to the middle of our shape here, and let's make some oval eyes and fill those in. And then we're going to come to this area right here where these two lines meet. And we're going to make a curve line in, it's going to hit the corner of this nose. Let me show you what I mean. So we start here at the corner and we come down and then we hit the corner of the nose and same thing on this side. And then if you'd like to, you can put a little bit of detail up here. At the top. Just, I'm just going to put a few little lines are a little bit of detail. Maybe one more here. Alright, so that's the face of our dear and we have antlers as well. And what we're going to do next is we're going to make our dear sweater. So I'm going to make some lines coming down like this. I'm going maybe an inch or two up from the bottom and make a curve line. And the same on this side, another curved line. Now coming out from this initial first-line for going to make a curved line like this. This is going to be the top part of our sweater. Let's make some lines in there. Now, what you're going to do is you're going to watch me fill in this space with some patterns, patterns as you know, repeat themselves. So I'm going to grab my pattern sheet and I'm going to put this up on the video so you can look at it as well. If you need some ideas, if you don't need ideas, that's okay. You can just use your own ideas, which would be wonderful. But I'm going to look at my pattern sheet and see what kind of patterns I'm going to make on my dears sweater. So I'm going to go ahead and do that. I'm going to speed up the video you can watch as I complete that and then you can get started on your own sweater. What I'm going to do next is I'm going to put some snowflakes in the background. And I want to make sure that my snowflakes aren't lined up in a straight line. They're kinda scattered throughout the background. Let me show you how I make snowflakes in case you don't know. This is what you do. They're really, really easy. You make three lines that intersect at the center. See how they're intersecting right here in the middle. And then you add some dots onto the end. I've each one of those lines. So I'm just going to find some spaces that need to be filled up with those cute snowflakes. Already friends. So I'm finished with my drawing. I have my snowflakes placed where I want them. Please make sure that you get your cap back on your marker. And I hope that you had fun with this project. I sure had a lot of fun teaching you. I'll see you next time.
6. Draw a Porcupine in a Cozy Sweater: Already friends. So let's get started on our cute little porcupine in his festive winter sweater. So the first thing that we're going to do is we're going to make our porcupines face right here in the center of our piece of paper. So take the cap off of your marker, put it on the back so it doesn't get lost, and let's get started. First thing that we're going to do is we're going to, I would say about a third of the way down your piece of paper, you're going to make a curved line like this. That's going to be the top of your porcupines head. Now we're going to bring two curved lines down in meat down here at the bottom, in the center. So curved line down and curved line down. So that's going to be the shape of the head of our porcupine. This is not a realistic porcupine, it's more of a doodle type drawing. So that's what we're doing today. Let's make some small ears. Porcupines have small ears. I don't even know if you can see them very well under all of that for in those coils. Alright, now we're going to go into the face and we're going to start out with our nose down here at the bottom. Let's make a small nose and fill it in with black. And make a little line down, going straight like this, straight down from the nose to the bottom of that line. Now we're going to make the eyes, so they're going to be oval eyes and they're pretty small in there, in the middle of your face. In other words, they're not up here and they're not down here, they're right in the middle. Okay? Now what we're going to do is we are going to make a curved line from this area where these two lines meet down to this corner of the nose watch what I mean, a curved line like this. Okay? And we're going to do the same thing on the other side. So curved line, coming down to the edge of the nose. Look it out. Q-dot little faces. All right, the last thing I'm going to do is put some small eyebrows to add a little bit of character. Okay, now that we have our porcupines head, we're going to work on the sweater. And the sweaters going to be down here at the bottom part of our drawing. So we're just going to come out a little bit up from the, the point here at the bottom, make a slightly curved line and another slightly curved line. This is going to be the sweater. So now what we're going to do is we're going to come back to the sweater in a little bit. We're going to start by making the quills of our porcupine. When you are making porcupine quills, makes sure that you understand that they're not all the same links. So we're not going to make all of our quills go all to the weight, all the way to the end of our piece of paper. Let me show you what I mean. So I'm going to start here in the middle. And I'm going to go maybe that high and then right next to it I'm going to make another one, but it's not going to be the same length. And it's not, they're not going to be super straight. Because for one, you're a human being. And it's almost impossible to make a perfectly straight line. But for two, for Q pines don't have perfectly straight coils. So I'm just taking my time. I'm going slowly and carefully and I'm coming out from my line right here. And I'm just making some quills the best that I can. I think the key, He's going slowly and carefully. So you do your best work. So I'm going to go ahead and do that. It's going to look like going so fast with my drawing, but I'm really not. I'm taking my time and then going slowly and carefully. You'll see that here in just a minute. Already friends, Ooh, I like this, especially around his ears. Have a get a little bit closer and right here on his neck. Now I can see some spaces that are a little bit too large, so I think I need to go in and maybe put a little bit more. Maybe they're maybe when they're just kinda look around to see if you're happy with how far apart your lines are spaced. Remember we're going to try not to touch the other lines with your initial line because we want to make sure that those quills are separated. All right. I think I'm really happy with that. Okay, so now that I'm finished with my quills, what I'm going to do next is I am going to make a sweater for my little porcupine. And I'm going to grab my example sheet because it helps me with ideas. I'm going to put this sheet app at the end of the video so you can look at it just in case you need ideas for yourself to create a pattern on your sweater for your porcupine. If you don't need it, that's fine. You don't need to look at it, but this is just to help you in, just in case you do. So the first thing that we do is we make the color for sweater and we're going to make a line that runs parallel to this line. Then we'll make some lines right here at the top for his color. And now you can get into your patterns. What I'm going to do is I'm going to speed up the video while I'm looking at my patterns as ideas to go along from the top to the bottom of my sweater. So you can watch me do that and then you can get started on your own porcupine sweater. Already friends, I'm finished with my porcupine sweater. I think it looks really cute. Make sure you get your cap back on the back of your marker and make sure that it gets on their tightly so we that doesn't dry out. All right, I hope that you enjoyed this lesson and I'll see you next time.
 Em Winn, Teacher, Art Instructor, Artist