Transcripts
1. Class Introduction: Have you ever seen
pattern like this and wondered how they are made? Ever thought you'd never be able to make patterns so complicated? Well, actually like with
anything else in life. Once you know the trick
to making these patterns, they are not too
difficult at all. Hi, I'm Katya. I'm a surface pattern
designer and artist, and I'm based in Sicily, Italy. In this class, I will show
you what is a true Chez tile. And now it works. How to create different
Touche tiles? What is a symbol
and how it works, and how to use symbols to
create Touche patterns. I will also show you how to do a normal and a random rotation. And now to make a repeat pattern from you to share design. As a bonus, I'll show you
how to make a maze pattern. This class is for
intermediate students or adventurous beginners who would like to try something different. It's also perfect for
pattern designers who love geometrical patterns or those who would like to add some geometrical patterns today, pattern collections, e.g. by the end of the
class, you will have acquired new skills and knowledge about some
of the illustrator tools, such as symbols, e.g. that can be applied to
other projects as well. So are you ready? Let's get started.
2. Class Project: Your class project is to
first create a symbol, then make the template, and then have lots of fun
creating Touche patents. Don't forget to post
images of your patterns in the project section because I really cannot wait to
see what you create.
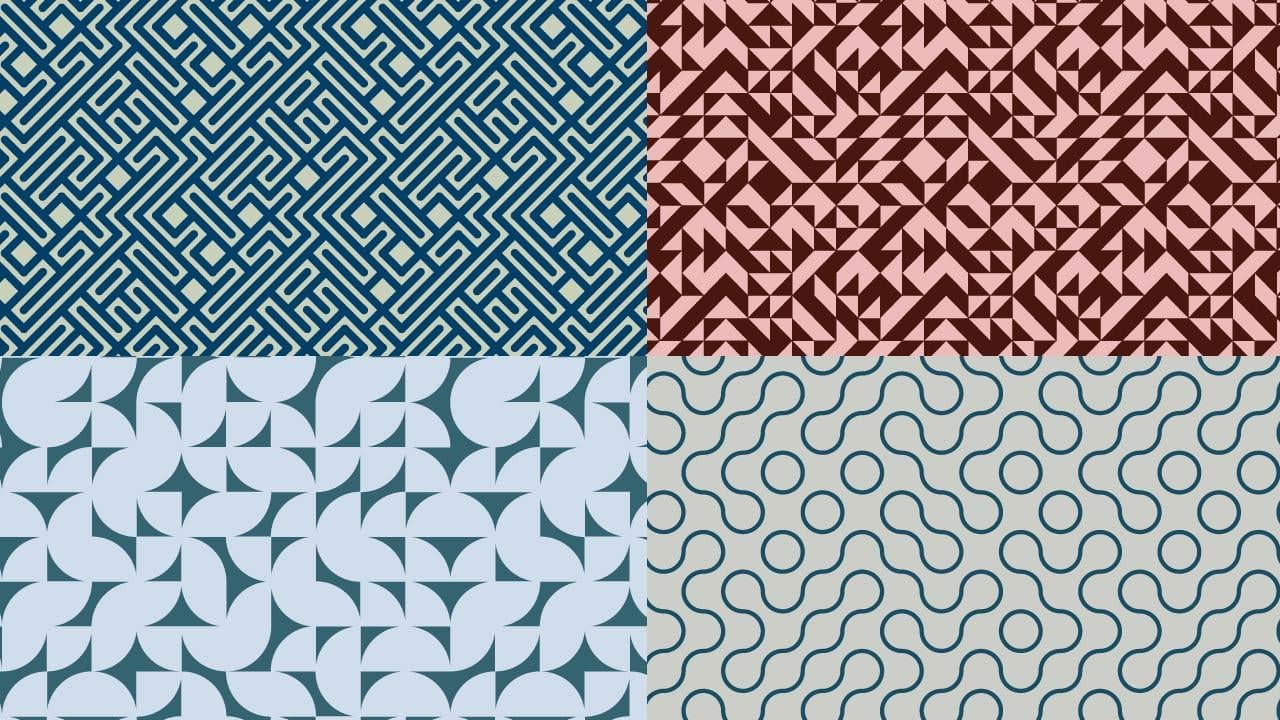
3. Truchet Introduction: In this module, we're
going to talk about true shape patterns
and how to make them. But first of all, let's see what crochet patterns are and
where they originated from. Trisha tiles were
first described by Sebastian Tricia in 1704. It was a French
Dominican priest. Home, amongst other things, studied the qualitative
patterns on ceramic tiles. One in particular
that he studied was made by a square split by a diagonal line
into two triangles, just like the one you see here. And it was decorated with
two different colors. Notice that by placing these tiles in
different orientations, like these ones, e.g. you could form a huge amount
of different patterns. Here are just some
very few examples. This type of pattern formation
is known as Touche tiling. Later on, series tally
Smith brought back this sort of patterns to popularity and he actually
added the new variance, just like the one you
can see here with these sections of circles, which when they are
employed to make a pattern, they form something like this. Well, this is one of the
divisions. Of course. This type of patterns to share patents are usually the domain of coders because
they can be generated very easily by
codes are scripts. However, I can show you a method to make these patents
that doesn't involve code, but it will involve making
some symbols and having a starting pattern template
more or less like this, you can see here with this
little arrows, right? So if you want more information
on crochet patterns, all you have to do really is type crochet patterns
on a search engine. And you will see there
is a huge amount of information starting
from the origins. Like something thinks about
Sebastian, true Chez. And up to nowadays, because lots of people
find these patterns really interesting and they
keep making them. There's lots of videos. You can just spend a
few hours if you want, searching for more information
about these patterns. And now in the next lesson
I'm going to show you the characteristics of
a true shaped tile, which is the building
block of our pattern. See you in the next lesson.
4. Tile Characteristics: In this lesson,
I'm going to show you the characteristics of true Chez tiles to shift patterns are not really as
complicated as they look. When you look at the
button like this, like this example
here on the left, you might think that it's
really difficult to do. But once you know how
these patterns work, it's really not that bad. Trisha patents are actually
made up by a number of tiles which are
basically identical, is the same as the one. Tile, is just the same tile
repeated over and over again. The only difference between the different tiles
is that they are rotated and every time
is rotated by 90 degree. So this tile here, which is basically just
the triangular shape, will be rotated and it
will create a pattern. This shape here with
a little sections of a circle will be
rotated and it will create something like
this pattern on the left. So to make a true shape atom with infinite really
combinations, you just need one
little tiny tile. And according to
what's in detail, then you will get
different results. Of course, it's
important the way you actually built the tile. And I will show you
how to do this. Because if they're
not built properly, then patterns like
this would not work. I will now show you in Illustrator
what I mean when I say the pattern is made with little tails is better to
have a visual I always find. So let's go to Illustrator. So here we are in Illustrator. And as you can see, one of the crochet
patterns here, which is made with
just this little tail. And it looks like, if you look at it like this, that these lines are all just
one line, the black lines. But actually as you can see, as I hover on top
of the pattern, you can see this little
squares been highlighted. And that's because
this pattern is actually made up of
lots of little squares. So every one of these, every single one of these
is the same square. And the only thing that
changes is that it's been rotated on multiples
of 90 degrees. I just wanted to show you this. Here. I just wanted to show you
some examples of the patents you can achieve with
just one little tail. This one here. As you can see,
it's just a couple of sections of circles. And you get this
sort of pattern. And then this one you see
already just that this one is almost the whole thing is covered by a
section of a circle. And you get this sort
of sixties a button. It's got a sixties vibes. And then we have a triangle, like just a simple
triangle and it gives you this sort of button. And then I wanted to
show you just this one, which is quite fun. Can you guess what this
is going to look like? So let's put this in here
and we'll center it. Okay, I know it doesn't
look very impressive now, but bear with me. If we randomly select
a few of them, let's say 60 per cent. Now we'll show you
how to do this. And then we transform each. We have amaze. And I will show you how to transform this into
a pattern as well. So in the next lesson, I'm going to talk to
you about what's the symbol and how to use
them and how do they work? I know you're thinking, well, why are we going to
talk about symbols now? But it will make sense, because the way
I'm going to show you how to make this
Touche patents. If you don't want
to use a script, you will have to use symbols. But it's really, really easy. So don't worry about it. I will show you how to do them and I will show
you how the work, okay, So how will see
you in the next lesson?
5. Symbols and How They Work: In this lesson, I'm
going to show you what symbols are and
how to use them, how to make them, especially because we
will need them later on. So symbols, basically, if we go to the Symbols panel here and
if you don't have it here, you can always go to
window and symbols. They are objects that you can use in your document
many different times. And once you change the
symbol in one instance, it will change the
symbols at the same time. So I will show you what
I mean because it might not make much sense
at the moment. So if I make a symbol for you, so I click on a door, 100 by hundred pixel is fine. And then I'll give it a fill. No stroke. We don't
need a stroke. And then, uh, let's see, uh, get the polygon tool
and I'll do a triangle. So give it three points. And this one, I would
turn it around. And then I do a little
rectangle here. So we can make an arrow. And this ones, if you select
them both and go into the align horizontal central than
it will align it properly. And what I like to
do is also go to the Pathfinder and
unite these shapes. So there's only one shape now. Let's give it a different
color, not the stroke. And make it a
little bit smaller. And just position it here. And I will select both in
control G to group them. Okay, so now we
have this symbol, but we need to make it
into an actual symbol. So if I drag it, click it, and drag it to the
symbols panel, you would get this little
window and you can name it. I call it placeholder and choose graphic and
dynamic symbol is fine. And now, as you can see, we have a little cross
here in the middle, which means that this
is now a symbol. So if we delete this and we drag this symbol out of
the symbols panel, and then I make different
copies. Let's see. Let's say we have this as a space where we
want to build our pattern. What I can also do
is make another one. Okay? So now we have symbols
here that we can drag out. Just to show you what
happens when you substitute this
symbols with a wood. Something there you
either draw or with somebody you have an object
that you already have. So let me go and get a
two different objects so I can show you
how these work. So this is a pattern IF
I'm done in the past. So we'll select a
couple of these groups. This to Control C, Control V. We will make
them a little bit smaller. And what you can do then, once you have your objective, can select it,
Control C. And then you need to double-click
on the symbol. You will see everything
else is grayed out and you need to get
rid of this one. But as you can see, the
little cross stays there. And you can paste control V, your object and
you need to set it around the middle
where this crosses. Maybe I'll make it a
little bit smaller. Okay, then you can double-click somewhere
else in your workspace, or you can use the arrow
exit symbol, editing mode. And just by magic, you these now instead
of your symbol. And the same thing you
can do with the order. So Control C, double-click, delete this control
V to paste it. And maybe make it smaller. Double-click somewhere
else and hear her. Your symbols which are
now something else. So once you put something here in your symbol,
nu original symbol. But you can do that with
any of the symbols. It will change your
object everywhere. Then it just does
this automatically. And I can show you
something else. If we this one, e.g. I. Can change this. If I think I didn't
want this part here, I want it something else. I double-click on it, select it, delete it, and Control
V to paste the new one. And there you go. Just like magic, everything
has been updated. And also, if I make
this bigger, e.g. and this a little bit less
and make this one smaller. If I change this now, so I double-click, I just
made it bigger or smaller. Just like that, without
going inside the symbol. If I change this again. So let's put this one, or maybe, maybe
something different. Let's put this one. So I just
double-click on the symbol, delete this, and paste this one. When you come out of the symbol, then it will change with
the new object and it will keep the sides you gave it. When you change the
sides, like this. So these are the symbols
and how they work. So in the next lesson, I'm going to show you how
to build the template. So you can use that to make your true shape patterns
in an easy and quick way. And the template is actually not difficult at all to make
anyone take that long. So I'll see you in
the next lesson.
6. The Template: Hello, welcome back.
In this lesson, I'm going to show you how
to set up your template, which is really quite simple. So what we need to do
is our usual rectangle. We need to make a symbol. So that's why I showed you
before how to make a symbol. So do the usual
100 by 100 pixel. And of course we need to swap
this k and give it a color. It this color. Because I'm, I don't really like gray. Alright, so we need to do a
little arrow here as well. So I'm just gonna do
it like I did before. I'm three sides, okay. And just put it the right
way up and make it a bit smaller and give
it a little foot. So I'm not sure if that's
the right name for it. Oops, not there. You
need to do that. Okay, So I need to make
these just one object. So I'm going to United and I give it a
different color at the moment. But I'm going to put it here. Maybe make it a bit bigger. I'm going to center it. And then what I want to
do is actually make like Pangea whole shaped in the
shape of the arrow here. So I'm going to do Minus Front. All right, so we have this
which is now like a whole. Alright, so we need to
make this into a symbol. As I showed you before. We drag it here. And a color, I don't know. Placeholder doesn't
really matter the name that you give
it a graphic as usual. And okay, so now this
has become a symbol. I'm going to align
it to the art board. And I want to cover the entire art board
with this symbol. So what I do is I like, I like shortcuts if
you have noticed. So if I do Control K, I can change here the
increments of the keyboard. So this is basically
when you click the right and left
arrows or up and down. This is by how much
your object will move. So I have here 100 pixel, which is the right sides because it's the
sides of our square. If I hold down the Alt
key and the right arrow, you will have basically a copy. And it will have moved
in the right direction. So make the copies to
cover the entire row. Then I select everything. Hold down the Alt key, which is Command I
think for the Mac, and then the down arrow. And this will make
copies going down. And that's basically our
template done. There you go. Nice and simple. What
we need to do though, is saved this file as
a template itself. So it will be there
for when you need it. You don't have to redo
this every single time. So if we go to File and
Let's see if I can find it. Save as Template. Notice we go. You can save this as a template
in Illustrator folder, but you need to change
a few settings and other like to fiddle
with that too much. So I normally make a folder
somewhere in my computer. And I call it templates,
my templates. So whatever you want to call it, and then save my templates
there because it doesn't really matter where
they are saved as long as when you want to open them. You open them, you
take the file. So let's see, let's call
it to share template. And if you look at the
type, will be illustrator, template, AIT, and save. So now you have a template. And if we want to open this, like use this file, we go to File New from Template. And then we go with a saved
it templates and open it. And you can see that it's kept, it has kept the symbol here. So now we can use these for a pattern basically to
create our Trisha pattern. In the next lesson, I will show you how to create the lead to true shaped tiles. And then now we'll
show you how to put everything together and use those styles and
the template and make, finally, make the button. Okay, see you in
the next lesson.
7. Make The Tiles: In this lesson, I'm
going to show you how to create these tiles. Of course, there are millions
more that you can do, but these are the classical
tiles if you like. And you can do lots and lots of patterns from
these ones already. So normally to create a tile, usually I work with art boards
which are 1,000, 1,000. So when I create a tile, I do my little square, 100 by 100 pixel so I can
fit them perfectly along, like to cover the
whole art board. So let's do the square, will go to the Rectangle tool. Click once is
already 100 by 100. Okay, I've got to
give it a gray color. And then let's do the circle. So the Ellipse tool, again, we can use our
100 by 100 pixel. And I'm going to change. So swap the fill and
the stroke color. And I'm gonna give
it a black stroke. And then I'm going
to make it bigger. Let's see, ten points. I'm going to center them. So select both of them. And then horizontal,
not to the art board, but to the selection, the horizontal and
vertical center. And then now we have
this circle that is coming out a little
bit from the square. And to do this, we need to basically cut
this circle into sections. So if we go to the CSO
tools or you can press C on your keyboard and you click
on the anchor points. It will chop the circle
into four sections. So click into each anchor point. And then you can do
is you can get rid of the sections that
you don't need. And then what I do is also
select both of these sections, just the sections,
and then expand them. So now we have this shape. So now we can move on
to the next style. Again, we need the square. And let's give it a day. It's light gray color. And then in this case we
will need two circles. So free, do L on the keyboard. Make the circle, give
it a black color in, swap, the fill and the stroke and then
give it a TEDx Points. And we make a copy of
it with the Alt key. So what I like to do
with these ones is to go quite close up and the foot, the center of the circle on the corner of your square. And if you have the guides on, it will help you to view. Smart guides will help you to
put it in the right place. And then again, we
need to expand these. So I'll expand. And now we can select everything and Shift M for the
shape builder tool. And by holding the Alt key, we can delete the excess and we can group them control G.
And that's done as well. So we will have
working like that. Then for this one, it's actually quite easy. You just need to make
a rectangle, 100, 100. And then what you do is
you go into, let's see, if I find that the
Delete Anchor Point tool or you can just hit
Minus on your keyboard. And z, we'll see a little
minus next to your pen. And then you can just go into the anchor point
there and click. And I'm Yoav euro triangle. For the next one. Again, we need to square again
and we'll do a light gray. And again we need a circle. So it's all squares and circles. Well, almost, almost
all the time. And then we center this here. And we'll make sure
it's in the middle. And then what we do
is we take again our scissor tool and we click on the anchor
points on there. Top and bottom. This makes basically
cuts the shape into mixed to us and we can give me the one
and then group them, control G. And the
last one will. The second-to-last, we make another square,
again, late gray. And then we make
again the circle. Again. We make it black. Of course, you can change
the colors afterwards. I'm just doing this. Now. Black for convenience. And then we put it here
where it says intersect. So it's in there. Oops, not going to. But this is a talk
with the smart guides. It will tell you when these, these to align at
the vertex here. And then with the Alt key, I will make another one, another copy and place it on the other vertex. And then we will bring them to the top and then
select them all. And with a shape builder tool, Let's do we did before, so get rid of the excess. So I did it on the
opposite sides, but that really doesn't matter. Because when you turn
it, it will be the same. Then the last one is
literally a line. You get your line segment tool. And by pressing Shift it
will do a 45-degree line. And then you can give it to a stroke as thick or
as thin as you like. And of course, if you want
the rounded and here, which will help for when you
make the labyrinth button. You can go into the Stroke panel and you can choose round cap. I think Round Join is
also a good idea to have. It will be round. And this is basically how you
build these tiles. But of course you can go
online and you can search for more and you can see how
the other tiles are built. But there's loads
and loads of them, but these are the
most used ones, the most famous, shall we say? Alright, so in the next lesson
I will show you how to do the manual rotation
of the Euro tails. As soon the next lesson.
8. Manual Rotation: In this lesson, I'm going
to show you how to create your button and also how to
rotate it in a manual way. Then I will show you how
to do the same rotations, but in a random way, which is much easier and simpler to achieve different buttons
with a random rotation. But I will show you this anyway. So as I showed you before, in order to have one of these repeating in all
of these symbols, we need to substitute these one of these
squares with a symbol. And to do that, we need
to select one of them, a Control-C to copy it. And then we double-click
on the symbol. Instead of deleting it this time we're going to keep
the symbol here as a guide to know where we
need to place these Exactly. So if we zoom in, we want to place this
exactly on top of the guide. And we can even select
them both and align them. So we are sure that they
are on top of each other. Next thing we need
to do is we go into the Layers panel and
we open them all. So this one here is the symbol. Let me see if I can
make them a bit bigger. Okay, So you can
see this better. So that's the arrow
we want to do, the similar we want to hide. And also wanted to hide
this gray here because otherwise it will show as a background and we don't
need it in this case. And now that we
have done all this, while we do is to double-click. And just like magic, we have our pattern. And if we want to use
a different square, we can just select
another one, control C. We double-click
here and Control V. I'm going to make this visible
again and maybe make that invisible and place
it perfectly aligned. Maybe we can just again make sure that it's
aligned like this. And then hide this again. Otherwise it will
show a pattern. And here we have a
different button. So it's the same thing
with all of them. You just substitute
your little square with the symbol here and
everything would be changed. To do the manual rotation. You can select certain rows
or columns or even diagonal. So I show you what I mean. So you can click and drag
and select this column e.g. and then holding down the shift, we can select another one
here and another one here. Maybe the last one. And then we can go
to Object Transform, Transform Each
from this panel we can reflect or change the angle. So with these squares you need
increments of 90 degrees. So let's see what happens
if I do 90 degrees. As you can see, it's changed. Those ones that we add selected. This tray underneath
is doing this effect. I think we can
reflect it as well. So this, this brings
it back as it was, but you kinda
reflected on the x. Let's see. To 70 brings it back. So one AD. And then
when you're happy, you can just click Okay. But then you can
select the rows, so click and drag. And then with the
Shift key held down, you can select a bit more. Let's do this one,
and then you go back to transform each. And it's already giving you, because we are the candor
and eating reflect. But we can. And then I'll bring
you back to 90. You can do all sorts of
different effects like this. And if you select in a diagonal. So let's see if I can do this. Let's select all of these
and go to transform each. And as you can see, it's changing them already. So you can do sections,
you can do all of it. You can do all sorts
of experiments. And it's basically up to how much time you want to
dedicate and your creativity. This is, of course, once you have this, you can again
change your symbol. So let's try with this one. Let's see. I will hide the little
gray square, this one. And here you already have
the transformation applied. And of course, if you
don't like and you can go back and change it again. So this was how you apply
the manual rotation. But I'm going to
show you how you apply a random rotation, which is even more fun. So I will see you
in the next lesson.
9. Random Rotation: In this lesson, I'm
going to show you how to do a random rotation. However, to do this, we're going to need to download a script from the Internet. Now, this script is
quite complicated. If you have a look at
it after you download, it is quite long
and complicated. So it's free to
download and you can simply go to this website. And I will put a link for you
and just click on Download. And depending on your type of
computer operative system, you need to save your file. And it will save
it as a zip file. So if we go to the downloads, is this one here. And you will have three
different scripts which you can save on your computer. So if you can, you advise you to save it on
the Illustrator I'm folder. So let me get this
and we go to this PC, this C Program Files,
Adobe Illustrator. And then it's actually presets. I think this actually changes depending
where you're from. And then you save
it into scripts. So I have them saved already, but you can just copy them or put them in, in this folder. Or if you put them
if you can't access this folder because sometimes you need special permissions, you can just save it on another folder on your
computer where you know you can access them and you
don't forget where they are. And you can just open all the scripts and an
access them that way. Once you, you've downloaded your scripts and you have
them in your computer, we can go back to illustrator. And what we do is
we need to select everything on your art board and you go into File scripts. So if you can put them into
that folder showed you, then you will find them in here. So I have the random select. Otherwise you just go
into all the scripts and open that folder
where you saved it. So if I click Random Select, it will ask you
what percentage of the objects selected you
want to target, basically. So you can change
this percentage, you can play with it. I will say, I don't know, 60 per cent. And okay. And this is, if you notice
them, if you can see it, but it's selected 60% of the objects and some of
them are not selected. But it's going to be more
obvious when we go to Object, Transform,
Transform Each. And as you can see,
just like magic, we have a random transformation
and it's quite fun. So we can just hit Okay? And that's it That's
done for you. And then if you want, you can do another pattern and redo the random
transformation. And I have a totally different pattern
with the same tile. Actually, I haven't
tried if I select these and run the script again. Let's see what happens. Let's leave 50 per
cent this time. Transform each. And again, it will transform it once more. If you'd like this
button selected again, repeat the process, and you will have your random transformation. And of course this will work with a different tiles as well. Let's try this one. Right? So please see here, it's aligned, align
it perfectly, and make this invisible again. Oh, I forgot to remove
the background. So as you can see, we
have the gray background. So double-click. Make that invisible. Okay, so we have this now. And we can select it. We can go into the scripts
and random select, say again 60 per cent. And then Object Transform,
Transform Each. And as you can see,
your pattern and just, you can just keep
playing with it. There's really no limit to this. Alright, so in the next lesson, I will show you how to actually make the pattern from this. See you in the next lesson.
10. Let's Make The Pattern: In this lesson, I'm going to
show you how to transform this series of little squares
into an actual pattern. So to do this, we need to
do a couple of things. First, we go into layers. And I usually like
to save a copy of this just in case I want to
play with it a bit more, I want to change it, or in
case I mess up somewhere, somewhere along the line, I want to have a backup. So what I do to do this, I will duplicate this layer. This layer contains all
of these basically. And it actually contains, I think these little
squares here, but you can always delete these. You don't need to
have your examples there, but just to show you, so I will click and
drag this layer with a little plus sign is weekly
to a copy of the layer, it should say here, copy. And then I will look and make
this one you're invisible. So we have a backup basically. Okay, So next thing
we need to do, these are all symbols
and make a button. We don't need them
to be symbols. So I'm going to go
to the Symbols panel and click here where it
says Break Link to symbol. So now these are just squares. They're not seamless anymore. Okay? So next thing to do is to create a
background for our pattern. So we need a square, a 1,000, 1,000, and we give it a color. So align it. And then with the Shift
Control Left bracket, we can send it to the back. If you want to change
the color of your line, you can select everything, hold down, shift and
click on the background. So all your black
lines are selected. And we can give them a different color
than somebody like. Pink is fine. And then, so now we have our lines here, we have our background. We need the no fill and no
stroke, square underneath. So Control C, Control V, and we get rid of the field. Okay, so we are, I think, ready to go. We can select everything, drag it to the swatches panel. And let's try it. Let's make a square and fill it. And we have, our pattern
is repeating nicely. And that's it. That's all you need to do. There's one thing I wanted
to show you one more way of doing the pattern again and
make the copy of the layer. And I have left that
gray background in here. So what I'll do is
select everything and release it from the symbols. Now we have all these squares. And then if I select
everything and Ungroup, now, to ungroup again. So you need to
ungroup a few times. And now we have, so I'm
going to get rid of these. We have the background
separated from the black lines. And what we can do is select
just the background and then select same
fill and stroke. So this selects the
whole background. And we can go into
the Pathfinder and met this brother
to the front, but we can just do Control
Shift and the right, I'm left bracket and
bring it to the back. Now, this is our
background which we can color, give a
different color. So something late. And then for the
black lines, again, we can select same fill color. And then we can give
them a different color. And I think we can
merge them as well. So now they are a
continuous line. And now we need to again now do the no fill
and no stroke square. So Control C, Control V, and get rid of the field. And then select everything, drag it to the swatches panel, and then Let's make a
square and fill it. And we have our pattern. So this is where he as well. This might not work with
all of these squares. That one little square
where the background, the gray background actually
interferes with the lines. So that's why I showed you
the other way to do this. You have both options. So if it doesn't work with the gray square in
there as a background, then you can get rid
of the gray square and do the pattern as
I showed you just now, just before a seal
in the next lesson.
11. Bonus: The Maze Pattern: Hello, welcome back. So I just thought I would add an extra lesson on how to make the labyrinth pattern
because this is a little bit different
from the other patterns. So let's open our template file, new from template, and
then we can use this. So this one here
is just the line. Is if you open the transform is 100 pixel by 100 pixel
and it's 20 points. You can change it, I'm sure. But this is what I'm
using right now. So if I double-click on our
template and get rid of this, then we can paste our line
and just align it here. And now we are just
straight lines. But of course you know
how to do this by now. So we select everything,
go to Scripts, Random Select, and
select 60 per cent. Then we go to Object
Transform, Transform Each. And we have our labyrinth
here was already 270. You can play with
this, of course. And I don't know
what happens if you reflected it brings
him back as he was. Okay, so let's
leave it like that. We have our labyrinth. But of course, when
you do a pattern, Let's give it a nice, everything that is on the left side needs
to be repeated on the right and everything that
isn't the top needs to be repeated at the bottom
in order to work. So right now, let's see, we have this one, e.g. if I do Control K and right, 1,000 pixel, which is the
width of the art board. If I move this here, you can see that it wasn't repeating, but it needs to be repeated because it's crossing this line. And the same goes for everything that is
repeating on this side. So I just of course to copy is the usual old and
right arrow key. So we have moved all of these. And now we need to
repeat everything that is at the top, at the bottom. And there might be some
lines that we're forgetting. So we're going to have to
check if the pattern is working and then make
adjustments if we need to. So let's have a look. Let's do a square. 1,000, 1,000. We get rid of the stroke and we fill
it with something like that at the moment and
send it to the back key. And then we need to
do the extra squares. So Control C, Control B, and get rid of the fill. For our pattern. Select everything. And let's test the particles. There might be some lines
that we are forgetting. And yes, there is
something here. So we need to find this one, which is probably
these two lines here. So yes. And then what else was there? This line here might be down. Let's see, just in case we
can add these ones as well. Is because they are crossing. And I think this one, k. Did we do this one? Alright, so you
have to make sure basically just look
very carefully and see all the lines cross
and just repeat them. Maybe this one. Let's try to get through
and see what happens. Okay, So now we
have just this line here that we need to find. Sometimes it's not easy when
it's a complicated pattern, but let's have a look. So I think is actually this one. Yes. I think it was
the one. Alright. Do some investigative work. Yes, I think now the
pattern is working. So as you can see, you just
have to maybe do a few tries, but just make sure that
everything that is repeated, not only from this side, but also from this side, everything needs to be repeated. Of course, as you know, if you're making patterns,
you will notice already. So just carefully look, see all of the lines
that are crossing. Check all of them. And
then of course you can. As you've seen,
that's what I do. I just make the pattern
check which one is which one needs to be
corrected and adjusted, then the pattern will work. I just put it another one
just right here. Let's see. I don't like to leave
things like that. So let's see if I try
if I find this one. I think he might be
these ones here. Yes. It's so look, it's just a matter of being
patients. Really. There we go. Now the pattern is working, and now we have our
labyrinth pattern. And of course you can do this with all sorts of
different shapes. You can change it with
the transform each. And then you can just check and make sure that all
the corners are matching up. Alright. I hope you have enjoyed this class and I'm
happy creating.
12. Bonus #2: Hi there. I just wanted to add a little
extra bonus class for you. If you have taken my class, my previous class before, just show you under the surface
pattern design classes. There is a class
called how to create easy templates for fun
symmetrical patterns. And if you've taken that class, then you will have
these templates. And you can actually combine these shapes
here with that template. So e.g. I. Show you what I mean, if I
copy this and go back to this is one of the templates
and paste it here. You can position the tile here. Let's go a bit closer. If I do this, I can actually double-click and I can actually
see where the title is. Let's see something like that. And then I will double-click again and actually delete this. And then we have this
button straight away. If you're looking for
something like that, then you can use this template. And if you rotate it, you can have the effect. Let's try another one. Let's see this one.
And paste it here. And then position here. And we have this type of effect. And of course you can rotate
it for something a bit funky and rotate it
again and again. So you can obtain different effects with
these type of templates. Let's open another one. So that one was the
reflect template. This is the rotate template. Let's see what happens here. Oh, that's interesting.
Look at that. And then that's a fun pattern. So as you can see, you can use these tiles for quite a lot of,
oh, look at that. But a lot of fun effects. So if you like, you can take this
class or you can even just download these templates. I think there's four
or five of them. And play with the templates. You don't have to do the class, of course if you don't want to. But in that class I teach
you how to do this. Let's try this one. This is so much fun.
K polka straightaway. So if we get rid of the
gray, that's quite cool. And then rule, this is
really nice pattern. I'm going to be
playing with this. By the way, I'm just experimenting
this real-time we do. So look at this, this is a really fun. And if I try this and this one, Let's see what happens. Okay? Did I do this
before? Maybe. But this is quite fun. Look at that. So let's
open another one. This is the half drop template. This template, I did
it a bit bigger. So that's why the square
here is a bit bigger, so it's not handled by
hand is a bit bigger. But what we can do is we
can make this bigger. So we already have
a pattern forming. And then we can make
this type of pattern. Because it's a half
took something like this the other way around
or something like this. Let's try one more. This is the transform template. Okay? So this gives us this
type of pattern. Let's see if we use another one. Let's try this one.
Okay, this gives us that same sort of true shape at an effect
that we had before. But we can do this
if we rotated this. Or maybe we can rotate it freehand instead of
holding the Shift key. So as you can see, and then
you can add, of course, more to this patterns and make them even more
different and varied. So just to let you know
that you can combine these tiles with
all the things that my other templates and, and get even more
patents out of it. Alright? I hope you will
have lots of fun with this.
13. Final Thoughts: Well done, incomplete
in the class. I hope you've enjoyed
it and now you can create lots of fun
geometrical patterns. If you'd like to keep in touch, you can find me on Instagram
at casual anti-art. And you can find
out more about me and my work at critical
anti-R2 dot com. Of course, if you
want to keep up to date with new classes I post, don't forget to hit the follow button and you'll be notified as soon as
I post a new class. As always, if you have
any questions, just ask, drop me a line in the discussion section and I will try and respond
as soon as possible. I'm looking forward
to see you soon in the next class.
Happy creating.
 Katia Galante, Botanical Artist and Illustrator