Transcripts
1. Introduction: Camera, lights, sounds,
and [NOISE] action. You want to become a filmmaker, master that camera of yours, and make the most
cinematic videos. But you have no idea
where to start. Well, you've come to the right address
because this right here is the most complete
fundamental class for beginner filmmakers. The exact information
and secrets that they teach in
expensive film schools. I forgot to introduce myself. Hi, I'm Jordy. About 10 years ago, I graduated from film school, which after, I began my career as
a filmmaker and own a film studio that I've
always dreamed about. I share my passion through
online classes and through an audience of over two million
subscribers on YouTube. Right now, I am super
excited to bring you a brand new and updated
filmmaking class for beginners. We're going to start
with the very basics and take manual control
over our camera. In that way, you can
make creative decisions. In the second half
of this class, we'll explore the filmmaking
rules such as framing, visual storytelling,
B-roll, and more. Finally, in the last chapter, I'll introduce you to some of the more popular camera
tools like the tripod, the gimbal, and more. By the end of the class,
you will be able to shoot an entire video that will look just like a professional
would have done it. That is because you will
become that pro filmmaker. This class is curated in a way that film
schools would teach. That means you will learn
everything from the basics in a very structured way to keep the learning experience
exciting and engaging. Throughout the class,
if you're stuck with any questions, just pop them in the
discussion below as I'll be happy
to help you out. I really hope to
see you in my class and start this new
filmmaking journey together. I am super excited and I
hope that you are too. I'll see you back in a moment.
2. Camera Introduction: [MUSIC] Oh, hi there. Good day. You signed up for the
film-making class. Well, can I say that I'm super excited to start this
journey together with you? As the maintenance guy of this very old abandoned camera
equipment storage unit, I've seen nearly everything. The first cameras
that came in here had an actual film strip inside. Then when the digital
revolution came, this entire storage room was piling up with digital
cameras like this. Do you know what then came? [NOISE] The photo cameras, which had an incredible
video functionality. Chances are that you
have one of these. There has been so
much change ever since film-making became
a real profession. But you know what
hasn't changed, the way that we make videos. By the end of the day,
it doesn't matter what kind of camera
that you're using. Maybe you have one
of those SLRs, or maybe perhaps a
larger digital camera, or maybe you're just
using your phone. Frankly, phones these days have pretty good video cameras. All I'm saying is that
filmmaking is all about the person behind the camera
and not the camera itself. A better camera will not
make you a better filmmaker. The theory and artistic rules
of visual storytelling, on the other hand, will. Now, we do have to choose one kind of camera as a
demo throughout this class. We'll be working with
the Panasonic Lumix GH5, a very popular SLR camera. It consists of a body, the brain and the sensor, and a lens, which is going to convert the light that it
captures into an image. Every camera has
these two things, a body and a lens. Sometimes the lens is
fixed onto the body. This means that you
can't change the lens. Now, in most photo cameras, we do have the ability
to take the lens off, which means that we can
attach other lenses to it as long as they
fit on the body. This is called the lens mount. Every brand has its own mounts. That's something
important to keep in mind if you're planning
to buy a new lens. Now, I've put that
camera into a rig. It's not necessary, but it does make
certain things easier. Rigs are like
connects, like Legos. You built them out
the way you want. There are no rules to it. My very first rig was
even something that I built in a garage
to save some money, and it worked very well. I was able to put my
camera on my shoulder. I thought about a
counterweight and where we'd mount an
external monitor. Today that rig looks
a lot smaller. I've learned that a big rig
isn't always so useful. I like to keep things compact. Around the GH5 is a
cage which gives me a top handle and allows
for rods to be attached. On the back, I've
got a big battery, which is powering
both the camera and the external monitor. Sometimes you can buy
such rigs as a package. Manufacturers will
recommend something, but you could also buy
parts from different brands and put something completely
custom together like I have. That's the beautiful
thing about these rigs. Most of these connections
are industry standards. Like these rods, they are
15 millimeters thick. That's the same everywhere. Now, for this class, such a rig is obviously not needed. I just wanted to explain that
to you because, after all, you have to look at
it the entire class, and so you don't need
to ask weird questions. Now, professional videographers know their camera inside out, so I highly recommend
to open up the menu of your camera and go through
the different settings. Make yourself familiar with your camera and don't
be afraid to explore. There should always
be a reset option there somewhere if
you do mess up. Anyways, don't worry too much. We're going to do that together. We're going to hold
each other's hands and make it nice and cozy. I'm making it weird again. If you're trapped in a
storage unit like this, you don't get to
meet many people. Thanks for watching,
and we'll explore the first setting within that complicated menu
in the next lesson.
3. The Aperture: There are three settings that control the exposure
of your camera. The aperture, the ISO, and the shutter speed. Each of these settings will let more or less light be captured. The exposure in other words. As you're starting out, you probably have your camera
set to automatic modes. Your camera will change the settings of
the aperture, ISO, and shutter speed automatically to capture a good exposure. That looks like a good
thing. Well, it's not. The art of filmmaking is to take control over the settings. So let's put that camera
into manual modes. Each of these exposure settings
come with a side effect. That's why we've got three exposure settings
and not just one. It's up to the filmmaker
to decide what side effects that you want to
see more prominence or not. Let's start with the aperture, which are actually a series
of blades within the lens. Digital cameras
control these blades through a dial on
the body itself. Back in the old days,
this was a physical ring that you had to turn
around on the lens itself. As you open the aperture, more light comes through, more exposure in other words. As you close that ring, less light comes through, the center is being
exposed less. I think that is pretty obvious. The sensor sits inside of the camera body behind
the lens by the way. As you take off the lens
from the camera body, you can actually see the
sensor. It's right there. This plane is what captures
the image coming through the lens and transforms
it into a digital video. Now, apart from
changing the exposure, the aperture also changes
the depth of field. That's the side effects. As you probably know, there's
a focus ring on the lens. As you turn it, you can put
things in the foreground, in focus, or in the backgrounds. The rest will then be
out-of-focus, blurry. Again, you can let your
camera do that automatically, which is not ideal, but that's
for later in this class. For now, that focus ring is something that you can control. You can push it back or forward. What's in focus is
called the focus field. That field can be
big or can be small. You have two people in focus, even though that
they don't stand at the same distance of the camera. But you could also have
only one of them in focus, essentially the focus field
gets bigger or smaller. The size of that focus field, which is the depth of fields can be controlled
with the aperture. The more you open
up the aperture, the smaller that depth
of field becomes. In filmmaking terms, we talk about a shallow
depth of field. Oftentimes, it's considered that a shallow depth
of field is more cinematic as the background
will be more out-of-focus. Now as we close the aperture, less light comes
through the lens, but the focus field
also becomes bigger. More elements will be in focus, but it also affects
the general look of, hence the out-of-focus
backgrounds. Here's the same shots
where we have the talent standing at the same
distance towards the camera. One of them is shot at an open aperture and the other
one lay closed aperture. See what that does
to the background. The aperture is more than
just an exposure setting, it's also a creative choice. Do you want more or
less depth of fields? Like with everything else, aperture is also
expressed in a unit. It's called the f-stop. Sometimes you'll see these
values on the lens itself. If not, you'll
probably see these on the display of your camera 2.8, 5.6, 8, 11. These are all different
F-stop values. The smaller this number, the more open your aperture is. The more light
that comes through the shallower the depth
the field becomes. Now, the bigger this number, the more close the aperture is, the less light that
comes through, and the bigger the depth
the field becomes. That is in a nutshell,
the aperture. In the next lesson, we'll
explore the ISO settings.
4. ISO Settings: Three settings, the aperture, the shutter speed, and the ISO. These control the exposure, but every single one of them
also control a side-effects. For ISO, that's
going to be noise, which makes it the easiest
exposure control of the three. ISO is nothing more than a
digital brightness control, see it as making a dark image brighter through
a simple slider. Unfortunately, this
introduces noise. Definitely when it's very dark and the ISO needs to be pumped up when taking a picture with your phone in low
light environments, you also see a lot of noise. Usually these photos
don't look so good. It's the automatic
exposure setting in your phone that is cranking up the ISO to expose it better. With video, it's the
same in a dark scene, the automatic exposure
controllable crank up the ISO, resulting in too much
noise in your video. As a filmmaker, what can we do? Well, first of all, try to keep the ISO as low as
possible and expose the sensor better using
other techniques like opening up the aperture or
changing the shutter speed, which we'll look at
in the next lesson. But you can also try to make your environment
more bright using lights or if you're shooting an after movie go stand
closer to the party lights, anything that helps to
keep the ISO to a minimum. Now when shooting in
bright environments like outside during a sunny day, keep an eye out for
the ISO setting. I've seen it happened way too much that aspiring filmmakers overlook this setting and actually are shooting
at a very high ISO. They have lots of
trouble to decrease the exposure entity video
will be very noisy. Try to make a habit of it to always check the three
exposure settings with every change in your
environment when you go from inside to outdoor
or vice versa, check these three settings
and not just one of them. Now what can we
do as filmmakers? Do we just keep the ISO
to a minimum at all time? Well, of course, not. You see every camera is a
little bit different. Some can produce a pretty
clean video at higher ISOs, while other cameras
produce noise pretty fast. It's important to know what
your camera can handle and what the maximum ISO
is that you should go for. If your camera is capable of
going up to a 128,000 ISO, it doesn't mean that you
should actually use that, maybe 6,400 is already
acceptable maximum. I want you to figure that
out for your own camera, but in the manual
mode and record some video at different
ISO settings. See for yourself what is still acceptable and at which
point it isn't anymore. We'll have a look at the shutter speed in the next lesson, and then it's time
for you to take a quick break and
practice these settings.
5. Shutter Speed: I just had a client
coming in here with this camera and he told me
that it isn't working anymore. I looked into it, I did some investigation, and it appears [NOISE] that there's no battery
inside. Now, I'm not sure. Should I tell him
about the battery or just tell them
that it's dead, that the camera is broken? Because maybe it's time
to invest in a new one. This is a pretty old camera. Anyways, the shutter speed, the last one of the
three exposure settings. The shutter speed can also
be seen as the refresh rate. That's why it's expressed
in a time value such as 1/50 of a second
or 1/100 of a second. As the light is coming
through the lens, it's being captured
by the sensor. The sensor waits a
little bit as it's being exposed and finally
it decides to write that information
away and wipe that sensor clean to
be exposed again. The speed at which
this refreshing is happening is
the shutter speed. Back in the old days, that was an actual physical disk rotating in front
of the film strip, which is now the sensor. There's a hole in the disk
and the bigger that hole, the longer the film was exposed. Now we couldn't change the
turning speed of that disk as it goes together
with the speed at which to film
is being rolled. That's the frame rate which
we'll talk about later, soon. Now when the sensor is
exposed 30 times per second, it's obviously more
exposed than if we were to have a refresh rate
of 60 times per second. We talk about a slower
shutter speed which lets in more light or a
fast shutter speed which captures less light. We understand how the
shutter speed works, but what is its side effect? Well, motion blur. As the sensor is
capturing light, what's happening in
front of the lens is moving so if you wave your arm, the sensor captures
the entire wave, then it refreshes to
take a new sample. A slow shutter
speed will capture a longer movement as with
a faster shutter speeds, it only captures a small
portion of that movement. That's why you often see
these blurry lines when people or something else
fast is moving in the scene. It works the exact same when
taking photos by the way. This is motion blur. Having a slow shutter speed can sometimes create fun and
camera effects like this right here or you can
make everything looks super sharp with a
fast shutter speeds. Action films like
fighting scenes are oftentimes filmed at a fast shutter
speeds as it makes the action feel harder
with less motion blur. Again, you can see the creative choice
that we have there. Another reason why
we should film in manual exposure
and not automatic. In dark scenes, we could
increase the ISO to expose the shots more
that introduces light. What if we were to
decrease the ISO and set a slower shutter speeds that
introduces more motion blur. Perhaps we put the camera
on a tripod so that it doesn't move and we ask the
talents to stand still. Essentially, we are decreasing
movement in the shots, which means that
the motion blur is not going to be that noticeable. Now, when outdoor,
we decrease the ISO and we close the aperture
and fortunately, our depth of field
becomes deeper. I would like to retain a
more shallow depth of field. What if we were to
open the aperture back and make the shutter
speed to go fast, that's a way to compensate
for the exposure. Depending on the side effects that you would like to have, you can change the aperture, ISO, and shutter speed. Every setting
changes the look of your video and that's the creative choice
of the filmmaker. Don't let an automatic feature take that creative
choice away from you. Now it's time to practice. Go into a darkroom and change the three
exposure settings, see how they work together, then go outdoor and change
the settings again. Now try to get familiar with
these settings and also remember to figure out the
maximum ISO for your camera. See what the threshold is by capturing a video with
different ISO settings. Have fun practicing, and I look forward to seeing you
back in the next lesson. In the meantime, I'm
going to do my hair because it's going
everywhere. [NOISE]
6. Frame Rates: Apparently people still
buy one of these cameras. Your phone shoots better video. Anyways, I hope you had
a good practice and got more familiar with the
three exposure controls. The ISO, aperture,
and shutter speeds. In this lesson let's
not talk about my hair which is still looking
very bad but instead, let's talk about the frame rate as there is so much more to it. In short, frame
rates are the amount of frames that you
record per seconds, common values are 25 or
30 frames per seconds. In short we talk about FPS, which stands for frames
per seconds. Good job. Now there are mainly
three FPS values that we're recording, 24 FPS, which is the
standard for cinema. If you go to the movie theaters, you're probably
looking at 24 FPS. It's considered more cinematic. When making videos for
the web such as YouTube, we oftentimes record
in 25 or 30 FPS. The reason that we have two different standards comes from the old days when
videos were still shown on old CRT televisions. Now I'm not going to go
in depth to what that is. It's in the past,
it's behind us, but it comes down to the refresh rate of
those televisions, which were bound to the
frequency of the electricity. That is different in
various continents. In Europe, we have an
electricity net 50 hertz, and in the US it's 60 hertz. I'm going to spare you all
the technical stuff behind that because it's no longer making sense in
the digital world. But it's good to know is that many cameras these days still shoot in 29.97 FPS. That is because the
electricity frequency in the US isn't actually 60 hertz, but 59 point something. That's the backstory. Now, what frame rate
should you record? Well, that is a personal taste or what your client
is asking you. Even though I'm from Europe, I do shoot everything in 30 FPS as I personally
like my videos a little more smoother
and sharper than if it were to shoot at 25 FPS. Wait, smoother and sharper videos as my frame
rate increases? Well, smoother; we can
understand a video of 10 FPS looks very sharp
compared to a video of 30 FPS. This one right here looks a
lot smoother but sharper? Why is that? Well, that has to do with
the shutter speed, which we talked about
in a previous lesson. Your frame rate and shutter speed are a little
bit bound together. You see when your camera is capturing 30 frames per seconds, it means that it cannot refresh the sensor more than
30 times a seconds. The lowest shutter
speed that you can have is 1/30th of a second. Many cameras have
that option locked. Just try that for yourself. Set your camera to 30
frames a seconds and try go below 1/30th of a second. The same thing is with 25 FPS, you can't go below
1/25th of a second. Now some cameras do
allow you to go lower, but that's some digital
processing get us going on. We're actually going to lower the FPS without telling you. Naturally, cameras
cannot do that. Now, the shutter
speed actually has an even bigger
correlation with the FPS. In the real-world there's
also motion blur. Just wave your hand in
front of your eyes, you'll see motion blur. This is obviously a
natural amount of blur. When we want to recreate
that natural motion blur, we take the double
of the frame rates. Shooting at 25 FPS, we set the shutter speed
at 1/50th of a second. For 30 frames that's going
to be 1/60th of a second. That way the motion blur feels natural depending on the
frame rate that you choose. That's why I said that my videos thoroughly
look smoother but also sharper when
increasing that frame rate. I set my shutter speed at 1/60th of a second,
less motion blur, thus my videos are sharper
and the motion still feels natural because it
matches with the frame rates. Maybe that is a lot to
take in so don't worry too much about the shutter speed and your frame rate just yet. These are settings that you can take with a grain of salt. The more you get familiar
with film making, the more you're going
to pay attention to such minor details. But let's talk real
quick about slow motion. Obviously, we're going
to need more frames per seconds, 60 FPS, maybe even 120 or perhaps
10,000 frames per second. Yes, that exists by the way, although switch cameras
are super expensive. Having those extra
frames a seconds means that we can
stretch our video clips. We only need 30 frames, but we have 60 frames
available for each seconds. This means that we can
stretch the club out, double as long and
we're going to take 60 frames per two seconds. We've created slow motion. Or if we were to do that
with a normal 30 FPS clip, we would get 30 frames per two seconds or 15
frames a second. Playing Baghdad video, it
starts to look choppy, a problem that we don't
have with 60 FPS. The more slow motion you want, the more frames per seconds
you're going to need. Most cameras already transform their captured FPS into
something like 25 or 30 FPS, like my Panasonic Lumix GH5. I can record in 120 FPS but it's going to process that
into a 30 FPS clip. When I play back the video, It's already in slow motion. I don't have to stretch
the clip in video editing. That's something
to keep in mind. What frames do you
capture in and what frame is your camera
processing it too. Sometimes that could be the
same recording in 60 FPS and processing it into
a 60 FPS video clip, but it can also record in 120 FPS and process that
into a 30 FPS file. Every camera has
different options, so check that out
for your camera. That's most of it
about frame rates. Later in this class,
we're going to learn more about when to shoot slow motion and how it can
help us to shoot better video. But first we need
to expose our shots correctly and that's
for the next lesson.
7. The Histogram: We've learned about the
different settings to change the exposure and also what
each side effect this, but purely looking at exposure, when is my shot underexposed
or overexposed? Underexposed means that
it's too dark and even outdoor during a sunny day
a shots can look too dark. You've close the
aperture too much, or you've set the
shutter speed to high. Deciding whether or
not your shot is well exposed can be done by simply looking at the display
of your camera. It's like going outside and guessing what
temperature it is. You can get a sense
whether it's warm or cold, but to know the
exact temperature, we use a thermometer, and that's the same
thing with your camera. We use a tool called the
histogram to measure the exposure so that we can make better decisions to what we
need to set the aperture, ISO, or shutter speed ads. That histogram looks
something like this. Before we continue
with the lesson, pause this video for just for a brief moment and try to find that setting
in your camera. Makes sure that it's
displayed on the monitor. For some camera models, you need to press the Display
button a couple of times. For others, it could be
a setting that needs to be turned on
within the menus. We're looking at a diagram. This information shows the
light or the exposure. On the left side sit the dark areas and on the
right side is the bright. When I close my aperture, you'll see that the
diagram moves towards the left and when I
open the aperture, the information
moves to the right. Ideally you want
to make sure that the histogram has its graph
somewhere within the middle, and not touch one
of the outside. This way I noted there
are no parts in my shot underexposed and no
parts are overexposed. In a studio environments
like this it's easy because I have full control over the light and the scenery, but when going outside
this gets trickier. We have a strong sunlight and white reflections in
the shot as well as the person standing
in the shadow. This is a big contrast and when looking at the
histogram there seems to be two peaks at both the
dark and the bright areas. On the left sits the information of the telons and the shadow, and on the right information
of the white reflector. It's impossible to
get the diagram into the middle because
of that contrast, a situation that you'll
face a lot by the way. Here it's important
to make a choice. Do you want to see detail in the reflector or on the telons? Well, I think in this case
the telons is more important, so let's open up the aperture. Hence bring the diagram loose from the left
side of the histogram. Now, don't put it in
the middle though, the telons stands
in the shadows. It is dark, so keep it dark, just don't make it underexposed
losing all detail. Now, this has been
an extreme example. Another more likely
situation is where you fill in your subject
in front of a bright sky. One could argue that the
subject is too dark when we try to aim all
of the information in the middle of the diagram, so we expose more. Right now at a sky
will get overexposed. This is a very typical shot that a beginner filmmaker makes. However, the sky is too prominence that I would
not recommend doing this. Try to get to the bright areas loose from the
histograms right sides, bringing back detail in the sky. You want to see the structure of the clouds and not
just white blobs. Yes, your telons is a
little bit too dark, but there's still detail. We can see the face
and if you can, it's always better to
underexposed than to overexpose. That's what separates a
professional from a beginner. Now what about the telons
and skin tones in general? Now we could see the histogram
as a percentage bar. Where on the left, so
it's zero percent black and on the right side sits
on a 100 percent whites. Brighter skin tones
like myself should be around 70 percent so when I
make a shot of my telons, I could move a little
bit closer in to see the information
of the face only, and I'll try to get the
diagram somewhere around to this 70 percent when I move back out to make my medium
shot or whatever, I know that I have exposed my shots correctly
for the skin tones. When working with a telon
to as dark skin tones, you could aim at
around 50 percent, but do take that with
a grain of salt. This 70 or 50 percent is
academically correct, but it's good to know
this academic standards. That's how the histogram works. Definitely use it all
the time to double-check whether or not something
is over or underexposed. Your display does not represent
the exposure correctly, which is why you have
to use that tool.
8. Autofocus: We get it guys. Exposure. Let's stop with that. Enough talk about exposure. Let's talk about
the fun stuff now. [NOISE] Focus and I mean
the focus of your camera, but also your focus, of course, two kinds of focuses. In short, we say that a subject is in-focus when it's sharp. Anything else in
the background or foreground that is
unsharp is out of focus. It's like me. I'm in-focus and that over there
is out-of-focus. Now turning that focus ring on your lens will bring the
focus back and forward. The bigger your focus field
is depends on the aperture. We've talked about this before. Now there are two
ways of focusing. Either you do it manually
by turning the focus ring, or you let the camera
do it automatically. Oftentimes you have a switch
on your lens for that, AF stands for autofocus, and MF stands for manual focus. If your lens doesn't
have that option, you can set it from
the menus and choose manual focus or one of the
different techniques that out-of-focus needs to use
because autofocus can do a face detection and always
try to have a face in focus, or it can be set to a chosen point so that
you can use the thumb sticks to choose
a specific point to which the lens
needs to focus. Each option has
its own use case. It's not like one is better
than the other, it depends. Now, autofocus might seem
a bad choice in general. I mean, so far I've been
telling you guys not to use auto but there
are exceptions. I mean, manual focus does
give you more control. However, it isn't
always easy to keep your subject in focus
when doing it manually. If your goal was to
keep your subject in focus while you run
around with your camera, why not set it to autofocus
with face detection? It allows you to focus
more on framing, camera movements, or the
histogram, and whatnot. When you don't have a
person in your framing, you could even opt for
the point focus option. Using the thumbsticks,
you can move it to that point to focus around
now, even while filming. You could start off filming, for example, one
object, run around, or do whatever you want, and then move that
focus point to somewhere else,
changing the focus. I think this is a great way to practice with focus changes without having to worry
too much whether or not your subject
is actually sharp. Autofocus definitely
has its benefits, but it also comes
with some downsides. You have no control over
what the focus does. It happens automatically. That means that focus
pumping could occur. This is where the camera
has traveled to focus on a subject and starts
pumping back and forward. Or when changing
the focus through that technique with
the thumbsticks, you have no control over
how fast the focus changes. If you have the guts and
want absolute control, then set your camera
to manual focus, and we'll talk more about
that in the next lesson.
9. Manual Focus: I'm completely out-of-focus. That's because my camera
over there is set to manual focus and
my little table, right there, my production
cart is in-focus. But this is my background and
I shouldn't even be here. That is why I have my
camera set to manual focus. Let me just go stand back here. Professional filmmakers
rarely use autofocus unless it actually has an advantage over
doing it manually. At first, you might think that autofocus might always
have the upper hand. That's because you need to train yourself to focus manually. It takes several months
or even years to master. Once you master it, it is so much better
than autofocus. Start with getting more
familiar with your lens. Choose a subject
and walk back and forward while trying
to keep it in focus, you need to get sense of
how much you have to turn the focus ring for the
distance that you walk. At first, you will walk slowly and as you get more
and more comfortable, you walk in a little bit faster. Now, it's good to
record that as well, so you can check your
practice afterwards. Sometimes it seems like
our subject was in focus, but actually it wasn't. Now, just like the histogram, there's also a tool to help
you measure the focus. This one is called
focus peaking. Now, not all cameras have that option though,
but if your does, it's that option that
you need to look for and turn it
on, focus peaking. This will display
a bunch of dots or lines on your viewfinder. The marked areas are in-focus, so that way you can easier see whether or not your
subject is in focus, which isn't always so easy
on a small viewfinder. A trained camera
operator can even focus without looking
through the viewfinder. When you turn the lens
all the way to one side, they know exactly how
much they have to turn it back to get their
subject in focus. But that's sort the masters, that's for the senseis
of filmmaking, which I happen to be. That's one aspect of focusing, trying to keep your
subject in focus, but manual focus also comes
for creative choices. For instance, you're
taking your final shots, and you want your video
to have an ending. What is often done is just
pulling the focus back, making everything out of focus, and you can do this smoothly at the exact speed that you want, changing the focus
from one subject to another will also
go much better. We're filming a subject
and mid shot or turning that focus wheel so that
another subject comes in focus. This technique is
also called focus pulling or rack focus. In the film industry, a focus
puller as a full-time job, you stand next to the camera guy while keeping the subject in focus performing focus
racks and what nots, you are the focus puller. Often times this can be done through a wireless
system as well, where the focus
puller can stand a little bit away from
the camera operator. The focus puller then controls a motor which is
attached to the lens, but that's for the future. For now, I want you to
practice with focusing and a helpful tool for that is
actually one of these things. This is a focus chart. You can find this online
and print it out. It allows you to better see if the plane is in focus or not. Such a focus chart is often used to hold next to
the subject real quick, so that the camera
operator can see if the subject is in focus or not
before they start filming. You thought you only
needed the camera. Film making comes
with thousands of different tools that you
actually don't need, but you buy it anyways. Now go practice your
focus, private. Step back and forward while trying to keep that focus chart, or whatever in focus, hit record on your camera too, so that you can review it
on your computer later on, and then I'll see you
back in the next lesson.
10. White Balance: Hey guys. Welcome back.
Something is off. The white balance. Let me just set that correct. There we go. There are different types of
lights in this world. You have warm tungsten lights like this one right
here or candles, or a very low warm sunlight's. But on the other side of
the spectrum there are cold lights like
this one over here, but also the lights
over at the dentist. Even the sun lights can be
very bluish cold as well. During an overcast
day, for instance. The clouds change the
color of the sunlight, or when the sun is set
after the golden hour, we get the blue hour. The difference in these
natural lighting colors is referred to as the
color temperature and here's a shot that
shows this very well with examples of types of lights that you can find
on the spectrum. A candle on the left side
where the orange colors are at and an overcast day on
the right in the blue tone. We can even give a specific value to
the color temperature, which is expressed in Kelvin. A candle sits around
2,000 Kelvin. A tungsten light is 3,200. You can often find these values back when buying a light bulb. LED lights have no
specific Kelvin, so they can be any value. In the middle around the
5,500 and 6,500 Kelvin, we can find back the
natural daylight. This is where the
sunlight is not blocked by clouds and
it's high up in the sky. Around noon and
on the right side at around 7 or 8,000 Kelvin, we can find back the
overcast day and furthermore also sits
the blue sky itself. Now why is this so
important to understand? Well, our eyes automatically
adapt to these colors. That's why we don't even notice or aren't even
bothered with this. But a camera doesn't
do this automatically. You need to set
the Kelvin value. I'm filming in a room
with tungsten lights, which sit around 3,200 Kelvin. I look for the white balance
menu and I enter that value. Doing that will make
the tungsten light appear as white or neutral. This technique is called
taking a white balance. We are balancing
the light color to appear white on camera. Now setting that exact
Kelvin value gives you, of course, the most control. But you can also choose
from a series of presets. You'll see some icons in your white balance menu that represents the lights
that you have. These are preset values and most of the time due to
trick, just as good. There is one option in there that you should
never pick though, and that is AWB, or auto white balance. Although an automatic white
balance seems as a good idea, it causes the colors
to shift and change. The colors in your
shots should stay the same unless you have a
really good reason for that. We understand what
white balance this now. The idea to make a white plane
appear as white on camera. Some cameras, definitely
professional video cameras allows you to even
capture a white point. You then simply
point a white paper towards the camera and you
can do a white balance. The camera will
calculate the Kelvin for you and makes
sure that the paper appears white and it's
going to save that value and not change anymore
automatically afterwards. Now not all SLR's or consumer
camcorders can do that, so we'll skip that part. Also you don't actually
need to be that precise. You see a shot like this
doesn't feel natural, even though white is white. We feel that there's
something wrong. The warmth from the indoor
tungsten colors are gone and the daylight coming through the window
is two bluish. Maybe instead of 3,200, we should set the
Kelvin to around 6,000. Aim for the daylight colors. Well, that makes the
window lights better, but indoor it's way too orange. In a scenario like this, you want to give
the impression that the bluish light from outside comes through the
window and that we have warm light indoors. Instead, let's pick
something in-between 4,500. This makes the window light
a little bit more blue and the indoor lights
more natural warm. It doesn't matter if you're
shooting at 4,200 or 4,800. Just as long as
you are somewhere in-between tungsten
and daylight. When filming solely indoors without any mixed color lights, I would also not recommend setting the white
balance to tungsten. You want to keep that
warm tone in there. Perhaps set it around 4,000. Shooting outside during the day, this is considered
natural light, so this is a good idea to
set your white balance accordingly and make
whites appear as whites. Finally, an overcast day
is moody and you could make the creative choice to keep your white balance
setting at daylight, making that overcast day
a little bit more blue. It adds to the look and feel, but that's up to the
filmmaker to decide. Now of course, once
you're going to jump into the editing phase, there's also the color
correction part in which we can change the white balance
and other colors as well. Don't be too much worried about the white
balance while filming. Just try to think
about it a little bit so that your
talents does not appear like a pumpkin or something because the bigger
that the difference is, the harder it will
be to color correct. You always want to make
sure to be somehow correct. Now we will not cover video
editing in this class, but I do offer an
editing and Adobe Premier Pro as well as a
color correction class. If you're interested, you
can always check those out. Now thanks for
watching and I'll see you back in the next lesson.
11. Picture Profiles: Now I've seen a lot of things, even a very wrong white balance, but this, where are my colors, ads and anti contrast. This looks so washed out. Oh, it's back. Right, the picture profile.
Welcome back guys. You've almost gone
through all of the lessons about the
camera's settings. After this one, you are ready
to start with film-making. The idea of the first
lessons was for you to understand your camera in and out and we've
accomplished that. Good job. They're
doing an amazing job. You can give yourself a pat
on the shoulder, but stop, don't pat yourself too much yet because there's still
so much more to learn. Picture profiles. Depending on the camera
brands that you have, that picture profile option is tucked away somewhere
within those menus. So just flip through
it until you find it. You'll come across some
different picture profiles, such as standard, neutral, vivid, maybe even black
and white, or monochrome. Using one of these options will change the way your video looks. Vivid will give you a very
saturated look with lots of contrast while neutral
is going to be more flat and desaturated. Most camera brands
even allow you to go into this picture
profiles and tweak there look a little
bit more by changing the contrast or the
saturation individually. Now comes the same
question as always. Why? Well, there are two reasons that you want to
change a picture profile. First of all, you don't
know what it's set to you when your camera
comes out of the box, you're a filmmaker, so you choose the look
of your videos. Either you want a nice picture
straight from the camera, then you can choose
something like standards or maybe
perhaps vivid. But if you'd like to
have some more control with color correction
later in the edit, it is best to choose something
as flat as possible so you choose neutral and
dial the contrast down, the saturation down and
the sharpness as well. We've got an ugly flat image
but we can add contrast, colors, and sharpness
back in the edit. It gives us much more control. That's what you saw in the
beginning of this video. You see, this right here is the flat image which is being recorded by the camera and this is with some
color correction on. We do that because
we can't remove contrast or saturated
colors only to an extent. That's why filmmakers like
to shoot flat to have that possibility to color grade and get that cinematic look. Professional video cameras
and even a little of prosumer SLRs have
the ability to shoot in a log picture profile. It's usually a setting that
is tucked away even more, but it's essentially
a super flat image, as you can see right here. But it holds all of the
information that we need. A shot like that can be easily color-rated to
something like this, in fact that flat look. This right here is actually
a lock picture profile and it gives me the possibility to color grade it to
anything that I want, like this or this, maybe this. You see, you can just do
anything you want with this, which is a lot harder
and maybe even impossible with something
like a vivid picture profile. Now, every brand has its own flavor of this
log picture profile. Sony cameras call it S-Log, Panasonic cameras called V-Log, for Canon it's C-Log, etc. But it all comes down
through the same thing. If picture profiles or something that you're already
familiar with, definitely play around with a log picture profile and check out my class
on color grading. This is all brand new to you, then don't bother
shooting log just yet. Just set your camera to
standards or neutral, whatever you prefer, and focus under rest of filmmaking first, because there's a lot to learn and the show has just begun, but I am super excited to
take you on this journey. What I'd like you to
do now is go through all the settings of your
camera, if you haven't already. Make sure that you
feel comfortable with the different tools and manual controls and
when you feel ready, come back because in the next lessons we're
going to start with a whole new chapter and learn about the creative
side of film-making, which starts with
the rule of thirds.
12. Rule of Thirds: Today if you shoot a video, you just take out the SD
card from your camera, plug it into your computer, and you can start watching it. Back in the old days,
you actually had to take out the film strip
from your camera, develop it, [NOISE] put it
on this thing right here, which would then project
the film to watch it. Talking about this
makes me feel very old, even though that this
was before my time. Anyways, now comes the fun part. The following lessons will
separate you from a beginner because knowing your camera
inside out is a good basis. But if you don't know
how to use it properly, you're still doing things wrong. Let's start with framing. This is the way that you point your camera at your subjects. You have probably heard
about a composition already. This is the way
that you position different elements in a shot. We have this rock right here, and some trees in the
back by moving around, and the way the way that I point my camera at these things, I can position them differently
in my camera frame. A filmmaker knows what a good
framing or composition is. In other words, they
know where to place those trees and the rocks to
make the shot interesting, and enjoyable to look at. Now, there are different
kinds of framing techniques, but almost everything comes down to the basic
rule of thirds. You divide your shot
into three parts, both horizontally
and vertically, thus the name rule of thirds. You might be familiar with this grid, as you
can call it up, as an overlay on almost
every camera device, including your phone, is
usually referred to as a grid. This is a guideline that we can use to align different objects, and let's start with the basics. We're filming a landscape which is being divided
with the horizon. The idea is to place the horizon on either the upper
guideline or the bottom one. That is going to depend on what you want to show the most, are that the clouds or is it perhaps the landscape itself? If it's the landscape, obviously you put the
horizon on the upper line. This is a balanced shot. It's pleasant to look at because we've aligned it
to the rule of thirds. Now let's bring a subject into the framing
such as a tree.A tree is tall so we can't position it on the
horizon guidelines. We're going to use one
of the vertical ones, either the left
or on the rights. At the same time,
we're going to keep the horizon on the upper line or perhaps on the bottom one. A composition are
always going to be multiple objects or subjects
that need to be aligned. Just like with the horizon, think about what area
is more important to show is that the left or
the right side of the tree, depending you'll choose to which guideline you will
align the tree to. Now sometimes your subject or main focus is much smaller
than the surrounding, such as the Terence here, who's sitting on a rock
in the far distance. In a case like this, we
could position them both on one vertical and
one horizontal line, basically choosing
one of the crosses. Now if some areas really
don't make any sense, you could opt for a
center composition, basically centering the subject, either perfectly in the center or still having them sit at one of the horizontal
guidelines, this works too. Doing such a centered
composition, you pool all the
attention to the subject. Filming the subject
from a closer distance, we can do the same thing. Place a subject on either the left or the
right or the center. But what do we put on
the horizontal line? The point of interests. Where does the audience look at for a person that's
going to be their eyes? We plays their eyes on
the top horizontal line. The bottom could also work, but then you need a very
good reason for that. Something is happening
above the Terence head. Then as for the vertical lines, as long as the person
who is looking into the camera, you can choose. Oftentimes, a centered
composition is used, but when the Terence
is looking away from the camera,
something happens. Suddenly, a viewing
direction occurs. The Terence either looks to
the left or to the right. In our composition,
we need to give some room to this
viewing direction. When your Terence
looks to the left, will place that person on the right vertical guideline with the viewing
space on the left, and of course vice versa. Now, this rule does not
only apply to people, but to basically anything
with a face such as animals and statues
or teddy bears. In fact, it works with anything that has a
front and a back. Think of a car, it doesn't have a face, but it does have a front, so make sure to give that
car some viewing space. Lastly, there's
also walking space. If a human walks into
a certain direction, give them walking space. It's the same as viewing space. If they walked from
the left to the right, you place that person
on the left guideline, and follow their movements. Again, this works with
anything that is moving, including cars, planes,
animals, and whatnot. Of course, this only implies when you're following a subject, when you have a
fixed framing and choose to let the subject
drunk students shots, you don't have to give them
walking space obviously. But that is how the
rule of thirds works, and depending on which areas
are the most interesting, where the subject is
looking at or moving to, you place them on one
or more guidelines. In the next lesson,
we're going to work some more with the rule of thirds and focus
solely on people.
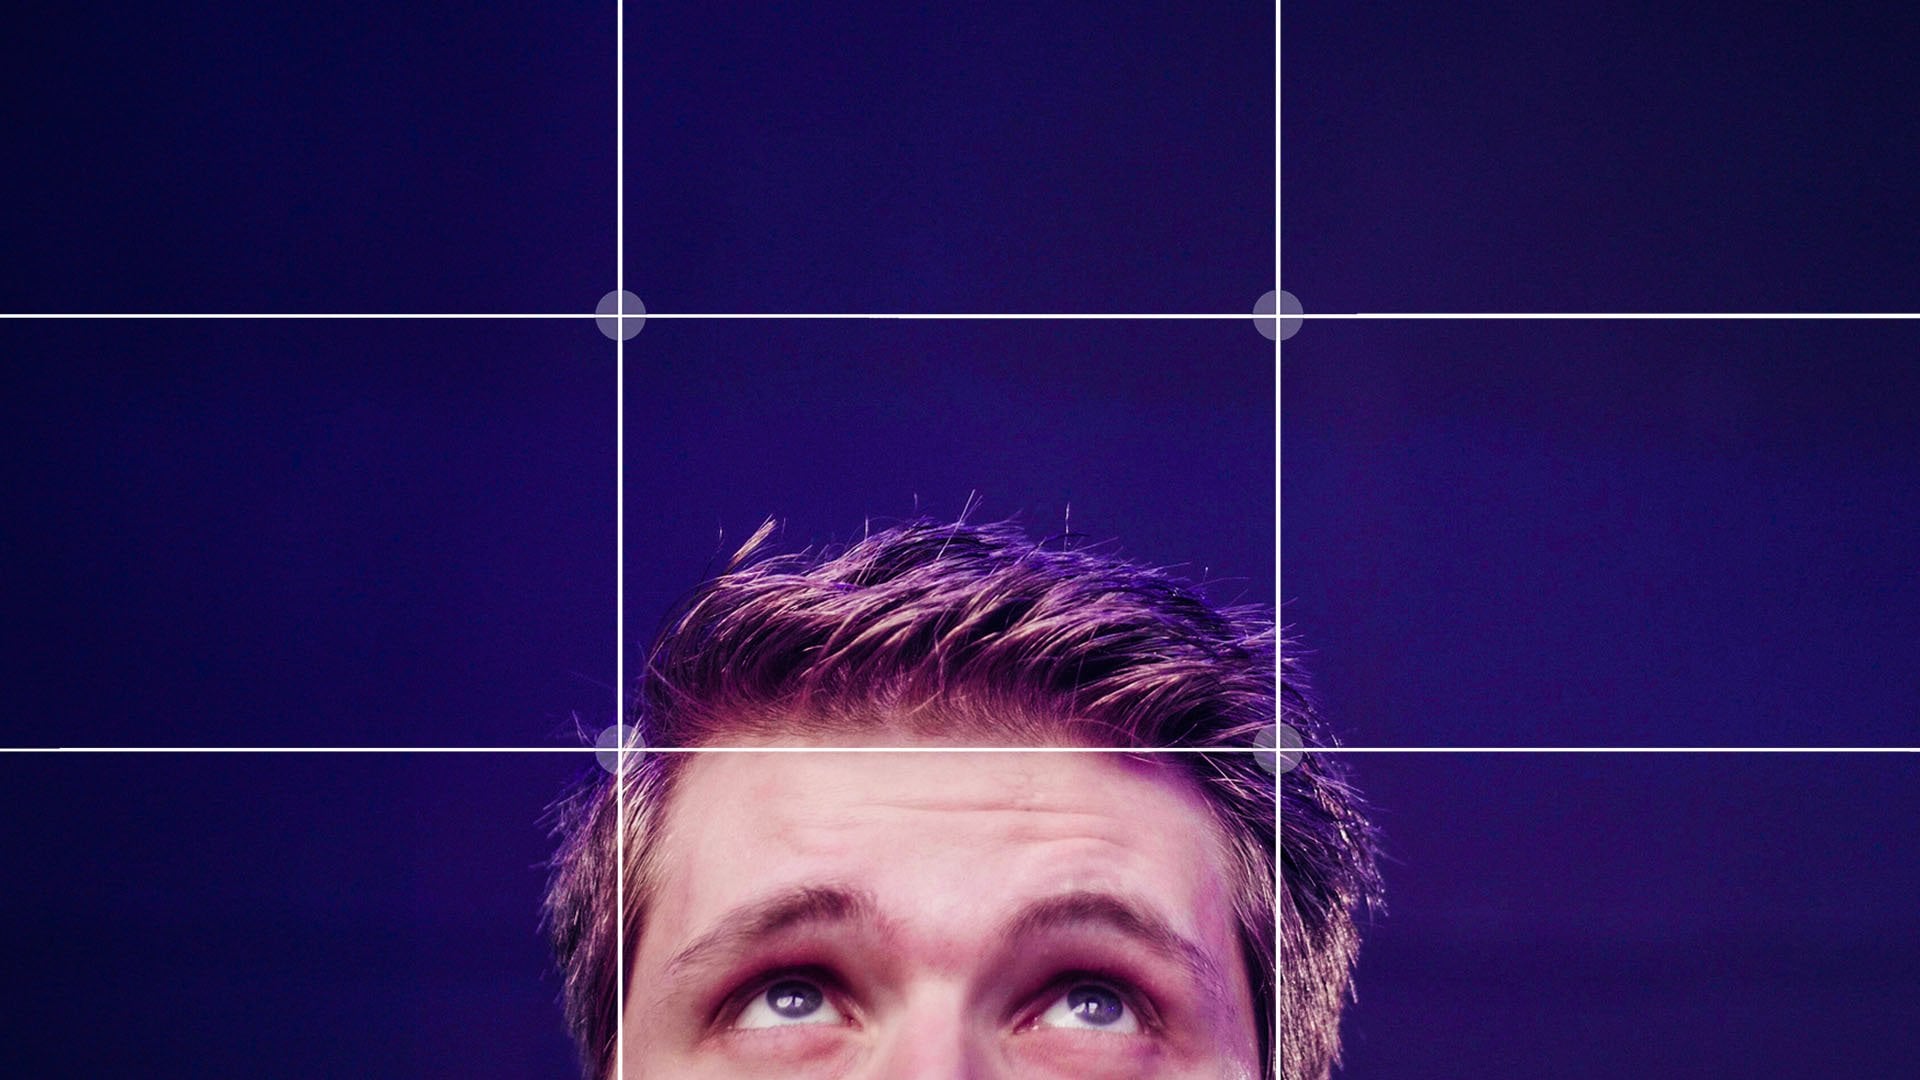
13. Talent Framing: We've got an understanding
of the rule of thirds and how to use the guidelines to frame different
objects in a shot. But the most common object or better sets subject
is the human being. Whether you're filming
a presentation, a dialogue between two people, an action scene,
it doesn't matter. Filming people comes
with framing rules. There are three main framings; the close-up, the medium shot, and the long shot. In-between we have sub-framings
like extreme close-up, or medium long shots,
extreme long shots. These are sub-framings
and they are therefore not that important to remember. You can also say, let's
make a long shot, which is a little bit closer. It doesn't really
matter as long as you understand the three
main framings. Let's start with a long shot. This means that we're going to frame so that the talent is completely visible into
shot from head to toes. As we learned in a
previous lesson, we could go for a
center composition if they are looking
into the camera. If they're looking
away from the camera, give your talent
viewing space and align them on the proper side of
the vertical guidelines. Using the horizontal
guidelines becomes trickier. We are looking at the face, so we might want to align that to the
horizontal guideline. But in a long shot, that creates too much
headspace above the subject. That space is called
breathing space. You need some of that,
but not too much. Just enough to get your subject
loose from the framing. On the bottom where
the feet are at, you also want to give
some breathing space, space between the feet
and the bottom frame. If you would stick the
feet to the frame, it looks very odd. This is called the
puppet effect, by the way, just don't ask
me why it's just this. The same thing with
your talent's head, sticking it to the
upper framing is odd. It creates that puppet effect, which you want to avoid, give
it some breathing space. Now let's move a little bit
closer into the talent. This is considered
a medium long shot. We're going to cut to the
feet from the talent off. I mean, not for real, just by framing it. Now we learned about
the puppet effect. You don't want anyone to
stand on your framing. The same thing occurs
with any joint. That means ankles,
knees, pelvis, etc. Avoid to cut into
anything that can bend. A medium long shot like this is odd as we're cutting
into the knees. I know filmmaking is cruel, there's a lot of
cutting involved. [LAUGHTER] Anyways, you
don't want to do that, always cut above or
underneath a joint. This feels so much more natural. Now let's take a medium shot. We're going to cut
above the pelvis. Interesting now is
that our subject has become more
prominent in a shot. It takes up more of the framing. We can actually
place now the eyes of the subject onto the
horizontal guidelines. Keep in mind to give breathing
space above the heads, definitely, for a medium shot. We can go a little
bit closer again and take a medium close up. Essentially we're cutting
underneath the shoulders. We're getting so close that it's impossible now to give
breathing space above the head. We'll cut into the head, avoiding the puppet effect, and make sure to cut in
the forehead as well. We're getting the
hang of this, guys. Let's go for a close-up. You want to be above
the shoulders now, but underneath the neck, as that is a joint as well. The eyes are going to lay above the upper
guideline, otherwise, we'll cut away too
much of the neck and the chin to leave an unwanted
space above the eyes. The foreheads becomes not
as important anymore, we are focusing on the eyes, nose, and mouth in a close-up. Finally, there's the
extreme close-up. Basically, you can choose what
you want to focus on now. Either that's going to be their eyes or mouth or whatever. Most often you're going
to frame it in the middle unless you have a good
reason to show other areas. Like if you're going for the
eyes but also for the nose, you can put then the eyes
on the upper guideline or a little bit above and leave
room below for the nose. That is in a nutshell
how to frame a talent. Just like with the
viewing space, you can find faces back
on other objects too. A teddy bear is also a talent that's can be framed by
the same principles. Even a dull objects
like a fridge. Before you're wondering,
what about the joints, well, that are the intersections
between the two doors. That is considered
a joint as well. Many objects have
something like that. Think for instance here
my light in the back. This right here at the light stands where I can
tilt it up and down, that is considered a joint. You either cut into framing just above it or right underneath. Now there's one
last framing type which we haven't
talked about yet, and that is the
establishing shot. It isn't even an actual framing, but more of a storytelling shot. An establishing shot
is oftentimes used at the very start of a
film or a new scene. It displays the location and
sometimes also the time. For instance, a wide
shot of a house. What follows next is a scene of a family having
dinner in that house. But that establishing shot of the house tells the
audience that the family is in dad's house and that it shows during the day,
the sun is shining. It helps to locate
where we are at, and we can use that principle
to cheat a little bit, because that establishing shot doesn't have to be a relocation. But you can trick your
audience into thinking it's the location that
the scene is played at. An example here are these skyscrapers where suddenly
an explosion in happens. We then cut to a shot of
me where I pretend to have tried to defuse the
bomb, but that failed. Obviously, I'm not actually sitting in that
particular building, but from a story
point of view, I am. That's where stock clips
comes in very handy too. We use a library called
Storyblocks for that. They'd been a longtime
partner of us by the way. It's basically a library
filled with over a million stock videos of
various genres and themes. You can use these
commercially and download unlimited video assets with
an active subscription. That's why I can highly
recommend it to anyone. For instance, I came across this establishing
shot of a planet. That's something that I
can't film obviously, but I can download it from here, and it allows me to point
out a specific scene that plays back on different
planets like Mars. We then cut to these
shots right here and it feels like these
guys are on Mars, which of course they aren't. This is on some desert
right here on planet Earth. These are also stock
clips from Storyblocks, but you get the idea. You know what? I'll
leave a link down here in the class notes. If you want to check
out Storyblocks, that's a special
link, by the way, which supports our business and these courses that
we're making here. Anyways, an establishing
shot doesn't really have rules in terms of how
wide your shot is. I mean, it can be
an entire planet. Important is that it shows the location and maybe
also at a time of day. Do make sure that you treat
your object as a subject. The entire house and the entire planet
becomes one subject. As we've learned about how to frame a subject to
the rule of thirds, give it some breathing space, and some viewing
space if you don't choose a center composition. Now we're not done
with framing just yet. There are two more lessons
about framing with foreground objects and
one about backgrounds. After that, you can
take a small break. Until then, keep watching, guys.
14. Foregrounds: So far we've only been
framing one person but what if there is a conversation
between two people? Shooting from the
side we can place each talent on the
vertical guidelines and furthermore apply
the rules of framing depending on whether
it's a long shot, medium shot, or a closeup. Having two people in the shot is also referred to as a two-shot. We're essentially focusing
on the two talents. Both of them are equally
important, a two shot. But at the moment that one
of them starts talking, we often cut to an
over-shoulder shot. Here we have one talent in
focus and the shoulder of the other person out-of-focus
on the side of the framing. In other words, the shoulder is acting as a foreground object. When looking at the
rule of thirds, we're going to frame
the shoulder in this example on
the right side of the vertical line not
on but next to it. The subject itself can be framed normally on the
vertical guidelines. Remember that these
guidelines are there to draw attention to a subject. We don't want the shoulder
to draw attention, it's just there as a
foreground element. The over-shoulder shot gives you more sense of
where we are at. We can see that the talent is
talking to another person. This is a framing
that we could use to swap between the two
people as they're talking. We move the camera from
one person to another. This is a very
typical way but a way of capturing a conversation. Foreground objects don't
always have to be a shoulder. It can also be a rock
or a tree, anything. Having an out-of-focus
foreground actually creates more
depth in your shots. You start to see bigger parallax between the subjects
and the foregrounds. This is a very easy way to make your shots simply
more interesting. Now sometimes that foreground object it does become
more important. We're going to go back to
working with one talent and that person is looking
into the distance. Now, we could choose to make
an over-shoulder framing, this way we show that the person is looking at the landscape. But we can also place
the talent on one of the vertical guidelines even though the foreground
is out of focus. It becomes a more important
part of the shots. Alternatively, you could even go for a central composition. A shot like this is oftentimes used to tell a visual story. The landscape is big
and the talent is ready to explore it and
go on to an adventure. These are obviously more
advanced camera techniques but I want you to know that camera framing at
an advanced level comes down to visual
storytelling. There are two ways of framing a subject either to make
a natural shot that is pleasing for the
audience or taking it a step further to tell
a visual story. The art of creating visual stories in film-making
is called cinematography. In films, you're
going to see a mix of both normal shots and
visual storytelling shots. For now, let's focus on the basic framings and get a good feeling of those first, and then we can go over
to the next level.
15. The Background: There is one last
thing that we haven't covered yet when it
comes down to framing, and that is the backgrounds. What is happening
in the backgrounds? Now, we've got a
nice medium shot of the talent framed by
the rule of thirds. Although this is a good shot, we forgot to think about what's going on in the background. Actually, this is not
such a great shot. We have a tree right behind the talent and it sticks out from behind
the talent's head. This feels very odd and something you always
want to avoid. If there's a tree, a pole, or anything else that could stick out from
behind the subject, make sure to avoid that. Always place a tree like this next to the
subject or perhaps cut it a little bit
out of the frame if you don't want to
pull attention to it. Apart from framing, the background also
tells us where we are. In a medium shot like this, the subject is very prominent in the shots and we don't see
much of the backgrounds, but we do feel that
we are in a forest or at some park because we can see trees
in the background. That's why we, as the filmmaker, need to think about
what's going on in the background and what we
want in the backgrounds, what fits best for my story? Does it make sense that we
are surrounded by tree, or is it best to go inside and have a living
room in the background? That's for us to decide. With this lesson,
I only wanted you to be aware of the backgrounds. Look at it and ask yourself
the question whether or not there's something annoying
and if it makes sense, also the elements in the background needs
to be framed properly. Now, let's take
that small break. Grab your camera or
even your phone, and try out some of these
framing techniques. Ask a friend or if
there's nobody available, just fill in your teddy bear, practice those long shots, medium shots and close-up while you follow
the rule of thirds. If you can, even enable that grit as an overlay on
your camera and finally, see what you can deal
with foreground objects. Practice that a bit, and
when you feel ready, come back and we'll
continue with the rest.
16. Focal Length: Hey, welcome back.
There are two kinds of lenses that you can
attach to your camera. Either it's a prime lens
or it's a zoom lens. Prime lenses have a
fixed focal length such as 50 millimeters. Zoom lens can cover an
entire range, for example, from 24 millimeters
to 70 millimeters. Turning the ring on the
lens allows you to zoom in, or in other words, change
the focal lengths. Now prime lenses tend to be of a better quality as they are easier to build and maintain
that better optical quality. That's why they are cheaper than zoom lenses of equal quality. That's the backstory. But now what are those
millimeters that I was talking about and how
does it affect our shots? Well, there are three
distinct focal differences. You've got wide angle. In an extreme way we can even
call this fisheye normal, which is just close
to how we see the world or the focal
length of our eyes. Finally tele, which
is zoomed in, we can see things closer than
they appear in real life. Now, the human eye
sits somewhere at around 50 millimeters. That's why a 50-millimeter
lens is so popular. Anything below that
is wide angle, so a 20-millimeter lens
looks something like this. A very wide angle view. The opposite side, 100-millimeter
lens is zoomed in. We talk about a
telephoto in shots, and there's a lot more going on when changing
the focal length. In fact, we're going
to take a look at three different side effects that any focal
length comes with. Here we have a medium shot of our talent at 100
millimeters focal lengths. Here's that same shot again, a medium framing
at 20 millimeters. The first thing we notice is the background and
in wide angle shot, we can see a lot more of the environment than
with the tele lens. This is because of the
field of view that changes. Starting at wide-angle, we have a large field of view
and as we zoom in, it becomes more narrow. Doing this trick right here with your arms really helps
visualizing what happens. When a background
is less important, you might want to zoom
in a little bit more, when it is more
important and you want to show more
of the environment, maybe zoom out and stand
closer to the subject. It is very important
to be aware of this. Don't just zoom in
because it's easier, because maybe the better
choice is to zoom out and actually stand
closer to the subjects. This same effect of
the field of view can be found back on
the talent itself. See what it does to the face. It expands the face more in a wide shot and it compresses
it more in a tele shot. That's why beauty
shots are always filmed at 50
millimeters and above. Eighty millimeters for
instance is something that is oftentimes
used in fashion because it makes you look more
beautiful, more pleasing. A wide shot makes you
look funny and weird, so are you filming comedy or something more
serious like fashion? Now you know which kind of
focal length to choose. That was the first
thing, field of view. The second thing
is depth of field, and we talked about this before. Having an open aperture creates a more shallow
depth of field. The area that is in
focus is smaller. Now enclosing the aperture of that focus field or depth
of field becomes larger, we can put more things in focus. The same thing occurs when
zooming in or zooming out. Zoomed out, or at wide-angle, we have a large depth of field, very wide angle lenses like your fisheye so you put
everything into focus. That's one of the reasons
why those action cameras like the GoPro has such
a wide-angle lens. There is no focus options so
these action cameras need to have a wide-angle lens so
that everything is in focus. But then the more that
we start to zoom in, the shallower the depth
of field becomes. Oftentimes a camera
man will close its aperture a little bit more
when filming a tele lens, that's where you can
make your focus field a little bit bigger again, making it easier to
keep things in focus. If you want to achieve that cinematic shall depth of field, you simply film from a bigger
focal length or zoom in. That brings us to
the last effect that the focal length has, which is the audience
perspective. The audience or the
people that watch your videos see everything
through the camera. That's obvious. They experience the story that you're telling from the camera perspective. Now if we film our subjects
from a distance and zoom in, the audience also feels
that they are far away. They are looking at something
from a distance and this again is a visual
storytelling technique which we talked about before. Looking at something
from a distance creates that same feeling. Now we are not involved
as we are looking at the situation yet we are
not part of the situation. Now opposite, we
could zoom out and go wide angle and stand really
close to the subject. Suddenly the audience stands
right next to the subject. They are part of
the situation now. During an action scene, the audience feels
in danger as well. The focal length allows you to place the audience
where you want. A very powerful tool within
visual storytelling. All right, so that is how different focal lengths work. But now when you go out
to the store and buy that very nifty
50-millimeter lens, you might notice that it doesn't actually compare
to the human eye. In fact, it might be more tele. It feels maybe something
like 80 millimeters. How is that possible? Have I been lying
the entire time? Don't worry, I haven't. The thing is that
in order to see the full 50-millimeter lens, you'll need actually
a full-frame sensor. That's the little
chip which sits inside your camera body. Hang on, let me just
grab one of those. It has a certain physical size. The bigger the size, the more it will cover from the actual lens. If you have a smaller sensor, you're only capturing a
smaller portion of that lens. Basically, you're
cropping in on the video. Now, full frame sensors like this one right here are
definitely a thing, but something like an APS-H or an APS-C sensor like this
camera are super popular too. In these sensors sizes can be found in anything
like a Sony, a Nikon, and Canon
camera, doesn't matter. In terms of size, they all
have their own flavor, but it comes roughly
down to the same thing. Now, Micro Four Thirds is also a very popular sensor size, which is even smaller
than this one. Now, these sit in the
Panasonic Lumix cameras. That means in order to
have a 50-millimeter view, you actually need to buy a 35-millimeter lens if your camera has
an APS size sensor. The reason that I know
that is because I can look up the crop factor. This is a multiplier numbers
such as one and a half, which is for APS-C sensors. A 35-millimeter lens
times 1.5 comes down to roughly around 50
millimeters on an APS-C sensor. For a Micro Four Third sensor, you need to multiply by two. You want to look at
a 25-millimeter lens or 24-millimeters, which is easier to find. That way you can have that
50-millimeter field of view. Now to make it even more complicated than it already
is, I'm sorry guys, I didn't invent this, but
lenses could also be made specifically for a
specific sensor size. That means that you
have full-frame lenses, you have APS-C lenses, you have Micro
Four Third lenses. Now, their crop factor
remains the same, so that's nothing
to worry about, but their coverage, on the
other hand, is different. An APS-C lens is only
so big that it covers the size of an APS-C sensor
and everything below. But that also means Micro
Four Third sensors, but not a full-frame sensor. If you put an APS-C lens on
a full-frame camera sensor, you will start to see a
vignette of the actual lens. That's because it's
not big enough to cover the entire sensor. This is very important to know when you're going to
look out for a new lens. If you choose to buy a lens
for a certain sensor size, it means that you
cannot use it anymore when you're going to buy
a camera in the future, which might have a
bigger sensor size. Ideally, you buy
full-frame lenses, but they are way more expensive. They're bigger and
they're heavier. That's a choice that you
have to make for yourself. I have a set of
APS-C lenses since most cameras do utilize
that size of sensors. Full-frame is more often used in photography and not that
much within videography. That is what you need
to know about lenses. If you have any questions, or perhaps you're thinking about buying a new lens or
anything of that, let me know in the
discussion down below, guys, and I'm happy to give
you some advice on that.
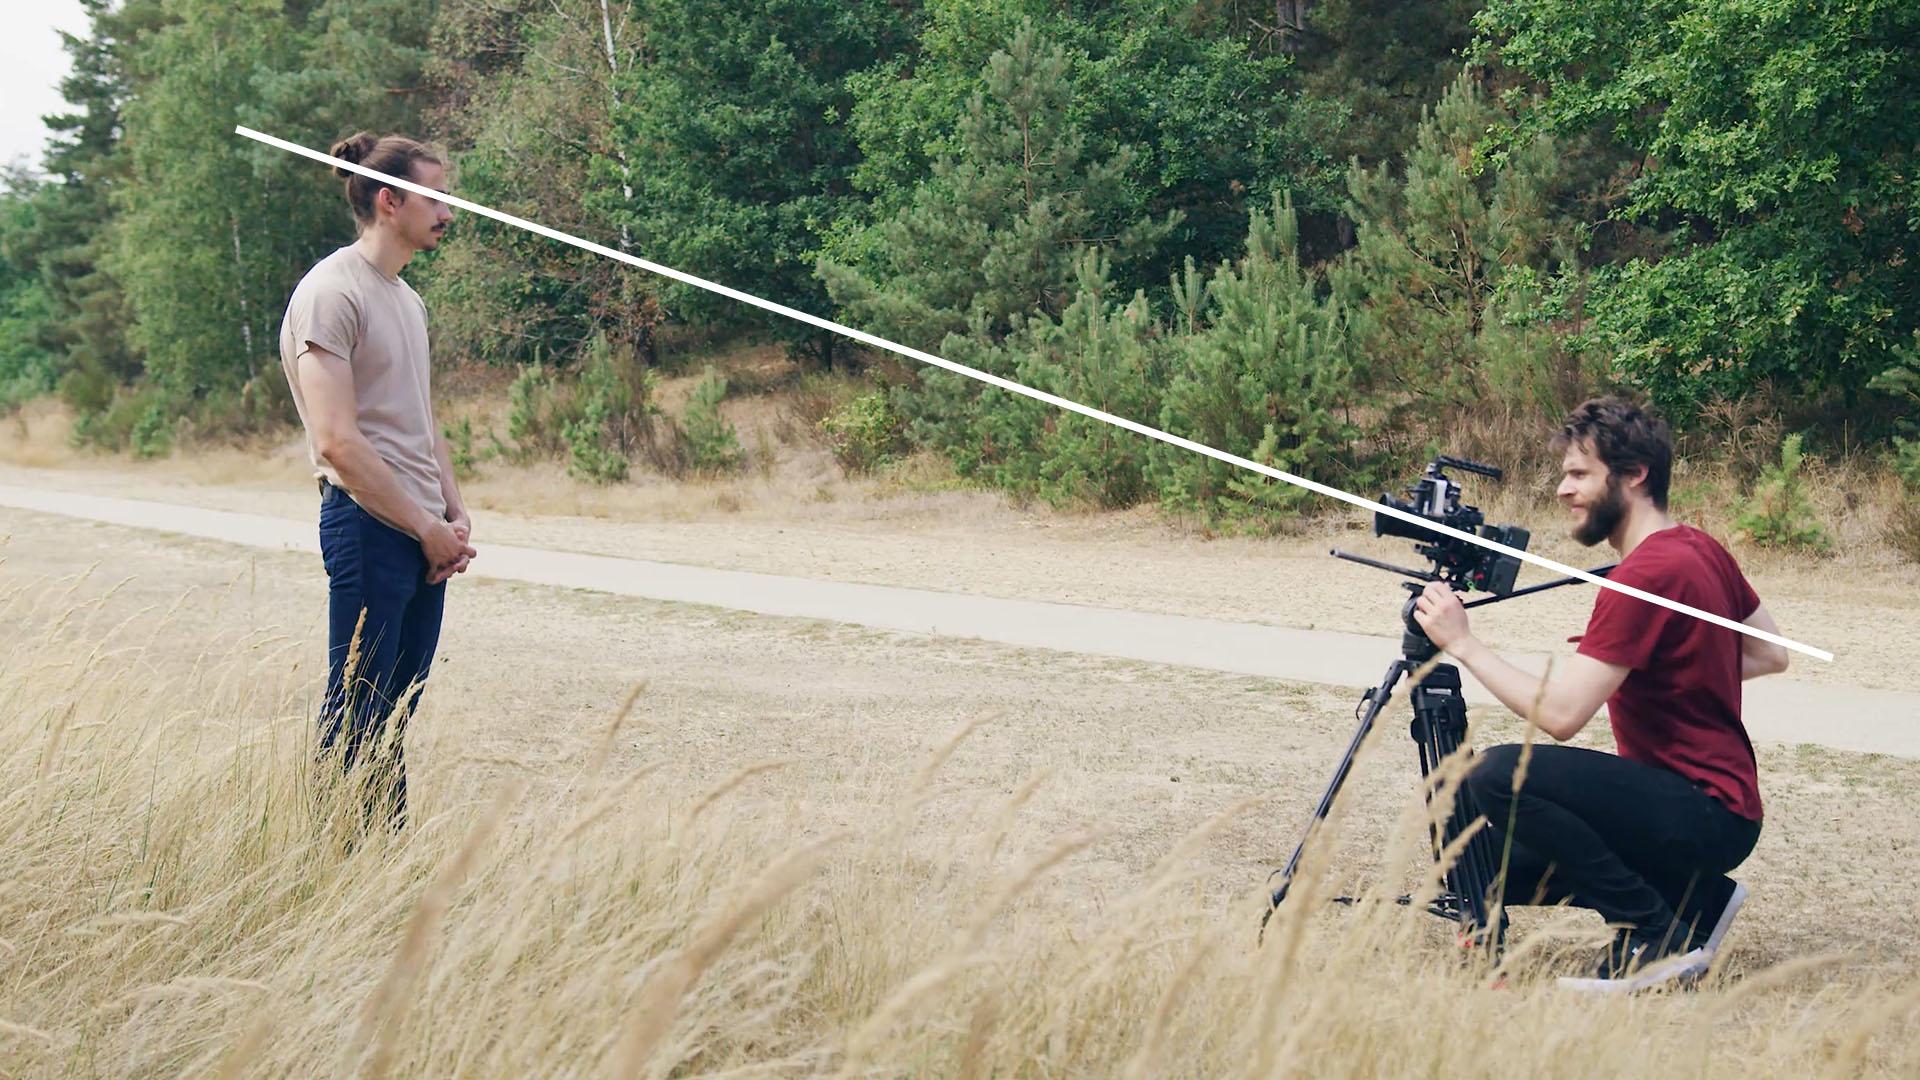
17. Camera Position: Now although a camera
can take any position, there are basically
three distinct ones. Do you film for me, low angle, or you go high height, or you go above the eyes
and take a high shot? That means that
anything lower than the eye height is considered
a low-angle shot. Anything above the eye is
considered a high angle. But let's start off
with the low angle and why you should use that
or why you shouldn't. Now, first of all,
the position of the camera creates
a visual story. It tells something
about the character. Remember that the audience
will always perceive the video that they are watching from
the camera perspective. We talked about that
before when placing the camera close to the
talent or far away. Now when shooting below the
height of the talent's eyes, we're looking up
to the character. They appear bigger onscreen, but also in status. All of a sudden my talent is somebody who means something. They have the upper hand, they are in control, they are the boss. Even when filming
slightly below eye level, you're already
telling that story. That is why it's so important
to be aware of this. Now of course, just going
slightly underneath eye level, will not make that
effect so prominence, but the status difference
is there just slightly. Now in the extreme case, we talk about a
frock perspective. This is used when you
want to showcase that your character is
the actual boss, the badass, the one who has
everything and control. Then we have eye height. This is when you level
with your audience, you make your character equal. Nothing special, a
neutral camera position, oftentimes used in interviews. Then finally, we have
the high perspective. The character appears
to be small on screen and their status
also diminishes. We are looking down
on the talents. They appear more vulnerable
and in the extreme case, we can call this even a
bird's eye perspective. Now, pretty
understandable stuff, but how do we implement
this in a video project? Well, let's say that we have two people talking
to each other. One of the characters is the employee and the other
one is the employer. The employee reaches out to
the boss to ask for a race. At first, the employee
feels vulnerable, a little bit scared to ask. We shoot the talents from
a higher perspective. When shooting an over-shoulder, we even link that perspective to the person that the
talent is talking to. When the boss starts to talk, we switch camera angle and
shoot from a little bit below. The employer has
the high grounds. They can make the decision, but suddenly the employee
steps up their game. We switch camera positions
and film slightly from below, making the talent
appear stronger. Maybe the employee is
threatening to quit, so the boss might get
a little bit scared. We shoot from a
slightly higher angle, making the boss now
feel vulnerable. But that is a great
example of how you can set and change the
status of a character. This also extends to creative
work or event videos. I once met a short video about someone who makes
spray paint arts. I created a mix of
both shooting from a low angle to make him
appear as a great artist, but also from a high angle
to visualize how small he is in front of the big wall
that he's about to paint. That tells us something about the canvas that he's working on. Always think about the
camera position and what the status is
that you want to give to the character
or talents.
18. The 180 Rule: The 180 degree rule
is probably one of the most important rules for anyone who's starting
out with filmmaking. The moment that you have two people talking with each other, we can then fill in this
from multiple angles to make the video more interesting, like we've already learned, we can make a two shot or
perhaps an over shoulder, maybe a long shot from an angle, perhaps change the
camera position and go a little bit lower. Although we have the freedom of placing the camera
where we want, you want to make sure not
to disorientate the viewer. That is where the
180 rule comes in. You see as the filmmaker, we know what the
location looks like. We've seen it with
our own eyes and our brain can immediately
tell where everything is at. But the audience only sees the location true to
view of the camera. This is something very
important to be aware of. We can draw an invisible line through the two characters, we're cutting in the direction
that they are looking we split it into two parts both, 180 degree, that is where
the name comes from. Now, it's important
to choose one of those sites and stay there. That means that we can
place the camera here and then cut to this
angle or to here. But you cannot mix shots from
one site with the other. That is going to
disorientate the audience. Let me show you why that is. here the talent is looking to the right side of the frame. As long as we stay on the
side of the 180 degree rule, the talent will keep
looking at the rights. But once we go over the line, the talent now suddenly
looks to the left. For the audience, it
feels like the talent has turned around
but they haven't. This gets even more
confusing with two people. One is facing to the right while the other
is facing to the left. This is normal as they stand
in front of each other. But when we cross the line, their viewing direction
is now different, and we lose the
feeling that they are standing in front of each other. This rule also extends
to different locations where we have the same
subjects like a driving car. If the car drives
away from a place, we choose a certain direction. Usually that's from the left
to the right when following that car or taking multiple shots from it
at different locations, we make sure to stay on
that side of the 180 rule. That way the car always drives from the
left to the right, regardless of the location. If you were to shoot
from the other side, the car would drive
the other way. Now it seems as it turned around somewhere in-between two shots. That is why it's so important
to shoot from one side of the 180 degree rule to keep
your audience orientated. However, sometimes you do want to disorientate
the audience. Think about a fighting scene. Obviously it's a fake fight
and you want to avoid that, the viewer sees that. We'll constantly jump over the 180 degree line to disorientate the audience
and cover up mistakes. But also this creates chaos and confusion which
fits the scene. It's a form of
visual storytelling. Breaking the rules of film making is sometimes
for the better, but you can only break the rules if you
understand them first. That is why I want you to follow the 180
degree rule first, make some shots and
edit them together, see how it influences
your scene. Once you've got the hang of it, then you're ready
to break that rule. Of course, for a
specific reason, everything you do
within filmmaking needs to have a reason.
Thanks for watching.
19. Handheld Movement: Handheld camera movements. We're starting to get a feel
of how film-making works. We've covered most of the rules, so we're ready to
start shooting. For most people start is by simply holding their
camera in their hands. Absolutely nothing
wrong with that. Even big Hollywood productions are oftentimes shots handheld. However, shooting
handheld is a choice and not something you do just
because it's convenient. As we've talked before, the audience perceives your
video through the camera, and the feeling that you
give to the audience is depending on what
the camera is doing. Thus, having some
shake in the camera, will give a different
feeling to the audience than if you would film
from a sturdy tripod. Handheld is more dynamic, more aggressive, more alive,
more energetic, playful. An action scene
like a car chase or a fight scene is therefore
more often filmed handheld. If there's a time
pressure, for instance, a simple action like dialing a number and
calling someone, could be filmed handheld
to emphasize the mood. But also things
like an interview, which needs to feel more
casual and personal, that can be filmed handheld too. Many different use cases. Of course, there is a difference in types of handheld motion. You can make big
and fast movements, or gentle and slow movements. Where a fighting scene will
get much more camera motion, to make it more aggressive, a casual interview will get a more gentle and
smooth handheld motion to make it more dynamic. But in any case of
handheld motion, it's always under control. Let's go over two extremes, a fighting scene and
a casual interview. Starting with that interview. The idea is not to draw
attention to the camera motion, but rather to the
talent and their story. You want to start off by finding a comfortable position so you can film for a very long time. Chances are that you shoot
with one of these SLR cameras. Hold it with the grip, and support the body with
your other hands, like this. Your elbows go into
your chest or belly. Important is your spine. Don't lean back like this, like the scene is
happening all the time. If you need to lean back
like that for some reason, then simply stand straight
and take a step back. It's the same thing. Stand
with your both feet, sturdy on the floor, and now you're ready to shoot. Casual handheld movements does not need to be made on purpose. It's already there. Simply breathe in and breathe out and let your camera
move with your breathes. As you inhale, the
camera goes up, and as you exhale,
the camera goes down. I'm of course,
exaggerating a bit. But you get the idea. Here's a better example. Keep focusing on the framing. You want to avoid
that your framing goes up and down. Do it gentle. In a more extreme example, like a fighting scene, you want to make small
but fast movements around your subject. You keep the same
pose like that, but you go with the
flow of the subjects. When they make a
specific movement, you can follow that movement, usually to make their
impacts more powerful. But it's important that
you snap onto a subject, make a correct framing, and make small and
fast movements. When you're switching
subjects during a shot, you make a fast movement to it and snap onto the new subjects. It's that snapping from
one subject to another, which makes your handheld
motion controls. Give your audience the time to understand what they are seeing. So don't move away from
the subject too quick. We'll talk more about
cameras supports like the tripods
later in this class. As a starter, going handheld
is definitely a good idea, just as long as you're
doing it correct and controlled.
Thanks for watching.
20. Slow Motion: When you shoot at 60
frames per seconds, you can add slow motion
to it because you can stretch it out to 30
frames per seconds. We've talked about this before in the lesson about frame rates. But apart from that
technical explanation, there is also a creative rule. When should we film
slow motion and what's the impact that
it has on our video? Our talent jumps over a rock, we've seen what happens, but we didn't see the details
because it went so fast. Let's shoot that again, but this time in slow motion. This gives the
audience the time to look more at the details, like what expression
is a talent making? Whether there are clouting
doing in the air? What is their body
position, etc? Automatically a
viewer will start looking at such details
because it feels like we're getting more
time to look even if the clip itself isn't
actually longer. That's the interesting parts. A normal close-up shot where not even something exciting
is happening in. At real-time speed
we see a person, a five seconds clip. Now let's show that same shot, also five seconds long, but in slow motion. The audience will
automatically start paying attention to the
details and the face. Because we look more
in-depth at someone's face, we perceive their
emotions a lot more. In this shot, the talent
tilts their head up. Nothing special, right when
we play this in slow motion, all of a sudden their
emotion becomes stronger. Depending on the story
that you're telling, you will emphasize that. That is an essence
what slow motion does. It doesn't always have
to be fast action shots, even small movements
or character emotions can be enhanced
with slow motion. So don't use it all the time, but use this powerful
technique wisely.
21. B-Roll: The name B-roll comes from
the old days where you had an actual film roll
inside of the camera. The main camera had the
A-roll. Here it is. The second camera
had the B-roll. Now that name kept
sticking around. But of course, the function of the B-roll camera has
not changed that much. Now, don't worry, you don't
need an actual second camera. In fact, you could make an entire video with
only B-roll shots. Let's start simple,
an interview. The talent who is talking on camera is shot with the A-roll. Usually we refer to it
as the main camera. The B-roll camera
usually sits more on the sides taking a
different framing. Now this is not necessary, but it does make the
interview more dynamic. This B-roll camera could even take shots of the
talent's hands. That means if you
only have one camera, you could take such shots
after the interview. You can edit them in such
a way that it seems like the hand gestures for the B-roll were taken
during the interview. But B-roll could
also be shots taken outside of the interview or the main message that
you're presenting. For instance, we again have
that interview but then we show clips of what the
person is talking about, which could be shot at
a different location, perhaps even some stock clips. Another example is
where you cut to a B-roll sequence
after an interview. The music suddenly
starts and you see a montage of creative shots. B-roll in essence just makes your videos look more dynamic. They don't tell a direct story or at least not an
important story, but they do visualize
a lot making your videos more
pleasant to look at. It's like in this class, I could also just
talk the entire time without showing
you guys anything. You get all the information, but it would be pretty boring. All the examples that
I show are B-roll, which makes this class
more interesting. But as I said before, a video can also exist
out of only B-roll shots. Think about a creative video, perhaps a travel video. You play a song
in the background and show a nice edit
of B-roll shots. There is no A-roll shots like an interview or a
monologue or something. Now, sometimes B-roll is so short that we can also
call it an insert shot. It's basically B-roll, but
it has a specific purpose. We have someone looking here at an object laying on the table, and what a filmmaker
would often say is, let's take an insert
chart of that object. You'll make a close-up of that
and edit it in such a way that you go from a long shot to the close up of that object. Then go back to the long shot. It feels like you've
inserted a shot in-between. This type of B-roll shot
is oftentimes used to show more detail about
something that is important. It adds additional
information to the scene. Whereas normal B-roll
might not be so important, an insert shot is. Finally, we have the cutaway, also a form of B-roll, but again, very
specific use case. Cutaways are basically inserts
that aren't as important, like the hands of the person
talking during an interview. It's B-roll, but more specifically referred
to as a cutaway. This could also be a
whole different shot about something that the
person is talking about. But it's always one shot. We cut away for a brief
moment from the A-roll. When you have more shots, basically, a small edits, we don't call it a
cutaway anymore, just a B-roll sequence. Now this was a little bit
complicated, don't blame me. These are filmmaking terms
invented in the old days. It's just good to know
that these things exist. B-roll sequences, insert shots, and cutaways, but you can
also name all of them B-roll. There's nothing wrong with that. Just make sure that
you think about B-roll when shooting a project. Don't just leave the shoot after the interview or the dialogue
or whatever is done. Always think about the extra
shots that you need to make your edits more dynamic and interesting, the B-roll shots. Before ending this lesson, I would like to mention
a very useful resource, again, Storyblocks which I
also talked about before. But a stock library like
them is super-useful, freaky, don't have
the right B-roll. Storyblocks has over a million
royalty-free stock clips and HD and 4K resolution. This means that you
can use your downloads even for commercial
purposes, which is great. Sometimes I feel like
I didn't shoot B-roll. It's a mistake everyone
makes at some points. You can fix that by
downloading a stock video. Or perhaps you need
an insert shot. You could film yourself as you turn around to look at a clock, for instance, but you don't
have that fancy clock. Simply search for clock
on Storyblocks and use that as the insert
shots. There you go. You can always check
out Storyblocks. Again, I'll leave a link here in the class notes if
you want to check it out for more information.
22. Shoot for the Edit: The one problem about
my cameras storage unit right here is that
one of these lights here work on batteries. That means I need to think about it to change that light, which I totally forgot. Does that make me
a bad filmmaker? No, because a good filmmaker starts with editing and
then shoots their videos. I know it sounds impossible,
but hear me out. You are asked to fill a simple action like someone
is pouring in a glass of water and then they
drink from it and before you even press that record
button on your camera, you should think first
about the edits. Say you shot everything
from one angle, you basically just
have one shot. In the edit you'll
notice that you can't really do much with that. As the camera operator, you need to make shots
that the editor can use. Or if you're the
editor yourself, make sure that you
don't get mad at yourself for not
making enough shots. How do you go at it? Well, you slice every scene or action into multiple shots. Important is that you always
make different framings. For instance, you start with a long shot as the [inaudible]
picks up the bottle, then you make a close up of pouring the water
into the glass. Then you take a
step back to make medium shots of the [inaudible]
drinking from that glass. We have sliced the
action into three shots. That means we can
also play a bit with the length of the scene
by cutting faster, the whole action becomes faster or we can make the
whole scene longer. We're giving ourselves or
the editor options to edit. That's what you always
want to try and do by making three individualist
shots of the scene. Now of course, there could be more shots that is up to you. Now, could we not just
make three long shots, for instance, wouldn't
that be easier? You take a shot from this angle, one from here and
another one from there. All long shots. Unfortunately, shots
like these don't cut. You're going from the
same framing to another. What happens are jump cuts. We see a jump in the
movement or in other words, the viewer notices the cuts and at all time you
want to avoid that. Although it's definitely
more acceptable these days in
professional filmmaking, jump cuts still need to be avoided unless there's
a creative choice. You could basically break
any filmmaking rule, but you need a ****
good reason for that. For every shot that follows, you change your framing. Medium shot, close up, medium shots, long shot, extreme close up, medium long shot, close
up, long shots, etc. I think you get the idea. Now let's say that
you're asked to shoot a business event. There are all sorts of things
going on and we could film some new product releases over
there in the other corner, guests are coming in. There's a bar where
they make cocktails. For every scene you make enough shots and I mean,
different framings. It's also easier to
cut from one scene to another and you will less
likely end up with jump cuts. Understanding that brings me to the second part
of this lesson. Shooting for the edit also means looking for interesting hooks. I actually shot many
business events back when I started out with. It's something that I
would oftentimes do is take a shot of an
empty dining room. I would then later
on in the evening, take that same shots from somehow the same angle and framing when that room
was filled with people. I know this is a jump cut, something I just
told you not to do. But I had a reason. I could add like a little glitch transition in between or just even keep it as a jump cut and add a beach to the
music underneath. I thought it was a cool idea to cut from an empty
room to a full room. Now, that was only possible
by having that edit idea in mind while
I was filming. I encourage you to do
the exact same thing. As you're shooting a video, think about some cool
transitions that you could make or perhaps
a sequence of shots. In a nutshell, always make multiple shots of the same
scene that are filmed at different framings
but also try to shoot something that you can use
creatively in your edits. What helps is to look at other people's work as an inspiration. If you come across some nice transition or editing sequence, write that down and take that
with you on your next shoot that helps you to remind you what shots that
you need to take.
23. Practice: We have been through most of the fundamental
rules of filmmaking. It's been a lot and
more to process. Let's go out now and practice
what we've learned so far. If I'm going to be
honest, I could use a break too, guys. Filmmaking is an
endless journey, even after more than 10 years, I'm still learning
new things about filmmaking every single day. Don't get overwhelmed by
all of this information. Take it step-by-step and most importantly,
enjoy that journey. The first thing that
I want you to do is make a short action film. With action, I literally
mean anything. That could be chopping
vegetables to make soup, cleaning the car, or doing
some gardening outside. Scripted actions like these
allows you to prepare. I want you to sketch out a storyboard of the different shots
that you want to take. As you are preparing
these shots, go back over the lessons
from this class, especially the lessons about filmmaking rules and
visual storytelling. Try to think about
it as much things as possible as you are
making your preparation. Then ask a friend
to be your talent and simply follow
your own storyboard. Your creative choices
were already made, so you don't need to
think about that anymore. Just follow that storyboards. That allows you to
pay attention to the technical aspects
of filmmaking. The lessons that
we started with, things like setting the right
exposure on your camera, focusing, white balance,
and other stuff. This is a great exercise to practice both technical
and creative skills. Definitely if you're
doing this with a friend, then there's no need to stress about doing anything wrong. Speaking of doing things wrong, I actually want you
to to make a mistake because if you always try
to never make a mistake, you will limit herself. Dare to experiment and
dare to make mistakes. You can only learn new
things by making mistakes. This class has been
a huge mistake. You've been learning
so many new things. That came out very wrong. I hope you are enjoying, guys. Anyways, go out now and start on that video project before
you continue with the class. You can publish that
video here to Skillshare, if you like, and
either me or someone from my team will look
at it for feedback. The class is not done yet, we're also going to talk about very important camera
tools the next lesson. But I do advise you to first practice what
you've learned so far. Take it step-by-step. Thanks for watching and we'll see each other back very soon. I'm going to pour some new
coffee in my mug. [LAUGHTER]
24. ND Filters: Hey, welcome back. I
hope you enjoyed making your very first video while keeping the film-making
rules in mind. We have about six lessons
left I believe which will be about [inaudible]
and camera supports. Once you feel more
comfortable with filmmaking, you'll quickly start looking to invest in some more equipment. Unfortunately, I have seen many mispurchases from
beginner filmmakers. That's why I'd like to give
you some advice about that, but also teach you
about how to properly use something like a
tripod for instance. But we're going to start off
with the ND filter first. It's probably the
very first thing that I recommend to get, as you're ready to
spend some more money. ND filter is a very
simple piece of glass, a round filter that
screws onto your lens. ND stands for neutral density, but essentially these are
sunglasses for your lens. The purpose of this filter
is to block out light. But why do we need that? Can we just close
the aperture if the video is too bright?
Of course, you can. But we've learned about the side effects that the
aperture brings as well, which is a larger
depth of fields. A simple shot like this has
almost everything in focus. The foreground is just not separated from the
background because of that. If we would have the ability to block out light
through an ND filter, we can open up the
aperture again, making the depth of
fields more shallow, and thus we get a
more cinematic shot. That will already set your
videos apart from the rest. Now, since the ND
filter is designed to block out a certain
amount of light, there are also different
kinds of ND filters. Now, the amount of
light that they block out is noted in their ND number. The higher this number, the more light is
being blocked out, or the stronger your
sunglasses are. Starting with ND2, which blocks out half the light. Or in other words, it let's
half the lights through. ND4 let's one-fourth or 25
percent of the lights through. If we skip a few
numbers forward, an ND100 only lets one
percent of lights through. Actually, it's pretty easy. The ND number refers
to the fraction, so an ND16, let's through
one-sixteenth of lights. So there is one thing they
made easy to understand. But now that we know the math
behind these ND filters, what ND filter do we
actually need now? Because half or one-fourth of light is just something
not easy to visualize. Well, ND filters are
most often used outdoor, where there's a lot of lights. In such a case, you'll mostly
be looking at an ND8 for overcast days and then ND32 for when the sun is
high up in a clear sky. Popular sets of NDs therefore usually
consists out of an ND8, an ND16, and an ND32. Sometimes there's also
an ND64 in there. Before you ask, can you screw multiple ND
filters on your lens? Although it's not
recommended. Yes, you can. The reason it's not recommended, and I'm going to take the
ND filters back out of their case I didn't
thought is through, [LAUGHTER] is because
the light has to travel through two pieces of glass. Hence the more pieces of glass that the light
has to travel through, the more the optical quality
decreases and you'll start to see things like ghosting
or a softer image. That's why these fixed ND
filters are so popular. They usually give you the
best optical quality. It's like a prime lens, as we've covered before. Like this one right here, a fixed 50-millimeter
lens is usually in better quality
than a zoom lens of the approximately same price. This is due to the more
glass elements needed in a zoom lens thus the
quality decreases. Although, take that
with a grain of salt. Technology has come
very far these days. Zoom lenses are definitely
a great choice. Now with ND filters like this, we have the same thing
going on in here. This right here is a
variable ND filter. These are the zoom
lenses of filters. They consist out
of two filters and more specific to polarizer
filters so that you can rotate them and that
way they'll let through more or less light,
isn't that cool? Let me just hold that
right here in front of this light so you can see
what it actually does. Isn't that awesome? Basically, you get a range of
around ND2 to ND400. In fact, you don't even
need to think about the whole ND numbers anymore and the amount of light it
blocks or lets through. You just twist the filter, look at your monitor, keep an eye out for the
histogram, and that's it. Because of that simplicity, I also suggest you get
yourself one of these. In fact, the only time that I work with fixed ND
filters like this one, it's when I shoot
scripted content where I have the time to swap filters and really want to get
the best possible quality. That's usually during a
short film for instance. But for all the rest, I
use a variable ND filter. So you've chosen your
ND filter, good job. But now comes the diameter size; 73 millimeters or
77 or perhaps 82. That's the filter size that
threats here on the back. When you look at your lens, you should see a symbol like here with a number next to it. This refers to the filter
size that your lens has. But then you realize that your other lenses have
different filter sizes. Do you buy two ND filters
now? Of course not. It is best to buy one ND
filter with a large diameter, for example, 82 millimeters. That's the size that
is often chosen. You can screw them
onto your lens, but you can't find adapters
for it to make them fit. These are called step-up rings, you step up from one
filter size to another. These rings, right here, they just cost a
couple of bucks so I equipped all my
lenses with them. Like right here you
can see that we go from 52 millimeters
to 82 millimeters. That way, I can fit this very big ND filter
onto a very small lens. I only had to spend money for one ND lens and it
fits to all my lenses. That's the story
of the ND filter. In a nutshell, I
recommend buying an 82-millimeter
variable ND filter and get step-up rings for
every lens that you have. It's the cheapest and
most versatile solution.
25. The Tripod: The tripods. The most basic form of
camera support yet that is so much more complex than most
aspiring filmmakers think. Essentially you
have three tripods: the cheap plastic ones, the photo tripods, and then the video tripods. Now, we can already eliminate that cheap plastic tripods. Twenty bucks seems like a good deal for a
tripod but in reality, you're just throwing
that 20 bucks away. We're then left with
that photo tripod and the video tripod. A photo tripod is usually
very lightweight. It has a simple design and it
keeps small cameras sturdy. They are meant to
hold photo cameras, which could be your
video camera as well. But if you're planning
to build out your SLR like we did with our
Panasonic Lumix GH5, then that photo tripod might
not be that strong anymore. The quick release is weird. The camera locks
into the tripods and it's pretty small
on photo tripods. Bigger cameras will
therefore wiggle more. Now, a tripod always
consists out of two parts. You have the legs and
you have the head. You can actually buy these two things separately
if you want. Sometimes you like
a certain head and a very specific set of legs. You can then combine them
together, super easy. Now, a tripod head
has three axis's. You can bend which is
a horizontal movement, you can tilt which
goes vertically, and finally, slant
or roll the camera. This is needed to
make vertical photos. Professional video is almost
never showed vertical so that's why a video tripod
can only bend or tilt. Now, looking closer
to the video head, you can see that it has
a much larger base, a much larger quick
release base. In fact, in the
high end segments of video and cinema cameras, we can even find
tripods like this. Look how big [NOISE] that
quick release plate is. That will definitely make
our camera sit sturdy. There's a reason a video
tripod exists because video moves so a video tripod is designed to
make moving shots, whereas a photo tripod is
designed to make still photos. We'll actually disregard
the photo tripod as well. Now, let's have a closer
look at the video tripod. Let me just take this one. This one's a little bit lighter. You'll find three
controls on here. There's the drag or
friction controls, the counterbalance,
and the locks. Now, not all video tripods have all three functionalities and that's where the price
difference is at. Now the locks are
usually always there. You can find them back here at your pan control locking that. It will make sure that
you can't pan anymore. The same thing with
the tilt as well. If you lock that, you can't tilt anymore. [LAUGHTER] Note that drag
or friction should be fluid and you can find this back in the description
of the tripods. If you can't find the
words fluid heads, then it doesn't
have that feature. A feature that is essential. A fluid heads makes
it possible that you can make fluids bend
and tilt movements. Within cheaper tripods, this is sometimes built into
the lock of your tripods. It's one way of
making that drag. The more that you lock it, you have drag, but it's
not really good drag. If you want to make very
small and gentle movements, having a bigger drag makes it
easier for you to do that. Have your cameras also need more drag or
friction as well. Although it seems
like a nice idea, the fluids lock control
is not as trustworthy. After a moderate use, you'll also quickly
run into issues where, for instance, the pan
control can shoot forward. Or even when you almost
entirely locked a pan, you can still move it and
it's not enough drag. Ideally, you want to have a separate drag
control and a lock. Rotating that wheel
also adds more drag to the pan so that way I can
make more precise movements. Where I do need to
make faster movements, I can just decrease the drag. A tripod like this will
last so much longer, although they are a little
bit more expensive. That is up to you to
decide which one to get. Finally, we have
the counterbalance. This is the feature that
not all video tripods have and it's usually only needed
to what have your cameras. Although if your budget allows, then do get that feature as well as it will make
your tripod ready to use on perhaps
a future camera that is going to be heavier. A tripod is not an electronic device so
it could last a lifetime. That is why I wouldn't cut
down on something like that. The counterbalance
is a spring in the heads pushing back
when it's being tilted. You have different
strengths settings in here. The idea is to put it at the right amount so that
your camera always stays at the position
it's being tilted in without having
to use the lock. That's actually needed to avoid camera shake when
you need to fill them from an angle and have to make efforts to keep
the cameras still. That's why this is an optional feature which is more important for
heavier cameras. Now, let's have a
look at the legs, which either come with
or without a spreader, which is right here
in the middle. The spreader makes sure
that the legs stay in place and just makes the whole thing
more sturdier in general. Now there are a mid spreaders
like this one right here, but there are also
ground spreaders or bottom spreaders like the
heavy tripod rights here. Both do the job good, but I do suggest to get a mid spreader because if
you have an uneven surface, that spreader won't
get into the way when you're going to put
your tripod somewhere, like on a staircase or when there are many
rocks out sites. Bottom spreaders
are really used in studio environments where you
always have a flat surface. Finally, let's have a look
at the connection between the tripod legs and
the video heads. You can either have a bowl head, also called half bowl,
or flats mounts. In most cases, they have bowls from the heads can also be detached so that way
you have two in one. In the industry standards, we always work with bowl heads. There are some exceptions where a flat mount goes
directly onto the legs, but I wouldn't recommend that. The great thing about the bowl heads is
that they are laid with any bowl of the legs and the bottom you can then
lock it into place. Having that bowl allows you to level the video
heads as you can see. There's almost
always some kind of a level tool and a top
to help you with that. This means that you
can extend the legs of the tripods very quickly
the way you want. You don't need to worry about if your tripod is straight or not. You can just use a lock
here on the bottom. Use the bowl heads to
level your camera. Bowl heads come in two sizes, 75 and 100 millimeters. You can always adapt a 100 to 75 just like with the step up brings that
we talked about before. But you cannot go
from 75 to 100. Again, that's something
to keep in mind. That is a story
about the tripods. In the next lesson, we're
going to talk about when to use a tripod
and also I've got a very good exercise for you to practice your
panning and tilting.
26. Panning and Tilting: A tripod allows us to make horizontal movements or doing a bend or a vertical movement, in other words, doing a tilt. Now you could see the tripod
as the opposite of handheld. Handheld is considered more dynamic, playful,
sometimes chaos. It has a form of reality to it. You showed a depth of a scene more because of that
camera movement. A still tripod shot has
the opposite effect. It is static but also
strong and confident, clean, we can create movements
by tanning or tilting, but that is a
controlled movement. Scenes shot on a tripod
are more relaxed. You can actually mix these shots for a
storytelling purpose. Say, we have someone sitting in a room casualty
reading something. We shoot this from a tripod because it is a
relaxed atmosphere. But then all of a
sudden the ground starts shaking,
perhaps an earthquake. The tone of the scene
changes to more dramatic, and to emphasize that we go handheld and add a
little camera motion. There's a reason why
we're choosing to film handheld or on a tripod. That is something very
important to keep in mind. Corporate is usually filmed on a tripod because it
shows confidence. It's like standing with your both feet steady on the grounds. However, it takes
some time to set up. You need to bring that tripod. Would you set it up to
the correct height, attach your camera to it, etc. You might go handheld, but the reason you're going handheld is not because
of storytelling, but because it's
more convenient to you and that is a wrong choice. The reason I say that
is because this is a mistake that is
oftentimes made. I've seen it way too many
times on small productions, where they start
shooting on a tripod, but as the day progresses, they start to shoot handheld
to save time and be faster. Think about what
filming technique benefits your story
or project the best. Now let's get to
panning and tilting. It's important that
you practice to start and and such a
movement smoothly. Once you started with a pan, for instance, you
have to keep going. It doesn't look good if
you see yourself adjust. If you notice that you
are going too fast, simply slow down until
the subject catches up. Although it seems so simple, panning and tilting is something that needs
to be practiced. Here's the best way to do that. Take nine sheets of paper
and hang them to the wall. Every paper is numbered from
1-9. Now, zoom into it. You only have one
paper in the frame. The idea now is to start with is panning from one
number to another. Try to start smooth, continue a solid movement, and stop without having to
readjust your framing. After that, you do the same
thing for tilting as well. Once you feel ready, go sideways, panning and
tilting at the same time. Now it's actually good
to have someone else standing behind you
shouting a number. That way it's more of a
surprise and you'll learn to act faster while
retaining a smooth movement. Also, experiment with
different friction levels. Slow movements had a
much bigger friction allowing you to make
very smooth movements. If you want to go faster, you need to turn
down the friction, try to you find a good
friction spot that feels very smooth but allows you to make fast pan and tilt movements. Friction levels
don't have to be the same for both the
pan and the tilt. In fact, it's sometimes a personal preference where someone likes to have
a higher friction, someone else might not. The friction level could also
be turned off completely. We talked about shooting
on a loose head. Obviously, you'll see a
lot more camera shake, but that's exactly
what you want. Actually, it's a way
to shoot handheld, but it's a more controlled
handheld movement because the tripod is
anchored to a fixed point. Do the pan and tilt exercises
well with a loose head, try to make smooth movements. Definitely when you
start and stop, it's going to be so much
more trickier though. Shooting on a loose head also gives you the
possibility to switch better between the
semi-synthetic shots and the more heavy movements. It's also easier to follow someone on a tripod while having that handheld feeling or you can see it as the lazy
handheld shot, but don't see it that negative. There's nothing wrong with
shooting on a loose head. In fact, it has
its own benefits. So go out now and practice your tripod movements with
that nine-paper technique. I look forward to seeing you
back in the next lesson.
27. The Camera Rig: There are basically
two kinds of cameras. You have, the cinema cameras, these are usually very
big and have a bunch of a sass severity and like gables
sticking out everywhere. Then you have the video
camera, like right here. Video cameras usually have good ergonomics and
everything is built-in. It works straight
out of the box. Video cameras or
camcorders come in small, but also in big sizes. We've seen that previously
with that one over there. Essentially, they are the same. A brick debt films
entry code is audio. But then one day this
little fellow right here came along the
SLR or photo camera, which apparently can choose
pretty high-quality videos. Chances are that you
have one of these. But where do these cameras fit in with the cinema cameras, the video cameras or
something between? Well, they're not
really video cameras, they are photo cameras and not really cinema cameras because we look at
the difference. So, we do have
their own category. However, that middle
category actually do means more towards
the cinema cameras. These two things
are pretty similar. I know it's crazy, but remember that
video cameras work out of the box while SLRs, not really, or it
depends on your needs. For instance, ergonomically,
this is not great. You don't have a usable
microphone either, oftentimes you need to dive
into the settings first, we change a whole
bunch of stuff to make it work better for video. It's display is very tiny. There's no high cap right here, like the video camera has. I not even all SLRs
have the ability to properly tilt or pan to display, although that was
mostly a problem with the first-generation
of these cameras. So considering that SLRs lean more towards
cinema cameras because these cameras are
essentially cubes that don't deliver much functionality
like this one right here. It's the red digital
cinema camera used to film Hollywood
and high-end production. But if you take this
thing out of the box, it can't do anything. It doesn't even have a display. Heck, it doesn't even have the ability to connect
a battery to it. Sounds very strange,
but the idea is that you build out this
camera to your own needs. I can buy a display and
attach that to this brick, but that means that I can get a type of display that I like. And let's talk through what
the manufacturer gives me. That is very different from a video camera where
everything is built-in. A cinema camera can take up many different
configurations. If you're shooting by yourself, that configuration
might be compact. So here we have a
lens, a display, and the site handle, and
a big battery. That's it. But I can also build it
out to something bigger, which gives me more control
with working with a team. And they'll go over every
component right here, but it looks
something like this. And, since most SLRs are missing these kind
of features as well, you're able to find
this same assess where is there a need
for cinema cameras, but then for SLRs. To give you an
idea, I can attach a top handle to
my cinema camera, which I can't do to my SLR. But if I put it into a cage, I get more mounting options, including that option
to add a top handle. You will hold most nut fine such assess severities
for camcorders, which is why he's
SLRs are so special. A whole new market has exploded and you'll find many brands making such assess severities. There are even crazy configurations
possible which makes your small little
SLR looked like a big Hollywood
production cameras. But whether you added fewest assess severity to
your SLR or build it out big, we always talk about
creating a camera rig. It's not necessary, but a
good rig definitely makes things easier and there are no rules when it comes
down to making a rig. So I'll share my
personal idea about it. And that starts with the cage, which gives you the
ability to mount a top handle as well as a better way to
attach a microphone. This is the heart of the rig. On the bottom, you could go for a set of 15-millimeter rods. These are industry
standard and allows you to attach things like
a bowl of focus. This thing slides onto
the rocks and allows you to control the
focus ring more easily, or more you could add
a side handled through these rods or even
perhaps a med-box. This is both useful for
blocking out light as well as slight and filters in here
such as that ND filter. Do keep in mind that such rectangular filters
are not more user-friendly. I'd stick to the screw ones. Med-box is in rectangular
filters are more often used in studio production where you work with
an entire crew. Anyways, and external display, it's not a bad idea. It bigger monitor is
always nicer to have and there are many
options to choose from. Having that initial cage allows me to connect
the battery as well. And then back here sits a plate. It also slides onto the
15-millimeter rods. I can attach a big
battery to it, which powers both the camera
and the external monitor. Big battery like this gives me power for almost the entire day. So this is my personal rig. It's compact and it adds a whole bunch of extra
features that I want. But where does that leave you? You might be stuck
with the question now, [inaudible], what do you
recommend to me now? That is unfortunately
very hard to answer because apart from the many different
options that you have, there's also a big
price difference between these different brands, and that's why I cannot give advice through a
class like this. However, one big advice that I can give you is to
start off simple. Never buy a complete rig
or make a big investment. Start with a camera
cage and a top handle. Along the way see for yourself
what feature that you still might miss and then
buy those things later on, or that could be an
external monitor perhaps. But give it some good thoughts whether or
not yet you need a big monitor or a more smaller one.
Perhaps what a nightclub. You see the options
are endless so take your time to
do the research, but also to get to
know your own needs. Likely would, everything, products and brands change. If you would ask me today
to look for a new rig, I'd have to scour the Internet again to see what has changed. And if there might be some
new innovative product or brand on the markets. But at least you have
an idea now over the SLR cameras stands, what a camera rig is and
what it's meant for. So I do hope that you learned
something from this lesson. If you'd like,
always feel free to ask for advice in the
discussion below, perhaps explain what
kind of filming that you do and what your budget is. And I'll see what
I can recommend to you. Thanks for watching.
28. The Gimbal: They say film-making is an
expensive hobby or a job. That's not true. The problem is that when we
walk into a camera shop, it feels like we're
in a candy store. You don't need all
the extra stuff, but you really want it, and the gimbal is
probably one of the most popular extra tools that nobody needs,
but everybody buys. [LAUGHTER] Maybe you already
have one or you have your eyeballs on one and if you haven't thought
about a gimbal yet, trust me, that moment will
come. What is a gimbal? It's a device in which you stick your camera in and
by powering it on, the motors are going to try
and keep your camera steady. That means that you
could walk around, but your camera will retain a smooth motion
through the scene. They've become very affordable, which is why many filmmakers
love to work with them. Just like with cameras, gimbals come in different
shapes and sizes as well. You have gimbals
designed for phones or the big ones for
heavier cinema cameras. But the principles
are always the same. Although there are
two distinct designs, you have the stick gimbals
and the hanging gimbals. Stick gimbals can be operated with one hand and are smaller, so that makes them
more travel friendly. Hanging gimbals
need to be operated with two hands and are wider. Such gimbals whoever
are easier to operate since the weight
is hanging on the bottom, those lollipop gimbals have
their weight above your grip, so more shake will occur. Of course, that shake is
reduced by the gimbal itself, so it won't be that noticeable. Now there are also hybrids
which allows you to easily switch between the
stick and hanging design. That gives you a
sense of the gimbal that are out there
on the markets. But now how do we properly operate one of these,
like with everything, it takes practice,
but there are already a few things that you can
keep in mind as a beginner. First of all, don't
expect the gimbal to keep your camera
perfectly steady. There's no up and
down stabilization unless you get one of these
with some sort of a spring. Always walk with
slightly bend knees and try to place your
toes first on the ground. When walking or running
at a faster pace, it is much harder to put
your toes down first. In such a case, your arm
becomes more important, see your arm as a
natural spring. Bend it in a 45-degree
angle and keep it loose. Move your body and
your arms separately. You should try to keep your
camera at a fixed height. However, it's also
important to slightly move your arm up and down to catch the bumps from
your footsteps. Now bending and tilting
either goes automatic by twisting the gimbal or it can be controlled
through a joystick. That joystick however
is not a good idea. You'll have much
more precise control over the movement if you
just twist the gimbal, steering it in the
right direction. This steering needs
to be done smoothly, just like you would span
or tilt on a tripod, give it a gentle push, let the motors do their
work and slowly stop. Never just jack the gimbal
to make a quick movement. Finally, let's talk
about where to use a gimbal and where not to. The idea of the gimbal
is to walk around, if you're planning to
stand on the same spot and either go handheld or
shoot from a tripods. Gimbals are designed
to explore the space, walking paths, objects or walls, show great depth in the scene. Don't be afraid to also experiment with
vertical movements. Use the space around you, walk through it and find
interesting angles. The gimbal is probably one
of the most dynamic tools, so use it in a
dynamic way as well. That's in a nutshell, what the gimbal is about
and how to use one. Now the gimbal alone could
use its own separate class. I've only scratched the surface, but at least you got
an introduction.
29. The Slider: Although I could go
on for hours about different camera tools
and accessories, I'm going to end to list with the camera slider in
this last lesson. This is by the way, my
very first slider that I got when I just started
out with film making. Camera sliders are
very simple gadgets, a rail and a platform
which you can slide on that rail from
left to right, that's it. Now, they are not as popular anymore since back in my day. I think the gimbal
has taken over many different tools
like also the jib, which I won't cover
in this class. The slider however is still
something that like to give some attention as it's
very underappreciated. Where a gimbal needs to make faster movements and it's
usually a bit more rough, a slider is very precise. You can make slow
movements while retaining that smooth motion. Sliders could even
be equipped with a motor allowing you to go even slower at a much more
controlled and precise motion. That is the big difference
between a gimbal and a slider. If you're shooting
product videos, a slider is a great option since your subject is small and
usually sits on a table, the smallest camera
motion is visible. I used to shoot all
the time on a slider. This one here in particular
because it's very cinematic. Which is both great
for corporates, commercials, short films, or anything of that. Sliders can be
placed on a table or on the ground allowing you to
make very low angle shots. But we could also
mount it directly onto a tripod and this opens
up a whole new world. We are going to
need a second head to mount on top of the slider. I would actually suggest you get a photo head because it can pan, tilt, but also roll or slant. You see we can go sideways on a slider or we can push the
camera forward and backwards. This is by the way called a
track in or a track out shot. But here it starts to
become interesting. We can slant this slider since we have it mounted
onto a tripod anyways. Here's where that photo heads
comes in handy as we can level the camera
with the third axis. We can now make jib or lifts
movements going up and down. Something that I did so often as I really
liked these shots. Now, we can add an
extra movement to it. Since the slider is
mounted onto a tripod, we can pan with that as well as we're doing
these slight movements. You can turnaround objects. This works especially
well with product videos where you want to go in an
arc around the product. Keep that in mind that you have the video tripod and
a slider together. Combining those two can trace dozens of
different movements. Movements that are
relaxed, dynamic, controlled, precise, and
look very cinematic. That's it for cameras sliders
and I showed you guys so much different camera gear
now that you might still be wondering why do we need
to move the camera. That is something that
I like to show you in the last lesson of this
class, Creating Depth. Which is the whole pure essence
of cinematography and are also the next steps into the advanced techniques
of film making.
30. Creating Depth: You've probably heard about the word,
cinematography already. It's a visual art, and a film projector is
also a cinematographer, and their role is to make creative decisions to
both camera and lights. In smaller projects, they could be the
camera guy as well, but most often they
don't touch the camera. The camera operator does that, and listens to what the
cinematographer asks them to do. So far in this class, we've been learning about
the basics of film making. Right now you have a
technical bag of knowledge which makes you a
great camera operator. You know how to set up
the camera properly, make a nice academic
framing of the object. You understand when a
cinematographer asked you to shoot handheld
instead of on a tripod. You know how a tripod works and why you should or
shouldn't use a gimbal. The role of the cinematographer
goes beyond that. Visual storytelling
through lighting, camera framing and movements, telling a thousand words
through one camera shots, and most importantly,
create depth. Creating depth, this
what's all starts with. It's the next chapter in
your film making career. I might make a new
class about that, until then, here's
an introduction. What many people forget, is that video is
two-dimensional, it's flat. You could project a video
onto a piece of paper, that's how flat the video is. Now, don't get me wrong, we do capture a 3D world, but we look at it
on a 2D screen. That's why it's so
important to create depth so that we can show the
two-dimensional world onto the 2D plane. Now, one way of doing that is by simply adding camera movements. Whether you go handheld, shooting on a gimbal,
or on a slider. You're moving the camera
through the scene, and thus we see a parallax. In other words,
the audience gets a better understanding of the space that the
cameras sits in. Another way to create some
more depth is by having the foreground and background
objects out of focus. We open the aperture, the focus area gets
smaller and thus the background
becomes more blurry. We could even place an object in the foreground to get
the same results. We can look at this shots
here in three layers now. The foreground
objects, the subjects, and the backgrounds, they are
separated from each other. This creates depth. Framing is another tool
to create more depth. Say that we have everything in focus and shooting
from a tripods. The way that you
frame your scene or subjects can make it appear
flat or show depths. I do happen to have a whole, entire class about
cinematic camera frame in which I can highly
recommend to check out. I'll live link here in the class notes as well as
in a class description. Now without going into details, we can use lighting
and shadows to show the two-dimensional
rolls much better. Colors and contrast so many different ways
of creating depths. Now it's not necessary
that you create depth through every
possible way. You pick one or two techniques, just as long as you're
actively looking for at least one way to create
depth with every shot. That brings me to the
end of the class. Now I have one last
conclusion lesson left, so don't leave just yet.
31. Conclusion: Now, let's start with a
big applause for yourself. Congratulations for
completing this class. You now have a
solid understanding of how professional
filmmaking works. The foundation is there and you are ready to build
further upon that. Now, I've got a few
advanced classes that I can highly
recommend you check out. Links to those can be found
in the description of this class as well as
here in the class notes. But give it some time though. As mentioned many times before, filmmaking needs practice, so go out and shoot, implement the techniques that you've learned from this class, but I also dare
you to experiment. By making mistakes, you will learn what
works and what doesn't. Now, somewhere in the
half of this class, I asked you to make a
short scripted video. If you haven't done that yet, then now is the time. Create a storyboard for yourself so that
you have plenty of time to think about the
different techniques that you want to implement. Plan your shots and perhaps re-watch them with the
lessons as you're doing that. Having a good preparation means that you can focus on other
things while shooting, such as the camera settings. Make a short video, a product video, a simple action of
someone making coffee, or perhaps a mini short film. You don't have to
edit it that much, just put the shots
in a sequence and publish your work here so
that I can give feedback. I wish you good luck with that, lots of fun and enjoyment, and then I guess it's
goodbye for now. These are always
very tough moments. Go now, be free, seek your own paths in life. Just promise me one
thing, never forget me, especially when you're
the cinematographer on some very big Hollywood set then I hope that you're still
thinking about me. Anyways, thank you so
much for watching guys. It was a true pleasure
giving this class to you, and like we always
say, stay creative.
 Jordy Vandeput, Filmmaker and Youtuber