Transcripts
1. Class Introduction: Hi, my name is record is. I welcome you all
for this course. Learn cotton background creation and animation with
Adobe Animate, who want to start to create a background for
the control design. This is the course for you. Adobe Animate is
one of the business off to it to create
CO2 emission. Nowadays, it has lot of animation for background
as well as the character. Through this course, you're
going to learn how to create a new document
setup and how to use Adobe Animate user interface for creating the background as
well as the camera animation. How to create a cartoon
background elements like how to create a
background of this guy. How to create clouds
over the sky, and how to add the green
landscape as well as the land for this cartoon
background creation. How to create a kosher
over this land, how to add the fence
for this land? And after creating
all those things, we are going to detail each
and everything from the sky, clouds, the shared, the
landscape, the fence. And also we are going
to create bunch of trees for this cartoon
landscape background. We do add small
shifts over the land. And finally, we are
going to see how to add and manage the camera
and how to create different camera
movement to create a background animation with this cotton background or
the end of this course, you can able to know how to use the Adobe Animate
software for creating cartoon background
animation and how to utilize the Adobe
Animate software also, let us see in our classes.
2. New Stage Setup: In this lesson, I'm going
to show you how to create an animated background
with the help of Adobe Animate CC
2020 to previously, this software is also
known as Adobe Flash. So let us see how
to do this with the help of Adobe
Animate CC 2020 2. So first I'm going
to click File menu. I choose new icon here. We can also use the shortcut
key, which is control. Yes, that is a huge
emotional shortcut. I just click here and choose New here you can see
we have a lot of options. So this Adobe Animate
software was used to haul different industries
like gaming industry also using the same software. A 2D animation was done with the help of
these over the enemy. The web advertisements,
which Internet say designs, educational application
development, and the social media
animators also using this adiabatic rate for
their respective industry. So it can able to produce output for all those industries. And right now I'm going
to create this animation. I was choosing this
character animation. In this eye, how different
resolution you can see that I have a
hatchery resolution. This is one of the basic
necessities assertion, which is 12 800 into 720 pixels. The first one is the width
of the particular stream, and the second one is
height of the frame. And here also we have the
full HD resolution dimension. They have 4k resolution and we have standard resolution also. We have 640 by 480. It's just the standard, the stages size
of Adobe Animate. So they have to choose
which one you want. I was choosing this full HD. After choosing this preset for, let's see, I come to
this right-hand side. Here I have the
document details. I have width and height. So this place it itself has
the dimension did then head. So if I change the preset, I can able to see we have the changes in
these details also. It's useful, it's D. So that time itself, you know, it was fixed those dimensions. If you want to
customize, it can do. For example, if I'm going to
set the value which is 2, 16, 0, I can do
this myself. Rice. It can keep the value itself. And after that, I come to this
area here you have units. Since you are creating this particular work
for visual purposes, you can not able to
change this units. If you're creating
the common work, you can change that into
centimeter or millimeter. Select note we are going
to use only this width. And after that we
have the frame rate. So traditional versions
of Adobe Flash, you may have 12 frame size. By default. You may also have 24. One's relations. In Adobe Animate 2022, we have 30 frames per
seconds since we are creating this animation for
a film or video purpose. That's why we have
the default value, which is 30 frames a second
if you want to change it. But the theory was
the app to work, so you should keep that. And after that here you can see we have the platform types. When you choose platform, you can see we have HTML5
canvas and ActionScript three. So this one you are recommending can choose which one you want. If you want to create
this animation for the purpose definitely
can go for HTML5 canvas. Then we can add that
inner web page. But if you are creating
this animation for games purpose or some
other video buffers, you should keep that with ActionScript three,
That's enough. Anyway, we are going to use
this for only Script purpose. Since I've asked coding to
create the animation part, it just keep this
in a default value, which is ActionScript 3. Now I'm going to
choose Create button. When it choose Create button, you can see I got a
new document here. You can see the user interface
was in enabled mode. Now the press Control 2. So when I press control to keep the stage in
Fit in Window mode. So you can able to see all
those options and also you can access all the features
with Adobe Animate right now. In this way, you can
create a new document, what you record for creating
animation with auto animate. In next lesson, we are going to see what are all the things we have with this Adobe
Animate user interface.
3. Adobe Animate User Interface: In this lesson, we
are going to see the user interface
up Adobe Animate. At the top, you can see
we have the menu bar. When you want to know what
are the things we have with this user interface and how
to create a new document. First, it had to open the existing Adobe
Animate document. So I've just created a new
document in our last lesson. And here I'm going to
use the same thing. So in this user interface, it can able to see we have
the menu bar at the top. As every software has
its own menu bar, this software to have
its own menu bar. So we can able to do
all those editing creation modification with
the help of these millibars. It has a different category
minerals like we can use Insert menu to insert
all those animations. And we can use text menu to
add different styles of text. We can use this command
minute to create. The commands are
scripting languages, so we use menu bar to operate
this entire software. And after this, I have
the document area. Here you can see
I've just created a new dogma and I have not
yet save this document. So the name is untitled, one that store nearby. The one indicates this
document was not yet saved after the modification
or from the new document. And this documented till has
a few more options here. You can able to see we have then the current
scene number. So if you have multiple scenes, it will show you in which scene you are
present right now. And before that scene number, we have edit symbol options. So if you want a detest symbol, you can use this icon right now. And on the right-hand
side you can see we have different options. From right-hand side, we
have the current zoom level. I can use this zoom level
to know what is the current in the stage display value. It shows me right now
with a fitting window. But if they want to
change, I can do. I can zoom in and
zoom out the stage. So based on your requirement, you can use which one you want. And you can also do those things for the group of
shortcut keys also. For example, I
press Control one. If I press Control 1, here you can see I got a
100 percent zoom level. And then plus Control 2, and I press Control 2, I will get Fit in Window mode. You can able to see
that animation. You know, the Enter animation will fit within that window. Whatever they were monitored for a solution, doesn't matter. It will fit within that
particular monitor area. For my monitor, it shows
me it's 71 percentage. If you monitor was different
with the resolution, you may have a
different values here. So this so you can able to handle this area,
this dogma area. And at the center you can see we have the
weight colored area. This is called the stage. In a live event program, we all know what is stage. So whatever you have in the stage will be
seen by the audience, not only in the event,
in the theater, also, what we have in this stage, the audience can
able to see easily. So in the same way within
this order BY animation, if you want to show
anything for audience, how to add that within
the stage alone, you cannot add outside. Otherwise, the audience
cannot able to see that. So that's why we have
stage with The animate. And you can do min and zoom out the stage with the
help of shortcut key, you can use Control
minus to zoom out and you can press
Control Plus to zoom in. Remember you how to use
those control minus and plus from your left
unsaid of the keyword, we cannot use the plus-minus, which is how the numbers keys. So it must use the plus
minus symbol which is present over your
alphabets in your keyboard. So the help of that, you can do that, zoom in and
zoom out in Adobe Animate. And I press Control 2 to fit
the screen within a window. After this document
area in lepton said you can able to see
we have the toolbar. So helm stuff tools to
create cartoon characters, cultural backgrounds, and
do the CO2 emissions. Currently we have a
single column of tools. And if I want, I can come to this place in-between
the toolbar S plus the document area. And you can see I
have the GL arrow. I just click and drag. So with the help of this, I can able to create two column toolbox or
three column toolbox, can customize it
according to my need. So I changed the
business like this. Here you can see we have
fill color and stroke color. So in Adobe Photoshop, we may have a foreground
color and background color. In Adobe Animate, we have
fill and stroke color. And we use this as how we used in different
Adobe softwares. You can press X shortcut key to change the stroke color into fill color and fill
color and stroke color. And you can press a D to default the fill and stroke
colors in Adobe Animate. So these are the common case we have with Adobe Photoshop also. So after this toolbar, the panels on right-hand side, you can see we have
different panels, we have assets, we have
pre animated objects here. You can able to see
all those things. We also have the
live preview here. A few more over the object
can see we have Macau blue, and we have wolf
running animation. We have the zombie
walk animation. So all those preset characters and animations are
available here. You can able to see here
what we have unlimited. And it can choose
which one you want to. Here you can see we have
the animated properties. And after this properties, I have a few more things. I chose background. So we have the default animated
backgrounds also here. So you have all
those things here. If you want to show all those
things we can choose all. So we have the scroll I
can hear, I scroll down. We can able to see
all those animations. What behave with
this Adobe Animate? After this Assets panel,
I have properties. So properties as all the
document properties, we can able to see
that the width and height of the
particular document, we have the stage color. If you want to change
the stage color, you can do all those changes
according to your need. And we also have the
frame rate here. You can able to see that you
have 30 frames per second. We have all those settings. Here. We have the colors
panel Elaine library, so we can use all those
things according to our nato. After this panels, we have one important area here at
the bottom, which is timing. And here you can see you have two tabs on this timeline
and other Buddhists output. So with the help of this output, you can able to see the word coding output or so here I'm not going to
use any code here. I just read to cover that and I'm choosing this close icon. So now I have only
the timeline and just increase the space
for the timeline. So the timeline is the major
part of the set interface. If you are creating
your animation, it shows you where you want to add a keyframe that you
have to do the change. Very hard to set the
different properties. All those things will be done with the help of
this timeline only. It has the time. We can see all
those frames here. We have that the frames, which is 1 second for animation. And we have 60
frames here and it shows this is the 2 second off the duration of an emission. If you want to
stretch your frames, you can able to
see here the help of this zooming and Sumatra
can statue of frames. So by default, it has
10 seconds frame here, which means around 300
plus frames by default. And it can able to
search it if you want. So we have a lot more
options with this timeline. When you are creating
animation that time you will see what are the things we
have with this timeline. So these are the user
interface features we have with Adobe Animate to create the cotton
background designs as well as the character design. And after that, we're
going to use all those user interface features
to animate the same.
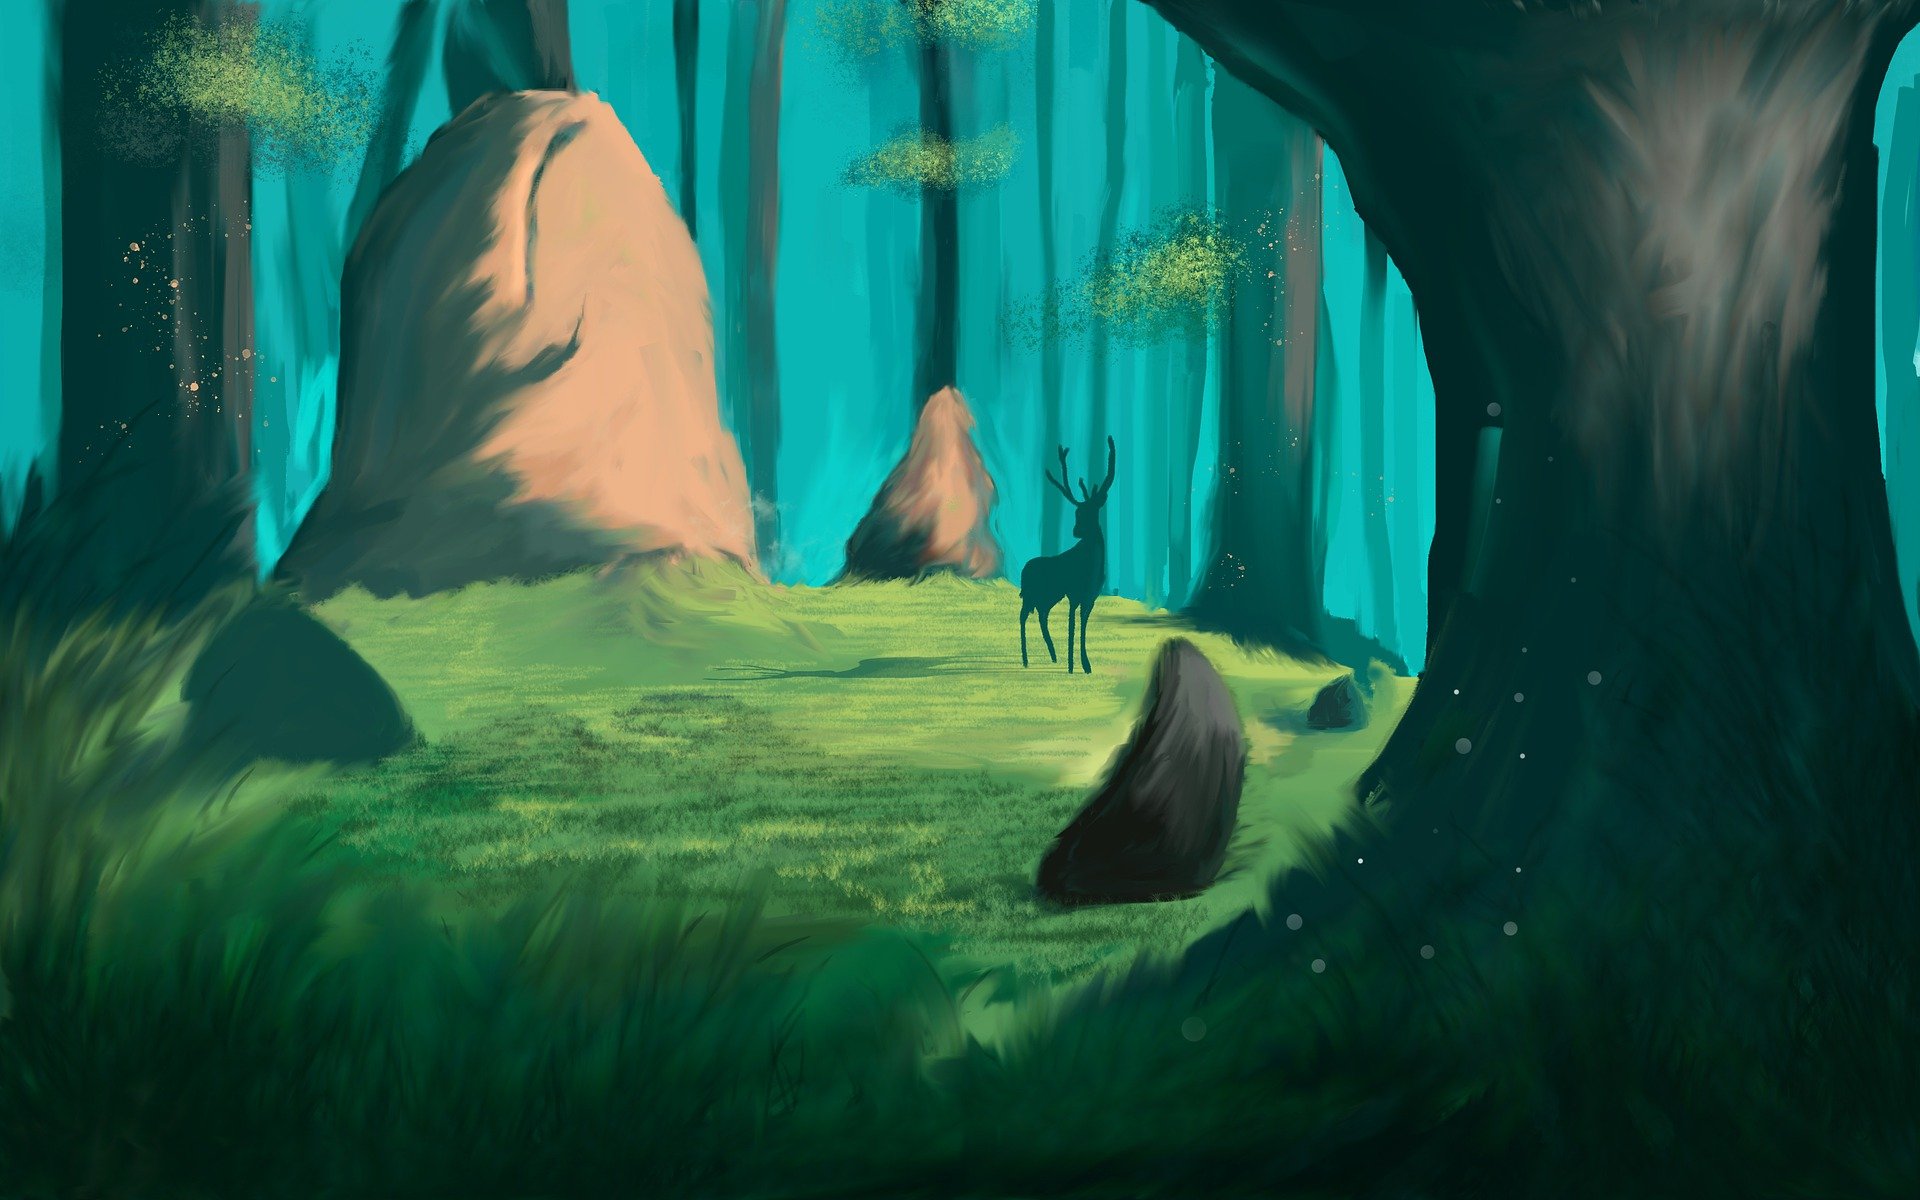
4. Create the background sky: In this lesson, I'm going
to show you how to create a sky background for this
cartoon background animation. You can see I haven't
new document. And we have one layer,
which is layer one. Since I'm going to create this background for
animation purpose, I'm going to use
multiple layers. So first I'm going to save
the document control. Yes. Here I'm going
to give a name for this document which is
cultural background. So it can see I have saved that particular document with the name cotton
background dot NFLPA. They have changed only the
particular software name from Adobe Flash shorter. We animate the hand knotted, change the file format. It has only dot F allele. So I press Control 2 to fit the screen
within this window. And here you can able
to see our frame size. Right now we are in layer one. I want to rename this layer. I double-click the text. Here. I'm going to give the name Skye. And here I'm going
to create the sky. Making a sky is a simple job. Going to create. I'm going to choose this
rectangle tool first. Since I don't want any stroke, I just choose the stroke. And I'm going to choose
the stroke value to none. I have only the fill color. After this fill color have to know which go I want to fill. So here I have the color, which is the, you can see
here the hexadecimal value. I choose the color
geological CCF. I choose this. And here I want to create a small rectangle
from start to yet. So this is my sky. I'm going to use this as a sky for this cultural
background and emission. Since I want to
animate the clouds, I want to keep all those
clouds in a different layer. That's why I'm going to have one lead this sky in this layer. If you want to some different colored
tones with the blue, instead of having a
single solid blue color, you can have
gradient colors are. So let me show you
how to do that. I choose the selection tool. You can see I have
the shortcut keys to access the selection tool. And I click here. When I click here you can able
to see it has only shapes. Now, I come to this
colors options. When it come to this
countless panel, you can see I have the
solid curves option here. I choose that and I'm going
to choose linear gradient. So when it choose
linear gradient, by default, you will have
black and white gradient here. Now, I just want to
choose this black point. I just double-click there. And here I'm going to
choose the same sky value, which is Jared euro CCF. Now you can see I
have the blue here as well as I have white point, which is the default point, which is the default point here. So now what I'm going to do, I'm going to rotate
the object because I want the blue graph at the top and the white at the bottom. So if you want to adjust
the color itself, you don't need to
shift the object. We don't need to
rotate the object. You can transform
the gradient itself. So we have special options
for that in Adobe Animate, I'm going to show
you how to do that. So first you have to
select the object. Now I want to apply this
gradient transform tool. We can use a shortcut
or you can select that from your toolbar
in your toolbox, you can see we have
a fill color here. We have Paint Bucket Tool,
the shortcut keys k. And after that I come to
this transform option here. Here we have the option of
which is free transform tool. The shortcut keys you. And if you want to access
the gradient to answer me how to pass code the mouse and you
preserve your mouse. You can see we have gradient transform inside this
particular tool. I choose Gradient transform
when IT tools grid in terms farm and I just press
Control minus to zoom out. So here you can see we have
three different points. With the help of
these three points, you can able to adjust, we can able to
transform the gradient. I had a fairly fast to
point at the center. So with the help of that wind, you can only transport
the gradient position. You can able to see how I transformed the position
of the gradient. This looks really good. And I come to the second. So with the help of this point, you can able to
rotate the object, just click and drag
towards the bottom. So this is always occur. So I was successfully
rotator and that point, you know, automatically
increase to the dimension. So they'll pull off
these central point. You can able to move the
pushing of the gradient point. And with the help of this point, you can able to rotate
the gradient color. And at the bottom we have the
third one, which is scary. So the help of
this I can able to reduce or increase the
scaling of the gradient. So currently I want the
appearance like this. I leave with this point. Now we choose this
selection tool again so you can able to
see how it looks. I press Control 2. It's
exactly what I need. How the blue as a list of white, this gradient background. So in this way, you
can able to create your sky for this cartoon
animation using Adobe Animate.
5. Clouds of Sky Design: In this lesson, I'm
going to show you how to create clouds
for this background. So previous lesson we have seen how to create this
sky background. I'm going to show you
how to create clouds. We are going to create
a cartoonish clouds. So for creating a coterie cloud, I'm going to create a new layer. Since I want to
animate the clouds, I had to create a
new layer for that. So I just click add new
layers from this timeline. Here you can see we have
add new layer option. I click here, click there, I will get a new layer here. You can able to see that I got a new layer,
which is layer 2. Here, I'm going to
give a name, clouds. Our Cloud, yes, Adding S. Now you can able to
see I have two layers. I have the sky and the clouds. When working with clouds, I don't want to
disturb the background since it was a normal S-shape. So if I create any
selection like this that will entirely
in fact the background, that will be the because to disturbance you will ever have. So to avoid that, what I'm going to do, I just want to lock that layer. So I just click this lock icon. We have in the same column. So now we can able to see we didn't disturb
the background. The same time we can able
to see the background. If you want to hide
the background, you can use this icon. But we want to see that. So you don't want to click that. Here. You can see it
looks really great. Now I come to this area. We have the clouds,
which is a new layer. And here I'm going to
create the clouds. To create the clouds,
what I'm going to do is I'm going to use
this oval tool. The help of this oval tool I can able to create the clouds. So I choose that old tool first, x I come to this colors palette. Here, I had to
choose Solid Color. I don't want any gradient color, so I want to solid color. I want to choose white only. So I come to this fill
color and they wanted to. So right now I want
to create a Clouds. So I'm going to create a different circles and
ovals to create clouds. Let me show you how
I was creating. It can able to see how I
was creating the circle. When I was creating the circle, I just press hold
the Shift tiki so I can keep the circle
instead of having ellipse. So it was created a circle here. And here I want to
create on more circle. And here I want to
create all the Mozart, but I have the diamond variation
between those circles. Now, what I'm going to do is I just select
the selection tool. I click on track here. And I was attaching like this. Now you can see how it looks. So this is going to
create a clouds. So you can able to draw directly or you can
create like this. This is just a cartoon cloud. I don't want to worry
about the logics, what we have in
real life clumps. Now I just want to transform
the shape of this cloud. I'll choose that. And I want
to apply the transform. So if you want to
transform objects, how to select that and
you had to press Q to quit transform and
rotate outside. Can see how it looks. You can also scale if you want. So a scale according to my need. You can create any
number of clouds. That's up to you.
And if you want to create some
chats in the Cloud, you can do the same thing. Let me show you how
I was creating that. I just zoom in the object using Alt Control Shift and
scroll mouse button. How to hold the Alt Control
Shift to simultaneously. And you had to scroll.
Then you can able to see, I can able to zoom the
current mouse position. So here I'm going
to do on things. I just hold my mouse and I
click and drag the object. So when I roll my mouse and
I click and drag the object, I can able to duplicate
the same object. Here you can see how an object, we've got the same object here. Now what I'm doing is I was
selecting the previous one. I choose the color. Here, I'm going to
switch color I want. So Q, little bit too
blue values there. You can able to
see how it looks. I choose the same white color. I move that and a place that
I want to create a shared. So this is how I have the Cloud. So if you want to create any shared you can create like this. If you have different
colors idea, you can use that also. Pretty hard to use the same
color for all those clots. So I was using this color and I keep those
objects where I want. Now I want to create
our McLeod here. So I'm going to use the tool. I use white too. And here I want to create. You can also use the Ellipse. Instead of having circles. You don't need to have
all those objects into ellipse or circle. Duplicate that. And I
use the same fill color. I use eyedropper. Click this fill color, dropper. One place where I just zoom in. Now I just have those clouds so you can create
according to your need, based on your creativity also, you don't want to make the exact size or shape
whatever creator. I'm going to increase
the size here. I press Q to update transform and the clouds with
a different height. So in this way you
can able to create your own Clouds for creating
this cartoon background. Since I'm going to create
the complete background, I'm going to reduce
the Cloud size, which may destroy my concept. Oh, yeah, this is enough. So the bottom I can able
to show my subjects. So in this way, you
can able to create your cultural background with
the help of Adobe Animate.
6. Green Land of the Cartoon Background: In this lesson, I'm going
to show you how to create the green landscape background for this cartoon animation. I'm going to create a
new layer for that. Click Add New. And here I'm going to give
a name, Green lander. I just plus, okay. Yeah, I got this
layer Greenland. I'm going to create a Greenland from this center position. Let us see how I was
creating the Greenland. For that first I'm going to
use this rectangle tool. I choose the Fill Color and
point to any one green color. I contend that later. Now I lock the previous
layer, which is Clouds. So I'm going to working
on this Greenland layer. Here. I'm going to add a shape. You can able to see how
I was added the shape. Going to use the bottom area
to create the state or road. That way I was creating
the shape like this. And here I want to create
what kind of shape I record. So since this is the land area, I don't need an even surface. So I was creating a curve. When you want to create
a CO or normal shape, you had to do only one thing. First, if you have
selected the object, just deselect that by clicking
snout, say this stage. When I click outside the stage, I can select the object. Now what I'm doing, I move my mouse
towards the edges. You can able to see I have the small coal nearby
mumbles customer. So that indicates this phase is steady to create a curves. If I move my mouse
towards the corner, you can able to
see this corner is ready to create the
corner points also. So rezone 180 can create corner points as well
as this kind of course. So now I'm going
to create a curve. I just click on track. You can able to see how
I created this curve. So we'll have these
kinda of course, in most of the
courtroom cereals. And I just want to
add on point here, like how we have the
corner point here. Further, what I'm going to do, I just press hold Alt key and I click and
drag from this place. Let us see I just press with all Tiki track from this place. Now you can see I was created
successfully corner point. So in this way you can create
any number of corner points with the help of
this appearance. So I was creating the
appearance like this. And here I was creating
the appearance like this. In this time, you know, I was just unlock
the clouds and I want to move the Cloud
in a little bit ago. My area here also, you know, I was selecting that and I create some movement. It's up to you based on your document you
are going to do. And I lock that layer. So we have a Greenland here. If you want the same Greenland, we can able to keep that. And if you want to
add more points like this, you can add. So based on your need, you can add how many
points you record. You can see here I have
a black colored outline. It shows the visible
area of the stage. So whatever happening outside
the stage are happening, or having outside the stage will not destroy the entire output. So I have the
background like this. Now I wanted to
change the color, so I choose the object to
the right color for that. Yes, I wanted this color. If you want more shades, you can add more shades. But if you want the
same solid background, you can keep that
with a solid colors. So in this way you
can able to create the green background landscape that they can pop this
out or be animated.
7. Add Soil over the land: In this lesson,
I'm going to show you how to add the state or the sand appearance at the
bottom using Adobe Animate. Firstly, choose the
same rectangle tool. After choosing this rectangle, I come to this fill color. Here. I'm going to choose some
brown color at first. So after choosing
this brown color, I come to the bottom area. Here, I'm going to create
a rectangle shape. You can able to
see how it looks. But I had to create a
new layer for that. So a plus Control Z, I'm going to lock
the Greenland layer. I'm going to create a new layer. I'm going to give a
name for the v. Yes, I just want to twist. Okay? So here I have the
layer, which is the way. And I'm going to create
a same shape here. So we are creating
only the basic shapes. Later we are going to do
our final announcements. And if you want to
scale our resize, the particular appearance
we can do here. We can create some curves. Instead of having
the same dimension, I was adding a point here. So you can able to see how
the street like appearance. And you can able to add
more color variation here. If I want to create a
colors like this, yes, you can add the help of this
particular solid gradient. Change that into this. So there's only 18 you can choose which color you
want for the background.
8. Create Shed on the Landscape: In this lesson,
I'm going to show you how to create a color shade, the help of this
Adobe Animate 2032, going to create a
new layer for that. First, I'm going to
lock this layer. The way I'm going to
create a new layer can see I've just created
a new layer and I'm going to rename that
into cow share. And I choose, OK, I have to give your knee has
towards on the layer name. Now I'm going to create
the shared appearance. I'm going to use
my rectangle tool first and I'm going
to choose the color. I'm going to choose
red color first. I can able to change
the color at anytime, so don't want to
worry about that. So he was creating that
shared with the red color. Most of the time, the
kosher will be in a red color because when
you have a Greenland, it's easy to identify
where you have the shared for human being
as elastically also. So that's why we'll have no other code with
red colored shirt. And I want to create a
three level of this Kosher. So first I want to add
a shape like this. Now I want to
duplicate this shape. I press hold all tiki and
a move on left-hand side. When I was to Brigade the
shape by holding Alt key. If a professorship Tiki, I can have the same x axis for the object, the new object. So I was placing here no, I just plus Q to transform. And I reduce the
size of the object. Can able to see what is the
size of the object now. And I choose the selection tool. And I have placed the object
near bay, the big one. Now I want another one, so I choose the same object. I pursued our Tiki
and I press the Shift together to move in
the same x-axis. And I want to place here.
And now you can see I was created three rectangles
of us created a 1 first, then it was indicated that and I was termed
firm that into smaller one and I was duplicated
the smaller one also. I just want to maintain
the same dimension. That's why, you know,
I was duplicated first and I was reduced the size and I was trying to
get the second one. So now we have the basic
shape for this shirt. I want to adjust further. Now what I'm going to do, I just want to join in
on both small shirts. I just click and drag and
join with that object. We can able to see this is how I have the object right now. Now, come to this
left top corner, you can able to see that point. I just click and drag
towards the bottom. So I can able to
adjust the shape the same way I had to adjust on this
right-hand side also, I want to maintain
the same height. For that. I'm going to show
the ruler bar here. You can show the
ruler board with the help of your menu bar. I come to this view menu. Here I can come to this
place, the rulers option. You can also use
the shortcut key, which is Control Alt Shift R. I click here. You can see I got the ruler
bar. From this ruler. I can able to bring
the guidelines. So I just click and
drag from this ruler. We can able to see
I got the guideline here, right place here. Now I come to this spot. I just click and drag
towards the bottom. So this is how it was creating
a perfect balance sheet. Now I don't want this guy line. I just click and drag, please, where I was shorter. That's it. So we have changed the shape
of the particular shared. Now we want to create or
click appearance or displays. So for that, what I'm doing is I want to create a
center line here. I want to create a
guideline first. So I click the object and
the object Transform. And a plus q, I can apply this quick transform and you can able to see which
is the center point. Now from this left-hand
ruler and just click and drag to create a
vertical guideline. So you can able to
see that guideline. Now, this is the central point and I choose Selection Tool. I deselect the selection, what I have selected here. Now I just click and drag this particular portion
and a place where I want. So this is where I
want. I just released. They're on a drag and
release in this point. Now I just come to this area. Here we have a diagonal
line up to this place. Here you can see we
have the caudal bind as we have in this place. I want to create a curve
like this on both sides. So in this era, so I had to create
the same thing. I just click and drag
towards the slept on site. And it was creating the CO. So here I just delete
that guideline. And I can adjust this. You can able to see
how I have the shape. And here I just click and
drag towards the top. And I can maintain
this shape here. Now, what I'm doing is I was
create a guideline again. Just want to increase. And I need a shape
like this where it just this area little
bit on both sides. So I was created the
shapes successfully. Of course, I had to
add more details here. But right now I was
creating a simple shape. I will add more details.
9. Fence over the Landscape design: After the successful
creation of this shared, I'm going to create the
rest of the details here. So I lock this layer and I'm
going to create a new layer. Here. I'm going to click
and just double-click here. And I'm going to give
a name, matures fence. So here I'm going to create
the fence for this shared. I choose rectangle tool and I choose the
color what I record. So I'm going to
choose a color here. And here I want to create share. It's the oldest shared. I
want to create in that way. Was created a shape here first. Now I want to add some details. So I just zoom in. Here, you can see how it looks. I select the object, I apply it onto them again, and I increase the
hate little bit. So here I had to queue bit
depth for this object. Further, I select in this way, you can able to see however
selected the object. And here I want to
change the color. I use the same color. I use this custom color. Here I want to add dark values. Let us see however,
selecting the dark value. Here you can see we
have only color here. Here you can see we
have only colors. So we are right now
in this read mode. If you can able to see we
have only pure colors here. I had just hue. So I choose Q. And here you can see in this color selection, I
have the color wheel. And here I want to
choose bit dark value. And that creates a
shared lake appearance. We can able to see that
and hear what I'm doing. Yes, I just zoomed this area. Just click and
drag a little bit. So that creates a
3D like appearance. It's illusion. And now what I can do is I can
select this object. I can duplicate. And again
please here for the fence. So in the same way, I'm going
to place on this side also this itemset also going
to duplicate this. Before that, I just want
to do on things when you are using a single object again and again
in Adobe Animate, better, you should make
that as a graphic symbol. That is the easy way,
so you don't want to load more objects
on your library. Make Q issue when you
are creating animation. So here what I'm doing is I
was selecting this object. Now we want to convert this
object as classic symbol. We all know that the
graphic symbol on Libya going to create an emission
for video purpose. So I select this object. Now I press F8, an a plus F8. I have the name of this particular option
which is convert to symbol. We'd give a name
which is friends. And how to choose
this type to graphic. And I choose this
initiation Art Center. And it will be in the
library root folder. If you have multiple folders
inside this library, we can place where you want. Otherwise it will be in
the libraries root folder. We have advanced options and I don't think we need
those objects right now. So I just choose, Okay? Now you can see
this is a symbol. When I have the
properties we can able to see it's exotic, simple. I just duplicate that. Since we have this in a symbol, and I select both symbols, I just hold the Alt key
and click it again. Now you can able to see I was perfectly duplicated the object. So after placing
the object here, here you can see I had
to adjust this area. So I just double-click
the symbol. And here I want to adjust. So I want to add like this. And here I had to add a shape. So what I'm doing is I was creating shapes, rectangle here. And this fill
balance, this side. I want to do as much
color variation. You can see the difference. Now. I move this towards this place and this corner
point towards this place. So we got that red shape here. I just double-click
to get outside. You can see that area was
updated in our older. See that. It looks great.
So this is one of the advantage when they are
using a graphic symbol. Once if you have updated
a shape anywhere, all those references
that will get updated. So this is a good thing. Now I'm going to do
the rest of the work. So we need more
fence details here. I will add all those things.
10. Make Details on Sky and Clouds: After adder in this
basic fence appearance, I'm going to add, are those detailing works for
this background design. So I just logged this fence. You can see a house sky layer and I help clouds the Greenland, the way cows shared and fence. So I'm going to detail
all those things. Let us see how to
do fuzzy choose this sky layer I
just unlocked that. Can able to see that. Now you have to apply
gradient transposed. And I come to the bottom and I want to adjust
the gradient value. Here you can see I want
the appearance like this. So I was adjust the
gradient value. That's it. I was completed the
retailing work for the sky. I just lock that layer and
I come to this clouds. I just unlock the cloud layer. So here we have three objects. You can able to see
that all our shapes. So I want to convert
that into a symbol. So I choose this and I
have to convert that. I want to press F8. And I'm going to give a
name which is Cloud one. And here I choose this area. I press F8. Let's choose Cloud. I choose this one. I press F8, choose Cloud. So they have given a name
for all these three. Now what I'm doing is
I go to my library, Control L is the shortcut
key to access your library. So I come to this area, we have three types of clouds. Of course here I
can rename that. I'm going to give a
name that just cloud 3. So we have Cloud 1, 2, 3. Now what I'm doing is I was
creating these cloud one can able to see I was duplicated
and I was reduced the size. And I was placing here. Now, what I'm going to do is I'm going to reduce the
object transparency. So I select Selection Tool. Now I go to the Properties Bar. Here you can see we have the option which is
colored effects. So in this color of x, right? No, we haven't none. I'm
going to choose this alpha. Now I'm going to reduce
the alpha value. Currently it was a hunter. I'm going to reduce that. We can able to see how it looks. So to help out this Alpha value, I can change all those
transparency values. So now I duplicate this
clouds and I scale this. Please. Here. I choose Selection tool. Now we come to the
Properties Bar. I choose cholera
vaccine to alpha. And you can see I was
reduced the Alpha value. So in the same manner, what you can do is we can use different clouds
that the different alpha values if you
want more details. So here I'm going to
duplicate this again. Go into place here. And I'm going to give
the Alpha value. So in this way, I was adding more
details for the clouds. As I record.
11. Add Details for Landscape and Land: So after adding in those
details for the clouds, I just lock this layer. Now I come to the
Greenland layer. I just unlocked this
Greenland layer. Here. I want to add
details for this land. So what I'm doing here, I was adjusting
those areas again. You can able to queue some sharp edges instead
of giving more close. And here I'm going to give some color variations
to perform that. What I'm going to do, just watch it carefully. I was using the line tool, but he'll put the line tool. I'm going to create a line here from this point to this side. Can able to see how it
was created that line. And here what I'm doing is I just create on more
rent from this point. So both lanes will
be joined here. You can able to
see this portion. I choose selection tool
and I click this area. So now we can able
to see that I can able to select that this
particular object alone. And here I'm quite
a bit dark color so far that I just
click this object, come to this color
properties and choose Fill, and it choose more colors. Here I'm going to do little dark values
and I just deselect. So now you can see the
difference between both colors. Now if I just select this
line and I delete that. So in this way you
can create any amount of detail for this background. So to you, based on
your requirement, you are going to add those
details on these items. It also, I can add
those kinds of details. So I use the line tool again. I come to this area. So here it cannot able to see
what you have this shared. So this time what I'm
going to do is I'm going to make this shared
appearance into invisible. So I can put the shade layer and a 2s invisible icon
so I can hide that. And I'm going to
perform what a record. So here I'm going to
choose this object, the fill color, and I choose the same color, what I record. And we double-click the
outline at it. Just did it. That's it. I just enable this Koshi at BYU before that I had to
extend this if a record. Because when you're
creating animation that we queue ugly appearance
for the background. So I was clearing are
adding details like this. If you want to add more
details like this, you can add, that's
purely you are per share. So based on your
creativity that need, you can create how you want. You can also go After added in all those things. I just logged that
Greenland layer. Now we come to this
layer the way. So here we have the VA,
I come to the player, I just unlock that layer the way here I want
to add more details. Right now here we
have only one shared. You can also add
details with the help of your brush tool
if you record. But what I'm going to do is I'm going to use my oval tool. I have one shared here
and choose Fill color. Let's choose the
same shared here. What I'm going to do
is I want to give some different
lighting appearance for this particular object. So firstly, choose this and
they come to the fill color. I go to the custom color here, I want to add some
dark colors first. So I choose this dark color. So from this to some brown instead of this green
here, I want this color. So from this one day I'm
going to extend my colors. So what I'm going to
do is I'm going to use my oval tool of us
creating a overlay. This, of course I don't want any stroke, disable the stroke. And I'm going to create
the same colored objects. Here I choose the color and
I come to the free color. I make color into bit later. And I move that object into this particular object location. You can see how it looks. But I want some
uneven surfaces here. So further I choose
the brush tool. So with the help
of the brush tool, just create some
uneven surfaces. I want to increase
the brush size. So I come to this properties. Let's choose a size. Now. We can able to see, you know, I can able
to customize it. We can able to adjust
the edges as a record. And after this, again, I had to create a circle. So I use oval tool and
choose the same color. Choose custom color. Here I have to choose
little bit like color grid ellipse first. And here what I'm going to do, I'm going to use the same brush and choose the brush
color into this. Of course, right now we have choose to that
same color also. And I'm going to apply here. So this time I'm going
to adjust the brush size from 51 to that file. Adding like this, add some more details. You can add more details. You can add.
12. Make Details for Shed: So after adding the details for the land area,
I can't do this. So right now it was invisible. I make it as a visible first. And I'm going to add those
details for this Kosher. I unlock this layer.
Come to this area. So here I want a lot of details. So first what I'm
doing is I choose this layer and I want to
duplicate this object. So I called OLTP, and I duplicate this once again. Here you can see we have
one more new object. I just want to
another object here. I just hold Alt key and
a two we get again. Here what I'm doing is I
choose the second one. I'm going to make the
fill color into black. This looks really good. And I'm going to move
that over this object. Here. I want to
adjust few edges, as you can see. So by adjusting those edges, I can able to create this shape, the black colored shape, away, delete the
rest of the areas. And here I just
group this object. This object, I press Control G, and I come to this area. Again, I group this object also. Now I just move this object, can see the red colored shared appearance after
this black shape. That's why it was introduced
this red colored shape. If I want to move
the black colored, the outline in front of
this particular red color. Hard to choose. This modify. I had to choose arranged here, I had to choose Bring to Front. So when it just bring to front, I can bring the
particular object in front of other old shapes. So here I have the object
over the other objects. So in this way you can
place where we want. Now what I'm doing is I
want the same object. Till the end. For that, I'll just double-click the
particular black object. Here I'm going to
create a selection. Just click and drag my mouse. Can able to see it was
created a selection. Now I apply q to
play terms form. And I can create a
shape like this. But this time what I'm
doing is I was changing the center point into this
particular location so that, you know, I can able to create the scaling at own
direction itself. So you can see that. And I'm
going to do the same thing. Just to want to create
a selection like this. Now I want to adjust
the center point. And I was creating
a moment like this. So after created that, I just add just a point a. And here I can
adjust if they want. So my need, I can
adjust how they record. If you feel like, you know, we have uniform shape, you need a difference. We can create like this. So it was created in the
outline, appearance like this. And after that, I want to
create a selection here. So I just double-click
the object here. What I'm doing is I'm
going to use my tool, which is ink bottle tool. So with the help
of the ink bottle tune can able to create a stroke around any object or choose ink bottle
to right now, I choose Stroke
Color into white. Instead of having
weight, I may also have this late pink color, red color. I'm going to click this object. So when I click this object, car denoted as true
with the same color, you can see that I
double-click the stroke. Can able to see the stroke. And I'm going to change the color to the stroke color
and choose custom color. And I increase the brightness. So we can able to see that right now and also increase
the stroke size. And I twos strokes,
I said three. Looks really good. I come to the bottom area
of this Properties Bar. Here you can see we have three different
appearances, four corners. So right now it was
in a kernel mode. I need the same thing. And after that we have three more options
here you can see the meter joint and
beverage giant and around Jan, Jan itself. So by default you
will have that. And here you can see we
have a lot more options. So if you want some
irregular shape, you can use these other ways. You can just leave
it. What I'm going to do is I'm going to
delete the stroke, what we have over this
particular black shape. I don't want that. I only want the stroke what
we have inside the object. So we just want that area only. So after this, I just want
to delete the stroke. So we have created in this way. And now I'm going to add in
some more detail for this. So I just double-click
the shape again. Here what I'm going to
do is I just duplicate the object, delete these areas. And I have only this area. Click Q. And I reduce
the object dimension. And they wanted to change
the color of this object. So I just select the area
alone as I show you. So I want to create a
selection from this point. K those kids disturbing me. So I just want to
lock those gates. So I come to this view Meno. They come to these
guys lock gates. Now we can able to create
a selection like this. And I choose a fill
color and I add dark values to create
shared like Appearance. Choose this object and a group. This demo, this took
place here. Scale this. And I double-click
and it come outside. So this is how a record
and all that object. And it shows a shared
like appearance. Now I'm going to create
those texture for the shirt. So I choose Line tool. And I come to this area. I'm going to choose black color. They create a stroke
from the top. Can able to see, since we
have so many objects inside, it shows me only the
area I create outside. First, group this. Now we move into this place. And I press Q and set the points doesn't scale the
particular line. So we can able to see
the line right now. It looks purely black, but I needed a dark red, so I double-click the line. Let's choose the dark red color. So this is how it
looks right now. I just want the
dimension of the line, so I just double-click
and from three to five. So this looks really good. And I want to duplicate this. More numbers. Just click inside. I just click and drag to create
a whole much of a secure. If it was created. Those strokes for one side. That's enough. We can duplicate that and please bear with occur. Finishing look. And I
choose all those lines. I use Control G to group. I press Alt key and click
and drag to duplicate that. Now I want to transform it, I just want to flip it further. I come to this modified amino. I choose Transform,
Flip Horizontal. And I move this lines. So it was placed in
a perfect place. Now I totally can come
outside the sphere. Now you can see we have
our different shots. And I come to this place, so we have different
shapes here. And I select this shape. I want to move that into front. I can go to the Modify menu. We can choose, arrange a
leg, and just bring fun. You can also use
the shortcut key here you can see
how Control Shift. So I can able to
move that object, you know, above
all other things. So we have created
all those shapes. We have to create a window and a door that you create
better look for this shared. Before that I want to
convert all those shapes. Those shapes we have created for this particular
shared as a group. I just want to delete
this guy lines. So I come to the view
menu and I come to this Guides unlock the lock. Now if I delete those guidelines and I
select all those objects, and I make that as a group. So it's a single
group right now. If you want to break
the help of control B, now you can able to see we
have different objects here. So after this, what
I'm going to do, I'm going to create a window. So I choose rectangle tool. Here. I'm going to choose the
outline color into black. And I'm going to choose
the fill color to white. Here I'm going to create
a rectangle outside. Making a square by
pressing Shift Tiki. This should be the size. I just want this
area here you can see how it has the appearance. I just copy the fill
color and I'm going to paste control V. So we
got a new object here. Here I feel the same black color or 90 percent gray color. I applied towns farm, and I reduce the
size of the object. The place inside again. Now I just select this and
I make the center crew. So we can able to see we
have a group icon here. This will act as a
window in place. In this way, I can
duplicate the window. We can place multiple windows. They are a record on this era
so I can place on window. So based on your need, you can create how much recur. And I duplicate this again. I want to make the
size of the beaker. And here I'm going
to create a door. So I just double-click
the object. Since it was a group, we can do a lot
of modifications. We don't have any
issues with that. To do some changes here. Going to fill. And black
color, pure black. And I'm going to place this
object at the center of this. So this will be the intense. Here. I'm going to change
the white and gray. I'm going to use the dark gray. This is a wild
place, those colors. And here I'm going to
create on Windows. So this window has
a single view. Here. I'm going to attach
both windows like this. So it's up to you based
on your creativity, can create what kind of
appearances you want here. So I'm going to duplicate. So in this way, you can create your
wont shared for this cartoon drawing background who was added in more
details for this shader.
13. Improve the Fence: So after adding details
for the shared, I'm going to add
detail for the fence. I just log this shared. Come to this fancy area, I unlock the fence. So here I have four objects. Of course our theme objects. And I want to create more
order to create a more word. I want to select Rectangle Tool, and I choose doubting
color and just fill color. First, I had to choose
the Fill Color. Fill color. From the same would. I choose custom color? And I want to choose some, some more color values. So I choose this color. First, I'm going to
create only one order. Was creating like this. We should not have too much of a difference between
this and this word. I just want to select
the same color again. From this, I want a small
kind of collaboration, or I can use the
same color also. So here I'm going to
use the same color. Just check whether
we have here also, I had to show depth for the welder to show
some more details. So here I'm going
to add the shared. It should be a bit
darker. That's it. I had to add more dark value. This looks better. And I want to create
the same share. Also. Using to selection
tool and select this area. Choose Fill Color. And I delete that. Can
able to see how it looks. Now we select this object, transform and a group
this using Control G, can see how it looks. Now I want to fix this particular route
with the background. I have to create a shape here. So I just double-click the
object and I want to create a shared use the oval tool
and just delete this. This is how it looks. Please here and here. Now we can see we have
the perfect shape. We can move a little bit
down the complete fans. Yes. I duplicate the shape. If you want to
maintain the same. Hate. The x-axis question. We can resolve the Alt
key and you can press Shift key to maintain
the same x-axis. I can adjust the
distance between those. Now again, I come to
this right-hand side. Here I can do two things. I can select all those things, a plus Alt key and a
duplicate all those things. We have created the
detailing for the fence. Now what we can
do is we can move the fence below the vase. I can do the sorting. I can
move that way about defense. So a movie about offense. It looks like this now. So it looks really good. So after adding
all those details, now it looks much better
if you want to add more detail over this sand. I can add that. I locked the
fence and I unlocked the VA. And here I can add if you want. So in this way you
can able to add all those details for the
sand and other all elements.
14. Create trees above the Landscape: Now in this cartoon drawing, finally, I'm going to
create a bunch of, let me show you how to create
those trees and just lock this layer and create a
new layer for the tree. Was renamed that layer 2, 3. And I'm going to create a tree. A tree is a easy job. Let me show you how to do that. I'm going to create
the leaves first. So I make the stroke
color in finance, I choose only the fill color. Right now I was choosing
the dark green only. You can see it was dark green. And I was creating
one leaf first. So hard to create
one leaf first. So based on that only we are
going to create our lives. Now what I'm doing is
I just group this leaf and creating a random
directions for those leaves. So it's up to you
based on your need. You need those leaves. You may randomize the size. You can do that later. So after placing
the exact version, you may randomize the sizes. You don't want to use
the same size objects. At the end, what I'm doing is my select are those objects
and they break the object. So now you can say
it's a single object. It's easy to carry this object. In the same way you
can create a bunch of ventures like appearances
was created a one. Now I scale it. And what I'm doing now is
I just duplicate that. You want to change
the fill color. So I want to make the
color into bit brighter. You can able to
see how it looks. But I want to maintain
the same color. So I'm going to use this tool. I group the very
first object and the second one also
transform, rotate. I can transform again. However, I can place where I want those leaves
like appearance. I can lose the same object. Also. Reduce the dimension. And again, I duplicate that
for the light-colored. I reduce the size. The place where this
time I break it again. And hair color. It's up to you. You can add more colors as a group that, and
I place it again. So you can place any number
of colors for those, can create those branches. I just delete the background
first group, are these, interestingly,
before that I break this objects when you
group it into singles. Now we can see all those things are shapes. Just topically. Side here you can
customize if you want. That's up to you. Because
you have all those shapes. You can customize if you want to say, it's easy. Anybody can do this.
You can do this. So after you know,
your adjustments, you can have a bunch of leaves. Now what I'm doing, yes, I was to be getting
this can transform. Transform. We can
place where I want. I can duplicate it to
any number of time. Finally, I'm going
to create the stem. So I'm going to choose
Rectangle tool. I'll choose a fill
color into Brown. Was creating a stem like this. And after this, I was selecting that particular object.
And the object. Can able to customize
the shape of the tree? No, we should have
the broader area at the bottom and we will have
shorter area at the top. For the RTK to create
those planters. Again, to create
those straight lines. I press Ctrl Alt key
to add more points. So we can create those branches like
appearance, how you require. You can decide the
size of those. Appearance, which you see are going to decide
how we trickier. So are they enrolled?
I'm going to do, I just select this object
and convert the rest. So here we also have
a bunch of groups. I just convert all those
objects into a single group. Here you can see we got 13. So this is a one-day
one example. You can also create
a simple cartoon. Our tree is like how
I was creating here. Let me show you. I was creating courtroom
tree like this also. So this is my tree that those green areas and
I have the stem here. Of course, this is also a tree. No one can say this
is not a tree, okay, So this is your world. You can create your own
trees based on your needs. You can choose
which one you want. So I was created like this
and I was afraid transform. And I place where I want. So I want to place those trees below the
vase and below the fence. Now I move the tree
layer below the fence. We can place where it recurs. The tree. It's a single group. Now, if you want the trees
over those backgrounds, I can totally get that. I get that. I can reduce the size and
place where I record. Again, I do the same thing. The distance will be shown
through the tree size. And here I need one big tree. Placing here. In the same way, you can also add multiple trees for this Scotland background. Can create your own new
teeth and you can duplicate. And you can place
where you record.
15. Small Shrubs over the Land: Now I want to create some
few shapes like appearances. So I just lock this layer. I create or more new layer. Here. I'm going to create
those public appearance. So I use rectangle tool first. We create a shape like this. And I was creating this shape. And I duplicate this. Now we go to this
transform flip horizontal. I reduce the size. You can also rotate to create
a different directions. The same way you can
create multiple objects. As I was creating that. I was also adding
small rectangle here with the same green color. Here. What I'm going
to do is I want to create a shape like this. I can create on
the federal side. You can control G to group this. I can. So in this way, you can create a complete
cartoon background using Adobe Animate CC.
16. Add Camera in Adobe Animate: In this lesson, I want
to show you how to create an animation for this background using
camera movement. This camera to list not
the best thing to create. A cinematic moment like appearance with the
help of Adobe Animate. Let me show you how to use the camera tool
in Adobe Animate. Here in timeline you can
see we have a lot of icons. We have all those layers
from the weight to sky. And I'm going to
add a camera here. If you want to add a camera, you had to press this
camera I can hear. So it was separately
added in timeline. I just press Add camera. When it choose, add camera. Wherever you have
selected a layer, the camera will appear at
the top of this timeline. So here you can able to
see the camera contours. And we have the
camera layer here. Now I press Control
2 so that I can able to see the entire screen
in a Fit in Window mode. Here we have some
unwanted areas so I can reduce the timeline, height plus control tour again. So with the help of
this camera tool, I can able to zoom in zoom mode. I can pan, I can move, I can do all those
camera movements with the help of this camera tool. First, I'm going
to do a zoom in. We can able to see how it
was created as zoom in. You can also create a zoom mode. So based on your requirement, it can create a zoom out also. So you should not go away
from the background. So this is the right for Shen. We have covered all
those backbones, right?
17. Animate the Cartoon Background with Camera Movement: If you want to create the animation for
the camera movement, what do you need to do is, I just select the
very first frame. Here, I right-click and I
choose create motion tween. So have to enable this
create motion tune if you want to create the
camera animation. So after adding that, I come to this place that yet the frame before that I
have to increase the frame for all those objects was increase up to four seconds
for all those layers. I select all those
layers for second frame, Nicholas F5, to add
a static frames. And here you can see I
was having 30 framed. By default, we have that. And at the beginning what I need is I just want to
zoom in a little bit. So I place my mouse cursor. So, so I place my timeline needle on
that year three frames. Here, I want to
create a small zoo. You can see when I
create a Zoom here, it will automatically
add a keyframe at frame. So I know we have
only a static frame. You just click and drag. That's it. I was released. So I will have a small
camera movement there. You can see I was just
press Play button here. I have the small
camera moment, right? That's what I record. And after this camera moment, I just want this camera
mode for two seconds. So I come in between the duration 30
seconds and press F5. So I can able to extend the time duration
up to 60 seconds. Now you can see I'm
going to play this. So I have a small amount
of x2 in a slow motion. You can also have
the same moment for three seconds up to 90 frames. I got it. So I'm
going to this again. We can able to see how I
got a Zoom in a smooth way. So after God, this Zoom, what I'm going to
do is I'm going to move the camera and I had to focus this window itself or the spinner itself.
Let me show you. So after this camera movement, I place my cursor
here at 180 frames. I press F5 to increase
static frame. So till this we have camera movement and we
have static frame again. In-between I have to give
1 second frame and travel. And after that, no, here I want to add one keyframe. I press F6, so in-between, I don't want any
camera movement. And after that, we want
to focus anyone window, either this right-hand side window or the transfer window. So I want to focus on
right hand side windows. So what I'm doing is
I was just zoom in. We can able to see I got
that particular keyframe. Now I just click and drag
towards my right-hand side. I can pan my camera. I can able to see that. And just click on track
towards my right-hand side. And I can zoom more if I want my pen towards
my right hand side. So this blue color line shows
that is the camera view. And I click and drag
towards the bottom. So this is how it works. Now I click and drag. You can able to see how I
was the zoom that area. And after that I'm
going to queue a static frames for two seconds. And I add a keyframe here, I'm going to start
the animation again. So from this place, I want to zoom 1 second. I want to move the camera
and a 100 to zoom out. And the total duration of the
camera moon was 1 second. So here I have only
1 second duration. Here what I'm doing
is I was Zoom Out. That's the first
one you have to do. And I was panning
towards my left side. And I was focusing this area. So maybe some of a vehicle, a person was arrived
at this place and they want to move
from left to right. So now I had to create a camera movement from
left to right slowly. So after reaching this version, I have to give 1
second time interval. Yes, I was given a
second time interval. Now I want to create the camera movement from
left to right slowly, slow. I want to create
more timeframes. I'm going to create up to
14 frames of 10 frames. And I'm going to have only
slow camera movement. So here I had to
create a keyframe. So I have six and I create
the camera movement. So I was moving towards
right-hand side. That's it. So now I'm going
to play from the beginning, you're going to
see how it looks. I press Control 2
and I play here. We have a camera movement. We have the small zoo, and we stopped the camera. We assume only the window
and Resume the path. And from that area, you know, we're moving that slowly
from left to right. So these all
cinematic movements, the camera movements
are possible only with one tool with Mitch's
add to camera two. So we have created 15
seconds camera movement. If you have the character here, we'll have all those animations with the help of
this camera tool. I was moving into the friend. So we'd have created a
15 seconds animation. At the end, what I'm doing
is I save this again.
18. Export the Animation as a Video File: Now I want to export
this as a video. Let me show you how to do that. So say come to the
File menu here, had to choose Export. And after choosing this, I had to choose Export
Video or media. I choose this. When I choose Export
media or video. How this Export Media option, if you want to ignore the stage where you can enable this, otherwise, it should be default. We have the exact for
literary resolution or nine, 200, 100, 1080 pixels. If you want to
change the dimension here itself, we can change that. And if you want to
create a sequence of image During the export process, you can choose scenes
instead of Intel movie. If you have multiple scenes and you want to export
all those scenes, we can choose Intel movie. Otherwise you can choose the
particular scene itself. But currently we have only one thing that is also comes out to
the entire movie. So it should be there. And we can mention the frame, starting frame and
the frame if you want to mention the
starting and ending time, you can do all
those things if you record and you can choose
the format if you want. So the encoding video format, we have the preceptor here. So I'm not going to
change anything here. I don't have any
intent right now. So you can do all those
things and it can also change this particular
output folder. And after choosing
all those things, I'm going to choose Export. So when I choose export, the export process was starter. It was king. Let us see how it was created as a video because
in this timeline, we didn't move any object. We have used only the camera
view and the camera itself. We have completed
all those things. Let me show you how
it was created. The soil was completed. So when you're
doing this process, it automatically opens
this Media Encoder. Here you can see
it was continuing. You have to wait when it starts fast time
to take some time. And it was successfully
completed. So at the end, you've
got your video. I click here so that
I can visit my file. So this is the video we have. So I'm going to play this
with my video player. So this is a starting
bind you can able to see we have a full HD video. We don't have any lag
or in this background. We have the camera moment, it's the first moment. And this is the second
moment of this as creator. And may have that
camera movement. Finally, we have the
fourth camera movement. So with the help of this
camera animation itself, we can able to create the complete cinematic camera movements in order be animate.
 Venkatesh B, Professional Instructor