Transcripts
1. Introduction: Hello. Welcome to learn Beat making an FL Studio
within 1 hour. If you want to
start making beats today and this course is
what you are looking for. You will see that you can
make an entire beat within a few minutes without even
having to reopen the project. I will show you a professional
beat making workflow step by step so you can
replicate on your own projects. You will see how I created
this beat from scratch.
2. Browser Setup and BPM Selection: Okay. Well, let's get started. The first thing I
want to show in this video is how to make a custom folder appear on
the FL Studio browser. On the top menu,
click on Options, and select file settings. A new window will open. Now, click on one of
these folder icons, and browse for the folder where
your samples are located. Click on, and that's it. The folder will
now appear inside the browser on the left
side of the screen. I'd like to mention
that in this course. I will be using only kits
that are available for free. I got these from wave supply. If you want, you can download them to your computer as well. Okay. Now that we have
our folder set up. Let's create a new
project. Click on file. New from Template minimal
and select empty. You won't see any change
on the screen because we are working on a project
that was already empty. After creating a new project, you can set the BPM of your
track by left clicking the tempo on the
top of the screen and dragging it up or down. You can also click it and select one of the
pre defined options. Well, that's it for now. Let's jump to the next video.
3. Working With the Channel Rack: In this video, we are going to talk about
the Channel rack. When it comes to making
music with FL Studio, you will be spending a lot of time working with
the Channel RC. The Channel RC is where you can load samples or
virtual instruments, create patterns, write melodic
lines, among other things. To open the Channel
rack on the top menu, if you need to click on
view and select Channel RC. Alternatively, you
can simply click on the Channel RC icon above the timeline of the project
to open the window. When there's already
a channel created, you can simply right click the main button of the channel. Go to replace and select a different virtual
instrument from the list. Let's replace this one with
an instance of FL keys. You can also click on
the Little plus sign and select an instrument
from the list to insert it on a new channel. Let's insert another
instance of FL Keys. With the channel
rack. It is also possible to load one
shot audio samples. Let's browse the
samples we got in our folder and
choose one we like. You can simply drag
the audio file into an existing channel to replace the previous
sound or instrument. Or you can also drag the
file and place it right below another channel to create a new one with
a selected sample. From there, you can start
creating your patterns. Okay. Now that you
know the basics, let's start talking about
chords and melodies.
4. Creating a Piano Melody: Okay. In this video, we will start working
on the melodic and harmonic elements
of our track. But first, let's click the channel and replace it
with an instance of FL keys. Now, right click the
channel where it says FL Keys and click on Piano
Role to open the editor. Most trap beats uses
the minor scale. That's what we are
going to use as well. The A minor scale only uses
the white notes of the piano. This is the scale we
are going to use here. The chords and the
melodies of the beat will be constructed based
on these white notes. Let's start by working
on a chord progression. To build a chord, I will start by picking one note
from the scale. In this example, the root
note of the chord is an A. Then skip the next
note of the scale and use the subsequent
on top of the root. Again, skip another white
note and use the next one. Then we have an A minor chord. Let's repeat this process and build an E minor as
our second chord. Pick the root note,
which in this case is an E. Skip one of the white
notes and pick the next. Skip another white note and
use the next one more time. Sometimes it may sound better
if we bring the notes a bit closer to each other to
avoid having big leaps. To smooth out the transition
between the chords, we can simply move the
notes an octave up or down. This is what we call
inverting the chords. I will bring the notes
of the second chord down to get a
smoother transition. First, move the B
down an octave, so it get closer to the
C from the a minor. Then move the g down an octave. It gets from the a minor. Okay. Now, we can
double the root notes, one or two octaves
below the chords to fill up the low frequencies
and get a bigger sound. The root note of
A minor is an A. The root note of minor is an E. Now, let's create a
simple melody above the chords using only
the A minor scale, which is made of the white
notes of the piano roll. By using long notes, I'm leaving some
space in the melody, so we can fill the gaps with
a counter melody later. Okay, I think the
piano is good enough. We have harmony and
a melodic line here. Let's work on
another instrument.
5. Creating the First Countermelody: In this video, we will
work on a counter melody. First, let's click on the plus sign and add
a new instrument. I will use this
synth called Sakura. You can change the
preset if you want, but for the purpose
of this course, I will try the initial
patch and see what it does. Right click the
instrument label on the Channel rack and click on Piano Role to open the editor. I will try to make the
counter melody more active on the long notes where
the piano melody rests. Okay. If you need to delete
a note on the piano roll, simply right click it
with the mouse cursor. The left click adds a note and the right click deletes it. Again, to create
the counter melody, I will be using only notes
from the A minor scale, which are the white
notes of the piano roll. These no next to each channel control the panorama
and the volume. Let's adjust the levels
of the counter melody. Let's also assign
the counter melody to a specific channel
on the mixer. We need to do this
for each instrument we add on the channel rec. Click on Vew and select Mixer. I will try to explain
this a little better. Note that each channel is related to an insert
on the mixer. The first channel is linked
to the first insert, and the counter melody channel is linked to the second one. Let's hear how the melody and the counter melody
are working together. Now, let's open
the mixer again to insert a reverb plug in
on the counter melody. After highlighting the counter melody channel on the mixer, I will click on an empty plug in slot and insert an instance
of Fruity reverb two. Let's play the track and tweak the wet and size controls until we find something we like. Great. Let's hear
it one more time.
6. Creating the Second Countermelody: In this video, we
are going to create one more melodic
layer to our track. In general, you should
try to keep your melodies 2-4 instruments to avoid
muddying things too much. Let's click on the
plus icon within the channel rack to
insert a new track. I'm going to use
Sakura one more time. There's a nice
pick guitar preset that might work with this track. Let's try this one called
picked guitar two. Okay. Now, right
click the channel and select piano roll
to open the editor. For this layer, I'm
thinking about adding some short length chords
to fill the gaps between the melody and the counter
melody. It's too low. Let's try placing
the one octave. Hold control or command
to select multiple notes. I'm dragging manually,
but you can use the shortcut control up or down to jump one
octave up or down. One interesting thing we could do is to make this
a strummed chord. You can do it
manually by holding Alt and offsetting each
note a little bit. You can move the notes to taste. Now I'm going to delete these notes by right clicking them. Let me quickly
recreate the chord so I can show you a quick
way to make strum chords. I will make these
notes a bit longer. Then we are going to click
on this small arrow on the left corner of the piano
roll to open the menu. Now, click on Tool
and select strum. Use the time control to choose the strength
of the strum effect. Also make sure to check
the preserve end option, which makes it easier to
align the notes on the grid. Click on Except to confirm, and let's hear how it sounds. Now, I'm going to insert
an E minor chord and then invert its notes to get them closer to the notes
of the first chord. Okay. Okay. Let's hold control or command to
select multiple notes. Click on the small
arrow to open the menu, go to Tool, and select Strum. Let's hear how it sounds now. Good. But it could
use more reverb. Let's also sync this delay. Low the volume a little bit. Finally, let's
assign this instance of Sakura to the Channel
three of the mixer. Okay, I guess we are
done with the melodies.
7. Making Strummed Chords: When it comes to
melodies and harmonies, I usually like to
have 2-4 instruments. As we already have
three elements, I think that should be enough. But now I'm thinking
we could also strum the piano chords and melody
to make it more natural. I will right click the channel
and open the piano roll. Now hold control or command, and left click to select all the notes at the
beginning of the timeline. Now hold control and shift at the same time to select the notes at the beginning
of the next chord. Click on the little arrow on the top left corner
of the editor window, go to tools and select Strom. Adjust the time
control to taste. And click on accept when
you are done. Perfect. Let's listen to all
the melodies together.
8. Creating a Clap Pattern: In this video, we are going to work on a clap pattern
for our track. But first, let's
duplicate this pattern. I keep one with
the melodies only. This will save us
some time later. Right click the pattern
and select clone. Now right click the original
pattern and select rename. Let's rename it to melodies. After that, select
the cloned pattern and switch back to
the channel RC. Now let's search our sample
folders for a clap sound that we like. Okay. I'm going to use
this simply drag and drop into the channel rack
to create a new instrument. Right click this rectangular
button and select rename. Let's change the name to clap. We can now create
a clap pattern. We are going to insert a clap hit on the three of each bar. Jump the first two
blocks of notes, and add one at the
beginning of the third. Let's repeat this process
for the remaining bars. Jump the first two and insert a note at the beginning
of the third. Again, jump the first
two and hit the third. One more time, jump the first two and put a
note on the third. Let's see how it sounds.
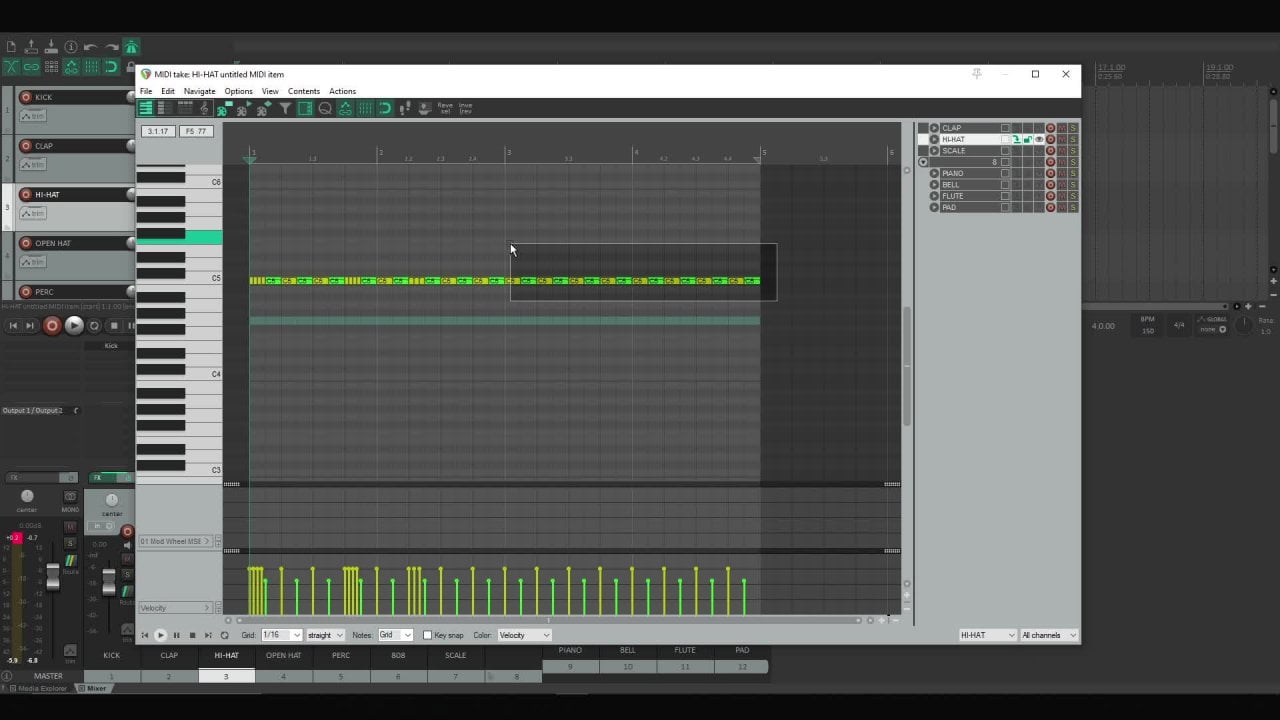
9. Creating a Hi-Hat Pattern: In this video, we are going to work on a high hat pattern. First, let's choose
a high hat sample. Okay. Drag the file into the channel rack
to create a new track. Right click the high hat track and select re name
to change its label. I will take the
opportunity to assign both the clap and the high hat to specific inserts
on the mixer. Creating a basic h hat
pattern is really simple. We just need to fill
every two steps. You can do it manually,
but there's an easier way. Right click the high hat track, then select fill each two steps. Now, let's get creative. Right click the high hat track, then select piano roll
to open the editor. I will start by adding
some crazy roles. We are going to fill the gaps
between the high hat hits with more notes to make
the rhythm extra bouncy. Let's start by filling
the gap between the first and the second
hits so if you'd better understand how it works.
This is what we want. You can create variations by playing around with
different subdivisions. Click on the little arrow on the left corner of the
piano roll window. Go to snap and select one of these four step
subdivision options to change the grid
visualization. For each subdivision, you will get a
different roll effect. Let's create some random
roles and hear how it sounds. You can play around
with different pitches while making the roles. It creates a nice effect. Let's add one more
role right after that. I will try another subdivision so you can see how it sounds. I'm getting creative here
with this cascade role. You can feel absolutely free to do whatever comes
up to your mind. You can right click and
drag with the mouse on the velocity area to gradually reduce the volume of the
high hat on the rolls. Now, let's create more roles for the remaining parts. Okay. Let's write one more role
at the end of this part. Let's move this a bit forward because I guess it
will sound better. Okay, we are done
with the rolls. Now I will press home to move the playback marker back to the beginning and
hear how it sounds. You can hold control
or command while scrolling the mouse
wheel to zoom in or out. Another thing you can
do to your high hats is to delete a few notes to
let the pattern breathe. We are simply going to
choose random notes to delete and decide whether
we like it or not. Let's go ahead and choose
some notes to delete. I think it is
sounding pretty good. Let's hear it one more time. Okay. Let's jump to the next video and work
on the percussion.
10. Creating Percussion Patterns: Okay. In this video, we are going to work on the
percussion of our track. Let's start by
choosing a Perk sound. Drag and drop the sound into the channel rack to
create a new track. When it comes to Perks, it is really common to
program a percussion to work as a ghost snare
in between two claps. Let's check how it sounds. Okay. Now, I'm going to select another percussion sound and drag it into
the channel rack. You should try to
avoid placing perks on spots where we already have
claps or high hat rolls. I will place this one right
after the first roll. Perhaps a little forward. I didn't like it. Let's
try a different sound. Again, I will try placing it
right after the first roll. Okay. Let's find
another perk sample to further develop the pattern. Drag and drop it into
the channel rack. And let's find a spot for it. I will put it at the end
of this hat roll. Okay. Let's find another spot
where this sound could fit. Actually, let's use a
different sound for that very same spot to
create some variation. Let's find other spots
where we can use one of these other perk
sounds we already have. Just remember to avoid
claps and high hat rolls. Okay. Perfect. Let's find one more spot where we can repeat another one
of these sounds. Now, let's rename these tracks
to keep things organized. Right click each channel and select re name to
change its label. Also, don't forget to assign each perk instrument to its
specific insert of the mixer. Well, let's search
for an open hat sound to complete our percussion set. Drag and drop it into
the channel rack. The best place is to
use the open hat or at the beginning of the measure
or on the fifth square. For this beat, I
will use it right at the beginning of the
bar. Let's check it out. Well, we are done. If you
want to bounce your beat. Make sure to spend some time
working on your percussion. The main tip I can
give you is to avoid have them hitting at
the same time as claps, high hat rolls, and
perhaps kick drums also.
11. Creating the Kick Pattern: In this video, we are going
to create a kick pattern. Let's start by finding
a sample we like. Drag and drop to load it
into the channel rack. Right click the kick channel and select renamed
to change its label. Let's also assign it to one
specific insert of the mixer. The only rule I follow when it comes to
kicks is to have one hit at the beginning of the
tempo before every two claps. This is important to lock the groove and create
a sense of ground. Let's put this one here and another one here after
the first two claps. Let's hear how it sounds. From there, you can just
play around and try to find other spots to
place more kick hits. As a rule of thumb,
just try to avoid having the kick and a clap
playing at the same time. I'll add one right
after the first stair. Let's double this one.
Perhaps one more right there. And another one there.
I didn't like it there. Let's move it backwards.
That sounds better. I will also move this perk forward to avoid having it
hitting at the same time as the kick. Perfect. I guess we are done
with the kick. Let's jump to the next video.
12. Creating the 808 Pattern: In this video, we are going
to create an 808 pattern. The first thing I'm
going to do is to search for an 808
sample that I like. Drag and drop the sample into the channel rack to
create a new track. Let's rename it to
eight oh eight. I will also take
the opportunity to assign it to a
channel of the mixer. Then click the eight
oh eight channel, and select cut itself. This will avoid having
sample overlaps on notes that change too fast. Now, we need to make the eight oh eight follow
the kick pattern. Click the Kick track and select Piano role
to open the editor. Press Control and A to select all the notes and then
control and C to copy them. After that, open
the piano editor from the eight eight track and paste the notes from the kick by pressing control and V. Now, we need to drag each note
to the correct pitch. By far, the best note to use is the root
note of each chord. This first chord is an A minor. So I'm going to drag the first two notes of the
eight eight to the note A. We can also increase
the length of the notes to make it easier
to visualize the pattern. Now, let's drag this
second note to A as well and make it a bit longer
for a better visualization. The next chord is an E minor. Let's move the
remaining notes to, which is the root of the chord. Again, I will take the opportunity to increase the length of each one of them. Let's move the
remaining notes to. One more time, increase their length for a
better visualization. Perfect. Let's hear how the track sounds now
with the eight eight. Awesome. But there's
more work to be done. An interesting thing
we can do to the 808 is to make it slide. To do so, simply click on the
little triangle right above the keyboard and draw a new note wherever you
want to make the 808 slide. Let's check how it sounds. The best note for the
slide is also the root, but in a different octave. Well, now let's try to
find other points where we could use slides to make the
pattern more interesting. I will make this one
go to a lower pitch. I think it is
sounding pretty good. Let's take one more listen. Great. It's time to
jump to the next video.
13. Processing the Melodies: In this video, I'd like to show you how to
create some variation for your melodies with an FL Studio plug in
called Gross Beat. First, let's click the
melody pattern we've saved earlier and select Quick
render as audio clip. This will create a new file
under the audio clips tab. You can switch back
to the pattern tab anytime by clicking the
piano icon right next to it. Let's drag the audio
clip into the timeline. Select the slice
tool on the menu, and let's cut off
the reverb tail. Now, switch back
to the pencil tool and click to erase the
part we don't want. Then click on this little
waveform icon at the corner of the audio clip
within the timeline and select make uniques sample. Select. Choose a name for
the file and save it. Let's open the
channel rack and send both audio channels
to the same insert. As we already have 12
instrument tracks, let's send these two to
the Insert number 13. Now, I will click on view
and open the mixer window. Let's select an empty
plug in slot on the corresponding channel and insert an instance
of gross beat. When the gross
beat window opens, click on presets and
select momentary. Then select half
speed on the menu. This will create variations on your melody by slowing it down. I will drag the
original audio clip into the timeline as well, because we are going to need
both in the arrangement. Let's get rid of the
reverb tail one more time. You probably notice
that gross beat changes the pitch of the melody. If you want to fix
this, double click the clip and raise
the pitch to the max. I will repeat this process
for the other clip as well. Let's take a listen. Now, I want to show
you a nice trick for intros and breaks. Double click the audio file and check the box
where it says reverse. Then use the slice tool to chop the file into eight pieces. And reorganize them from
the end to the beginning. Let's hear how it sounds now. Okay. Sounds pretty
interesting to me. After playing something
from the time line, you probably won't
hear any audio from the patterns if you
switch to the Channel RC. To solve this
problem, simply use this little button to switch the monitoring back
to the Channel rack. You can switch to
the timeline audio again by clicking on
this other button. I will switch to the
Channel R audio once again.
14. Structure and Arrangement: In this video, we will work on the structure
of our track. The first thing I'm
going to do is duplicate this second pattern by right clicking it and selecting clone. Right click the
original pattern and select rename to
change its label. Now, right click the
duplicate pattern and select split by channel. This will break the pattern
into multiple instruments. Good. Make sure the
playback marker is at the beginning
of the timeline. Then click on the small arrow on the corner of the window
to open the menu. Go to time markers
and select add one. This one will be our intro. I want my intro to
last for 8 bars. The next marker will
be on the ninth. After creating the first marker, we can start adding
others by right clicking this upper region
of the timeline and selecting add marker. This one will be for the hook. The hook will last for 8 bars. Let's jump eight and add another marker. This
will be the verse. Let's now jump 16 bars and add a marker for
a break section. I will make the break 4 bars
long and add another marker. From now on, I'm simply going
to repeat the structure. Starting from the hook, let's jump 8 bars and
add another verse. Then jump 16 bars and
add another break. Jump four and add another hook. Finally, jump eight and
add an out row section. This is how I structure
most of my beats, but you can feel free to use a different
structure if you want. Now, I'm going to move this processed melody to the verse. Click on the small PNO icon to alternate back
to the pattern tab. Hold shift to select all
the instrument patterns, and drag them onto the hook
section of our timeline. Hold shift and drag the selected patterns
to duplicate them. Let's duplicate them across
the verse section as well. Let's also duplicate
this reverse melody from the intro to
fill all the 8 bars. I will leave the hook
the way it is because I want the full B to be
played on this section. For the verse, let's subtract some elements to
create contrast. Use the right click to
delete the melody pattern, and let's hold
shift to duplicate the processed melody
across the 16 bars. I will also delete
the high hats and the perks from the first
8 bars of the verse. And the eight eight as well. Let's also delete
a few perks from the last 8 bars to make it
less impactful than the hook. Now, I will hold control to select the
reverse melody from the intro and then hold shift to copy it onto
the break section, and let's also duplicate
the claps onto the break. Let's check how it sounds. Okay. Now it's time to work
on the transitions. The first thing we can do to
make the transitions more interesting is to
make everything stop playing as soon
as the last clap hits. I will simply shorten the
length of every track with the exception of the snare on the last measure of
the hook section. I will employ the same trick on the last measure of
the verse as well. Now we can also
add a riser f x on every transition point to
make it more interesting. Let's take a look at what we
got on these sample packs. Let's try another pack. This one is pretty nice. Let's drag it onto the
first transition point and now hold shift to copy it to the other transitions. Great. Now, let's select everything
from the hook to the break. Hold shift and drag to make a copy that we are going to use on the second part
of the arrangement. Now I will select
and copy the hook only to fill the remaining part. Hold control and use the left click to select multiple tracks. Then hold shift and drag the
patterns to create a copy. Finally, let's copy the reversed melody from
the break to the out. Okay, I guess we are
done with a structure. The technique we used here is called subtractive
arrangement. You basically take a
complete loop and start subtracting elements to create variation between the
different sections. Now, let's hear how it sounds.
 Alexandre Machado