Transcripts
1. Guitar Fretboard Secrets Intro: Knowing the guitar fretboard is one of the most important things that you can do to improve as a guitar player with the knowledge that you learn in this course, number 1, you'll be able to find any note in any area of the fretboard. And secondly, if you read music, it'll help you to read better so that you can find notes anywhere along the fretboard. Thirdly, you'll learn quicker because your belt and move the note scales and chords around the fretboard with these. Alright, so how does this work? Well, I've been teaching guitar for over 20 years, and I've learned from my experiences certain things that will help students. In addition to that, I've also struggled with finding notes on the fretboard myself. So I'll show you the tricks that I personally use to remember those notes. These are the same things that I show my students. So step number one is to find out where you already know and then quickly find other notes that are related to those notes. Next, I'll show you an easier way to look at note interval so that you can easily recognize neighboring notes. Then we'll visit different areas of the fretboard and we'll get to know them just like you get to know your own neighborhood. So then we'll use what we call a cage sequence to lay out a whole map of the fretboard. And we'll use that to recognize cord patterns as you go up along the fretboard. Next, I'll show you the scales that are related to those chord shapes that you can be able to play on any area of the fretboard. Then with that knowledge, what we'll do is take a look at core triad inversions centered around the root notes and build a construct chords on different sets of strings going up and down the fret board. I'll also show you how we can make a chord melody using what's called suspended chords. And then on top of all that, I gave you some audio files with the exercises so that you can take these with you wherever you go. And it's this method of constant repetition that will really help you to engrave those notes in your mind. Once you know the fretboard, then that makes you free to be able to move around anywhere. So do yourself a favor and take the course.
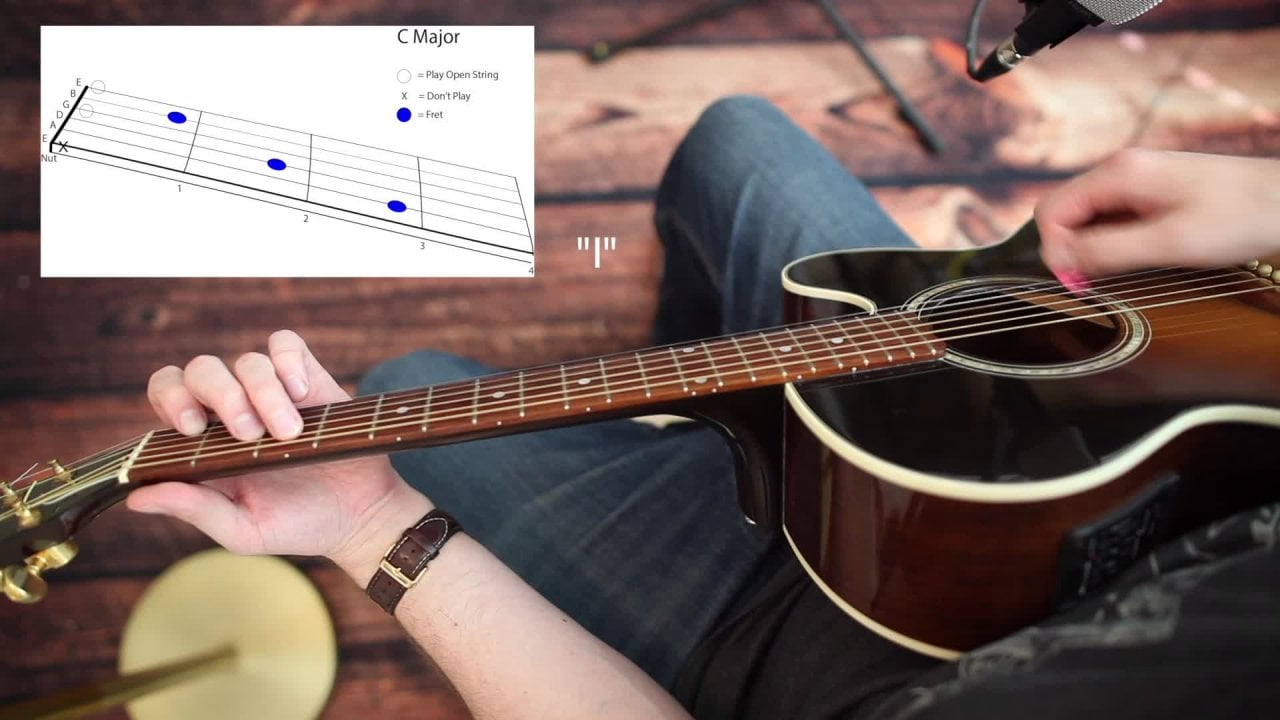
2. Course Prerequisites - What You Should Know Already: In this part of the course, I'm going to be explaining what are the prerequisites for taking the rest of the course, you'd want to know basic chords of CAG, E and D, the major chords, those chords are like this, C, a, G, E, and D. Now, in addition to that, It's important that you know which of those notes are the root notes of the chord. That's going to help you to identify chords along the fretboard because you're going to learn the note names of all the frets on the fretboard on every string. And if you know the root note, then you can build a chord off of that. If you download the sheet, you can just look at the sheet and an identify the notes. But in the case of all of these chords, is essentially the note that you will play as the lowest note. So if I play a C chord, typically, you're going to start that on the fifth string. You play the fifth string and you strum through until the first string. So you could also play them the low E string as part of that chord. But, but typically you would want to have that no, in the base and that is the note C. With the a chord. We do the same thing. We start on the fifth string. And that note right there is the root note of the a chord. And that is a note. A. Next one is the G. So G, replay like this. This is typically a six string cord, and we can play like that. And of course, that low note right there is G. The next one will be E. So E, the nice sixth string core that we can strum all the way through. And the lowest note there would be E. And the last one on the list will be d. So d typically you want to start on the fourth string. And that note, right there would be the root note of that D major chord. Now there are other root notes in those chords. But if you just get to know those as a start, if you don't know them already. Another thing that you should know is the C-scale, and we'll actually go through that in another video. So if you download the sheet, it has all of those five chords there. And it also has the C major scale that has all of the notes of this C. So that has all of the natural notes of, of that C scale, which is important as a foundation for us to build on so that we can learn the rest of the notes on the fretboard. Now, another thing that's really important is just to know the name of the open strings as the strings are tuned. So again, if I go from the first string to the sixth string, it will be E, B, G, D, a, and E. And that's also going to be indicated on the sheet. So once you've got those and you're comfortable with that, then we can move on to the next part.
3. Professor Eccles - Know What You Know!: Hi, welcome to guitar fretboard secrets. I'm John Chang Lee, and I'll be hosting this course. Now, I grew up in England and I've spent a lot of my life in the United States, but there's definitely a part of me that still lives in the UK. And when I was back there recently I met a very important person by the name of Professor Albert Eccles. Professor echoes will be appearing with us in this course to explain some of the theory. And he'll be joining us right now. Professor Eccles, welcome. Hello. Great. So Professor, what's a good way to start learning the guitar fretboard? Well, I think he wanted to start by looking at it. That makes sense. So what should we be looking for in particular, you should be looking footnotes that you already know because then you'll know what you know and you know, you don't know. Do you know what I mean? Right? Now you might be surprised at what you do know already are given example in old days, tuning the guitar, comparing notes with the reference, no. But these days is a bit different. Then I will start a Tony where a fish. Anyway, in old days, what he had to do is you'd have a tuning fork and then you go on, you hit against something and you put it on guitar and he got the knobby tuning, want it? And then when she got one string in tune, then what happens is you press down on that fret on the sixth string and you belted tune that string there when it. Now one thing you got to know is you've got to know what names that strings are. We should put them on there shortly. So that's a, that's a, that's D, that's G, that's B. And that's another way over there into it. Right? So what happens then? Push on the fifth fret right there. What note the F. It seems that on intake. So that's an a if push on that one. What's that is same as that one in a day. What happens if you push on that one? It seems that note right there intake. So you've got a G. What happens if you push on that one? It's not same as that one because it's got different intervals between, between second, third string then it just from all other ones. So actually, if you push on the fourth fret, that's going to be same as that one. So this one was that going to be, it's going to be a C. Alright. I'll be string that same as that one, so that's an ENT. All right? You know that, that's an Eastern, that's an a string. So that's got to be an, a daunting. All right, See See you already know them things though. Yeah. So that's, that's you guitar, tuning nose. And then what else have ego, ego, octaves. You know, an octave is, well, octave means a, you've got a nose in a major scale. So that's where, that's where that comes from. So a look, you've got an E right there. So Octave to that on is actually the 12th fret. A lot of times you got guitars, they've got, they've got two dots on 12th fret right down here, then that means that these these are going to be same. No, exactly. So you've got a, B, you've got G, and this is going to be B. And that's going to be, that's what you know without even doing any more sturdy. Professor ankles. Thank you for your explanation. That's been really great and we'll be talking to you very soon. Very good. Then I'll talk to you later.
4. Which way is up?: Before we get started with the course, I'd like to talk a little bit about terminology. Now, on the guitar, we've got six strings and we number them one through six. The first string is going to be close to the floor, and the sixth string is the one that's going to be close to the ceiling. The first string, of course, there's going to be the high, the high notes. And the lowest string would be number six. Now we also numbered the fingers, the left-hand 1234. And if, if I place my fingers on the fretboard like that, I'm actually placing each one of those fingers on threat numbers 1, 2, 3, 4. And the frets are numbered from, from the nut here and they go along the fretboard. And other thing I wanted to mention is that if you talk about the fretboard, you talk about this direction as going up the fretboard. The reason being that the pitch of the notes that is produced when you press down on the frets is increasing. So just be aware of that because I know some people refer to this direction is going up the fretboard. Likewise, if I say play, play the top string and then the top string. Now we'll be thinking of is the string which is actually closest to the floor. So when I'm referring to going up, I'm talking musically, we're going up in pitch. So now we've got those things out the way we can move on and start looking at the fretboard.
5. Demystifying Scales Chords & Intervals: What we're going to take a look at in this video is scales, chords, and intervals. Now if we take a look down here, you'll notice I've got numbers here, one through 12, and those are the names of all of the notes that we have available to us in the Western scale. Now we can either call these in-between notes here, sharps or flats, depending on usually depending on what Qd, where we're in, if it's whether it's a sharp key or it's a flat key. Now there are many types of different scales, and the most common that you'll hear about is the major and the minor keys. So what we call a major key has a certain set of intervals between the notes. And if we start a scale on the note C, and we play all of the natural notes, means all of the letter notes. Then we'll get these intervals of a whole, whole, half, whole, whole, whole, and then back to the octave. And other half. That's a pattern that occurs in every single major key. So if I take this pattern of notes right here and I move it down, Let's just move it down D and see what happens. What we find out here is we've got the first note will be D, E, and then we come across an F sharp right on the third. And the fourth would be G, a, B. And then here again we have another node on the seventh note we have a C-sharp, so that key, the key of D, has two sharps in it, which are F-sharp and C-sharp. Now, in this particular course, we're going to be looking at two keys. And those keys will be C, which we started with, and G. So let's move this down to G. So if we move this down to G, what we'll find here is that most of the notes line with the natural notes, except for the seventh note, which is F sharp. So in the key of G, you have an F-sharp. And if you, if you've seen the key signatures, you know that they are written with a sharp sign on the top line, which is the f. So let's take a look now at chords and how they're made up from the scales. Now major chords are made up of what's called the major triad. A triad is three notes, the first, the third, and the fifth. So with those three notes right there, in this case, on the C or B, C, E, and G. Those three notes are all you need to make up a major chord. So even when you strum a chord on guitar, if you place your fingers on a C-shape during the actually playing three different notes and some of them are going to be duplicated. So now if we want to play a different chord, this will be a C major chord. Let's say we want to play a D chord. We will do the same thing. It will be the first, third, and the fifth. So in the case of the D chord, it would be D, F sharp and a. I just want to emphasize the point that when you're learning the fretboard, you don't need to learn all 12 notes. If you learn seven notes, then realized that there are notes in between some of those notes, with the exception of B, C, and E, and F, then it's quite easy. It makes it, it makes it that much easier. We've reduced it down from 12 notes now to seven. So hopefully if you didn't understand this already, this has helped to clarify what the relationship is between scales, chords, and what intervals are. So let's build on this knowledge and get to know some more of the fretboard.
8. BIG SECRET plus C-Major Scale Along One String: As a foundation for learning the fret board, it's important to know about intervals, and that's what I'm going to talk about in this video, as well as how to play a scale on one string. And also one of my favorite secrets, which is big cats eat fact. So what does that mean? B, C, E, F. Big cats eat fat represents the notes B, C, and E and F. Before I explain what the significance of those notes is, let me just explain about intervals. An interval is the difference between the pitch of two notes. So if I play a C there and I play a D there, you'll notice that I'm playing the C on the first fret, and I've got my finger on the third fret to play the D. And that means that there's a fret in-between. So that's called a whole step interval. If I went from C to that node right there, that would be called a half-step, or you might refer to as a semitone half tone. Depending on which part of the world you come from. I'm going to use step. So that note in between, I'm going to assume that you understand this, either a C-sharp or a D flat. So between the nodes B and C, and E and F, It's only a half step. So if I play this open string B and a plan C right there, there is no other note in-between. And also if I played this E right here, and I played this F right here, there's no, no in-between. Okay, So now let's do a scale on the second string. The second string is good because you can start right here and play a C major scale which has only natural notes. There are no sharps or flats in it. So the players C-scale, I start on the first fret. Next note will be on the third fret. Now I like to do this in three positions on the fretboard. So the first position will be when I got that first finger on here. I'll play two notes there. Then I will move up to the fifth fret of the fifth position, where I have that first finger on the fifth fret. So here I'm going to be using fingers, one. Fingers too. And fingers for to play those notes E, F, and G. And then I'll move on to more frets to the 10th fret. Now place that first finger. So I'm in tenth position now. And then the next note will be on the 12th fret with the third finger, followed by that note right there, which is another C, which is the octave c on the 13th fret. So there are several reasons for learning this scale on one string. Firstly, is that you can see the intervals between the notes. Every major scale is going to have those same intervals. Other reason for learning this is that you can actually learn the notes on the second string, which is very useful. So in this video, I'm just demonstrating where the notes are. You can download the sheet for this and look at the diagram and then just locate those notes. And then in the next video we'll just go through and do some exercises going up and down the fret board on the second string. So here's how it goes. So I'm just gonna play the scale now and I'm going to name the notes as I go. So it's going to be seeing on the second fret, D, on the third fret, E on the fifth fret, f on the sixth fret. On the eighth fret. A on the 10th fret, be on the 12th fret, followed by C on the 13th fret. So that's our scale. So in the next video, we'll do some exercises using that scale.
9. C-Scale on One String Playthrough: Let's play our C-scale on the second string, allowing two clicks for each note. Ready? 1234, C, D E, F, G, a, B, C, or more time. 34, C E F, G, a, B, C. All right, now let's do this in reverse. So ready, C, B, a, G, F, E, D, C. Let's do that one more time. And say b, a, G, F, E, D. Now let's do it together. We go up and then we'll come back down. Ready? 1234, C D E F G, a, B, C, coming down again, C, B, a, G, F, E, C. So I recommend if you're not familiar with the notes on that string, play this through a few times and follow along with the EC50, can name the notes as you go and that way you can learn them. So once we've got that, we can move on and look at the rest of the fret board.
10. Write Out the Notes Using "Big Cats": What we're gonna do right now is use big cats eat fat to be able to name all of the notes on the fretboard. So what I've got here is a diagram of a fretboard, and here the strings across the top. So if we use the rule that there's a whole tone or a whole step between each pair of notes, except for between BC and EF. Then what we can do is start at the top on each string and we go through all of the notes. And then we're going to be able to name all these notes. I'm just going to write in right here. Because between E and F, We know that there is only one space. So that's a half-step or a halftone. So between F and G, there's going to be a whole step. And between G and a, we find there that's going to be a whole step between a and B. A whole step. All right. The next one, big cats, between B and C. There's a half-step. All right? C to D is a whole step. And then we've got between the two E, which is a whole step. So that's the sixth string, and it's also going to be the same thing over here on the E string. Now let's do the a string. All right, so see if you can identify these before I write them in. Between a and B is going to be a whole step between B and C. Big cats, we got B and C. We have a half-step. C to D is going to be a whole step. D to E is going to be a whole step. And between E to F, eat fat. Oops, what happened there? Okay, between E and F, a half-step, right? F to G. And then what we have here is between G to a, we're back to a. All right, now, so that was the sixth string. And we're going fifth string, fourth string for string is next. So D is going to be D to E is like that. All the strings like this. So you should be able to eat F. Now we know that between E and F is going to be a half-step. F to G, G to a, a to B, B to C, right? So B2C is a half-step. And then we have c to d on the G on the third string, G to a. Half-step, a to B. I'm sorry, did you say half step? G to a is a whole step? A to B is a whole step. B to C is a half-step, right? C to D is a whole step, D to E, whole step E to F, F to G. Now let's do a second string, second string, B to C. So that's going to be a half-step. C to D, D to E. All right, Now E to F is going to be a whole step. I'm sorry. I'm distracted here. I'm distracted because they got something going on in the background. Okay, so E to F is going to be a half-step, right? F to G, whole step, G to a whole step. And as we can see down here, a to B is a whole step. And the E string is going to be identical over here. Now that's the entire fretboard. And of course, we all know that between these nodes is going to be either a sharp or a flat. And of course, between F and G, recall that either an F sharp or you call it a G flat. So what you should do here is use the blank that's included with the course and write out just exactly the way I did. So that you can become really familiar with this fretboard. And this is better than just having a diagram the fretboard, because you're going to actively put in those notes that I just did there. And once you've done that, then let's move on to the next step.
11. GuitarFretboardSecretsHowToRememberNotesOnFret7: Okay, what I'm going
to explain to you now is a secret of Bede. Bead is BAD. If you look at the seventh fret, if you have Dotson and guitar, you got for adults on the third, fifth, and the seventh,
the seventh fret. The sixth string. The
seventh fret is B. The fifth string is E. On the fourth string. It's a on the third string is D. So that spouse B, E a D. That's very useful. Now, since you've
got to E strings, it means that the sixth string, the first string of both B. So that leaves only
one note leftover. So that's gonna be
this note right here, which is two frets higher
than the fifth fret. We know that the fifth fret is the thread that you
used to tune your guitar. So if you tune your guitar
to the high E string, we know that that's E.
So two frets higher, we know that one fret higher
is f. One fret higher than that is going to be F
sharp, just like it is here. So that leaves us with B, E, a, D, F sharp, B. Now you can also find BAD. Down here at the second fret. He got second fret
on the fifth string, the second fret on
the fourth string, second fret on the third string, and the third fret on
the second string. Because of the difference in the interval between the
second and the third string. So there you have also a, B, D.
12. GuitarFretboardSecretsFret7 SelfTest: The following test
asks you to name note surrounding
the seventh fret. Remember the seventh
fret notes on strings six through
the string one, or B, E, a, D, F sharp, B. Also remember it, cats eat fat. We have two Bs on strings 16, and we also have an
E on string five. So the halftone intervals
that you have to watch out for between B and C on threat 78 of
strings, one, string six. Then you also have
the halftone interval between the notes of E and F. I'm Fred 78
of string five. Following a ten questions, you have five seconds to answer each question before
the answers given. So let's begin. String six. Fret seven is B. String for fret
seven is a string, two frets, seven Is F-sharp. String three frets, seven is D. String one fret seven is B. String five frets, seven is E. String to fret. Eight is G. String, 1488 is C. String five. Freight eight is f. String six. Fred, eight is C.
13. GuitarFretboardSecretsKidsAndPets: Okay, so now what I'm going
to tell you about is what happens in a family when
one of your children, if you're a parent and
one of your children, decide that they want
to have a dog or a cat? Well, what will happen next is that your children
will promise you that they will be very interested in taking
care of that animal. What will happen next when
you purchase that animal? That they will be very
interested in taking care of that dog or that cat. For a certain amount of time. After that time, there'll
be less interested in, you will be the one who gets
to take care of that animal. This is what we
call a dog cat FAD. Now there's a dog cat fed at
the 10th fret on the guitar. Let me show you
the sixth string. The 10th fret. Is it D? The 10th fret on the
fifth string is a G. There's your dog. At the fourth string. You have a C. There's your kept. The following three
strings are F, a, D. So what you have is a, D, G dog, cat, and F a, D.
14. GuitarFretboardSecretsFret10 SelfTest: The following test asks you to name nodes surrounding
the 10th fret. Remember that notes on strings
six through to string1, D, G, C, F, a, D. Easily remembered
by dog, cat fat. Also remember big
cats and eat fat. We have both C and
F on the 10th fret. So the halftone
intervals that you have to watch out for are between the B and C on threats
910 of the fourth string, and between E and F on fresh
910 of the third string. Following a ten questions, you have five seconds to answer each question before
the answers given. Let's begin. String six, fret ten is D. String for fret ten is C. String to fret. Ten is a string three, Fred, ten is f. String one, fret ten is D. String five, threat ten is G. String for threat, nine is B. String five, Fred, eight
is f. String three fret nine is E. String to Fred, eight is G.
15. GuitarFretboardSecretsEcclesWrap: Hello there, Professor
Eccles here again. How are you doing with
this course so far? Well, today what
I want you to do is just kind of wrap
things up because you should by now
be able to know all notes on the fretboard
hoped at 12th fret. Now, what happens
after 12th fret is it repeats so you don't need
to worry about that. That should be easy. So let, let's just go
over things just to, just to remind you
somewhat things were done. Last time when I showed you
this board what we did. We looked at tuning
noticed in way. That's on this
fifth fret, right? So the, you got a, which
is same as that one. So that's, that's
all, that's all I'm tuning notes over there
except for this one. What I didn't do,
we'll put that, That's not be the
same as that one. Alright, so that's
the tuning notes. So we can tick that one off, right then we've got
octaves, doorway, octaves. The open string right there, same as, same as that
note right there. So that's on 12th fret, all across the 12th fret. Alright, so we can
take that one off. And then we did this dog
cat FAD, remember that one? Alright, so that's, that's on which bets on tenth row index. So if you look at ten
for it over here, we've got D, G, C, a needle, FAD. This ball is moving. So we can take that
one off right there. Then what we did if he'd been through these scales
like he should have been, you should know all
these notes over here. Because if you did you see
scale, you should know C, D, E, That's an F, G, and then a, B, C, D, E, F, and G. So you should know all of them. And he did the G scale
to right starting there. So G, a, B, C and all there. And then plus G scale, you got F sharp though. Yeah. That's a bonus one, right? So we've got F sharps
there like that. Then you know, this one is F2. So he got all this all
this today in all right. So we can take that
one off like that. And then we did, didn't we? So on seventh fret, you got this thing where you've got these
notes like this. It spells out bead B, E, a, D, like that. Alright. Do you remember? And then it could find that in different place to
write like that. Bed. Alright? And then you remember this, this node over here. That's going to be
an F sharp intake. Which means that
one's FMD, right? Because you've got E,
F and the F sharp. And then this one
over here is a b. So we'll take that one off. That's another one I'm going
to show you this is as easy as ABC. Intake. Look at this. He got a, he got B. Now if you use your fingers, 134, that note right
there is a C, right? So you've got to use
your fingers 134. And that's them knows like that. And good thing about this is you can use whenever we now know wherever
you, alright, so ABC, good thing about that is it can follow alphabet again
using the same fingers D, E, and F, like
that. Good into it. But then you got another one. Look at this. You got
that one right there. That's an a. This is a B. That's a C. Same thing
that D, E, and F. So what more do you need? It all doubts,
Let's have a look. So F G a B, C D a B, C D E F G a, B. We've got D E, F, G a, B, C, D. Here we've got G a B C D E F G, a, B, C D E, F G. Whoops, we lost one. There's one right there into it. Well, we should know that
that one is a G, right? All right, so B, C, D E F G a B. Then let's have a
look at this one. E, F, G, a, B. Oops, there's another
one right there. That's going to be same intake because you know, that's a C. So let's see over there. Alright, so a, c, d, e, You got it. You got it. That's it. It's as easy as a, B, C, D, E, F, intake. I hope that's been
useful for you. I know we've got some
other things to work on that I think
you've really got a foundation now
that you can master this fretboard episome
exercises, I'll show you. You can work on to make this
really stick in your brain. All right, We'll
talk to you later.
16. GuitarFretboardSecretsFindingAllTheEes: So let's see if we can find the notes E on the guitar
and all six strings. So firstly, we've got
both outside strings. Then we have our tuning note on the second string, fifth fret. That gives us three. We should know that on the fourth string. Second fret, if we
know our C-scale, third note in the scale is E. Now here's another
little tip which I don t think we've covered
so far in this course. If you want to play the octave, even though I'm a low string. If your bass guitar play, you're probably
going to know this. If you're playing a certain dome and the low string you're
going to find is active. You can go straight to it. Okay, So the seventh fret is
also part of beam, right? B, b, sorry, beat, BAD. Okay, so what do we have left? We got we got part of our bead. Because the third note of
the C-scale tuning note, we've got E, they're
leading the third string. The third string,
what do we have? Well, if we look at our, if we look at our
dog cat fat, D, G, C, F. So we know that the
note before f is e, right? And dog, cat, I saw
a big cats eat fat. So eat fat. That's a half-step. So that's how we
can find e there. We could also find it
from a bead, be a dy. Dy E is a whole step from there. Alright, so again,
the open string, the tuning note E, we have the E there. From either way, you'd
like to find that we have our fourth string,
E right there. In the first position, we got our octave, the seventh fret, or
from, from the bead. Now here's another
interesting observation that they can also help
you to find E quickly. Most of these ys are on a duct. If you have dots on your
guitar, you haven't either. You have a fifth fret dark. You have a ninth. Ninth fret dark. You don't have it up there, but you do have a dot
there at the seventh fret. And then you open string. And the dark there,
the 12th fret. So that's the 0s. See if you can find those. And that's good practice then that'll help there to
help you retain that, that, that, that picture
where the ys are.
17. GuitarFretboardSecretsBsAreEverywhere: So now let's take a
look at the bees. The bees string is
the second string. Now, you also
remember we covered, we covered beam going across
the seventh fret, F sharp. So we've got two
b's right there. So that's three Bs. Now the B string, if you want to tune
the B string to the string below, or do we do? We don't go to the fifth fret. We go to the fourth, right? Okay. So that's what I'm
sorry, that's 1234. Okay. And if you know your
notes in the first position, should know that
there's a B right there on the second fret
of the fifth string. That leaves one more that's on, that's on the D string. Now here's something
I'm not sure we covered in this course so far. But if you play any note
on a particular fret, on the low string, if you go across two
strings and up two frets, you find an octave
that works again, that works on, works
on all strings, that works on one, 645
and it does not work on, does not work on 52. You have to go up an extra fret to compensate. So
it doesn't work. It doesn't work on
those two strings between 42 and it
doesn't work between 31. Okay, so again, let's go
through those strings. We have seven front beat. We have the open B, we have the tuning note
on the fourth fret B. Now we can think about, we have, we can think about this two
ways where we have a B, which is an octave to
that one right there. Or you can also think
about dog, cat fab, right? So d, G, C. So the note before C, remember big cats eat fat. So there's an alright there be, so that's another
way to find it. Okay, Then the string a b right there on
the fifth string, and then a b right there, again on the sixth string. So see if you can find those. Then we'll move on
to the next track.
18. GuitarFretboardSecrets 6Ds: Let's find the d's. The D is a fourth string. Now, we did do dog
cat fed, right? Dog cat Fed is up here. So we've got two days
on the outside strings. Okay, so we've got,
we found three. We should know in
the first position, The D is on the third fret
of the second string. Alright? Then we
have a tuning note. We've got four strings, so the, the fifth string, fifth fret is also D. Alright, so what do we,
what do we have left? I'm sorry, we got, we got, we got the tuning note there. The open string. Now, remember bead, BAD. Alright, so BAD is on, is on the seventh fret. Seventh fret D, right? That the write that first
string, we have it. Dog, cat, FAD. We have a D right there. I think that's everything
covered, right. So with a beam, it's right there on
the seventh fret, the open string,
the tuning melt, and back to dog cat fed. So that's the D cupboard.
Have a go at that one.
19. GuitarFretboardSecretsFindingAas: Alright, so now we're looking at the a string, the fifth string. And we're going to
find all the anos. So let's see, on
the tuning note, we have e to a. On the E string, we've
got the fifth fret, which also means
that we also have the fifth right on
the first string. So that's three. Now, if we
remember beam as BAM, right? So that's the fourth string. Okay? And we also
have, if you remember, we got a right there, okay, so we got right there. We've got the 10th fret there. You should know that
the third string, second fret is an a. And from our beam, we're going, we've got the fourth
on the fourth string, seventh fret, and we
got the open string, and then we have
the tuning note a. So actually the a is, is covered with both of our
dog cat fat and our beam, and also with the tuning nuts. And they opened an open string. And then the first
position scales. So have a go with
that one, I think. And I think we've got
that one covered.
20. GuitarFretboardSecretsFindingGs: Oh jeez. Now we're
looking for the Gs. So actually, if we
play the G chord, you play that chord, you're
actually playing three g's. The first string G,
The third string G. We've got the sixth string G. So that just
leaves us three more. Well, let's see if we got, if you've got the
third string bean G, we have our tuning note on the fifth fret of
the fourth string. And then if we look
at our dog cat Fed, remember D, G on the 10th
fret of the fifth string. So that just leaves us one more. And one more is on
the second string. So how do we find that one? Well, this, we've got
several different ways. One way, if you know
that this note is E, you can consider that
like the open string. On the open string we have e. Well, if that's an E,
you can go like that. Finding this way. Another way is we
know our bead beat, F sharp B, right? So we know that that's F sharp. We know that a halftone higher or a half-step
higher is G. Seven front you go
to the eighth fret. We can also find this when you think about
dog, cat FAD, FAD. We know that it's an
a and we know that g is a step down from a,
which is right there. So that's like three different
ways to find that g. So I think we've got, we've
got the G cover, we've got g. First, first string. We've got the G on
the second string. We've got the open string g, we've got the fifth
string, fifth fret G. And then we got the 10th
fret from our dog cat fed. And then we got there. We've got the G on the sixth string, third fret and getting
mixed up here. Okay, so that's, that's
got the G cupboard, so have a go at that. And that's, that should be, that should be
straightforward too.
21. GuitarFretboardSecretsSelfTest AllStrings 0: In this lesson, we're
going to prompt you to play a certain
note on each string. For example, the
first note is A-Flat. So you play a flat starting on string one and ending
on strings six. When you get to string six, the note to follow will
be shown on the slide. Play this new note
starting again on string one through strings six. There are prompts for
each of the 12 notes. In addition, prompts
for each note that are both sharp and flat
will be given. So get ready now to play the following note on strings
one through strings six. In turn, the first note
is gonna be a flat. There'll be count off a four. Before we start the strings. Next note will be g. Next note will be C-sharp. Next note is B. Next note would be next note is going to be G flat. Next note will be C. Next note is E flat. The next note will be a. Coming up. We'll be note D. Next up will be B-flat. The next note is
gonna be D-sharp. Next note, F. Next note is a sharp. Next note is going
to be F sharp. This next note will be D-flat. Next note coming
up with a G-sharp. Next note is E. That's it. You made it.
22. GuitarFretboardSecrets Introducing CAGED: So far in this course
we've been focusing on learning the notes
of the fretboard. Now, in this next
group of lessons, what we're gonna
be taking a look at is using that knowledge and building chords off of
the notes that we know. We're gonna be using the cage chords which we've
already introduced before. That's the cause of CAG E and D. Now first thing I'm
going to show you a little trick how
you can figure out how many sharps are in
each one of those keys. Then we'll look at the scale
surrounding those chords. Then we're going to look
at that cage sequence all over the fretboard. And we're going to look
at finding each one of those chords in
different positions. Then we'll take a look at how
we can play scales around those chords when they're
away from the open position. So in the next lesson,
we're gonna do a quick review of those chords, and then we're going to play
some scales around them. Let's jump in and get started.
23. GuitarFretboardSecrets The CAGED Notes: In this lesson, we're
going to take a look at what's called the cage sequence. Now we're talking about
the chords C, a, G, E, and D. Now these have a shape which will be
already familiar with. So if you look at the C chord, this is the kind of shape that we're talking about, right? That's our C chord. Now if I just back this
one up again and we draw the a chord is going
to have this shape. So that's our h shaped cord. And the G shape is
going to be like this, is how we can do our G chord. And then the shape is like this. And finally, we've
got the D shape, which is like this. So those five basic shapes. So what we're going to use to identify the shapes
along the fretboard. Now, when we talk
about the shapes, the actual chord
being played is not necessarily going to be
that particular cause. So we're just referring
to these shapes, but the code we're
actually going to be playing in this first example is going to be c. So all of these codes actually
going to be a C chord, but we're going to play
them in different positions along the fretboard. And the way we do that is
to use this cage sequence. So if I just back
this up again and I draw our C chord like this, this will be the first chord. Now this is a C chord and the shape to follow
is gonna be a. Now this a shape is going
to be starting from here. If we draw this shape
across here like this, that's also going
to be a C chord. So we're just going to, we're going to move down like this. I'm going to take that
note that we just played there and put this
shape across here. And that's also going
to be a C chord. Following that. Just pay attention to the
three notes there. And the next chord in the sequence CAG is
going to be a G chord. And what's, how that's going
to look is we're going to have this G shape chord using those three notes and the other notes of the
shapes surrounding it. So we'll put those
three notes back in. And I'm going to put
a note right there. And these notes like that. And that's going to
be the G-sharp chord. So be reusing those
two notes right there. And then we'll put
in our U-shape, which is going to be like that. And that's, that's gonna
be our E shaped chords. So CAG, the final one is the d. So what we'll do here is we're only going to
play a fourth string cord. And this is gonna be the
starting note of that chord. And we're going to have this
D-shaped cord over here. So what we'll do is we'll put this, that note right there. And we'll put these three
nodes in right here. And that's going to
be the D-shaped cord. So if I go back to the
beginning of this, then we can see all of these caged shapes playing C chords all along
the fretboard. So let's see how we play
the C chord all along the fretboard using those
caged chord shapes. Here we go, C, a, G, E, and D. So that's the cage
chord sequence. And in the next video, what we'll be doing is
using it to be able to take any of the open position chords up and down the fret board.
24. GuitarFretboardSecrets CAGED ON GUITAR: Now that we understand
the cage system, Let's see if we can
go through some, creating some chords
on the guitar. Now I'm going to
use the C chord. If we start with a
C chord like this. And what we do is if I use that, that note C right there. And I often play this
kind of shaped like that. This is the a shape chord. You could do that. And
then we take that, that row notes across the
fifth fret right there. Here we can play the G shape, so I'm going to place
a finger over there. Now, it's good to know that these can accord shapes and not necessarily what
you're going to use. This is really a concept and it's a way of visualizing
the fretboard so that you can understand how the chords are connected
along the fretboard. So that's the G. The next one will be the e. We can play using this
E-jet cord, so that's CAG. The next one will be,
Here's a D chord. So I happen to know that that note right there
is a root note that we use. And then this is gonna be a fourth string chord like that. So that would be our D shape. Now what we can do
the same thing with any of these cause
any of the cage, cause if I pick the next one, the a chord, we've
got this shape. So we just follow the
same sequence from the a. Cag will be the g, so we play this shape. Now, oftentimes you may only use part of the
shapes like this, which is something that's
a bit more usable. And then this full
G shaped cord. And the next one in
the sequence is the E, or the E chord will be like
this, the ear-shaped cord. Remember that we're actually playing chords along
the fretboard now. So it's the same
with all of these. I can take any one
of those chords. I could take this one, e.g. and do the same thing. Now open the next chord and we take that all the
way up the fretboard. We take that chord. So this is, this is the, this is already the
shape cause CAG, next one will be the D chord. So I would take
this one like this. That's how that works. Then if I took the D chord, so this is already the DC a GED, and that would be C again. So the C, that
shape will be here. Now one other point
here is that those are only five chords and we
actually have 12 notes. So you could actually start these sequences on
other threats, e.g. let's just take a B-Flat, e.g. I. Take that B-flat chord
and I do it like this. I do it like this. So this is really just getting to know the sequence of chord
shapes along the fretboard. Now, if you can do this and be able to
finger these chords, this is the best thing. And it will really, really help you to solidify
the understanding of being able to just being able to visualize where the
chord shapes are, where the cords are, and how they're connected
along the fretboard. Now once we have
this understanding, what you can be able to
do is to take each one of those chord shapes along the fretboard and create
scales around them. And that will be coming
up in a following video. So what I suggest is,
before you go on, just try and get a good
feel for those chord shapes going along
the fret board and see if you can
visualize those. The more, the more you have give-and-take with
this information, then the more it will, it will make sense to you.
25. GuitarFretboardSecrets HowManySharpsInAKey: In this video, I'm
going to share with you a little secret of how you can determine how many sharps are in each of the keys
of those cage chords. So we have C, which has
actually no sharps. And those other keys, a, G, E, and D, have 1-4 sharps. So here's how we can
do this on guitar. So this is a little trick. Now this isn't, this
is a note C, right? So that, that scale based on that note is all natural notes. And that is on string two. Now, it just so happens
that each one of these following
strings is one of those caged notes, right? Let's look at them.
The adjacent string. Going over to the G.
That's one of those notes. Write that key of G
major has one sharp. Now, if I move over
one more string, I'm going now to the D string. That's another one of
those cage notes, right? That has two sharps. Alright? Now move over to the
next string, the a, and that has three
sharps. Alright? And finally, the E
has four sharps. Now let me show that to you. So I'm gonna play the
notes of the G scale. It goes G, a, B, C, D, and F sharp, G. Alright, let's take,
let's take the note D. So D is going to be like This, is gonna be D, E, F sharp, G, a, B, C-sharp, d. Let's do the a. So a is going to
be a, B, C-sharp, D, E, F-sharp, G-sharp. Finally, we've got the E. Now, E is going to have four sharps. So we've got E, F-sharp, G-sharp, B, C-sharp, D-sharp, E. Now, each one of
those scales would actually relate to
one of the chords, e.g. the E scale. That E chord uses notes
from the East scale, namely the first,
third, and the fifth. So what we're gonna be doing in, in the following videos
is actually going through each one
of those shapes. But not in the open position, but actually along
the fret board, where we can see
how we can create scales which has centered around each one of
those chord shapes.
26. GuitarFretboardSecrets FatherCharlesGoesDown: I'm going to explain
what is the order of sharps when you add
sharps to a key? We looked at those
keys are starting with C that had no sharps at all. G has one, D has two, has three, and e
has four sharps. So what are those sharps? Well, they follow a sequence which is the same every time and the first sharp is
actually F sharp, right? So, so every key that has
a sharpen, it has F-sharp. Alright, now they
follow a sequence. When we take a look at
the circle of fifths, we can take a look
at that sequence, but basically, there is
something that you can remember. And that is farther. Charles goes down
and Ends Battle. Those represent letters
on the circle of fifths. If you have the
circle of fifths, if this is the C on the top, then at 11:00 you have F here. So Father Charles, and then G would be right
next to it at 01:00, D will be at 02:00
down and a will be at 03:00 and 04:00 would be E ends, and then B will be 05:00. So that's all from
the circle of fifths. Now let me just
show you something. I'm gonna, I'm gonna show
you where the fifth is. Any note on the bottom four
strings of the guitar. We know that the interval between strings
2.3 is different, so it only really works on those four strings
without having to change the spacing
between the nodes. So if I take the note F, The fifth of that note, is two frets higher on the, on the adjacent highest string, right? That's a note C. So far, the Charles Wright, I take the notes C, and I play the same interval to
the next adjacent string. That gives me the note G, right? Father Charles goes right. And then I take, take that note. I play that note. So
that's going from the G. And this is a note D. Now since we would have
to cross over strings, I'm gonna go down to another, another D down there, which is on the fifth fret down. And if I play right there, that'll be the note a. And now I can go one more, which will be the note E ends. I'm going to take
another E right there. And then I'm going to
play on the ninth fret, will be a B on the fourth
string before battle. So you can see how if you follow around
in perfect fifths, then you get that
sequence of notes. So best thing is just remember Father Charles goes
down and ends battle. That one my
grandfather taught me.
32. GuitarFretboardSecrets JigIntro 2: In this next few videos, I'm gonna be showing
you how we can use these positions that were learned based on
the cage chords. Now this is in the key. It actually shifts
between the key of a and the key of D. In terms of
the notes of the scales. The difference in those two
keys is actually a difference between G and a G sharp. The key of a has, has
an extra sharp in it. So it starts out, starts out in this position
using, using this D-shaped. And it shifts down to
using this, this a shape. And then it goes into, into this G shape. Then we'll have some, he could think of it as
being centered around this, the C-shape, a shape, and the G shape in
those positions. Let me just show you,
and I'll show you how, how I'm shifting between those different positions using the scales that we've covered. So it starts out in
this D-shaped position. It starts out like this. Now here I'm a shifted, I just, I just went down, shifted
down to this position. So I'll do that one more
time from the beginning, shifting down into this. So now it's going. I can
use that to move down. So this, so this is
kinda the G shape. All right, and now I'm going to stay in that position and go. This is where we've
got the G-sharp there. So then it moves up
again to this position. So that's, that's centered
around this a shape cord. And then the next part goes. So this you can think of as, as this J-shaped cord, which would be actually
in the key of D. So again, then finally, and it's finishing
up there in that same, that same position. So we started out using
this D-shaped chord and we were finishing up
in this J-shaped cord. So in the following videos, you'll be able to have
some experience playing in these different positions using
those caged chord scales. Coming up next.
33. GuitarFretboardSecrets Jig50percent: In this video, we're gonna be going through at half speed, and this is actually repeated, will be playing
through four times. Here we go. Three.
34. GuitarFretboardSecrets Jig70percent: This time we're
going through at 70%
36. GuitarFretboardSecrets Jig100percent: Yeah.
37. GuitarFretboardSecrets CAGEDWrapup: Hey, congratulations, so far and guitar
fretboard secrets. You've learned all the
notes on the fretboard. We went through the cage system, learning how you can connect
chords along the fretboard. And you learn the scale
surrounding those chords. And not only that,
but now you've, you've also been able
to play a tune which connects those different scales going along the fretboard. So what's next? Well, in the next part of guitar fretboard
secrets will be taking a look at chord Triads
and inversions. And these are very
useful things that you can add to your playing to
make it really interesting. I look forward to
seeing you over there.
 John Chamley, Guitar Lessons for Life!