Transcripts
1. Knock Knock, Who's There? Pizzle Doors! by Pizzle Paints: guys, welcome to my second skill shack class. I'm so happy that you will back today. We're doing Christmas stores. I'm going to teach you how to illustrate them how to paint them. Had a day. Tell them I'm gonna put all together and it's gonna be fat in may look odd, but I'm gonna make it really easy. So take a C Gharbi paint, grab your brushes, garbage paper. And I'll see that in today's video, you will learn simple techniques on how to paint a Christmas store. My aim is to simplify the process, starting with the color palette, decorations, brick technique illustration, and then painting the door and putting it all together. This takes immense patients. Please be kind to yourself and enjoy the process of creating a very unique door off your own. I'll see you at the end, but I can't wait to say the doors that you create using my simple door techniques
2. Materials : for materials. I will be using silver brushes. The black velvet range sizes to eight. I will also using a black marker and the job market for day telling. At the end, make sure you have a pencil are razor on a roll up for when we're illustrating outdoors. I will also remixing on a porcelain palette for today's video. This is optional four paints. I'll be using the Prima Marketing Inc vintage on the classics palette. If you would like to purchase these, even Goto my primo place dot com and use my coat. My coat gets you 15% off the entire website. I'll also be using their lush paper for today, which is 300 years.
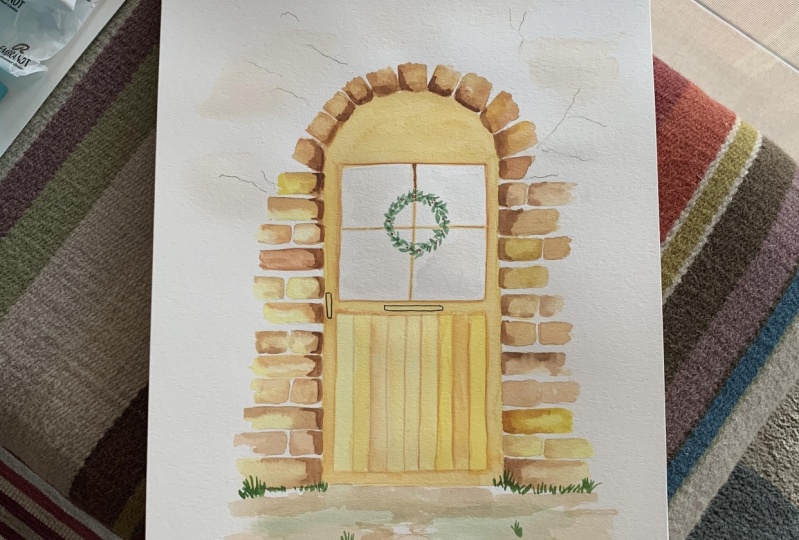
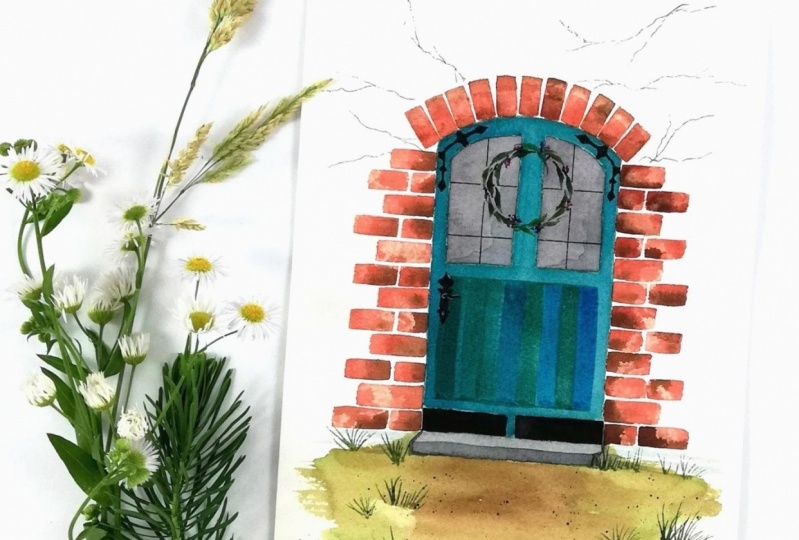
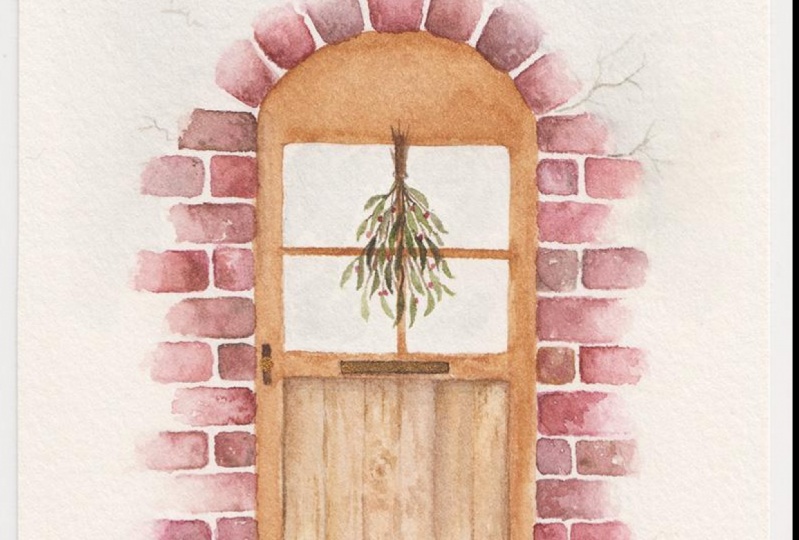
3. Colour Palette!: for my color palette. I've broken it down under headings off what will be involved in the picture. You don't have to do the same color door, however, For today's video, I have chosen a mustard door head with red, brown and chocolate type bricks. I like the calm trust. I also have a thing for yellow. I like to see how the colors look side by side, especially when I'm painting bricks just so I know that I'm getting variation off colors. Last of all, I want to make sure that my door has some lovely ground in front of it. I've gone with brown and green to create a grassy type effect on the floor. You can see me try to switch this on the side just to see if I can get a feel for it. My details will also be in black. When I finish play around with the colors. This is your door. It's very personal, your relationship with your color palette. I like to choose colors that I genuinely like, and I think that they work together. I also think outside the color will don't go for your standard color doors. Try pastoral doors, try flew over doors. Just try everything. The world of doors is yours
4. Wreath or Mistletoe?: I wanted to give you two options for decorating the door. I've given you a wreath option and a mistletoe option. I've also given you various different techniques and how to pay them. My first rate example is a structured lay free. This is using the point of your brush. My second rate option is more loose. It's where I flatten my brush to create variations off leaps. It's super effective. My next race combines both the techniques together. Start off with your structured leaves using the point of your brush and then fill in space by pressing down and creating leaf variations all around the rest. It's really great. Following the same pattern, we're going to create a structured mistletoe using the point of our brush. You can say that the mistletoe is going in a triangle direction, with the stems of the leaves coming up the top following the same mistletoe shape. Try now using the loose leaf technique by pressing down your brush, then attach a little stems that peek through the top. Last of all, combined both the techniques together to create variation in your mistletoe. I really want you guys to have a lot of options when creating the doors. By all means, you could combine all these things and have decorations everywhere. But I like the simplicity of having one pace in the middle of the door. I heard this was helpful.
5. Brick Techniques: Now that the rates and the mistletoe Rosa done, it's time to work on a brick technique. Start off with your lot break color and paint a square like shape while it's wet. A touch a darker color on the corners of the bricks. You will say it starts to bleed. Now with a tiny bit of tissue paper. Dab it out so that it creates a Grady in effect in the brick practice. Most definitely makes perfect in this situation. Try different colors, different variations. Put bricks all over your page so they even get a feel prior to painting your bricks on your door. Make sure you try different colors because variation of brick colors and make the look more realistic. I try various colors, like browns blacks, combining the red and the brown together just to try different things and say what the colors do together. Also, try a painting unfinished bricks, these air super effective. Remember, you're in control. You can dab out as much or as little as you like to finish. I want to create some little just stress marks on the wall like cracks. There's a super effective and really realistic, and when you look back at the pace, they worked right
6. Illustrate Your Door!: when illustrating, you'll need on a razor, a pencil and a ruler of some sort. I am no good. Would lions or measuring maths is not my forte, so inaccuracies are inevitable. But start off by creating four sides toe a long rectangle. For some reason, I always angle my lines and have to start again. However, be patient with yourself. You can watch me try a zillion times, but eventually it'll happens. Next step is to draw two squares within the rectangle. Try to get these looking somewhat symmetrical again. It doesn't have to be perfect. Just try your best. Don't forget to curve the top of the door. This will create that lovely round. Borrow for the bricks now at the cross shape on the top square and lions on the bottom square to create details in your door. You can add the other stuff later, but just map out where you want things now for bricks. I start off on the round part of the door and I create square like bricks with a tiny little gap between them. These don't have to be perfect at all. I've sort of curved out the sides, so there no actually very square for the bricks on the side. Try to scatter them and follow a consistent Patton. I try to do one thing to one thing to once you are happy with how it's all looking. Make sure that you will raise some of those dark lines so that it's ready to pay.
7. Paint Your Door!: wear now, ready to paint our doors. Start off by mixing your colors. I'm mixing. I'm mustard yellow. I'm going to start off by outlining the first window. This is a technique that I call boat to bleed where I paint a pigmented line and bleed it out just with water. This allows control, and it's really simple to do. Stop filling in your shape, painting it with the color that you've chosen also start to darken it up with browns and things like that around the corners. To create that realistic finish. It takes time. Be patient with yourself and enjoy it. - Paint the cross on the door with your chosen door color, then paint the panels below again using the Volta Ble technique. Make sure you isolate the panel so that they all don't bleedin together. You may choose to use a darker color for the panel. I have tracing her brown just for a few of the panels to create a little bit of difference within them. Next I'm going to mix up my brick color using red black brown. I wanted career this deep red is rich red that I can manipulate with browns and blacks throughout my brakes using the brick technique that I told you previously, start to paint the bricks around your door. This is very time consuming, but it will be worth it when you look back and see the piece. Please remember, it does not have to be perfect. Have fun with it. This is your door bricks at inconsistent on. That's why they're very, very beautiful to look at when painted with watercolors.
8. Detail Your Door!: time to date how your door create texture on your bricks by adding darker colors on the surface. This creates that old type brick feeling, and it's so lovely to see Once you're happy with your bricks, start to paint your decoration on your door. Fun. You can choose which ever decoration you lack. For this one, I have chosen a combination mistletoe to finish. Add some shadows around your door with dirty water and dab it out also in your windows. Dirty water and dab it out. Don't forget the ground of the door. Put some bran and put some green and bladed out all together to finish. Put some cracks on the walls and also some grass on the ground. Don't forget to agile lettuce lock and a door handle just to bring it all till life. Once you were done, look back and admire your amazing Christmas door. This is fantastic work. Well done
9. Thank you For Watching: No, we made it to the end. Thank you so much for taking my second skill share class. And I cannot wait to see your doors. Make sure you post them tag me, showing me message me. I don't care. I want to see them. I want to be involved. And I'm so very thankful that you watch today. Thanks God, and see you soon. Um, knocking on his own store. Two handbook. Knock on Pitso door. Knock fizzles, dog. No, after, not bush. Oh, yeah, Yeah. You bad? No, no, no. Oh, I'm puffed. Yes, this'd me looking No.
 Pizzle P., Ain't no party like a Pizzle Party!