Transcripts
1. Introduction: Do you want to step up your cooking game? Are you looking to add a little excitement to your everyday recipe rotation? Do you want to be able to whip up an easy meal confidently, knowing that it will taste good? Then it's time to master some sauces. Hi, I'm Julie, a trained chef who's passionate about helping beginner cooks gain confidence in the kitchen. I'm a blogger, kitchen coach on YouTube, and an instructor right here on Skillshare. In this class, I talk about why sauces boss. Then we'll cover various techniques for making seven superstar sauces that will expand your cooking chops. These sauces are versatile and easy to make. Once you know how to master them, you'll find countless ways to use them. This class is geared towards beginners, but as a trained chef, I've picked up some things along the way that even the advanced home cook can benefit from in order to hone their cooking intuition. If you want to be smarter about making sauces and creating dishes that are effortless and successful. This class is for you. My hope is that once you complete this class, you'll be a certified sauce boss. Let's get started together. I'll see you in class.
2. It Begins With the Sauce: Welcome to my second class where we're going to continue growing in our cooking intuition by mastering sauces. In my previous class, I mentioned that sauce is boss. In this class, we're going to dive deeper into learning the important techniques and concepts for making superstar sauces. I believe most dishes can be served by the sauce. In fact, that's how I figured out what to make for dinner in my everyday life. When I'm rummaging through my pantry, fridge and freezer, I often think about the sauce first and then think about what vetkoek I want to put it on. Whenever your inner recipe rut, start with the sauce. A well-crafted sauce can bring any dish together. It can add a luxuriousness, bright acidity, complexity, and even texture. It's the starting element, and a finishing touch. Did your chicken turn out a little bland or dry? Throw a pan sauce or vinaigrette on top of it. Do you have some leftover veggies that are about to go bad? Toss them in a yummy stir fry sauce. Or like me, do you have a picky eater? Learn to make a creamy cheese sauce, anything will be good with that. What makes a good sauce? A good sauce should be versatile and easy to make. You should be able to use it in various ways and in multiple applications. It should not be a one-hit wonder. You should be able to tweak it easily and make changes and additions to it to suit your different needs and preferences. Ideally, it should cover the five taste elements, which I've mentioned in my previous class. I know this is not the case for all the sauces like something like a bechamel, which is pretty straightforward, but I think it does apply for sauces like a pan sauce or a vinaigrette. You should be able to use basic pantry staples and easy techniques to make it. It should not cause you stress. I'll talk more about my favorite pantry staples later. You might be thinking, okay, sounds good. How do we begin? Let's start with what I like to think are the seven essential sauces.
3. The 7 Essential Sauces: What are the basic sauces? As a classically trained chef which is fancy for, "I studied French cuisine", we were taught something called the five mother sauces. Those are bechamel, veloute, sauce tomat, sauce espagnole, and hollandaise. These sauces are the base of almost every traditional French sauce so they're considered the jumping off points. Meaning that if you know how to make these, then hopefully you'll be able to make various sauces out of that. It's still applies to a lot of professionally trained chefs, restaurant chefs, and home cooks alike. But I would say that in today's kitchen our palates have changed a little bit so I feel like these five mother sauces are important to learn, but we can expand on them. For example, instead of a sauce tomat, which is thickened with flour and butter, I'm going to opt to go for a lighter pomodoro. Instead of a sauce espagnole which has to be simmered on the stove for hours, I'm going to go for a light bright chimichurri, which can be made on any day of the week. Here are the seven essential sauces that I believe are relevant for today's home cook, plus the key ingredients and tools we need to pull them off. A pan sauce takes advantage of all those tasty bits that are left at the bottom of your pan after you brown your meat. Then all you need is a splash of wine, some herbs, and some other little elements to make a fantastic sauce that you can drizzle over the meat, as well as vegetables, potatoes, pasta, and rice. A pomodoro is a quick cooking version of a marinara. It's simmered with simple ingredients which you can then toss your pasta with or put on top of chicken parmigiana. You can even ducter it up by adding anchovies and capers and then really expand your palate. Learning how to make a vinaigrette is not only important to make salad dressings, but it's also used to sauce chicken, fish, and vegetables. If you master this technique, you can vary the oils, vinegars, and seasonings to make dozens of dressings. Then your recipe repertoire has expanded by that much. A bechamel is a classic and a mother sauce for a reason. It doesn't really have a taste of its own, it's just a basic white sauce made with a reel. But then once you add other elements to it, you can even add cheese to make it a more nice sauce. It becomes the basis of a lot of classic dishes like mac and cheese lasagna. It's incredibly versatile and yet you don't need any special equipment for it. A chimichurri is a bright herbaceous sauce that goes well with everything. It truly jazzes up cuts of meat like steak and chicken, even fish. You can totally throw all the ingredients together quickly into a food processor or blender so that it's a super easy sauce. But I'm just going to be focusing on a cutting board and a knife. I love me a good stir fry. I would like to say that there's one universal stir fry sauce, but that's not the case. However, I do have some tips and techniques to put together a good stir fry at anytime with almost any ingredient. A good marinade will tenderize your meat, lock-in juiciness, and create excitement for your meal. I have a couple of good marinades in mind that I have on our website that I would love to share with you, ranging from Korean barbecue to lemon herb but what I would like to focus on is what I would funnily call a make it once, use it twice marinade. Now that we've introduced the sauces, let's go shopping together for some sauce making pantry staples.
4. Shop with Me for Pantry Staples: Let's go shopping for some sauce-making staples. I'm going to be pointing out some of my favorites that I usually keep stocked in my pantry at all times so that I can make sauce anytime I need it. But I'm also going to provide a comprehensive list of everything that I like. I'll leave it for you in the class downloads, so check the class resources and snag that. Let's go to the store. Honey has so many uses in the kitchen, it's unbelievable. From sweet to savory applications. You can use it for dressings, marinades, dips, and sauces. It has a natural sweetness as well as a floral fragrance. I always have it in stock at all times. Jam is my gem every time I need an inspiring ingredient. I have two recipes on the blog where I use jam as the star when I'm whipping up a quick treat. One of them is my raspberry mummy hand pies, and another one is my famous jam bars. It's particularly handy if you have little kids because you can put on plain toast or PB and J, come on, it has so many uses, but it's especially great for making sauces and even glazes. Every time I say maple syrup, I think of our son Lincoln, because he goes around singing maple syrup. I don't even know what that is, but make sure you grab a 100 percent pure maple syrup. Not the stuff that you use just for pancakes, like the pancake syrup. Although maple syrup is used for pancakes as well, it goes way beyond that. It has a unique deep taste and it's really irreplaceable. If you want a hint of sophistication, add some maple syrup to it. I use extra virgin olive oil for most of my dressings, but then I also use it for marinades as well. It's a good drizzling sauce, a finishing oil, and it has a robust deep flavor, so make sure that you grab some good-quality extra virgin olive oil because that will take you far in so much of your cooking. Make sure you grab yourself an assortment of vinegars. I usually like rice wine vinegar. I tend to grab it the most because I make a lot of Asian style of food. But you can have an assortment of apple cider vinegar, balsamic, white wine, red wine, it's endless and every vinegar has its own unique flavor. Some are lighter, some are tangier and they serve their different purposes. If you have an arsenal of great vinegars, you can have a diversity in your cooking. Ketchup and mustard are not just condiments, you can use them for cooking too, and I definitely do. I even have a recipe on my blog called a hamburger stir-fry, where ketchup and mustard are the star to make the sauce. Ketchup adds a sweet subtle tanginess to your food, so sometimes I plop some in there when I don't know what it's missing. I definitely cannot live without Dijon mustard, I always have it in stock. It goes inside of marinades, pan sauces, and vinaigrettes. I usually like just plain Dijon, but lately, I've been really enjoying stone ground mustard as well with the whole seeds. Mayo is a must in the kitchen. I know some people feel weird about it, but it really is a lifesaver and a game-changer. It keeps meats moist and also locks in flavor. It helps adhere breadcrumbs on to things. It's an emulsifier. It's actually my secret ingredient when making grilled cheese. If you can find an aioli is a good idea too, it's an automatic dipping sauce but you can also add things to it and stretch it. Like who doesn't like a garlic aioli? Add some sriracha to it, add some spices, make it a chipotle aioli. Think of an aioli as a thinner garlicky cousin of mayo. I cannot stop raving about Better than Bouillon. It's almost like I'm sponsored by them, but I'm not, but maybe I should be. It is your quick rescue ingredient. If your food is lacking something, I mentioned this in our previous video, adding a dab of that will do you because all you have to do is add that to your sauces, your stir fries, soups, and you have instant umami flavor. I even add it to my ground beef when I'm making tacos. It comes in different flavors, chicken, beef, even vegetable, and I like all of it. I just add a little bit of it. I keep it in my fridge at all times and you can make a quick pan sauce, and whenever you're lacking a little bit of flavor, add some Better than Bouillon. Fish sauce is a salty umami bomb, and it doesn't taste as fishy as you think. Yes, it does have a fishy, strong pungent smell, but once you incorporate it into other ingredients, it gives so much flavor without imparting so much of its own flavor into the dish. It's the secret ingredient to a lot of Brussels sprouts dishes in certain restaurants, and it's the main ingredient for Pad Thai and a lot of Asian ingredients, dips, dressings, and marinades. It's definitely becoming more popular and mainstream, and now I see more and more people grabbing it and keeping it in their pantry because it really adds that, "What is that flavor to your food?" I probably also couldn't live without soy sauce and there's different versions of it. There's tamari, coconut aminos. Soy sauce really adds that deep umami salty flavor without being just pure salt. I throw soy sauce into my fried rice, stir fries, soups, marinades, and dressing. Sesame oil also adds an umami richness and flavor. Most people will just use it sparingly. I go nuts with it. I usually add it to salad dressings. It adds a little hint of savoriness. It's good on rice, noodles, salmon, chicken, beef. I probably really can't live without sesame oil. Worcestershire sauce. Can anyone really say that? It is so important, especially when you're doing a lot of savory dishes, like beef and steak. It adds a richness to it because it doesn't have just a one-note flavor. It almost has different sauces combined into one. It has a little bit of a salty sweetness tang, fish saucy next to it. It is also an umami ingredient, and like I mentioned in my previous video, it's so important to keep umami ingredients in your pantry. I love keeping peanut and other nut butters in my pantry. I think that it adds so much creaminess and richness, complexity, and flavor. I even have a couple of quick peanut sauce recipes on our blog. They're so easy to make. Usually, I like to pair it with some citrus like lime and zap it with some sriracha and you just have an over-the-top sauce. Let's talk about the hot sauces. I love any kind of hot sauce like I love the Frank's, the Crystal, but I also always keep sriracha on hand. Sriracha is one of those ingredients that you can add to it, especially if you mix it with mayo, it becomes a sriracha aioli. I use it for burger toppings, sandwich spreads, and honestly just drizzling right on top of foods as another layer of flavor. Sambal is really important as well. It's like sriracha, but it doesn't have as many other flavors in it, it's mostly just a chili, oil, and salt. That's what's so great about it, it's more like pure. If you want to add it to dishes, it doesn't impart that much flavor except for just pure heat. Gochujang is a Korean favorite staple and I used it in our previous class to make a gochujang vinaigrette. That's another sauce recipe for you if you're interested. It not only has heat, but it has a tint of sweetness and saltiness as well, and because it's like a paste, it's very diverse, you can throw it into marinades and also make it into dressings. I usually like to keep a variety of canned tomatoes in the pantry at all times. Sometimes they're diced. These days I'm leaning more towards the San Marzano tomatoes. They're plump tomatoes that are just a little thinner and longer and sweeter and they just have a nice flavor to them. If you have San Marzano, you can make endless recipes, sauces and soups. Tomato paste is another umami ingredient that I like to keep. Honestly, it has a lot of surprising uses. Not only do I use it to make sauces, sometimes I just mix it in with heavy cream and it turns into this beautiful sauce for pastas. But I also use it for things like curry, which is amazing. It's concentrated tomato flavor at its best and it's great to keep. I like to buy it in a tube and then keep it in my fridge, then I can squirt out a little bit at a time. I don't know how many times I could talk about umami and the importance of it, but anchovies is another ingredient that I love to keep on hand. I like to buy the anchovies that are packed in oil. You pull out a little fillet, you put it in a pan and it melts away. It literally just disintegrates. Then you can make a beautiful pan sauce out of it too. You can toss zucchini in it and pasta, and it doesn't have a fishy taste to it. It's just a really deep, earthy, beautiful flavor. It might be a good idea to keep a variety of stocks on hand. I know I talked about Better than Bouillon, but it's also good to just have beef, chicken, and vegetable stock on hand. I usually always at least have chicken stock. It helps to get the low sodium kinds that you can use it for a variety of uses. If you need to add a little splash to make a pan sauce, the low sodium will help you so that you can control the amount of salt. It's good to make soup and sauces and deglaze the pan. Speaking of deglazing your pan, make sure that you have some red or white wine on hand as well. When you cook off the alcohol, you're just left with a deep, rich flavor that you can't really imitate with anything else. I'll sear some meat off and I'll deglaze it with a white or red wine to take off the brown bits. But red and white wine is also useful for tenderizing and for marinades. I've also made flank steak with red wine marinade before, and it turned out so good. I used to not care about buying whole nutmeg, I would just get the ground nutmeg, but I do see a difference. Sometimes it's hard to find, sometimes you don't need even for me, I bought a thing and I was like, "Oh, this might be too much for me." But actually, it ends up being so useful. I just use a fine grater and I just grate it right into my cream sauces. If you're having something with thick heavy cream, cream sauces, chili sauces, nutmeg really adds a deepness and a savoriness. Make sure you have some butter in your fridge. That's the way to go, maybe because I'm French-trained, but I always believe in butter. It's the start and the finishing of certain sauces and dishes. It's the start of a roux and the ending of a pan sauce. I usually like unsalted the best because then that can control the amount of salt I put into the dish. I like to grab some milk or heavy cream and keep that in the fridge as well. I don't usually buy both at the same time. If I know I'm going to make a bechamel, I'll just buy milk. For making bechamel, I usually use any kind of milk, anywhere from skimmed to whole milk. These days, I just get like one or 2% if I know I'm going to make a bechamel. I feel like if you have cheese in your fridge, you're good to go. You can pretty much tackle everything. If you have some cheese that [inaudible] yourself, you can easily add it into your bechamel to make an easy cheese sauce. The type of cheese I usually like to keep in my fridge are Parmesan, sharp cheddar, mozzarella, and Gruyere. But when I need some cheap ingredients, I also like using Pecorino, Romano, and feta cheese. I even have a recipe on the blog where I make a quick pan sauce for spaghetti and all I do is melt a little bit of feta cheese in. For those of you who are on Tiktok, you know there was that viral feta cheese and tomato bake where you just mix it up together in the oven, and it turns into its own sauce. I also make sure to grab shallots, ginger, and garlic. Those are my trifecta. I used to not buy shallots all the time, but more and more I'm realizing how much flavor it imparts into the dish from vinaigrettes to pan sauces. I would like to say shallots are a cross between garlic and onion and has its own little sharp distinct taste. Garlic just adds so much flavor, and sometimes even if all you have is garlic and olive oil, you can make so many dishes. Ginger is also a very important ingredient that goes into a lot of Asian marinades, dressings, and dips because it adds this spice that's not too spicy, it just kicks you and warms you in the back of your throat. I know some of you don't like buying fresh herbs and that's okay. I would say don't buy all the herbs, all at once, just stick to one. The ones that I like are parsley, cilantro, because first of all, you can turn that into a chimichurri, especially as it's starting to get old and wilted. But for the flavor for herbs that really pack a punch, I like things like dill, thyme, and basil. Herbs add so much flavor that you don't even have to do much, even just adding a hint of basil to tomato sauce changes that up so much. Adding a little bit of dill into a marinade takes it to the next level. If you automatically want your food to taste exceptional, then don't sleep on the herbs, really grab them but you don't have to worry about grabbing them all at once. Just take it one at a time. I cannot live without lemons and limes. The more I cook, the more I realize I just need to have it every day. It adds so much flavor, so much brightness. You can use the zest and the juice. It tenderizes, it marinades, and you can even clean your kitchen with them. I love to add them into salad dressings and just finish off a pan sauce with them. Lemons and limes always come to the rescue for me. Now that we've got our pantry essentials, let's go over our supplies so that we can get started on our sauces.
5. Supplies: To be a sauce boss, you're going to need the proper supplies. I'm going to leave some downloads in the class resources that has some specific brands and names that I personally like for all the tools that I mentioned. Be sure to check that out. With the chimichurri, we're going to be using it. I'm going to call it the chopping board chimichurri. Make sure you have a good eight inch chef's knife and a good solid cutting board that doesn't rock around, has grooves and silicon grips. You definitely need to get a glass measuring cup to execute any sauce. You need to make sure that you have the right amounts and ratios, especially when it comes to vinaigrettes. Then you will need dry measuring cups. These happen to be nesting and magnetic, which I loved. You're going to need this if you're going to be measuring out dry ingredients like sugar, for instance. You have to be accurate and get some measuring spoons. This once again, are my favorite. They are magnetic and nesting as well to come apart, so they're not stuck on a ring. They're doubled ended so they can get into spice jars easily. Don't guess when you're first starting to cook, you definitely need a whisk and I have two for you right here. These are my favorites. I have a flat whisk which I love because that really mixes the dressing elements together in a measuring cup really easily. But especially if you're using a cast iron pan, you can get into the sides and edges and scrape and you can pick up all of that gorgeous flavor, the pan drippings, you can deglaze it really easily. But then I also have a silicone whisk. Because I tend to use a lot of non-stick pans, if I'm making a pan sauce, I don't want to scrape up the coding of my non-stick pan, so I have a silicone whisk. I also use it when I'm mixing in a bowl and I want to scrape up all the last bits of it. It acts like a spatula and a whisk at the same time. I showed you this in my previous class list of tools I recommend, but I love my glass nesting balls. These definitely come in handy because I use it for [inaudible] measuring out my spices and little biberty bobs. But I also use it to whisk up my sauces, to make salad dressings, to whip up marinate, and then actually marinate the meat right into the bowl as well. You need a really reliable trustee, large pan or skillet. I love my 12 inch non-stick skillet. This has been my tried and true. It's my everyday pan. If you don't want to use non-stick, you have to at least grab yourself a cast iron skillet. This is 12 inches as well because I like to have a large surface area, perfect for penne sauces because you brown your meat into it and has a nice crust to it. You can deglaze it, and then you can use your flat whisk to really get in there. You don't have to worry about it scratching up because it is cast iron. For the non-stick pan, I do like using the silicone whisk. These are my two favorite pans that I use pretty much exclusively and all the time. This silicone spatula is my favorite cooking tool of all time, I use it every day. Not only is it good for mixing and scraping in a bowl, but also in a pan. Then also, I'd like a wooden spoon for the same things. Both of these things will not scratch up either of your pans. They should be okay. This silicone spatula is heat resistant and it doesn't have cracks so there's no seams. The seamless design helps it so that you don't have water go in there. Tongs are my second favorite tools. I use these guys all the time. I like the ones that are interlocking and they have that little pop-up button so that, when you want to close them, they won't be all splayed out. I like these because they're silicone tipped and heat resistance. Then again, I use them a lot for my non-stick pans. They won't scrape it up, but they're still very sturdy. You don't use these to make sauce, but you definitely toss everything in your sauce from your pastas to flipping your chicken or your steak. If you have a kid like me, then you're going to be making a lot of cheese sauces, so you definitely need to get yourself a good box grater. Did you know there's a difference between freshly grated cheese from a block as opposed to cheese that's already shredded. The pre shredded cheese is coded in a corn starch. It doesn't melt as creamy and as smooth. I would recommend grating your own cheese. You have to get yourself a good, reliable blender and food processor. This took us a while to splurge on this, but this vitamix has saved our lives. It's so great because it makes everything so silky smooth, even big chunks of things like onions if you want to blend it up for a marinade. A lot of Korean marinades require blending up onions and fruits, like apples or pears. This really does the job. Even if you don't want to bring out a big food processor, you don't want to invest in it, then at least get the little guy. I have both. I have everything. But this little guy is so useful for even like chopping up nuts as a base of a pesto. Because like with any pesto, usually there's some pine nuts, walnuts. It can blend up cheese, it can break down tomatoes. I would say it's worth it to invest into equipment like this, either a blender or a food processor or both depending on your needs. If you tend to make a lot of runnier sauces, dressings, and marinades, then maybe a blender is good enough. But if you tend to make chunkier sauces, pestos, chimichurris, dips, and hummus', I would go for a food processor. What I like to invest in is a micro plane. I used to actually say this was my favorite tool because I just can't live without it. A fine grater, a rasp, is the same thing. I usually use this not only for like grating Parmesan cheese, again for like Alfredo sauce or something, but I grate ginger on it, garlic on it, and lime and lemon zest. Those are all things that I use when I'm making dressings and pan sauces and vinaigrettes. Another favorite that I use in a lot of our videos is a citrus press. This one has both the lime and the lemon capacity so that you can squeeze either one in here. I'm a huge fan of citrus I'm always using it as much as I can in all my vinaigrettes and marinades. You'll see me using this a lot. I really say you need to invest in one of these bottles with a spout, because if you're going to make vinaigrettes, then you need to stream in your oil slowly. In order to do that, it's easier to put it into a measuring cup with a spout and then just pour like that. Once you don't have to measure anymore and you can just eyeball it with ratios. You can just directly pour like this and it will create a nice, steady and slow stream so that you can emulsify your dressings. Now that we have our tools and supplies ready, let's start making some sauce.
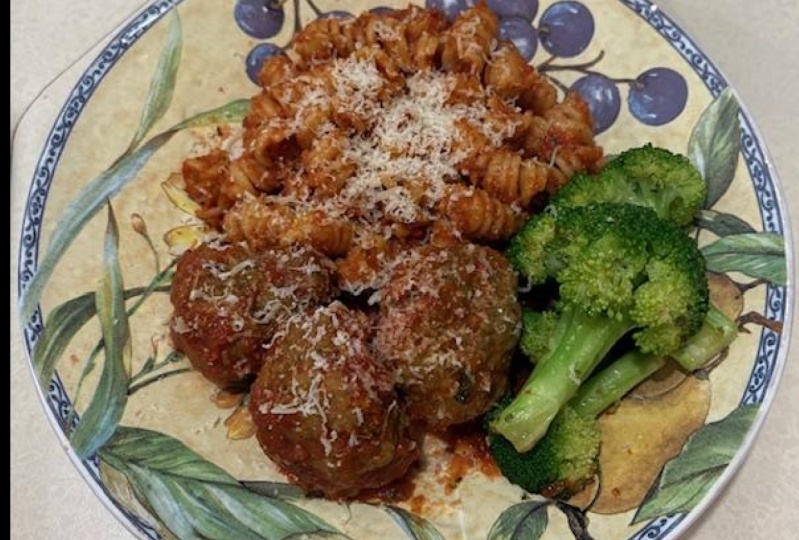
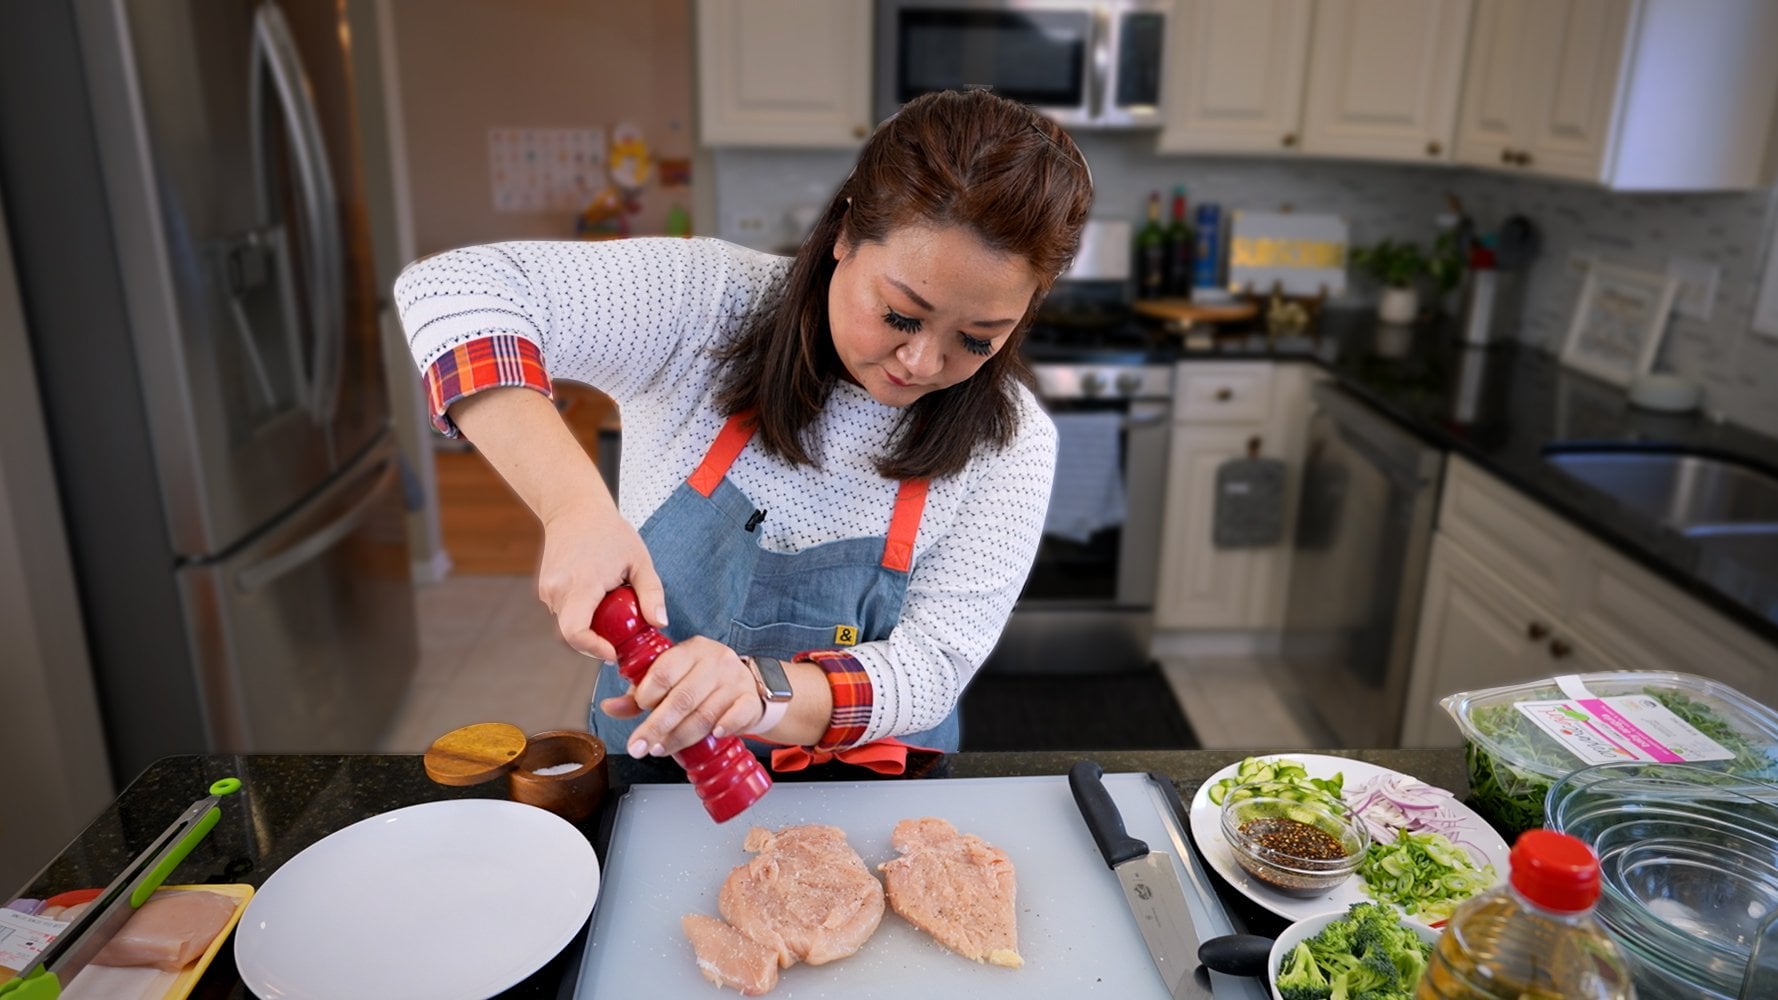
6. 4 Steps to A Pan Sauce: Why is it important to learn how to make a pan sauce? It's because it's the easiest, tastiest, and quickest way to complete your meal. It makes the most out of the rendered fat and the tasty, brown bits that gather from searing your meat. I guess you can say that this is more like four steps to a pan sauce than it is an actual recipe, but I'll try to give you some actual amounts. The best part about making a pen sauce is it's completely flexible. Now, I'm going to use pork chops because that's what I have, but you can do it with chicken and steak as well. I'm going to heat a pan, cast iron pan so that I can get a good crusty steer, throw in a little bit of vegetable oil, and then I got some pork chops. I'm probably just going to put whatever fits in this pan. I'm thinking it might be about three, we'll see. I have some pepper on both sides, I'm just using bone and pork chops. You want to hear that sizzle. I'll just do three, I don't want to overcrowd my pan. If you have more meat than fits the pan, just do it in batches and don't clear out your pan. The more meat you do, the more caramelization and the more fond will form on the bottom of your pan. First step of making a pan sauce is season your meat with salt and pepper. You need to have that salt and pepper on that meat so that it develops some flavor and sear it. One of my pork chops looks nice and brown, the other ones don't. I'm going to rotate them in the pan. It depends on where it's sitting in the pan. Sometimes some spots are hotter. Go for another minute. If one of them is brown enough, I might just take it off on the side. I do that sometimes, if they don't cook evenly at the same time. This one is nice and brown, I know. Look at that one. The browning equals flavor. The only way to really know if your meat is done is to use a digital thermometer, an instant read, and check the internal temperature. You got to let it rest. You can tend to, at this point, to keep it warm. Something to note is that as meat rests, there's going to be juice that comes out, sometimes I pour that right back into the pan sauce as well. Step 2, I'm going to lower the heat. If there's a lot of fat in here, you want to drain off everything, but about a tablespoon's work, you don't want it to be too fatty. Likewise, if there's probably not enough fat, which seems like my case, you can add a little more. I'm just going to add some olive oil just because I like the flavor of it. I'm going to turn on the heat a little because it's getting hot, especially in a cast iron pan. See all those brown bits in there, I'm going to add in our shallots. I'm going to add about a quarter cup of finely diced shallots. You can also use garlic cloves if you want, instead, or you could use a combination. If you really wanted to, you could use onions as well, but I love the deep, savory taste of shallots. Since there's water in the shallots, it's actually releasing and deglazing some of the brown bits a little bit. Step 3, deglaze with some wine. I'm going to add in about a quarter cup of white wine. Get that facial. You can add more if you want, so I'm using white wine, but you can use red wine, especially if you want to make a deep red wine sauce. Then I'm going to add in about a quarter cup of stock. I'm using chicken stock. I'll reduce the heat, and I'm going to add in a sprig of thyme, any herb that you want; so wine, stock, and a sprig of an herb. That herb really does a lot. If it looks like it's reducing too much, you can add more stock. You can also add water, which I'm going to grab. It also helps to use reduced sodium chicken broth, or beef broth, vegetable broth, because it helps you to control the amount of salt in there. Since I only have regular, I'm going to add a splash of water too. At this point, I didn't add any seasonings. I didn't add any salt and pepper because I'm relying on the seasonings that are already at the bottom of the pan, as well as the stock. If you didn't want to use wine, could you use something else? Yes, you can use vinegar or even something like some lemon juice. The whole point of the wine is to add a little bit of acidity and a depth of flavor. If you didn't want to use shallots, garlic, or onions, you can also use mushrooms. In the stage where I added the shallots to the fat, you can add sliced mushrooms instead. What we're doing now is just letting it reduce a little bit and gets slightly thickened. Variations of a pan sauce are at this point, you could also squirt in a bit of Dijon mustard because I think that'll add a nice brightness to it and creaminess as well. You can also add heavy cream, and then that'll make it a velvety creamier sauce, which would be good, especially if you had mushrooms in here too, be like a mushroom cream sauce. I made the mistake before of seasoning with salt and pepper before it fully reduced, and it got way too salty, so I'm not doing that right now. You could even make your pan sauce a little bit sweeter by adding some brown sugar or a squirt of honey or maple syrup. Step 4, I'm going to whisk in some butter. This is unsalted butter, about two tablespoons, and butter always finishes off a pan sauce. You'll see this a lot in French cooking. It makes everything tie in together, turn velvety, smooth, have a good mouthfeel. You can see that the texture almost instantly changes to almost like a creamy gravy. Whisking the butter in at the end is important too because it emulsifies and ties in together as opposed to just melting and turning greasy, so you want to do is at the very end. Sometimes if you want to cook for the bigger dinner party, you can sear your meat off first and keep it warm, or reheat it in the oven, and you can make your pen sauce a la minute or last minute, right before serving. Then we're going to ditch that little sprig, turn it off. I feel like this is a good consistency for me. If you want to brighten it up, you can add a little lemon zest or lemon juice. That's pretty good. I don't think I need anything. Actually, I might need a tiny bit of salt. I'll meet you over there where I'm going to play it up. I have my pork chops nicely rested, and you see all of that juice. You don't want to waste that, right? I'll start right in, which is fine by me because I should loosen this pan sauce up anyway. Goodness. Add a little blob of mashed potatoes, blanched green beans because, why not? See how that changes it completely. Add a sprig of thyme, and I think I'm ready to give this a taste. I usually like to plate and serve anything with a pan sauce with a wedge of lemon because I feel like then you can add a little squirt if you want a little more acid. Just for fun, I decided to add some sauteed mushrooms to the pan sauce. I did nothing different except for fold in some sauteed mushrooms in here. I'm going to try it with that too, just to show you the versatility of a pan sauce. I overcooked my pork chop, but that's okay. That's why sauce is boss. Adding a pan sauce adds moisture back into overcooked meats, some potatoes. It honestly doesn't even bother me that it's overcooked because the sauce saves the day. It's so savory, buttery, slightly creamy. You can taste the shallots and the thyme. You know what? Honestly, serving with a little bit of potato puree or mashed potato doesn't hurt because you can add the sauce right on top, it all works together. Trying with a little squirt of lemon, because why not? The lemon adds a nice pop, so if you want to throw that in at the very end, you could do that to freshen and brighten it up. Put a little mushroom. I don't know about you, but I love mushrooms. It adds another depth and texture to the sauce. It's well-balanced. It's not too tart, it's not too salty because I controlled my seasoning into the very end. If you don't have pan juices just stirring into the end, don't worry, you can always thin it out with a little bit of water or some more stock if it gets a little thick on you. You really can't mess it up. This would be definitely enough pan sauce to go for 3-4 pork chops. You can always make more if you wanted to. The key is to make sure that you do it a la minute or last minute right before serving. That's four steps to a pan sauce, and that is a very basic skill to learn when making sauce. That's how you become a sauce boss. Now, we're going to learn how to make another saw staple that is very versatile. I'll meet you in the next video where we're going to learn how to make an easy Pomodoro.
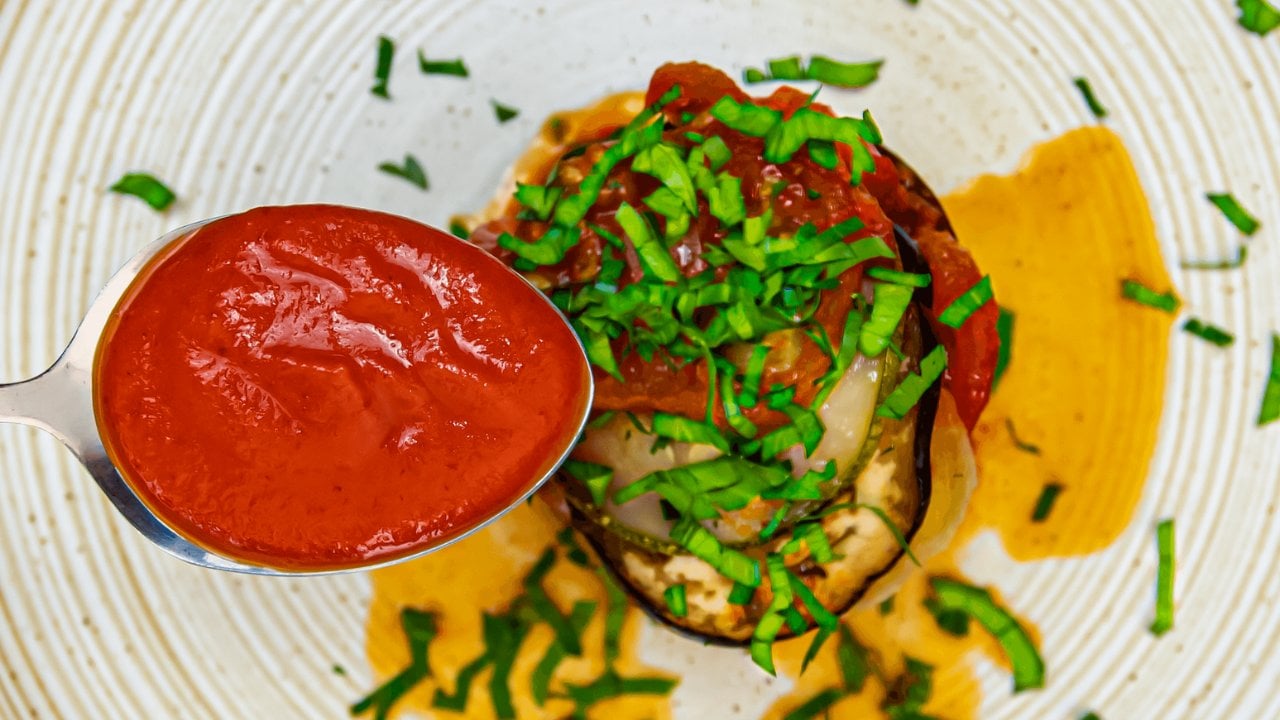
7. Perfecting A Pomodoro: Pomodoro is a super easy tomato sauce, and it just uses simple ingredients. In fact, you can grab most of this stuff from the pantry. But why we need to learn how to make it is because it's almost like a base for a lot of Italian cooking. If you eat a lot of pastas, eggplant, or chicken Parmesan, because it's just a plain tomato sauce, you can really doctor it up and add different flavors, you can make it spicy, add herbs, you can add cream to it, the possibilities are endless. I'm going to pop up the ingredients on the screen throughout this demo, but you can also check the class resources in our downloads and you'll get all the printed recipes with the measurements there. All we need are two cloves of garlic. This is debatable. If you like more garlic, go for more, and you're just going to slice it thinly. Some people just leave it whole and crushed, like to just smash it with their knife, and you just simmer it in the sauce. It's up to you. That's basically all the chopping we need to do. We move on to the tomatoes. You're going to grab a 20 ounce can of San Marzano tomatoes. Now, there are brands called San Marzano brands, usually they are the white label with a little cute tomatoes on top. I actually couldn't find it when I am grocery shopping. But luckily, a lot of brands now have San Marzano tomatoes. San Marzano tomatoes are pretty much are thinner, longer, plum tomato, and they have less seeds. It's supposed to be like what people say the product of tomatoes. You want to grab yourself a blender or a food processor. Now, if you don't have one, that's okay. You can just go in it with your hands, a potato masher, whatever you want, even the back of a wooden spoon. Pour in everything with the juice, just blend it up. How chunky you want it to be is up to you. A lot of Pomodoro sauces are just completely smooth and velvety. I'm going to go for that. But if you want extra chunks, you want to be more homey, you can crush it by hand, or you can just leave more chunks in it. The easiest part, now let's just head over to the stove. I'm going to use a tall-sided saute pan. The reason I'm doing that is because I know that I'm going to turn this into a pasta Pomodoro afterward. I want enough room so that I can toss the pasta in here. We are going to go with a quarter cup of extra virgin olive oil. There's a reason for all this olive oil. It balances out the acidity of the tomatoes, it's also going to add a nice richness to the sauce. Then we're going to add in our two cloves of garlic sliced, and then I have a pinch of red pepper flakes, not measured, because if you have small kids and they don't want heat, then don't put this part in. When I made this before, knowing that Lincoln would eat it, I didn't add any. You could really start to smell the garlic in the extra virgin olive oil. This alone is making me salivate. You can see I'm not walking away because I don't want that garlic to burn because there's nothing worse than a burnt flavored oil. This garlic is diffusing this oil, so it's becoming garlic pepper oil. I just want to toss some pasta in here right now, and toss it with some Parmesan cheese and call it a day. Always pour away from you. You can always turn your heat off, pour it in, and then turn it back on too, so it doesn't create an eruption like that. Now, we're just going to simmer this, meaning that you're turning it like medium low. We're going to let this simmer for about five minutes. I didn't add any other seasoning to it, we're not going to salt it yet. It's been about five minutes, and it's starting to thicken up, but it's not thick enough yet. We're going to go maybe about another 10 minutes or so, so a total of simmering for about 15 minutes. But I am going to add a little bit of salt right now. Then you're just going to have to like taste as you go because there's no measurement. You don't want to over salt it, so I'm just going to do a little, and then we're just going to taste it at the end and add more if we need. Then I'll meet you back again in 10 minutes. I'm a huge fan of ABM, always be multitasking. If you know that you're going to turn this into a pasta Pomodoro, which is in my next video, then you would want to go ahead and do yourself a favor and get a pot of boiling water on the stove. That's what I did. I have it ready to go so that by the time my sauce is ready, then I can multitask and have my pasta ready to go as well. You can see how chunky, and velvety, and luscious the sauce looks, and it's so simple, right? At this point, you want to give it a taste to make sure the seasoning is right. That is just so good. It just needs a little bit more salt, but man, that is robust. Remember, you can re-season your sauce when you're going to heat it and use it for different applications, you don't have to go too heavy-handed. You get yourself some fresh basil. If you're going to use it right away, grab a little chunk, and throw it in your sauce and fold it in. But if you're not going to use it right away, you don't want the basil to turn all bruised, and black, and wilted. This sauce can be good in the refrigerator for up to five days. It's just a really good basic tomato sauce with tons of flavor. Now that our Pomodoro sauce is done, I'll meet you in the next video, where we can put together some pasta Pomodoro for two.
8. Pasta Pomodoro for Two: Pomodoro is literally Italian for tomato, so we're just making up tomato pasta. In our last video, we made a beautiful luscious Pomodoro sauce that was so easy to put together. While we are waiting for the sauce to simmer down, I knew I was going to be making a pasta Pomodoro so I got my water quickly on the stove and then salted it. That's the key ingredient because you've got to make sure that the pasta itself is nice and flavorful. I'm using Mezzi Rigatoni which is pretty much tubular pasta Rigatoni but it's smaller because I just think it's cute. I think it clings onto the sauce really well. But I've done this with Bucatini, the really thick spaghetti. Then you can use regular spaghetti or any pasta that you want. We're going to use half a pound or half a box. I just eyeballed it. I just shook in about halfway of the box because it's just going to be for Joe and me and this is enough sauce for this amount of pasta. If you want to make it for four, you would have to double your Pomodoro sauce recipe first, which is not a huge deal. You just use two cans of tomatoes instead of one. Double your ingredients. We're going to cook this shy of al dente, meaning that we're going to make it firm to the tooth, but even more so because we want to finish cooking it in the sauce itself. The key to do that is to save some of your starchy pasta cooking water. That's going to be the glue that gets poured into the sauce that adheres the pasta to the sauce. Look for the instructions of your box of how long to cook your pasta and then make it about two to three minutes or less than that. I just cheated, and I tasted one of the pastas and saw that it was very firm to the tooth but still soft enough to drain. I'm going to turn the heat back on on my sauce that we just need but if you have made it in advance, just reheat it and that's fine. You want to do this before you drain your pasta, whether in a colander or not, so that you don't forget. We're going to reserve about a quarter cup of the starchy cooking pasta water. I like to just use a skimmer and throw it right in. You want your pasta to be undercooked so that when it continues to cook in the pasta sauce, it will have room to drink up that pasta sauce, and it won't be overly cooked and mushy, like you want that texture. A quarter cup of starchy pasta water along with two tablespoons of butter. I'm using unsalted so that I can control the amount of salt. Typical pasta Pomodoro does have these elements. It has butter and cheese. I'm going to use Parmesan and Pecorino Romano then we're going to add in half of the Pecorino. I have a quarter cup in total, and then half of the Parmesan, again, a quarter cup in total. Turns out like almost illegally. Listen to that sound. I'm also going to put in my basil leaves now. You can do chiffonade, which means to Julienne them into thin little strips. But this fresh basil I got from my friend, Audrey's garden, they are just so cute left hole so I'm just going to do that. By the way, plug for my friend Audrey. She's also a teacher on Skillshare. You want to add any fresh herbs closer towards the end. Right out of culinary school, I landed a job with an Italian chef and I learned a lot of tricks and tips along the way. One of the things that I valued was cooking your pasta right into the sauce and also making sure that your pasta is not overly sauced. We're just going to top it with some more cheese, the leftover quarter cups of Parmesan and quarter cup of Pecorino, whatever's leftover, as well as some fresh basil and serve it up. I'm just going to a taste it to make sure that it's seasoned well with enough salt. That is so good. You can taste like that tomato flavor. A hint of the basil, the spice from the red pepper flakes. I am so excited to eat this. I'm actually super hungry. Do a little bit of the cheese. You can use that in microplane and grate that cheese right on top too. Actually, I might do that. Yeah. Let it rain. Couple of springs of basil. Honestly don't you just want to dive right in. It's so simple and beautiful, especially with the pop of the fresh basil and the topping of that cheese. It looks like restaurant quality, but you've made it at home. It's even more special because you made the sauce with love and from scratch as opposed to just getting it from the jar. It makes a world of a difference even the way that it clings to the pasta. Okay, I can't wait. So fresh, light, but creamy. It has a good decadence while it's being light at the same time. This would make a date night feels special. Your kids will love it. Just adjust for the heat if you're going to use red pepper flakes. You don't really need anything else with it, but you could add sausage, meat balls, serve it with salad or garlic bread. Speaking of salad, I'm going to show you how to make a homemade vinaigrette. I'll meet you in the next video. Seriously I can't stop eating it, it's so good. I'm so hungry too.
9. Mastering a Versatile Vinaigrette: Why is it so important to know how to make a vinaigrette? Because in addition to dressing greens, a vinaigrette can be used to sauce chicken, fish, or even vegetables. If you master the technique of making a vinaigrette, you can vary up the ingredients you use; the vinegar, the oil, the seasonings, the herbs, and then you can create dozens of dressings. On top of it, fresh-made vinaigrette can usually last up in your refrigerator in a non-reactive container for up to two weeks, throw it into a mason jar and keep it in there. Remember the ratio, a vinaigrette is usually one part vinegar to three parts oil. But I also have to share with you a myth buster. There are some vinaigrettes that benefit from having different ratios. For instance, if you're using citrus, I find that sometimes you need to do more equal parts, and some dressings actually require to use more vinegar than oil. It actually can benefit from that zing. It really depends on what vinaigrette you're making, what vehicle you're putting it on, and you just have to go by taste, which is why I talk about cooking with intuition in our previous class. If you don't know where to start, definitely go for the one to three ratio, one part vinegar, three parts oil. But the best way to do that, as you'll see me demonstrating, is to stream in your oil slowly. That way you can throw it in, taste it. If you feel like it needs more then you add more. You'll notice that a lot of vinaigrettes call for extra virgin olive oil as your base and some vinegar or citrus. Now I don't have all of the vinegars in the world, but I do have a good collection. For a white vinegar, this happens to be a white balsamic or white Modena vinegar and white vinegar usually goes well with any kind of leafy greens, even like arugula, spring mix salad, and then you have your classic balsamic vinegar. Balsamic vinaigrette is super popular and that will be good on any hardy like romaine lettuce. Red wine vinegar is good for that zingy pop. Think like a lot of Greek or Italian salads, things with cucumbers, tomatoes, feta olives. Apple cider vinegar has a little bit of a fruity, sweet, and tangy taste to it. Think about putting it in summer salads that have mayo. Rice vinegar is my ultimate vinegar. I actually keep it right by my stove in one of those bottles. I like it that it's so light and it goes into a lot of Asian style dressings. Additional options are some of your lighter vinegars like champagne or sherry because they have a not so strong vinegar taste. Other options definitely include things like citrus. I usually always keep lemons and limes in my fridge all the time. The thing about citrus is that you can use not only the juice but the zest as well. Don't forget the emulsifier, which can look like mayo, mustard, and honey. This is what combines the oil and the vinegar together and when you whisk it, it most likely will not separate, at least not as much. Right now we're going to make a classic vinaigrette. There are so many variations of this, but I'm going to use the one to three ratio. Classic vinaigrettes are based off of garlic or shallot. I like to use shallot, it makes a huge difference. I've said this before, but I feel like shallots are a little bit like a cross between onion and garlic. You're just going to finely mince or dice a shallot. If you want to make sure that the chunks are really small, you can just run your knife through it one more time. I'd like to add the citrus or the vinegar, the acid right onto the shallot because it actually mellows it out a bit. I've tried this with red wine vinegar and balsamic recently. Both are really good. Today I'm going to go for a white. This happens to be the white balsamic vinegar or white modena vinegar. You need one tablespoon for this amount. This seems very particular because I'm measuring. But the measurements are not hard to remember. We're going to use a half teaspoon of mayo. You might be thinking, "Mayo?" I wanted to keep this nice and light. Look how little this is. Mayo is a natural emulsifier, and it also adds a little bit of a creaminess, a depth. I got to shake this up. I don't like mustard juice coming out. You know what I'm talking about. We need a half a teaspoon of Dijon mustard. Dijon mustard is my favorite vinaigrette ingredient. S&P, you know me. You always got to season with salt and pepper, even if your other ingredients have flavor in it. We need about 1/8 of a teaspoon, so I'm just going to eyeball it. Kosher salt and then some black pepper about an 1/8 of a teaspoon, eyeball it as well. At this point, you're pretty much done with all your vinaigrette ingredients except for the olive oil. If you wanted to add a bit of sweetness, you could add a little squirt of honey, that's always good. But I'm going to show you the classic. If I was to use something like red wine vinegar instead of the white, I would definitely suggest adding a little bit of dried oregano too. It's so good. Extra virgin olive oil makes a world of a difference in terms of flavor. I'm actually going to measure it out, three tablespoons. Why three tablespoons? Because we did one tablespoon of vinegar, 1, 2, 3. I'm putting it in this measuring cup because it has a spout. With a vinaigrette, you want to stream in your olive oil last, and you want to stream it in slowly. Now, there are mason jar recipes where you don't even have to fuss with this. Some people just put all the ingredients together inside a mason jar, shake it up and call it a day. This is what I'm talking about. If for some reason you feel like maybe that's too much olive oil, at this point, put in a little, whisk it together, and taste it. Then if you feel like it's too tangy and too sharp, you add the rest of your olive oil. That is a happy-looking sauce. You can imagine that this tastes better as it sits because the shallots mellow out and they also infuse the vinaigrette itself. If the emulsifiers weren't in here, it wouldn't stay this creamy and dreamy and put together. It would start to separate right before your eyes and almost look a little greasy. Then you might be thinking, this isn't a lot of vinegrette and that's intentional because a good vinaigrette is pungent and strong in flavor, you don't need a lot. I'm just going to grab a little bit of arugula. When you dress it, you don't want to just douse it with the vinaigrette. You want to grab a little bit and put it along the sides of the bowl, like that. Just a little at a time because you can always add more. Gently toss it together. It's the shallots. You don't need much to make an impact. It is so simple, so delicious, and has a great depth of flavor. You can always adjust it by adding a pop of sweetness. I feel like you don't need it, especially depending on how you're going to serve it. If you're going to serve this with, for instance, a Croque Madame, then this is perfect as it is. Make sure that you stay tuned for my Croque Madame video where you'll see this arugula salad pop up again. But for now, I'll meet you in the next video where I'll show you another variation of a vinaigrette. You'll see the ratios will be slightly different, but I'm going to be using citrus. It's my famous lemon garlic vinaigrette over a kale salad. I'll see you there.
10. Massaged Kale Salad with Lemon Garlic Vinaigrette: I hope you enjoyed my last video where I show you a classic vinaigrette ratio. In this one, I'm going to go a little bit off the cuff. We're still going to go with it, but I'm not going to be too dainty about measuring. I'll show you it'll still work out just fine. I'm going to start with a clove of garlic, which most of my vinaigrettes actually start off that way. I'm just going to grate it on a fine grater. Then instead of vinegar, I'm going to use citrus. I love [inaudible] of lemon in dressings. But I'm going to zest it first because most of the flavor and fragrance comes from the zest. Make sure you don't get the white part. Smells so good, it's like knocking my socks off. I like to hold my rasp upside down so that it doesn't go all over the place. It's in a controlled spot. Roll, roll, roll, squeeze out some of that juice. It's a nice juicy lemon. Now I say juice of one lemon, it's all relative. All the lemons are different sizes. Some are not as juicy as others, so use your discretion, and you feel like you need to add more lemon, more than one lemon, you can. I usually find one lemon is just fine. Let me get my trusty Dijon mustard. Unlike the other dressing, I'm using a whopping one tablespoon because I'm going to add also honey that'll balance out all that tartness. One tablespoon as well. Sometimes when I'm feeling sweeter, I add more. You can also make variations with maple syrup or just sugar. I've done this dressing with Agave and it's really good too. Don't forget your S and P. Eyeball it. Now in my recipe, sometimes I add this and sometimes I don't. Today, I'm feeling a little spicy, so we're going to add some crushed red pepper flakes. Now we need our olive oil, extra virgin. We're going to go for a quarter cup. I've definitely done this dressing where I just shook it up in a mason jar and it still works out just fine. I just realized I'm teaching you how to make two different yellowish-looking vinaigrettes. Now with this dressing, this vinaigrette, sometimes I have to re-whisk it, but that's okay. I really do think it's like the ratios of everything in the lemon juice. You should always taste it and adjust your seasonings, so I might do that. That's good. Now I'm going to grab my kale. This is washed, I'm just going to give it a chop. I love to use curly kale, but the reason I like this hardier kale is because I like to give it a massage, so it's going to be a massaged kale salad. You guys, I make this salad all the livelong day, all the time. Ask any of my friends. If there's a potluck, it's like, Julia, you're going to bring your kale salad? I'm not doing the full recipe right now, I'm not even doing accurate measurements for the salad part, I'm just doing a little bit just to demonstrate. It does help if your kale is more dry than mine. Usually, I run it through a salad spinner, that will help the dressing to adhere better. I'll clean my hands. This is a method that I always do. I just grab a little of the extra virgin olive oil that's in the dressing, add a little glug, and then a little sprinkle of salt. Salt draws out moisture and breaks down things. We're going to with clean hands, give it a massage. All you do is just scrunch it up and squeeze it. You'll see this rough fibrous kale turn all soft and melty. Sometimes with recipes, it's the sauce, yes. But it's also technique. You can't just depend on the sauce all the time to save the day. You have to know your technique too. You can see the kale has turned a darker green. It's more vibrant, it looks more appealing. It's almost a texture of butter lettuce now. It's super soft, you wouldn't believe it. I'm going to grab some farm fresh tomatoes from my friend, Audrey's garden. She's my legit farmer friend. These are the most amazing tomatoes ever. This is so funny. This is like my most sped up version of kale salad. You can do all sorts of stuff. I've done boiled eggs, chickpeas, red onions, cucumbers. You can see it's emulsified but starting to fall apart. That's runnier than the other vinaigrette I showed you. I personally love vinaigrettes with a touch of honey, a little bit of sweetness. I'm going to dress it similar to the way I dress the arugula, around the bowl. Kale is so hearty that it can really take on a good amount of dressing. Then the finishing touch of Parmesan cheese. I usually also add garlic croutons. I can leave the full recipe for you in our class downloads. Check the resources tab and you'll see our PDF. I'm just using a vegetable peeler in Parmesan cheese. I love the salad because it's sometimes can become a main meal, you just add a protein. I like to have a bite with everything with the Parmesan cheese too. The crunchy croutons would definitely be beneficial. That lemon really shines through as well as the garlic. It's one of those complex flavors that keeps on growing as you chew it. The cool thing about kale salad is that it can take the dressing and sit, so you can actually do this ahead of time. But it does hold up pretty nicely. That massage kale is so buttery soft. This is the best dressing to complement it. I love this dressing. I use it all the time. Variations of it is sometimes for fun, instead of the salt, I add a splash of soy sauce. In addition to the olive oil, I also add a splash of sesame oil. This dressing would be great on something like a piece of chicken. If your chicken turned out dry, you wanted a little brightness, this vinaigrette tends to be a crowd-pleaser, but I'm sharing with you all of my secrets. Now that we know how to make these vinaigrettes, we need something to eat alongside our bright and zesty salads. I'll meet you in the next video where I'll show you how to make a bechamel.
11. Basic Bechamel (and a Cheese Sauce Too!): A bechamel is a thick white sauce that clings onto food like a good sauce should. It's a mother sauce for a reason because it's the base for a lot of different sauces. This is going to make a lot of bechamel. It's going to make four cups. But I'm doing that on purpose because I want to divide it up. If you're going to make a pasta sauce then you want the bechamel to be slightly runnier. If you're going make something like a croque madame which is what I'm going to show you in the next video, then you want your bechamel to be a little bit thicker, which means you can adjust the amount of milk that you're using. I'm starting with a whole stick of butter, which is half a cup, unsalted, so that you can control the amount of salt. Another mother sauce that is similar to bechamel is a veloute. You're using some stock, like chicken stock, vegetable stock with the milk. You're not doing just milk. Once you add cheese to a bechamel, then it becomes a mornay sauce. You can see how there's a lot of variations that come up with one mother sauce. The butter's just about melted so I'm going to add my half cup of flour. Can you cut down this recipe? Sure. Why not? You can divide it in half if you'd like. What we're doing right here is making a roux. A roux is when you cook out equal parts, usually equal parts, butter and flour till it becomes like a little bit of a paste. You want a little bit of color on it, but not too much because otherwise it won't become a white sauce. The only time that you want it to have some color is you're going to make a roux for a basis of like a gravy or gumbo where the color is meant to be there. Now, another step that you might want to do, which you don't have to do is pop your four cups of milk into the microwave. Not so it could be boiling, but so it could be slightly heated, slightly warm. You don't want it to be bubbling or boiling by any means. You don't have to do that. You can totally make this bechamel without doing that. If you don't like the microwave, you can also heat it in a separate pot on the side. Basically, I'm just taking the chill off the milk. It should just be warm to the touch, not bubbling or boiling. I'm putting in four cups of milk. What kind of milk you ask? It can be any. I've done bechamels with skim milk, whole milk. Whole milk obviously would be creamier. Then this one, I'm using two percent because I just thought, why not do a happy medium? You want to go slowly, you don't want to dump your milk in all at once because you won't have a good texture to your sauce. Why I slightly warm it is so that it doesn't sputter and splatter all over and there's a better chance of your bechamel not being grainy. Already you can see how velvety it's becoming. You don't want lumps, you don't want grainness, and you don't want your bechamel to separate. The last bit, I'm going to crank up the heat to about a medium high so it can get going. We do want this milk to reduce and thicken. Depending on how much milk you are using and how wide your pot, that'll determine how long it will take to thicken. If you were using a taller saucepan, it might take about 15 minutes. Mine might take a little bit less. The consistency and how thick you want it depends on you and how you want to use it. How do you store bechamel? You can keep it covered and you could put a piece of Saran wrap on top so that the skin won't form. But it's not a big deal if the skin forms anyway because when you go to reheat it, it just mixes it up. Then when you reheat it, you just want to put a little splash of milk in it to loosen it up and do it over low heat. A good way to tell if a bechamel is thick enough is if you just get a back of a wooden spoon, rubber spatula, and it does create a line. If your bechamel accidentally gets too thick, you can always thin it out by adding some more milk. A basic bechamel sauce has a very simple seasoning. It's usually just salt, pepper and nutmeg. I don't want to put too much in, it's okay if it's slightly bland because you can always season it more when you're using it for other applications. Some pepper. Some purists like to use white pepper because it's a white sauce. I think that's good enough for me. I'm going to turn it off. For me, it probably only took about probably seven minutes to reduce to the consistency that I wanted. I have some whole nutmeg, just a little scraping. When you don't add it in, it's definitely missing, gives it a depth, a savoriness, and a little bit of kind of interesting, what is that kind of taste taste? I thickened this up a lot. If you can see it, the consistency is very thick. Now for me, this is good because I'm going to use it for a croque monsieur which I want it to be thick. What I'm going to show you is one step more. I'm going to show you how to turn it into a cheese sauce. I'll leave about half for croque monsieurs for the next video. So make sure you watch that. But I'm also then a pour some in here because I said I do like sauces to be on the thinner side. I might actually thin it with a splash of milk too, so thick and luscious. Also, you'll notice that when it stays in the fridge, it gets seriously thick like the consistency of mashed potatoes almost or some sort of puree. Now, I'm purposely not going to be giving you measurements for this because it's just by feel and eyeball and it's completely flexible. I'm just going to heat it up just because I need to add a little splash of milk to thin it out. See it got back to it's runnier consistency. Then I'm just going to turn it off the heat. Whenever you add cheese, you do want to make sure it's off the heat. It also helps to shred the cheese yourself, which I did. I have some sharp cheddar cheese, going to add that in. For about a cup of bechamel, you can aim anywhere between half a cup to a cup depending on how cheesy you want. I've also seen some people add in a touch of turmeric if they want that really nice orangey yellow color, so it looks more like a processed cheese sauce. Then I like to add in a tablespoon or so of freshly shredded parmesan cheese because I feel like parmesan adds that sharp flavor, that depth. In this cheese sauce, it already has the salt, the pepper and the nutmeg, but you probably will have to taste it to make sure that it's seasoned right and it's to your liking. That's pretty good. Another thing you can do to a cheese sauce is add a splash of hot sauce or some mustard. I have a little baked potato or a big, big potato. I'm just going to fluff it up. I'm going to take some broccoli that I blanched. I like it running down the side. Two-in-one, you thought you were going to learn a bechamel, but you've got a bechamel and a mornay cheese sauce. Can you toss some pasta in this cheese sauce? Absolutely. It'll be like a nice stove top macaroni. I just had a ratatouille moment. My parents used to take us to buffets when we were younger, like Ponderosa, anyone know what that is? This is the kind of stuff that they would have there. I already ate lunch too. Why am I eating this right now? I haven't made a baked potato with broccoli and cheese sauce in so long. This is really good. Put that to the side. I'll save this and put it in a refrigerator because there's no waste in this kitchen. I'm going to move on in the next video. I'll meet you there where we're going to make a croque madame.
12. Croque Madame: How to Use Leftover Bechamel: What do you do with your leftover béchamel? You probably will have some leftover. I usually do, especially with the amount that I told you to make, but you can totally turn it into a croque monsieur or a croque madame. The only difference between the two is one has a fried egg on top. Today we're going to go for the fried egg. We're going to make a croque madame. I think this is an awesome way to use leftover béchamel if you're tired of throwing it on top of pasta. We have our béchamel leftover. Remember I used half of it to make a cheese sauce. Go check out that video if you haven't. It turns like a wiggly jiggly as it sits and cools, and coagulates. It'll turn more like this when it's in the fridge. I'm going to add in a squirt of Dijon because classic croque madame and monsieurs have a hint of Dijon, this will add that nice little pleasant ting. It really depends on how much sauce you have to see how much Dijon you need to incorporate into it. This I don't even know, I just eyeballed it, because with croque monsieurs and madames is the best part is you don't really have to have any measurements. We're going to incorporate that in, and once again, a béchamel is already seasoned with some salt and pepper, and not [inaudible]. If you want to, you can always taste it and add a little bit more salt if it's bland. Classic croque madames have Gruyere cheese, and that has a nice pungent, strong taste to it. I usually use that, but today, I'm going to use mozzarella, which is a little bit blander. I seasoned to my sauce a little bit hardier. You get four slices of bread, and I like thin bread. I don't want it to be too thick because it's like a French toast concept. You want it to slowly soak up some of that béchamel sauce. I have some thin slices of sourdough bread. You can use whatever you want, white bread, country rustic bread, whatever floats your boat, you're going to get the blob of béchamel onto each slice, and you want to be generous with it. I've made this before where I was being a little stingy. It was okay. It wasn't great. That's crazy. I did not measure this, I just cut my recipe in half, but it ends up being quite perfect for this size of bread. But this will be dinner for Joe and me tonight. You want to make sure you get all the way to the edges. You want to make sure your sauce is on the thicker side if you're going to make a croque monsieur or a croque madame. I just lined a baking sheet with parchment paper, so that if case the gooeyness gets on there, I won't have a problem with it sticking on my pan or burning. I have some honey ham thin deli sliced. You can just use whatever you want. You can use like black forest ham. I'm just shingling it all across. For me, it's four thin slices of deli ham. You want to be a little generous, like every bite should have every piece of flavor into it, the béchamel, the ham, everything. Now, you need the glue to stick the top onto here, because we're not going to flip it over. No, no, this is going to be the top. We're going to grab our typically Gruyere cheese, but right now I have freshly grated mozzarella cheese. Then, I'm going to use Parmesan, and even if you were to use Gruyere cheese which already has that funky, salty, earthy taste, you still want to add a little bit of Parmesan. I'm going to go a little heavier with Parmesan, just because mozzarella doesn't have much of a flavor on its own. Then, we're going to plop the top on, again, and not flipped over, but like this. The cheese it's going to help glue it together, so don't worry about that. Yeah, if you wanted to do this for four, you could probably fit four on one sheet pan at once. If you wanted to do it for a lovely brunch, that'll be great because, like me, I'm going actually serve this with a side salad with our homemade vinaigrette. I love things like that, when it's creamy and anxious, and luxurious match with something sharp, and vinegary, and bright. Then we're going to put the Parmesan on top. Again, no measurements, so don't go super [inaudible]. Can you make variations of this? For sure. You can always add some fresh chopped herbs. I'm probably going to top it with some green onions on top because I just love that spicy bite with it. The oven sang to me, my oven sings to me, and it told me that it was preheated to 425. We're going to pop it in, and then once the cheese melts and gets a little gooey, then we're going to change it to broil. We're going to go for about 5-6 minutes. One thing to note, is if your béchamel is cold, you can definitely put this on cold too, but then you might want to compensate and pop it in just for a little bit longer so it warms up. Into the oven, we go. Make sure you wave goodbye. While I have some minutes to spare, I just grabbed some arugula and some cherry tomatoes that my friend gave me from her garden, and I'm going to just toss in our classic vinaigrette that we made, remember? I'm just going to add in a little, dress the salad. I love that arugula doesn't need much at all. It would be perfect even just with some lemon juice and olive oil. That's ready to go on the side. Admittedly, I probably went a little bit overboard with the Gruyere sauce. I just had so much leftover. I was like, "Yeah, let me just put all on there." But this is pretty amazing guys. Look at that, this is a hefty boy. Look at that blistered top, that comes from the broiling, and it's all gooey, and cheesy, and decadent. Get yourself some fried eggs. I do this while it's in the oven, or while it's broiling, whichever one. I like it nice and runny because the egg yolk becomes part of the sauce. Definitely, you don't have to do this, I just happened to have fresh thyme in the fridge. For me personally, I like a little bit of byte from green onions, so going to add a little. One day, I should come up with a Korean eyes like a Korean fusion version of this, and add some sautéed kimchi inside. What do you think? You guys, if you're enjoying this class so far, remember to leave a comment, a good comment, post a project, and you can also follow me so that you can stay connected whenever we post a new class. All right. That's our dinner for tonight, but I'm going to cheat, and have a little taste right now because I can't wait. I had to cut right into my egg because you've got to get that yoke. Definitely, add that Dijon and that little bit of green onion helps a lot to. Joe is going to be happy for dinner tonight. This has so many complex flavors, not just creamy. We want to take it up a notch, take some of that peppery arugula with the vinaigrette in one shot at that. Just put the salad right on top. It's so good. If this is too much sandwich for you to handle, just enjoy half because a little goes a long way, but don't miss out on a salad with it because that really makes a huge difference. It's luxurious, but complex and flavor, has many layers from the honey ham, to the Dijon, to the creaminess, to the different types of cheeses. There's a sweet, savory saltiness to it, and you will not regret it. Learn how to make a béchamel and make your croque madame today. This is a lot of decadence and richness, so let's lighten things up with a bright green chimichurri. I'll meet you in the next video.
13. Chopping Board Chimichurri with Steak: Chimichurri is part of the salsa verde family and it's a bright herbaceous sauce that is always ready to go. You can stash it in your fridge and put it on everything. I would say it's like the cousin of the pesto, because they're made very similarly, and you can use up any herbs that you have left over in your fridge. In fact, I'm actually using up some leftover herbs I have here. I have half a bunch of parsley and half a bunch of cilantro. Now, typically, Chimichurri is an Argentinian sauce made with parsley and fresh oregano. But I don't usually have oregano lying around, but I always do have cilantro. This recipe calls for half parsley and cilantro. If you want to, you can substitute by just having a full cup of parsley and about two tablespoons of fresh oregano, that would give you that more authentic Argentinian chimichurri taste. I'm going to serve my chimichurri over some grilled steak. I already did that and it's resting over here right now. All I did was just get a grill pan and season up my flank steak with salt and pepper on both sides. Make sure your flank steak is at room temperature, and put it over medium-high heat for about six minutes per side, or if the internal temperature reaches 135 Fahrenheit, you let it rest and that's what I'm doing. It's still warm, it's resting so the juices can redistribute and we're going to quickly make our chimichurri. Now, typically with the chimichurri, you can just throw everything into a food processor, blitz it up and call it a day. How course the gradients are, or how smooth they are, depends on your preference. I typically like my chimichurri slightly more course, so I would say this is more like my chopping board chimichurri, but if you don't want to chop all day, you can just throw it into a food processor and do exactly what I'm doing. I have two cloves of garlic with the garlic in the shallot. I do like to mince it up pretty small. Now I have one shallot. If you have a large shallot, like sometimes they come in a couple of pieces, just use like half of it. Shallot adds a really nice depth of flavor. It's hard to explain. I think adding the shallot makes it just taste really unique and savory. The thing about this recipe too is it's very forgiving. I have some measurements out for you, which I'll leave for you also in the class resources. But you can really just eyeball and go by feel. I like to sometimes add vinegar or the acid right on top of my raw ingredients like raw garlic and shallot, because I feel like it just mellows it out a little bit, it makes it slightly less pungent and spicy. Speaking about pungent and spicy, that shallot was making me cry. We're going to grab some red wine vinegar, and that is very typical to making chimichurri. But you can always switch it up and use any kind of vinegar you want, you could even use citrus. I'm going to go for about 2-3 tablespoons. I already know that I like my chimichurri slightly more tangy, so I'm going to probably add about three tablespoons. Just let these guys hang out by the pool. Then this is how I really store my herbs in real life. I just bring them home, I wash them, dry them in a salad spinner and then I just wrap them in a paper towel. What I have is half a bunch of cilantro and half a bunch of parsley. With the cilantro, you can use the stems if you want, they're pretty tender. I'm going to just probably go for mostly the leaves. Like I said, I usually have cilantro in the house. It smells so good though. If you didn't have cilantro, you didn't want to use oregano, you could you use something else? Sure, you can use basil too, just chop it up, throw it in there. What I'm going for is about half a cup of chopped cilantro and I would say finely chopped, throw that right in. Now for my fresh parsley, I took off the stems for this. I feel like this is a great sauce to know, especially if you had to buy parsley for some recipe that you've done before and then you're like, "I don't know what to do with the rest of my parsley." Let's see if that's about half a cup. Pretty soon if you make this enough, you won't have to even use measurements, you just go by eye. Into the bowl. I'm just going to clean up this mess and then we'll finish the chimichurri. We're going to add some seasoning with salt and pepper. For this amount, I can tell I'd probably need about half a teaspoon and about like an eighth of a teaspoon of fresh black pepper, just going to eyeball it. With that you need some spice. We're going to add some crushed red chili flakes. Now this is totally up to you. You can go from a quarter teaspoon to about half a teaspoon, I'm going to go somewhere in between, like maybe just shy of a half a teaspoon. You can also do this with a fresh chili, like if you had like a Thai red chili. Once you add the salt, salt draws out moisture in things. It'll start to moisten the herbs and like mash down a little bit. Then I like to do that first before I add my extra virgin olive oil, because you're going to add some extra virgin olive oil to slightly cover it or moisten. I made a mistake before of actually drowning it, like it was a little bit too covered, and I realized that once I toss it into salt, that helps to bring it down a little bit and then you're like, "Okay, now I don't have to add as much oil." That will help not only with the fat content, but also the taste. Like it won't be too oily and blend. I'm going to go for about a third of a cup maybe. I'm going to slowly stream in and while I toss because once again, I don't want to add too much. If you do add too much, you can definitely add more herbs, more of the vinegar, or even like a squirt of lemon, you can also make it a little fresh by adding just the zest of a lemon. It doesn't look like a lot, but trust me, as it sits in the fridge, you'll see the oil start to gather in pool. It will start to taste better as it sits and melts just a little bit, but you can taste it and adjust the seasoning if you wish. I have my steak that's been resting. Look, see all the juices are coming out even as it's resting. If you cut into it right away, then all those juices will just come out all over your cutting board. You wanted to keep it retained in there. You can see the steak. There's a grain that goes this way along the steak. You want to cut it against the grain so that it's tender. You want to cut your slices fairly thin so that they're easier to eat and they're not as tough or chewy. Flank steak can be a tougher cut of meat if you overcook it and also if you don't cut it against the grain. This is a great meal to serve for guests, because it stretches really well, it looks impressive. You can even turn this into like tacos or fajitas, serve it with rice, have roasted vegetables on the side or serve it with a bright green salad. Let's grab a little mashed potatoes. You can see my chimichurri is melting nicely. Only been a couple of minutes while I was slicing the stake. If you want to, you can add just a little bit more olive oil just to loosen it up more. That is a beautiful herbaceous green sauce. It's so gorgeous, it's so fragrant, and fresh. Doesn't that look super mouth-watering and appetizing? That green herbaceous sauce really just brings a simple grilled steak to life. All I did was season with salt and pepper. If a little gets on your mash potatoes even better. Seriously, doesn't this look so amazing? I think that anyone would be happy to eat this if they came over for dinner. What do you think? A little bite of everything. Why not? Little mash potato while I'm at it. I got to eat this summer fresh tomato that my friend Meg gave me. I feel like all my friends are giving me their fresh garden veggies. Does anyone else do this? Put your potatoes on top of their meat? Man, that herbaceousness, but also the vinegar, really pops right away. I tend to like it with a little bit more vinegar, so it has a hint of acid. It's balanced with that olive oil, which is so velvety and rich, simple grilled steak, and chimichurri. I really can't stop eating it. This is so tender and good as it is. But in our next video, I'll show you how to make the flank steak even more tender and throw it in awesome stir fry sauce. I'll see you there.
14. Steak and Pepper Stir Fry: I wish I could tell you that there's one universal stir fry sauce, like one shoe that fits all, but that's not the case. As you can tell, there's probably tons of stir fry sauces out there, ranging from sweet and savory and spicy. But there are some ingredients that I find repeat themselves in typical stir fry sauces. I'm going to demonstrate one for you today, which I think really fits well because it hits all of the tastes qualities. Another thing to remember when making stir-fry is that you want your meat to be tender and also have flavor in itself, that process is called velveting. In restaurants sometimes they use egg whites, today we're going to be using baking soda. That's what we're going to start on first. I guess you can call this a two part stir-fry sauce but we're going to start with a velveting which is, in a bowl where you're going to hold your meat, I'm going to add in a tablespoon of water and just a small amount, half a teaspoon of baking soda. That might sound a little weird, but you won't be able to taste it but this is going to help make the beef tender because we're using flank steak for the meaty taste but sometimes it can be a little tough, especially if you cook it too long, especially in a stir-fry application. Then let's talk about our flank steak. I have a pound of flank steak here and it's trimmed of any silver skin. Try to use the right amounts when you're following this recipe. If the recipe calls for a pound, use a pound so that everything works out the way that it should. You can see that there's the grain running along this way on the meat. At first to cut into smaller pieces, I'm going to go with the grain and cut it in half so that each piece is about like 2- 2,1/2 inches. Then we're going to go against the grain, so if this is the grain, we're going to go against it just like what we did in our previous video. We're going to go about 1/4 inch. Mine's looking more like 1/4- 1/2 inch thick, it's fine. Going thin ensures that the beef will be tender. See you can barely even see it, you're just going to let it coat a little bit. I definitely got the inspiration for this technique from America's Test Kitchen, but I find it to be so useful and so easy. We're going to let this sit for five minutes and then we're going to work on the rest of the velveting sauce. I'm just going to wash up my board and my hands. Now we're going to continue on with our velveting mixture. We're just going to season the meat that's sitting in here. We're going to add a tablespoon of soy sauce, and then I have this big jug of mirin and I have this big jug because I use it a lot, especially for Asian recipes. It's just a rice seasoning that's slightly sweet, that's a little more than tablespoon it's fine. Tablespoon. If you don't have mirin you can use a cherry or you could use a Chinese cooking wine. Now that we've got our liquid, we can dissolve our cornstarch, I go for a teaspoon. Remember, cornstarch only dissolves in cold liquid. Then we're going to do a packed teaspoon of light brown sugar. I have my brown sugar in mounts already because we're going to use two more teaspoons later on. I just got my little blob here. This sugar is important in this step because when it coats the beef, when you put it in the pan, it will get browner faster because the sugars will caramelize. Pour that in, make sure all the sugar and the cornstarch has dissolved in incorporated. We're going to let this sit in here for about 15 minutes. I'm going to make the stir fry sauce whilst we're waiting, and then also chop the rest of my vegetables. For the stir-fry sauce, we're going to repeat some of those ingredients. We have a quarter cup of water, two tablespoons of soy sauce, balance it out with two tablespoons of mirin. I [inaudible] again, a little bit less this time. Two teaspoons of cornstarch, that'll make it thick and glossy. Two packed teaspoons of the light brown sugar, blob and blob, one tablespoon of oyster sauce. I find myself using oyster sauce for a lot of stir fries, it's the chief ingredient. When I don't really want to make a whole stir fry sauce, I just substitute it with oyster sauce. We're going to balance out the sweetness we put in here so far mind you there's also saltiness, so keep that in mind. With two teaspoons of rice vinegar. I love rice vinegar because it's so light. Then we're going to balance it out and round it out with two teaspoons of sesame oil. Sesame oil is like one of my favorite ingredients, it's aromatic and adds so much. Then we're going to add a teaspoon of coarsely ground black pepper. When we go to pour this in the pan, keep in mind that you'll probably have the whisk this again because cornstarch does settle to the bottom. I already went ahead and minced up the garlic. I have three cloves of garlic, finely minced, and about one tablespoon of freshly minced ginger. Now ideally you want to use a good amount of scallions for this recipe. If you have larger, thicker scallions, you could use maybe about six scallions. For me, I'm going to use more than that, maybe more like eight or nine, I don't know, because I actually I was growing this in a mason jar and they look pretty skinny. I'm going to cut these two ways for the white parts, I'm going to cut them just on bias because we're going to sort the white part separately from the green parts. For the green parts, we're just going to cut them into roughly about two inch pieces, which means for me I just probably cut it into 1/3. This is a recipe for steak and peppers but you can use any vegetables that you want as long as they're not too watery. I have one red and one green bell pepper and we're just going to thinly slice them. That's it for all our chopping. Now let's just go over to the stove. At this point, you don't want to blink, with stir-fry, you want to make sure everything is all ready to go right next to you because everything moves really fast. I'm going to grab my trustee non-stick skillet and I'm just going to add two teaspoons of oil. Every time I add something to the pan, it's always going to be another two teaspoons of oil. I'm using vegetable oil because it has a high smoking point. You can use a rack but something to note is that with home kitchens, racks sometimes don't create the nice surface area that you need because our burners don't work as hard as restaurant burners. That's why I'm using a non-stick skillet with a wider surface. You can always use a cast iron skillet too, I just feel like they're a little bit harder to maneuver. Our meat has been marinating nicely and it's absorbed everything that was in there, there's nothing in the bowl. I'm going to do it in batches. I'm going to do about half of the beef in here, let it spread out and get brown, and then I'm going to do the other half. When you put the beef and you're going to want to hear that sizzle. Spread your beef out into your pan, that's why you want to do it in batches so that we get overcrowded and then steam and after spread out, you're not going to want to touch it for a good minute so it has a chance to brown. Don't touch it and it's cut so thinly it should cook really quickly. About a minute later we're going to just carefully flip over the pieces. Oh yeah, you can see that nice browning. Doesn't that look so appetizing? The sugars and the velveting definitely helps create that browning. If you find that it's getting a little too dark for your liking you turn down your heat just a little bit. I'm going to let it go for another minute and then I'll meet you back after I pull this out and I put the second batch in. Look at the beautiful brown fits on the bottom, that's all flavor. That looks so good I just want to dive in. I add my two teaspoons of oil again. Remember two teaspoons every time you add something new, here we're going to add in our bell peppers and the scallion greens, and little bit of the moisture from the onions and the peppers will help to deglaze this pan so don't worry about it. You can see it's actually picking up all those brown bits right now. We're going to let this go for about three minutes until it's crisp, tender. I'll meet you back soon. I'm going to remove these peppers, and they smell fantastic they picked up all of the tasty bits. Lower the heat just a bit, add my two teaspoons of oil again. I told you everything moves fast. Now beyond your game. Then we're going to add in our scallion whites, as well as our garlic and ginger. But you can see that this is not a universal stir-fry sauce, like one sauce doesn't do it all to make a great stir fry, there's technique involved, there's layers and steps. This is only going to cook for about a minute or two. The aroma that is filling this kitchen is insane right now. I'm going to add back your beef and your peppers and all juices that gathered in there. Give your stir fry sauce a nice little whisk so that's the cornstarch can get dissolved again, add it right in. That's it guys. Once it gets coated and heated it through, that's it. You just got to serve it with some rice and probably top it with some more fresh scallions on top just for texture. If you need to, you can taste it and season with salt and pepper if you need it. Let's plate it up. I seriously cannot wait any longer. I have some jasmine rice here at the bottom of my bowl. This looks so amazing. I can't even stand it. If you want to change things up, you can add some cilantro, add another flavor, squirt some lime on top, that would be good. But that looks pretty done perfect to me, I don't know about you. Steak is so tender and you can taste all of the balanced flavors, like you can get a little hint of the black pepper sweetness, you can even taste the rice vinegar, a little bit of the tang. Feel free to adjust any of the ingredients. If you like things on the sweeter side, add some more sugar. If you want some more garlic, go nuts with it, it's totally up to you. Now that we've mastered a simple stir fry sauce and technique, it's time to master a marinade. I'll meet you in the next video.
15. Make It Once, Use It Twice Marinade: Marinades are simple way to add big bold flavor to things like meat, tofu and certain vegetables like eggplant or zucchini. There are probably thousands of different types of marinades out there and the combinations are endless, so, it's kind of difficult to figure out which one to do for you. But the basic things of a marinade are fat, acid and seasonings. Also, don't forget the salt. After you have those covered, then you can play around with aromatics, adding spice and even a hint of sweetness. The recipe I'm going to be going over with you, I would consider a magical marinate because you make it once but you use it twice. I love that, that resourcefulness and that's why I chose to make my chicken with tomatoes and dill. We're going to start off with a shallot and we're going to finally mince it. I feel like I've been using shallot a lot in this entire class series. I grew love for it probably in culinary school. If you haven't been using shallots in your life, you're totally missing out. But if you don't have a shallot, don't fret my pet because you can still make this. You can substitute with garlic or just some finely minced onion if you want to. We're going to put it in our bowl. You grab yourself a large bowl because you're going to actually marinate the chicken in here. While we're chopping, I'm going to go ahead and chop my dill. You need about a quarter cup of fresh dill. Can you use dry dill? My friend actually asked me this. Yes, you can. But it won't be exactly the same. There's something to say about using actual fresh dill for this recipe, and especially because it's such a huge part of the recipe too. It's like the whole source for everything. But otherwise, yes, you can use dry but you got to cut down the measurements until like a tablespoon. This is the interesting ingredient, we're going to use balsamic vinegar. I like the fruity depth of a slightly sweet vinegar like balsamic. We're going to use two tablespoons. We are going to serve this with tomatoes and you know, balsamic vinegar and tomatoes go so well together. So far we have our aromatics and herbs, we have our acid, and then we're going to put in an emulsifier. Two tablespoons of Dijon mustard. Isn't it fun to see me reusing some of these pantry staples over and over again? I did say salt is an important element of a marinade and that is true. But in this situation, we are going to put it in banana marinade. We're going to season our chicken with salt and pepper, and then we're going to also add a quarter teaspoon of salt to the tomatoes. You got to account for that, and there's a method for doing that because those are also different techniques. We're skipping the salt. There's no soy sauce, there's no salt in here. We're going to go for a half cup of extra virgin olive oil, nice and fruity. I'm not going to add any spice like black pepper or red pepper flakes. But if you want to add that little pop, you could definitely do that and it'll be really good. I'm just going to treat it like I did a vinaigrette in a way. We have the emulsifier, we have the acid, I'm going to slowly stream in the olive oil. Not all marinades need an emulsifier. It is not a vinaigrette. But I am technically doing this because I'm going to use it as a vinaigrette as well. This is really important before it touches anything raw, like the chicken. As of now, it's good to eat as is. You don't want to do anything to that. You're going to scoop out some of your marinade about a quarter cup and reserve it into another bowl. That should be good enough for your tomatoes. We're going to put this aside. You are going to have a pint of cherry tomatoes. I have probably a little bit shy of a pint. I just had what I had. I quartered them. Put them into smaller bite-sized pieces. You want to put about a quarter teaspoon of kosher salt over your tomatoes in a sieve, over a bowl. Because I have a little bit less than a pint, I'm just going to go a little shy, but I don't want it to be too salty. It draws out the moisture so it doesn't become too wet when you're like incorporating it as a sauce. Another thing is that it's seasons the tomatoes itself. I like to sprinkle it in and then just give it a little toss and we'll let it do its thing. We're not going to dress the tomatoes quite yet. We're going to work on our chicken because we've got to get that marinated. But the cool thing about this marinade is that it doesn't take that long. You ideally should have about three chicken breasts. I only have two. But I think that it'll be okay for this amount of marinade because there's no salt in the marinade. You don't have to worry about sucking up too much extra salt. I get my bigger chicken breasts. These aren't that huge and I cut them in half on a bias like this. If they're already small, you don't really have to go through the step. Each thing is supposed to be its own portion size in a way. Get some plastic wrap and with the flat side of a mallet, not the spiky part. If you don't have a mallet, you can use a rolling pin. Just something we're going to gently tap your chicken breasts. What am I doing? I'm paddling them flatter so that they could all be an even thickness throughout the piece. That is what causes problems when you're cooking because then it's like it doesn't cook at the same time. Two, by making them flatter they'll cook quicker. I'm going to season it and I pulled aside some salt just in case I have chicken juice on my hands. I don't want to contaminate the rest of my salt. We're just going to season it not too nuts, but make sure that you season high and get all the surface. I'm going to do some pepper. Flip. It's again so season both sides of salt and pepper. I hope this is taking the intimidation out of cooking and out of marinades in general because sometimes you're like, what do I put in that marinade? That already looks so good. With marinades you want to be careful with the recipe like with the amount of acid there isn't things because marinades when there's acids, it does break down the proteins of meats. If you marinate it for too long, it'll turn a little bit gummy or disintegrated. That's why if there's acid and then a recipe says to marinate it for x amount of time, you got to follow that. We're just going to let that marinate for five minutes and then I'll meet you by the stove. I'm going to make sure that my pan is nice and hot. Yes, there's olive oil in this marinade, but I'm going to add a little extra. When you put your chicken down, you don't want to crowd the pan. If you have to do it in batches, then do it in batches. I don't know why that makes me so happy every time. Now, I'm going to do something a little bit different. I'm going to actually cover it with a lid. Make sure you have a pan that you can grab a lid. If you don't want to do the stuff, you can skip it. But I like doing this because it ensures that the moisture will get locked in. Once I heard that it's dissolve, I know it's starting to brown. I'm going to clamp it with a lid and time it for about two to three minutes. I would say given how flat and how larger your cutler is, it should only take about a total of 45 minutes to cook in general. You want to make sure that you read it with an instant read thermometer to make sure that the inside is cooked. Let's see. I'm going to just take a peek. Yeah, that's looking good. I rotated that couple of the chicken pieces in the pan because I felt like some of them weren't getting brown enough. I think it's ready to come out of the pan. Some of the sides got a little brown with my yard reaction. Some of it not so much, but that's okay. I'm just going to toss it in the sauce one more time to give it a glaze. That one's nice and brown. We're going to let it rest for five minutes before we slice into them. Now my chicken's resting for about five minutes because you want the juices to just redistribute and not leak out all over the place. You can actually see some of the juices leaking out and I don't want to waste it. I might put it over my couscous. We've got our tomatoes that had been draining with the salt. You can see that some liquid has actually poured out of it, even for the small amount of tomatoes. We're going to use that reserved dressing, that marinade that is now going to be our dressing, and just coat them. This is probably a lot of dressing for this amount of tomatoes because I did tell you I didn't have a full pints worth. I decided to jazz it up and go a little rogue from my original recipe and run it to my fridge. Remember it's all about cooking with intuition and using what you have. I have some diced cucumbers. These are these little mini Persian cucumbers. This is not part of my original recipe, which I'll have in the class resources of all the ingredients, amounts, and directions for this original recipe. This will be a little bit rogue, a different take, and I may even garnish it with some feta cheese at the end. It's going to turn Greek. I also have some Israeli couscous that I just cooked up in advance. All I did was cook it in chicken broth instead of water. Why am I serving with the couscous? I don't know, it just seemed right. My chicken had a chance to rest a little. I like to pre-slice it then you don't have to worry about slicing it yourself later. My chicken is nicely cooked, it really took no time at all. I have some leftover broccoli from my previous recipe. Why not just add a little pop of green? Then I get my tomatoes and cucumbers and I call it my relish because that's what it is. I'm going to put that right on top of the chicken. That looks so good. I really liked the addition of the cucumbers actually. This definitely is going to change the taste, it's going to add a little bit of salty bite of the feta cheese, but I just can't help myself because I just feel like it needs it with cucumbers and tomatoes. That's a little variation from what's in my original recipe, but I feel like I improved it. You know why? Because I'm older and wiser now. I think this is good enough to eat. Do you see this glorious chicken juice? You'll want to do this to it. That's an extra layer of sauce right there. I cannot wait. This turned out so yummy and fresh looking. You got to get it all. Got to get the tomato, the cucumber, the chicken, sap it up in that sauce. Words cannot describe the taste of that fresh dill. So herbaceous, bright, it's like a pop. You guys will really love it with the cucumber. Add the cucumber. The couscous is really good too. I like pairing it with something a little bit more neutral, like a nice grain, you can use quinoa, couscous of rice, orzo. I could seriously sit here and eat this all day. I'm glad that we're ending our recipes on this nice note. Now that you've got all your tools for your sauces in your arsenal, let's talk about your project. I'll see you in the next video.
16. Your Project: For your project, we're going to level up. I want you to take a sauce that you already know or one that we did together. Take one element or one ingredient about it, tweak it, and then show me something new with it. Change something about the sauce itself or use it in a different way than I did or that you normally do. For instance, if you usually make chimichurri for steak, then why don't you try putting it on shrimp instead? How does this expand what you already know? Remember, we're trying to level up our cooking intuition here. Describe it and take a picture. But if you're a beginner cook and that seems intimidating to you, no worries, I understand. Just take a recipe that we did together and recreate it as is. Remember, you have to learn how to follow recipes before you can use them as jumping-off points to make them your own. Take a picture and walk us through your thought process and your experience. Even if something came out as a flop, let us know that too because that's how we learn from our mistakes, and by experimentation. Or you can do a couple of project prompts. Take a picture of your favorite pantry staple items that you usually go to all the time that you keep in stocking your pantry to make your favorite sauces. Tell me why you use them and how. Or show me a picture of a new ingredient that you don't normally use but you are now going to add to your arsenal as a result of this class. I love seeing your projects in our last class, and it was so awesome to see your versions of the chicken teriyaki rice bowl. Some of you used salmon or tofu, made it vegetarian, but you made it your own and you utilized one or both of the sauces that you learned in that class. Use that as your inspiration when you're creating your project for this class. Make some sauces, add some tweaks, and then be creative with whatever vehicle you put it on. Explain your thought process and don't be afraid to use it in a new way or with a tweak. Remember, it's okay to have fun and play in the kitchen. That's how we learn and that's how we grow in our cooking intuition. Now, some final thoughts.
17. Final Thoughts: Congratulations. You completed this class and you are officially on your way to becoming a sauce boss. Welcome to the club. Remember, mastering sauces like any cooking skill is a journey and it will take time and practice to get it right. Focus under practical techniques and recipes you learned. Invest in the right kitchen tools and equipment that you need to make your life easier, and follow a recipe enough times until you have it down, and then you can start making tweaks and adjustments of your own. As a review, the project prompt was to take a picture of your favorite pantry staple items and let us know why you tend to gravitate towards them when you're making sauces. Of course, your project is you showing us a sauce that you're already familiar with or recreating one that we did together, but showing us how you're using it in a new way. Even if it wasn't as successful as you had hoped, still post it anyway because mistakes are okay and experimentation is how we learn. Remember to check back in this class every now and then, and update me on how you've been using these sauces and incorporating them into your everyday life. If you need some practical tips for cooking with intuition, be sure to check out our previous class where I do hint at the fact that sauce is boss. This was an expansion of that class. If you want to learn some cooking basics and some mentalities of a chef, go back and watch that class. I'd always love to see your journey and stay connected too, so be sure to find me on social media and find me with a handle @chefjulieyoon. Keep me up with your progress. Be sure to use the #CookWithChefJulieYoon, so that I can see your creations. If you enjoyed this class, do me a solid, leave a comment and a review, I'd love to hear back from you. Thanks so much for watching, and I'll see you next time. Bye.