Transcripts
1. Introduction: The world of photography is more approachable and an ever was before, if you own a cell phone, your photographer, what was once an extremely daunting professions that require tons of year training and experience, is now a fun hobby that anyone can get into as long as you have one of these, despite all of that, often the line that separates people like us who use our cell phones to post pictures, to Instagram and our websites. And most seasoned traditional photography's is the editing style and expertise in the editing craft process that is actually used. Hello everyone. My name is, uh, ways I'm a YouTuber, VFX, artist, other and movie lover and photographer, messing around with video and photography for over five years now, over on my channel, the data alert. And after teaching myself everything I know I figured why not put it all together in one place for all of you to enjoy here on Skillshare. So over the course of this course, we are going to be diving into white photo editing actually is. And the core concepts behind it, this involves breaking down color correction versus calibrating the differences as well as the reasons for both of those, as well as how you can use those techniques for 40 years right now on your iPhone or Android device using Lightroom Mobile, which is a completely free app to download. Right now, I'll teach you how to make your very own custom, please edge just like Peter McKinnon and the pros, as well as how you can export your photos in the highest quality possible, ready to be posted on your stunningly collated Instagram account. So that sounds interesting and fun and you're ready to make all of your friends jealous because of just how much better your pictures look. Then all of these head over to listen to and let's get started on this journey.
2. Lightroom's Free iPhone App: So let's say you've taken a couple of pictures and there are tons of classes on how to actually take a really good pictures using just your iPhone or your Android, basically your smartphone. So let's say you have these pictures and now you want to actually start editing them because you want to post them mainly on Instagram. Maybe it is still used, Facebook, Twitter, you want to post them on your website when a post them anyway, even if you're just sending them out to your friends, you want to edit them and make them look the best that they can be. So the main app, obviously that I've mentioned before in the introduction that I would recommend you use is something called Adobe Lightroom. Now if you guys use PCs and Macs and computers, you know that Lightroom is included in Adobe CC subscription, but it is a paid program. And fortunately for us though, is if you have a cell phone and you have an App Store, you can mainly download Lightroom for free, which is obviously a more contained version for your mobile phone. Like I said, completely for free off of your phone's App Store. So I'm gonna put my phone screen up. Yes, I can show you guys exactly what I'm doing. And I'm going to head over to my App Store. And obviously I have an iPhone and here I'm going to type in Lightroom. So here it is right here, adobe Lightroom photo editor. So essentially what this is is a tone down or sort of reduced version of Adobe Lightroom, but you have most of the features that you would need to use. And the key thing about this is that it's completely free to use. So obviously I already have it downloaded, so I'm just going to launch it right now. So this right here is Adobe Lightroom. Now, the cool thing about this app is that it has most of the main features that you want to use. So for example, if I open up a random photo that I was editing of here, as you can see, some buildings. I just took it because I was bored. We have a lot of the different features that we can use OVO, we can edit the light, we can edit the kind of features that we can add some effects and details as well as some optic connections. And the main thing is that's not available in this app is things such as geometry, which is warping the image, as well as some other things like maybe masking and things that are a bit more advanced, which we won't really need to cover in this beginner course anyway. So now that you've downloaded Lightroom, which I hope you have, let's head on over to Episode 3 and we can start talking about what color correction is in terms of photo editing.
3. Color Correction vs Color Grading: So what is color correction and what is color grading? So let's start with color correction. Now, I'm going to be explaining this in the most basic and simple terms that everybody watching can understand, including those who haven't ever heard a single word or the jargon related to editing photos and things like that. So if you do find some of these words are but symbols, I know that I'm trying to appeal to everybody. So essentially what Calico addiction is is before we start adding any really cool color effects to our pictures and warping the color scheme and adding things like green and sharpening and things like that. We essentially want to level the playing field and correct any abnormalities inside at our picture. For example, if this window over here was overexposed and the picture look like this, I want to add an exposure effect and I want to bring that down. So it looks like this and it's more neutral. For example, we also want to connect something called the white balance. For example, if my image right now let's say this is the photo you're looking at is really shifted towards the warm side like I'm showing you right now. Then we want to add a temperature effect and we want to bring it back to neutral so there is not too warm and not too cool. So those are a couple of examples of what color connection is. Now, the essential thing that I want you guys to understand here is that when you have a photo and you want to start editing it and making it look more stylistic or stylized, you need to have a good starting place so that you need to have a structure. You can't build a fancy balding with tons of CPU bathrooms and things like that in it with fancy close doors and corner offices. Unless you have the foundation and the color correction is the foundation of your picture. If we have an image that is too overblown and the light in the image is too bright and dark spots are too dark, can barely see my face and things like that. If we add all of our color effects onto it and try and add presets and make it look all cool like Peter McKinnon and met the Avila and all those guys. It's couldn't look bad because we're not correcting the image first. What we want to do is brighten up those dark spots, lower those light spots, and make the image look even and nice and flat. And then we can hop over until what we call color grading. Color grading is basically after you've corrected your image and have a good starting point. Now you start to layer on really cool effects and start twisting the color image or the colors inside of your image. For example, if I don't want a lot of blue right now, and I have blue here. I have blue of at the end I'm wearing blue jeans, even though you can't see that, then I might want to take out some of the blues in my image. And that's a form of color grading. Maybe I like the green that's outside and I want to pop that more. So I started introducing more green and obviously we'll go over this in the coming lessons. Also calibrating, maybe I want to add a bit of a grainy effect to my image. Maybe I want to shop in my image because I find it a bit too blurry. Maybe I want to darken the sides of the image as well. That's also all part of calibrating. Essentially, color correction is making your picture look basic and flat like every other person's picture. And calibrating is where you express yourself and stylistically infuse your image with your personality and your specific look. Calibrating is basically where you can reinforce the tone of your image as well. For example, if I want to have a really dark and grimy image, I suck out all the color and the saturation. I may sharpen it a bit. I may add a lot of green and I may blurt it out a bit as well. And all of those aspects that I've just mentioned are part of the color grading process. So I hope that gives you guys a little bit of an understanding, an ongoing fast, but I want to try and cram as much of my information that I've learned over the years by watching videos and watching other guys who do things far better than myself into these short lessons. And so if you do find yourself struggling, please definitely leave a message for me to respond to in the project tab, as well as go back to the video and go through it again. But now let's move on to actually color connecting our first ever image and starting to edit in Lightroom.
4. The Basic Principles of Color Correction: So before we actually dive into Lightroom and start color correcting our first image, let's talk about the basic principles of color correction and what are the main things that I want you guys as beginners to start collecting on your actual image. So the first thing I want to focus on is the light in the image. And the main three sections we want to talk about is exposure, highlights, and shadows. These are the main three things that I want you guys to focus on for beginners when editing the light in your picture, there are various other aspects. But for now, let's start off with those three. So let's start off with exposure. What is exposure in layman's terms? And essentially it's the brightness of your image. If your exposure is too high, you can have an overexposed image and it'll look something like this, really nicely and upbeat to look at. And if you exposure is underexposed and too low, your image will look like this. Also not very nice. We have to squint, is extremely dark and if you get to expose it just right and your highlights are blown out and your shadows are not too dark, your image should look something like this. If I don't say so myself, what our highlights then highlights are essentially again, in layman's terms, the brightest parts of your image showing this image. For example, if this window over here, That's the main light source and it's popping and it's got a lot of the white color coming in. And what are the shadows? The shadows are just that the dark parts of your image. My hair, my shirt, this chair, this microphone, those are the darker parts of the image. And essentially if I were to introduce some contrast into the image like I'm doing now, you'll notice that the bright spots get brighter, the highlights get more highlighted and the shadows become more dark. So as you can already see, I hope your time to piece together. How are we going to be manipulating these three aspects of light, the exposure, the highlights, as well as the shadows moving on, we have the white balance, which obviously feeds into the temperature of the image. Now the white balance is essentially the color information that your camera or your cell phone will capture when taking an image that tells it how warm the images or how cool the images. Now this is obviously, it's factored in by many different things. If you use a DSLR, you'll see a lot of different factors. For example, if you're using fluorescent lights, if you're using daylight, if you add night, if you're using tungsten bulbs, things like that at all alters the white balance of your image. And fortunately for us, cell phones these days automatically correct the white balance. And so most more often than not, our white balance isn't really that off. What we can do sometimes is manipulate that white balance. And the way that we do that in Lightroom specifically is using the temperature slider. So if we slide the temperature more towards the warm side of the scale, we'll introduce more orange tones and it'll make it look like a more warmer image. And if we slide that ball all the way to the other side, will introduce more blue tones and make it look like a cooler image. So an example of how we would use this is if we took a picture in the middle of a desert of a cactus, we want to slide that bar a bit towards the warm side and introduce some audience warm tones. Because being the desert, it's a hot climate, things tend to be orange. And if we took a picture in the snowy Alps in Switzerland, we wanted to not be looking warm, so it's slide at the other direction, introduce some cool tones and make it look colder. That isn't we have to do this is because when we take a picture, our phone is again, like I said, correcting the image and balancing out all of the tones. But stylistically we might want to add a little bit more cool tones in on, a little bit more warm tones in. And this is what the white balance or temperature effects will allow us to do when color correcting our image. And the last thing I wanna talk about is tenting. Now, tenting like the temperature effect, which goes to the temperature if it goes between orange and blue, the tenting effect will go between green and purple. So the other side of the spectrum, now in basic terms, you notice your image is a bit green. Put it towards purple and it should balance out. And if you image is a bit purple product towards green, and it should balance out as well. This has to do a lot with the environment you're taking your picture in. So there's a lot of lights that's maybe bad quality lights, very bad like light levels and color values in it, especially in some stores that use very cheap fluorescent bulbs, you may notice your phone sometimes add too much green in the image and you may need to use the 10th defector slider towards purple. And kind of even at out. Obviously, you want to do your best to make sure all the color is balanced when you are taking the picture. But obviously these things happen and sometimes we need to use the 10th detect correct these things at this point, if you are feeling a little bit lost, I know that that is totally understandable, but all of these things are going to be coming back in the next few lessons in which we actually started using these effects on a picture. And you'll get a real example of what all of this theory that I'm telling you now has in its practical application. So let's jump on over to the next lesson.
5. Color Correcting Your First Photo: So let's start editing our first ever image within the free app on the iPhone called Lightroom. And obviously we're going to start color correcting first, one of the things I mentioned before should come to fruition over here right now in terms of color correction. So I've imported this image into Lightroom and it's essentially just a nice city View image in Morocco, a really interesting place that I visited. And as we can see, there's a nice looking mosque in the background over there. The sky is well exposed as not images. The last sections of it that are too bright, although this part over here seems to be quite bright, that will form part of the highlights. If you look down here, these trees and these buildings over here, those form part of the shadows because those are the darker sides of the image. So let's get started with editing this thing. So the first thing we want to do over here is here into the Light tab at the bottom over here. And now we can start to alter the things that I talked about. Remember I spoke about exposure, I spoke about highlights and I spoke about shadows. If we drag the exposure bar, we can see if we go to the right, it gets extremely bright. And if we go to the liver, it gets extremely dark. Right now we're somewhere here in the middle. So the thing that I want to do is first play around with it, see if I slide it a little bit here. It's looking a bit nice. Essentially what I like to do is make the whites look brighter and the blacks or darks in the image look darker because that's generally what the human eye perceives as more aesthetically pleasing. So over here the image still looks a bit too bright for my liking. So maybe I'll just decrease it just a little bit. And as you can see, this node that experience behind the shore, you can use this graph up here if you know how to do that. But for beginners, I would say just eyeball it and whatever looks good probably is good for you. So this is a bit too bright, this is a bit too dark. So maybe I'll start in the center and I'll just brighten it just a little bit. And that looks good for me. Moving on, let's go on to the highlights now if I boost the highlight, you notice just the sky is getting brighter. And if I lower the highlights, just the sky is getting darker. And if you might notice, as I lower the highlights, more detail in the sky starts to show up. And if I brighten, it will lose some of that detail. So in the center over here, I want to just lower that just a little bit so that the sky retains a bit more color and detail. Then in the exposure, once again, I'll just compensate for that by raising the exposure just a little bit more. Since we did darken the image slightly in the shadows. If I brighten it, see the bottom part of the image gets brighter. And if I lowered the bottom part of the image, like I mentioned before, gets darker. So in the center, what I wanna do is actually brighten it up just a little bit. So let's just go just there. Now. I may not be, it may seem like I'm not doing much, but if I zoom in over here and I hold down on the image, you'll see just how much work we did, just with the light. And this is like I said, correcting the image. So if I hold down, we can see how dark it is compared to what the phone book. And then afterwards, our little adjustments that we made. Next step, what I want to do obviously is edit the color part of the image. And mainly like I mentioned, the white balance or temperature. The temperature bys over here. If I slide it towards the right, it gets more orange and more warm. And if I slide it towards the left, it gets a bit cool. So obviously we don't want things such as drastic as that. So let's think about the climate of Morocco. And I was the, it was extremely hot in the city which is Casablanca. And so what I want to do obviously is that the unit force that theme and make it just a little bit warmer, not going overboard since we still want to calibrate. So let's just make it alert on bit warmer. And that's what I'm gonna do. If we zoom in and we check what we did is just a tad bit warmer only plus 11. Now, if I go over here into this section, I'm noticing a shift towards green is not looking very purple and LDF firm that by using the tent Bach. As I said, if you slide towards the right, it becomes more purple. And if you slide towards the left with slides because more green. So if I can slide a little bit towards the right to get rid of this green overtone here, you'll see a star to slightly disappear. And this is something you need to really look carefully for any zoom into seem. So if I'm at normal, we can see that the slide tenth over them. And if I slide up just about maybe five or six sittings forward to become more purple. We see I've kinda removed that. And if we hold down, we can see a drastic change already to our image. We've calculated the light with color, corrected that color, and we now have a good starting point to start color grading. So let's go over what we did. We change the exposure to make it a tad bit brighter. We took the highlights down so that the sky, which is the brightest or highlighted part about image, retains more detail and we can see more clouds. And then we boosted the shadows a bit so that the entire city, which forms part of the shadows, isn't too dark within, increase the temperature, but to make it a bit more warmer and reflect Morocco's climates. Since this is a Moroccan picture, obviously you took a picture in the middle of a snowy mountain, you do the opposite. And then because I noticed my camera adding in just a bit too much green for my liking. I took the 10 slider a bit towards the purple side and made it more neutral. Let's then move on to color grading this image, which is the extremely fun part.
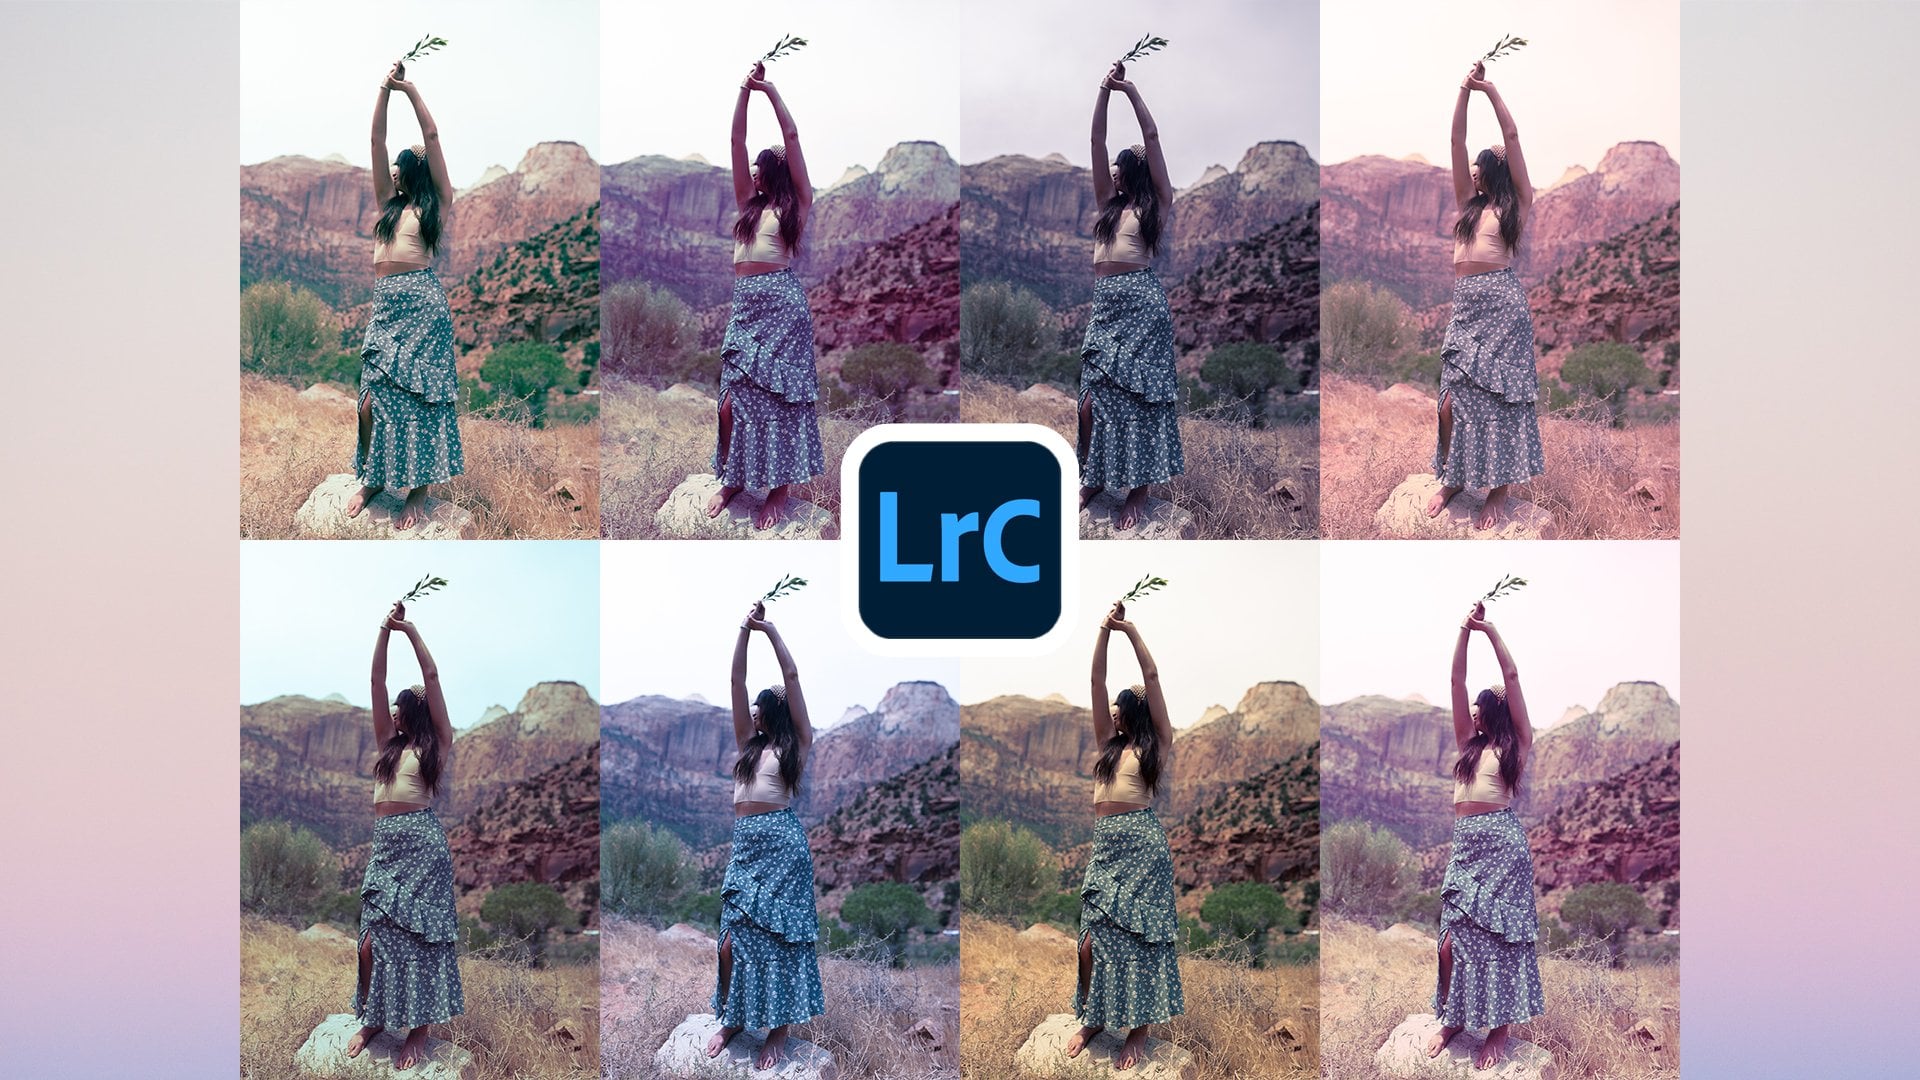
6. Color Grading Presets: Before we move on to actually color grading our image, and let's talk about what color grading presets for. Now, if you follow a lot of photographers, maybe on Instagram, especially on YouTube, you'll hear them always talking about color grading presets that they will usually be sending to you. Now a lot of these times these presets off for Lightroom and they sometimes work in the iPhone app, but mainly they mainly used for the PC or Mac versions of the Lightroom app. So for those of you who don't know color grading presets are essentially like a filter. If I want to explain it in layman's terms in others filters you apply to your Instagram pictures, even within your own iPhone camera and on Snapchat. Those essentially our presets are. But the cool thing about preset is that once you apply that filter to your image, you are then able to go into the same settings that we just used right now to color correct and to calibrate, and then change those settings based on the preset. So it gives you a nice starting out point that they've thought up. And then you can edit it and adapted to your picture because obviously know folder looks great on every picture and no color preset or calibrating preset will look great on any picture. Calibrating pieces are really cool to use, but oftentimes, people who are selling them for really, really exorbitant prices. So in the next lesson, now that I've explained what they are, we're going to take a look at how to create your own color grading presets extremely easily. And while doing that, while actually creating our own preset, bringing the show you guys how to actually calibrate your image of the color corrected, taking it further, adding your own stylistic touch to it and fully finishing off your image as well.
7. Making Custom Presets (The Easy Way): So now that we have our image color corrected and we want to start calibrating using presets. Let's talk about my favorite way and my cheating way of actually making presets. So we are please, it's found if we scroll around to the start and refine it right over here next to crop, we can click on Presets. Now, if we go through please set we have first of all, color, creative black and white portraits, defaults curve grant optics. So many different categories of presets that come standard within Lightroom. Now my favorite category to look at within Lightroom own standard police. It is the Creative section, because in the Creative section it has a really cool starting points. And so my trick to actually make implicit isn't to start from scratch, but rather to use one of Lightroom's really cool basic pieces and then adapted and change it to make a preset that suits my particular style or taste. So if we look at through, I'll zoom in a little bit so you can see what these sets are doing. If we add something like desaturated contrast, it's a rapidly or rather rapidly or drastically changing what the image looks like. Cool light makes it look a bit cooler. Turquoise and read pushes the blues and reds up a bit soft must makes it look a bit hazy. Vantage instant makes it look a bit more brownie and vantage him. Warm contrast, flattened, green, red loved mat, warm shadows, aged photo, Cool Matt, cuz there's so many different things over here, all of them sitting a different tone. So what I will usually do is go in here onto the, whoops, not on the crop to the presets. I will go into creative and I will pick one that suits my specific style. Find would be a good base point. So for me over here, because this image right over here is really worn down buildings, a lot of culture and there's a lot of history within these buildings are going to do something that sort of brings out a morphine TG or more aged look to it. And so instead of using the standard aged photo look, which is a bit too drastic, I want to do something may be called warm contrast. Because what this does, if we just go back to the standard, it looks like this, the image. And then if we go over and we add the warm contrast, but he said we can see that it's adding a bit of warmth into the image. And it's also taking out a little bit of the color and also making it look just a little bit more rugged. That's something I really like. And so essentially what we need to do right now is just adapt this preset so that it suits our image. And then I'll show you guys how to actually save that please it as your own custom user, please it. So now that we have the basic preset selected onto our picture, we want to start editing it or adapting it to let it put, spit it to the style that I'm going for. So I'm just going to go over this and explain what I'm doing and you guys can use it as a starting point for all of your images in member, that there's no set way to do this because you can do it anyway that you want to do it.
8. Color Grading: So now that we've added a stock preceptor image, we want to start calibrating and refining that please it to make it our own. And then at the end of this lesson, we'll save that presets that we can use it now, upcoming pictures as well. So like I said, let's dive into the light. So we want to make some more connections to the basic things that we did. I'm going to go a little bit faster because this process is all up to you guys. Don't use the exact steps I'm using. Everything is dependent on the picture you take an astounded you want to go for. So with the exposure, I'm thinking over here that I wanted to be a little bit brighter because I wanted to really emphasize the sun beating down on the landscape. The contrast, I may want to add a bit, a bit less contrast over here, just marginally less because I find these spots a bit too dark, so I'll decrease it by about maybe minus 8 in the highlights. I'm liking where the highlights are, so I'm just going to leave it as is in the shadows. I'm liking with the shadows are but I went to boost him just a bit. So we were sitting at about plus 14. I'll maybe go up, up to about maybe 26 because really when the sun is beating down, things are going to be illuminated and they're going to be bright. So I want to do that. The whites and the blacks generally contain all the same things that the exposure does. It controls how bright the spots are, as well as how dark the spots on. So over here in the black parts of the image, I want to just erase that a bit. Overall in the light parts of the image. I want to just also make that a bit brighter as well. There we go. Maybe we can decrease the exposure just a little bit. So I'm liking me that it is, but the color is still not fitting my needs. So let's go into the color tab. Over here. I'm going to keep the temperature may be a little bit higher and I'm going to take the tenth and I'm going to put it, you know what, let's leave it as is. Then in the vibrance and saturation. I'm going to leave that alone for the time being. I'm rather gonna go over here and click the mixed button. What the mixed button allows me to do is select individual color channels and change those. For example, if I select the light blue and I drag that slider down, or rather the dark blue and I select day the slider down, you see the sky becomes completely gray because I've taken out all of that color. Whereas on the flip side, if I start to push it a bit, I can actually pop that sky, but this is looking at it to Michael Bay, overexposed for me. So what I'm rather than a doom is actually just marginally increased that as well. I can also change the luminance of that specific color channel within here. So here I want to actually decrease it a bit to bring in a little bit more detail. And I can even change the user. Maybe I wanted to be a bit more of a blue sky like this, but I like what this preset is doing and it's changing it to be more of a turquoise color, which I generally like to see. Next step, what I wanna do is change some of the audience values. Because as you can see, there's a lot of audience happening over here in the trees. So if I increase the saturation, we can see all of the buildings and trees papa bit more, but if I decrease it, it doesn't. And so because I'm going for the Sandlot, good African heat landscape, what I wanna do is just push that up just a little bit. Now, a really good tip I want to add you guys ALL OF a bonus tip is there's something called a teal and orange color grade. Essentially it's a more bluish and orange tones. They go really well together. And so what you wanna do, obviously a lot of the times is introduced those blue tones and then also contracted with the orange tones. Because as you can see, it creates a really aesthetically pleasing image. So far, some of the other colors I want see here that I want to change. Maybe it is some of the greens. If I decrease, some of the greens are, but nothing really happens. But let's do it for now. The yellows is a big one because if I decrease these yellows, these three is completely lose oil, they color and they essentially die. So if I want to keep these trees, which are kinda pulling my attention that right towards this side even though I wanted to be centrally or maybe decrease the saturation a little bit and maybe even change the hue so that it matches a little bit more towards the orange side of things. And then the luminance, I may want to decrease that luminance just a little bit. Keeping in mind that I'm also affecting the wall over here. All right, that's it for color. Now remember in your image you may have lots of purples and you may have lots of, I don't know, dot-dot blues and light blues. And you may want to go into those specific color channels and change those yourself as well. Next step, let's go into the effects now here, there's only three fixed I want to talk about. First is texture. Now, if you zoom in on your image and you increase the Texture slider you can see it makes things just a bit harsher. Now right now, I want to keep things as is. I'm not going to attach that. The clarity, what it does is it either makes it look a lot more contrasted and harsh, or it smooths out everything. Whoops, it smooths out everything and makes things look a bit more messy. And kind of clothing. That because this is a dark or dark dog but rather beaten down hot landscape idea that I'm going for. I want to zoom in and then I want to just push that clarity just a little bit towards maybe minus 12 to give it a bit more of a soft glow from the sun. Remember, I'm making up my own theory here, but it's all part of the fun of doing things. And the last effect I'm going to talk about, well, actually there's two more effects. First of all, it's a vignette, Nivea drag vignette towards the left, you get a score of a darker circle coming in. And if you did, I go towards the right, you get more of a lighter circle. Now, I attend generally don't really use the light part, but if I want to add a little slight vignette here, I can drag it a little bit towards the side. This is a bit too much. So what I'll do is. I'll drag it just a little bit so that in this case, I can focus my, my viewers eye on the mosque, which is really central. Now a lot of times vignettes, it really helped to centralize the focus of the person looking at your image. So for example, if I'm adding a vignette to this image, I'd added in TVD, maybe hear that you're focusing on my face. But again, it's a stylized choice. And the last effect I want to talk about when it comes to the fixed step is the grain effect. Now, I'm a sucker for grain. I love film cameras and the way that they put the images looked at they produce. So if I zoom in over here, especially on the sky, if I pump up the grain, you can see exactly what it's doing is just making it look a lot more grainy. And obviously, this is a bit way too much for my liking and it uses a lot of processing power. So I'm going to drop that back down. But what I do like to do is add in grain to about at least 30. Now this is a bit on the heavier side, but then again, I do like grain. If you don't like brain atlas or live it out entirely, completely up to you. I feel like grain just ties everything together by adding that layer of sort of grid on top of your image and makes it not look so polished off and clean, like digital cameras look when you're using them because these cones are digital cameras. They're not phone cameras. And as a kind of charm to having an imperfect image, I like to have. So that's why I like to add a bit of green to my image as well. And that does it for over there. If we go into detail, the tab called detail, the thing I want to talk about here is sharpening. Now that's exactly what it sounds like. Sharpening the image. If your camera is a bit blurry, you could add a touch sharpening to just shop and up those edges. So for example, if I zoom in here on the mosque, we can see how it looks. And if I start sharpening it up, we can see exactly how much more detail it's being out. Now I would caution you guys to be very careful with the sharpening effect because you can easily go overboard like I'm doing here. And if you look at an image, it's just way, way, way too sharp and harsh. And it's counteracting what we're trying to do with softening it with clarity and the green. So essentially what I wanna do here is just alert little bit of sharpening maybe at around 24. And this is just to counteract some of that compression that's going to be happening when I post it on Instagram, on my Twitter page or even on my website. And so essentially here, at this point, I've sort of finished my image. If I hold down my finger on the screen and we're going to see what it looked like before. And as you can see, if I let go, that is a drastic change through color correcting and calibrating. Again, I know it was going fast in this episode where this lesson, I want to cover everything in a short time as possible so that you guys can maybe rewatch it if you want to and if you're not up to the speed yet, but it it along with me and do these changes on your photos, obviously adapting into what you like and you should get a result that is extremely, extremely cold. So how do I save this as a preset is usually a click these three dots up here, and then I will click Create Preset. I can then name it. Maybe I want to name this vintage, vintage, vintage heat. And then I just click the I can obviously select what I want to obviously contained within your I didn't make any changes to the optics for the geometry as well as the masking. But I did keep the profile, light color effects and detail. So I'll select all of these boxes so that they contain those effects. And then we click the Check button and a brand new police, it has been created. If I want to add this buddy sit to other photos, I'll go to please it. And then into User Presets. And I'll find my place it over the men to cheat and I can apply it to other photos as well.
9. Exporting in High Quality: So you've actually made it all the way through the theory of color correction versus color grading. You've made it through actually color correcting an image. You've made it through creating a Police it, you made it through adapting that reset and calibrating your image. And you add the final section, which is actually going to be exporting that image and uploading it wherever you want to do that. I'm extremely proud of you if you've made it this far and if you follow the long, that's even better. So let's get started with actually export in the image and I'll show you just how easy and how quick it will. Yes. So we're done editing our image as we can see here, it's looking stunning, is looking way better than what it did at the start. And so in order to export this, it's extremely simple, so it's extremely easy to export. What I wanna do is click this little Share button over here, and I want to click Export to camera roll. And essentially it will then just export the picture. That's kind of how easy it actually is. These cameras these days are obviously recording a lot of high-quality pictures and videos. I mean, how can you record a picture taking high-quality pictures? From here, I can add this to Instagram. Now, obviously, if I want to change my image a bit more to fit Instagram's formatting. What I can do is go into Lightroom, head over to the crop function, and then I can change the ratio to fit something more square like Instagram. So if I click a four by three ratio, it's squares that up. If I click a 16 by 9, which is a more cinematic letterbox ratio, I can crop the image as well. And this is standard cropping over here. If I can do a three by two, I can do a five by four, basically, whatever you want. Instagram generally uses around something like 4.3 and you can square it that uploaded to Instagram. Or what I would do is not crop it at all. Keep it at the original. Keep it at the original, or maybe just crop it for aesthetic purposes. Maybe I want to take these trees out. Whether you want to scoop some of the sky out, make it a more banner if your YouTube channel, something like that. But I would export the high-quality image first and then go back into Lightroom, change the crop, maybe Instagram or what other platform you want to use, find out the dimensions and crop it accordingly. And then you upload it and all your fill-in start to bomb your comments saying how cool your picture is and how you learned. And that's the point where you send them over here to this channel so that they can learn as well.
10. Conclusion: So throughout this course you've gone, if you follow all of the instructions and if you type it out yourself, from a person who just takes pictures on the iPhone like everybody else, to a full bone season photographer that could be featured in Empire magazine. Okay, that may be an over-exaggeration, but throughout this course we've covered lots of different things and we've covered them in detail. I know I speak really fast like a rabbit chipmunk, but I hope you guys have taken all of that knowledge, ingested it into your brain, and can now start to think about how you can use that for your own images. If you guys have any questions at all regarding something in Lightroom regarding something about your images, maybe even regarding life. I don't know much about that one, but if you want to chat, you can always hit me up on the Skillshare website, that idea in the community tab or the Project tab down below as well, and submit your project down below so we can all learn from it and congratulate you and just leave about your work because I'm sure you make exciting and amazing looking, stunning images as well. So if you guys have enjoyed this course and stay tuned for the next one, happy editing.
11. BONUS - Moody Train Portrait (Edit Ideas): So welcome to this bonus episode in which I want to talk to you guys about a image I edited recently just to give you guys some more ideas about how I've been using Lightroom myself. So as we can see here, an image over here we have is just me standing in these fields of like a little abandoned railway section. Time to be cool posing even though I don't know how to do them. And if we see what I've done with the edit, I've kind of made it look similar to the picture we just did, but a bit more moody and grainy looking. So obviously the first thing we notice is that a lot of the contrast is kind of sucked out and the main part of the image falls towards green. And so to counteract that, I've added a lot more bluish, coppery purple tones in to sort of emphasize the decrepit nature of this image. Obviously we have ni over here, you know, look in a bit dumb, but let's just overlook that for now. And if we go in some of the settings over here, we can see what I've done is, as you can see in the exposure, I've decreased the bugs. I want this image to look a bit more somber and dark instead of happy and nice and things like that. Also in the contrast, that kind of lift than where it is. But in the highlights, I've kind of push that up because to sort of balance out all of the exposure I'm sucking out, I need to push the highlights alphabet because otherwise it would be just way too dark and that's sort of just counteracted. Let me just undo that the shadows, I'm also boosted because once I decrease the exposure, if I keep the shadows as is, you cannot make out any detail. And so if I add in just a bit of the shadows, you can make out that you can just just just make out the checkered pattern on my shirt. I would even increase that a bit more. Obviously not that much, that just defeats the purpose. But you get what I'm saying. In the whites and the blacks, not much, they just boosting the blacks a bit so that we can get a bit more detail in the image. Um, and then in the color section, which is the favorite section I want to talk about, I've increased the vibrance, yes, but I also decrease the saturation. And in the mixer, I've decreased a lot of the reds. I bumped the oranges luminance down because if I push it up you can see how bright these railway tracks taught to look. So both them down because Azure decrease the brightness of the orange. You can see a lot more detail. If I push that out, the detailed kind of gets obscured and I want to see that rust and dock, good lunch in those old railway tracks. The blues I've also decreased. If I push it out, the sky becomes too blue and way too happy for my liking. And I want this to be a more somber doc image. So I've suck that out as well. The green as well. Green represents fertility, that represents life. And so we obviously don't want that over here because this is a doc Zack Snyder, the image. So I've decreased the greens as well. And then purple's is not really much going on there. There's not very much like blues going on the yellow. I've kind of played around a little bit with, but again, it's mostly within the grass, so actually, I could decrease that a bit, but let's leave it how it is. So if we go over into the Effects tab, we can see that. What, we can see that I've pushed the grain lot on this one because obviously I want it to be more grimy and graduate. So if we zoom in over here, we can see just how much grainy is present in this image. I mean, it's 60 percent green. Some people be like a waste. What are you thinking? But I wanted a lot more grain over here. And so these are some images or some images and some ideas of what you guys can do with your images. I think I added a bit of a vignette. A vignette as well, because like I mentioned in a few lessons back, I do have a central character year and a central focal point. So I have the vignette around the edges to focus the audience in just a bit on myself. Um, and that's just a few basic ideas that I want you guys to think about. Because when it comes to editing, even if you're adding a police it, your presets won't work with every image. Your camera might change, your phone might change. So always play around. Just always land my bed and just slide things around and play around until I have a variation that I like. If you get to a certain point, you don't want to mess it up, export that photo, and then continue messing around so that you have that reference point. And you can always go back to a previous version as well.
 Uwais Adam, YouTuber, Filmmaker, Movie Lover