Transcripts
1. Intro - Hello!: Hello. My name is measured a lot. I'm 18 years old and I've been making APS for over three years now. I'm super excited to be introducing you to the wonderful world of up development. By the end of this class, you will have made an awesome war card game app that you can install on your own phone and show off to your friends and family. This class is intended to be for beginners. So don't feel intimidated if you've never written any code. Because I guarantee you that by the end of this class you will be writing your own code in the swift programming language. Along the way, we're gonna learn a lot of really cool things. Just a few of the things that we're gonna learn Our how to create a custom user interface using custom images had a lay out our app using auto layout so that it looks great on all devices. We're also gonna learn the fundamentals of the swift programming language which include things like variables, data types, if statements string interpolation, typecasting and generating random numbers. And then we're gonna learn how to connect our user interface to our code and how to respond to user interaction. So if you're ready to start making your own app that you can share with the world, let's get started.
2. What is an App: before we jump in and start making our app. I think it's a really good idea to go over what an app is. Every app is made up of three main components. The 1st 1 is the screen or user interface. This includes things like buttons, switches, images, search bars and really anything that the user sees as app developers. The very first thing that we do is create the user interface of our app. So if you think in the case of Snapchat, this includes the chat, but in the camera button, the discover button and all of the cells with our friends as well as a search bar at the top. This is the user interface of Snapchat. The second part of our app is the code you can think of code as instructions that we give to the app. So, for example, if we have a play button in our app, we need to write code to tell the act what to do when the user clicks on the play button. So maybe we want to start a video when the user clicks the button. An app would be really boring and nonfunctional if it wasn't for the code, it would just be a static screen that did absolutely nothing. So in the case of Snapchat, when a user clicks on one of his friends, the code takes them to the next page, where they can see all of their text messages and chat with their friends. Finally, the third part of our app is the data. So in the case of Snapchat, this includes all of your friends, your snap score and any previous text messages that you've had with anybody. So when you click on one of your friends, not only does the code move you to the next screen, but it also goes into a database and retrieve all the necessary data and sends it back to the user interface for you to see.
3. What is Xcode: our app making journey starts with X code. Exclude is a free software made by Apple. And this is where we're gonna create the user interface for up and write our code. The cold we will be learning how to write is in a swift programming language. If you've never written a line of code, don't worry, because by the end of this class you will learn how to. There are a few things you need to know before installing X coat. Firstly, X code can only be installed on a Mac. So if you have a Windows computer, there are ways around this, like installing a virtual machine. But I will not cover those in this class. Next, you want to make sure that you're on Mac OS Catalina or higher to check what version of Mac OS your on. You want to come up to the apple logo up here and click about this Mac. Now, under the overview tab, you can see the Mac OS version that you're on. So you want to be on Mac OS Catalina or higher? The last thing that you need to know is that X code is quite a large application So you're gonna need about 10 gigabytes of free space on your computer in order to install it. To check how much free space you have on your Mac. You want to come up to the apple ago just like we did before and click about this, Mac. And now you want to go to the storage tab and right here you're gonna see how much gigabytes of available story that you have. So I have 13. You want to make sure that you have at least 10 in order to install X code? Alright, If you're ready to install X code, just follow along. So the first thing that we want to do is we want open the Mac App store so you can come up here and the spotlight search, or you can click command in Space Bar on your keyboard, and now we're gonna look for the APP store, and once you have the Mac App store open, you want to come up here and search for X code, and here it is, and yours is probably gonna say install here. So just click on that and this might take anywhere between 20 minutes and an hour depending on your Internet connection. So you want to make sure that you have a strong Internet connection when you're installing X code. If you encounter any problems, you want to make sure that you checked off all the things that we talked about previously.
4. Starting Our Project: Now that you have X code installed, you can go ahead and open it from here. You will be greeted by this welcome screen, and you can see we have three options to choose from. But we want to click on create a new X Code project. If you don't see this welcome screen, you can go up to file new and then click on Project, and this will be doing the exact same thing. Now we get to choose what platform we want to develop for. So we have IOS watch us, TV, us and MCA wives. But we're gonna develop for Iowa's now. From here we have a bunch of different templates that we can choose from, like a master detail up or a tabbed up. But we're going to start with a single view application, and the great thing about a single view up is that you can actually get to any one of these templates using this. And usually when I do want to create something like a tab dot for example, I would start with a single view up as it allows for the most customization. Now we can go and click next. Now we have to input some details about her app, starting with the product name. So I'm gonna go ahead and type war card game in here and now we have the team. So years is going to say none by default. And if it does, that's okay. You can actually just leave it as none. When it comes time to submit your up to the absolute, you're gonna have to create a team. Next, we have the organization name. So if you do have an organization, you can type that in here. Otherwise, you can just type your first name and your last name Down here we have the bundle identify air, and this is an I. D. That is unique to every single application. So no Tuapse on the APP store can have the same bundle identify. And so the bundle idea is made up of the product name as well as the organisation. Identify. So, to get a unique bundle, I d. You can go in and type your first name, your last name in here, and that should work next. We have the language and you want to make sure this is such a swift and not objective C down here, we have the user interface and you also want to make sure this is such a storyboard and not Swifty. Why? I actually think it's such a swift. You are by default. So you want to make sure that you change this and down here, you want to make sure that you leave all three of these check boxes unchecked, and then we can go ahead and click next. And now you have to save your application so you can choose where you want to save it. I'm just gonna save mine on my desktop. And from here, you can just click on create and that's it. We created our new exclude project. Don't be intimidated if X code looks really confusing to you because I'm gonna go over everything you need to know about X code In the next lesson.
5. Tour of Xcode: in this lesson. I'm gonna be taking you on a tour around X code, and I'm gonna be showing you all the different parts associated with X code. So let's start with the left hand side over here. This is called the navigation area, and you can see we have different tabs here, but the most important one by far is the project manager. This first time over here, that looks like a little file. This is where we can see all the files associated with their application. And I'm gonna be talking a little bit about each file here. So let's start with a view controller dot Swift. This is the file where we're gonna write all the code with for our application. So you can see that when I clicked on this file, this middle section actually changed. This middle section is called the editor, and this is where the majority of our work is gonna happen. This is where all the magic takes place. Next after the view controller that swift. We have something called the main dot storyboard and you can see when I clicked on it, the editor area also changed. And now we have a little iPhone 10 here on this is where we can actually design and create the user interface for application. Now, after the main dot storyboard, we have the assets folder. This is where we can store any assets related to our application, like any images or music. And you can see we have the APP icon here, and this is where we can actually store the icon for application. Next, we have the launch screen dot storyboard, and this is very similar to the main dot storyboard. But the only difference is that this is a screen that is shown when we first opened our application. So if you think of any any app, usually they have the company logo shown as soon as you open the application. And this is your usually where you can design that. And finally, we have the info dot p list, and this just shows more information related to our application. Now, I want to talk a little bit about this utility pain over here on the right. So if you have your project open, you can go and follow along with me. I'm gonna go ahead and open the main dot storyboard here to bring up our interface builder . And I'm going to click on this little plus button in the top, right? This is called the Object Library, and I'm going to get into a lot more detail about this later on. But for now, we can go ahead and drag a label onto our screen. Now you can see the utilities pain here changes, and what this section is is it shows us more details about anything that we currently have selected. So you can see we have the label selected. So it's gonna show us a lot of information about our label so you can see up here we have the label text, so I'm gonna go ahead and type hello, world and click enter and you can see the label actually changes to say, hello, world. We also have some more traditional things like the color, and we can go and set that to read, for example, or pink. And we also have the font so I can go and increased the fund. Tow whatever you want, and we can go out and center in the screen so you can see we have a bunch of information relating to our label. We also have a lot more top and all of these show a different type of information about the label. But the most common tab is the properties tap here, which shows the most basic kind of properties about the label stuff you would see in something like Microsoft Word. Like the font alignment, number of lines, the color highlights shadows. And this applies to everything, not just labels. So you can see if I click on the actual screen here, it shows us information about our screen. Now, I want you to shift your attention to the top of the screen. This is called the X Code toolbar, and if you take a look to the left, we have the run button and stop button. This allows us to run our application on a device. And if you take a look to the right here, we can if they choose what device we want to run our app to. So you can see I have my personal iPhone connected so I can run our application on my personal device. Now, you're not gonna be able to do this right now, but we'll get into how you can do this later on, but as of right now, you can choose from any one of these simulators to run the application to. So I'm gonna go ahead and choose the iPhone 11. But you can choose whatever simulator that you want. And now we can go ahead and click the run button and there's our simulator and there's our application says Hello World. So if you follow it along, you just built your first application. Congratulations continuing with the toolbar at the top. If we take a look at the middle, this is the X Code status bar, and this shows us the status of whatever is going on right now so you can see the current status is finished running war card game on iPhone 11 and to the right side. Now we have this first button called the Object Library, and I mentioned this before, but what it is is it allows us to choose from all of these different you I components that we can use on our storyboard so you can see we have things like labels, buttons, segment controls, text fields, slider switches, progress views and a bunch more stuff that we can use on our view controller. Now, I'm not gonna talk about this button for now, but over here on the right, we can actually hide and show different parts of X code. So this button allows us to hide and show the navigation pane. This button allows us to hide and show the utilities pain. And finally, this button allows us to hiding. Show the debug area, which is the last part of X code that we haven't talked about yet for the debug area is where we're going to see any errors associated with our code. This is also where we can print stuff to the consul within our code.
6. Autolayout: before we jump in and start designing the user interface for our war card game. I want to talk to you about a very important concept called auto layout. So here I have a brand new project open, and I'm going to design the user interface for a log in screen for an imaginary application . Now, for this part, you can just pay attention. You do not have to make this on your own, so I'm going to start off by grabbing a label, and I'm gonna place it on the screen, and I'm gonna rename this label to say user name, and I'm gonna go ahead and grab a text field and a text field is a you I component that allows users to type into it. So when you click on it, the keyboard comes up and I'm gonna go ahead and grab another label. This one can say password and let's go and center it and another text field. And this is the password text field. And finally, we can go ahead and grab a button, and this is gonna be the log in button. This is what the user's gonna click. Once they finished typing in the user name and password. All right, so there is the log in screen for application, and you can see on the iPhone 10. It doesn't look that bad, but let's go ahead and switch it to an iPad, for example. You can see now this looks really weird, so let's go ahead and talk about why this is happening. The reason this is happening is because when we place a you element onto the screen, we're actually defining a fixed X and Y position off that element. So when we place a label onto the screen, we're saying that we want this label to be, for example, 200 pixels from the top of the screen and 100 pixels from the left side of the screen. Now, this may look fine on the device we're designing it on, but when we switch to a different screen size, our fixed X and Y position stay the same, so it actually ends up looking really funky. Auto layout is a system where, instead of specifying hard X and Y positions of you elements, we can specify a set of rules that dictate where the elements are relative to the screen. or relative to other you elements. So, for instance, if we had two buttons that we want to place onto the screen, we could say that Button one is centered horizontally relative to the scream as well, a centered, vertically relative to the screen. And then we could say that button to is also centered horizontally relative to the screen. And it's 20 pixels below, but in one, so you can see that by doing this we didn't specify any hard X and Y positions for anything . Instead, we just specified a set of rules, and through this set of rules are you? I will actually look good on any device. Now these rules that we specify for your for you, I elements are called constraints and constraints are a huge part of IOS development.
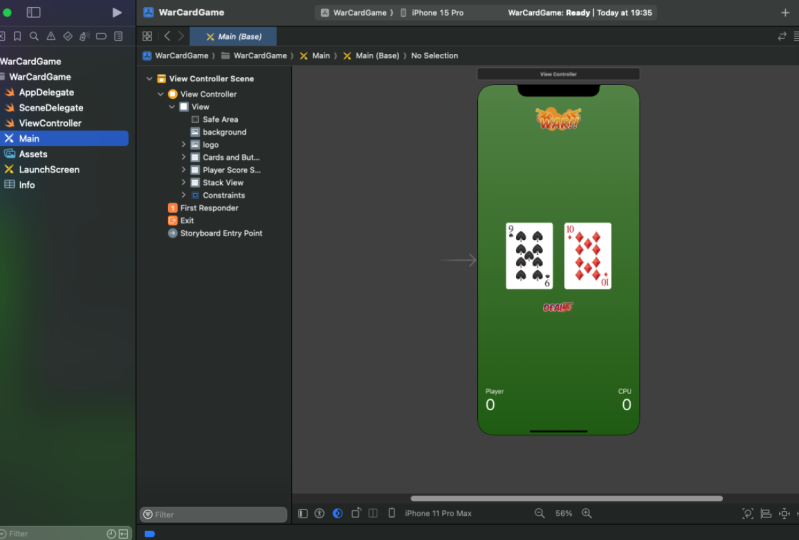
7. Building the UI Part 1: Now that we understand the theory behind auto layout, we can get to designing the user interface for our war card game. Firstly, you will need to Donald the assets for our game. I included a dot Zip folder under the projects and resource is tab for this class. So if you're watching this class on somewhere other than your computer, you will need to open skill shit on your computer to download the assets. Once you have your assets folder downloaded, you can go ahead and unzip it now, in your ex could project. You want to click on assets that xsi Assets folder and drank everything in the folder you just downloaded into the assets that exceed assets. Now we can head back into the main dot storyboard. If you have already done so you can go ahead and delete the hello world label. The first thing that we want to do is add a background to our app so we can come up here to the object library and weaken search for an image view. An image view is au element that allows us to sudden image within it. So if we come over here to the right. This is the attributes pain, and we have an attributes called image. So if you click on this little drop down button, we can choose from any of the images in our Assets folder. Apple also gives us a bunch of default images, but what we want is the background image so we can go and double click on that. Now you can see our image view is still really small, so we need to add some constraints to make it stretch the entire screen. So down here in the bottom, right, we confined the constraint buttons, and there's only two buttons that we're gonna be working with in this project. The 1st 1 is the align, but it on this looks like two little rectangles above each other. This one allows us to horizontally align our image in the container or vertically aligned the image in the container. The 2nd 1 is the constraints button. This one has, like a little square in the middle, with two lines on the edge, and this allows us to add constraints or rules, like I previously mentioned toe all four sides of our image. All right, the first thing that we want to do is uncheck this button that says, Constrained to margins. So if you think of Microsoft Word, for instance, the margins are a thin border around the paper. And in the case of X Code, this is the exact same thing. So the margins are just a border around the screen, and they're useful from preventing important things, like text fields or labels from touching right on the edge of the screen. But for the case of the background, we actually do want it to go all the way from edge to edge, so we don't want to constrain it within the margins. The next thing that we want to do is come up here to the top and click this drop down arrow , and now we get to choose what we want to constrain the top of this image relative to so we can constrain it relative to the view or relative to the safe area. So if you think about the view, this is the entire screen from edge to edge. Where has the safe area is on Lee, the parts of the screen that are completely unobstructed. So if you think about the iPhone 10 or above. For instance, the safe area does not include the area right above the notch. So this area right here is not part of the safe area. Neither is this area down here where this home button slider exists before the image. We want to constrain it relative to the view and not the safe area. Now you can see this lineup here lights up in red, and this mean that we have the upper constraint enabled. And now you want to change this value from 1 92 to 0. That means we want this image to be zero pixels relative to the top of the screen, which is a view. Next, we want to do the same thing for all four sites. So we're gonna click on view and then set this 20 And it's important that you first select the view and then you change this number 20 You don't want to do it the other way around. And now, once we have all four sides enabled, we can click on add four constraints and you can see our image now covers the entire screen . I want to point out that if you click on the constraints button. Again, you'll notice that none of the constraints are lit up in red, so you might think that none of them are enabled, which is weird, because we just added all thumb. While this constraints menu is purely for adding new constraints, but it does not show us what constraints we already have. So to see what constraints we already have on a U element, you can click on it and come up here to this little ruler button on this is called the size Inspector. And right here we have ah, tab called constraints and you'll be able to see all the constraints that we have enabled on Are you element? So we have all the horizontal constraints and the vertical constraints now say you messed up one of the constraints. Well, what do you do? So let's say I messed up this top constraint. I can click on it and then click the delete button. And now that constraint is gone so I can come back over here and just Riyadh it and fix whatever mistake that I made previously. And you can see the constraint is back. Opens right here. You may have noticed that if you're using a device other than the iPhone 11 say the iPhone eight plus, for instance, the background doesn't look quite right. So the way we can fix this is by coming to the attributes, pain and coming down to content mode and switching it from aspect fit to aspect Phil, and now it looks a lot better.
8. Building the UI Part 2: in this lesson. We're gonna finish building the user interface for our war card game. So we're going to start by placing the logo onto the screen so we can come up to the object library and search for image view. Now, over here in the attributes section, we can change the image to the logo image. And now we actually have to add some constraints. So the 1st 1 is we wanna horizontally aligned the image in the container, and now you can see that X code is complaining. So if you click on this little red arrow over here, we can say that it says need constraints for why position? So we added a constraint for the exposition, but we're still missing one for the Y position. Now, once you add a single constrained to a U element X code wants you to complete all the constraints so that it knows exactly where to precision position this element. So right now it doesn't know how to position it on the why access. So we need to tell it what to do. We can come down here to the constraints button, and we're gonna go ahead and click on safe area and we're gonna set this to 60 and now it can add one constraint. And now ex code is happy because it knows exactly where to place this image. Now, the next thing that we want to do is add the card images to the screen. So we're going to come up here and we're gonna search for a horizontal stack view. Now say, we have multiple you elements that we want to stack above each other or next to each other . We could add constraints, toe all of those elements individually, or a much easier solution would be to use a stock view. So what is a stack view? A stack view is a way of stacking multiple you elements together. And then we can treat the entire stock view of a single element. And right now you can see that the stack view is invisible, so it's actually kind of hard to see him move around. But if you take a look to the left here, we can actually see all of the elements that make up our screen. And if you've ever used photo shop, you can think of this as all the layers that make up our screen. The layers all the way at the top are the back most items, so you can see the safe area is all the way at the back. And then comes our background and then our logo and then our stack view, Whatever is at the bottom is the front. Most elements on the screen. Now, the next thing that we want to do is we want to actually fill our horizontal stock view with images so we can come up to the object library and search for an image. And now we could place it in the stock view, or an alternative is to come up here and we can place it right under the stock view this way. So you can see that when I place it right under it. This blue line, actually in dense on this is showing us that we're placing the image in the stock view. If this blue line is on the same position as a stack for you, that means we're actually placing it right beneath the stack. You and not within the stack to you. So you want to make sure that this blue line is indented inwards And now we have a single image in the stack view and we can come up here to the image attributes and change it any one of these cards. So it doesn't matter what card it is for now, so I'll go ahead and select card 10. And now we want to come up and we want to get another image, and we wanna indented again within the stack view. And again, we're gonna go ahead and choose a random card. Now, if we click on the stock view over here, you can see the stock. He has a bunch of attributes that we can change, and one of them is spacing. So this is the space between all the elements within the stack to you. And right now the cards are right next to each other, and that doesn't look very good. So we can go in a justice, spacing, Say to something like 30 and you can see the cards look much better now. Now we have to add constraints to the stack view. So if we click on it and come down here, I want to align it horizontally in the container and vertically in the container. and we can add to constraints and there's our images now. The next thing that we want to do is add a button to the screen so we can come up here and search for button and we can go ahead and placed out down here. And if we come to the attributes inspector, we have an image attribute and we can go ahead and set that to the deal button. And now you can see our button is the deal button. But we also have this button taxed right next to it. So if we come up here, we can actually go ahead and delete this text to say nothing. Now we have to actually add some constraints tore butter. So we're going to start off by horizontally aligning in the container, and now we have to add some vertical constraints. So if we come up to the odd new constraints, we can click on this drop down menu and you can see it already has it selected to the stack view, and that's what we want. We want a constrain it relative to the stack view, and 50 points seems about right so we can go ahead and click Add one constraint. Now all that's left for us to do is add the text labels at the bottom of the screen that show how Maney points both the player and the CPU have, so we can come up to the object library and search for a stock view. And this time we're going to use a vertical stack view, and we can go ahead and play started right here and within the stock view we want to place to labels so we can come over here and indented in the stock view, and this label is going to say Player. And now the second label that we want to add this is gonna hold the number of points, the player hat so we can come up to the label text and we can change that to zero. And there's our stock. Few with the player text and the score right beneath it. Now we can go ahead and click on the stock view, and we have to add some constraints. So let's click on the constraints button, and the first constraint that we want to do is for the left side. So it's important that you click on this drop down menu and select safe area and we want to constrain it 20 pixels seems about right. And now for the bottom, we're gonna click on this, and we're also gonna make sure that it's selected to safe area and we're gonna set that to 20 pixels. And now we can go ahead and click on add to Constraints. Now, I'm gonna click on this player text, and I want to change the color to a white color, and that's all the way at the bottom over here. I also want to change the font size to 25 and I'm gonna do the same thing for this label. And now the last thing to do is to click on the stock few and change the alignment to center. And that allows this the bottom label to be centered right in the middle. And now we want to do the exact same thing, but for the CPU. So we're gonna go ahead and search for a stack view, and we want to go ahead and place it right beneath this staff, you and you want to make sure that it's not indented in words. That would mean that we're placing this stack, Few within the other stack few. Instead, we wanted to be on the same level. So like that. And now we're gonna come up and search for a label in place that within the stack view. And now we're gonna search for another label and place that within the stack for you. And this first label is going to say CPU in the second label, I was gonna say zero No, we can go in and take the stock view and we can click on the constraints button and you can see that by default. It's constraint relative to this button over here, but we want to change that to the safe area. And on the right side, it's already set to safe area. So you want to set this to 20 and we want to set this to 20 and we can click on add to constraints. And now we want to click on this CPU text, and we want to change the color toe white and the font to 25. And I just noticed that I made a typo here, so I'm gonna go ahead and delete this backslash and I'm gonna change the color toe white and the text font to 25. And finally I'm gonna click on the stock view and click on center. Another thing that I want to mention is that you can actually rename these you elements. So if I click on this stock view and then click on it again just one time, I'm gonna go ahead and rename it player stock, and I'm gonna click on the CPU stock and click on it one time, and I'll go ahead and remain Rename it to see if you stack, and this just allows us to be a little bit more organized.
9. Swift Part 1 - Variables : in this lesson, we're gonna learn the fundamentals of the swift programming language. If you've ever programmed before, then this lesson will be super easy for you. But if you haven't, don't worry, because we're going to start from the absolute beginning. And hopefully, by the end of this class you will understand the basics of swift programming. Also, I highly recommend that you actually code along with me on your own computer and type out what I'm actually typing. And you don't have to memorize any of the code we write. The best way to learn to program is to just keep practicing and applying the things that we learned. But memorizing is not necessary at all. So I want you to go ahead and open X code and we're gonna click on get started with a playground. Alternatively, you can go up to file. You can get the file new and playground, and a playground is a light. A playground is a lightweight, swift file that allows us to play around with some code without actually starting a full project. So it's exactly what it sounds like. A playground. Make sure you have a set toe. Iowa's and blank and then you can go ahead and click next. And now you can save it wherever you want. I'm just gonna save it to my desktop. This right here is the area where we're going to write all of our code, and this is called the preview pain over here. But we're not gonna worry too much about this. Instead, we're gonna come up here and click on this middle button toe Open up our consul and the console is where we're gonna output code to. So let's start by talking about this very first line up here. Import you I kid, I'm gonna briefly explain this, But if you don't understand it, don't worry, because it's not important toe what we're gonna learn today. So, as programmers, we don't need to build everything from scratch. Instead, we want to use as much pre existing code that others have written as much as possible. So you I kid is a library of code that Apple has written. And by importing u i kid, we're saying that we want to have access to the code that Apple has written in our program . If that doesn't make much sense, you're right. now, don't worry about this at all. Now, before I explain this line of code right here, I want to talk to you about comments. So I'm gonna go ahead and make some space here a na minha type two forward slashes. And this is my little comment. Now, you can think of this as a little note that we write to ourselves or to other people to explain the code that were writing. And so comments are crucial if you're working in a team because you need to explain to other people what the code your writing actually does. And so this is a single line comment, and anything that comes after these two forward slashes is completely ignored by Ex code. Now, what if we want to write a comment that takes multiple lines? Well, we can type a forward slash and then we can put an asterisk. And now we just have to click enter, and you can see Swift actually gives us this area where we can type a multi line comment and everything within this Ford slash an asterisk on this forward slash an asterisk will not actually get run. So none of this will be treated as code instead, this is just a little note that we can write to ourselves. Now let's talk about this line of code right here. Var s TR equals Hello playground When we're programming, there's a lot of data that we need to keep track of. So a variable is just a way to keep track of a single piece of data and right here were creating or declaring a variable. So the first part of this variable is var, and it is simply telling swift that we are making a variable. Next is str on This is the actual name off that variable and finally we put an equal sign and then we put the piece of data that we want to store in our variable. In this case, it's str no this is a process of actually making or declaring a variable. But once we've actually created the variable, we can change the data that it holds simply like this s t r equals hello skill share and you can see that I am using the same variable. But now I'm putting a different piece of data in it and notice that I didn't use the var keyword so far is only used when we first create the variable. But here I'm not actually creating the variable. Instead, I'm just changing the data that the variable holds. So here it holds Hello, playground. And now the same exact variable holds. Hello, Skill. Share up here and we're gonna type print and we're gonna put the name of our variable between two brackets. Enough. We go ahead and run our code. So just by bringing our mouths to the left side on bringing it to the last line and clicking this run button, you can see the Consul Prince. Hello, playground. Now you may be wondering, Why does it say hello? Playground and not hello skill share. Well, that's because at this point in time, where we're printing are variable the variable still says Hello, playground. It's on Lee Online eight that we actually change the variable to say hello skill share. So if we go ahead and type print and the name of our variable again and we bring our mouse down here and we click run, you can see now it says hello scale share. So now hopefully you're starting to understand how variables behave Now there's another type of variable that's called a constant and a constant is created with the let keyword instead of the var keyword. So now we can type the name of our constant. So let my hair color equals black and this is declaring a constant very similar to a variable. But the only difference is that a constant never changes. So you can see here with str we were able to reassign the value of str by simply putting the name and then putting an equal sign and putting a new value. But if we go ahead and say my hair color equals green and now we try to run it, you can see X Code is going to give us an error and the error says cannot assign to value my hair color is a let constant. So by saying by putting the keyword, let were saying that this value can never change. Now why would we want to do this? We use constant when we know that the data inside the constant will never, ever change. And by putting let we guarantee that any time we try to use this variable, the data within it will be the same, so it kind of guarantees that this variable will never change by accident or change anywhere in our code. So you should. On Lee is a constant when you know that the data that it holds will never change. Like my hair color is probably not going to change unless I diet but safer something like age. You probably want to use a far and not let because age is a data type that will probably change when it comes to naming your variables. There are a few rules that you have to follow. Firstly, your variable cannot start with a number. Instead, the first letter of the variable haas to be a letter. And after the letter, you can put as many numbers within the variable name as you want next year. Variable can only be composed of letters and numbers and underscores nothing else, including spaces, so you cannot have spaces in your variable names. Finally, the last rule is that upper case letters are distinct from lower case letters, so this variable is not the same as this variable. These are completely separate variables, so you have to watch out for that. There are two main naming conventions that people use when it comes to naming their variables. The 1st 1 is called Camel Case, and that's when you capitalize the first letter of every single word except the first word . The second naming convention is called Snake Case, and that's when you add an underscore after every single word, and all the letters in the variable are lower case. So it doesn't matter which one of these you use. You can choose whatever one you like, as long as you stay consistent with it.
10. Swift Part 2 - Data Types: All right, now, I'm gonna go ahead and delete these two lines of code, and I'm also gonna do delete this line of code. Sore program doesn't crash. And I'm also gonna comment the print statements so that our consul doesn't get flooded with different print statements. Now, you may have noticed that the Onley data type that we have been storing in our variable has been text, and this text is actually called a string. So that might seem odd to you at first. But the reason it's called a string is because it's a string of characters and you'll notice that all strings have to be enclosed in quotation marks. Now, there are actually a bunch of different data types that weaken store in our variables. But there are four main ones that we're gonna talk about today. And we already covered one of those, which is the string. The next one is the interject. So this includes all whole numbers, including all negative whole numbers and zero so we can go ahead and make a variable called my age and will set this to 10. Don't worry, I'm not actually 10 years old, so the cool thing about integers, unlike strings, is that we can actually do operations on them. So we can say my age equals my age plus one. And what this is doing is that it's setting my age to be my age, which is 10 plus one. So now my age is gonna be 11 after this. So if I go ahead and print my age and run our code, you can see 11 shows up in the console. However, if I try to do this with a string, say, I create a variable called my sheep and I'm gonna set that to 10 as a string, so you'll notice. I put quotation marks around the number 10 and now I try to say, my sheep equals my sheep plus one and I try to print my sheep and I run our code. You can see it gives us an error on. The reason is that we cannot actually add numbers to text, so X Code is not treating this as a number. Instead, it's treating it as text, and so you cannot add a number to a word, for instance, so there's actually a difference between 10 as an integer and 10 as a stream and I'm gonna go ahead and delete all of this. The next data type is called the Double and this is all decimal numbers. So I can make a variable my double hope. I forgot the far keyword and I can set this to 0.865 and this is now a double data type and I can go ahead and print my double and there's our double. Finally, the last data type is the bullion and a boolean is either true or false So I can save our is green and I can set that to true. And now if I print is green, you can see it prints true And I can also changes green to false and a Boolean can Onley be true or false? Now if I go out in print, it you can see is green is false Now the next thing that I want to talk about is that you cannot make a variable have two different data types. So what do I mean by this? So we created a variable called my age here and we said it to 10 and 10 is an integer That means my age can always on Lee be an interject. So if we try to reassign my age to a string, for instance we're actually going to get an air message and it says cannot assign value of type string to type end. But if I go ahead and make it 563 since 563 is an integer, you can see we're actually not gonna cry. So if I try to set is green, which is of type Boolean to a number or an integer, we're also going to get an error message so cannot assign value of type integer to type Boolean. Now, you may be wondering, at what point did we specify that is green is a Boolean Well, when we first create is green we assigned it to true and true is a Boolean So we indirectly specified that is green is gonna be a Boolean and you can never be anything other than a Boolean
11. Swift Part 3 - If Statements: in this lesson, we're gonna learn all about its statements. So I'm gonna go ahead and create a new playground file and I'm gonna click next and save it to my desktop. I'm going to start off by deleting this line of code, and I'm also gonna go ahead and open the console. Now I'm gonna create a variable called number of Fish. I'm gonna set that to 10. Now, what I can do is write an if statement by using the key word if and then I can put a condition here. So the condition I'm gonna put is if number of fish is greater than 10 and now I can open up a curly bracket and I can put another close curly bracket to open up this little space here. Now, I can type whatever code I want inside of this inside of these two brackets, so I'm gonna start by typing print. That's a lot of fish. Now, what's gonna happen is that we're gonna go through our code and we're gonna check this first condition so it's gonna check if the number of fish is greater than 10. And if it is, it's gonna run all of the code inside of these two brackets. But if it's not, it's gonna completely skip this if statement. So if I go ahead and run here, you can see nothing actually gets printed to our consul unless because the number of fish is not greater than 10 it is actually set to 10. But if I go ahead and set it to 11 and now I run our code, you can see that's a lot of fish gets printed to the consul Now. Another thing that I can do is add more conditions so I can actually write else. If number of fish is greater than five and in here I can print. That's a decent amount of fish. And now, if I set number of fish to six, the first condition is going to get skipped because six is not greater than 10. However, it's gonna move on to the next condition, and this one is going to go through. So if I go ahead and run our code, you can see that's a decent amount of fish gets printed. Now See, I make this variable 50 and 50 is greater than 10 and it's greater than five So let's see what happens. So that's a lot of fish gets printed on. The reason for this is that it starts off by checking the first condition, and this condition is true, so it will execute the code inside of the brackets on. Then it'll end the if statement, so only one condition inside of the S statement can ever be executed. Now, another thing that you can add to your statement isn't else block. And so what this does is if none of the conditions specified are true. It runs whatever is inside the else block. So here we can print. That's not a lot of fish. And now if I set this to to the first condition is false, the second condition is false, and so it goes to the else block. So if I run it, you can see that's not a lot of fish gets printed toe our council. Now you can actually add a lot more else if statements, so you can add as many else of statements as you want. So I can do else. If number of fish equals four and in here I can print we have four fish, and if I said this to four. You can see we have four fish gets printed, so the first condition is false. The second condition is false, and I'm just gonna go on interested. It's more clear, but the third condition is actually true. Now, you may be wondering, why did I use to equal signs here and not one? Well, one equal sign is actually saying that we want number of fish to equal to four. But here we're not saying that we want number of fish equal to four. Instead, we want to check if the number of fish is equal to four. And that's why we used to equal signs. So one equal sign is to actually set the value, and to equal shot signs is to check the value now some other things that you can do with. If statements is, you can add greater than or equal to, or you could do less than or equal to. And finally, you can actually do not equal to by putting an exclamation point and then equals. So let's see what's gonna happen now. So is the number of fish greater than or equal to 10? No, it's not. Is the number of fish less than or equal to five. Yes, it is. So if we go out and run it, you can see that's a decent amount of fish will actually get run. And that's all you have to know about. If statements for now. Now, I have a little challenge for you. I want you to open a new playground project and creative variable called Animal, and you can start by setting this off to dog or whatever you want. And now I want you to write an s statement the checks if the animal is either a dog, a cat or a cow, and if it's a dog, I want you to print bark to the consul. If it's a cat, you can print me out, and if it's a cow, you can print, move.
12. Connecting UI to Code: now I'm back in our war card game file, and right now I'm in the main dot storyboard file. So in this lesson, were actually gonna be connecting our you I elements to our code so that we can actually manipulate it with our code. So what we're gonna do is inside of our main dot storyboard. We're gonna come up to these lines here at the top, right? And we're gonna click on assistant on this is gonna bring up our assistant editor. So this code file actually belongs to this view controller or this screen. So I'm going to start by making some space under this class view controller. You I view controller, and we're going to start off by connecting our cards to our code. So the way you can do this is you can either open up this panel over here from the left by clicking this button, and you can use this stack over here to easily navigate through the different you I element . Or instead you can actually just click on them from the view controller itself. So I'm gonna start with this card on the left. You want to hold down the control button on your keyboard and dragged the card over into your coat. So I'm just gonna place it under this class view controller Colon new I view controller. And once you let go, you can see it's gonna ask you to name the variable. So I'm gonna call this layer card, and now I'm gonna click on Connect. And now we have a variable four our card. And now I'm gonna drag the right card over by holding control and dragging it over right under it. And I'm gonna call this CPU card and I'm gonna click enter. Now, the next thing that we want to connect is our actual point text. And so we need to connect this tour code so we can actually increase the number of points for each player through our code. So I'm gonna start off. Actually, I'm gonna open up this panel over here because it's kind of hard to drag it from the view controller and someone to start off with zero right here under the player stack. I'm gonna control drag it and I'm gonna call this layer points text, and I'm gonna click Enter and finally, we're gonna take the CPU points text, and I'm gonna call it CPU points text. And now we have all of our variables. We have the player card variable the CPU card variable the player points of text variable on the CPU, points tax payable. But there's just one last thing that we have to connect to our code, and that's actually the deal button. So we don't want this to be a variable because we don't want to actually change anything about the deal button. Instead, we want to connect it as a function. So I'm gonna go ahead and make some room down here under the override Funk block of code, and I'm gonna control drag the deal button right down here. And now I want to make you need to change this type to you, I But it and we're also gonna go ahead and remain rename it to deal pressed. And now we have this block of code here that gets run every single time. The deal button is actually pressed. And so now I'm gonna go ahead and click on our view controller tax just to see all of our code much more easily. So this is a function and all of the code inside of the function is going to be executed every single time our deal button gets pressed. Another thing that I want to point out. So say when you're connecting one of the U I elements, you made a typing mistake. So say I called this player crowd instead of player card and a click connect. Well, now we have a typo and we need to fix that. So you might think that you can just come over here and rename it to save player card. But that actually won't work, because if you right click on the card over here, you can see it's still connected to player crowd, so it's gonna try to find a variable that actually doesn't exist. Well, then, how do you fix this? So you could delete the entire variable and then right click on the card and delete the connection. So, under referencing outlets, you can just click on that X over here and now this card is not connected to anything, and now we can actually drag it back in and name it properly. And also you can see that when I hover over these these circles here they actually outline what they're connected to. So player card is connected to the card over here on the left. This one's connected to the card on the right, and these guys are connected to the text.
13. Adding the Code Part 1: in this lesson, we're gonna be coding our war card game to give it some functionality. So by the end of this lesson, we're gonna have a fully functioning app where we can click on the deal button and random cards are chosen for the player and the CPU and whatever player has the highest card. So in this case, it was a CPU. They're gonna get awarded a point. So hopping into our X code project right now, I'm inside of the view controller dot swift file, and I want to bring your attention to this deal pressed function so inside of here, I'm going to go ahead and write print tap. Now, if I go ahead and run our program, you can see our app opens up. And every time I pressed a deal, button top gets printed to the consul. So if I go ahead and press it five more times, you can see tap gets printed five more times to the council. All right, so we know that all the code inside of here gets run every time the deal button is pressed . The first thing that we want to do for our game is have the card images change every time we pressed the deal button, so let's see how we would do that manually. So going into our main dot storyboard, if we want to change the image for the cards, we would click on the card and then in the attributes pain. We would come to this image a tribute, and from here we can set whatever image we want for this image attributes, and it changes based on what imagery select. This is great and all, but we want to be able to do this automatically through our code. So let's see how we would do that. We have our player card variable up here. So if we go ahead and type player card and if we type a dot afterwards, we actually get access to all of the attributes available for this card. And one of those attributes is the image attribute, and this is the exact same attributes that we saw previously in our storyboard. So what we can do is we can actually set the player cards image attribute to whatever image we want, and to do this, we're gonna go ahead and type you. I image and you'll notice. X Code is auto suggesting code for us. And if we go ahead and press enter, we can go with ex codes. Auto suggestion. Now, if we open up a bracket and we type and we want to go ahead and go with this named suggestion, so if we click enter again, we can actually specify the name of the image that we want to set for this player card dot image attribute. So if we go ahead and open up some quotation marks, we can actually type the name of the image that we want to set the player card image, too. So if we go into our Assets folder, these are all the images that we have available, and right here we can see all of the names for each one of these images. So let's change our player card image to card to, for instance, in the View controller. We can actually just type card to in here, and now the player card image will be set toe you I image that's named card to every time we pressed the deal button, and we can do the same exact thing for the CPU card. So if we access the image attributes we can set it to, Are you? I image That's named, say, for instance, card five. And now if we go ahead and rerun our program by clicking this arrow up here, we can see that when we click on the deal button, the cards change to two and five exactly what we specified in here. But if we press it again, you can see nothing's happening because they're already set to two and five and we're trying to set them to two and five again. And so nothing's gonna happen. So what we have to do is we have to get a random card every single time. We pressed a deal, but it we can go ahead and delete this print top statement, and we can create a variable called player card number. And we want this to be a random number every time we press the deal button so we can set it to end dot random and you can see it's auto suggesting auto suggesting this in range range method. So if we just click enter X code, will auto fill that for us now here? X code is giving us some placeholder code on this is where we're gonna input the range for our random number. So to do this weaken type the smallest number in the range, which is to followed by three periods and then the biggest number in the range range, which is 14. Now, if you're wondering why are ranges 2 to 14 we can click on the Assets folder and you can see the smallest card numbers too. And the biggest card number is 14. So now every time we pressed a deal button, this player card number variable is gonna be a random number between two and 14. And now we need to do the same exact thing for the CPU. So CPU card number equals end dot random and we can specify the range. Now we can go ahead and print our player card number, and we can print our CPU card number. And now, if we run our program and we pressed the deal button, you can see we get two numbers printed to our consul. If we go ahead and press it a few more times, you can see every single time. These numbers are completely random, but the cards still are not changing, and that's because we haven't really used these random numbers. So what we have to do is we have to replace thes numbers over here with these random numbers that we just created so we can do something called string interpolation. So any time we want to put a variable inside of a string, we can actually put a backslash and then open up two brackets and you can see it becomes white now and in here we can put whatever variable we want so we can go ahead and type player card number. Now. What's happening here is that the player card image is being set to an image that's named Card, followed by the player card number, which is a random number that we're generating every single time. So now we can do the same thing for the CPU so we can type a backslash, and then we can open up a pair of brackets and type CPU card number. And now I'm gonna just delete these prints statements. And now, if I run up the program, you can see that every time I press the deal button both the player and the CPE you get a random card
14. Adding the Code Part 2: now, the next thing that we have to do is check whether the player one or the CPU one. And depending on who one, we need to increase the points labels down here. So this seems like a job for the if statement. Now, before we can write any code down here, we actually have to create some variables that hold the score for each player. So up here we can create a variable called var Player score and weaken set it to zero. And now we need another variable called CPU score. And we can also set this 20 now inside of our deal pressed function. We can write an if statement that checks which player one. And to do this, we can write if player card number is greater than CPU card number and we can go ahead and open up a pair of curly brackets. Now, any code inside of here will be executed if the player card number, which we're generating appear, is greater than the CPU card number which were generating up here. So that means that the code that runs in here will only run if the player wins. So I'm just going to write a comment that says player wins on this is just gonna be This is just gonna be a placeholder comment for now and now I can write an else if statement the checks if the player card number is less than the CPU card number. And inside of these curly brackets, the code that gets run here will be if the CPU wins. And finally we can put an IST. L statement on this l statement means that the player the player didn't win, nor that the CPU, which means that both the player and the CPU got the same exact card. And so in here it's gonna be a draw. Now, let's think, What do we want to do when the player wins? So the first thing that we have to do is increase this variable called player score so we can write players. Score equals players score plus one, and this is gonna increase one to the players score every single time that the player wins . But this won't actually change the label down here because this player score variable is not connected to the label at all. So what we have to do is go to the player points text and we have toe access the text property of this player points text label. So to do that, we can write a period, and now we get access toe all of the properties for this player points text label on the property that we want is a text property, and we want to set this to the player score. Now, if I go ahead and press command be and what this is gonna do is it's gonna have X code, compile our code and show us any errors that we might have. So I'm gonna go ahead and press command be and you can see we have an error and it says cannot assign value of type end to type string. So what this is saying is that our player points tech stock text is a string, but our players score is an integer, and that's because we initialized it with a zero, which is an interject. So we cannot set an integer to be a string. So what we have to do is we have to change this player, score variable into a string, and to do that we can type string and then open a curly bracket and put a curly bracket after the players score and this is actually changing. Our players score to be a string. Now, if I go ahead and press command be again, you can see that error is gone. Now and now we have to do the exact same thing if the CPU wins so we're gonna do CPU score equals CPU score plus one and then CPU points, text dot text equal string CPU score. And now if I go ahead and run our code, you can see every time I press the deal button our code checks who the winner is, and depending on who it is, it increases the score label so you can see the King is bigger than the Jack. So the CPU got a point and all. We have a draw here, and that's actually funny because we didn't code anything for the draw. So the else statement was just run because the player didn't win and neither the deceive you and then the Jack is bigger than the four and so on. All right, now let's think what we want to do. If its a draw, so what? I want to do is I want to increase both the players score and the CPU score by one so I can go ahead and write. Player score equals player score plus one and CPU score equals CPU score plus one and then player points. Text equals string players score and CPU points. Sex equals Oh, I forgot the dot text here, and so we cannot actually change the label to be a string. Instead, we have to change the tax attribute of the label. So that's a mistake that I made and dot text equals string C. Pugh score. And now we just handled what will happen if, in the case of a draw, so both the players score will be increased by one and the CPU school will be increased by one. And down here we're just changing the text labels to match what these variables say, and that's it. We just finished our first stop, the war card game, so I'm going to run it for the last time here and we can check out the final product and there it is
15. Installing Onto Your Device: in this final lesson. I'm just gonna explain to you how you would run our war card game or any up that you make on your own personal device. So the first thing that you want to do is connect your device to your Mac physically with an actual wired cable. And after you do that, you're gonna be prompted on your phone to enter your password. So you want to go ahead and type your password. And if this is the first time you plug your phone into your computer, it's gonna ask you if you want to trust a computer, so you're gonna want to click Yes, for that. Afterwards, you're gonna come up here to the devices tab and you're gonna see your device right over here at the top. I know it's is no devices because my personal devices not connected. But when it is, you're gonna see your phone right here, and you're gonna want to select it and then just click the run button and it should build on to your device. Also, you're only gonna be able to use your op on your device for seven days, and if you want to be able to use it forever. You're gonna need to upgrade to an apple developer account, which costs $100 a year. And I don't recommend you do that until you're ready to upload your app to the APP store.
16. Final Words: Hey, before you go, I wanted to congratulate you on completing this class. Hopefully by now, you have a good understanding about what it takes to make it up. Of course, there's still lot for you to learn, but hopefully this was a great start. Your journey. Also, I ask that you please leave a review for this class so that it helps me build credibility on skill share and so that this class gets to more people. If there's any feedback that you want to give me on anything that you disliked about this class, please let me know in the discussion section so that I can update the class material. All right, that's all for now. Have a good day and good luck on your journey.
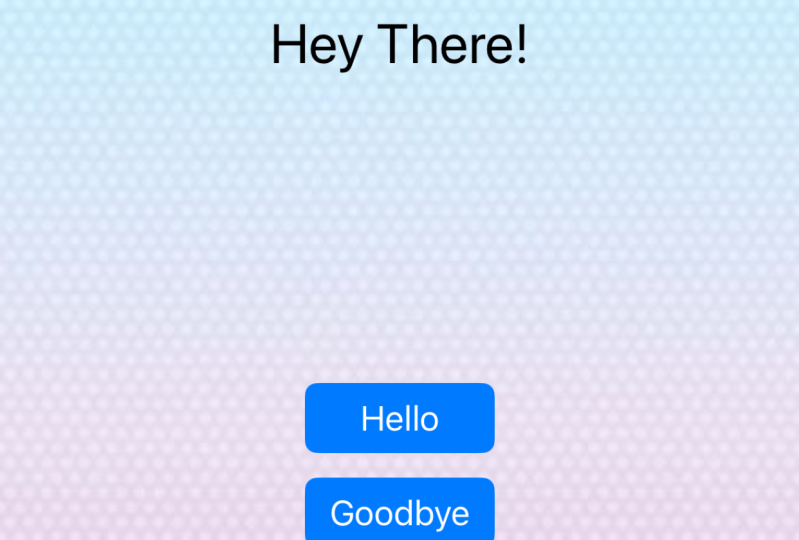
17. Class Project: So the project for this class is to make an app similar to this where there's a text label in the middle and two buttons right beneath it. So when I click the hello button, you can see it says hello world and the image up here actually changes. And when I click goodbye, it says goodbye world. So of course you can get us creative as you want. With this, you can use a custom background custom images for the image up here that says hello and goodbye. And you don't even have to use the hello world and goodbye world text. You can use whatever text you want so you can get as creative as you want with this project . Next, I wanted to teach you guys how to import your own images for your final project. So I'm gonna go ahead and look for a picture of a hot and I'm gonna type the word PNG afterwards so that the image is transparent and I'm gonna go to images and we can use this hot right here. So I'm gonna save it to my computer and now an X code. I'm gonna click on the Assets folder and I'm going to right click right here and click on Image set. And now, over here, to the right, next to scales. We want to change it from individual skills to single scale. And this will allow us to put only one image instead of three different images with three different sizes. So now I can go ahead and drag my heart over, and there it is. There's our image imported into X code. Also, rename your image by just clicking on here once, and now you can rename it so I can name it. Hot on this is the name that you're gonna use when you try to fetch your image from within your code. I also want to mention that if your image is way too large for your screen, you can actually add with and height constraints so I can go ahead and select with and set that to 200. And for the height, I can set it to 200 and now I can click on add to constraints. And don't worry, the aspect ratio of your image will stay the same. And that's as long as you have, um, aspect fit selected under content mode. When you're all done making your app, you can run it on any simulator that you want, and then you can come appear to file, and then you can click on save screen, and this will take a screenshot of your image and save it to your desktop. And you should probably take a picture of both the hello screen and the goodbye screen. And now you can upload these to the project section under this class so you can show off your creativity and app making skills toe everyone else.
 Majd Hailat, Hello! I teach magic and python dev.