Transcripts
1. Introduction: [MUSIC] I used to not spend nearly as much
time exploring and experimenting and playing
in my art practice. Now I'm all about
play and exploring, and that's what this
class is all about. I'm Denise Love
and I'm an artist. Today I want to show
you playing with charcoals in an
intuitive painting way. I love doing this
intuitive abstracts because they allow me
to sit at my table, play and experiment
with my supplies, push them in ways
that I didn't expect like with the charcoal,
adding water, using the blocks versus using the pencils versus
adding marks on top, and just seeing where
can we take this? Limiting our supplies down to just a paper type in a
material type and saying, what can I create today? I love putting these
limitations on myself. I love experimenting with the supplies that I've
collected in my art room, and I love seeing what can I create today
with this mindset? It gives me a lot of joy to
play and discover and think, oh my goodness, I didn't even
know that this did that. This is how we're going to come into developing our style. Your style is just a series
of decisions that you have made over probably a long period of time of what you like
and what you don't like. It's a series of discovering
things that you're like, oh my gosh, I love this. I'm going to do this going
forward, or oh my gosh, I didn't like that at all, so we're going to
just scrap that. Then as you hone in on those
things that you love to do, your artwork becomes
more and more yours. The authentic work that
you were meant to create, and so I like to explore and experiment and figure out what do I like and
what can that do? What if I did this, and what if we did that? Let's peel this tape
and see what we got. That's my most favorite part. [LAUGHTER] I always
start a piece of art with the intention
that I can cut it up. But with these, I find that there's always three that I love and one that I'm like, huh, I don't love that one. Let's cut it up and then I get the joy of pieces I
created that I didn't cut, and agility of cutting up the other pieces because that's
my favorite part anyway. [LAUGHTER] I hope you
have fun in class today. We are going to be doing a large project that
we've taped together. We're going to work big, but then we peel the
tape and we have several different
compositions left. We wave a little series, and then there's always a fourth that I cut up
into something else. I want you to always
keep your mind open to, let's create this series, and then we can always trim things down to a
better composition. I don't want you to
get super stressed about composition and
what's on each piece. I want you to work intuitively
like what feels good, what if I put this here? What if I put that there? Then let's see what
we just end up with. Let's not put all
that pressure on ourselves to create
something amazing. But most of the time, some of these are amazing. It's a little bit of serendipity and you're
like, I love this. [LAUGHTER] I hope you
have fun in class today. I'm super glad to have you here. I hope you get something
out of just letting yourself play an experiment
with your supplies. I can't wait to see what you're
creating in class today. Come back and share
those with me. Let's get started. [MUSIC].
2. Class Project: [MUSIC] Your class project is to come back and share some of your intuitive charcoal
paintings that you did. I love how the charcoal looks when you add water to
it and swish it around, and then add more dry
charcoal on top of that. We got some really
cool pieces in class. I love experimenting with my different supplies
and new ways to discover what is it that this supply can do and
how far can I push it? This is how we discover
things that we love, things we don't love, things we want to continue
doing in our art practice. It's how we hone in on
our different styles. Style is just honing
in on your likes and dislikes and then using the things you like in
your art going forward. The more you work
and the more you hone that down and the more you play with your
supplies and allow yourself that time
to experiment, the more you're going to
discover about yourself, your art, and the things
you want to create. I can't wait to see what you do in class today
with the charcoal. I'm looking forward to seeing these projects so come back and share those with me and
let's get started. [MUSIC].
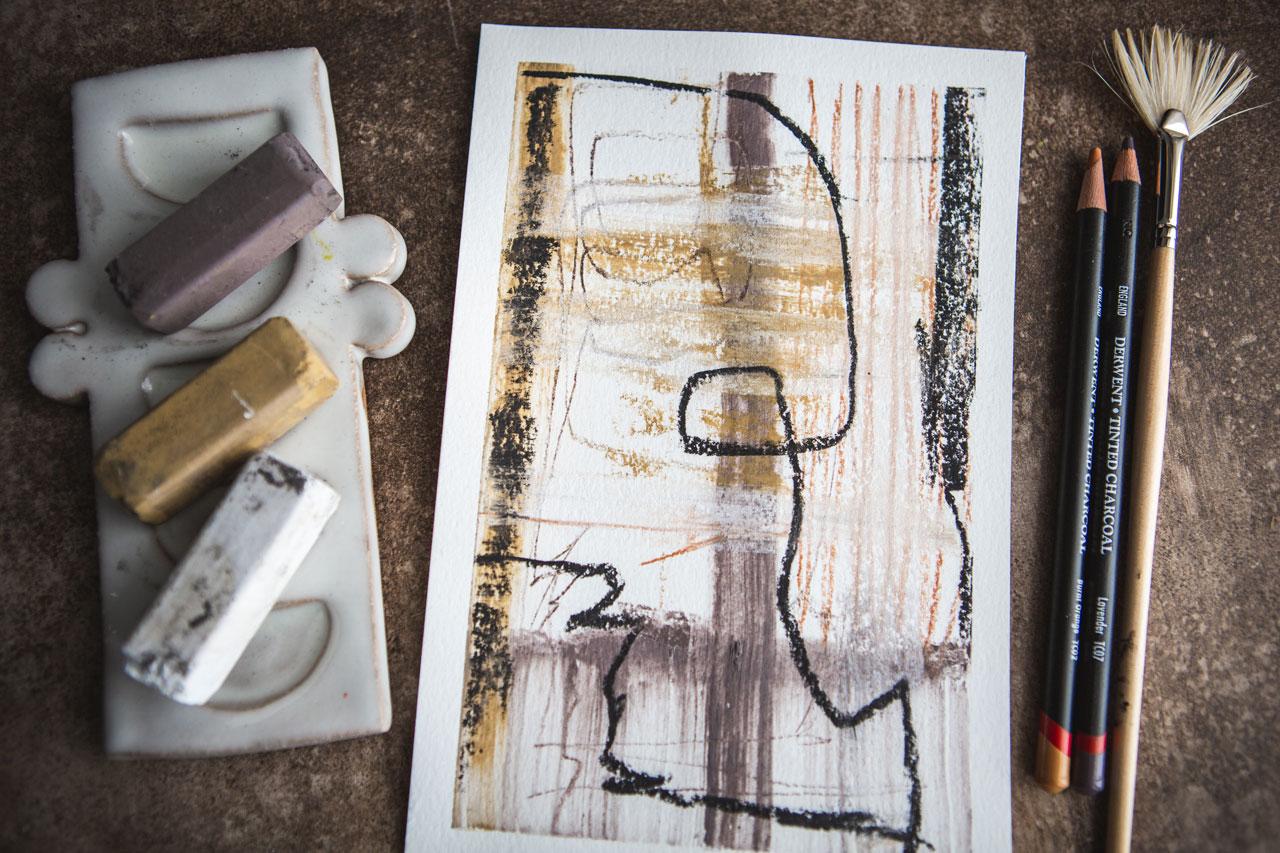
3. Supplies: [MUSIC] Let's take a
look at the supplies that I'll be using
in this class. I want to focus on
just using charcoal, so I have pulled out the charcoal options
that I want to use. I'm going to be using my extra large charcoal blocks because I love the
color range in there. I'm also going to be using my Derwent tinted
charcoal pencils. I love this because there's the whole range of
colors in here. I can basically just
use this one set of pencils and blocks and just create and see what all
I can come up with. I've also got just some
really dark black peel and sketch charcoal. It's just a dark black color. I like using pencils
with charcoal because then you don't get your hands dirty as
you're working with it. The extra large charcoals is the only thing that really
gets on my fingers and I use a microfiber cleaning
cloth here in my art room. I have lots of these. They come in a big package. What I love about these
is they're perfect for getting chalky substances
off your fingers, and so I always
have one of these available sitting
over here off to the side to get some of these chalky things off of my
fingers as I'm working so I don't get marks and
fingerprints and smudges on different parts of
the paper than I intended. I'm also going to be playing on the Canson XL
watercolor paper, 140 pound cold press paper. You can play on any
paper that you like. This is just a good one for
experimenting and playing. I liked that. Got
some painters tape. Then I'm going to be using the charcoal dry and I
want to use it wet. I've got some water over here in just a cup and I've got
some different brushes. I want a variety here, so I've got a fan brush, I've got some square brushes. I can pull out some round
brushes if I wanted to, but I want to keep this simple. I want to use the
square brushes. Get a variety of brushes
together and say, okay, here's what I'm
creating with today, what can we make? I've tried to keep the
supplies pretty simple. Now let's see what
we can make today. I'll see you in class. [MUSIC]
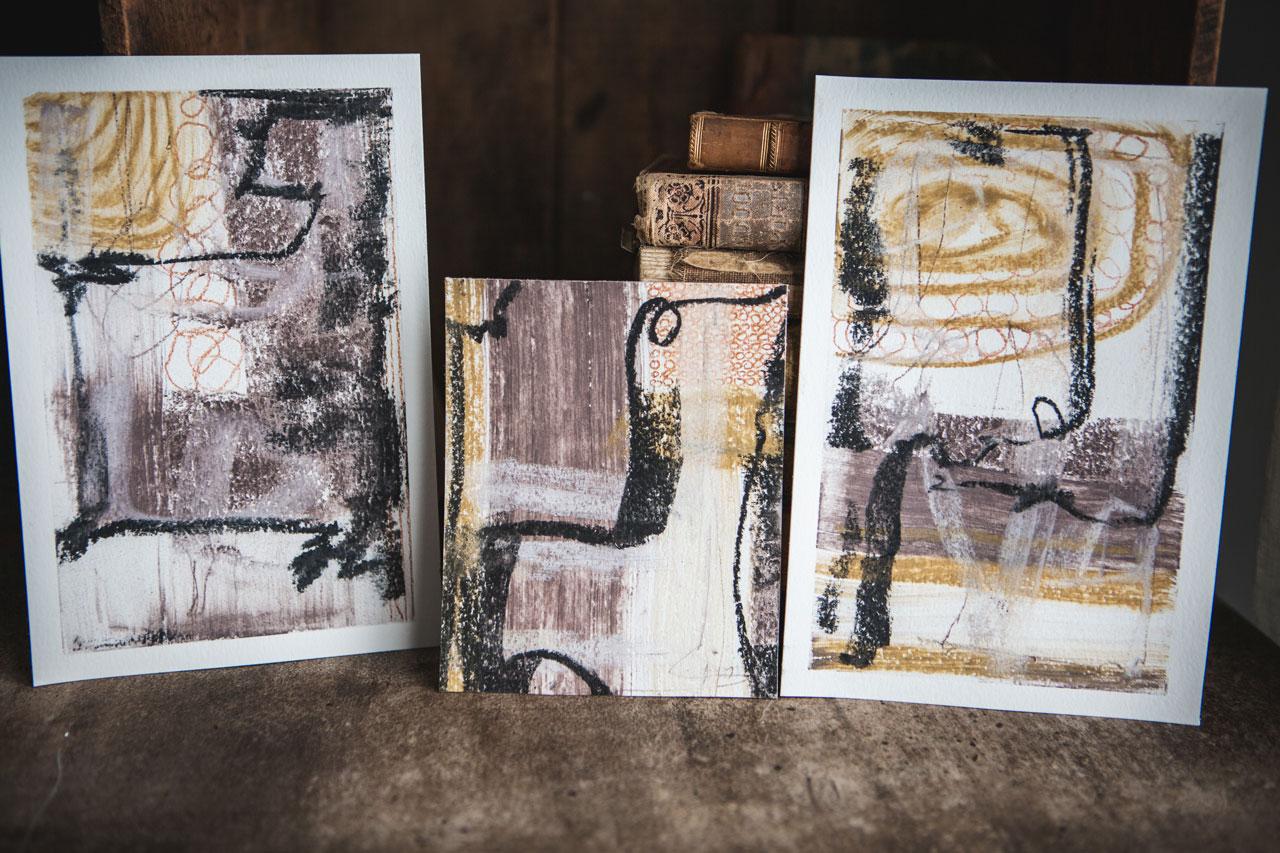
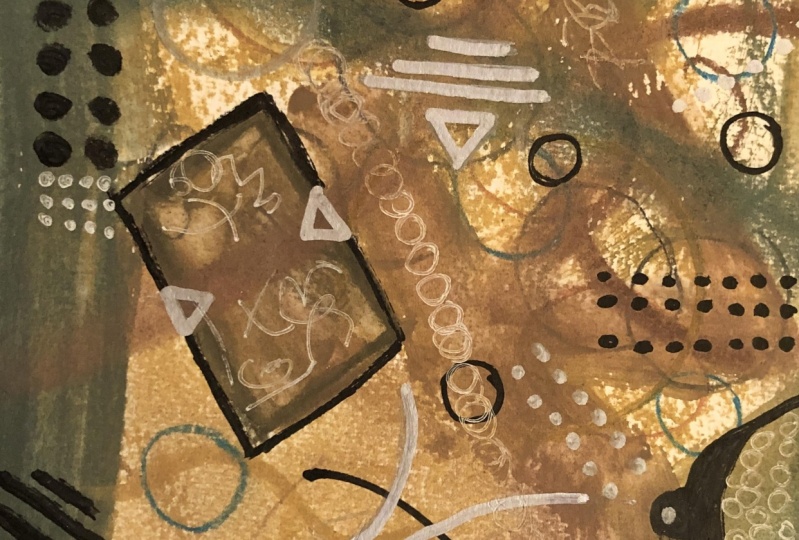
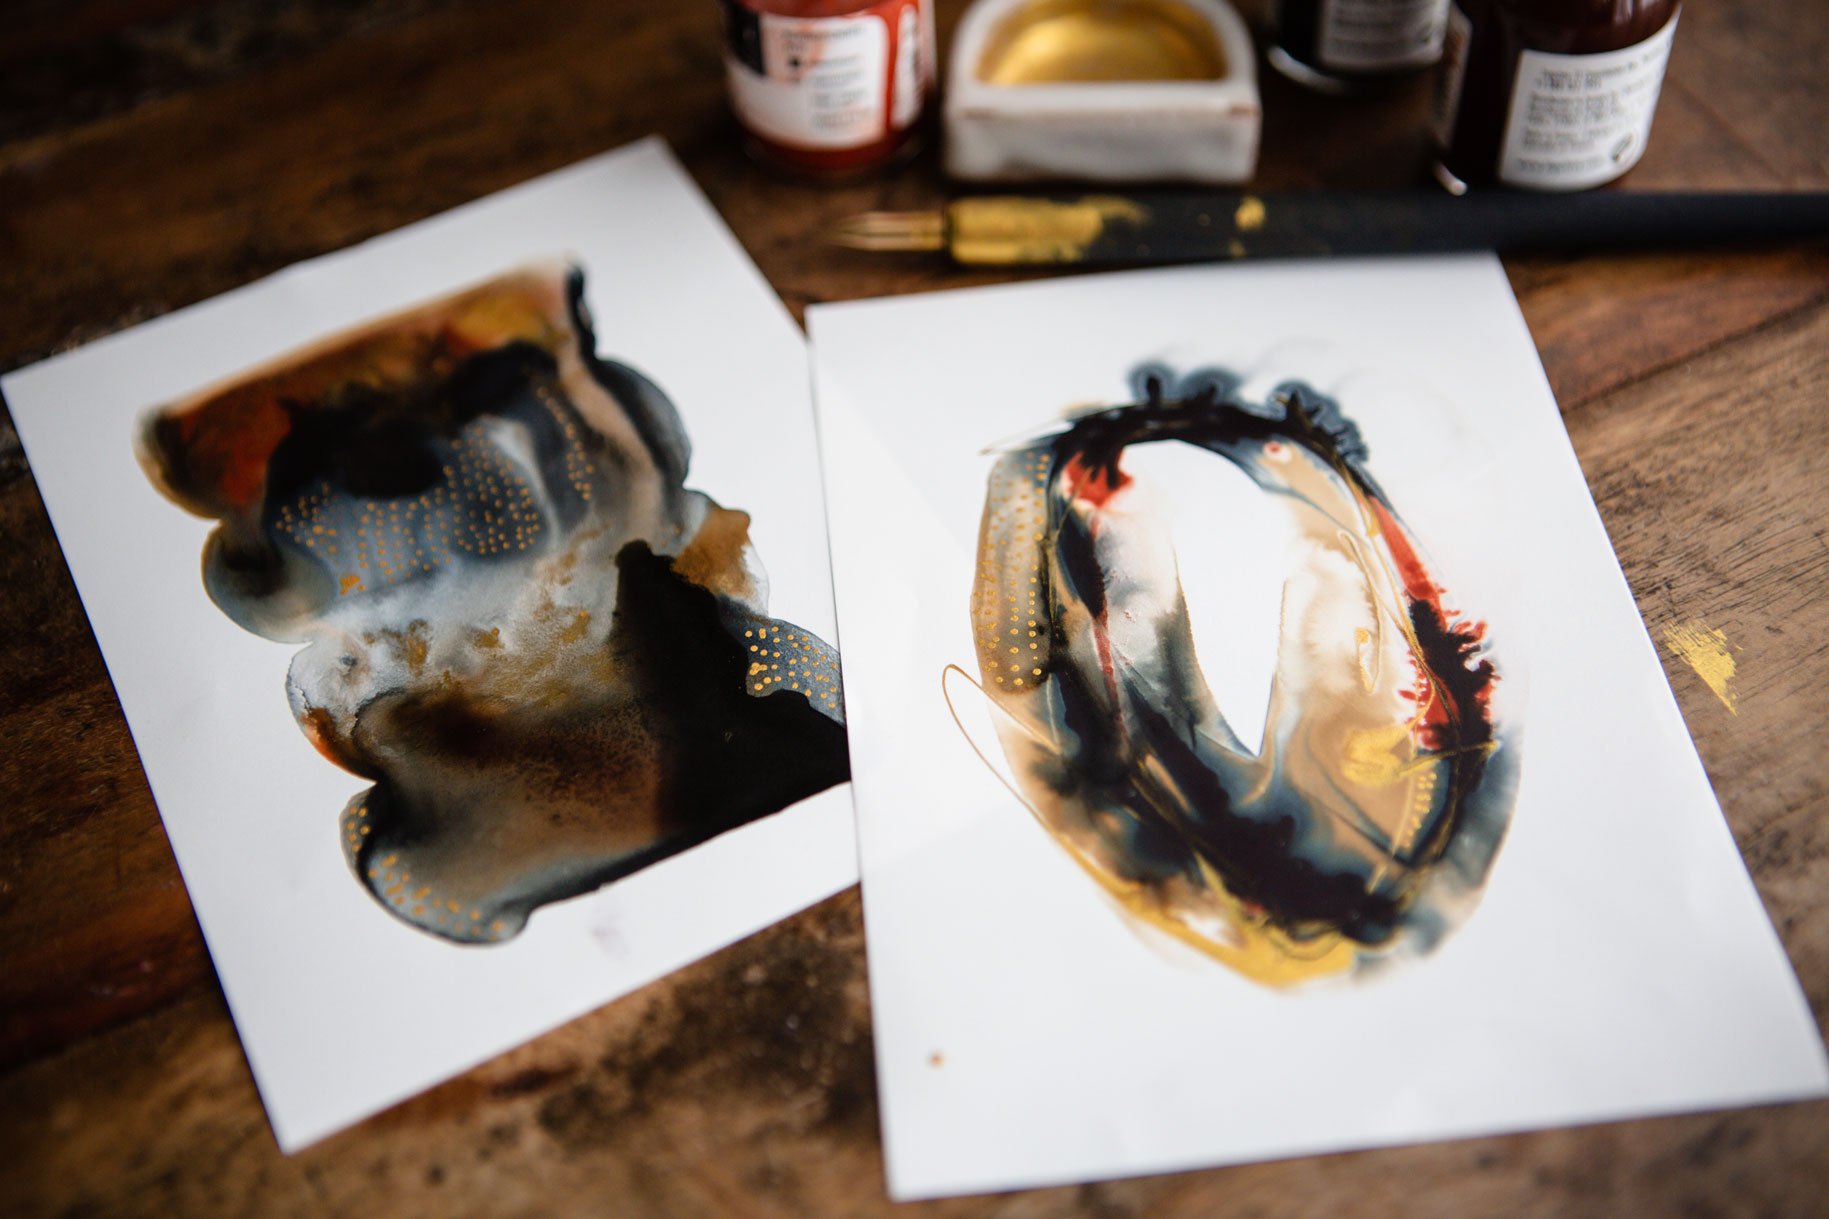
4. Painting Big: I've gone ahead for our project, and I've taped down
four pieces of paper. All I've done is taken my
9 by 12 pad and I have cut these pages in half and
then stuck down two pages. It's basically two
pages worth of paper. I have recently decided
that this is almost as fun as using a great big sheet and cutting it up
when you're done. Already almost cut up. I like working big, like we're working
on the whole piece. Then we're going to
separate it out when we're finished and see what
cool art we end up with. I love this, it's
more intuitive. I just paint, and I
don't worry about the composition on each individual piece
until I'm finished. Then I always keep
the option open to trim these into a
better composition, or to add two and change
after I pull the tape to see, did it need anything else? Did I get it all
when I was painting? I'm going to start off. I really love in this
extra-large charcoal block. I wish this came in so many
more colors. I'm telling you. I see all the colors that
the pencils come in, and I'm like, "Can I have a block in every color, please?" Like this gorgeous green and this beautiful
salmony, pink color. I love all these colors. But since I have the blocks
in this set of colors, I'm going to go with, I really love the yellow
ocher, the yellow one. I really love this pinky
burgundy colorish one. In my other charcoal class, it was dominant yellow. Let's start off with the
yummy pinky color one. I'm just going to work
on all four of these. I'm going to lay
some dry charcoal, going to smoosh that
around with some water. We can add some other
charcoal, some line, some marks, just wherever
your heart desires. I don't want you to focus in on doing something
specific at this point. I want you to focus
in on creating and just having fun with the
materials and just saying, "What does it do if I do this?" [LAUGHTER] Look at
this, oh my goodness. On something like this, got to be careful with
how hard we press down. Because as you see
now we got a lot of little individual chips here. But I'm going to pick up with my fingers because it
can spread that in. When you're working
with charcoal, I want you to resist
leaning your head down and blowing this
off of your page. Because that is mostly going to blow pigment dust
all over your stuff. It's an excellent lesson
here with this stuff here. I'm not going to blow this off. If I feel the need to
get it off my paper, I'm going to put a piece
of paper towel down, tap that dust onto
the paper towel, and then I can get rid of that very easily
in the trash can. Let's just do that just
to give you an example. I can put this here, just paper towel at the edge. Then we can pick this
up, tap our board, and then you can see now
I've got the majority of that dust off of my
piece and onto my towel. I keep that handy and just do that in the rare times that I feel I need to
get that dust off, and I might even have
to do that at the end, but resist sticking your head down there and blowing the dust and then sucking air back
in and breathing the dust. Just be careful when you're
working with pastels or chalks or anything like
that, we're doing here. Just be real careful in
how you're doing that. Now I'm just coming back, adding in some
extra little marks, charcoals, very chalky,
just resist, resist. [LAUGHTER] Now I've got a
couple of brushes here. I want to smoosh some of
this around with water. But what if we did it with say, a fan brush instead of a regular brush?
What would that do? This is why I want you to
experiment with a couple of different brushes
and techniques. Will still look at that. We
don't have to do it all wet. We can leave parts of it dry. Look at that. Look at that. That was fun. [LAUGHTER] Can drag it
through and see what we get. I liked that. Look on that one. So I did a little over here. Then we can keep going. Let's just keep on going. We can go ahead and pick some pencils and do
some other marks. We can come back before
we even do that, and we can do the yellow
because I like this yellow and just see what are we
going to create today. I'm personally in my
own little project here focusing on larger
blocks of color. Because in a lot
of my abstracts, I get really tight in
there and I don't know, it's almost chaotic, and sometimes I'm
just too focused in really tight on stuff. What if we focus here on how to go bigger and
not be so tight? That's what I'm thinking. I'm thinking let's
not go as tight. Let's go bigger and
see what that gets us. I'm treating the tape as just
an extension of my paper so that I'm not thinking
each piece is separate. I want this to look like something big and
giant that I created. I'm trying to work
further out and extend my lines from
one piece to the other. Look at that, that picked up a little bit
of that wetness in there, that was pretty
cool. I see you now. That's really cool. I like that. Super cool. Play an experiment. Then this is perfect for getting all that dust off your fingers. I'm still resisting blowing
in this stuff as you can see. I fill in this fan brush. Let's just come back here
and wet some of this down. In the spirit of going further, let's just drag that down into our other piece.
That's pretty. Then I've just got some
water over there just to pick up some more freshwater. Pretty pretty. I
love how the water really gets that charcoal
in there really tight. I love that. Let's see,
what else do we want to do? Now we've got some
charcoal pencils. Come back in. Let's see. I can come back over here
with some white to it. I thought I didn't
like the white on some earlier pieces that
I did in another class. But then after a day or
two of looking at it. That white's pretty cool. What are we feeling? It's
very intuitive in the moment. Let's see what this
glowing embers. It's similar to this purply
color here that we've got. But what if we come back in
here now and start doing some lines and some
marks and some pattern. Just use this as a fun
mark-making scribble. One big reason why I like
to do pieces like this, where we're doing
like a set of four because I always like three
of them, and they're, for some reason there's
always one or two that are like, that's pretty fun. Let's see also like this gold since we've
got gold in there. It's fun to come back
in with some details. I do want to be
very careful about setting my hand
on my piece here. I got a longer ruler but
the short will respond to. Rather than dragging your hand across anything with a powder. It's fun to have, I have a longer wood one
wood ruler like a yardstick. That's really handy, but I've
got this one right here. Put that on your page, rest your hand on
that and protect your hand and your paper
from any weird smudges. That's a good tip
so that you're not smearing a lot of stuff you
didn't intend to smear. This is more of an orange
than it is this gold. But let's start doing some
marks and that can be dots, it can be hashes, it could be circles. Let's start filling
in some pattern. You could do a
little plus signs, you could do whatever your
favorite mark-making thing is. My favorite mark-making things tends to be circles and dots. [MUSIC] I might come
over here since I've got this room and maybe
do some fun lines. Did not mean to circle out, curve that one at the end, but maybe some
lines would be fun. Don't be afraid to give
any of your drawing tools. If you need help drawing like a straight line in
a certain spot, don't be afraid to get out
a ruler, is perfectly fine. Sometimes an uneven line
is very interesting, but it doesn't have to be
anything hard like that. I'm just going to do some
little scribble circles here. I like that. If I'm doing
something on one piece, I'm going to try to do
it on the other pieces. Not the same
necessarily technique, but something that's going
to bring this color in because I want these to match, have some cohesive element
that pulls them together. But I also think it's fun
to have them all have, even though they're cohesive, maybe by the color, still have some differences just to see like what
did we like the most, what worked, what didn't work? Here's our chance to play, experiment and
figure things out. [MUSIC] That's fun, super fun. I liked the differences on
all three of these pieces. Let's step back a moment, take a little look and decide what else we want
to do with this. I did take that as a moment to tap the dust off of my piece. Again, resist blowing on your pieces just because
you're going to make a mess. What if we tried, this
extra large white just to come through with some extra
marks somehow in here, and these aren't
going to be super dramatic because
I'm using white, which is not going to show up as heavy as some of
the other colors. But it's a nice
subtle transition that the closer you
get, you're like, there's something else going on in there that's
super-duper cool, and so what if we go
ahead and do that? Let's just add that, it's almost like a really light invisible,
something different. Not really invisible,
but it definitely gives a slight dimension change. That's pretty cool. I tried using it on an earlier project like I was
telling you and I thought, I don't know if I'm
going to like that, but then after I cut
the camera's off and I came back a
day or two later. I'm like, wow, look that
white really is very impactful and I didn't
even realize that, so we could just really let
the white do somethings, and it'd be very subtle. See, that's fine. I
like that organic. Let's do that over here too. Let's not do a couple of straight lines within a couple with some of this
random scribble. That's fine. I'm feeling that [LAUGHTER] Now do we want
some extra contrast? I've got these dark
colors over here. These are three different
shades of almost like a black that I could come in or I could
do more pencil work. I almost feel like maybe some contrast on
these would be fun. See, these are fun because
I can use the edge or I can use the little corner or I can use the
whole big flat side. It's skinny flat side. There's just some options that you can do with the big
blocks that are super cool. I want to go ahead and remember that I'm
working on a bigger, four-piece, gigantic
piece of art. I do want to see
about coming off the page into the other
page on some of these. Yes, I'm feeling some of this. Now we've got like
some very exciting, heavy contrast that we weren't
really getting before. You don't want it all to be samey-samey because
then it's just flat. If you'll come in with some
extra dark contrast in some places you'll
really start to pull the eye around the piece, add some movement, some
contrast and color. See now that's fun there. A swipe in. I like that coming in on
the edge a little bit , I'm feeling that. You don't have to do
it on every edge, but it is fun there. They're pulling that
in a little bit. Let's see. Let's wipe
our fingers off here. Let's pick the clean
cloth and make it black. What do we think? Feeling like we need
to tap this off and then peel the tape and see
doesn't need anything else, and we can spray this with a finishing
spray if we want to put, say, posca pen on top of this, we could use a finishing
spray to hit this. Let me tap this off and
then I'll be right back. [MUSIC]
5. Revealing & Cutting Final Pieces: [MUSIC] Before I go any further, I've tapped all of
the dust off of this. If you need to blow
it off really good, take it outside and blow it off. But don't suck the air in, blow it off and move your head. But before I decide if I'm
going to be done here, we can add a finishing spray
to these and that will help in protecting where
that powder is sitting. There's really no way to
permanently affix a powder. We can do it as best
as we can do it, but you can always come back and if you hit it hard
enough, you'll smudge it. But some options are the soft pastel fixative
by Sennelier. I use this one for a lot of stuff because it's
less likely to dramatically change my piece because anything
you spray on top of these powders tends to
change the color and if you're really adamant about these are the
perfect colors, it can't change at all, don't spray a fixative on it. If you're wanting to add a layer and put
stuff on top of this, you can certainly do it unfixed, but you're going to smear
that powder around. You saw how we
moved that charcoal around with water and anything
you put on top of this, is going to smear and
smudge that powder, so this would be how
you could do that with the least amount of
damage to that layer. We could spray a soft
pastel fixative, we could spray a
workable fixative on there and that will set it, make it less likely to
move and be damaged. Then that could be a nice little finishing
touch on there. Then you could always too spray a Krylon, final spray too. That's the final varnish, but it does say oil, acrylic, and watercolor, so I'm not sure I would use
this on my final piece, but that is what I use on top of my pieces if I want to
add a final varnish. I'd probably stop
at the fixative on my charcoal
pieces personally, just to show you what
I would do there. I'm actually going to go
spray my pastel fixative on this so I can give you an
opinion on what it does. Maybe I'll spray it on half and not the other half
and I'll be back. All right, so I sprayed
the Sennelier fixative on these two and left
these two as they were. You can see it's fresh, so it's not been set
up for a couple days. You can see the color
is very similar, so it doesn't drastically
change everything. That's a good thing. [LAUGHTER] Now wondering, does it need anything else? At this point I'm
probably going to peel off the tape and
take a look at these and I'm going to be
very careful with the ones that I did not
spray the fixative on. I'll be careful peeling the tape because depending
on how you peel it, you may peel some paper or not. But you're less likely to
peel some paper if you will peel it at an angle
from the paper. If you peel it at an angle, you're less likely
to pull the paper. It just so nicely comes off. Now if you're still having
trouble pulling off tape, you can hit the tape with
your heat gun a little bit, and that will make your
tape release the paper. Try that if you're just
having all kinds of bits. But if you'll pull
it at an angle, you can see very clearly I'm
pulling these at an angle, not going super fast, but I'm not going super
slow and it is coming right off the paper and not
sticking to my tape at all. It tends to be how I get these to come off so let's
be very careful here. See we just peel that right off without it snagging
and tearing the paper. We're going to pull charcoal
as we're doing this. I'm going to be real careful, I don't want charcoal
all over my white edges, but [NOISE] it is the
nature of the beast, so I'm just trying to be very careful not to press
it in with my fingers, for instance, [LAUGHTER]
and just see. [NOISE] Can I get some
of that off of there? I can maybe even use, and we'll try this out, I can maybe even use my
little kneaded eraser if I needed to get some of the dust that we've just created and I've got
my towels over here, so before I get this really
smudged down into my papers, let's tap all the
dust off that we can. [NOISE] I might blow
it once at the end, like I just did. [LAUGHTER] These are
turning out fantastic. [NOISE] One little
boy with the end, I love these colors. [NOISE] A lot of these. [NOISE] We'll put that away. Then we can see I've
got a little bit of charcoal dust on the
edge of this piece, and I'll make sure I don't have any charcoal on my fingers. Let's just see, practice, experiment if our
kneaded eraser will erase dust off of the edge. My goodness, yes, it does. [LAUGHTER] Look at that. If you get a little
dust on your pages, be real careful and use
your kneaded eraser. This is that one
that is all rubbery. You can clean that edge up. Which I was hoping we could because it's
basically a pencil. I got this one. My goodness, let's
take a look at these. [LAUGHTER] My goodness. I don't know how we liken
it? Do we like it? I like it with the
stuff at the top, I think. [LAUGHTER]
See, look at that one. This one, I feel like is a
roadway and that was a car that did something funky because I feel like
there's the road. [LAUGHTER] But I'm liking
it that way there. I'm liking these all up. Look at that. I see, now I like it this way. [LAUGHTER] Look how
gorgeous these are. Now, I always said I like three normally and I think these
are the three that I love. This is the one
that I'm like, huh. Maybe it needs more, maybe the composition is off. I always end up with
one that I'm like, this one could be cut
up into something else. Maybe if I cut it here, I have a better composition. I have something moving
through the piece. I'm feeling yes to
cutting this one up, so we'll take a look at
that in just a second. But check out these,
these are amazing. Now, you almost can't
even tell which one I sprayed with the spray
and which one I didn't. Sure I could touch it
and that would tell me. But the fixative
spray has not changed these colors to the
point that it's unrecognizable so
thank goodness. I actually don't want to add anything else to these three. I love those three. It really feels good to work a little bigger with my color instead of getting real
tight in and getting all the color close and it
being a little chaotic. This just feels
like a nice breath of fresh air spreading that out. I'm loving those.
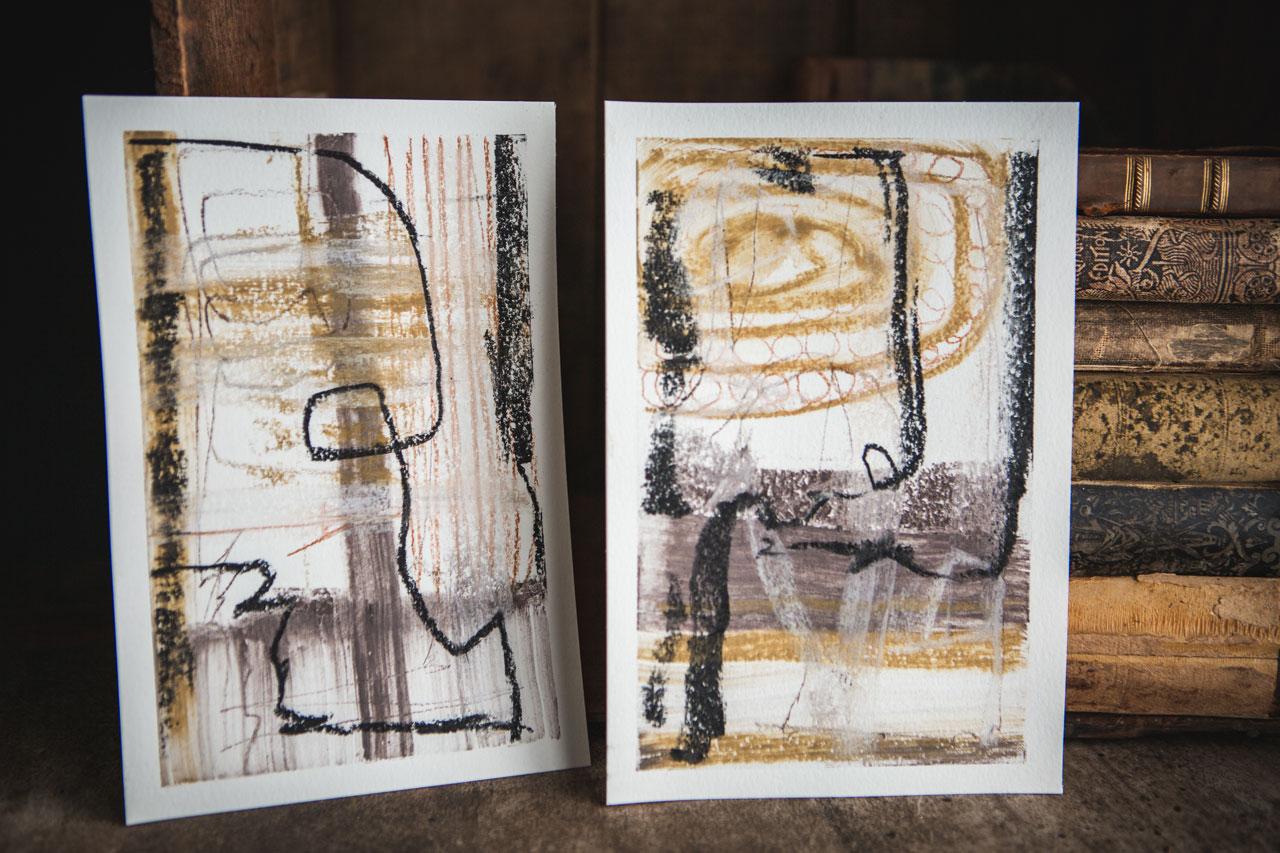
Let's take this one. I'm going to set these
up behind my table for a moment. [LAUGHTER]
I love those. [LAUGHTER] I love doing my
experiments with you guys. It just aids in my
own art practice. I'm doing stuff now
that I wouldn't be doing if I weren't sitting
here chatting with you guys. I really love that we do these. It helps me expand
whatever we're doing. I expand my own art practice. Let's see. I'm
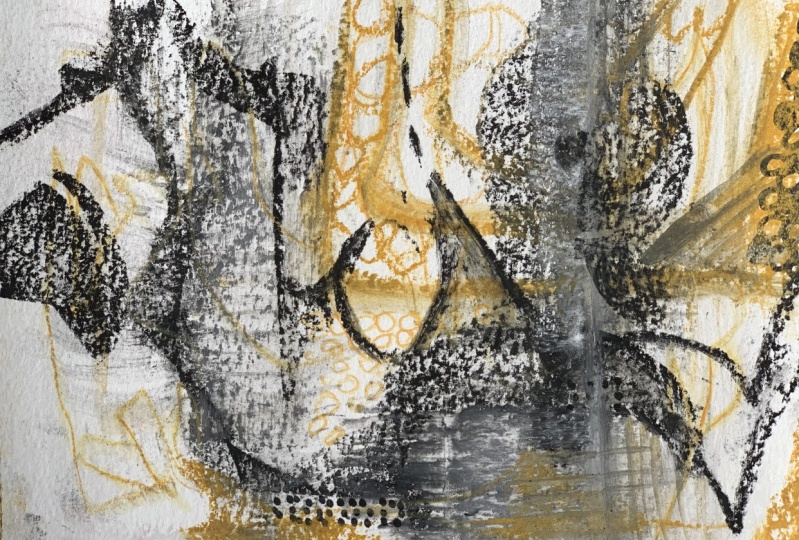
really loving that. Let's just take a look at these. That right there is
actually really beautiful. If I cut out that one there, is there anything on this
side that would be a match? Not really. This side is what's not exciting to me at all. If I cut it out more like this, I'm looking up in
the camera so I can see it from a
little further away. Is this a better composition? See, I'm feeling
that right there. I feel like if I chop
it down a little bit, my composition is way better. I feel right here in the
middle of that circle. Because I've now chopped
off the edge of that one, let's just chop
all the edges off. Let this one be one that doesn't have those
white edges or, did I get that off good, I could mount this
to another piece of paper if I'm determined to have those edges and
create new edges. I got to be real careful here
not to smear charcoal all over because remember this is a powder and I don't want to
put my fingerprints on it. See, totally looks better now. [LAUGHTER] That's
what it needed. Sometimes you just
need to crop a little out to pull the
composition together, see how that was
like, I don't know, it's not quite right
and now it's perfect. Exactly what I wanted. Sometimes you just
got to cut off a little tiny bit to make
that composition perfect. [LAUGHTER] Don't be afraid to trim pieces down
if they're working, but you're like, it's almost there but not quite,
what can I do? Look at other compositions, cut yourself out a
little viewfinder out of a piece of paper. Or just visually hold off some areas with another
piece of paper and see, what can I do to
make that better? Because that right there, look how cool that is now. Totally was not my favorite. But now that I have cut off the part that was
throwing it for me, totally brought it all together. I'm loving that. Now this
right here, we can keep that. It can be a collage element, it can be something other that
we cut up and make it into some other type of
art so I'd keep all my little scraps
and we'll go for it. Here we go. Our intuitive
charcoal abstracts. Hope you loved
doing this project. I really love repeating one element of a project like taping four pieces
of paper down. I want to do a whole series of these intuitive classes because I get such joy pulling the tape, looking at elements and things that I wouldn't
normally have created. Definitely playing in a
color palette that I'm like, my goodness, I love this and
didn't even know I would. It's gold, and orange,
and purple basically. But look how amazing it is. We discover all these new
things and techniques. I love doing little force them because
there's always going to be three I love and
one that I'm like, what the heck, I hate this one. Then we cut it up and we're
like, okay, now I love it. [LAUGHTER] You can do this
with any of your supplies. I don't want to do
a whole series. That lets me experiment with
different art supplies and different techniques
and we talk about different things and
so I love these. I hope you love these as much
as I do and I can't wait to see what you do
with your charcoal. Pull out your charcoal, the Derwent extra large blocks
and the colored pencils. The charcoal colored pencils
are definitely my favorite. These extra large
blocks, love them, so pull those out and see, what can you create? Yeah, your colors are probably going to be similar to mine because the blocks are just
six colors, but who cares? They're cool and you're
going to love them. I can't wait to see
what you create. Definitely come back
and share those with me and I'll see you
back in class. [MUSIC]
6. Finishing & Storing Pieces: [MUSIC] Let's talk about storing these and finishing these. I talked about using
in the middle of our project some fixative
to fix that pastel down. That's the best way
to secure it and, the test I did, the color didn't change at all once it dried. I was really happy to see
that on these charcoals, that worked really
good on this paper. Paper is going to
make a big difference depending on the
paper that you use. I would do a little test page, go out and spray it and
see if you like it. But I would recommend
a soft pastel fixative and I'm using
this a Sennelier. I can also use something like the Krylon working
with fixative, which lets you keep
working on top of things also and I finished it that way. To store these until you
do something with it, I would use some type of
wax paper or deli paper. I have these deli paper sheets that came from a big box store. It's just a box of them. But if I'm going to store
these on top of each other, I would stack these in-between sheets of deli paper to
protect them so that they're not rubbing
up against each other or anything else and getting this charcoal
dust on anything. I just wanted to give you
some ideas on finishing and storing and then if I
were to frame these, say to sell, I'd
probably float frame. If I left a pretty
border and it was clean, I might float frame these or I would mat it in under glass. I'll see you back
in class. [MUSIC]
7. Final Thoughts: [MUSIC] How much
fun is charcoal? I'm telling you, I
didn't even know charcoal was this fun. Getting these blocks
and pencils and just have enough stored in my art room for a long time now, I've had these for a long time and I never really used them and now I'm in this
intuitive painting phase and so I'm going to
do lots [LAUGHTER] of these intuitive classes because it allows me to pull
out supplies that I'm like, why do I have this? When did I get this? Where did this come from? I totally forgot it was here and dig through my drawers and be
like, let's play with this. I don't even remember
what this was. [LAUGHTER] It allows me
to pull these things out and paint something
just for what feels good, what colors feel good, what marks feel good. Let's work big. Let's not go so tight
and chaotic and I discover new things about
myself and my own art-making. I love doing this
journey with you. I hope you love experimenting and playing
and giving yourself permission to come up
to your art room and explore the things that you have and see how can
you push them further? Could you add water to charcoal? Could you make on top of that? Do you need to finish it?
How would you store it? All these fun things that you're learning and
discovering about yourself lead you to some things later that help you
develop your style. Your style is just a series of decisions that you've
made in all of this play for the
things that you love and you want to continue
doing going forward. Sooner or later, you're
going to be like, I know exactly what
I want to make. I know exactly the colors
and the materials, and these are the marks I like and you get very deliberate. I'm not at the
delivery stage and I didn't do an art
for most of my life, and I still like the
exploring, the playing. I think that's why I like
making workshops so much because it allows me
to continue that play, that experimenting,
that joy that you get back to your
five-year-old self. You watch a child make art
and they're not worried about color and composition and what things they're doing. They're just having fun and
mark-making and they're playing on the paper and they hold it up and
they're proud of it. That's what I love
about art making. That's what I love about
the intuitive painting that we're doing now. Taping down several pieces, just going with the
flow and moving from piece to piece
altogether like it were a big piece
and then pulling the tape apart and
seeing what we get. I'm like super proud like a kid. Look at these that
we've made today. I'm like I love these. [LAUGHTER]. I hope you love the pieces
that you're going to make in class with me today. I hope you have fun exploring charcoal and what it can do
and the way you can push it. If you've never used
charcoal before, these are so much
fun given charcoal. [LAUGHTER] Can't
wait to see what you're creating so come back and share those with me and I'll
see you next time. [MUSIC]
 DENISE LOVE, Artist & Creative Educator