Transcripts
1. Introduction to Portrait Drawing with Pencil: Have you wanted to start
portrait drawing with pencil, but not sure how to approach
this wonderful medium. It can be difficult to
know where to start. This course will
take you through the entire process
of how you can use the most simple tools
and techniques to create stunning, realistic
portrait drawings. You can be proud of
whether you're an aspiring professional or
just drawing for fun, you'll learn everything you
need to know from drawing your first AI to creating
professional level artworks. Throughout the course, we will cover a variety of techniques, starting with the fundamentals, like using
construction lines and basic shapes to create the
general form of our subject. Will then move on to using a variety of techniques
to add texture, lighting, detailing, and depth to your drawing
to really bring it to life. By using a combination of all these techniques
and principles, you will have the confidence and understanding to re-create a variety of male and
female eyes, lips, and noses with great
accuracy and detail to produce amazingly realistic and complete
portrait drawing. Not only will you have access to over 20 h of
comprehensive lessons, but you will also
be supplied with additional course resources and course assignments to help you refine and practice your
skills along the way. Art isn't about talent, it's about having
the right guidance. Our index explanation will take you step-by-step on how to improve your overall
drawing skills to create amazing artworks.
2. Introduction to Pencil Drawing: Hi there, Welcome to a
new drawing tutorial. Today we're going to
draw and shade and I, using the pencils
from the B family. Remember to make use of your
downloadable resources which will have all the information necessary for each tutorial. Today we're gonna be using these B-series pencils
from this brand. We're going to use
different pencils on the dark and the light parts. Take your time to familiarize
yourself with the pencils. We have the B
pencil series here, which are the pencils
with the softest core. It's a good idea to try
the different pencils on a separate piece
of paper on the side. Remember that the
pencil brands that we suggest are our recommendations. You are welcome to use any brand of pencil
for this course. On the screen, it
takes you through the main differences between charcoal and graphite
based pencils. Take some time to read this
information before moving on. The different pencils
in a pack all have different degrees
of pencil hardness. Take a look at this
slide to understand the different pencils
and what they are most suitable for based
on their hardness. In this lesson, we have been
talking about the B-series, which are on the
first and second row. Now get all your different
pencils together. Pick four or eight different
pencils from dark to light. Now similar to on the screen by using pencil pressure
make scribbles from dark to light with
four different pencils like on the left-hand
side of the screen. Then let's try and create a neater version by
having the gradients and squares from dark to light as shown on the right-hand
side of the screen. Take your time. We want to know what our
pencils can offer us. Knowing what kind of effect and aesthetics your pencils
can give you will help with your selection depending
on what you're drawing. Finally, let's create
a gradient scale from dark to light using one
pencil for each bar. This is so you can
become familiar with the pencil pressure for different
hardness grade pencils. Now we have learned
about pencils. Let's move to the next
lesson and start drawing. Thank you so much
for joining me for this tutorial and see
you in the next one.
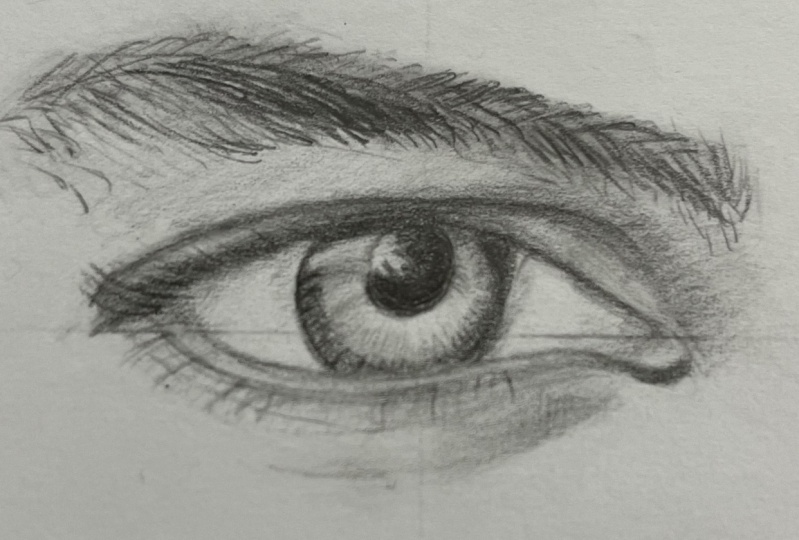
3. How to Draw the Human Eye: Hi there. Welcome to
another drawing tutorial. In this tutorial, we
will be sketching and shading a female I together
using our pencils only. Now we're going to draw
a woman's eye from the three-quarter angle view. We can still use
the access method as our guide for this drawing. Some people draw an
oblique axis line. They're gonna draw an eye
from the three-quarter view. This would be done like this. However, we are going to continue following
the same method we have used up until now and
draw the axis like this. We start off by
drawing a circle. You can do this free hand. Or with the help of an
object that's circular. Or you do it lightly. And then we're going to
draw our axis through it. I'm going to use a ruler. We can also draw the axis
on our sample photograph as well so that we have the
most accurate measurements. Make use of your downloadable resources which are available for each tutorial with all
the information necessary. We can see the eye
from the side here. Make sure that your
model image is placed in front of you so you can
see it comfortably or in any position that's most
comfortable for you. The size of the pupil changes by the muscles that surrounded based on the amount of
light that hits the eye. As we see the eye from the side. The inner part of
the eye lid and that part in the
front are visible. Take your time to
create your sketch. If you need more time, just pause the video and then play again when you are ready for us to continue together. Keep observing your
model will give you the right sense as to
where the highlights are, where the shadows are. Where to start in with
regards to adding details, consider the fact that the iris would not be this round and visible in some
parts of it would be hidden beneath the lead, the upper lid or the lower lid. You also have the inner
corners of the eye. Now we're drawing the
outer eyelid from the top. I'm also taking
into consideration the opening and closing
of the eyelids. In order to draw that
curvature of the lid. We're drawing an eye
in its entirety. With the corner of the eye, the whole, the whole pupil, the eyeball just to
understand it better. Again, because we see the eye almost from the side the iris. And this position does not
form a complete circle, but takes the form of an oval. So we have that circular
form of the eyeball, but the eye itself and the
opening that's more oval. It's not a complete oval, but it's not a perfect
circle either. The more you practice, the more these details will
come instinctively to you. Although every I'll draw will
be very, very different. Use your eraser to
remove any excess lines are lines that don't serve you anymore that you don't need. They were there as a guideline. They have served their purpose and now we're done with them. Keep observing your model
and your own drawing. They're not meant
to be equivalent, but it's the reference. This is the part the
light has hit the eye, and therefore we have
intense light here. This is the place
for the eyelashes. We're just determining the
places of each element. Later on we will
work more on them. Here, There's a concave point, but right now we're just
determining the place for it. There's a small wrinkle
right under the eye. So we determine
that place as well. This is the upper lash line, and that's the lower lash line. Now we start the
shading process using our sharpened six B pencil. I'm just removing any excess
lines here with my eraser. Just to clean it up, clean up the drawing, working on the lower lid, how it has these two lines
going over the eyelashes. And you start with medium
pressure at aware of the eyelash stems
from our grows from and then you lift your pencil in the
direction that you are creating your mark by
the end of the lash. So instead of creating the
same pressure all across, you want to lift your
pencil at the end of each line for the
eyelash in order to imply that lightness and to get closer aesthetically
to how eyelashes look. Give it a try. Take your time to create these details. You wanna do it
slowly and gently, especially for the
eyelashes because it's not just the pressure and the
lifting of the pencil, but also the direction of the lash deadlines that you are creating the delicate
none of them. Some pencils might be darker
than others and you might want to use the
darker pencil for the top lashes but
not the bottom. All of these choices will rely
on our use of our pencils, understanding them better and our own preferences as well. Now I'm drawing in the eyebrow. Again, we have an
element of hairs and the aesthetic of
how eyebrow hairs look. You want to follow
the direction of the eyebrow shape but also the muscle like if it's going upwards or downwards on
the sides like this, you can cross hatch, but I would do it lightly. Now, let's draw an eye
from the side view. Again, we're drawing a circle to create our axis and to
draw our guiding lines. So you want to divide your
circle into four sections. So the primary I, we did an axis which is vertical and horizontal
separating it into four. But here sideways we're going
to create horizontal lines. So that's three sections. We're going for the
triangular shape of where the eye
is going to show. You have your upper lid
and the bottom lid here. There's a lip on it, so that's why there we
have a secondary line. If you're uncertain as to the next step at
any point in time, just follow my lead
and you'll make your observations after as
to what you've achieved. I'm drawing in the iris. Usually there's a
different understanding as to where the iris sets
or what space it takes. It's drawn into the eye. It takes up a circular space. In your words, it's
not on the surface, on the very outer surface. Let's try it in an
isolated form here. So this is the top
surface that you see. But that's not the
full shape of it. That's not how we should
draw it from the side. The irises in,
inside that space. Take some time to practice it. I'm adding some lashes and the direction that they need to be which is downwards
and then flick upwards. Later on we'll be drawing
the reflection or shadows of the eyelashes that will
show on the eye itself. Let's draw a, an eye that is
closed from the side view. Just to take a look
at that shape and the form and how to achieve it. The lid is closed and you have the eyelashes sort of spread. You can see more of them. Here we have it. An eye from the front view with the
different details of the eye. And an eye from the side view with an understanding
of the iris. And when the eye is closed, keep practicing and see you
again in the next tutorial.
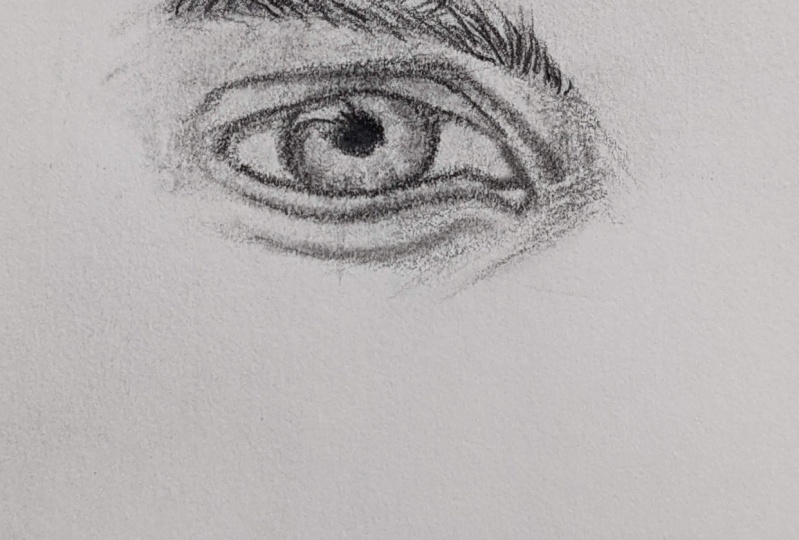
4. How to Draw a Male Eye: Hi there. Welcome
to a new tutorial. Today we're going to draw
a male eyes together, which is a bit smaller than the previous model we worked on. We've created our axis
as our first step. We're going to draw
the axis to help us better measure and transfer
subject of our drawing. So take your time to do that. You can use a ruler to create your axis if it makes it easier. Now the corner of the eye
is almost located here. Now, remember to make use of
your downloadable resources. They have all the information you need for every tutorial, from materials to the model, to the outline to
draw the model. It's there to help you. Take your time to create
your base sketch, print out your model image, place it in such a
way that it's easy for you to reference and
look at comfortably. Because that's what
we're gonna be doing. We're going to be continuously
looking at our model, looking at our drawing, referencing the
highlights, the shadows. We're simply completing
our base sketch here. Just so when we start shading, we're shading in
the right places. We can draw the axis line
on our sample as well. By the axis line, we mean the horizontal and the vertical line that
cross each other and they divide the paper beneath
them into four equal parts. And after we draw our
axis and our base sketch, that's when we're going
to move on to shading. Remember, just like
I'm doing here, repeating your drawing is no problem as many
times as necessary. So if you need to
pause the video, complete your base sketch, make any adjustments, adjust the measurements with
with your model. Maybe with any practice
outlines you've created, just go ahead and do it. And the AI that we are
going to draw together, it's not located in, on a straight line. It has more of an oblique form. It's at an angle, at a diagonal angle. So this corner here is a bit
higher than the other side. This is the inner
part of the eye. The more we observe our model, the more we are practicing, the best exercise you can do, which is looking and really
looking at the highlights on the lines and the shadows
and where everything falls. I would advise to trust
your observation. If you notice a straight line, then draw what you see. Sometimes in our mind
because we know we understand the general
shape of some things. So we draw it based on
our understanding of its curvature or
assuming that it's more curved than it is when
it might be more square. So trust what you're seeing. Now, the pupil is
located at the top. We can see the light has shown
from this side of the eye. So we're going to
determine the place for that light as well. So you can mark specifically as a place where it's
completely white, even if it has an unusual shape. I'm using a mono eraser here. Just to get into these
little spaces and erase any excess lines or
lines to be adjusted. And then we're
going to determine the place for the eyebrow. It's a bit further comparing
to the corner of the eye. There is not much
distance between the eyebrow and
the upper eyelid. And it's pointed as well. You want to create your sketch
as lightly as possible. Now here we have at the overall shape and
form for the eyebrow. We're going to
fill it in shaded. As we move along. Later. We are working on this
sample of the eye. Together, we started
with drawing an axis, and now we are determining the right places for
the different parts of the eye and drawing the
details step-by-step. This is a man's eye with a slightly short eyelid and his eyebrows are also very
close to the upper eyelid. At this part, we are just going to determine
the place for the eyebrow and then we can
move on to the shading part. We are almost done with
the initial sketch. We just have to check the measurements and
the details and do any adjustments if needed so that we can move on
to the next level. After checking the
correctness of all the details in
the sketching part, we can start shading. As mentioned earlier,
it's very important to have a perfect
initial sketch or as perfect as possible
before moving on to the shading part so
that they can remain no modifications to be done in the basic lines are the
baselines of our drawing. This is the right
place for the pupil. There's also the spot where
the light hits the I on the left corner that
we determined for the, we determine the place for. Now we can start shading. There's a wrinkle on the
line beneath the eye, which we need to
just draw in here. We need to put it
in place as well. Now, as we start shading, we start adding more
and more details. We're going to start the shading process
using our six B pencil. Make sure that it's sharpened. We are not going to create the darker areas with
sharp lines are clear, sharp lines with heavy
pressure with our pencils. Instead, we're going to use the back-and-forth
movement of our pencil. And we're going to
add shading layers on those parts and create
the look that we want. We start shading
from the tear duct in the inner corner of the
eye where the tears come. Then there is this
white part in-between. We are determining
the place for it now, but it would not
remain this white. We will work on it later. Then we move on to add the shading layers
to the white part of the eye very gently and
delicately using our pencil. Now we reach the other
corner of the eye. The order with which you
shade different parts of the eye depends on you and
how you like to do it. But usually it's better
to start with a pupil. However, it's also
possible to start from this part or to work
on the eyebrows first. The point is not
to limit yourself. Some people like to
work on the background first and then move
on to the details. And some follow
the opposite way. And working on the background
is their last step. But generally it's more
common to start from the top and move downwards gradually of your
image so that you don't smudge it with the
pressure of your palm. We add the shading
layer for this part. And now we determine
the shadows on the eyelid very gently
and delicately. You want to build layers. You're using medium
pressure, light to medium. And if something
needs to be darker, you go over it again, as opposed to placing
a harder pressure. This shadow here is the darkest part created
by the upper eyelid. On the eyelid itself. We're just determining
the place for it here so we can apply the highlights
around it correctly. It is important to add
the layers of shading on the upper eyelid very gently because there's that texture
as well to the skin, to that area that you want to maintain that delicate
aesthetic, the look of it. We are going to use the blending
stump or the hog brush. It's a flat bristle brush. On this part. We can even use the darkness of the brush and add these
dark parts on the eye. So the graphite that
holds onto the bristles, you can use them to apply some shadows here and
there on your drawing. You would use it in this way. Now we're going to add a background for this
part which is the iris. We want to add those
details inside the iris. Just two as well in accentuate
the curvature there. Not only the details, but the lines that you're
applying around the way that they take direction depending on the curvature of the eye. You want to add these details
very gently and delicately. We're going to add the
background or basis. And then we're going
to darken the pupil. The eye has a light color. So we want to be able to show that by keeping the highlights, the white of the page. So wherever there's a highlight, you want to keep it light
and not put graphite on it. Using the blending stump
or the Hong brush. Again, we are going
over these parts to to harmonize the color
or just blend it well. I'm using my mono eraser here, which is a more specified
eraser to go in and lift some of some of the lines just
to bring back that light. And starting from this point, we are going to add the details and draw
the lines on the pupil. Remember, we're
adding the details of the outlines, any shading. We're marking the dark
parts, the shadowed parts, and also not marking
the highlights, like not keeping an eye on the highlights so that
we don't fill them in. Now we're going to work on
the basis of the work again, as we might want to come
back to the details and the shadings of this part later and we want to add more to it. I'm using hatching lines here
very gently and delicately. We started shading this part. The hatching lines that
are appropriate to be used on these
parts are simple, organized hatching lines that
are in the same direction, so you're applying them
right next to each other. Very delicately,
very light pressure. They're uniform next each other. We have a certain
light spot over here, very smooth and with the
same textures all along, we apply our shading
but just even lighter, just to leave that
highlight light. Now we're going to erase
the unnecessary lines, the ones that guided
us at the beginning. And we're not going
to be using anymore. We're going to use the stump
again and feed these parts. And we continue shading the eye. We are going to edit this
part just a little bit. So you can use your mono eraser or any eraser that's
suitable for you already. And we erase this
part a little bit. And then we continue shading
with our six B pencil. There's a concave point
here on the eye lid. We have an intense dark part. And remember if
you've made marks or lines or shadings that
are a bit too intense, you can use your hog brush or the blending stump in order
to achieve a smoother, smoother shading across, especially in the
initial layers, it's very important to fade those lines using
your brush or stamp on the inner part of the eye. Here we have a shadow. We must be very careful
while adding it, not to leave any lines behind and create that shadow and
a smooth layer of shading. This layer has the
most light parts. However, the white part
of the eye looks a bit darker than
it is right here. We are going to use a smaller
stump and fade these parts. We keep checking our model and keep looking at our
own drawing that we're applying the shadows and the right places and
the right tonality. Yes, your image is not going
to be the same as the model, but the referencing
of the highlights and the shadows is the point. It is going to tell us
where to apply those lines. I'm using an electrical
eraser here. And we're going to erase these
parts a bit where they had turned out slightly darker
than we wanted them. I went for a mono eraser was
a little bit more detailed. There's a shadow right
underneath the eye. Using the blending technique, we're going to add
the shading layers very smoothly and delicately. Welcome. We're going to add the shading
layers on the white part of the eye very gently
and smoothly here. For instance, on this
corner of the eye, as the white part of the
eye is not truly white. And if we pay close attention, we can see the smooth
shadows on it. Be it on a picture
or in real life, especially on these
parts on the corners, we're going to add the shadows smoothly because you
have these veins, these vessels that are there. We are going to
work a bit more on these parts as it
needs to get darker. That outline that, that
creates the contrast, allowing for the eye
to pop. Or be more 3D. We're going to darken
the eyebrow area using our blending stump. I'm using the smaller
blending stump here. Another way of
darkening this area apart from what we're
doing right now, is to add smooth shading layers. It's like creating a background. Before we start
adding in the hairs. We are going to fade
this part again. I'm using my flat bristle brush. Now we start adding the
hairs of the eyebrow. And we do it delicately
and we need to create. Intentional lines,
and as practiced previously in the
previous tutorials, is to have heavier pressure on the point of where that
every hair starts, where it grows out from. And then you lift
your pencil off as each line is being
drawn, you lifted off. So the ends of those
hairs are light. The mark of them is light. Way to achieve the
aesthetics of hair. And to achieve that
delicate look as well of the nature of the eyebrow
hair or eyelash hair. When drawing the eyebrows, we must pay attention
to the direction of the hair strands as they
may face different angles. For instance, this
part right here, these hairs have
grown from this side, from the top coming down, and these hairs are exactly
opposite from the bottom. There in a way
crossing each other. We add the hair on the eyebrows
one-by-one as we've been doing on these parts, the hair is even more
delicate and thin, so we're going to use
a mechanical pencil, that's 0.5 mechanical pencil. So in order to
draw the eyebrows. Depending on the density of
the hair on different parts, we draw them one-by-one
and even one on top of another to show the texture and the
form of the eyebrow. At the same time, we have to keep in mind
that the lines we draw for this facial feature are not straight and simple
hatching lines. And we need to consider the curve and the
direction of each share. So there might be
curvature within them or some irregularities
in terms of direction. We are now going to work
on the pupil again, making it darker as it is the darkest part of the
eye we are drawing. We fill all the white parts completely of the pupil. I mean. And we go over any part that
needs a little more shading, maybe a bit of detail, maybe some lines as such
in the direction and the appropriate direction to keep
the curvature of the eye. I'm using my mono eraser here. We can show the
linear light parts using our mono eraser
here, like this. For instance, this part
on the eyebrow has an empty section we're
going to edit and add. Now still there are some thin hair strands
crossing this part, which we are going
to consider and draw them with our mechanical pencil. I'm using my six B pencil here. And then back to my
mechanical pencil, 0.5. When we are done with adding the shading layers all
around the eyelids, we are going to
draw the eyelashes. We are drawing a man's
eye and the eye lashes are a little bit short. We should be careful how
we draw them to look natural and the way
they actually are, the direction that
they need to be. There are also some
small wrinkles here underneath the eye. We're going to add
them with our eraser. On the highlight
part of the eye. On the eye, we do not have a
complete intense white spot. There are some lines
that we are going to add very delicately, very slightly, just so
it's not a stark white. It's still very bright. But just with a little
bit of a shade. Shading needs time. It needs a lot of patients
and observation of our model. And to add the lines, there are very thin and
short eyelashes here. I'm trying to add
them correctly. Take a moment to look
at your drawing. Pull your head back, take a look at what
you've created. It just gives you a moment to notice what might be missing. Maybe something
we've over shaded. We are almost done
with this drawing. We are just going over some details that
need to be added. That's why we take
a moment and we stop and we look at our drawing. Now we're going to add another dark layer on the
parts that need to be darker, like here, the pupil and
the area around the iris. Even if an outline
is delicate or thin, it's okay to slightly
go over it in this shading method
as I'm doing here. Just to achieve that little bit, little bit more
degree of darkness. As we can see these lines from the eye muscles on the pupil, we're going to draw them. We're also going to add a
dark layer on the eyebrow. Sour. Final step to
complete the work is to darken the areas that need
additional layers of shading. Now we're going to
make these parts lighter using our mono eraser. Here we have the lightest parts. The highlights are
just as important as the shadows and the outlines. They bring such contrast. We're going to add
more darkness to these parts to finish the work. And each one of us
works differently. Someone might take another
10 min or half an hour. Maybe some of us need
another minute or two. That's completely up to you. We slightly shade
these parts as well. Just to complete our
drawing even more. It can be very slight. Thank you so much for
joining me today. Hope you've enjoyed
this tutorial. Remember to keep practicing
and see you again next time.
5. Male Eye Looking Up Drawing and Shading: Hi there. Welcome
to a new tutorial. Today we're going to
draw this I together, which is from the side angle. As the angle changes, we need to pay attention
to all the details. For instance, the line
beneath the eye in this position is not seen as a straight
line and has a curve. This is the same with the
upper side of the eye as well. We are going to draw
the axis lines in order to measure and
draw accordingly. This is the best place to
draw the axis lines on. You can do it directly
on your model. We draw a vertical and
a horizontal line. This will help us
divide the work into four equal sections and then compare the details
in each section on their form and size
with one another. And as a result, we will
have an accurate drawing. For instance, with
access lines at work, we know that this
part of the pupil is located exactly here. This is also very useful for those of us
whose eyes are not yet trained enough to trace
the lines professionally. You want to draw them as such
in terms of perspective. And now we start
sketching the eye. We pay attention to the placements of different
parts of the eye. I'm using an HB pencil. We're going to draw the
eye or the model that we're looking at slightly smaller than the original model. That is why we reduce the
size while drawing it. Remember to make use of your
downloadable resources. They have all the information necessary for every
tutorial you follow, including all the
materials we'll be using, the model image, the outlines to create the sketch of your
model image, and so on. Make sure your pencils
are sharpened. We begin our sketch. The pencil we are using right
now is a bit dark or harsh. To sketch. We are going to use lighter pencil such
as to-be or HB. When we start shading, we use six B pencil for
medium and light shadows and the HB pencil for these
stronger and darker shadows. As we already know. The higher the number on
the pencils bring stronger, darker, and softer
color with it. So take your time to use
all these pencils and practice what different
effects they can give you, what kind of pressure
you need to put on them. So we use the HB or to
be pencil for sketching. Even the mechanical
pencil is good for that. And the other pencils for shading and different
tonalities. Observe your model. We need to consider
the angle of the eye. And from this angle we see
the I in its different parts. And that sense, the line under the eye has this
kind of shape and form. We draw it lightly
now and we will add more layers to it
and work more on it. As we move on. We draw the axis
lines as our guide. But sometimes depending
on the angle of the eye, we may need to draw
a curved line here. For instance, like this, as the two corners of the eye are not located
on a straight line, and one is slightly higher while the other is a bit lower. Use a ruler to draw
the bottom of the eye. We can draw this line or
the help of our axis lines, but we're going to erase all
these unnecessary lines. As we move on and complete different
parts of our drawing. We need to draw this
part like this. We start working on the inner
part of the upper eyelid. We can see some
parts of it clearly. This part is under the shadows and thus is not that visible. This is the same for
the lower part of the eyelid and the
inner section of it. This ending part of
it is visibly seen, but this part on the front, we can just see the eyelid and where the eyelashes are located. We must pay attention
to all the details. It is not right to draw a
line like this for this part. Because from our
point of view we can see this part from
the inner eyelid. Next we are going
to draw the iris. We need some modifications on this part as it is wider
than it should be. We do it right
away because it is better to add all
the details and apply all the modifications on the sketching part,
the base sketch. And before we start shading, the iris is drawn like this. And up to this part, we must know that in this
angle the iris is not completely round and it
takes an oval shape. As we're looking at it
almost from the side. There's a highlight
on the pupil. It's like a light spot, shining part on this section. And then there's the
pupil so you can mark the highlight in whatever
shape it needs to be. There's a shadow that makes the pupil looks
slightly larger. So we're considering
that as well. We are drawing a male eye. We want to pay attention to all the details such
as the eyebrows, the shape of the
eye and the form. Eyebrows usually have a lot of detail in them with the
hairs and the direction. So we want to map out that area just to mark where
the eyebrow is. We can now start working on
this part of the eye as well. This is a small part
of the forehead visible that has
a concave point. We determine the place
for the eyebrow. We are still comparing all the sizes and measuring different parts of
the eye together. If we are drawing this line, we're not going to just
compare it to this line here, but to the parts of the upper
and the lower side as well. You want to make those
comparisons all across. We determine the
place for the eyebrow and later on we will
be working on it. There are some wrinkles on these parts that we're going to show with more
shading layer later, but we want to mark
it very lightly now. Now we're going to
do a final check on our sketch to see if everything
is in the right place. If there are any more
lines we'd like to add. Take your time. If
you need to pause the video and spend some
time on your sketch, this space sketches, important. Just do it and then play again when you're ready to
continue together. We're now going to
draw a small part of the mask which is
covering the face. However, we're not going
to work on it that much as our main focus
is on the eye itself. Now we start shading
using our six B pencil. Make sure your
pencil is sharpened. We are going to draw some of the details that are
casted on the eye, which highly depends on
the form of the pupil. And we can see some
circular shapes on it. We add them like this. Simple circular shapes. I'm observing my model. We keep on drawing
these circular shapes. We could have also
added the basic color and then drew these
circular shapes and forms. As the work at this point is
very delicate and we need to work finally lightly and on
different parts as well. We shade the basis of the work, keeping its form as it is. So you can add some shading with the intention to
work on it more later. It's simply to know
that it's there. We are now going to blend the colors using
our blending stump. As we're still working
on the background. I mean the base sketch, we can erase these dark parts here later on and
make them lighter. Now, using a pencil eraser, we add the lights, we can go in and lift
some of that shading off. The pupil is the darkest
part of the eye. So we're going to add the shading layers very
smoothly and delicately on it. Our shading layer must be bold. We add the layers step-by-step. You want to take your time
shading needs patients, and we need to
build those layers. Keep observing your model. And every few minutes, look at your own drawing. Look at what you've
created so far. It helps you spot what
adjustments need to be made. We need to add some more
light on these sections. Then we can start adding the details that
are on this part. We're going to gently
erase these parts, making them lighter
and less bold. And then we're going to draw the shapes we see in the eye. As the work is very
delicate and detailed, we're going to use
our mechanical pencil to add these fine, fine lines. I'm also using my mono eraser, which is a much smaller
eraser allowing me to remove shading or graphite
from very specific areas. We're going to use our mechanical pencil right till the end to add the details, because in general
the work is very delicate and this pencil will
achieve us the aesthetic. And the fine lines that we need. The core of this mechanical
pencil is to be, but it is better to use
a for B1 as it will be more flexible and we can
cover more parts with it. It also has a medium color. Don't worry about adding too many details in
this beginning stage, as long as you're
doing them lightly, the details are important and we can add as
much as we can. Now we're going to work on
the upper side of the eye. Shading. It was small hatching
lines as I'm doing here. There are some delicate wrinkles right here underneath the eye. If we're going to draw this
part using hatching lines, it is better to use
cross hatching lines in order to create that tonality
or that shadow right there. I mean, that texture. We start shading these parts
very gently and smoothly. We want to stay as consistent
in our shading in terms of pressure and application and style across the entire drawing. So it looks harmonious. Using our blending
stump or hug brush, we are going to fade
these parts a little bit. Make sure your pressure
remains light. Take your time. I'm
using a six B pencil. Keep observing your model. Now. We're going to shade those parts inside the eye
that need shading. These shading layers
must be added very delicately and smoothly. We want a small
degree of shade here. It's just for the vessels
that appear in the eye. Notice how I'm shading
in circular motions, these small light
circular motions. Just to achieve a smooth layer. This part here needs
a layer of shading. Little bit around the iris. These parts that are
the inner parts of the upper eyelid
need to be shaded. We're going to make
this line over here boulder to add the
dimension of the work. It allows for the high to gain a little bit
of depth of perception. So some curvature here. By creating that contrast. Keep taking a moment to stop. Pull your head back and
look at your drawing. You'll notice what
might be missing. These parts are lighter, so we are adding a
very smooth layer of shading over here. I'm using my hog brush just
to smooth in these lines. Now we're going to
add darker layers to the eyebrow as the darkest part of the face here is the I rows. We're going to use an HB
pencil to work on this part. As mentioned before in
the previous tutorials. To draw in the eyebrow
hairs or hairs in general, you want to have more
pressure or medium pressure on the beginning point where the hair grows out from. And draw your your line in the direction that
the hair is going. And then at the end
of each stroke, you're lifting the
pencil off of the paper. The direction of the hair on the eyebrows is
mostly in this way. So we are going to add the shading layers
according to that. There are some very
light parts which we are going to add later
on with an eraser. However, we try to leave them untouched as much as possible. At this stage, the light parts, you want them if you want them, the white of the page. We want to avoid filling
in all the gaps here. If you need to keep
stopping every few moments, just to look at what
you've created, just to make sure you're
not over shading. Then go ahead and do it. We pay close attention to
the direction of the hair on the eyebrows and apply
them accordingly as they are. For instance, some are in
this direction from the top. This part is the
tip of the eyebrow, which has less hair on it. They're barely little,
little marks here. As these eyebrows are full. They have moved further comparing to this curve
of the face over here. They are kind of
sticking outwards. There are some here strands here and there
underneath the eyebrow, which we're going to add. We're going to make this line
on the upper eyelid folder. And then we're going
to add the eyelashes. Keep observing your model. Now we are going to draw
the eyelashes step-by-step. Keep in mind that direction. The eyelashes are going to take. The tip of the pencil
must be very sharp for this part to make sure
you sharpen your pencils. We are going to
draw the eyelashes one-by-one as separate
hair strands. At the same time, paying attention to
the fact that on some parts the
eyelashes are fuller. We also consider the fact that eyelashes may have
different lengths. Just keep applying this
same technique of having more pressure on
the starting point of the eyelash and then lifting, lifting the pencil
upwards or off the page. We also want to pay attention to the length of the
eyelashes here. You don't want to draw a
stroke that is too long. We can see the eyelashes
almost up to this point. As we reach this part, we pay more attention to the direction the
eyelashes have. Keep observing your model. It's your best reference. You don't want to put
too much pressure, but you want to be intentional
as to where you're applying your eyelash while keeping that distance
between them. Take your time. Now we're going to add the eyelashes
on the lower eyelid. They are not so many, but next we're going to work on the background
and the basis for this part as it has
some lighter spots, we're going to determine
now with the eraser. The eraser can be
used as a tool to draw light marks and
not just to erase. We continue completing
our work on the areas underneath
the eyelashes. Keep observing your model and take a moment to look
at your own drawing. It gives us a chance to notice or have a
little bit of a break. Look away, look back
at your drawing and notice whether the
highlights need something, whether the shadows need some more work on this
training part here, the light part on the eye. We can also see the
reflection of the eyelashes, so we're going to draw them in. Notice how I'm drawing
in these little lines. It's done exactly like this. Shading needs patients and for your tools to be sharpened. And you need to work
lightly and consistently. You want the work to look
harmonious every year, coherent or the
shadings the same. Now we're adding
some shading layers on the visible part of
the forehead in our work. Next, we're going to erase the axis lines we drew at the
beginning of our drawing. That's why it's important
to draw these lines really lightly because we're
not going to keep them. They are simply a guideline. And we want to clean up
our image here all around. I'm using the brush just to
dust off any eraser residue. Just not a risk
ruining our drawing. As we want these parts
to look even smoother, we fade them a bit
using our brush. This is our hog brush. We go over all the
parts that maybe we feel need a little
bit of blending. Maybe the lines can be
a little bit smoother. Feel free to send me any
questions you might have. I'm more than happy to share
with you some pointers. Or if even you want to share
with me your final drawings, I'm more than happy
to share with you some guidelines,
maybe some feedback. I'm here to help.
Completing any drawing or any artwork is really up
to the person creating it. It can take a really long time or any number of
minutes, really. Because we might
want to keep adding some more details,
some more highlights. I'm using my mono eraser
here just to go into these tight spaces to
work on the highlight. As they are delicate parts, I'm using my HB pencil here. I hope you've enjoyed
the process of shading and creating
this drawing. Remember to keep practicing, practice your hand pressure, the pressure you
place on your pencil, the different the
different tonalities your pencils can give you. The more you practice, the easier all of these
decisions will come to you. Thank you so much for
joining me today. See you next time.
6. How to Draw Two Male Eyes: Hi there and welcome to
another drawing tutorial. Here in this tutorial
we are going to draw two male eyes together. We are going to use the
access method again. And we're going to make use of the access lines to help us
draw these pair of eyes. I'm using a ruler here. I'm using a favorite
castle HB pencil. We're going to sketch
while doing it. We try to use minimum
hand pressure and do it very lightly. As we don't want to see
these lines in the drawing. We're doing our initial
sketch with our HB pencil. We're going to sketch
a pair of male eyes. Let's see how this sketching
process can be started. We have our four equal sections. For the initial sketch to begin, we need to measure
different parts of what we're going to draw. We observe closely
and for instance, we realized that
this part is located underneath our access line. We want to make these comparisons
and decisions and keep observing our model as we
create our base sketch. If we are not confident or trained enough to draw freehand, we can use different types of measurements and the easiest one amongst them is the
access lines method as we are using here. It's our guide. Remember that you can make use of your
downloadable resources. They have all the information necessary for each
tutorial you follow. The set of pencils will be using any tools,
any other tools, the model drawing in any outlines necessary to help
you draw the base sketch. When we compare the measurements for the eyes that
we are drawing, we can see that they are not
located on a straight line. As the head is slightly tilted. Take your time to
create your drawing. Making these comparisons between the eyes in order to draw them in the right
place is very helpful. Because then we're able to kind of see the differences and draw them against
each other in a way. Make your drawing
and your lines in your sketch exactly as
you see on your model. This part can take time, so don't worry about having to erase several times and redraw. The head is also
slightly downwards, so the eyebrows look very
much closer to the eyes. For now, we are
going to determine the right place for them. And we compare the measurements and the proportions
between the tip of the eyebrow with the
end point of the eye, the ending point of the eye. The idea is to determine where each element goes to create a sort of contouring light form. And to apply as many details as we can lightly in order for us to be able to reference them correctly when we start shading. Any additions or a
little modifications must be done right on spot. For instance, here
the distance between the two parts is more
than it should be, so we edit it right away. We're determining the form
for the eyebrow on the right. And now the eyelid of
the eye on the left, but also the eyebrow. We want to keep our
hand pressure medium. Compare the eyebrow height. We are almost done
with the base sketch, the initial sketch here. And we have also checked
the measurements for the different parts and did
the needed adjustments. We can measure and draw the
eyes as large as we want. We just have to
consider the sizes of the different parts
according to our axis lines. We just have to
keep in mind that the smaller the eyes are, the more difficult it
is to work on them. I'm drawing the eye here. For both eyes. It's neither a full
circle nor ANOVA. Now I'm drawing the pupils. We want to mark them and any highlight that might be around the pupils
are on the eye. We determined the
right places for the inner shadings of the eye. Right now. We work on the edge of the
eye as well as the inner side of
the lower eyelid. We tried to add all the details, as many details as you can without
overpowering the image. What I mean is without
creating dark lines. We are almost done
with this sketch. And what we have to do now
is check the measurements one more time to make sure that everything is in
the right place. We are now going to erase any unnecessary lines
inside the eyes. Are trying to eliminate
those axis lines from inside the drawing. Once they have served
their purpose, you've made use of them. You've created your
initial sketch, you can remove the excess lines. Now we start shading and
we're going to start from the darkest parts of the
eyes, which is the pupils. It depends on your
own preference where you want to
start shading from, but it is generally
better to start from the darkest parts and then move towards
the lighter parts. We should not draw
bold lines either. Instead, we need to
create the lines with the back-and-forth
movement of our pencil. So if there's a dark part, instead of applying pressure on your pencil and
creating a dark line. Very quickly, you want to use consistent medium
pressure and go over any shadowed or dark
part just by going, going over it again and again. We're fixing these parts
here as they need to be wider and also a
little bit lower. Remember, making all
these adjustments is completely normal. And very important. Now we repeat the process. On the other side. We are shading the
inner part of the eye. That's the, on the
white part of the eye. But makes sure you leave
the tear vessel nice and clear because there is a bright spot on
the tier vessel. What we're doing is
gradually determining the right places for
all the darker parts, the parts which are
the outlines and will give us more contrast
the more we work on them. They are giving definition to our whole drawing altogether. We continue observing
our model and shading. After we determined
the right places for the darker parts, we are going to make the iris a bit lighter and less bold. By slightly shading it. We need to apply some shade. Inside this space here. And keep in mind the
highlights don't go over them. As the work is very
delicate and we have drawn, it's small as well. We can leave the lighter
parts untouched from now on and apply the lines in the direction that
they need to be. So the curvature of the eye also shows through the lines
that we're creating. Later on we can add the basis
very lightly and shade it. But for now we're just
creating a base, base color. We're gonna fade this part
using a blending stump. Just to smooth and some
of the lines here. This part also needs
a bit more fading. We can add the basis
for the other eye now. When we are shading
and we feel like some parts are darker
than they should be. We can easily reduce the
darkness using a mono eraser. The process has done
exactly like this. These little dotted motions. We are going to fade
these parts with our blending stump
just to look smoother. Make sure you're not applying
a lot of pressure here. We can add darker layers here on this part to
determine the right place for the eyebrows and to give it a background color before we
start applying the hairs. Take your time. If you need to pause the
video at any point in time to complete something and then play when you're ready. Go ahead. Now we're going to emphasize more
on the line values. Those are the darker
lines so that we have more dimension, more contrast. And it's done exactly like this. If you're unsure at
any point in time, what's the next step or maybe
about a certain detail. Just follow my lead. You shading in the
circular motions, these small light
circular motions. Across. Now we start drawing the arrows. We need a very sharp pencil
to draw the eyebrows. We have thin hair strands that are almost directed downwards. The beginning edge
of the eyebrows right here is very light and it gradually becomes darker as we move towards the end
of the eyebrows. We can see a bit of a frown at this point which we
consider while drawing. The eyebrows, especially on this part, are
pointed downwards. And then we can see a lot of hairs on these points crossing one another because
some of them from the bottom of the eyebrows
pointing upwards. So take your time to do those. Now we work on this
side and complete the drawing of this eyebrow. Again, on this part, we have thin hairs
directed downwards. Make sure your
pencil is sharpened. You follow my hand gestures. There's a little bit
more pressure at the beginning of a hair strand. And then you lift
your pencil off the paper as you
complete each stroke. Some parts of the eyebrow, especially on these
points, are quite darker. So we need to work on
them once more and add another layer with
the HB pencil later. Next, we are going to fade these parts a bit with
our blending stump. And if we compare these parts, we can see that by doing this, the remaining white
spots are filled. Remember that we're
doing this very lightly. But keep in mind that
we still need to come back to the eyebrows
and work more on them. Now I'm going to use
are perfectly sharpened eight B pencil and add hair strands one-by-one
on the eyebrows. We are going to add
another layer on this part here, making it bolder. Take your time. As the portrait is slightly facing downwards
and has a frown, the eyebrows look like this. There's a little bit of an arch. Now we're going to
draw the eyelashes. The eyelashes have come out from the inner part of
the eye like this. They are also slightly
dark and we're going to draw them like that. Follow my lead. We are being decisive where
we're placing each eyelash. It's a dark line. And we're curving it in the direction that
it needs to be. Now, we work on the eyelashes
of the lower eyelid. We're now going to use
the brush and blend. The dark and light
layers we have added on these parts were using
a hog brush here. Here I'm using a six B pencil. And I want to create
a very light layer, a hatching layer very
lightly to shade the face. In general, the forehead, accentuate the nose,
the nose bridge, maybe a little bit of the cheek. We are using hatching
lines on these parts. Just to further show the light, where the light is hitting, where the shadows are and how
they're working together. So our pressure goes between
really light and medium. But we want to be able to show
parts of the nose bridge, so we have a shadow next
to it and right here. Every couple of minutes, take a moment to pull your head back and look at your drawing. Just to maybe catch
any missing parts, either shadows or highlights. I'm using a blending stump here. We're going to work on
the shading layers. But just to smooth them
even more if we need to. You could work on
these shading layers with your blending stump, but I prefer going over
them with my pencil. We are going to work on
the eyebrows even more. As we do not want to see these empty white parts
in between the eyebrows. I'm using an HB pencil. We're going to fill
these parts by drawing the hair
strands one by one. Here in this drawing, we drew a pair of eyes
together from the front view. And we worked on how to measure the different
parts and comparison. However, we did not use
the ruler that much and we use the axis lines
more as our guide. If we are not
confident enough about our lines and our eyes are not trained enough to follow in this way and we're
in this technique. We can measure each
part with our ruler and every part separately
and then draw them. That's also a technique. We use a ruler to draw our axis. The axis that is
horizontal and vertical. But we didn't use it otherwise. But that doesn't mean that
you can't use your ruler. To measure each part. I'm going over my hatching
here and some of the shadows. I'm using a six B pencil. We can work on these parts with large crosshatching lines. So we're creating lines
that are diagonally crossing the primary hatching
lines we've created, but we need to do it
very, very lightly. Whether you want to create crosshatching lines or
just hatching lines. Just make sure that you are consistent across your drawing. There is something, there
is something called visual harmony or logic that when you're
looking at your image, that there's clear harmony or similarity from each
end of your drawing. I'm going to over with my mono
eraser here over this lid, the lower eyelash lid. It needs to be lighter, so we're going to erase this part a little bit and
we're working on it again. There are some
wrinkles on this part. And also on the other eye here, which we're going
to draw by adding some concentrated
crosshatching lines, still lightly, but
just applied more. Otherwise our drawing is done. Thank you so much
for joining me. Hope you've enjoyed
today's tutorial and see you in the next one.
7. Learn to Draw Al Pacino’s Eye: Hi there and welcome
to another tutorial. In this tutorial, we
are going to work on an old man's eye together. To begin the drawing process, we are going to
draw the axis lines to help us better measure the
different parts of an eye. We can draw the axis lines on the sample picture as well
that we're referencing. We are drawing opportunities. I generally his eyes are not
located on a straight line. Also with age, his
eyes are drooping. That is why we can see
a shape like this. Make use of your
downloadable resources. They have all the
information for every tutorial that you follow. They also have a grid or an outline for the base sketch
that we're creating here. And all the materials and
your model photo, of course, make sure that your
model photo is placed comfortably so you can keep looking at it and reference it as we're
gonna be doing that often. As mentioned, the eyes here are located
on an oblique line. That is why when measuring, we need to measure the
edges of the eye together. And also the axis lines are in comparison to the axis line. So when this is the
corner of the eye, the edge of the eye
would be like here. Yeah, On that point. So take your time to
create the base sketch. We want this base sketch
as usual and drawing. And creating a drawing you
want your base sketch to be like it will have as
many details as you can in low pressure, the light outline, even
if it includes shadows. But we want it to
be as accurate as possible before we start
the shading process. Here I'm using a to B pencil. You can use either HB or a to B pencil for the initial sketch. Take your time creating
the base sketch. Here we can see some parts
of the eyebrow as well. And because our main aim is
to learn how to draw shade and thus create the
texture of skin. At different ages, we
need to be very careful about the details and
consider them all. The eyebrow also falls into
that category as it looks harsher or more defined than
a younger looking eyebrow, which tends to be softer and
maybe with less details. We can either keep
this axis line here right till the end of
the sketching process. And when we want to start
shading or we can erase it. If we can continue
the measuring of the different parts
are with our eye. Though it's something that
happens with practice. The more you practice, the more instinctively you can
make these decisions. The reason we erase
the axis line, Yes, it is to not
disrupt our drawing. We don't want it in the
middle of the eye here. But it's also because
it's served its purpose. So once I've made use of it, it has helped me. It has guided me with my sketch. I no longer need
it, so I erase it. As we are drawing the eye
from the profile view. But we can see the
inner layer of the upper eyelid pretty well. So we're going to draw it, especially on this part. And add the end. We're going to consider
all these details. All these details play a role. And now we draw the pupil. Now we are drawing the eyebrow. Sketching out that
the shape of it, the form, the space, it's going to fail. And later on, of course, we'll add more details
and more contrast. But we want to, you want
to define that area. We're just going to determine the right place for the
hybrid this point as the eyebrows are very
bold and they can be messy as well and we
need to work on them. So it's good to kind of take
up the space that they need. We can also use the
geometrical shapes as our guide for
drawing the eyebrows. We can consider the overall
shape of the eyebrows to be like a long rectangle may be which is slightly
curved in the middle. We can draw this
rectangle and determine the place for the
eyebrows inside it. Now we will start shading
with our Tooby pencil. Make sure that you're happy with your sketch you're drawing. You've taken your time. And we start shading very
gently and smoothly. Even if we have strong
shadows on some parts, we need to add the shading
layers very smoothly and one-by-one to gradually reach that level of darkness
that we're looking for. We should not use maximum
hand pressure to create the darkness as it will harm that paper and
leave marks on it. We need to work on our shading step-by-step layer by layer, adding layers one on top
of another very smoothly. However, it is good to know that the sketching pencils give us different ranges
of the color grey, not that black and the
darkness that we might want. But building those
layers is still better than applying intense pressure. We're going to add the
darkness we want as much as the boldness and the strength
of the pencil allows us. We just want to avoid the darkest parts
to be super sharp. You want them to
remain soft, smooth? Yes, dark, but not, not like an absolute black. Now we will continue
shading other parts, but we're going to
use a six B pencil. Make sure your pencils
are sharpened. Just so you can get
the best result. First, we're going
to add the basis. So we add a very light layer
of shading at this point, especially because the eye
has a light color as well. After adding this
light shading layer, we're going to also fade it. For fading and blending. We can use the blending stump, the hog brush, or
even your pencil. To do so, we need to shade
very smoothly right from the beginning using the
sharpened tip of the pencil. We have created the basis
and now we're going to fade these parts a little bit
with our blending stump. Again, we can use the hog
brush for this as well. We blend the colors
on our paper. Then we will reduce the color on the lighter part with an eraser to lift some of
that color off the page. So we have created the shine
we were looking for in this way and now we will move on to shade the
basis for the eye. As this part is also very light, we're going to use the pencil. We're still applying the
same medium hand pressure and we avoid adding
too much pressure. So no marks and lines
would remain on the paper. You don't want to
make an indentation. We just want to continue adding a very smooth and light
layer of shading. With the back-and-forth
movement of our pencil. Follow my hand movements. Now we're going to use the blending stump to add
some of these wrinkles. I'm using a smaller
blending stump as well, so it helps me get that
detail or blend those lines. On this part above the eyelid. We can add cross
hatching lines to create the texture
on these parts. As the texture is itself
resembles the skin over here. Sometimes instead
of creating only hatching which is single lines, you can do crosshatching where the lines
cross each other. You can achieve that
texture and do it smoothly. Notice my circular movement, circular movement of my
pencil as I'm shading. Feel free to send me any questions you might
have along the way. You can even send me
your final drawings are drawings as you are
progressing in the middle. And I'm more than happy
to share with you some pointers, some feedback. Now, here, these are
the lightest parts, but still we can see the wrinkles and we
are adding them with crosshatching lines
while considering the lightness of these parts, you want to keep the highlights light almost white of the paper. We can use the blending
stump here on these parts. Dress to blend a little
bit more of the color. Or we can use the
hog brush as well. It's those edges that are between an outline and
maybe some shading. Now we're going to shade the lower part
underneath the eye. And we're gonna do
it very smoothly and gently and continue the process. On these parts here we can add crosshatching lines and draw
the wrinkles very easily. You would have your
crosshatching more concentrated near or on the
wrinkle or any wrinkle line. We continue shading. Keep looking at your model. Apply the lines and the shadows, and preserve the highlights
exactly as you see them. We continue shading with the same pencil pressure
and hand movement. This is all for the
basis of the work. We can either use
blending or apply very small hatching
lines are using crosshatching lines
to show the wrinkles. It's completely up to you, but what you want to keep an
eye on is the consistency. So if you're using crosshatching
in a certain area too, go ahead and complete that
entire area with the same, with the same shading. We want our image to
look visually logical. So when you look at it, no part looks out of place in a way that's why
we want to be consistent across the whole
drawing where you apply the same techniques across
the whole the whole eye. This part is slightly darker here where the wrinkles
are coming together. But still we can see the
lines so we draw them all. We include all the details. This part up here, above the top eyelid, it has the most shadows on it. So we determined the
dark parts first. And then we can use the
eraser to show some of the light better in
case we've over shaded. So keep your eye on
it. Continue shading. We are going to work on
this drinker here now. Older people's skin texture has those small wrinkles and they have smaller lines in different directions
within them. So observe your model really
well and we can show, we can show these lines with our regular pencil movements
and drying diverse lines. It would be done
exactly like this. So follow, follow my lead line coming from here and
another one coming from there in a
different direction. They may cross each
other at some point. We should pay close attention to the face as we're drawing. It's not like we're going to
draw a direct straight line. The quality of the
line also matters. So if you're hesitant, create those lines lightly. And then you can go over them again and again
to make it darker. But also apply the lines in the, in the direction
that you see them. It's okay to use these small irregular lines that come together and create
a form of hatching, but they're also taking
the shape that you want. There are 2 mol right
beneath the eye here. So we're adding the shading
layers to show these malls. You don't want to apply a lot of pressure on the mall because
usually we're thinking, oh, it's a dark dots. So we're going to apply
pressure like it's an, it's an instinct or a feeling. But don't do it. Just, just apply them all
as you see it and lightly. Going over the details
here, we continue shading. Now we're going to work
on the darker parts. We observe our model. And we are working
on the texture of the skin beneath the eye. And keeping in mind the moles
over here that we have. The shadings on this part need a lot of blending so
that we're able to show the signs of age
on the I and the skin. And we also want
to mediate between those lighter parts and the darker parts of
this transitioning between a concentrated part of shading where it's a bit
darker and the lighter parts. We're going to work
on them like this. Follow my hand movement. It's as if we are
drawing several semi-circles facing
downwards to show the skin underneath the eye
and achieve the older look. Aging skin texture. We can trace some of
the veins on the eye. We're going to add them
very delicately here. We should do it like this. That's just about enough
and it's not that visible. I'm using my mono
eraser dressed to bring in some
highlights on the eyes. Because these light reflections
are very important. And I want to make the
highlights a bit bolder. That's why I use
the mono eraser. We're going to work on
the iris a little bit. It's looking good so far, but I wanted to add
that outline around it just to give it that
more 3D presence. As mentioned earlier, we can
add the small semicircle, detail or way of
shading like this. And create the texture to imply and show an aging
skin or an older skin. Let's continue shading and
building those layers. Apart from the skin texture, There's some freckles
on this part as well. We're going to add them
as much as possible to look more like
the original model. Keep your hand pressure light. Follow the same head
movement that I'm, that I'm using here. As I'm shading this
back-and-forth movement, but also some lines are a
little bit curved or irregular. You want to create a
more complete image. I'm blending some of those
lines with my brush. So we do want to leave the parts we
have faded untouched. We keep working on
them with pencil. This will help our work come out and be more contrasting
for this to be created, we work step-by-step and add layers on top
of one another. Yet from time-to-time, we
need to fade some parts so that the layers we
have added our blended, translating into each other
and were able to work on them even more and give
them more details. So if there's no reason for
keeping that blurred area, it's better to work
on those parts, again, giving them some
accentuated lines. But if we want to
draw realistically, we need to add the details
as much as possible. And for that, we have
to work like this, adding layers on layers. And then going back in and
considering all the details. Although you might think, Oh, this detail won't
show, but it will. There's difference between hyper-realistic and
realistic drawing. And we need to consider
that what we are doing right now is
realistic drawing. There are more wrinkles
underneath the eyelid here, which we're going to draw, redraw them by adding these
small and thin lines. Always make sure your pencils are sharpened in order
for you to achieve the details that you want and for you to achieve them with such delicate aesthetic which
mimics the skin texture. And it's what your
pencils can achieve you. So the more you practice
using different pencils, you'll know what effect they can give you and how you
can manipulate them, and what details
you can achieve. So it's important
to keep practicing. For instance, on this
point right here we have this darker part which is
also larger than the others. We just keep going over it. Keep looking at your model and keep shading and
building those layers. Now it's time to work on
some parts of the eyebrow. Make sure your
pencil is sharpen. And as we practiced and other
tutorials for the eyebrows, you must consider the
direction of each hair strand. You want to start
each hair strand with some pressure.
But then as you The hair strand, you're lifting
the pencil off the page. So the line becomes lighter. And it gives you
the aesthetic of these hairs that are fluttering. We're going to draw
the eyebrow exactly as it is with thick
hairs and irregular. So they have some lines that are curved street
crossing each other. All of these are taken
into consideration. Follow my hand movement and the gestures and strokes
that I'm creating. And let's continue
working on this eyebrow. Now we're going to
add the lashes as far as we can see them
on our sample model. You want to be decisive with each eyelash because you're creating that specific stroke. They have spaces
in between them. We want to apply that detailed correctly because
it is delicate, but it is there. And it adds so much to
the depth Perception. We're going to darken
this part a bit here. Then using our eraser, we're going to delicately erase some parts and add
the linear light. So just like we add value lines, which are the darker
lines, we're adding. Highlight lines. They are dressed as
important, they add contrast. They bring clarity to the work. More dimension. I'm switching between my six
B pencil and my mono eraser. We can add even more
layers and work more on different
parts of the eye here. The result would become better
and it would achieve you a more perfect drawing are well-rounded drawing because
it looks more complete. We are almost done here. We can always work more
and add more details, spending more time patiently. It helps the work to
get better because you get a chance to maybe
look away, take a break, look back at your
image and notice what, what other shadows
you need to add, maybe some highlights
that can be better. Now we're going to add the
eyelashes of the lower eyelid. Make sure you're drawing
them in this short strokes. In the right direction. We are done with
these parts here. And now we're going to add more dimension to the wrinkles. To do so, we will
erase these parts a little bit with the
mono eraser here. You can look at your mono eraser as your highlight pencil. The one that adds the
highlights or the whitespaces. Make sure you're
doing it delicately. You're erasing in
the right places. And also these parts here. The highlights help accentuate the dark outlines
just as much as the dark outlines bring
forward that contrast. We just need to keep observing our model and practicing
our drawing skills. For instance, we have
this wrinkle here, so we're going to slightly erase this part right
underneath the eye. Another example would be this part in which
we had the mole. We're going to erase this
part a little bit and then add some layers
and shading to it. Take your time to add all
the details necessary. I continue to use as
six B pencil here. We're going to work
on this part as well. We must be careful
not to exaggerate, but as we're drawing an older
face with the wrinkles, we can work delicately
on the wrinkles more so that it shows the
texture perfectly. We can use our blending stump on these parts to make them
look even smoother. When we're not drawing
hyper realistically, it's okay if there's some
small hatching lines visible. There is another dark spot here, just like the one we drew there. You're going to add it. Just keep looking at
your model and keep applying the lines of the
highlights as you see them. We have some lighter parts here. And the shadows are stronger
at the back of the wrinkles. And we're going to apply that highlight
exactly as we see it. We keep working on different
parts of our drawing. Don't let the
dissimilarity between our final drawing and the model to discourage
you in any way. It's not meant to look
exactly the same. We're meant to practice
shading and drawing. And how to preserve the highlights and how
to work with them. And how to accentuate
the outlines or create a shadow
by going over it in the back-and-forth
movement or circular motions to create shadings
or irregular lines. The idea is to keep drawing
and keep practicing. The more you practice, the more instinctively those
decisions will come to you, the more confident you
are with your medium. When your confidence grows, your approach just improves. It'll show on your drawing. And the closer you get to your own style to
discovering your own style. These parts here look
like hair strands. That is why we are going
to edit them a little bit. However, it is better to do
all the modifications in the sketching process so
that the rest of the parts we have added won't be
damaged when we edit. After shading, we
don't want to be erasing through the
layers that we've built. We're going to modify these
eyelashes here as well. I'm using a six B pencil. We are now erasing some
small parts besides the wrinkles and then
adding a light layer of shading decided
that the wrinkles show themselves better and get that dimensional
value so you gain a depth of perception. Remember to also practice
looking at your own drawing. So every couple of minutes, stop all your head back. Maybe look away, look
at your drawing, and notice what you've
created so far. It gives you a chance to
really notice the shadows. Maybe something is missing. Maybe some highlights
are missing. It gives you an idea of whether
your image is harmonious. Everything looks visually
logical in a sense that the shading is consistent
across your drawing. You'll also be able to
see if something is imbalanced or needs
to be shaded further. Then you go in and
with your mono eraser or your pencil and you had those highlights
because you see them, you get a chance, your eye gets a break just for
these few moments. And then you look at your
drawing and you're able to add the details, but even better every time. Let's continue working
on these final details and really observe our
own drawing, our model. And move towards
completing our drawing. Hi. Now I'm using a medium
blending stump, chest to fade some of
those sharper lines. Our drawing is done. It's done. It's just those perfections that we can create in the end, maybe some lines, anything
that can be missing. It's really up to you. You can continue working on your drawing for
as long as you want. Because our own perception of
whether an image is done or whether we like it at
a certain stage and we're happy with it to be done. That's something that is
completely up to you. Remember that I'm more
than happy to receive your final drawings or your drawings at any
stage of completion. And you can send me any
questions you might have. And I'm more than happy
to share with you some feedback or maybe
some guiding pointers. But all I can say for
now is keep practicing. I hope you've been enjoying the shading process
and learning a lot. Thank you so much
for joining me in today's tutorial and see
you again in the next one.
8. Nose Drawing and Hatching: Hi there. Welcome to
another drawing tutorial. In this tutorial,
we will be drawing noses in different
positions and styles. And we will begin with
the portrait angle. We're going to start by using the access method for
this drawing as well. So the first step is to
draw our axis lines. I'm using a ruler here. We use these axis lines to measure different
parts and compare all the proportions to each other or compare
them together. We can easily start
sketching when we have drawn our axis lines. Using the axis lines, we can measure and then compare measurements of different parts, whether they are linear or
maybe they're on a diagonal. Let's say the eyes
or the eyebrows. That sense. But today we're gonna
be focused on noses. I'm using a to B pencil, but you can use either a to B or HB pencil to
start sketching. Remember to make use of your
downloadable resources. These are available for every
tutorial that you follow. They have all the
information you need from materials to the, the model image
that we're using. The outlines necessary to create your base sketch
as we're doing here. It's there to help you. Now we're drawing the two edges of the nose on the corners here. And this is a frontal
view of the nose. Always take time. Take your time to create
your base sketch. The base sketch
is very important to get it exactly as
you want it or as accurately as you see on your model before you
start the shading process. It's there as a guideline to help us know where to
shade the highlights, where to shade the
outlines, the shadows. In this, at this
stage you're using your eraser as much as you want. You can go back and
redo your sketch drawing as many times
as you need to. Now this is the nose from
the frontal profile view. We're going to start shading it now that we have
our base sketch. For that we consider
the source of the light and whether it
is located in the front, corners, above or behind, because it matters where
the light is coming from. It helps us see, see the shadows and
the highlights better, and make our drawings
more accurately. Now I'm using an HB pencil. In most cases, these
parts of the nose, which are the nostril
holes or the nostrils, they have the darkest shadow. What do we mean by dark shadows? And the darkest parts of the drawing do not mean
that we're going to draw a dark hole on these points
and apply a lot of pressure. Instead, as we have learned in shading, the shading process, we start from the
darkest parts and then gradually move to
the lighter parts. But we build those layers. We go over the
parts that need to be darker with medium pressure. You can also use a pencil or switch 8-6 B
pencil for shading. Makes sure that
your model image is placed comfortably
in front of you in such a way that it's easy
for you to look at it often. Notice my shading technique. It's these tight
circular motions. In order to create
these shaded areas. You can also shade in
this back-and-forth, almost creating these lines that are right next
to each other, which is like hatching. But generally in order to create that smooth shaded texture, you do these circular motions. But here as I'm trying
to create the shadow, I'm I'm using hatching, which are little lines
right next to each other. And maintain your hand pressure. You want your hand
pressure to be medium. You even apply shading around the lines that you've created
in order to soften them. For shading, we can
either erase the lines we have drawn earlier or we
can make them lighter. We can also keep
them as they are an ad or hatching
lines on top of them. So it's really up
to you how you want to go about shading. Because the more you
practice, the more you shade, the more you draw, the more you, the more
you play with the medium. You get to discover your own
style, your own preferences. And you get to make
different choices depending on the subject that you
are drawing or the object. And what pencils to use. The only way to get better at making these decisions
is to practice. Now gradually, we can start erasing the axis
lines that we drew earlier. There are guidelines, but we don't want them to
disrupt our drawing. Once they've served
their purpose. They have helped you
create your drawing, you erase them, and you
continue from there. Because we don't want
any of these lines to be disrupting our drawing and they are done serving
their purpose. Here I'm using a cross
hatching technique. That means the lines, I'm creating another layer of shading with these very
fine smooth lines, but they are crossing against the primary lines
and the primary layer. We continue shading in this way, applying our shadows
exactly where we see them. And keeping in mind
the highlights, that means avoiding them, leaving the highlights
nice and clean, the white of the page. At this point we're adding
hatching lines and on some points we are continuously using circular motions
or circular lines. The idea is that you can use either one or you can use both. But you need to keep it
consistent across your drawing. So whether you're drawing
noses or an entire picture, if you're using two types
of shading techniques, is to remain consistent
across the whole drawing, regardless of whether
you're shading and you're creating a shadow and a dark
part or a very light part, you want that texture
to be consistent. Remember that you can pause the video at any
point in time to complete any of any
parts of the drawing. And then play again to
complete it together. This is how we are going to
be shading and we're going to continue adding the
details as we move along. Feel free to send me any questions you might
have along the way. Or even at the end of
the tutorial or at any point in time you want to share with me your drawings. I'm more than happy to
address your questions. Maybe give you some feedback on your drawings, some
guiding pointers. I'm here to help keep
looking at your model. Your model gives you the best
reference as to where to apply those shadows
and highlights. Over here for the nose, we didn't want to erase
this line completely. We just wanted to really
soften it or lighten it so that we don't see
it very harshly. And we simply shade. On top of that guiding line. It's the bridge of the nose. We continue shading in this way. We are shading these areas
as well underneath the nose. Just to add more dimensional
value to the nose. So always consider the
completion of your image. So I know we're only working
on noses in this tutorial, but in general, when you're
looking at your drawing, pull your head back. Take a look at what
you've created and whether maybe something
might be missing visually. Later on we're going
to work more on the proportions of the nose
by adding line values. Those are lines which are
definitive or more contrasting, give a higher value
to our drawing. One important point
to be considered here is that if
we're not confident enough to measure
different parts and proportions with
just access lines. Or we feel like our eyes are not trained enough to measure them. We can imagine one bigger
circle to be located here surrounded by two
smaller circles like this. We can then add shading layers on top of these circles and step-by-step erase
the unnecessary lines as we build our image. However, the best way still
is to practice enough for the drawing different shapes and forms such as sphere, cone, cylinder to train our eyes and be able
to measure visually. Doing this step-by-step,
we will be able to use different tools and
materials and techniques, or even grids and
outlines less and less. Because then your
eyes are used to it. You're able to
instinctively know. In the beginning we can use
the shapes and forms such as a circle and rectangle to
depict forms out of them. And get on with the
whole drawing process. It is only with a
lot of practice. And even if you're really
trained and professional, you still use guidelines. You still use them
here and there. It's not a problem. It's simply about getting more used to it and gaining
confidence in the medium itself. And how much you can
achieve with either using geometrical shapes or access or training our eyes as well. They all play a part. But for now, all I can
advise is to practice. Keep drawing, keep
shading, keep using your, all your tools, the different techniques and play
around with your pencils. See what kind of, what kind of tonalities they can give you, what gestures they can give you. Now, this is for the
sketching and shading and nose from the profile view we've achieved this
first drawing. Now we will move
on to sketch and shade and nose from
the side profile. For drawing the nose from
the frontal profile view, we considered a bigger, bigger circle in the
middle joined by two smaller circles in
the corners to shape the form to draw a nose from the side
profile view though, we see a circle here. And then another
circle on this point. We will work on them and
shape the nodes from the side profile through
these, through these circles. Take your time to, to create that
guiding sketch here. I'm starting from the bridge. After we have drawn
the initial sketch, getting help from the two
circles that we drew. We're now going to determine the right places for
the lights and shadows. Erase any unnecessary lines. You can use your kneaded eraser, which is a software eraser, then your, then your
hard normal eraser. It's just to lift some of some color off of your paper
without erasing the lines. We work on our
drawing like this. As mentioned earlier,
usually the darkest part of the nose
or the nostrils. So the nose holes. Remember you're not applying a lot of pressure
onto the paper. You don't want to create
that indentation. You're simply shading and
a medium head pressure. But going over it again and
again to make it darker. We are using simple and
organized hatching lines all in one direction. As it looks better on this nose. We have to always consider the darker parts as well
as the lighter parts. In terms of shading, we could have also used
crosshatching lines or the circular, circular
shading motions. It's just a matter
of taste really, it's up to you, It's
your preference. But do keep your pressure
light to medium on your pencil and build
those layers slowly. There you have it, a drawing and shading of a nose
from the side view. So we have different types of noses that we're
going to draw today. We're simply creating
these different samples. They can be a reference
to you in the future. Moving on, we're going
to draw a nose from the three-quarter profile view. When we are drawing
the nose from the three-quarter profile view, we have this circle
in the middle, the other circle
right next to it. And then the other circle
would be located a bit higher. And also not in a complete form, but in the shape
of a semicircle. Just follow my lead. So we will have a
circle like this, another circle right next
to it, and a semicircle. Here. These shapes will give us the
three-quarter angle view that we are looking for. We need to draw this semicircle here on its correct location. We do any modification necessary before we start the
shading process. Take your time while
creating this space sketch. As you know. No problems
erasing several times. Keep, keep going back and
recreating the sketch. It's an important part
and it's very normal to make these adjustments
and corrections. Make sure that your pencils are sharpened just to get
the best results from them every time we erase
any unnecessary lines, I'm using my mono eraser just to have a more detailed eraser. Notice how when you're erasing any unnecessary parts
of the guiding lines, you start seeing the shape of the nose. So keep observing. That's why it's
important to look at are our own drawings,
what we're creating. Now we will start shading. First, we sharpen our
pencils, like I said, so that we're able to add delicate smooth
layers of shading. However, as we're practicing, we can add hatching lines and even harsher lines for shading. That's completely up to you. We can keep adding
more and more details. Now, we observe one more time before moving on
to the next step. If feels like the curve
is bigger than it should be here on the nose that
it can be a bit softer. So we're modifying it. The base sketch is
very important. It leads where you're
shading is going to go. And it helps you. It stops you from having to make corrections after you've shaded in area or build those layers. We continue shading the nose. And you can also work
with a mechanical pencil. Mechanical pencils and
even thinner line. It gives you these thin, thin, delicate lines which
you could shade with. We can use a mechanical
pencil with a for B Corps as it has the necessary
flexibility to help us in the different
stages of our work. Test your pencils on a
separate piece of paper. If there are different
techniques of shading that you want to try with
different pencils just to get a feel for it and to make that choice
because maybe your preference is not
a mechanical pencil, but a different kind of pencil. It's always helpful to have a sample page on
the side and pause the video and take
your time and then play again when you're
ready to continue together. As you can see, now we're
adding cross hatching lines. We have to pay attention
to the dark parts. So that's the shadowed parts. And use the free
lines to show them. So even if you've placed
shade across a certain area, you can still go darker
in certain parts and specific parts just by
adding another layer on, on those, on those outlines. Keep observing your model and
look at your own drawing. Maybe a little
curvature is missing. Maybe some shadow is missing. I also feel like the
line as well for the bridge of the nose here
is a little bit too defined. We might change that. Just remember that you have
different kinds of erasers. You have your normal eraser, a mono eraser, and
kneaded eraser. These are all there
to help you lift. Remove the lines or lift some
color or graphite off of your page or accentuate
the highlights. This was the drawing
and shading of a node's from a three-quarter
profile view. We have added more lines
on different spots just to bring
forward that shape. Now we're going to
draw the nose as if we're looking at it from below. That's the next one. But before that, let me
add some more layers to the shading over
here because I noticed, remember how I
said when you look away and leave a drawing
and look back at it, you get to see what's missing, what can be added. We work on this part like this, although it is, it has
to be faded a bit more. But there you have it. Before drawing our
next new sample from the downward view, we're going to work on a nose
with a clear curve on it. We want to go over more samples just that
way you get to try it, you get to give it a go. We get to understand
it a little bit more. I'm using an HB pencil here. We're going to
consider this type, also like the previous ones, and draw it using
the same guidelines, either circles or the axis. That's completely up to you. If you're unsure at any point in time what the next step is, just follow my lead. The model we are working
from the side view angle allows us to consider this
circle as the tip of the nose. Then we can consider one
more circle right next to it as we are looking at it
from the side view angle. Consider this area, that part on which the eye is located. We continue creating
our base sketch. I'm looking at the nose, the third sample here, we're going to add a
basis for it and work on the background a bit just so the shape of the nose
comes out better. When we add the shading
layers on the nose itself. It needs a little
bit of completion on the sides just to get a better
sense of the full shape. Now, back to our fourth sample. We're going to shade the tip
of the nose from this point. Keep looking at your model, keep observing where
the shadows are, where the highlights are. So you can avoid these white parts because we want them the
white of the page. We must pay attention to
the lights and shadows. For instance, if this part is
located under the shadows, a line like this would
be created and then we can work on it with different
types of hatching lines, such as simple hatching
lines, cross hatching lines, and also circular movements like circular
motions of shading. That's why it's important to practice away from
the tutorial as well, like on different models, different things
around you just to practice shading in itself. Now, all of these techniques, they don't mean that we're
not going to pay attention to the details completely
the opposite. We are paying lots of
attention to all the details. We are using all types of
hatching lines for our work. But it doesn't mean
that we are doing it aimlessly and with no
reason we should be aware of every step that we
take and remain consistent. We consider where the dark parts are located and then dress like when we are using the blending stump or when
we are shading smoothly, we add the hatching lines. You can go back and
add another layer. It's a balance between
shading and creating a smooth layer or
background or a tonality. But also creating
these lines that are beautiful and give you that aesthetic, the
drawing aesthetic. And this was the drawing and shading of
another type of nose with a curve and a convex point
at the top of the bridge. Just going to add a little
bit more detail here. Just to accentuate a
bit more of the nose. I'm observing my model. I'm switching to a
mechanical pencil here if we want to add
more delicate lines, remember as we mentioned before, a mechanical pencil gives you
really fine lines is thin, thin lines, but it
does need practice. The core of this mechanical
pencil is for B. It can be it can be other, other types of cores. So it's just a matter of
practicing and trying it out. That's the only way we get to. We get familiar with our tools. Now we're going to draw the nose from the downward
view that which we talked about and which the nose holes
can be completely visible. Let's take a moment,
make sure your pencil sharpened in this position. This would be the circle we consider in the
middle for drawing. These would be the
other two circles which take more of an oval
shape at this point in time. I'm using an HB
pencil. By the way. Please remember your downloadable
resources if you need any assistance in terms of the outline for the base catch, your downloadable
resource has a lot of information on the tutorial. Now by following the lines created by the
circles that we've, we've drawn here
as our guideline. We can easily shape the nose. Keep observing your model. And it's a nose that
we're looking up at. We're looking at the down view, the bottom view of it. So it's a nose that
looking upwards. If we look at it from this side, it would look like this. Where you see the
nostril completely. I'm starting a little
bit of my hatching here. Just so I have it in place
as I see it and it's okay to add as many details as
you can even if lightly. At the stage of sketching
the nose or the base sketch. It's important to
just take your time. Now, we erase the lines that are darker than what we
want along with the, any, any extra lines of the circles that we have
drawn earlier for a guide. Just so we have more
space for shading once. As mentioned before, once these guiding lines
don't serve you anymore, you have used them, you have made use of them. You erase them. So you might not erase
the entire circle, but you erase the part
that's unnecessary. And we keep drawing
our base sketch here. I'm going to erase some of my lines here just because they are too harsh or too dark. And it happens sometimes where you kinda get
taken with shading are drawing and apply more pressure on your pencil than we need to. So if you do find that your
drawing is a bit darker or that you've shaded a
bit darker than you intended, just erase it. I think let's do, let's redo this nose again. I'm going to erase
it completely. Let's do it again. It's looking sharper
or harsher than I, than I want it to. Of course, this
doesn't mean that you need to do the same. You've probably drawn
your base sketch much better than I have. I'm gonna give this
another go now, from the lower perspective, looking up at the nose. This is looking up. As
we can see from below. We have to pay attention to the details of not
just the nostrils, but also the sides. Don't let these hindrances
because sometimes we're drawing something from
a perspective that is more challenging or unusual. But don't let it hold you back. Keep practicing, keep drawing. And the best way to do
it is simply to look at your model and apply
the lines as you see them. In the beginning,
we might not be 100% sure of what
it would look like. But as we build the layers, it will come together. And we'll get to see the logic, the logic in what we have drawn. That's why I say,
Take your time. The base sketch is important. Right now we're shading the
darkest part of the nose, which is the nostril. But here because
it's an upward view, it's only semi dark, it's not fully dark. There is some shadow
and we keep shading. This is it for the
nose from this angle. You can continue working
on it if you feel it needs more shading
at the bottom. Now we're going to
draw a nose from the below perspective or above perspective such that the
nose is looking down. It's like we are looking at
the nose from the top part, but in the three-quarter
angle view as well. So it would look like this. Make sure your pencil sharpened. Observe your model. You can create your
guiding lines, either the axis lines
or geometrical shapes. We're not just drawing noses
from different angles here, but we are drawing different
types of the noses as well. So different perspectives
and also different forms. That's what I mean by
different types of the nose. When we're looking from above, the nose would look like this, where we see more of the bridge of the nose and the sides of it. If we consider these lines
to be on these parts, this would be the
tip of the nose, the corners of the nose, and then the nose
holes that look like a line when we look at them from above so they are
barely visible. You don't see so much of them. Remember to keep your lines
as light as possible. I know some of my lines
are a bit darker. I'm trying to figure out the
positions of everything. The tip of the nose here, also, little bit pointy. We continue drawing our
base sketch and as well, once you've defined
certain areas will be can we begin shading it? And we keep working
on this nose as such. We have locked away scale decisions that may be here with us to
stay here with us, to stay here with us today. We have lost control. Don't know where to go late
to turn around his j for j, for j for the crashing down. We've got to ne never stood. See things your way and you probably feel the same problem. You probably fair to say we're going down in
flames and just scream and didn't seem to care. A guess. Guess. Guess. We weren't. Crashing crashing down. Well, you've got to leave. Oh, you got it. Crash. But we've got to lay. You get to where we are almost done with drawing different types of noses
and different angles. Remember that the pencils
that we are using, if you're more
comfortable in using alternate pencils to create different kinds of
shading aesthetics. You can go for it. I'm using a mechanical
pencil, but again, the core can be different
than the one that I'm using. I'm using a four vCore here. Depending on the shape of the face and the
age of the person, we're going to work on
the area around the nose. Just to give a little
bit of a contour more completion to the
image of the nose here. Yeah. Now we're going
to draw and shade another sample nose again from the three-quarter
view angle. But this time we're going to change the way in
which we shade it. We're going to use the
pencils from the B-series and add the shading layers more
smoothly and delicately. We draw our axis lines. First. I'm using my ruler here. So you draw two axis
lines very lightly. We're going to do
the initial sketch considering the angle all along. Make sure that your
model image is placed comfortably next to you or near you so you can
reference it easily. Remember that you can
send me any questions, have along the way or even your final
drawings are more than happy to give you some
guiding pointers. Now on this sample here
we are not going to draw the lines as freely
as the previous ones. We can use circles to help
us draw this nose as well. Or we can do it freehand. It's completely up to you. But the differences
and the differences, we're going slower or
being more accurate, more specific and more delicate. With shading, the more
time you spend on it, the more patient you are. And you shade and
you are consistent with the tonality
and the texture. The more realistic it'll look. We want to pay attention
to the details. We want to add all
the details as well, especially on the main part. So when we reach
the shading part, there would be no
need to go through any modification of
the base sketch. These baselines, the
base sketch that our guidelines and their guidelines
for the shading parts, just like the axis lines are the guidelines for the sketch, the base sketch that
we're creating right now. Our base sketch is the
guideline for us for shading. So we want to take our time. If you find that
your lines are not as as delicate as
you want them to be. Make sure you sharpen your
pencil or lower your pressure. There's also, there's also the element of controlling
your pencil or the way we hold our pencil or the way we apply our lines to the page. We can determine
the shading parts while we're sketching like this. For instance, these
circles that we have drawn on these parts depict the darkest and the
lightest parts in order. This is followed by
the next part which is dark and then it
gradually becomes lighter. But I've marked
where they should go or dressed as a visual
reminder for myself. If you're uncertain
at any point in time as to what the next step is. Just follow my lead. Now we're going to start
shading with a pencil. I want to make sure
that it's sharpened. It's important to have
our pencils sharpened. Are erasers cleaned? So if you ever need that
moment, just pause. Then play again
when you're ready. If controlling a six B or
AB pencil is difficult and shading you can use a
for B pencil as well. Just because it's a medium
pencil and easier to handle. Starting from the top
here we're going to add very smooth and delicate
hatching lines. I'm shading lines that are right next to each other very gently. Light to medium hand
pressure on my pencil. Follow my lead. We're not
going to use free lines. Are lines on this part
or more controlled. So we've used free lines
on the other samples. And like always, we move
from dark to light. We can use the blending
technique and add the small hatching lines very
delicately and smoothly. Right here we're using
a combination of both. So you can blend and use these circular
motions and shade in that way or you can use
the hatching lines. It's really up to you. It's a preference. It's also a matter of
what comes easier to you. The paper we are using right
now is the regular A4 paper. And it has a very delicate
surface or the pencil marks do not remain on it and it
looks very smooth in general. If we use paper
with more texture, we can see the pencil
marks on them better. As we are moving
from dark to light. And right now we are becoming very much closer to
the lighter parts. We must gradually reduce
our hand pressure as well. This allows you to use the same pencil that
just by reducing your pressure and maybe having more distance between
the hatching lines. It gives you a lighter tonality. You just need to practice. And of course, every, every face or nose or facial expression you draw
is going to be different. It's going to have
different elements, but still there are, it will start coming to
you more instinctively. The more you practice. Again, you readjust your hand
pressure like you increase your hand pressure while you're shading when you reach
the darker parts. And it's not a major increase, it's just a little bit of increase as you're
adding another layer. Here's the approximate
location for the eyebrows and we can draw some small
parts of it as well. Then we have this dark
shadow on this side, which we're going to add again very delicately
and smoothly, just like what we
did for shading. We're marking where
the shadows are dressed to be able to also
accentuate the highlights. Because the highlights are yes, they are the white of
the paper and we avoid them and we leave them
as light as possible. But it is an action in itself
to preserve the highlight. We accentuate them by working on the outlines
or the darker shadows. And we also work on the shadows by accentuating the highlights. We have a convex
point on this part. Just a little bit. We keep shading, keep
observing your model, and we keep shading. Now we're going to erase the unnecessary lines that we're not going to use anymore. They have served their purpose. Then we're going to
shade the nose holes, which are the darkest
part of the nose. And again, we are going to be very smooth and delicate here. Take your time. We're going to use the back-and-forth
movement as I'm doing here, with a very controlled
and low hand pressure shade this part. So it means that we
are going to create this darkness by repetition
and step-by-step, adding more and
more layers and not by drawing thick lines
with heavy pressure. We can use the free lines on the upper parts as the main
focus is on the nose itself. It's not on the skin in-between. The eyebrows are the cheeks. So you can go for a more irregular shading
or free lines here. Gradually we're going to add the line values by darkening the boulder edging lines
as I'm doing here. They are thinner
lines but they're just a little bit darker, a little bit more graphic. That's why we keep
them very light. They simply bring more
contrast and they help the nose a
little bit more 3D, almost popping a little bit. So you want to be intentional and select where you're
placing those value lines. And continue working on the nose and building
those layers. Okay, hi. Now we're going to work more on the dark parts
using the HB pencil. And also now that we have
added the background, we can use the simple hatching
lines on these parts. Keep observing your model. And also take a moment to
look at your own drawing. Pull your head back, maybe look away, look
back at your drawing. It gives us a chance to kind of, it's like moving away from the drawing because we might
be really engrossed in it. And just that little
break allows you to see what might be missing
in terms of shading. Or maybe the highlights, maybe they need to
be highlighted more. And as such. Now here we're going to shade
the background was free. Lines. Follow my lead. Let's keep shading. Hi. As this line over here is
not actually that visible. We're going to adjust
it a little bit. I'm using my kneaded eraser. It means that it doesn't
have that much shadow. And kneaded eraser is perfect instead of
the other erasers in order to lift some of the graphite or the color off
of the page without really erasing or creating that
eraser mark on your drawing. And the way you use your kneaded
eraser is up and down in this dotted motion to lift
some color off of your page. Just like this. If you need to go in a line or, or Lyft color in a line along the bridge of the nose that is mimicking the shape
that's also possible. With our mono eraser. Here we are determining and
showing the lighter parts. And we keep working on both
the shadows and highlights. I'm back to using my HB
pencil. And we continue. So here on this sample we have added very smooth
layers of shading, especially on the main parts. On the other areas
surrounding the nose, we have added free lines, free hatching lines,
just like we did for the previous samples
that we worked on. We've practiced
the free lines are more more relaxed application of shading with
the other samples. This last sample is
more controlled. It took longer. Our shading is smoother. We paid attention
to the details. Do practice this technique, this, this type of shading. Again, I'm using my
mono eraser here. The amount of
details we decide on applying on our
drawing is really completely up to each one of us. Now on the sample where we've drawn eyes in the past
and other tutorials. We're going to create one
more sample of the nose. We're going to draw
the axis lines again. We can also consider
the general shape of the nose to be
like a rectangle. However, if we see the nose, we're going to draw
from the front view. After drawing the
axis lines like this. I'm going to grab my ruler
to create my axis lines. But you can do it
freehand if you want to. I like to use a ruler because it gives me those crisp
lines very lightly. And it differentiates them from all the other
lines that I'm going to be using or
drawing or creating myself. Make sure your pressure
is very light. Then if we want to consider
our formula for drawing the nose from the front view, we can consider a
circle here joined by two other circles right
next to it like this. If you're unsure, just
follow what I'm doing. And then looking at
our sample model, we're going to draw the
nose out of these circles. We do all the modifications
in the sketching part, the base sketch part. And as mentioned before, you can erase as many
times as necessary, redraw your sketch
as many times as necessary until you
are happy with it. The base sketch is important. It is the guide for
our shading process. Now, using the circles and
the circles guideline for the nose drawings is one way of creating a
base sketch for the nose. You have the smaller circles intersecting with the big one. And then eventually
you will erase these intersecting lines
and draw the nose. But another way to do it is to draw the axis lines
as we have here. And then consider geometrical
shapes such as rectangles and combined with other shapes just to achieve a
higher accuracy. Now this second
technique is a way to get those lines
to be more angular, I guess in a way, but more accurate to get the drawing of your
nose more accurately. That's the whole point. So here I've created a sort of rectangle horizontally
and vertically, and some triangular
shapes on the side. And we will draw
the three circles to shape the nose because we can still use the
circles were just, we've just added some more
geometrical shapes to them. This is the tip of the nose. These two on the corners to
show the sides for the nose. We can either draw
the nose freehand or depending on the
shape of the nose, use different shapes
to depict its form. For instance, to show where
the nose holes start. Keep observing your
model and try to fit the shape of the nose that we're trying to draw into
a geometrical shape. That's essentially
what we're doing. I'm drawing in the shadow
for the nostrils here. Just locating the sides of
the nose, the nostrils. For these sides of the nose, the circles we draw
must be the same size with the corners of
our sample model. Then gradually we will erase the lines that we're not
going to use anymore. So we've made use of
the geometrical shapes. With our mono eraser. We erase any excess lines, lines that don't
serve us anymore. We have used them as our guide. We erase them because
we don't want them to disrupt our drawing. You can erase in a
circular motion as well. By the way, I'm doing it
section by section here.
9. Drawing and Shading Lips: Hi there. Welcome to another
drawing tutorial. In this tutorial we're
going to learn how to draw and shape the lips. There are so many
ways to draw lips. And one can use
different methods to make this process easy, especially when we're drawing
it from the profile view. One of the easiest of
these methods is to use circles as your guide. You can draw the
circles freehand or you could use the
help of an object. But remember they're
only guiding lines. We're going to draw a
circle here in the middle, another circle on this point. And then another circle
here to form the upper lip. The lower lip, we draw
two circles down here like this. Take your time. Now, based on the shape
and the form of the lips, we draw it out of the circles. The circles we have drawn
up here form the upper lip. This part shows the lower
side of the upper lip. On it would look like this. Now remember, this is a guide. We are meant to erase these lines once they
stopped serving us. And you could draw it freehand if you've observed the drawing
and you're able to do it. Now the lower lip
would look like this, but it all depends on
the shape of the lips. For instance, some lips have a curve like this in the middle. But there are some
forms of lips in which this part is like
a straight line. After paying attention to
how the lips are touching, the details are important. We're able to form
the lips better, the better we
observe our drawing. Now, there are
different ways through which we can draw the ellipse. This is the simplest form
or the simplest formula. Another way is to draw a shape
like a teardrop down here. Instead of those two circles. If we consider this
to be the lower lip, we will have a
shape like this and another one like this in here. We draw, we draw
them and we shape the lips out of these
teardrop shapes. Another way of drawing the lips, which we're gonna do now
is using axis lines. Now we're going to draw and shade this type
of lips together. Today. I've erased
the teardrop formula, and I'm going to
use my ruler just to create my axis lines. I like to use a ruler and apply my axis lines
very lightly. But I like to use the
ruler because it gives me a very straight line
that stands out from my own more organic drawing or drawing and shading gestures. So it's really up to you. It's a preference, a
question of preference. We're going to draw the axis
lines using a to B pencil. And then we can start
sketching the lips. Remember that the axis lines
help us make comparisons between both sides
of the face. So e.g. the line on which the eyes are, maybe one is higher than the other on the left
and on the right. These lines help us sketch different elements of the
face in the right places. So as we, as we were
drawing our base sketch, Let's check all the proportions. We are drawing with
minimal pressure. With light lines.
Follow my lead. Now we check and modify if
there are any problems, then we will start shading. We want to make sure
the base sketches as accurate as we want it to be. So make sure you have
your model image set in front of you such that it's comfortable for you
to keep looking at it. Remember to make use of your downloadable
resources which have all the information
for every tutorial you follow from the
materials we use to the grid that we're using
to create our base sketch. That's why you need to take your time for the base sketch. Because we don't want to make these modifications
after we've shaded. Okay, Now we're going to erase the lines that we're
not using anymore. And we're going to draw
this part one more time. We erase the guiding lines
that we're done with. So they no longer
serve as they've helped us create the
shape of the lips. And we don't want them to
be disrupting our image. So they were the base or the guide for the
sketch, the base sketch. And our base sketch is the
guide for our shading process. We are going to use the
six B pencil for shading. Now, we first determined the place on which
we're going to apply the shading layers. Make sure your pencils
are sharpened. That way you get the best
effect from your pencil. And you get the delicate
lines that you need. You're applying medium pressure. You don't want to press
really hard on your pencil. If there are more
shadowed areas, the technique to apply is to
go over it again and again. I'm using hatching lines here. Before we actually
start shading, we're going to determine and create the texture of the lips, which is muscular by drawing very thin
and delicate lines. So we apply these lines
and we can shade on top of them with a lighter degree
so they still show through. And you can keep balancing
between shading, either in circular motions and adding those details because those delicate details
are just as important, you think that they won't show, but they will remember that. You can send me any
question you might have. You can even send me
your final drawings or your drawings at any
point, at any stage. And I'm more than happy
to share with you some guiding pointers or
maybe address your questions. I'm here to help. I continue to add those
details little by little. Now that we are done
with the lines, then we can start shading. We're starting from the
edge here on the right. We're going to add
smooth hatching lines. Those are small, delicate
lines next to each other. Very brief distance between
them in one direction. It's better to sharpen the
tip of your pencil all along the way in order to really get that delicate
aesthetic that we're seeking. We keep on shedding very
smoothly and gently. Shading needs patients. And when you do take your time, you get better results. We can use both simple
and small hatching lines and also the blending technique
while shading the lips. So these are two techniques. Another point is
that we can slightly increase our hand
pressure when it comes to the wrinkles
and the texture of the lips that we
determined before. Using lines and work on them repeatedly not to look like
lines, but actual wrinkles. So they are, they're irregular, but we want to mimic, use our modal image as our reference and apply
the texture on the lips. We need to reduce our
hand pressure even more while working
on these parts. As these are the lightest parts. These parts are two or three
times lighter than the rest. It's important to determine where the highlights
are in order to leave them light or
the white of the page. We do this as we move along, you want to take your time, observe your model, and apply your shading and
your lines accordingly. You're applying medium pressure. And for any darker shadows, you're simply going over them. These circular
motions, as I'm doing. As mentioned before,
we are going to use the back-and-forth
movement as well of our pencil on the
wrinkles and the texture, the areas that we have created. And we go over these
lines again and again until we get the
tonality that we need. These parts also have some lighter areas right
next to each other. So you can have that contrast
are these gaps in-between the little fractures
in the lips texture. And we're going to keep
working on these and use the eraser to accentuate
the highlights. This is the lightest part in this model that we're
working on together. So we have the source of light
coming from the left side. All right? Now we start working
on these parts which are the darkest
parts of the lips using the repeated back and
forth movement of our pencil. Follow my hand movements. And let's build these
layers one-by-one. This part of the lip is darker compared to the upper upper lip. So we're adding additional
shading layers on them. Remember that the
best practice you can do is observing your model. Really looking at
where the highlights are, the shadows are, but also where are the
darkest tonalities and the lightest tonalities of both the light parts
and the dark parts. You have the bits which are where the lips are
touching each other. These have an outline here. They are the darkest parts
because that's where they meet and that shadow
is created in that place. So we want to work on that. We used the repeated
back-and-forth movement of our pencil to make these
parts darker and darker. And again, we're using
medium pressure, not high pressure. And we're going over them
again and again in order to maintain that smooth,
delicate aesthetic. If you use a hard pressure, you risk creating a shrine on
your paper and indentation. And you kind of lose a little bit of that
delicate aesthetic. We are almost done with
the upper lip here as we have sketched and also
created the texture of it. Though we need to
work on it a bit more using our mono eraser here on some parts to reduce the darkness or to
add some details. You need to consider
your mono eraser as if it's a highlight
pencil like to bring the light back in and
increase the contrast of it with the dark parts. And we continue
working in this way. You want to maintain applying your shading smoothly
and delicately. The point is to be consistent. Whether you are working
on a darker shadow or a lighter area
or a highlight, is that the technique, you're shading technique
remains the same. It's consistent. There are more
details in form of smaller lines besides the
wrinkles that we have created. And we're going to add
them as much as possible. But also considering the
fact that we are drawing a realistic lip and not working on it hyper
realistically. It's achieving us
the needed result. We can even use our
blending stump on these parts and feed them
a bit if we want to. However, we are creating that smooth and faded
look by repeating the shading process and adding one smooth shading layer
on top of the other. Take your time. And every few minutes
pull your head back, take a look at your own drawing and what you've created so far. And you'll be able to see better what adjustments need to be done on the shadows
or the highlights. We are not just done
with the upper lip, but we're going to
start working on the lower lip as well. And we repeat the same process that we did for the upper lip. But now for the lower lip. Whilst keeping in mind the
highlights and the shadows. As we can see on
the sample model, the lower lip has a
lot of light parts. We are going to determine the parts for the
lighter areas as we start working on the lower lip from the right to the left, we need to be even more
delicate on the lower lip. Makes sure that your
pencils are sharpened. We want to be able to achieve those delicate, delicate lines. If you prefer using
a mechanical pencil. That's also an option. Just because it can achieve
you and even thinner line. But for now we need to add these details because they
will show through even if you create shading on top of it with hatching
or crosshatching. We can work on this
part step-by-step and by adding the right
layers at the right time. But we can also add a smooth
background and then create the lighter parts by erasing
these parts with the eraser. We are also considering the wrinkles that
create the texture of the lips and we're determining
the right place for them. So take your time. Feel free to send me
any questions you might have or maybe share with
me your final drawings. I'm more than happy to give you some pointers or some feedback. Now, to make the
whole process easier, we can determine
where the wrinkles on the lips are located
from the very beginning. And we're still in the sketching part here
for the lower lip, we determine them
in a light way, but then we can go over them
and darken them even more. We continue shading in this way. We apply our lines
as we see them. So sometimes we're looking at our model and we have our own, our own perception in our
mind of what the lips, what, what shade they need, what curvature they need. So we're curving
our lines as well. But we need to keep looking
at our model and applying, applying what we see as we
see it on our own drawing. As it was mentioned before, it's very important
to constantly sharpen your pencil as what we're working on is very delicate work and with lots of details. And we're going to
continue shading very smoothly, delicately and gently. So do take your time. We can modify and reduce
the color on the parts that have turned darker
than they should. Using our eraser. The initial sketching
layers that we add, it might not look like the actual result that we
want at the beginning, but we can, and we
should go back and work on them more to reach our goal. There are two ways
of doing this. We can either work on this perfectly from
the beginning and add every single detail on the spot before moving
to any other part. Or we can work step-by-step and add layers on top
of one another. However, in the latter option, we are actually
adding the background first and then applying the
details on different layers. It's really up to you. These two parts are
the lightest parts. So we're not going to
work on them that much. We want the white of the
page to shine through. However, we can add these
layers later on using our eraser because
these lighter parts are not pure white. So we can add a very thin, smooth light layer, but
we can do it in the end. There's no need to do it. Right now. Let's continue shading the lips and adding these details and building
those layers together. We are gradually creating
the texture here. If you have been
doing practicing, looking at your own drawing, as mentioned before, where
you stop and you look at it and you're able to see
what might be missing, what highlights
needs to be added. You can see those layers. We have different types of lips. But in the model that we are drawing the lips
that we are working on, we have a heart shape
right on this point, which is usually located a bit further than the other parts. So this is why it is usually lighter than the
other parts as well. So it depends on the placement
of the source of light. Even the shading
part of it takes the form of a heart
shape as well. It's just an observation. Really. Remember to sharpen your pencils or take a moment to do that, or maybe clean,
clean your erasers. Just so they're ready for you whenever you want to use them. And to keep your lines
delicate for the pencils. But the idea is to
keep practicing, to keep using your pencils. And the more you use them, the more your confidence grows with the medium
and the more we're learning the shading layer
that we're adding now. It's taking that form the heart shape that
we talked about. And it's the same
on the other side, which is the right side
of this lower lip. Let's keep shading. We are now working
on the upper part, the upper lip and erasing the lighter parts are bringing
back the highlight with the same head movement of the texture that
we want to create. So you are applying the lines in the direction that they need to be in order to
imply the curvature. Whilst also leaving, leaving space for the highlights to come through to appear. If you need to take a moment, like a break, to look away. Take a little break, maybe have a cup of
tea and then come back and look at your
drawing with fresh eyes. That's really, really helpful. It's one of the best
practices we can do because then you
come back and you notice things that you
haven't noticed before because we're so focused on shading and drawing the image that we were too
close to the image, so we need some distance. Now, we should pay attention
to the texture of the lips, as there may be some lines
like this vertically. These are the details that may differ from one person to the other and give texture to
the lips while being drawn. These wrinkles might
have different forms, so we have to be
careful about them. So every set of lips
you're going to draw are going to be different. We're darkening these parts
here and these edges. Just to add a dimensional
value to our work. It's important to create
this sort of outline, but in a shading manner, we're not drawing a
very straight line. Just increase the
contrast as well. As mentioned earlier, after adding the
initial shading layer, we should go back to
the parts we have already worked on and continue adding
more shading layers on the parts where it seems
maybe it might need it. Just like I'm going over the line in the
middle of the lips, the shadow which is
the darkest area, which is, that's where we
need to add more layers. Even if that means bringing out some highlights and whatnot. We're trying to create
the texture accurately. We've worked on the
darkest part and we continue working as well
on these highlights. So we see here in the
tone, the top lip. This part is not purely white. It has a very smooth
shading layer on it. You want to keep your
hand pressure light. And very delicately
adding that tonality, you don't wanna go
too dark either. Here we are using our mono eraser to create
the very light areas. Later on we'll be adding delicately adding shading layers right next to these parts. So you can have a
very light part and more contrasting part
right next to each other. Now I'm using my four B
Corps mechanical pencil. We are now going to add more shading layers and
work on the wrinkles, adding the necessary shadings. But what I mean by necessary, it needs to be in
the right places just to make them bolder. So if there are lines that
accentuate the texture, those outlines that give you those irregular lines
that create the texture. And some of them are darker
and some of them are a little bit lighter in tonality. That's what we're working on. So keep observing your model, keep observing your own
drawing and looking at what you've created so far
and make that judgment. Because there's also the
question of aesthetic. Maybe you prefer them to
be a little bit lighter, but still you have that
range of tonality. There's a difference
between drawing realistically and
hyper realistically. We are going for the realistic, realistic final goal
and not hyper realism. With hyper realism, it
would take even longer with more shading and
it has to be very smooth and very consistent. Or mechanical pencil
here achieves us that smoother surface, which is why I keep
going back to it. This part here is a lot darker, so we're going to
use our HB pencil with utmost attention. You want to really
focus on it and care as it is a
very strong pencil. It can very easily
transfer a lot of, a lot of color are
a lot of graphite, so you want to be
careful and not. I'm spread it everywhere. If you need to practice on a
sheet of paper on the side, just to give it a feel. Because sometimes
even though we've used the pencil before, it's it's okay to give it a try again or get a
feel for it after having used other pencils and make sure it's sharpened, we
continue shading. We have more highlights here. Yet it's not purely
white as we do not have a completely white area
while drawing this image. But you can clearly see the highlight in the
middle of the bottom lip. So we're going to add the
light on this part delicately. And that could mean
that we need to darken the lines around it, the darker details and leave
the highlight as it is. It could mean going in
with a mono eraser. We need to control our hand. And the pencil. The pencil we are using now
is very soft and very dark. We're going to use either B6
or before for these parts, just adding shading
layers that are lighter. Remember switching
between your pencils, achieving those
different gradients and different textures of pencils. It just allows your image
to be so much more rich. It has that range, it has that depth. So don't hesitate to switch
between your pencils. Have a sheet of paper on the
side where you get to shade a little bit and see
what it can give you. Here. Although I faded this part a bit with my fingers earlier. I don't recommend
using your fingers because it's very likely
to leave a stain. We are, we are much
closer to being done with with shading
these set of lips. However, we can
always work more on them and make them more
delicate and smoother. Shading is really a process
that needs patients. Because in order to achieve it or really make
visible all these, all these textures and tonalities and the
use of the pencils. And you could achieve a
very realistic drawing. You can keep going and
adding those details and working on them
for a very long time. So do take your time. Okay, Now we're gonna move on to work on the next drawing. And that's drawing and shading a set of lips from
the side view angle. As mentioned before,
there are many ways that can be used for
drawing the lips. The simplest of them being using the circles as we did
on the top sketch here. Now that we are going to
work from this angle, we can use the cone
shape to help us. We are basically using
geometrical shapes that will help us create the
form of what we're drawing. You can draw your
triangle freehand. This shows the width
of the ellipse. Now, this part is the concave point on
the lips, the top part. And then based on the size of the ellipse we're going to draw, we draw a line like this. Then we're going to take
the shape of the lips out of this triangle
that we have drawn. So once we've made
use of our guide, which was our guide
base here, the lines. Then we remove, we
erase this triangle. Remember that you can erase
as many times as you need to in order to create
your base sketch. Don't let it hold you back or
discourage you if you have to do it several times,
that's completely normal. If we consider the
shape and form of the lips to be
something like this, we're going to draw
it in this way. We have a little
bit of an opening in the middle of the lips. We have the concave
part at the top lip. The straight lines as
well as the triangle help us realize that there's more curvature and
the top lip here, the triangle needs to
be longer on this point here in order to draw the
angle that we're aiming for. If we're going to draw
the ellipse using the triangle as our health, as we have done here. From the front view, based on the size of the lips, we're going to draw
triangles and add line on this point when it
distances the upper part. And thus we draw the
convex point on the lips. Take your time to practice this technique of trying
to fit what it is that we want to draw within a
geometrical shape or using a geometrical shape to
draw the shape that we're trying to achieve based on
different types of lives. This triangle may look
longer or shorter. Now we're going to draw the lips from the three-quarter
viewpoint. We can use the triangle again. If you're uncertain
at any point in time, what the next step or how
to start this base sketch, just follow my lead. Keep your hand pressure light. Use a light pencil for
sketching here we can use both the triangle technique and the access technique
where you have a vertical and a horizontal line. It's completely up to you. Although I feel that the
triangle technique is easier. We will draw a shape
like this as it is located in the
three-quarter view angle, we curve this line
as much as needed. We use our triangle
as our contrasting these lines that help us create the curvature in contrast to it. Now we see the triangle from
the three-quarter view. And on this triangle, this would be the
lips we want to draw. Take your time if you need
to pause the video and then play again when you're ready
or continued together. As this part usually
has a curved shape, we're not going to
draw it completely. This part which is not close
to us, would be longer. And this part which
is closer to us, we'll look a bit bigger. So we draw it longer. And then to help us even more, we're going to draw
the line like this. Again, if you're uncertain
at any point in time, what the next step is, just follow my lead. Follow how I'm
creating this sketch. This is the part which is
located inside the triangle. Now we're going to
draw the lips as they are right out
of this shape. You can add a little
bit of detail on the lower lip just to
imply the curvature there. But we're just creating
different samples in order to create lips
from different views. It's really to practice. And again, the
more you practice, the better you'll get, the more confident
you'll get as well. Now we're going to
draw lips from, again, a three-quarter
view angle. However, we're going
to use the method we just discussed to draw it and the axis lines. And we can erase the lines we're not going to use anymore. We can also use the
access method and draw the axis lines as our guide to measure different parts and compare the proportions like
splitting an image into four using your axis lines gives you a chance to make
comparisons right to left, top to bottom. That's the idea. Really. Make sure your
pencils are sharpened. Then we're going to start. Now we're going to start
sketching and shading. The set of lips are
referencing this modal image. It's in a three-quarter
view angle. Remember that you can make use of your downloadable resources. Have all the
information you need for every tutorial you follow. You will have all
the model images on the downloadable resources, all the materials
that we're using. And basically any information
it's there to help you. I've created an axis here,
horizontal, vertical. You can draw them free hand, or you can use a ruler. I prefer a ruler because
the, the straight line, the geometric shape helps
me see the contrast between my own drawing where
my lines are more organic and my guiding lines
which are the axis lines. And now we are
drawing the lips from the three-quarter angle,
as mentioned earlier. We can draw another curved
line like this to help us. The idea with the drawing, what you see is that you
see it on your model image. You draw it exactly as
you see it on your paper. It's just also a very
straightforward technique. Draw what you see. It takes practice. Observing our model is very good practice to be able to see where
the highlights are, where the shadows are, and where the lines are
and how they're curving. That practice is
very, very important. That's why have your model
image placed in front of you in such a way that it's comfortable for you
to look at it as, as often as we need to. We can also draw the axis
lines on our sample picture, by the way, just for
better measurements. So you can draw these axis lines directly on your model image
that's in front of you. If you print it out, you get to see the four
different sections. Because the axis lines separate your image
into four sections. And these sections
basically help you make that comparison between left
and right, top and bottom. And each section in
comparison to the next. That's really the guiding
powerful element of the axis. As the mouth is partially
open in this sample, we have the lips
that are parted. We can see some of the teeth. And the teeth are, the brighter part
are very white part. So we want to keep that
the white of the page for, for the most part of
our drawing here. Just because it might
be difficult to achieve that brightness or with an
eraser if you shaded it in. So do take your time. A race as many
times as you need. You can pause the video, take your time to create
your base sketch, and then play again
when you're ready for us to complete the
image together. Just drawing in some of the
teeth here that I can see. We're almost done with
the sketching part. Then we should erase
any lines that we are no longer using,
any guiding lines. We need to compare
the different parts together and their sizes. So when I say we're
comparing left to right and top to bottom,
it's comparing e.g. on the top lip, the right
side to the left side. And that differentiation
automatically gives you a better reference and a better idea of how
to draw the lines. Now we start shading the lips. We can determine the
right places and draw the initial lines to show the wrinkles that
create the texture of the lips while we're
working on this part. Although it's the base sketch, you can add a very
light indication and the lines that you need
to build those layers. And I've started from
the right corner of the bottom lip and I'm moving
towards other sections. Keep in mind that the
axis lines we drew are the base or the guiding lines to create this sketch,
the base sketch. And now we are creating
the base sketch, which is the guide for. When you want to start
shading your drawing. So we've erased the axis lines once they've served
us were done. And now we are working
on the base sketch. We're determining the place of the shine on the lip as well, using a six B pencil. Then we continue sketching. We need to keep in mind that these lines here
have a semicircle look just like this in
the three-quarter angle, so they are a bit curved. You want to show
that the shape of the lip or the
curvature of the lip. More specifically. We are making our lines
bolder at this point. We want them to be a little bit clearer because we want
those details to show. We're shading. I'm using these long
circular motions. We use the six B pencil
for the sketch as well, but we could have used
the HB or to-be pencil. We're going to add a
very soft shading layer on these lips as they do not have them many wrinkles on them. Take your time and enjoy
the process of shading. We are now adding a
very soft background, paying attention
to the lights and shadows and the darker
parts created on the lips. We need to be very accurate
with our sketch and observe it several times before moving on to
the shading part, as it would be much easier to
modify the little problems stage now before we
enter the shading part, because when you've entered the shading part where
you've built layers, it's difficult to, It's a shame to have to
erase through them. So it's better to
make the changes now at this point and
make that modification. They are very delicate
and thin lines on these parts which we are
going to draw later on. Once we're done
with our shading, as they can easily
be added using a sharpened tip of our pencil. However, the lips
texture is much softer and the
texture is totally different from the previous
lips we have worked on. There are some linear
lights on these parts which we are going to
draw using our pencil, determining the right
place for them. However, we can always add these lights later
on using our eraser, specifying them even more. Remember that we can also add these lights using the brush. Also the white gouache
with a tiny bit of red and gray would also
do this job for us. When applied in the form of the very linear lines
with a small brush. We can use that
technique to help us in terms of the, the highlights. However, we can easily create
these highlights as well around the shadows using just our pencils and
our mono eraser. It's a matter of
preference really. We're going to shade this part just like
the other section, As they have similar texture, but we need to
build those layers here and increase the contrast, which increases the depth of
perception in our drawing. The lips have taken
their form and now we are going to work on
the lower part of the lips. We're going to shade it and
show the convex point on it. It's just a little extension of the drawing to show that
curvature down here. This over here is
the darkest part. But we're not going to add a very dark layer
all over this area. Instead, we're going to add
the shading layers from this point and
gradually move upwards. When we reach this point, we are going to
fade the shading. So whatever lines we've created
that might be or shading, there might be a bit too dark. We need to fade it
because there are these little details that
we want to keep showing. So let's continue
building those layers. On this point here, on the bottom lip on the right, we have the bigger shining part which reduces as we
move towards it. However, it is
still lighter than the other parts and we can see the highlights
that I created. It's almost like an
irregular shape, but we want to, we want to hold on to that and keep it bright. Let's work on the
shading around it. Be at the edge of the lips
which has an outline. But it's still shaded in. Even the details are
shaded in whilst leaving the highlights
nice and bright. We are now going to shade the teeth because the
teeth also are not purely white and have a very
slight, slight gray shadow. So we want to, we want to work on
that and we want to work on the outline, that line that is on the
top of the bottom lip. Just to give it that
contrast right there. If you're unsure at
any point in time where to apply the line or
how just follow my lead. We need to be very
patient when we are shading in this way
using our pencil. The beginning when we are first applying these techniques
in these ways, it is normal that we spend more time to be
delicate and precise. And it's, and it's truly with practice that we can speed up this process because our decisions
become more instinctive. Once you've practiced enough times you have that information, you make that selection
in terms of pencils, you decide on your hand
pressure instinctively. And therefore you
work a bit quicker. But do keep practicing. It's the only way to gain
confidence and to use your medium better and
to understand it better. So the more we use our pencils, the more we know how
to manipulate them, and the more we
understand what kind of aesthetic they can give us, what tonality they can give us, what shading effect
that can give us. So here we have worked on this light over
here with our pencil. But it must be
lighter than this. So we're going to
use our eraser on it and create the light. So all the highlights
that we have here, they need to just be
accentuated a bit more. Now to make the linear
lights even bolder, we add smooth and delicate
shading layers on their edges, especially here on the
wrinkles, on the lips. There are some white
parts left which are not supposed
to remain white. We should work on them. We can fill them up using very delicate hatching lines or by adding dots
on those areas. And we do it very lightly just to add the
lightest tonality and to avoid having that
stark whiteness on the page or in
the general drawing. We have added some small
lines using our eraser here. And now we're shading
the corners of these lights to add
more depth to them. By shading the corners, you're accentuating
the outline around it, but you're doing it in
a shading technique. At the same time, we keep
in mind that these lips that we are drawing
have a very soft, delicate texture
here that we see. It's very uniform. So we're trying to work on
that a little bit more. Our drawing is almost
completely done. We use two methods
for drawing the lips and applied them on
two different samples. One of them is to
use the circles, three at the top and
two on the lower part. Then we can draw
the ellipse out of these shapes as we did
in the top sample. Another method was using the triangle as
are helping guide, which is most useful
while drawing the lips from a
three-quarter view angle. These shapes and forms can
change sizes depending on the shape and the angle that
we're drawing the lips from. We just need to practice and
choose our preferred method. Thank you so much for joining me and see you in
the next tutorial.
10. How to Draw Different Hands: Hi there. Welcome
to a new tutorial. Today we're going to learn
about sketching hands. But at first we're going to
learn about the hand anatomy. There are 27 bones
from the fingers to the wrist that
include 14 finger bones, five palm bones, and
eight bones of the wrist. Let's take a moment just
to observe our own hand. So we have the finger bones which are separated into
three sections each. We have our palm bones, which are five bones. Then we have our wrist bones
here, which are eight. Now we're going to
sketch the hand anatomy. We should know the anatomy of
different parts of the body in order to be able
to draw it perfectly. Before we start, I just
wanted to remind you of your downloadable
resources which have all the information for
every tutorial you follow. Now, every finger is formed of one tall bone at
the palm and then the top, which is the finger,
has three bones. We know that the fingers of
every hand have 14 bones. Understanding the anatomy of the hand will help
us draw it properly because we know the
form or the shape of the bone or the way the skin is sitting on top of the bone. So you can achieve a lot
more detail by having this understanding
of the subject. Let's start with the bones
of the tip of the fingers. These and add the nails. We are now drawing the
bone of the pinky finger. Every finger has three bands, except for the thumb. These bones of each finger
extend until the palm. There are five
bones in our palm. And they extend on the top
here into three sections, which are the fingers, except for the thumb
which has two bones. All the other fingers
have three sections on top and a long bone
into the palm. There we have it. This is the pinky finger bone. Now we're going to work
on the other bone. The next finger, this one
is taller than the pinky. This is the same
as the last one, except this one is more extended and a
little bit thicker. We continue drawing every
next finger in this way. Here we have it. This finger is what we
call the ring finger. The one right next to the pinky. Now we're going to work
on the middle finger. This finger is taller. The size of the fingers is different for every
person of course. But also the size of the fingers are
different from each other. This part is like a puzzle. It has a hole and a knob
that match together, and it has a joint
spot between them. It's very good that we
know the anatomy in order to properly make a
drawing of the hand. As mentioned earlier, it gives you the right
information to know how how the muscle sits on the skeleton and then how
the skin sits on the muscle. Understanding that
structure helps us make our drawings
more accurately. Make sure you're using
medium pressure. And these parts at the
bottom of the fingers, they're connected to each other. Now we're going to draw the
next finger, the other bone. This is the index finger that has almost an equal size
with the ring finger. For the majority of people. In terms of length, that is width or thickness, that of course can differ. I would advise doing a
little bit of research, are looking at some images
of the anatomy of the hand. Just to familiarize yourself with the way it
looks, the shape, the you might get more information from a more
3D picture or photograph. And it just helps us
learn a little bit better what we are drawing. Now, this is the connection of the fingers at the bottom here. And on the top knuckles, There's a sort of curved
alignment across horizontally. I'm using my eraser to
make an adjustment. Use your eraser and go back and forth and redo your sketch as
many times as you need to. It's not a problem. Don't let it discourage you. It's something very normal. As we know, the thumb has
two bands, that's two bones. We're going to work
on that in a second. Just trying to determine
the place for it. Make use of your model
image that's available on your downloadable
resources if you've printed it out or maybe you
have it open in front of you. You have these images and
some outlines to help you make this base drawing
as we're doing here. They're there to help you. I'm just completing
my drawing here. Now. If we count the bones, we will count 14 bones. And then we will be drawing the five long bones in the palm. Take a look at the
different bones here, the different sections. There's similarities,
dissimilarities, their alignment. All of this helps us. We also have the
bones in the wrist. We're going to
draw them as well. Here we are drawing the connection between
the fingers and the palm. This bone here supports
these two fingers, that pinky finger
and the ring finger. So in total we have eight
bones in this section here. One of them is supporting the pinky finger and
the ring finger. Then next one is under
the middle finger. And then we have one that's
underneath the thumb and it's there and
underneath the index. So in total we have 27 bones. This part is called the
fella and just this tall. I've just marked the
different sections just to be able to show them. This part is the
middle phalanges. This part is the proximal
phalanges down here. This part is the metacarpal. This part is carpel. So these are their scientific
names, phalanges, distal, middle phalanges, proximal phalanges,
metacarpals, and carpel. Now we're going to sketch
different models of the hand. We learned the right places of the hand bones at
this point in time. So we can go ahead and create sketches of
different hand models. Let's make sure all our
pencils are sharpened. We have our eraser
nice and clean. When I grab a new
piece of paper. And I'm using a to B
pencil to begin my sketch. Okay? So we can use symmetry lines
for our model or paper. We can also do it without
any symmetry lines. That's completely
up to you really. But if at any point
in time you're unsure as to what
the next step is, just follow, follow my lead. But let's start with a
sketch of a simple hand. Remember that the base
sketch is very important. So erase as many times as you need to until you're happy
with your base sketch. Take your time if
you need to pause the video and then play when you're ready and
we continue to gather. Just take your time. Now. Look at the form of
this finger and thumb. Observe your own hand. Let's take a closer look
at our model image. Look at the curvature
here in this thumb. Look at the shadow
and the light. Place your model image in
front of you in such a way that it's comfortable
for you to look at it as many times
as you need to. Let's continue sketching. Make sure you keep
making measurements. As you create your sketch. You have the width of the hand, but also the distance between this part until
that part here from the thumb to the top
of the index finger and the space between
two fingers, e.g. these measurements can be done using the pencil measurement, or you can use a ruler. If you've printed out your
model image like on a paper, you could also measure
it in that sense. Either way, just keep
sketching, keep drawing. It's not going to look perfect
from the first time, even, even when you do achieve
a really good drawing, it's not going to look like your model image unnecessarily. The idea is to not
just practice, but also learn from the process and to enjoy
it, enjoy the process. There are things such
as happy mistakes. So you've used a certain
technique and then realize that it gave you a
really nice effect and so on. So just take your time
and enjoy the process. Now on our current drawing, we have to pay attention
to the details. So e.g. these two parts, they're
connected together and yet there is a space
between these parts. We should consider
these kinds of details. They, they bring us closer to creating an image
that's realistic. Now as we're creating the
general form of the hand here. For me, it's almost like it's almost correct
that I'm happy with it. And if you are happy
with your base sketch, just check, check
all the details. Make your measurements again
in order to make the edits. Now, before we move
on to the next stage, it's always, it's very good
practice to double-check. Here we're going to
sketch the nails. We continue working
very lightly. Adding any details that
you feel you want to add, even if they are
really light details, at least they give
you an indication of where you might want to remember a certain shadow or
certain highlight to avoid coloring in and so on. Now the tip of the
fingers is flat and has a relatively
squarish form. We have different
forms for the hands as well and nails there are different each hand
that you draw. But this is the one
we're working on now. Now we are working on the wrinkles and the lines
of the back of the hand. Just apply your lines
as you see them. Now we're going to
start the sketch of another, another hand model. From the side view. We repeat the same process. You're very lightly with light pressure creating
the base sketch. And we're just trying
to study the form and the perspective of different angles of
the hand really. All right. We have to pay attention to the position of
the fingers here. As mentioned earlier, we
want to double measure, make our measurements
more than once. Keep observing our model. This part here is for
the second finger. We continue sketching. We're sketching different models based on the anatomy
that we've learned. We should practice in order to imagine the
correct place of every bone and joint and the bending of the
fingers as well. It helps us understand how
to create these lines. That's essentially what it
is that we are practicing. The more you practice, the easier it will come to you. It'll instinctively come to you. Now keep in mind that you can use your own hand in order to practice drawing
different samples or different models of the hand. Because it's your most primary, your most primary model like
you can observe your hand and make the drawing according
to what you see exactly. A live model is always so much better than a paper model because it's 3D, it's
in front of you. You get a lot more
information visually. So those are all
important parts. I'm just completing my
sample here, the second one, because the fingers are right
next to each other there, they are forming a shape, but you need to distinguish
the fingers from each other. The first finger
here, the index. It goes along the same curvature or the same line in terms of drawing with a thumb,
they're almost connected. Remember that there are
various and different models for practicing drawing hands and we can use geometrical shapes
to help us Draw, draw the hands as we've
done in previous tutorials. It's important to know the
anatomy for sketching. And it's important to also maybe try and apply those
geometrical shapes like circles for the, for the bones
connecting or maybe rectangles for the different
sections of the fingers, the three bones on top. So the idea is to
simply practice. Now we're going to
sketch the next model. Just want to complete
this one here, the nail. And we move on to the next one. The thumb finger in this
sample is more extended. Remember to keep
observing your model. It has, it's the best reference, it gives you the
best reference in terms of where the lines are in comparison as well to
the fingers, to each other. Where their placement is, what the curvature
of the lines is. Keep looking at your
model and keep looking at your own drawing and
what you've created. This sample is almost done. We need to check and adjust the wrinkles on the
lines of this part. In this lesson, the general form of
hand is more important than the details like the
wrinkles on the skin itself. So that's why we need to
work on the line values to specify the form or the lines that define
this form for us. This is what we're
practicing here. Now we're going to
sketch the next model. Makes sure that your
pencils are sharpened. We're just getting in
closer on the image here. We continue creating
our next sketch. Feel free to send
me any questions you might have along the way. Also, you can share with
me your final drawings or final sample that
we're drawing today. I'm more than happy to share
with you some pointers, some feedback. I'm here to help. Remember that we can also sketch the wrist at first and
then draw the lines from the wrist up to the fingers and complete our
drawing in that way. I feel like sometimes when
I start from the wrist, it helps me sort of anchor
and view the whole, the whole image of the hand better so I get
to draw it even better. There you have it. This
is the form of this hand. The natural form of the
thumb is like this. I'm just trying to look
at our model image again, just to take a look
at the hand here. It's very good practice
to keep measuring, keep looking at our
model, keep observing. It helps us create an even
more beautiful final image. Remember that you can also use the axis lines
technique as a guide. So sometimes even if
you draw the axis, not, not a straight lines
but a little bit curved. These guidelines help you make comparisons between the
bottom part and the top. And making those measurements as it helps you get as closer, closer than without them. Especially if you're
at the beginning of your art journey. We are checking the
measurements here. Again. This should be shorter. We can remove the thumb or this entire part
and redo it really. Just trying to make a decision. It's better to edit
the thumb because the top part looks okay,
closer and proportion. So let's work on this part. You might have done it
really well already. It's just me who
needs to redo it. Please remember that
it's completely fine to make as many
edits as you need. Take your time. Pause the video, play again when you're ready. But making edits is
completely normal. It's necessary. And it essentially helps us observe our model even better. Because the more we were
drawing the sketch, the more we're
actually looking at our model image and not
just looking at it. That's what I mean by
observing that you can see the highlights and
the shadows and you can see the
lines even better. And that only gets easier
the more we practice, it becomes more instinctive. Let's continue
sketching this sample, adding a little bit of detail on the knuckles and
the fingernails. And then we can go
over the other ones. In this sketch is almost completely done. We need to check it again. And you check simply
by observing, pull your head back, maybe look away and then look
back at your drawing and you'll automatically
see what highlights or shadows might be missing. We can also make comparison
with our model image here. Look at what, what we might have missed out or maybe some lines can be more correct. Creating these outlines
is very, very important, especially if you're
at the start of your journey with drawing
in pencil drawing, these outlines are just as important as adding
more details later on, such as sketching
and shading and harmonizing between
the tonalities and using all the
different pencils. So it's very good to
use lines at first. It's very useful for
different parts, especially if you're trying to create those quick sketches like 1 min sketch or
five-minutes sketch where you must get the lines
right in the right place. So very good exercise. I'm just erasing any
unnecessary lines, cleaning up my paper here. Drawing. Now we can add some line values. For this part. Line values are more
definitive lines, lines that you decide to make darker because they're
exactly as you want them and they
help your image gained contrast and look closer
to being realistic. Now, let's work on a new set
of samples for the hands. This first model
has a fist form, but it's not completely closed. We're creating these
different samples in order to practice. And to get a little bit more
familiar with the hand, the hand structure or the hand forms and the
lines that we could create. And to get a chance to maybe if you want
to switch pencils. But in general it's
to practice and to get a better idea and a better set of
samples that you can reference in the future
for your future drawings. Remember that we can
use different diagrams for the forms of hand, e.g. after drawing, we put our, our index finger on
this part, then format. We can use a square or
a cube shape as well. If you wanted to use
geometrical shapes. It's really up to you. As we are adding the details. Let's remember that
we can also practice with different models that
have finger forums like this. And as mentioned earlier, we can use our own
hand as a model. The form of the index finger
is not completely straight. We should pay attention, consider all these things. There's a slight bend in the knuckle and the
second joint there. So it's important to
add these details as they bring us a bit closer to making our
drawing and look realistic, even, even if it's just
mainly lines or outlines. Add all the details
necessary in order to make your drawing look more complete. So a little bit of
shading on the knuckles. Maybe also the outline
itself is shaded and not just a straight
line that's on there. A little bit of the
detail with the bones, the palm bones here. We do this in order to
create the form better. Now we're going to sketch
the hand from the front. This is our second sample. I'm starting here from
the bottom, which is, as we talked about before, starting from the wrist. I find this, this
strategy to be helpful because then I'm anchoring the hand with the
size of the wrist. And obviously
changes can be made. But starting off with just
the basic simple thin lines, we can move forward to
create our drawing. We can also use
geometrical shapes like a square and an oval for
different parts of the hand. These can be really,
really useful. Remember that you can
place the position of the fingers using lines. So you can use your ruler. You can also make
measurements on your model image if
you've printed it out and mimic those measurements on your own drawing in
order to get a closer, closer, more accurate drawing in comparison to your model. Take your time. Keep observing your model and draw the
lines as you see them. The more you practice, the more we get better at looking at our
model and creating those proportions and
drawing these distances. We can use circular
shapes are circles. When we start sketching
from the palm, you have the poem as a
circle and then you have rectangles that can
point out of it. It's just an idea to, if you're using the
geometrical shapes guideline. And every hand you're
going to work on, it's gonna be different.
Just keep practicing. Other than adding the
details such as the Neil's, we want to add
wrinkles or lines that you find are giving your
drawing more characteristic. If you find that the
wrinkles, obviously, wrinkles on every hand are very different and the
texture is different. But here since we're dealing
with lines and some, some creases in the
hands can be very specific to the model you're drawing and it gives
it more characteristic. We go ahead and redraw it. And palm lines, of
course they are different but they are
more prominent, let's say. So it's good to add
them even if lightly. Now that the drawing here, the second one is
almost finished. Then we're going to add the airline values
are aligned values, as we said before, they are more definitive lines. They're a little bit darker and the sort of bring that height, heighten the contrast
in your drawing. Now we're going to
sketch another model. This model is from the
front view and with the index and the middle finger pointing upwards as well
as the thumb is pointing, but it's those two fingers that are grabbing
the attention here. Let's start as we have been from the
bottom, from the wrist. Let's create our sample. Again. Remember you can use any
guideline technique you want, either that axis, axis lines
or the geometrical shapes. It's completely up to you. This model is now
finished for us and we start adding
our line values. Again, these are the
lines that sort of finalize your line drawing or
you're drawing of the hand. They are more definitive
and a little bit darker. This part of the
pinky finger here is sitting right next
to the ring finger. We're just creating that detail. We also have to add the lines, the lines of the poem. These help characterize
the front of the hand, from the inside of the hand, from the back of the hand. I'm just referencing
my model image here. Looking at the details, maybe I've missed something. And then we're going to
draw the next sample. It's going to be a fist at hand. Makes sure your
pencils are sharpened, your eraser is nice and clean. And let's take a look at our model image and
start sketching. As we're creating
the general form here of the hand, the hand. We have this part that is not completely straight,
is slightly curved. And I'm using my own
hand as a reference. I have my model image, but also our own
hands can give us extra information as to
how a certain curvature, certain line might
look. We keep drawing. We need to make some edits here, so I'm going to use my eraser. Then we'll add some details
to the nails as we have done with all the samples and maybe
some wrinkles increases. This model is completed. Now we have our second
set of samples. And let's get ready
for the next set. We're going to draw the
signs of good luck, okay. Here we are starting
with the first sample of a set of hand signs. Good luck hand signs. We're repeating the
same sketching process that we've been doing
for the last samples. And we're continuing to
practice not just drawing, not just creating the form or the general shape
of these hands, but also practicing
looking at our, our model and adding
the necessary details to bring its characteristic forward and then adding
our line values. Take your time. Even if the results are not as perfect
as you want them to be, don't let it discourage
you. It's a process. It needs practice and you'll get better the more you practice,
the better you'll get, the easier the process will get, and the more instinctive you'll
become with your choices. Okay? As you can see, the sample, the hand is not
completely fist ID. Now we're checking
the measurements. It's better to practice our
eyes for measuring instead of using a ruler or the pencil
measurement technique. But it's okay to use the measurements especially
in the beginning and especially for a long
time whilst practicing. Try to look at a model and
sketch at the same time. That's very good
practice to try and do it freehand without
any guidelines, you just draw what you see. Now we are specifying the nails, the positions of them. And then we're going to add
our line values, which, which are the darker lines
but more definitive, and bring out the
form of the drawing. Now that we're done
this for sample, we're going to start
a new sample of a hand held out as if taking something from someone or maybe trying to catch
some droplets of rain. As this drawing might be a
little bit more challenging in terms of the form of
the hand, the perspective. If you're unsure at any point in time as to what
the next step is. Just follow my lead, follow my hand movement
and pencil gestures. And let's take it from there. Hi. We're just making some
final adjustments here. Remember that all these
samples that we've created, if we're happy with this
base primary sketch, we can go in and shade them. And especially with
this one right here, it's one of those, one of those samples that
kind of inspires me to shade it and work on the
highlights and the shadows. But essentially any
of these samples are ready for you to sort of
maybe attempt shading them. Now we're just adding
some value lines to our drawing just to make it stronger and give it more characteristic
and presence. Now our next sample
is a handshape that is inspired from a
yoga yoga stance. This handshape is essentially the index touching the thumb. And the remaining
three fingers are in alignment or in a sort
of opening sideways. It is a little bit
of a challenge, but we can do it. Start off from the rest. Keep observing your model. If you need time to take
a look at your model, just pause the video and then play again and we can
continue together. And remember the point of doing these different
samples is to yes, practice and get more confident and familiar with
making such drawings, the line drawings and the
minimal details that actually bring out the true characteristic
of what we're drawing. But also to build your own
confidence with the medium. Just go at it no matter
what the result is, just enjoy the process. And you will learn
along the way. We're trying to sketch all
the fingers as we see them. We continue building our
drawing as we move along. This sample drawing
is almost complete. We're just adding our
line values here just to have the general form and shape of the entire
hand more definitive. Now that we're done with
these three samples, we're going to go on and
create one more sample. I want to look at my model here. Just observe it really well
before I begin my sketch. And this model will be the
last one in this tutorial. This model is almost done. We're just finishing
up our line values. Now today we learned
about the anatomy, the hand, and we've practiced different forms of the
hand and drawing them. I really hope you've enjoyed the process
and you didn't feel overwhelmed because
of the many samples. But it was essentially
repeating the same technique, but trying to achieve
these lines and observing our model really well. Remember keep practicing. Use different pencils and play around with their
medium and discovered more. Thank you so much for joining me today and see you in
the next tutorial.
11. Girl with a Pearl Earring Portrait: Hi there. Welcome to another
drawing tutorial. Today we're going to draw the
Girl with a Pearl Earring painted by Johannes
Vermeer in 16 65. Make sure your
pencil is sharpened. We have drawn an axis
on our page here. We first draw these
lines both on our paper and our sample drawing
like our sample model, in order to compare the
different proportions and make comparisons between the
top and the bottom, the left and the right. We also consider all the parts
before we start drawing. So if you need a
moment to observe your model, Take your time. We're starting from
the forehead here. And we check the proportions
with our modal image. Now remember to make use of
your downloadable resources. They're available
for every tutorial that you follow and they have all the necessary information for this for every tutorials. So the materials, the
access that we're using, the outline you need in order
to draw your base sketch, your model drawing, and so on. Now as I'm starting
my drawing here, I already need to
make a modification. Remember, making
modifications is normal. Do it as much as you need to. Until you are satisfied
with your image. Take your time, keep your
hand pressure low to medium, and keep drawing. Our initial sketch
remain need to draw an erase several times. So don't let that hold you back or maybe discouraged
you. Not at all. We're going to build the layers. So first we need to
create this base sketch. And it's very important because we want this base sketch to
be as precise as possible. It's not meant to be like
our final drawing is not meant to look exactly
like our model. But we want to get it as close as possible in terms
of measurements, proportions, and so on. We are checking every single
section in proportion and in comparison to our model and also in comparison to
every next section. So if I'm working on
the top left here, I'm making comparison to
the bottom left and making those measurements like
how long is the knows how far does the forehead
go and so on. The eyes are located
on an oblique access. The nose here and the side of the nose
and the nostrils are showing all these details. We want to go over and achieve
them in the right places. Take your time. If you need to pause
the video at any point. Do so and then play
again when you're ready to keep drawing together. Although if at any
point in time you are not certain
about any next step, just follow my lead.
I'm here to help. Feel free to send me your
questions at any time or even share with me your final drawings or your
drawings at any stage, really, I'm more than happy
to give you some pointers, maybe some feedback,
or some guiding notes. Now, we start sketching
from the top of the scarf. So we've, we've
worked on the face. And now we're sketching from
the top of the scarf to determine where it
is located exactly. It will help us frame, frame the entire, the
entire head and the face. Now that we've drawn the
general form of the head scarf, we want to work on
the text style. We wanted to show
some character like the characteristics
of this cloth. Then we're also going to work
on the upper eyes again. Just finishing the detail
of the head scarf here. We need to check
every single detail when we move from one
part to the next. We're continuously
looking at our model, but we're also looking
at our own drawing. And within, let's see, e.g. the bottom-right
square of r axis. How far down does the scarf go? How far in is the earring, e.g. add as many details as you want. But at this stage we're
doing it lightly. We're not putting a lot of
pressure on our pencil. And at any point in time, if you need to sharpen
your pencil, go for it. It'll give you a
more detailed result or more delicate
or thinner lines. Even. I'm defining the ear here. And working on the
upper part of the eye. We want to determine the shadow that covers her face here. There's a shadow that I see. I just want to mark on
the face where it is very lightly dressed to keep in mind that that's
the lighter area, the area that might take its brightness from the
white of the page, right? So we want that to be
as bright as possible. Now, here, at this point, if you've gotten to the
same point as I have, then some axis
lines we don't need anymore because they've served their purpose,
they've helped me. I have created my
drawings so we can erase these axis lines
from inside our drawing. I'm just going
over some details. But for now, at this
stage we're able to, we're able to start
shading if we wanted to. Because we have all, all of the all
rounded information in terms of form and shape. And we've marked where
the shadow is on the face and maybe some
detail on the head scarf. And now we work on the eyes. We will observe the sketch carefully to see if
everything is okay. If anything looks
visually out of place. And we start shading, we're adding some
line values here. Line value is a more darker line that defines the form of any certain part
that you're looking at. So right now the eye, we have outlined the iris. And now given the
pupil some detail. Now I'm going over the
eyebrow just a little bit. So they are intentional lines. They are not lines that are
light and everywhere they are more darker lines and
they're more intentional. You, you know where you're
putting that shade. Again, keep your hand
pressure medium. You don't want it to be
too intense because you don't want to make an
indentation onto your paper. If you want to work on a
shadowed area or a darker area, as mentioned earlier,
you simply go over it again and again. With medium pressure. We continue working on
our drawing in this way. Now we're going to make
some edits to her lips. Make your edits and your
adjustments as you see them. So if you're working
in a certain part, Let's not postpone making that correction because
our eyes are focused, we are working on
these different parts. So we're editing this
drawing here are redoing it. We can see the problem. Very good practice would be to stop every couple of minutes, pull your head back, maybe look away and
then look back at your drawing with a
little bit of fresh eyes. Just two, it gives you a chance to take a very small break. And this break allows you to
see maybe what's missing. If something is
out of proportion, maybe the chin can be different. Maybe some highlights can
be outlined and so on. Now, we can start
shading as I've, as I've started from the
edge of the nose here, we're working more and
more on the eyes. Now. Holding my pencil as you see, our pencil has become too short to be controlled while drawing. So it's better to use this pencil holder to control
it better while drawing. So you can move your hand
down onto your pencil. But if it's uncomfortable, we have a pencil holder like this one that helps you extend
the length of your pencil. This is very important
because it keeps your hand or your palm where you're
placing your palm away from your drawing so
you're avoiding damaging it. But also you're continuing to apply your lines
very delicately. As I'm saying this, I realize I'm holding my pencil
very close to the tip now because I want to create
that detail on the eye. This just reminds us that
in the end will always work with what we are
comfortable with. So don't feel forced to
use the pencil holder. I mean, I'm not using it myself. I'm going to continue because
I'm paying attention to my risk not being heavy on my drawing in order
not to ruin anything. But I'm holding my
pencil a bit closer at the tip because I
want to achieve those details for the eyes. They do need a little
bit more modifications, so I'm working on that part. The eyes on this portrait are not located on a straight line. So they're slightly tilted. They are on a diagonal axis, in a way imaginary axis. This is one of the facts we
consider while drawing and trying to apply our
lines precisely. We have locked away. We can skip seasons that may be here with us
to stay here with us, to stay here with us this day. We have lost control. Don't know where
to go late to turn around his dream for the girl. Fall. Within this J folder. And we continue shading. And we also need to
consider the fact that the portraits eyebrows
are very, very light. We've got we've got some may never stood. See things your way. You probably feel the same. Probably fair to say. You probably going
down in flames. I'm just screaming. Didn't seem to care. Jasmine. Jasmine. Guess we weren't. We continue shading and adding
these details. Remember to keep an eye
out for the highlights. You don't want to touch
these or you want to build shades around them and leave the highlights for
one of the last parts in case it needs a
very slight shade. But for now we want to leave
it the white of the page. And we continue shading one
section after the next. So we've worked on the nose, we've worked a little
bit on the eyes, and it doesn't mean
that it's finished. We will keep adding
layers as we move along. You just didn't seem
to care. Guess. Guess. Guess we work with oh, we got to crash. Well, you've got to lay we
have gotten all you guys. We're shading the
portrait here and determining the dark parts
using hatching lines. So in the past and
other tutorials, we have used hatching lines, which is small, thin light
lines that are right next to each other
in order to create a shadow or a shade. You could use
crosshatching as well. But here where e.g. we have the eyebrows
that are really light. We were using hatching
lines very lightly. We can't really define the single hairs just
from this model. We are shading the portrait. We're working on the
little shadow here. This part on the portrait is
dark and needs more shading. However, we have used
thin and small lines to show it so that no
marks remain on the paper. We don't want these
definitive lines showing we want it to be smooth and nicely harmonized
with everything else. We want it to be faded. So take your time. Let's continue shading. We've got we got in the original painting, we can see this darkness
on the face as well. This shadow here. As this is one of the most
famous paintings in the world. Really, a movie
has been made with Scarlet Johanson
playing the role of The Girl with
a Pearl Earring. But the important part
here is to remember that these shadows need to
be done very smoothly. And we need to feed
them and work on them and build those
layers step-by-step. Now we will start
working on the lips. Keep observing your model. Take your time. And notice how I'm shading in
these circular motions. These help keep the
shading marks very, very delicate and smooth. We're still working on this drawing by adding
shading layers to it. The more layers we
add delicately, the more we add to the depth
of perception of our work. Okay, hello. As we continue shading and
working on our drawing, remember that we
can also add cross hatching lines to
shade this portrait. So here I've created diagonal lines on the
side of the face, but then I'm creating
a cross hatching. They are more vertical lines and horizontal lines that
are crossing each other. But I'm doing it very
delicately and very lightly on these
different parts. It works better to build
those layers step-by-step in order to create the darker areas and adding that shadow
that we're looking for. We just want it to be smooth. Remember that you can send me any questions you might
have along the way, or maybe any final drawings
that you've achieved in a way that you find as interesting or might
have questions around, I'm more than happy to
address any of your of your concerns or
maybe share with you some guiding pointers
or just for sharing. I'm happy to receive
your final drawings. First, we're going to erase the axis lines here that
we drew at the beginning. Our drawing looks cleaner because you don't
want these lines to. You're, you're,
you're drawing here. So I'm going to use my eraser
just to go over the face. So I want to remove
these lines from inside my drawing because they've
served their purpose. I no longer need them. Then we will work on any
empty spots remaining on the portrait in order to
add shading layers to them. Now we will work on
the teeth. At first. It may look like we need to edit the teeth and draw
them a bit higher. But actually if we add the necessary shadows inside the mouth that are
caused by the top lip, there would be no need
to erase anything. No need to draw them again. They are, they are looking okay. We're addressing the
shading layers on the nose here as it looks like. It needs to be a little
bit smaller maybe. And now we're going to add
volume and dimension to it. From this perspective. I'm just taking a bit of
time to observe my model, but also observed by
drawing in order to create the nose or work on
the nose a little bit better. We can see this light part on the nose here in
the original painting. So we just need to
work on the shadow that's that's next to it. In order to give it that form
without using a sharp line. We should not see any clear definitive lines on these parts. They are here at first because we use them as a guideline and they are light. We use them to determine the right places
for the shadows. So we added these lines. Now that we are
shading the portrait, we must not see these
clear, harsh lines anymore. So we're erasing them or
removing them along the way. And we're adding very
smooth shading layers on the sprites we want.
So we won't see these. Ideas to shade these
sharp lines away. And generally
speaking, because we are working from dark to light, which is what you would do in
pencil drawing or shading. That's how we need to work. We don't want any sharp lines. We want to shape them in or
soften them or fade them. Remember that we can use hatching lines like
this for shading. And we can also work
on the background and the different
layers step-by-step. Whether you're using only hatching lines or
crosshatching lines. Either way, your
application needs to be primarily light,
smooth, and consistent. So whether you're working on a darker part or that has more
shadows or a lighter part. The technique needs
to be consistent. So visually our drawing looks logical and all
parts look coherent. Hello. Now as these parts here
on this car for a darker, we're going to add
more shading layers on the hatching lines
we have already added. So our primary hatching
lines on the scarf, on the head part, they
are more prominent. You can see, you can
see my lines there. But I want to work on
them a little bit more. Maybe heightened that
shadow here underneath in the bag and increase the
shadow using more layers. We can also fill these
parts completely. I had a smooth shading
layer on top of it all. So the white parts on top
which are highlighted, you can have a very light, light, dark shade over there. But that's something
we're building towards. We're smoothly adding
the shading layers. Though we are not completely
shading the whole portrait. It is like we are showing
exactly in which parts we do have the shadows and the lights
and looking out for them. Simply outlining the end of the scarf here where
it's coming down. Made sure my pages nice
and neat and clean. It gives me a moment to
look away or look at different details So
I can try and look at my image with fresh eyes. Here we are adding the lights and shadows
on the textiles. We can add the shading
layers in the same manner the painting was
painted or the same way that we see them on
our modal image. We can do that with more
definitive brush strokes. It's really up to you. But essentially, I would
prefer to simply continue with hatching lines or
crosshatching or even the circular motion
shading technique. If you've used that. If we are using the
hatching lines, it is very important too, in an organized way. So take your time. That's why shading
needs patients. Because also the initial
hatching lines that we had added on
these parts were not they're not necessarily
well organized and they are the first layer when we started adding the
shading layers. But then we've added
more on top of them. And we want to continue being
more and more organized so it can remain very
smooth and clear. Also remember that you can also use different
pencils in the process. The hatching lines and
the shading layers must match and
complete one another. And we want to be careful
as to how we're adding them because we're basically creating a balance between these two. Even the cross hatching lines, they must follow this
rule and be regular. That's what we mean
by consistent. And we need to observe and keep that texture of
the work all over. And it makes it better and clear and adds to the depth of
perception of our work. We're now going to
fill these parts. We could have used
the hatching lines, cross hatching lines, and also shading layers to work
on these parts as well. It's really a preference. Take your time. This part, which we are working on
adding more dark layers two, is completely dark in the
original painting as well. So we are trying to
fill these parts completely using hatching lines. All right. We are going to fade
these parts a little bit as well using our pen song. This is why we erase
this part a bit just to add a smooth
layer of shading. I'm doing it delicately
and on specific parts. We don't want to erase
everything very harshly. We just want to build on what we have here and
make an adjustment. If you need to erase anymore. Using a more specific tool, you can use a mono eraser
that's a thinner eraser. Just to get into
these tighter spots. Make sure that your pencils are nice and sharp end
because they'll give you that delicate
effect that you want. And remember that you can use
a mechanical pencil with, with a core of your choice, the ideas that you need to use. Pencils that are delicate and allow you to
achieve that detail, but also you need to be
comfortable with them. I'm just sharpening my
pencil here because we've reached a
level where we truly need to add these
details no matter how small or thin they
will show through. So let's continue building our drawing and
building those layers. All right, here on this point we have a light
spot is shining part. We're going to add
it using the eraser. This is the Mono eraser here. This painting is famous for the pearl earring
and also of course, every other element, the
pearl earring has that shine, so we want it to stand out. Now we are working
on different parts, making them bolder using
well-organized hatching lines. I'm taking my time. If you need a moment to
step away, pause the video, look away, take a minute or two, and then come back and
look at your drawing. And you'll automatically notice more what might be missing, what shadows can be added or are lacking a
little bit of layers. Or maybe some highlights
that can be accentuated. Here on the head scarf. And the part here where it's
nicely, nicely rotating. There are some, some, some crinkles in it that
we want to add carefully. The original model or the
model print out that we have. This part is slightly
thinner and is not as wide as this and almost has
a shape like this here. I'm just trying to
achieve that part. We continue hatching
and crosshatching in a very organized light
and smooth away. Although there's more highlight on this part of the head scarf, we're keeping it
very light but still applying our
crosshatching lines. Remember that if you
need to lift some of some of the shading
off of your drawing, but without erasing it
completely or erasing, you would use a kneaded eraser. We've used it in
other tutorials, and kneaded eraser is used
in this dotted motion up and down onto the area that you
want to lift some graphite. And what it does is that yes, it lifts the color and
it brings a highlight, like it brings in some
light on this part. But it does it in
such a way that it mimics the texture
of the drawing. That's why it's an
important tool. You can shape it as well
in the shape that you need it and clean it up. Make use of it in that way. It's very, very helpful. I'm just going over
some outlines here that define the edges
of the head scarf, just like I did on the forehead. I'm doing it here. These are the darkest parts. We adjust the shading
layers on them one more time and we
will also work on the lighter parts using small and delicate
hatching lines. Again. Now, looking at the eyes, they are actually
the lightest part on this portrait in terms of how
bright the white part is. Here, I'm just adding a very delicate layer
on the forehead. Was very smooth hatching lines. And just by doing that, you automatically
make the eyes pop. You make them stand
out and more 3D. Because you've added that
very slight shading layer on the bright parts of the
cheeks and the forehead, leaving, leaving the eyes
to really be contrasted. And it makes them stand out. Even here on this
edge of the nose, which gives me that bridge. Very lightly. Take your time. These parts on the eye, the lightest parts, the white part of the eye, the eyeball. We're going to add
another shading layer. I'm erasing with my eraser
here just to brighten it up. But I'm gonna go in and add another shading layer
to the forehead. Very lightly, very,
very lightly. So you want to be careful. We don't want to take
away from that lightness, that bright, bright,
bright points in the eyes. Now the next thing is the lips. We are going to work more
on the lips as well. As these inner parts
are completely dark. We do have a highlight there, but these parts are
completely dark. I'm adding the details, some lines over the highlights. We are just making the final, final additions or adjustments are drawing is basically done. As I always say, completing any drawing
really depends on you. Because every, every
person drawing, It's really depends on you
and how much you want to add, how many layers you
want to work on. Also, it's an aesthetic. It's a question of aesthetic. Maybe you like where it
is right now and you see it completed and finished. So it's really up to you. You can take as long as you
need to complete a drawing. The idea is to practice, enjoy the process,
learn from it. Take your time, test your
pencils and your tools. Maybe create the drawing again with a different
set of pencils. It's a practice of observation and looking
at the highlights and the shadows and
being able to apply them in this technique on paper. Keep practicing. And I hope you've enjoyed
today's tutorial. I find shading to be
really meditative. I really get into it. But I hope you've really
enjoyed this and you're able to try and use different
shading techniques. So thank you so much for joining me and see you again
in the next tutorial.
12. Complete Manon Balletti Portrait: Hi there. Welcome to a
new drawing tutorial. We're going to start drawing this portrait by
sketching the face. We're going to start by
drawing the axis lines in order to assist us in
creating our base sketch. It will be located
in the center of the face to help us compare different proportions based on different sizes of different
parts of the face. So splitting your image
into four and you can draw the axis on your model, drawing like your model
image on your page here. It helps you make comparisons for left to
right, top to bottom, and also allocate which parts of the face are in every square. Now, we draw the
axis lines just like how we drew them on
the sample picture. I've used a ruler. It helps me have that
very straight line differentiated from our
drawing are more raw lines. Please note that the
axis that I drew is not in the center of the page horizontally
and vertically. It's slightly to the left. And it's because this side has the head of the portrait
and it's tilted to the left. So we may want to draw some
parts of the dress as well. And the bottom parts. That's why we move the axis upwards and slightly
to the left. We begin the sketching of
the face with a to B pencil. Remember to make use of your
downloadable resources. There are available for every
tutorial that you follow. They have all the information
on every tutorial. So the materials you're going to be using, the base sketch, the outline to create your
base sketch, your model image, of course, and anything
that you might need. So do make use of them. Feel free to send me any
questions you might have. I'm here to help you. Now as we're drawing the face, it just remember
that the face has an oval shape here and
it's a very long face. Take your time to create
your base sketch. We want it to be
as accurate as we want or as closely as we can get it to our model image
before we start shading. So take your time. We sketch the overall look
of the hair on this part. But later on we'll
add more details. So we're giving it the form, like the space where the
hair is going to go. But we'll add more details later on as we
build up the image. We can add as many details as we want to in
our base sketch. Just keep it very light. If we're going to
consider the size of the face and the
different proportions. This is, this is what
it would look like. You would draw one
part at a time. It helps to make the
comparisons by drawing one square at a time that
were aligned by our axis. It just helps when you're, this comparison is a
form of measurement. So do take your time. We draw the initial
sketch very lightly. And we can add, as
mentioned earlier, you can add as many details. As you can or as you like, including not just
the general form of the hair or the
face or the eyes, but also shadows, shading, maybe marking where
the highlights are. All of these are very important. And redo, we do the sketch
very lightly because later on we're going to
be adding line values. And that, that makes the
necessary parts bolder it, it starts to increase
the contrast of our image and giving
it a depth of perception. Makes sure your model image
is placed in front of you in such a way that it's comfortable to continuously look at it. It just makes the
process of drawing your base sketch and making
that measurement either visually or with a ruler or even the pencil measurement
technique easier. There's a flower here, we're just determining the
right place for it now. And later on we're going
to come back to it and work more on it and
all the other details. But we're just
marking where it is. Just like the other details. The ear is located here. And we continue marking
the different parts of the face and different elements
for us to shade later. We are now going to observe
the sketch carefully. If we are satisfied
with the measurements, we continue our work by editing. Erase as many times
as you need to. Don't let it hold you back. Erasing and fixing all these
proportions is very normal. And it's a process. But don't let it
discourage you in any way. We're, our final drawings are
not meant to look exactly like our modal drawing
or modal image. So it's just there for the references for us to know
where the highlights are, where the shadows are. And we build our
own image and we work on our own drawing skills. Now we determine the right
place for the eyebrows, and we do the initial
sketch for them. To draw the eyes
and the eyebrows. We can draw something like this. Then erase the lines. This portrait, it would be
located here approximately. If we consider the
eyebrows to be here. We are checking the
distance over here. As we move forward, we observe and do all
the necessary edits, for instance, now on
this point we need to draw it more to the side. Also notice the, the, how linear the eyes are. Are they on a straight line? Horizontally are the
diagonal to each other. And also then you make
that comparison between the right and the
left square on top. And you continue adding
the details as such. Now we start working
on the eyes first, we measure and
compare the distance and proportion
with the eyebrows. So we use every
other element around to mark the exact place where
we should draw something. Remember that you can send me any questions you
might have along the way. You can also share with
me your drawings at any stage of the,
of your drawing. Doesn't have to be
fully complete. And I'm more than happy to
share with you some pointers, some guidance, some
guidelines. I'm here to help. I'm just trying to
add details slightly. Now we move on to work. On the other eye. We compare the measurements
and the distances with the other eye and the upper point on
the eyebrows as well. We will come back to
the eyes and modify some parts as we move along. Now we're determining the
right place for the nose. We need to modify this
part a little bit more. Remember that it's
okay to do that because sometimes
you need to draw it and look at it for you
to actually notice what's wrong and how
it can be done better. Here, I'm realizing as I'm looking at my
image that we need to draw the eye a
little bit lower. You might have done
it correctly already, are that the proportions
look well already. But on my side I
have to redo that the face is a bit longer
than it should be. It is important to know that we need to do all the edits
and the sketching part, which is this part, because editing on the applied
shading layers, which are layers,
would be difficult. But it would also may
cause the work to become messier or a
little bit more dirty. And it's a shame to erase
through so many layers. So that's why we take
our time on the sketch. It's also important to note that we are measuring one-to-one. We can easily see how it should look like and where
we need to edit it. So it's the same size
as we are seeing it. We're not drawing it
bigger or smaller. We can also use the ruler to measure some
portions accurately. You can measure it on your model image and then
measure it on your drawing. It's just a matter of practice and we've gone through
several tutorials, but practice can take, you can keep practicing and drawing and testing your
techniques and your pencils. It all helps with not
only our scale in, in drawing, but our
confidence and our approach. And it helps build our own
style in the drawing medium. Now we're going to
work on the lips. Make it a habit to always take a moment
every couple of minutes. Pull your head back, look at your own drawing, the courts you've created. You'll notice what
changes need to be made. We also need to work a
bit more on the eyes. I'm noticing we need to
make them a little larger, but we will work more on
that later after we are done with the nose
and the mouth. Now we're going to
work more on the eyes. As mentioned earlier, they
need to be a little larger. So we use our eraser to remove those light lines and
re-apply our base catch. Now, as you might already know, so we use the axis lines as the guide to create
our base sketch here. Then, once we have all
the information we need, we erase the axis lines and
then our base catch becomes the guide for our
shading process. So it's all building
up those layers and each layer is a assisting every next layer and
building upon it. Now I've, I've raised
sketch the right. I am going to move on
to sketch the left one. Take your time and if you're unsure about any next step
at any point in time, just follow my lead. We are now adding the details of the flower that we
see on her dress. We want to add as
much information as we can in our base sketch. It marks where everything
needs to go and even if there's a highlight
like a brighter spot, you can mark it very lightly, the shape of it, where it goes, just to know when to avoid it, like which parts
to avoid because we want the highlights to be the white of the paper and
we shade them very lightly, but it's important to
notice where they are. We are almost done
with the sketch here. Remember if you need extra time, just pause the video,
take your time. This process can take
longer than we expect, because drawing and shading, it takes time, it
needs patience. And we want our base
sketch to be great, ready for the next step. We are now going to
do the final edit. And then we will start shading. I'm using my mechanical pencil. You can also use a to B pencil. Make sure that your
pencils are sharpened. And we're going over every part. Take a look at your model
drawing, model image. Take a look at your drawing,
make the comparisons. It's very good practice
to double-check, always double-check,
double measure. Make that comparison add
anything that might be missing. That's why it's good to
stop every few minutes. Pull your head back,
maybe look away, then look back at your drawing. And you'll notice right
away what might be missing. Maybe some things
out of proportion. Maybe some parts can be
marked as highlights. Or shadows, of course. Now, we may need to erase and draw different
parts several times, especially for at the beginning
of our artistic journey. So it's better to
train our eyes by practicing and not
tracing the lines. So you want to do it freely and don't let it hold
you back or discourage you if the result is
not as you imagined or if it's not like
your model image, that's not, not a problem. It's not a problem at all. The ideas to practice and to get better
and to improve our, your own, to improve
your own drawing skill. The only way to do it
is to keep practicing. The hairs on the eyebrows
are slightly facing down and the eyebrows are
also a bit tilted towards the lower
parts of the face. We just want to draw
them in the right shape. And as we see them
on our model image. Don't worry too much if
your initial sketch is not exactly your precisely
like your model image and it's just close or in the same, the same similarities
and some aspects That's suffices because we
still have the shading, the shading process and
that in the shading layers, you can, you can add more
accuracy to your drawing. But it doesn't mean that
you need to keep changing your initial sketch if it's at a place where the
proportions are right, you're happy with it. Then it's ready to move on
to the shading process. Yeah. Now we're going
to start shading, starting from the hairline. And the hair. Makes sure
your pencils are sharpened. You can use two
different pencils for lines that are
lighter or darker. But again, continue to apply medium pressure on your pencils. You don't have to apply a
harder pressure in order to, you want to avoid creating
an indent on your paper or maybe placing too much graphite on your page that would be
maybe difficult to remove. So go ahead and draw
these delicate lines, mimicking the hair,
the direction. So observe your model very well and draw the
lines as you see them. And we're leaving
little gaps between our lines here because we
want to show the texture. We want to shade that texture
and be able to see it. So we're gonna go over
the entirety of the hair. So take your time. Now we're going to add some
more line values to the hair. We want to draw the hair, the hairs and the hair texture in the direction of the
curvature that you see. Just like the hair
is curved here vertically but also
bending towards the left. And that's how we
draw our lines. But I'm adding more line values, meaning darker lines are
more contrasting lines that allow for the image
to become more 3D. Follow my lead. Now we're going to start shading the shadow on the right
side of the face. And by shading that shadow, we're also going to outline
the hairline and its third separating the hair from
from the face itself. I'm going to start using the
hatching technique to shade. You can also use crosshatching, but you want to
keep it very light. We're starting off
from the darker areas and we move towards
the lighter areas, as you always do
with pencil drawing. Because with a darker areas, the more shadowed areas, you go over it again
and again and again to build that shadow as opposed to applying
pressure on your pencil. You can also change your
pencil to a darker pencil. But it's better to
keep a light to medium pressure and
go over your shadow. And if it's necessary
to make it darker, to just go over it again. That's how we build
those layers. The right side of the face, including the a little bit of the back of the neck and
underneath the chin. These are the darkest shades
that we have on our drawing. So they are the darker parts and we're gonna go over them. Now that we've, we've worked
on our shadows and we can continue working on
them a bit more later. We're going to start
working on the eyes, marking the iris and the pupil. We want to bring
that definition and there's a highlight
inside the eye, which is a white part so you
don't want to fill that in, so keep that in mind. And although the eye
has a darker part, I'm still not applying
a lot of pressure. I'm just going over
it again and again. I'm marking the
upper eyelid line. Now. I'm working on
the I on the left. Just to be able to make that comparison between the
eyes and their placement. And adding the color. The more we shade our drawing, the more 3D it becomes. We're not drawing in
hyper-realistic style, but it is realistic. We're aiming to get as
close as possible to that. Marking. The iris
and the pupil here. Making sure that
that look as well. You take a moment, look at your own drawing. Are the eyes looking
visually logical? Their proportions are, well. Now I'm adding an outline
to the, to the pupil. Adding a little bit
of shading here. We're gonna do the same
for the other eye. And then we're going to
define the eyebrows. Let's work a little bit more on the nose and just bring
those details in. We've added a very
slight shadow, as you can see to the forehead
underneath the mouse. And of course, on the
curvature that's on the inside of the left eye. But now we want to define
the nose a bit more. So the nostrils or the
darkest part going over it and we continue observing our model
image as we draw. Because sometimes we make
assumptions in our mind that this is darker or something that
needs to be lighter. But then when you look
at your model image, it looks a little
bit different or not as dark or as shaded
as we fought. So keep looking at
your model image and keep looking at
your own drawing. And we continue shading. Let's work on the lips more. We want to add
those layers here. There's a highlight
on the lower lip. There's a texture to
the lips as well. So you want to
keep that in mind. You want to apply
your lines lightly. You're hatching lines. You want to go over the top
lip and then the bottom lip. And keep using those
delicate lines. Take a moment to
sharpen your pencils, make sure your image
is nice and clean. And let's work on the
eyes a little bit more. Defining that shadow
right next to the eye because we
don't want the look nor the aesthetic of the eye or the highlights that we've
created to be disrupted. But we need to shade the
area around the eye. Again, if you're unsure at any certain point what the
next step is, what to do. Just follow my lead. And working on the shadow on the inner part of the eye here. Because the light is coming
from the left side of the drawing or the
left side of our, of our model here. That's why we have more
shadows on right side. My lines are really light. They're very delicate. I want to apply them
lightly and take a look at my drawing and see maybe if
you've shaded a bit too much, you can lift that color with
either a kneaded eraser. I would advise using
a kneaded eraser because you can shape it however you want
it to be shaped. And then in this dotted
motion is up and down motion. You go over the part
where you want to reduce the amount of graphite
that's on your paper. And therefore, you accentuate the highlight or make a
certain part lighter. Now we're working on the I on the left that has different
different shading. They have the lightest hitting
each eye very differently. Follow my lead. Now that we've defined
several parts and almost most of the facial
expressions and the hair and gone
over those details. Let's add a little bit more
detail to the clothing. And maybe the lower
part of our drawing. We have some irregular
lines here and there, meaning that they are
not straight lines or their lines that we create and redraw according to
the shape that we see. Because fabrics, you need
those delicate lines and you need to mimic
the direction of the curvature and so on. And they can be further apart than the shading you would
do on the face, e.g. so keep in mind the highlights
where the white parts, the parts that you want to
be the white of the page. We continue adding those details and I'm using a mono eraser here to erase and bring
some highlight back in. Just because a mono
eraser allows to get into those smaller spaces. I'm using crosshatching here
to go over that detail. And we work on the
clothing as such. Yeah. Now that we've
defined a little bit of the neck and a
bit of the clothing. Let's finish. The shape of the face
on the left side, especially with the chain. We want to bring
that definition in. You want to work very lightly, very delicately and shade
in those details just exactly like I'm doing these
back-and-forth motion. And even when we're
drawing a line like this, we're doing it in
a dashed motion, not in one go. So keep your hand lied. We're defining the
shape of the chin. Then we go in and
we feed that line. You shade over it very slightly and you feed it
because you don't want a very highlighted line
showing the edge of the face. You want it to be calm and delicate and implying
the curvature of that cheek over there, the chin, without it
being too contrasting. Take your time if
you need to pause the video and then play
again when you're ready, just take the time
that you need. Next, I'm going to add some shading to the neck
and the collarbone. If there are any
shadows that are missing or any shading you
want to add to any part. We, because our drawing is at a stage where we've
built some layers. You get to see even better
what might be missing, what highlights might be needed. Just go for it,
enjoy the process. Take your time. And let's complete this drawing. Now let's work on the
flower down here. Let's give it some
definition and maybe make it a
little bit more 3D. I'm adding some line values. And I'm going to
shade the leaves. Just keep observing your
model and apply your shadows, your highlights, and your
lines exactly as you see them. Now that we've shaded and
drew our flower here, Let's get some definition or some texture to the clothing. Just to also bring in that
outline and that form. And it differentiates it from the collarbone and the chest. We need to draw that
delicate line here. They are irregular lines, so they are lines according to what you are seeing
and they're not just straight lines or hatching lines or crosshatching lines. Giving some texture
to the shoulder, the shoulder cloth here. Now I want to work
on the shadow, the most shadowed
part of the drawing. I want to work on these
layers a little bit more. We need to just give them
a couple more layers. And I'm continuing shading in
this back-and-forth motion. And the most
important thing with shading is to stay consistent. So whether you're working on the more shadowed areas,
the darker parts, or the lighter areas, you're shading needs
to remain consistent. The technique that
you've used needs to remain consistent because
you want your image to visually look logical
and that all the parts belong together and nothing
is standing out too much. Here. I've just erased that line
that defines the neck. It was it wasn't 100% clear. It was mixing with the back
hairs or the neck hairs. But I've defined it
there with a very slight, very slight definition. Now, I want to work a little
bit more on the shadow here. Just to give definition
to everything and allow for the highlights to
stand down by working on both the shadows and the highlights you
allow them to shine, to really come forward. And it adds a depth of
perception to your image. Take your time. Let's continue working on the different parts
of our drawing. Adding our shading lines
and anything that might be missing in order to
complete our drawing today. Now that we're just about
finished with our drawing, we're adding any last touches, erasing any extra
lines on the sides, cleaning up our drawing. I hope you've enjoyed today's
tutorial and you got to practice shading and drawing
further and further. But thank you so
much for joining me and see you again
in the next tutorial.
 Ava Moradi, Art and Design Instructor