Transcripts
1. Introduction: Welcome to the Introduction
to Lua programming class. The goal of this class is to go over the basics of programming, as well as the
fundamentals of using Lua. If you've never
programmed before, this class will be
perfect for you to get your first taste
of what coding is like and learn all
of the concepts that are used throughout all
programming languages. If you already have
some coding experience, you'll pick up on the
basics of Lua very quickly. The videos on tables are
a must watch, though. That's what really separates
Lua from other languages. At the end of the class,
you'll be assigned a project, which will be an excellent
opportunity for you to experiment with the language
and build something cool. Getting started with
Lua is very easy. I'll be going through each
lesson just in a web browser. If you go to ua.org, you can go to this
download link, go over to live demo, and there's a few different sites here that you
can choose from. Each of these have a
small text section over here that allows
you to write Lua code, and you can run it
directly in the browser. Once you're all set up, go
ahead to the next lesson, where we'll write our
first bit of Lua code.
2. Variables: The very first thing
that we're going to discuss is variables. A variable is a piece of stored data whose
value can be changed. To demonstrate this, let's go ahead and put one into our code. At the top of the
file, I'm going to write message equals, and then in quotation
marks, Lua is awesome. In this line, we just
created a variable. The variables name is message, and the value that this variable contains is the text
Lua is awesome. Now, to make sure that
we did this correctly, let's print the value
of this variable. So in print, instead
of Hello World, let's go ahead and
pass in message. So the one we run, we'll see
the text Lua is awesome. It's just going to
grab whatever value this variable contains. And all kinds of
data can be stored. In this case, it's storing text. And in programming, text like
this is called a string. A string is just some words or letters surrounded by
quotation marks like this. A variable could
also store numbers. For example, we could set this message variable to
five, just the number five. And keep in mind that we do
not want quotation marks around five because
we want it to be treated as a
number, not a string. And same deal as before, if we're printing out
the value of message, we should see five over
here in the output. Can have pretty much as
many variables as we want. For example, let's put
in another variable, and I'll call it chicken. And let's set it equal to ten. So now we have a
message variable, and we have a chicken variable. But even when we run, it's
still going to say five over here because we're
printing message specifically. Let's make a third variable, and we'll call this one result. But this time, let's do
something a bit different. Instead of setting it
equal to a new value, let's set it equal to chicken. So now, the variable result now contains whatever
value chicken has. Since chicken has ten, and let's try print
result this time, we should see ten in the output because result contains whatever
value chicken has, and we're printing result. When programming,
the value stored in a variable could change
later on in the program. So even though, for example, chicken starts off at ten, I could later on change it to chicken equals
25, for example. And when we print chicken, we should see 25, because even though it
starts off being ten, this line changes it to 25, and we print it
out at that point. This result variable is set to chicken here on line three. At this point, since
the program runs from top to bottom,
chicken is set to ten, result is set to chicken, meaning that result
actually contains ten, and we can see that if
we print result and run. It is ten. Another way
that variables can change in your program is by performing basic
arithmetic on them. This means is that we can
do addition, subtraction, multiplication or division
with these variables. So let's try that
out with result. Instead of setting result
just equal to chicken, let's set it equal
to chicken plus one. So what this does is
since chicken equals ten, we'll see ten plus one. And when we print result, we will see 11. It performed this
arithmetic right here. And you can perform any kind. Like I said, you can do minus
one or times say times 20. We'll see that says 200, or you can do division. And similarly, we'll
get the decimal value. Keep in mind that this math only works when we're
working with numbers. If say chicken was a
string, like, hello. Well, this suddenly becomes strange because we're trying to take the string hello
and divide it by 20. And that doesn't
really make sense. In fact, when you try to
run, we'll see an error. And when you're programming, it's very common to
run into errors. It's just a natural
part of learning and just a natural
part of programming. Even experts run into errors. And here we can see that it is attempting to
perform arithmetic. On a string value,
global chicken. So you can't perform
arithmetic on strings, and that's why we would
need to change it back to a number in order
for this to run properly. And even after a variable
is already initialized, we can still change its value
later on with arithmetic. So with chicken, for example, I could say chicken
equals chicken plus ten. So here we have chicken
starts off at one, and then this line
is going to set chicken equal to the
current value of chicken, which is one plus ten. So that should give us 11, and if we print that
out, we will see 11. That about covers the
basics of using variables. These are the foundation
of any program, and having a good
idea of how they work will make you a very
capable developer.
3. Conditional Statements: Next up, we're going to cover I, LSF, and else statements. These types of statements
may be known as conditional statements
because they determine whether or not a section
of our code will run at a given time
based on a condition. We're going to start off with
our code looking like this where we have a
message variable, and we're printing it out. And when we run, we just
see zero over here. Also, let's add another
variable to the program, and I'm just going to
call it condition. You can call it
whatever you want. And you can also set it
to whatever you want. I'll set it equal to 25. We're going to use this
variable as part of a conditional
statement that's going to change the value of message. We're going to start
with an if statement, and that starts with if
condition is greater than zero, then and then end. Now between this
then and this end, we're going to put what actually happens when the
condition is true. So I'm going to set
message equal to one. This line reads as if the value of condition is
greater than zero, then and only when that
condition is true, it's going to perform
what's in here. It's going to say message
equals one. We can test that. Message starts off at zero, but if we run, we can
see that it goes to one. Alternatively, let's change
condition to negative 25. Now, this if statement
won't be true anymore because negative 25 is
not greater than zero. Since this condition isn't true, that means this line
here won't run. Again, when we run, we see
message remains to be zero. This line never happens. Going to add another conditional
statement to our code, and it's going to be a really
similar idea to before. But this time it
will check to see if condition is less than
or equal to zero then. And in here, we'll set message
equal to negative one. So same idea as before, it's going to see
is condition less than or equal to zero. And only if that's the case, will message be set
to negative one? And we will see
that that happens. This line is reached because
its condition is true. But again, all of our programs
happen from top to bottom. So first, this line
happens, then this line, and then it's going to
check this condition, in our case, this
condition is not true. So this line does not happen. Then it moves on
to this condition, and since this one is true, this line does happen. Writing our code this way with two separate if statements, one right after the
other is acceptable, but there is a much easier
and more efficient way of writing this
exact same thing. So I'm actually going to remove this second condition or
the second if statement, and instead, we're going
to add to this first one. I can put in else and say
message equals negative one. This is a new type of condition, where it just says else. The way this reads is it's first going to check
this condition. If condition is
greater than zero, then this line happens. But if this condition
is not true, or if condition is less than zero instead
of greater than, then it's going to say else, and once this else is reached, then whatever is between else and the end is what gets run. In this case, message
equals negative one. This is the exact same
functionality as before, but it's more compact with just one single set of if and then else. And
we can test this. If we run, we still get our
negative one in output. So far, we've used
if statements, we've used else
statements, and finally, we're going to move on to
the last conditional that is sort of a combination
between these two and it's called the else if. Go ahead and put one into here, and I'm actually going to remove our else for now just
to clean it up a bit. But in its place, I'm
going to add the LI. So you say el if, one word like that, and we'll
add a condition to this. Condition is less
than negative ten, then, and in this case, we'll say message
equals negative one. So this is different than before because with
our statement, there was no condition
attached to it. So what's going to happen is this condition is
going to check first, and if it's true, we're
going to do this. But if this condition
is not true, it's going to move
on to here SIF, and it's going to
check this condition. And if this one is true, then this line here
is going to run. But if neither of these
conditions are true, then neither of these lines
are going to run at all. So testing this out since condition is negative
25 right now, we still get our negative one. But if we change this to, say negative five instead, so with that negative five
is not greater than zero, so it moves on to the SIF, and negative five is not less
than negative ten either. So neither of these
conditions were met, and that means that message remains at zero,
what it starts at. Now to tie everything
together is that you can put an else in addition
to everything else. So I'll put message equals, and let's put it to a string. No conditions met. So with this negative five
example, this is not true. This is not true, so the
else is going to be hit, and this line is
going to happen. So we can see if we
run, no conditions met. Now, with blocks
of code like this, you can have one if. You can have one else. But between the else and the if, you can have as many of these
el if portions as you want. So I'm going to put in
another one, actually. I'll say ls if condition, and we'll say is equal
to negative five. Then. And in this case, I'll say message equals hello. Now, keep in mind that I'm using the double equal sign here. When you're using
double equal sign, that's how you're
testing to see, is this equal to this. But when you're using
one equal sign, that's called an assignment, meaning that this value is being directly assigned
to this variable. So we're not setting
condition to negative five. We are testing to see is condition equal
to negative five. And if it is, then
this line will happen. And we can test that out, if we run, we will see hello. One final comment on this topic is that in these intersections, you can have as many lines
in here as you want. In addition to hello, I could do an extra print and say, Hi. When I click Run, we get
both the i and the hello, both of these lines run because everything between
this and this, the entire inner
indented section, that's going to be run.
4. Loops: The next topic is loops, and there's a reason
I'm showing you these right after
conditional statements. Loops are sections of
code that run more than just once based on
certain conditions. To show this off, we'll
jump right in with our first type of
loop, the ile loop. I'm starting with the code
looking like this where we have our message, and
we're printing it out. And after the message, we're going to write the
first loop, and it's a loop. We'll say Y message
is less than ten, D. And then in here, let's say message equals
message plus one. Let's go through this
section of code line by line to get a better
understanding of what it does. We start with ile, and then this message
is less than ten. So this is really similar to our if statements where
this is a condition. And only if this
condition is true, do we go on to the intersection? And inside of this ile loop, we are saying message is equal to the current
value of message, which is zero plus one. So after this line runs, that would mean that
message would equal one. But what makes Loops interesting is that once it reaches here, the end, it's actually going
to jump back and go why, message is less than ten. So it's actually going to
check the condition again, right after I checked
it the first time. And message is now one. So it's going to ask,
is one less than ten? And since it is, that means message is going
to increase to two. And then once again, I'll go back here is two, less than ten, and then now it's three,
is three, less than ten, and over and over and over,
it's going to keep looping, which is where the
name loop comes from. Until finally, message is
going to increase to be ten, and it's going to say
is ten, less than ten. And since ten is
not less than ten, that means that the
condition is no longer true, and this intersection
stops running. It does not run anymore after
that. And then it moves on. After this runs, that means that this intersection ran a total of ten times and message ended up being ten.
And we can see that. If we print message
and run, we see ten. Keep in mind that this
whole process that we just talked through
happens instantaneously. Since computers are
incredibly fast, the program comes across
this while loop here and can almost immediately
get through all iterations. You could even jump
this ten up to 10,000, and it's still going to
run instantaneously. It gets through all 10,000
iterations in no time. Speaking of, this message equals message plus one is a
very basic example. Between the do and the end, you can have as much
code as you want, just like the if statements, and all of it will be executed as long as the
condition is true. For example, we could
add a second variable. I'll go ahead and
just call it test, and I'll set it equal to zero. Then within the loop,
let's do something like test equals
test minus five. So I'm also going to drop
this back down to ten, so it's a little bit
easier to understand. So just like before, this loop is going
to run ten times, which means that this line here is also going
to run ten times, which means that test, if we print out test, will be negative 50. It subtracted by
five, ten times. Earlier, I mentioned
that the loop will run until the condition
is no longer true. And as a programmer, it's your responsibility to make sure that whenever
you use a while loop, it will eventually end. Otherwise, your loop will
keep going on and on forever. And just as a
learning experience, we can go ahead and try it
out just to see what happens. What causes the loop to end
is list line because message keeps growing until message
is no longer less than ten. So if we change this
to minus one, well, now this loop is going
to keep going on forever because message will
always be less than ten. So if we run, we can see
that we kind of get stuck. So if you go Yeah, it
actually times out. If you do this on
your own computer, be careful, you might have
to force close the program. But yeah, that's what happens whenever the wile
loop runs forever. It just never stops,
and it times out. So before we forget, let's
change this back to plus, and we are back to normal. That about covers wile loops. So let's move on to the
second type of loop, which is called a four loop. This kind of loop is just
as useful as the ile, but it's useful for
different situations. In programming, you'll
notice that there's normally many ways
to do something, so you'll always
have options for how you go about
solving problems. Let's start by making
a new variable again, and I'm going to
just call it pickle. It doesn't really matter
what you call it. And I'll set it equal to zero. And this is the value we're
going to print out, pickle. And after the ile loop, we're going to start
the four loop. And this is what it looks like. You say four. I equals one, comma three, one, do. And then inside here, let's do pickle equals
pickle plus ten. Now, looking at this code, it's a little less self explanatory compared
to the ile loop. So let's go through
it bit by bit so we can better understand
what's going on here. This first line specifies
three different values. First, we have i equals one. In a four loop, this is going
to act as our iterator, which basically means that it's a value that's going to be updated every time
this four loop loops. The next number in the sequence, this three is the number that
our iterator will approach. And once that number is
reached, the loop will end. And finally, this last number is the step value for the loop. Or in other words, it's the
amount that our iterator will increase by every
time this loops. So I know that was a lot of
information all at once. So let me go through what will happen when this loop runs. The loop will start.
I starts off at one. And again, this is our iterator. So the loop begins, pickle
is going to increase 0-10. So zero plus ten is ten. So now pickle is ten.
Now the loop ends. It goes back to the start. But this time, I
increases by this value. So I increases from
one plus one is two. So now equals two. And since two, the
current value of i is less than this value, the three, that means
the loop will continue. So we're going to go
into the loop once more. Pickle is going to
increase by ten again, so now pickle is 20. And again, we go back to
the start of the loop. I is going to increase 2-3. So now I is equal to three. Now that i is equal to
this middle number, three is equal to
three, that means that this is the last
iteration of the loop. So pickle is going to
increase by 101 more time, and then the loop is finally
done and it moves on. So that means this line
in the middle here, or I should say
this whole section ran three times total,
the one to three. So we can see that pickle after
all of this should be 30. At face value, this loop
might look a little bit more complicated than the
Wile loop we did earlier, since there are a
few more numbers for us to keep track of. But once you're used to it, I think it's pretty
self explanatory. The loop will start
at this number, increase by this number each time until it
reaches this number. So it's an easy way to have a
predetermined set of loops. Thing interesting
and very useful that you can do with
four loops is that you can use this iterator value
inside of the loop itself. For example, I could
increase pickle by i. What this means is that i is
going to start off at one, so pickle is going
to increase by one, then it's going to
increase by two, and then it's going
to increase by three. One plus two plus three is six. This is a really common way to use four loops
because there will be many circumstances
where you'll need this iterator value in order to perform
certain calculations.
5. Functions: In programming, it's
important to remember that copying and pasting your code
is not very good practice. If you ever find the need to copy a section of your code and paste it to another spot so that there's now two copies
of the same code, you should instead
consider using a function. A function is a section
of code that you define, and then you can
call that section of code to be ran elsewhere
in the program. You'll understand what I
mean in just a moment. We're starting off the code
with just message equals zero and then printing
message, which outputs zero. But after message, we're going to write our
first function. We're going to say
the function keyword, and the name of our function
will be increase message. And then inside
of this function, we'll say message equals
message plus five. So here, function
keyword indicates that the next thing is the
name of our function. The two parentheses is necessary to indicate
it's a function. And then everything before end, so whatever is here, this is going to be run whenever the function gets called. Now, by default, just because
we define this function, that doesn't
necessarily mean that this code is going to
be run off the bat. Like if I click Run, we'll see that our output
is still zero. In order for this
code to be executed, we need to call the function. Which just means we
type the function name, increase message, and then
put the two parentheses. So this is referred to
as calling the function, which just means that
when you type this line, it's going to take
whatever code is inside the function and run it. So we'll see now that when
we run the whole program, our message value is five. And similarly, to
demonstrate this, I could copy this
function call and say, call it two more times. So we're calling this
function three times total, which means that this code
is going to run three times, which in the end means
that our message is 15. We're going to make
the function a little bit more interesting. When you're writing a function, you have the option of
giving it parameters. Parameters are what go in
between the parentheses, sort of like what
we're doing with this print function down here. We could change it so
that this function accepts one parameter. We'll say it accepts
something called Pu, and then we can use this
parameter in the function. So we'll say plus pu. Instead of adding
five each time, it's going to add whatever
value we pass in. So when we call
increased message, I can put in whatever
value here that I want. I can say 99, for example, when
I run, we got 99. But I can also call it a
second time increased message, but this time, I'll pass in two. And this time, it's one oh one. It called this code twice. The first time Fu
is equal to 99, and the second time
Fu is equal to two. Although in our example, we only have one parameter
in this function, you are able to put as
many in there as you want, and you do this by putting
commas between each one. So if I wanted
another one called Val and another one called
me, it doesn't matter. You put them all in an order. And then when you
call the function, you would pass in additional values for each
one of those parameters. So this is how that would look if you wanted to do it that way. Now, one very important
thing to know about functions is that you have the option of returning a value. To explain what this means, let's go ahead and
alter our function so that it returns something. I'm going to clean
up this code a bit, so we're just back to
the one parameter Pu. So instead of having
message increase by just the value of Fu, let's make it so that
fu equals fu times two. So we're going to
pass a value in, and then immediately we're
going to double that value. And then let's return Fu. Now the function is behaving a bit different
than it was before. Before we manually said message is going
to increase by Fu, but now we're just changing
Fu and then returning Fu. What happens is in
order to actually apply this function to message, we would say message
equals increase message, and then let's pass in ten. What's going to happen here is this ten is going to
be passed in SFU, then fu is going to double, so that ten is going
to turn into 20, and then it's going to
return the new value of Fu, which, like I just said, is 20. So when something gets
returned in a function, that basically means
that the function call is going to replace
itself with the result. So since we were
returning 20 up here, it's basically the same
thing as replacing itself just with the result. So it's basically doing that. And but the beauty of it is that you're able to pass in
whatever value you want. And it'll take
this and apply it. So in this case, I typed in 99, the result is 198. It just doubles this value. And then since we're
setting message equal to this returned value, that's what we get in the print. The reason why this is useful is because now if I wanted to apply this function to say a
new variable like chicken, The way I had it set
up before where I manually said message
inside of this function. That would mean that it only applied to this
variable, and that's it. But now when I'm
returning something, I can use it for any variables. So I could say chicken equal
to increase message five. And then if I print chicken, we should see ten. A cool thing that you
can do with functions is pass other variables
as parameters. For example, at the
top of the program, let's make a new variable. I'll call it Monkey, and
let's set it equal to 100. Then what I can do is I can
pass this monkey variable, let's say into here. So I'm going to just say monkey. So what's happening is the
value of monkey, which is 100, is going to get passed
into increased message, and then can get
applied to chicken, which results in 200. Having functions in
our tool belt will be incredibly useful as you move
forward with programming. You'll see how often
sections of code need to be ran at different
points in the program. And it's a lot easier to manage everything
when the code is in one place rather than copy and pasted
throughout the file.
6. Comments: So far, everything
that we've written in our LuA file has been Lua code. But with pretty much every
programming language, there's an option for
programmers to put in little notes that are
not treated as code, and these notes are
called comments. For example, here in this code
from the previous lesson, we have a function that's
called increase message. If I was writing a
bunch of code and I had a ton of functions written
throughout my files, it might be difficult to keep track of what each
function does. So it's helpful
to write comments into your code to
help you remember. I Lua, you write
comments by typing dah, dah, and then everything after it is
considered a comment. So I can write my message
doubles a value and returns it. So, this message here is
ignored by the program, but it helps me or
whoever's reading my code. It just gives you
some extra context. It's a little reminder. Cool trick that you can
do once in a while is called commenting out some code. Comments are helpful for these little
reminders like this, but you can also use it to disable certain
sections of code. So for example, if I wanted
to see what would happen if I completely removed this
line, I could delete it, or maybe I want to just
temporarily delete it by doing d. Now this line
is considered a comment, and when I run the program, it basically pretends like
this line isn't there at all, but at the same time, it's really easy for me
to bring it back. Also the option to
treat entire sections of code as comments. You can do this by typing, square base square base, and then when you want to
end the section of comments, you do square base square base. Everything between this and
this is considered a comment, neither of these lines
here are going to be run. Getting into the
habit of commenting your code is really important. It helps for your
own note taking, but if someone else wants
to look through your code, comments make a
huge difference in understanding what you
as the programmer, were trying to do when
you were writing it. Reading other people's code
can be difficult at times, but having comments
to guide you along the way makes the
process a lot easier.
7. Local vs. Global: In Lua and lots of other
programming languages, there are two types
of variables, global variables and
local variables. So far we've been
working with globals. Global variables are
things like message. Once you define it, it can be accessed anywhere
throughout the program, and that's what
Global refers to. We could type message
anywhere in the file, and the program would
know that we're referring to this
variable up here. Alternative to a global
variable is a local variable. And all you have to
do in order to make a variable local is add this local
keyword beforehand. And as the name implies, the local variable can
only be accessed within the same section of code that the variable
was declared in. So, for example, let's update this increase message
function to do something different and
utilize a local variable. I'm going to make a new
local variable in here and call it local VR. And I'm going to
set it equal to FU. Then on the next
line, I'm going to do VR equals R divided by two. And then finally, we're
going to return VR. So now rather than
doubling the message, we're now cutting it
in half because we're setting VR equal to
the past in value, cutting it in half,
and then returning VR. But it's important to note that the variable VR is only going to be used in this section
of code inside the function. And since that's the case, using local here makes sense. We wouldn't want
VR to be utilized anywhere outside of this
section of code right here. And that's where local becomes really useful is when you're
managing your project. There's a large amount of variables throughout
your program. It's more likely
for a mistake to be made when there's lots
of different globals, because if you made
a second variable later on and I called it VR. Well, it might not be clear which var we're talking about. But if everything is local to its relevant section of code, there would be no mistaking which Var this is referring to, just in case you named two
variables with the same name. So this is a habit I highly
encourage you getting into, especially with
writing functions, I would say this is a
very common scenario where I use local variables because I don't want
these variables to be used outside of the function
that I'm declaring them in.
8. Tables: Everything that
we've covered so far is very common in the
programming world. You'll find all of these things in pretty much any language. However, our next
topic is tables, and this is a data structure
that's pretty unique to Lua. Every language is going to
have options that are similar, but tables in Lua are one of a kind, incredibly powerful tools. You use them to store
sets of related data. And since that data is all
stored in the same place, it makes it much easier to access and keep
everything organized. A lot like variables. A variable stores one piece
of data, and that's it. Nothing else than
that one thing. A table is capable of storing multiple pieces of data
in the same variable, except it's a table,
not a variable. So let's go through
an example from scratch on how to
utilize tables. I'm going to start off with our typical message equals zero, and then we're printing message. After this message variable, let's make a new table. I'll call it Test scores. Then when we created
a new table, we set it equal to curly braces. In Lua, if you ever see
these curly braces, that's how you know that
we're working with a table. And since there's nothing
between the curly braces, that means it's an empty table. Here we initialize test
scores to be an empty table. For this demonstration,
we're going to store a bunch of made up
scores in this table. To do this, we're
going to assign a score to its own
index in the table. Let's go through how to do this. First, we want to write the name of the
table, test scores. And then right after, we're
going to put square brackets. And then between the
square brackets, we're going to put an index. You'll see what this
means in just a moment. To start, we'll
put in Index one. And I'll set Index one to 95, for example. And that's it. We assigned our first score to the test scores
table at Index one. Now we can move on to
the second test score. Let's duce test
scores, and then two. We'll set this one to 87. For now, we'll put in
one more test score. I'll say test scores three, and I'll set this one to 98. So at this point, we now have
a table called test scores, and it contains three scores, one at each of these
three indices. Now, in order to access that
data that we just put in, we simply need to write
the table name and refer to whichever index
we're talking about. So let's say we
want to set message equal to test scores Index two. So this is just going to grab whatever value is at Index two, which is 87, and we're
printing message here, so we should see 87. Keep in mind that we only
assigned values to Index one, Index two, and Index three. What would happen if we
tried to access Index four? We didn't put anything in
there. So what would happen? If we set message equal to test scores Index four
and try to run this, we actually see NIL. So when nothing is assigned
to a particular index, it actually contains
the value NIL. Now NIL is a reserved
word in Lua, that just represents
the meaning of nothing. It just means nothing exists
right here in this position. So this method that
we're assigning values to the table is okay, but there is a
more efficient way to do this exact same thing. I'm going to go ahead and
delete these three lines. And instead of writing out three different lines
for those assignments, we can go back up to this
original curly Berry section and put in those three
different scores. And that was 95, 87, and 98. So this whole line here accomplishes the same
exact thing that we were doing before with the three manual inputs
for these three scores. In other words, this
value is at Index one, this value is at Index two, and this value is at Index three. And we
can test this out. Let's go ahead and set message to Index
three of test scores, and we get 98, which
is this value. Although this is the easiest way to put values into a table, there is one other method to doing this that still is
important to go through. We're going to redo
all of this by simply making test
scores start empty, and similar to the
way we did it before, we're going to write
three separate lines. But this time,
we're going to use this function called
table insert. Same idea from earlier where
we wrote our own functions. The LuA programming
language comes with a bunch of functions written
for us that we can use, and table dot insert
is one of them. What this function
does is simply takes a value and
puts it into a table. The function has two
parameters that we have to pass in
before we can use it. The first parameter
is the table name. So let's type test scores. That's the name of the table
that we want to insert into. And the next parameter is the value that
we want to insert. Let's first put in
our test score of 95, and we can do the same thing. With the other two scores
and say 87 and 98. Now, the benefit of this table dot insert function compared to what we were doing before is that we don't have to specify what index we want
these scores to go at. And you'll run into
situations where you won't actually know
which index you're on. You'll write code
that just says, put this value into the table. But you won't know at the time how many items are in the
table or if there's any gaps. So this insert function figures
all of that out for you. Just a little side note. When assigning values
to a table in LuA, it's typical to
start at Index one, and then go up from there. It's probably more common for languages to start
at index zero, but LuA is one that
starts at Index one. But you don't even have to
use numbers as an index. You can also use strings. You could say test scores, and then in square
brackets, I'll say, hello. And then we'll put
the value 90 there. Then, similar as before, I can just recall that same data by passing in the
appropriate index. And we get 90. But
like I said earlier, the one line approach, if you already know what data is going to be in
there, in this case, 95 87 and 998, this is the most
compact way to do it. And when you have tables full
of data, like we do here, it's important to be able
to efficiently and easily go through all of that data to either find what
you're looking for, do some calculations, or do whatever it is that you
need that information for. Luckily, for us, Lua gives us a very easy option for iterating through all of the
table's entries and examining the
data it contains. Remember the four
loop from earlier, we can use them in a new way here in order to easily
go through the table. And here's how it's done. We can say four, and
I'll say I S in pairs. And then the table
that we want to iterate through is test scores. D. And then inside
the four loop, I'll say message equals
message plus S. Now, this loop here is going to go through each item in the table, and for each item, it'll perform whatever code
is inside of the loop. This I refers to the current
index that the loop is on, and this S refers to the value or the data that
exists at that index. In this case, test scores has three different scores
in it currently. That means that
this loop is going to loop three different times. The first time, I
is going to be one, and S is going to be the value
that's at Index one or 95. Then at that point, message
is going to increase by 95. Then the loop is going
to start over again. I is going to be two this time, S is going to be 87 or
the value at index two. And once again, message
is going to increase. This up in general is just
going to add up all of the scores together and
put it into message. So I'm going to get
rid of this line, and we can run and see
that the sum is 280. That's what we get if you
add 95 plus 87 plus 98. There's one last thing about tables that I'd
like to go through. A cool feature about them is that you can add
properties to them, which is basically a variable that's tied directly
to the table itself. Let's go ahead and add
one to this test scores. I'll say test scores
dot subject equals, and in quotation marks math. And that's it. We can now get this property by just calling it similar to
any other variable, and we should get math. This is a convenient
way to clearly mark what each piece
of data represents. But really, all that this
line is doing is test scores, and then in square brackets,
the string subject. Equals math. These two lines accomplish the identical thing. This is just an alternative way of doing this and vice versa. This really demonstrates
how flexible tables are, and they let you get really customizable with how
your code is organized.
9. Wrapping Up: Time to talk about the
project for this class. I'm going to give
you this code here, and I want you to add to it. You can either type all of this code out directly
from this video, or you can download a LuA file from the project
section of the class, and then copy and
paste it all into the same browser from
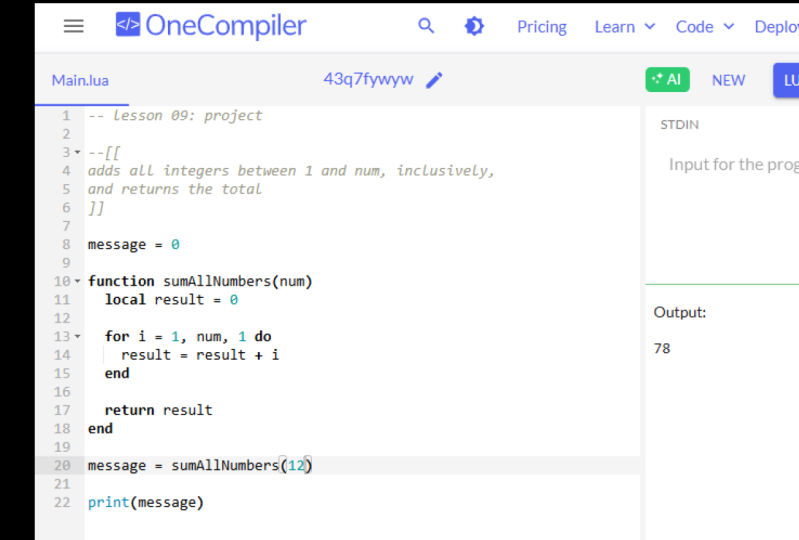
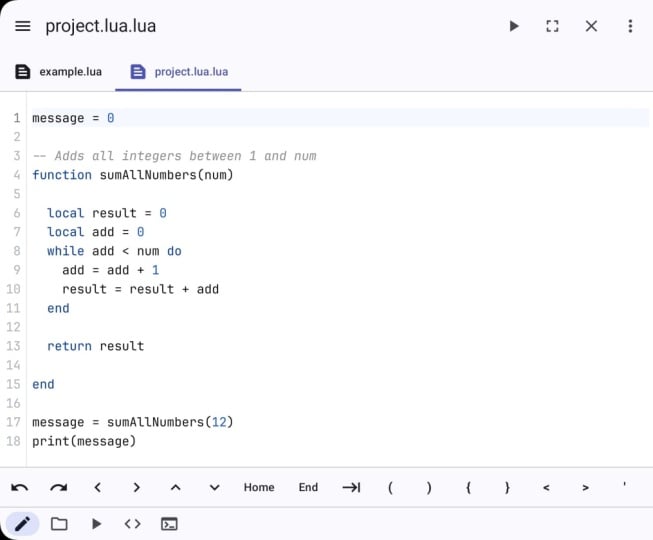
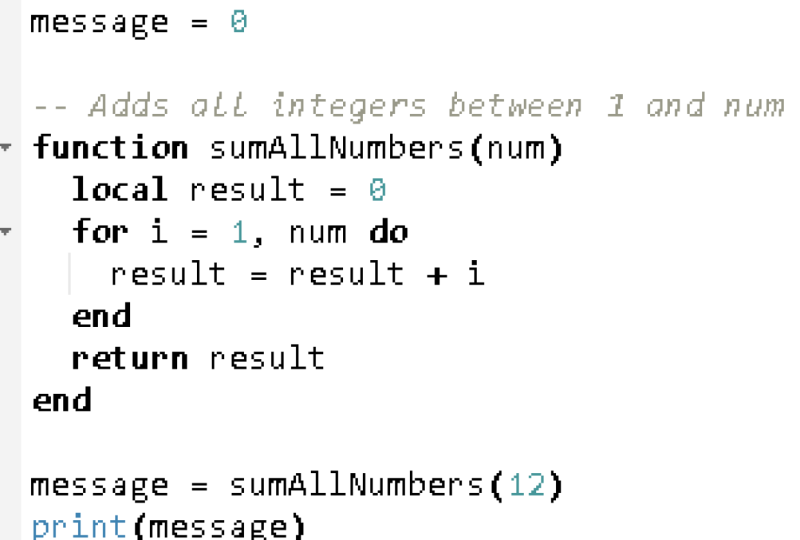
the previous lessons. Here's the problem. I give you this function called
sum all numbers. But at the moment, it
doesn't work properly. This function is supposed
to take a number, which we call num
as a parameter, and it needs to add up all of the integers between
one and num. For example, if we
passed in four, that would mean it would add one plus two plus
three plus four, and the result would be ten. Then it would set that ten
to result and return result. Right now, though, when we run, it's always returning zero, no matter what we pass in for this sum numbers
function call. What we need to do is fix this so that whatever
value we pass in gets utilized within the function and returns
an appropriate response. By the way, when we pass
in 12 to sum all numbers, we should expect the
result to be 78. So at first, you should aim for getting at least this
number correct here. Of course, in the end, it should be able to
accept any number. The total amount of
code you have to write should only be about
five or six lines. In order to solve this problem, think back to the
previous lessons. One of those topics works particularly well
for this problem. When you come up
with a solution, be sure to take a
screenshot of your code here and post it to the
class project page. I'll take a look at it and
give you some feedback. If you spend some
time thinking about this problem and you can't
quite figure it out, be sure to contact me,
and I'll give some hints. Until then, good luck. After you complete the project, that will conclude this class. Thank you so much for going through this material with me. Have not already,
please leave a review. And if you enjoyed the
class, please recommend it. I greatly appreciate
the support. Moving forward, I
recommend diving deeper into each of the topics
discussed in the class. We only scratch the surface
of what Lua has to offer. The language has
excellent documentation and tutorials on ua.org. So I highly recommend
checking out that site. With all that said, I believe
that covers everything. Thanks again for
taking my class, and I look forward to
seeing you in the next one.
 Kyle Schaub, Software Engineer