Transcripts
1. 1 Introduction: You've ever wondered how to build simple 2D games that work inside the browser, then this class is
designed for you. Since JavaScript is built
into all major browsers, it's perfect for building
browser-based games. This class will teach you all the concepts
which you need to know while building
a Pong-style game, put everything into practice. This class isn't designed
to go too deep or if you do have some existing
JavaScript knowledge, it will really help
you as you progress. We'll try to cover all of the main concepts which
you need to build basic 2D games work
inside the browser, and for this, we begin by
setting up the HTML Canvas. The Canvas is an ideal way
to draw inside the browser. It's perfect for
drawing our game area, things like the
ball, the puddles. We can also use JavaScript to move these on the Canvas too. But working with
a Canvas though, we do need a little bit of background knowledge
on the grid system. That's all covered
in this class too. But don't worry, it's
really easy to pick up. We'll take a look at all of
the basic drawing functions such as how to draw text, how to lines, how to draw squares and
rectangles, circles, and how we can also apply
looping so we can repeat processes that make a
really smooth game. We'll take a look at also
how we can interact with our game and move objects
by using the keyboard. Of course, what kind of game
of Pong would be complete? We didn't handle the ball
bouncing off various items. The ball needs to bounce off
all the sides of our game. We need to crack a score if
it hits one particular side. We need bounce off
the moving paddles. All of this is covered
inside this class. You don't need any
additional tools or to make any purchases
for this class. All we need is a web browser
and a free text editor. If this sounds like something which excites you
and you want to learn about, jump into the class
and I'll see you in the first lesson
where we'll begin by setting up the HTML Canvas.
2. Share Your Work On Skillshare!: When taking any course, it's really important to
not get in the habit of following along just for the sake of ticking
off another lecture. Take the time to
process each lesson, review the code which you write, and think about how you might approach these
solutions yourself. With this in mind, this
class is project-based, and this gives you
the opportunity to really make something
personal and unique. You don't need to
get too lost and diverted away from the class, and you can even take a step back after you've
finished the class and come back and make some
project changes afterwards. This will really give you
a good chance to practice what you've learned
away from the class. Also, remember to share
your project too here on Skillshare and only
will I check it out, but it will also inspire
fellow students too. For more information
on the class project, head into the Project
and Resources tab where you can not only
upload your project, but you can also see
other class projects too. With this in mind, I look
forward to seeing what you create and upload
here on Skillshare.
3. Setting Up The HTML Canvas: Since we are creating a 2D game, we need a way to create
various shapes and various elements and place
these onto the screen. To do this, we'll
be making heavy use of the HTML5 canvas. Canvas is just an HTML element just like a div
or even an image. It has an opening
and closing tag, and on its own it doesn't
actually do anything. But once we have this in place, we can make use of the
canvas API to draw graphics. We can also do much more to
for overuse cases such as photo manipulation by changing the pixels and animations,
to name a few. This course will be more
focused on a 2D graphics. A lot of other APIs
and libraries are also available to
handle 3D features. To access these 2D features, the canvas API has an interface available called
canvasRenderingContext2D. This is not something
you need to memorize. But just know this is
why we have access to the 2D drawing features on
the canvas using JavaScript. Here, you can see a selection of some
of the properties and methods we have access to which will allow us
to draw on the canvas. You'll see some more of
these during the course. Let's now go into
the text editor and set things up
with a new project. First things first, we
need a new project folder to store all of our
files inside of. Let me call this game, anything you want to
but I want to call this one game and hit, "Enter." Open up Visual Studio Code. If you prefer, you can use a different editor
if you want to. Drag this over. Then we need two new files
to get started. The first one you
can either click on the New File icon just here, this will create a new file. I'm going to call
this the index.html. The second file we need
is going to be for our script, the script.js. This is going to handle all of our drawing functions
in our game code. Let's start over
in our index.html. Inside here, Visual
Studio Code has a handy shortcut called html:5, which will give us all of
our basic HTML structure. The title are the same. We don't need much
content inside of the body section but the first thing we
need is the canvas. As mentioned before,
the canvas has the opening and
the closing tags. If we save this and open
this up inside the browser, you won't see any content
just yet on the screen. If we copy the path index page, paste this in, you don't see any content inside the browser. To actually see the canvas, we need to draw things inside of our JavaScript file or we can also add some styling inside of here to make our
canvas more visible. On the style, then all we want to do inside here
is to grab our canvas, set a background color to
make this more visible. You can make this
any color you want to but I'm going to
go for an rgb value. The red of 61 and 59 for
the green and the blue. This will give us this
darker background color. We can now see the canvas
inside the browser. You can see by default that
it's a pretty small canvas. By default, the canvas
will be rendered as 300 pixels wide and
150 pixels tall. We can override this
inside of our script. To make this in the center, we can do this just
like we would do with other regular HTML elements. First, set the display type
to be the value of block. Then we can set the margin
to be zero on the top and bottom and then auto
on the left and right. Save and Refresh,
and this will now appear inside the center because I've automatically divided up the space on the left and right. The final thing to do
inside of our index page, just below the canvas is
the link our script file. Placing the source which
points to our script.js. Then we can move into this
file to add some content. The first thing we
need to do inside of here is to actually grab
our canvas element. We do this just like we would do with any other HTML element. We have access to our elements using things like querySelector, getElementByID, getElementByClassName,
and we can store this inside of a
constant called canvas. For this access,
the full document, I'm going to use querySelector passing in our canvas element. Now this stores our reference to our elements inside of
this variable or constant. We can now access
this just below. Starting by overriding
this default, 150 by 300 pixels
size. Grab our canvas. We can set the width
of this element to be any value which you want. Let's say 800. Next, the height of 400. This should now update
inside the browser. The last thing we
need to do inside of this file is to access the canvases 2D drawing
functions with getContext. We can store this inside
of a constant called ctx, grab our canvas elements, and then call a method
called getContext. Passing in a string
of 2D to give us access to the 2D
drawing features. The constant name of ctx
is up to us but this is a common naming convention to access the rendering context, and this constant
can now be used to draw to the canvas
when we need to. We will use this plenty
throughout this course. This canvas is now ready
for us to draw too. But just before we do this, in the upcoming video
we're going to take a look at how we can work
with grids and coordinates, which will really
help us understand the placements of our
objects onto the canvas.
4. Grids & Co-Ordinates: We're not going to get too
far withdrawn to the Canvas, if we first don't understand
some basic coordinates. You may already
understand some of these, and we don't need
to go too deep, but if not, we're now going
to take a quick recap. When we draw it to the
Canvas, or in fact, most 2D grid systems, we have two directions
we need to know. This is the x and the y-axis, x is horizontal
from left to right, and y is vertical
from top to bottom. Meaning if you wanted to locate the top left corner of
this grid, x and y, will both be zero, but what about something like this square of many
shapes like this? Although, it takes up
multiple grid spaces, the starting location
is the top-left. This is where we
have this red dot. Again from the starting
top-left of this grid, we'll go across three spaces on the x-axis and down two
spaces on the y-axis, which gives us our
starting position. After this, once we have our starting position in the corner, we can then set the height and the width of any shape
which you want to. This is all you really need
to know to get started. We can then set the size of the graphics and do other
things when we create them too. This is what we're going
to have coming up next.
5. Drawing On The Canvas: To help with drawing
to the canvas, I've created a
download for you to use during this course
and also in the future. All you need to do is go to this link which you
can see on the screen, download the PDF, and keep
this in a safe place. Now let's jump into our script and take a look at how we can
use some of these. In the coordinates
video previously, we looked at an example
of drawing a square. Let's begin with
this. Also note, the squares and rectangles
use the same drawing method. We just changed the width or the height values To draw a rectangle or a
square using the canvas, what we need to do is to first access our context variable, so ctx, and this has a method
available called fillRect. This will fill a rectangle with a solid color or even
something like a gradient. We're going to parse into
year 4 different values. Just like we looked at with the coordinates
video previously, the first two values is the location where we want
to place this rectangle. Since this is based on the top left of the
rectangle or square, I want to begin this example by showing this up
in the top left. The top left will be x, 0 and y, 0. Then we parse in the width and the height which we
want the shape to be. To make this a square, we can parse in some
even values like 100. This will place a 100 by 100 pixels square in the
top left of our canvas. We can also push this across
the x-axis or the y-axis, any value which we want to. If we change the
y-axis to be 50, this will push this
further down the canvas. As well as the fillRect method, we can also change this to
be stroke, so strokeRect. Rather than filling a solid color just
like we're seeing, stroke will place an
outline around the shape. This will give us a outline
of a rectangle or a square. For most things we
draw to the canvas, will have a stroke or
a fill alternative. I'm just going to change
this back to be fill. We can also create
a rectangle by changing either the
height or the width. If we change this to be 200, for example, this will
give us a rectangle. By default, we'll have
this solid black color. We can change this by
accessing a property on this context called fillStyle, just above fillRect, again, access our context like we'll do with all of these
drawing features. We can access the property
called fillStyle. FillStyle is going
to be equal to a string and set this equal
to a color such as red. If we refresh the browser, this will now update
the background color. If we were using the
strokeRect instead of fill just like
we've seen before, to do the outline, we'd also need to update this to
be strokeStyle to match. This will change the
outline color to be red. Let's just undo these two
changes and leave as the fill. As you would expect,
these rectangles will be useful inside of our game. We could use them
to draw the player and also the computer's paddle, which is going to be
used to hit the ball. Let's give this a
go starting with the players paddle
over on the left. To begin, since we have a
400 pixels height canvas, we can start by placing
this in the center by changing the y-value to be 200. The width of the canvas, let's set this to be a value of eight and the height of 80. Refresh. You would expect
the paddle to be in the middle since we've set
this y-value to be 200, which is half of the height. But as we've already learned, the starting position
of the x and the y coordinates is in the top
left position of our shape, meaning that the top of the
shape is in the center of the canvas rather than the
center of our rectangle. This is where we need
to start thinking about things more carefully. For the paddle to be correctly in the center of the canvas, we need to now deduct a half
of the height of the paddle. Since we know the height of
the paddle is 80 pixels, we could deduct 40 from
the starting position. This works, but a better
option would be to change these values to make
use of variables. The variables would
then be used to perform this calculation for us, and it would also be useful in the future if we were to
change any of these values. Just both, we can
create some variables. The first one is the paddle
width using the same values, so the width of eight pixels. Then the second one is
for the paddle height. The paddle height is 80 pixels, just like we already have. Then we can make use of these
in our fillRect method. The paddle width,
also the height, and this should still
work exactly the same. But now instead of hard-coding
this value of 160, what we're now going to do is to calculate this using JavaScript. We can grab the canvas height, which is currently 400 pixels, divide this by two to get the center which currently
gives us the value of 200. But as we know, 200 will not place this into the
center of the canvas. We also need to deduct
half of the paddle height, so canvas.height divided by 2. I will also take away the
paddle height divided by two. What we have here is
exactly the same as before. We have the value of
200, takeaway 40. This is just the same
as before but using variables. Save and refresh. Now, for the computer's paddle, which is going to be
over on the right, and this should all
look pretty similar, all we need to do is to change the x position to be
over on the right. We can change the fillStyle
to be a different color too. Moving down, all
the code from now will have a different color
by changing the fillStyle. Let's go for blue. Then
we use ctx.fillRect. As mentioned, the
only difference between the players paddle and the computer's
paddle is we want to push this over to
the right-hand side. The players paddle has the x
starting location of zero, which is over on the left. What we want to do for the computer's version
is to place this over on the right by accessing
the canvas.width, which is currently equal to 800. But since this starting
position is based off the top left of the rectangle, this would actually push this
off the edge of the canvas. What we need to do is to bring this back on by deducting
the paddle width. The last three values are
exactly the same as above. This is going to
start in the center. We can use this,
and the width and the height of the paddle
has also been set too. Grab all three of these, add these in just
after the comma, leaving us with two paddles
now in place on the screen. The next thing we need
to draw is a ball. You may be expecting
a method called fillCircle or something
along those lines. But for circles, we use
a method called arc. Again, on the context, call the arc method. This is used for creating
an arc or a curve. We can form a circle by rotating this curve all the way around back to the
starting position. Unlike a rectangle,
since an arc is curved, the shape doesn't have a
top corner to locate it. Instead, we locate
it by the center. To place it in the
middle of the canvas, we could do something like this. We could access the
canvas.width divide by 2. This is placing this in
the center of the x-axis. Then also the same
for the height. We're not finished yet though. Next comes the circle radius, which is the dimension
from the center of the circle to the
very outer edge. Basically, half the
width of the circle. Let's place it in as 50, separated by a comma. The next value in a clockwise direction is the
start and the end angle. To effectively start this
vertically at 12:00 o'clock, we start with the
position of zero. For the end position to rotate this all the way around
and create a circle, we need to rotate
this by 360 degrees. But when using the arc method, this rotation is in
radians, not degrees. The equivalent of 360 degrees in radians is 2 times math.Pi. This is how we can do
this using JavaScript. Now, if we save this and
refresh the browser, we're currently don't see
any circle on the canvas. We don't see our circle
on the Canvas just yet, because first we need
to declare if we want this circle to be a
fill or a stroke. We can do this with ctx.fill. This is a method, so we need the brackets just afterwards. Refresh. This will now fill our circle with a solid
background color. As you'd expect,
we could also use the stroke method to give us
the outline of our circle. I'm going to keep this as fill. Also change the fill
color just above using fillStyle and set
this equal to gray. Since 2 times math.Pi
is a full circle, you can probably
guess that half of this value is a half circle, so rather than
timesing it by two, we can just say math.Pi. This will be a half circle. Again, if you want
this to be a line, you could change
this to be stroke. You could also reduce or
increase the value of math.Pi. If we divided the
value of math.Pi by 2, this will then give us
a quarter of a circle. As you can imagine, this arc is a pretty versatile method. But since we need
a ball, I'm going to reinstate this to be 2 times math.Pi, just
like we had before. We can also change this
to be a fill color, and also a smaller ball
radius of 10 pixels. This is just a first basic
look at drawing to the canvas. As you would expect, there
is a lot more to learn, and many more things you can do. We'll begin to look at some of these in the upcoming video.
6. Text, Lines & Paths: Continuing on from
the previous video, we're now going to discover some more techniques we can
use to draw to the Canvas, to draw some lines
and also some text. This is going to be really
handy for our game. I will begin with drawing texts to the Canvas which is
going to be used to draw the user's score and to also prompt the user
to begin the game. The draw texts on the Canvas
we have both a stroke texts, but an outline,
and the fillText, or a solid color. Let's start at the very
bottom of our script. Access the context and
we'll begin with fillText. For fillText, the first thing we need to add is a string, which is the text which
we want to display, so hey, followed by the x and the y positions
where we want to place this. Let's go for 150. Save and refresh. We can just about see this small text on
the Canvas but it's really hard to see because
the default size is 10 pixels with a
sans serif font. But we can of course change
this in our JavaScript. First of all, let's
change the fillStyle to be equal to any color such as red and also to change the
size and also the font family. We can access ctx or font. Set this equal to a string. This takes in the exact same
syntax as we would do with the CSS on property so we can pass in a string
of the pixel size. Let's go for 30 and then the
font family of Helvetica. Refresh and this takes effect. What would be nice to have
is the player's score displaying on both
sides of the Canvas. If we had the player's
score in the middle of the left half and the computer score on the
middle of the right half. To simulate this for
the player's score, we effectively
need to push us in a quarter of the
width of the Canvas. To simulate a score
we can just place in any value inside of here, such as three, and then pushes over a
quarter of the width. We can first grab the Canvas, that width and divide this by 4. The computer score,
this needs to be three-quarters
of the way across the Canvas and we can duplicate this. Change the score for now. But rather than dividing
the Canvas by 4, we're going to
multiply this by 0.75, pushing our text
three-quarters of the way across the Canvas. Finally, we can also store
these two values into variables so we can access them and use them
later in the course. Back to the top, using LET so we can update these
as the game is progressing. The first variable is
the player's score. We have an initial value of 0, followed by our computer score. These variables can now be used inside of our fillText method. Remove the hard-coded value, and this is the player's score. The second one is
the computer score. Something else that
Canvas gives us is the ability to draw using lines. We have two useful methods
available called move tool and line tool. Let's
take a look at these. Ctx.moveTo and ctx.lineTo. The first one of
move to is used to move to the starting
position and then line to is what
actually draw a line on the Canvas to the end
position which we set. Move to is like
lifting the pen off some paper and moving it
to a certain position. Line to is used to
actually draw the line. What I'm going to use this
for is to draw a center line vertically on the Canvas and
also the center circle too. First, let's start with
this vertical line and we need to first move the position of the pen to be in the center of the
Canvas and at the top. The values for
this, first of all, for x is half of the width of the Canvas and the
y position is 0, since we want to keep
this at the very top. Move dependent to be in
this position just here. Now, we need to use
the line to method. Actually draw a line to the end location, which
is at the bottom, passing in the end
location so this is still in the center of
the Canvas so we can grab Canvas width divided by 2 and the final y position
is down at the bottom. This is the Canvas.height. This will then set where
we want to draw our line to but actually
places on the Canvas, we need to use the
stroke method, so ctx.stroke and there's a line from the
top to the bottom. This is really good,
but if we look closely, we also have an additional unwanted line around this ball. This happens because
at the moment we don't have any separation between all of these Canvas paths and the graphics
which we've created. For example, just above, we've drawn a circle
using the film method. We've drawn this, as you'd
expect with this gray color, but then the code keeps running all the way down and it also draws the same circle using
the stroke method too. This is why the ball has a fill and also an outline
from the stroke to. When this happens, we
can separate each one of these sections by using a
method called begin path. We'll call this just above our line section
with ctx.beginpath. Begin path will effectively
clear out all of the existing paths above and start a fresh
from this line. Save and refresh
and now our line has been removed
from the circle, leaving only the
vertical line which we intended as well as
this solid line. We can also change this
to be a dashed line too. We can do this just
before we draw our line with ctx.setlinedash. Set line dash is a
method which takes in an array inside of
this JavaScript array, we set the size so both the dashes and also the gaps
between each one of them. If we did something
like this, 10, 10, 20, 20, and 30, this will set all the
values for our dashes and spaces so we have the
size of the first dash, the size of the first space, the size of the second dash, the size of the second space, and then the size
of the third dash and then it will repeat
until the end of the line. Ten pixels for the first
line and then 10 pixels for the first gap and then we
move on to 20 and then 30. To keep this simple, I'm
just going to pass in one single value of 6 and this will make sure that each
one of our spaces and also our dashes is
in equal value. The last thing to draw is
going to be a center circle. We know how to draw a circle
using the arc method. But this time we'll also set
a dashed line right down to the very bottom and we'll begin a new section with
ctx.beginpath. For our circle, ctx.arc. Just like our starting
ball position, we need to place this into
the middle of the Canvas with Canvas.width divided by 2 and also the same
for the height to. Grab this, paste these in. The third value is the radius and since we have a ball of 10, let's make this a value of 20. For the circle, the starting position is 0 and a full circle
is 2 times math.pi. Actually draw the
circle you need to call the stroke method leaving our center circle now
in place on the canvas. This is most of what we
need for our games at drawing functions and the
great part about using variables like this is
in the future we can update these values to move
our objects on the Canvas.
7. Looping: Looping is going to be
a really important part of moving things
inside of our game. If you think about
it at present, we are currently
drawn things like a ball and also the
pedals onto the screen. But what we need
to do is to update these values to move these
into a different direction, and then we need to continuously redraw and repeat
this using a loop. This is what we're going
to take a look at now. Down at the bottom
of our script, the first thing to do
is to create a function which you want to
repeatedly call loop. You can give this any
name of your choice, I'm going to stick
with loop this one. The purpose of this function
is to repeatedly draw autographics such
as the ball and paddles after they
move position. To call it, we can use a JavaScript method
called setInterval. SetInterval will repeat
our loop function after a number of milliseconds. We call this at the very bottom, this is going to
take in two things, the first thing is the thing
which we want to repeat, and in our case it's
our loop function. We'll pass this in, followed by a time delay in milliseconds. Let's set this currently to 15, and you can increase this for the slower game and reduce
this for a faster game. This loop function
will eventually repeat many parts of our code
which we have above, but for now let's place in a simple console log so we
can check this is working. So any text inside of
here, give this a save, and now we can go into
the console and check our setInterval is
calling our function, inspect, jump into the console, and now if we refresh, we can see this is called
every 15 milliseconds. Let's start off by replacing this console log with our ball. To draw our ball
we could cut and paste the code which we use to draw our ball which
is the ctx.arc method. Or instead, we could wrap this in a function and
call this directly. Just above this will create a new function called drawBall. This is going to wrap all
of our code just below. Open up the curly
brackets just like this, and then we can cut
and paste and move this directly inside
of our function. Now, we can call our
drawBall function from inside of our loop, replace the console log, pass in our drawBall function, and we'll call this
every 15 milliseconds and refresh the browser. A couple of things to note here, the first thing you'll notice
is our ball is now too big. We seem to have a
conflict between the paths which we
are drawing again, which can be fixed
with ctx.beginPath. I'm going to add this inside
of our drawBall function, refresh and this now
fixes our first issue. The next issue is the ball
actually isn't moving yet. This can be expected
because although we've repeatedly drawn this ball
every 15 milliseconds, we always drawn it in
the same location. In the drawBall function, we always drawn this
into the center, and we can change
these two values with some variables
which we can update. For the width, which
is the exposition, we replace this with ballX, and ballY for the Y position. We still do want both
of these variables to initially be in the
center of the canvas. First of all, ballX, it'll be equal to the
canvas width divided by 2. Place this initially
into the center, and then for ballY just below, we'll divide the
canvas height by 2. As we would expect if
we save and refresh, we don't see any updates still just yet because we
actually need to update the values of ballX and ballY each time the
frame has been repeated. We can do this again in our drawBall function
after this has been drawn. As soon as we move
on to the next loop, we'll update the value of
both of these variables , plus equals 2. Plus equals, we'll
add the value of two to our ballX variable and then update the variable,
ballY is equals. We'll keep this short
since we don't have as much trouble on the y-axis, so the value of one is
fine. Refresh this. We'll now see the ball
traveling on the canvas. This is now updating, but we still have this solid
trail on the canvas since the previous ball position
needs to be removed. We can fix this with a canvas
method called clearRect, which will clear all
existing drawings from the canvas before we redraw
our ball down to our loop, place this in at the beginning, just before we repeated
to call our function, passing clearRect, which is
available on the context. If we want to do have the
option of only clearing small parts or a particular
section of the canvas, on our case we'll
clear the full canvas. First, we pass in at
the starting location which is in the top-left, which is the coordinate of 0, 0, and then we clear the full
width and the full height. First of all, by passing
in canvas.width, separated by a comma, canvas.height, and again
replace this with small values. If you only want to
remove a small part of the canvas over
to the browser, the ball now moves as expected without leaving
this solid trail. Go to the ball, now
moves as we expect, and we don't see
anything else now on the canvas since we
cleared it with clearRect. We're clearing the
canvas each time, we call this loop function. What we need to do is to grab
our drawing functions from above and also move
these into our loop. Also, the additional benefits of all these drawing
functions being in the loop is that very soon we're going to update the paddle
position with a keyboard, and this will also
update the position on the canvas on each loop. But for now, we'll go up to
where we draw our shapes, and we'll do the same as
we did with the ball, which is to wrap all of the relevant code into
a standalone function. So it can be called from
inside of our loop. First, drawing function
was the player paddle, which is here just
underneath our variables. Cut this out and
create a new function called drawPlayerPaddle, paste this back
into our function. Second one is draw
a computer paddle, and this is for
all blue section. Cut this out, and create our new function called
drawComputerPaddle. Again, paste in our code, drawBall function
is still in place. The next one was filtText, and this is to draw the
score onto the canvas. So cut this out, create a new function called drawScore, and then paste this
back into the body. The next two sections are for drawing our
lines to the canvas. This one was for the center line and also the circle
in the middle. We'll place both of these
into a single function called drawCanvas. Paste this in. Now we can call all of
these new functions from our loop: drawPlayerPaddle
which was the first one, followed by drawComputerPaddle, drawScore, and
finally drawCanvas. Let's try this out, let
us see the browser. Now after we clear our
rectangle along with the ball, all of the rest of the drawing
functions are now working. As you would expect, this is
a really important part of our game and a big step
in the right direction. Coming up next in
the upcoming lesson, we'll take a look
at how we can use the keyboard to move the players paddle up and also
down to the ball.
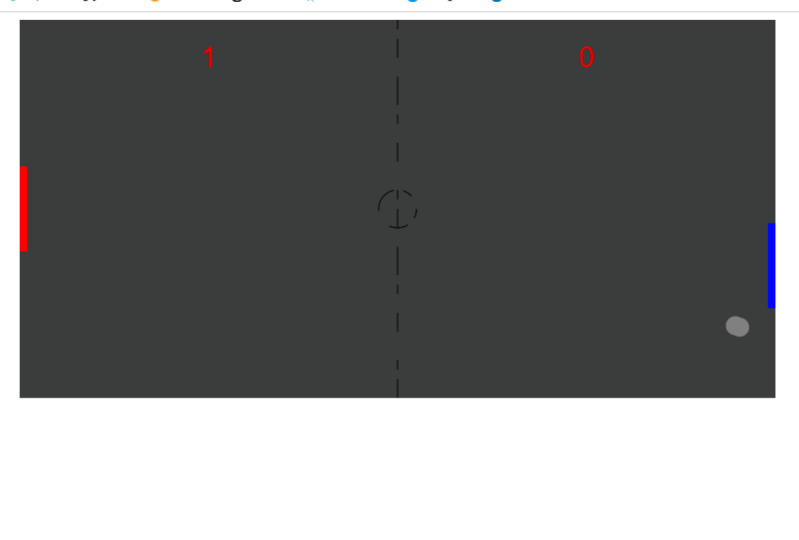
8. Moving Objects With The Keyboard: We now get to the
fun part where we can actually make things move on the Canvas using controls such as the mouse
or the keyboard. The aim of this video is to
listen out for when the user presses the up or the down
button on the keyboard, then we're going to
move the users paddle. We can do all of this
with regular JavaScript. At the moment, we
have this player paddle over on the left. If we go to the
draw player paddle function, which controls this, just here, we can see with the x and the y
coordinates location. Though this is over on the left because we have
the x value to be 0 and the y-value is set
to be in the center. To update our paddle
with the keyboard, we need to replace this
y-value with a variable. To keep it positioned in the center rather
than the top-left, we can still keep this
peddle height divided by 2. But the Canvas height divided by 2 can be replaced with a
variable called player position. A position will need
to be created up at the top with the rest
of our variables. We use let since this
needs to be updated. Play position and set this equal to Canvas
height divided by 2. To begin, this will
leave our player in the center of the Canvas,
just like before. But now we have a variable
which we can update. This will also be
checked on each loop since we call our
function from our loop. With this variable now setup, we can begin to listen out
for a keyboard events, move our player position. Just below this, what we
need to do is to listen out for a keyboard event
with addEventListener. This is just regular JavaScript document.addEventListener. We're going to listen
out for a user's event. The event we want to
listen out for is a key being pressed down, which will then
trigger a function which I'm going to
call movePaddle. Function movePaddle. Since this isn't event, we need to access the
event information to find out exactly which
key the user has pressed, we need to pass in
the event information into our function. Begin, we'll start
with a console log passing in the value of e. We can see exactly
what event information we have for our key down event. Jump into the console, refresh. This won't do anything
to begin with until the user has
pressed the key. Let's start with the key up, which will then print
all the information from our keyboard events. There's lots of information inside here which we don't need. But the main thing
which you do need for this project is
this code property. You can see this is a
string of Arrow Up. If we now close this down
and press the Arrow Down, the code which you need for
this one is Arrow Down. We can access e.code and
check if each one of these is equal to the arrow
up or the arrow down, then we can set the value
of player position. Let's remove the console log since we know what
we're looking for now and replace this with a
JavaScript switch statement. The value which we
want to check against, as we've just seen, is e.code. Since we're only current
list now for the arrow up being pressed
or the Arrow Down, it could replace this with an if else statements if you prefer. But I want to use a switch statement so we can extend this later on to use the
keyboard to start the game. To begin, the first
case which we need to listen out
for is Arrow Up. Make sure this
matches the string exactly like we see
inside the console. Each word begins with a capital. If the arrow up has been
pressed with a need to update the player position
by deducting a value. Because remember, the value
of y at the very top is 0. This updates as the
player position moves down passing our variable
of player position. For this, we'll make use of the subtraction
assignment operator, which will subtract our
particular values such as 15 from our current value and then re-update
this variable. Each one of our
cases needs to be followed with a break clause. Break out of our
switch statement if this case is being matched. We also just need to place
in a colon inside of here. Our second case is just below. This one is going to be
for the case of Arrow Down : This time we'll update the player position with the addition
assignment operator, which will add 15, and then reassign
our new variable with the updated value. We'll break out of this
if this one is true. Since our player
position is used inside of our function
when we draw the paddle, we should now be able to update this when we press
the up and down keys. We can also move
anything else on the canvas using
the same technique. In a future video, we'll
look at how to move the computer's
paddle up or down, but this one needs to
be done automatically. Next, we'll cover how to handle the ball bouncing
off our objects.
9. Detecting Collisions & Bouncing: What kind of game we would have if the ball didn't bounce off the sides or also
the paddles too? Well, this is a tricky
one because it involves some working out because all of our current coordinates
are based off the center lines of things like the ball and also the paddle. But we'll do our best
to figure things out and we'll move
on to this now. If we locate this
draw ball function, we know these two
lines of code at the very end are responsible
for moving our ball. Each time the ball is
drawn to the canvas, we're going to move the value of ball X and also the
value of ball Y. Also, we know how to
change the direction. If we now refresh this, this will go across in
a positive direction. We can also switch the
direction by changing any of these values to be
a negative number. This is going to be the basis of bouncing off our walls
and also the paddle. To do this, rather than having our hard-coded values
just like this, let's update this function to make use of variables instead. Move x to the x location and
move y to the y direction. This will make updating these values
dynamically much more easier so we can reverse the direction when
there is a collision. At the top, let's set
these up as variables. First of all, move x, and for now let's
keep in the same hard-coded values
which we had before. Move y this was equal to one. But you can update these to be different values if you want to. Also one more variable
for the ball radius, which is a initial value of 10. We will need this
a lot when we're calculating the collisions. This is because the ball is positioned from the center
point of the circle, but when it gets up to
the top for example, we also need to take into
account the radius of the ball. We can also update
our functions to make use of the ball
radius just below. Back down to draw ball. Here we're setting
the ball radius to be also some pixels, or we can update this
to use our variable. Now, on to the function to check if there is a collision. Let's set up a function at the very bottom just
above our loop. I'm going to call my
function collide. Then this function
is going to be responsible for checking
four different things. The first thing is to bounce
off the top and bottom. We also want to check
if there's contact on either the left or the
right of our game, so we need to check for
the score on the x-axis. This applies to both sides. We also want to
check if there is contact with the players paddle. Also, the same for the
computer's paddle too. Good. We now know what we want to do inside of this function, and we can call this just
below inside of our loop. This means that
we'll check all of the collision points at any
given frame of our loop. We'll check for contact
each time anything moves. Now we do have a bit
of working out to do inside of this collide function. Just before we start to work out our four points of contact, I'm going to draw a temporary
ball onto the canvas. We can move this around,
and make sure we have the correct contact points. First of all, we'll
begin a new path. It doesn't interfere
with any other drawings. The fill style. You can make this any color you want just so it stands out, I'm going to go for purple. Then ctx.arc to draw
our ball on the canvas. Any location for now, any random location is fine, 10 pixels on the x and y
as in the ball radius. To make our circle the
start angle can be zero, and then 2 times math.PI. Do draw this, the final thing we need
to do is ctx.fill, save, and there's a ball in
the top corner of our screen. Okay. The first
points of contact we want to check is the top
and bottom of the canvas. Starting with the bottom. Let's move our temporary
ball down to the bottom of the canvas and make sure we have the correct collision point. The x-axis doesn't
matter for now, but we do need to
change the y-direction. But first of all,
we'll pass in the canvas.height, save this. As you can see, this will push this off the edge of the canvas, so we need to pull this back
half of the ball radius. We already have this
stored as a variable, so we can deduct this from our canvas height. There we go. This is the point
of collision on the bottom of the canvas
we want to watch out for. Now, we can make use of
this in an if statement. We want to check if
something is true. The check which you want
to do is if the ball y, which is the location on the
center point of the ball, is greater than the ball location which
we've just drawn; if the ball has gone further down than this current point, it's then considered
to be off the canvas, and we then need to
rotate the direction. Just before we do
this, we'll test this is working okay with the console log of hit bottom. Jump into the console
and refresh the browser. As soon as the contact point gets to the bottom of
the canvas or goes off, we want to get our console
log run inside of here. Bouncing this ball
is pretty simple. Currently when the game starts, the ball goes in a positive
or a downward direction, but we can reverse
this by changing this to be a negative number, just like we've seen at
the start of this video. Now, in this and since we are working on the y-direction, we can replace our console
log by updating the variable. Move y, which is the
current location, is equal to a negative
version of move y. Which will effectively
reverse the positive to a negative and a negative
to a positive. Let's save this
and try this out. Refresh, and we should see a
bounce off the very bottom. Of course it still goes off the corner of the
right-hand side of the canvas, but this is fine. We can now see our
bounce is all working. Good. Now we need to account for the collision on the
top of the canvas too. Inside the if statement
we'll add an or condition. This time we want to check if the ball y location is just touching the
top of the canvas. We don't want to check
if this is equal to zero because then if it was, because of the ball
radius, this would be half off and half on the canvas. We also want to deduct
the ball radius. We check if this is less
than or equal zero. If it is, it should bounce
off the top of the canvas. Currently, when we
reload the browser, the ball moves in a
downward direction. But for testing, we can
move the move y-direction to be a negative number, and this will cause the ball to move in an upward direction. This is the basics of how
we can bounce a ball. It really is mostly
a case of just checking our contact
points are correct, and also making sure we account
for the ball radius too. We'll now move on to adding
a condition to check if the ball hits the left or the right-hand
side of our canvas, and later on, this will
increase the scores. This one will all be
based off the ball x location for the left and the right-hand
side of our game. Go back down to our
function, which is collide. Then just under our comments, we also want to place
in an if statement. First of all, to check if the ball is collided over
on the left-hand side. Currently, our temporary ball is exactly where we want the
point of contact to be, which is set to
be a value of 10. This all works out fine because our ball radius is set to 10. We want to check if the location stored inside
the variable of ball x is less than or equal
to the ball radius. Effectively, if the ball is
on the left where it is now, we want to then pass a
score to the computer. We'll provide a way to do
this later, but for now, just paste in a console
log of computer score. Then below this, an
else-if section. This is going to
be for our check to see if the player has scored by moving the ball
over to the right-hand side. For this one, we pass in
the location of ball x. We want to make sure
that the ball is touching the right-hand
side of the canvas. Again, the x position vertically is in the
center of the ball. We also want to check
if the ball x plus the ball radius is greater than equal to the
full width of our canvas. We can grab this with
the canvas width. Then placing a console
log for the player score, test this out into the console. It's a little bit bigger.
You've got a typo on line 85. This just wants to be
together, no space in between. Let's try this out now. If the ball moves
over to the right, we see there's a player score. If we go up to our x
location at the very top, it can just to be
a negative number. We can then test out
the computer score. Here we go. This now
all works as expected. Things are really beginning to take shape now with our game. Next, we'll take a look at
another important section, which is to bounce the ball
off the moving paddles.
10. Paddle Contact: In a similar way to bounce
off the sides of our canvas, we now also need to account for the ball hitting our
moving paddles too. This involves a little
bit more work because we need to account for
not only the ball hitting the front of the paddle, but we also need to check
the ball location is between the top and the bottom
of the paddle too. Starting off with
our player's paddle, to check we are working
things out correctly, we can use this temporary ball, place this on the front
of the paddle and check we have the
correct contact point. Jump into the collide
function and at the top, we have this arc which is
creating this temporary ball. Remove this value and place this on the face of the paddle, we need to move this
across on the x-axis, the ball radius, plus the width of the paddle which is stored in the paddle width variable. Refresh and first of all, we can see this move across, and just to confirm
this we can move this into the center by adjusting the y-axis equal to the
canvas height divided by 2. There we go. Now we have the correct
contact point for our paddle. We can use this contact
point now to check if the ball is less than or
equal to this X value. Again, we set up an if
statement just like this. Move down to our
comment, which is check the player paddle contact. The if statement is
going to check if the ball X position is less than or equal to the X position
which we just set, which is the ball radius plus the paddle width at this end. Basically checking if
this ball position is where it is now or less than. Using our move X variable, we can then reverse this by setting this equal to
the negative equivalent. Remember here though
all we're doing is checking the X location, so the ball should bounce
off anywhere vertically from the top to the bottom as long as it is in-line with
the face of the paddle. Let's refresh this
and test this out. We should now see
a bounce before it hits the back of the canvas. Good, so this all
now works fine. Next, we want to restrict this
bounce to only happen when the ball is between the top
and the bottom of the paddle. We already have a variable in our game called player position, which is set to be
initially in the center of the canvas which for
us now would be 200. When the up and down
keys are pressed, the center point to
the paddle will update the player position variable so we always know where this is. For example, let's say
it's currently at 100, next we need to
check where the ball is in relation to the paddle. Now we can use 70 as
the ball position. Take this value away
from the paddle and we can see the difference
is 30 pixels, and this is a positive number. In another example, here we can see the ball
position is a 125. Again, take this off
the player position, but this time the result is
a negative number of 25. But why does this
calculation matter? Well, it matters because if this number is within
the paddle height, there should be a contact. We would have half the Paddle height since we're working from the center line and we also need to account for
the ball radius too. This is where things can get
a little bit more complex. Here we've add the
radius or deducted, depending on which side
of the ball is on, positive and negative values. In the previous
slide, we also had the same positive
and negative numbers to account for too. This means we could write
some complex code to account for this or we
could make our lives a lot easier by changing
every comparison to be positive or we can do this with a math method called absolute. To see how math. absolute works, let's jump into the
console and test this out. Placing a console log
with the value of math, delta abs passing in a
positive number such as two. Now if we refresh and
go into the console, we can see we have
the value of two so just as expected
in the console. However though, if we change this to be
a negative value, I'll just move this
out of the loop so it doesn't keep repeating. Refresh, we can also see the value is still a
positive number of two. Regardless of if we pass in a positive number or
a negative number, we always get the positive
equivalent shown. The point here is we can use this absolute methods to make sure the calculation
between the ball and paddle is always positive, meaning we can always
compare this value to a positive action of adding the ball radius rather
than having to work out if we want to
add or deduct this. Over to the code and
let's see how this looks. We can remove our console log, and then jump into our
if statement at the top. We currently only
checking the exposition, but we now also need to check the Y position with
the "AND" operator. Now we're going to check
if the ball is between the top and the very bottom. Passing in math to abs. We always get a positive number. What we want to do is to
check if the Ball Y position, take away the player position. Remember this is
going to give us this value between the
ball and the paddle, but it's always going to be a positive number
unlike in the slides. Then we check if this
value is less than or equal to the height
of the paddle, divided by 2 plus
the ball radius. The reason why we can
add the ball radius, and we don't need to
worry about taking away depending on
which side it's on is because we are always converting this to
be a plus number, therefore, we're always
adding the ball radius. Let's give this a save and try this out inside the browser. First of all, the ball
can go auto play, and if we now move
the paddle in place, they should now cause
a contact point between the ball and the paddle. I know this may seem difficult, but without this
positive conversion, we wouldn't need to duplicate this for the ball being either above or below the
paddle center line. Now with this working, the
next thing to do is to check the contact point
for the computer's paddle. This one's going to
be pretty similar, so we can copy the
full if statement in the player section and paste this just below
the computer comment. First, the exposition needs
to be over to the right. We now need to check if the ball position
is now greater, add the ball radius
to account for this. On the right of the
greater or equals, we need to check if
the ball is past the face of the
computer's paddle. We can do this by
checking the canvas, width, takeaway the
width of the paddle. This should be the
X position taken care of and for the y position, this is going to
be pretty similar. We want to also check if this is between the top
and the bottom of the paddle rather than checking it against
the player position, we want to check this against
the computer position. Of course this one
hasn't been created yet so let's go up to the very top where we created our variables
and we can duplicate our player position and change this to be the
computer position. Again, setting this to be
in the center of the canvas is completely fine for the
beginning of our game. The computer position will also be updated in
a future video. To clean this up, we
can now go back down to the collide function and remove our temporary ball, we
no longer need this. It's going to be pretty
difficult to test if the computer's paddle is working since we can't move
this towards the ball. But one thing we can
do just to check things out and check
we have a bounce, is to change the move Y
position to be a value of zero. This will move the ball
horizontally across our game, off the players paddle. Excellent, so the bounce is now working off both of our paddles. Now it changes back, Negative 1 since we know this is working. We've made it through
one of the more difficult parts of our game. It may be a little
bit hard to take in, but this really is an essential part to make
our game function correctly. It's not perfect. We have not accounted for
certain edge cases, such as if the
ball hits the very top or the very
bottom of the paddle, but we don't want to go
too deep in this course. Next, in the upcoming video, we'll take a look at how
to track the scores, both for the player and
also the computer too.
11. Tracking Scores: We already use the filtText
method to draw our score onto the Canvas and our scores are
also stored in variables. We also know when the player or the computer scores by hitting the ball off the left or the right-hand side
of our Canvas. The logical next
step would be to update these variables
when this happens, to then update the
score on the screen, these variables where player
score and also computer score down into the
Cloud Function, let's locate this
inside of our script. Just here. We
currently logged to the console when a player
or the computer has scored. Inside of our if
else if statement, we could directly update our score variables inside here, but instead I'm going
to call a function. This function will also check other things like if the game is over and also place the
ball back into the center. We'll replace these
two console logs with a function which we're going
to create soon called score. The score function will
also need to be made aware of which one of our
players has scored. For our first one, we'll pass in the computer as a string, and for our second one, if the player has scored, we'll pass in the player
to this function. Of course, we need
to create this and just blow our Cloud Function, create our function
called score. Inside here, we're going
to take in the player. Remember this player variable
is going to be equal to either our computer
or our player. We can check which
one of these has been passed with an if statement. If the player variable is
equal to the computer, we'll do something
inside of here, which is to update
our variables. Remember at the
start, we looked at the player score and
the computer score, and Here we'll update both of these variables by
the value of one. This one is for the
computer score. Increases with plus-plus. Else we update in
the player score. Over to the browser and
let's test this one out. We'll let the ball pass
out and the paddle. We can see that
the computer score is going up really fast. The reason this happens
is because each time the ball moves or each time we have a new frame
inside of our loop, we are checking if the ball is behind the player or
the computer's paddle. Since we are continuously
behind the paddle, the score will keep
on increasing. To fix this, we can
put the ball back into the center of our game
so we can start again. The way we can do this inside
of our score function is to reset ball location with ballX is equal to the
canvas.width divided by 2, place this into the center. We'll also do the same for
the location of ballY. This time this is based
off the canvas height, also divided by 2.
Let's test this out. Refresh, let the ball
pass behind the paddle, this is set to one,
then the ball is placed back into the center
for our game to continue. This is a simple way to track
the scores of our game. In the upcoming section, we're going to take a
look at how we can add a maximum score so we know when the game has ended and also will display the winner
onto the Canvas.
12. Ending The Game: The first step towards ending our game is to set how many points we want
to be the maximum. For this, we need a variable at the top called winning total. Const winningTotal and my
value is going to be equal to three so the first player to
get to three is going to be the winner and we can update this inside of
our score function. Let's head back
into our function. Here we need to check if
our computer score or player score is equal
to this winning total. Placing an if
statement to begin, check if the computer score is equal to our new variable
which is winning total. If it is, we're going to
do something, if not, we'll pass in an else-if clause and this
time we'll check if the player score is also
equal to our winning total. What we want to do
inside of here, we're going to end the game by creating an endGame function. Obviously, we haven't
created this yet, but it's called endGame. Just like when we created
our score function, which took in the player, we're going to also do the
same for the endGame function. This is the left, this function know which one was the winner. This one, this was the
computer then we'll also pass in the return keyword to break out of the statements. In a similar way, the else-if
statement will also call our endGame function but
passing in the player. Also return out of
this if this is true and the reason why the
endGame function needs to know which one of these
players was the winner is because we're going to change the colors depending on
which one was the winner. As you can see, we've
got the red color for the player and the blue
color for the computer. This will be reflected
inside of our endgame text. Let's create this
function just below. Remember this is being passed either the computer
or the player, which will store inside a winner and then pass in an
if else statement. The if section we can check if the winner is equal
to the computer. Just need to remove
these brackets we don't have these in
the else section. If the winner is equal
to the computer, which is the color of blue, we're going to then
change the text color to display the results
to be a blue color. ctx.fillStyle is equal to blue and then in
the else section, we changes fillStyle
to be equal to the red color to
match our player. Now the reason
we're changing this text color is because
we're going to display some text onto the canvas when the
game has ended. This is simply just going
to let the player know if they've won or if
the computer has won. Just before the text, we'll set the text line to be
equal to the center. Place this into the middle
of the canvas and then we create our texts with a
function called fillText. Open up the backtick
so we can insert a variable because we
also need to insert the variable of the
winner depending if the computer or the
player has won. Say the winner is, a colon, then using the dollar symbol and the curly braces in JavaScript, we can insert the
variable of winner. This will be the
winner is player or the winner is computer. After the backticks, add a comma then we can place this in
the center of the canvas. First of all, the exposition, which is the canvas.width
divided by two. On the Y position is
canvas.height divided by two. Auto-browser and we
can try this out. Refresh and let's move this out of the way to get
to the value of three. That's one, two, and three. You can see straightaway that we do initially see our text, but it quickly disappears
and the game continues on. The reason this
happens is because our loop is still running. We haven't done anything
to stop our set interval. Once the player or the computer gets to the score of three, we're still drawing the
text very briefly to the canvas but on the next
iteration of our loop, we're running this
clear text method, which is clearing all of
the texts off the screen and then redrawn all
of our game functions. How do we stop this
loop from running? Well, set interval
can be stopped by a method called clear interval. This involves
storing a reference to this interval when we create it and then using this reference to stop it later
with clear interval. This reference can
be stored inside of a variable and like all
the rest of the variables, this will be at the very top. Call this gameLoop and
then at the bottom, set this variable to be equal to our interval so gameLoop is
equal to our setInterval. Here, we're still calling setInterval just like
before but this is going to return a unique ID which is stored inside
of this variable. We can see this if we
log this to the console, jump into the browser and refresh into the console and
we can see the value of one. If we had multiple
intervals running, each one of these returned
IDs will be unique. Back to our endGame function, this variable can now be pass to clearInterval to stop
the loop from running. We'll do this right at the
very start of our function. Pass any method which
is clearInterval, which takes in our ID, our reference store
interval called gameLoop. Now we can test
this out, refresh, wait for this to get
to a value of three. Good. We can see straight
away to the game freezes and we still have
the text on the screen. To improve on this, it would
be better to clear the ball, to clear the paddles, and also these dotted
lines in the background. Even only the score on
the winner on the canvas. This is something we
already know how to do from our loop where we clear
our canvas, we clearRect. Let's copy this and place this inside of our
endGame function. This will only
clearInterval method, it'll clear all the
rest of the Canvas. Since it happens before
we draw our text, we should still see
the text on the screen but it would be
useful if we could also see the score
at the very top. Well, this is pretty simple. We also know how to draw the score with this
function just here. After we clear our Canvas, refresh and we'll try
this one more time. Great, the canvas
has been cleared we still see the text. We still see the final
score at the very top too. With this all now working, next, we'll move on to starting
and restarting our game.
13. Starting & Re-Starting The Game: Instead of our game starting immediately as soon
as the browser loads, it would instead be nice to
trigger this action with the keyboard by using
something like the space bar. We'll now take a look
at how to do this and also how to restart our
game once it is finished. I will use the space
bar to start the game, but you can change to a
different key if you prefer. Look inside our
switch statements. we will listen out for the
arrow up and the arrow down. We can create a new
case to listen out for our chosen key
to begin the game. So case, this time as a string. The key I'm going to
listen out for is the space bar, put a colon, and then we're going
to call a function to start the game
called game start. At the break clause,
if this is true, and just before we
create this function, it would also make
more sense now to rename this new part of
function to be something else, since it does other
things rather than just move our player up or down. I want to go for a
handled key pressed. Remember we also
need to change this in our key down
listener just above. Of course, we need to create
this game start function. Set this up just below. If we think about this, what
do you want this game to do? Well, since we are
currently unable to refresh the game and it currently starts
without doing anything, we want to now move this loop, which we call it right down at the bottom into our function. Rather than this game
starting straight away, we can cut this out and place this into our
game start function, so this will only happen when
the space bar is pressed. Let's try this. If we refresh, we don't see any
game start just yet. Hit the "Space bar" or your
chosen key and there we go. Instead of this empty screen, there should also be some
instructions at the beginning. Let the user know they need to press the space bar to begin. This doesn't need to go into a function or anything else, we can just add this at
the top of our script. But this is just going to be some texts and we use fillText, but first we'll
set the color with fillStyle equal to red. You can change this
up if you prefer. Ctx.font will set this
to be a string or 30 pixels for the font size
with a style of Helvetica. Place this into the
center with text line, then draw our text with the method called filtText
and pass in a string. We don't need to
insert any variables, so the regular quotations is fine then the text of
press space to play. For x and y positions, this is canvas width
divided by two, and also divide
the height by two. Let's try this out.
There is our text. Press "Space" and our
text is also cleared because if you remember
down at the very bottom, the canvas is cleared before
each one of our loops. Back to our game start function, there's also a few
other things which needs to go inside of here too. The first step at the very
top is to reset any scores. The player score equal to 0 and the computer score also 0. Using clear interval
will also clear out any existing timers which is stored inside of our game loop variable. Let's try this out. Refresh, press "Space" to begin, and everything
looks fine. All scores updated, but there is a small problem if we keep pressing the space
bar during the game. You can see up at the top, if
we press the space bar now, the score is reset each
time we begin the game. This isn't a problem if we actually want to begin the game, but if the player accidentally presses this during the game, it's going to restart. We can help this by keeping track of this with a variable. Let game running to initially
be a value of false, so we'll switch
this around to be true as the game is running, which will then
prevent the space bar from restarting our game. We need to paste this into
a few different places. First of all, we look for our
function, which is endgame. As you would imagine, since
this is the end of the game, we can also set this game
running variable to be equal to false into the game
start function. Now at the very top, we want
to perform a check to see if this game running
variable is equal to true. Pass this inside of an if
statements, if game running. We don't need to say equal to
true or anything like this. If the value of game
running is equal to true, the code inside of
these braces will run. Or we can also place this
onto a single line and remove the curly braces and then
return out of this function. Basically if game running
is equal to true, we'll then jump out to this function without running
the rest of the code below. This will prevent the
game from restarting. If it's not, if it's
equal to false, we then want to go ahead
and run the code below. Also we'd say in
our game running variable to be now
equal to true. Therefore, this will
stop this function from running a second time, if the space bar is
pressed during the game. We can try this out,
refresh, press "Space", let the ball go behind for the score and if we now
try to press the space, the game isn't reset. But we do have another issue
to address and to see this, if we restart the game and wait to get to
the score of three, let us pass behind three times. All is good, we have the text of the winner is computer, the score of 3-0. But now if we restart the
game with the space bar, the game restarts, but we still have an initial score of one. But you would expect
this to be zero since we set this inside of our function. Why do you think
this is happening? Well, to find out more, let's go into our
score function. The score function is
the only place where we update either one
of these variables. The score function
is being called just above inside of our
collide function. Jump into the collide
function and we calling this with
our if else section. This is the only function or the only piece of code which
is called in our game, which is responsible for
updating these variables. We know this is a cause of our score being
set to one initially. Why do you think this
score function is being called at the beginning
of a new game? Well, the reason this happens is because as soon as
the game has ended, our ball is either over on the left-hand
side for a score, or over on the right-hand side. We have this controlled by
the variable called ballX. Yes, in our game start function, we do initially reset
both of these scores, but as soon as a
new game starts, the ballX location is still
touching one of the sides, causing the score
function to run again. Fixing this is pretty simple, all we need to do is to
reset the location of ballX to back into the
center when the game starts. Game starts just after a game running and before
we reset our scores, we can also reset the value of ballX to be in the
center of the screen. Let's test this out. We get
to the end of our game, which is a score of three. Game over, both of our scores
are now reset as expected. When building games like this, you will often find edge cases like this to work on and it's usually just a
case of trying out different things and
seeing which one works. Next, we're going to take
a look at how we can apply some random movement to
the ball when it bounces.
14. Random Direction: Having both of these
moveX and moveY variables preset makes the game start
much more predictable. We know because
our negative 2 and our negative 1 values which
direction the ball would go. We can improve on
this by making this much more random
inside of a function. Let's create a
function just below our texts, called
random movement. The purpose of this
function is to set both of these variables with
some random values, meaning we can now remove
these initial values. To set these variables, we need to call this
randomMovement function inside of gameStart. Locate this function,
call our new function, which will reset our
two variables with a new value each time
our game starts. Go back to our
randomMovement function that generate our two x and y-values, as well as setting the ball off in unpredictable directions. This will also slow down
and speed up the game a little because of the random
values and movements, i.e, the x movement could
be higher or lower, causing it to move
slower or faster. Again, create two variables
or two constants. This is random x, which will be a random
number between two and four. Basically, we're going to set our x value to be equal to 2 or 4 and also either a positive
or a negative direction. We can do this by accessing a JavaScript math
function called random. Math.random will
generate a random number between 0 and 1. But we're going to
multiply this value by 3. Doing this will
allow us to generate a number from one onwards. We can also round this up
by cutting this value out. In the math.ceil
method, paste this in. Now since we're
rounding up our value, this will either give us
a value of 1, 2 or 3. Since we want the value of 2-4, we can add one more to
this value to give us our random number.
Let's test this out. Placing a console
log of randomX, save and refresh the browser, jump into the console. To see this, we'll also need to call our GameStart function. Press Space, the value of 2, the value of 4, 2, 3, 2. These all seems to
work correctly. For our randomY location, we can duplicate this line, change the variable
name to be randomY. RandomY is going to be a
number between 0 and 2. This one we don't
need to add plus 1. We can use math.round to
round this number down, leaving us with a value
from zero up to two. We also now need to create
two more variables. This is going to
decide if we have a positive or a
negative direction. Currently, we just have a
positive x and y-value, but this is going to also
add to the unpredictability. Const plusOrMinusX. Again, we'll access the
random JavaScript function, which one's more is
going to give us a number between 0 and 1. Using the JavaScript
conditional operator, we can check if this
value is less than 0.5, which should roughly
be a 50/50 chance. If it is, we'll return back or store inside of this variable
a string of negative. If not, it will be positive. Since this is a number
between 0 and 1, there's a half or a 50/50
chance roughly that this is going to be either a
negative or a positive value. We'll also add this
to our numbers soon. Duplicate this and
the only difference this time is the
variable name of y. Then we can use these variables to merge together and create our new values of moveX
and moveY variables. First the variable of moveX. Since we're also returning a string value for the
positive or the negative, we'll wrap this inside of
a number function to make sure we always get a number
rather than a string. Starting with x, plusOrMinusX, add this to our random number. For example, this
could be negative and then a value of
two or positive one, or any number
between this range. Duplicate. We'll
do this for moveY. Also changes to be
a plus or minus y and the value of random y. This is a random positive or a negative number
in both directions, but I'm going to add one more
little piece of randomness. Create constant to store this
in called random number. Just set this equal to
simply math.random. The reason we do this is to add a small random value to
both of these variables. Add this to our first number, then to our second number, it should be all we now
need. Refresh the browser. Each time we start the game, we should see the ball traveling in a slightly
different direction. We have it going left,
we have it going right, we have it going up,
we have it going down. You can also see we have
various different speeds depending on the actual values
for these two variables. This is not all over
for our randomness. A little bit later
on, we'll look at how to add some
random movement to the ball direction
when it bounces off the walls and also
the paddle too. Speaking of paddles,
this is what we're going to cover in
the upcoming video, where we'll look at
how to automatically move the computer's paddle.
15. Computer Movement: At the top of our scripts,
we have the player and also the computer positions
inside of these variables. Both of these values set the paddle positions at
the start of our games, be in the center vertically. The player position we
already took care of with the movements inside of our
handle Key pressed function. Now we can also add
some movement to the computer to make the game
a little bit more playable. Let's do this in a draw
computer paddle function, which is this one just here. All we are doing
currently is setting the canvas.height divided by 2, places into the center. Obviously, we don't want to
do this just like above. We also want to replace
this with a variable. We take away the canvas height and replace this with
the computer position. This means just like the
player position above, each time this variable is updated and we then
call the loop, the new position of the computer paddle
will also be reflected. The ext stage is to update this. But how do we decide
on how to move this? Well, we could go
really complex and include things like some
artificial intelligence, but we don't want this
course to be too complex, Instead, we're going
to replace this with some simple
motion tracking. For this down at the bottom
just above our loop, I'm going to create
a new function which is called
on each interval. Function's name
is move computer. This also needs to be
called on each interval, so we can grab our function name and add this into our loop. The most basic tracking can
be done something like this. We can update our variable of computer position to be equal
to the location of ball Y. This will effectively track the location vertically
of our ball, move the Computer paddle to
track this, we can see this? If we go back to our browser, refresh and you can now
see the computer paddle moving up and also down depending on the
location of the ball. Great, this all works
fine, but as you can see, this creates a game which is impossible for the
player to win. Again, we could go as complex as we want to with a
computer movement. But to keep it simple, I'm going to just add
an if-else statement. This if-else statement
will gradually update the computer position
depending on if the ball is above or
below the paddle. We can remove this,
add an if statement. Where we check if the
computer position currently is below the
current location of ball Y. Remember for the
y-axis is begins at 0 at the top and goes down
in a positive direction. The ball is below the paddle. We can then update
the computer position variable to move
towards the ball. This can be done by
adding plus, plus, else if is the
opposite direction, we want to move the
computer's paddle in the reverse direction. We can do this inside of here. Let's try this. Refresh
and test this out. Bounce the ball back. You can see that the computer
is now moving. It's now a winnable game. You can also if you wanted
to speed up or slow down the steps which the computer paddle takes
to go towards the ball. But this is completely optional, and this may also
need to be fine-tuned too depending on how fast
the loop is running. Great. This is a very
basic computer movement and next will improve the game even further by adding some additional randomness
to the ball movement.
16. Random Bouncing: The ball currently bouncing
off all of the walls and the paddles is a
little bit predictable. Currently every bounce
is at 90 degrees, which often leaves us with a situation where the ball can sometimes go
round in a square, and it bounces off the paddles without even needing
to move them. To improve on this, we'll
add some randomness to our paddle bounce to make our game a
little bit better. For this, we need a function. Let's create a
function anywhere in our code with the name of
generate random bounce. Add some randomness.
We don't need to do anything too crazy or complex. If we first go up to
our collide function, the last two if statements check the paddle contact for both the player and also
the computer's paddle. Currently, when there is any contact between the
ball and the paddle, all we're doing with
these two lines of code here is reversing the direction. We do this by setting a
positive direction to a negative and also the
other way round too. To add a little randomness, all we need to do is add a small positive or negative value to either one of these lines, which we can return back
from our new function. Inside of this function, we're going to first generate a number between zero and one. Zero and one gives
us two options, which we can then use to decide if we're
going to create a positive or a negative number. Again, we use Math.floor
to round our number down. The number which
you want to round down is going to
be generated with Math.random to give us a
number between zero and one. Remember all of Math.random generate a random number
between zero and one. It doesn't actually include one. For example, it will go
all the way up to 0.999. Randomness number down will always give us a value of zero. To get a value
between zero and one, we can multiply this by two, install this inside
of a constant called number zero to one. These two options can
now be used to create a positive or a negative symbol, just like we looked at earlier. Store this inside of a
constant, positive or negative. Then we'll grab our
variable from above, which is either zero or one. We'll, say if this is equal to one of the options
which is zero, using the JavaScript
conditional statements, the first option will return
back a negative value. If not separated by a colon, will return back a
positive symbol. If this returns back a zero, we'll get a negative symbol. If it returns back a one, we'll get a positive symbol. Remember, since we are
returning back a string, we also need to wrap the results inside
the number function. Make sure we always get back a number rather than a string. We return back the symbol
which is positive or negative, and add this equal
to a small value. Again, we use Math.random to give us a number
between zero and one and also to make it a little bit more of
a smaller value, we'll divide this by two. If we then return this value
back from our function, this will return back a number which is a positive number or a negative between the
value of zero and 0.5. With this being
such a small value which we are now returning back, how do we tell if this is being added to our
bounce or not? Well, we can first see
this with a console log. If we take a look for
our Cloud Function and into our last two sections
that we looked at before, we can add this to
the player paddle contact just above where we do the direction change at a console log with
the value of mu of x. Copy this and do exactly
the same just afterwards. Each time the ball bounces
off the players paddle, we should see two console logs
with the value of mu of x. Remember we haven't added different random
value to any one of our direction
changes just yet. These two values should
be exactly the same or the opposite in terms of
positive or negative. Let's try this out. Refresh
and jump into the console. Start our game, and now make some contact between the puddle, and we can see we have negative 2.49 and also the
positive equivalent too. Since these numbers
are exactly the same, this proves all we're doing is reversing the direction
by 90 degrees. But if we now go ahead and
add our small random value, we should see two different
values inside the console. Now, we'll add our small
volume which is returned back from our function called
generate random bounds. Also the same with the
computer's paddle too. Now, if we test this
out, we should see the small value being returned back and added
from our function, and this should be
slightly different values to give us a different
direction change with our ball. Refresh. Now, if we make
some contacts, there we go. Great. Now, there's
a lot going on here but if we take a look
at these in pairs. The first two pairs,
there's negative 3.55, which then reverses to be
a positive value of 3.22. With these two values
being slightly different, this means our bounce value
has now taken effect. If we look at the
second pair, again, we're now not only changing the value from a
positive to a negative, we'll also slightly change
any bounds value too. This is true for all of the
pairs which follow too. Small change can make
a big difference and make our game a
lot less predictable. Also stop the ball
going around in a square on the Canvas too. Next up we'll take a
look at how we can restrict our paddle so it
doesn't go off the Canvas.
17. Keeping The Paddle On The Canvas: As we approach the
end of our game, one of the finishing
touches which you want to add is to restrict the players paddles so it doesn't go off the top or the bottom
of the canvas, when we press the
up and down keys. For this, we'll head into the handleKeyPressed function to add our code which is
needed to restrict this. This handleKeyPressed function
is the area in our code which detects if we press the
arrow up or the arrow down. The switch statement
is responsible for then moving the players paddled in an upward direction or in a downward direction. Inside here, starting
with the arrow up case, we're going to add
some code to restrict the players petals from going
off the top of the canvas. To do this, before we move our player position by
any particular value, we'll add an if
statement to check this. If something is true, we then want to return out of this section without moving
the player's position. There's something
which we want to check is the player position. Remember when we're
talking about the player position variable, this is the center
line of the paddle. To find the very
top of the paddle, we need to deduct half the
paddle height and to find the bottom of the paddle to make sure it's not going off
the bottom of the canvas. We also need to add half the
height of the paddle too. We can use this inside
of our if statement. Going off the top location
inside of our if statement. First of all, we'll grab the
current player position. Just as we've seen
in the slides, we'll deduct the paddle
height divided by 2. This will give us the very
top point of our paddle. We need to check if this is
less than or equal to 0, which is the very
top of our canvas. If it does, we'll
then return out to this without moving
the player position. Then in the arrow down section, we'll do a similar if statement where we check if
the player position, this time we're going to
add half the paddle height, since we're dealing with
the bottom of the paddle. Here, we're checking if
the bottom of the pedal is equal or greater than the
bottom of the canvas, which we can find
with canvas.height. Greater or equal, on the canvas.height, if this is true, again will return out of this without
moving the player position, so it won't go any further
than the bottom of the canvas. Test this out, press the space bar and we'll
go right to the very top. The place paddle doesn't go any further than the very top. Move this down to the bottom. It's now restricted
the players paddle to stay within the canvas area.
18. Final Thoughts: [MUSIC] This is it now for the end of our game and congratulations for
reaching this stage. We've now learned
some core concepts and even though our
game is not perfect, it's playable, we've
learned all of the concepts which we need to begin
JavaScript game development. I hope you've enjoyed it. I hope you picked up some
new skills and eager to dive into building more
JavaScript-based games. Thank you for taking this class, and I will see you
in the next one.
 Chris Dixon, Web Developer & Online Teacher